自动标注工具 Autolabelimg

原理简介~~
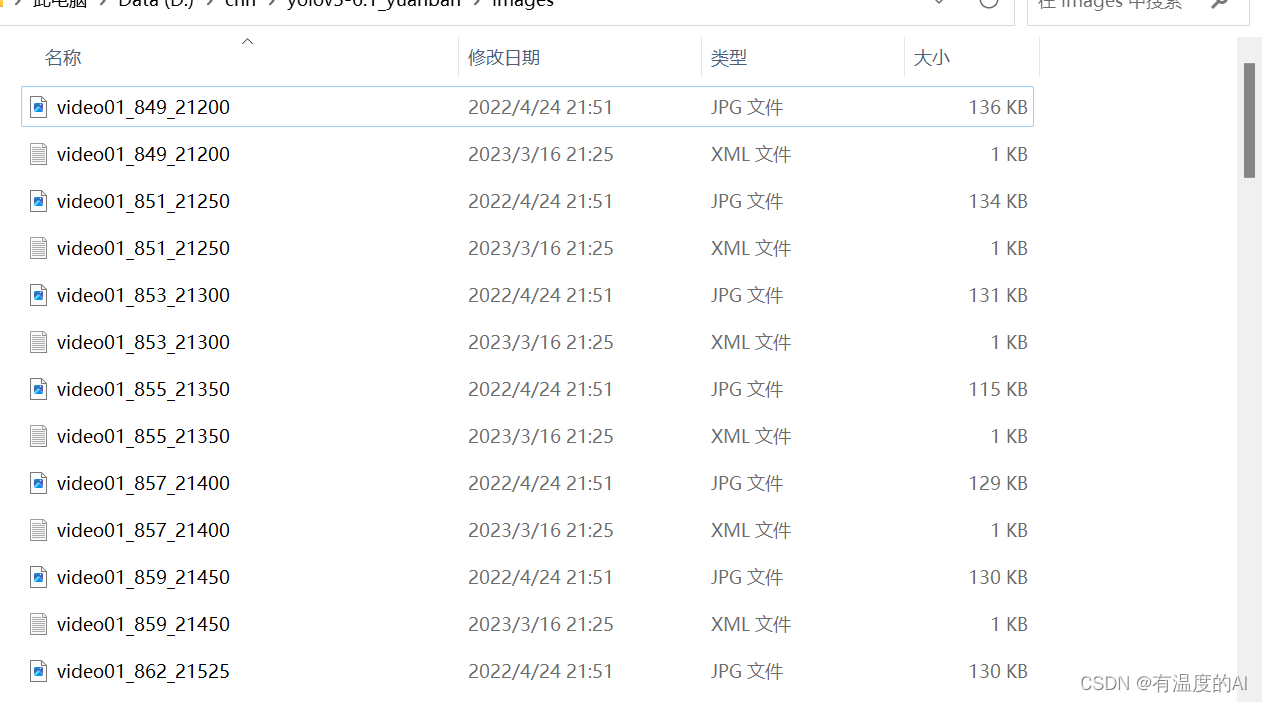
对于数据量较大的数据集,先对其中一部分图片打标签,Autolabelimg利用已标注好的图片进行训练,并利用训练得到的权重对其余数据进行自动标注,然后保存为xml文件。
一、下载yolov5v6.1
https://github.com/ultralytics/yolov5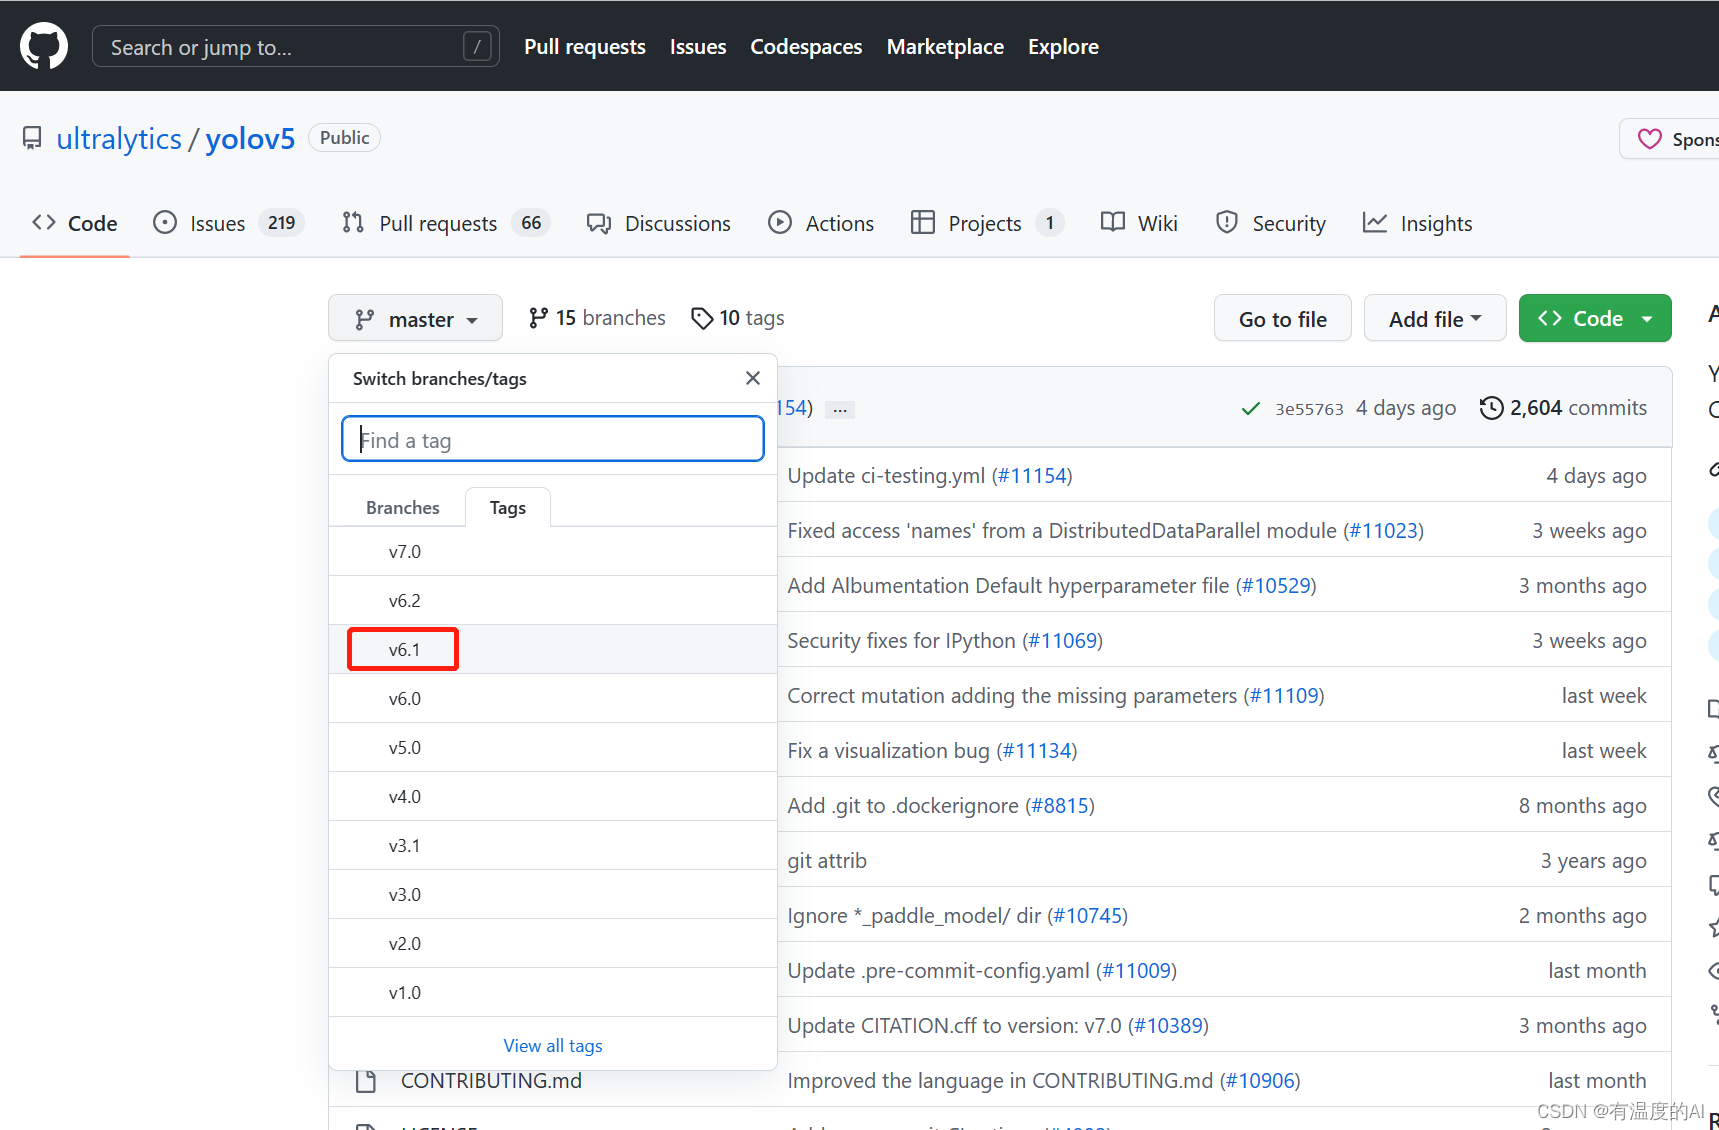
并对已标注的数据集进行训练,得到权重best.pt
二、将detect_auto.py文件放入yolov5根目录下
import sys
from utils.torch_utils import select_device
from models.common import DetectMultiBackend
from utils.datasets import *
import torch
from utils.general import (check_img_size, non_max_suppression, scale_coords)
from tkinter import *
from tkinter import filedialog
import natsort
# FILE = Path(__file__).resolve()
# ROOT = FILE.parents[0]  # YOLOv5 root directory
# if str(ROOT) not in sys.path:
#     sys.path.append(str(ROOT))  # add ROOT to PATH
# ROOT = Path(os.path.relpath(ROOT, Path.cwd()))  # relativeimport os
from os import getcwd
from xml.etree import ElementTree as ETclass Detector():def __init__(self):self.objectList = []self.weights = r""  # 可去官方下载v5 6.0的预训练权重模型self.dnn = Falseself.data = r""  # 选择你的配置文件(一般为.yaml)self.device = select_device(device='0')self.half = self.device.type != 'cpu'  # 半精度化self.predefined_classes = []self.imgdir = r""  # 你需要标注的图片文件夹self.outdir = r""  # 你需要保存的xml文件夹self.detect_class = r""  # 你需要自动标注的类型self.root_window = Noneself.flag = False@torch.no_grad()def run(self,frame,model,device,half=False,img_size=None,augment=False,visualize=False,max_det=1000):if img_size is None:img_size = [640, 640]img0 = framestride, names, pt, jit, onnx, engine = model.stride, model.names, model.pt, model.jit, model.onnx, model.engineimg_size = check_img_size(img_size, s=stride)# Halfhalf &= (pt or jit or engine) and device.type != 'cpu'  # half precision only supported by PyTorch on CUDAif pt or jit:model.model.half() if half else model.model.float()img = letterbox(img0, auto=True, new_shape=img_size, stride=32)[0]img = img.transpose((2, 0, 1))[::-1]  # HWC to CHW, BGR to RGBimg = np.ascontiguousarray(img)# model.warmup(imgsz=(1, 3, *img_size), half=half)  # warmupimg = torch.from_numpy(img).to(device)img = img.half() if half else img.float()  # uint8 to fp16/32img /= 255  # 0 - 255 to 0.0 - 1.0if len(img.shape) == 3:img = img[None]  # expand for batch dimpred = model(img, augment=augment, visualize=visualize)pred = non_max_suppression(pred, max_det=max_det)for i, det in enumerate(pred):if det is not None and len(det):det[:, :4] = scale_coords(img.shape[2:], det[:, :4], img0.shape).round()info_list = []for *xyxy, conf, cls in reversed(det):xyxy = torch.tensor(xyxy).view(-1).tolist()info = [xyxy[0], xyxy[1], xyxy[2], xyxy[3], int(cls)]info_list.append(info)return info_listelse:return Nonedef create_annotation(self, xn):global annotationtree = ET.ElementTree()tree.parse(xn)annotation = tree.getroot()# 遍历xml里面每个object的值如果相同就不插入def traverse_object(self, AnotPath):tree = ET.ElementTree(file=AnotPath)root = tree.getroot()ObjectSet = root.findall('object')for Object in ObjectSet:ObjName = Object.find('name').textBndBox = Object.find('bndbox')x1 = int(BndBox.find('xmin').text)y1 = int(BndBox.find('ymin').text)x2 = int(BndBox.find('xmax').text)y2 = int(BndBox.find('ymax').text)self.objectList.append([x1, y1, x2, y2, ObjName])# 定义一个创建一级分支object的函数def create_object(self, root, objl):  # 参数依次,树根,xmin,ymin,xmax,ymax# 创建一级分支object_object = ET.SubElement(root, 'object')# 创建二级分支name = ET.SubElement(_object, 'name')# print(obj_name)name.text = str(objl[4])pose = ET.SubElement(_object, 'pose')pose.text = 'Unspecified'truncated = ET.SubElement(_object, 'truncated')truncated.text = '0'difficult = ET.SubElement(_object, 'difficult')difficult.text = '0'# 创建bndboxbndbox = ET.SubElement(_object, 'bndbox')xmin = ET.SubElement(bndbox, 'xmin')xmin.text = '%s' % objl[0]ymin = ET.SubElement(bndbox, 'ymin')ymin.text = '%s' % objl[1]xmax = ET.SubElement(bndbox, 'xmax')xmax.text = '%s' % objl[2]ymax = ET.SubElement(bndbox, 'ymax')ymax.text = '%s' % objl[3]# 创建xml文件的函数def create_tree(self, image_name, h, w, imgdir):global annotation# 创建树根annotationannotation = ET.Element('annotation')# 创建一级分支folderfolder = ET.SubElement(annotation, 'folder')# 添加folder标签内容folder.text = (imgdir)# 创建一级分支filenamefilename = ET.SubElement(annotation, 'filename')filename.text = image_name# 创建一级分支pathpath = ET.SubElement(annotation, 'path')# path.text = getcwd() + '\\{}\\{}'.format(imgdir, image_name)  # 用于返回当前工作目录path.text ='{}/{}'.format(imgdir, image_name)  # 用于返回当前工作目录# 创建一级分支sourcesource = ET.SubElement(annotation, 'source')# 创建source下的二级分支databasedatabase = ET.SubElement(source, 'database')database.text = 'Unknown'# 创建一级分支sizesize = ET.SubElement(annotation, 'size')# 创建size下的二级分支图像的宽、高及depthwidth = ET.SubElement(size, 'width')width.text = str(w)height = ET.SubElement(size, 'height')height.text = str(h)depth = ET.SubElement(size, 'depth')depth.text = '3'# 创建一级分支segmentedsegmented = ET.SubElement(annotation, 'segmented')segmented.text = '0'def pretty_xml(self, element, indent, newline, level=0):  # elemnt为传进来的Elment类,参数indent用于缩进,newline用于换行if element:  # 判断element是否有子元素if (element.text is None) or element.text.isspace():  # 如果element的text没有内容element.text = newline + indent * (level + 1)else:element.text = newline + indent * (level + 1) + element.text.strip() + newline + indent * (level + 1)# else:  # 此处两行如果把注释去掉,Element的text也会另起一行# element.text = newline + indent * (level + 1) + element.text.strip() + newline + indent * leveltemp = list(element)  # 将element转成listfor subelement in temp:if temp.index(subelement) < (len(temp) - 1):  # 如果不是list的最后一个元素,说明下一个行是同级别元素的起始,缩进应一致subelement.tail = newline + indent * (level + 1)else:  # 如果是list的最后一个元素, 说明下一行是母元素的结束,缩进应该少一个subelement.tail = newline + indent * levelself.pretty_xml(subelement, indent, newline, level=level + 1)  # 对子元素进行递归操作def work(self):with open(self.detect_class, "r") as f:  # 打开文件for line in f.readlines():line = line.strip('\\n')  # 去掉列表中每一个元素的换行符self.predefined_classes.append(line)model = DetectMultiBackend(self.weights, device=self.device, dnn=self.dnn, data=self.data)model.to(self.device).eval()names = model.module.names if hasattr(model, 'module') else model.namesIMAGES_LIST = os.listdir(self.imgdir)for image_name in natsort.natsorted(IMAGES_LIST):# print(image_name)# 判断后缀只处理图片文件if image_name.endswith(('.jpg', '.png', '.jpeg', '.bmp')):image = cv2.imread(os.path.join(self.imgdir, image_name))if image is None:print(image_name+"图像为空请删除")continuefile_tail = os.path.splitext(image_name)[1]coordinates_list = self.run(image, model, self.device, self.half)(h, w) = image.shape[:2]# xml_name = ('.\\{}\\{}.xml'.format(outdir, image_name.strip('.jpg')))xml_name = ('{}\\{}.xml'.format(self.outdir, image_name.strip('.jpg')))if (os.path.exists(xml_name)):self.create_annotation(xml_name)self.traverse_object(xml_name)else:self.create_tree(image_name, h, w, self.imgdir)if coordinates_list:print(image_name+"已标注完成")for coordinate in coordinates_list:label_id = coordinate[4]if (self.predefined_classes.count(names[label_id]) > 0):object_information = [int(coordinate[0]), int(coordinate[1]), int(coordinate[2]),int(coordinate[3]), names[label_id]]if (self.objectList.count(object_information) == 0):self.create_object(annotation, object_information)self.objectList = []# 将树模型写入xml文件tree = ET.ElementTree(annotation)root = tree.getroot()self.pretty_xml(root, '\\t', '\\n')# tree.write('.\\{}\\{}.xml'.format(outdir, image_name.strip('.jpg')), encoding='utf-8')tree.write('{}\\{}.xml'.format(self.outdir, image_name.strip(file_tail)), encoding='utf-8')else:print(image_name)# 客户端def client(self):def creatWindow():self.root_window.destroy()window()def judge(str):if (str):text = "你已选择" + strelse:text = "你还未选择文件夹,请选择"return textdef test01():self.imgdir = r""self.imgdir += filedialog.askdirectory()creatWindow()def test02():self.outdir = r""self.outdir += filedialog.askdirectory()creatWindow()def test03():self.data = r""self.data += filedialog.askopenfilename()creatWindow()def test04():self.weights = r""self.weights += filedialog.askopenfilename()creatWindow()def test05():self.detect_class = r""self.detect_class += filedialog.askopenfilename()creatWindow()def tes06():self.work()self.flag=TruecreatWindow()def window():self.root_window = Tk()self.root_window.title("")screenWidth = self.root_window.winfo_screenwidth()  # 获取显示区域的宽度screenHeight = self.root_window.winfo_screenheight()  # 获取显示区域的高度tk_width = 500  # 设定窗口宽度tk_height = 400  # 设定窗口高度tk_left = int((screenWidth - tk_width) / 2)tk_top = int((screenHeight - tk_width) / 2)self.root_window.geometry('%dx%d+%d+%d' % (tk_width, tk_height, tk_left, tk_top))self.root_window.minsize(tk_width, tk_height)  # 最小尺寸self.root_window.maxsize(tk_width, tk_height)  # 最大尺寸self.root_window.resizable(width=False, height=False)btn_1 = Button(self.root_window, text='请选择你要标注的图片文件夹', command=test01,height=0)btn_1.place(x=169, y=40, anchor='w')text = judge(self.imgdir)text_label = Label(self.root_window, text=text)text_label.place(x=160, y=70, anchor='w')btn_2 = Button(self.root_window, text='请选择你要保存的xml文件夹(.xml)', command=test02,height=0)btn_2.place(x=169, y=100, anchor='w')text = judge(self.outdir)text_label = Label(self.root_window, text=text)text_label.place(x=160, y=130, anchor='w')btn_3 = Button(self.root_window, text='请选择你的配置文件(.yaml)', command=test03,height=0)btn_3.place(x=169, y=160, anchor='w')text = judge(self.data)text_label = Label(self.root_window, text=text)text_label.place(x=160, y=190, anchor='w')# if(self.outdir and self.imgdir and self.data):btn_4 = Button(self.root_window, text='请选择使用的模型(.pt)', command=test04,height=0)btn_4.place(x=169, y=220, anchor='w')text = judge(self.weights)text_label = Label(self.root_window, text=text)text_label.place(x=160, y=250, anchor='w')btn_5 = Button(self.root_window, text='请选择需要自动标注的类别文件(.txt)', command=test05,height=0)btn_5.place(x=169, y=280, anchor='w')text = judge(self.detect_class)text_label = Label(self.root_window, text=text)text_label.place(x=160, y=310, anchor='w')btn_6 = Button(self.root_window, text='开始自动标注', command=tes06,height=0)btn_6.place(x=169, y=340, anchor='w')if (self.flag):text = "标注完成"else:text = "等待标注"text_label = Label(self.root_window, text=text)text_label.place(x=160, y=370, anchor='w')self.root_window.mainloop()window()if __name__ == '__main__':detector = Detector()detector.client()
三、运行detect_auto.py文件
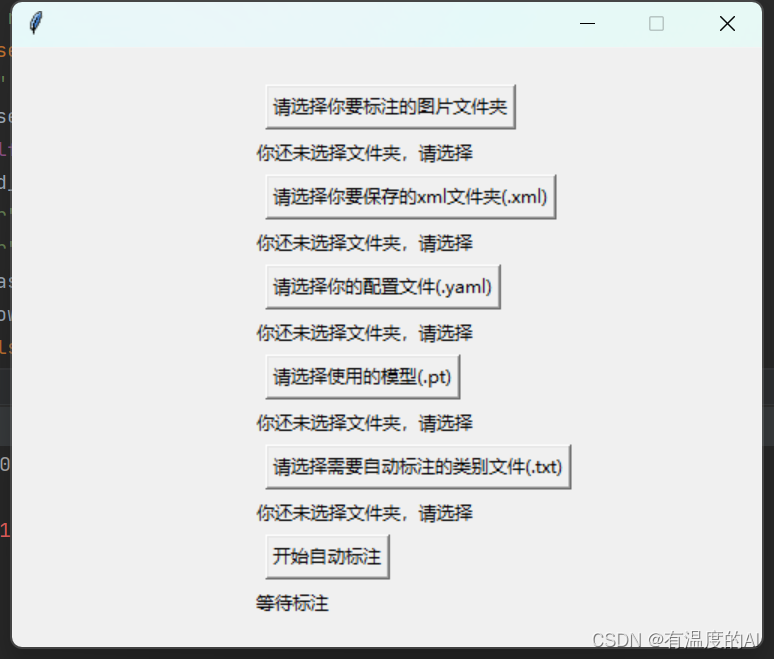
- 建议将要标注的图片文件和标注完的.xml文件放在同一文件夹下,这样方便使用labelimg查看标注效果;
- 配置文件即为训练时data文件夹下对应的.yaml文件;
- 使用的模型为训练好的权重文件(best.pt);
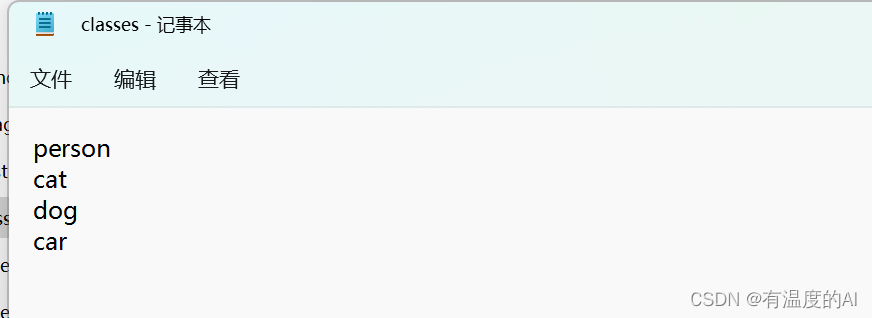
- 在根目录下创建class.txt文件,里面为数据集所包含的类别;
- 点击开始自动标注;

tips:自动标注的质量不是特别高,如果对标注质量有要求的话还需手动进行调整
报错处理:改动utils/torch_utils.py文件中第55行如下


reference
【解放双手YOLOv5 6.0自动标注(已开源)】 https://www.bilibili.com/video/BV1TZ4y1S76W/?p=2&share_source=copy_web&vd_source=95705b32f23f70b32dfa1721628d5874