Three.js——learn02

Three.js——learn02
Three.js——learn02
通过轨道控制器查看物体OrbitControls
Orbit controls(轨道控制器)可以使得相机围绕目标进行轨道运动
和动画不同的是,轨道控制器由用户操控,手动调整位置来观察物体
核心代码
import { OrbitControls } from 'three/examples/jsm/controls/OrbitControls'
/创建轨道控制器
const control = new OrbitControls(camera, renderer.domElement)
//更新控制器
control.update()
//给物体添加动画
const an = () => {//requestAnimationFrame有很多的优点。最重要的一点或许就是当用户切换到其它的标签页时,它会暂停,因此不会浪费用户宝贵的处理器资源,也不会损耗电池的使用寿命requestAnimationFrame(an)control.update()//开始渲染renderer.render(scene, camera)
}
an()
index2.html
<!DOCTYPE html>
<html lang="en"><head><meta charset="UTF-8" /><meta http-equiv="X-UA-Compatible" content="IE=edge" /><meta name="viewport" content="width=device-width, initial-scale=1.0" /><title>Document</title><link rel="stylesheet" href="./assets/styles/index.css" /></head><body><script src="./core/index2.js" type="module"></script></body>
</html>
index.css
* {margin: 0;padding: 0;background-color: beige;
}
index2.js
import * as THREE from 'three'
//导入轨道控制器
import { OrbitControls } from 'three/examples/jsm/controls/OrbitControls'//创建场景
const scene = new THREE.Scene()/* 创建相机并设置相机参数* 参数:* 1. fov视野角度* 2.长宽比* 3.近端距离参数(近截面)最近能看到哪里* 4.远端距离参数(远截面)最远能看到哪里*/
const camera = new THREE.PerspectiveCamera(75, window.innerWidth / window.innerHeight, 0.1, 1000)
//设置相机位置
camera.position.set(0, 0, 5)
//将相机放置到场景中
scene.add(camera)
//创建渲染器
const renderer = new THREE.WebGLRenderer()
//设置渲染器渲染大小
renderer.setSize(window.innerWidth, window.innerHeight)
//添加渲染器到页面中
document.body.appendChild(renderer.domElement)
//创建几何体对象
const geometry = new THREE.BoxGeometry(1, 1, 1)
//设置基础材质(颜色:0x00ff00)
const material = new THREE.MeshBasicMaterial({ color: 0xffffff })
//创建物体对象(几何体+材质)
const cube = new THREE.Mesh(geometry, material)
//添加物体到材质中
scene.add(cube)
//创建轨道控制器
const control = new OrbitControls(camera, renderer.domElement)
//更新控制器
control.update()
//给物体添加动画
const an = () => {//requestAnimationFrame有很多的优点。最重要的一点或许就是当用户切换到其它的标签页时,它会暂停,因此不会浪费用户宝贵的处理器资源,也不会损耗电池的使用寿命requestAnimationFrame(an)control.update()//开始渲染renderer.render(scene, camera)
}
an()
result

添加辅助器
1.坐标轴辅助器AxesHelper
用于简单模拟3个坐标轴的对象,红色代表 X 轴. 绿色代表 Y 轴. 蓝色代表 Z 轴
核心代码
//创建辅助器
const axesHelper = new THREE.AxesHelper(5)
//场景中添加辅助器,用于简单模拟3个坐标轴的对象
scene.add(axesHelper)
完整代码
import * as THREE from 'three'
//导入轨道控制器
import { OrbitControls } from 'three/examples/jsm/controls/OrbitControls'//创建场景
const scene = new THREE.Scene()/* 创建相机并设置相机参数* 参数:* 1. fov视野角度* 2.长宽比* 3.近端距离参数(近截面)最近能看到哪里* 4.远端距离参数(远截面)最远能看到哪里*/
const camera = new THREE.PerspectiveCamera(75, window.innerWidth / window.innerHeight, 0.1, 1000)
//设置相机位置
camera.position.set(0, 0, 5)
//将相机放置到场景中
scene.add(camera)
//创建渲染器
const renderer = new THREE.WebGLRenderer()
//设置渲染器渲染大小
renderer.setSize(window.innerWidth, window.innerHeight)
//添加渲染器到页面中
document.body.appendChild(renderer.domElement)
//创建几何体对象
const geometry = new THREE.BoxGeometry(1, 1, 1)
//设置基础材质(颜色:0x00ff00)
const material = new THREE.MeshBasicMaterial({ color: 0xffffff })
//创建物体对象(几何体+材质)
const cube = new THREE.Mesh(geometry, material)
//添加物体到材质中
scene.add(cube)
//创建轨道控制器
const control = new OrbitControls(camera, renderer.domElement)
//更新控制器
control.update()
//创建辅助器
const axesHelper = new THREE.AxesHelper(5)
//场景中添加辅助器,用于简单模拟3个坐标轴的对象
scene.add(axesHelper)
//给物体添加动画
const an = () => {//requestAnimationFrame有很多的优点。最重要的一点或许就是当用户切换到其它的标签页时,它会暂停,因此不会浪费用户宝贵的处理器资源,也不会损耗电池的使用寿命requestAnimationFrame(an)control.update()//开始渲染renderer.render(scene, camera)
}
an()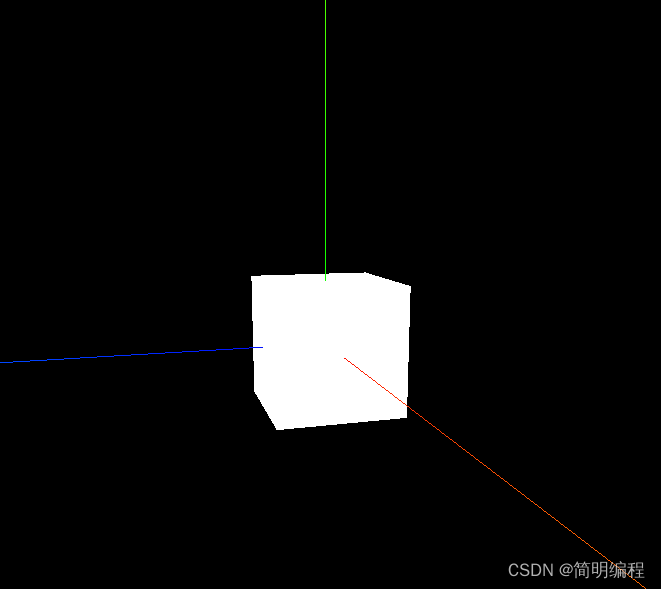
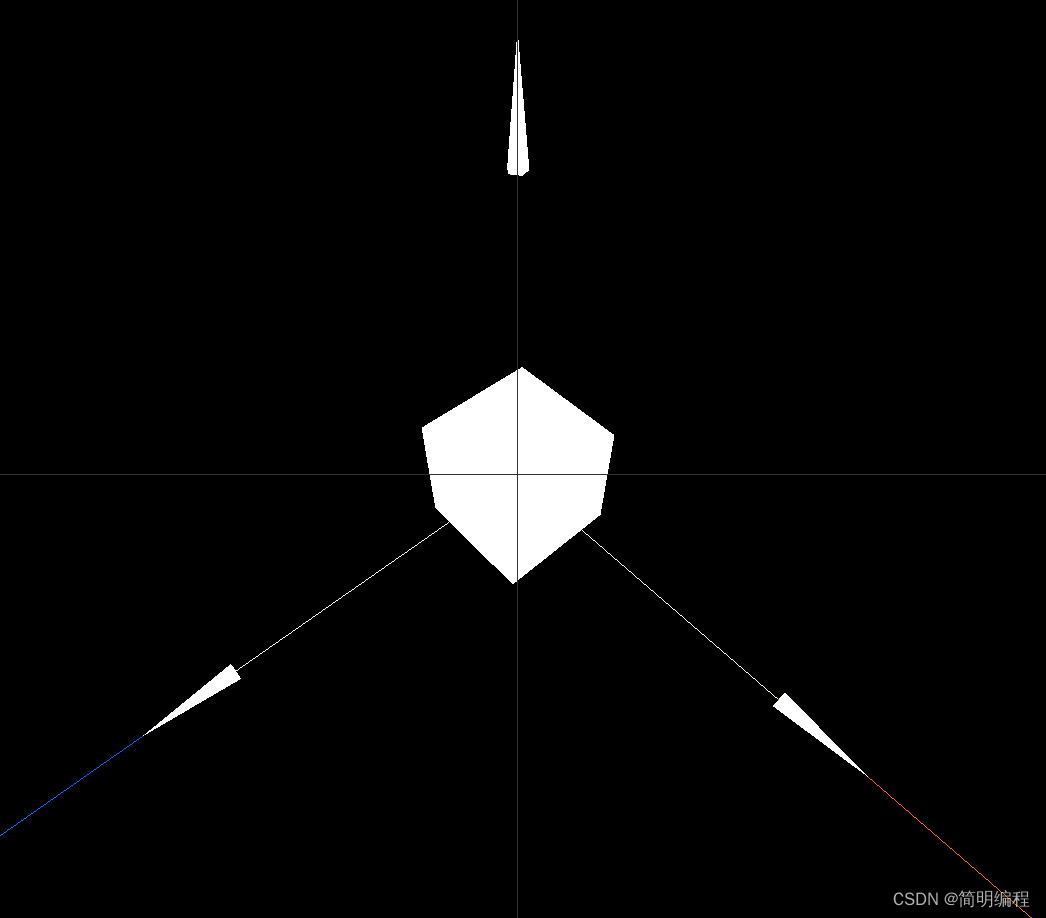
2.箭头辅助器ArrowHelper
用于模拟方向的3维箭头对象
核心代码
/* 构建一个三维向量* x - 向量的x值,默认为0。* y - 向量的y值,默认为0。* z - 向量的z值,默认为0。*/
const dirx = new THREE.Vector3(1, 0, 0)
//将该向量转换为单位向量(unit vector), 也就是说,将该向量的方向设置为和原向量相同,但是其长度(length)为1。
dirx.normalize()
const origin = new THREE.Vector3(0, 0, 0)
const length = 3
const hex = 0xffffff
/* 构建箭头* dir -- 基于箭头原点的方向. 必须为单位向量.* origin -- 箭头的原点.* length -- 箭头的长度. 默认为 1.* hex -- 定义的16进制颜色值. 默认为 0xffff00.* headLength -- 箭头头部(锥体)的长度. 默认为箭头长度的0.2倍(0.2 * length).* headWidth -- The width of the head of the arrow. Default is 0.2 * headLength.*/
const arrowHelperX = new THREE.ArrowHelper(dirx, origin, length, hex)
//我们可以给三个轴线添加箭头
//添加到场景中
scene.add(arrowHelperX)
完整代码
import * as THREE from 'three'
//导入轨道控制器
import { OrbitControls } from 'three/examples/jsm/controls/OrbitControls'//创建场景
const scene = new THREE.Scene()/* 创建相机并设置相机参数* 参数:* 1. fov视野角度* 2.长宽比* 3.近端距离参数(近截面)最近能看到哪里* 4.远端距离参数(远截面)最远能看到哪里*/
const camera = new THREE.PerspectiveCamera(75, window.innerWidth / window.innerHeight, 0.1, 1000)
//设置相机位置
camera.position.set(0, 0, 5)
//将相机放置到场景中
scene.add(camera)
//创建渲染器
const renderer = new THREE.WebGLRenderer()
//设置渲染器渲染大小
renderer.setSize(window.innerWidth, window.innerHeight)
//添加渲染器到页面中
document.body.appendChild(renderer.domElement)
//创建几何体对象
const geometry = new THREE.BoxGeometry(1, 1, 1)
//设置基础材质(颜色:0x00ff00)
const material = new THREE.MeshBasicMaterial({ color: 0xffffff })
//创建物体对象(几何体+材质)
const cube = new THREE.Mesh(geometry, material)
//添加物体到材质中
scene.add(cube)
//创建轨道控制器
const control = new OrbitControls(camera, renderer.domElement)
//更新控制器
control.update()
//创建辅助器
const axesHelper = new THREE.AxesHelper(5)
//场景中添加辅助器,用于简单模拟3个坐标轴的对象
scene.add(axesHelper)
/* 构建一个三维向量* x - 向量的x值,默认为0。* y - 向量的y值,默认为0。* z - 向量的z值,默认为0。*/
const dirx = new THREE.Vector3(1, 0, 0)
const diry = new THREE.Vector3(0, 1, 0)
const dirz = new THREE.Vector3(0, 0, 1)
//将该向量转换为单位向量(unit vector), 也就是说,将该向量的方向设置为和原向量相同,但是其长度(length)为1。
dirx.normalize()
diry.normalize()
dirz.normalize()
const origin = new THREE.Vector3(0, 0, 0)
const length = 3
const hex = 0xffffff
/* 构建箭头* dir -- 基于箭头原点的方向. 必须为单位向量.* origin -- 箭头的原点.* length -- 箭头的长度. 默认为 1.* hex -- 定义的16进制颜色值. 默认为 0xffff00.* headLength -- 箭头头部(锥体)的长度. 默认为箭头长度的0.2倍(0.2 * length).* headWidth -- The width of the head of the arrow. Default is 0.2 * headLength.*/
const arrowHelperX = new THREE.ArrowHelper(dirx, origin, length, hex)
const arrowHelperY = new THREE.ArrowHelper(diry, origin, length, hex)
const arrowHelperZ = new THREE.ArrowHelper(dirz, origin, length, hex)//我们可以给三个轴线添加箭头
//添加到场景中
scene.add(arrowHelperX)
scene.add(arrowHelperY)
scene.add(arrowHelperZ)
//给物体添加动画
const an = () => {//requestAnimationFrame有很多的优点。最重要的一点或许就是当用户切换到其它的标签页时,它会暂停,因此不会浪费用户宝贵的处理器资源,也不会损耗电池的使用寿命requestAnimationFrame(an)control.update()//开始渲染renderer.render(scene, camera)
}
an()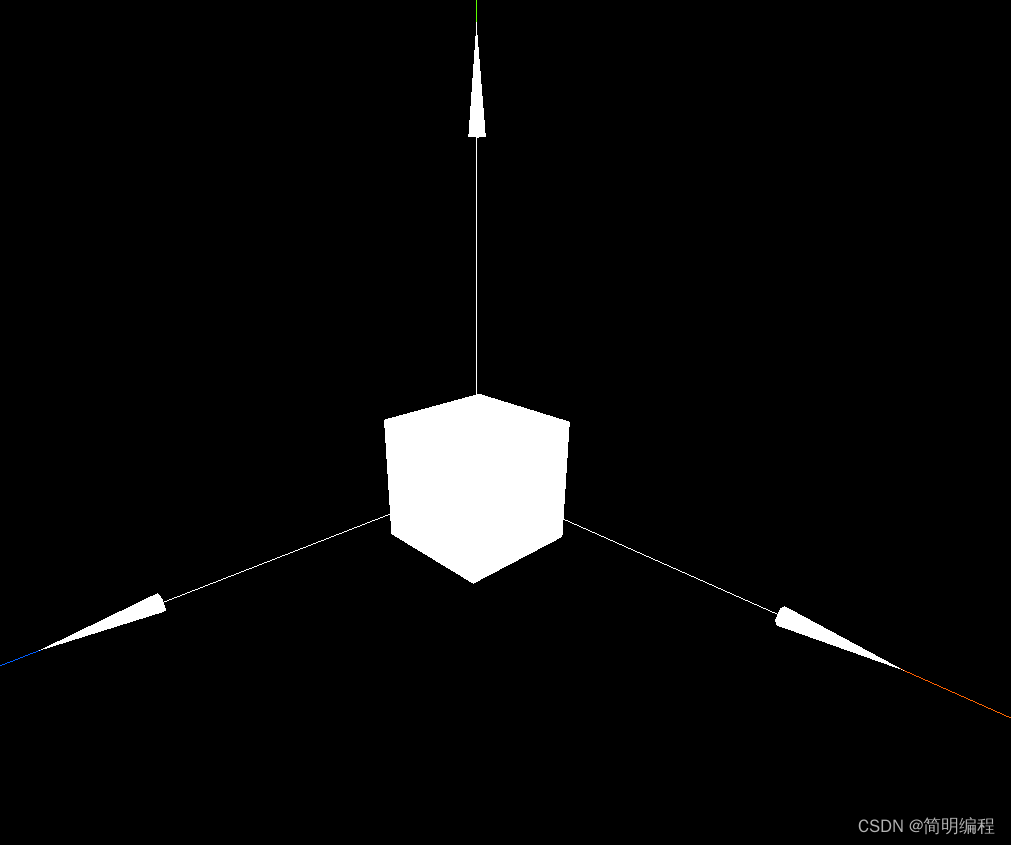
3.相机视锥体辅助器CameraHelper
用于模拟相机视锥体的辅助对象,它使用 LineSegments 来模拟相机视锥体
核心代码
//创建摄像机视锥辅助器
const helper = new THREE.CameraHelper(camera)
scene.add(helper)
完整代码
import * as THREE from 'three'
//导入轨道控制器
import { OrbitControls } from 'three/examples/jsm/controls/OrbitControls'//创建场景
const scene = new THREE.Scene()/* 创建相机并设置相机参数* 参数:* 1. fov视野角度* 2.长宽比* 3.近端距离参数(近截面)最近能看到哪里* 4.远端距离参数(远截面)最远能看到哪里*/
const camera = new THREE.PerspectiveCamera(75, window.innerWidth / window.innerHeight, 0.1, 1000)
//设置相机位置
camera.position.set(0, 0, 5)
//将相机放置到场景中
scene.add(camera)
//创建渲染器
const renderer = new THREE.WebGLRenderer()
//设置渲染器渲染大小
renderer.setSize(window.innerWidth, window.innerHeight)
//添加渲染器到页面中
document.body.appendChild(renderer.domElement)
//创建几何体对象
const geometry = new THREE.BoxGeometry(1, 1, 1)
//设置基础材质(颜色:0x00ff00)
const material = new THREE.MeshBasicMaterial({ color: 0xffffff })
//创建物体对象(几何体+材质)
const cube = new THREE.Mesh(geometry, material)
//添加物体到材质中
scene.add(cube)
//创建轨道控制器
const control = new OrbitControls(camera, renderer.domElement)
//更新控制器
control.update()
//创建辅助器
const axesHelper = new THREE.AxesHelper(5)
//场景中添加辅助器,用于简单模拟3个坐标轴的对象
scene.add(axesHelper)
/* 构建一个三维向量* x - 向量的x值,默认为0。* y - 向量的y值,默认为0。* z - 向量的z值,默认为0。*/
const dirx = new THREE.Vector3(1, 0, 0)
const diry = new THREE.Vector3(0, 1, 0)
const dirz = new THREE.Vector3(0, 0, 1)
//将该向量转换为单位向量(unit vector), 也就是说,将该向量的方向设置为和原向量相同,但是其长度(length)为1。
dirx.normalize()
diry.normalize()
dirz.normalize()
const origin = new THREE.Vector3(0, 0, 0)
const length = 3
const hex = 0xffffff
/* 构建箭头* dir -- 基于箭头原点的方向. 必须为单位向量.* origin -- 箭头的原点.* length -- 箭头的长度. 默认为 1.* hex -- 定义的16进制颜色值. 默认为 0xffff00.* headLength -- 箭头头部(锥体)的长度. 默认为箭头长度的0.2倍(0.2 * length).* headWidth -- The width of the head of the arrow. Default is 0.2 * headLength.*/
const arrowHelperX = new THREE.ArrowHelper(dirx, origin, length, hex)
const arrowHelperY = new THREE.ArrowHelper(diry, origin, length, hex)
const arrowHelperZ = new THREE.ArrowHelper(dirz, origin, length, hex)//我们可以给三个轴线添加箭头
//添加到场景中
scene.add(arrowHelperX)
scene.add(arrowHelperY)
scene.add(arrowHelperZ)
const helper = new THREE.CameraHelper(camera)
scene.add(helper)
//给物体添加动画
const an = () => {//requestAnimationFrame有很多的优点。最重要的一点或许就是当用户切换到其它的标签页时,它会暂停,因此不会浪费用户宝贵的处理器资源,也不会损耗电池的使用寿命requestAnimationFrame(an)control.update()//开始渲染renderer.render(scene, camera)
}
an()