Android 自定义View 之 Mac地址输入框

Mac地址输入框
前言
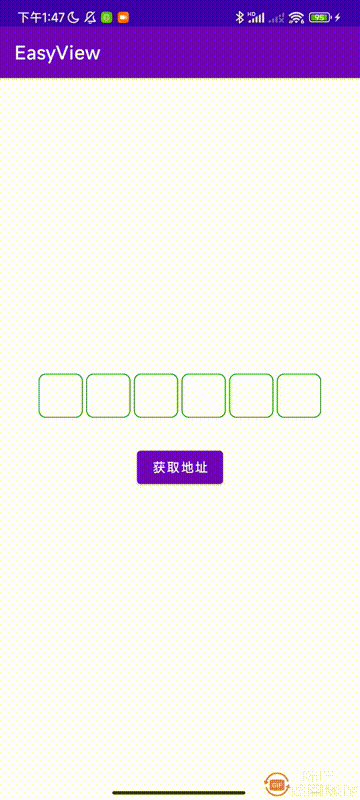
在日常工作开发中,我们时长会遇到各种各样的需求,不部分需求是可以通过Android 原生的View来解决,而有一些是无法解决的,这时候我们就需要自定义View,我们先来看看本文中这个自定义View的演示效果图。
正文
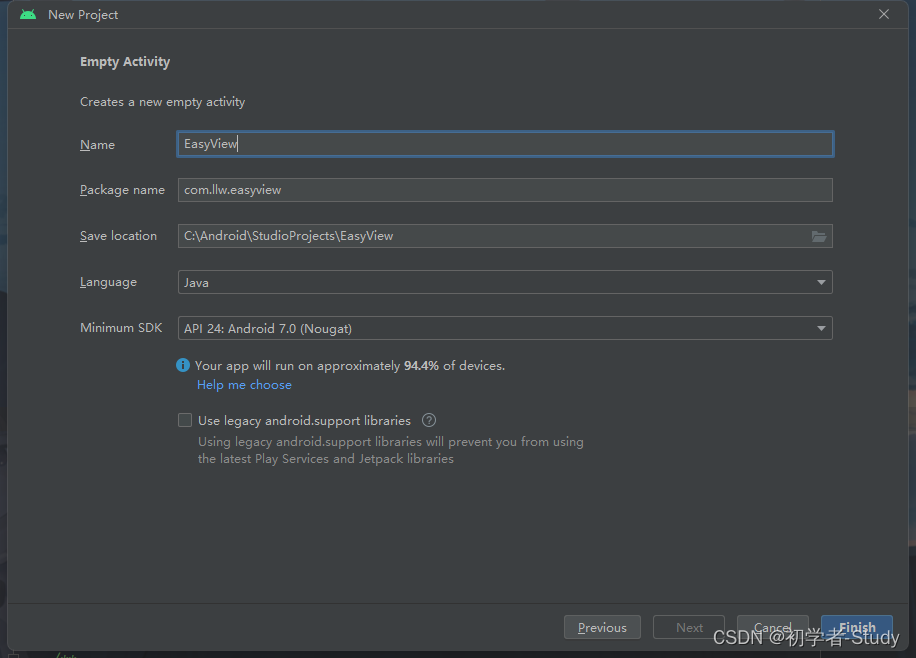
在了解自定义View之前,我们先了解什么是View,View就是视图,再通俗一点就是你在手机上所看到的内容,假设我们创建了一个项目,算了,我们真的去创建一个项目,创建一个名为EasyView的项目。
一、什么是View?
项目创建好之后,看一下activity_main.xml,我们能看到什么?白色的背景,中间有一个Hello World!的文字。

这能看的出什么呢?如果从界面上你看不出什么的话,我们就从代码上来看:
<?xml version="1.0" encoding="utf-8"?>
<androidx.constraintlayout.widget.ConstraintLayout xmlns:android="http://schemas.android.com/apk/res/android"xmlns:app="http://schemas.android.com/apk/res-auto"xmlns:tools="http://schemas.android.com/tools"android:layout_width="match_parent"android:layout_height="match_parent"tools:context=".MainActivity"><TextViewandroid:layout_width="wrap_content"android:layout_height="wrap_content"android:text="Hello World!"app:layout_constraintBottom_toBottomOf="parent"app:layout_constraintEnd_toEndOf="parent"app:layout_constraintStart_toStartOf="parent"app:layout_constraintTop_toTopOf="parent" /></androidx.constraintlayout.widget.ConstraintLayout>
从代码上我们看到有一个约束布局,布局里面是一个TextView,用于显示文字。这个ConstraintLayout 布局就是View,这个TextView也是View。你说是就是吗?怎么证明呢?
我们来看一下ConstraintLayout 的源码。
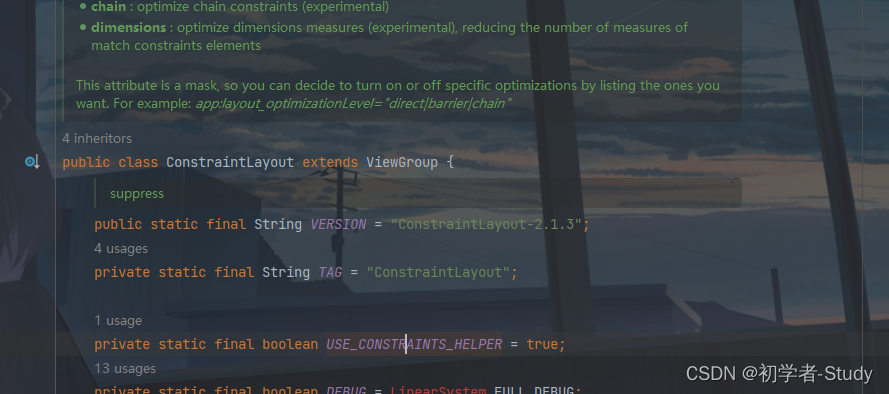
这里我们得知ConstraintLayout 继承自ViewGroup,然后我们再查看ViewGroup的源码。
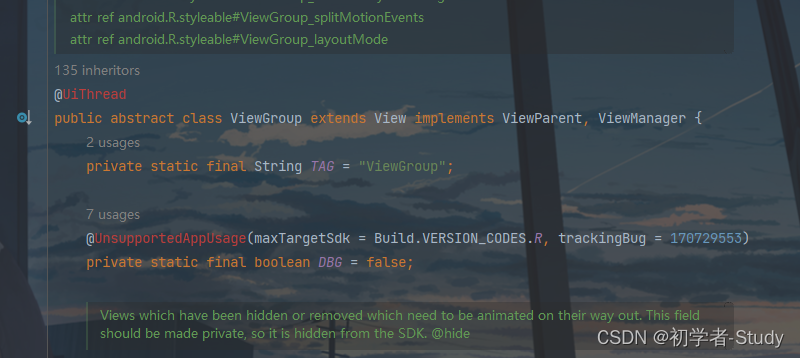
ViewGroup 继承自View,所以说ConstraintLayout是一个View并非是空穴来风,而是有真凭实据的,而TextView,你查看它的源码就会看到,它也是继承自View。
现在我们知道View是所有视图的父类,手机屏幕上看到的任何内容都是View。
二、什么是自定义View
刚才我们所看到的ConstraintLayout和TextView都可以理解成自定义View,只不过因为这两个View都是由Google源码中提供的,所以不属于自定义View,属于系统View,也就是原生的控件,那么对于ConstraintLayout和TextView来说,它们的却别是什么?
这里我们需要先知道View和ViewGroup的区别,View是一个视图,ViewGroup是一个容器视图,在简单一点说,View只是一个视图,而ViewGroup可以放置多个视图。ViewGroup我们通常作为布局容器来使用,例如LinearLayout、RelativeLayout等都是布局,它里面是可以放置控件的,而这个控件就是View。
通过翻来覆去的描述,可能你会更清楚两者的区别,那么系统的我们了解,所谓自定义View就是系统View之外的View,例如网上开源的图表控件、日历控件等。作为开发者我们实现自定义View有那些方式:
- 继承View,例如折线图等。
- 继承ViewGroup,例如流式布局等。
- 继承现有的View,例如TextView、ListView等。
前面的两种方式我们已经知道了,那么第三种是什么意思,不知道你有没有注意到,Android 5.0时推出一个material库,这里库里面就是继承了现有的View而制作的Material UI风格的控件,下面我们将xml中的TextView改成com.google.android.material.textview.MaterialTextView,你会发现也不会报错,而我们查看MaterialTextView的源码,发现它继承自AppCompatTextView,而AppCompatTextView又继承自TextView,通过这种层层继承的方式,子类可以做很多的特性的增加,同时又具备父类的基本属性,而且相对改动较少,举一个简单的例子,你现在有一个TextView,你希望这个TextView的文字颜色可以五颜六色的,还要会发光,那么这个时候你就可以继承自View,来写你所需要的五颜六色和发光的需求,而不是继承View,所有的功能都要重新写。
三、自定义View
首先我们创建一个自定义View,在com.llw.easyview包下新建一个MacAddressEditText类,从名字上来看这是一个Mac地址输入框。
① 构造方法
然后我们继承自View,重写里面的构造方法,代码如下:
public class MacAddressEditText extends View {/* 构造方法 1* 在代码中使用,例如Java 的new MacEditText(),Kotlin 的MacEditText() @param context 上下文*/public MacAddressEditText(Context context) {super(context);}/* 构造方法 2* 在xml布局文件中使用时自动调用 @param context 上下文* @param attrs   属性设置*/public MacAddressEditText(Context context, @Nullable AttributeSet attrs) {super(context, attrs);}/* 构造方法 3* 不会自动调用,如果有默认style时,在第二个构造函数中调用 @param context      上下文* @param attrs        属性设置* @param defStyleAttr 默认样式*/public MacAddressEditText(Context context, @Nullable AttributeSet attrs, int defStyleAttr) {super(context, attrs, defStyleAttr);}
}
这里重写了3个构造方法,通过方法上的注释你应该就可能够明白分别是怎么使用的,因为我们会涉及到样式,那么最终是使用构造方法 3, 所以对上面的方法我们再改动一下,修改后代码如下:
public class MacAddressEditText extends View {private Context mContext;public MacAddressEditText(Context context) {this(context,null);}public MacAddressEditText(Context context, @Nullable AttributeSet attrs) {this(context, attrs,0);}public MacAddressEditText(Context context, @Nullable AttributeSet attrs, int defStyleAttr) {super(context, attrs, defStyleAttr);mContext = context;}
}
这里增加一个上下文变量,然后就是构造方法1 调用2,2调用3。现在你在java代码和xml中就都可以正常使用了。我们在使用系统的View的时候通常会在xml中设置一些参数样式,那么自定义里面怎么设置样式呢?
② XML样式
在设置样式之前需要先知道我们的自定义View要做什么,Mac地址输入框,主要就是蓝牙的Mac地址输入,一个完整的Mac地址格式是12:34:56:78:90:21,我们去掉分号,就是12个值,那么是不是一个值一个输入框呢?那样看起来有一些繁琐,那么就定为两个值一个框。

这个框我们能看到那些样式呢?每一个框的大小、背景颜色、边框颜色、边框大小、文字大小、文字颜色、分隔符,一般来说默认是英文分号( : ),不过也有使用小横杠的( - ),那么怎么去设置样式呢?在 res →
values 下新建一个attrs.xml文件,里面我们可以写自定义的样式,代码如下所示:
<declare-styleable name="MacAddressEditText"><!-- 方框大小,宽高一致 --><attr name="boxWidth" format="dimension|reference" /><!-- 方框背景颜色 --><attr name="boxBackgroundColor" format="color|reference" /><!-- 方框描边颜色 --><attr name="boxStrokeColor" format="color|reference" /><!-- 方框描边宽度 --><attr name="boxStrokeWidth" format="dimension|reference" /><!--文字颜色--><attr name="textColor" format="color|reference" /><!--文字大小--><attr name="textSize" format="dimension|reference" /><!--分隔符,: 、- --><attr name="separator" format="string|reference" /></declare-styleable>
这里我们声明View的样式,里面是样式的一些设置属性,重点看属性值,dimension表示dp、sp之类,reference表示可以引用资源,比如我们专门写一个dimens.xml文件,里面存放常用的dp、sp,使用方式就是@dimens/dp_20,你可以理解为间接引用,那么其他的属性值格式就顾名思义了,很简单。
属性样式定义好了,还有一些颜色值需要定义,在colors.xml中增加如下代码:
<color name="key_bg_color">#fcfcfc</color><color name="key_tx_color">#1b1b1b</color><color name="key_complete_bg_color">#009C3A</color><color name="box_default_stroke_color">#009C3A</color><color name="box_default_bg_color">#f8f8f8</color><color name="tx_default_color">#0C973F</color>
xml中的dp、sp之类的在绘制的时候需要转换,转成px,我们可以写一个自定义View,在com.llw.easyview下新建一个Utils类,代码如下所示:
public class Utils {/* dp转px @param dpValue dp值* @return px值*/public static int dp2px(Context context, final float dpValue) {final float scale = context.getApplicationContext().getResources().getDisplayMetrics().density;return (int) (dpValue * scale + 0.5f);}/* sp 转 px @param spValue sp值* @return px值*/public static int sp2px(Context context, final float spValue) {final float fontScale = context.getApplicationContext().getResources().getDisplayMetrics().scaledDensity;return (int) (spValue * fontScale + 0.5f);}
}
下面我们回到View中去使用,先声明变量,代码如下:
private int mBoxWidth;private final int mBoxBackgroundColor;private final int mBoxStrokeColor;private final int mBoxStrokeWidth;private final int mTextColor;private final int mTextSize;private final String mSeparator;
然后修改第三个构造函数,代码如下所示:
public MacAddressEditText(Context context, @Nullable AttributeSet attrs, int defStyleAttr) {super(context, attrs, defStyleAttr);mContext = context;//根据设置的样式进行View的绘制参数设置@SuppressLint("CustomViewStyleable")TypedArray typedArray = context.obtainStyledAttributes(attrs, R.styleable.MacAddressEditText);mBoxWidth = Utils.dp2px(mContext, typedArray.getInt(R.styleable.MacAddressEditText_boxWidth, 48));mBoxBackgroundColor = typedArray.getColor(R.styleable.MacAddressEditText_boxBackgroundColor, ContextCompat.getColor(context, R.color.white));mBoxStrokeColor = typedArray.getColor(R.styleable.MacAddressEditText_boxStrokeColor, ContextCompat.getColor(context, R.color.box_default_stroke_color));mBoxStrokeWidth = Utils.dp2px(mContext, typedArray.getInt(R.styleable.MacAddressEditText_boxStrokeWidth, 1));mTextColor = typedArray.getColor(R.styleable.MacAddressEditText_textColor, ContextCompat.getColor(context, R.color.tx_default_color));mTextSize = Utils.sp2px(mContext, typedArray.getInt(R.styleable.MacAddressEditText_textSize, 14));mSeparator = typedArray.getString(R.styleable.MacAddressEditText_separator);typedArray.recycle();}
这里通过MacAddressEditText得到TypedArray,通过TypedArray获取MacAddressEditText中的属性,然后进行赋值,注意一点就是数值类型的需要默认值,有一些默认颜色值,就是我刚才写到colors.xml中的String类型不需要。数值类型就涉及到dp/sp转px的,此时我们调用了刚才工具类中的方法。
③ 测量
测量只是的了解View的宽和高,得出绘制这个View需要的大小范围。这里我们就不考虑padding了,只计算每一个方框的大小和方框之间的间距,首先我们在自定义View中定义两个变量,代码如下:
private final int mBoxNum = 6;private int mBoxMargin = 4;
这里表示方框个数,和方框间的间距,然后我们重写onMeasure()方法,代码如下:
/* View的测量 @param widthMeasureSpec 宽度测量* @param heightMeasureSpec 高度测量*/@Overrideprotected void onMeasure(int widthMeasureSpec, int heightMeasureSpec) {super.onMeasure(widthMeasureSpec, heightMeasureSpec);int width = 0;int margin = dp2px(mBoxMargin);switch (MeasureSpec.getMode(widthMeasureSpec)) {case MeasureSpec.UNSPECIFIED:case MeasureSpec.AT_MOST: //wrap_contentwidth = mBoxWidth * mBoxNum + margin * (mBoxNum - 1);break;case MeasureSpec.EXACTLY: //match_parentwidth = MeasureSpec.getSize(widthMeasureSpec);break;}//设置测量的宽高setMeasuredDimension(width, mBoxWidth);}
这里的代码说明一下,首先是获取px的margin值,这里因为有6个方框,所以就有5个间距,然后来看测量模式,这里的模式和XML中设置layout_width、layout_height的值有关,无非就是三种值,具体是大小,比如100dp,然后就是wrap_content,最后是match_parent,MeasureSpec.EXACTLY表示match_parent / 具体的值,MeasureSpec.AT_MOST表示wrap_content。
width = mBoxWidth * mBoxNum + margin * (mBoxNum - 1)
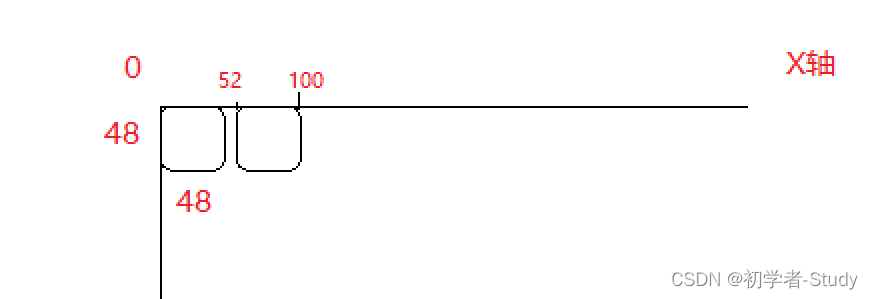
这里的 宽 = 方框的宽 * 6 + 方框间距 * 5,这很好理解,然后就是高,高就是宽,这里就算你在xml设置layout_height为match_parent,实际上也是wrap_content。那么根据测量的结果最后就是一个局限性,如果我们没有设置方框的大小的话,那么默认是48,间距为4,那么最终结果就是宽:308,高:48,我画了一个图来进行说明(有点抽象,能理解就可以)。

④ 绘制
测量好了之后,下面就可以开始绘制了,绘制就相当于在纸上画画,而画画呢,首先要有画笔,首先声明变量,代码如下:
private Paint mBoxPaint;private Paint mBoxStrokePaint;private Paint mTextPaint;private final Rect mTextRect = new Rect();
然后我们需要对3个画笔(方框、方框边框、文字)进行设置,因为绘制文字稍微有一些不同,所以加了一个Rect,下面我们在View中新增一个初始化画笔的方法,代码如下所示:
/* 初始化画笔*/private void initPaint() {//设置方框画笔mBoxPaint = new Paint();mBoxPaint.setAntiAlias(true);// 抗锯齿mBoxPaint.setColor(mBoxBackgroundColor);//设置颜色mBoxPaint.setStyle(Paint.Style.FILL);//风格填满//设置方框描边画笔mBoxStrokePaint = new Paint();mBoxStrokePaint.setAntiAlias(true);mBoxStrokePaint.setColor(mBoxStrokeColor);mBoxStrokePaint.setStyle(Paint.Style.STROKE);//风格描边mBoxStrokePaint.setStrokeWidth(mBoxStrokeWidth);//描边宽度//设置文字画笔mTextPaint = new Paint();mTextPaint.setAntiAlias(true);mTextPaint.setStyle(Paint.Style.FILL);mTextPaint.setColor(mTextColor);mTextPaint.setTextSize(mTextSize);//文字大小mTextPaint.setTextAlign(Paint.Align.CENTER);//文字居中对齐}
然后在第三个构造方法中去调用,如下图所示:

下面要进行绘制了,绘制分为两步,绘制方框和绘制文字。
1. 绘制方框
首先是绘制方框,在自定义View中新增一个drawBox()方法,代码如下:
/* 绘制方框*/private void drawBox(Canvas canvas) {//每个方框的间距int margin = Utils.dp2px(mContext, mBoxMargin);for (int i = 0; i < mBoxNum; i++) {//绘制矩形框,需要左、上、右、下四个点的位置float left = i * mBoxWidth + i * margin;float top = 0f;float right = (i + 1) * mBoxWidth + i * margin;float bottom = mBoxWidth;RectF rectF = new RectF(left, top, right, bottom);//绘制圆角矩形框int radius = Utils.dp2px(mContext, mBoxCornerRadius);canvas.drawRoundRect(rectF, radius, radius, mBoxPaint);//绘制圆角矩形边框float strokeWidth = mBoxStrokeWidth / 2;RectF strokeRectF = new RectF(left + strokeWidth, top + strokeWidth, right - strokeWidth, bottom - strokeWidth);float strokeRadius = radius - strokeWidth;canvas.drawRoundRect(strokeRectF, strokeRadius, strokeRadius, mBoxStrokePaint);}}
这里绘制方框有必要好好说明一下,首先是这个间距,就是方框的间距,已经说过了,然后我们根据设置的方框数量就行遍历,需要绘制6个方框,那么,int = 0,进入循环,绘制第一个方框,首先我们需要确定方框左、上、右、下4个坐标点的坐标,那么我们将值代入到代码中看看。
float left = 0 * 48 + 0 * 4;
float top = 0f;
float right = (0 + 1) * 48 + 0 * 4;
float bottom = 48;
得出的结果就是:left :0、top:0、right :48、bottom :48,然后通过四个点得到一个矩形,因为是圆角方框,所以在自定义View中声明变量:
private float mBoxCornerRadius = 8f;
然后得到px的radiu,再通过canvas.drawRoundRect()方法绘制一个圆角矩形,圆角矩形绘制好之后,我们可以顺便绘制圆角矩形的圆角边框,注意看下面这几行代码:
float strokeWidth = mBoxStrokeWidth / 2;
RectF strokeRectF = new RectF(left + strokeWidth, top + strokeWidth, right - strokeWidth, bottom - strokeWidth);
float strokeRadius = radius - strokeWidth;
首先是这个mBoxStrokeWidth / 2,为什么要这么做呢?这是因为绘制边框的时候实际上不是居内绘制,而是居中往两侧绘制,而我要做的是居内绘制,为了保持绘制的边框不至于太粗我就除以2,只用一半的宽度,然后就是绘制边框的时候,左、上都加上了这个边框的宽,右、下都减去了这个边框的宽,这样做是为了让边框完整置于圆角矩形里面,下面的图中右侧的示例就是我想要的。

那么第一个方框绘制后如下图所示。

方框的背景颜色我默认设置成白色了,可以自行修改,或者在xml中进行属性设置,那么按照刚才的思路,现在循环第2次,i = 1;
float left = 1 * 48 + 1 * 4;
float top = 0f;
float right = (1 + 1) * 48 + 1 * 4;
float bottom = 48;
得出的结果就是:left :52、top:0、right :100、bottom :48,那么绘制出来第二个框如下图所示:
那么按照上述的说明我相信你已经知道是怎么绘制的了,那么下面我们就可以绘制文字了。
2. 绘制文字
现在方框有了,而文字绘制我们需要绘制在方框的中间,首先我们声明变量,代码如下:
private final int mMacLength = 6;private final String[] macAddressArray = new String[mMacLength];
然后我们在自定义View中新增一个drawMacAddress()方法。
/* 绘制Mac地址*/private void drawMacAddress(Canvas canvas) {int boxMargin = Utils.dp2px(mContext, mBoxMargin);for (int i = 0; i < macAddressArray.length; i++) {if (macAddressArray[i] != null) {//绘制的文字String content = macAddressArray[i];//获取绘制的文字边界mTextPaint.getTextBounds(content, 0, content.length(), mTextRect);//绘制的位置int offset = (mTextRect.top + mTextRect.bottom) / 2;//绘制文字,需要确定起始点的X、Y的坐标点float x = (float) (getPaddingLeft() + mBoxWidth * i + boxMargin * i + mBoxWidth / 2);float y = (float) (getPaddingTop() + mBoxWidth / 2) - offset;//绘制文字canvas.drawText(content, x, y, mTextPaint);}}}
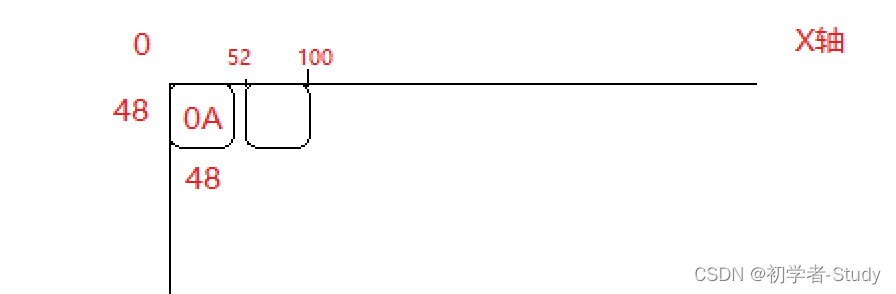
假设地址数组第一个值是0A,然后通过mTextPaint.getTextBounds()得到这个文字的边界,就相当于得到一个文字的边界框,然后就是通过边界框的上+下的坐标 / 2的边界框的中间位置,因为文字的绘制是从左下角到右上角进行绘制的。最重要的就是去顶起始点的x、y轴坐标,

将 i = 0 ,offset = 12代入进去。
float x = (float) (0 + 48 * 0 + 4 * 0 + 48 / 2);
float y = (float) (0 + 48 / 2) - 12;
最终 x = 24,y = 36。
然后绘制出来的结果如下图所示:
后面的绘制也是一样的道理,现在两个绘制方法都写好了,需要在onDraw()中调用,在自定义View中新增如下代码:
/* View的绘制 @param canvas 画布*/@Overrideprotected void onDraw(Canvas canvas) {//绘制方框drawBox(canvas);//绘制Mac地址drawMacAddress(canvas);}
⑤ 输入
绘制的处理已经完成了,那么作为一个蓝牙Mac地址输入框,我们需要输入的数据是什么呢?0、1、2、3、4、5、6、7、8、9、A、B、C、E、F、G,像上述的这些数据表示16进制的,那么如果使用系统的软键盘进行输入,我们可能需要在输入的过程中选择字符键盘,而这个字符键盘上其他的英文字母或者标点符号右不是我所需要的,那么为了方便,我打算自己做一个键盘来进行输入。
1. 键盘布局
首先在layout下创建一个lay_hex_keyboard.xml,用于作为键盘的布局,代码如下所示:
<?xml version="1.0" encoding="utf-8"?>
<androidx.constraintlayout.widget.ConstraintLayout xmlns:android="http://schemas.android.com/apk/res/android"xmlns:app="http://schemas.android.com/apk/res-auto"xmlns:tools="http://schemas.android.com/tools"android:layout_width="match_parent"android:layout_height="wrap_content"android:background="#eff4f9"><Buttonandroid:id="@+id/btn_a"android:layout_width="0dp"android:layout_height="48dp"android:layout_marginStart="4dp"android:layout_marginTop="4dp"android:backgroundTint="@color/key_bg_color"android:insetTop="0dp"android:insetBottom="0dp"android:text="A"android:textColor="@color/key_tx_color"android:textSize="16sp"app:layout_constraintEnd_toStartOf="@+id/btn_9"app:layout_constraintHorizontal_bias="0.5"app:layout_constraintStart_toStartOf="parent"app:layout_constraintTop_toTopOf="parent" /><Buttonandroid:id="@+id/btn_9"android:layout_width="0dp"android:layout_height="48dp"android:layout_marginStart="4dp"android:layout_marginTop="4dp"android:backgroundTint="@color/key_bg_color"android:insetTop="0dp"android:insetBottom="0dp"android:text="9"android:textColor="@color/key_tx_color"android:textSize="16sp"app:layout_constraintEnd_toStartOf="@+id/btn_8"app:layout_constraintHorizontal_bias="0.5"app:layout_constraintStart_toEndOf="@+id/btn_a"app:layout_constraintTop_toTopOf="parent" /><Buttonandroid:id="@+id/btn_8"android:layout_width="0dp"android:layout_height="48dp"android:layout_marginStart="4dp"android:layout_marginTop="4dp"android:backgroundTint="@color/key_bg_color"android:insetTop="0dp"android:insetBottom="0dp"android:text="8"android:textColor="@color/key_tx_color"android:textSize="16sp"app:layout_constraintEnd_toStartOf="@+id/btn_7"app:layout_constraintHorizontal_bias="0.5"app:layout_constraintStart_toEndOf="@+id/btn_9"app:layout_constraintTop_toTopOf="parent" /><Buttonandroid:id="@+id/btn_7"android:layout_width="0dp"android:layout_height="48dp"android:layout_marginStart="4dp"android:layout_marginTop="4dp"android:backgroundTint="@color/key_bg_color"android:insetTop="0dp"android:insetBottom="0dp"android:text="7"android:textColor="@color/key_tx_color"android:textSize="16sp"app:layout_constraintEnd_toStartOf="@+id/btn_del"app:layout_constraintHorizontal_bias="0.5"app:layout_constraintStart_toEndOf="@+id/btn_8"app:layout_constraintTop_toTopOf="parent" /><Buttonandroid:id="@+id/btn_del"android:layout_width="0dp"android:layout_height="48dp"android:layout_marginStart="4dp"android:layout_marginTop="4dp"android:layout_marginEnd="4dp"android:backgroundTint="@color/key_bg_color"android:insetTop="0dp"android:insetBottom="0dp"android:text="删除"android:textColor="@color/key_tx_color"android:textSize="16sp"app:layout_constraintEnd_toEndOf="parent"app:layout_constraintHorizontal_bias="0.5"app:layout_constraintStart_toEndOf="@+id/btn_7"app:layout_constraintTop_toTopOf="parent" /><Buttonandroid:id="@+id/btn_b"android:layout_width="0dp"android:layout_height="48dp"android:layout_marginTop="4dp"android:backgroundTint="@color/key_bg_color"android:insetTop="0dp"android:insetBottom="0dp"android:text="B"android:textColor="@color/key_tx_color"android:textSize="16sp"app:layout_constraintEnd_toStartOf="@+id/btn_6"app:layout_constraintHorizontal_bias="0.5"app:layout_constraintStart_toStartOf="@+id/btn_a"app:layout_constraintTop_toBottomOf="@+id/btn_a" /><Buttonandroid:id="@+id/btn_6"android:layout_width="0dp"android:layout_height="48dp"android:layout_marginStart="4dp"android:layout_marginTop="4dp"android:backgroundTint="@color/key_bg_color"android:insetTop="0dp"android:insetBottom="0dp"android:text="6"android:textColor="@color/key_tx_color"android:textSize="16sp"app:layout_constraintEnd_toStartOf="@+id/btn_5"app:layout_constraintHorizontal_bias="0.5"app:layout_constraintStart_toEndOf="@+id/btn_b"app:layout_constraintTop_toBottomOf="@+id/btn_a" /><Buttonandroid:id="@+id/btn_5"android:layout_width="0dp"android:layout_height="48dp"android:layout_marginStart="4dp"android:layout_marginTop="4dp"android:backgroundTint="@color/key_bg_color"android:insetTop="0dp"android:insetBottom="0dp"android:text="5"android:textColor="@color/key_tx_color"android:textSize="16sp"app:layout_constraintEnd_toStartOf="@+id/btn_4"app:layout_constraintHorizontal_bias="0.5"app:layout_constraintStart_toEndOf="@+id/btn_6"app:layout_constraintTop_toBottomOf="@+id/btn_a" /><Buttonandroid:id="@+id/btn_4"android:layout_width="0dp"android:layout_height="48dp"android:layout_marginStart="4dp"android:layout_marginTop="4dp"android:backgroundTint="@color/key_bg_color"android:insetTop="0dp"android:insetBottom="0dp"android:text="4"android:textColor="@color/key_tx_color"android:textSize="16sp"app:layout_constraintEnd_toStartOf="@+id/btn_delete_all"app:layout_constraintHorizontal_bias="0.5"app:layout_constraintStart_toEndOf="@+id/btn_5"app:layout_constraintTop_toBottomOf="@+id/btn_a" /><Buttonandroid:id="@+id/btn_delete_all"android:layout_width="0dp"android:layout_height="48dp"android:layout_marginStart="4dp"android:layout_marginTop="4dp"android:backgroundTint="@color/key_bg_color"android:insetTop="0dp"android:insetBottom="0dp"android:text="全删"android:textColor="@color/key_tx_color"android:textSize="16sp"app:layout_constraintEnd_toEndOf="@+id/btn_del"app:layout_constraintHorizontal_bias="0.5"app:layout_constraintStart_toEndOf="@+id/btn_4"app:layout_constraintTop_toBottomOf="@+id/btn_a" /><Buttonandroid:id="@+id/btn_c"android:layout_width="0dp"android:layout_height="48dp"android:layout_marginTop="4dp"android:backgroundTint="@color/key_bg_color"android:insetTop="0dp"android:insetBottom="0dp"android:text="C"android:textColor="@color/key_tx_color"android:textSize="16sp"app:layout_constraintEnd_toStartOf="@+id/btn_3"app:layout_constraintHorizontal_bias="0.5"app:layout_constraintStart_toStartOf="@+id/btn_b"app:layout_constraintTop_toBottomOf="@+id/btn_b" /><Buttonandroid:id="@+id/btn_3"android:layout_width="0dp"android:layout_height="48dp"android:layout_marginStart="4dp"android:layout_marginTop="4dp"android:backgroundTint="@color/key_bg_color"android:insetTop="0dp"android:insetBottom="0dp"android:text="3"android:textColor="@color/key_tx_color"android:textSize="16sp"app:layout_constraintEnd_toStartOf="@+id/btn_2"app:layout_constraintHorizontal_bias="0.5"app:layout_constraintStart_toEndOf="@+id/btn_c"app:layout_constraintTop_toBottomOf="@+id/btn_b" /><Buttonandroid:id="@+id/btn_2"android:layout_width="0dp"android:layout_height="48dp"android:layout_marginStart="4dp"android:layout_marginTop="4dp"android:backgroundTint="@color/key_bg_color"android:insetTop="0dp"android:insetBottom="0dp"android:text="2"android:textColor="@color/key_tx_color"android:textSize="16sp"app:layout_constraintEnd_toStartOf="@+id/btn_1"app:layout_constraintStart_toEndOf="@+id/btn_3"app:layout_constraintTop_toBottomOf="@+id/btn_b" /><Buttonandroid:id="@+id/btn_1"android:layout_width="0dp"android:layout_height="48dp"android:layout_marginStart="4dp"android:layout_marginTop="4dp"android:backgroundTint="@color/key_bg_color"android:insetTop="0dp"android:insetBottom="0dp"android:text="1"android:textColor="@color/key_tx_color"android:textSize="16sp"app:layout_constraintEnd_toEndOf="@+id/btn_4"app:layout_constraintStart_toEndOf="@+id/btn_2"app:layout_constraintTop_toBottomOf="@+id/btn_b" /><Buttonandroid:id="@+id/btn_d"android:layout_width="0dp"android:layout_height="48dp"android:layout_marginTop="4dp"android:layout_marginBottom="4dp"android:backgroundTint="@color/key_bg_color"android:insetTop="0dp"android:insetBottom="0dp"android:text="D"android:textColor="@color/key_tx_color"android:textSize="16sp"app:layout_constraintBottom_toBottomOf="parent"app:layout_constraintEnd_toStartOf="@+id/btn_e"app:layout_constraintHorizontal_bias="0.5"app:layout_constraintStart_toStartOf="@+id/btn_c"app:layout_constraintTop_toBottomOf="@+id/btn_c" /><Buttonandroid:id="@+id/btn_e"android:layout_width="0dp"android:layout_height="48dp"android:layout_marginStart="4dp"android:layout_marginTop="4dp"android:backgroundTint="@color/key_bg_color"android:insetTop="0dp"android:insetBottom="0dp"android:text="E"android:textColor="@color/key_tx_color"android:textSize="16sp"app:layout_constraintEnd_toStartOf="@+id/btn_f"app:layout_constraintHorizontal_bias="0.5"app:layout_constraintStart_toEndOf="@+id/btn_d"app:layout_constraintTop_toBottomOf="@+id/btn_c" /><Buttonandroid:id="@+id/btn_f"android:layout_width="0dp"android:layout_height="48dp"android:layout_marginStart="4dp"android:layout_marginTop="4dp"android:backgroundTint="@color/key_bg_color"android:insetTop="0dp"android:insetBottom="0dp"android:text="F"android:textColor="@color/key_tx_color"android:textSize="16sp"app:layout_constraintEnd_toStartOf="@+id/btn_0"app:layout_constraintHorizontal_bias="0.5"app:layout_constraintStart_toEndOf="@+id/btn_e"app:layout_constraintTop_toBottomOf="@+id/btn_c" /><Buttonandroid:id="@+id/btn_0"android:layout_width="0dp"android:layout_height="48dp"android:layout_marginStart="4dp"android:layout_marginTop="4dp"android:backgroundTint="@color/key_bg_color"android:insetTop="0dp"android:insetBottom="0dp"android:text="0"android:textColor="@color/key_tx_color"android:textSize="16sp"app:layout_constraintEnd_toStartOf="@+id/btn_complete"app:layout_constraintHorizontal_bias="0.5"app:layout_constraintStart_toEndOf="@+id/btn_f"app:layout_constraintTop_toBottomOf="@+id/btn_c" /><com.google.android.material.button.MaterialButtonandroid:id="@+id/btn_complete"android:layout_width="0dp"android:layout_height="0dp"android:layout_marginStart="4dp"android:layout_marginTop="4dp"android:backgroundTint="@color/key_complete_bg_color"android:insetTop="0dp"android:insetBottom="0dp"android:text="完成"android:textColor="@color/white"android:textSize="16sp"app:iconGravity="start|end"app:layout_constraintBottom_toBottomOf="@+id/btn_0"app:layout_constraintEnd_toEndOf="@+id/btn_delete_all"app:layout_constraintStart_toEndOf="@+id/btn_0"app:layout_constraintTop_toBottomOf="@+id/btn_delete_all" />
</androidx.constraintlayout.widget.ConstraintLayout>
布局的预览效果如下图所示:

这个布局从使用上来说就很简单了,基本上一目了然,这里我们可以写一个接口用来处理键盘上按钮点击的事件。
2. 键盘接口
在com.llw.easyview下新建一个HexKeyboardListener接口,代码如下所示:
public interface HexKeyboardListener {/* Hex字符* @param hex 0~9,A~F*/void onHex(String hex);/* 删除*/void onDelete();/* 全删*/void onDeleteAll();/* 完成*/void onComplete();
}
现在接口有了,接口中的方法基本上覆盖了键盘上所有按钮点击时触发的事件处理,下面我们来写一个弹窗,用来点击Mac地址输入框时弹出这个键盘。
3. 键盘弹窗
这个弹窗,我就写在Utils类中了,在里面新增如下方法代码:
/* 显示Hex键盘弹窗 @param context 上下文* @param listener Hex键盘按键监听*/public static void showHexKeyboardDialog(@NonNull Context context, @NonNull HexKeyboardListener listener) {BottomSheetDialog dialog = new BottomSheetDialog(context);//根据xml获取布局视图View view = LayoutInflater.from(context).inflate(R.layout.lay_hex_keyboard, null, false);//点击按键触发接口回调view.findViewById(R.id.btn_a).setOnClickListener(v -> listener.onHex("A"));view.findViewById(R.id.btn_b).setOnClickListener(v -> listener.onHex("B"));view.findViewById(R.id.btn_c).setOnClickListener(v -> listener.onHex("C"));view.findViewById(R.id.btn_d).setOnClickListener(v -> listener.onHex("D"));view.findViewById(R.id.btn_e).setOnClickListener(v -> listener.onHex("E"));view.findViewById(R.id.btn_f).setOnClickListener(v -> listener.onHex("F"));view.findViewById(R.id.btn_0).setOnClickListener(v -> listener.onHex("0"));view.findViewById(R.id.btn_1).setOnClickListener(v -> listener.onHex("1"));view.findViewById(R.id.btn_2).setOnClickListener(v -> listener.onHex("2"));view.findViewById(R.id.btn_3).setOnClickListener(v -> listener.onHex("3"));view.findViewById(R.id.btn_4).setOnClickListener(v -> listener.onHex("4"));view.findViewById(R.id.btn_5).setOnClickListener(v -> listener.onHex("5"));view.findViewById(R.id.btn_6).setOnClickListener(v -> listener.onHex("6"));view.findViewById(R.id.btn_7).setOnClickListener(v -> listener.onHex("7"));view.findViewById(R.id.btn_8).setOnClickListener(v -> listener.onHex("8"));view.findViewById(R.id.btn_9).setOnClickListener(v -> listener.onHex("9"));view.findViewById(R.id.btn_del).setOnClickListener(v -> listener.onDelete());view.findViewById(R.id.btn_delete_all).setOnClickListener(v -> listener.onDeleteAll());view.findViewById(R.id.btn_complete).setOnClickListener(v -> {listener.onComplete();dialog.dismiss();});//点击外部不消失dialog.setCancelable(false);//设置内容视图dialog.setContentView(view);if (dialog.getWindow() != null) {//去掉弹窗背景透明WindowManager.LayoutParams params = dialog.getWindow().getAttributes();params.dimAmount = 0.0f;dialog.getWindow().setAttributes(params);}//显示弹窗dialog.show();}
这里就是一个底部弹窗,然后设置布局视图,设置接口回调,设置背景透明,最后显示出来。那么下一步要做的就是点击输入框调用这个弹窗显示键盘。
4. 显示键盘
在View中是可以获取到点击触摸事件的,那么我们可以在自定义View中新增如下代码:
/* 触摸事件*/@SuppressLint("ClickableViewAccessibility")@Overridepublic boolean onTouchEvent(MotionEvent event) {if (event != null) {if (event.getAction() == MotionEvent.ACTION_DOWN) {//显示Hex键盘弹窗Utils.showHexKeyboardDialog(mContext, this);return true;}}return super.onTouchEvent(event);}
这里的代码就是当我们的手机点击这个Mac地址输入框的时候,会先触发触摸事件,然后才是点击事件,而在这里我们就是在触摸到的时候显示键盘弹窗,然后返回 true,这里就会进行事件的拦截,这里的这个this,就是我们当前的自定义View需要实现的回调接口,将鼠标放在这个this后面,然后Alt + Enter的组合键,会出现弹窗,如下图所示:
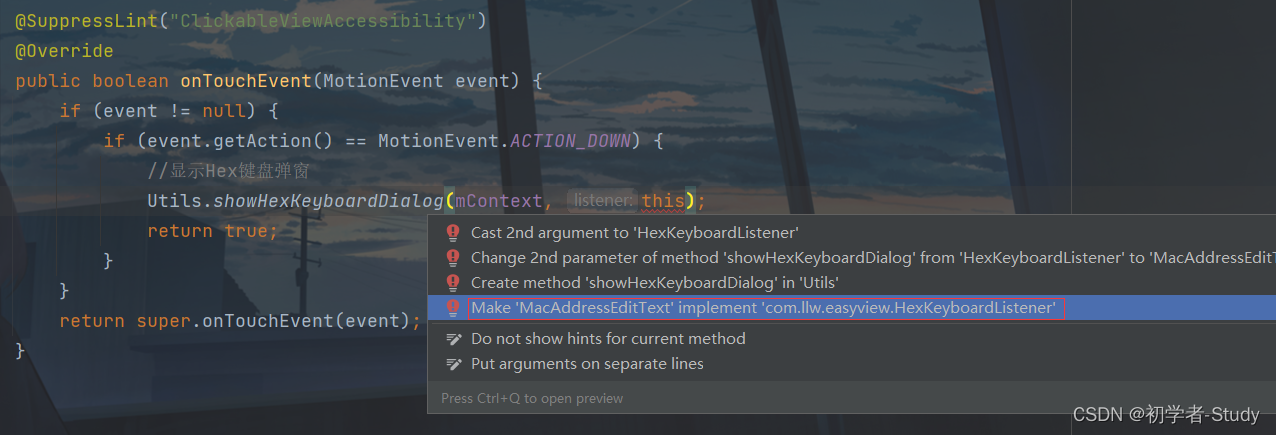
这里点击第四项,会出现一个弹窗,如图所示:

点击OK就可以快速实现这个接口的回调,重写接口的方法,你会看到自定义View新增了四个方法,代码如下:
@Overridepublic void onHex(String hex) {}@Overridepublic void onDelete() {}@Overridepublic void onDeleteAll() {}@Overridepublic void onComplete() {}
5. 处理输入
现在自定义View已经实现了键盘的点击事件回调,那么下面就是怎么处理这些事件,首先我们需要声明两个变量
private final int mInputLength = 12;private final String[] inputArray = new String[mInputLength];private int currentInputPosition = 0;/* 操作标识* -1:添加,* 0:删除,* 1:全删*/private int flag = -1;
这个地方就是输入的长度、保存输入的数组、当前输入的位置,这里的12,就是我们实际上输入一个完整的Mac地址,去掉分隔符实际长度是12,而分隔符我们可以自己去设置要用什么分隔符。首先是修改绘制文字的处理,什么时候会触发绘制文字呢?当我们修改inputArray的内容时,添加、删除之类的操作,这里还有一个标识位用来记录当前的绘制文字方式,在自定义View中添加一个处理Mac文字绘制的方法,代码如下:
/* 处理Mac地址绘制*/private void processMacDraw() {if (flag == 1) { //全删currentInputPosition = 0;Arrays.fill(inputArray,null);Arrays.fill(macAddressArray,"");} else { //添加或删除String hex = "";int hexPos = 0;for (String input : inputArray) {if (input == null) {input = "";}hex = hex + input;macAddressArray[hexPos] = hex;if (hex.length() == 2) {hexPos++;hex = "";}}}//刷新ViewpostInvalidate();}
这个方法就是当inputArray发生变化时,同时改变macAddressArray,而我们的文字绘制是根据macAddressArray来的。当点击全删的时候就两个数组置为null和空字符串。然后就是添加或删除的时候遍历inputArray,满足两个字符长度就给macAddressArray进行一次赋值,最后调用postInvalidate()刷新View,会重新调用onDraw进行绘制。下面我们再修改一下onHex()方法,代码如下:
@Overridepublic void onHex(String hex) {//输入长度满足12if (currentInputPosition == mInputLength) return;//不满足12inputArray[currentInputPosition] = hex;currentInputPosition++;flag = -1;processMacDraw(); //添加时绘制}
这里的代码就是在inputArray中添加数据,然后调用绘制文字方法,下面再修改一下onDelete()方法,代码如下:
@Overridepublic void onDelete() {if (currentInputPosition == 0) return;currentInputPosition--;inputArray[currentInputPosition] = null;flag = 0;processMacDraw(); //删除时绘制}
删除后绘制,最后我们修改一下onDeleteAll()方法,代码如下:
@Overridepublic void onDeleteAll() {flag = 1;processMacDraw(); //全删时绘制}
最后就是在输入完成的时候获取当前输入的Mac地址数据,在自定义View中新增getMacAddress()方法。
/* 获取Mac地址* @return 完整的Mac地址*/public String getMacAddress() {StringBuilder builder = new StringBuilder();for (String macAddress : macAddressArray) {if (macAddress == null) continue;if (macAddress.isEmpty()) continue;if (builder.toString().isEmpty()) {builder.append(macAddress);} else {builder.append(mSeparator == null ? ":" : mSeparator).append(macAddress);}}return builder.toString();}
最后我们修改onComplete()方法,在里面进行打印,代码如下所示:
@Overridepublic void onComplete() {Log.d("TAG", "onComplete: " + getMacAddress());}
四、使用自定义View
现在自定义View写好了,可以使用了,修改activity_main.xml中的代码,如下所示:
<?xml version="1.0" encoding="utf-8"?>
<LinearLayout xmlns:android="http://schemas.android.com/apk/res/android"xmlns:app="http://schemas.android.com/apk/res-auto"xmlns:tools="http://schemas.android.com/tools"android:layout_width="match_parent"android:layout_height="match_parent"android:gravity="center"android:orientation="vertical"android:padding="16dp"tools:context=".MainActivity"><com.llw.easyview.MacAddressEditTextandroid:id="@+id/mac_et"android:layout_width="wrap_content"android:layout_height="wrap_content" /><Buttonandroid:id="@+id/btn_mac"android:layout_width="wrap_content"android:layout_height="wrap_content"android:layout_marginTop="30dp"android:text="获取地址" /></LinearLayout>
如果你发现XML预览不了,看不到这个自定义View,就Rebuild Project一下,就能看到了,预览效果如下图所示:

下面进入到MainActivity中去使用,修改代码如下所示:
public class MainActivity extends AppCompatActivity {@Overrideprotected void onCreate(Bundle savedInstanceState) {super.onCreate(savedInstanceState);setContentView(R.layout.activity_main);MacAddressEditText macEt = findViewById(R.id.mac_et);Button btnMac = findViewById(R.id.btn_mac);btnMac.setOnClickListener(v -> {String macAddress = macEt.getMacAddress();if (macAddress.isEmpty()){Toast.makeText(this, "请输入Mac地址", Toast.LENGTH_SHORT).show();return;}btnMac.setText(macAddress);});}
}
这里的代码就很简单,获取View,然后点击按钮时获取输入框的值,获取到值显示在按钮上,下面运行测试一下。
五、源码
如果对你有所帮助的话,不妨 Star 或 Fork,山高水长,后会有期~
源码地址:EasyView