vue笔记

第一个Vue应用
<!DOCTYPE html>
<html lang="en"><head><meta charset="UTF-8" /><meta http-equiv="X-UA-Compatible" content="IE=edge" /><meta name="viewport" content="width=device-width, initial-scale=1.0" /><title>Document</title></head><body><div id="app"><h1>{{content}}</h1><div>{{content}}</div><div>{{count}}</div><div>{{count+1}}</div><div>{{user}}</div><div>{{user.id}},{{user.name}},{{user.age}}</div></div></body>
</html>
<script src="./vue.js"></script>
<script>//记得大写Vnew Vue({//element 用来给Vue实例定义一个作用范围el: "#app",//用来给Vue实例定义一些相关数据data: {content: "哈哈哈",count: 1,//要展示属性,直接.属性就好user: { id: 1, name: "zs", age: 50 },},});
</script>
- vue实例(对象)中el属性: 代表Vue的作用范围 日后在Vue的作用范围内都可以使用Vue的语法
- vue实例(对象)中data属性: 用来给Vue实例绑定一些相关数据, 绑定的数据可以通过{{变量名}}在Vue作用范围内取出
- 在使用{{}}进行获取data中数据时,可以在{{}}中书写表达式,运算符,调用相关方法,以及逻辑运算等
- el属性中可以书写任意的CSS选择器[jquery选择器],但是在使用Vue开发是推荐使用 id选择器 注意: el属性值不能指定body或html标签
v-text和v-html
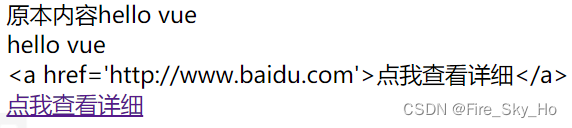
v-text:用来获取data中数据将数据以文本的形式渲染到指定标签内部 ,类似于javascript 中 innerText
v-html:用来获取data中数据将数据中含有的html标签先解析在渲染到指定标签的内部 ,类似于javascript中 innerHTML
<!DOCTYPE html>
<html lang="en"><head> </head><body><div id="app"><div>原本内容{{msg}}</div><div v-text="msg">原本内容</div><div v-text="content"></div><div v-html="content"></div></div></body>
</html>
<script src="./vue.js"></script>
<script>var app = new Vue({el: "#app",data: {msg: "hello vue",content: "<a href='http://www.baidu.com'>点我查看详细</a>",},});
</script>
[外链图片转存失败,源站可能有防盗链机制,建议将图片保存下来直接上传(img-9hs0l4kG-1678803545834)(.\\图片\\1.png)]
总结
- {{}}(插值表达式)和v-text获取数据的区别在于
- 使用v-text取值会将标签中原有的数据覆盖 使用插值表达式的形式不会覆盖标签原有的数据
- 使用v-text可以避免在网络环境较差的情况下出现插值闪烁
v-on
基本使用
<!DOCTYPE html>
<html lang="en"><head> </head><body><div id="app"><h1>{{msg}}</h1><!--双向绑定机制 MVVM   Model <===> ViewModel(监听器)  <===>  View(视图)--><h1>{{count}}</h1><h1>{{count}}</h1><button v-on:click="test" v-on:mouseover="test1">点我</button></div></body>
</html>
<!--引入vue.js核心文件-->
<script src="./vue.js"></script>
<script>var app = new Vue({el: "#app",data: {//用来定义数据  Modelmsg: "hello vue",count: 23,},methods: {//用来定义方法test: function () {//如果在vue定义方法中获取data中数据 注意:在自定义方法中可以直接使用this,this代表当前vue实例console.log(this);console.log(this.msg);console.log(this.count);//this.count = this.count+1;this.count++;//触发aa事件this.aa();},test1: function () {console.log("test1 mouseover");},aa: function () {console.log("aaa");},},});
</script>
总结
事件源:发生事件dom元素
事件:发生特定的动作 click…
监听器:发生特定动作之后的事件处理程序 通常是js中函数
- 在vue中绑定事件是通过v-on指令来完成的 v-on:事件名 如 v-on:click
- 在v-on:事件名的赋值语句中是当前事件触发调用的函数名
- 在vue中事件的函数统一定义在Vue实例的methods属性中
- 在vue定义的事件中this指的就是当前的Vue实例,日后可以在事件中通过使用this获取Vue实例中相关数据 调用methods中相关方法
传参
<!DOCTYPE html>
<html lang="en"><body><div id="app"><h1>{{msg}}</h1><h1>年龄: {{count}}</h1><button v-on:click="incrementAge">点我每次给年龄+1</button><!--指定事件并给事件传递参数--><button v-on:click="changeAge(40)">点我每次给年龄+不确定</button><button v-on:click="changeAgeAndMsg({count:2,msg:'i love vue'})">点我每次给年龄+不确定,同时msg+不确定</button></div></body>
</html>
<!--引入vue.js核心文件-->
<script src="./vue.js"></script>
<script>var app = new Vue({el: "#app",data: {//用来定义数据  Modelmsg: "hello vue",count: 0,},methods: {//用来定义方法incrementAge: function () {this.count++;},changeAge: function (count) {console.log(count);this.count += count;},changeAgeAndMsg: function (param) {console.log(param);this.count += param.count;this.msg = "hello vue " + param.msg;},},});
</script>
简化写法
日后在vue中绑定事件时可以通过@符号形式,简化 v-on 的事件绑定
<!DOCTYPE html>
<html lang="en"><body><div id="app"><h1>{{msg}}</h1><h1>年龄: {{count}}</h1><button v-on:click="test">点我年龄+1</button><!--简化写法--><button @click="test3(5)">点我年龄+5</button></div></body>
</html>
<script src="./vue.js"></script>
<script>var app = new Vue({el: "#app",data: {msg: "hello vue",count: 0,},methods: {test: function () {this.count++;},test2: function (count) {//原始定义函数: 函数名:function(){}   =====> 简化函数:  函数名(){}this.count += count;},test3(count) {//简化函数少了:functionthis.count += count;},},});
</script>
v-show,v-if, v-bind
v-show,v-if
作用
用来通过vue方式控制页面中哪些标签展示和隐藏
语法
控制那个标签显示隐藏直接在那个标签上 加入v-if=“true|false|逻辑运算表达式” v-show=“true|false”
区别
1.v-if 底层通过控制dom树上元素节点实现 页面标签展示和隐藏 dom树
2.v-show 底层通过控制标签css中display属性实现标签展示和隐藏 css样式
使用总结
一般来说,v-if 有更高的切换开销,而 v-show 有更高的初始渲染开销。因此,如果需要非常频繁地切换,则使用 v-show 较好;如果在运行时条件很少改变,则使用 v-if 较好,变化快 用v-show 变化慢 v-if
<!DOCTYPE html>
<html lang="en"><body><div id="app"><h2 name="if" v-if="isShowTrue">{{msg}}</h2><h2 name="show" v-show="isShowTrue">{{msg}}</h2><h2 name="if" v-if="isShowFalse">{{msg}}</h2><h2 name="show" v-show="isShowFalse">{{msg}}</h2></div></body>
</html>
<!--引入vue.js核心文件-->
<script src="./vue.js"></script>
<script>var app = new Vue({el: "#app", //代表vue实例作用范围data: {//用来vue实例绑定数据msg: "hello vue",isShowTrue: true,isShowFalse: false,},methods: {//用来给vue实例定义一些列的相关方法},});
</script>
发现if确实是操作dom树,直接删除,show改变css样式
动态更改ifshow里的值
<!DOCTYPE html>
<html lang="en"><body><div id="app"><h1>{{msg}}</h1><!--管理状态--><h2 v-show="isShow">{{msg}}</h2><button @click="hideH2">用来隐藏h2标签</button><button @click="showH2">用来显示h2标签</button><button @click="showHideH2">用来展示|隐藏h2标签(方法)</button><button @click="isShow=!isShow">用来展示|隐藏h2标签(直接操作data中属性)</button></div></body>
</html>
<!--引入vue.js核心文件-->
<script src="./vue.js"></script>
<script>var app = new Vue({el: "#app", //代表vue实例作用范围data: {//用来vue实例绑定数据msg: "hello vue",isShow: true,},methods: {//用来给vue实例定义一些列的相关方法hideH2() {this.isShow = false;},showH2() {this.isShow = true;},showHideH2() {this.isShow = !this.isShow;},},});
</script>
v-bind
作用:用来绑定html标签中某个属性交给vue实例进行管理
好处:一旦属性交给vue实例进行管理之后,日后可以通过修改vue实例中绑定属性达到动态修改标签属性的效果
语法:对应标签上 v-bind:属性名
<!DOCTYPE html>
<html lang="en"><body><div id="app"><h1>{{msg}}</h1><imgv-bind:width="width"v-bind:height="height"v-bind:src="src"@mouseover="changATM"@mouseout="changeTwo"/><br /><button @click="changATM">修改为图1</button></div></body>
</html>
<!--引入vue.js核心文件-->
<script src="./vue.js"></script>
<script>var app = new Vue({el: "#app", //代表vue实例作用范围data: {//用来vue实例绑定数据msg: "hello vue",src: "../笔记/图片/1.png",width: 200,height: 200,},methods: {//用来给vue实例定义一些列的相关方法changATM() {this.src = "../笔记/图片/1.png";this.width = 150;},changeTwo() {this.src = "../笔记/图片/2.png";this.width = 200;},},});
</script>
简化写法
vue为了方便我们日后绑定标签的属性提供了对属性绑定的简化写法如 v-bind:属性名 简化之后 :属性名
<!DOCTYPE html>
<html lang="en"><head><style>.aa {width: 200px;height: 200px;border: 10px red solid;}.bb {width: 200px;height: 200px;border: 10px salmon dashed;}</style></head><body><div id="app"><h1>{{msg}}</h1><div v-bind:class="cls" @mouseover="cls='bb'" @mouseout="cls='aa'"></div><br /><div :class="cls" @mouseover="cls='bb'" @mouseout="cls='aa'"></div></div></body>
</html>
<!--引入vue.js核心文件-->
<script src="./vue.js"></script>
<script>var app = new Vue({el: "#app", //代表vue实例作用范围data: {//用来vue实例绑定数据msg: "hello vue",cls: "aa",},methods: {//用来给vue实例定义一些列的相关方法},});
</script>
v-for
作用:用来对对象进行遍历的(数组也是对象的一种)
<!DOCTYPE html>>
<body><div id="app"><h1>{{msg}}</h1><!--v-for指令:   作用: 用来在页面中实现vue中定义数据的遍历语法: 直接在对应标签上加入v-for指令a.遍历对象: v-for="value,key,index in data中变量名"b.遍历数组: v-for="item(普通类型元素),index in data中变量名"c.遍历数组对象:  v-for="item(对象),index in data中变量名"注意: 在使用v-for 建议尽可能在使用 v-for 时提供 key attribute  key属性唯一--><h3>遍历对象</h3><span v-for="value,key,index in user">   [{{index}} {{key}} {{value}}]  </span><h3>遍历数组</h3><ul><li v-for="item,index in schools">{{index+1}}--- {{item}}</li></ul><h4>遍历数组里面对象</h4><table border="1" width="100%"><tr><th>编号</th><th>姓名</th><th>年龄</th><th>工资</th><th>简介</th><th>操作</th></tr><tr v-for="user,index in users"  :key="user.id" ><td>{{user.id}}</td><td v-text="user.name"></td><td v-html="user.age"></td><td>{{user.salary}}</td><td>{{user.content}}</td><td><a href="">删除</a><a href="">修改</a></td></tr></table></div>
</body>
</html>
<!--引入vue.js核心文件-->
<script src="./vue.js"></script>
<script>var app = new Vue({el:"#app",//代表vue实例作用范围data:{    //用来vue实例绑定数据msg:"hello vue",user:{id:21,name:"xiaochen",age:23,salary:23000.23},//定义一个对象schools:["河南校区","北京校区","天津校区"],users:[{id:21,name:"xiaochen",age:23,salary:23000.23,content:"xiaochen是好人"},{id:22,name:"xiaoming",age:23,salary:23000.23,content:"xiaoming是一个好奥特曼"},{id:23,name:"xiaosan",age:23,salary:23000.23,content:"xiaosan是一个好姑娘"},]},methods: { //用来给vue实例定义一些列的相关方法}});
</script>
v-model 双向绑定
v-bind:绑定 作用: 用来将html标签的属性进行绑定,交给vue实例管理,单向的,只有修改vue种的数据,才能影响页面上的值,而修改页面上的值,无法影响vue中的值
v-model:模型 作用: 用来将html标签的value属性进行绑定,交给vue实例管理 主要用在表单元素上 最能体现双向绑定机制一个指令
语法:在表单元素标签上 直接加入 v-model="vue实例中一个变量"
双向绑定:表单中数据变化导致vue实例data数据变化 vue实例中data数据的变化导致表单中数据变化 称之为双向绑定
MVVM架构 双向绑定机制
Model:数据 Vue实例中绑定数据
VM:ViewModel 监听器
View:页面 页面展示的数据
<!DOCTYPE html>
<html lang="en"><body><div id="app"><h1>{{msg}}</h1><input type="text" v-model="msg" /></div></body>
</html>
<!--引入vue.js核心文件-->
<script src="./vue.js"></script>
<script>var app = new Vue({el: "#app", //代表vue实例作用范围data: {//用来vue实例绑定数据msg: "hello vue111",},methods: {//用来给vue实例定义一些列的相关方法},});
</script>
表单提交示例
输入框里面的值改变,vue里的值也会改变
<!DOCTYPE html>
<html lang="en"><body><div id="app"><form>用户名: <input type="text" v-model="user.username" /> <br />密码: <input type="text" v-model="user.password" /><br />邮箱: <input type="text" v-model="user.email" /><br />QQ: <input type="text" v-model="user.qq" /><br />验证码: <input type="text" v-model="user.code" /><br /><input type="button" @click="reg" value="注册" /></form></div></body>
</html>
<!--引入vue.js核心文件-->
<script src="./vue.js"></script>
<script>var app = new Vue({el: "#app", //代表vue实例作用范围data: {//用来vue实例绑定数据msg: "hello vue111",user: {},//虽然是空的,但是输入框填写的时候这里就会有值},methods: {//用来给vue实例定义一些列的相关方法reg() {//1.获取form数据console.log(this.user);//2.发送ajax请求},},});
</script>
购物车案例
<!DOCTYPE html>
<html lang="en">
<head><meta charset="UTF-8"><title>vue系列课程</title>
</head>
<body><div id="app"><h1>{{msg}}</h1>编号: <input type="text" v-model="item.id">名称: <input type="text" v-model="item.name">价格: <input type="text" v-model="item.price">数量: <input type="text" v-model="item.count"><button @click="addCart">添加到购物车</button><br><br><br>3 <br><table border="1"><tr><th>编号</th><th>名称</th><th>价格</th><th>购买数量</th><th>小计</th></tr><tr v-for="item,index in items" :key="item.id"><td>{{item.id}}</td><td>{{item.name}}</td><td>{{item.price}}</td><td><input type="button" value="+" @click="incrementCount(index)"> {{item.count}} <input type="button" @click="decrementCount(index)" value="-"></td><td>{{(item.count * item.price).toFixed(2)}}</td></tr></table><h3>总价格: {{ totalPrice() }} </h3></div>
</body>
</html>
<script src="js/vue.js"></script>
<script>var app = new Vue({el:"#app",data:{msg:"购物车案例",item:{},items:[{id:1,name:"iphone8",price:19.9,count:1},{id:2,name:"meta40 pro",price:15.0,count:1},]},methods:{incrementCount(idx){//增加数量//console.log(idx);//console.log(this.items[idx]);this.items[idx].count++;},decrementCount(idx){if(!(this.items[idx].count>1)){alert('购买商品不能少于1件!!!');return false;}this.items[idx].count--;},//减少数量totalPrice(){//计算总价格var totalPrice = 0;for (var i = 0; i < this.items.length; i++) {totalPrice += this.items[i].count * this.items[i].price;}return totalPrice.toFixed(2);},addCart(){//添加购物车方法console.log(this.item);if(!this.item.id){alert('请输入编号!');return false;}if(!this.item.name){alert('请输入名称!');return false;}if(!this.item.price){alert('请输入价格!');return false;}if(!this.item.count){alert('请输入数量!');return false;}if(!(this.item.count>0)){alert('请输入正确数量!');return false;}this.items.push(this.item);//放入数组}}})
</script>
computed 计算属性
computed是vue的计算属性,是根据依赖关系进行缓存的计算,只有在它的相关依赖发生改变时才会进行更新
<!DOCTYPE html>
<html lang="en"><body><div id="app"><div v-text="sum"></div><div>{{sum}}</div>输入什么值都加10:<input type="text" v-model="count" /></div></body><script src="./vue.js"></script><script>new Vue({el: "#app",data: {count: 10,},computed: {sum() {console.log("只打印一次");return parseInt(this.count) + 10;},},});</script>
</html>
事件修饰符
stop:用来阻止事件冒泡 用来阻止事件继续向外传递
prevent:用来阻止标签的默认行为
self:只监听自身标签触发的事件
once:该事件只触发一次
<!DOCTYPE html>
<html lang="en"><body><div id="app"><h1>{{msg}}</h1><h3>stop修饰符</h3><div style="width: 200px; height: 200px; background: red" @click="parent"><divstyle="width: 100px; height: 100px; background: aquamarine"@click.stop="child"><divstyle="width: 50px; height: 50px; background: royalblue"@click="child1"></div></div></div><h3>prevent修饰符</h3><a href="http://www.baidu.com" @click.prevent="testa">点我</a><a href="javascript:;" @click.prevent="testa">点我</a><h3>self修饰符(事件修饰符可以连用)</h3><divstyle="width: 300px; height: 300px; background: green"@click.self="parent1"><!-- 影响不到上面,上面的parent1依旧是只监听自己的事件 --><divstyle="width: 200px; height: 200px; background: red"@click.self="parent"><divstyle="width: 100px; height: 100px; background: aquamarine"@click.self.stop="child"><divstyle="width: 50px; height: 50px; background: royalblue"@click="child1"></div></div></div></div><h3>once修饰符</h3><button @click.once="test">点我我是按钮,我的单击支触发一次</button></div></body>
</html>
<script src="./vue.js"></script>
<script>var app = new Vue({el: "#app",data: {msg: "事件修饰符",},methods: {parent1() {console.log("parent1");},parent() {console.log("parent");},child() {console.log("child");},child1() {console.log("child1");},testa() {console.log("testa");},test() {console.log("test");},},computed: {}, //用来在vue实例中定义一些列计算属性    {{属性名}}});
</script>
按键修饰符
事件修饰符:用来对事件一些列描述修饰
按键修饰符:用来对键盘按键事件进行修饰 修饰符,keyup keydown …
.enter:对键盘回车键修饰
.tab:对键盘切换tab按键修饰
.delete:(捕获“删除”和“退格”键)
.esc:对键盘esc按键修饰
.space:对键盘的空格按键修饰
.up:对 上
.down:下
.left:左
.right:右
<!DOCTYPE html>
<html lang="en"><body><div id="app"><h1>{{msg}}</h1><inputtype="text"v-model="name"@keyup.enter.tab.delete.esc.space.up.down.left.right="keyup"/><!-- 按下enter会触发test事件 --><input type="text" @keyup.enter="test" /></div></body>
</html>
<script src="./vue.js"></script>
<script>var app = new Vue({el: "#app",data: {msg: "按键修饰符",name: "",},methods: {keyup() {console.log(this.name);},test() {console.log("test");},},});
</script>
axios
Axios是一个异步请求技术,核心作用就是用来在页面中发送异步请求,并获取对应数据在页面中渲染
<!DOCTYPE html>
<html lang="en"><body><div id="app"><h1>Axios的基本使用</h1></div></body>
</html>
<script src="js/axios.min.js"></script>
<script>//发送axios的get方式请求axios.get("http://localhost:8081/demo?id=21&name=xiaochen").then(function (res) {console.log(res);console.log(res.data);}).catch(function (err) {alert("进入catch");console.log(err);});//发送一个post方式请求axios.post("http://localhost:8081/test", { id: 21, name: "xiaochen" }).then(function (res) {console.log(res);console.log(res.data); //响应结果}).catch(function (err) {console.log(err);});//发送put方式请求axios.put("http://localhost:8081/test1", { id: 22, name: "小三" }).then(function (res) {console.log(res);console.log(res.data); //响应结果}).catch(function (err) {console.log(err);});//创建axios的配置对象var instance = axios.create({baseURL: "http://localhost:8081/",timeout: 5000,});//请求拦截器instance.interceptors.request.use(function (config) {if (config.url.indexOf("?") == -1) {config.url += "?token=1234";} else {config.url += "&token=1234";}return config;});//响应拦截器instance.interceptors.response.use(function (response) {if (response.status == 500) {alert("服务器出现错误!");}return response;});//发送get方式请求instance.get("/demo?id=11&name=xiaochen").then(function (res) {console.log(res.data);});instance.post("http://localhost:8081/test", { id: 21, name: "xiaochen" }).then(function (res) {console.log(res.data);});
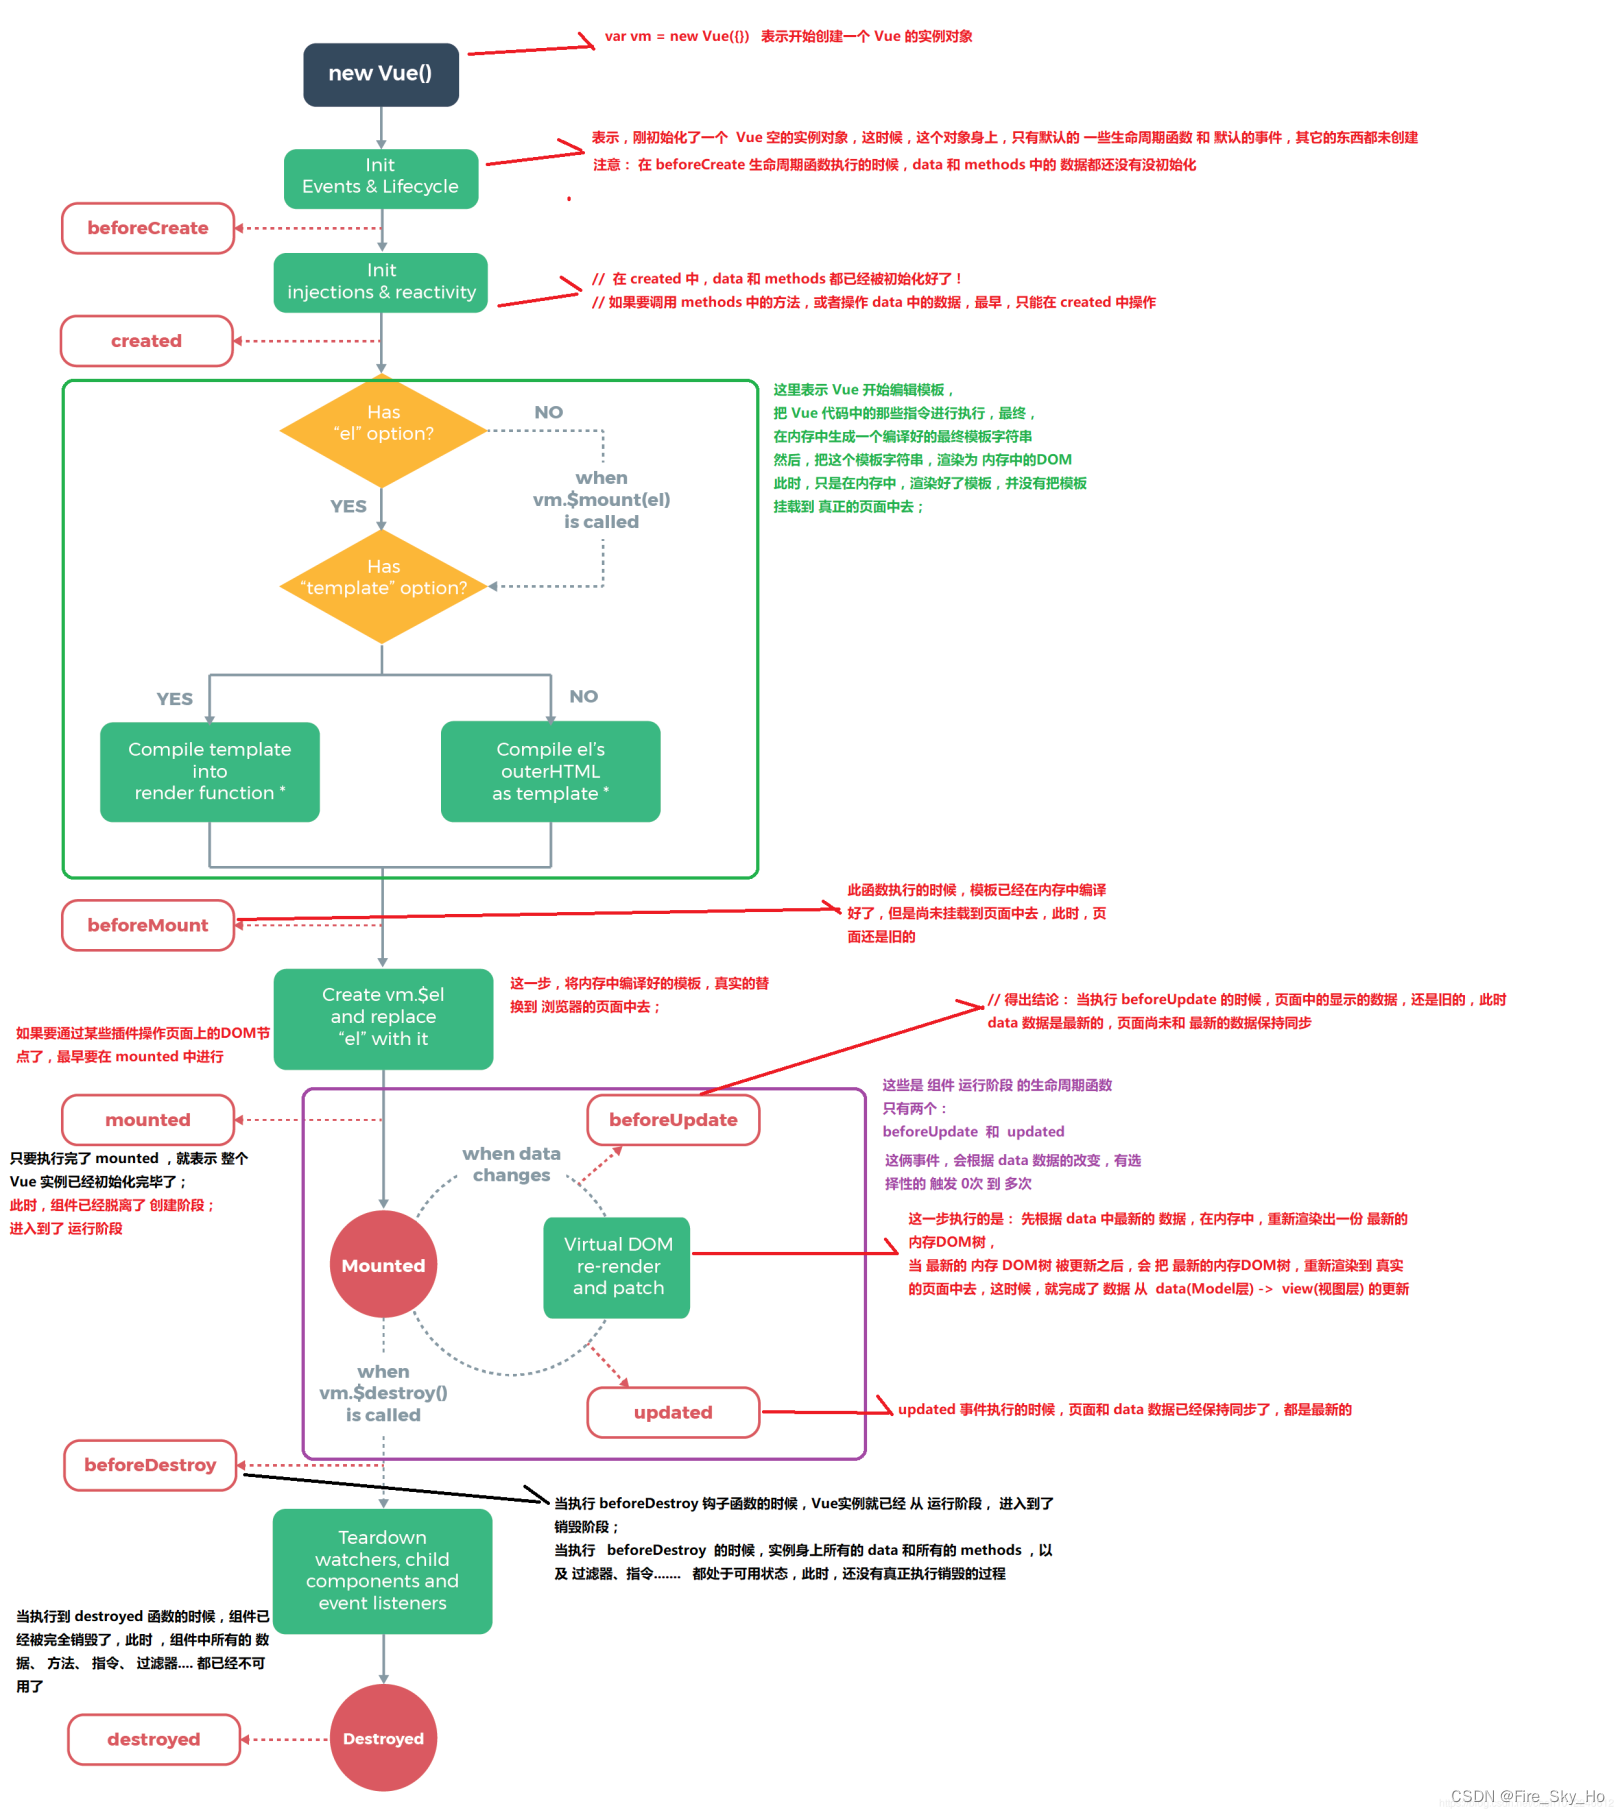
</script>vue 生命周期
<!DOCTYPE html>
<html lang="en"><body><div id="app"><h1 id="h1">{{msg}}</h1><input type="text" v-model="msg" /><table>数据 v-for</table></div></body>
</html>
<script src="js/vue.js"></script>
<script>//在vue实例生命周期过程中官方提供一系列声明周期函数 钩子:  这些生命周期函数最大特点伴随着vue实例过程自动触发的//vue 实例生命周期阶段:  1.初始化阶段   2.运行阶段   3.销毁阶段var app = new Vue({el: "#app",data: {msg: "vue生命周期",users: [],},methods: {},computed: {},//初始化阶段beforeCreate() {//第一个生命周期函数  这个函数执行时 仅仅完成自身内部事件和生命周期函数注入console.log("beforeCreate:", this.msg);},created() {//第二个生命周期函数      这个函数执行时 完成自身内部事件和生命周期函数注入 包括自定义data methods computed等属性注入和校验工作console.log("created:", this.msg);//var _this = this;//axios.get().then(function(response){_this.users = response.data})},beforeMount() {//第三个生命周期函数  这个函数执行时 el执行html还是一个原始模板 并没有完成数据渲染工作console.log("beforeMount:", document.getElementById("h1").innerText);},mounted() {//第四个生命周期函数   这个函数执行时 vue已经完成template和el执行html渲染工作console.log("beforeMount:", document.getElementById("h1").innerText);},//运行阶段beforeUpdate() {//运行阶段第一个函数  这个函数执行时  data数据发生变化,此时页面数据还是原始数据console.log("beforeUpdate data:", this.msg);console.log("beforeUpdate view:",document.getElementById("h1").innerText);},updated() {//运行阶段第二个函数  这个函数执行时  data数据页面数据保持一致console.log("updated data:", this.msg);console.log("updated view:", document.getElementById("h1").innerText);},//销毁阶段beforeDestroy() {//销毁时第一个函数 这个函数执行时 vue实例刚刚开始销毁,控制台输入app.$destroy(),即刻触发console.log("beforeDestroy:", "开始销毁");},destroyed() {console.log("destroyed:", "全部销毁");},});
</script>
组件
组件作用
用来减少Vue实例对象中代码量,日后在使用Vue开发过程中,可以根据 不同业务功能将页面中划分不同的多个组件,然后由多个组件去完成整个页面的布局,便于日后使用Vue进行开发时页面管理,方便开发人员维护。
全局组件注册
说明:全局组件注册给Vue实例,日后可以在任意Vue实例的范围内使用该组件
<!DOCTYPE html>
<html lang="en"><body><div id="app"><!--登录--><login-name></login-name><!--注册--><register></register><!--用户添加--><add></add></div></body>
</html>
<script src="js/axios.min.js"></script>
<script src="js/vue.js"></script>
<script>//1.定义一个全局组件 参数1:组件名称  参数2: 组件的配置对象Vue.component("loginName", {template: `<div><h2>用户登录</h2> <form action=""></form></div>`, //用来书写该组件的html代码});Vue.component("register", {template: `<div><h2>用户注册</h2>  <form action=""></form></div>`,});const app = new Vue({el: "#app"});
</script>
注意
- 1.Vue.component用来开发全局组件 参数1: 组件的名称 参数2: 组件配置{} template:''用来书写组件的html代码 template中必须有且只有一个root元素
- 2.使用时需要在Vue的作用范围内根据组件名使用全局组件
- 3.如果在注册组件过程中使用 驼峰命名组件的方式 在使用组件时 必须将驼峰的所有单词小写加入-线进行使用
局部组件注册
通过将组件注册给对应Vue实例中一个components属性来完成组件注册,这种方式不会对Vue实例造成累加
//局部组件登录模板声明
let login ={   //具体局部组件名称template:'<div><h2>用户登录</h2></div>'
};
const app = new Vue({el: "#app",data: {},methods: {},components:{  //用来注册局部组件login:login  //注册局部组件}
});//局部组件使用 在Vue实例范围内
<login></login>
组件中定义组件数据data、methods、computed、components
<!DOCTYPE html>
<html lang="en"><body><div id="app"><h1>{{msg}}</h1><!--使用组件: 直接通过组件名--><login></login><register></register></div></body>
</html>
<script src="js/axios.min.js"></script>
<script src="js/vue.js"></script>
<script>Vue.component("register", {template: `<div><h3>我是注册</h3><span>{{msg}}</span></div>`,data() {return {msg: "我是注册全局组件中数据",};},});//登录组件配置对象const login = {template: `<div id="aa"><h2>用户登录</h2><h2>{{counter}}---{{msg}}---{{counterSqrt}}---{{counterSqrt}}----{{counterSqrt}}</h2><button @click="test(10)">点我counter++</button><aa></aa><register></register></div>`, //用来书写组件html代码data() {//用来给当前组件定义属于组件自己数据  组件中定义数据  data必须是一个函数return {counter: 1,msg: "我是组件msg",};},methods: {//用来给组件自己定义一些列方法test(count) {this.counter += count;},},computed: {//用来给组件自己定义一些列计算方法counterSqrt() {return this.counter * this.counter;},},//初始化阶段beforeCreate() {console.log("beforeCreate:", this.msg);},created() {console.log("created:", this.msg);},beforeMount() {//此时组件中template还是模板还没有渲染console.log(this);//console.log("beforeMount:",this.$el.innerHTML);},mounted() {// 此时组件中页面的数据已经和data中数据一致console.log("mounted:", document.getElementById("aa").innerHTML);},//运行阶段beforeUpdate() {// 此时data中数据变化了  页面数据还是原始数据console.log("beforeUpdate:", this.counter);console.log("beforeUpdate:", document.getElementById("aa").innerHTML);},updated() {//此时data 页面数据一致console.log("updated:", this.counter);console.log("updated:", document.getElementById("aa").innerHTML);},//销毁阶段beforeDestroy() {},destroyed() {},components: {aa: {//定义组件template: "<div><span>我是aa子组件</span></div>",},},};const app = new Vue({el: "#app",data: {msg: "Vue的组件中定义组件 Data  methods Computed等",},methods: {},computed: {},components: {//用来定义局部组件login,},});
</script>
通过-Prop-向子组件传递数据
通过在组件上声明静态数据传递给组件内部
<!DOCTYPE html>
<html lang="en"><body><div id="app"><login title="我是父组件传递过来的数据" count="123"></login></div></body>
</html>
<script src="js/vue.js"></script>
<script>//定义组件对象const login = {template: `<div><h3>父组件传递过来的:{{title}}</br>父组件传递的数据赋值给子组件属性:{{loginTitle}}</br>父组件传递过来的:{{count}}</br></h3></div>`,data() {return {//title:"我是子组件内部标题"loginTitle: this.title,};},props: ["title", "count"], //用来接收父组件给当前组件传递数据  注意:props机制接收数据就相当于自己组件data中声明一个这样数据};const app = new Vue({el: "#app",data: {msg: "组件之间数据传递",},components: {//注册局部组件login, //注册局部组件login},});
</script>
通过在组件上声明动态数据传递给组件内部
<!DOCTYPE html>
<html lang="en"><body><div id="app"><!-- 动态改变传到子组件的值,但是loginTitle不会动态改变 --><input type="text" v-model="title" /><!-- 绑定父组件传过来的title,key,value都是props里的属性 --><login :title="title"></login></div></body>
</html>
<script src="js/vue.js"></script>
<script>//定义组件对象const login = {template: `<div><h3>父组件传递过来的:{{title}}</br>父组件传递的数据赋值给子组件属性:{{loginTitle}}</br></h3></div>`,data() {return {loginTitle: this.title,};},props: ["title"], //用来接收父组件给当前组件传递数据  注意:props机制接收数据就相当于自己组件data中声明一个这样数据};const app = new Vue({el: "#app",data: {msg: "组件之间数据传递",title: "我是父组件的title属性值",},components: {//注册局部组件login, //注册局部组件login},});
</script>
单向数据流
-
所有的 prop 都使得其父子 prop 之间形成了一个单向下行绑定:父级 prop 的更新会向下流动到子组件中,但是反过来则不行。这样会防止从子组件意外变更父级组件的状态,从而导致你的应用的数据流向难以理解。
-
额外的,每次父级组件发生变更时,子组件中所有的 prop 都将会刷新为最新的值。这意味着你不应该在一个子组件内部改变 prop。如果你这样做了,Vue 会在浏览器的控制台中发出警告。
-
注意在 JavaScript 中对象和数组是通过引用传入的,所以对于一个数组或对象类型的 prop 来说,在子组件中改变变更这个对象或数组本身将会影响到父组件的状态。
向子组件传递事件
<!DOCTYPE html>
<html lang="en"><body><!-- 2.传递事件:直接在对应组件标签上定义传递事件即可,@子组件接收的事件名="父组件中要传递的事件",不要使用驼峰命名事件名--><div id="app"><demo @method-key="methodParent"></demo></div><!-- 点击按钮后,控制台打印我是子组件方法methodChild我是父组件方法methodParent--></body>
</html>
<script src="js/vue.js"></script>
<script>const demo = {template: `<div><span>我是子组件</span></br><button @click="methodChild">触发父组件的methodParent方法</button></div>`,methods: {methodChild() {console.log("我是子组件方法methodChild");//3.调用用父组件中methodParent事件,传参是子组件接收的事件名this.$emit("method-key");},},};new Vue({el: "#app",methods: {//1.定义父组件方法methodParent() {console.log("我是父组件方法methodParent");},},components: {demo,},});
</script>
子组件通过事件传参给父组件
<!DOCTYPE html>
<html lang="en"><body><!-- 2.传递事件:直接在对应组件标签上定义传递事件即可,@子组件接收的事件名="父组件中要传递的事件",不要使用驼峰命名事件名--><div id="app"><div v-text="parentMsg"></div><demo @method-key="methodParent"></demo></div><!-- 点击按钮后,控制台打印我是子组件方法methodChild我是父组件方法methodParent接着parentMsg内容变成现在变成子组件属性--></body>
</html>
<script src="js/vue.js"></script>
<script>const demo = {template: `<div></br><button @click="methodChild">触发父组件的methodParent方法</button></div>`,methods: {methodChild() {console.log("我是子组件方法methodChild");//3.调用用父组件中methodParent事件,传参是子组件接收的事件名this.$emit("method-key", "现在变成子组件属性");},},};new Vue({el: "#app",data: {parentMsg: "现在是父组件属性",},methods: {//1.定义父组件方法methodParent(childMsg) {console.log("我是父组件方法methodParent");this.parentMsg = childMsg;},},components: {demo,},});
</script>
插槽solt
插槽(slot)是 vue 为组件的封装者提供的能力。允许开发者在封装组件时,把不确定的、希望由用户指定的部分定义为插槽。)
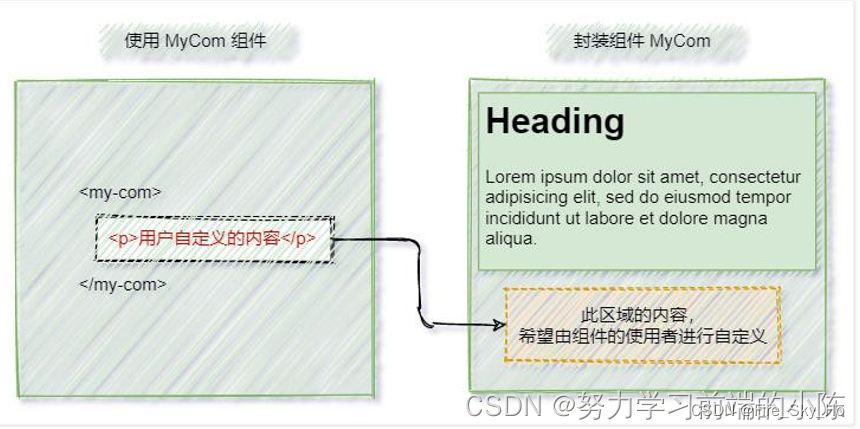
可以把插槽认为是组件封装期间,为用户预留的内容的占位符。
<!DOCTYPE html>
<html lang="en"><body><div id="app"><h1>父组件count:{{count}}</h1></br></br></br><login></login><login><span slot="aa">替换到插槽aa的内容</span></login></br></br></br><login><span slot="bb">替换到插槽bb的内容</span></login></br></br></br><login><button slot="aa" @click="incrmentCount()">替换到插槽aa的按钮和事件,点我父组件count+1,</button></login></div>
</body></html>
<script src="js/vue.js"></script>
<script>const login = {template: `<div><slot name="aa"><span>默认插槽值</span></slot><h3>用户登录</h3><slot name="bb"></slot></div>`,};const app = new Vue({el: "#app",data: {count: 0,},methods: {incrmentCount() {this.count++;},},components: {//注册局部组件login,},});
</script>
路由
理解: 一个路由(route)就是一组映射关系(key-value),多个路由需要路由器(router)进行管理
前端路由:key是路径,value是组件
作用:设定访问路径,并将路径和组件映射起来(就是用于局部刷新页面,不需要请求服务器来切换页面)
工作过程:当浏览器的路径改变时,对应的组件就会显示。
<!DOCTYPE html>
<html lang="en"><body><div id="app"><a href="#/login">用户登录</a><a href="#/reg">用户注册</a><!--3.显示路由组件标签--><router-view></router-view></div></body>
</html>
<script src="js/vue.js"></script>
<script src="js/vue-router.js"></script>
<script>//登录组件const login = {template: `<div><h3>用户登录</h3></div>`,};//注册组件const reg = {template: `<div><h3>用户注册</h3></div>`,};//404组件const notFound = {template: `<div><h3>404 Not Found!,当前页面走丢了!!!!</h3></div>`,};//1.创建路由规则对象const router = new VueRouter({routes: [//2.配置路由规则  //redirect: 路由重定向{ path: "/", redirect: "/login" },{ path: "/login", component: login },{ path: "/reg", component: reg },{ path: "*", component: notFound }, //这个路由必须要放在路由规则最后后面],});const app = new Vue({el: "#app",methods: {},router, //注册路由});
</script>
router-link
<router-link> 组件支持用户在具有路由功能的应用中 (点击) 导航。 通过 to 属性指定目标地址,默认渲染成带有正确链接的 <a> 标签,可以通过配置 tag 属性生成别的标签.。
好处:就是可以自动给路由路径加入#不需要手动加入
属性
to
表示目标路由的链接。当被点击后,内部会立刻把 to 的值传到 router.push(),所以这个值可以是一个字符串或者是描述目标位置的对象。
除了使用 创建 a 标签来定义导航链接,我们还可以借助 router 的实例方法,通过编写代码来实现。 router.push(location, onComplete?, onAbort?)
注意:在 Vue 实例内部,你可以通过 $router 访问路由实例。因此你可以调用 this.$router.push。
想要导航到不同的 URL,则使用 router.push 方法。这个方法会向 history 栈添加一个新的记录,所以,当用户点击浏览器后退按钮时,则回到之前的 URL。
当你点击 <router-link> 时,这个方法会在内部调用,所以说,点击 <router-link :to="..."> 等同于调用 router.push(...)。
| 声明式 | 编程式 |
|---|---|
<router-link :to="..."> |
router.push(...) |
该方法的参数可以是一个字符串路径,或者一个描述地址的对象。例如:
// 字符串
router.push('home')// 对象
router.push({ path: 'home' })// 命名的路由
router.push({ name: 'user', params: { userId: '123' }})// 带查询参数,变成 /register?plan=private
router.push({ path: 'register', query: { plan: 'private' }})
https://segmentfault.com/q/1010000021157248/a-1020000021159208
to=‘这里不管写什么都是字符串’;
:to=‘这里写的内容是会运行逻辑’,比如:
:to=‘home’;//传了变量home进去;home在data中定义的;
:to=’ “home” ‘;//传了个字符串进去;
:to=’{path:“home”}';//传了个对象进去;你不理解主要是路由的跳转支持好几种方式:
:to=‘home’;相当于调用router.push({path:‘home’});//简写而已
:to=‘{path:“home”}’;//这么写是应为push支持的参数多一些:router.push({path:‘home’,name:‘’,param:‘’,query:‘’});
<!-- 字符串 -->
<router-link to="home">Home</router-link>
<!-- 渲染结果 -->
<a href="home">Home</a>
<!DOCTYPE html>
<html lang="en"><body><div id="app"><h1>{{msg}}</h1><div>< a href="#/login" >方式<!--路径切换路由: 根据请求路径切换显示不同组件--><!--切换路由链接--><div><a href="#/login">点击跳转login组件-展示用户登录</a><a href="#/register">点击跳转register组件-展示用户注册</a></div></div><br /><div>< router-link to="/login" >方式<!--切换路由标签 router-link 标签必须加入 to属性 to="路由路径" --><div><router-link to="/login">点击跳转login组件-展示用户登录</router-link><router-link to="/register">点击跳转register组件-展示用户注册</router-link></div></div><br /><div>< router-link :to="{path:'/login'}" >方式<div><!--切换路由标签--><router-link :to="{path:'/login'}">点击跳转login组件-展示用户登录</router-link><router-link :to="{path:'/register'}">点击跳转register组件-展示用户注册</router-link></div></div><br /><div>< router-link :to="{name:'Login'}" >方式<div><!--名称切换路由: 根据路由对象名称切换路由显示不同组件 根据路由名称切换路由只能使用router-link 推荐使用命名路由--><router-link :to="{name:'Login'}">点击跳转login组件-展示用户登录</router-link><router-link :to="{name:'Register'}">点击跳转register组件-展示用户注册</router-link></div></div><br /><div>展示路由组件</div><!--展示路由组件标签--><router-view /></div></body>
</html>
<script src="js/vue.js"></script>
<script src="js/vue-router.js"></script>
<script>//loginconst login = {template: `<div><h4>用户登录</h4></div>`,};//registerconst register = {template: `<div><h4>用户注册</h4></div>`,};//1.创建路由规则对象const router = new VueRouter({routes: [//name:这个属性代表路由对象名称 用来给路由对象一个唯一名称标识{ path: "/login", component: login, name: "Login" },{ path: "/register", component: register, name: "Register" },],});const app = new Vue({el: "#app",data: {msg: "vue router 基本使用之使用router-link切换路由",},router, //注册路由对象});
</script>
路径上没有login,就不会展示任何组件

此时点击注册链接,访问了注册路径,就展示了用户注册组件
动态路由切换
当点击按钮访问完后台,等访问完毕,在切换到不同组件,这时候就需要动态切换组件
<!DOCTYPE html>
<html lang="en"><body><div id="app"><h1>{{msg}}</h1><!--切换路由: 1.通过标签直接切换   2.在js代码中切换--><router-link :to="{name:'Login'}">用户登录</router-link><router-link :to="{name:'Register'}">用户注册</router-link><!--2.在js代码中切换路由--><button @click="login">用户登录</button><button @click="register">用户注册</button><!--展示路由组件标签--><router-view /></div></body>
</html>
<script src="js/vue.js"></script>
<script src="js/vue-router.js"></script>
<script>//loginconst login = {template: `<div><h4>用户登录</h4></div>`,};//registerconst register = {template: `<div><h4>用户注册</h4></div>`,};//1.创建路由规则对象const router = new VueRouter({routes: [//name:这个属性代表路由对象名称  用来给路由对象一个唯一名称标识{ path: "/login", component: login, name: "Login" },{ path: "/register", component: register, name: "Register" },],});//解决同一个路由多次切换报错的问题const originalPush = VueRouter.prototype.push;VueRouter.prototype.push = function push(location) {return originalPush.call(this, location).catch((err) => err);};const app = new Vue({el: "#app",data: {msg: "vue router 基本使用之在js代码中切换路由",},methods: {login() {//发送axios请求完成登录 响应回来之后切换路由到主页//this.$route object 当前路由对象//this.$router vueRouter  代表路由管理器对象//在vuerouter 中多次切换相同路由出现错误//1.每次切换之前手动判断// if(this.$route.name!='Login'){//     this.$router.push({name:'Login'});//使用名称切换// }//2.加入官方一段配置解决错误问题//代码在上面this.$router.push({ name: "Login" }); //使用名称切换},register() {this.$router.push({ name: "Register" }); //使用名称切换},},router, //注册路由对象});
</script>
路由传参
<!DOCTYPE html>
<html lang="en"><body><div id="app"><h1>{{msg}}</h1><!--标签形式切换路由地址栏传递参数分为两种方式:1.queryString ?              this.$route.query.key2.restful  路径传递参数 /xx/21 this.$route.params.key--><a href="#/login?name=xiaochen&password=123">用户登录</a><a href="#/register/21/xiaochen">用户注册</a><!--query--><router-link to="/login?name=xiaohei&password=123456">用户登录</router-link><router-link :to="{path:'/login',query:{name:'xiaohong',password:123456}}">用户登录</router-link><router-link :to="{name:'Login',query:{name:'xiaohei',password:123456}}">用户登录</router-link><!--restful--><!-- 传给router的{ path: "/register/:id/:name", component: register, name: "Register" },login组件收到,在生命周期created时,获取到传过来的参数 --><router-link :to="{path:'/register/22/xiaojindou'}">用户注册</router-link><router-link :to="{name:'Register',params:{id:233,name:'xiaojinniu'}}">用户注册</router-link><!--展示路由组件标签--><router-view /></div>
</body></html>
<script src="js/vue.js"></script>
<script src="js/vue-router.js"></script>
<script>//loginconst login = {template: `<div><h4>用户登录</h4></div>`,created() {//声明周期 在执行已经组件内部事件 和 声明周期函数注册 自身 data methods computed属性注入和校验console.log("created");console.log(this.$route); //获取当前路由对象console.log(this.$route.query.name); //获取当前路由对象console.log(this.$route.query.password); //获取当前路由对象},};//registerconst register = {template: `<div><h4>用户注册</h4></div>`,created() {console.log(this.$route);console.log(this.$route.params.id);console.log(this.$route.params.name);},};//1.创建路由规则对象const router = new VueRouter({routes: [//name:这个属性代表路由对象名称  用来给路由对象一个唯一名称标识{ path: "/login", component: login, name: "Login" },{ path: "/register/:id/:name", component: register, name: "Register" },],});const app = new Vue({el: "#app",data: {msg: "vue router 基本使用之参数传递",},methods: {},router, //注册路由对象});
</script>
嵌套路由(子路由)
在应用界面开发中通常由多层嵌套的组件组合而成。但随着页面的增多,如果把所有的页面都塞到一个 routes 数组里面会显得很乱,你无法确定哪些页面存在关系。借助 vue-router 提供了嵌套路由的功能,让我们能把相关联的页面组织在一起。
<!doctype html>
<html lang="en"><body><div id="app"><h1>{{msg}}</h1><!-- 就算点击了删除,但是再点这个链接,就会重新渲染users组件,数据就会恢复created里的数据 --><router-link :to="{name:'users'}">用户列表</router-link><!--展示路由组件--><router-view></router-view></div>
</body></html>
<template id="users"><div><h3>用户列表</h3><!-- 3.访问子路由,让添加组件展示到表格下面 --><a href="#/users/useradd">添加用户信息</a><table border="1"><tr><th>id</th><th>name</th><th>age</th><th>salary</th><th>操作</th></tr><tr v-for="user,index in users"><td>{{user.id}}</td><td>{{user.name}}</td><td>{{user.age}}</td><td>{{user.salary}}</td><td><a href="">删除</a><router-link :to="{name:'useredit',query:{id:user.id}}">修改</router-link></td></tr></table><!-- 2.在父组件里添加 路由组件标签,让父路由找到--><router-view></router-view></div>
</template>
<script src="js/vue.js"></script>
<script src="js/vue-router.js"></script>
<script>//定义用户列表const users = {template: '#users',data() {return {users: []}},created() {//发送axios请求查询所有this.users = [{ id: 1, name: 'xiaochen', age: 23, salary: 2300 }]}};//定义用户添加组件const useradd = {template: `<div><form action="">姓名: <input type="text"> <br> 年龄: <input type="text"> <br>  工资: <input type="text"> <br> <input type="submit" value="提交"></form></div>`};const useredit = {template: `<div><form action="">id: <input type="text" v-model="user.id"> <br> 姓名: <input type="text" v-model="user.name"> <br> 年龄: <input type="text" v-model="user.age"> <br>  工资: <input type="text" v-model="user.salary"> <br> <input type="button" @click="editUser" value="提交"></form></div>`,data() {return {user: {}}},methods: {editUser() {//发送axios请求更新用户// axios.post("url",this.user).then(res=>{//     this.user = {};//清空数据//     this.$router.push({name:'users'})//切换路由// });this.$router.push({ name: 'users' })//切换路由}},created() {let id = this.$route.query.id;console.log("updated: ", id);//发送axios请求//axios.get("url?id="+id).then(res=>this.user = res.data);this.user = { id: id, name: 'xiaochen', age: 23, salary: 2300 };}};//定义路由规则对象const router = new VueRouter({routes: [{path: '/users', name: 'users', component: users,//1.定义子路由children: [ //嵌套子组件路由 注意:嵌套路由中子路由不能使用/开头   访问子路由 /users/useradd{ path: 'useradd', name: 'useradd', component: useradd },{ path: 'useredit', name: 'useredit', component: useredit },]},]});const app = new Vue({el: "#app",data: {msg: "vue router 基本使用之嵌套路由"},router,//注册路由});
</script>
让添加和修改内容,展示在同一页面,如果不使用多个 ,会直接替换掉,表格内容
plate: <div><form action="">姓名: <input type="text"> <br> 年龄: <input type="text"> <br> 工资: <input type="text"> <br> <input type="submit" value="提交"></form></div>
};
const useredit = {template: `<div><form action="">id: <input type="text" v-model="user.id"> <br> 姓名: <input type="text" v-model="user.name"> <br> 年龄: <input type="text" v-model="user.age"> <br>  工资: <input type="text" v-model="user.salary"> <br> <input type="button" @click="editUser" value="提交"></form></div>`,data() {return {user: {}}},methods: {editUser() {//发送axios请求更新用户// axios.post("url",this.user).then(res=>{//     this.user = {};//清空数据//     this.$router.push({name:'users'})//切换路由// });this.$router.push({ name: 'users' })//切换路由}},created() {let id = this.$route.query.id;console.log("updated: ", id);//发送axios请求//axios.get("url?id="+id).then(res=>this.user = res.data);this.user = { id: id, name: 'xiaochen', age: 23, salary: 2300 };}
};//定义路由规则对象
const router = new VueRouter({routes: [{path: '/users', name: 'users', component: users,//1.定义子路由children: [ //嵌套子组件路由 注意:嵌套路由中子路由不能使用/开头   访问子路由 /users/useradd{ path: 'useradd', name: 'useradd', component: useradd },msg: ](https://img-blog.csdnimg.cn/cb4ed29872bd43f4ab518b9aaaf3c762.png#pic_center)
让添加和修改内容,展示在同一页面,如果不使用多个 ,会直接替换掉,表格内容