C语言实现链表--数据结构


- 魔王的介绍:😶🌫️一名双非本科大一小白。
- 魔王的目标:🤯努力赶上周围卷王的脚步。
- 魔王的主页:🔥🔥🔥大魔王.🔥🔥🔥
❤️🔥大魔王与你分享:很喜欢宫崎骏说的一句话:“不要轻易去依赖一个人,它会成为你的习惯当分别来临,你失去的不是某个人而是你精神的支柱,无论何时何地,都要学会独立行走,它会让你走得更坦然些。”

文章目录
一、前言
本篇讲述的是八种链表中面试和刷题中最容易出现的链表–无头单向不循环链表,过几天也会出一个性能最好的链表–有头双向循环链表,希望能够帮助你。
下面的链表都是针对无头单向不循环这钟来说的。
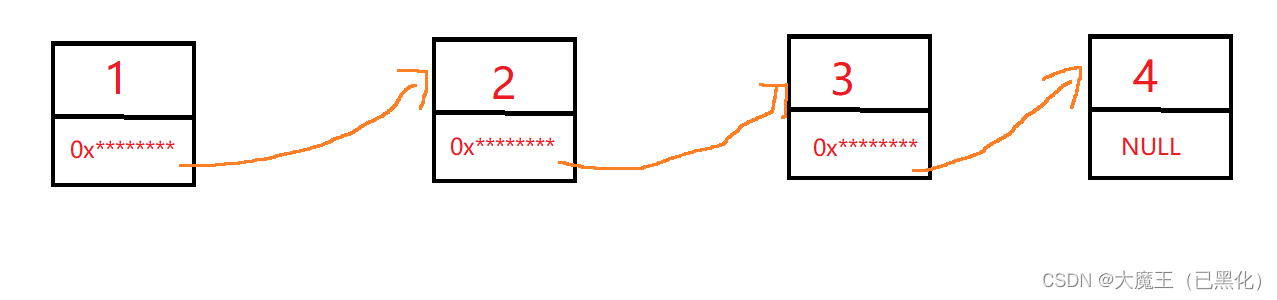
链表是线性表的一种,它与顺序表不同的是它在内存中并不是连续存储,而是一个节点对应一个位置,前一个结点存着下一个结点的地址,从而产生了联系。如图:
二、链表实现
1、创建结构体类型
如图所示,链表和顺序表的不同之处:链表每个元素都是一个结点,是一个整体,既包含该位置的数值,又包含下一个位置的地址,但它不用像顺序表一样去记住有几个元素,因为它不是连续存放的,所以这样做根本没有任何意义。因此虽然顺序表和链表都用到了结构体,但他们是完全不同的意思。
代码:
typedef int SListDateType;typedef struct SeqListNode
{SListDateType date;struct SeqListNode* next;
}SListNode;
2、创建结点
每次增加数据,我们都需要调用创建新结点这个函数,它的目的是在堆区开辟一个结点的内存空间,然后把我们新建数据的值赋上去,至于地址,我们在创建时并不知道赋什么,所以先置空,最后返回新建的结构体指针。
代码:
//创建新结点。
SListNode* BuyNewnode(SListDateType x)
{SListNode* newnode = malloc(sizeof(SListNode));assert(newnode);newnode->date = x;newnode->next = NULL;return newnode;
}
3、打印单链表
单链表的打印就是从第一个打印,直到最后一个,怎么判断是否结束,那就是最后一个结点指向的是NULL。
代码:
//打印单链表。
void SListPrint(SListNode* phead)
{SListNode* cur = phead;while (cur){printf("%d->",cur->date);cur = cur->next;}printf("NULL\\n");
}
4、单链表尾插
单链表尾插挺简单的,就是先创建出来这个新节点,然后让原链表最后结点指向新节点就ok了。
//单链表尾插。
void SListPushBack(SListNode** pphead,SListDateType x)
{assert(pphead);SListNode* newnode = BuyNewnode(x);if (*pphead == NULL){*pphead = newnode;}else{SListNode* cur = *pphead;while (cur->next){cur = cur->next;}cur->next = newnode;}
}
5、单链表头插
单链表头插,意味着要改变传过来的结构体指针(头指针),我们知道,形参只是实参的临时拷贝,那么如何实现改变实参呢?那就需要指针,但是实参本来就是一级指针,所以我们需要传二级指针,也就是实参(一级指针)的地址,这样才能实现修改。
知道了上面这些,那么剩下的就是让新节点地址赋给实参,然后让新结点指向原来的头结点就好。
代码:
//单链表头插。
void SListPushFront(SListNode** pphead, SListDateType x)
{assert(pphead);SListNode* newnode=BuyNewnode(x);newnode->next = *pphead;//先指向这个,如果先弄下面一步,就找不到原头节点的位置了。*pphead = newnode;//pphead是二级指针,解引用后就是一级指针,newnode也是一级指针,然后让newnode赋给pphead,这样就改变了实参。
}
6、单链表尾删
单链表尾删很简单,就是把最后的结点释放,倒数第二个结点便成了尾结点,此时它指向的是已经释放的结点,是野指针,我们要让它置空,他也应该置空,因为尾结点要指向空,不然之后用的时候程序不知道什么时候结束。
我们需要首先判断是否只有一个,因为只有一个的话,那就要改变实参了,释放这仅有的结点,让实参的值置空。
代码:
//单链表尾删。
void SListPopBack(SListNode** pphead)
{assert(pphead);assert(*pphead);//指针指向的内容不能是空的SListNode* cur = *pphead;SListNode* cur_ = NULL;//存倒数第二个结点的位置if (cur->next == NULL){free(cur);*pphead = NULL;return;}while (cur->next){cur_ = cur;//保留要释放结点的前一个位置,然后当下面用完cur(释放)后,让cur_(释放后的最后结点位置指向空)cur = cur->next;}free(cur);cur_->next = NULL;
}
7、单链表头删
单链表头删要让实参变为第二个结点的地址,也就是说要改变实参,所以还是要用二级指针。
代码:
//单链表头删。
void SListPopFront(SListNode** pphead)
{assert(pphead);assert(*pphead);SListNode* first = *pphead;*pphead = (*pphead)->next;free(first);
}
8、单链表查找
当我们想在某个值后面插入元素时,我们首先需要直到这个地方的地址,我们才能进行操作。所以便有了查找函数,实现原理就是逐个遍历,出现就返回这个结点地址,如果没出现,就返回空指针。
代码:
//单链表查找。
SListNode* SListFind(SListNode* phead, SListDateType x)
{assert(phead);//既然查找了,那么就不能为空链表,否则没有意义,这是使用者的问题。SListNode* cur = phead;while (cur){if (cur->date == x){return cur;}cur = cur->next;}return NULL;//上面已经判断不能为空链表,所以这里返回的空指针指的就是找不到,而不是链表为空。
}
9、单链表插入
单链表插入如果时从该位置之后插入,很方便,不需要遍历找上一个结点的位置,直接用传过来的结点的位置进行操作。
但是一般意义上的插入都是在该位置之前,那么就需要遍历,找到上一个位置的结点,因为我们要用,这是单链表的弊端。
☃️该位置之后插入
代码:
//单链表插入(pos之后)。
void SListInsertAfter(SListNode* phead,SListNode* pos, SListDateType x)
{assert(pos);//插入默认是该链表不为空的,如果想要空的时候插入,用头插函数。SListNode* cur = phead;SListNode* newnode = BuyNewnode(x);while (cur!=pos){cur = cur->next;}newnode->next = cur->next;cur->next = newnode;
}
☃️该位置之前插入(插入正常理解)
//单链表插入(pos之前)。
void SListInsertBefore(SListNode** pphead, SListNode* pos, SListDateType x)
{assert(pphead);assert(*pphead);//和刚才同理,链表没有元素的时候插入调用头插函数。SListNode* cur = *pphead;SListNode* newnode = BuyNewnode(x);if (cur->next == NULL){*pphead = newnode;newnode->next = pos;}else{while (cur->next != pos){cur = cur->next;}cur->next = newnode;newnode->next = pos;}
}
10、单链表删除
单链表删除需要找到前一个结点,让前一个结点指想删除位置指向的位置,然后释放要删除的位置即可。
代码:
//单链表删除。
void SListEraseAfter(SListNode** pphead, SListNode* pos)
{assert(pphead);assert(*pphead);SListNode* cur = *pphead;if (cur == pos){*pphead = pos->next;free(pos);}else{while (cur->next!=pos){cur = cur->next;}cur->next = cur->next->next;//或者写成cur->next = pos->next;free(pos);}
}
- 因为传的pos是一级指针,所以我们无法在函数里修改pos的值,我们只能修改pos指向位置的内容,当我们释放pos后,实参pos便指向释放后的位置,也就变成了野指针,所以我们需要在出函数后让pos置空。
11、单链表销毁
单链表销毁就是释放每个结点的空间,一直到最后结点,注意别释放前没做准备导致释放后找不到下一个结点的位置。
//单链表的销毁。
void SListDestroy(SListNode** pphead)
{assert(pphead);SListNode* cur = *pphead;while (cur){SListNode* pc = cur;cur = cur->next;free(pc);}
}
三、总代码
SeqListNode.h
SeqListNode.h
#pragma once#include <stdio.h>
#include <assert.h>
#include <stdlib.h>typedef int SListDateType;typedef struct SeqListNode
{SListDateType date;struct SeqListNode* next;
}SListNode;//创建新结点。
SListNode* BuyNewnode(SListDateType x);//打印单链表。
void SListPrint(SListNode* phead);//单链表尾插。
void SListPushBack(SListNode** pphead,SListDateType x);//单链表头插。
void SListPushFront(SListNode** pphead, SListDateType x);//单链表尾删。
void SListPopBack(SListNode** pphead);//单链表头删。
void SListPopFront(SListNode** pphead);//单链表查找。
SListNode* SListFind(SListNode* phead, SListDateType x);//单链表插入。
//pos之后插入。
//不用从头开始查找,比较高效
void SListInsertAfter(SListNode* phead,SListNode* pos, SListDateType x);
//pos之前插入。
//还要从头开始查找,不合适
void SListInsertBefore(SListNode** pphead, SListNode* pos, SListDateType x);//单链表删除。
void SListEraseAfter(SListNode** pphead, SListNode* pos);//单链表的销毁。
void SListDestroy(SListNode** phead);
SeqListNode.c
SeqListNode.c
#define _CRT_SECURE_NO_WARNINGS 1#include "SeqListNode.h"//创建新结点。
SListNode* BuyNewnode(SListDateType x)
{SListNode* newnode = malloc(sizeof(SListNode));assert(newnode);newnode->date = x;newnode->next = NULL;return newnode;
}//打印单链表。
void SListPrint(SListNode* phead)
{SListNode* cur = phead;while (cur){printf("%d->",cur->date);cur = cur->next;}printf("NULL\\n");
}//单链表尾插。
void SListPushBack(SListNode** pphead,SListDateType x)
{assert(pphead);SListNode* newnode = BuyNewnode(x);if (*pphead == NULL){*pphead = newnode;}else{SListNode* cur = *pphead;while (cur->next){cur = cur->next;}cur->next = newnode;}
}//单链表头插。
void SListPushFront(SListNode** pphead, SListDateType x)
{assert(pphead);SListNode* newnode=BuyNewnode(x);newnode->next = *pphead;*pphead = newnode;
}//单链表尾删。
void SListPopBack(SListNode** pphead)
{assert(pphead);assert(*pphead);//指针指向的内容不能是空的SListNode* cur = *pphead;SListNode* cur_ = NULL;//存倒数第二个结点的位置if (cur->next == NULL){free(cur);*pphead = NULL;return;}while (cur->next){cur_ = cur;//保留要释放结点的前一个位置,然后当下面用完cur(释放)后,让cur_(释放后的最后结点位置指向空)cur = cur->next;}free(cur);cur_->next = NULL;
}//单链表头删。
void SListPopFront(SListNode** pphead)
{assert(pphead);assert(*pphead);SListNode* first = *pphead;*pphead = (*pphead)->next;free(first);
}//单链表查找。
SListNode* SListFind(SListNode* phead, SListDateType x)
{assert(phead);SListNode* cur = phead;while (cur){if (cur->date == x){return cur;}cur = cur->next;}return NULL;
}//单链表插入(pos之后)。
void SListInsertAfter(SListNode* phead,SListNode* pos, SListDateType x)
{assert(pos);SListNode* cur = phead;SListNode* newnode = BuyNewnode(x);while (cur!=pos){cur = cur->next;}newnode->next = cur->next;cur->next = newnode;
}//单链表插入(pos之前)。
void SListInsertBefore(SListNode** pphead, SListNode* pos, SListDateType x)
{assert(pphead);assert(*pphead);SListNode* cur = *pphead;SListNode* newnode = BuyNewnode(x);if (cur->next == NULL){*pphead = newnode;newnode->next = pos;}else{while (cur->next != pos){cur = cur->next;}cur->next = newnode;newnode->next = pos;}
}//单链表删除。
void SListEraseAfter(SListNode** pphead, SListNode* pos)
{assert(pphead);assert(*pphead);SListNode* cur = *pphead;if (cur == pos){*pphead = pos->next;free(pos);}else{while (cur->next!=pos){cur = cur->next;}cur->next = cur->next->next;free(pos);}
}//单链表的销毁。
void SListDestroy(SListNode** pphead)
{assert(pphead);SListNode* cur = *pphead;while (cur){SListNode* pc = cur;cur = cur->next;free(pc);}
}
Test.c
Test.c
#define _CRT_SECURE_NO_WARNINGS 1#include "SeqListNode.h"void test1()
{SListNode* pc = NULL;SListPrint(pc);SListPushBack(&pc,0);SListPrint(pc);SListPushBack(&pc, 1);SListPrint(pc);SListPushBack(&pc, 2);SListPrint(pc);SListPushBack(&pc, 3);SListPrint(pc);SListPushBack(&pc, 4);SListPrint(pc);SListPushBack(&pc, 5);SListPrint(pc);SListPushBack(&pc, 6);SListPrint(pc);SListPushBack(&pc, 7);SListPrint(pc);
}void test2()
{SListNode* pc = NULL;SListPrint(pc);SListPushFront(&pc, 0);SListPrint(pc);SListPushFront(&pc, 1);SListPrint(pc);SListPushFront(&pc, 2);SListPrint(pc);SListPushFront(&pc, 3);SListPrint(pc);SListPushFront(&pc, 4);SListPrint(pc);SListPushFront(&pc, 5);SListPrint(pc);SListPushFront(&pc, 6);SListPrint(pc);SListPushFront(&pc, 7);SListPrint(pc);
}
void test3()
{SListNode* pc = NULL;SListPrint(pc);SListPushBack(&pc, 0);SListPrint(pc);SListPushBack(&pc, 1);SListPrint(pc);SListPushBack(&pc, 2);SListPrint(pc);SListPushBack(&pc, 3);SListPrint(pc);SListPopBack(&pc);SListPrint(pc);SListPopBack(&pc);SListPrint(pc);SListPopBack(&pc);SListPrint(pc);SListPopBack(&pc);SListPrint(pc);
}
void test4()
{SListNode* pc = NULL;SListPrint(pc);SListPushBack(&pc,0);SListPrint(pc);SListPushBack(&pc, 1);SListPrint(pc);SListPushBack(&pc, 2);SListPrint(pc);SListPushBack(&pc, 3);SListPrint(pc);SListPushBack(&pc, 4);SListPrint(pc);SListPushBack(&pc, 5);SListPrint(pc);SListPushBack(&pc, 6);SListPrint(pc);SListPopFront(&pc);SListPrint(pc);SListPopFront(&pc);SListPrint(pc);SListPopFront(&pc);SListPrint(pc);SListPopFront(&pc);SListPrint(pc);SListPopFront(&pc);SListPrint(pc);SListPopFront(&pc);SListPrint(pc);
}
void test5()
{SListNode* pc = NULL;SListPushBack(&pc,0);//SListPushBack(&pc,1);//SListPushBack(&pc,2);SListPrint(pc);SListNode* pos = SListFind(pc,0);assert(pos);//SListInsertAfter(*pc, pos, 9);//pos之后插入。SListInsertBefore(&pc, pos, 5);//pos之前插入。SListPrint(pc);pos = SListFind(pc, 5);SListEraseAfter(&pc, pos);//删除后要置空pos = NULL;//这块被释放了,所以置空SListPrint(pc);SListDestroy(&pc);
}int main()
{//test1();//测试尾插。//test2();//测试头插。test3();//测试尾删。//test4();//测试头删。//test5();//测试查找,插入,销毁。return 0;
}
四、总结

✨请点击下面进入主页关注大魔王
如果感觉对你有用的话,就点我进入主页关注我吧!