vue 3.0组件(下)
.jpg)
文章目录
前言:
上一章给大家讲解了组件的注册以及父子组件之间数据的传递,本文继续给大家讲解Vue3组件剩下的东西
一,透传属性和事件
1. 如何“透传属性和事件”
父组件在使用子组件的时候,如何“透传属性和事件”给子组件呢?
- 透传属性和事件并没有在子组件中用
props和emits声明 - 透传属性和事件最常见的如@click和class、id、style
- 当子组件只有一个根元素时,透传属性和事件会自动添加到该根元素上;如果根元素已有class或style属性,它会自动合并
// 父组件
<script setup>
import ChipVue from './components/Chip.vue';function say() {alert('Hello')
}
</script><template><!-- 透传的属性(style,class,title)在子组件中并没有在 props 声明 --><!-- 透传的事件(click)在子组件中并没有在 emits 声明 --><ChipVueclass="rounded"style="border: 1px solid blue;"title="纸片"@click="say"/>
</template>
// 子组件
<template><!-- 当子组件只有一个根元素时,透传属性和事件会自动添加到该根元素上如果根元素已有 class 或 style 属性,它会自动合并--><button class="chip" style="box-shadow: 0 0 8px grey;">普通纸片</button>
</template><style>
.chip {border: none;background-color: rgb(231, 231, 231);padding: 8px 15px;
}.rounded {border-radius: 100px;
}
</style>
渲染结果:

2.如何禁止“透传属性和事件”
- 当子组件只有一个根元素时,透传属性和事件会自动添加到该根元素上,那怎么阻止呢?
- 在组合式 API 的
< script setup>中,你需要一个额外的< script>块来书写inheritAttrs: false选项声明来禁止
- 在组合式 API 的
// 父组件
<script setup>
import ChipVue from './components/Chip.vue';function say() {alert('Hello')
}
</script><template><!-- 透传的属性(style,class,title)在子组件中并没有在 props 声明 --><!-- 透传的事件(click)在子组件中并没有在 emits 声明 --><ChipVueclass="rounded"style="border: 1px solid blue;"title="纸片"@click="say"/>
</template>
// 子组件
<script>
export default {inheritAttrs: false // 阻止自动透传给唯一的根组件
}
</script><!-- 在组合式 API 的 <script setup> 中,你需要一个额外的 <script> 块来书写 inheritAttrs: false 选项声明来禁止
-->
<script setup></script><template><!-- 当子组件只有一个根元素时,透传属性和事件会自动添加到该根元素上如果根元素已有 class 或 style 属性,它会自动合并--><button class="chip" style="box-shadow: 0 0 8px grey;">普通纸片</button>
</template><style>
.chip {border: none;background-color: rgb(231, 231, 231);padding: 8px 15px;
}.rounded {border-radius: 100px;
}
</style>
3.多根元素的“透传属性和事件”
- 多根节点的组件并没有
自动“透传属性和事件”的行为,由于Vue不确定要将“透传属性和事件”透传到哪里,所以我们需要v-bind="$attrs"来显式绑定,否则将会抛出一个运行时警告
// 父组件
<script setup>
import ChipVue from './components/Chip.vue';function say() {alert('Hello')
}
</script><template><!-- 透传的属性(style,class,title)在子组件中并没有在 props 声明 --><!-- 透传的事件(click)在子组件中并没有在 emits 声明 --><ChipVueclass="rounded"style="border: 1px solid blue;"title="纸片"@click="say"/>
</template>
// 子组件
<template><!-- 多根节点的组件并没有自动“透传属性和事件”的行为 --><button class="chip">普通纸片</button><hr><button class="chip" v-bind="$attrs">普通纸片</button><hr><button class="chip" v-bind="$attrs">普通纸片</button>
</template><style>
.chip {border: none;background-color: rgb(231, 231, 231);padding: 8px 15px;
}.rounded {border-radius: 100px;
}
</style>
4. 访问“透传属性和事件”
- 在组合式 API 中的
< script setup>中引入useAttrs()来访问一个组件的“透传属性和事件”
// 父组件
<script setup>
import ChipVue from './components/Chip.vue';function say() {alert('Hello')
}
</script><template><!-- 透传的属性(style,class,title)在子组件中并没有在 props 声明 --><!-- 透传的事件(click)在子组件中并没有在 emits 声明 --><ChipVueclass="rounded"style="border: 1px solid blue;"title="纸片"@click="say"/>
</template>
// 子组件
<script setup>
import { useAttrs } from 'vue';// 透传的属性和事件对象
let attrs = useAttrs()// 在 JS 中访问透传的属性和事件
function showAttrs() {console.log(attrs)console.log(attrs.class)console.log(attrs.title)console.log(attrs.style)attrs.onClick()
}
</script><template><button class="chip" v-bind="attrs">普通纸片</button><hr><h6>{{ attrs }}</h6><ul><li>{{ attrs.title }}</li><li>{{ attrs.class }}</li><li>{{ attrs.style }}</li></ul><button @click="attrs.onClick()">执行透传的事件</button><hr><button @click="showAttrs">在 JS 中访问透传的属性和事件</button>
</template><style>
.chip {border: none;background-color: rgb(231, 231, 231);padding: 8px 15px;margin: 10px;
}.rounded {border-radius: 100px;
}
</style>
注意:
● 虽然这里的attrs对象总是反映为最新的“透传属性和事件”,但它并不是响应式的 (考虑到性能因素),你不能通过侦听器去监听它的变化
● 如果你需要响应性,可以使用prop或者你也可以使用onUpdated()使得在每次更新时结合最新的attrs执行副作用
二,插槽
- 在某些场景中,我们可能想要为子组件传递一些
模板片段,让子组件在它们的组件中渲染这些片段,为此 vue 提供了组件的插槽
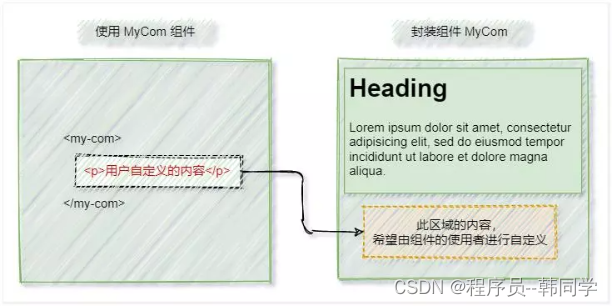
1. 什么是插槽
- 在封装组件时,可以使用
<slot>元素把不确定的、希望由用户指定的部分定义为插槽;插槽可以理解为给预留的内容提供占位符 - 插槽也可以提供
默认内容,如果组件的使用者没有为插槽提供任何内容,则插槽内的默认内容会生效
注意:如果在封装组件时没有预留任何插槽,用户提供传递一些模板片段将会被遗弃
// 父组件
<script setup>
import CardVue from './components/Card.vue'
</script><template><CardVue><!-- 向子组件插槽中提供内容 --><button>关闭</button></CardVue>
</template>
// 子组件
<template><div class="card"><h2 class="title"></h2><div class="subtitle"></div><div class="content"></div><div class="action"><!-- 定义一个插槽 --><!-- 插槽的默认内容,只有没有提供内容时,才会显示 --><slot>卡片功能区域</slot></div></div>
</template><style>
.card {width: 250px;border: 1px solid black;
}.card h2,
.card div {margin: 10px;padding: 5px;
}.title {border: 1px solid red;
}.subtitle {border: 1px solid green;
}.content {border: 1px solid blue;
}.action {border: 1px solid pink;
}
</style>
2. 具名插槽
- 如果在封装组件时需要预留多个插槽节点,则需要为每个
< slot>插槽指定具体的name名称,这种带有具体名称的插槽叫做“具名插槽” 没有指定name名称的插槽,会有隐含的名称叫做default- 在
< template>元素上使用v-slot:slotName或者#slotName向指定的具名插槽提供内容
// 父组件
<script setup>
import CardVue from './components/Card.vue'
</script><template><CardVue><!-- 向具名插槽提供内容 --><template v-slot:cardTitle>博客</template><template #cardSubtitle><i>百万博主分享经验</i></template><!-- 向子组件默认插槽中提供内容 --><!-- <button>关闭</button> --><template #default><button>关闭</button></template></CardVue>
</template>
// 子组件
<template><div class="card"><h2 class="title"><!-- 带有 name 的属性的插槽,称为具名插槽 --><slot name="cardTitle"></slot></h2><div class="subtitle"><slot name="cardSubtitle"></slot></div><div class="content"><slot name="cardContent"></slot></div><div class="action"><!-- 定义一个插槽 --><!-- 插槽的默认内容,只有没有提供内容时,才会显示 --><!-- 没有 name 属性的插槽称为默认插槽,会有一个隐含的名字:default --><slot>卡片功能区域</slot></div></div>
</template><style>
.card {width: 250px;border: 1px solid black;
}.card h2,
.card div {margin: 10px;padding: 5px;
}.title {border: 1px solid red;
}.subtitle {border: 1px solid green;
}.content {border: 1px solid blue;
}.action {border: 1px solid pink;
}
</style>
3. 作用域插槽
- 如何在向插槽提供的内容时获得子组件域内的数据呢?
- 在声明插槽时使用
属性值的方式来传递子组件的数据,这种带有数据的插槽称之为作用域插槽 - 在
< template>元素上使用v-slot:slotName="slotProps"或#slotName="slotProps"的方式来访问插槽传递属性值 - 如果没有使用
< template>元素,而是直接在使用子组件中直接给默认插槽提供内容,我们可以在使用该子组件时用v-slot="slotProps"来接收该插槽传递的数据对象
- 在声明插槽时使用
注意:
< slot >插槽上的name是一个Vue特别保留的属性,不会在作用域插槽中访问到
// 父组件
<script setup>
import CardVue from './components/Card.vue'
</script><template><CardVue><!-- 向具名插槽提供内容 --><template v-slot:cardTitle>博客</template><template #cardSubtitle><i>百万博主分享经验</i></template><!-- 访问插槽中提供的数据 --><template #cardContent="dataProps"><ul><li>{{ dataProps }}</li><li>博客的标题:{{ dataProps.cardBlog.title }}</li><li>博客的时间:{{ dataProps.cardBlog.time }}</li><li>博主:{{ dataProps.cardAuthor }}</li></ul></template><!-- 向子组件默认插槽中提供内容 --><!-- <button>关闭</button> --><template #default><button>关闭</button></template></CardVue><hr><CardVue v-slot="dataProps"><!-- 如果使用子组件时用到了 v-slot,则该子组件标签中将无法向其他具名插槽中提供内容 --><!-- <template #cardSubtitle><i>百万博主分享经验</i></template> --><button>{{dataProps.close}}</button><button>{{dataProps.sure}}</button></CardVue>
</template>
// 子组件
<script setup>
import { reactive, ref } from 'vue';let blog = reactive({title: 'Java 如何实现上传文件',time: '2021-12-25 15:33:25'
})let author = ref('爱思考的飞飞')let closeBth = ref('关闭')
let determine = ref('确定')
</script><template><div class="card"><h2 class="title"><!-- 带有 name 的属性的插槽,称为具名插槽 --><slot name="cardTitle"></slot></h2><div class="subtitle"><slot name="cardSubtitle"></slot></div><div class="content"><!-- 带有数据的插槽称之为作用域插槽 --><!-- <slot>插槽上的 name 是一个Vue特别保留的属性,不会在作用域插槽中访问到 --><slot name="cardContent" :cardBlog="blog" :cardAuthor="author"></slot></div><div class="action"><!-- 定义一个插槽 --><!-- 插槽的默认内容,只有没有提供内容时,才会显示 --><!-- 没有 name 属性的插槽称为默认插槽,会有一个隐含的名字:default --><slot :close="closeBth" :sure="determine">卡片功能区域</slot></div></div>
</template><style>
.card {width: 450px;border: 1px solid black;
}.card h2,
.card div {margin: 10px;padding: 5px;
}.title {border: 1px solid red;
}.subtitle {border: 1px solid green;
}.content {border: 1px solid blue;
}.action {border: 1px solid pink;
}
</style>
三,单文件组件CSS功能
- 默认情况下,写在
.vue组件中的样式会全局生效,很容易造成多个组件之间的样式冲突问题
导致组件之间样式冲突的根本原因是:- 单页面应用程序中,所有组件的
DOM结构,都是基于唯一的index.html页面进行呈现的 - 每个组件中的样式,都会影响整个
index.html页面中的DOM元素
- 单页面应用程序中,所有组件的
1. 组件作用域CSS
- 当
< style>标签带有scoped属性的后:- 它的
CSS只会影响当前组件的元素,父组件的样式将不会渗透到子组件中 - 该组件的所有元素编译后会自带一个特定的属性
- 该
< style scoped>内的选择器,在编译后会自动添加特定的属性选择器 - 子组件的
根节点会同时被父组件的作用域样式和子组件的作用域样式影响,主要是为了让父组件可以从布局的角度出发,调整其子组件根元素的样式
- 它的
// 转换前
<style scoped>
.error {color: red;
}
</style><template><div class="error">hi</div>
</template>
// 转换后
<style>
.error[data-v-f3f3eg9] {color: red;
}
</style><template><div class="example" data-v-f3f3eg9>hi</div>
</template>
案例:
// 父组件
<script setup>
import ButtonVue from './components/Button.vue';
</script><template><div class="error"><h3>【父】标题</h3><button>【父】普通按钮</button></div><hr><ButtonVue />
</template><!-- scoped 属性,让下方的选择器的样式只作用在该组件中,或者子组件的根元素上
-->
<style scoped>
h3 {border: 1px solid blue;
}.error {border: 1px solid red;padding: 15px;
}
</style>
// 子组件
<template><div class="error"><h3>【子】标题</h3><button>【子】普通按钮</button></div>
</template>
2.深度选择器
- 处于
scoped样式中的选择器如果想要做更“深度”的选择,即影响到子组件,可以使用:deep()这个伪类
// 编译前
<style scoped>.a :deep(.b) { /* ... */ }
</style>
// 编译后
<style>.a[data-v-f3f3eg9] .b { /* ... */ }
</style>
案例
// 父组件
<script setup>
import ButtonVue from './components/Button.vue';
</script><template><div class="error"><h3>【父】标题</h3><button>【父】普通按钮</button></div><hr><ButtonVue />
</template><!-- scoped 属性,让下方的选择器的样式只作用在该组件中,或者子组件的根元素上该组件中的所有元素及子组件中的根元素会加上固定的属性(data-v-~)该 css 选择器都会自动添加固定的属性选择器([data-v-~])
-->
<style scoped>
h3 {border: 1px solid blue;
}.error {border: 1px solid red;padding: 15px;
}/* 如果想在 style scoped 中让样式作用到子组件中,那么可以使用 :deep() 伪类选择器 */
.error:deep(button) {border: 2px solid green;padding: 8px 15px;
}
</style>
// 子组件
<template><div class="error"><h3>【子】标题</h3><button>【子】普通按钮</button></div>
</template>
3.CSS中的v-bind()
- 单文件组件的
< style >标签支持使用v-bindCSS函数将CSS的值链接到动态的组件状态 - 这个语法同样也适用于
< script setup>,且支持JavaScript表达式(需要用引号包裹起来) - 实际的值会被编译成
哈希化的CSS自定义属性,因此CSS本身仍然是静态的 - 自定义属性会通过
内联样式的方式应用到组件的某个元素上,并且在源值变更的时候响应式地更新
<script setup>
import { reactive } from 'vue';// 按钮主题
let btnTheme = reactive({backColor: '#000000', // 背景色textColor: '#FFFFFF' // 文本色
})
</script><template><button>普通按钮</button><hr>背景色:<input type="color" v-model="btnTheme.backColor">文本色:<input type="color" v-model="btnTheme.textColor">
</template><style scoped>button {/* 使用 v-bind() 可以使用该组件的中数据源,如果绑定的数据源值发生变化,则样式也会随着更新 */background-color: v-bind('btnTheme.backColor');color: v-bind('btnTheme.textColor');}
</style>
四,依赖注入
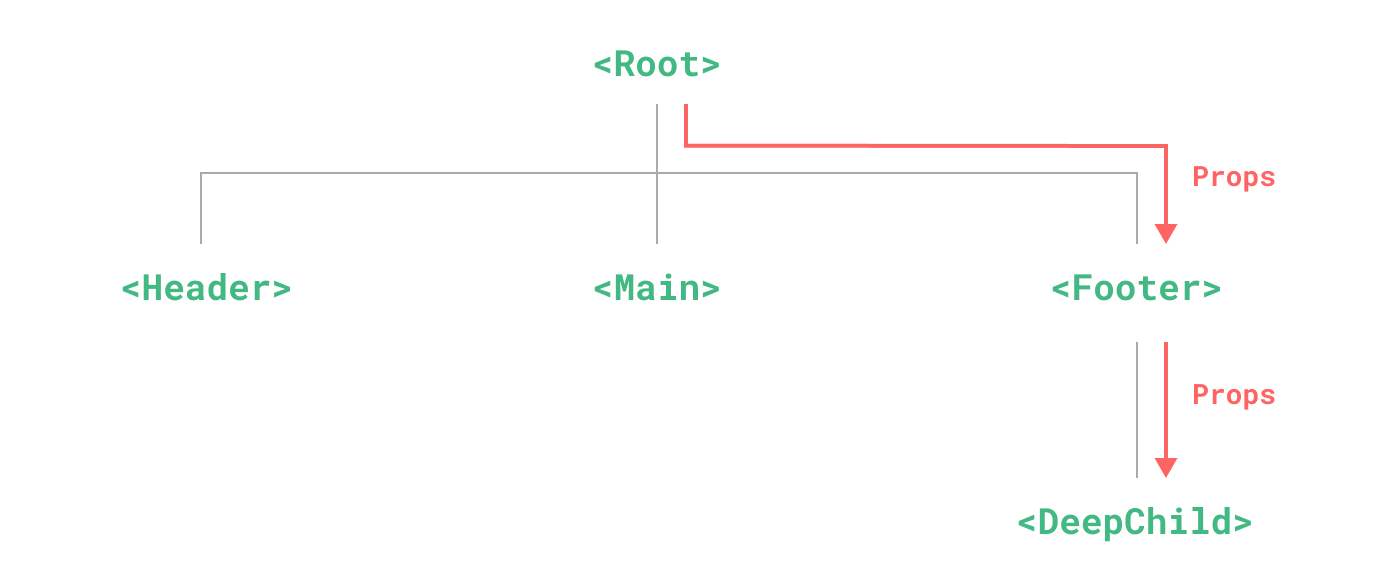
- 如果有一个深层的子组件需要一个较远的祖先组件中的部分数据,如果实现呢?
- 可使用props沿着组件链逐级传递下去,如图
- 可使用props沿着组件链逐级传递下去,如图
- 我们可在祖先组件使用provide提供数据,后代组件使用inject注入数据,如图

1. provide(提供)
在应用层如何提供:
- 在应用层方面可通过
app.provide()为后代提供数据
import { createApp } from 'vue'
const app = createApp({ })
app.provide('message', 'hello!') // message 注入名, 'hello' 值
在组件中如何提供:
- 在组合式 API` < script setup`> 中,可通过`provide()函数`来为后代组件提供数据
<script setup>
import { ref, provide } from 'vue'const message = 'hello'
const title = ref('博客')
const subtitle = ref('百万博主分享经验')function changeSubtitle(sub) {this.subtitle = sub
}provide('message', message) // 提供固定数据
provide('title', title) // 提供响应式数据
provide('subtitle', subtitle) // 提供响应式数据
provide('changeSubtitle', changeSubtitle) // 为后代组件提供修改响应式数据 subtitle 的函数
</script>
2.inject(注入)
- 在组合式 API 中,使用
inject()函数的返回值来注入祖先组件提供的数据- 如果提供数据的值是一个
ref,注入进来的会是该ref对象,和提供方保持响应式连接 - 如果注入的数据并没有在
祖先组件中提供,则会抛出警告,可在provide()函数的第二个参数设置默认值来解决 - 他们可以在
JS和视图模板中直接访问
- 如果提供数据的值是一个
<script setup>
import { inject } from 'vue'const c_message = inject('message')
const title = inject('title')
const c_subtitle = inject('subtitle')
const c_changeSub = inject('changeSubtitle')
// 祖先组件并未提供 content,则会报警告,设置默认值来解决
const c_content = inject('content',  '暂时还未有内容')
</script>
总结
以上就是vue3.0 组件的全部内容和基本用法,文章的代码为一个一个的案例感兴趣可以敲一敲看一看。希望本篇文章能够帮助到你,不懂得可以评论区或者私信问我,我也会一 一解答。谢谢观看!
我的其他文章:https://blog.csdn.net/m0_60970928?type=blog