
项目10:springcloud组件的加入
1.nacos加入服务注册中心管理
2.openfeign远程调用服务
3.sentinel服务熔断
4.gateway网关的设定
5.跨域问题和跨域问题解决方案
项目10:springcloud组件的加入
1.加入服务注册中心管理
①结果

②引入pom(在service-base中)
<dependency><groupId>com.alibaba.cloud</groupId><artifactId>spring-cloud-starter-alibaba-nacos-discovery</artifactId></dependency>
③在所有微服务的application.yml配置
cloud:nacos:discovery:server-addr: localhost:8848
④在主启动类中开启服务发现
@EnableDiscoveryClient
2.openfeign远程调用服务
①实现功能
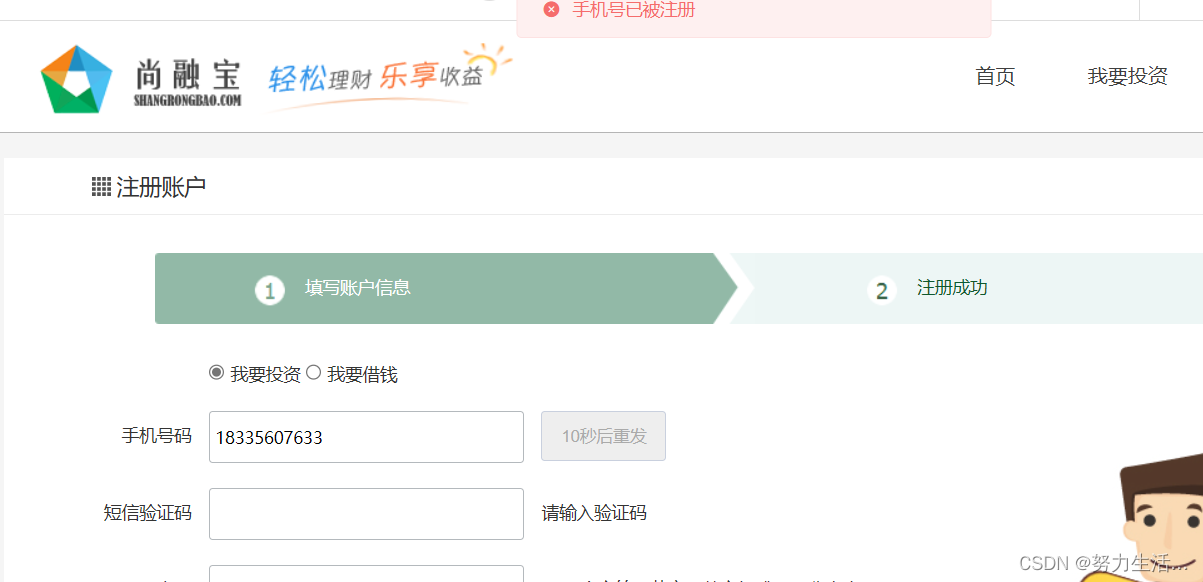
- 未加入远程调用:注册发送短信,然后前端封装一个注册对象到后端,后端用整个注册对象去查数据库,有了返回手机号已经存在。
- 优化:在注册发送短信时就判断手机号是否注册,如果没注册则不发送短信并且返回结果
- openfeign服务流程
即在sms发送短信服务中远程调用core服务的校验手机号是否已经注册服务,然后再前端调用发送短信服务时判断是否注册
②引入openfeign依赖
<dependency><groupId>org.springframework.cloud</groupId><artifactId>spring-cloud-starter-openfeign</artifactId></dependency>
③openfeign调用的服务
@Api(tags = "会员接口")
@RestController
@RequestMapping("/api/core/userInfo")
@Slf4j
@CrossOrigin
public class UserInfoController {@ApiOperation("校验手机号是否注册")@GetMapping("/checkMobile/{mobile}")public Boolean checkMobile(@PathVariable String mobile){boolean result = userInfoService.checkMobile(mobile);return result;}}
public interface UserInfoService extends IService<UserInfo> {boolean checkMobile(String mobile);
}
@Service
public class UserInfoServiceImpl extends ServiceImpl<UserInfoMapper, UserInfo> implements UserInfoService {@Overridepublic boolean checkMobile(String mobile) {QueryWrapper<UserInfo> userInfoQueryWrapper = new QueryWrapper<>();userInfoQueryWrapper.eq("mobile",mobile);Integer count = baseMapper.selectCount(userInfoQueryWrapper);return count>0;}
}
④openfeign客户端
@SpringBootApplication
@ComponentScan({"com.atguigu.srb","com.atguigu.common"})@EnableDiscoveryClient
@EnableFeignClients
public class ServiceSmsApplication {public static void main(String[] args) {SpringApplication.run(ServiceSmsApplication.class, args);}
}
package com.atguigu.srb.sms.client;import org.springframework.cloud.openfeign.FeignClient;
import org.springframework.web.bind.annotation.GetMapping;
import org.springframework.web.bind.annotation.PathVariable;@FeignClient(value ="service-core")
public interface CoreUserInfoClient {@GetMapping("/api/core/userInfo/checkMobile/{mobile}")Boolean checkMobile(@PathVariable("mobile") String mobile);
}
package com.atguigu.srb.sms.controller.api;import com.atguigu.common.exception.Assert;
import com.atguigu.common.result.R;
import com.atguigu.common.result.ResponseEnum;
import com.atguigu.common.util.RandomUtils;
import com.atguigu.common.util.RegexValidateUtils;
import com.atguigu.srb.sms.client.CoreUserInfoClient;
import com.atguigu.srb.sms.service.SmsService;
import io.swagger.annotations.Api;
import io.swagger.annotations.ApiOperation;
import io.swagger.annotations.ApiParam;
import lombok.extern.slf4j.Slf4j;
import org.springframework.data.redis.core.RedisTemplate;
import org.springframework.web.bind.annotation.*;import javax.annotation.Resource;
import java.util.HashMap;
import java.util.Map;
import java.util.concurrent.TimeUnit;@RestController
@RequestMapping("/api/sms")
@Api(tags = "短信管理")
@CrossOrigin
@Slf4j
public class ApiSmsController {@Resourceprivate SmsService smsService;@Resourceprivate CoreUserInfoClient coreUserInfoClient;@Resourceprivate RedisTemplate redisTemplate;@ApiOperation("获取验证码")@GetMapping("/send/{mobile}")public R send(@ApiParam(value = "手机号", required = true)@PathVariable String mobile){Assert.notEmpty(mobile, ResponseEnum.MOBILE_NULL_ERROR);Assert.isTrue(RegexValidateUtils.checkCellphone(mobile), ResponseEnum.MOBILE_ERROR);Boolean result = coreUserInfoClient.checkMobile(mobile);Assert.isTrue(result==false,ResponseEnum.MOBILE_EXIST_ERROR);log.info("result",result);String code = RandomUtils.getFourBitRandom();Map<String,Object> param = new HashMap<>();param.put("code", code);redisTemplate.opsForValue().set("srb:sms:code:" + mobile, code, 5, TimeUnit.MINUTES);return R.ok().message("短信发送成功");}
}
⑤openfeign的超时配置
feign:client:config:default:connectTimeout: 10000 readTimeout: 600000
⑥openfeign日志控制
package com.atguigu.srb.base.config;import feign.Logger;
import org.springframework.context.annotation.Bean;
import org.springframework.context.annotation.Configuration;@Configuration
public class OpenFeignConfig {@BeanLogger.Level feignLoggerLevel(){return Logger.Level.FULL;}
}
- yml中配置日志级别(在sms即openfeign的客户端)
logging:level:com.atguigu.srb.sms.client.CoreUserInfoClient: DEBUG
<springProfile name="dev,test"><logger name="com.atguigu" level="DEBUG"><appender-ref ref="CONSOLE" /><appender-ref ref="ROLLING_FILE" /></logger></springProfile>
3.sentinel服务熔断
①实现
- 如果core服务宕机,那么sms服务发短信服务不能一直等待,需要有兜底方法
- 功能:
如果连接不到core服务,那么就不进行手机号校验,执行兜底方法,直接发送验证码给用户然后在提交时校验
②引入依赖(service-base)
<dependency><groupId>com.alibaba.cloud</groupId><artifactId>spring-cloud-starter-alibaba-sentinel</artifactId></dependency>
③配置feign支持服务熔断
sentinel:enabled: true
④配置兜底方法
package com.atguigu.srb.sms.client;import com.atguigu.srb.sms.client.fallback.CoreUserInfoClientFallback;
import org.springframework.cloud.openfeign.FeignClient;
import org.springframework.web.bind.annotation.GetMapping;
import org.springframework.web.bind.annotation.PathVariable;
@FeignClient(value ="service-core",fallback = CoreUserInfoClientFallback.class)
public interface CoreUserInfoClient {@GetMapping("/api/core/userInfo/checkMobile/{mobile}")Boolean checkMobile(@PathVariable("mobile") String mobile);
}
package com.atguigu.srb.sms.client.fallback;import com.atguigu.srb.sms.client.CoreUserInfoClient;
import lombok.extern.slf4j.Slf4j;
import org.springframework.stereotype.Service;@Service
@Slf4j
public class CoreUserInfoClientFallback implements CoreUserInfoClient {@Overridepublic Boolean checkMobile(String mobile) {log.error("远程调用失败,服务熔断");return false;}
}
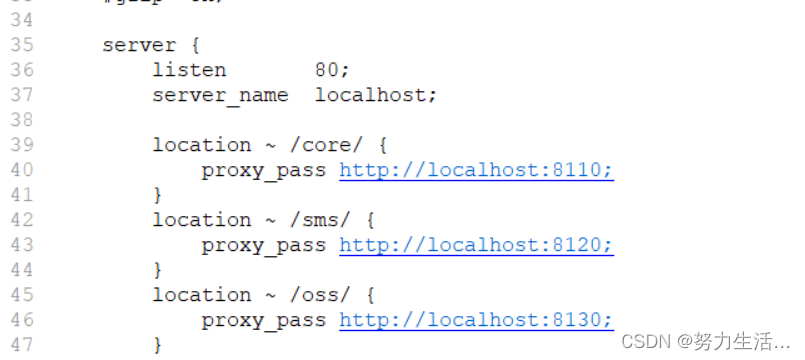
4.gateway网关的设定
①功能
- 之前前端访问后端(nginx)
- 跨域用@CrossOrigin解决。
- 前端访问http:localhost/admin/core/integralGrade/list
nginx转发到。http:localhost:8110/admin/core/integralGrade/list
- ajax请求需要配置跨域,在controller中加入@CrossOrigin解决。
- 正常功能
- nginx配置反向代理访问前端,前端通过gateway访问后端。
跨域用gatewat的配置。
- 前端访问http://localhost/admin/core/integralGrade/list
- gateway转发到http://localhost/admin/core/integralGrade/list(gateway配置了路由,gateway自动路由应该是http://网关地址:网关端口/service名称/路由地址:例子:http://localhost/service-core/admin/core/integralGrade/list)
- 配置跨域
即ajax请求访问到gateway(跨域请求),gateway转发到各个微服务,在gateway中配置跨域
②配置gateway微服务(引入依赖)
<?xml version="1.0" encoding="UTF-8"?>
<project xmlns="http://maven.apache.org/POM/4.0.0"xmlns:xsi="http://www.w3.org/2001/XMLSchema-instance"xsi:schemaLocation="http://maven.apache.org/POM/4.0.0 http://maven.apache.org/xsd/maven-4.0.0.xsd"><parent><artifactId>srb</artifactId><groupId>com.atguigu</groupId><version>1.0-SNAPSHOT</version></parent><modelVersion>4.0.0</modelVersion><artifactId>service-gateway</artifactId><dependencies><dependency><groupId>org.springframework.cloud</groupId><artifactId>spring-cloud-starter-gateway</artifactId></dependency><dependency><groupId>com.alibaba.cloud</groupId><artifactId>spring-cloud-starter-alibaba-nacos-discovery</artifactId></dependency></dependencies></project>
③gateway微服务的application.yml
server:port: 80 spring:profiles:active: dev application:name: service-gateway cloud:nacos:discovery:server-addr: localhost:8848 gateway:discovery:locator:enabled: true routes:- id: service-core uri: lb://service-core predicates:- Path=/*/core/ - id: service-smsuri: lb://service-smspredicates:- Path=/*/sms/- id: service-ossuri: lb://service-osspredicates:- Path=/*/oss/
④主启动
package com.atguigu.srb.gateway;import org.springframework.boot.SpringApplication;
import org.springframework.boot.autoconfigure.SpringBootApplication;
import org.springframework.cloud.client.discovery.EnableDiscoveryClient;@EnableDiscoveryClient
@SpringBootApplication
public class ServiceGatewayApplication {public static void main(String[] args) {SpringApplication.run(ServiceGatewayApplication.class, args);}
}
⑤配置跨域(删除之前所有微服务使用的跨域注解@CrossOrigin )
package com.atguigu.srb.gateway.config;import org.springframework.context.annotation.Bean;
import org.springframework.context.annotation.Configuration;
import org.springframework.web.cors.CorsConfiguration;
import org.springframework.web.cors.reactive.CorsWebFilter;
import org.springframework.web.cors.reactive.UrlBasedCorsConfigurationSource;@Configuration
public class CorsConfig {@Beanpublic CorsWebFilter corsFilter() {CorsConfiguration config = new CorsConfiguration();config.setAllowCredentials(true); config.addAllowedOrigin("*"); config.addAllowedHeader("*"); config.addAllowedMethod("*"); UrlBasedCorsConfigurationSource source = new UrlBasedCorsConfigurationSource();source.registerCorsConfiguration("/", config); return new CorsWebFilter(source);}
}
5.跨域问题和跨域问题解决方案
①什么是跨域问题?
- 前端后端交互时前端页面和后端服务不在同一个机器下的端口下,默认浏览器会设定为跨域访问。
②怎么才是跨域呢?
- 浏览器键入URL是跨域吗?
不是跨域,浏览器键入URL属于客户端和服务器交互,而不是页面与服务器交互。
- href标签涉及跨域吗?
href标签也不涉及跨域,因为href标签相当于网页跳转,与本页面无关。
- ajax请求跨域吗?
具体为网页向服务器发起请求,故ajax涉及跨域。
③跨域请求流程
- 浏览器发起请求
- 浏览器先检查该请求是否会跨域请求(判断目的主机和本主机的ip和端口号)
不是跨域直接发送出去。
是跨域请求则在请求头中增加origin字段表明请求从哪里发出。
- 服务器接受请求
- 服务器给出响应
响应header里写明跨域的配置信息,表明自己可以接受哪些域名的请求访问。
④跨域问题的解决方案
- 使用 @CrossOrigin 注解实现跨域
- 通过 CorsFilter 对象实现跨域
- 两者选一个使用即可
更改响应头
未更新
未更新
未更新
未更新
未更新
未更新
未更新
未更新
未更新