YOLOv8源码逐行解读(yolov8.yaml)(更新中)

本人也是刚接触YOLO不久的菜鸟一个,写博客主要是记录自己的学习过程,如果有写的不对的地方欢迎大家批评指正!
yolov8.yaml 官方下载地址:https://github.com/ultralytics/ultralytics/tree/main/ultralytics/models/v8
# Ultralytics YOLO 🚀, GPL-3.0 license
# YOLOv8 object detection model with P3-P5 outputs. For Usage examples see https://docs.ultralytics.com/tasks/detect# Parameters
nc: 80  # number of classes
scales: # model compound scaling constants, i.e. 'model=yolov8n.yaml' will call yolov8.yaml with scale 'n'# [depth, width, max_channels]n: [0.33, 0.25, 1024]  # YOLOv8n summary: 225 layers,  3157200 parameters,  3157184 gradients,   8.9 GFLOPss: [0.33, 0.50, 1024]  # YOLOv8s summary: 225 layers, 11166560 parameters, 11166544 gradients,  28.8 GFLOPsm: [0.67, 0.75, 768]   # YOLOv8m summary: 295 layers, 25902640 parameters, 25902624 gradients,  79.3 GFLOPsl: [1.00, 1.00, 512]   # YOLOv8l summary: 365 layers, 43691520 parameters, 43691504 gradients, 165.7 GFLOPsx: [1.00, 1.25, 512]   # YOLOv8x summary: 365 layers, 68229648 parameters, 68229632 gradients, 258.5 GFLOPs
nc:数据集类别数。scales:不同尺寸的模型大小根据scales进行缩放。
本文使用的结构图来自RangeKing(github)

Backbone部分:
# YOLOv8.0n backbone
backbone:# [from, repeats, module, args]- [-1, 1, Conv, [64, 3, 2]]  # 0-P1/2- [-1, 1, Conv, [128, 3, 2]]  # 1-P2/4- [-1, 3, C2f, [128, True]]- [-1, 1, Conv, [256, 3, 2]]  # 3-P3/8- [-1, 6, C2f, [256, True]]- [-1, 1, Conv, [512, 3, 2]]  # 5-P4/16- [-1, 6, C2f, [512, True]]- [-1, 1, Conv, [1024, 3, 2]]  # 7-P5/32- [-1, 3, C2f, [1024, True]]- [-1, 1, SPPF, [1024, 5]]  # 9
# [from, repeats, module, args]
from:本层的来源,也就是输入。-1表示将上层的输出作为本层的输入。
repeats:本层的重复次数。
module:本层的名称。
args:本层的参数。
第0层: - [-1, 1, Conv, [64, 3, 2]] # 0-P1/2
-1代表将上层的输入作为本层的输入。第0层的输入是640*640*3的图像。
Conv代表卷积层,相应的参数:64代表输出通道数,3代表卷积核大小k,2代表stride步长。
这里给出Conv的代码供参考
def autopad(k, p=None, d=1): # kernel, padding, dilation# Pad to 'same' shape outputsif d > 1:k = d * (k - 1) + 1 if isinstance(k, int) else [d * (x - 1) + 1 for x in k] # actual kernel-sizeif p is None:p = k // 2 if isinstance(k, int) else [x // 2 for x in k] # auto-padreturn pclass Conv(nn.Module):# Standard convolution with args(ch_in, ch_out, kernel, stride, padding, groups, dilation, activation)default_act = nn.SiLU() # default activationdef __init__(self, c1, c2, k=1, s=1, p=None, g=1, d=1, act=True):super().__init__()self.conv = nn.Conv2d(c1, c2, k, s, autopad(k, p, d), groups=g, dilation=d, bias=False)self.bn = nn.BatchNorm2d(c2)self.act = self.default_act if act is True else act if isinstance(act, nn.Module) else nn.Identity()def forward(self, x):return self.act(self.bn(self.conv(x)))def forward_fuse(self, x):return self.act(self.conv(x))
可以从代码中看出,当k=3时,p=1
所以第0层的卷积f_in=640, c_out=64, k=3, s=2, p=1
输出的特征图大小计算公式:f_out = ((f_in - k + 2*p ) / s ) 向下取整 +1
计算出卷积后的特征图大小:640-3+2=639,639/2向下取整=319,319+1=320
所以经过此层,输出的特征图尺寸为320*320*64,长宽为初始图片的1/2。
第1层: - [-1, 1, Conv, [128, 3, 2]] # 1-P2/4
本层和上一层是一样的操作(128代表输出通道数,3代表卷积核大小k,2代表stride步长),卷积后的特征图尺寸为160*160*128(320-3+2=319,319/2向下取整=159,159+1=160),长宽为初始图片的1/4。
第2层: - [-1, 3, C2f, [128, True]]
本层是C2f模块,先给出C2f的源码:
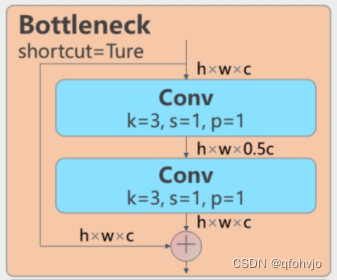
class C2f(nn.Module):# CSP Bottleneck with 2 convolutionsdef __init__(self, c1, c2, n=1, shortcut=False, g=1, e=0.5): # ch_in, ch_out, number, shortcut, groups, expansionsuper().__init__()self.c = int(c2 * e) # hidden channelsself.cv1 = Conv(c1, 2 * self.c, 1, 1)self.cv2 = Conv((2 + n) * self.c, c2, 1) # optional act=FReLU(c2)self.m = nn.ModuleList(Bottleneck(self.c, self.c, shortcut, g, k=((3, 3), (3, 3)), e=1.0) for _ in range(n))def forward(self, x):y = list(self.cv1(x).chunk(2, 1))y.extend(m(y[-1]) for m in self.m)return self.cv2(torch.cat(y, 1))def forward_split(self, x):y = list(self.cv1(x).split((self.c, self.c), 1))y.extend(m(y[-1]) for m in self.m)return self.cv2(torch.cat(y, 1))class Bottleneck(nn.Module):# Standard bottleneckdef __init__(self, c1, c2, shortcut=True, g=1, k=(3, 3), e=0.5): # ch_in, ch_out, shortcut, groups, kernels, expandsuper().__init__()c_ = int(c2 * e) # hidden channelsself.cv1 = Conv(c1, c_, k[0], 1)self.cv2 = Conv(c_, c2, k[1], 1, g=g)self.add = shortcut and c1 == c2def forward(self, x):return x + self.cv2(self.cv1(x)) if self.add else self.cv2(self.cv1(x))
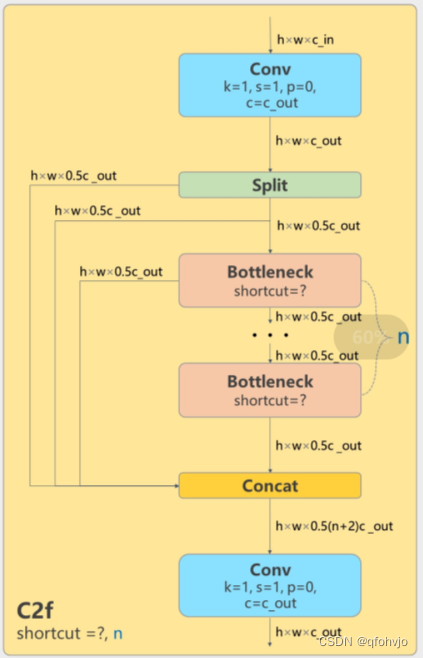
结合RangeKing绘制的YOLOv8网络结构图理解:
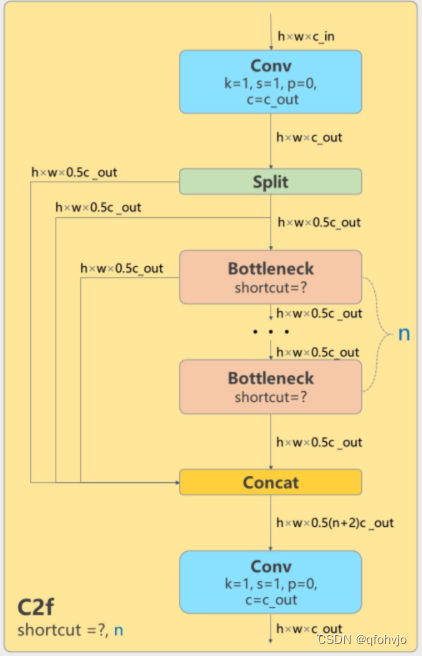
(代码有点复杂,之后补上这一块的解释)
3代表本层重复3次。128代表输出通道数,True表示Bottleneck有shortcut。
经过这层之后,特征图尺寸依旧是160*160*128。
第3层: - [-1, 1, Conv, [256, 3, 2]] # 3-P3/8
进行卷积操作(256代表输出通道数,3代表卷积核大小k,2代表stride步长),输出特征图尺寸为80*80*256(卷积的参数都没变,所以都是长宽变成原来的1/2,和之前一样),特征图的长宽已经变成输入图像的1/8。
第4层: - [-1, 6, C2f, [256, True]]
6代表本层重复6次。256代表输出通道数,True表示Bottleneck有shortcut。
经过这层之后,特征图尺寸依旧是80*80*256。
第5层: - [-1, 1, Conv, [512, 3, 2]] # 5-P4/16
进行卷积操作(512代表输出通道数,3代表卷积核大小k,2代表stride步长),输出特征图尺寸为40*40*512(卷积的参数都没变,所以都是长宽变成原来的1/2,和之前一样),特征图的长宽已经变成输入图像的1/16。
第6层: - [-1, 6, C2f, [512, True]]
6代表本层重复6次。512代表输出通道数,True表示Bottleneck有shortcut。
经过这层之后,特征图尺寸依旧是40*40*512。
第7层: - [-1, 1, Conv, [1024, 3, 2]] # 7-P5/32
进行卷积操作(1024代表输出通道数,3代表卷积核大小k,2代表stride步长),输出特征图尺寸为20*20*1024(卷积的参数都没变,所以都是长宽变成原来的1/2,和之前一样),特征图的长宽已经变成输入图像的1/32。
第8层: - [-1, 3, C2f, [1024, True]]
3代表本层重复3次。1024代表输出通道数,True表示Bottleneck有shortcut。
经过这层之后,特征图尺寸依旧是20*20*1024。
第9层: - [-1, 1, SPPF, [1024, 5]] # 9
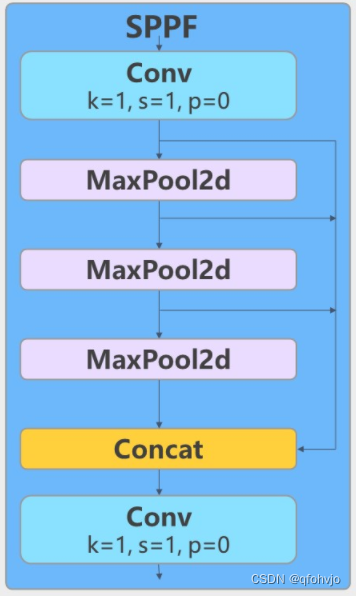
class SPPF(nn.Module):# Spatial Pyramid Pooling - Fast (SPPF) layer for YOLOv5 by Glenn Jocherdef __init__(self, c1, c2, k=5): # equivalent to SPP(k=(5, 9, 13))super().__init__()c_ = c1 // 2 # hidden channelsself.cv1 = Conv(c1, c_, 1, 1)self.cv2 = Conv(c_ * 4, c2, 1, 1)self.m = nn.MaxPool2d(kernel_size=k, stride=1, padding=k // 2)def forward(self, x):x = self.cv1(x)y1 = self.m(x)y2 = self.m(y1)return self.cv2(torch.cat((x, y1, y2, self.m(y2)), 1))本层是快速空间金字塔池化层(SPPF)。1024代表输出通道数,5代表池化核大小k。结合模块结构图和代码可以看出,最后concat得到的特征图尺寸是20*20*(512*4),经过一次Conv得到20*20*1024。
Head部分:
# YOLOv8.0n head
head:- [-1, 1, nn.Upsample, [None, 2, 'nearest']]- [[-1, 6], 1, Concat, [1]]  # cat backbone P4- [-1, 3, C2f, [512]]  # 12- [-1, 1, nn.Upsample, [None, 2, 'nearest']]- [[-1, 4], 1, Concat, [1]]  # cat backbone P3- [-1, 3, C2f, [256]]  # 15 (P3/8-small)- [-1, 1, Conv, [256, 3, 2]]- [[-1, 12], 1, Concat, [1]]  # cat head P4- [-1, 3, C2f, [512]]  # 18 (P4/16-medium)- [-1, 1, Conv, [512, 3, 2]]- [[-1, 9], 1, Concat, [1]]  # cat head P5- [-1, 3, C2f, [1024]]  # 21 (P5/32-large)- [[15, 18, 21], 1, Detect, [nc]]  # Detect(P3, P4, P5)
第10层: - [-1, 1, nn.Upsample, [None, 2, 'nearest']]
torch.nn.Upsample(size=None, scale_factor=None, mode='nearest', align_corners=None)
本层是上采样层。-1代表将上层的输出作为本层的输入。None代表上采样的size(输出尺寸)不指定。2代表scale_factor=2,表示输出的尺寸是输入尺寸的2倍。nearest代表使用的上采样算法为最近邻插值算法。经过这层之后,特征图的长和宽变成原来的两倍,通道数不变,所以最终尺寸为40*40*1024。
第11层: - [[-1, 6], 1, Concat, [1]] # cat backbone P4
本层是concat层,[-1, 6]代表将上层和第6层的输出作为本层的输入。[1]代表concat拼接的维度是1。从上面的分析可知,上层的输出尺寸是40*40*1024,第6层的输出是40*40*512,最终本层的输出尺寸为40*40*1536。
第12层: - [-1, 3, C2f, [512]] # 12
3代表本层重复3次。512代表输出通道数。与Backbone中C2f不同的是,此处的C2f的bottleneck模块的shortcut=False。

经过这层之后,特征图尺寸变为40*40*512。
第13层: - [-1, 1, nn.Upsample, [None, 2, 'nearest']]
本层也是上采样层(参考第10层)。经过这层之后,特征图的长和宽变成原来的两倍,通道数不变,所以最终尺寸为80*80*512。
第14层: - [[-1, 4], 1, Concat, [1]] # cat backbone P3
本层是concat层,[-1, 4]代表将上层和第4层的输出作为本层的输入。[1]代表concat拼接的维度是1。从上面的分析可知,上层的输出尺寸是80*80*512,第6层的输出是80*80*256,最终本层的输出尺寸为80*80*768。
第15层: - [-1, 3, C2f, [256]] # 15 (P3/8-small)
3代表本层重复3次。256代表输出通道数。
经过这层之后,特征图尺寸变为80*80*256,特征图的长宽已经变成输入图像的1/8。
第16层: - [-1, 1, Conv, [256, 3, 2]]
进行卷积操作(256代表输出通道数,3代表卷积核大小k,2代表stride步长),输出特征图尺寸为40*40*256(卷积的参数都没变,所以都是长宽变成原来的1/2,和之前一样)。
第17层: - [[-1, 12], 1, Concat, [1]] # cat head P4
本层是concat层,[-1, 12]代表将上层和第12层的输出作为本层的输入。[1]代表concat拼接的维度是1。从上面的分析可知,上层的输出尺寸是40*40*256,第12层的输出是40*40*512,最终本层的输出尺寸为40*40*768。
第18层: - [-1, 3, C2f, [512]] # 18 (P4/16-medium)
3代表本层重复3次。512代表输出通道数。
经过这层之后,特征图尺寸变为40*40*512,特征图的长宽已经变成输入图像的1/16。
第19层: - [-1, 1, Conv, [512, 3, 2]]
进行卷积操作(512代表输出通道数,3代表卷积核大小k,2代表stride步长),输出特征图尺寸为20*20*512(卷积的参数都没变,所以都是长宽变成原来的1/2,和之前一样)。
第20层: - [[-1, 9], 1, Concat, [1]] # cat head P5
本层是concat层,[-1, 9]代表将上层和第9层的输出作为本层的输入。[1]代表concat拼接的维度是1。从上面的分析可知,上层的输出尺寸是20*20*512,第9层的输出是20*20*1024,最终本层的输出尺寸为20*20*1536。
第21层: - [-1, 3, C2f, [1024]] # 21 (P5/32-large)
3代表本层重复3次。1024代表输出通道数。
经过这层之后,特征图尺寸变为20*20*1024,特征图的长宽已经变成输入图像的1/32。
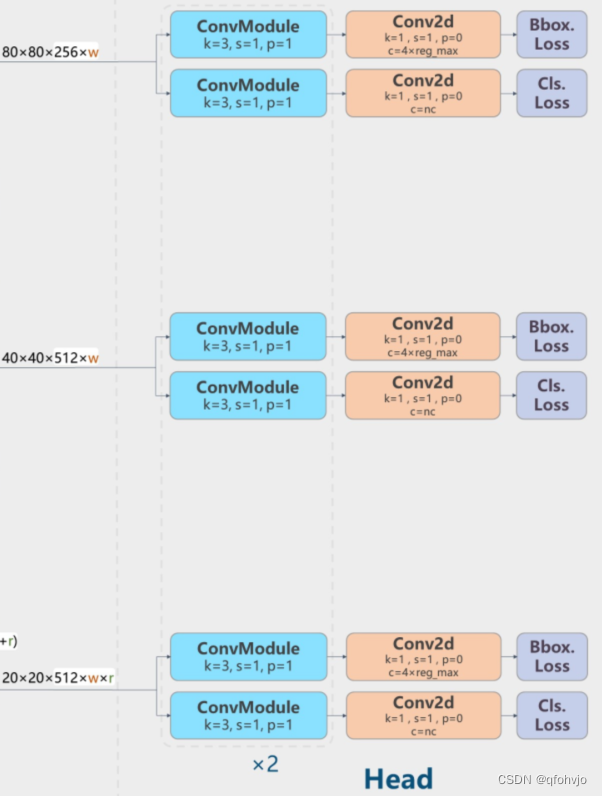
第22层: - [[15, 18, 21], 1, Detect, [nc]] # Detect(P3, P4, P5)
本层是Detect层,[15, 18, 21]代表将第15、18、21层的输出(分别是80*80*256、40*40*512、20*20*1024)作为本层的输入。nc是数据集的类别数。
class Detect(nn.Module):# YOLOv8 Detect head for detection modelsdynamic = False # force grid reconstructionexport = False # export modeshape = Noneanchors = torch.empty(0) # initstrides = torch.empty(0) # initdef __init__(self, nc=80, ch=()): # detection layersuper().__init__()self.nc = nc # number of classesself.nl = len(ch) # number of detection layersself.reg_max = 16 # DFL channels (ch[0] // 16 to scale 4/8/12/16/20 for n/s/m/l/x)self.no = nc + self.reg_max * 4 # number of outputs per anchorself.stride = torch.zeros(self.nl) # strides computed during buildc2, c3 = max((16, ch[0] // 4, self.reg_max * 4)), max(ch[0], self.nc) # channelsself.cv2 = nn.ModuleList(nn.Sequential(Conv(x, c2, 3), Conv(c2, c2, 3), nn.Conv2d(c2, 4 * self.reg_max, 1)) for x in ch)self.cv3 = nn.ModuleList(nn.Sequential(Conv(x, c3, 3), Conv(c3, c3, 3), nn.Conv2d(c3, self.nc, 1)) for x in ch)self.dfl = DFL(self.reg_max) if self.reg_max > 1 else nn.Identity()def forward(self, x):shape = x[0].shape # BCHWfor i in range(self.nl):x[i] = torch.cat((self.cv2[i](x[i]), self.cv3[i](x[i])), 1)if self.training:return xelif self.dynamic or self.shape != shape:self.anchors, self.strides = (x.transpose(0, 1) for x in make_anchors(x, self.stride, 0.5))self.shape = shapeif self.export and self.format == 'edgetpu': # FlexSplitV ops issuex_cat = torch.cat([xi.view(shape[0], self.no, -1) for xi in x], 2)box = x_cat[:, :self.reg_max * 4]cls = x_cat[:, self.reg_max * 4:]else:box, cls = torch.cat([xi.view(shape[0], self.no, -1) for xi in x], 2).split((self.reg_max * 4, self.nc), 1)dbox = dist2bbox(self.dfl(box), self.anchors.unsqueeze(0), xywh=True, dim=1) * self.stridesy = torch.cat((dbox, cls.sigmoid()), 1)return y if self.export else (y, x)def bias_init(self):# Initialize Detect() biases, WARNING: requires stride availabilitym = self # self.model[-1] # Detect() module# cf = torch.bincount(torch.tensor(np.concatenate(dataset.labels, 0)[:, 0]).long(), minlength=nc) + 1# ncf = math.log(0.6 / (m.nc - 0.999999)) if cf is None else torch.log(cf / cf.sum()) # nominal class frequencyfor a, b, s in zip(m.cv2, m.cv3, m.stride): # froma[-1].bias.data[:] = 1.0 # boxb[-1].bias.data[:m.nc] = math.log(5 / m.nc / (640 / s) 2) # cls (.01 objects, 80 classes, 640 img)class DFL(nn.Module):# Integral module of Distribution Focal Loss (DFL) proposed in Generalized Focal Loss https://ieeexplore.ieee.org/document/9792391def __init__(self, c1=16):super().__init__()self.conv = nn.Conv2d(c1, 1, 1, bias=False).requires_grad_(False)x = torch.arange(c1, dtype=torch.float)self.conv.weight.data[:] = nn.Parameter(x.view(1, c1, 1, 1))self.c1 = c1def forward(self, x):b, c, a = x.shape # batch, channels, anchorsreturn self.conv(x.view(b, 4, self.c1, a).transpose(2, 1).softmax(1)).view(b, 4, a)# return self.conv(x.view(b, self.c1, 4, a).softmax(1)).view(b, 4, a)
以上是对yolov8模型结构的一个大概的梳理,有一些模块的细节本人了解的也没有很清楚,所以就没有对全部代码进行解释。希望我的文章对你有帮助!