ROS2中将octomap发布到Moveit中作为碰撞物体

1.安装准备
这里假设你已经装好了ROS2以及Moveit2(都用二进制安装就行,不用从源码安转),没有安装好的,可以按照鱼香ROS的教程安装,两三行命令就搞定了。
我的ROS2版本为humble,请根据你使用的实际版本替换。
安装pcl
sudo apt install libpcl-dev
sudo apt-get install ros-humble-pcl*
安装octomap相关库
sudo apt-get install ros-humble-octomap*
下面这个也安装一下
sudo apt-get install ros-humble-moveit-ros-perception
2.bt文件读取
octomap信息可能来自话题(由设备或者其他节点发布),或者从bt文件中读取。这里出于便于演示等原因,选择从文件中读取。文件读取时要注意使用的bt文件是txt还是bin的,要选择对应的读取方式,具体请查看代码。
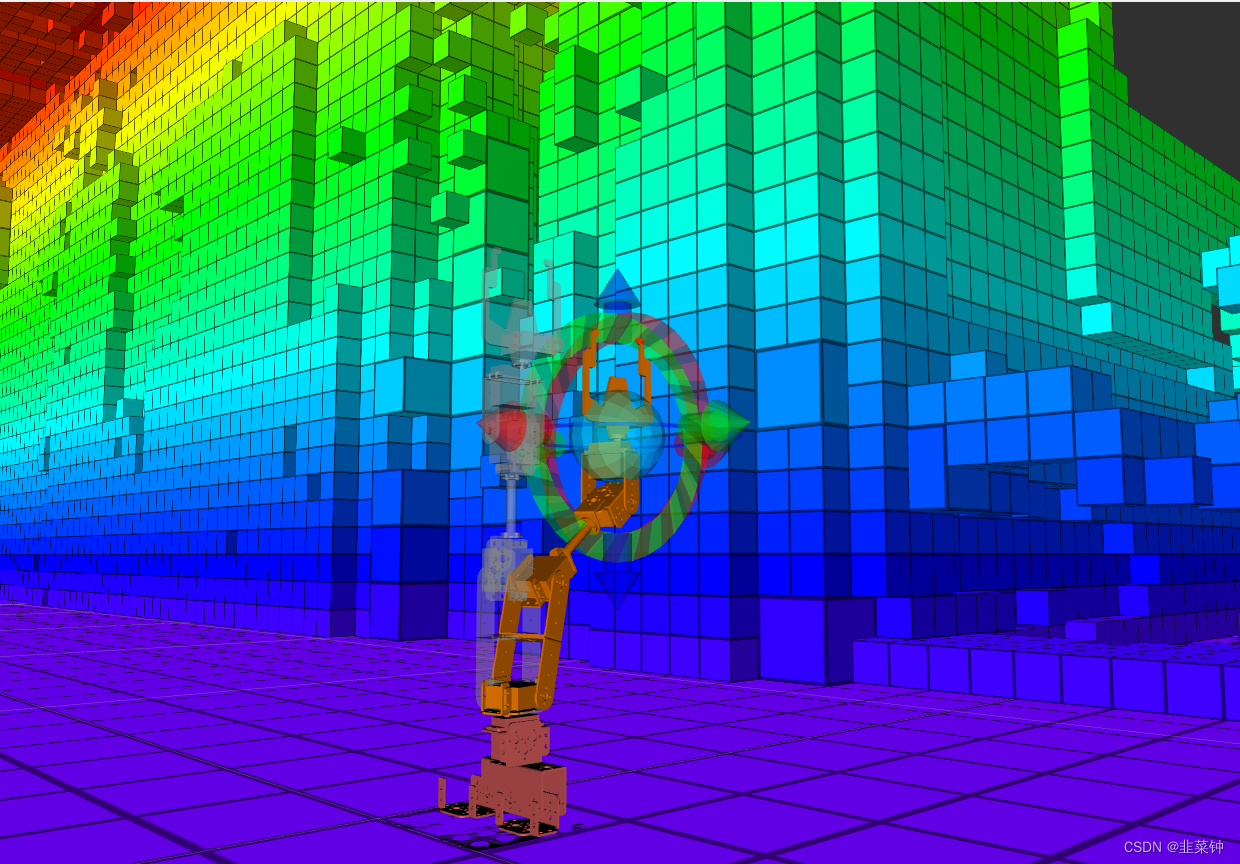
这个octomap的功能还是用之前做的机械手环境来演示。
以下所使用到的【geb079.bt】文件来自于octomap的github。而【octomap.bt】文件是通过以下函数创建:
void createOctoMap()
{// 创建OcTree对象,并设置分辨率为0.05octomap::OcTree* tree = new octomap::OcTree(0.05);// 设置障碍物的大小和位置octomap::point3d origin(0, 0, 0);octomap::point3d obstacle(0, 0, 0); // 1 1 1double size = 0.2;// 在OcTree中添加一个立方体障碍物tree->updateNode(octomap::point3d(origin.x() + obstacle.x() - size, origin.y() + obstacle.y() - size, origin.z() + obstacle.z() - size), true);tree->updateNode(octomap::point3d(origin.x() + obstacle.x() + size, origin.y() + obstacle.y() - size, origin.z() + obstacle.z() - size), true);tree->updateNode(octomap::point3d(origin.x() + obstacle.x() + size, origin.y() + obstacle.y() + size, origin.z() + obstacle.z() - size), true);tree->updateNode(octomap::point3d(origin.x() + obstacle.x() - size, origin.y() + obstacle.y() + size, origin.z() + obstacle.z() - size), true);tree->updateNode(octomap::point3d(origin.x() + obstacle.x() - size, origin.y() + obstacle.y() - size, origin.z() + obstacle.z() + size), true);tree->updateNode(octomap::point3d(origin.x() + obstacle.x() + size, origin.y() + obstacle.y() - size, origin.z() + obstacle.z() + size), true);tree->updateNode(octomap::point3d(origin.x() + obstacle.x() + size, origin.y() + obstacle.y() + size, origin.z() + obstacle.z() + size), true);tree->updateNode(octomap::point3d(origin.x() + obstacle.x() - size, origin.y() + obstacle.y() + size, origin.z() + obstacle.z() + size), true);// 将OcTree保存为octomap.bt文件std::string filename = "octomap.bt";auto ret = tree->writeBinary(filename);
//    auto ret = tree->write(filename);qDebug() << "write octomap.bt:" << ret;// 删除OcTree对象delete tree;
}
假如要将读取、接收到的octomap通过代码的方式“输出”到moveit中,让其参与碰撞检测、路径规划,一般有两种方式:
2.1通过moveit_msgs::msg::CollisionObject加入场景中
这种方式,是通过 octomap–》pointCloud–》mesh 的方式进行的,比较麻烦。而且在pointCloud–》mesh这一步遇到了一些问题,转出来的是面片,而非实体mesh。后面再研究研究
// 这个函数还是有问题的,弄出来的是面片,而不是mesh,后续还需要改进
void pclPointCloudToShapeMsgsMesh(const pcl::PointCloud<pcl::PointXYZ> *cloud,shape_msgs::msg::Mesh &mesh)
{// 创建三角形索引数组pcl::PolygonMesh triangles;pcl::Vertices vertices;for (size_t i = 0; i < cloud->size() - 2; ++i){vertices.vertices.clear();vertices.vertices.push_back(i);vertices.vertices.push_back(i + 1);vertices.vertices.push_back(i + 2);triangles.polygons.push_back(vertices);}// 拷贝点云数据到Mesh消息中mesh.vertices.resize(cloud->size());for (int i = 0; i < cloud->size(); ++i){geometry_msgs::msg::Point p;p.x = (*cloud)[i].x;p.y = (*cloud)[i].y;p.z = (*cloud)[i].z;mesh.vertices[i] = p;}// 拷贝三角形索引数据到Mesh消息中mesh.triangles.resize(triangles.polygons.size());for (int i = 0; i < triangles.polygons.size(); ++i){shape_msgs::msg::MeshTriangle t;t.vertex_indices[0] = triangles.polygons[i].vertices[0];t.vertex_indices[1] = triangles.polygons[i].vertices[1];t.vertex_indices[2] = triangles.polygons[i].vertices[2];mesh.triangles[i] = t;}
}// 将octoMap作为碰撞物体导入到moveit中
void appendCollisionObject(QString octoFile)
{auto const node = std::make_shared<rclcpp::Node>("hello_moveit",rclcpp::NodeOptions().automatically_declare_parameters_from_overrides(true));//创建 MoveIt MoveGroup Interface,用于连接、获取MoveGroup的信息using moveit::planning_interface::MoveGroupInterface;auto move_group_interface = MoveGroupInterface(node, "my_group"); // 估计要依附一个节点,才能进行interface的创建// 将碰撞物体加到scene中moveit::planning_interface::PlanningSceneInterface planning_scene_interface;auto frameId = move_group_interface.getPlanningFrame();qDebug() << "frame id:" << frameId.data();{std::shared_ptr<octomap::OcTree> octree = std::make_shared<octomap::OcTree>(octomap::OcTree(octoFile.toStdString()));if (octree == nullptr) {throw std::runtime_error("Could not read Octomap data from file " + octoFile.toStdString());}// octTree转点云pcl::PointCloud<pcl::PointXYZ> cloud;// Traverse all the leaf nodes and add them to the point cloud if they are occupiedfor (auto it = octree->begin_leafs(); it != octree->end_leafs(); ++it) {if (octree->isNodeOccupied(*it)) {pcl::PointXYZ pt;pt.x = it.getX();pt.y = it.getY();pt.z = it.getZ();cloud.points.push_back(pt);}}// 点云转meshshape_msgs::msg::Mesh output_mesh;pclPointCloudToShapeMsgsMesh(&cloud, output_mesh);geometry_msgs::msg::Pose octomap_pose;octomap_pose.orientation.w = 1.0;octomap_pose.position.x = 0.2;octomap_pose.position.y = 0.2;octomap_pose.position.z = 0.2;// 直接往octomap_object里面塞meshmoveit_msgs::msg::CollisionObject octomap_object;octomap_object.id = "my_octomap_object";octomap_object.header.frame_id = frameId;octomap_object.meshes.push_back(output_mesh);octomap_object.mesh_poses.push_back(octomap_pose);octomap_object.operation = moveit_msgs::msg::CollisionObject::ADD;// 将碰撞对象添加到collision_objects中,然后传递给applyCollisionObjects函数std::vector<moveit_msgs::msg::CollisionObject> collision_objects;collision_objects.push_back(octomap_object);qDebug() << "applyCollisionObjects" <<  planning_scene_interface.applyCollisionObjects(collision_objects);}
}
2.2通过moveit_msgs::msg::PlanningScene加入(替换)场景
目前我使用的是这种,效果良好。不过可能会存在一些冲突,等后面研究得更加透彻之后再修改吧。
void appendScene(QString octoFile)
{auto const node = std::make_shared<rclcpp::Node>("hello_moveit1",rclcpp::NodeOptions().automatically_declare_parameters_from_overrides(true));//创建 MoveIt MoveGroup Interface,用于连接、获取MoveGroup的信息using moveit::planning_interface::MoveGroupInterface;auto move_group_interface = MoveGroupInterface(node, "my_group"); // 估计要依附一个节点,才能进行interface的创建auto frameId = move_group_interface.getPlanningFrame();// Load an OctoMap from fileoctomap::OcTree* octree = new octomap::OcTree(octoFile.toStdString());// 将Octomap数据转换为ROS2消息octomap_msgs::msg::Octomap octomap_msg;octomap_msgs::binaryMapToMsg(*octree, octomap_msg);// 创建PlanningSceneMonitor实例, 用于获取 AllowedCollisionMatrixauto planning_scene_monitor = std::make_shared<planning_scene_monitor::PlanningSceneMonitor>(node,"robot_description");collision_detection::AllowedCollisionMatrix acm = planning_scene_monitor->getPlanningScene()->getAllowedCollisionMatrix();
//    // 假设我们需要允许"obstacle_1"和"obstacle_2"之间的碰撞
//    acm.setEntry("obstacle_1", "obstacle_2", true);// 将 collision_detection::AllowedCollisionMatrix 转成 moveit_msgs::msg::AllowedCollisionMatrixmoveit_msgs::msg::AllowedCollisionMatrix acm_msg;acm.getMessage(acm_msg);moveit_msgs::msg::PlanningScene planning_scene_msg;planning_scene_msg.world.octomap.header.frame_id = frameId;  // Replace "map" with your frame IDplanning_scene_msg.world.octomap.origin.orientation.w = 1.0;planning_scene_msg.world.octomap.octomap = octomap_msg;planning_scene_msg.allowed_collision_matrix = acm_msg;// 将PlanningScene 加(替换)到moveit中moveit::planning_interface::PlanningSceneInterface planning_scene_interface;planning_scene_interface.applyPlanningScene(planning_scene_msg);
}
3.效果演示
视频演示可以看这里:【MoveIt2中导入octomap】
参考
https://blog.csdn.net/qq_27865227/article/details/125002311