《SpringBoot》第02章 自动配置机制(一) 项目启动

前言
关于SpringBoot,最大的特点就是开箱即用,通过自动配置机制,遵守约定大于配置这个准则,那么这个是如何实现的呢?
本章首先会介绍SpringBoot的启动执行
一、启动第一步:初始化
1.本章概述
当启动SpringBoot的时候,需要运行主程序的main()方法,那么代码执行的时候首先会创建一个SpringApplication对象,然后进行一些初始化工作,那么就先介绍初始化了哪些东西
2.构造方法实例化
当创建好SpringBoot项目以后,通过启动类来启动项目
@SpringBootApplication
public class BootTest02Application {public static void main(String[] args) {SpringApplication.run(BootTest02Application.class, args);}
}
运行run(),通过底层看到会经历两步:
- 创建
SpringBootApplication对象,参数类型为启动类 - 通过
run()运行方法
public static ConfigurableApplicationContext run(Class<?> primarySource, String... args) {return run(new Class<?>[] { primarySource }, args);
}public static ConfigurableApplicationContext run(Class<?>[] primarySources, String[] args) {return new SpringApplication(primarySources).run(args);
}
这里看到在构造方法中,会将很多组件提前加载到容器中
public SpringApplication(Class<?>... primarySources) {this(null, primarySources);}public SpringApplication(ResourceLoader resourceLoader, Class<?>... primarySources) {// 资源加载器(传过来的就是Null)this.resourceLoader = resourceLoader;Assert.notNull(primarySources, "PrimarySources must not be null");// <1> 主程序类this.primarySources = new LinkedHashSet<>(Arrays.asList(primarySources));// <2> 获取到Web应用类型,判断为Servlet / 响应式编程this.webApplicationType = WebApplicationType.deduceFromClasspath();// <3> 【初始启动器】,也就是去spring.factories找,但是默认是没有配置的this.bootstrapRegistryInitializers = new ArrayList<>(getSpringFactoriesInstances(BootstrapRegistryInitializer.class));// <4> 【设置初始化器】,同样是去spring.factories中找,测试找到了7个,在spring.factories中存在5个,另外2个肯定在其它配置的setInitializers((Collection) getSpringFactoriesInstances(ApplicationContextInitializer.class));// <5> 【设置监听器】,同时是在spring.factories找,测试找到了8个setListeners((Collection) getSpringFactoriesInstances(ApplicationListener.class));// <6> 【决定主程序类】,也就是那个是启动类this.mainApplicationClass = deduceMainApplicationClass();}
deduceFromClasspath() 判断应用类型
判断应用类型,这里会通过WebApplicationType枚举类来判断,对应的类型在枚举中已经标明了:
public enum WebApplicationType {NONE, // NONE就是什么都没有,按照正常的代码走即可不需要额外启动web容器如tomcat等SERVLET, // SERVLET则代表这是一个传统的servlet的web程序,对应SpringMVC,表示需要启动对应的web容器支持如tomcat等REACTIVE; // 对应响应式编程,这里不介绍了,毕竟Java开发主要是SpringMVC// 该方法中调用了很多 ClassUtils.isPresent() 方法, 下面会介绍static WebApplicationType deduceFromClasspath() {// 判断是否有响应式编程的类 WEBFLUX_INDICATOR_CLASSif (ClassUtils.isPresent(WEBFLUX_INDICATOR_CLASS, null) && !ClassUtils.isPresent(WEBMVC_INDICATOR_CLASS, null)&& !ClassUtils.isPresent(JERSEY_INDICATOR_CLASS, null)) {return WebApplicationType.REACTIVE;}// 判断是否存在对应的SpringMVC的类for (String className : SERVLET_INDICATOR_CLASSES) {if (!ClassUtils.isPresent(className, null)) {return WebApplicationType.NONE;}}// 最后就是Servletreturn WebApplicationType.SERVLET;}
// 负责判断常量中的类是否存在。实现原理是通过Class.forName尝试加载某个类,如果能够成功加载,则证明这个类存在,反之发生异常则代表类不存在。
public static boolean isPresent(String className, @Nullable ClassLoader classLoader) {try {// 通过尝试加载某个类来判断类是否存在forName(className, classLoader);return true;}catch (IllegalAccessError err) {throw new IllegalStateException("Readability mismatch in inheritance hierarchy of class [" +className + "]: " + err.getMessage(), err);}catch (Throwable ex) {// Typically ClassNotFoundException or NoClassDefFoundError...return false;}
}


getSpringFactoriesInstances()
根据系统的配置文件,在启动时加载各种配置类
private <T> Collection<T> getSpringFactoriesInstances(Class<T> type) {return getSpringFactoriesInstances(type, new Class<?>[] {});
}private <T> Collection<T> getSpringFactoriesInstances(Class<T> type, Class<?>[] parameterTypes, Object... args) {// 类加载器ClassLoader classLoader = getClassLoader();// Use names and ensure unique to protect against duplicates// 从 spring.factories 中加载对应的组件名Set<String> names = new LinkedHashSet<>(SpringFactoriesLoader.loadFactoryNames(type, classLoader));// 创建组件实例List<T> instances = createSpringFactoriesInstances(type, parameterTypes, classLoader, args, names);// 排序AnnotationAwareOrderComparator.sort(instances);return instances;
}
从上面的方法中,从SpringFactoriesLoader.loadFactoryNames(type, classLoader)可以看到会加载配置文件,那么配置文件在哪,往底层去找,会看到这么一个静态常量,存储着地址
public static final String FACTORIES_RESOURCE_LOCATION = "META-INF/spring.factories";
那么来看一下这个文件
[外链图片转存失败,源站可能有防盗链机制,建议将图片保存下来直接上传(img-QBeVu6zr-1680140140219)(E:/Gitee/SpringBoot/image-20230303111923474.png)]
deduceMainApplicationClass()
决定主程序类
private Class<?> deduceMainApplicationClass() {try {// 获取堆栈的跟踪记录  学会JVM的都知道每个方法都是一个栈帧,这里获取到执行到这里的全部栈StackTraceElement[] stackTrace = new RuntimeException().getStackTrace();for (StackTraceElement stackTraceElement : stackTrace) {// 获取到栈帧方法名为main的, 对象的就是找到启动类if ("main".equals(stackTraceElement.getMethodName())) {return Class.forName(stackTraceElement.getClassName());}}}catch (ClassNotFoundException ex) {// Swallow and continue}return null;
}

3.总结
关于SpringApplication的构造方法,都做了啥:
- 判断应用类型
- 初始化各种底层类,包括:初始化器、监听器
- 获取主启动类,主启动类很关键,后续会详细讲到
二、 启动第二步:run()
1.本章概述
在上面我们把SpringApplication创建完毕了,并且初始化了一些组件,那么接下来就来看一下run()
那么首先需要明确一点的就是SpringBoot底层封装的最核心的框架依旧是Spring框架,那么SpringBoot利用了Spring的扩展机制,把启动类封装成配置类,然后丢进容器中进行初始化,以此来实现自动配置机制
上面介绍了思想,那么来概述一下run()的大致步骤:
- 就是启动的各种初始化,包括环境、监听器、banner等
- 接下来就是结合
Spring的三步: 1)初始化IOC容器 2) 注入后置处理器 3)refresh() - 容器启动之后,就是各种后续处理
2.run()
public ConfigurableApplicationContext run(String... args) {// 记录应用启动时间StopWatch stopWatch = new StopWatch();stopWatch.start();ConfigurableApplicationContext context = null;Collection<SpringBootExceptionReporter> exceptionReporters = new ArrayList<>();// <1> 应用进入headless模式configureHeadlessProperty();// <2> 获取所有的运行时监听器, 实际测试获取的监听器就1个:EventPublishingRunListenerSpringApplicationRunListeners listeners = getRunListeners(args);// 发布容器开始启动事件listeners.starting();try {// 创建对象,保存命令行参数ApplicationArguments applicationArguments = new DefaultApplicationArguments(args);// <3> 准备环境ConfigurableEnvironment environment = prepareEnvironment(listeners, applicationArguments);// <4> 禁用BeanInfo, configureIgnoreBeanInfo(environment);// 打印bannerBanner printedBanner = printBanner(environment);// <5>【创建IOC容器】context = createApplicationContext();// <6> 获取启动过程的异常分析器,作用是对启动过程的异常进行分析、报告exceptionReporters = getSpringFactoriesInstances(SpringBootExceptionReporter.class,new Class[] { ConfigurableApplicationContext.class }, context);// <7>【准备IOC容器信息】prepareContext(context, environment, listeners, applicationArguments, printedBanner);// <8>【刷新IOC容器】这是就是Spring经典的初始化过程refreshContext(context);// <9> 空方法,子类继承扩展afterRefresh(context, applicationArguments);stopWatch.stop();if (this.logStartupInfo) {new StartupInfoLogger(this.mainApplicationClass).logStarted(getApplicationLog(), stopWatch);}// 发布容器启动完成事件listeners.started(context);// <10> 运行RunnerscallRunners(context, applicationArguments);}catch (Throwable ex) {// <11> 错误处理方法handleRunFailure(context, ex, exceptionReporters, listeners);throw new IllegalStateException(ex);}try {// 遍历listeners.running(context);}catch (Throwable ex) {handleRunFailure(context, ex, exceptionReporters, null);throw new IllegalStateException(ex);}return context;
}
<1> configureHeadlessProperty()
让当前应用进入headless模式
那么什么是java.awt.headless模式,它是J2SE的一种模式,用于在缺失显示屏、鼠标或者键盘时的系统配置。例如:应用集群、数据库集群等,它们一般没有显示器、键盘、鼠标,都是通过网络远程操作。对于后端服务来讲,很多都是需要将这个属性设置为true的。
private static final String SYSTEM_PROPERTY_JAVA_AWT_HEADLESS = "java.awt.headless";private void configureHeadlessProperty() {System.setProperty(SYSTEM_PROPERTY_JAVA_AWT_HEADLESS,System.getProperty(SYSTEM_PROPERTY_JAVA_AWT_HEADLESS, Boolean.toString(this.headless)));
}
<2> getRunListeners() + starting() 启动监听器
获取所有的运行监听器RunListener,通过查看配置文件META-INF/spring.factories,看到其实就1个监听器,而且该监听器只是在启动的时候使用,通过该接口的名字SpringApplicationRunListener,就可以看出来,是监听SpringApplication中的run()方法
private SpringApplicationRunListeners getRunListeners(String[] args) {Class<?>[] types = new Class<?>[] { SpringApplication.class, String[].class };return new SpringApplicationRunListeners(logger,// 这里还是固定的去spring.factories文件中去找getSpringFactoriesInstances(SpringApplicationRunListener.class, types, this, args),this.applicationStartup);
}
// spring.factories配置文件中显示的监听器就1个# Run Listeners
org.springframework.boot.SpringApplicationRunListener=\\
org.springframework.boot.context.event.EventPublishingRunListener
遍历监听器,调用starting()方法
void starting() {for (SpringApplicationRunListener listener : this.listeners) {listener.starting();}
}
<3> prepareEnvironment() 准备环境
https://www.cnblogs.com/youzhibing/p/9622441.html 关于该方法的文章
private ConfigurableEnvironment prepareEnvironment(SpringApplicationRunListeners listeners,DefaultBootstrapContext bootstrapContext, ApplicationArguments applicationArguments) {// Create and configure the environment// 获取或者创建环境,存在则使用,没有则创建ConfigurableEnvironment environment = getOrCreateEnvironment();// 配置环境:配置PropertySources和activeProfilesconfigureEnvironment(environment, applicationArguments.getSourceArgs());// 绑定环境信息ConfigurationPropertySources.attach(environment);// 通知所有的监听器,当前环境已经准备完成listeners.environmentPrepared(bootstrapContext, environment);DefaultPropertiesPropertySource.moveToEnd(environment);Assert.state(!environment.containsProperty("spring.main.environment-prefix"),"Environment prefix cannot be set via properties.");// 将环境绑定到SpringApplicationbindToSpringApplication(environment);if (!this.isCustomEnvironment) {environment = convertEnvironment(environment);}// 配置PropertySources对它自己的递归依赖ConfigurationPropertySources.attach(environment);return environment;
}
configureEnvironment()
protected void configureEnvironment(ConfigurableEnvironment environment, String[] args) {if (this.addConversionService) {// 设置转换器environment.setConversionService(new ApplicationConversionService());}// 加载外部配置源configurePropertySources(environment, args);// 激活profile环境,默认空方法configureProfiles(environment, args);
}protected void configurePropertySources(ConfigurableEnvironment environment, String[] args) {MutablePropertySources sources = environment.getPropertySources();if (!CollectionUtils.isEmpty(this.defaultProperties)) {DefaultPropertiesPropertySource.addOrMerge(this.defaultProperties, sources);}if (this.addCommandLineProperties && args.length > 0) {String name = CommandLinePropertySource.COMMAND_LINE_PROPERTY_SOURCE_NAME;if (sources.contains(name)) {PropertySource<?> source = sources.get(name);CompositePropertySource composite = new CompositePropertySource(name);composite.addPropertySource(new SimpleCommandLinePropertySource("springApplicationCommandLineArgs", args));composite.addPropertySource(source);sources.replace(name, composite);}else {sources.addFirst(new SimpleCommandLinePropertySource(args));}}}
<4> configureIgnoreBeanInfo()
环境创建成功后,进入到configureIgnoreBeanInfo方法,就是配置了一个spring.beaninfo.ignore属性,默认为TRUE,跳过对 BeanInfo 的搜索,这个BeanInfo是JDK 声明的一个接口,可以使用Introspector.getBeanInfo获取一个对象的方法、属性、事件和其他功能的显式信息。
一句话讲明白:Java可以通过基础反射和BeanInfo 两种方式解析类,这里通过spring.beaninfo.ignore = TRUE将BeanInfo禁用了,可以提升一些性能。
private void configureIgnoreBeanInfo(ConfigurableEnvironment environment) {if (System.getProperty(CachedIntrospectionResults.IGNORE_BEANINFO_PROPERTY_NAME) == null) {// 空的话获取,默认为trueBoolean ignore = environment.getProperty("spring.beaninfo.ignore", Boolean.class, Boolean.TRUE);System.setProperty(CachedIntrospectionResults.IGNORE_BEANINFO_PROPERTY_NAME, ignore.toString());}
}
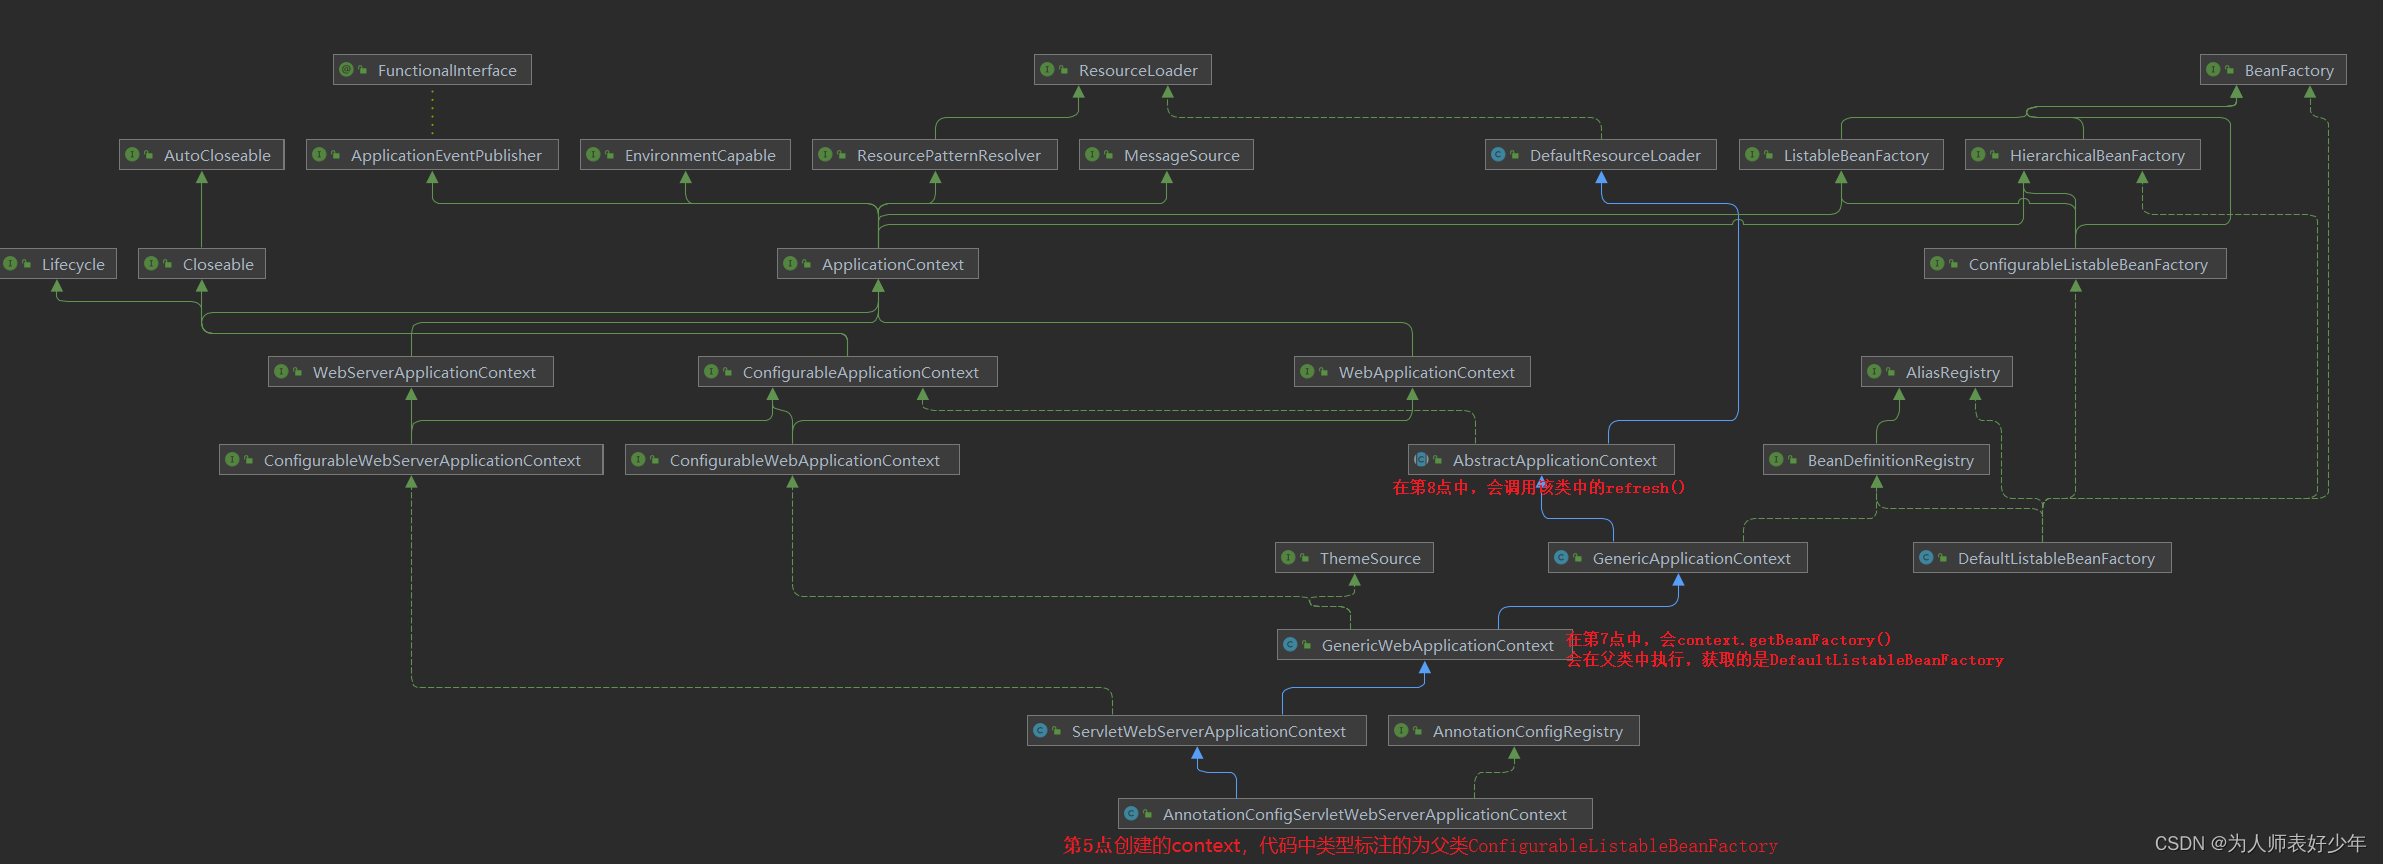
<5> createApplicationContext()
根据容器类型,创建IOC容器,我们启动Web,创建的肯定是AnnotationConfigServletWebServerApplicationContext
protected ConfigurableApplicationContext createApplicationContext() {// 容器类型Class<?> contextClass = this.applicationContextClass;if (contextClass == null) {try {switch (this.webApplicationType) {case SERVLET:contextClass = Class.forName(DEFAULT_SERVLET_WEB_CONTEXT_CLASS);break;case REACTIVE:contextClass = Class.forName(DEFAULT_REACTIVE_WEB_CONTEXT_CLASS);break;default:contextClass = Class.forName(DEFAULT_CONTEXT_CLASS);}}catch (ClassNotFoundException ex) {throw new IllegalStateException("Unable create a default ApplicationContext, please specify an ApplicationContextClass", ex);}}// 实例化return (ConfigurableApplicationContext) BeanUtils.instantiateClass(contextClass);
}
<6> 异常分析器
下面从run()方法中截取了2行代码,它是负责获取异常分析器
Collection<SpringBootExceptionReporter> exceptionReporters = new ArrayList<>();
exceptionReporters = getSpringFactoriesInstances(SpringBootExceptionReporter.class,new Class[] { ConfigurableApplicationContext.class }, context);
那么它是干什么的?当我们启动项目的时候,如果存在问题,会有例如下面的错误提示,这个就是异常解析器负责的
***************************
APPLICATION FAILED TO START
***************************Description:The Tomcat connector configured to listen on port 9099 failed to start. The port may already be in use or the connector may be misconfigured.Action:Verify the connector's configuration, identify and stop any process that's listening on port 9099, or configure this application to listen on another port.
在源码中,它也是通过getSpringFactoriesInstances()去META-INF/spring.factories中获取
[外链图片转存失败,源站可能有防盗链机制,建议将图片保存下来直接上传(img-iRcfqLSK-1680140140221)(E:/Gitee/SpringBoot/image-20230306135343297.png)]
<7> prepareContext() 准备容器
该方法通过名字可以看到是准备容器,各种初始化,其中最重要的就是loader.load()这行代码,它会将启动类变成一个BeanDefinition注入到容器中,这样它就和Spring框架结合起来了,后续会以它为起点,开始扫描项目中的Controller、Service等等注册到容器中
// 参数1: context是刚新建好的容器
// 参数2: environment是我们真正要使用的环境对象,已经完成了配置文件等的装载
// 参数3: listeners中有一个事件发布器,内部含有springboot内置的监听器列表
// 参数4: applicationArguements是对命令行参数的一个封装
// 参数5: printerBanner是上面打印过的启动banner
private void prepareContext(ConfigurableApplicationContext context, ConfigurableEnvironment environment,SpringApplicationRunListeners listeners, ApplicationArguments applicationArguments, Banner printedBanner) {// 容器绑定环境context.setEnvironment(environment);postProcessApplicationContext(context);applyInitializers(context);listeners.contextPrepared(context);if (this.logStartupInfo) {logStartupInfo(context.getParent() == null);logStartupProfileInfo(context);}// Add boot specific singleton beans 添加引导特定的单例 bean// 首先获取BeanFactory, 会调用父类GenericApplicationContext中的getBeanFactory(),返回的肯定就是DefaultListableBeanFactoryConfigurableListableBeanFactory beanFactory = context.getBeanFactory();// 将命令行参数和打印的banner对象作为一个单例Bean注册到容器中beanFactory.registerSingleton("springApplicationArguments", applicationArguments);if (printedBanner != null) {beanFactory.registerSingleton("springBootBanner", printedBanner);}// 将SpringApplication对象中的allowBeanDefinitionOverriding属性设置到容器中if (beanFactory instanceof DefaultListableBeanFactory) {((DefaultListableBeanFactory) beanFactory).setAllowBeanDefinitionOverriding(this.allowBeanDefinitionOverriding);}if (this.lazyInitialization) {context.addBeanFactoryPostProcessor(new LazyInitializationBeanFactoryPostProcessor());}// Load the sources// sources里面放的就是启动类Set<Object> sources = getAllSources();Assert.notEmpty(sources, "Sources must not be empty");load(context, sources.toArray(new Object[0]));listeners.contextLoaded(context);
}
postProcessApplicationContext()
protected void postProcessApplicationContext(ConfigurableApplicationContext context) {// 注册BeanNameGenerator到单例池,它负责给容器中的bean生成名字的,默认的命名策略就是类名小写if (this.beanNameGenerator != null) {context.getBeanFactory().registerSingleton(AnnotationConfigUtils.CONFIGURATION_BEAN_NAME_GENERATOR,this.beanNameGenerator);}// 赋值的,默认为Nullif (this.resourceLoader != null) {if (context instanceof GenericApplicationContext) {((GenericApplicationContext) context).setResourceLoader(this.resourceLoader);}if (context instanceof DefaultResourceLoader) {((DefaultResourceLoader) context).setClassLoader(this.resourceLoader.getClassLoader());}}// 默认为true,进入if,设置一个ConversionService,做类型转换的,比如String转Integer等等if (this.addConversionService) {context.getBeanFactory().setConversionService(ApplicationConversionService.getSharedInstance());}
}
applyInitializers()
它取出了SpringApplication对象创建时,到META-INF/spring.factories中加载到的ApplicationContextInitializer列表,并依次调用其initialize方法
protected void applyInitializers(ConfigurableApplicationContext context) {// 遍历所有的初始化器for (ApplicationContextInitializer initializer : getInitializers()) {Class<?> requiredType = GenericTypeResolver.resolveTypeArgument(initializer.getClass(),ApplicationContextInitializer.class);Assert.isInstanceOf(requiredType, context, "Unable to call initializer.");// 调用初始化方法,对IOC容器进行初始化扩展功能initializer.initialize(context);}
}
# Application Context Initializers
org.springframework.context.ApplicationContextInitializer=\\
org.springframework.boot.context.ConfigurationWarningsApplicationContextInitializer,\\
org.springframework.boot.context.ContextIdApplicationContextInitializer,\\
org.springframework.boot.context.config.DelegatingApplicationContextInitializer,\\
org.springframework.boot.rsocket.context.RSocketPortInfoApplicationContextInitializer,\\
org.springframework.boot.web.context.ServerPortInfoApplicationContextInitializer
load()
// 参数1: IOC容器
// 参数2: 数组,里面放着启动类的Class,也就是我们在启动类中传的参数
protected void load(ApplicationContext context, Object[] sources) {if (logger.isDebugEnabled()) {logger.debug("Loading source " + StringUtils.arrayToCommaDelimitedString(sources));}// getBeanDefinitionRegistry获取BeanDefinitionRegistry, context实现了该接口,底层强转一下即可// 创建BeanDefinitionLoader,负责加载BeanDefinitionLoader loader = createBeanDefinitionLoader(getBeanDefinitionRegistry(context), sources);// 接下来几个if分支都不会进,默认情况下SpringApplication中的beanNameGenerator、resourceLoader、environment都是nullif (this.beanNameGenerator != null) {loader.setBeanNameGenerator(this.beanNameGenerator);}if (this.resourceLoader != null) {loader.setResourceLoader(this.resourceLoader);}if (this.environment != null) {loader.setEnvironment(this.environment);}// 加载loader.load();
}
createBeanDefinitionLoader()
初始化BeanDefinitionLoader,通过名字可以看出来意思
// 创建BeanDefinitionLoader
protected BeanDefinitionLoader createBeanDefinitionLoader(BeanDefinitionRegistry registry, Object[] sources) {return new BeanDefinitionLoader(registry, sources);
}// 上面使用到的BeanDefinitionLoader的构造方法
BeanDefinitionLoader(BeanDefinitionRegistry registry, Object... sources) {Assert.notNull(registry, "Registry must not be null");Assert.notEmpty(sources, "Sources must not be empty");// 这里会把启动类当初属性存进来this.sources = sources;this.annotatedReader = new AnnotatedBeanDefinitionReader(registry);this.xmlReader = new XmlBeanDefinitionReader(registry);if (isGroovyPresent()) {this.groovyReader = new GroovyBeanDefinitionReader(registry);}this.scanner = new ClassPathBeanDefinitionScanner(registry);this.scanner.addExcludeFilter(new ClassExcludeFilter(sources));
}
loader.load()
// 继续回到上面SpringApplication#load()方法最后一行,调用了loader.load()
// 接下来来到了 BeanDefinitionLoader#loader()
int load() {int count = 0;// 遍历启动类,正常情况下使用SpringBoot只有1个启动类,所以这里的遍历就是1个for (Object source : this.sources) {count += load(source);}return count;
}// 启动类传入的参数是一个Class类型,所以会走第1个if分支
private int load(Object source) {Assert.notNull(source, "Source must not be null");if (source instanceof Class<?>) {return load((Class<?>) source);}if (source instanceof Resource) {return load((Resource) source);}if (source instanceof Package) {return load((Package) source);}if (source instanceof CharSequence) {return load((CharSequence) source);}throw new IllegalArgumentException("Invalid source type " + source.getClass());
}private int load(Class<?> source) {if (isGroovyPresent() && GroovyBeanDefinitionSource.class.isAssignableFrom(source)) {// Any GroovyLoaders added in beans{} DSL can contribute beans hereGroovyBeanDefinitionSource loader = BeanUtils.instantiateClass(source, GroovyBeanDefinitionSource.class);load(loader);}// 【重要】这里会判断启动类是否有@Component注解, 启动类的复合注解 @SpringBootApplication是肯定有@Component的if (isComponent(source)) {// 【重要】最终将我们的启动类转化为BeanDefinition注册到spring容器的BeanDefinitionMap中this.annotatedReader.register(source);return 1;}return 0;
}
contextLoaded()
void contextLoaded(ConfigurableApplicationContext context) {for (SpringApplicationRunListener listener : this.listeners) {listener.contextLoaded(context);}
}
@Override
public void contextLoaded(ConfigurableApplicationContext context) {// 遍历监听器for (ApplicationListener<?> listener : this.application.getListeners()) {if (listener instanceof ApplicationContextAware) {((ApplicationContextAware) listener).setApplicationContext(context);}// 将事件发布的职能转交给容器进行,有了监听器列表, 自然可以向它们广播事件了context.addApplicationListener(listener);}// 最后发布事件ApplicationPreparedEventthis.initialMulticaster.multicastEvent(new ApplicationPreparedEvent(this.application, this.args, context));
}
<8> refreshContext()
看到方法中有一个refresh(context);,学过Spring框架,这个方法自然不会陌生
private void refreshContext(ConfigurableApplicationContext context) {refresh(context);if (this.registerShutdownHook) {try {context.registerShutdownHook();}catch (AccessControlException ex) {// Not allowed in some environments.}}
}protected void refresh(ApplicationContext applicationContext) {// 判断传过来的容器是否为AbstractApplicationContext的子类// 因为refresh()是该类中的方法, 这里需要判断一下类型,然后下面再强转Assert.isInstanceOf(AbstractApplicationContext.class, applicationContext);((AbstractApplicationContext) applicationContext).refresh();
}
<9> afterRefresh()
留给开发人员扩展功能
protected void afterRefresh(ConfigurableApplicationContext context, ApplicationArguments args) {
}
<10> callRunners()
遍历监听器调用started方法
private void callRunners(ApplicationContext context, ApplicationArguments args) {List<Object> runners = new ArrayList<>();// 获取容器中的 ApplicationRunner runners.addAll(context.getBeansOfType(ApplicationRunner.class).values());// 获取容器中的  CommandLineRunnerrunners.addAll(context.getBeansOfType(CommandLineRunner.class).values());// 合并所有runner并且按照@Order进行排序AnnotationAwareOrderComparator.sort(runners);// 遍历所有的runner。调用 run 方法for (Object runner : new LinkedHashSet<>(runners)) {if (runner instanceof ApplicationRunner) {callRunner((ApplicationRunner) runner, args);}if (runner instanceof CommandLineRunner) {callRunner((CommandLineRunner) runner, args);}}
}
<11> handleRunFailure()
异常的时候会调用该方法
private void handleRunFailure(ConfigurableApplicationContext context, Throwable exception,SpringApplicationRunListeners listeners) {try {try {handleExitCode(context, exception);if (listeners != null) {// 发布容器启动失败事件listeners.failed(context, exception);}}finally {reportFailure(getExceptionReporters(context), exception);if (context != null) {context.close();}}}catch (Exception ex) {logger.warn("Unable to close ApplicationContext", ex);}ReflectionUtils.rethrowRuntimeException(exception);
}
er, args);
}
}
}
 <11> handleRunFailure()异常的时候会调用该方法```java
private void handleRunFailure(ConfigurableApplicationContext context, Throwable exception,SpringApplicationRunListeners listeners) {try {try {handleExitCode(context, exception);if (listeners != null) {// 发布容器启动失败事件listeners.failed(context, exception);}}finally {reportFailure(getExceptionReporters(context), exception);if (context != null) {context.close();}}}catch (Exception ex) {logger.warn("Unable to close ApplicationContext", ex);}ReflectionUtils.rethrowRuntimeException(exception);
}