【Three.js】手把手教你在三维场景中实现人物行走动画效果

three.js的官方例程里面有个人物行走的案例,链接如下:
three.js官方案例-人物行走
这里简单剖析下人物行走的原理:
(1)
首先需要有个动画素材。gltf是可以集成动画的,像行人行走的动画,一般是通过骨骼动画实现的。一个gltf里面可以有多组动画,加载到three.js引擎里面之后,可以选择所需要的动画进行播放。
(2)
一般来说,人物行走的轨迹需要通过程序指定。当然,glb里面直接集成了位移的动画也不是不可以,但这样的轨迹控制就不方便。所以一般来说,glb动画就是人物在原地走动甩腿就可以了,通过程序来变更其位置。
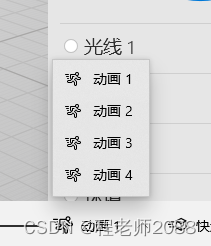
官方的glb可以在windows下的3d查看器打开。

右下角可以切换不同的动画,这个例程里面有4个动画,奔跑、慢走、站立、伸展。有兴趣的小伙伴自己切换来看下。
那接下来我们开始写代码。
1、首先引入threejs的相关库
<script type="importmap">{"imports": {"three": "./threejs/build/three.module.js","three/addons/": "./threejs/jsm/"}}</script> <script type="module">import * as THREE from 'three';import { GLTFLoader } from 'three/addons/loaders/GLTFLoader.js';import * as SkeletonUtils from 'three/addons/utils/SkeletonUtils.js';</script>2、定义好相关的变量。
各个变量的含义可以直接根据变量名读出来
let camera, scene, renderer;let clock;let model1,model2;const mixers = [];3、接下来写一个初始化函数init。
这个是搭建three环境的厂员工操作了
function init() {camera = new THREE.PerspectiveCamera( 45, window.innerWidth / window.innerHeight, 1, 1000 );camera.position.set( 2, 10, -25 );camera.lookAt( 0, 1, 0 );clock = new THREE.Clock();scene = new THREE.Scene();scene.background = new THREE.Color( 0xa0a0a0 );scene.fog = new THREE.Fog( 0xa0a0a0, 10, 50 );const hemiLight = new THREE.HemisphereLight( 0xffffff, 0x444444 );hemiLight.position.set( 0, 20, 0 );scene.add( hemiLight );const dirLight = new THREE.DirectionalLight( 0xffffff );dirLight.position.set( - 3, 10, - 10 );dirLight.castShadow = true;dirLight.shadow.camera.top = 4;dirLight.shadow.camera.bottom = - 4;dirLight.shadow.camera.left = - 4;dirLight.shadow.camera.right = 4;dirLight.shadow.camera.near = 0.1;dirLight.shadow.camera.far = 40;scene.add( dirLight );// scene.add( new THREE.CameraHelper( dirLight.shadow.camera ) );// groundconst mesh = new THREE.Mesh( new THREE.PlaneGeometry( 200, 200 ), new THREE.MeshPhongMaterial( { color: 0x999999, depthWrite: false } ) );mesh.rotation.x = - Math.PI / 2;mesh.receiveShadow = true;scene.add( mesh );const loader = new GLTFLoader();loader.load( 'models/gltf/Soldier.glb', function ( gltf ) {gltf.scene.traverse( function ( object ) {if ( object.isMesh ) object.castShadow = true;} );model1 = SkeletonUtils.clone( gltf.scene );model2 = SkeletonUtils.clone( gltf.scene );// const model3 = SkeletonUtils.clone( gltf.scene );const mixer1 = new THREE.AnimationMixer( model1 );const mixer2 = new THREE.AnimationMixer( model2 );// const mixer3 = new THREE.AnimationMixer( model3 );// mixer1.clipAction( gltf.animations[ 2 ] ).play(); // idlemixer1.clipAction( gltf.animations[ 1 ] ).play(); // runmixer2.clipAction( gltf.animations[ 3 ] ).play(); // walkmodel1.position.x = - 2;model2.position.x = 0;// model3.position.x = 2;// scene.add( model1, model2, model3 );scene.add( model1, model2);// mixers.push( mixer1, mixer2, mixer3 );mixers.push( mixer1, mixer2);animate();} );renderer = new THREE.WebGLRenderer( { antialias: true } );renderer.setPixelRatio( window.devicePixelRatio );renderer.setSize( window.innerWidth, window.innerHeight );renderer.outputEncoding = THREE.sRGBEncoding;renderer.shadowMap.enabled = true;document.body.appendChild( renderer.domElement );window.addEventListener( 'resize', onWindowResize );}关键代码剖析:
加载gltf、glb的函数是:loader.load( 'models/gltf/Soldier.glb', function ( gltf ) {}),
第二个参数是一个回调函数,当加载完毕之后,我们就开始调用骨骼动画了。这里用到了SkeletonUtils这个类。
注意选择具体的动画的地方就是mixer1.clipAction一句。gltf.animations就是上面提到的动画数组,有4个元素。
4、增加一个animate方法。
function animate() {requestAnimationFrame( animate );const delta = clock.getDelta();for ( const mixer of mixers ) mixer.update( delta );model1.position.z -= 0.03;model2.position.z -= 0.01;renderer.render( scene, camera );}代码剖析:
在这段代码里面,model1和model2的position属性被不停地更改,所以在场景刷新的时候,人物就走动起来了。
5、当然最后还是要调用一下这两个方法:
init();animate();至此,整个步行动画效果就出来了。
完整的代码下载:
完整代码包下载(含模型资源)