【Python3】matplotlib,模块,进/线程,文件/xml,百度人脸api,hal/aiohttp/curl

文章目录
- 1.matplotlib/时间复杂度/线性表:顺序表要求存储空间必须连续
- 2.python模块导入:python3 -c ‘import sys;print(sys.path)’ 显示导入模块时会去哪些路径下查找
- 3.进/线程:进/线程是不能随便创建,就像每招一个员工是有代价的,无限制招人最后崩溃。招几个固定员工,某个人的活干完了再去任务中心领新活
-
- 3.1 多进程&进程池:multiprocessing
- 3.2 多线程&线程池:c是编译型,python是解释型
- 4.文件/xml:os.walk
-
- 4.1 增:写入文件内容给文本文件
- 4.2 改:批量修改图片大小
- 4.3 查:查询文件夹中的文件
- 4.4 查:读取文件
- 4.5 查:搜索文件夹路径内含有指定内容的代码文件
- 4.6 labelimg_yolo_txt转pascal voc_xml
- 4.7 删除 w label
- 4.8 检查不是people和obstacle的label
- 4.9 读取指定后缀
- 4.10 检查是否有图片漏标,并删除漏标图片
- 4.11 检测标记的box是否超过图片的边界,若有则显示删除与box相关的xml文件和图片文件
- 4.12 检查xmin<0....,并修改xmin....
- 4.13 读取classname
- 4.14 检查trainval.txt
- 5.百度人脸api:https://ai.baidu.com/docs#/Auth/top 获取Access Token
- 6. hal层:strings flash-s3ip | grep U-Boot ( openbmc_version.bbclass )
-
- 6.1 i2c-utils/setup_i2c,i2c_dev_sysfs/syscpld.c
- 6.2 DL_DIR: 一个字节 = 0x(8421)(8421)
- 7.aiohttp: 0.0.0.0表示所有IP地址,如tomcat配置文件中监听的IP地址设置了0.0.0.0,就表示你的这个tomcat服务器监听在本机的所有IP地址上,通任何一个IP地址都可以访问到
- 8.curl:http请求
-
- 8.1 sshpass获取动态ip
- 8.2 restful获取动态ip
- 8.3 curl认证
1.matplotlib/时间复杂度/线性表:顺序表要求存储空间必须连续
import numpy as np
from matplotlib import pyplot as plt
import pandas as pd
df =pd.read_excel("Documents/b.xlsx")
df
plt.figure(figsize=(6,4))
plt.title("Train History")
plt.xlabel("Epoch")
plt.ylabel("Number of loss")plt.plot(df.c,df.d,"r",marker='*', mec='r', mfc='w')
plt.plot(df.a,df.b, marker='*', mec='b', mfc='w')
plt.plot(df.g,df.h,marker='*', mfc='w')
plt.plot(df.e,df.f,"g",marker='*', mec='g', mfc='w')
plt.xticks(range(0,21))plt.legend(["y=CNN-AlexNet-loss","y=CNN-VGGNet-loss","y=CNN-ResNet-loss","y=Improved CNN-ResNet-loss"])
plt.show

plt.figure(figsize=(6,4))
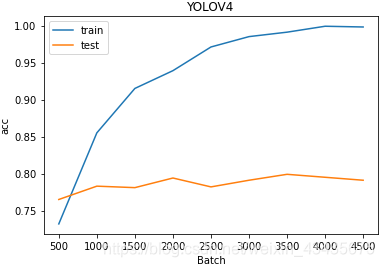
plt.title("YOLOV4")
plt.xlabel("Batch")
plt.ylabel("acc")plt.plot(df.a,df.b,"")
plt.plot(df.c,df.d,"")
plt.legend(["train","test"])
plt.show
plt.figure(figsize=(6,4))
plt.xlabel("Precision")
plt.ylabel("Recall")plt.plot(df.a,df.b, marker='o', mec='b', mfc='w')
plt.plot(df.c,df.d,"r",marker='o', mec='r', mfc='w')
#plt.xticks(range(0,21))
plt.legend(["y=Ours","y=YoloV4"])
plt.show

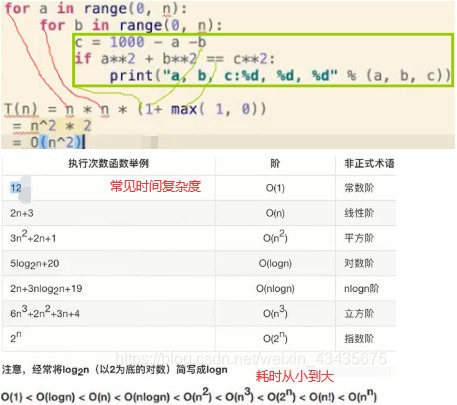
# 如果a+b+c=1000,且a^2+b^2=c^2(a,b,c为自然数),如何求出所有a,b,c可能的组合?
import time
start_time = time.time()
for a in range(0,1001):for b in range(0,1001):for c in range(0,1001):if a+b+c==1000 and a2+b2==c2:print('a,b,c:%d,%d,%d'%(a,b,c))
end_time = time.time()
print('time:%d'%(end_time-start_time))打印出:
a,b,c:0,500,500
a,b,c:200,375,425
a,b,c:375,200,425
a,b,c:500,0,500
time:203
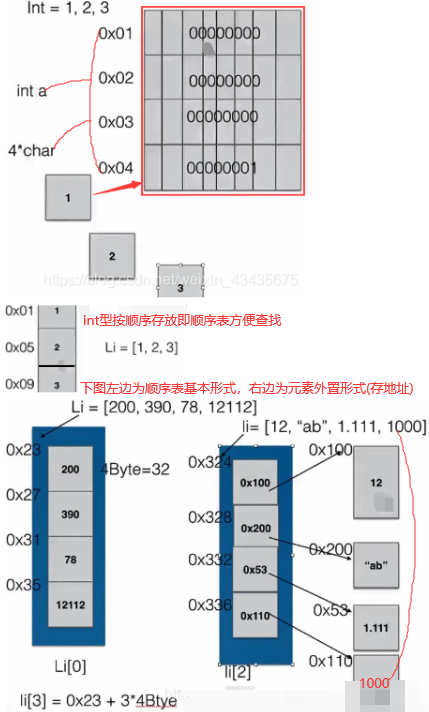
程序=数据结构+算法:下图为数据的存储:1个int数占4个字节(char或B)(1B=8bit),如下1放在4个字节中。

2.python模块导入:python3 -c ‘import sys;print(sys.path)’ 显示导入模块时会去哪些路径下查找

__init__构造方法:


3.进/线程:进/线程是不能随便创建,就像每招一个员工是有代价的,无限制招人最后崩溃。招几个固定员工,某个人的活干完了再去任务中心领新活
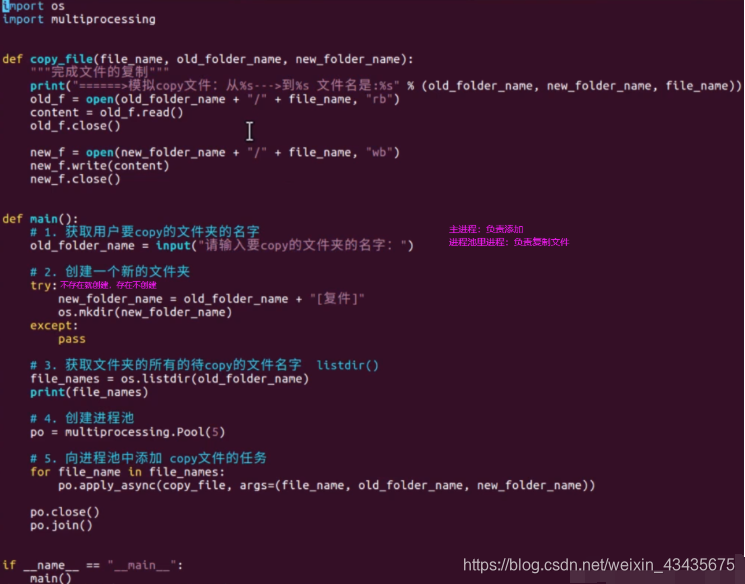
3.1 多进程&进程池:multiprocessing
# a.py
from multiprocessing import Process
from hal.hal_sensor import *   # HalSensor
from hal.hal_temp import *     # HalTemperaturesensor = HalSensor()
a=HalTemperature(sensor)def pt():while True:b=a.get_inlet_temp()print(b)if __name__ == '__main__':p1 = Process(target=pt)p2 = Process(target=pt)p3 = Process(target=pt)p1.start()p2.start()p3.start()p1.join()p2.join()p3.join()# l = []# for i in range(10):#     p = Process(target=pt)#     l.append(p)# for x in l:#     x.start()# for y in l:#     y.join()


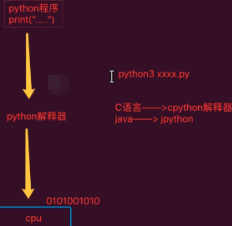
3.2 多线程&线程池:c是编译型,python是解释型
如下红框是主进程,没有等子线程结束就结束了。
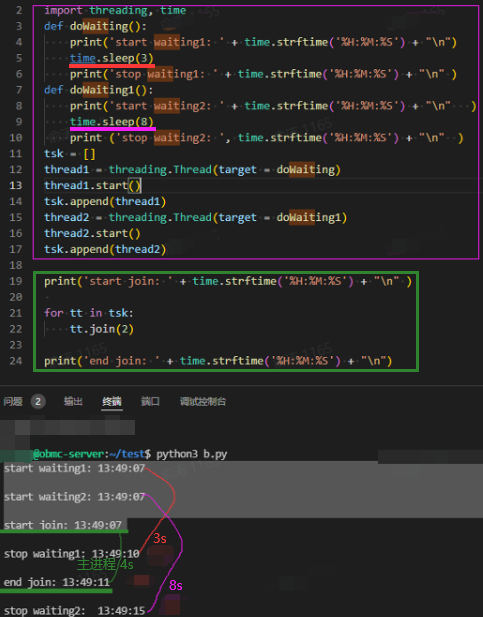
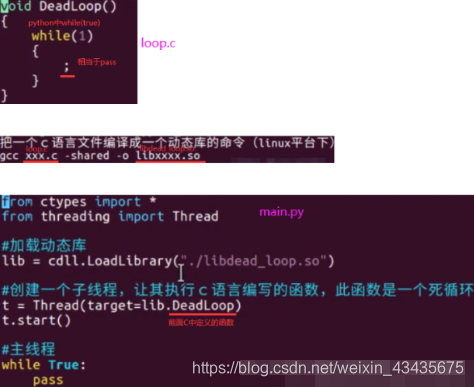

线程池适合需要大量线程完成任务,但实际处理时间较短。
import time
from concurrent.futures import ThreadPoolExecutor
import random# max_workers表示工人数量,也就是线程池里面的线程数量
pool = ThreadPoolExecutor(max_workers=2)
# 任务列表
task_list = ["任务1", "任务2", "任务3", "任务4", ]def handler(task_name):n = random.randrange(5) # 随机睡眠,模仿任务执行时间不确定性time.sleep(n)print(f"任务内容:{task_name}")if __name__ == '__main__':# 遍历任务,for task in task_list:"""交给函数处理,submit会将所有任务都提交到一个地方,不会阻塞然后线程池里面的每个线程会来取任务,比如:线程池有3个线程,但是有5个任务会先取走三个任务,每个线程去处理其中一个线程处理完自己的任务之后,会再来提交过的任务区再拿走一个任务"""pool.submit(handler, task)  # 线程取【任务task】并【执行handler】【任务task】# pool.shutdown() # 让主线程等待所有子线程执行完之后,主线程再执行完print("main执行完毕")# main执行完毕
# 任务内容:任务1
# 任务内容:任务3
# 任务内容:任务2
# 任务内容:任务4
4.文件/xml:os.walk
4.1 增:写入文件内容给文本文件
def writeTextFile(filePath, fileContent, encoding='utf8'):with open(filePath, 'w', encoding=encoding) as file:file.write(fileContent)
4.2 改:批量修改图片大小
import os
from PIL import Imagedef getFilePathList(dirPath, partOfFileName=''):allFileName_list = list(os.walk(dirPath))[0][2]fileName_list = [k for k in allFileName_list if partOfFileName in k]filePath_list = [os.path.join(dirPath, k) for k in fileName_list]return filePath_listdef batchResizeImage(oldDirPath, newDirPath, height, width):if not os.path.isdir(newDirPath):os.mkdir(newDirPath)jpgFilePath_list = getFilePathList(oldDirPath, '.jpg')for jpgFilePath in jpgFilePath_list:image = Image.open(jpgFilePath)resized_image = image.resize((height, weight), Image.ANTIALIAS)jpgFileName = os.path.split(jpgFilePath)[1]saveFilePath = os.path.join(newDirPath, jpgFileName)resized_image.save(saveFilePath)oldDirPath = 'source_images'
newDirPath = 'train_images'
height = 640
width = 640
batchResizeImage(oldDirPath, newDirPath, height, width)
4.3 查:查询文件夹中的文件
import osdef getFileNameList(dirPath, partOfFileName=''):allFileName_list = list(os.walk(dirPath))[0][2]fileName_list = [k for k in allFileName_list if partOfFileName in k]return fileName_listdef getFilePathList(dirPath, partOfFileName=''):allFileName_list = list(os.walk(dirPath))[0][2]fileName_list = [k for k in allFileName_list if partOfFileName in k]filePath_list = [os.path.join(dirPath, k) for k in fileName_list]return filePath_list
4.4 查:读取文件
import osdef getdir():for root, dirs, files in os.walk("D:\\soft\\Dict\\8.9.6.0\\otherskins\\simisent"):#for dir in dirs:print('root {}'.format(root))print('dirs {}'.format(dirs))print('files {}'.format(files))
a=getdir()#11111111111111111111111111111111111111111111111111111111111111111111111
def show_files(path, all_files):file_list = os.listdir(path)for file in file_list:cur_path = os.path.join(path, file)if os.path.isdir(cur_path):show_files(cur_path, all_files)else:all_files.append(file)return all_filescontents = show_files("D:\\soft\\Dict\\8.9.6.0\\otherskins\\simisent", [])
for content in contents: # 循环打印show_files函数返回的文件名列表print(content)
def readTextFile(filePath, encoding='utf8'):with open(filePath, encoding=encoding) as file:return file.read()
4.5 查:搜索文件夹路径内含有指定内容的代码文件
import os
# 传入3个参数:文件夹路径dirPath、指定内容partOfFileContent、代码文件后缀名suffixOfFileName
def searchFileContent(dirPath, partOfFileContent, suffixOfFileName=''):dirPath = os.path.expanduser(dirPath)walk_list = list(os.walk(dirPath))result_list = []for walk in walk_list:filePath_list = [os.path.join(walk[0], k) for k in walk[2] \\if k.rsplit('.', maxsplit=1)[1]==suffixOfFileName.strip('.')]for filePath in filePath_list:with open(filePath, encoding='=utf8') as file:fileContent = file.read()if partOfFileContent in fileContent:Wprint(filePath)result_list.append(filePath)return result_list
4.6 labelimg_yolo_txt转pascal voc_xml
from PIL import Image
import os#读取文件尺寸
def ImgSize(image):img = Image.open(image)w,h =  img.width,img.heightreturn w,h#labelimg中yolo转voc图位转换
#width,height就是原图的w,h  #xmin指中心点占横比例,xmax指中心点占竖比例  #ymin指bbox占整图宽比例,ymax指bbox占整图高比例
def ScaleCovertor(width,height,xmin,xmax,ymin,ymax): center_x = round(float(xmin* width))           center_y = round(float(xmax * height))bbox_width = round(float(ymin * width))bbox_height = round(float(ymax * height))xmin = str(int(center_x - bbox_width / 2 ))ymin = str(int(center_y - bbox_height / 2))xmax = str(int(center_x + bbox_width / 2))ymax = str(int(center_y + bbox_height / 2))return xmin,ymin,xmax,ymaxdef Main(filepath): #filepath是txt文件夹路径(里面全是需要转换的txt文件)
#设置xml内部格式xml_head = '''<annotation><folder>Desktop</folder><filename>{}</filename><path>unknonw</path><source><database>unknow</database></source><size><width>{}</width><height>{}</height><depth>3</depth></size><segmented>0</segmented>'''xml_obj = '''<object>        <name>{}</name><pose>no</pose><truncated>0</truncated><difficult>0</difficult><bndbox><xmin>{}</xmin><ymin>{}</ymin><xmax>{}</xmax><ymax>{}</ymax></bndbox></object>'''xml_end = '''</annotation>'''counter = 1  #计数器for filename in os.listdir(filepath): #现在的filename是带后缀的print ('Processing:->>',filename,'Number %s'%counter) #打印当前文件名 和 第几个文件#原图:      content=[]  #建立内容列表,class,中心点占比,bbox占比with open(filepath+'/'+filename,'r') as readlines:for linecontent in readlines.readlines():  #读取每一行内容content.append(linecontent) #添加到列表中  w,h = ImgSize('C:/Users/lenovo/Desktop/yuantu'+'/'+filename.split('.')[0]+'.jpg')  #调用文件尺寸读取函数#xml:                    obj = ''   #这里创建xml,建立空字符串head = xml_head.format(str(filename.split('.')[0]+'.jpg'),str(w),str(h))  #向xml head里添加文件名 文件w和hfor info in content:  #读取每个文件里的内容infodetail = info.split(' ') #以空格切割列表内的数据#单独读取每个数据保存到变量里Class,XMin,XMax,YMin,YMax = infodetail[0],infodetail[1],infodetail[2],infodetail[3],infodetail[4],xmin,ymin,xmax,ymax  = ScaleCovertor(w,h,float(XMin),float(XMax),float(YMin),float(YMax))label= {1:'obstacle',0:'people'} #确定label和类的映射关系,下行用到obj += xml_obj.format(label[int(Class)],xmin,ymin,xmax,ymax) #向主object里循环添加 一个图里的物体或类#写入xml文件with open('C:/Users/lenovo/Desktop/annotation2/xml'+filename.split('.')[0]+'.xml','w') as xmw:#创建写入 合并 三个 xml主体部分xmw.write(head+obj+xml_end)counter+=1
Main('C:/Users/lenovo/Desktop/annotation2/txt') #txt文件夹

#验证转的对错
import matplotlib.pyplot as plt
import matplotlib.image as Image #这个读取库比较方便 不用把数据转来转去,plt可以直接使用
%matplotlib inline
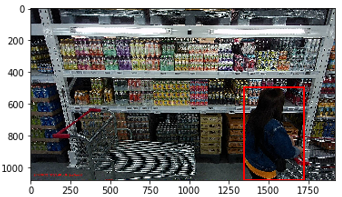
img = Image.imread('/Users/Desktop/annotation2/test/yuantu/'+'20190721062948_000394_cc8cdaa5ee38.jpg') #读取
x1,y1,x2,y2 = 1344, 495, 1722, 1080 # 自己找验证plt.gca().add_patch ( plt.Rectangle(xy=(x1,y1),width=x2-x1,height=y2-y1,fill=False,edgecolor='red',linewidth=2)
)plt.imshow(img)
plt.show() #根据环境添加
4.7 删除 w label
import re
import os
rawfolder='123' #存放三张xml的文件夹
newfolder='33333' #生成的新的xml文件夹
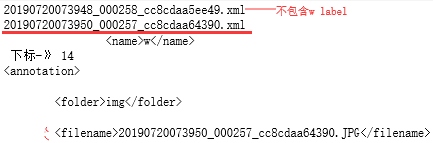
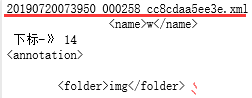
for i in os.listdir(rawfolder):print (i) #输出#20190720073948_000258_cc8cdaa5ee49.xml#20190720073950_000257_cc8cdaa64390.xml#20190720073950_000258_cc8cdaa5ee3e.xmlwith open(rawfolder+'/'+i,'r') as r:content = r.readlines()#print(content)
#输出['<annotation>\\n', '\\t<folder>img</folder>\\n', '\\t<filename>20190720073948_000258_cc8cdaa5ee49.JPG</filename>\\n', ...]c = 0for j in content:if '<name>w</name>' in j:print (j,'下标-》',c) #c为14行<name>w</name>,从0行开始start = 0end = c-1 # c-1为上一行<object> first_part = content[start:end]second_part = content[end+12:] #整个一块为w的objectfinal = first_part+second_partfor x in final:with open(newfolder+'/'+i,'a+') as w:w.writelines(x)print (x)c+=1# break
4.8 检查不是people和obstacle的label
# 检查不是people和obstacle的label
import re
import os
rawfolder='123'
#newfolder='33333'
for i in os.listdir(rawfolder):
# print (i)with open(rawfolder+'/'+i,'r') as r:content = r.readlines()
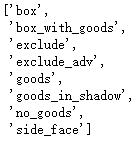
# print(content)for j in content:if '<name>' in j and ('people' not in j and 'obstacle'not in j):print (j)print (i)

4.9 读取指定后缀
import os
def get_filePathList(dirPath, partOfFileName=''):all_fileName_list = next(os.walk(dirPath))[2] #['20190720072950_000256_cc8cdaa64390.JPG',#'20190720073948_000258_cc8cdaa5ee49.JPG',# '20190720073950_000257_cc8cdaa64390.JPG',# '20190720074950_000259_cc8cdaa5ee3e .jpg',#'20190720074950_000259_cc8cdaa5ee3e.JPG'] fileName_list = [k for k in all_fileName_list if partOfFileName in k] #去除除了'.JPG'文件,不含前面绝对路径filePath_list = [os.path.join(dirPath, k) for k in fileName_list] #含全部路径,['', #             '']#return fileName_listreturn filePath_listdirPath='C:/Users/lenovo/Desktop/lian'
a=get_filePathList(dirPath,'.JPG')
a
#print(len(a))

4.10 检查是否有图片漏标,并删除漏标图片
def delete_file(filePath):if not os.path.exists(filePath): #filePath指C:/Users/lenovo/Desktop/lianxi/img\\\\20190720072950_000256_cc8cdaa64390.JPG'print('%s 这个文件路径不存在,请检查一下' %filePath)else:print('%s 这个路径的文件需手动删除' %filePath)def check_1(dirPath, suffix): xmlFilePath_list = get_filePathList(dirPath, '.xml') # 与suffix不同,自己指定'.xml'xmlFilePathPrefix_list = [k[:-4] for k in xmlFilePath_list] # 不带.xmlxmlFilePathPrefix_set = set(xmlFilePathPrefix_list)#print(xmlFilePathPrefix_set) #{'绝对路径不带后缀',# '                ' }imageFilePath_list = get_filePathList(dirPath, suffix)imageFilePathPrefix_list = [k[:-4] for k in imageFilePath_list] # 不带后缀imageFilePathPrefix_set = set(imageFilePathPrefix_list)#print(imageFilePathPrefix_set)redundant_imgFilePathPrefix_list = list(imageFilePathPrefix_set - xmlFilePathPrefix_set)redundant_imgFilePath_list = [k+'.JPG' for k in redundant_imgFilePathPrefix_list]#上行带.JPG后缀, 如果自定义.0JPG,显示这个文件路径不存在,请检查一下for imgFilePath in redundant_imgFilePath_list: delete_file(imgFilePath)dirPath='C:/Users/lenovo/Desktop/lx'
check_1(dirPath,'.JPG')

4.11 检测标记的box是否超过图片的边界,若有则显示删除与box相关的xml文件和图片文件
import xml.etree.ElementTree as ET
from PIL import Image
def check_2(dirPath, suffix):xmlFilePath_list = get_filePathList(dirPath, '.xml')#print(xmlFilePath_list) #['.xml全部路径',# '            ']allFileCorrect = True # 跳出for循环则执行 if allFileCorrectfor xmlFilePath in xmlFilePath_list:imageFilePath = xmlFilePath[:-4] + '.' + suffix.strip('.')#print(xmlFilePath) #print(imageFilePath)#C:/Users/lenovo/Desktop/lx\\20190720072950_000256_cc8cdaa64390.xml#C:/Users/lenovo/Desktop/lx\\20190720072950_000256_cc8cdaa64390.JPG#.....image = Image.open(imageFilePath)width, height = image.sizewith open(xmlFilePath) as file:fileContent = file.read()#print(fileContent)  #<annotation>...root = ET.XML(fileContent) #根<annotation>...object_list = root.findall('object') # <object>for object_item in object_list:bndbox = object_item.find('bndbox') #<bndbox>xmin = int(bndbox.find('xmin').text)ymin = int(bndbox.find('ymin').text)xmax = int(bndbox.find('xmax').text)ymax = int(bndbox.find('ymax').text)if xmax>xmin and ymax>ymin and xmax<=width and ymax<=height:continueelse:delete_file(xmlFilePath)delete_file(imageFilePath)allFileCorrect = Falsebreakif allFileCorrect:print('祝贺你! 已经通过检验,所有xml文件中的标注框都没有越界')
dirPath='C:/Users/lenovo/Desktop/lx' #lx文件夹里.xml和.JPG混在一起
check_2(dirPath,'.JPG')#''里必须.JPG或不填

4.12 检查xmin<0…,并修改xmin…
#coding=utf-8
import os
import shutil
import random
from xml.etree.ElementTree import ElementTree,Element
import cv2def read_xml(in_path):'''读取并解析xml文件in_path: xml路径return: ElementTree'''tree = ElementTree()tree.parse(in_path)return treedef check():url = "C:/Users/lenovo/Desktop/source/xml_sum" # xml_sum只存放xml的文件夹for item in os.listdir(url): # item为.xml文件tree = read_xml(url + "/" + item) # read_xml函数上面定义root = tree.getroot()object = root.findall("object")size = root.find("size")width =int(size.find("width").text)height = int(size.find("height").text)if object == None:print(item)continuefor it in object:bndbox = it.find("bndbox")if bndbox == None:print(item)xmin = int(bndbox.find("xmin").text)xmax = int(bndbox.find("xmax").text)ymin = int(bndbox.find("ymin").text)ymax = int(bndbox.find("ymax").text)if  xmin <= 0 or xmin >= xmax or ymin <=0 or ymin >= ymax:print(item)if xmax > width or ymax> height:print(item)if __name__ =='__main__':check() # 不输出则表示全对。输出123111.xml,没有列表引号
import xml.etree.ElementTree as ETdef generateNewXmlFile(old_xmlFilePath, new_xmlFilePath):with open(old_xmlFilePath) as file:fileContent = file.read()root = ET.XML(fileContent)object_list = root.findall('object')for object_item in object_list:bndbox = object_item.find('bndbox')xmin = bndbox.find('xmin')xminValue = int(xmin.text)xmin.text = str(int(xminValue + 1))ymin = bndbox.find('ymin')yminValue = int(ymin.text)ymin.text = str(int(yminValue + 1))xmax = bndbox.find('xmax')xmaxValue = int(xmax.text)xmax.text = str(int(xmaxValue + 1))ymax = bndbox.find('ymax')ymaxValue = int(ymax.text)ymax.text = str(int(ymaxValue + 1))tree = ET.ElementTree(root)tree.write(new_xmlFilePath)
old_dirPath ='C:/Users/lenovo/Desktop/999/8'
new_dirPath ='C:/Users/lenovo/Desktop/999/9'def batch_modify_xml(old_dirPath, new_dirPath): #修改文件夹中的若干xml文件#以下4行将new_dirPath和xmlFileName名称结合,内容是调用generateNewXmlFile函数改写xmlFilePath_list = get_filePathList(old_dirPath, '.xml')for xmlFilePath in xmlFilePath_list:xmlFileName = os.path.split(xmlFilePath)[1] #1后#print(xmlFileName) #输出 20190720073950_000257_cc8cdaa64390.xmlnew_xmlFilePath = os.path.join(new_dirPath, xmlFileName)        generateNewXmlFile(xmlFilePath, new_xmlFilePath) batch_modify_xml(old_dirPath, new_dirPath)
4.13 读取classname
def get_classNameList(txtFilePath):with open(txtFilePath, 'r', encoding='utf8') as file:fileContent = file.read()line_list = [k.strip() for k in fileContent.split('\\n') if k.strip()!='']className_list= sorted(line_list, reverse=False)return className_list
txtFilePath='C:/Users/lenovo/Desktop/labelImg/data/predefined_classes -outofstock.txt'
get_classNameList(txtFilePath)
# 添加环境变量
import sys
sys.path.append('')
import os
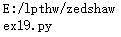
pathnoname,name=os.path.split("E:/lpthw/zedshaw/ex19.py")
print(pathnoname)
print(name)
4.14 检查trainval.txt
import cv2
from os import listdir
from os.path import isfile,isdir,jointrainval_list = list()
with open('./trainval.txt','r') as f:for line in f.readlines():line = line.strip('\\n')a = line +'.jpg'trainval_list.append(a)
print(trainval_list)

for i in trainval_list:img_path = '{}{}'.format('./img3/',i)img = cv2.imread(img_path) try:img.shapeprint(img.shape) # 在img3文件夹中没有......11111.jpg图片except:print('fail read:' + img_path)continue

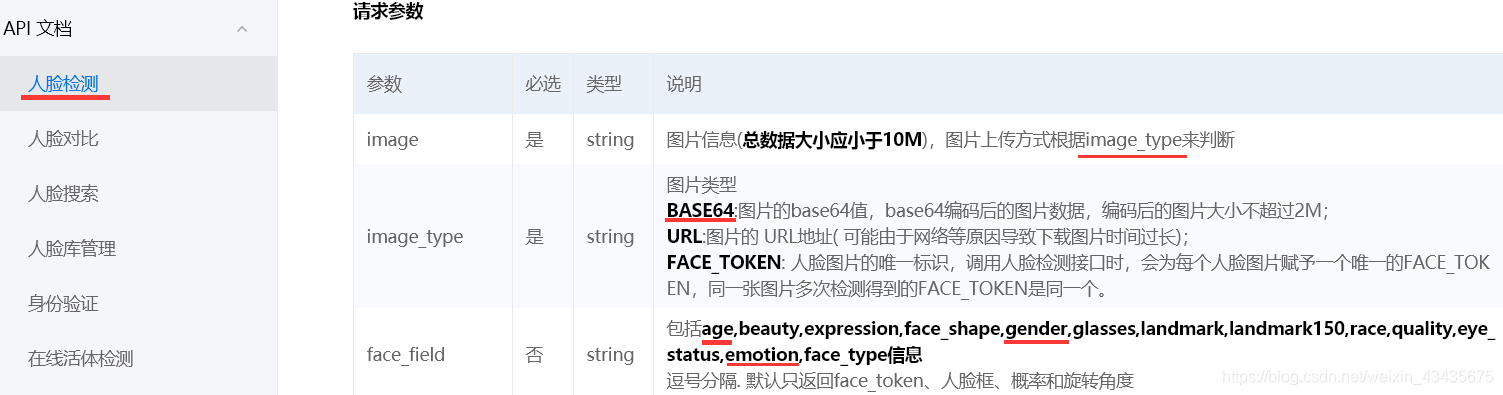
5.百度人脸api:https://ai.baidu.com/docs#/Auth/top 获取Access Token


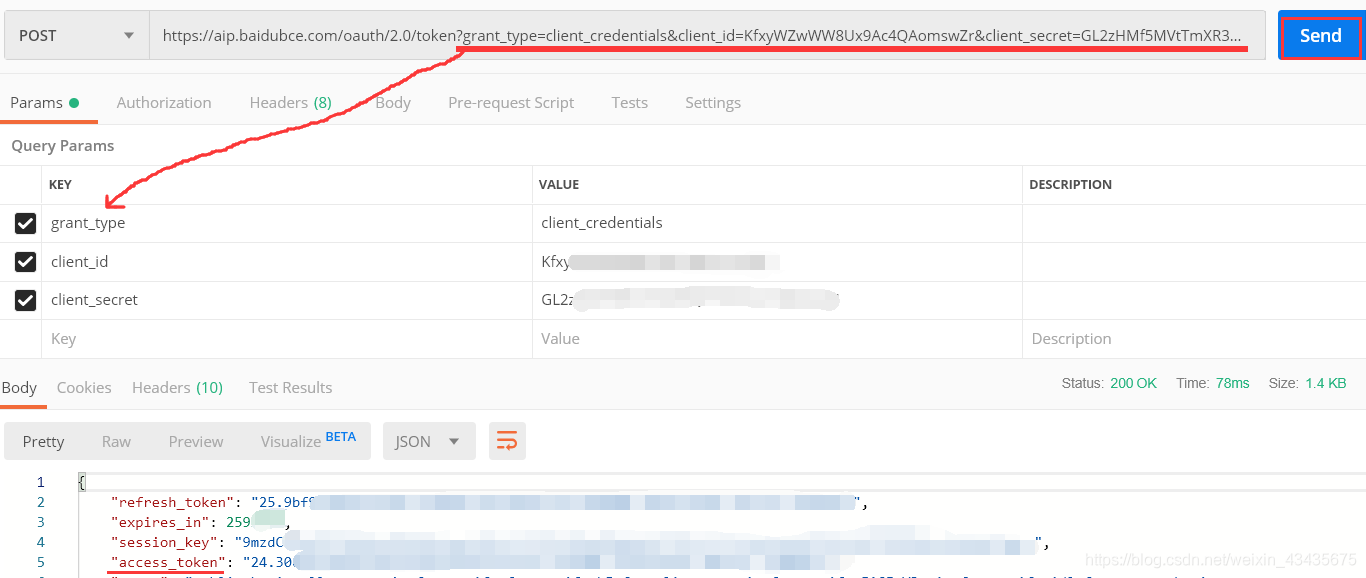
# encoding:utf-8
import os
import base64
import json
import xlwt
import urllib.request,urllib.parse
request_url = "https://aip.baidubce.com/rest/2.0/face/v3/detect" # 在人脸识别API文档中人脸检测中
row = 0
col = 0
workbook = xlwt.Workbook('123.xls')
worksheet = workbook.add_sheet("gongzuobiao")
worksheet.write(row, col+0, "时间")
worksheet.write(row, col+1, "相机ID")
worksheet.write(row, col+2, "性别")
worksheet.write(row, col+3, "年龄")
worksheet.write(row, col+4, "种族")
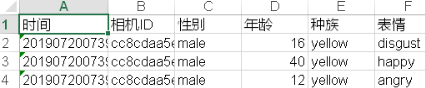
worksheet.write(row, col+5, "表情")for imgname in os.listdir("G:/img3"):print("imgname:",imgname) # imgname: data = imgname.split('_')[0]print("data:", data) # data: camera = imgname.split('_')[2].split(".")[0]print("camera:",camera) # camera: imgpath = "G:/img3"+imgnamef = open(imgpath, 'rb')img = base64.b64encode(f.read())params ={"image":img,"image_type":"BASE64","face_field":"age,gender,race,emotion"}params = urllib.parse.urlencode(params).encode(encoding='UTF8')access_token = '24.0449cf2437689f550ca5f93dac53fce3.2592000.1574310334.282335-17084453'request_url = request_url + "?access_token=" + access_token request = urllib.request.Request(url=request_url, data=params)request.add_header('Content-Type', 'application/json')response = urllib.request.urlopen(request)content = response.read()print("content:",content)if content:str = content.decode()content = json.loads(str)results = content['result']if results:row += 1for item in results["face_list"]:print("item:\\n",item['gender']['type'])worksheet.write(row, col + 0, data)worksheet.write(row, col + 1, camera)worksheet.write(row, col + 2, item['gender']['type'])worksheet.write(row, col + 3, item['age'])worksheet.write(row, col + 4, item['race']['type'])worksheet.write(row, col + 5, item['emotion']['type'])workbook.save('123.xls')


6. hal层:strings flash-s3ip | grep U-Boot ( openbmc_version.bbclass )
# aliases.sh 同setup_board.sh
alias ls='ls --color=auto'
alias i="ip addr show | grep 'inet '| grep ' eth0' | grep -v '240.1.1.1' | awk '{print $2}'|awk -F "/" '{print $1}'"
alias t="tail -10 /var/volatile/log/messages"
alias a="python3 /usr/local/bin/board_setup_routes.py"
alias sr='/usr/local/bin/sshpass -p 1 scp -r li@10.75.92.228:/home_a/liuht/openbmc-s3ip/meta-huaqin/meta-s3ip/recipes-utils/rest-api/files/* /usr/local/fbpackages/rest-api/'
alias cv='cd /var/volatile/log'
alias cm='cd /mnt/data/etc/'
# meta-huaqin/meta-kestrel/recipes-utils/openbmc-utils/files/setup_board.sh
. /usr/local/bin/openbmc-utils.shPATH=/sbin:/bin:/usr/sbin:/usr/bin:/usr/local/bin
BMC_BOOT_STATUS="${SYSCPLD_SYSFS_DIR}/bmc_boot_status"cp /etc/sensors.d/custom/__PLATFORM__.conf /etc/sensors.d/__PLATFORM__.conf
enable_spi2_function#write bmc status to CPLD
echo 0x1 > $BMC_BOOT_STATUS#Set BMC login timeout
echo "TMOUT=300" >> /etc/profile
echo "export TMOUT" >> /etc/profileif [ -f /sys/bus/i2c/devices/48-0058/mfr_id ];then ln -snf /sys/bus/i2c/devices/48-0058/mfr_id /sys_switch/psu/psu1/model_name;fialias s='scp -r li@10.75.92.228:/home/li/openbmc-s3ip/build/tmp/deploy/images/s3ip/flash-s3ip .'
alias f='flashcp ./flash-s3ip /dev/mtd4;flashcp ./flash-s3ip /dev/mtd5;reboot;'
cd /var/volatile/log # 和/var/log下文件一样,机器重刷系统,重启都不会变,在emmc卡里
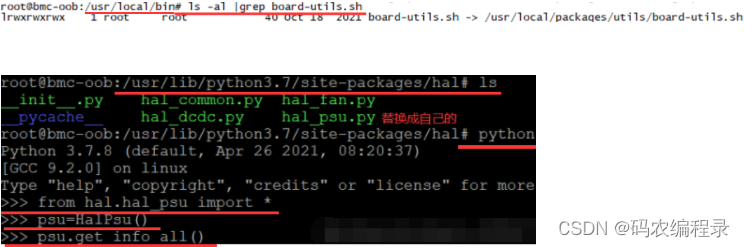
scp -r lit@10.75.92.228:/home/openbmc-s3ip/meta-huaqin/meta-s3ip/recipes-plats/hal/files/hal_common.py .;
alias c='cp ./rest_psu.py /usr/local/fbpackages/rest-api/rest_psu.py;cp ./rest_psu.py /usr/local/bin/rest_psu.py;rm ./rest_psu.py;'
6.1 i2c-utils/setup_i2c,i2c_dev_sysfs/syscpld.c
1.openbmc-holly/common/recipes-utils/openbmc-utils/files/i2c-utils.sh
SYSFS_I2C_ROOT="/sys/bus/i2c"
SYSFS_I2C_DEVICES="${SYSFS_I2C_ROOT}/devices"
SYSFS_I2C_DRIVERS="${SYSFS_I2C_ROOT}/drivers"# Return the given i2c device's absolute sysfs path.
# $1 - i2c device in <bus>-00<add> format (for example 0-0050).
i2c_device_sysfs_abspath() {echo "${SYSFS_I2C_DEVICES}/${1}"
}# instantiate an i2c device.
# $1 - parent bus number
# $2 - device address
# $3 - device name/type
i2c_device_add() {bus=$"$1"addr="$2"device="$3"echo "$device" "$addr" > "${SYSFS_I2C_DEVICES}/i2c-${bus}/new_device"
}# delete an i2c device.
# $1 - parent bus number
# $2 - device address
i2c_device_delete() {bus=$"$1"addr="$2"echo "$addr" > "${SYSFS_I2C_DEVICES}/i2c-${bus}/delete_device"
}
2.openbmc-holly/meta-hua/meta-holly/recipes-utils/openbmc-utils/files/setup_i2c.sh
PATH=/sbin:/bin:/usr/sbin:/usr/bin:/usr/local/bin
. /usr/local/bin/openbmc-utils.sh#register cmm cpld at first since query psu/lc/fcb status will relay on it
# Bus8
# CH2
i2c_device_add 82 0x0d cmmcpld# Bus0  LC1
# 0-0077
# CH0
i2c_device_add 16 0x0d lccpld
ret=$(is_lc_ok 1)
if [ $ret -eq 0 ];then# CH1i2c_device_add 17 0x50 24c64    #LC1 EEPROM# CH2i2c_device_add 18 0x50 24c64    #LC1 COME EEPROM
fi
# CH3
i2c_device_add 19 0x0d fpgacpld    #LC1 FPGA
3.openbmc-hollywood/common/recipes-kernel/i2c-dev-sysfs-mod/files/i2c_dev_sysfs.h
typedef struct i2c_dev_attr_st_ {const char *ida_name;const char *ida_help;i2c_dev_attr_show_fn ida_show;i2c_dev_attr_store_fn ida_store;int ida_reg;int ida_bit_offset;int ida_n_bits;unsigned int enable_log_on_write:1;
} i2c_dev_attr_st;
4.openbmc-hua/meta-hua/meta-hollywood/recipes-kernel/cpld-mod/files/syscpld.c
static const i2c_dev_attr_st syscpld_attr_table[] = {{"psu_led_color","0x0: green\\n""0x1: yellow\\n""0x2: alternate", //echo 0x0 > psu_led_color文件,相当于i2csetI2C_DEV_ATTR_SHOW_DEFAULT, // 可读I2C_DEV_ATTR_STORE_DEFAULT, // 可写0x40, 4, 2, // 如下第4个字节开始占两位},
source /usr/local/bin/openbmc-utils.sh ( 里面source了很多-utils.sh,如board-utils.sh ) 后就可用get_psu_power_sta 1(board-utils.sh中),tail -f /var/log/messages。
6.2 DL_DIR: 一个字节 = 0x(8421)(8421)
github上clone下来的openbmc没有源码文件如uboot、kernel、fs文件系统等,而是在编译中过程中根据配置文件中SRC_URL来下载需要的源码文件,不修改配置文件,默认将下载下来的源码存放在build/downloads文件夹下。如果已下载过这些源码文件,可以修改DL_DIR,指定到你下载文件的路径。build/local.conf会自动添加最后一行。
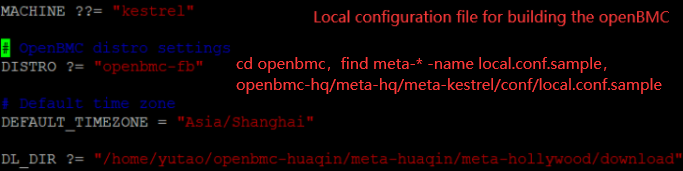
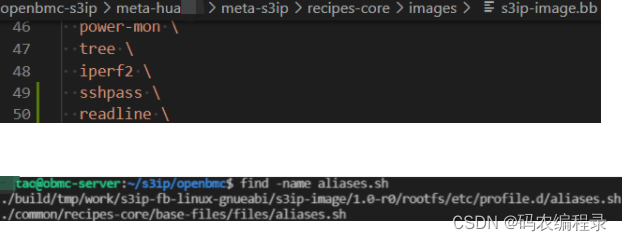
1.openbmc-huaqin$ source openbmc-init-build-env meta-huaqin/meta-kestrel //让bitbake命令生效2.openbmc-huaqin/build$ bitbake kestrel-image //如果不自动进入build目录,关闭shell,并重新打开shell,删除build目录或删除build里的tmp和cache3.scp -r y@10.75.92.228:/home/yutao/openbmc-huaqin/build/tmp/deploy/images/kestrel/flash-kestrel .4.flashcp flash-kestrel /dev/mtd4 ; reboot (不用flashcp : scp yutao@10.75.92.228:/home/yutao/openbmc-huaqin/build/tmp/work/kestrel-fb-linux-gnueabi/kestrel-image/1.0-r0/rootfs/usr/local/bin/sensor-mon .)5.vi /etc/platform/hollywood/sensors_config.json , sv restart sensor-monbitbake -> .bb-> .bbappend ( do_install -> usr/local/pachages/utils ln-s软链接到 usr/local/bin ) 打包进image/usr/lib/..so, deploy镜像, ./sy..sh生成yocto文件夹 , find -name 文件名, grep -r 变量
7.aiohttp: 0.0.0.0表示所有IP地址,如tomcat配置文件中监听的IP地址设置了0.0.0.0,就表示你的这个tomcat服务器监听在本机的所有IP地址上,通任何一个IP地址都可以访问到
localhost:是一个域名,默认指向127.0.0.1这ip(本地回环地址,速度快,不会出现在主机外部网络),绑定了localhost的服务只能在本机访问。
# a.py:创建一个后端app应用
from aiohttp import web
# from application.routes import setup_routesapp = web.Application()
# setup_routes(app)
web.run_app(app, host='0.0.0.0', port=9000) #开启后端
如下python a.py。在浏览器中打开http://localhost:9000/或者使用命令curl -X GET http://localhost:9000,对于请求现在只会返回404: Not Found。

如下创建一个视图(返回值)和路由来展示:在a.py中将注释的两行放开运行,$ curl -X GET localhost:9000/hello ,Hello Aiohttp!
# application文件夹/views.py
from aiohttp import web
async def hello(request):return web.Response(text='Hello Aiohttp!')
# application文件夹/routes.py
from .view import hello
def setup_routes(app):app.router.add_get('/hello', hello)  # 第二个hello是调用views.py中函数,相当于response。# 第一个/hello可单独写一个.py文件里面写成如下,取board_routes[0]# board_routes = [# "/api/psu/info",# "/api/psu/info/{name}",# ]
restful:
# board_endpoint.py:视图即response
import re
import rest_help
import rest_psu
import rest_fan
from aiohttp import web
from rest_utils import dumps_bytestrclass boardApp_Handler:async def rest_help_hdl(self, request):return web.json_response( rest_help.get_help(), dumps=dumps_bytestr)async def rest_psu_model_name_hdl(self, request):return web.json_response( rest_psu.get_model_name(request.match_info["name"]), dumps=dumps_bytestr)
# boardroutes.py:路由即/
board_routes = []
board_routes.append("/api/help")
board_routes.append("/api/psu/{name}/model_name")
# board_setup_routes.py:路由即/
from board_endpoint import boardApp_Handler
from boardroutes import *
from aiohttp.web import Applicationdef setup_board_routes(app: Application, write_enabed: bool):bhandler = boardApp_Handler()# 下行第一个参数路径(boardroutes.py路由),第二个参数response(board_endpoint.py视图)app.router.add_get(board_routes[0], bhandler.rest_help_hdl) app.router.add_get(board_routes[3], bhandler.rest_psu_model_name_hdl)
8.curl:http请求
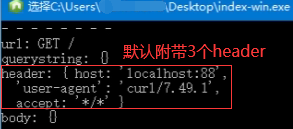
curl -h查看可接的参数:-s:省略进度条。-o:output。-H:请求头。-d:请求内容。-X:请求方法。

如下没有-H指定header,但是默认附带3个header。

index-win.exe测试小程序主要监听88端口并能将请求内容打印出来。

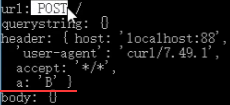
如下会自动多出content-两个请求头。

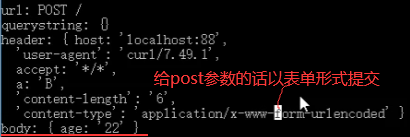

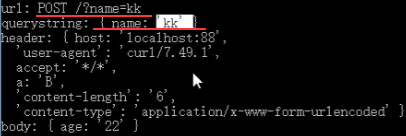
如下以json形式提交替代表单形式提交。


# redfish_update_BMC.sh
#!/bin/sh
usage() {echo "Usage: update BMC thought redfish or BMC factory reset"echo "    $(basename $0) <IP>"echo "    $(basename $0) <IP> <factory bmc> "echoecho "Examples:"echo "    $(basename $0) 10.75.159.18 imagefile"echo "    $(basename $0) 10.75.159.18 imagefile f"
}bmc=$1
##建立 Redfish 连接会话
token=`curl -k -H "Content-Type: application/json" -X POST https://$bmc/login -d '{"username" :  "root", "password" :  "0penBmc"}' | grep token | awk '{print $2;}' | tr -d '"'`
##获取BMC升级的URL
uri=$(curl -k -H "X-Auth-Token: $token" https://$bmc/redfish/v1/UpdateService |grep  '"HttpPushUri"' | awk -F '"' '{print $4;}')
##打印log
echo "bmc=$bmc    token=$token  uri=$uri"if [ $# -eq 2 ] && [ "$2" = "f" ]; then  ##删除配置#恢复出厂设置,删除文件系统中的一些后期文件,立刻重启BMC系统curl -k -H "X-Auth-Token: $token" -X POST https://$bmc/redfish/v1/Managers/bmc/Actions/Manager.ResetToDefaults -d '{"ResetToDefaultsType": "ResetAll"}'
elif [ $# -eq 2 ]; then  ##保留配置升级##升级完FW后等待下一次重启后生效# curl -k -H "X-Auth-Token: $token" -X PATCH -d '{"HttpPushUriOptions": {"HttpPushUriApplyTime": {"ApplyTime": "OnReset"}}}' https://$bmc/redfish/v1/UpdateService##升级完FW后立刻自动重启后生效curl -k -H "X-Auth-Token: $token" -X PATCH -d '{"HttpPushUriOptions": {"HttpPushUriApplyTime": {"ApplyTime": "Immediate"}}}' https://$bmc/redfish/v1/UpdateServicesleep 1##升级的FW将被拷贝到/tmp/image/下-->对应的接收函数时bmcweb么快的handleUpdateServicePost函数# curl -k -H "X-Auth-Token: $token" -H "Content-Type: application/octet-stream" -X POST -T ./build/kestrel/tmp/deploy/images/kestrel/obmc-phosphor-image-kestrel.static.mtd.tar  https://$bmc$uri# curl -k -H "X-Auth-Token: $token" -H "Content-Type: application/octet-stream" -X POST -T ./build/gnr5713cmm/tmp/deploy/images/gnr5713cmm/obmc-phosphor-image-gnr5713cmm.static.mtd.tar  https://$bmc$uricurl -k -H "X-Auth-Token: $token" -H "Content-Type: application/octet-stream" -X POST -T $2  https://$bmc$uri# curl -k -H "X-Auth-Token: $token" -H "Expect:" -X POST -T ./build/gnr5713cmm/tmp/deploy/images/gnr5713cmm/obmc-phosphor-image-gnr5713cmm.static.mtd.tar  https://$bmc$uri# sleep 5##重启BMC# curl -k -H "X-Auth-Token: $token" -X POST https://$bmc/redfish/v1/Managers/bmc/Actions/Manager.Reset -d '{"ResetType": "GracefulRestart"}'
elif [ $# -eq 3 ] && [ "$3" = "f" ]; then  ##不保留配置升级##升级完FW后等待下一次重启后生效curl -k -H "X-Auth-Token: $token" -X PATCH -d '{"HttpPushUriOptions": {"HttpPushUriApplyTime": {"ApplyTime": "OnReset"}}}' https://$bmc/redfish/v1/UpdateService##升级完FW后立刻自动重启后生效# curl -k -H "X-Auth-Token: $token" -X PATCH -d '{"HttpPushUriOptions": {"HttpPushUriApplyTime": {"ApplyTime": "Immediate"}}}' https://$bmc/redfish/v1/UpdateServicesleep 1##升级的FW将被拷贝到/tmp/image/下-->对应的接收函数时bmcweb么快的handleUpdateServicePost函数# curl -k -H "X-Auth-Token: $token" -H "Content-Type: application/octet-stream" -X POST -T ./build/kestrel/tmp/deploy/images/kestrel/obmc-phosphor-image-kestrel.static.mtd.tar  https://$bmc$uri# curl -k -H "X-Auth-Token: $token" -H "Content-Type: application/octet-stream" -X POST -T ./build/gnr5713cmm/tmp/deploy/images/gnr5713cmm/obmc-phosphor-image-gnr5713cmm.static.mtd.tar  https://$bmc$uricurl -k -H "X-Auth-Token: $token" -H "Content-Type: application/octet-stream" -X POST -T $2  https://$bmc$urisleep 1curl -k -H "X-Auth-Token: $token" -X POST https://$bmc/redfish/v1/Managers/bmc/Actions/Manager.ResetToDefaults -d '{"ResetToDefaultsType": "ResetAll"}'# curl -k -H "X-Auth-Token: $token" -H "Expect:" -X POST -T ./build/gnr5713cmm/tmp/deploy/images/gnr5713cmm/obmc-phosphor-image-gnr5713cmm.static.mtd.tar  https://$bmc$uri# sleep 5##重启BMC# curl -k -H "X-Auth-Token: $token" -X POST https://$bmc/redfish/v1/Managers/bmc/Actions/Manager.Reset -d '{"ResetType": "GracefulRestart"}'
elseusage
fi
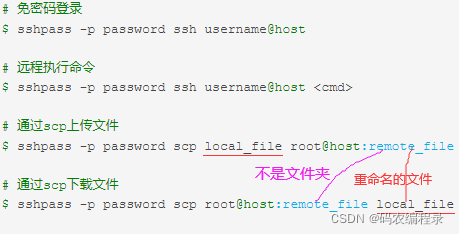
8.1 sshpass获取动态ip

# auto-ip
# !/bin/bash
PATH=/sbin:/bin:/usr/sbin:/usr/bin:/usr/local/bin
log="/var/log/auto-ip.log"
ip a > $log
date >> $log
# -p密码。-o StrictHostKeyChecking=no:内网中非常信任的服务器之间的ssh连接。或者/etc/ssh$ vi ssh_config
# 如下将log拷贝去远程并重命名为s3ip-openbmc-bmc
sshpass -p 1 scp -o StrictHostKeyChecking=no $log li@10.75.92.228:/home_a/li/ip/s3ip-openbmc-bmc
sleep 10
# setup-auto-ip.sh
echo "Starting auto-ip daemon..."
runsv /etc/sv/auto-ip > /dev/null 2>&1 &
echo "Started auto-ip daemon"
# run-auto-ip.sh
exec /usr/local/bin/auto-ip
// auto-ip.bb
SUMMARY = "auto-ip"
DESCRIPTION = "auto-ip"
SECTION = "base"
PR = "r1"
LICENSE = "GPLv2"
LIC_FILES_CHKSUM = "file://COPYING;md5=94d55d512a9ba36caa9b7df079bae19f"SRC_URI =  "file://COPYING \\file://auto-ip \\file://run-auto-ip.sh \\file://setup-auto-ip.sh \\"S = "${WORKDIR}"
binfiles = "auto-ip \\"
pkgdir = "auto-ip"DEPENDS += "update-rc.d-native"
RDEPENDS_${PN} += "bash"install_sysv() {install -d ${D}${sysconfdir}/init.dinstall -d ${D}${sysconfdir}/rcS.dinstall -d ${D}${sysconfdir}/svinstall -d ${D}${sysconfdir}/sv/auto-ipinstall -d ${D}${sysconfdir}/auto-ipinstall -m 755 setup-auto-ip.sh ${D}${sysconfdir}/init.d/setup-auto-ip.shinstall -m 755 run-auto-ip.sh ${D}${sysconfdir}/sv/auto-ip/runupdate-rc.d -r ${D} setup-auto-ip.sh start 91 5 .
}do_install() {dst="${D}/usr/local/fbpackages/${pkgdir}"bin="${D}/usr/local/bin"install -d $dstinstall -d $binfor f in ${binfiles}; doinstall -m 755 $f ${dst}/$fln -snf ../fbpackages/${pkgdir}/$f ${bin}/$fdoneinstall_sysv
}FBPACKAGEDIR = "${prefix}/local/fbpackages"
FILES_${PN} = "${FBPACKAGEDIR}/auto-ip ${prefix}/local/bin ${sysconfdir}"
8.2 restful获取动态ip
# /mnt/data/etc/rc.local中
#!/bin/bash
/usr/local/bin/set_fan_speed.sh 30
# pi上 /etc/rc.local
_IP=$(hostname -I) || true
if [ "$_IP" ]; thenprintf "My IP address is %s\\n" "$_IP"
fish /boot/autorun.sh &
if [ -x /var/log/rc.local ]; then   # -x是否是可执行文件/var/log/rc.local
fi
exit 0
# /boot/autorun.sh
sleep 30
ifconfig > /boot/autoboot.log
# /var/log/rc.local
/usr/bin/python3 /var/log/client.py 10.75.92.228 pi1 &
# client.py
#!/usr/bin/python3
# -*- coding: utf-8 -*-
import socket
import subprocess
import sys
import json
import timedef get_self_ip():try:s = socket.socket(socket.AF_INET, socket.SOCK_DGRAM)s.connect(("8.8.8.8", 80))ip = s.getsockname()[0]finally:s.close()return ip
# if __name__ == "__main__":
#     a = get_self_ip()
#     print(a)
# python client.py       10.75.92.230if len(sys.argv) == 3:server = sys.argv[1]     # 10.75.92.230client = sys.argv[2]     # 服务端中的json文件中记录着的客户端的ip地址
else:print ("usage")#11111111111111111111111111111111111111111111111111111111111111111111111111111111
while True:url_body = {}url_body["slave"] = clienturl_body["ip"] = get_self_ip()     # python client.py 10.75.92.230 a# print(url_body)     # {'ip': '10.75.92.230', 'slave': 'a'}cmd = "curl -s http://{}:8080/api/slave -d '{}'".format(server,json.dumps(url_body, ensure_ascii=False))# print(cmd)   # curl -s http://10.75.92.230:8080/api/slave -d '{"ip": "10.75.92.230", "slave": "a"}'  # -d:data 即server.py中data 即 请求request数据(returncode, output) = subprocess.getstatusoutput(cmd)   #subprocess启动一个新进程print (output)if returncode == 0:if output:d = json.loads(output)if d:if 'result' in d.keys():if d['result'] == 'success':print ('success')breaktime.sleep(300) # 5 minute
# client.py放在需要得到ip的机器上,下行bmc是标识这机器。服务端和客户端都是230。
# root@diag-server:~# python3 client.py 10.75.92.230 bmc    必须先开启服务端且用python3
# {"result": "success", "data": {"slave": {"bmc": "10.75.92.230", "s3ip-openbmc-bmc": "10.75.92.109", "hollywood-bmc": "10.75.92.146",
# "server": "10.75.92.228", "s3ip-bsp-bmc": "10.75.92.96", "pi1": "10.75.92.53", "pi2": "10.75.92.152", "pi3": "10.75.92.51"}}}# root@diag-server:~# curl -s http://10.75.92.230:8080/api/help | python -m json.tool
# {
#     "data": {
#         "slave": {
#             "bmc": "10.75.92.230",
#             "hollywood-bmc": "10.75.92.146",
#             "pi1": "10.75.92.53",
#             "pi2": "10.75.92.152",
#             "pi3": "10.75.92.51",
#             "s3ip-bsp-bmc": "10.75.92.96",
#             "s3ip-openbmc-bmc": "10.75.92.109",
#             "server": "10.75.92.228"
#         }
#     },
#     "result": "success"
# }
# server.py
#!/usr/bin/python3
# -*- coding: utf-8 -*-
from aiohttp import web
import json
import requests
import json
import sysPATH = "./usr_slave.json"     #bmc镜像会刷到master或slave,这里获取的是slaver的bmc的ip
def parse_config_file():with open(PATH,'r') as load_f:load_dict = json.load(load_f)return load_dict
# if __name__ == "__main__":
#     a = parse_config_file()
#     print(a)
# root@diag-server:# python server.py
# {u'slave': {u's3ip-openbmc-bmc': u'10.75.92.109', u'hollywood-bmc': u'10.75.92.146', u'server': u'10.75.92.228',
# u's3ip-bsp-bmc': u'10.75.92.96', u'pi1': u'10.75.92.53', u'pi2': u'10.75.92.152', u'pi3': u'10.75.92.51'}}def req_post_json(str_url, json_data):headers = {'Content-Type': 'application/json'}response = requests.post(url=str_url, headers=headers, data=json.dumps(json_data))return response.json()# client.py 即 curl中 -d  data = {'slave' : 'bmc', 'ip' : '10.75.85.34'}
def add_slave(data):configs = parse_config_file()if not configs:configs = {}configs['slave'] = {}configs['slave'][data['slave']] = data['ip']   # configs['slave'][bmc]with open(PATH, 'w') as write_f:json.dump(configs, write_f, indent=4, ensure_ascii=False)  # 将configs写入write_f对象return {'result':'success','data': configs}def update_slave(data):configs = parse_config_file()configs['slave'][data['slave']] = data['ip']with open(PATH, 'w') as write_f:json.dump(configs, write_f, indent=4, ensure_ascii=False)return {'result':'success','data': configs}#1111111111111111111111111111111111111111111111111111111111111111111111111111111
async def get_help(request):configs = parse_config_file()return web.json_response({'result':'success','data': configs})async def slave(request):data = await request.json()configs = parse_config_file()if 'slave' in data or 'ip' in data:if configs:if  configs['slave']:for k in configs['slave'].keys():if k == data['slave']:if k == data['slave'] and configs['slave'][k] == data['ip']:return web.json_response({'result':'success','data': configs})else:return web.json_response(update_slave(data))return web.json_response(add_slave(data))else:return web.json_response(add_slave(data))def app_factory(args=()):app = web.Application()app.router.add_get('/api/help', get_help)app.router.add_post('/api/slave', slave)return app

// usr_slave.json,其中a是python3 client.py 10.75.92.230 a 多出
{"slave": {"bmc": "10.75.92.230","s3ip-openbmc-bmc": "10.75.92.109","hollywood-bmc": "10.75.92.146","server": "10.75.92.228","s3ip-bsp-bmc": "10.75.92.96","pi1": "10.75.92.53","pi2": "10.75.92.152","pi3": "10.75.92.51","a": "10.75.92.230",}
}
# /mnt/data/etc/rc.local
if [ ! -f /usr/local/bin/sshpass ];thenln -snf /mnt/data/etc/sshpass /usr/local/bin    #将前者sshpass复制到后面文件夹里
filn -snf /mnt/data/etc/debug.api /usr/local/bin/usr/bin/python3 /mnt/data/etc/client.py 10.75.92.228 s3ip-openbmc-bmc &
# debug.api
#!/bin/bash
pn=$(ps | grep rest | grep runsv |awk '{print $1}');kill $pn;/usr/local/bin/sshpass -p 1 scp -r li@10.75.92.228:/home_a/li/openbmc-s3ip/meta-hua/meta-s3ip/recipes-utils/rest-api/files/* /usr/local/fbpackages/rest-api/# /usr/local/bin/sshpass -p 1 scp -r li@10.75.92.228:/home_a/li/openbmc-s3ip/meta-hua/meta-s3ip/recipes-plats/hal/files/*.py /usr/lib/python3.7/site-packages/hal/runsv /etc/sv/restapi &
#sv d restapi   #停止
8.3 curl认证
如下两个middlewares中间件(request和response的中间),app = web.Application(middlewares=[jsonerrorhandler, auth_enforcer])。

1.Basic auth:最简单的一种(户名+密码)认证方式,用base64_encode加密,安全性低,每次都需要传递用户名和密码,用户名和密码很大程度上存在被监听盗取的可能。
客户端curl -u usr:pwd,服务端显示如下Headers中字段用base64_decode_auth_headers函数解码,获取usr和pwd明文后,用creds_validator函数对其加密并与/etc/shaodow下用户名和加密密码段做匹配,如果一致则处理curl请求,否则返回401: Unauthorized。

import spwd
import crypt
import base64def base64_encode_auth_headers(username, password): # 没用到temp_str = username + ':' + password# convert bytes stringbytesString = temp_str.encode(encoding="utf-8")# base64 encodeencodestr = base64.b64encode(bytesString)return 'Basic ' + encodestr.decode()def base64_decode_auth_headers(encodestr):# convert bytes stringbytesString = encodestr.encode(encoding="utf-8")# base64 decodedecodestr = base64.b64decode(bytesString)return decodestr.decode()def creds_validator(username, password):crypted_root_pwd = spwd.getspnam(username).sp_pwdcrypted_method, crypted_salt = (crypted_root_pwd.split('$')[1],crypted_root_pwd.split('$')[2])result_str = '{0}{1}{0}{2}{0}'.format('$', crypted_method, crypted_salt)crypted_input_passwd = crypt.crypt(password, result_str)return crypted_input_passwd == spwd.getspnam(username).sp_pwddef basic_auth(authstr):# basic auth for curl,# compare authorization field whit encrypted password in shadow file# PASS :retrun "TRUE" ; NO PASS :return "FALSE"encode_str = authstr.split(' ')[1]clearstr = base64_decode_auth_headers(encode_str)username = clearstr.split(':')[0]password = clearstr.split(':')[1]return creds_validator(username, password)
2.ACL:Access Control List访问控制列表是由一条或多条规则组成的集合。所谓规则,是指描述报文匹配条件
的判断语句,这些条件可以是报文的源地址、目的地址、端口号等。
$ sudo cat /etc/shadow | grep test
test:$6$sT8RMKkg$QLhvrR/iSwurIM0Z0.ZVkxPKRvKXueuAx7fZzq5Umffm3ydNbeGujV7mUKnTNYtbpLIbIdJ2.Q4Spw9OUjhl91:16502:0:99999:7:::


在我们每次改写密码时,都会随机生成一个这样的salt(某个固定长度的随机字符串而已)。我们登录时输入的明文密码经过上述的演化后与shadow里的密码域进行字符串比较,以此来判断是否允许用户登录。
// passwd.c
#include <stdio.h>
#include <string.h>
#include <unistd.h>
#include <shadow.h>
#include <crypt.h>
#include <errno.h>int main(int argc, char *argv[])
{int     i, j;char    salt[16];char    crypt_char[128];struct spwd *shd;/* 参数检查 */if (argc != 3) {fprintf(stderr, "./passwd USERNAME PASSWORD\\n");return -1; }   /* 访问shadow文件,参数为所指定的用户名 */shd = getspnam(argv[1]);if (shd == NULL) {printf("Error: %s\\n", strerror(errno));return 0;}   strcpy(crypt_char, shd->sp_pwdp);i = 0, j = 0;/* 读到第三个'$'符号*/while ((crypt_char[i] != '\\0') && (j != 3)) {   salt[i] = crypt_char[i];if (crypt_char[i] == '$') {j++;}i++;}   salt[i] = '\\0';printf("salt:\\n%s\\n", salt);printf("crypt_pw:\\n%s\\n", shd->sp_pwdp);printf("------------------count ----------------\\n");printf("salt:\\n%s\\n", salt);printf("crypt_pw:\\n%s\\n", crypt(argv[2], salt));return 0;
}$ gcc passwd.c -o passwd -lcrypt
$ sudo ./passwd test shadow1234
salt:
$6$sT8RMKkg$
crypt_pw:
$6$sT8RMKkg$QLhvrR/iSwurIM0Z0.ZVkxPKRvKXueuAx7fZzq5Umffm3ydNbeGujV7mUKnTNYtbpLIbIdJ2.Q4Spw9OUjhl91