安卓渐变的背景框实现

安卓渐变的背景框实现
1.背景
万恶的设计小姐姐又来搞事情啦,你说好好的设计一个纯色的背景框框不好嘛,非要把一个框框弄成渐变的,如果不拿出放大镜估计没几个人能看出来它是渐变的。来,我让你看看是啥样
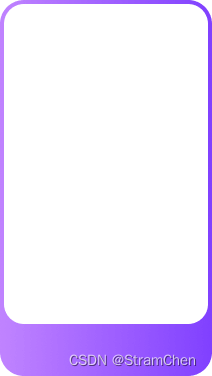

框子是从左到右渐变的,设计应该是做了一个底图,然后上面盖了一个白色圆角矩形。那么我们该怎么去实现它呢?
实现方法
下面介绍三种实现它的方法。先贴上源码地址,大家记得给个star
https://github.com/stramChen/AndroidGradientBorderDrawable.git
1.利用PorterDuffXfermode进行图层的混合,这是最推荐的方法,也是最有效的。
关于图形混合不明白的,推荐看下面的文章
https://blog.csdn.net/iispring/article/details/50472485
实现思路大致就是先在canvas上绘制一个渐变的圆角矩形,然后再利用clear混合模式在原矩形中间绘制一个较小的圆角矩形将中间的颜色擦除,即中间绘制的颜色和原颜色会混合成透明色,这样就能达到渐变框框的效果了,是不是很容易。废话不多说,直接上代码。
/* @des: 渐变背景边框* @author: 569133338@qq.com* @date: 2023/2/23 16:19*/
public class BorderDrawable extends Drawable {public int mLeftBorderWidth = 0;public int mRightBorderWidth = 0;public int mTopBorderWidth = 0;public int mBottomBorderWidth = 0;public float mBorderRadius =0;public float[] mBorderRadii;Path mOuterPath = new Path();Path mInnerPath = new Path();private Paint mPaint = new Paint(Paint.ANTI_ALIAS_FLAG);private Shader mShader;private int mColor;private int[] mColors;private Integer mWidth;private Integer mHeight;private RectF mRectF;public BorderDrawable(int borderWidth) {this(borderWidth,borderWidth,borderWidth,borderWidth);}public void setCornerRadii(@Nullable float[] radii) {this.mBorderRadii = radii;}public void setCornerRadius(float radius) {this.mBorderRadius = radius;}public void setColor(int color){mColor = color;mPaint.setColor(mColor);}public void setColors(int[] colors){mColors = colors;}public BorderDrawable(int leftBorderWidth, int rightBorderWidth, int topBorderWidth, int bottomBorderWidth) {mLeftBorderWidth = leftBorderWidth;mRightBorderWidth = rightBorderWidth;mTopBorderWidth = topBorderWidth;mBottomBorderWidth = bottomBorderWidth;}@Overridepublic void draw(Canvas canvas) {int width = getBounds().width();int height = getBounds().height();if(mWidth == null || mHeight == null || mWidth != width || mHeight != height){mOuterPath.reset();mInnerPath.reset();if(Build.VERSION.SDK_INT >= 21){if(mBorderRadii != null){mOuterPath.addRoundRect(0,0,width,height,mBorderRadii, Path.Direction.CW);mInnerPath.addRoundRect(mLeftBorderWidth,mTopBorderWidth,width-mRightBorderWidth,height-mBottomBorderWidth,mBorderRadii, Path.Direction.CW);}else {mOuterPath.addRoundRect(0,0,width,height,mBorderRadius,mBorderRadius, Path.Direction.CW);mInnerPath.addRoundRect(mLeftBorderWidth,mTopBorderWidth,width-mRightBorderWidth,height-mBottomBorderWidth,mBorderRadius,mBorderRadius, Path.Direction.CW);}}else {if(mBorderRadii != null){mOuterPath.addRoundRect(new RectF(0,0,width,height),mBorderRadii, Path.Direction.CW);mInnerPath.addRoundRect(new RectF(mLeftBorderWidth,mTopBorderWidth,width-mRightBorderWidth,height-mBottomBorderWidth),mBorderRadii, Path.Direction.CW);}else {mOuterPath.addRoundRect(new RectF(0,0,width,height),mBorderRadius,mBorderRadius, Path.Direction.CW);mInnerPath.addRoundRect(new RectF(mLeftBorderWidth,mTopBorderWidth,width-mRightBorderWidth,height-mBottomBorderWidth),mBorderRadius,mBorderRadius, Path.Direction.CW);}}if(null != mColors){mShader = new LinearGradient(0, 0, width, 0,mColors, null, Shader.TileMode.REPEAT);mPaint.setShader(mShader);}mRectF = new RectF(0,0,width,height);mWidth = width;mHeight = height;}int layerId = canvas.saveLayer(mRectF, null, Canvas.ALL_SAVE_FLAG);canvas.drawPath(mOuterPath,mPaint);mPaint.setXfermode(new PorterDuffXfermode(PorterDuff.Mode.CLEAR));canvas.drawPath(mInnerPath,mPaint);mPaint.setXfermode(null);canvas.restoreToCount(layerId);}@Overridepublic void setAlpha(int alpha) {}@Overridepublic void setColorFilter(@Nullable ColorFilter colorFilter) {}@Overridepublic int getOpacity() {return PixelFormat.UNKNOWN;}
}
使用方法也很简单
int[] colors = { Color.parseColor("#C084FF"), Color.parseColor("#8040FF") };//初始化并设置四个边框的宽度BorderDrawable borderDrawable = new BorderDrawable(5,5,5,30);//设置渐变色borderDrawable.setColors(colors);//设置圆角大小borderDrawable.setCornerRadius(20);//将设置好的,放到放到view里面即可view.setBackground(borderDrawable);
2.利用canvas裁剪实现,这个方法有个缺陷,就是圆角会出现毛边,也就是锯齿。
这个方法的思路基本上同上面一致,我们可以直接继承GradientDrawable来绘制外层的渐变背景,然后把颜色混合变成从原矩形中间进行画布的裁剪,把中间的画布给裁剪掉,这样不就只剩下边框了吗,哈哈哈。废话不多说,直接上代码啊。
/* @des: 渐变背景边框* @author: 569133338@qq.com* @date: 2023/2/23 16:19*/
public class BorderDrawable2 extends GradientDrawable {public int mLeftBorderWidth = 0;public int mRightBorderWidth = 0;public int mTopBorderWidth = 0;public int mBottomBorderWidth = 0;public float mBorderRadius =0;public float[] mBorderRadii;Path mPath = new Path();public BorderDrawable2(int borderWidth) {this(borderWidth,borderWidth,borderWidth,borderWidth);}@Overridepublic void setCornerRadii(@Nullable float[] radii) {this.mBorderRadii = radii;super.setCornerRadii(radii);}@Overridepublic void setCornerRadius(float radius) {this.mBorderRadius = radius;super.setCornerRadius(radius);}public BorderDrawable2(int leftBorderWidth, int rightBorderWidth, int topBorderWidth, int bottomBorderWidth) {mLeftBorderWidth = leftBorderWidth;mRightBorderWidth = rightBorderWidth;mTopBorderWidth = topBorderWidth;mBottomBorderWidth = bottomBorderWidth;}@Overridepublic void draw(Canvas canvas) {int width = getBounds().width();int height = getBounds().height();if(Build.VERSION.SDK_INT >= 21){if(mBorderRadii != null){mPath.addRoundRect(mLeftBorderWidth,mTopBorderWidth,width-mRightBorderWidth,height-mBottomBorderWidth,mBorderRadii, Path.Direction.CW);}else {mPath.addRoundRect(mLeftBorderWidth,mTopBorderWidth,width-mRightBorderWidth,height-mBottomBorderWidth,mBorderRadius,mBorderRadius, Path.Direction.CW);}}else{if(mBorderRadii != null){mPath.addRoundRect(new RectF(mLeftBorderWidth,mTopBorderWidth,width-mRightBorderWidth,height-mBottomBorderWidth),mBorderRadii, Path.Direction.CW);}else {mPath.addRoundRect(new RectF(mLeftBorderWidth,mTopBorderWidth,width-mRightBorderWidth,height-mBottomBorderWidth),mBorderRadius,mBorderRadius, Path.Direction.CW);}}canvas.setDrawFilter(new PaintFlagsDrawFilter(0, Paint.FILTER_BITMAP_FLAG|Paint.ANTI_ALIAS_FLAG));canvas.clipPath(mPath, Region.Op.DIFFERENCE);super.draw(canvas);}
}
使用方法也一如既往的简单
int[] colors = { Color.parseColor("#C084FF"), Color.parseColor("#8040FF") };//初始化并设置四个边框的宽度BorderDrawable2 borderDrawable2 = new BorderDrawable2(5,5,5,30);//设置渐变方向borderDrawable2.setOrientation(GradientDrawable.Orientation.LEFT_RIGHT);//设置渐变色borderDrawable2.setColors(colors);//设置圆角大小borderDrawable2.setCornerRadius(20);//将设置好的,放到放到view里面即可view.setBackground(borderDrawable2);
3.利用layer绘制边框
这种方法网上有一大堆教程,这里就不再赘述了,基本思路就是利用layer的两层item来实现,外层先绘制整体的背景色,内层比外层小一些像素,并盖在外层即可实现边框的效果。但这种实现方式有一种很大的缺陷,就是它不是真正意义上的边框,因为内层无法是透明的,如果是透明的,那么外层的颜色就露出来了,所以内层必须要用一个和整体控件一致的颜色来盖在上面,因此并不推荐这种方法。
好了,就写到这,祝大家天天开心。