3.springcloud微服务架构搭建 之 《springboot自动装配ribbon》

1.springcloud微服务架构搭建 之 《springboot自动装配Redis》
2.springcloud微服务架构搭建 之 《springboot集成nacos注册中心》
ribbon工作原理自己网上百度,说的都很详细
目录
1.项目引入openfeign和ribbon配置
2.新建lilock-ribbon-spring-boot-starter
3.增加restTemplate配置类
4.配置Ribbon配置类
5.配置ribbon自动装配spring.factories
6.新建一个cms业务服务,开始测试
7.配置ribbon参数
8.新建测试类进行测试
9.在user服务调用
1.项目引入openfeign和ribbon配置
openfeign集成了ribbon,需要单独给ribbon配置参数信息
<!-- openfeign 集成了ribbon,openfeign坐标引入 版本号:2.1.3.RELEASE-->
<dependency><groupId>org.springframework.cloud</groupId><artifactId>spring-cloud-starter-openfeign</artifactId><version>${spring.cloud.version}</version>
</dependency>
<dependency><groupId>org.springframework.cloud</groupId><artifactId>spring-cloud-starter-netflix-ribbon</artifactId><version>${spring.cloud.version}</version>
</dependency><!--配置httpclient 版本号:4.5.9-->
<dependency><groupId>org.apache.httpcomponents</groupId><artifactId>httpclient</artifactId><version>${httpclient.version}</version>
</dependency>
2.新建lilock-ribbon-spring-boot-starter
引入ribbon坐标
<?xml version="1.0" encoding="UTF-8"?>
<project xmlns="http://maven.apache.org/POM/4.0.0"xmlns:xsi="http://www.w3.org/2001/XMLSchema-instance"xsi:schemaLocation="http://maven.apache.org/POM/4.0.0 http://maven.apache.org/xsd/maven-4.0.0.xsd"><parent><artifactId>lilock-commons</artifactId><groupId>lilock.cn</groupId><version>1.0-SNAPSHOT</version></parent><modelVersion>4.0.0</modelVersion><version>1.0-SNAPSHOT</version><artifactId>lilock-feign-spring-boot-starter</artifactId><dependencies><dependency><groupId>org.springframework.boot</groupId><artifactId>spring-boot-autoconfigure</artifactId></dependency><dependency><groupId>org.springframework.boot</groupId><artifactId>spring-boot-configuration-processor</artifactId></dependency><dependency><groupId>org.springframework.cloud</groupId><artifactId>spring-cloud-starter-openfeign</artifactId></dependency><dependency><groupId>org.springframework.cloud</groupId><artifactId>spring-cloud-starter-netflix-ribbon</artifactId></dependency><dependency><groupId>org.apache.httpcomponents</groupId><artifactId>httpclient</artifactId></dependency><dependency><groupId>org.projectlombok</groupId><artifactId>lombok</artifactId></dependency></dependencies></project>
3.增加restTemplate配置类
package lilock.cn.common.ribbon.properties;import lombok.Data;
import org.springframework.boot.context.properties.ConfigurationProperties;@ConfigurationProperties(prefix = "lilock.rest-template")
@Data
public class RestTemplateProperties {/* 最大链接数*/private int maxTotal = 300;/* 同路由最大并发数*/private int maxPerRoute = 200;/* 读取超时时间 ms*/private int readTimeout = 30000;/* 链接超时时间 ms*/private int connectTimeout = 15000;/ 最大重试次数*/private int maxAutoRetries = 0;/* 是否支持重试*/private boolean enableRetry = false;
}
4.配置Ribbon配置类
package lilock.cn.common.ribbon.config;import com.netflix.loadbalancer.IRule;
import com.netflix.loadbalancer.RoundRobinRule;
import lilock.cn.common.ribbon.properties.RestTemplateProperties;
import org.apache.http.client.HttpClient;
import org.apache.http.client.config.RequestConfig;
import org.apache.http.config.Registry;
import org.apache.http.config.RegistryBuilder;
import org.apache.http.conn.socket.ConnectionSocketFactory;
import org.apache.http.conn.socket.PlainConnectionSocketFactory;
import org.apache.http.conn.ssl.SSLConnectionSocketFactory;
import org.apache.http.impl.client.DefaultHttpRequestRetryHandler;
import org.apache.http.impl.client.HttpClients;
import org.apache.http.impl.conn.PoolingHttpClientConnectionManager;
import org.springframework.beans.factory.annotation.Autowired;
import org.springframework.boot.context.properties.EnableConfigurationProperties;
import org.springframework.cloud.client.loadbalancer.LoadBalanced;
import org.springframework.context.annotation.Bean;
import org.springframework.context.annotation.Primary;
import org.springframework.http.client.ClientHttpRequestFactory;
import org.springframework.http.client.HttpComponentsClientHttpRequestFactory;
import org.springframework.web.client.RestTemplate;@EnableConfigurationProperties
public class RibbonConfig {@Autowiredprivate RestTemplateProperties restTemplateProperties;@Bean@LoadBalancedpublic RestTemplate restTemplate(ClientHttpRequestFactory factory){RestTemplate restTemplate = new RestTemplate();//设置resttemplate http工厂restTemplate.setRequestFactory(factory);return restTemplate;}/* 配置默认负载均衡策略-轮训* @return*/@Bean@Primarypublic IRule ribbonRule(){IRule rule = new RoundRobinRule();return rule;}@Bean@Primarypublic ClientHttpRequestFactory httpRequestFactory(HttpClient httpclient){//设置httpclientreturn new HttpComponentsClientHttpRequestFactory(httpclient);}/* 配置httpclient 参数* @return*/@Beanpublic HttpClient httpClient(){Registry<ConnectionSocketFactory> registry = RegistryBuilder.<ConnectionSocketFactory>create().register("http", PlainConnectionSocketFactory.getSocketFactory()).register("https", SSLConnectionSocketFactory.getSocketFactory()).build();PoolingHttpClientConnectionManager connectionManager = new PoolingHttpClientConnectionManager(registry);// 最大链接数connectionManager.setMaxTotal(restTemplateProperties.getMaxTotal());// 同路由并发数20connectionManager.setDefaultMaxPerRoute(restTemplateProperties.getMaxPerRoute());RequestConfig requestConfig = RequestConfig.custom()// 读超时.setSocketTimeout(restTemplateProperties.getReadTimeout())// 链接超时.setConnectTimeout(restTemplateProperties.getConnectTimeout())// 链接不够用的等待时间.setConnectionRequestTimeout(restTemplateProperties.getReadTimeout()).build();return HttpClients.custom().setDefaultRequestConfig(requestConfig).setConnectionManager(connectionManager).setRetryHandler(new DefaultHttpRequestRetryHandler(restTemplateProperties.getMaxAutoRetries(),restTemplateProperties.isEnableRetry())).build();}
}
5.配置ribbon自动装配spring.factories
org.springframework.boot.autoconfigure.EnableAutoConfiguration = \\
lilock.cn.common.ribbon.properties.RestTemplateProperties,\\
lilock.cn.common.ribbon.config.RibbonConfig
6.新建一个cms业务服务,开始测试
<?xml version="1.0" encoding="UTF-8"?>
<project xmlns="http://maven.apache.org/POM/4.0.0"xmlns:xsi="http://www.w3.org/2001/XMLSchema-instance"xsi:schemaLocation="http://maven.apache.org/POM/4.0.0 http://maven.apache.org/xsd/maven-4.0.0.xsd"><parent><artifactId>lilock-modules</artifactId><groupId>lilock.cn</groupId><version>1.0-SNAPSHOT</version></parent><modelVersion>4.0.0</modelVersion><version>1.0-SNAPSHOT</version><artifactId>lilock-service-cms</artifactId><dependencies><dependency><groupId>org.springframework.boot</groupId><artifactId>spring-boot-starter-web</artifactId></dependency><dependency><groupId>org.springframework.boot</groupId><artifactId>spring-boot-starter-test</artifactId></dependency><dependency><groupId>lilock.cn</groupId><artifactId>lilock-feign-spring-boot-starter</artifactId><version>${project.version}</version></dependency><dependency><groupId>io.springfox</groupId><artifactId>springfox-swagger2</artifactId></dependency><dependency><groupId>io.springfox</groupId><artifactId>springfox-swagger-ui</artifactId></dependency><dependency><groupId>com.alibaba.cloud</groupId><artifactId>spring-cloud-starter-alibaba-nacos-discovery</artifactId></dependency></dependencies><build><plugins><plugin><groupId>org.springframework.boot</groupId><artifactId>spring-boot-maven-plugin</artifactId></plugin></plugins></build>
</project>
7.配置ribbon参数
server.port 可以配置不同的端口,cms服务启动2次模拟负载,我这里端口分别配置的是8990,8991
lilock:rest-template:max-total: 300 #最大连接数max-per-route: 200 #路由最大数max-auto-retries: 0 #最大重试次数enable-retry: false #是否开启重试connect-timeout: 15000 #链接超时时间read-timeout: 30000 #请求超时时间
spring:cloud:nacos:discovery:server-addr: 127.0.0.1:8848register-enabled: truenamespace: devapplication:name: lilock-service-cms
server:port: 8990
8.新建测试类进行测试
package lilock.cn.cms.controller;import io.swagger.annotations.Api;
import lombok.extern.slf4j.Slf4j;
import org.springframework.beans.factory.annotation.Value;
import org.springframework.web.bind.annotation.GetMapping;
import org.springframework.web.bind.annotation.RequestMapping;
import org.springframework.web.bind.annotation.RestController;@RestController
@RequestMapping("/api/cms")
@Api(value = "cms接口管理",tags = {"CMS接口管理"})
@Slf4j
public class CmsController {@Value("${server.port}")private Integer port;@Value("${spring.application.name}")private String service;@GetMapping("/hello")public String getHello(){return "["+ service +"]点前服务端口号是:["+ port +"]返回内容 HELLO" ;}
}
9.在user服务调用
package lilock.cn.user.controller;import com.alibaba.fastjson.JSONObject;
import io.swagger.annotations.Api;
import lombok.extern.slf4j.Slf4j;
import org.springframework.beans.factory.annotation.Autowired;
import org.springframework.cache.annotation.Cacheable;
import org.springframework.web.bind.annotation.GetMapping;
import org.springframework.web.bind.annotation.RequestMapping;
import org.springframework.web.bind.annotation.RestController;
import org.springframework.web.client.RestTemplate;@RestController
@RequestMapping(path = "/user")
@Api(value = "系统用户",tags = {"系统用户"})
@Slf4j
public class UserController {@Autowiredprivate RestTemplate restTemplate;@GetMapping("/testTemplate")public String testTemplate(){String value = restTemplate.getForObject("http://lilock-service-cms/api/cms/hello",String.class);log.info("获取当前请求结果:{}",value);return value;}
}
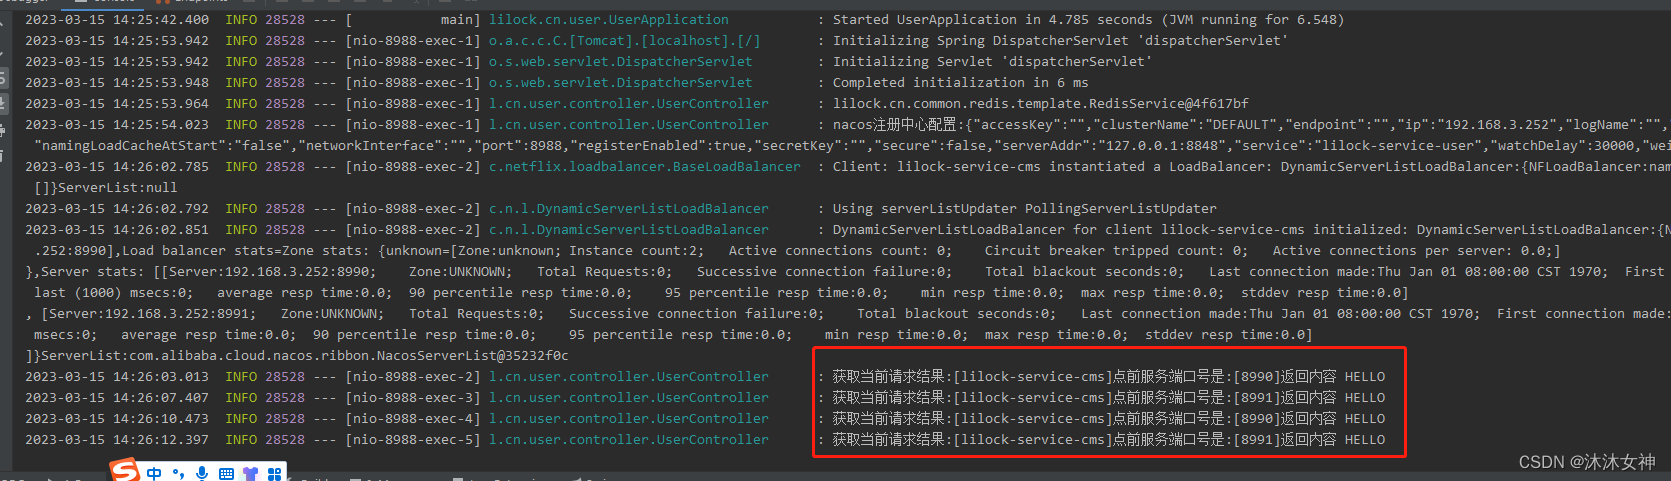
可以看到8990,8991 2个端口对应的服务轮训返回,说明配置的轮训策略生效