Java中的异常处理机制

1. 异常机制存在的必要性
首先明确,程序一旦发生异常,如果没有被处理,程序就会非正常终止。
紧接着来看一段代码,在以下代码中,以为对数组进行了越界访问,导致程序运行中断,提前结束。导致后面的代码根本来不及运行。从运行结果来看,程序的退出代号是1,表示异常退出。
public class Demo1 {Demo1() {int a[] = new int[2];System.out.println("越界访问数据元素 :" + a[3]);}public static void main(String[] args) {Demo1 demo = new Demo1();System.out.println("@@@@@@@@@@@@@@@@@@@");System.out.println("@@@@@@@@@@@@@@@@@@@");System.out.println("@@@@@@@@@@@@@@@@@@@");}
}

那么是否有一种机制,就是当产生异常时,可以对其捕捉并进行适当的处理???
有。这就是Java中的异常处理机制。
实际上,这种机制在C++、Python等高级语言中都有,Java中也不例外,而且用法基本雷同。
public class Demo1 {Demo1() {try {int a[] = new int[2];System.out.println("越界访问数据元素 :" + a[3]);} catch(ArrayIndexOutOfBoundsException e) {System.out.println(e.getMessage());System.out.println("-----------------------------");System.out.println(e.toString());System.out.println("-----------------------------");e.printStackTrace();}}public static void main(String[] args) {Demo1 demo = new Demo1();System.out.println("@@@@@@@@@@@@@@@@@@@");System.out.println("@@@@@@@@@@@@@@@@@@@");System.out.println("@@@@@@@@@@@@@@@@@@@");for(int i = 0 ; i < 5; i ++) {System.out.println(i);}}
}
此时再次运行程序,虽然有异常,但是我们对其进行了捕捉并处理,所以程序并不会异常退出,也不会硬性后续代码的运行。从下图可以看到,程序的退出代号是0,表示正常退出。

2. 异常类Expection的层次
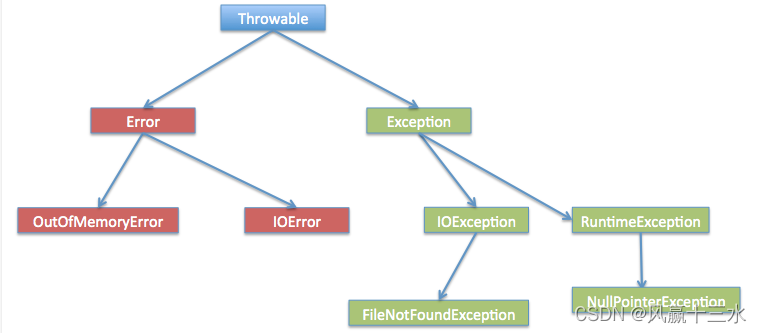
Exception 类的层次
所有的异常类是从 java.lang.Exception 类继承的子类。
Exception 类是 Throwable 类的子类。除了Exception类外,Throwable还有一个子类Error 。
Java 程序通常不捕获错误。错误一般发生在严重故障时,它们在Java程序处理的范畴之外。
Error 用来指示运行时环境发生的错误。
例如,JVM 内存溢出。一般地,程序不会从错误中恢复。
异常类有两个主要的子类:IOException 类和 RuntimeException 类。
3. Java 内置异常类
Java 语言定义了一些异常类在 java.lang 标准包中。
标准运行时异常类的子类是最常见的异常类。由于 java.lang 包是默认加载到所有的 Java 程序的,所以大部分从运行时异常类继承而来的异常都可以直接使用。
Java 根据各个类库也定义了一些其他的异常,下面的表中列出了 Java 的非检查性异常。

4. 捕获异常
使用 try 和 catch 关键字可以捕获异常。try/catch 代码块放在异常可能发生的地方。
try/catch代码块中的代码称为保护代码,使用 try/catch 的语法如下:
try {// 程序代码
} catch(ExceptionName e) {//Catch 块
}
catch 语句包含要捕获异常类型的声明。当保护代码块中发生一个异常时,try 后面的 catch 块就会被检查。如果发生的异常包含在 catch 块中,异常会被传递到该 catch 块,这和传递一个参数到方法是一样。
5. 多重捕获
一个 try 代码块后面跟随多个 catch 代码块的情况就叫多重捕获。
多重捕获块的语法如下所示:
try {// 程序代码
} catch(异常类型1 异常的变量名1) {// 程序代码
} catch(异常类型2 异常的变量名2) {// 程序代码
} catch(异常类型3 异常的变量名3) {// 程序代码
}
上面的代码段包含了 3 个 catch块。
可以在 try 语句后面添加任意数量的 catch 块。
如果保护代码中发生异常,异常被抛给第一个 catch 块。
如果抛出异常的数据类型与 ExceptionType1 匹配,它在这里就会被捕获。
如果不匹配,它会被传递给第二个 catch 块。
如此,直到异常被捕获或者通过所有的 catch 块。
public class Demo2 {public int divide(int a, int b) {int c = a / b ;return c;}public static void main(String [] args) {Demo2 demo = new Demo2();try {demo.divide(5, 0);} catch(ArithmeticException e) {System.out.println("除数不能为0.");} catch(IllegalArgumentException e) {System.out.println("不能为负数.");} catch(Exception e) {e.printStackTrace();}}
}
6. throw关键字
throw 关键字用于在当前方法中抛出一个异常。
通常情况下,当代码执行到某个条件下无法继续正常执行时,可以使用 throw 关键字抛出异常,以告知调用者当前代码的执行状态。
不同于throws,throw 则是用来抛出一个具体的异常类型。
public class Demo2 {public void checkNumber(int num) {if (num < 0) {throw new IllegalArgumentException("必须是正数。");}}public static void main(String [] args) {Demo2 demo = new Demo2();// checkNumber中抛出异常, 但是此处并没有进行IllegalArgumentException的异常捕获处理, 那么程序将异常退出, 退出代码1;// 如果对IllegalArgumentException进行了捕获处理, 程序将不会异常退出, 正常执行;try {demo.checkNumber(-1);} catch(IllegalArgumentException e) {e.printStackTrace();} catch(ArrayIndexOutOfBoundsException e) {e.printStackTrace();}System.out.println("#@@##");}
}
7. throws关键字
throws 关键字用于在方法声明中指定该方法可能抛出的异常。当方法内部抛出指定类型的异常时,该异常会被传递给调用该方法的代码,并在该代码中处理异常。
throws 用来声明一个方法可能产生的所有异常,不做任何处理而是将异常往上传,谁调用我我就抛给谁。
throws 在方法后边声明异常,其实就是自己不想对异常做出任何的处理,告诉别人自己可能出现的异常,交给别人处理,让别人处理。
throws 用于方法上,可抛出多个异常,每个异常的类名用逗号隔开。
public class Test
{public void getCount(double count) throws RemoteException, InsufficientFundsException{// Method implementation}//Remainder of class definition
}
public class Demo2 {public int divide(int a, int b) throws Exception {  // 如果有异常, 则交给调用处处理return a / b ;}public static void main(String [] args) {Demo2 demo = new Demo2();try {demo.divide(5, 0);} catch(ArithmeticException e) {System.out.println("除数不能为0.");} catch(Exception e) {e.printStackTrace();}}
}
8. finally关键字
finally 关键字用来创建在 try 代码块后面执行的代码块。
无论是否发生异常,finally 代码块中的代码总会被执行。
在 finally 代码块中,可以运行清理类型等收尾善后性质的语句。
public class Demo2 {public int divide(int a, int b) throws Exception {return a / b ;}public static void main(String [] args) {Demo2 demo = new Demo2();try {demo.divide(5, 0);} catch(ArithmeticException e) {System.out.println("除数不能为0.");} catch(Exception e) {e.printStackTrace();} finally {System.out.println("清理资源");}}
}
9. try-with-resources
JDK7 之后,Java 新增的 try-with-resource 语法糖来打开资源,并且可以在语句执行完毕后确保每个资源都被自动关闭 。
JDK7 之前所有被打开的系统资源,比如流、文件或者 Socket 连接等,都需要被开发者手动关闭,否则将会造成资源泄露。
注意:try-with-resources 语句关闭所有实现 AutoCloseable 接口的资源。
import java.io.*;public class RunoobTest {public static void main(String[] args) {String line;try(BufferedReader br = new BufferedReader(new FileReader("test.txt"))) {while ((line = br.readLine()) != null) {System.out.println("Line =>"+line);}} catch (IOException e) {System.out.println("IOException in try block =>" + e.getMessage());}}
}
以上实例中,我们实例一个 BufferedReader 对象从 test.txt 文件中读取数据。
在 try-with-resources 语句中声明和实例化 BufferedReader 对象,执行完毕后实例资源,不需要考虑 try 语句是正常执行还是抛出异常。
如果发生异常,可以使用 catch 来处理异常。
再看下不使用 try-with-resources 而改成 finally 来关闭资源,整体代码量多了很多,而且更复杂繁琐了。
import java.io.*;class RunoobTest {public static void main(String[] args) {BufferedReader br = null;String line;try {System.out.println("Entering try block");br = new BufferedReader(new FileReader("test.txt"));while ((line = br.readLine()) != null) {System.out.println("Line =>"+line);}} catch (IOException e) {System.out.println("IOException in try block =>" + e.getMessage());} finally {System.out.println("Entering finally block");try {if (br != null) {br.close();}} catch (IOException e) {System.out.println("IOException in finally block =>"+e.getMessage());}}}
}
try-with-resources 语句中可以声明多个资源,方法是使用分号 ; 分隔各个资源。
import java.io.*;
import java.util.*;class RunoobTest {public static void main(String[] args) throws IOException{try (Scanner scanner = new Scanner(new File("testRead.txt"));PrintWriter writer = new PrintWriter(new File("testWrite.txt"))) {while (scanner.hasNext()) {writer.print(scanner.nextLine());}}}
}
以上实例使用 Scanner 对象从 testRead.txt 文件中读取一行并将其写入新的 testWrite.txt 文件中。
多个声明资源时,try-with-resources 语句以相反的顺序关闭这些资源。 在本例中,PrintWriter 对象先关闭,然后 Scanner 对象关闭。
10. 声明自定义异常
/*
* 自定义异常:
*   在 Java 中你可以自定义异常。编写自己的异常类时需要记住下面的几点。a. 如果希望写一个检查性异常类,则需要继承 Exception 类。b. 如果你想写一个运行时异常类,那么需要继承 RuntimeException 类。
* */
class MathException extends Exception {public MathException() {}public MathException(String message) {super(message);}
}
class DivisorIsZeroException extends MathException {public DivisorIsZeroException() {}public DivisorIsZeroException(String message) {super(message);}
}
class DivisorInvalidException extends MathException {public DivisorInvalidException() {}public DivisorInvalidException(String message) {super(message);}
}/*
* 如果父类中的方法抛出多个异常, 则子类中的覆盖方法可以选择不抛出任何异常, 或者要么抛出相同的异常,
* 要么抛出异常的子类, 但是不能抛出新的异常。
* 在本例中,如果将MyMath中的throws MathException 更换为 throws DivisorIsZeroException, 那么由于SuperMath中抛出了新异常DivisorInvalidException,
* 此时就会报错。
* */
class MyMath {public int divide(int a, int b) throws MathException {if(0 == b) {throw new DivisorIsZeroException("除数为0.");}return a / b;}
}
class SuperMath extends MyMath {@Overridepublic int divide(int a, int b) throws DivisorIsZeroException, DivisorInvalidException {if(0 == b) {throw new DivisorIsZeroException("除数为0.");} else if(b < 0) {throw new DivisorInvalidException("除数为负数.");}return a / b;}
}class Test {private int x = 5;private int y = 0;public int divide(MyMath math) {int res = 0;try {res = math.divide(x, y);} catch(DivisorIsZeroException e) {System.out.println(e.getMessage());} catch (MathException e) {System.out.println(e.getMessage());}return res;}public static void main(String[] args) {Test t = new Test();t.divide(new MyMath());t.divide(new SuperMath());}
}