Linux: 进程间通信机制

文章目录
1. 前言
限于作者能力水平,本文可能存在谬误,因此而给读者带来的损失,作者不做任何承诺。
2. 进程间通信机制
进程间通信机制,简称 IPC(InterProcess Communication)。
2.1 管道
管道特性:
1. 半双工,数据是单向流动。
2. 只能在有共同祖先的进程间使用。
3. 数据一旦被读走,便不在管道中存在,不可反复读取。
2.1.1 匿名管道
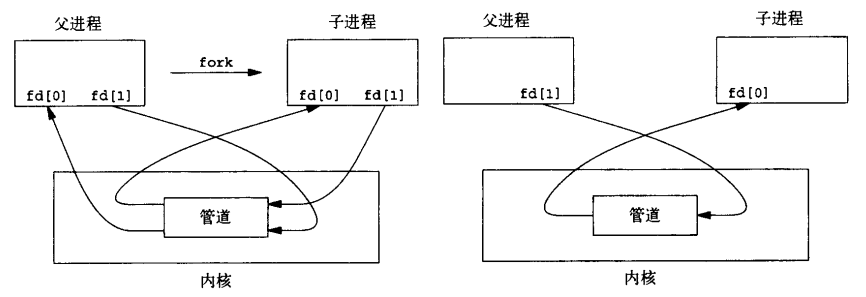
可通过系统调用 pipe() 创建匿名管道:

pipe() 调用返回两个文件句柄:filedes[0] 用于读,filedes[1] 用于写。用于读的句柄在所有数据被读取后,继续读返回0指示达到数据末尾;如果管道读端的 filedes[0] 关闭了,再向管道写端的 filedes[1] 写入,会产生 SIGPIPE 信号。
例子代码:
#include <unistd.h>
#include <stdio.h>
#include <stdlib.h>
#include <errno.h>int main(void)
{int n, fd[2];pid_t pid;char buf[4096];if (pipe(fd)) {perror("pipe");exit(EXIT_FAILURE);}pid = fork();if (pid < 0) {perror("fork");exit(EXIT_FAILURE);}if (pid > 0) { /* 父进程 */close(fd[0]); /* 父进程关闭读端 */write(fd[1], "hello, child, i'm your father.\\n", 31);} else if (pid == 0) { /* 子进程 */close(fd[1]); /* 子进程关闭写端 */n = read(fd[0], buf, sizeof(buf));write(STDOUT_FILENO, buf, n);}return 0;
}
例子中,管道数据流向是 父进程 -> 子进程,我们也完全可以通过关闭父进程的写端和子进程的读端,创建数据流向完全相反的管道。
2.1.2 popen() 和 pclose()
前述匿名管道方式使用起来不是很方便,这时候可以使用 popen() :
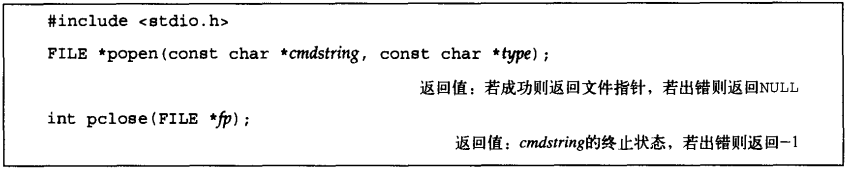
函数 popen() 先执行 fork() ,然后调用 exec() 执行 cmdstring 参数指向的程序,最后返回一个标准 I/O 的文件对象指针。
如果 type 参数是 "r" ,则文件对象指针连接到 cmdstring 参数指向程序的标准输出:

也就是 cmdstring 参数指向程序所在子进程,通过管道将其标准输出数据传递给父进程。
如果 type 参数是 "w" ,则文件对象指针连接到 cmdstring 参数指向程序的标准输入:
也就是 cmdstring 参数指向程序所在子进程的标准输入,通过管道从父进程读取。
说白了,本质上 popen() 就是对 pipe() 的封装,提高了使用的便利性。
看一个 popen() 使用的例子:
#include <stdio.h>
#include <stdlib.h>
#include <errno.h>int main(int argc, char *argv[])
{FILE *fp;char buf[4096] = {0};int n;fp = popen("/bin/ls -l", "r");if (!fp) {perror("popen");exit(EXIT_FAILURE);}n = fread(buf, 1, sizeof(buf), fp);printf("%d bytes\\n%s\\n", n, buf);pclose(fp);return 0;
}
2.1.3 命名管道 FIFO
前述的管道方式,只能用于有亲缘关系的进程,不相关的进程之间,可以使用命名管道(FIFO)进行数据传输。通过函数 mkfifo() 创建命名管道(FIFO):

一旦创建了命名管道(FIFO)文件,就可以通过 open() 打开它,然后进行 read(), write(), close(),unlink() 等操作。
类似于匿名管道,在没有读端进程打开命名管道文件时,如果写端进程对命名管道(FIFO)进行写操作,则会产生 SIGPIPE 信号。
多个进程写同一个命名管道(FIFO),这是很常见的情形,如果不想各进程写入的数据相互穿插,就需要考虑同步问题。
命名管道(FIFO)常见用途如下:
1. shell命令间相互传递数据。
2. 客户/服务端程序,以便客户进程和服务端进程之间传递数据。
看一个例子:
/* FIFO 写端程序:fifo_wend.c */#include <unistd.h>
#include <sys/types.h>
#include <sys/stat.h>
#include <fcntl.h>
#include <stdio.h>
#include <stdlib.h>
#include <errno.h>#include "fifo_test.h"int main(void)
{int fd;char s[] = "hello!\\n";fd = open(FIFO_FILE, O_WRONLY);write(fd, s, sizeof(s));close(fd);return 0;
}
/* FIFO 读端程序:fifo_rend.c */#include <sys/types.h>
#include <sys/stat.h>
#include <fcntl.h>
#include <unistd.h>
#include <stdio.h>#include "fifo_test.h"int main(void)
{char buf[4096];int fd;fd = open(FIFO_FILE, O_RDONLY);read(fd, buf, sizeof(buf));close(fd);printf("%s", buf);return 0;
}
公共头文件 fifo_test.h :
#define FIFO_FILE "fifo"
编译和运行:
$ make fifo_rend fifo_wend
$ mkfifo fifo  创建 FIFO 命名管道文件 fifo
$ ./fifo_rend 先启动读端程序
$ ./fifo_wend 后启动写端程序
$ rm fifo 测试完成后删除 fifo 文件
读端程序 fifo_rend 会输出 hello! 字串。
2.2 消息队列
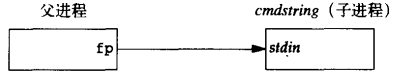
管道的方式虽然简单,但是比较低效,不适合进程间频繁的数据交流,并且管道只能传输无格式字节流。对于进程间频繁的数据交流,如果要求高效、带有格式,使能消息队列将是更好的选择。消息队列的数据在进程间的流动如下图(图片取自参考资料中知乎博文):
创建消息队列函数 msgget() :

更多细节参考 https://man7.org/linux/man-pages/man2/msgget.2.html 。
配置消息队列函数 msgctl() :

更多细节参考 https://man7.org/linux/man-pages/man2/msgctl.2.html 。
发送数据到消息队列函数 msgsnd() :

更多细节参考 https://man7.org/linux/man-pages/man2/msgsnd.2.html 。
从消息队列获取数据函数 :

更多细节参考 https://man7.org/linux/man-pages/man2/msgrcv.2.html 。
看一个例子,包含消息发送和接收两个程序。程序公共头文件 msg_test.h :
#define MSGQ_ID 1234
#define MSG_END "<END>"#define MAX_TEXT 4096struct msg_data {long int msg_type;char text[MAX_TEXT];
};
消息发送程序代码 msg_snd.c :
#include <stdlib.h>
#include <stdio.h>
#include <string.h>
#include <unistd.h>
#include <sys/msg.h>
#include <errno.h>#include "msg_test.h"int main(int argc, char **argv)
{struct msg_data data;int msgid = -1;static const char *msg_text[] = {"message 001", "message 002","message 003",MSG_END};int i;/* create */msgid = msgget((key_t)MSGQ_ID, 0666 | IPC_CREAT);if (msgid == -1) {perror("msgget");exit(EXIT_FAILURE);}for (i = 0; i < sizeof(msg_text)/sizeof(msg_text[0]); i++) {data.msg_type = 1;strcpy(data.text, msg_text[i]);if (msgsnd(msgid, (void *)&data, MAX_TEXT, 0) == -1) { /* send text message */perror("msgsnd");exit(EXIT_FAILURE);}}return 0;
}
消息接收程序代码 msg_rcv.c :
#include <stdio.h>
#include <stdlib.h>
#include <string.h>
#include <sys/msg.h>
#include <errno.h>#include "msg_test.h"int main(int argc, char **argv)
{int msgid = -1;struct msg_data data;long int msgtype = 0;msgid = msgget((key_t)MSGQ_ID, 0666 | IPC_CREAT);if (msgid == -1) {perror("msgget");exit(EXIT_FAILURE);}for (;;) {if (msgrcv(msgid, (void *)&data, MAX_TEXT, msgtype, 0) == -1) {perror("msgrcv");exit(EXIT_FAILURE);}printf("<MESSAGE>: %s\\n", data.text);if (strcmp(data.text, MSG_END) == 0)break;}/* remove */if (msgctl(msgid, IPC_RMID, 0) == -1) {perror("msgget");exit(EXIT_FAILURE);}return 0;
}
编译和运行:
$ make msg_snd msg_rcv
$ ./msg_rcv
$ ./msg_snd
当然,消息队列也可用于父子进程间的通信,感兴趣的读者可以自行实践。
2.3 共享内存
为了避免消息队列那样频繁的数据拷贝,以及系统调用开销,引入了共享内存 IPC 机制。
共享内存 允许两个或更多进程共享一块物理内存区域,因为数据不需要在进程间来回拷贝,所以这是本文所有 IPC 机制中最快的一种。共享内存的各进程页表结构如下图(图片取自参考资料中知乎博文):
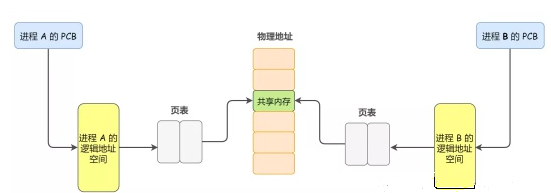
上图告诉我们,共享内存的物理区域是相同的,进程使用各自页表项映射到相同的物理内存块。也可以从另一个视角来理解(图片取自参考资料中CSDN博文):
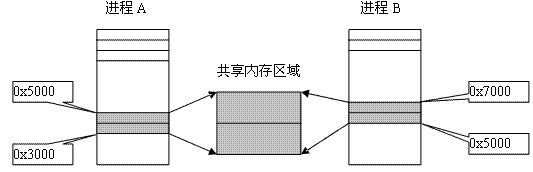
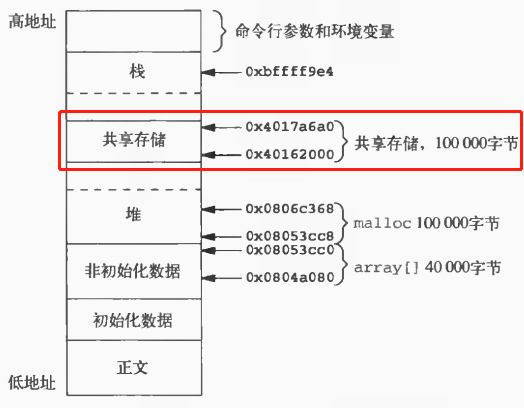
这里更清晰的看到,共享内存的物理内存区,在进程中对应的虚拟地址可能是不同的。再看下共享内存在进程虚拟地址空间布局中的位置:
看共享内存相关函数:
#include <sys/shm.h>int shmget(key_t key, size_t size, int shmflg); /* 创建 或 获取 共享内存 */
int shmctl(int shmid, int cmd, struct shmid_ds *buf); /* 配置共享内存 */
void *shmat(int shmid, const void *shmaddr, int shmflg); /* 建立到共享内存的映射 */
int shmdt(const void *shmaddr); /* 移除到共享内存的映射 */
看一个例子,仍然是一个写程序和一个读程序。两个程序的共同头文件 shm_common.h :
#ifndef SHM_COMMON_H
#define SHM_COMMON_H#define MY_SHM_KEY 1234
#define TEXT_SZ 2048
#define MSG_END "<END>"struct shared_data {int data_avail;char text[TEXT_SZ];
};#endif /* SHM_COMMON_H */
写程序 shm_write.c :
#include <unistd.h>
#include <stdlib.h>
#include <stdio.h>
#include <string.h>
#include <sys/types.h>
#include <sys/ipc.h>
#include <sys/shm.h>#include "shm_common.h"int main (void)
{int running = 1;int shmid;void *shared_vaddr = NULL;struct shared_data *shared;char buffer[BUFSIZ];static const char *msg_text[] = {"message 001", "message 002","message 003",MSG_END};int i;shmid = shmget((key_t)MY_SHM_KEY, sizeof(struct shared_data), 0666 | IPC_CREAT);if (shmid == -1) {perror("shmget");exit(EXIT_FAILURE);}shared_vaddr = shmat(shmid, NULL, 0);if (shared_vaddr == (void *)-1) {perror("shmat");exit(EXIT_FAILURE);}printf("Memory attached at %p\\n", shared_vaddr);shared = (struct shared_data *)shared_vaddr;for (i = 0; i < sizeof(msg_text)/sizeof(msg_text[0]); i++) {while (shared->data_avail)asm("nop");strcpy(shared->text, msg_text[i]);shared->data_avail = 1;}if (shmdt(shared_vaddr) == -1) {perror("shmdt");exit(EXIT_FAILURE);}return 0;
}
读程序 shm_read.c :
#include <unistd.h>
#include <stdlib.h>
#include <stdio.h>
#include <string.h>
#include <sys/types.h>
#include <sys/ipc.h>
#include <sys/shm.h>
#include <error.h>#include "shm_common.h"int main (void)
{int shmid;void *shared_vaddr = NULL;struct shared_data *shared;shmid = shmget((key_t)MY_SHM_KEY, sizeof(struct shared_data), 0666 | IPC_CREAT);if (shmid == -1) {perror("shmget");exit(EXIT_FAILURE);}shared_vaddr = shmat(shmid, NULL, 0);if (shared_vaddr == (void *)-1) {perror("shmat");exit(EXIT_FAILURE);}printf("Memory attached at %p\\n", shared_vaddr);shared = (struct shared_data *)shared_vaddr;shared->data_avail = 0;for (;;) {if (shared->data_avail) {printf("%s\\n", shared->text);if (strcmp(shared->text, MSG_END) == 0)break;shared->data_avail = 0;}}if (shmdt(shared_vaddr) == -1) {perror("shmdt");exit(EXIT_FAILURE);}return 0;
}
编译和运行:
在这里插入代码片
同样,共享内存也可用于父子进程间的通信,感兴趣的读者可以自行实践。
2.4 信号量
先看信号量函数集:
#include <sys/sem.h>int semget(key_t key, int nsems, int semflg); /* 创建 或 获取 一个已有信号量 */
int semctl(int semid, int semnum, int cmd, ...); /* 配置信号量 */
int semop(int semid, struct sembuf *sops, size_t nsops); /* 改变信号量的值 */
int semtimedop(int semid, struct sembuf *sops, size_t nsops,const struct timespec *timeout);
看一个例子,代码来自此处:
#include <unistd.h>
#include <sys/types.h>
#include <sys/stat.h>
#include <fcntl.h>
#include <stdlib.h>
#include <stdio.h>
#include <string.h>
#include <sys/sem.h>
#include <errno.h>union semun {int val;struct semid_ds *buf;unsigned short *arry;
};static int init_semaphore(int sem_id);
static int fini_semaphore(int sem_id);static int semaphore_p(int sem_id);
static int semaphore_v(int sem_id);int main(int argc, char *argv[])
{char message = 'X';int sem_id, i = 0;sem_id = semget((key_t)1234, 1, 0666 | IPC_CREAT);if (sem_id == -1) {perror("semget");exit(EXIT_FAILURE);}if (argc > 1) { /* first time to init */if (!init_semaphore(sem_id))exit(EXIT_FAILURE);message = argv[1][0];sleep(2);}for (i = 0; i < 10; ++i) {if (!semaphore_p(sem_id))exit(EXIT_FAILURE);printf("%c", message);fflush(stdout);sleep(rand() % 3);printf("%c\\n", message);fflush(stdout);if (!semaphore_v(sem_id))exit(EXIT_FAILURE);sleep(rand() % 2);}sleep(10);printf("\\n%d - finished\\n", getpid());if (argc > 1) {sleep(3);fini_semaphore(sem_id);}exit(EXIT_SUCCESS);
}static int init_semaphore(int sem_id)
{union semun sem_union;sem_union.val = 1;if (semctl(sem_id, 0, SETVAL, sem_union) == -1) {perror("semctl");return 0;}return 1;
}static int fini_semaphore(int sem_id)
{union semun sem_union;if (semctl(sem_id, 0, IPC_RMID, sem_union) == -1) {perror("semctl");return 0;}return 1;
}static int semaphore_p(int sem_id)
{struct sembuf sem_b;sem_b.sem_num = 0;sem_b.sem_op = -1;sem_b.sem_flg = SEM_UNDO;if (semop(sem_id, &sem_b, 1) == -1) {perror("semop");return 0;}return 1;
}static int semaphore_v(int sem_id)
{struct sembuf sem_b;sem_b.sem_num = 0;sem_b.sem_op = 1;sem_b.sem_flg = SEM_UNDO;if (semop(sem_id, &sem_b, 1) == -1) {perror("semop");return 0;}return 1;
}
编译和运行:
$ make sem_test
$ ./sem_test 0
$ ./sem_test
2.5 网络套接字
就上张图吧,其它的就不多说了。
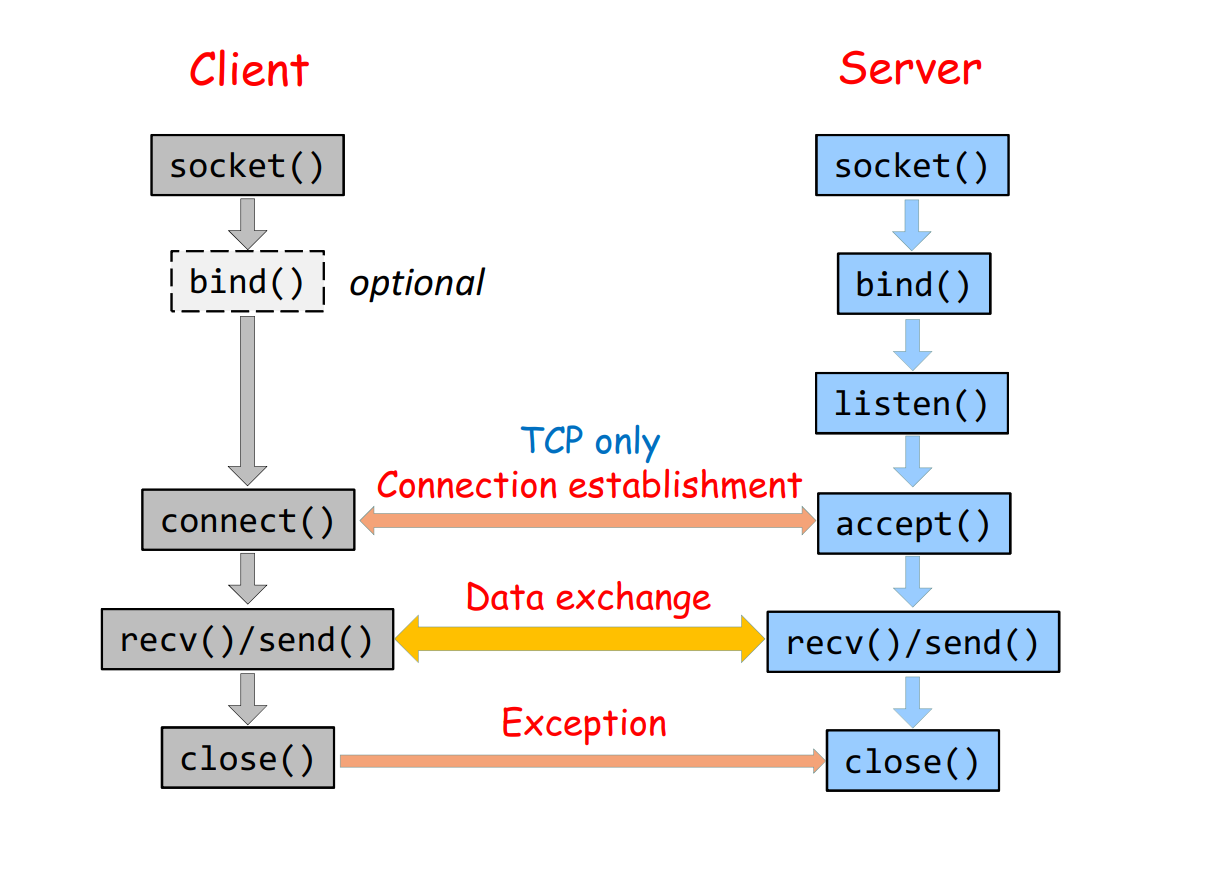
图片来自于 这里 。
2.6 UNIX套接字
有点类似于命名管道(FIFO),也许我们可以把UNIX套接字说成命名socket。更多细节参考博客 https://blog.csdn.net/inthat/article/details/27371939 。
2.7 信号
#include <signal.h>int kill(pid_t pid, int sig); /* 发送信号到进程 */
int killpg(int pgrp, int sig); /* 发送信号到进程组 */
int tgkill(pid_t tgid, pid_t tid, int sig); /* 发送信号到线程 */
int syscall(SYS_pidfd_send_signal, int pidfd, int sig, siginfo_t *info,unsigned int flags); /* 发送信号到进程 */
3. 参考资料
《Advanced Programming in the UNIX Envinronment》
https://zhuanlan.zhihu.com/p/556004836
https://blog.csdn.net/fukangwei_lite/article/details/120640540
https://blog.csdn.net/m0_52387305/article/details/124149859
https://blog.csdn.net/inthat/article/details/27371939