Bean作用域和生命周期

修改的Bean案例
User:
package com.bean;import org.springframework.context.annotation.Bean;
import org.springframework.stereotype.Controller;public class User {private int id;private String name;@Overridepublic String toString() {return "User{" +"id=" + id +", name='" + name + '\\'' +'}';}public int getId() {return id;}public void setId(int id) {this.id = id;}public String getName() {return name;}public void setName(String name) {this.name = name;}
}
Users:
package com.bean;import org.springframework.context.annotation.Bean;
import org.springframework.stereotype.Controller;@Controller
public class Users {@Beanpublic User user1() {User user = new User();user.setId(1);user.setName("Java");return user;}
}
Controller1:
package com.bean.controller;import com.bean.User;
import com.bean.Users;
import org.springframework.beans.factory.annotation.Autowired;
import org.springframework.stereotype.Controller;@Controller
public class Controller1 {@Autowiredprivate User user1;public User getUser1() {User user = user1;System.out.println("原来的Name:"+user.getName());user.setName("Golang");return user;}
}
Controller2:
package com.bean.controller;import com.bean.User;
import com.bean.Users;
import org.springframework.beans.factory.annotation.Autowired;
import org.springframework.stereotype.Controller;@Controller
public class Controller2 {@Autowiredprivate User user1;public User getUser1() {User user = user1;return user;}
}
App(启动类):
import com.bean.User;
import com.bean.controller.Controller1;
import com.bean.controller.Controller2;
import org.springframework.context.ApplicationContext;
import org.springframework.context.support.ClassPathXmlApplicationContext;/* Created by 伦敦看日出* Description:* User: yyt* Date: 2023-04-22* Time: 15:41*/
public class App {public static void main(String[] args) {ApplicationContext context = new ClassPathXmlApplicationContext("spring-config.xml");Controller1 controller1 = context.getBean(Controller1.class);System.out.println("A对象修改之后Name:"+controller1.getUser1().toString());Controller2 controller2 = context.getBean(Controller2.class);System.out.println("B对象读取到的Name:"+controller2.getUser1().toString());}
}
执行结果:
原来的Name:Java
A对象修改之后Name:User{id=1, name=‘Golang’}
B对象读取到的Name:User{id=1, name=‘Golang’}
分析
Bean默认情况是单例模式(可以提高性能),所有人使用的是同一个对象,所以Bean作用域也是单例模式
作用域定义
Bean 的作⽤域是指 Bean 在 Spring 整个框架中的某种⾏为模式,⽐如 singleton 单例作⽤域,就表 示 Bean 在整个 Spring 中只有⼀份,它是全局共享的,那么当其他⼈修改了这个值之后,那么另⼀个 ⼈读取到的就是被修改的值。
Bean原理分析
Bean执行流程(Spring执行流程): 1.启动 Spring 容器 -> 2.实例化 Bean(分配内存空间,从⽆到有) -> 3.Bean 注册到 Spring 中(存操作) -> 4.将 Bean 装配到需要的类中(取操作)。
- 启动main
- 加载XML实例化内存
- 将5大类注解对象存储
- 将注入的对象属性进行初始化
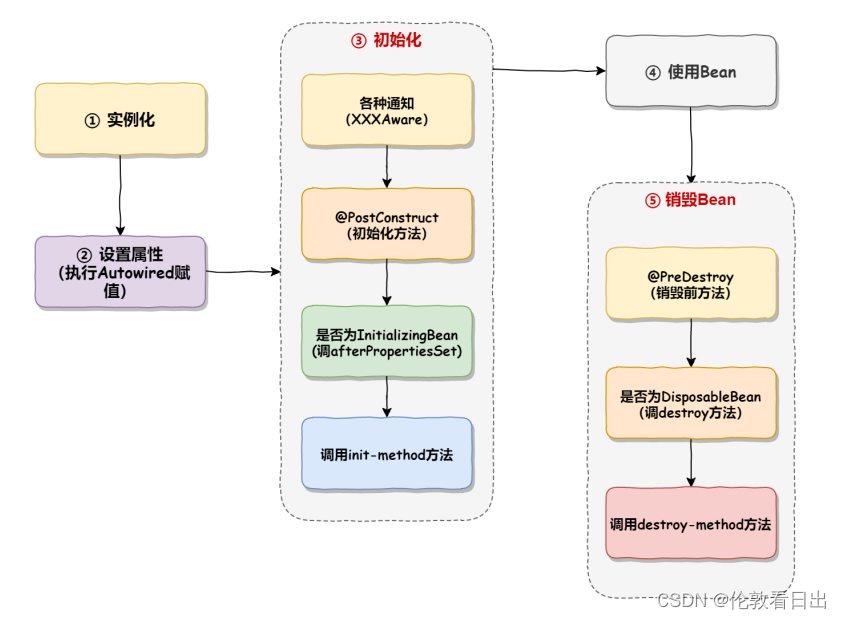
Bean生命周期
-
实例化 Bean(为 Bean 分配内存空间)
-
设置属性(Bean 注⼊和装配)
-
Bean 初始化
实现了各种 Aware 通知的⽅法,如 BeanNameAware、BeanFactoryAware、 ApplicationContextAware 的接⼝⽅法; 执⾏ BeanPostProcessor 初始化前置⽅法; 执⾏ @PostConstruct 初始化⽅法,依赖注⼊操作之后被执⾏; 执⾏⾃⼰指定的 init-method ⽅法(如果有指定的话); 执⾏ BeanPostProcessor 初始化后置⽅法。 -
使⽤ Bean
-
销毁 Bean
销毁容器的各种⽅法,如 @PreDestroy、DisposableBean 接⼝⽅法、destroy-method。 执⾏流程如下图所示:

