Elasticsearch:为日志分析设置安全的 Elasticsearch 管道

在我之前的许多文章中,我已经详细地描述了如何配置如下的管道:

如果你想了解更多,请详细阅读文章:
- Logstash:Logstash 入门教程 (二)
-
Elastic:运用 Docker 安装 Elastic Stack 并采集日志文件
在实际的使用中,Elastic Stack 中的各个组件极有可能不在同样的一个机器上。我们该如何保证数据在传输过程中的安全呢?我们需要确保在上图所示的每一个连接都是安全的。在今天的教程中,我将详述如何在考虑安全的情况下设置 Filebeat、Logstash、Elasticsearch 和 Kibana。我将在 Ubuntu OS 22.04 上安装最新的 Elastic Stack 8.7.0。Ubuntu OS 的 IP 地址为 192.168.0.9。
步骤一:安装 Elasticsearch
导入 Elasticsearch PGP 密钥:
wget -qO - https://artifacts.elastic.co/GPG-KEY-elasticsearch | sudo gpg --dearmor -o /usr/share/keyrings/elasticsearch-keyring.gpg确保安装了 apt-transport-https 包:
sudo apt install apt-transport-https保存 Elasticsearch deb 存储库:
echo "deb [signed-by=/usr/share/keyrings/elasticsearch-keyring.gpg] https://artifacts.elastic.co/packages/8.x/apt stable main" | sudo tee /etc/apt/sources.list.d/elastic-8.x.list下载并安装 Elasticsearch:
sudo apt update && sudo apt install elasticsearchElasticsearch 版本 8.0 及更高版本安装时默认启用安全性。 默认 Elasticsearch 超级用户的密码,名为 elastic,在你安装 Elasticsearch 后生成。 你以后可以随时更改密码,但现在将其复制到某个安全的地方以备后用。
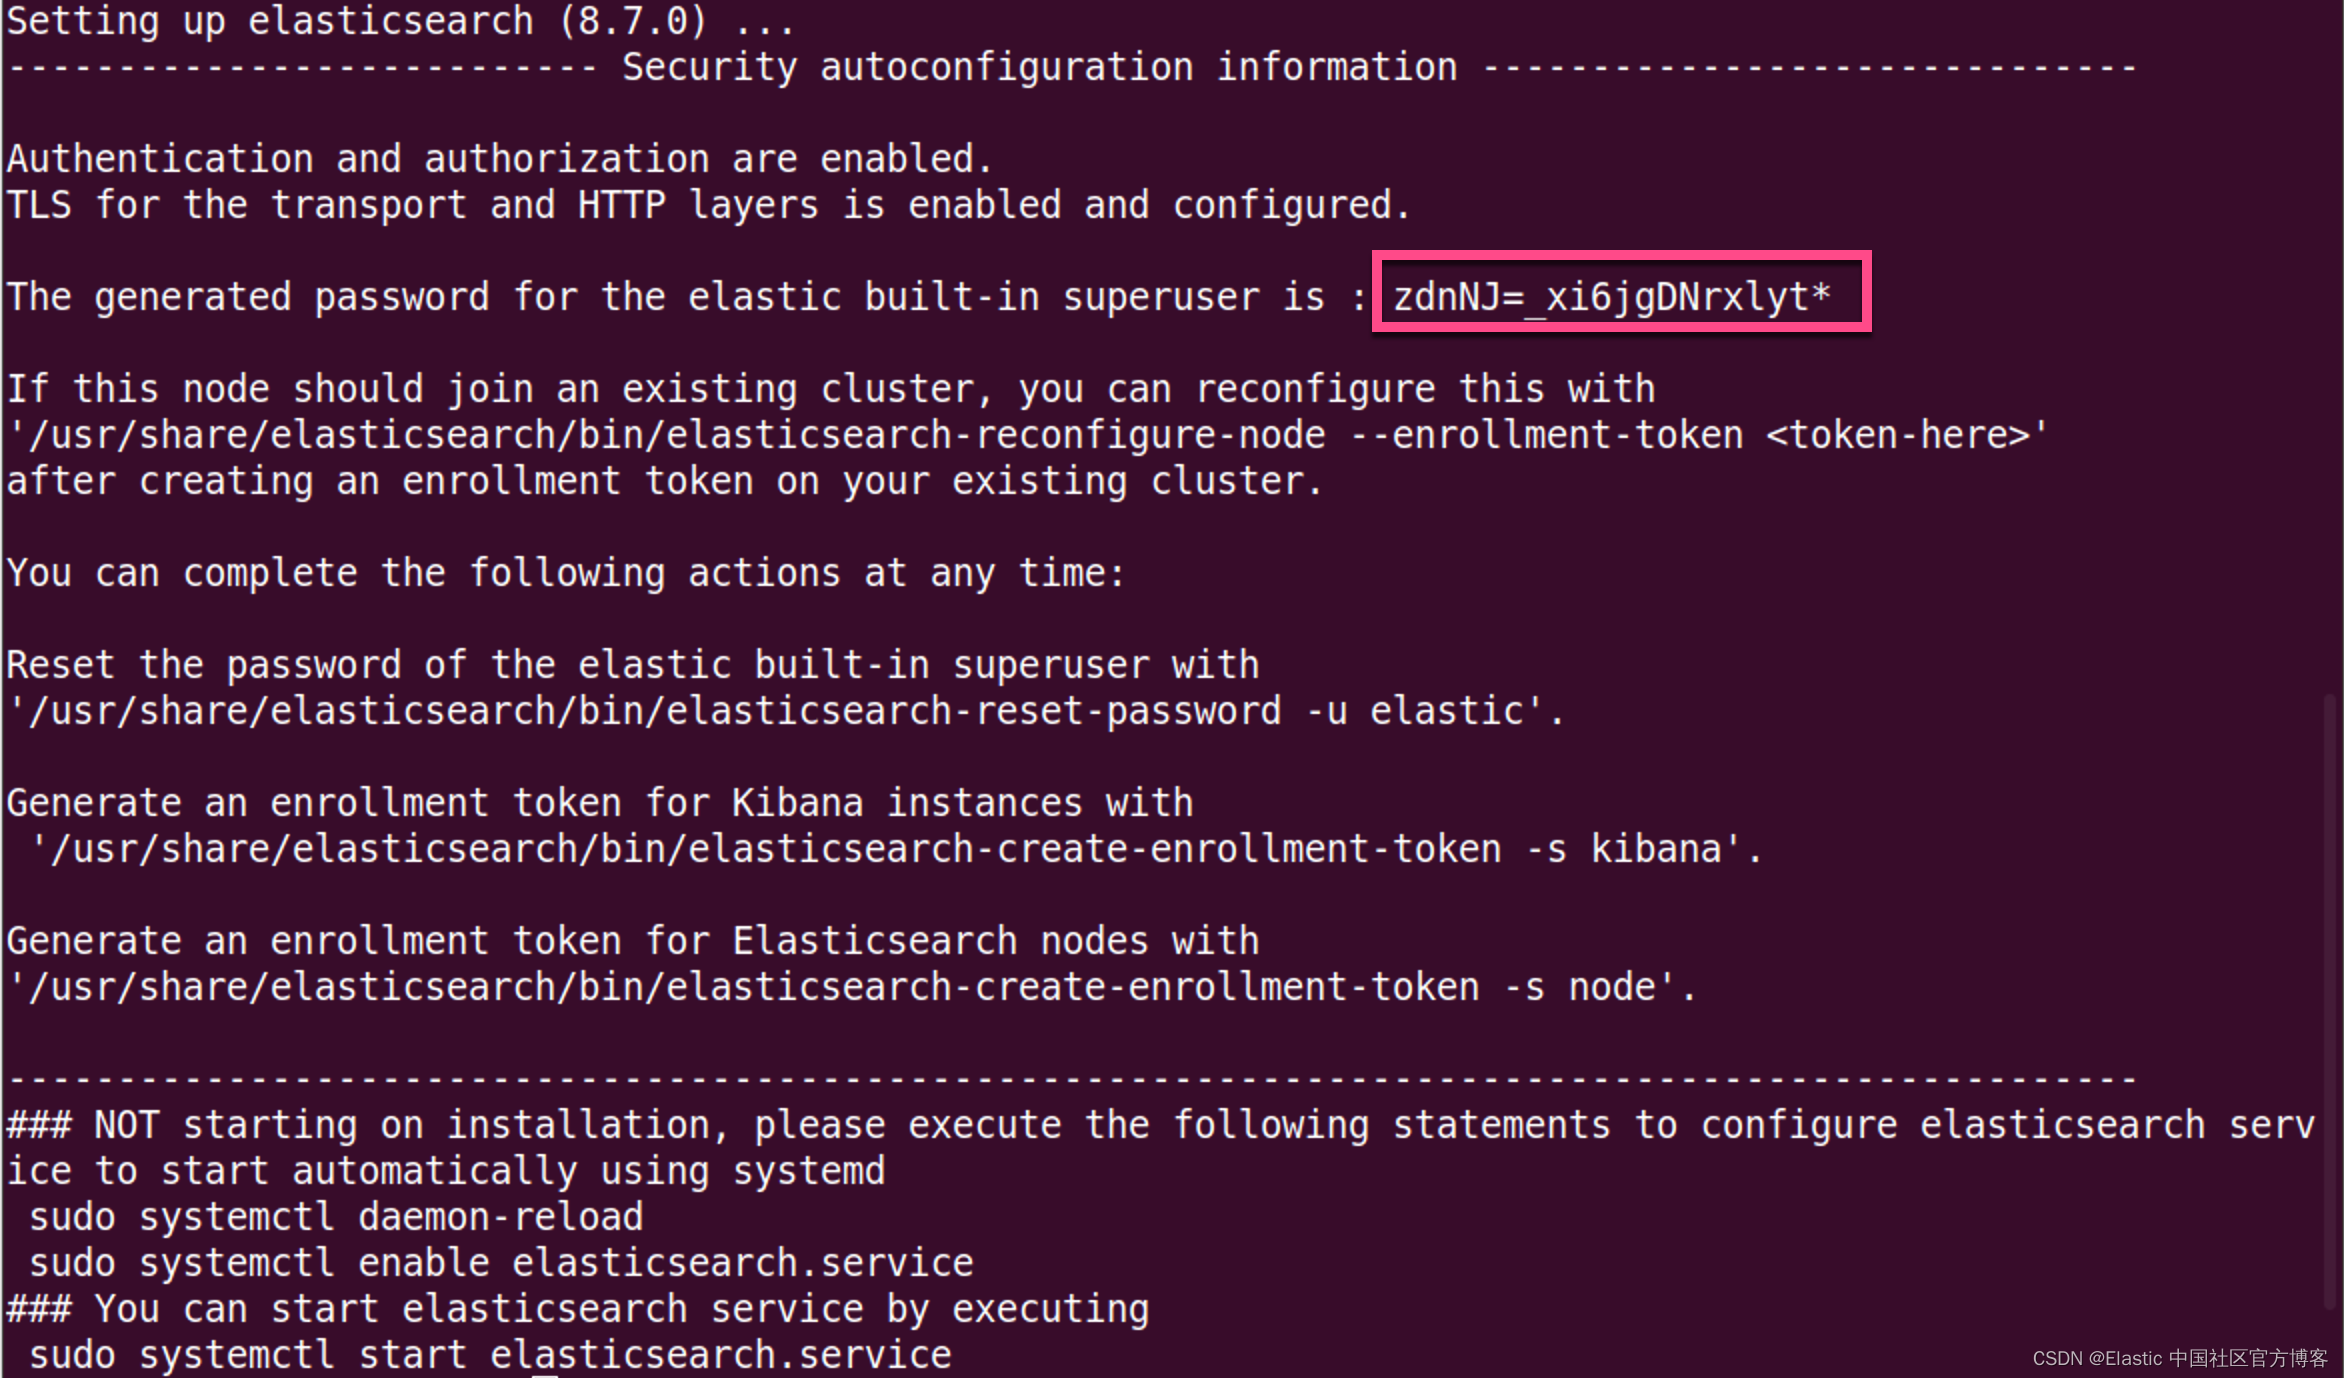
如果我们忘记了这个密码,我们可以使用如上所示的命令来进行修改:
sudo /usr/share/elasticsearch/bin/elasticsearch-reset-password -u elastic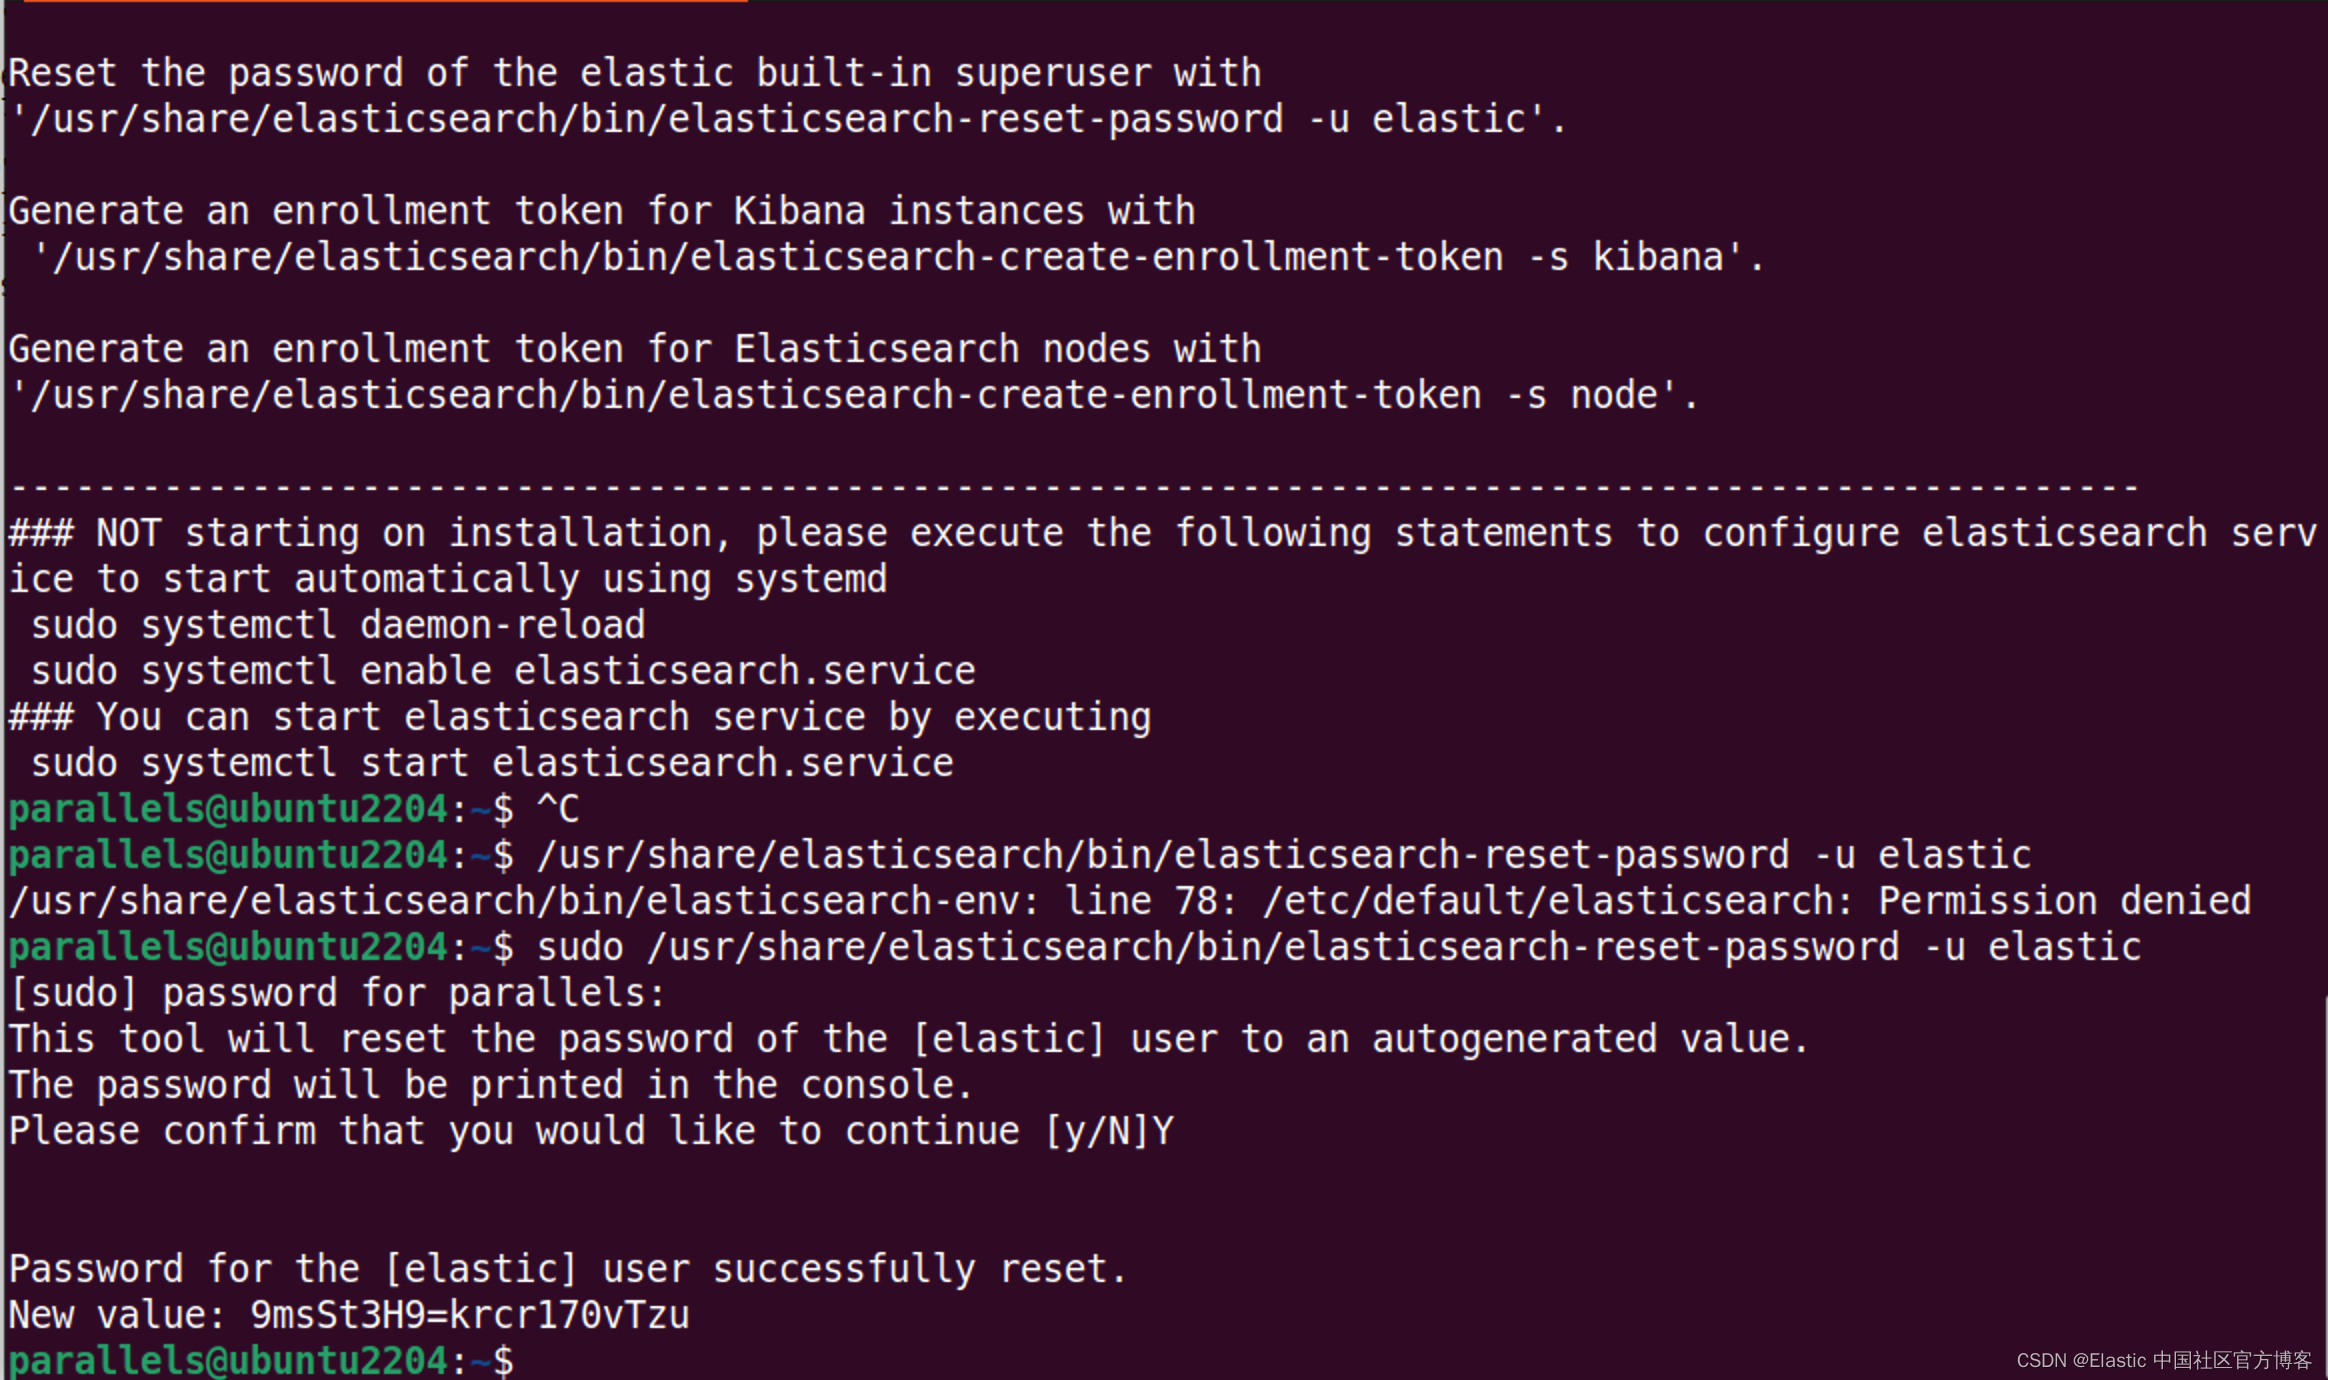
步骤二:配置 Elasticsearch
修改 Elasticsearch 配置文件 /etc/elasticsearch/elasticsearch.yml 以匹配以下内容:
/etc/elasticsearch/elasticsearch.yml
network.host: 0.0.0.0
cluster.name: elastic-demo
node.name: demo-node
path.data: /var/lib/elasticsearch
path.logs: /var/log/elasticsearch
http.port: 9200
xpack.security.enabled: true
xpack.security.enrollment.enabled: true
xpack.security.http.ssl:enabled: truekeystore.path: certs/http.p12
xpack.security.transport.ssl:enabled: trueverification_mode: certificatekeystore.path: certs/transport.p12truststore.path: certs/transport.p12
cluster.initial_master_nodes: ["demo-node"]
http.host: 0.0.0.0
你将需要取消注释某些设置。 我发现将初始配置文件重命名为 old.elasticsearch.yml(以供将来参考)并使用上述内容创建一个新配置文件会更容易。必须强调的一点是:cluster.initial_master_nodes 的配置必须是 node.name 里设置的值。
步骤三:启动 Elasticsearch
启用 Elasticsearch systemd 服务并启动它:
sudo systemctl enable elasticsearch && sudo systemctl start elasticsearchElasticsearch 可能需要几秒钟才能启动。
有几种方法可以检查 Elasticsearch 是否正在运行:
service elasticsearch status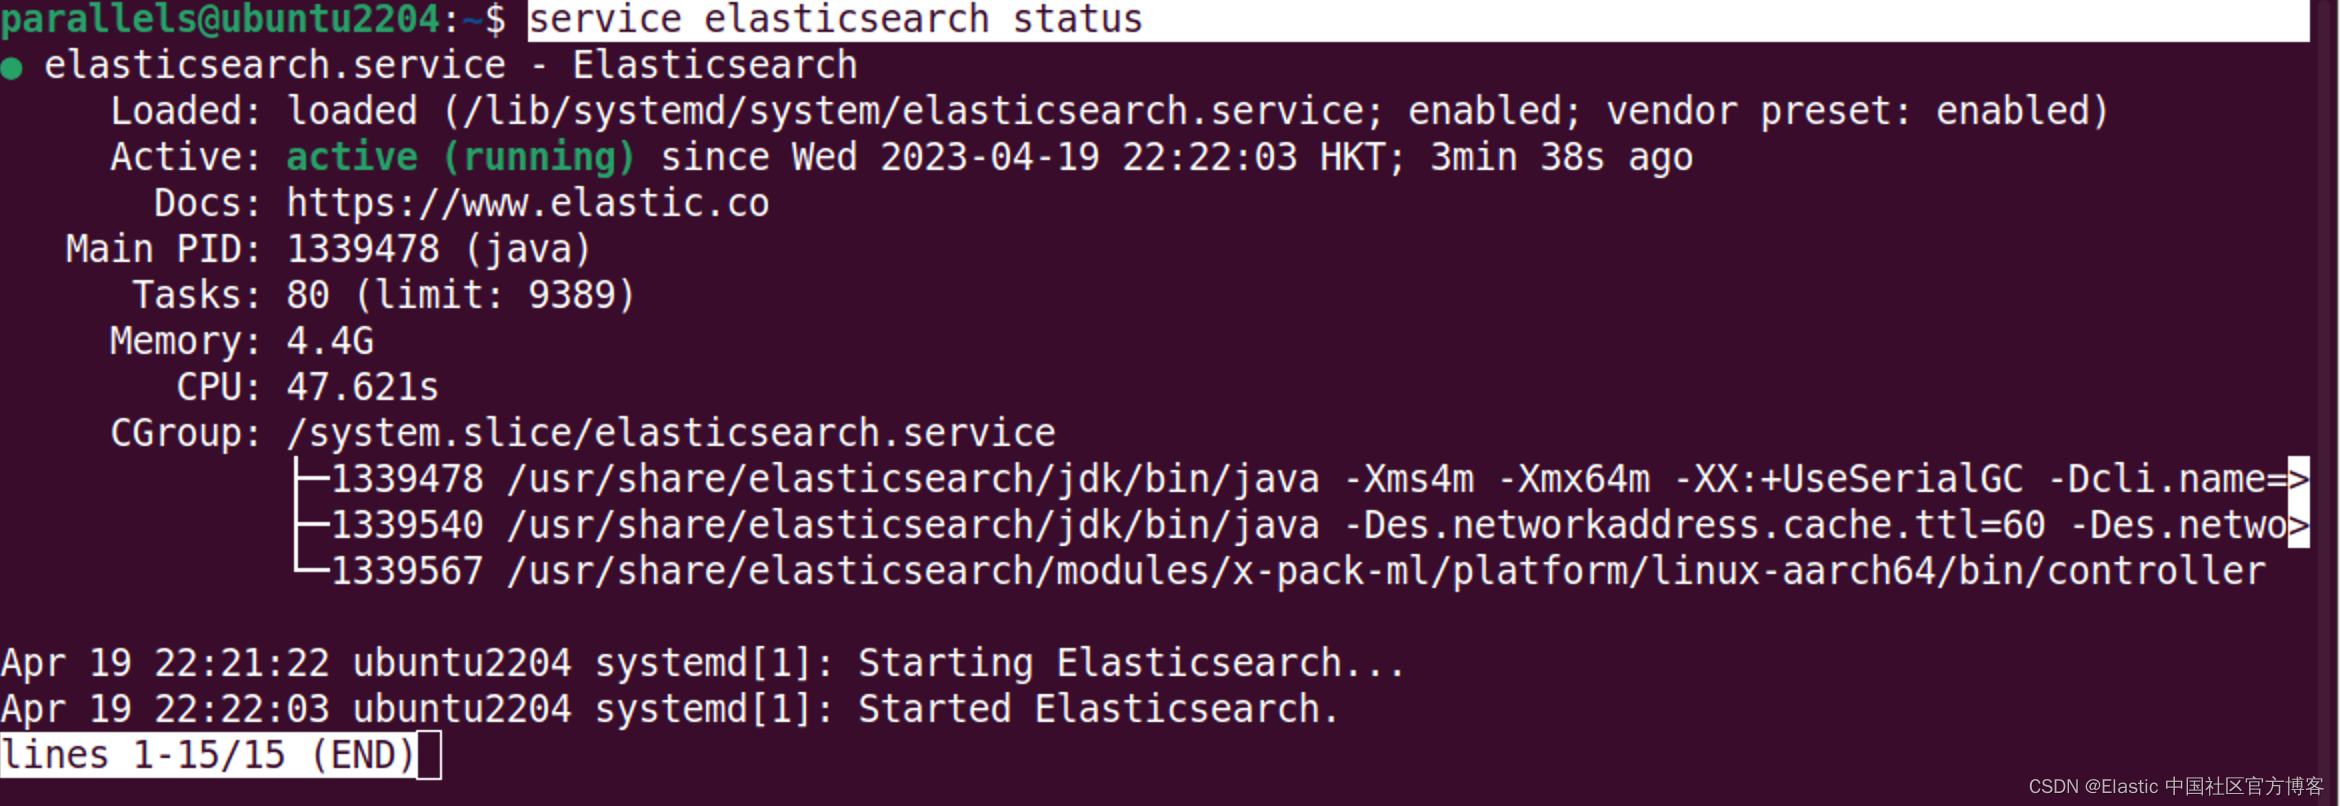
上面显示 elasticsearch 服务是 active 的。它正在运行。
我们还可以通过一下的方法来查看日志:
sudo tail -n 20 /var/log/elasticsearch/elastic-demo.log我们可以通过检查 port 9200 是否为 open:
sudo apt install nmap
nmap localhost -p-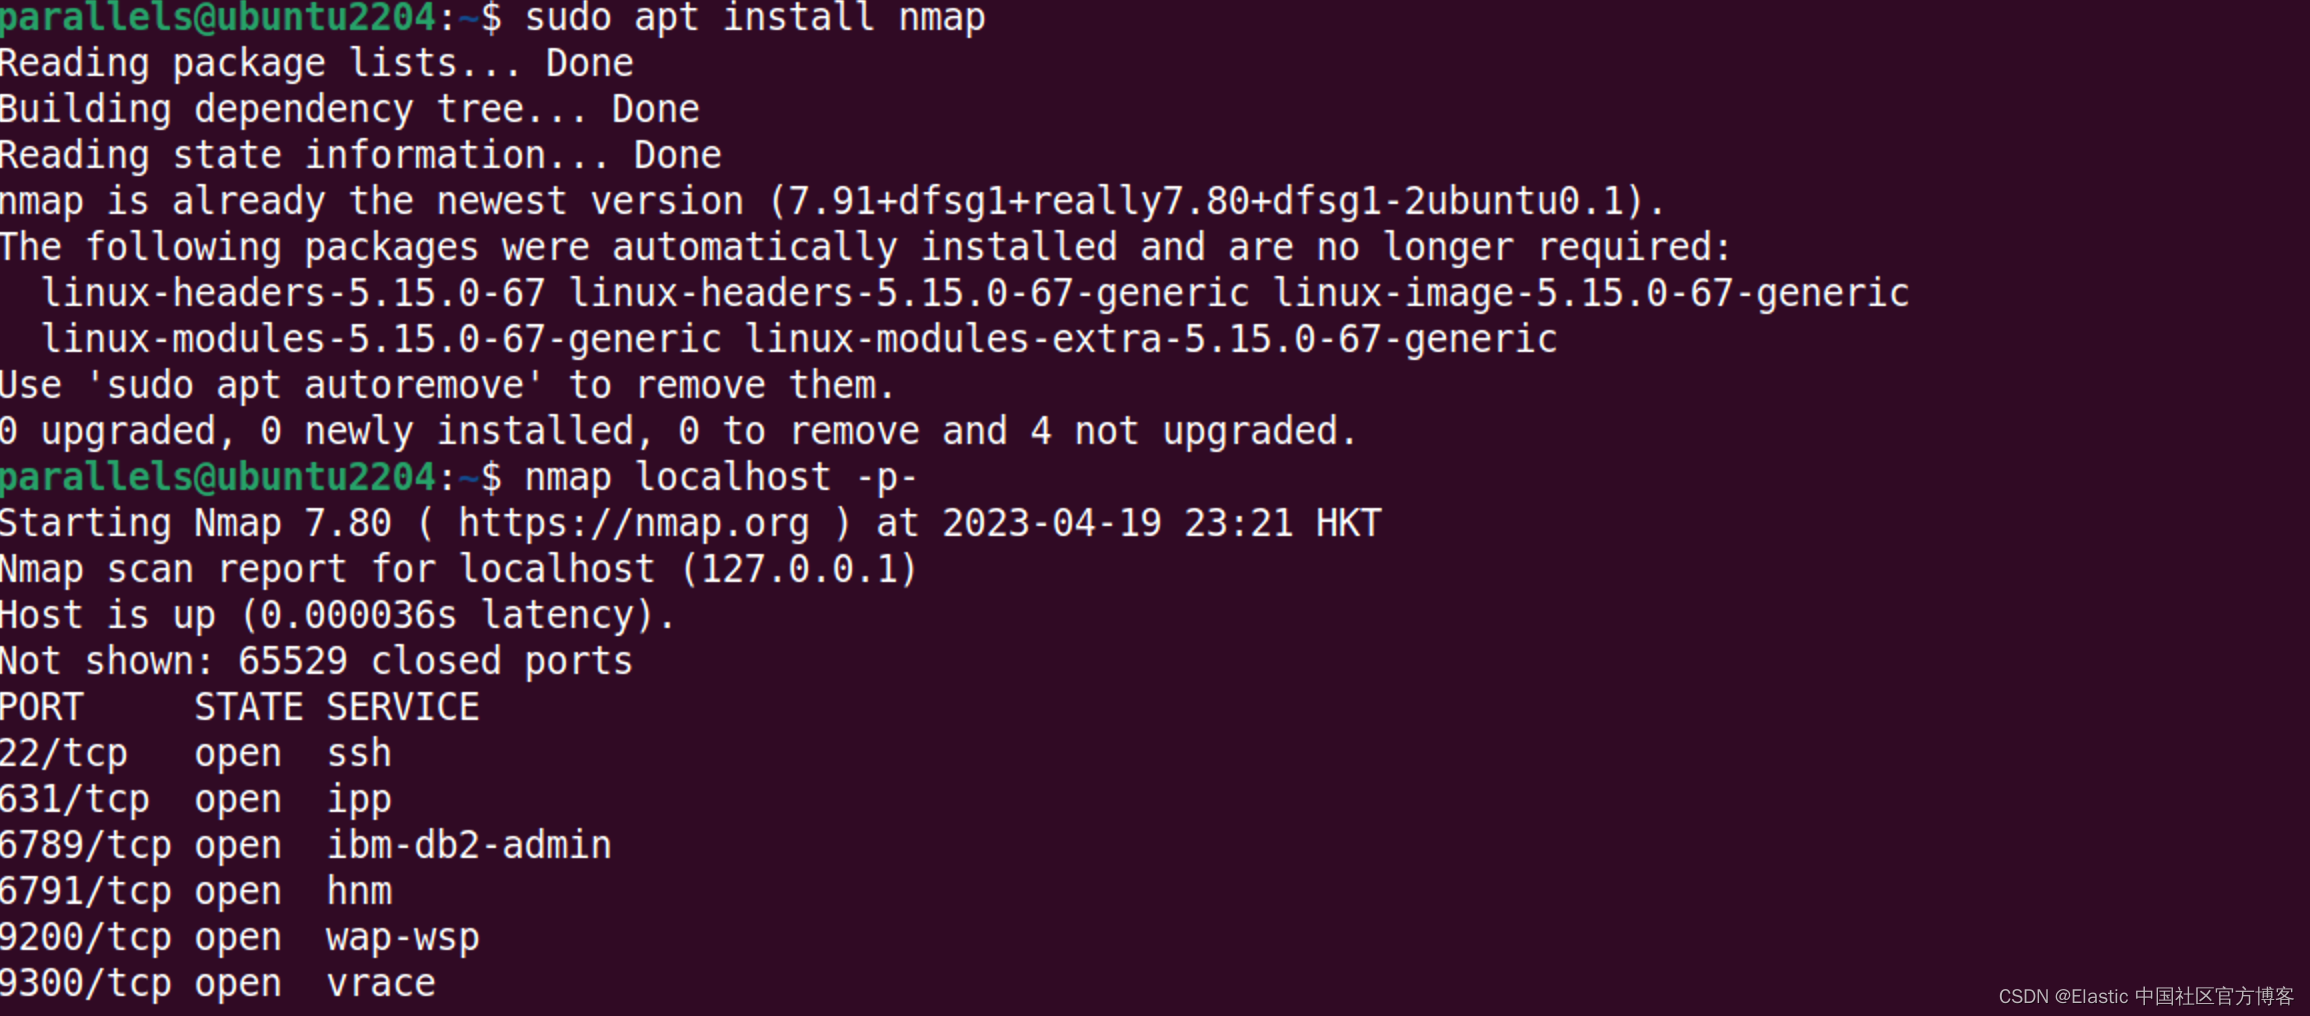
我们还可以使用如下的命令来查看发送到 Elasticsearch 的 HTTPS 请求:
curl -k -u elastic:9msSt3H9=krcr170vTzu https://192.168.0.9:9200
如果我们能看到上面的输出就证明我们的 Elasticsearch 的安装是正确的。在上面,我们使用了 -k 来忽略自签名证书。完整的命令为:
sudo curl --cacert /etc/elasticsearch/certs/http_ca.crt -u elastic:9msSt3H9=krcr170vTzu https://192.168.0.9:9200我们还可以通过 journalctl 命令来进行查看:
journalctl -u elasticsearch -n 20步骤四:安装 Kibana
我们使用如下的命令来安装 Kibana:
sudo apt install kibana步骤五:配置 Kibana
与上面的 Elasticsearch 配置类似,我建议重命名 /etc/kibana/kibana.yml 并创建一个包含以下内容的新配置文件:
/etc/kibana/kibana.yml
server.port: 5601
server.host: "0.0.0.0"
server.name: demo-server
logging.root.level: info
logging:appenders:file:type: filefileName: /var/log/kibana/kibana.loglayout:type: jsonroot:appenders:- default- file
pid.file: /run/kibana/kibana.pid
我们把 server.host 设置为:"0.0.0.0",这样确保 Kibana 也能被其它的服务器所访问。
接下来为 Kibana 创建注册 token:
sudo /usr/share/elasticsearch/bin/elasticsearch-create-enrollment-token -s kibanaparallels@ubuntu2204:~$ sudo /usr/share/elasticsearch/bin/elasticsearch-create-enrollment-token -s kibana
eyJ2ZXIiOiI4LjcuMCIsImFkciI6WyIxOTIuMTY4LjAuOTo5MjAwIl0sImZnciI6IjdhZDI0NGE4N2I2ODU4YmUzMzdhYzBjOGI5ZWZiMjVkZWE0MTY4NjgwZGFhNDRlNTk5MGQ1NDZlYzA2YjEyNzAiLCJrZXkiOiJ1b29QbkljQjZqVUE2VUM4VHVkejpSSGhhTGdNT1RmZTdoMUNZMmFGNEl3In0=接下来,运行 kibana-setup :
sudo /usr/share/kibana/bin/kibana-setup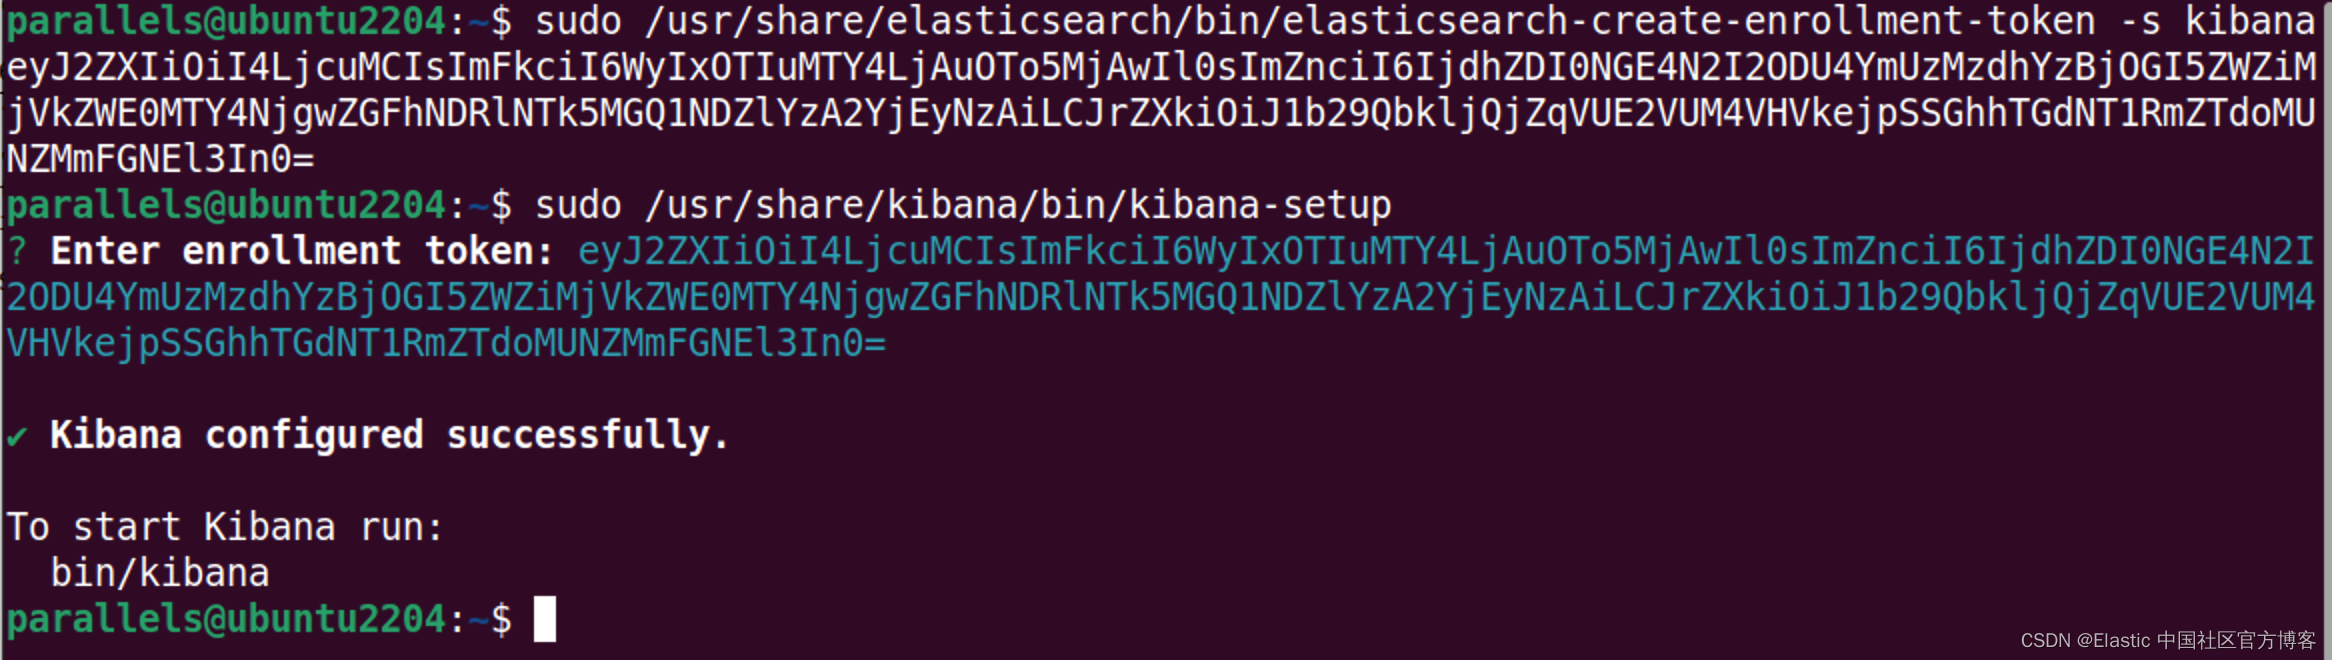
该工具将提示你输入注册 token。 请注意,设置工具将修改 Kibana 配置文件,添加 elasticsearch.hosts 等设置。
然后你需要为 Kibana 生成加密密钥:
sudo /usr/share/kibana/bin/kibana-encryption-keys generate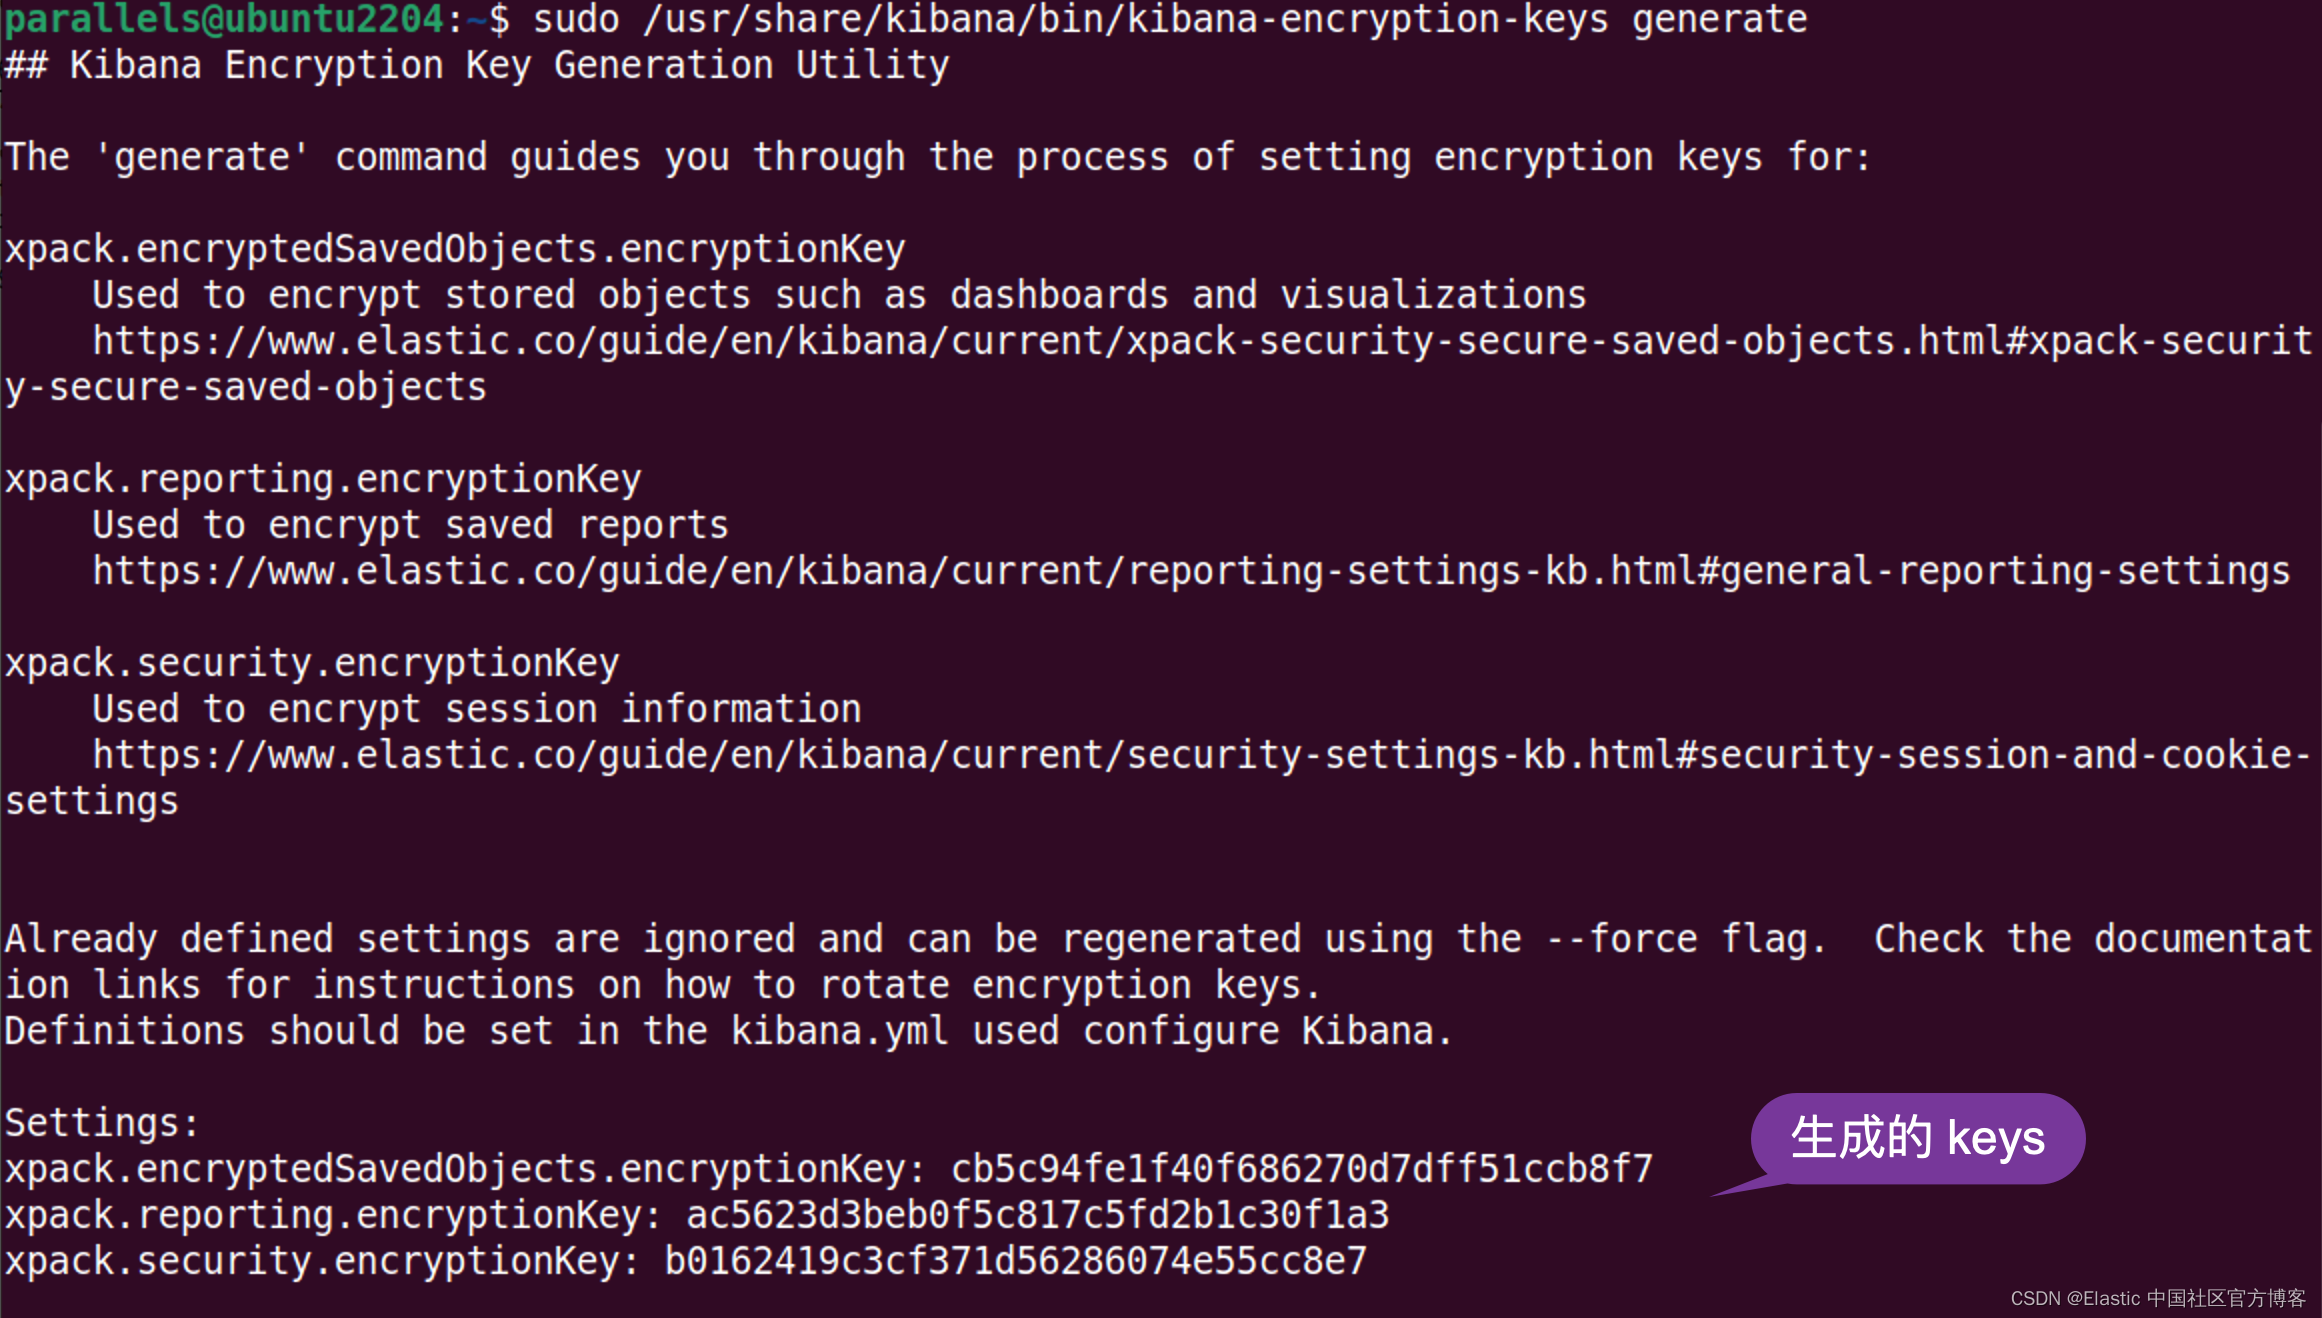
将打印的设置复制到 Kibana 配置文件。 它们将类似于以下内容:
xpack.encryptedSavedObjects.encryptionKey: cb5c94fe1f40f686270d7dff51ccb8f7
xpack.reporting.encryptionKey: ac5623d3beb0f5c817c5fd2b1c30f1a3
xpack.security.encryptionKey: b0162419c3cf371d56286074e55cc8e7
步骤六:启动 Kibana
sudo systemctl enable kibana && sudo systemctl start kibana我们有好几种方法来检查 Kibana 是否已经在运行:
service kibana status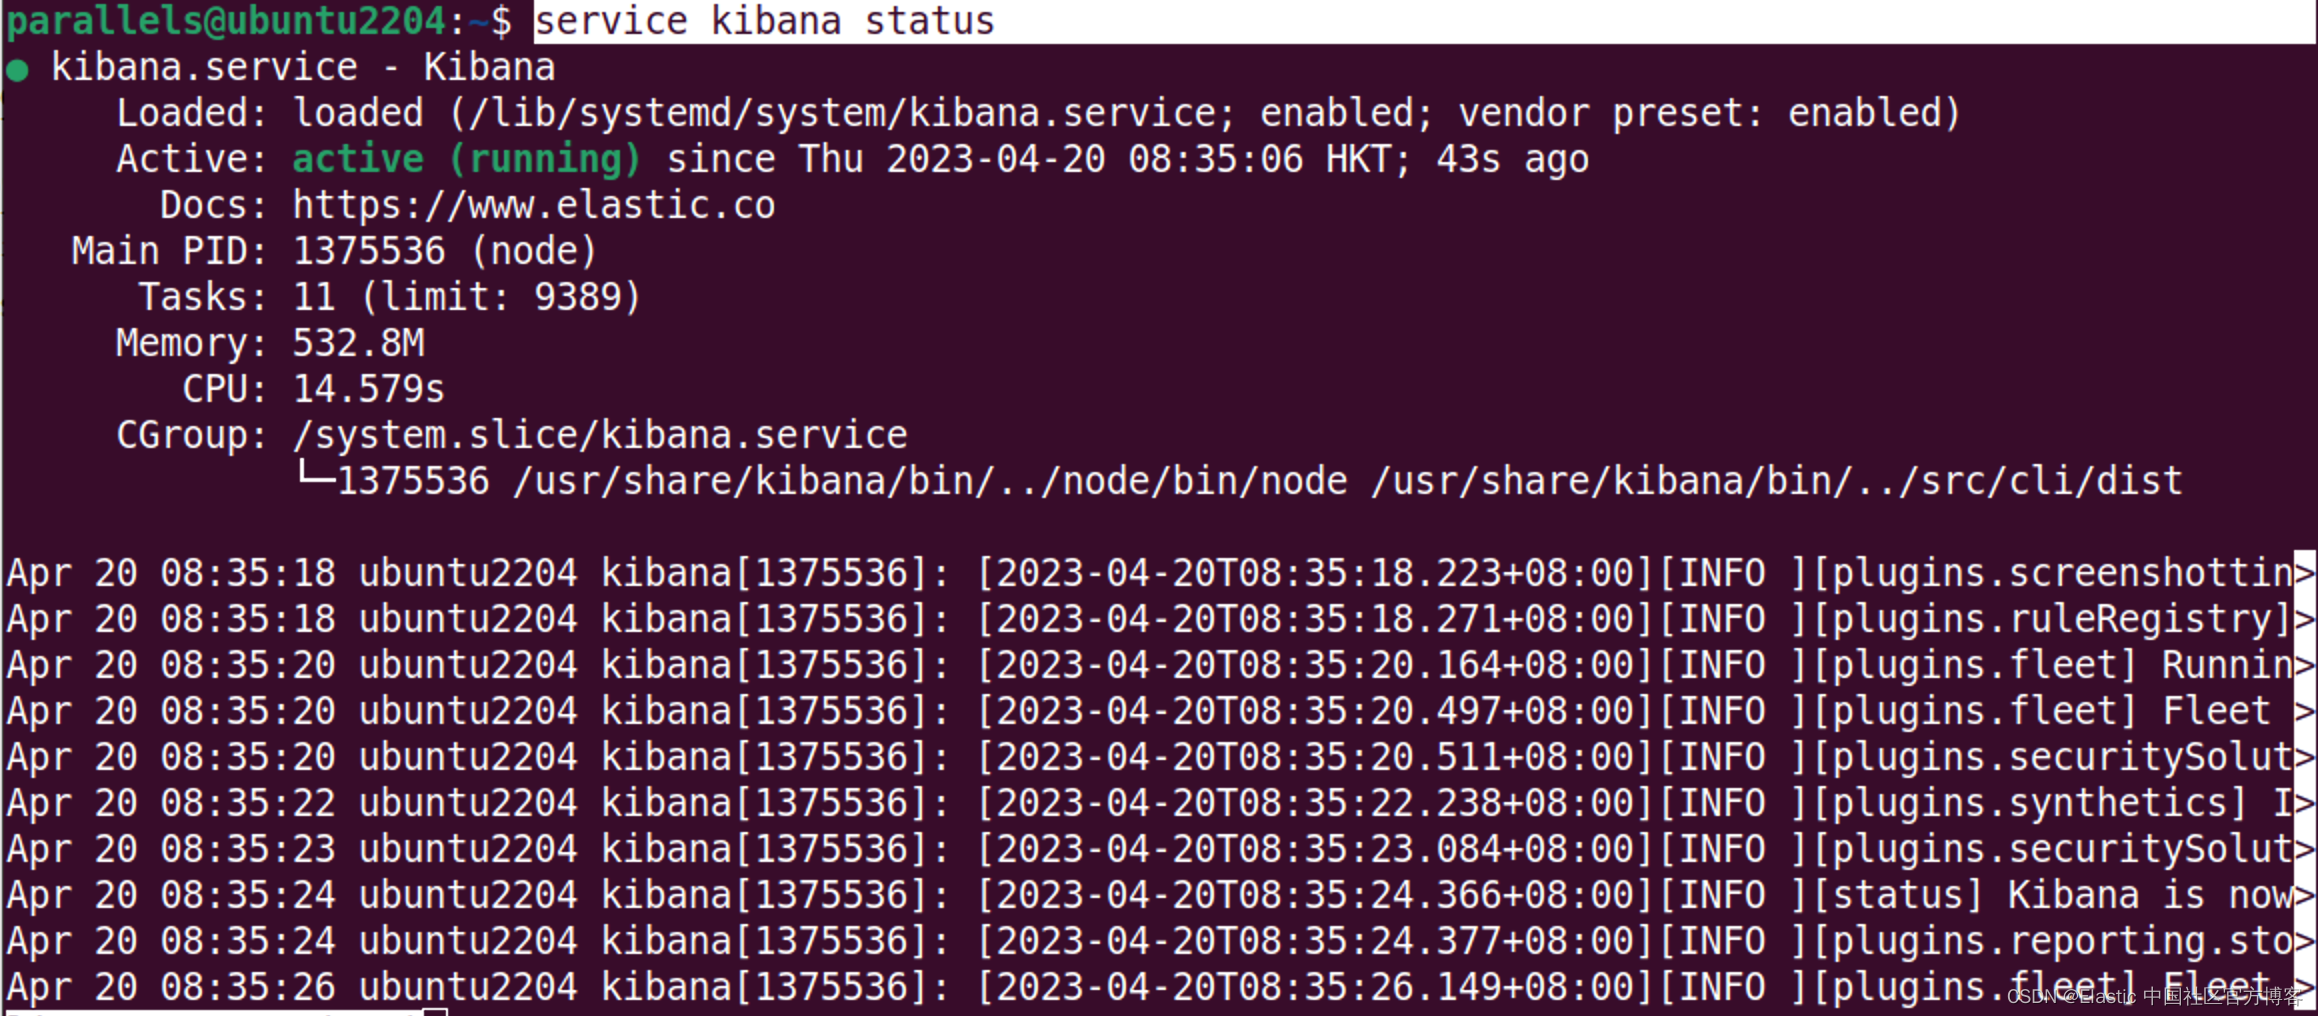
上面显示 kibana 服务已经正在运行中。
我们还可以通过查看 kibana.log:
sudo tail -n 20 /var/log/kibana/kibana.log我们还可以通过 journalctl 命令来进行查看:
journalctl -u kibana -n 20我们还可以通过检查 5601 端口来查看它是否已经被打开:
nmap localhost -p-当然,我们可以打开地址 http://localhost:5601:
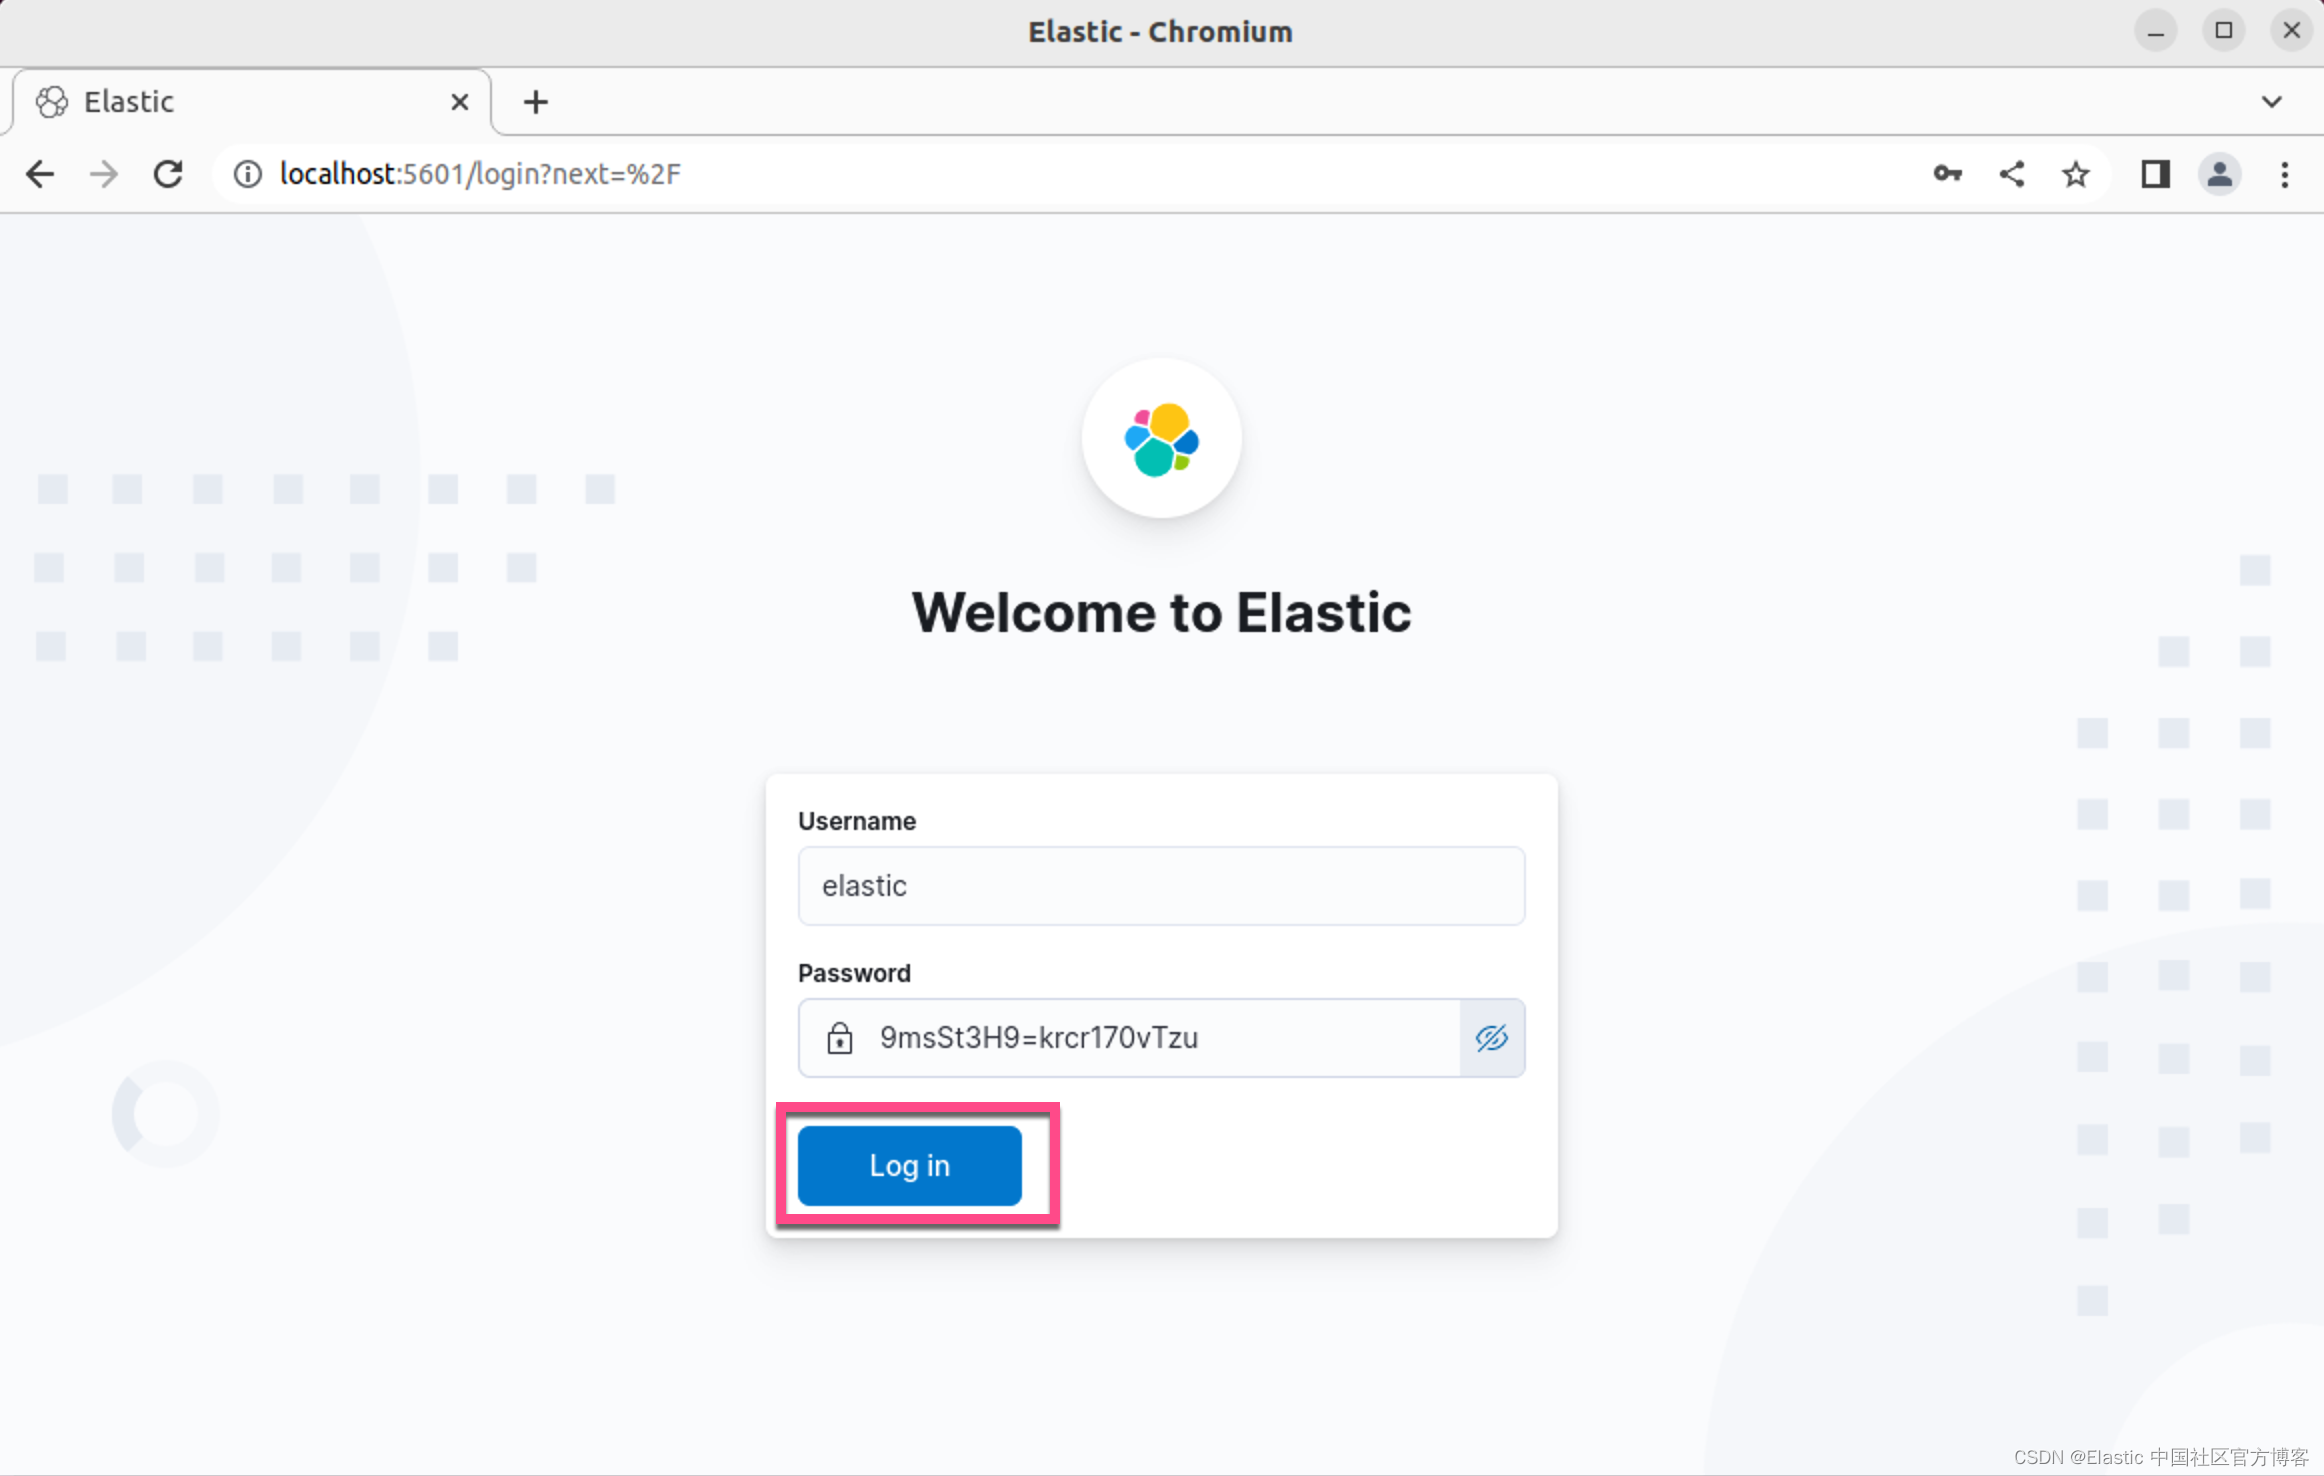
在上面,我们通过输入 elastic 用的密码来进行登录。
这样我们就完成了 Kibana 的安装了。
步骤八:安装 Logstash
我们使用如下的命令来安装 Logstash:
sudo apt install logstash步骤九:创建用于加密客户端和服务器计算机之间通信的证书和密钥
首先,创建一个用于放置加密密钥的临时目录:
sudo mkdir /tmp/certgen锁定对目录的访问:
sudo chmod 700 /tmp/certgen更改为 Linux 超级用户 (sudo su) 并 cd 到目录。
安装 Elasticsearch deb 包时,会生成 CA 密钥和相应的证书。 用于 HTTP 加密的 CA 证书应该放在 /etc/elasticsearch/certs/http_ca.crt。 相应的密钥应该在 /etc/elasticsearch/certs/http.p12 中。 p12 文件受密码保护,密码存储在 Elastic 密钥库(磁盘上的文件)中。 以下是我们如何检索它:
/usr/share/elasticsearch/bin/elasticsearch-keystore show xpack.security.http.ssl.keystore.secure_passwordroot@ubuntu2204:~# /usr/share/elasticsearch/bin/elasticsearch-keystore list
autoconfiguration.password_hash
keystore.seed
xpack.security.http.ssl.keystore.secure_password
xpack.security.transport.ssl.keystore.secure_password
xpack.security.transport.ssl.truststore.secure_password
root@ubuntu2204:~# /usr/share/elasticsearch/bin/elasticsearch-keystore show xpack.security.http.ssl.keystore.secure_password
hUpNoB9YSdGM6j2BkQ8itA我们需要记下上面命令生成的密码。这个密码将在下面使用到。
这是我希望用于为 logstash 实例(IP 是 Ubuntu OS 机器的 IP)生成密钥和证书(用于 TLS)的命令,它基于默认安装的 HTTP CA 作为信任根:
/usr/share/elasticsearch/bin/elasticsearch-certutil cert --pem --ca /etc/elasticsearch/certs/http.p12 --ip 192.168.0.9 --name logstashroot@ubuntu2204:~# sudo mkdir /tmp/certgen
root@ubuntu2204:~# sudo chmod 700 /tmp/certgen
root@ubuntu2204:~# cd /tmp/certgen/
root@ubuntu2204:/tmp/certgen# ls
root@ubuntu2204:/tmp/certgen# /usr/share/elasticsearch/bin/elasticsearch-keystore show xpack.security.http.ssl.keystore.secure_password
hUpNoB9YSdGM6j2BkQ8itA
root@ubuntu2204:/tmp/certgen# /usr/share/elasticsearch/bin/elasticsearch-certutil cert --pem --ca /etc/elasticsearch/certs/http.p12 --ip 192.168.0.9 --name logstash
This tool assists you in the generation of X.509 certificates and certificate
signing requests for use with SSL/TLS in the Elastic stack.The 'cert' mode generates X.509 certificate and private keys.* By default, this generates a single certificate and key for useon a single instance.* The '-multiple' option will prompt you to enter details for multipleinstances and will generate a certificate and key for each one* The '-in' option allows for the certificate generation to be automated by describingthe details of each instance in a YAML file* An instance is any piece of the Elastic Stack that requires an SSL certificate.Depending on your configuration, Elasticsearch, Logstash, Kibana, and Beatsmay all require a certificate and private key.* The minimum required value for each instance is a name. This can simply be thehostname, which will be used as the Common Name of the certificate. A fulldistinguished name may also be used.* A filename value may be required for each instance. This is necessary when thename would result in an invalid file or directory name. The name provided hereis used as the directory name (within the zip) and the prefix for the key andcertificate files. The filename is required if you are prompted and the nameis not displayed in the prompt.* IP addresses and DNS names are optional. Multiple values can be specified as acomma separated string. If no IP addresses or DNS names are provided, you maydisable hostname verification in your SSL configuration.* All certificates generated by this tool will be signed by a certificate authority (CA)unless the --self-signed command line option is specified.The tool can automatically generate a new CA for you, or you can provide your own withthe --ca or --ca-cert command line options.By default the 'cert' mode produces a single PKCS#12 output file which holds:* The instance certificate* The private key for the instance certificate* The CA certificateIf you specify any of the following options:* -pem (PEM formatted output)* -multiple (generate multiple certificates)* -in (generate certificates from an input file)
then the output will be be a zip file containing individual certificate/key filesEnter password for CA (/etc/elasticsearch/certs/http.p12) :
Exception in thread "main" java.lang.IllegalArgumentException: expected a single key in file [/etc/elasticsearch/certs/http.p12] but found [2]at org.elasticsearch.xpack.security.cli.CertificateTool$CertificateCommand.loadPkcs12CA(CertificateTool.java:371)at org.elasticsearch.xpack.security.cli.CertificateTool$CertificateCommand.getCAInfo(CertificateTool.java:347)at org.elasticsearch.xpack.security.cli.CertificateTool$GenerateCertificateCommand.getCAInfo(CertificateTool.java:759)at org.elasticsearch.xpack.security.cli.CertificateTool$GenerateCertificateCommand.execute(CertificateTool.java:701)at org.elasticsearch.common.cli.EnvironmentAwareCommand.execute(EnvironmentAwareCommand.java:54)at org.elasticsearch.cli.Command.mainWithoutErrorHandling(Command.java:85)at org.elasticsearch.cli.MultiCommand.execute(MultiCommand.java:94)at org.elasticsearch.xpack.security.cli.CertificateTool.execute(CertificateTool.java:160)at org.elasticsearch.cli.Command.mainWithoutErrorHandling(Command.java:85)at org.elasticsearch.cli.Command.main(Command.java:50)at org.elasticsearch.launcher.CliToolLauncher.main(CliToolLauncher.java:64)请注意上面的 IP 地址 192.163.0.9 是 Logstash 安装机器上的地址。在我们的配置中,它和 Elasticsearch 的地址是一样的。显然上面的操作是失败的,所以我们必须提取 HTTP CA 密钥并将其放在它自己的 p12 文件中。
我们首先将密钥转储到 PEM 文件中:
openssl pkcs12 -in /etc/elasticsearch/certs/http.p12 -nocerts -nodes -out http_ca_key.pemroot@ubuntu2204:/tmp/certgen# openssl pkcs12 -in /etc/elasticsearch/certs/http.p12 -nocerts -nodes -out http_ca_key.pem
Enter Import Password:
root@ubuntu2204:/tmp/certgen# ls
http_ca_key.pem请在上面使用在上面步骤中得到的 xpack.security.http.ssl.keystore.secure_password 密码。
在你喜欢的文本编辑器中打开生成的 PEM 文件。 请注意,文件中确实有两个密钥。 我们对 friendlyName 称为 http_ca 的那个感兴趣。 从文件中删除行,以便你只剩下 http_ca 键。 你最终得到的应该如下所示:
-----BEGIN PRIVATE KEY-----
MIIJQQIBADANBgkqhkiG9w0BAQEFAASCCSswggknAgEAAoICAQC6/8acAclT6T2s
0n7sBJe8/qx/uGb/Pn8iuhAUQz04lQwn83Kv5P3B+X07AyeOoMyzBh34xyIODuNR
eLmuyyfitwybE2Gtttbu60xUolg8lyWOwmb6Lx59TMVrAIkV/t8qHoK4K1bFJMSA
r4tNoIavzpTYBis8fLsrwFp85FqmQT9hzirZ/lpbDwFz8ZHBBmarpJubbe6eZzg6
jArKLf2vZxlVrjzauDkbJmei1iUrHONZoJr6UES101T1xPxh9NlNf8Som2YGBPnn
pGapIC4Iq7b6Z2iUgGI7ecz3uw+3PfEhz6ZZZU4S0/aCS+w2nA2vdyyMWpEf9DeN
NUSfnXfHzAIOJZvDBlOz8iYOKjKcdFIvvoqx2wWF1KxNBcXO3mfnXHnT4NUhSsPv
KPVFxMoRSJW0eNqglPzB7po3fK2I2uq3mdvGoy6wl1xDB3ZWn/4yf81QRRtVvlZy
E50A1epTAncvNxmzx4iHYz1lsVH6W9thobQ7xC1bMYxvCR1GCuW8uyIou2I4UKjU
ReY9O2ATxlehTBhsMQgt+bTUvrVcTYEgjaFuJhN3bRe0NGxhwLZ3mhOic+R60Q5D
jP7QNcPwuT+Sb6tyGaw/i0D7gJ1GkpIO4uqSfwVdzm6l/Pk/roeXl8J1J6ANxwzv
JeL26MHryxn1HdPYQsmWlKOIeXdpmQIDAQABAoICAEqlC/I9UlDBA4IHmmt7H9js
7g2jndWYbGZ/0ChOeNMrx+jwqGCnL1YtUXxrc3BfJqb1s6QZVTI4Ziwg3Tn1VWwN
9qW2dGDD4gMIAPWtwjwZd4AHgNSwV2Lb8NgYJCCYFxv4huSeRCo41YmqyRgJEop+
E3Mx7zNbdNlvlI9TFg5UcEkJ45gWDJpZoJJYJP7gn743XHgMR1qKyGqyeSIgfqn0
JSxK+3axX/ZC+86H3dlaVDR0RDjULsFH5Ruf8MDnXJCvhmBpe62+ccUyHlq3gjiq
1sUY3ymcH9ou8g8XaBwUyTreaUA5DJO+caGsTdO0sk/O6gTyqAiR01T2JPj0Ahob
mDifAOv2WUnApbnx8BtVjtvDnLbwDiaMWQIXyRD9C0ZgDStgxIvqfSRZ+2mGAF0f
WC6mKFFmD7qUfja02keuPPX4TZD2xuMb6CdUx5pQTI3fCPINUOKYO7cR/rvIfp6X
BYoPNMQZ0yplHfZXvru+wNrEn+heyZKsTZELNLbeZJtxL8zpww6VyvCj8HtP2+a9
Lxjf0wvJuJBAX/PAfedtsPQqOJfR/JDtOGyohVpK7s5oBTFyC5Zz5l6Z7gVp6bz0
zlR7kH5j6F++pnJ+t0yuS2iXln6TWJsgATtX6wIj90mrBa1di97RH4oH2T/vSClm
zNOp/lp61dH5bVo1YbkbAoIBAQDPHa/oaMMrmwszLzNngrIw8G8xPYnuYqAkjekL
KWQg6ni5ZQ+96BRCOHOjlSYL8AGJY16xSDo8Ua8GQ+Qe5IFFZzFSvVKrv/0snc81
7GBF37wM9JaIZEPqe/S9nxXdDCM+gMmYFj0k+vtZ4DFN/rDyNbWAsEcBalWtCENS
bgZO1sbpmsfaKz4fBSQP9kkBN4m2Gw1lznx7CpAj9kF70RCmApuBJDmvjOAbb4w9
P+n0IJztK1jv7op4m/4KjIJeN+zNhY5EbFzA+shEBBNFrbyZ30CnaBJkh1tL0RpU
Yznv/qVyfku4mwXzvYg6rX5rT8bj56/b1Yb+91mOwP01LDJ3AoIBAQDnIpf0BB8D
slnsIq8Zi4Eq5qJxBpNmCFNRVBrmqUSR31CcdetzhupQLkteeDxmabNLQwyX8ypj
6Sw9nfrVhNZbTohdTsq+QDl9FHJ9AWG6IhTtisQ8FkVpdbaIEoTezfYDdf9VTxqu
rMLqy3iHbJkCk+u7S7mM24pFtEJosw4NI3LDz81AWiEUO6WdKTt/kkr70f2mZgF0
abhOVQok25jGWY4znqg3wZXWqUmdRZ6A/pFyC44qP+KF86sd7lcFixjDlmw2RnKW
BJWl6cLaGlVBNwCZh8X4ap6gQ0JDlDnnDbPwf4X16fHpCnM9eZJgvkuHH2EnYENj
C2xZbXOLOLhvAoIBAA6gNg/fdgjaRgwzRRoGLLcwA2oiwl7HMC/kpZRYM+3vIN9W
t6ndfbC/c8sVeT5WkIU3MzSpuRMRYZ67pJxZ3pccFmuVWwUt5Z8E9eEE9Dd6+Tig
/RBcpD8myb2qQkz90m9TgOjwiRjXcHCEWHb9iVlRWaPgzuLWs34omzhy9JcUq69L
ctmBPD3MiyNlbPpdBaiKeIO79SZrNIqVlUI9HUPb40dXW4t+E0VctzaMEOVgeDR3
XyxyV+z0dxgfnAUzRdGtoMJMNLCcBRBoiUPeZPcowNQRkVrwBA5ykb1r1GeSP/S5
3ncG24C+3aPnJIpHc/AcKFsJ1SKkLPrbvgXHPTkCggEARCCBM26HibpnIN/0Ro5F
C1Uhqjjq91ca38zvhO99g5WUGBn1xX6N0AZlNrov62vaaiOgMaV96CcRYDQRfCAE
YrNaJE6WGc+qYkDFoiznFkr3ajDNuHxEB1qn66Gxwk5o5gpAsW94iOXpKfXBWAFd
dFIPWIxwa6FGN1dzf5LPYHYDXM4CTKaEO4d9QD6oB+kh6umxXvuQEDUdGxGbxNNp
S4WYEYUBRjXsKXKKfS3JE3J1gmz/gVqFNUBmPpNC2SJvsS7ERJctLSS6y0WEpm6+
lFNW/On1I0yh5tEMVgj5rC3wzMF5xcsn/62R3BvaVmOgtXo9U7LfCfGTBSTquq2E
RwKCAQAEFO/pygGMNUFpm6M4Cll8APPQtBKyfqeV4e96u+Qx1abwT9K1kzRgkL/1
abMpdIWrb8Bh6+18Q0j63q6YV8+lySuBXQL7bbW44iUqukxOnj/5CMOjeZHiHyii
UZLcHuK9KI4rBfSk8M/57+sjuSDF8tUKHw+oJAiULfsjw0lwsu6XkYYvz3LAduwL
fnt5XBZW4+Bwa0bJ8TjwvxqT1M/p6FDYX2ZS/MYA6/Y+elwO0EkvooTfm4ON2vxX
N/u+kzXz4ixy6RCQk1/tCrPLlNWaWjYNUfkcmpMjUVkqBTTVhdo08GqoY1gz4xW4
qPr8OvXFIO53ORlTC+uV7hVIYiUv
-----END PRIVATE KEY-----
我们把不感兴趣的部分删除。最后的文件就像上面的那样。下一步是将 CA 密钥打包到它自己的 p12 文件中:
openssl pkcs12 -export -out http_ca_key.p12 -inkey http_ca_key.pem -in /etc/elasticsearch/certs/http_ca.crtroot@ubuntu2204:/tmp/certgen# openssl pkcs12 -in /etc/elasticsearch/certs/http.p12 -nocerts -nodes -out http_ca_key.pem
Enter Import Password:
root@ubuntu2204:/tmp/certgen# ls
http_ca_key.pem
root@ubuntu2204:/tmp/certgen# vi http_ca_key.pem
root@ubuntu2204:/tmp/certgen# vi http_ca_key.pem
root@ubuntu2204:/tmp/certgen# openssl pkcs12 -export -out http_ca_key.p12 -inkey http_ca_key.pem -in /etc/elasticsearch/certs/http_ca.crt
Enter Export Password:
Verifying - Enter Export Password:上述命令将生成一个新的文件 http_ca_key.p12。
现在我们可以为 Logstash 实例生成一个密钥证书对:
/usr/share/elasticsearch/bin/elasticsearch-certutil cert --ca /tmp/certgen/http_ca_key.p12 --ip 192.168.0.9 --name logstash --out /tmp/certgen/logstash.p12root@ubuntu2204:/tmp/certgen# /usr/share/elasticsearch/bin/elasticsearch-certutil cert --ca /tmp/certgen/http_ca_key.p12 --ip 192.168.0.9 --name logstash --out /tmp/certgen/logstash.p12
This tool assists you in the generation of X.509 certificates and certificate
signing requests for use with SSL/TLS in the Elastic stack.The 'cert' mode generates X.509 certificate and private keys.* By default, this generates a single certificate and key for useon a single instance.* The '-multiple' option will prompt you to enter details for multipleinstances and will generate a certificate and key for each one* The '-in' option allows for the certificate generation to be automated by describingthe details of each instance in a YAML file* An instance is any piece of the Elastic Stack that requires an SSL certificate.Depending on your configuration, Elasticsearch, Logstash, Kibana, and Beatsmay all require a certificate and private key.* The minimum required value for each instance is a name. This can simply be thehostname, which will be used as the Common Name of the certificate. A fulldistinguished name may also be used.* A filename value may be required for each instance. This is necessary when thename would result in an invalid file or directory name. The name provided hereis used as the directory name (within the zip) and the prefix for the key andcertificate files. The filename is required if you are prompted and the nameis not displayed in the prompt.* IP addresses and DNS names are optional. Multiple values can be specified as acomma separated string. If no IP addresses or DNS names are provided, you maydisable hostname verification in your SSL configuration.* All certificates generated by this tool will be signed by a certificate authority (CA)unless the --self-signed command line option is specified.The tool can automatically generate a new CA for you, or you can provide your own withthe --ca or --ca-cert command line options.By default the 'cert' mode produces a single PKCS#12 output file which holds:* The instance certificate* The private key for the instance certificate* The CA certificateIf you specify any of the following options:* -pem (PEM formatted output)* -multiple (generate multiple certificates)* -in (generate certificates from an input file)
then the output will be be a zip file containing individual certificate/key filesEnter password for CA (/tmp/certgen/http_ca_key.p12) :
Enter password for logstash.p12 : Certificates written to /tmp/certgen/logstash.p12This file should be properly secured as it contains the private key for
your instance.
This file is a self contained file and can be copied and used 'as is'
For each Elastic product that you wish to configure, you should copy
this '.p12' file to the relevant configuration directory
and then follow the SSL configuration instructions in the product guide.For client applications, you may only need to copy the CA certificate and
configure the client to trust this certificate.
root@ubuntu2204:/tmp/certgen# ls
http_ca_key.p12 http_ca_key.pem logstash.p12
同样地,我们需要输入从 xpack.security.http.ssl.keystore.secure_password 得到的密码。
从 logstash.p12 中提取 PEM 格式的密钥:
openssl pkcs12 -in logstash.p12 -nocerts -nodes -out logstash.keyroot@ubuntu2204:/tmp/certgen# openssl pkcs12 -in logstash.p12 -nocerts -nodes -out logstash.key
Enter Import Password:
root@ubuntu2204:/tmp/certgen# ls
http_ca_key.p12 http_ca_key.pem logstash.key logstash.p12上述命令将生成 logstash.key 文件。
同时从 p12 文件中提取证书:
openssl pkcs12 -in logstash.p12 -nokeys -nodes -out logstash.crtroot@ubuntu2204:/tmp/certgen# openssl pkcs12 -in logstash.p12 -nocerts -nodes -out logstash.key
Enter Import Password:
root@ubuntu2204:/tmp/certgen# ls
http_ca_key.p12 http_ca_key.pem logstash.key logstash.p12
root@ubuntu2204:/tmp/certgen# openssl pkcs12 -in logstash.p12 -nokeys -nodes -out logstash.crt
Enter Import Password:
root@ubuntu2204:/tmp/certgen# ls
http_ca_key.p12 http_ca_key.pem logstash.crt logstash.key logstash.p12上述命令将生成 logstash.crt 文件。
除了 logstash 证书外,logstash.crt 还将拥有 CA 证书。 在文本编辑器中打开文件并删除 CA 证书。这样它只剩下如下的部分:
logstash.crt
Bag AttributesfriendlyName: logstashlocalKeyID: 54 69 6D 65 20 31 36 38 31 39 36 36 35 36 32 33 36 39
subject=CN = logstash
issuer=CN = Elasticsearch security auto-configuration HTTP CA
-----BEGIN CERTIFICATE-----
MIIEOzCCAiOgAwIBAgIUZ6hRnSFh4lm2hlcLywrhBccGSskwDQYJKoZIhvcNAQEL
BQAwPDE6MDgGA1UEAxMxRWxhc3RpY3NlYXJjaCBzZWN1cml0eSBhdXRvLWNvbmZp
Z3VyYXRpb24gSFRUUCBDQTAeFw0yMzA0MjAwNDU1NTlaFw0yNjA0MTkwNDU1NTla
MBMxETAPBgNVBAMTCGxvZ3N0YXNoMIIBIjANBgkqhkiG9w0BAQEFAAOCAQ8AMIIB
CgKCAQEAqx1lT2/l3PdhGP7iwuMti7Xq2u6LRCQ/RgsxaGENEz3HDwkah2cPxf8c
WzXqTrycYM3aunI7eOLHYHCraH/l4r42vJbeKuCVawcTMeDH24Fqb3naeFSBADBg
MOSCWlfbSQakqvhPTMWt373B1caebiTrUNyjjGN3K6IbF8zaV+QFyYhbW8j/hTNg
wXj3sRgHDHKlGzZNG8G3uW6peeCgQwUVuRgHUjcAQZkWVWLSUgSGPT02CqDp3Ic9
0Qh68OEtbn6+zZ8KCjApLBCfpmlgL9h7jY/btgx8ZXpPdOxgDgA/dWMiS471T1Z9
QdciPLneBQjaA60xS+/YS+61b7k/lQIDAQABo14wXDAdBgNVHQ4EFgQUZhxBXdbC
m5o2oxq4tUE1aNrVwQcwHwYDVR0jBBgwFoAUzCrXx2iy1PTUFY9QhAiUNa4BpZkw
DwYDVR0RBAgwBocEwKgACTAJBgNVHRMEAjAAMA0GCSqGSIb3DQEBCwUAA4ICAQCB
MC/oQB7Hp3s6KyfRX9yXLuvQ0TwXMTDHg01vPQ7Sf09z4Fj5IDablfIsQ5lAZrh7
+t9xGgSdQwogisFY40R2QX3nJDh15oHb9BE35hddCbbiRRHE6xadvf1mbDFpS7SY
QIHZH41zUlT99nPJvGPGHladlLdN8M8Hqb9rw6mC2g2hPCziRLazwE2ZLZk2F0Vc
EoWCpqXwBNBNLjfd69AUxrPmcepRMQ0or/dpOs/9SpGTuUGAvAmVVRw5tkf1B+kJ
Qe8Klz0u8GMhxedZS7hw/cHODEDF8yI5RPShTNrQPNYMdV4Qe8Zl+JJKhLiq9h8S
kaUnQqkD01rtuOqKR+ezEFTsc9bRaNV9yJj7Yx+5JYm5AhxqN8SAshu3aSXolQ3I
VzECBI1YqCTk7ic5+wDAPr3WpLwoTX+P0Vfna+tccc4ItrMY52Px13nxmMxMe4Dx
22/IpqjRZh+WVmKTXGlFBsSQtZAeWqLc03qHLG9aYwKpBdlY2N6tuv7yveaOVvl7
RuVNc/Jre+1paw8oKDvti8FcQA1EIRyeheo6glkyy83yEi6stEJs3bj73ydoAuSU
mP69syJAkQDWB5CJD/RKSMjHkSfrRj26gWFj3NHzAD2in82dGzD+T5uk6KzvmOVT
fzno6C3KetoVzGZXT6se2Pah5jy6meII4qoU7UscQw==
-----END CERTIFICATE-----
在 /etc/logstash 和拷贝 logstash.key 和 logstash.crt 下创建一个名为 “certs” 的目录。
root@ubuntu2204:/tmp/certgen# mkdir -p /etc/logstash/certs
root@ubuntu2204:/tmp/certgen# cp logstash.crt logstash.key /etc/logstash/certs
将 HTTP CA 证书也复制到目录中:
cp /etc/elasticsearch/certs/http_ca.crt /etc/logstash/certsroot@ubuntu2204:~# cd /etc/logstash/certs
root@ubuntu2204:/etc/logstash/certs# ls
http_ca.crt logstash.crt logstash.key你可能需要修复 logstash 配置目录的权限,以确保 logstash 用户可以读取其内容,但任意用户不能:
sudo chown -R root:logstash /etc/logstash
sudo chmod -R g+rX /etc/logstash
sudo chmod -R o-rwx /etc/logstash
sudo find /etc/logstash -type d -exec chmod g+s {} \\;注意:您可以通过传递 --pem 参数来指示 certutil 工具生成 zip 文件而不是 p12 文件,但我以这种方式生成的密钥由于某种原因被拒绝为无效:“File does not contain valid private key: /etc/logstash/certs/logstash.key”
以与服务器相同的方式为客户端计算机创建密钥证书对(改为指定客户端的 IP):
/usr/share/elasticsearch/bin/elasticsearch-certutil cert --ca /tmp/certgen/http_ca_key.p12 --ip 192.168.0.3 --name client --out /tmp/certgen/client.p12root@ubuntu2204:/tmp/certgen# /usr/share/elasticsearch/bin/elasticsearch-certutil cert --ca /tmp/certgen/http_ca_key.p12 --ip 192.168.0.3 --name client --out /tmp/certgen/client.p12
This tool assists you in the generation of X.509 certificates and certificate
signing requests for use with SSL/TLS in the Elastic stack.The 'cert' mode generates X.509 certificate and private keys.* By default, this generates a single certificate and key for useon a single instance.* The '-multiple' option will prompt you to enter details for multipleinstances and will generate a certificate and key for each one* The '-in' option allows for the certificate generation to be automated by describingthe details of each instance in a YAML file* An instance is any piece of the Elastic Stack that requires an SSL certificate.Depending on your configuration, Elasticsearch, Logstash, Kibana, and Beatsmay all require a certificate and private key.* The minimum required value for each instance is a name. This can simply be thehostname, which will be used as the Common Name of the certificate. A fulldistinguished name may also be used.* A filename value may be required for each instance. This is necessary when thename would result in an invalid file or directory name. The name provided hereis used as the directory name (within the zip) and the prefix for the key andcertificate files. The filename is required if you are prompted and the nameis not displayed in the prompt.* IP addresses and DNS names are optional. Multiple values can be specified as acomma separated string. If no IP addresses or DNS names are provided, you maydisable hostname verification in your SSL configuration.* All certificates generated by this tool will be signed by a certificate authority (CA)unless the --self-signed command line option is specified.The tool can automatically generate a new CA for you, or you can provide your own withthe --ca or --ca-cert command line options.By default the 'cert' mode produces a single PKCS#12 output file which holds:* The instance certificate* The private key for the instance certificate* The CA certificateIf you specify any of the following options:* -pem (PEM formatted output)* -multiple (generate multiple certificates)* -in (generate certificates from an input file)
then the output will be be a zip file containing individual certificate/key filesEnter password for CA (/tmp/certgen/http_ca_key.p12) :
Enter password for client.p12 : Certificates written to /tmp/certgen/client.p12This file should be properly secured as it contains the private key for
your instance.
This file is a self contained file and can be copied and used 'as is'
For each Elastic product that you wish to configure, you should copy
this '.p12' file to the relevant configuration directory
and then follow the SSL configuration instructions in the product guide.For client applications, you may only need to copy the CA certificate and
configure the client to trust this certificate.
root@ubuntu2204:/tmp/certgen# ls
client.p12 http_ca_key.p12 http_ca_key.pem logstash.crt logstash.key logstash.p12上面的命令生成证书文件 client.p12。这个证书可以为一些客户端所使用,只要我们的证书里含有它的 IP 地址信息。
步骤十:为 Logstash 创建一个新的 Elasticsearch 用户
我们将使用基本身份验证在 Logstash 和 Elasticsearch 之间进行通信。 为此,我们将设置一个新的 Elasticsearch 角色和用户。在我之前的很多演示中,为了方便和快捷,我使用超级用户 elastic 来配置 Logstash。在实际的使用中,这种是不建议使用的,因为超级用户 elastic 具有更多的权限。我们不希望这样的用户权限被广泛使用及泄露。
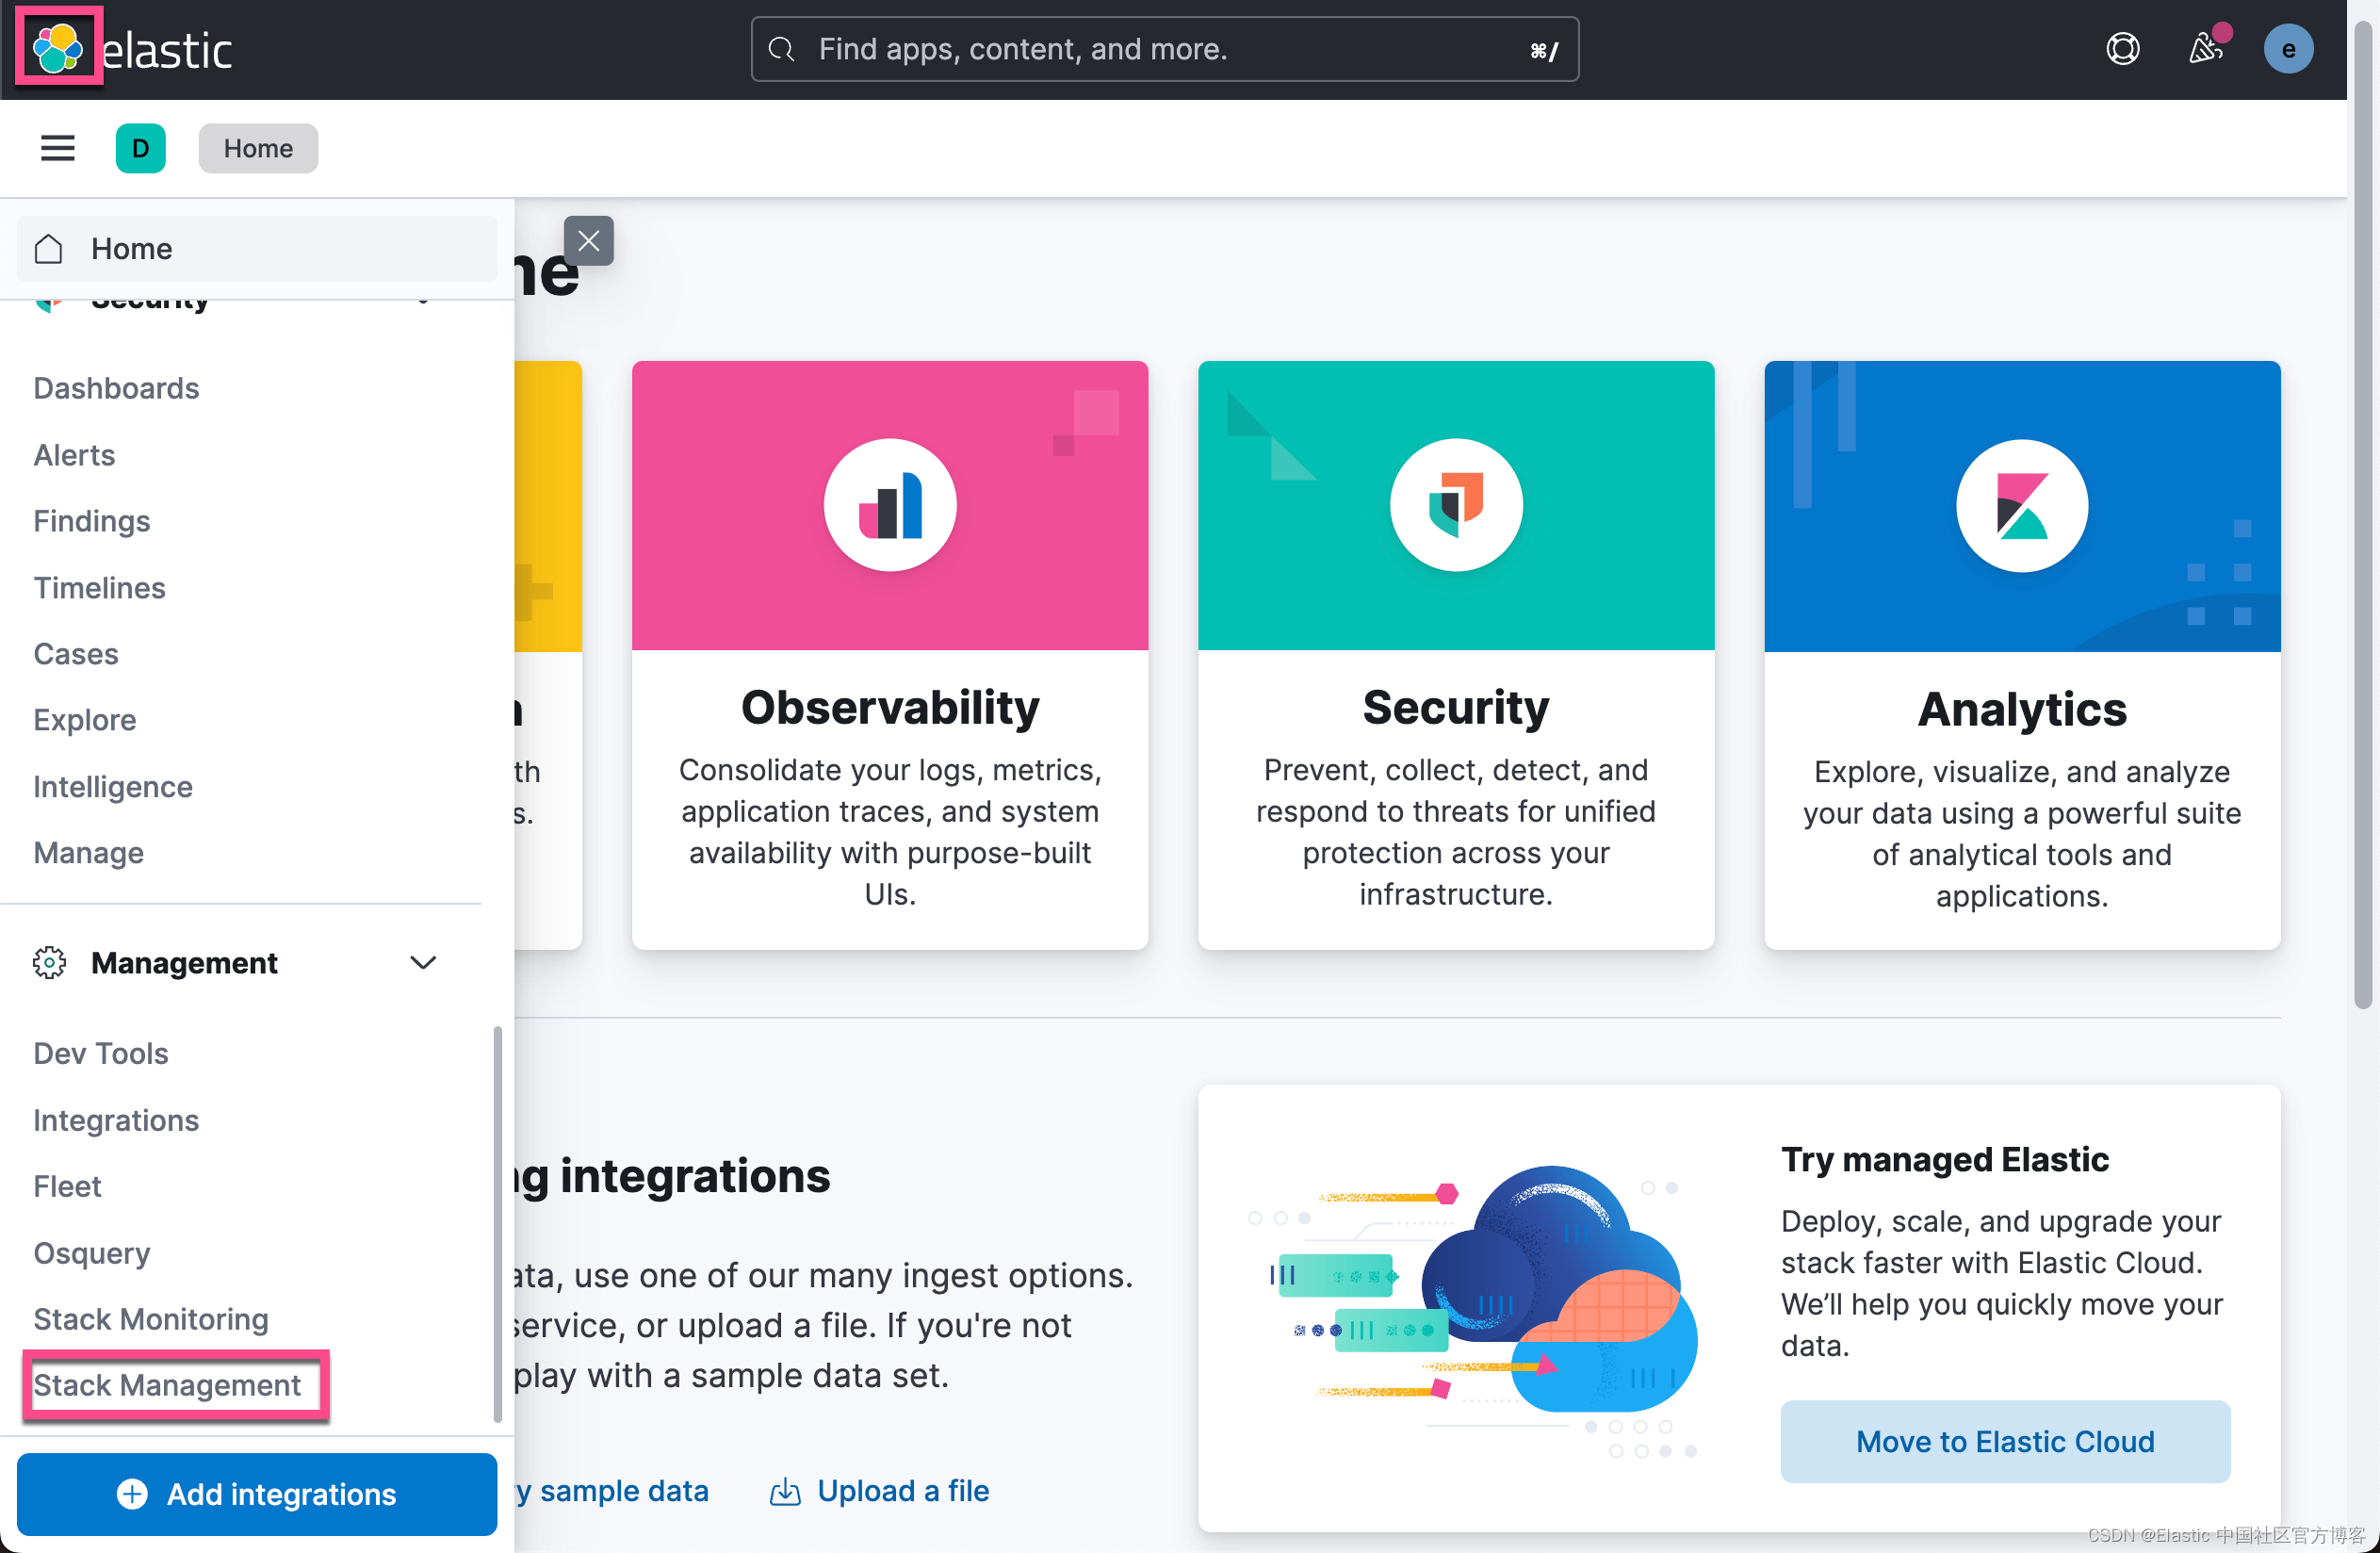
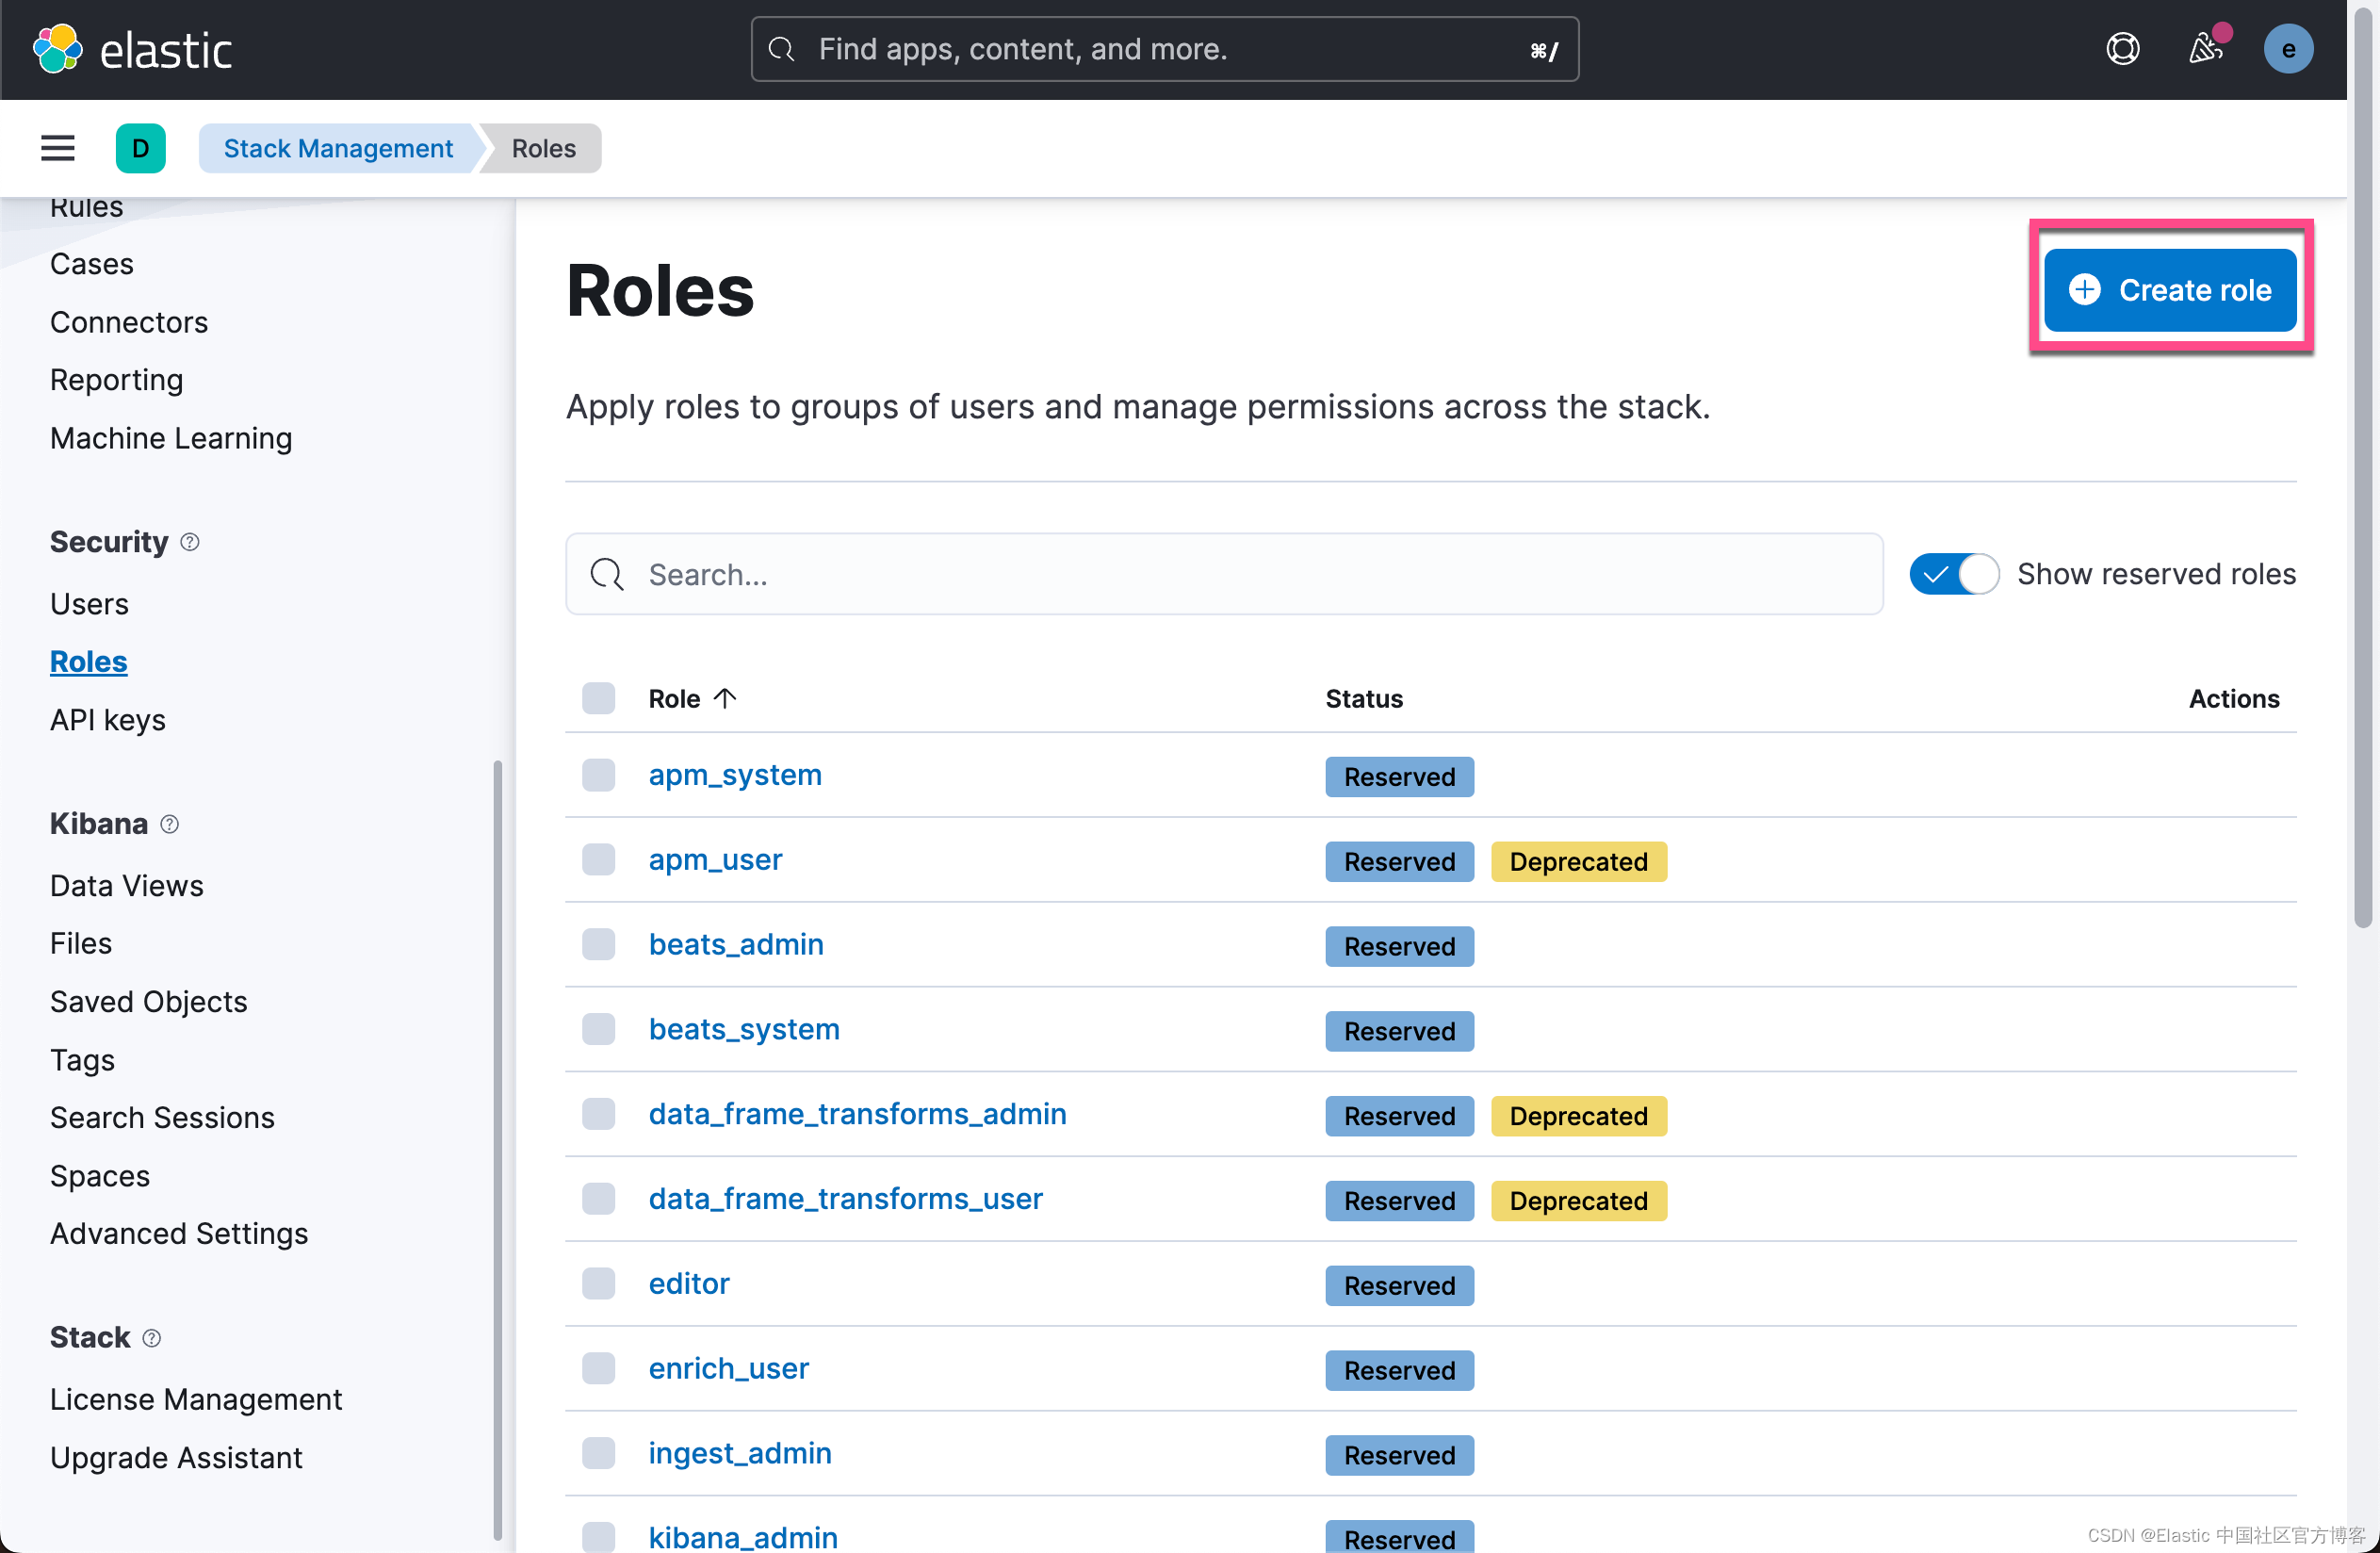
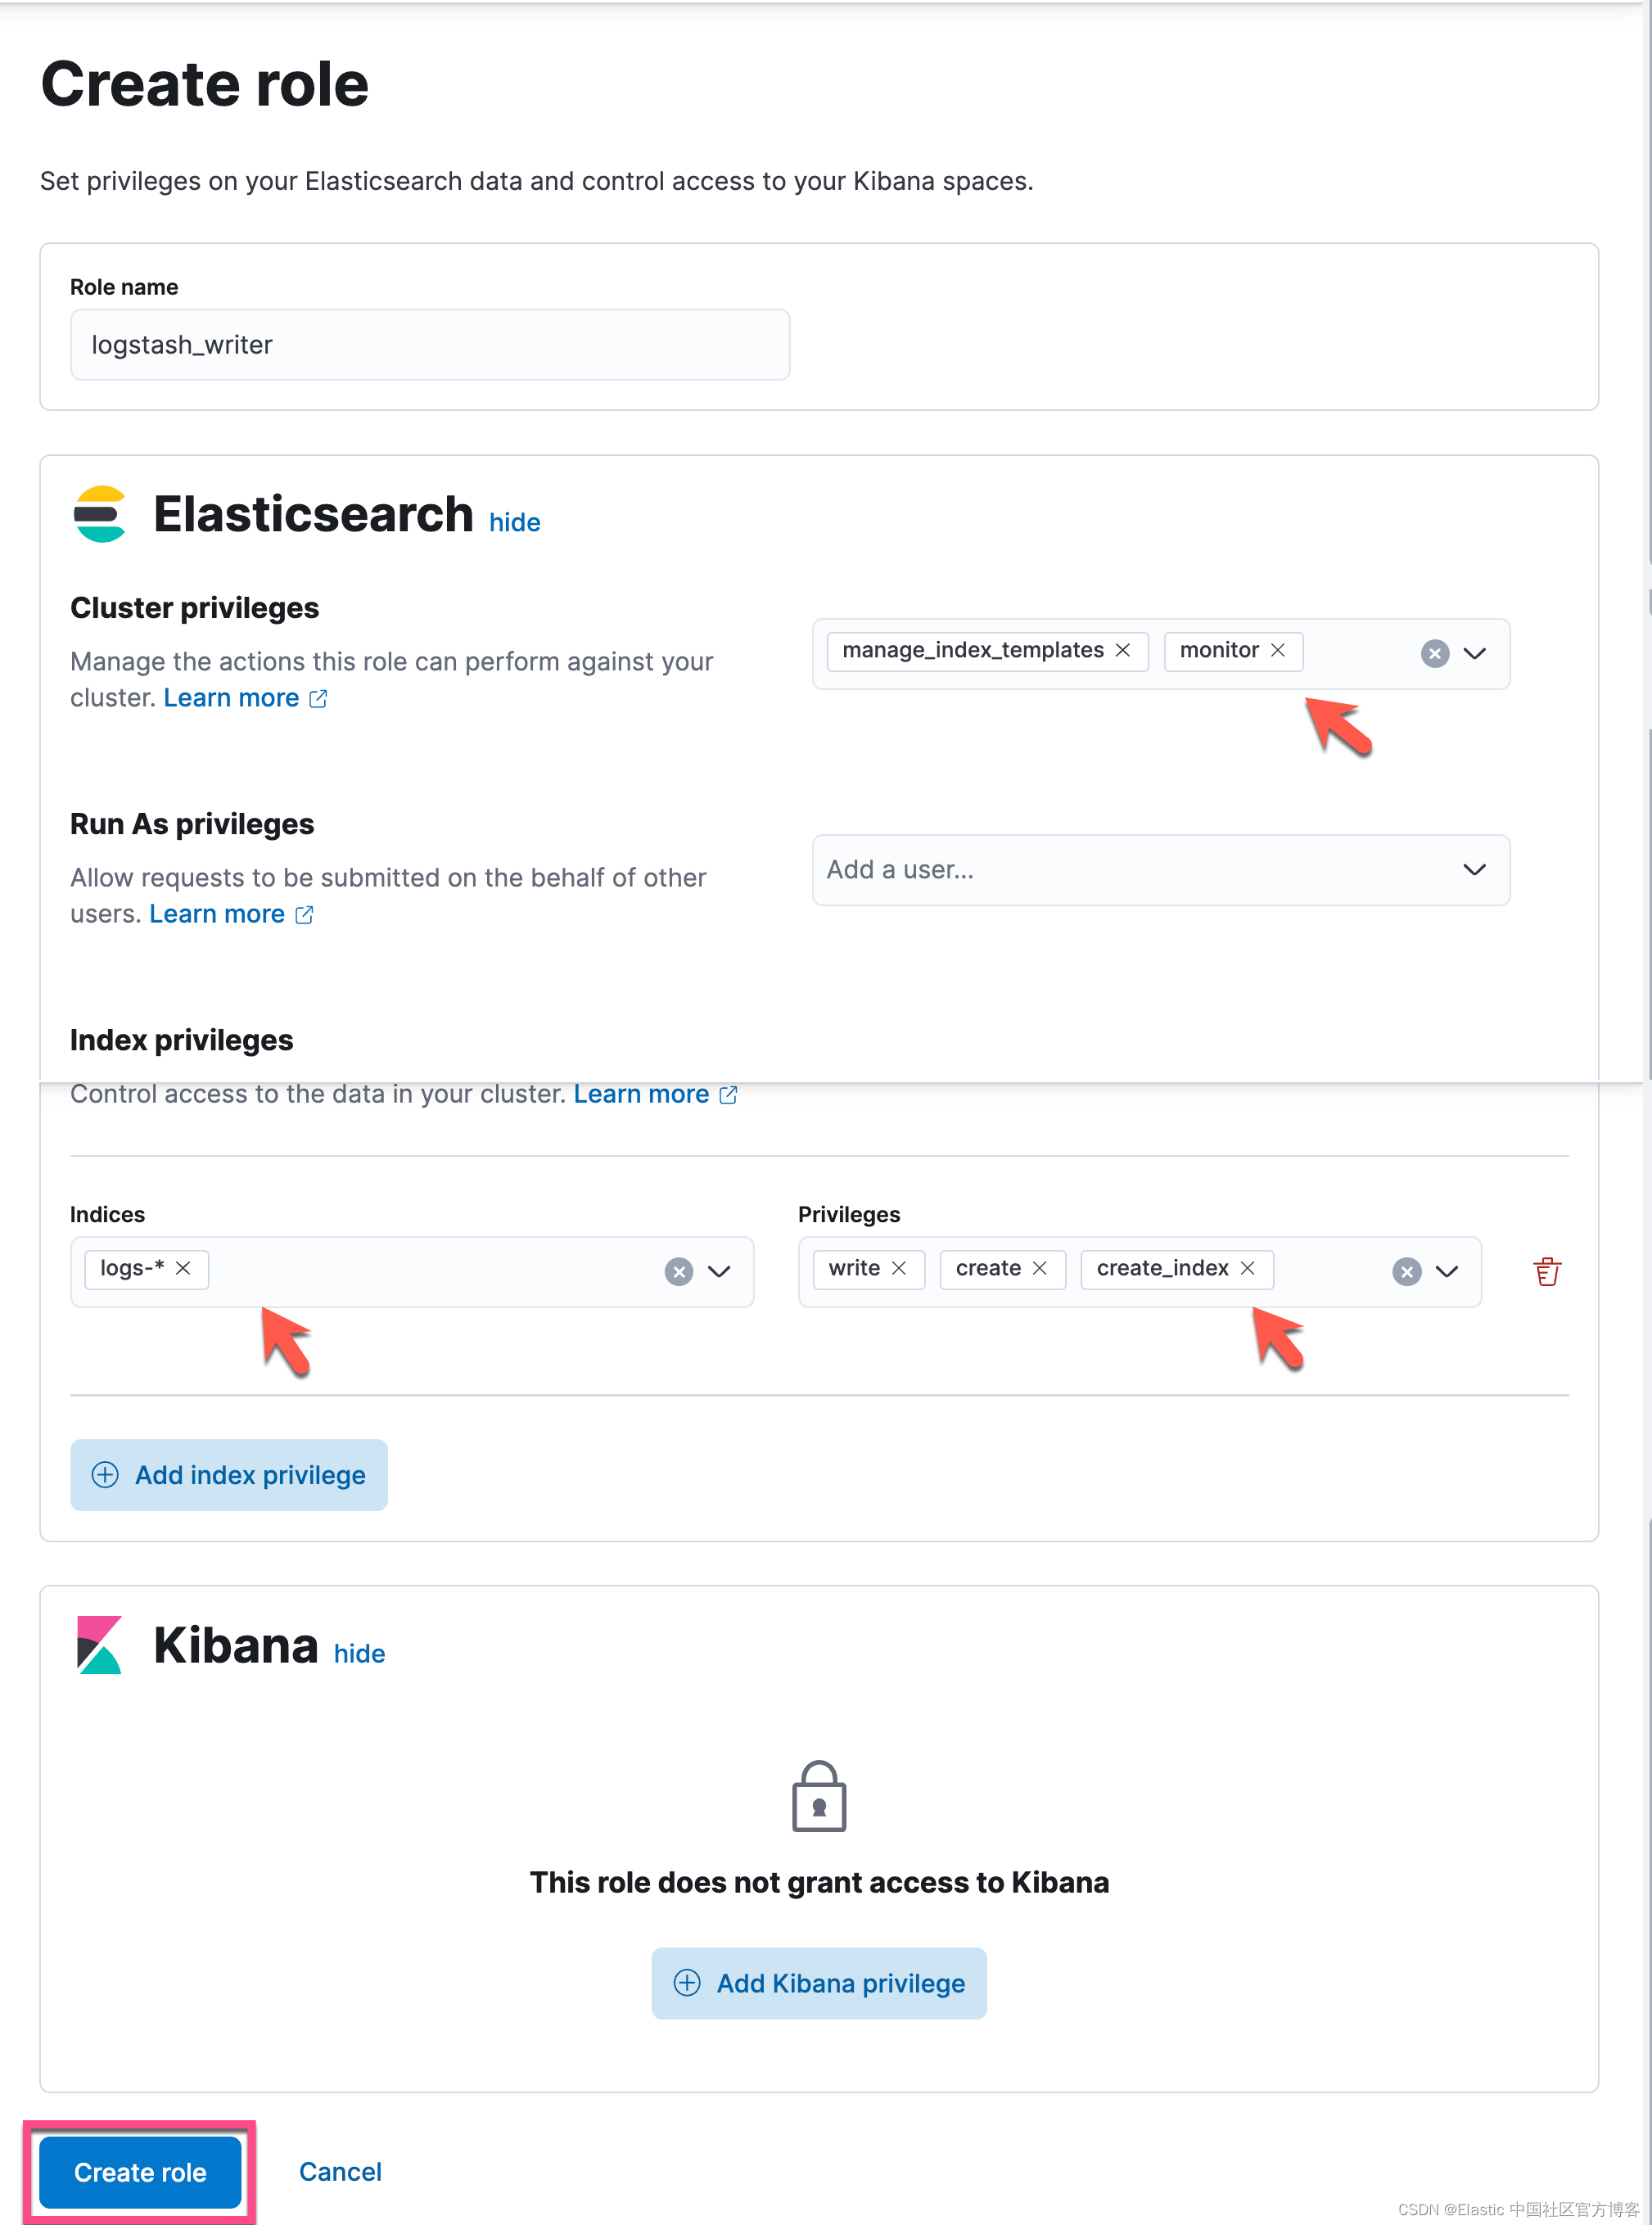
导航到 Kibana 中的 Management > Roles UI。 单击右上角的 Create Role 按钮。 将新角色命名为 logstash_writer。 对于集群权限,添加manage_index_templates 和 monitor。 对于索引权限(cluster privileges),添加 write、create 和 create_index。 默认情况下,我们将拥有的设置将使用名为 logs-generic-default 的索引,因此我们希望通过指定与索引名称匹配的模式来确保新角色可以访问它。
接下来,导航到用户 UI,创建一个名为 logstash_internal 的新用户并为其分配 logstash_writer 角色。 对于本教程,我们将为用户使用密码 “demo-password”。
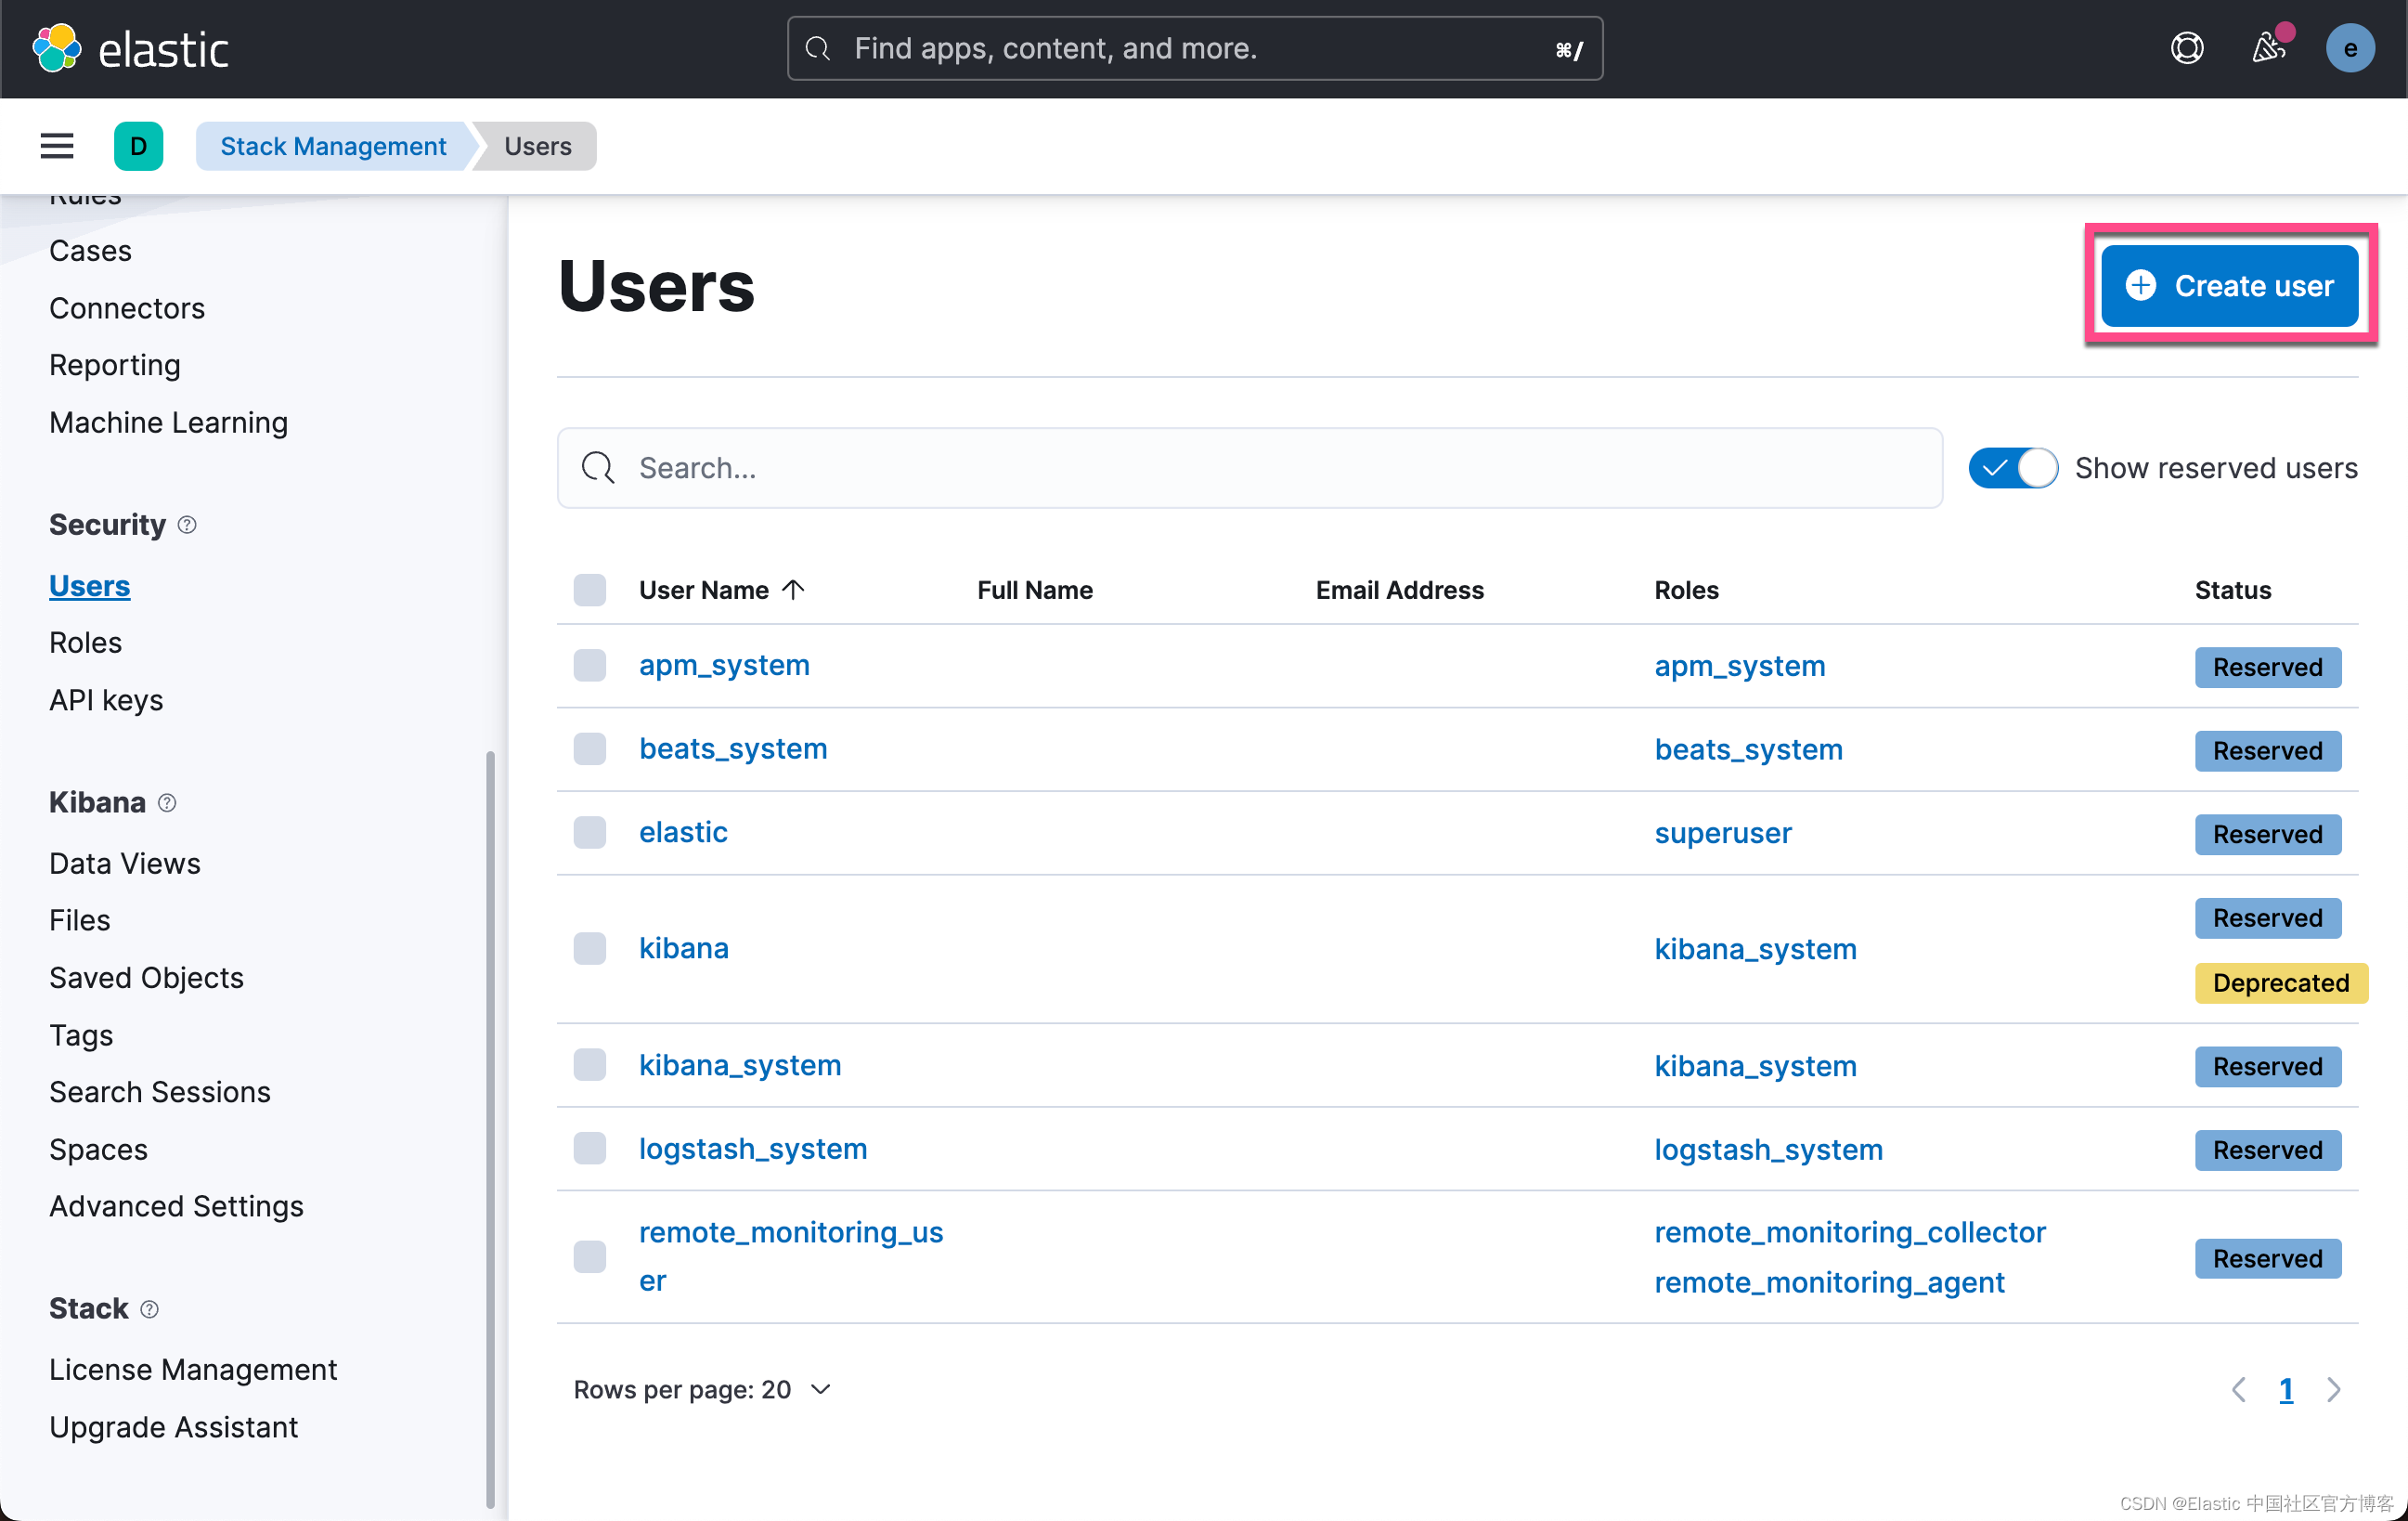
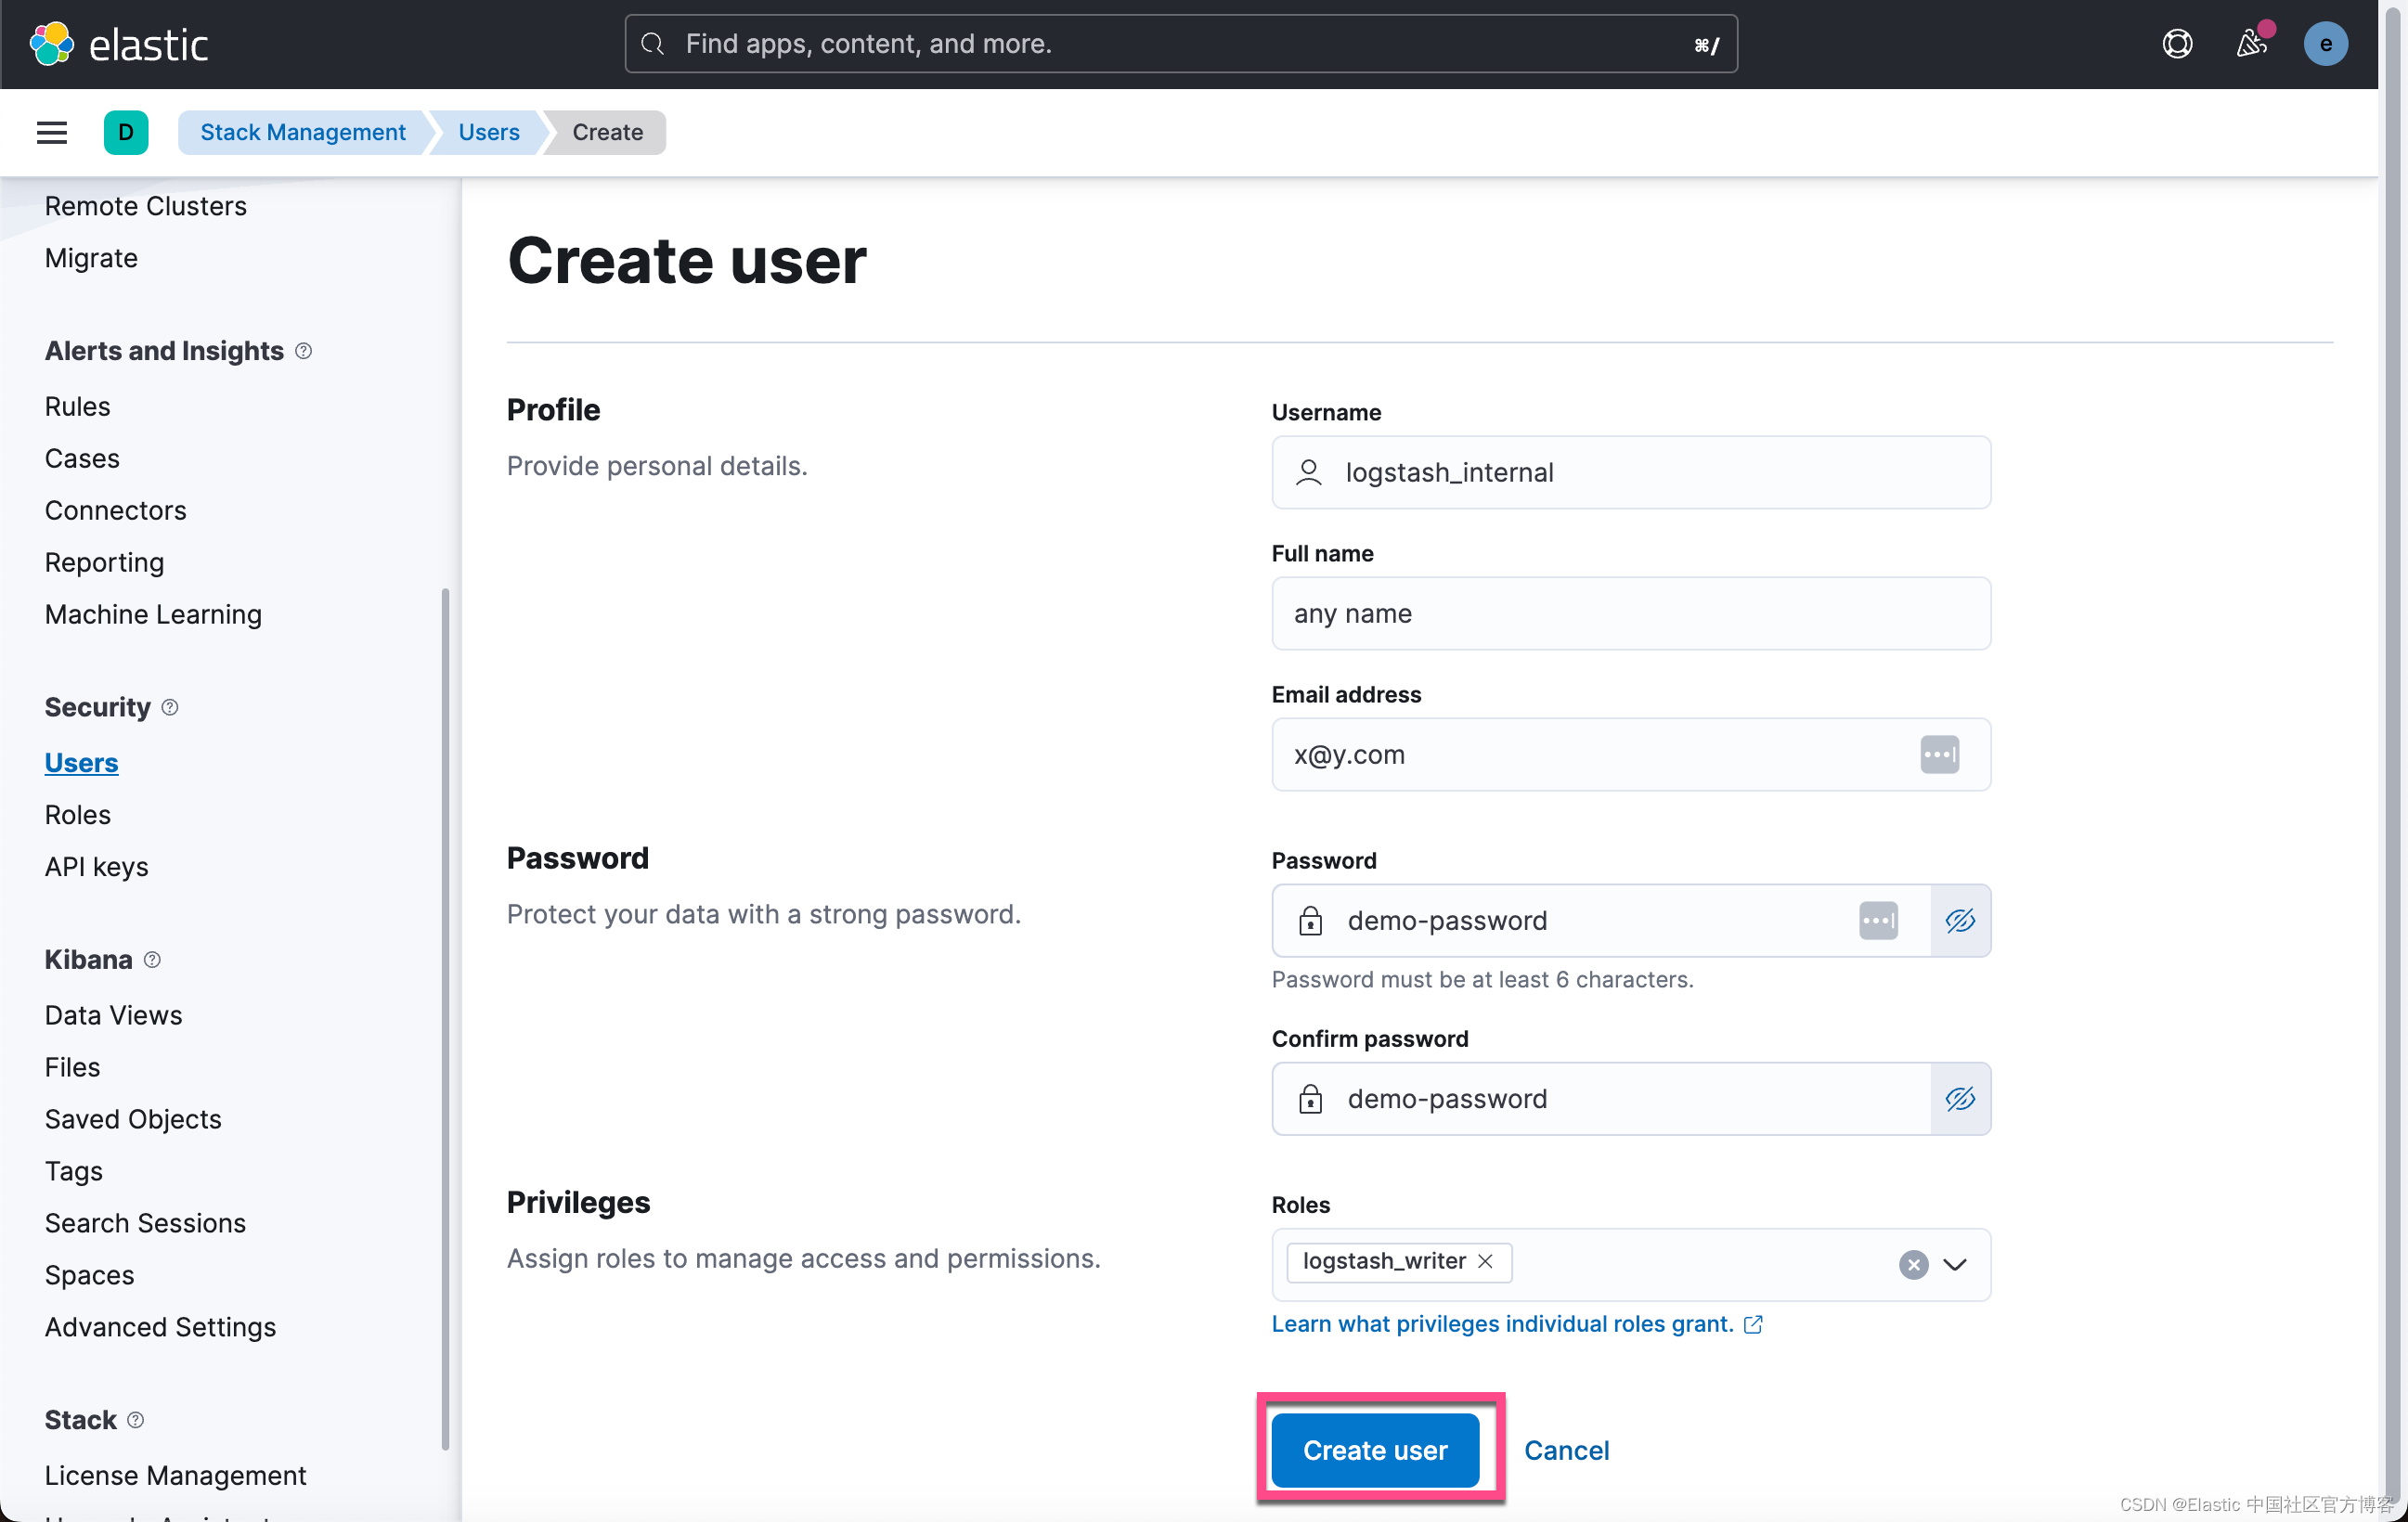
这样就完成了 logstash_internal 用户的创建。
步骤十一:配置 Logstash
修改 /etc/logstash/logstash.yml 以匹配以下内容:
/etc/logstash/logstash.yml
node.name: demo-node
path.data: /var/lib/logstash
api.enabled: false
path.logs: /var/log/logstash
log.level: info
对于本教程,我们希望将所有系统日志消息从客户端计算机转发到 Elasticsearch。使用以下内容在 /etc/logstash/conf.d/beats.conf 中创建一个文件:
/etc/logstash/conf.d/beats.conf
input {beats {port => 5044ssl => truessl_certificate_authorities => ["/etc/logstash/certs/http_ca.crt"]ssl_certificate => "/etc/logstash/certs/logstash.crt"ssl_key => "/etc/logstash/certs/logstash.key"ssl_verify_mode => "force_peer"}
}filter {grok {match => { "message" => "%{SYSLOGLINE}" }}date {match => ["timestamp", "MMM dd HH:mm:ss"]}
}output {elasticsearch {ssl => truehosts => ["https://192.168.0.9:9200"]cacert => "/etc/logstash/certs/http_ca.crt"user => "logstash_internal"password => "demo-password"}
}
Logstash 附带一些内置的 Grok 模式,你可以在 logstash-plugins Github 存储库中找到这些模式:https://github.com/logstash-plugins/logstash-patterns-core/tree/main/patterns。 SYSLOGLINE(在上面的配置中)是内置模式之一。
默认情况下,Ubuntu 上的系统日志条目具有上述日期过滤器中指定的格式(明显缺少年份)。 你可以修改格式以匹配客户端计算机上的系统日志时间戳。
步骤十二:启动 Logstash
我们打入如下的命令来启动 Logstash:
sudo systemctl enable logstash && sudo systemctl start logstash要查看 Logstash 是否正在运行,你可以:
service logstash status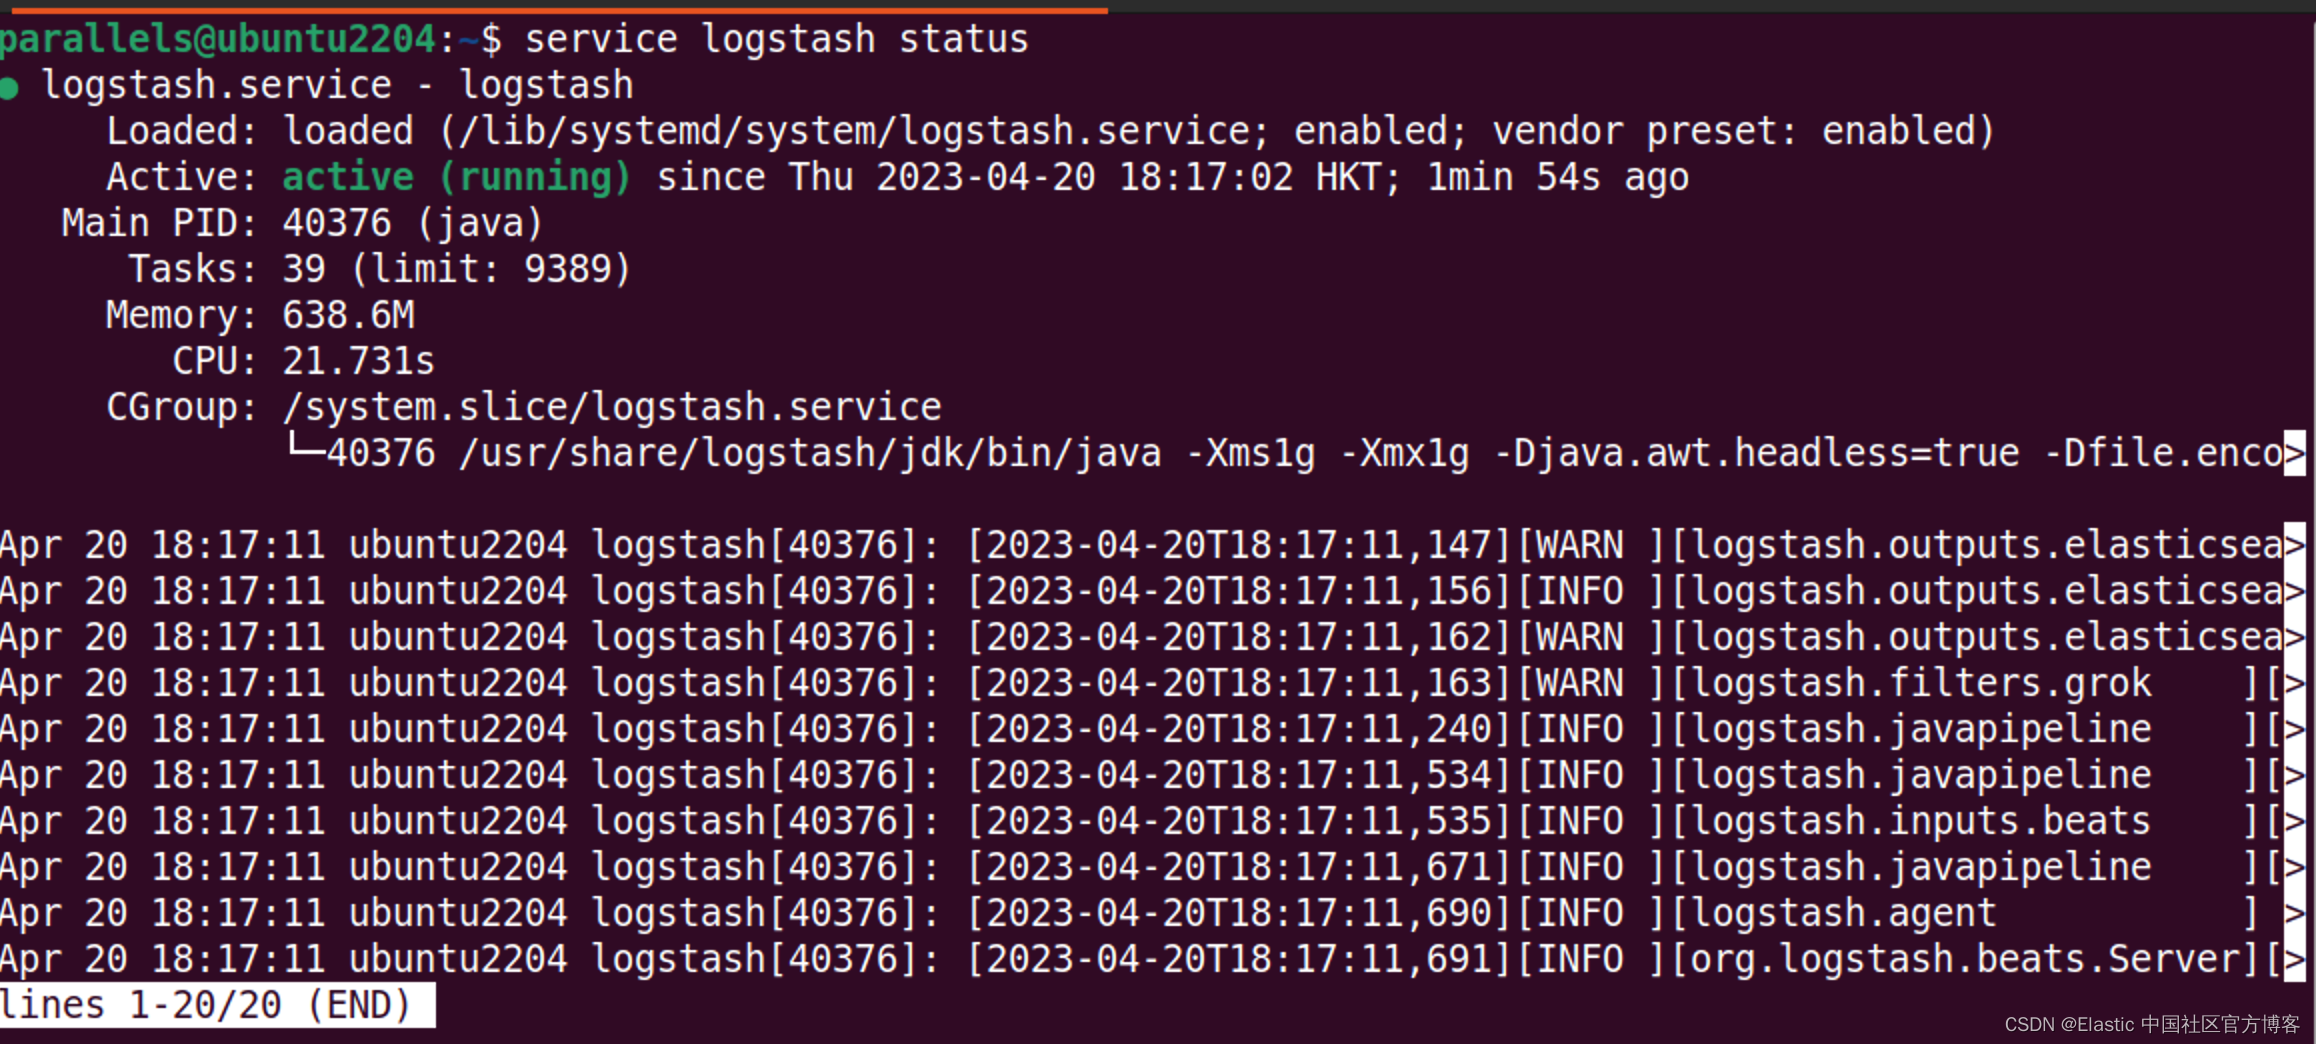
我们还可以检查它的日志文件:
tail -n 20 /var/log/logstash/logstash-plain.log我们还可以使用 journalctl 命令来进行检查:
journalctl -u logstash -n 20我们还可以通过检查 5044 端口是否已经开启:
nmap localhost -p-parallels@ubuntu2204:~$ nmap localhost -p-
Starting Nmap 7.80 ( https://nmap.org ) at 2023-04-20 18:30 HKT
Nmap scan report for localhost (127.0.0.1)
Host is up (0.000028s latency).
Not shown: 65529 closed ports
PORT STATE SERVICE
22/tcp open ssh
631/tcp open ipp
5044/tcp open lxi-evntsvc
5601/tcp open esmagent
9200/tcp open wap-wsp
9300/tcp open vrace步骤十三:在客户端机器上安装 Filebeat
在客户端机器上运行以下命令安装 Filebeat(大部分与步骤 1 相同):
wget -qO - https://artifacts.elastic.co/GPG-KEY-elasticsearch | sudo gpg --dearmor -o /usr/share/keyrings/elasticsearch-keyring.gpg
sudo apt install apt-transport-https
echo "deb [signed-by=/usr/share/keyrings/elasticsearch-keyring.gpg] https://artifacts.elastic.co/packages/8.x/apt stable main" | sudo tee /etc/apt/sources.list.d/elastic-8.x.list
sudo apt update && and sudo apt install filebeat
在本示例中,出于方便,我们还是将 Filebeat 安装于另外一个机器上,并且它的 IP 地址是 192.168.0.3。这个 IP 地址和 Logstash 安装的 IP 有所不同。
步骤十四:将密钥和证书复制到客户端
将上面生成的 client.p12 文件复制到客户端机器。 像以前一样提取密钥和证书:
openssl pkcs12 -in client.p12 -nocerts -nodes -out client.key
openssl pkcs12 -in client.p12 -nokeys -nodes -out client.crt
由于 client.crt 将同时包含 CA 和客户端证书,因此你需要将它们分离到不同的文件中。 将 CA 证书复制到名为 http_ca.crt 的文件中。
在 /etc/filebeat 下创建一个名为 certs 的目录,并将密钥和证书复制到那里:
sudo mkdir /etc/filebeat/certs
sudo cp client.key client.crt http_ca.crt /etc/filebeat/certs
步骤十五:配置 Filebeat
修改 /etc/filebeat/filebeat.yml 使其内容与以下内容匹配:
/etc/filebeat/filebeat.yml
filebeat.inputs:
- type: filestreamid: syslogpaths:- /var/log/syslog
setup.template.settings:index.number_of_shards: 1
logging.level: info
output.logstash:hosts: ["192.168.0.9:5044"]ssl.enabled: truessl.certificate_authorities: ["/etc/filebeat/certs/http_ca.crt"]ssl.certificate: "/etc/filebeat/certs/client.crt"ssl.key: "/etc/filebeat/certs/client.key"pipelining: 4
上面的配置将系统日志消息转发到 Elasticsearch 服务器。 默认情况下,/var/log/syslog 的所有现有内容将在 Filebeat 第一次运行时发送到 Elasticsearch,因此如果你认为文件太大,你可能需要轮换该文件。
步骤十六:启动 Filebeat
我们使用如下的命令来启动 Filebeat:
sudo systemctl enable filebeat && sudo systemctl start filebeat你可以使用 journalctl 检查 Filebeat 是否正在运行:
journalctl -u filebeat当然,你也可以使用如下的命令来检查 Filebeat:
service filebeat status如果一切正常,名为 logs-generic-default 的数据流应该出现在 Kibana 的 Management> Data > Index Management > Data Streams。
你还应该能够在 Logs > Stream UI 中看到来自客户端的一些系统日志消息:
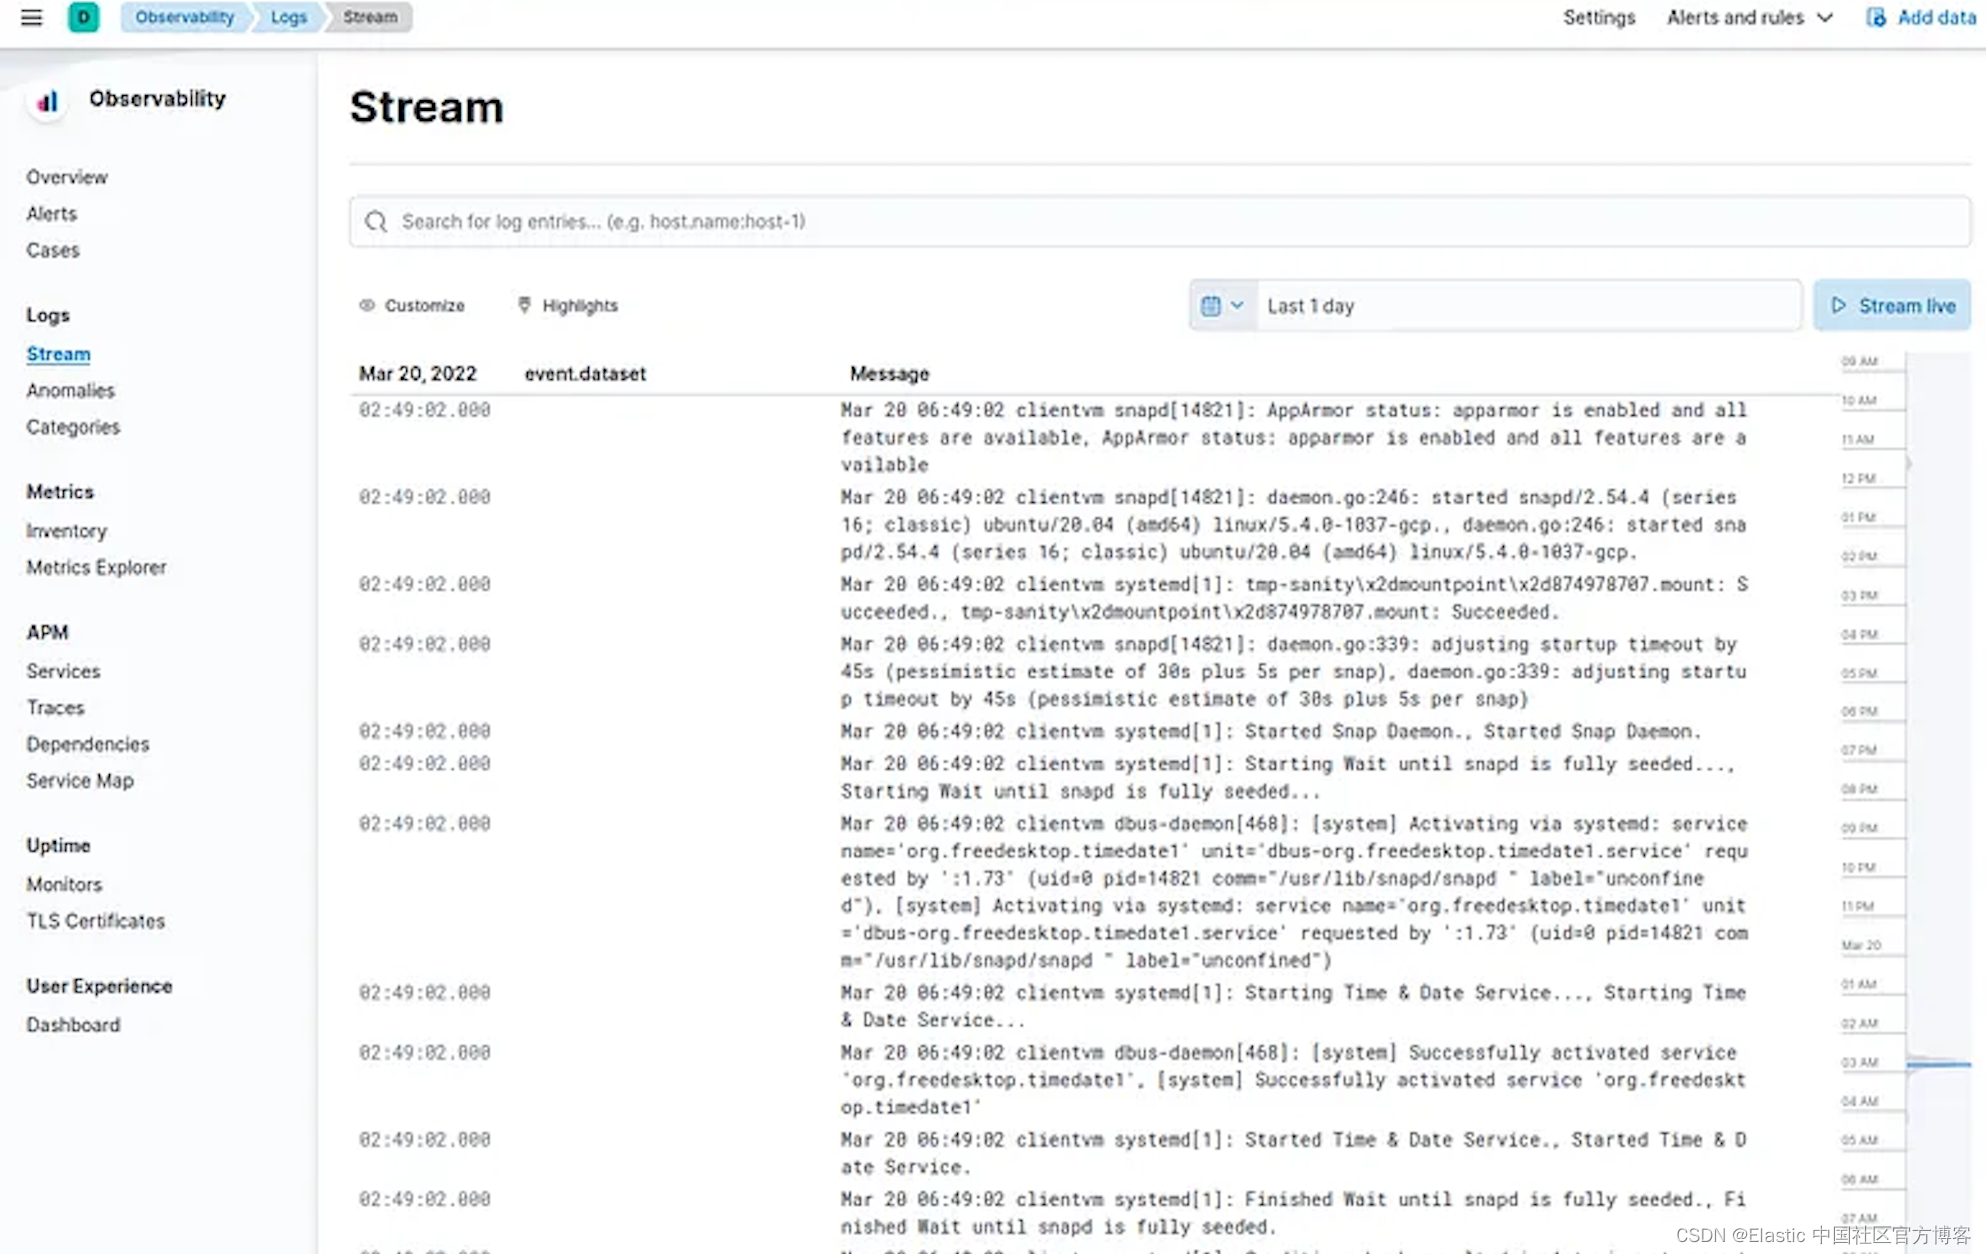
不要忘记清理密钥和证书的临时副本。
至此,我们完成了整个数据管道 Filebeat => Logstash => Elasticsearch 的所有安全连接。它们之间的连接都采用 TLS 认证。