插件化换肤原理—— 布局加载过程、View创建流程、Resources 浅析

作者:孙先森Blog
本文主要分析了 Android 布局加载流程
分析
一般的换肤功能大概是这样的:在 App 的皮肤商城内下载“皮肤包”,下载完成后点击更换界面上的 View 相关资源(颜色、样式、图片、背景等)发生改变;
大多数 App 的换肤功能是不需要重启页面的,那么就有两个问题需要搞明白:
- 如何通知 View 进行换肤操作?
- 换肤是如何加载皮肤包中的资源的?
想彻底搞清楚这两个问题首先要熟悉 View 是怎么从 XML 文件中出现到屏幕上的,熟悉布局以及 View 的创建流程后上面的问题解决思路就出来了。
布局创建流程
以 Activity 中加载 XML 布局的过程作为切入点来了解这一流程,这部分其实和换肤功能关联性不大,但是作为基础知识还是过一遍流程吧。
我们一般都通过 setContentView 方法给 Activity 设置布局,如下所示:
class MainActivity : AppCompatActivity() {override fun onCreate(savedInstanceState: Bundle?) {super.onCreate(savedInstanceState)setContentView(R.layout.activity_main) // 核心代码}
}
源码流程
跟踪 setContentView 源码到 Activity 类中:
public void setContentView(@LayoutRes int layoutResID) {getWindow().setContentView(layoutResID);initWindowDecorActionBar();
}
最终调用了 mWindow 的 setContentView 方法,那么就从这里开始,先来分析下 mWindow 是怎么来的。此处调用的生命周期在 onCreate,那么说明 mWindow 的初始化在 onCreate 之前,直接跳到 ActivityThread 类中的 performLaunchActivity 方法查看(关于 Activity 的启动流程请自行查阅资料):
ActivityThread.java
private Activity performLaunchActivity(ActivityClientRecord r, Intent customIntent) {// ...Activity activity = null;try {// 通过反射创建 Activityjava.lang.ClassLoader cl = appContext.getClassLoader();activity = mInstrumentation.newActivity(cl, component.getClassName(), r.intent);}// ...// 注意这个 attach 方法在触发 onCreate 之前调用activity.attach(appContext, this, getInstrumentation(), r.token,r.ident, app, r.intent, r.activityInfo, title, r.parent,r.embeddedID, r.lastNonConfigurationInstances, config,r.referrer, r.voiceInteractor, window, r.configCallback,r.assistToken, r.shareableActivityToken);// ...// 这里是触发 Activity onCreate 生命周期mInstrumentation.callActivityOnCreate(activity, r.state);// ...
}
看一下 Activity attach 方法中 mWindow 初始化部分:
Activity.java
final void attach(Context context, ActivityThread aThread, Instrumentation instr, 参数省略...) {// ...// mWindow 初始化mWindow = new PhoneWindow(this, window, activityConfigCallback);// ...// 给 mWindow 中的 mWindowManager 赋值mWindow.setWindowManager((WindowManager)context.getSystemService(Context.WINDOW_SERVICE),mToken, mComponent.flattenToString(),(info.flags & ActivityInfo.FLAG_HARDWARE_ACCELERATED) != 0);// 将上面 mWindow 中的 mWindowManager 又赋值给 Activity 的 mWindowManagermWindowManager = mWindow.getWindowManager();// ...
}
从上面源码中可以知道 mWindow 是 PhoneWindow,在 Activity 中调用 setContentView 就直接调用到了 PhoneWindow 中,看一下 PhoneWindow 中的源码都做了什么:
PhoneWindow.java
public void setContentView(int layoutResID) {if (mContentParent == null) {installDecor(); // 核心 1} else if (!hasFeature(FEATURE_CONTENT_TRANSITIONS)) {mContentParent.removeAllViews();}if (hasFeature(FEATURE_CONTENT_TRANSITIONS)) {// ...} else {mLayoutInflater.inflate(layoutResID, mContentParent); // 核心 2}// ...
}
上述代码主要有两处核心代码,逐个来进行分析,先记住一点,此时的 Activity 还是一片空白。
installDecor()
此时的 mContentParent 还是 null,进入 installDecor 方法看源码:
PhoneWindow.java
private void installDecor() {// ...if (mDecor == null) {// 初始化 mDecormDecor = generateDecor(-1);// ...} else {mDecor.setWindow(this);}if (mContentParent == null) {// 初始化 mContentParentmContentParent = generateLayout(mDecor);// ...}
}
mDecor 初始化代码:
PhoneWindow.java
protected DecorView generateDecor(int featureId) {// ...// 直接 new DecorView 进行初始化// 注意第三个参数 this,将当前 PhoneWindow 对象赋值给 DecorView 中的 mWindowreturn new DecorView(context, featureId, this, getAttributes());
}
注意这个 DecorView 是继承自 FrameLayout 就不贴源码了,重点来看一下 mContentParent 的初始化代码:
PhoneWindow.java
protected ViewGroup generateLayout(DecorView decor) {// ...// 先是一系列的属性设置贴了一些平时常用的// 取消标题栏if (a.getBoolean(R.styleable.Window_windowNoTitle, false)) {requestFeature(FEATURE_NO_TITLE);} else if (a.getBoolean(R.styleable.Window_windowActionBar, false)) {// Don't allow an action bar if there is no title.requestFeature(FEATURE_ACTION_BAR);}// ...// 设置全屏if (a.getBoolean(R.styleable.Window_windowFullscreen, false)) {setFlags(FLAG_FULLSCREEN, FLAG_FULLSCREEN & (~getForcedWindowFlags()));}// ...WindowManager.LayoutParams params = getAttributes();// 一系列的窗口属性设置// 如:SDK 31 新增的高斯模糊if (a.getBoolean(R.styleable.Window_windowBlurBehindEnabled, false)) {if ((getForcedWindowFlags() & WindowManager.LayoutParams.FLAG_BLUR_BEHIND) == 0) {params.flags |= WindowManager.LayoutParams.FLAG_BLUR_BEHIND;}params.setBlurBehindRadius(a.getDimensionPixelSize(android.R.styleable.Window_windowBlurBehindRadius, 0));}// ...// 整体布局文件int layoutResource;// 根据一系列判断选择 SDK 中的布局一般默认是 R.layout.screen_simpleif (...){}else if(...){}else{layoutResource = R.layout.screen_simple;}mDecor.onResourcesLoaded(mLayoutInflater, layoutResource);// 拿到 screen_simple.xml 布局的内容部分 (R.id.content)ViewGroup contentParent = (ViewGroup)findViewById(ID_ANDROID_CONTENT);// ...return contentParent; // 返回
}
最终,是调用了 DecorView 的 onResourcesLoaded 方法,并且将 R.layout.screen_simple 布局传递过去,先来看一下布局文件源码:
R.layout.screen_simple.xml
<LinearLayout xmlns:android="http://schemas.android.com/apk/res/android"android:layout_width="match_parent"android:layout_height="match_parent"android:fitsSystemWindows="true"android:orientation="vertical"><ViewStub android:id="@+id/action_mode_bar_stub"android:inflatedId="@+id/action_mode_bar"android:layout="@layout/action_mode_bar"android:layout_width="match_parent"android:layout_height="wrap_content"android:theme="?attr/actionBarTheme" /><FrameLayoutandroid:id="@android:id/content"android:layout_width="match_parent"android:layout_height="match_parent"android:foregroundInsidePadding="false"android:foregroundGravity="fill_horizontal|top"android:foreground="?android:attr/windowContentOverlay" />
</LinearLayout>
可以看出整个 Activity 默认是一个 LinearLayout 布局中包含着标题栏和内容部分,标题栏部分采用 ViewStub 形式加载,内容部分是一个空白的 FrameLayout。
接着来看 mDecor.onResourcesLoaded(mLayoutInflater, layoutResource) 源码:
DecorView.java
void onResourcesLoaded(LayoutInflater inflater, int layoutResource) {// ...// 通过 LayoutInflater 将 screen_simple.xml 解析成 Viewfinal View root = inflater.inflate(layoutResource, null);if (mDecorCaptionView != null) {// ...} else {// 调用 addView 将 root 添加到 DecorView 上addView(root, 0, new ViewGroup.LayoutParams(MATCH_PARENT, MATCH_PARENT));}mContentRoot = (ViewGroup) root;// ...
}
onResourcesLoaded 主要将默认布局文件解析成 View 并且添加到 DecorView 上,解析的过程这里先不分析,放到后面的小节中,addView 则调用其父类 ViewGroup 的 addView。
此时 DecorView 应该是这样的:
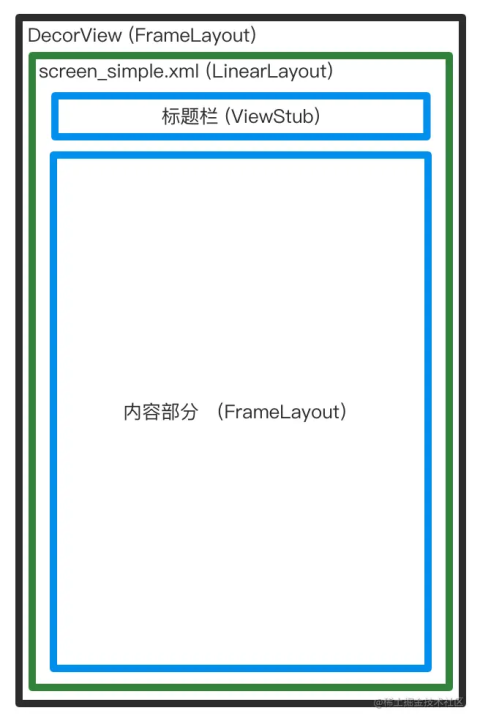
内容部分目前还是空白,还没有解析添加我们在 Activity setContentView 传入的布局。
onResourcesLoaded 执行完成后,通过 findViewById 方法获取内容部分的 FrameLayout,并且将其返回。
installDecor 方法到此就分析完了,总结下:
- mDecor 也就是 DecorView 进行初始化
- 解析出默认布局添加到 DecorView 中,并且将内容部分 View 赋值给 mContentParent
mLayoutInflater.inflate(layoutResID, mContentParent)
分析完 installDecor 方法得知 mContentParent 就是承载 Activity 布局的 View,这里继续跟踪源码来看一下 inflate 做了哪些工作:
LayoutInflate.java
public View inflate(@LayoutRes int resource, @Nullable ViewGroup root) {// 注意这里第三个参数 也就是 attachToRoot 为 ture// root 也就是 mContentParent,installDecor 中已经初始化return inflate(resource, root, root != null);
}public View inflate(@LayoutRes int resource, @Nullable ViewGroup root, boolean attachToRoot) {// ...// 获取布局文件的解析器XmlResourceParser parser = res.getLayout(resource);// ...return inflate(parser, root, attachToRoot);
}public View inflate(XmlPullParser parser, @Nullable ViewGroup root, boolean attachToRoot) {// ...// root 赋值给 resultView result = root;// 将解析器推进到第一个START_TAG 也就是根ViewadvanceToRootNode(parser); // 拿到根 View 名字final String name = parser.getName();if (TAG_MERGE.equals(name)) { // merge 布局进 if// ...} else { // 普通布局进 else// 创建出根 View ## 后面小节着重分析这里是如何创建 View 的final View temp = createViewFromTag(root, name, inflaterContext, attrs);ViewGroup.LayoutParams params = null; // 布局参数if (root != null) { // root 不为 nullparams = root.generateLayoutParams(attrs); // 初始化布局参数if (!attachToRoot) { // atachToRoot 为 true 不进入temp.setLayoutParams(params);}}// ...// 解析布局中的其他 View 并且添加到 temp 根 View 中rInflateChildren(parser, temp, attrs, true);// ...// 将创建的根 View 添加到 root 也就是 mContentParent 中if (root != null && attachToRoot) {root.addView(temp, params);}// ...}// ...return result;
}
可以看出这里的调用将我们传入的 Activity 布局的根 View 解析出来并且添加到了 mContentParent 中,此时的 DecorView 是这样的:
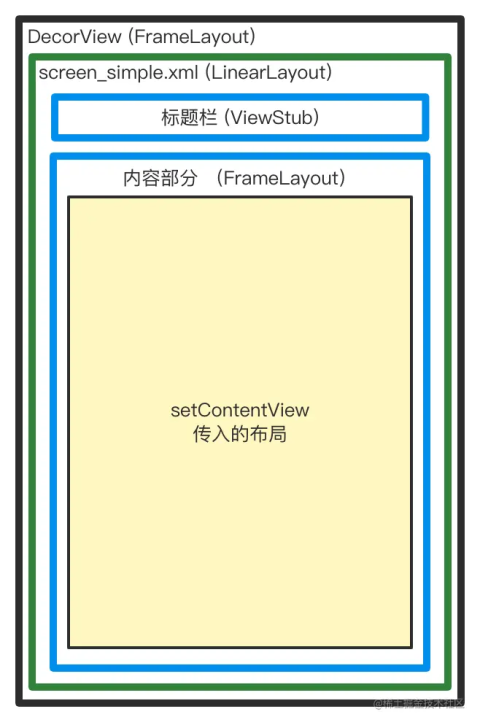
到这里为止我们的布局就全部创建完成了,但是要注意,onCreate 中调用 setContentView 后流程就走到了这里,此时布局文件虽然创建完成了,但是还并没有绘制到 Activity 中,View 的三大流程 measure、draw、layout 都还没有进行,本篇博客主要分析换肤功能,View 的绘制流程将在后续其他博客中会另行分析。
View 的创建
在上述布局文件创建流程,在最后的 LayoutInflate 文件中的 inflate 方法里创建出了布局文件的所有 View。根布局的 View 直接通过 createViewFromTag 方法创建,直接点进去源码查看:
LayoutInflate.java
private View createViewFromTag(View parent, String name, Context context, AttributeSet attrs) {return createViewFromTag(parent, name, context, attrs, false);
}View createViewFromTag(View parent, String name, Context context, AttributeSet attrs,boolean ignoreThemeAttr) {// ...// 先通过 tryCreateView 尝试创建 ViewView view = tryCreateView(parent, name, context, attrs);if (view == null) { // 如果创建失败进入 if// ...try {if (-1 == name.indexOf('.')) { // 表示 sdk 中的 View (Text、Button...)view = onCreateView(context, parent, name, attrs);} else { // 表示自定义 View 或者 support 包中的 View (androidx.appcompat.widget.AppCompatButton...)view = createView(context, name, null, attrs);}}// ...}return view;// ...
}
上述代码的逻辑并不复杂,共有三个创建 View 的方法,逐个对其进行分析
tryCreateView(parent, name, context, attrs)
LayoutInflate.java
public final View tryCreateView(@Nullable View parent, @NonNull String name,// ...View view;if (mFactory2 != null) { // 优先通过 mFactory2 创建 Viewview = mFactory2.onCreateView(parent, name, context, attrs);} else if (mFactory != null) {  // 第二选择 mFactory 创建 Viewview = mFactory.onCreateView(name, context, attrs);} else { // 都创建失败返回 nullview = null;}// ...return view;
}
逻辑很简单,那么就有分别看看 mFactory2 和 mFactory 是什么:
LayoutInflate.java
public interface Factory {@NullableView onCreateView(@NonNull String name, @NonNull Context context,@NonNull AttributeSet attrs);
}public interface Factory2 extends Factory {@NullableView onCreateView(@Nullable View parent, @NonNull String name,@NonNull Context context, @NonNull AttributeSet attrs);
}
两个均是 LayoutInflate 的内部接口,本博客以 Activity 布局创建流程作为切入点分析,且 Activity 也实现了 Factory2 接口,
onCreateView(context, parent, name, attrs)
LayoutInflate.java
public View onCreateView(@NonNull Context viewContext, @Nullable View parent,@NonNull String name, @Nullable AttributeSet attrs)throws ClassNotFoundException {return onCreateView(parent, name, attrs);
}protected View onCreateView(View parent, String name, AttributeSet attrs)throws ClassNotFoundException {return onCreateView(name, attrs);
}protected View onCreateView(String name, AttributeSet attrs)throws ClassNotFoundException {// 因为是sdk原生View 增加前缀 android.view. 用于反射创建 Viewreturn createView(name, "android.view.", attrs);
}public final View createView(String name, String prefix, AttributeSet attrs)throws ClassNotFoundException, InflateException {Context context = (Context) mConstructorArgs[0];if (context == null) {context = mContext;}return createView(context, name, prefix, attrs);
}
可以看出 onCreateView 方法最后还是调用到了 createView 方法,仅仅是增加了 “android.view.” 前缀传递过去。
createView(context, name, null, attrs)
public final View createView(@NonNull Context viewContext, @NonNull String name,@Nullable String prefix, @Nullable AttributeSet attrs)throws ClassNotFoundException, InflateException {// ...// 优先从 sConstructorMap 中获取 View 的构造方法Constructor<? extends View> constructor = sConstructorMap.get(name);// ...Class<? extends View> clazz = null;// ...// sConstructorMap 中获取不到 则通过反射获取 View 的构造方法并且保存到 sConstructorMap 里if (constructor == null) {clazz = Class.forName(prefix != null ? (prefix + name) : name, false,mContext.getClassLoader()).asSubclass(View.class);// ...constructor = clazz.getConstructor(mConstructorSignature);constructor.setAccessible(true);sConstructorMap.put(name, constructor);} else {// ...}// ...// 通过反射获取的构造方法创建 Viewfinal View view = constructor.newInstance(args);// ...return view;
}
createView 方法主要是是通过反射的方式创建出 View,并且对 View 的构造方法做了缓存。
Factory 和 Factory2
熟悉了 View 创建过程,总结下来就是优先使用 Factory2 去创建,创建失败则尝试使用 Factory,再失败直接反射创建,那么我们来找一下 Factory2 是什么时候设置的。
通常我们继承的 Activity 是 AppCompatActivity,在其 onCreate 方法中有这样一行代码:
AppCompatActivity.java
@Override
protected void onCreate(@Nullable Bundle savedInstanceState) {final AppCompatDelegate delegate = getDelegate();delegate.installViewFactory(); // 注意这行代码delegate.onCreate(savedInstanceState);super.onCreate(savedInstanceState);
}
先看一下这个 delegate 是什么:
AppCompatActivity.java
public AppCompatDelegate getDelegate() {if (mDelegate == null) {mDelegate = AppCompatDelegate.create(this, this);}return mDelegate;
}
AppCompatDelegate.java
public static AppCompatDelegate create(@NonNull Activity activity,@Nullable AppCompatCallback callback) {return new AppCompatDelegateImpl(activity, callback);
}
原来是 AppCompatDelegateImpl 的实例,直接查看其 installViewFactory 方法:
AppCompatDelegate.java
public void installViewFactory() {LayoutInflater layoutInflater = LayoutInflater.from(mContext);if (layoutInflater.getFactory() == null) {// 看到这里的 this 就说明 AppCompatDelegate 实现了 Factory2 接口LayoutInflaterCompat.setFactory2(layoutInflater, this);} else {if (!(layoutInflater.getFactory2() instanceof AppCompatDelegateImpl)) {Log.i(TAG, "The Activity's LayoutInflater already has a Factory installed"+ " so we can not install AppCompat's");}}
}
在 installViewFactory 方法中手动给 LayoutInflater 设置了 mFactory2,既然 AppCompatDelegate 实现了 Factory2,直接查看其 onCreateView 方法实现:
AppCompatDelegate.java
@Override
public final View onCreateView(View parent, String name, Context context, AttributeSet attrs) {return createView(parent, name, context, attrs);
}public View createView(View parent, final String name, @NonNull Context context,@NonNull AttributeSet attrs) {if (mAppCompatViewInflater == null) {// ...mAppCompatViewInflater = new AppCompatViewInflater();// ...}// ...return mAppCompatViewInflater.createView(parent, name, context, attrs, inheritContext, IS_PRE_LOLLIPOP, true, VectorEnabledTintResources.shouldBeUsed());
}
最终又调用了 AppCompatViewInflater 的 createView 方法,继续跟踪源码:
AppCompatViewInflater.java
final View createView(View parent, final String name, @NonNull Context context,@NonNull AttributeSet attrs, boolean inheritContext,boolean readAndroidTheme, boolean readAppTheme, boolean wrapContext) {// ...View view = null;switch (name) {case "TextView": // 根据名字 创建出 Viewview = createTextView(context, attrs);verifyNotNull(view, name);break;case "ImageView":view = createImageView(context, attrs);verifyNotNull(view, name);break;case "Button":// 还有很多不贴了// ...default:// 没有列举出来的 走 createView 方法 返回的 nullview = createView(context, name, attrs);}return view;
}// 直接创建出了 appcompat 包下的 View 并没有使用反射
protected AppCompatTextView createTextView(Context context, AttributeSet attrs) {return new AppCompatTextView(context, attrs);
}// 直接创建出了 appcompat 包下的 View 并没有使用反射
protected AppCompatImageView createImageView(Context context, AttributeSet attrs) {return new AppCompatImageView(context, attrs);
}// createView 返回的 null 也就意味着 mFactory2 创建 View 失败了
protected View createView(Context context, String name, AttributeSet attrs) {return null;
}
从上述代码流程中可以看出,AppCompatActivity 默认设置了 Factory2,并且其实现创建 View 是直接通过 new 的方式,并没有使用反射,性能也比较好。
Resources 浅析
熟悉了 View 创建流程,接着熟悉下资源文件的获取过程。
所谓插件化换肤,就是将皮肤资源单独打包下发给 App,App 从打包文件中获取皮肤资源进行设置。实现这个功能需要对 Android 的资源文件获取有一定的了解。
当我们的 App 打包后,资源文件会在打包进 resources.arsc 文件中,随便找一个apk,可以在 AS 中打开进行分析,如下图所示:
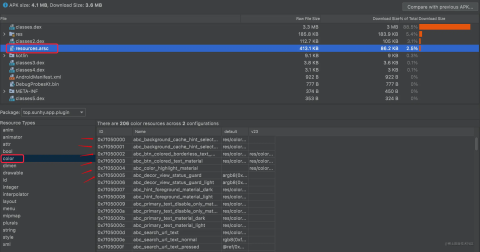
可以看出颜色、drawable、mipmap等等资源都类似于数据库形式存在,当我们调用 getDrawable(id) 时,会找出对应的资源返回。
接着就来分析下 Android Resource 文件是如何获取的。通常我们在 Activity 中获取一个 Drawable 资源代码是这样的:
getResources().getDrawable(R.drawable.xxx)
源码分析
getResources()
先来分析 getResources 方法,跟踪源码会跳到 Context 中的 :
Context.java
public abstract Resources getResources();
返回的是一个 Resources 对象。Context 的实现类是 ContextImpl,同样是在 ActivityThread 的 performLaunchActivity 方法中创建,通过 Activity 的 attach 传递给 Activity:
ActivityThread.java
private Activity performLaunchActivity(ActivityClientRecord r, Intent customIntent) {// ...ContextImpl appContext = createBaseContextForActivity(r);// ...activity.attach(appContext, this, getInstrumentation(), 参数省略...);
}private ContextImpl createBaseContextForActivity(ActivityClientRecord r) {// ...ContextImpl appContext = ContextImpl.createActivityContext(this, r.packageInfo, r.activityInfo, r.token, displayId, r.overrideConfig);// ...return appContext;
}
可以看出是通过 ContextImpl 的 createActivityContext 方法创建,查看其源码:
ContextImpl.java
static ContextImpl createActivityContext(ActivityThread mainThread,LoadedApk packageInfo, ActivityInfo activityInfo, IBinder activityToken, int displayId,Configuration overrideConfiguration) {// ...// 创建出 contextContextImpl context = new ContextImpl(null, mainThread, packageInfo, ContextParams.EMPTY,attributionTag, null, activityInfo.splitName, activityToken, null, 0, classLoader,null);// ...// ResourcesManager 单例final ResourcesManager resourcesManager = ResourcesManager.getInstance();// 在这里调用了 setResources 给 mResources 赋值context.setResources(resourcesManager.createBaseTokenResources(activityToken,packageInfo.getResDir(),splitDirs,packageInfo.getOverlayDirs(),packageInfo.getOverlayPaths(),packageInfo.getApplicationInfo().sharedLibraryFiles,displayId,overrideConfiguration,compatInfo,classLoader,packageInfo.getApplication() == null ? null: packageInfo.getApplication().getResources().getLoaders()));// ...return context;
}
接着查看 ResourcesManager 的 createBaseTokenResources 方法是如何创建 Resources 的:
ResourcesManager.java
public @Nullable Resources createBaseTokenResources(@NonNull IBinder token, 参数省略...) {try {// ...// 又调用到了 createResourcesForActivity 方法return createResourcesForActivity(token, key,/* initialOverrideConfig */ Configuration.EMPTY, /* overrideDisplayId */ null,classLoader, /* apkSupplier */ null);} finally {Trace.traceEnd(Trace.TRACE_TAG_RESOURCES);}
}private Resources createResourcesForActivity(@NonNull IBinder activityToken, 参数省略...) {synchronized (mLock) {// ...// 创建出了 ResourcesImpl 这里注意下一会会分析这个方法ResourcesImpl resourcesImpl = findOrCreateResourcesImplForKeyLocked(key, apkSupplier);// ...// 又调用到了 createResourcesForActivityLocked 方法return createResourcesForActivityLocked(activityToken, initialOverrideConfig,overrideDisplayId, classLoader, resourcesImpl, key.mCompatInfo);}
}private Resources createResourcesForActivityLocked(@NonNull IBinder activityToken,@NonNull Configuration initialOverrideConfig, @Nullable Integer overrideDisplayId,@NonNull ClassLoader classLoader, @NonNull ResourcesImpl impl,@NonNull CompatibilityInfo compatInfo) {// ...// 创建出 Resources 对象Resources resources = compatInfo.needsCompatResources() ? new CompatResources(classLoader): new Resources(classLoader);// 将上面创建的 ResourcesImpl 赋值resources.setImpl(impl);// ...return resources;
}
Resources 的创建过程中值得注意的是 ResourcesImpl 的创建,回到 findOrCreateResourcesImplForKeyLocked 方法中查看其创建过程:
ResourcesManager.java
private @Nullable ResourcesImpl findOrCreateResourcesImplForKeyLocked(@NonNull ResourcesKey key, @Nullable ApkAssetsSupplier apkSupplier) {// 缓存获取ResourcesImpl impl = findResourcesImplForKeyLocked(key); if (impl == null) {// 缓存获取不到 直接创建impl = createResourcesImpl(key, apkSupplier);if (impl != null) { // 放入缓存mResourceImpls.put(key, new WeakReference<>(impl));}}return impl;
}
继续查看 createResourcesImpl 方法:
ResourcesManager.java
private @Nullable ResourcesImpl createResourcesImpl(@NonNull ResourcesKey key,@Nullable ApkAssetsSupplier apkSupplier) {// 先创建出了 final AssetManager assets = createAssetManager(key, apkSupplier);if (assets == null) {return null;}// ...// 将 AssetManager 对象作为参数传递给 ResourcesImpl 构造器final ResourcesImpl impl = new ResourcesImpl(assets, displayMetrics, config, daj);// ...return impl;
}
到这里先稍微总结下,Resource 的创建过程中会先创建出 AssetManager 并且传递给 ResourcesImpl,最后将 ResourcesImpl 再 set 给 Resources。实际上 Resources 和 ResourcesImpl 都是壳,真正做事情的是 AssetManager。
getDrawable()
熟悉了 Resources 的创建过程,就来跟踪下 getDrawable 看看其是如何查找资源的:
Resources.java
public Drawable getDrawable(@DrawableRes int id, @Nullable Theme theme)throws NotFoundException {return getDrawableForDensity(id, 0, theme);
}public Drawable getDrawableForDensity(@DrawableRes int id, int density, @Nullable Theme theme) {final TypedValue value = obtainTempTypedValue();try {// 在这里调用了 ResourcesImpl 的 getValueForDensity 方法final ResourcesImpl impl = mResourcesImpl;impl.getValueForDensity(id, density, value, true);return loadDrawable(value, id, density, theme);} finally {releaseTempTypedValue(value);}
}
继续查看 ResourcesImpl 的 getValueForDensity:
ResourcesImpl.java
void getValueForDensity(@AnyRes int id, int density, TypedValue outValue,boolean resolveRefs) throws NotFoundException {// 最终交给了真正做事情的 AssetManagerboolean found = mAssets.getResourceValue(id, density, outValue, resolveRefs);if (found) {return;}throw new NotFoundException("Resource ID #0x" + Integer.toHexString(id));
}
看到这里就可以明白,如果想要加载皮肤包的资源,那就需要在 AssetManager 上做文章,本篇博客主要熟悉源码流程,思路在下一篇分享。
只需记住 Resources 中包含 ResourcesImpl,而 ResourcesImpl 中又包含着 AssetManager 即可。
最后
本篇主要分享了布局加载流程(好像跟换肤没啥关系)、View 创建过程(重点)、Resources 简单分析(重点)。
Android 学习笔录
Android 性能优化篇:https://qr18.cn/FVlo89
Android 车载篇:https://qr18.cn/F05ZCM
Android Framework底层原理篇:https://qr18.cn/AQpN4J
Android 音视频篇:https://qr18.cn/Ei3VPD
Jetpack全家桶篇(内含Compose):https://qr18.cn/A0gajp
Kotlin 篇:https://qr18.cn/CdjtAF
Gradle 篇:https://qr18.cn/DzrmMB
OkHttp 源码解析笔记:https://qr18.cn/Cw0pBD
Flutter 篇:https://qr18.cn/DIvKma
Android 八大知识体:https://qr18.cn/CyxarU
Android 核心笔记:https://qr21.cn/CaZQLo
Android 往年面试题锦:https://qr18.cn/CKV8OZ
2023年最新Android 面试题集https://qr18.cn/CgxrRy
音视频面试题锦:https://qr18.cn/AcV6Ap