03-Mybatis的基本使用-注解配置文件+xml配置文件

目录
1、环境准备
2、注解配置文件
基础操作01-通过ID删除数据
基础操作02-插入数据
基础操作03-更新数据
基础操作04-根据ID查询数据
基础操作05-条件查询数据
3、xml配置文件
1、环境准备
1. 创建数据库数据表
-- 部门管理
create table dept(id int unsigned primary key auto_increment comment '主键ID',name varchar(10) not null unique comment '部门名称',create_time datetime not null comment '创建时间',update_time datetime not null comment '修改时间'
) comment '部门表';insert into dept (id, name, create_time, update_time) values(1,'学工部',now(),now()),(2,'教研部',now(),now()),(3,'咨询部',now(),now()), (4,'就业部',now(),now()),(5,'人事部',now(),now());-- 员工管理
create table emp (id int unsigned primary key auto_increment comment 'ID',username varchar(20) not null unique comment '用户名',password varchar(32) default '123456' comment '密码',name varchar(10) not null comment '姓名',gender tinyint unsigned not null comment '性别, 说明: 1 男, 2 女',image varchar(300) comment '图像',job tinyint unsigned comment '职位, 说明: 1 班主任,2 讲师, 3 学工主管, 4 教研主管, 5 咨询师',entrydate date comment '入职时间',dept_id int unsigned comment '部门ID',create_time datetime not null comment '创建时间',update_time datetime not null comment '修改时间'
) comment '员工表';INSERT INTO emp(id, username, password, name, gender, image, job, entrydate,dept_id, create_time, update_time) VALUES(1,'jinyong','123456','金庸',1,'1.jpg',4,'2000-01-01',2,now(),now()),(2,'zhangwuji','123456','张无忌',1,'2.jpg',2,'2015-01-01',2,now(),now()),(3,'yangxiao','123456','杨逍',1,'3.jpg',2,'2008-05-01',2,now(),now()),(4,'weiyixiao','123456','韦一笑',1,'4.jpg',2,'2007-01-01',2,now(),now()),(5,'changyuchun','123456','常遇春',1,'5.jpg',2,'2012-12-05',2,now(),now()),(6,'xiaozhao','123456','小昭',2,'6.jpg',3,'2013-09-05',1,now(),now()),(7,'jixiaofu','123456','纪晓芙',2,'7.jpg',1,'2005-08-01',1,now(),now()),(8,'zhouzhiruo','123456','周芷若',2,'8.jpg',1,'2014-11-09',1,now(),now()),(9,'dingminjun','123456','丁敏君',2,'9.jpg',1,'2011-03-11',1,now(),now()),(10,'zhaomin','123456','赵敏',2,'10.jpg',1,'2013-09-05',1,now(),now()),(11,'luzhangke','123456','鹿杖客',1,'11.jpg',5,'2007-02-01',3,now(),now()),(12,'hebiweng','123456','鹤笔翁',1,'12.jpg',5,'2008-08-18',3,now(),now()),(13,'fangdongbai','123456','方东白',1,'13.jpg',5,'2012-11-01',3,now(),now()),(14,'zhangsanfeng','123456','张三丰',1,'14.jpg',2,'2002-08-01',2,now(),now()),(15,'yulianzhou','123456','俞莲舟',1,'15.jpg',2,'2011-05-01',2,now(),now()),(16,'songyuanqiao','123456','宋远桥',1,'16.jpg',2,'2010-01-01',2,now(),now()),(17,'chenyouliang','123456','陈友谅',1,'17.jpg',NULL,'2015-03-21',NULL,now(),now());
2. 创建Springboot工程,引入相关依赖
<dependencies><!-- mybatis的起步依赖--><dependency><groupId>org.mybatis.spring.boot</groupId><artifactId>mybatis-spring-boot-starter</artifactId><version>2.2.2</version></dependency><!-- mysql 驱动包--><dependency><groupId>mysql</groupId><artifactId>mysql-connector-java</artifactId><scope>runtime</scope></dependency><!-- springboot单元测试--><dependency><groupId>org.springframework.boot</groupId><artifactId>spring-boot-starter-web</artifactId></dependency><dependency><groupId>org.springframework.boot</groupId><artifactId>spring-boot-starter-test</artifactId><scope>test</scope></dependency><dependency><groupId>org.springframework.boot</groupId><artifactId>spring-boot-test</artifactId></dependency><dependency><groupId>org.projectlombok</groupId><artifactId>lombok</artifactId></dependency></dependencies>3. 配置数据库信息
application.properties
# 配置数据库的链接信息 -四要素
#驱动类名称
spring.datasource.driver-class-name=com.mysql.cj.jdbc.Driver
#数据库连接的url
spring.datasource.url=jdbc:mysql://localhost:3306/mybatisdemo02?serverTimezone=UTC
#连接数据库的用户名
spring.datasource.username=root
#连接数据库的密码
spring.datasource.password=# 配置mybatis的日志,指定输出到控制台
mybatis.configuration.log-impl=org.apache.ibatis.logging.stdout.StdOutImpl
4. 创建对应的实体类Emp
package demo01.pojo;import lombok.Data;import java.time.LocalDate;
import java.time.LocalDateTime;@Data
@NoArgsConstructor
@AllArgsConstructor
public class Emp {private Integer id;private String username;private String password;private String name;private Short gender;private String image;private Short job;private LocalDate entrydate;private Integer depId;private LocalDateTime createTime;private LocalDateTime updateTime;}
5. 准备Mapper接口EmpMapper
package demo01.mapper;import org.apache.ibatis.annotations.Mapper;@Mapper
public interface EmpMapper {
}
6. 创建启动类,与测试类
启动类:mybatisdemo02quickstartspplication
package demo01;import org.springframework.boot.SpringApplication;
import org.springframework.boot.autoconfigure.SpringBootApplication;//启动类 -- 启动springboot工程
@SpringBootApplication//具有包扫描作用,默认扫描当前包及其子包,即demo01
public class mybatisdemo02quickstartapplication {public static void main(String[] args) {SpringApplication.run(mybatisdemo02quickstartapplication.class,args);}
}
测试类: mybatisdemo02quickstartspplicationTest
package demo01;import org.springframework.boot.test.context.SpringBootTest;@SpringBootTest //springboot整合单元测试的注解
public class mybatisdemo02quickstartapplicationTest {}
2、注解配置文件
基础操作01-通过ID删除数据
-- 在EmpMapper中编写删除接口
// 根据ID删除数据@Delete("delete from emp where id = #{id}")public void delete(Integer id);-- 在测试类中编写测试函数
@Autowiredprivate EmpMapper empMapper;@Testpublic void testDeleteById(){empMapper.delete(17);}运行测试函数testDeleteById():
运行结果:
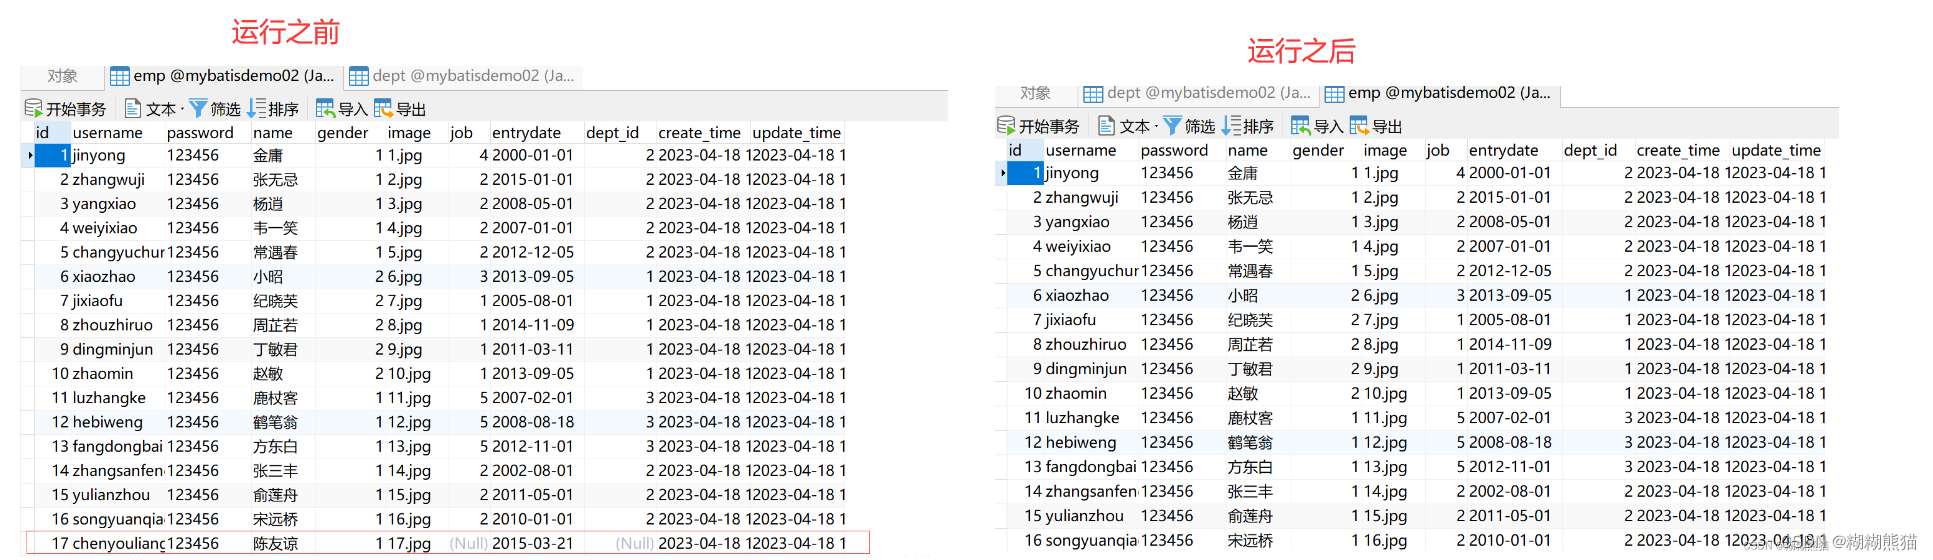
id为17的数据已经不存在了
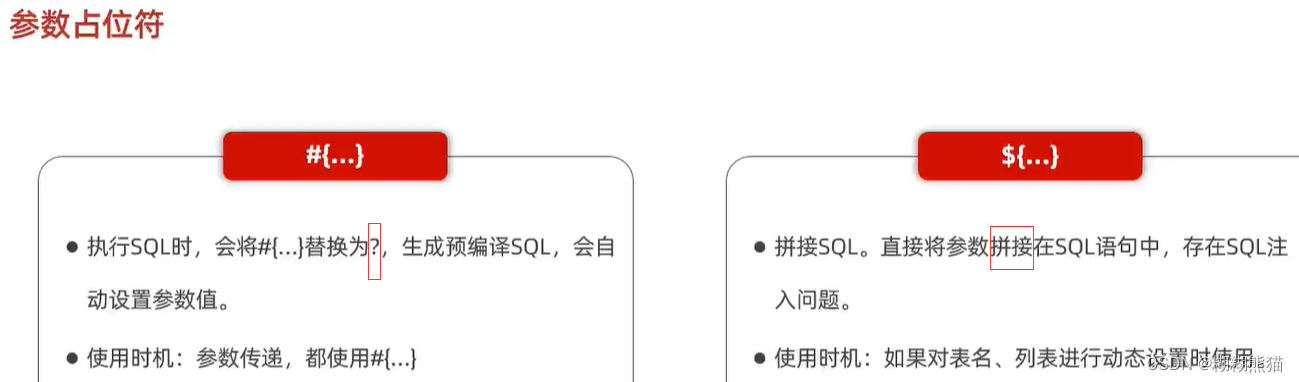
补充:参数占位符
#{...}与${...}的区别
#{...}会将参数替换为`?`,生成预编译SQL
${...}会直接将参数拼接在SQL语句中,有SQL注入的风险
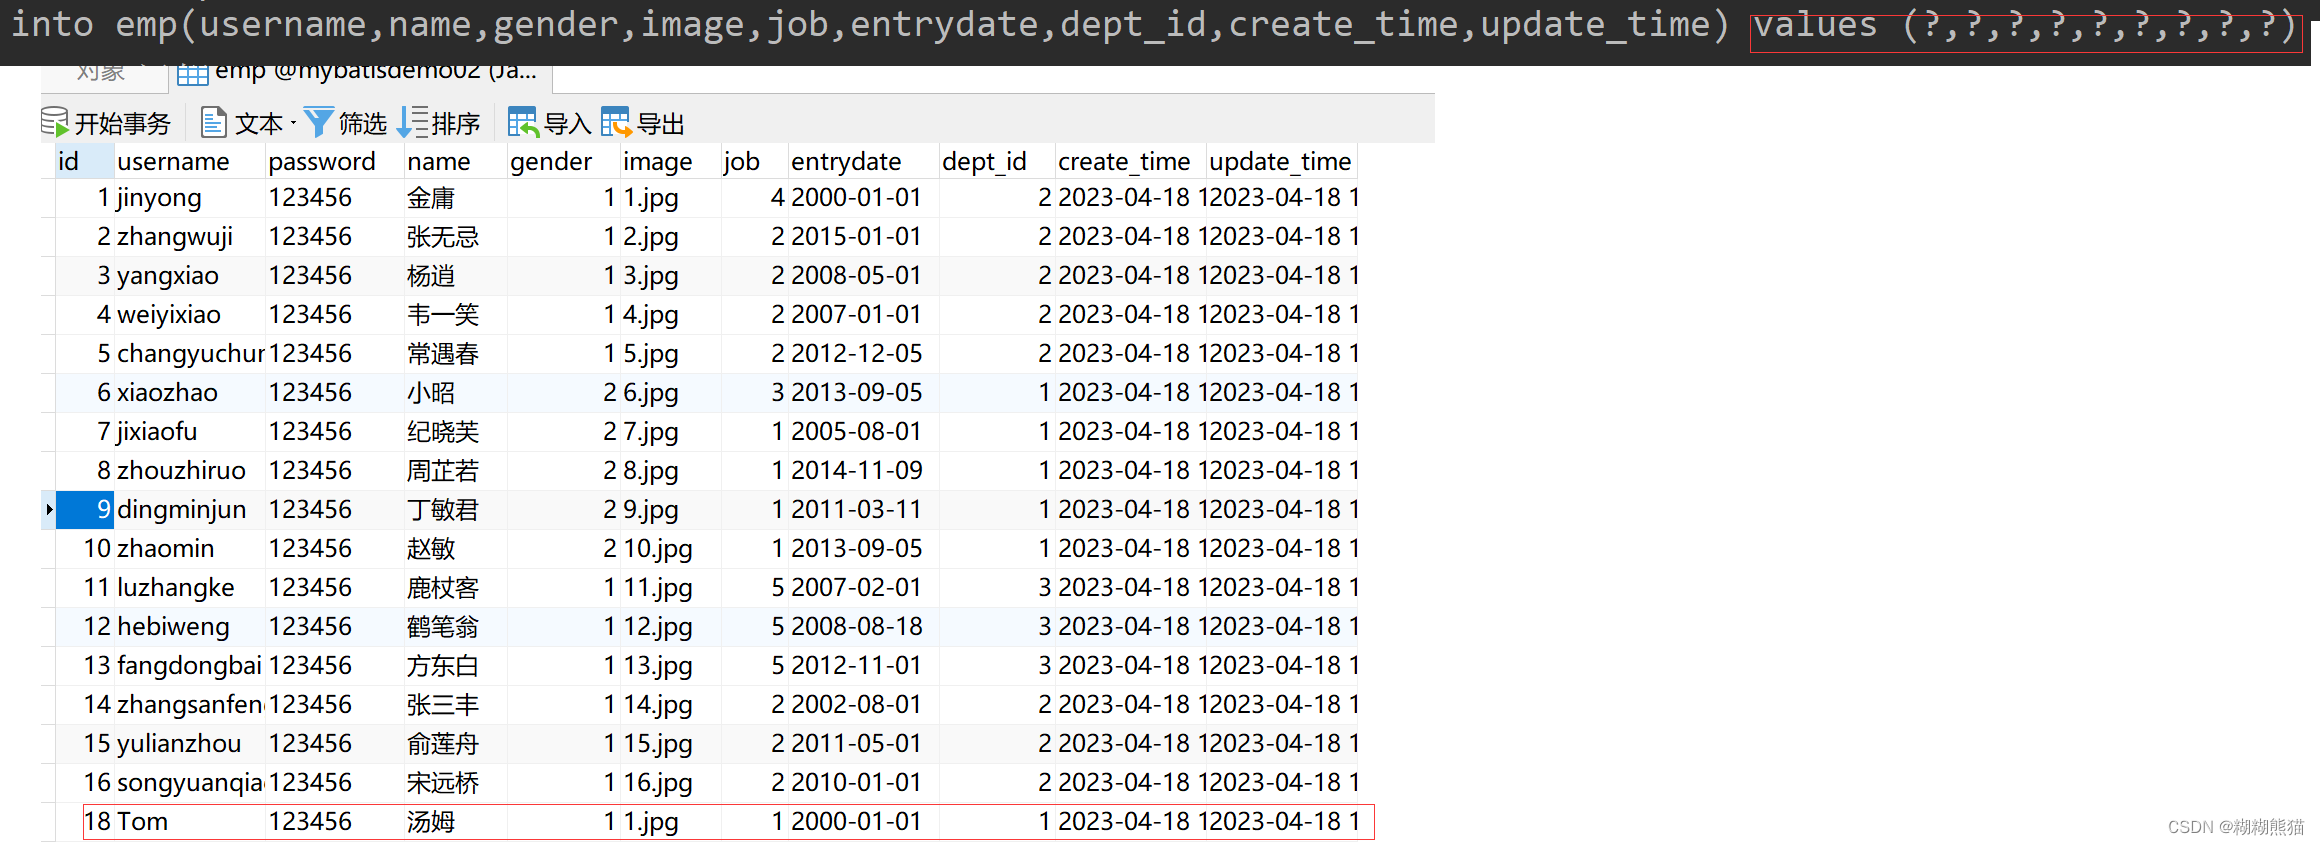
基础操作02-插入数据
-- 编写插入接口
//    新增员工
//    插入固定值
//    @Insert("insert into emp(username,name,gender,image,job,entrydate,dept_id,create_time,update_time) " +
//            "values ('Tom','汤姆',1,'1.jpg',1,'2005-01-01',now(),now())")
//    修改后@Insert("insert into emp(username,name,gender,image,job,entrydate,dept_id,create_time,update_time) " +"values (#{username},#{name},#{gender},#{image},#{job},#{entrydate},#{deptId},#{createTime},#{updateTime})")public void insert(Emp emp);
要传递的有多个参数,可以将多个参数封装到一个实体类中
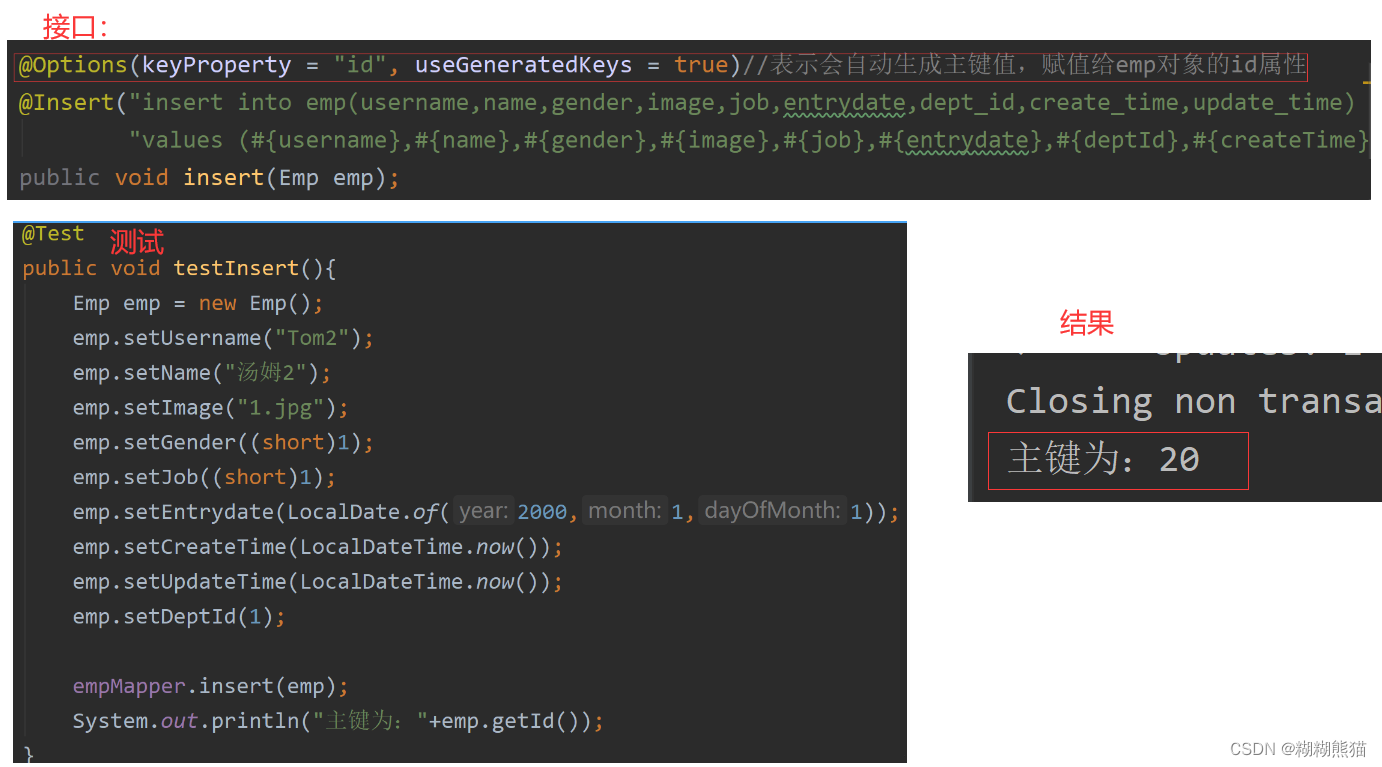
-- 编写测试类
@Testpublic void testInsert(){Emp emp = new Emp();emp.setUsername("Tom");emp.setName("汤姆");emp.setImage("1.jpg");emp.setGender((short)1);emp.setJob((short)1);emp.setEntrydate(LocalDate.of(2000,1,1));emp.setCreateTime(LocalDateTime.now());emp.setUpdateTime(LocalDateTime.now());emp.setDeptId(1);empMapper.insert(emp);}运行结果:
返回主键:
在插入SQL语句前加入注解
@Options(keyProperty = "id", useGeneratedKeys = true)
//表示会自动生成主键值,赋值给emp对象的id属性
然后即可在测试类中获取插入数据的主键
基础操作03-更新数据
-- 编写插入接口
// 更新数据@Update("update emp set username = #{username},name = #{name}, gender = #{gender},image = #{image},job =#{job},entrydate =#{entrydate},dept_id =#{deptId},update_time =#{updateTime} where id =#{id}")public void updateById(Emp emp);-- 编写测试函数
@Testpublic void testUpdateById(){Emp emp = new Emp();emp.setId(18);emp.setUsername("Tom1");emp.setName("汤姆1");emp.setImage("1.jpg");emp.setGender((short)1);emp.setJob((short)1);emp.setEntrydate(LocalDate.of(2000,1,1));emp.setUpdateTime(LocalDateTime.now());emp.setDeptId(1);empMapper.updateById(emp);}运行结果:

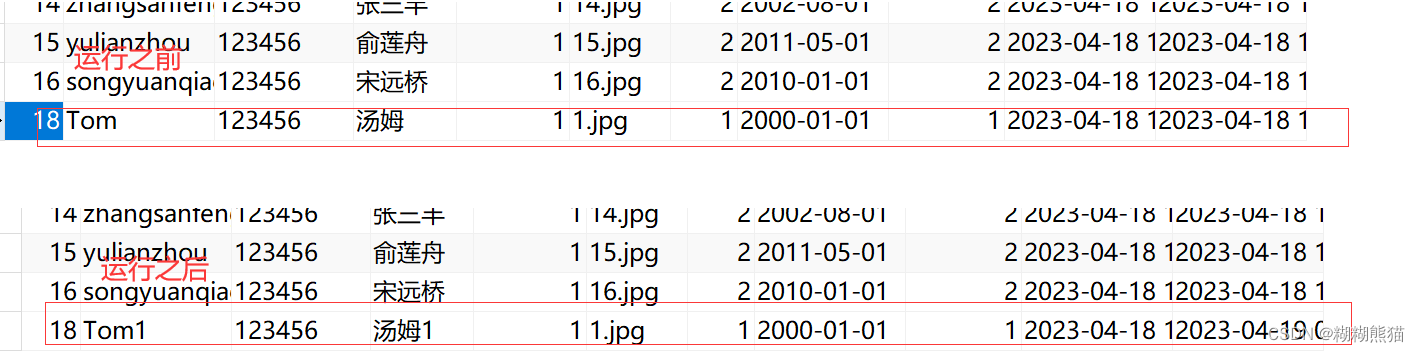
基础操作04-根据ID查询数据
-- 编写SQL接口
// 根据ID查询员工@Select("select * from emp where id = #{id}")public Emp selectById(Integer id);由于返回的是单条数据,所以用Emp类型接收即可
-- 编写测试函数
@Testpublic void TestSelectById(){Emp emp = empMapper.selectById(17);System.out.println(emp);}运行结果:

现在看来输出是有问题的,因为deptId、createTime、updateTime等字段数据库中是有数据的,但是这里没有查询代,这就涉及到了mybatis的自动封装问题。
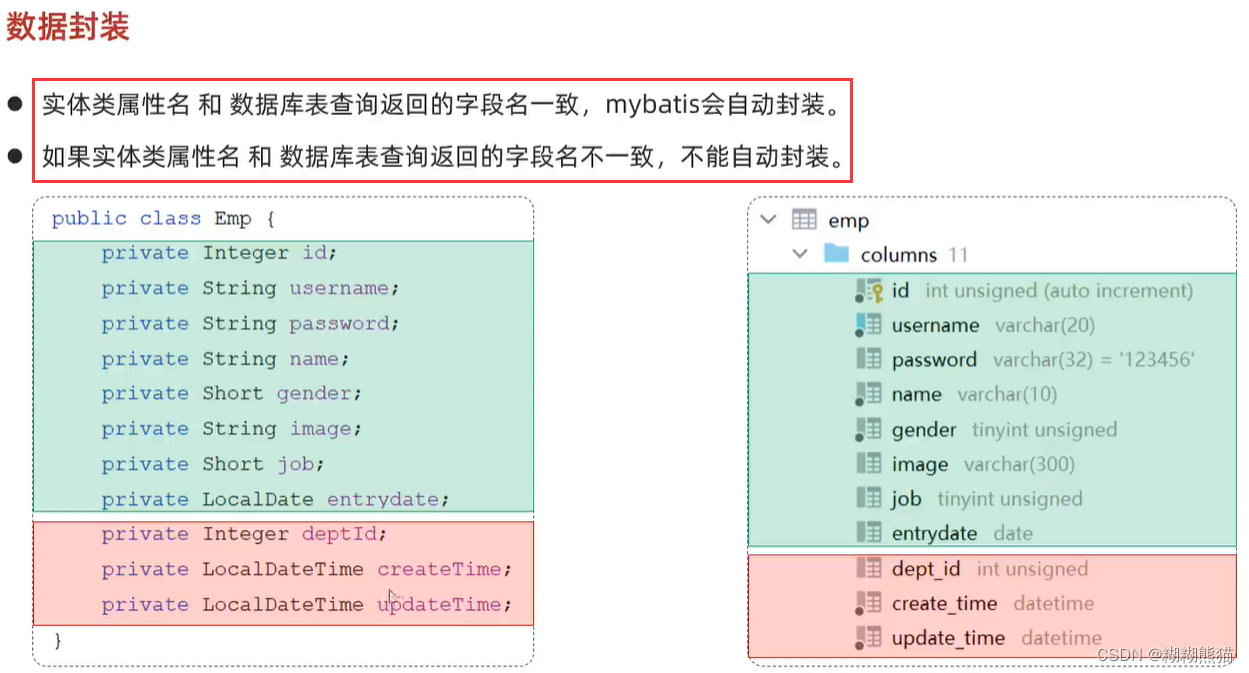
解决方案1: 给字段起别名,让别名与实体类属性一致
修改SQL语句
// 解决方案一:起别名@Select("select id username,password,name,gender,image,job,entrydate," +"dept_id deptId,create_time createTime,update_time updateTime from emp where id = #{id}")public Emp selectById(Integer id);
问题解决。
解决方案二:通过@Results,@Result注解手动映射封装
添加注解:
    @Results({
//            column : 表中字段名      property :类中属性名@Result(column = "dept_id", property = "deptId"),@Result(column = "create_time", property = "createTime"),@Result(column = "update_time", property = "updateTime"),})@Select("select * from emp where id = #{id}")public Emp selectById(Integer id);
解决方案三: 开启mybatis的驼峰命名自动映射开关
在application.properties中添加设置
# 开启mybatis的驼峰命名自动映射开关
mybatis.configuration.map-underscore-to-camel-case = true
完美!
基础操作05-条件查询数据
匹配名字里带张的女士,入职日期在2010.1.1-2020.1.1之间,且结果按入职时间降序排序
-- 编写SQL接口
// 条件查询@Select("select * from emp where name like concat('%',#{name},'%') and gender = #{gender}" +" and entrydate between #{begin} and #{end} order by update_time desc")public List<Emp> select(String name, Short gender, LocalDate begin,LocalDate end);concat() 字符串拼接函数:
concat("Hello","WWW","orld") ----> HelloWWWorld
-- 编写测试类
@Testpublic void testSelect(){List<Emp> empList = empMapper.select("张", (short) 1, LocalDate.of(2010, 1, 1), LocalDate.of(2020, 1, 1));System.out.println(empList);}运行结果:

3、xml配置文件
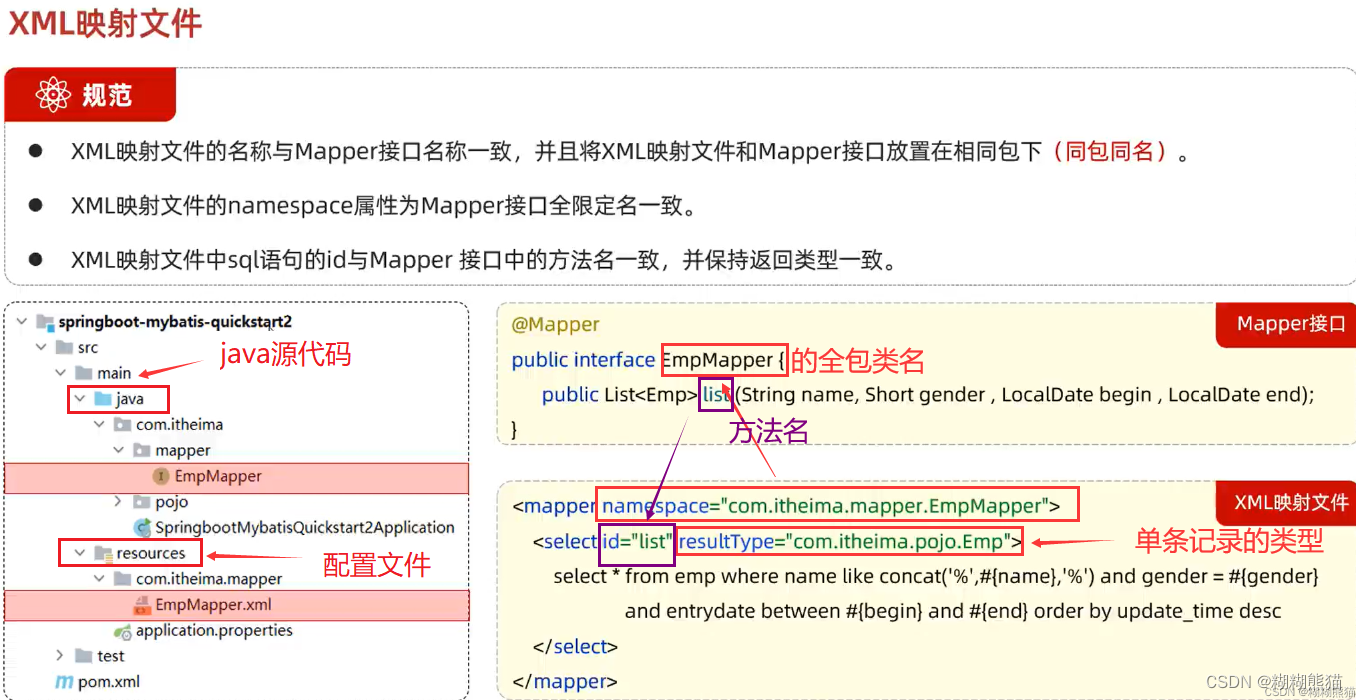
举例:利用xml文件配置--条件查询数据
首先把上一博客的SQL语句注释
public List<Emp> select(String name, Short gender, LocalDate begin,LocalDate end);在Mapper接口相同包下创建xml映射文件,注意文件名与Mapper接口类名保持一致
![]()
注意用`/`隔开不同包
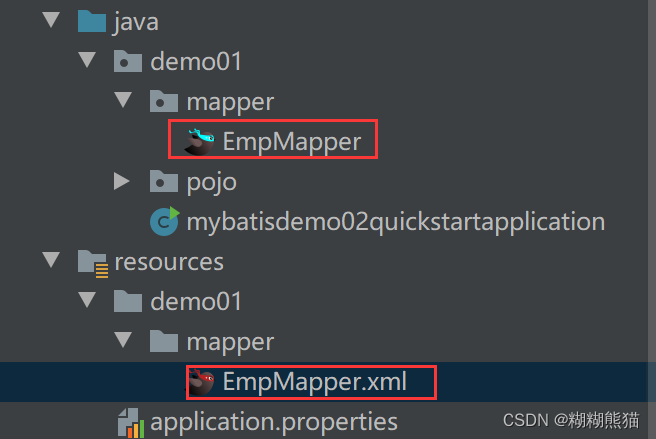
EmpMapper.xml
<?xml version="1.0" encoding="UTF-8" ?>
<!DOCTYPE mapperPUBLIC "-//mybatis.org//DTD Mapper 3.0//EN""http://mybatis.org/dtd/mybatis-3-mapper.dtd">
<mapper namespace="demo01.mapper.EmpMapper"><select id="selectBycondition" resultType="demo01.pojo.Emp">select * from emp where name like concat('%',#{name},'%') and gender = #{gender}and entrydate between #{begin} and #{end} order by update_time desc</select>
</mapper>
运行测试函数
结果与注解配置方式的相同