Qt·DBus快速入门

目录
一、QtDBus简介
二、QtDBus类型系统
1、QtDBus类型系统简介
2、原生类型
3、复合类型
4、类型系统的使用
5、扩展类型系统
三、QtDBus常用类
1、QDBusMessage
2、QDBusConnection
3、QDBusInterface
4、QDBusReply
5、QDBusAbstractAdaptor
6、QDBusAbstractInterface
7、QDBusArgument
8、QDBusConnectionInterface
9、QDBusVariant
四、QtDBus工具
1、qdbusviewer
2、qdbuscpp2xml
3、qdbusxml2cpp
五、QtDBus编程
1、创建服务并注册对象
2、通过QDBusMessage访问Service
3、通过QDBusInterface 访问Service
4、从D-Bus XML自动生成Proxy类
5、使用Adapter注册Object
6、自动启动Service
一、QtDBus简介
QtDBus是一个使用D-Bus协议进行进程间通信的仅在Unix运行的库,是对D-Bus底层API的封装实现。
QtDBus模块提供了使用Qt信号槽机制扩展的接口。要使用QtDBus模块,需要在头文件中加入以下代码:
#include <QtDBus>
如果使用qmake构建程序,需要在工程文件中增加下列代码来链接QtDBus库。
QT += qdbus
本文的编译环境为:银河麒麟V10服务器——Kylin Linux Advanced Server release V10 (Tercel),Kernel: 4.19.90-20.2.ky10.x86_64,Build版本:Kylin Linux Advanced Server release V10 (SP1) /(Tercel)-x86_64-Build08/20200902。开发环境:Qt 5.11.1,编译C/C++使用GCC(x86 64bit)。
在该环境下尝试在pro文件中添加以上qdbus语句会提示找不到模块qdbus,改用QT += dbus后编译通过。
以下是系统中dbus相关包以及版本:
[root@localhost qtcreator]# rpm -qa|grep dbus
dbus-tools-1.12.16-13.ky10.x86_64
python3-pydbus-0.6.0-10.ky10.noarch
dbus-glib-0.110-5.ky10.x86_64
python3-dbus-1.2.8-8.ky10.x86_64
dbus-1.12.16-13.ky10.x86_64
lvm2-dbusd-2.02.181-8.ky10.x86_64
dbus-x11-1.12.16-13.ky10.x86_64
qt5-qdbusviewer-5.11.1-4.p01.ky10.x86_64
python2-dbus-1.2.8-8.ky10.x86_64
dbus-libs-1.12.16-13.ky10.x86_64
dbus-common-1.12.16-13.ky10.noarch
dbus-daemon-1.12.16-13.ky10.x86_64
二、QtDBus类型系统
1、QtDBus类型系统简介
D-Bus提供了一种基于“几种原生类型 与 在数组和结构中的原生类型组成的复合类型"的扩展类型系统。QtDBus模块通过QDBusArgument类实现了该类型系统,允许用户通过总线发送和接收每一种C++类型。
2、原生类型
QtDBus通过QDBusArgument支持原生类型,不需要特殊的定制。
| Qt类型 | D-Bus类型 |
|---|---|
| uchar | BYTE |
| bool | BOOLEAN |
| short | INT16 |
| ushort | UINT16 |
| int | INT32 |
| uint | UINT32 |
| qlonglong | INT64 |
| qulonglong | UINT64 |
| double | DOUBLE |
| QString | STRING |
| QDBusVariant | VARIANT |
| QDBusObjectPath | OBJECT_PATH |
| QDBusSignature | SIGNATURE |
除了原生类型,QDBusArgument也支持在Qt应用中广泛使用的两种非原生类型,QStringList和QByteArray。
3、复合类型
D-Bus指定由原生类型聚合而成的三种复合类型:ARRAY、STRUCT和 maps/dictionaries。ARRAY是零个或多个相同元素的集合,STRUCT是由不同类型的固定数量的元素组成的集合,Maps or dictionaries是元素对的数组,一个map中可以有零个或多个元素。
4、类型系统的使用
为了在QtDBus模块使用自定义类型,自定义类型必须使用Q_DECLARE_METATYPE( )声明为Qt元类型,使用qDBusRegisterMetaType( )函数注册。流操作符会被注册系统自动找到。
QtDBus模块为Qt容器类使用数组和map提供了模板特化,例如QMap和QList,不必实现流操作符函数。对于其它的类型,流操作符必须显示实现。
5、扩展类型系统
QtDBus定义的所有类型能用于通过总线发送和接收消息。不能使用上述类型之外的任何类型,包括typedefs定义的列表类型,如
QList<QVariant> 和 QMap<QString,QVariant>
三、QtDBus常用类
1、QDBusMessage
QDBusMessage类表示D-Bus总线发送或接收的一个消息。
QDBusMessage对象代表总线上四种消息类型中的一种,四种消息类型如下:
A、Method calls
B、Method return values
C、Signal emissions
D、Error codes
可以使用静态函数createError()、createMethodCall()、createSignal()创建消息。使用QDBusConnection::send() 函数发送消息。
2、QDBusConnection
QDBusConnection代表到D-Bus总线的一个连接,是一个D-Bus会话的起始点。通过QDBusConnection连接对象,可以访问远程对象、接口,连接远程信号到本地槽函数,注册对象等。
D-Bus连接通过connectToBus()函数创建,connectToBus()函数会创建一个到总线服务端的连接,完成初始化工作,并关联一个连接名到连接。
使用disconnectFromBus()函数会断开连接。一旦断开连接后,调用connectToBus()函数将不会重建连接,必须创建新的QDBusConnection实例。
作为两种最常用总线类型的辅助,sessionBus()和systemBus()函数分别创建到会话在总线和系统总线的连接并返回,会在初次使用时打开,在QCoreApplication析构函数调用时断开。
D-Bus支持点对点通信,不必使用总线服务。两个应用程序可以直接交流和交换消息。可以通过传递一个地址到connectToBus()函数实现。
以下是常用方法的简介:
QDBusConnection connectToBus(BusType type, const QString & name)
打开一个type类型的连接,并关联name连接名,返回关联本连接的QDBusConnection对象。QDBusConnection connectToBus(const QString & address, const QString & name)
打开一个地址为address的私有总线,并关联name连接名,返回关联本连接的QDBusConnection对象。QDBusConnection connectToPeer(const QString & address, const QString & name)
打开一个点对点的连接到address地址,并关联name连接名,返回关联本连接的QDBusConnection对象。void disconnectFromBus(const QString & name)
关闭名为name的总线连接void disconnectFromPeer(const QString & name)
关闭名为name的对等连接QByteArray localMachineId()
返回一个D-Bus总线系统知道的本机IDQDBusConnection sender()
返回发送信号的连接QDBusConnection sessionBus()
返回一个打开到session总线的QDBusConnection对象QDBusConnection systemBus()
返回一个打开到system总线的QDBusConnection对象QDBusPendingCall asyncCall(const QDBusMessage & message, int timeout = -1)const
发送message消息到连接,并立即返回。本函数只支持method调用。返回一个用于追踪应答的QDBusPendingCall对象。QDBusMessage call(const QDBusMessage & message, QDBus::CallMode mode = QDBus::Block, int timeout = -1 ) const
通过本连接发送消息message,并且阻塞,等待应答。bool registerObject(const QString & path, QObject * object, RegisterOptions options = ExportAdaptors)
注册object对象到路径path,options选项指定由多少对象会被暴露到D-Bus总线,如果注册成功,返回true。bool registerService(const QString & serviceName)
试图在D-Bus总线上注册serviceName服务,如果注册成功,返回true;如果名字已经在其它应用被注册,则注册失败。
3、QDBusInterface
QDBusInterface是远程对象接口的代理。
QDBusInterface是一种通用的访问器类,用于调用远程对象,连接到远程对象导出的信号,获取/设置远程属性的值。当没有生成表示远程接口的生成代码时时,QDBusInterface类对远程对象的动态访问非常有用。
调用通常是通过使用call()函数来实现,call函数构造消息,通过总线发送消息,等待应答并解码应答。信号使用QObject::connect()函数进行连接。最终,使用QObject::property()和QObject::setProperty()函数对属性进行访问。
4、QDBusReply
QDBusReply类用于存储对远程对象的方法调用的应答。
一个QDBusReply对象是方法调用的应答QDBusMessage对象的一个子集。QDBusReply对象只包含第一个输出参数或错误代码,并由QDBusInterface派生类使用,以允许将错误代码返回为函数的返回参数。
QDBusReply<QString> reply = interface->call("RemoteMethod");if (reply.isValid())// use the returned valueuseValue(reply.value());else// call failed. Show an error condition.showError(reply.error());
对于没有输出参数或返回值的远程调用,使用isValid()函数测试应答是否成功。
5、QDBusAbstractAdaptor
QDBusAbstractAdaptor类使用D-Bus Adaptor基类。
QDBusAbstractAdaptor类是用于使用D-Bus向外部提供接口的所有对象的起点。可以通过将一个或多个派生自QDBusAbstractAdaptor的类附加到一个普通QObject对象上,使用QDBusConnection::registerObject注册QObject对象可以实现。QDBusAbstractAdaptor是一个轻量级封装,主要用于中继调用实际对象及其信号。
每个QDBusAbstractAdaptor派生类都应该使用类定义中的Q_CLASSINFO宏来定义D-Bus接口。注意,这种方式只有一个接口可以暴露。
QDBusAbstractAdaptor使用了信号、槽、属性的标准QObject机制来决定哪些信号、槽、属性被暴露到总线。任何QDBusAbstractAdaptor派生类发送的信号通过任何D-Bus连接自动中继到注册的对象上。
QDBusAbstractAdaptor派生类对象必须使用new创建在堆上,不必由用户删除。
6、QDBusAbstractInterface
QDBusAbstractInterface是QtDBus模块中允许访问远程接口的所有D-Bus接口的基类。
自动生成的代码类也继承自QDBusAbstractInterface,此描述的所有方法在生成的代码中也有效。除了此处的描述,生成代码类为远程方法提供了成员函数,允许在编译时检查正确参数和返回值,以及匹配的属性类型和匹配的信号参数。
QDBusPendingCall asyncCall(const QString & method, const QVariant & arg1 = QVariant(), const QVariant & arg2 = QVariant(), const QVariant & arg3 = QVariant(), const QVariant & arg4 = QVariant(),const QVariant & arg5 = QVariant(), const QVariant & arg6 = QVariant(), const QVariant & arg7 = QVariant(), const QVariant & arg8 = QVariant())
调用本接口中的method方法,传递参数到远程的method。
要调用的参数会通过D-Bus输入参数传递到远程方法,返回的QDBusPendingCall对象用于定义应答信息。
本函数最多有8个参数,如果参数多于8个,或是传递可变数量的参数,使用asyncCallWithArgumentList()函数。
QString value = retrieveValue();
QDBusPendingCall pcall = interface->asyncCall(QLatin1String("Process"), value);QDBusPendingCallWatcher *watcher = new QDBusPendingCallWatcher(pcall, this);QObject::connect(watcher, SIGNAL(finished(QDBusPendingCallWatcher*)),this, SLOT(callFinishedSlot(QDBusPendingCallWatcher*)));
7、QDBusArgument
QDBusArgument类用于整理和分发D-Bus参数。QDBusArgument用于通过D-Bus发送参数到远程应用,并接收返回。
QDBusArgument是QtDBus类型系统的核心类,QtDBus类型系统用于解析和原生类型。复合类型可以通过在数组、词典或结构中使用一个或多个原生类型创建。
下列代码展示了使用QtDBus类型系统构造的包含一个整数和字符串的结构。
struct MyStructure{int count;QString name;};Q_DECLARE_METATYPE(MyStructure)
// Marshall the MyStructure data into a D-Bus argument
QDBusArgument &operator<<(QDBusArgument &argument, const MyStructure &mystruct)
{argument.beginStructure();argument << mystruct.count << mystruct.name;argument.endStructure();return argument;
}// Retrieve the MyStructure data from the D-Bus argument
const QDBusArgument &operator>>(const QDBusArgument &argument, MyStructure &mystruct)
{argument.beginStructure();argument >> mystruct.count >> mystruct.name;argument.endStructure();return argument;
}
在QDBusArgument使用这个结构前,必须使用qDBusRegisterMetaType()函数进行注册。因此,在程序中应该则增加如下代码:qDBusRegisterMetaType<MyStructure>();
一旦注册,类型可以在呼出方法调用QDBusAbstractInterface::call()、来自注册对象的信号发射或来自远程应用的传入调用。
8、QDBusConnectionInterface
QDBusConnectionInterface类提供了对D-Bus总线服务的访问。
D-Bus总线服务端中提供了一个特殊的接口org.freedesktop.DBus,允许客户端运行访问总线的某些属性,例如当前连接的客户端列表,QDBusConnectionInterface类提供对org.freedesktop.DBus接口的访问。
本类中最常用的是使用registerService()和unregisterService()在总线上注册和注销服务名。
QDBusConnectionInterface类定义四个信号,在总线上有服务状态变化时发送。
void callWithCallbackFailed(const QDBusError & error, const QDBusMessage & call)
void serviceOwnerChanged(const QString & name, const QString & oldOwner, const QString & newOwner)
void serviceRegistered(const QString & serviceName)
void serviceUnregistered(const QString & serviceName)
9、QDBusVariant
QDBusVariant类使程序员能够识别由D-Bus类型系统提供的Variant类型。一个使用整数、D-Bus变体类型和字符串作为参数的D-Bus函数可以使用如下的参数列表调用。
QList<QVariant> arguments;
arguments << QVariant(42) << QVariant::fromValue(QDBusVariant(43)) << QVariant("hello");
myDBusMessage.setArguments(arguments);
当D-Bus函数返回一个D-Bus变体类型时,可以使用如下方法获取:
// call a D-Bus function that returns a D-Bus variant
QVariant v = callMyDBusFunction();
// retrieve the D-Bus variant
QDBusVariant dbusVariant = qvariant_cast<QDBusVariant>(v);
// retrieve the actual value stored in the D-Bus variant
QVariant result = dbusVariant.variant();
QDBusVariant中的QVariant需要区分一个正常的D-Bus值和一个QDBusVariant中的值。
四、QtDBus工具
1、qdbusviewer
qdbusviewer用于查看D-Bus总线上的服务、对象、接口以及接口的method。使用方法直接在命令行执行:qdbusviewer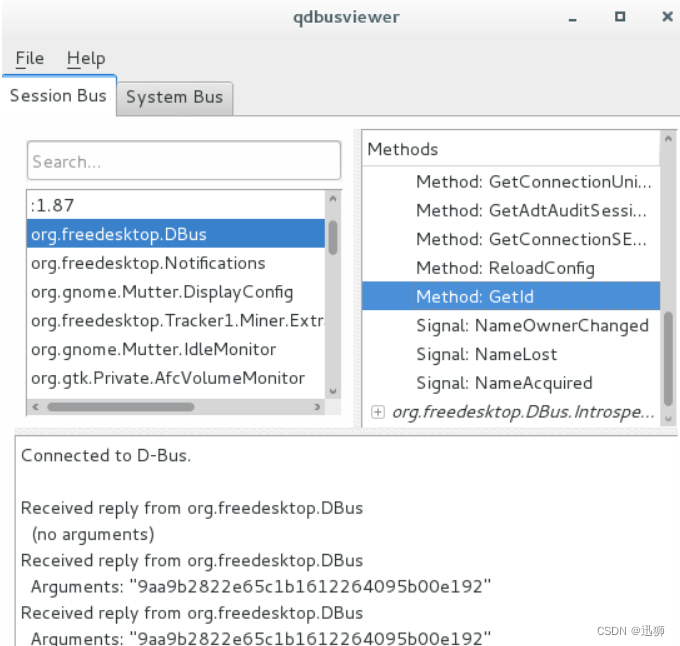
2、qdbuscpp2xml
qdbuscpp2xml会解析QObject派生类的C++头文件或是源文件,生成D-Bus的内省xml文件。qdbuscpp2xml 会区分函数的输入输出,如果参数声明为const则会是输入,否则可能会被当作输出。
qdbuscpp2xml使用语法如下:qdbuscpp2xml [options...] [files...]
Options参数如下:
-p|-s|-m:只解析脚本化的属性、信号、方法(槽函数)
-P|-S|-M:解析所有的属性、信号、方法(槽函数)
-a:输出所有的脚本化内容,等价于-psm
-A:输出所有的内容,等价于-PSM
-o filename:输出内容到filename文件
解析所有的方法输出到spark.test.xml文件命令如下:qdbuscpp2xml -M test.h -o spark.test.xml
<!DOCTYPE node PUBLIC "-//freedesktop//DTD D-BUS Object Introspection 1.0//EN" "http://www.freedesktop.org/standards/dbus/1.0/introspect.dtd">
<node><interface name="com.scorpio.test.value"><method name="maxValue"><arg type="i" direction="out"/></method><method name="minValue"><arg type="i" direction="out"/></method><method name="value"><arg type="i" direction="out"/></method><method name="setValue"><arg name="value" type="i" direction="in"/></method></interface>
</node>
3、qdbusxml2cpp
qdbusxml2cpp根据输入文件中定义的接口,生成C++实现代码。
qdbusxml2cpp可以辅助自动生成继承于QDBusAbstractAdaptor和QDBusAbstractInterface两个类的实现代码,用于进程通信服务端和客户端,简化了开发者的代码设计。
qdbusxml2cpp使用语法如下:qdbusxml2cpp [options...] [xml-or-xml-file] [interfaces...]
Options参数如下:
-a filename:输出Adaptor代码到filename
-c classname:使用classname作为生成类的类名
-i filename:增加#include到输出
-l classname:当生成Adaptor代码时,使用classname作为父类
-m:在cpp文件中包含 #include "filename.moc"语句
-N:不使用名称空间
-p filename:生成Proxy代码到filename文件
解析spark.test.xml文件,生成Adaptor类ValueAdaptor,文件名称为valueAdaptor.h、valueAdaptor.cpp命令行如下:qdbusxml2cpp spark.test.xml -i test.h -a valueAdaptor
解析spark.test.xml文件,生成Proxy类ComScorpioTestValueInterface,文件名称为testInterface.h、testInterface.cpp命令行如下:qdbusxml2cpp spark.test.xml -p testInterface
五、QtDBus编程
分为两个部分,DBus服务和访问DBus服务。
1、创建服务并注册对象
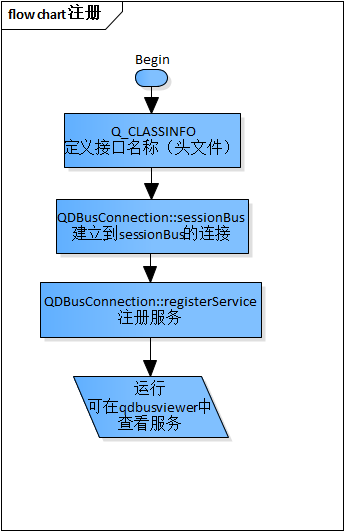
创建DBus服务的大致流程:
test.h文件:
#ifndef TEST_H
#define TEST_H
#include <QObject>
#include <QtDBus>class test: public QObject
{Q_OBJECT
// 这里定义的是DBus连接的接口,client需要这个"spark.test.interface"接口对DBus服务进行访问。Q_CLASSINFO("D-Bus Interface", "spark.test.interface")
public:test(int value);public slots:void set_value(int value);int get_value();
private:int m_value;
};#endif // TEST_H
test.cpp文件:
#include "test.h"test::test(int value)
{m_value = value;
}void test::set_value(int value)
{m_value = value;
}int test::get_value()
{return m_value;
}
main.cpp文件:
#include <QCoreApplication>
#include <QDBusConnection>
#include <QDebug>
#include <QDBusError>
#include "test.h"int main(int argc, char *argv[])
{QCoreApplication a(argc, argv);// 建立到session bus的连接QDBusConnection connection = QDBusConnection::sessionBus();// 在session bus上注册名为spark.test的服务// spark.test是服务的名字,注意和test.h中的接口名字spark.test.interface区别if(!connection.registerService("spark.test")){qDebug() << "error:" << connection.lastError().message();exit(-1);}test test_object(60);// 注册名为/test/test_objects的对象,把类Object所有槽函数导出为object的methodconnection.registerObject("/test/test_objects", &test_object, QDBusConnection::ExportAllSlots);return a.exec();
}
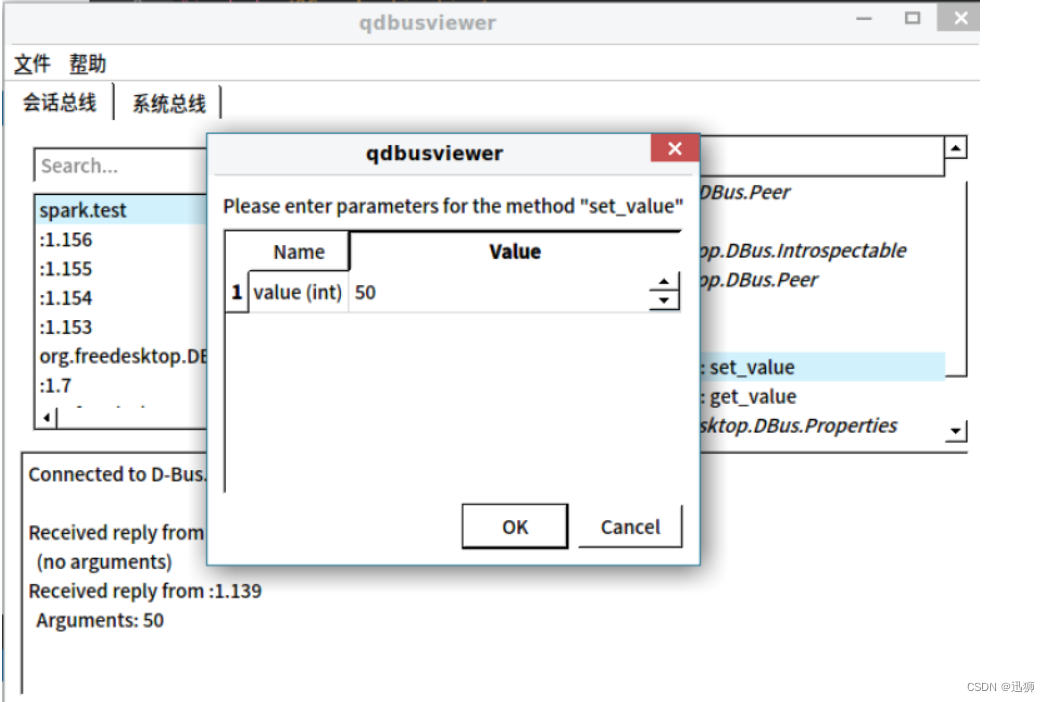
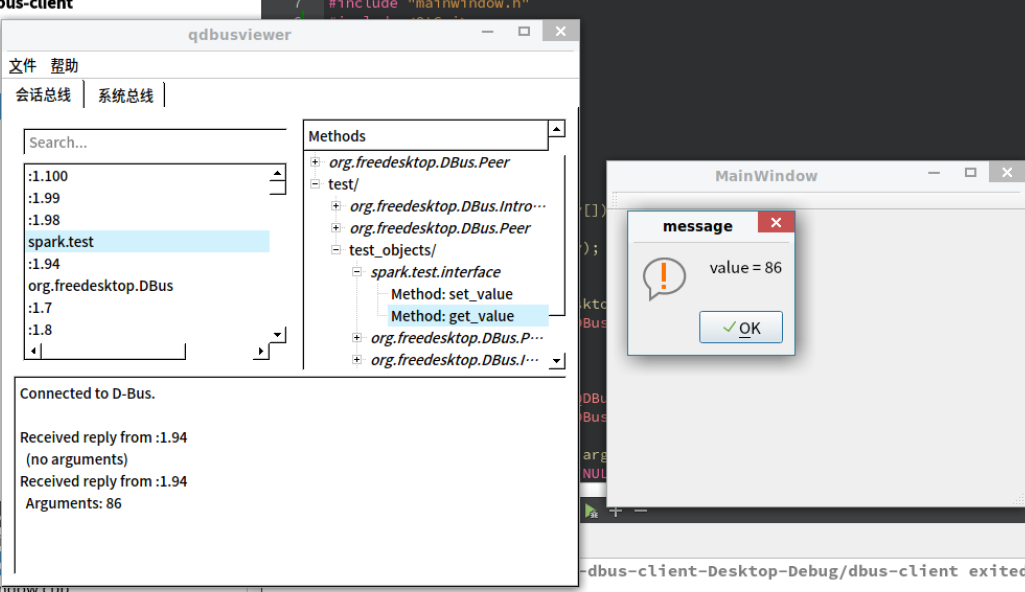
启动程序后,在命令行打开qdbusviewer,查看session bus。
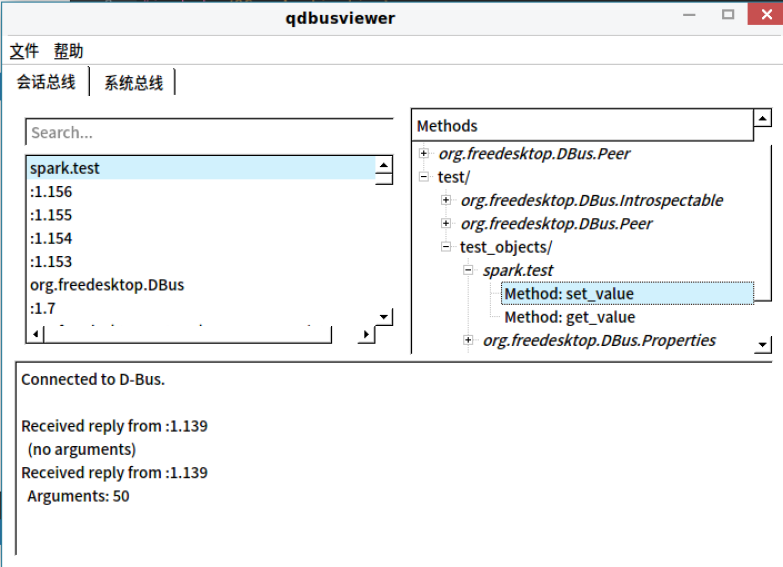
双击Method方法会调用该方法。这里接口类设置为只设置了两个方法,set_value和get_value,可以通过双击调用,设置和获取test类中的m_value属性值。
2、通过QDBusMessage访问Service
本节使用QDBusMessage来访问服务,调用服务的Method方法。
确保spark.test服务运行在总线上,可用qdbusviewer查看。(注释:可以在DBus服务的工程目录下make一个服务的可执行文件,用终端去执行,就可以随时取消掉。分两个步骤:1.qmake-qt5生成Makefile:qmake-qt5 -o Makefile *.pro;2.直接make即可生成可执行文件。)
现在,继续创建一个Qt Widgets Application工程,使用消息访问spark.test服务。
其中main.cpp文件如下:
#include "mainwindow.h"
#include <QtGui>
#include <QApplication>
#include <QDesktopWidget>
#include <QCoreApplication>
#include <QDBusMessage>
#include <QDBusConnection>
#include <QMessageBox>
#include <iostream>
#include <unistd.h>int main(int argc, char *argv[])
{QCoreApplication a(argc, argv);MainWindow w;w.show();// 让MainWindow窗口显示在屏幕中央w.move((QApplication::desktop()->width() - w.width())/2, (QApplication::desktop()->height() - w.height())/2);// 构造一个method_call消息,服务名称为:spark.test,对象路径为:/test/test_objects// 接口名称为spark.test.interface,method名称为get_value。注意这里信息不能填错,如果接口名或Method名不正确就无法正常通信和调用。QDBusMessage message = QDBusMessage::createMethodCall("spark.test","/test/test_objects","spark.test.interface","get_value");//发送消息QDBusMessage response = QDBusConnection::sessionBus().call(message);//判断method是否被正确返回if (response.type() == QDBusMessage::ReplyMessage){//从返回参数获取返回值int value = response.arguments().takeFirst().toInt();QMessageBox::warning(NULL, "message", QObject::tr("value = %1").arg(value));}else{QMessageBox::warning(NULL, "error", QObject::tr("value method called failed!"));}return a.exec();
}
运行结果:
3、通过QDBusInterface 访问Service
继续创建一个Qt Widgets Application工程,使用接口访问spark.test服务。
#include "mainwindow.h"
#include <QtGui>
#include <QApplication>
#include <QDesktopWidget>
#include <QCoreApplication>
#include <QDBusMessage>
#include <QDBusConnection>
#include <QDBusInterface>
#include <QMessageBox>
#include <QDBusReply>
#include <iostream>
#include <unistd.h>int main(int argc, char *argv[])
{QCoreApplication a(argc, argv);// 创建QDBusInterface接口QDBusInterface interface("spark.test", 									             "/test/test_objects","spark.test.interface",QDBusConnection::sessionBus());if (!interface.isValid()){QString mes = QDBusConnection::sessionBus().lastError().message();QMessageBox::warning(NULL, "message", QObject::tr("lastError = %1").arg(mes));exit(1);}// 调用远程的get_value方法。// Todo: set_value带参数方法测试无效,需进一步研究QDBusReply<int> reply = interface.call("get_value");if (reply.isValid()){int value = reply.value();QMessageBox::warning(NULL, "message", QObject::tr("value = %1").arg(value));}else{QMessageBox::warning(NULL, "message", QObject::tr("value method called failed!"));}return a.exec();
}
代码运行结果同上一小节。
目前上面两种访问DBus的方法,使用带参数的set_value方法均无效,需要进一步研究如何使用。
4、从D-Bus XML自动生成Proxy类
Proxy Object提供了一种更加直观的方式来访问Service,如同调用本地对象的方法一样。
生成Proxy类的流程如下:
A、使用工具qdbuscpp2xml从object.h生成XML文件;qdbuscpp2xml -M test.h -o spark.test.xml
<!DOCTYPE node PUBLIC "-//freedesktop//DTD D-BUS Object Introspection 1.0//EN" "http://www.freedesktop.org/standards/dbus/1.0/introspect.dtd">
<node><interface name="com.scorpio.test.value"><method name="maxValue"><arg type="i" direction="out"/></method><method name="minValue"><arg type="i" direction="out"/></method><method name="value"><arg type="i" direction="out"/></method></interface>
</node>
B、使用工具qdbusxml2cpp从XML文件生成继承自QDBusInterface的类qdbusxml2cpp spark.test.xml -p valueInterface
生成两个文件:valueInterface.cpp和valueInterface.h
valueInterface.h文件:
/*
* This file was generated by qdbusxml2cpp version 0.7
* Command line was: qdbusxml2cpp com.scorpio.test.xml -p testInterface
*
* qdbusxml2cpp is Copyright (C) 2013 Digia Plc and/or its subsidiary(-ies).
*
* This is an auto-generated file.
* Do not edit! All changes made to it will be lost.
*/
#ifndef TESTINTERFACE_H_1526737677
#define TESTINTERFACE_H_1526737677
#include <QtCore/QObject>
#include <QtCore/QByteArray>
#include <QtCore/QList>
#include <QtCore/QMap>
#include <QtCore/QString>
#include <QtCore/QStringList>
#include <QtCore/QVariant>
#include <QtDBus/QtDBus>
/*
* Proxy class for interface com.scorpio.test.value
*/
class ComScorpioTestValueInterface:
public QDBusAbstractInterface
{
Q_OBJECTpublic:static inline const char *staticInterfaceName(){return "com.scorpio.test.value";}
public:ComScorpioTestValueInterface(const QString &service, const QString &path, const QDBusConnection &connection, QObject *parent = 0);~ComScorpioTestValueInterface();
public Q_SLOTS: // METHODSinline QDBusPendingReply<int> maxValue(){QList<QVariant> argumentList;return asyncCallWithArgumentList(QLatin1String("maxValue"), argumentList);}inline QDBusPendingReply<int> minValue(){QList<QVariant> argumentList;return asyncCallWithArgumentList(QLatin1String("minValue"), argumentList);}inline QDBusPendingReply<int> value(){QList<QVariant> argumentList;return asyncCallWithArgumentList(QLatin1String("value"), argumentList);}
Q_SIGNALS: // SIGNALS};namespace com
{namespace scorpio{namespace test{typedef ::ComScorpioTestValueInterface value;}}
}
#endif
valueInterface.cpp文件:
/ This file was generated by qdbusxml2cpp version 0.7* Command line was: qdbusxml2cpp com.scorpio.test.xml -p testInterface qdbusxml2cpp is Copyright (C) 2013 Digia Plc and/or its subsidiary(-ies). This is an auto-generated file.* This file may have been hand-edited. Look for HAND-EDIT comments* before re-generating it.*/#include "testInterface.h"/ Implementation of interface class ComScorpioTestValueInterface*/ComScorpioTestValueInterface::ComScorpioTestValueInterface(const QString &service, const QString &path, const QDBusConnection &connection, QObject *parent): QDBusAbstractInterface(service, path, staticInterfaceName(), connection, parent)
{
}ComScorpioTestValueInterface::~ComScorpioTestValueInterface()
{
}
调用Proxy类访问Service如下:
#include <QCoreApplication>
#include <QDBusMessage>
#include <QDBusConnection>
#include <QDBusReply>
#include <QDBusInterface>
#include <QDebug>
#include "testInterface.h"int main(int argc, char *argv[])
{QCoreApplication a(argc, argv);// 初始化自动生成的Proxy类com::scorpio::test::valuecom::scorpio::test::value test("com.scorpio.test","/test/test_objects",QDBusConnection::sessionBus());// 调用value方法QDBusPendingReply<int> reply = test.value();//qdbusxml2cpp生成的Proxy类是采用异步的方式来传递Message,//所以需要调用waitForFinished来等到Message执行完成reply.waitForFinished();if (reply.isValid()){int value = reply.value();qDebug() << QString("value =  %1").arg(value);}else{qDebug() << "value method called failed!";}return a.exec();
}
5、使用Adapter注册Object
可以直接把test类注册为消息总线上的一个Object,但QT4不推荐。QT4推荐使用Adapter来注册Object。
大多数情况下,可能只需要把自定义的类里的方法有选择的发布到消息总线上,使用Adapter可以很方便的实现选择性发布。
生成Adapter类的流程如下:
A、使用工具 qdbuscpp2xml从test.h生成XML文件qdbuscpp2xml -M test.h -o spark.test.xml
B、编辑spark.test.xml,选择需要发布的method,不需要发布的删除。
C、使用工具qdbusxml2cpp从XML文件生成继承自QDBusInterface的类qdbusxml2cpp spark.test.xml -i test.h -a valueAdaptor
生成两个文件:valueAdaptor.cpp和valueAdaptor.h
valueAdaptor.h文件:
/ This file was generated by qdbusxml2cpp version 0.7* Command line was: qdbusxml2cpp com.scorpio.test.xml -i test.h -a valueAdaptor qdbusxml2cpp is Copyright (C) 2013 Digia Plc and/or its subsidiary(-ies). This is an auto-generated file.* This file may have been hand-edited. Look for HAND-EDIT comments* before re-generating it.*/#ifndef VALUEADAPTOR_H_1526742670
#define VALUEADAPTOR_H_1526742670#include <QtCore/QObject>
#include <QtDBus/QtDBus>
#include "test.h"
class QByteArray;
template<class T> class QList;
template<class Key, class Value> class QMap;
class QString;
class QStringList;
class QVariant;/ Adaptor class for interface com.scorpio.test.value*/
class ValueAdaptor: public QDBusAbstractAdaptor
{Q_OBJECTQ_CLASSINFO("D-Bus Interface", "com.scorpio.test.value")Q_CLASSINFO("D-Bus Introspection", ""
"  <interface name=\\"com.scorpio.test.value\\">\\n"
"    <method name=\\"maxValue\\">\\n"
"      <arg direction=\\"out\\" type=\\"i\\"/>\\n"
"    </method>\\n"
"    <method name=\\"minValue\\">\\n"
"      <arg direction=\\"out\\" type=\\"i\\"/>\\n"
"    </method>\\n"
"  </interface>\\n""")
public:ValueAdaptor(QObject *parent);virtual ~ValueAdaptor();public: // PROPERTIES
public Q_SLOTS: // METHODSint maxValue();int minValue();
Q_SIGNALS: // SIGNALS
};#endif
valueAdaptor.cpp文件:
/ This file was generated by qdbusxml2cpp version 0.7* Command line was: qdbusxml2cpp com.scorpio.test.xml -i test.h -a valueAdaptor qdbusxml2cpp is Copyright (C) 2013 Digia Plc and/or its subsidiary(-ies). This is an auto-generated file.* Do not edit! All changes made to it will be lost.*/#include "valueAdaptor.h"
#include <QtCore/QMetaObject>
#include <QtCore/QByteArray>
#include <QtCore/QList>
#include <QtCore/QMap>
#include <QtCore/QString>
#include <QtCore/QStringList>
#include <QtCore/QVariant>/ Implementation of adaptor class ValueAdaptor*/ValueAdaptor::ValueAdaptor(QObject *parent): QDBusAbstractAdaptor(parent)
{// constructorsetAutoRelaySignals(true);
}ValueAdaptor::~ValueAdaptor()
{// destructor
}int ValueAdaptor::maxValue()
{// handle method call com.scorpio.test.value.maxValueint out0;QMetaObject::invokeMethod(parent(), "maxValue", Q_RETURN_ARG(int, out0));return out0;
}int ValueAdaptor::minValue()
{// handle method call com.scorpio.test.value.minValueint out0;QMetaObject::invokeMethod(parent(), "minValue", Q_RETURN_ARG(int, out0));return out0;
}
调用Adaptor类注册Object对象如下:
#include <QCoreApplication>
#include <QDBusConnection>
#include <QDebug>
#include <QDBusError>
#include "test.h"
#include "valueAdaptor.h"int main(int argc, char *argv[])
{QCoreApplication a(argc, argv);QDBusConnection connection = QDBusConnection::sessionBus();test object(60);//ValueAdaptor是qdbusxml2cpp生成的Adaptor类ValueAdaptor valueAdaptor(&object);if (!connection.registerService("com.scorpio.test")){qDebug() << connection.lastError().message();exit(1);}connection.registerObject("/test/test_objects", &object);return a.exec();
}
使用qdbusviewer查看发布的method。

6、自动启动Service
D-Bus系统提供了一种机制可以在访问某个service时,自动把应用程序运行起来。
需要在/usr/share/dbus-1/services下面建立spark.test.service文件,文件的内容如下:
[D-BUS Service]
Name=com.scorpio.test
Exec=/path/to/scorpio/test
在访问test的method前,不必手动运行应用程序。