HBase安装

文章目录
- 一、安装Zookeeper
- 二、安装HBase
- 三、启动Hbase步骤
- 四、关闭进程顺序
- 五、简单使用Hbase
在开始安装HBase之前,请确保您已经安装了Java运行环境和Hadoop分布式文件系统。如果您还没有安装这些软件,请查看之前博文介绍安装。
HBase安装包:
链接:https://pan.baidu.com/s/1MB1y7HCjgYPaiG3vo4jgkQ
提取码:c59o将安装包放入Centos的/opt/install目录下
一、安装Zookeeper
# 解压zookeeper
tar -zxf /opt/install/zookeeper-3.4.5-cdh5.14.2.tar.gz -C /opt/soft/
# 修改目录名
mv /opt/soft/zookeeper-3.4.5-cdh5.14.2/ /opt/soft/zk345
# 还原配置文件
cp /opt/soft/zk345/conf/zoo_sample.cfg /opt/soft/zk345/conf/zoo.cfg
# 修改配置文件
vim /opt/soft/zk345/conf/zoo.cfg
zoo.cfg(主要修改数据目录和zookeeper服务器id和端口)
# The number of milliseconds of each tick
tickTime=2000
# The number of ticks that the initial
# synchronization phase can take
initLimit=10
# The number of ticks that can pass between
# sending a request and getting an acknowledgement
syncLimit=5
# the directory where the snapshot is stored.
# do not use /tmp for storage, /tmp here is just
# example sakes.
 设置数据目录 ##
dataDir=/opt/soft/zk345/datatmp
# the port at which the clients will connect
clientPort=2181
# the maximum number of client connections.
# increase this if you need to handle more clients
#maxClientCnxns=60
#
# Be sure to read the maintenance section of the
# administrator guide before turning on autopurge.
#
# http://zookeeper.apache.org/doc/current/zookeeperAdmin.html#sc_maintenance
#
# The number of snapshots to retain in dataDir
#autopurge.snapRetainCount=3
# Purge task interval in hours
# Set to "0" to disable auto purge feature
#autopurge.purgeInterval=1
 设置zookeeper服务器id和端口
server.0=192.168.136.144:2287:3387
# 创建设置数据目录
mkdir -p /opt/soft/zk345/datatmp
# 加入myid
echo '0' > /opt/soft/zk345/datatmp/myid
# 修改系统环境变量文件(将环境变量加入文件)
vim /etc/profile# ZOOKEEPER_HOMEexport ZOOKEEPER_HOME=/opt/soft/zk345export PATH=$PATH:$ZOOKEEPER_HOME/bin
二、安装HBase
# 解压HBase
tar -zxf /opt/install/hbase-2.3.5-bin.tar.gz -C /opt/soft/
# 修改HBase目录
mv /opt/soft/hbase-2.3.5/ /opt/soft/hbase235
# 修改env文件
vim /opt/soft/hbase235/conf/hbase-env.sh28行删除#号,修改为自己的JAVA路径126行true修改为false,不使用hbase内置zookeeper
# 修改site文件
vim /opt/soft/hbase235/conf/hbase-site.xml
hbase-site.xml
<?xml version="1.0"?>
<?xml-stylesheet type="text/xsl" href="configuration.xsl"?><configuration><property><name>hbase.rootdir</name><value>hdfs://192.168.136.144:9000/hbase</value><description>Hbase存放路径</description></property><property><name>hbase.zookeeper.property.dataDir</name><value>/opt/soft/zk345/datatmp</value><description>hbase数据目录</description></property><property><name>hbase.cluster.distributed</name><value>true</value><description>hbase是否为集群分布</description></property><property><name>hbase.zookeeper.property.clientPort</name><value>2181</value><description>客户端端口</description></property><property><name>hbase.tmp.dir</name><value>/opt/soft/hbase235/tmp</value><description>hbase临时文件目录</description></property><property><name>hbase.unsafe.stream.capability.enforce</name><value>false</value><description>避免hbase启动出错</description></property>
</configuration>
# 修改系统环境变量(将HBase环境变量放入文件中)
vim /etc/profile# HBASE_HOMEexport HBASE_HOME=/opt/soft/hbase235export PATH=$PATH:$HBASE_HOME/bin
三、启动Hbase步骤
- 启动Hadoop: start-all.sh
- 启动Zookeeper: zkServer.sh start
- 启动Hbase: start-hbase.sh
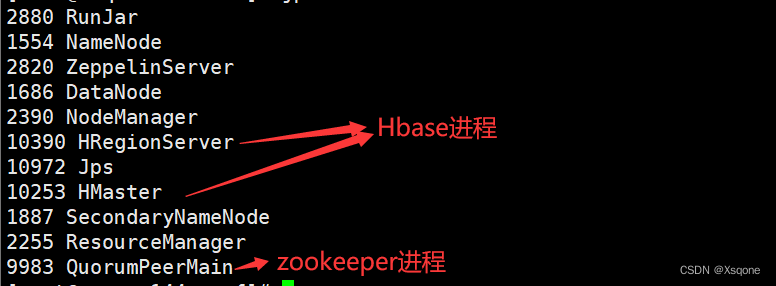
启动后使用jps后看到HMaster和HReginServer就OK了
四、关闭进程顺序
- 关闭hbase: stop-hbase.sh
- 关闭zookeeper: zkServer.sh stop
- 关闭hadoop: stop-all.sh
五、简单使用Hbase
- 进入Hbase客户端: hbase shell
- 查看版本: version
- 查看命名空间: list_namespace
- 查看命名空间下的表: list_namespace_table ‘命名空间名’
- 创建命名空间: create_namespace ‘命名空间名’
- 删除命名空间: drop_namespace ‘命名空间名’