SpringBoot源码分析

SpringBoot源码分析
- 1.启动类分析
- 2.SpringBoot的项目启动流程
-
- 1.SpringApplication构造函数
-
- 1)deduceFromClasspath()
- 2)getSpringFactoriesInstances
-
- 2.1)loadFactoryNames加载类名称
- 2.2)createSpringFactoriesInstances创建实例
- 2.run方法
- 3.SpringBoot自动配置的原理
-
- 1.@SpringBootConfiguration
- 2.@ComponentScan
- 3.@EnableAutoConfiguration
- 4.@EnableAutoConfiguration
-
- 4.1.@Import
- 4.2.ImportSelector接口
- 4.3.AutoConfigurationImportSelector
-
- 1)selectImports
- 2)加载并过滤自动配置
- 3)getCandidateConfigurations 加载自动配置
- 4.4.加载到的配置如何筛选
- 4.SpringBoot学习总结
-
-
- 4.1.SpringBoot是做什么的?
- 4.2.SpringBoot自动装配是什么?解决了什么问题
- 4.2.SpringBoot的启动流程
- 4.3.SpringBoot自动配置原理
-
面试的时候,面试官经常会问几个问题:
- SpringBoot是做什么的吗?
- SpringBoot的项目启动流程?
- SpringBoot自动配置的原理呢?
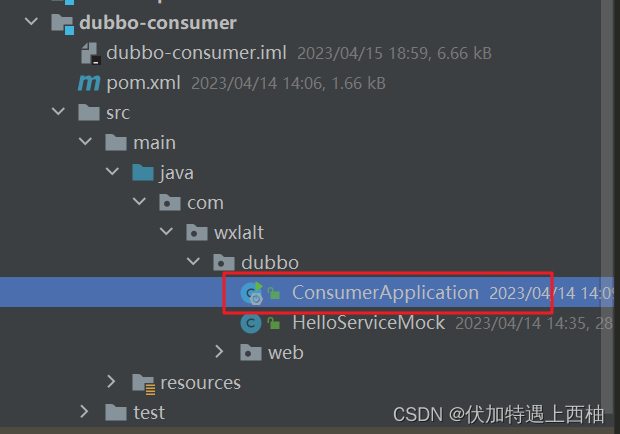
1.启动类分析
项目的入口是带有main函数的启动类:ConsumerApplication
@SpringBootApplication
public class ConsumerApplication {public static void main(String[] args) {SpringApplication.run(ConsumerApplication.class,args);}
}这里跟SpringBoot有关联的部分有两个,
一个是SpringApplication.run(BankApplication.class, args);,
一个就是启动类上的注解:@SpringBootApplication。
我们分别跟踪两部分内容。
2.SpringBoot的项目启动流程
main函数中的SpringApplication.run(ConsumerApplication.class,args);就是项目的入口,也是Spring加载的完整过程,我们从这里开始。
首先跟入run方法,流程如图:
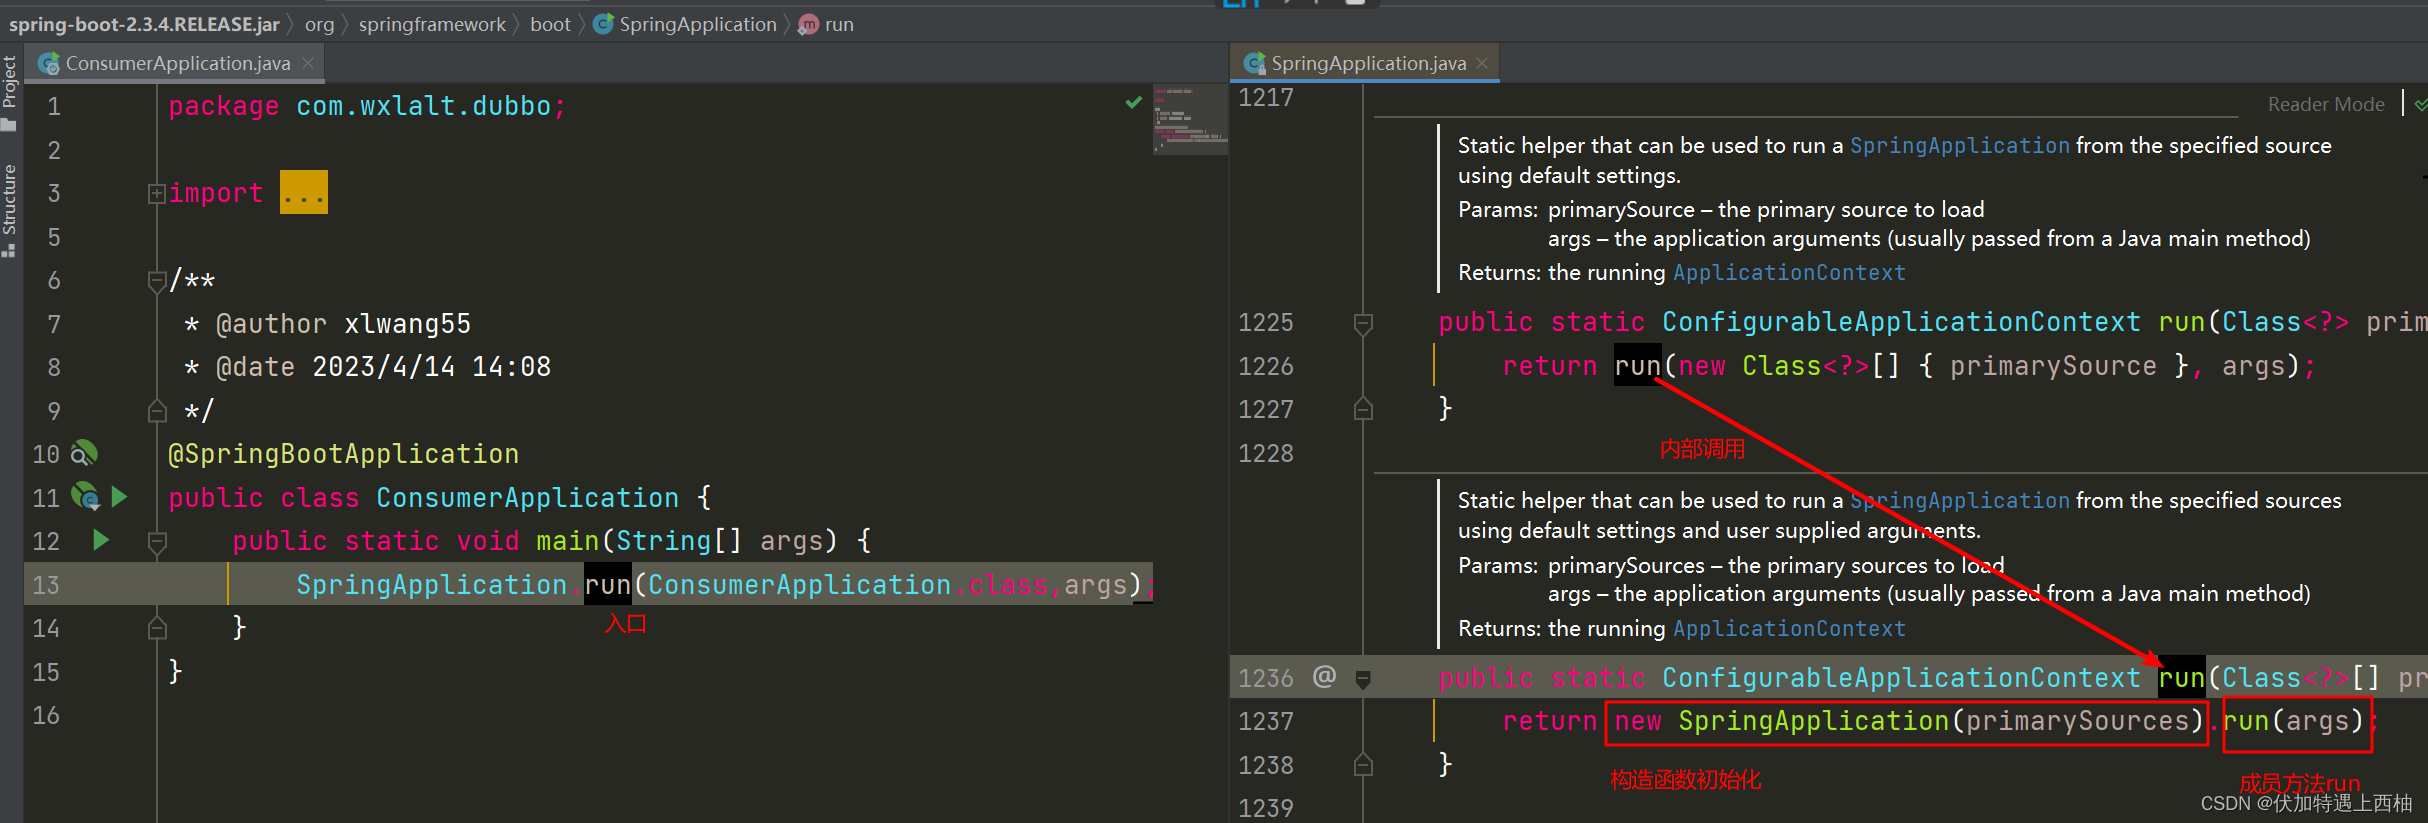
因此,接下来要看的是两部分:
new SpringApplication(primarySources):构造函数初始化run(args):成员的run方法
1.SpringApplication构造函数
构造函数有关的几个变量和方法提取出来,方便查看:
// SpringApplication.java/* 资源加载器,读取classpath下的文件*/
private ResourceLoader resourceLoader;
/* SpringBoot核心配置类的集合,这里只有一个元素,是我们传入的主函数*/
private Set<Class<?>> primarySources;
/* 当前项目的应用类型*/
private WebApplicationType webApplicationType;/* ApplicationContextInitializer 数组*/
private List<ApplicationContextInitializer<?>> initializers;
/* ApplicationListener 数组*/
private List<ApplicationListener<?>> listeners;public SpringApplication(Class<?>... primarySources) {this(null, primarySources);
}
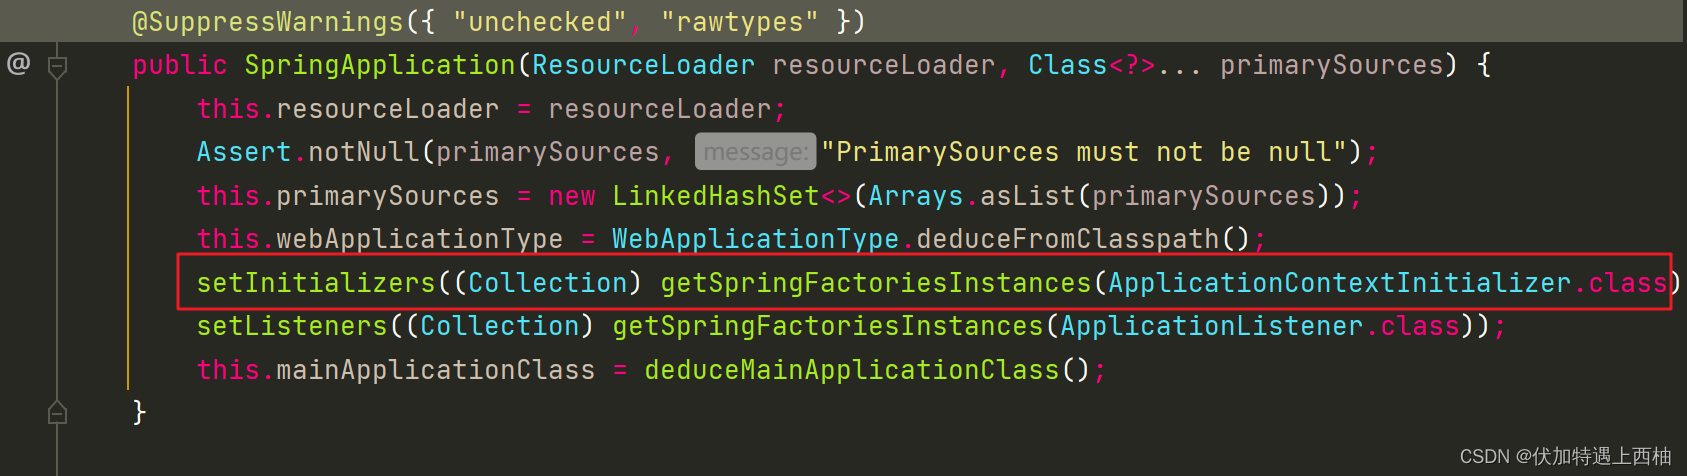
// 核心构造函数
public SpringApplication(ResourceLoader resourceLoader, Class<?>... primarySources) {// 1.记录资源加载器this.resourceLoader = resourceLoader;Assert.notNull(primarySources, "PrimarySources must not be null");// 2.将传入的启动类装入集合this.primarySources = new LinkedHashSet<>(Arrays.asList(primarySources));// 3.判断当前项目的类型,可以是SERVLET、REACTIVE、NONEthis.webApplicationType = WebApplicationType.deduceFromClasspath();// 4.初始化 initializers 数组setInitializers((Collection) getSpringFactoriesInstances(ApplicationContextInitializer.class));// 5.初始化 listeners 数组setListeners((Collection) getSpringFactoriesInstances(ApplicationListener.class));this.mainApplicationClass = deduceMainApplicationClass();
}
解读:
1.ResourceLoader resourceLoader:Spring中用来加载资源的加载器2.Class<?>... primarySources:这里是启动类,本例中就是ConsumerApplication3. WebApplicationType.deduceFromClasspath():判断当前项目的类型,可以是SERVLET、REACTIVE、NONE,根据当前classpath中包含的class来判断,会影响后续创建的ApplicationContext的类型4. getSpringFactoriesInstances(ApplicationContextInitializer.class):获取ApplicationContextInitializer类型的实现类对象数组5. getSpringFactoriesInstances(ApplicationListener.class):获取ApplicationListener类型的实现类对象数组deduceMainApplicationClass():没有实际用途,打印日志,输出当前启动类名称
我们只看难点部分,也就是步骤3、4、5
1)deduceFromClasspath()
判断项目类型:
static WebApplicationType deduceFromClasspath() {if (ClassUtils.isPresent(WEBFLUX_INDICATOR_CLASS, null) && !ClassUtils.isPresent(WEBMVC_INDICATOR_CLASS, null)&& !ClassUtils.isPresent(JERSEY_INDICATOR_CLASS, null)) {return WebApplicationType.REACTIVE;}for (String className : SERVLET_INDICATOR_CLASSES) {if (!ClassUtils.isPresent(className, null)) {return WebApplicationType.NONE;}}return WebApplicationType.SERVLET;}
可以看到判断结果包含3种:
REACTIVE:要求classpath中包含org.springframework.web.reactive.DispatcherHandler,这个是WebFlux中的核心处理器,我们并没有。SERVLET:要求classpath中包含org.springframework.web.servlet.DispatcherServlet,应用程序应作为基于 servlet 的 Web 应用程序运行,并应启动嵌入式 servlet Web 服务器。这是SpringMVC的核心控制器,在classpath中肯定可以找到NONE:以上都不满足,就是NONE
2)getSpringFactoriesInstances
在构造函数中被调用了两次,分别加载ApplicationContextInitializer和ApplicationListener:
getSpringFactoriesInstances(Class<T> type) 方法的作用是获得指定接口的实现类的实例集合。
private <T> Collection<T> getSpringFactoriesInstances(Class<T> type) {// 调用下面的一个重载方法,参数type就是接口的类型return getSpringFactoriesInstances(type, new Class<?>[] {});
}
// 真正的处理逻辑
private <T> Collection<T> getSpringFactoriesInstances(Class<T> type, Class<?>[] parameterTypes, Object... args) {ClassLoader classLoader = getClassLoader();// 1.先加载指定接口的实现类的名称集合Set<String> names = new LinkedHashSet<>(SpringFactoriesLoader.loadFactoryNames(type, classLoader));// 2.根据类的名称,创建实例对象List<T> instances = createSpringFactoriesInstances(type, parameterTypes, classLoader, args, names);// 3.排序AnnotationAwareOrderComparator.sort(instances);return instances;
}
这里关键是第1步中,调用SpringFactoriesLoader.loadFactoryNames(type, classLoader)方法,是用来获取指定接口的实现类的名称字符串,而后就可以根据名称创建实例了。
例如我们传递的参数是:ApplicationContextInitializer.class,那么获取的就是ApplicationContextInitializer下面的实现类的名称字符串集合。
那么这里是如何根据接口找到对应的实现类名称呢?
2.1)loadFactoryNames加载类名称
那么loadFactoryNames是如何根据接口找到对应的实现类名称呢,继续跟入:
SpringFactoriesLoader.loadFactoryNames(type, classLoader)方法:
// SpringFactoriesLoader
/* 使用指定的类加载器,加载{@value #FACTORIES_RESOURCE_LOCATION}中记录的,指定factoryClass* 类型的实现类的全路径名。* @param factoryClass 需要加载的接口或抽象类* @param classLoader 用来加载资源的类加载器*/
public static List<String> loadFactoryNames(Class<?> factoryClass, @Nullable ClassLoader classLoader) {// 获取接口名称String factoryClassName = factoryClass.getName();// 从loadSpringFactories(classLoader)方法返回的是一个Map:key是接口名称字符串,值是实现类的名称集合// 然后就可以调用map的get方法,根据factoryClass名称获取对应的实现类名称数组return loadSpringFactories(classLoader).getOrDefault(factoryClassName, Collections.emptyList());
}
注意到这里是先调用loadSpringFactories(classLoader)方法,此方法方法返回的是一个Map:key是接口名称字符串,值是实现类的名称集合。
那么,loadSpringFactories方法是如何读取到这样的map呢?代码如下:
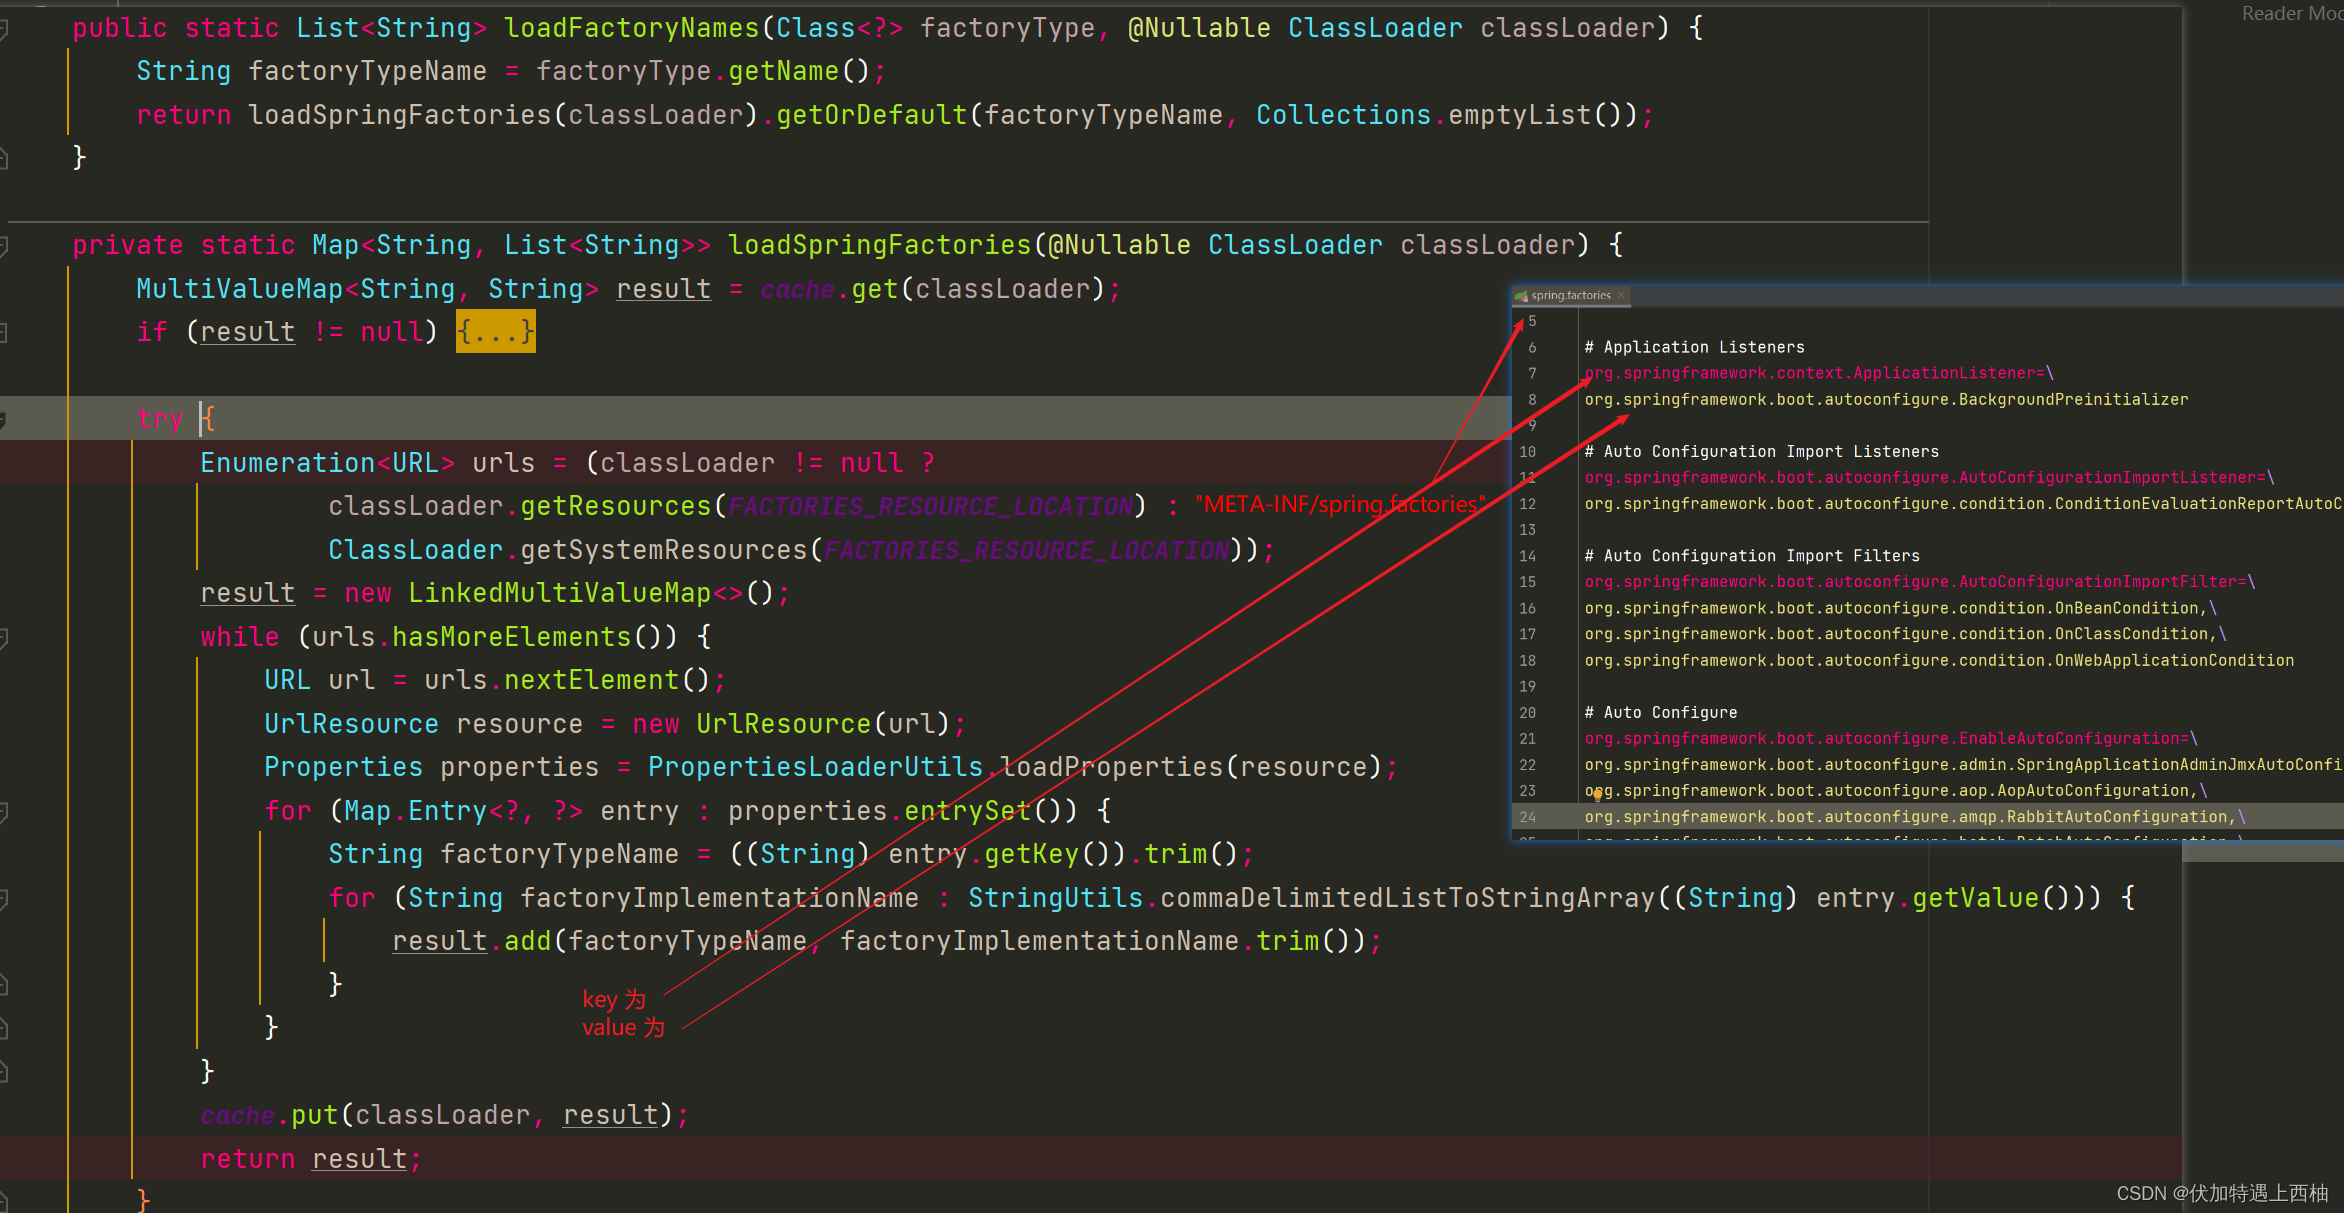
private static Map<String, List<String>> loadSpringFactories(@Nullable ClassLoader classLoader) {// 尝试从缓存中获取结果MultiValueMap<String, String> result = cache.get(classLoader);if (result != null) {return result;}try {// 从默认路径加载资源文件,地址是:"META-INF/spring.factories"Enumeration<URL> urls = (classLoader != null ?classLoader.getResources(FACTORIES_RESOURCE_LOCATION) :ClassLoader.getSystemResources(FACTORIES_RESOURCE_LOCATION));// 创建空mapresult = new LinkedMultiValueMap<>();// 遍历资源路径while (urls.hasMoreElements()) {// 获取某个路径URL url = urls.nextElement();UrlResource resource = new UrlResource(url);// 加载文件内容,文件中是properties格式,key是接口名,value是实现类的名称以,隔开Properties properties = PropertiesLoaderUtils.loadProperties(resource);for (Map.Entry<?, ?> entry : properties.entrySet()) {// 获取key的 名称String factoryClassName = ((String) entry.getKey()).trim();// 将实现类字符串变成数组并遍历,然后添加到结果result中for (String factoryName : StringUtils.commaDelimitedListToStringArray((String) entry.getValue())) {result.add(factoryClassName, factoryName.trim());}}}// 缓存中放一份,下次再加载可以从缓存中读取cache.put(classLoader, result);return result;}catch (IOException ex) {throw new IllegalArgumentException("Unable to load factories from location [" +FACTORIES_RESOURCE_LOCATION + "]", ex);}
}
这个方法是利用ClassLoader加载classpath下的所有的/META-INF/spring.factories文件。注意:所有jar包都会被扫描和查找。
例如,在spring-boot的jar包中,就有这样的文件
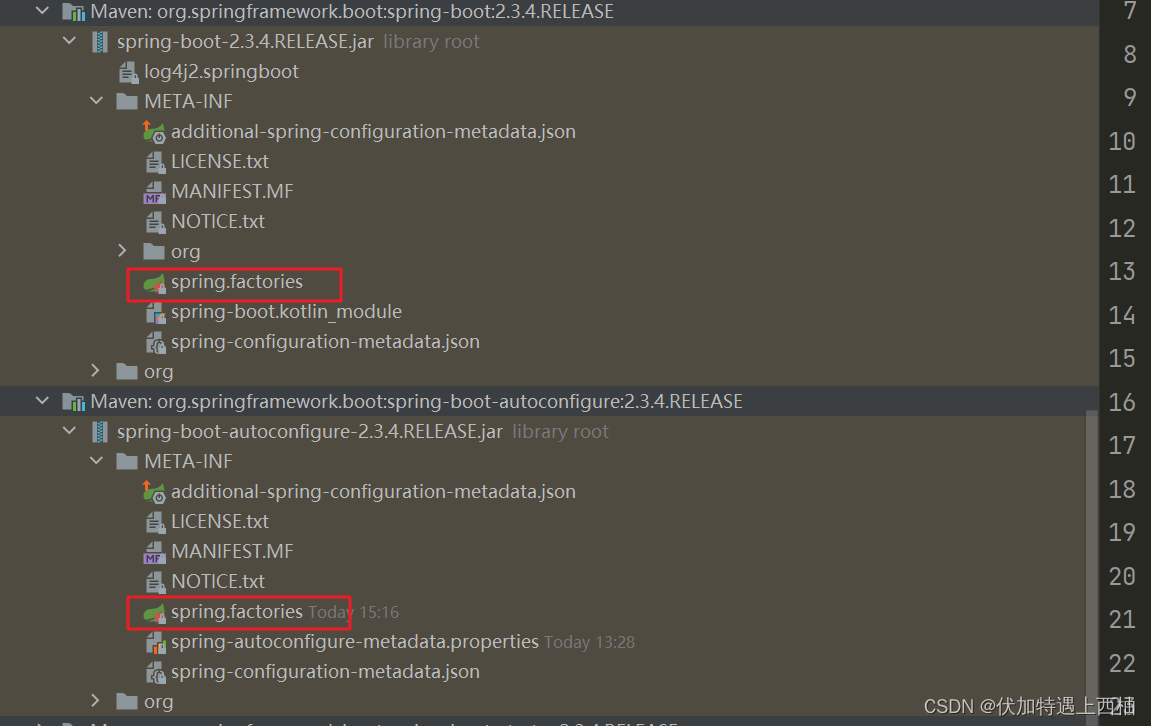
内容类似这样:
# PropertySource Loaders
org.springframework.boot.env.PropertySourceLoader=\\
org.springframework.boot.env.PropertiesPropertySourceLoader,\\
org.springframework.boot.env.YamlPropertySourceLoader# Run Listeners
org.springframework.boot.SpringApplicationRunListener=\\
org.springframework.boot.context.event.EventPublishingRunListener# Error Reporters
org.springframework.boot.SpringBootExceptionReporter=\\
org.springframework.boot.diagnostics.FailureAnalyzers# Application Context Initializers
org.springframework.context.ApplicationContextInitializer=\\
org.springframework.boot.context.ConfigurationWarningsApplicationContextInitializer,\\
org.springframework.boot.context.ContextIdApplicationContextInitializer,\\
org.springframework.boot.context.config.DelegatingApplicationContextInitializer,\\
org.springframework.boot.rsocket.context.RSocketPortInfoApplicationContextInitializer,\\
org.springframework.boot.web.context.ServerPortInfoApplicationContextInitializer# Application Listeners
org.springframework.context.ApplicationListener=\\
org.springframework.boot.ClearCachesApplicationListener,\\
org.springframework.boot.builder.ParentContextCloserApplicationListener,\\
org.springframework.boot.cloud.CloudFoundryVcapEnvironmentPostProcessor,\\
org.springframework.boot.context.FileEncodingApplicationListener,\\
org.springframework.boot.context.config.AnsiOutputApplicationListener,\\
org.springframework.boot.context.config.ConfigFileApplicationListener,\\
org.springframework.boot.context.config.DelegatingApplicationListener,\\
org.springframework.boot.context.logging.ClasspathLoggingApplicationListener,\\
org.springframework.boot.context.logging.LoggingApplicationListener,\\
org.springframework.boot.liquibase.LiquibaseServiceLocatorApplicationListener# Environment Post Processors
org.springframework.boot.env.EnvironmentPostProcessor=\\
org.springframework.boot.cloud.CloudFoundryVcapEnvironmentPostProcessor,\\
org.springframework.boot.env.SpringApplicationJsonEnvironmentPostProcessor,\\
org.springframework.boot.env.SystemEnvironmentPropertySourceEnvironmentPostProcessor,\\
org.springframework.boot.reactor.DebugAgentEnvironmentPostProcessor根据传入的接口名称,例如org.springframework.boot.env.PropertySourceLoader,就可以寻找到对应的实现类,例如:
org.springframework.boot.env.PropertySourceLoader=\\
org.springframework.boot.env.PropertiesPropertySourceLoader,\\
org.springframework.boot.env.YamlPropertySourceLoader
得到一个字符串集合并返回。
结束后,把得到的名字集合传递给createSpringFactoriesInstance方法,创建实例
2.2)createSpringFactoriesInstances创建实例
然后看看#createSpringFactoriesInstances(Class<T> type, Class<?>[] parameterTypes, ClassLoader classLoader, Object[] args, Set<String> names) 方法,创建对象的代码:
/* 根据类的全名称路径数组,创建对应的对象的数组 @param type 父类类型* @param parameterTypes 构造方法的参数类型* @param classLoader 类加载器* @param args 构造方法参数* @param names 类全名称的数组*/
private <T> List<T> createSpringFactoriesInstances(Class<T> type,Class<?>[] parameterTypes, ClassLoader classLoader, Object[] args,Set<String> names) {// 定义空实例集合List<T> instances = new ArrayList<>(names.size()); // 遍历 names 数组for (String name : names) {try {// 获得类名称 nameClass<?> instanceClass = ClassUtils.forName(name, classLoader);// 判断类是否实现自 type 类Assert.isAssignable(type, instanceClass);// 获得构造方法Constructor<?> constructor = instanceClass.getDeclaredConstructor(parameterTypes);// 创建对象T instance = (T) BeanUtils.instantiateClass(constructor, args);instances.add(instance);} catch (Throwable ex) {throw new IllegalArgumentException("Cannot instantiate " + type + " : " + name, ex);}}return instances;
}
基本上就是利用反射根据类名称,获取类的字节码,然后创建对象
2.run方法
在完成SpringApplication对象初始化后,会调用其中的run方法:
public ConfigurableApplicationContext run(String... args) {// 1.计时器,记录springBoot启动耗时StopWatch stopWatch = new StopWatch();stopWatch.start();ConfigurableApplicationContext context = null;Collection<SpringBootExceptionReporter> exceptionReporters = new ArrayList<>();// 2.配置headLess属性,这个跟AWT有关,忽略即可configureHeadlessProperty();// 3.获取SpringApplicationRunListener实例数组,默认获取的是EventPublishRunListenerSpringApplicationRunListeners listeners = getRunListeners(args);// 启动监听listeners.starting();try {// 4.创建ApplicationArguments对象ApplicationArguments applicationArguments = new DefaultApplicationArguments(args);//5.加载属性配置。所有的environment的属性都会加载进来,包括 application.properties 和外部的属性配置ConfigurableEnvironment environment = prepareEnvironment(listeners, applicationArguments);configureIgnoreBeanInfo(environment);// 6.打印BannerBanner printedBanner = printBanner(environment);// 7.根据WebApplicationType,创建不同的ApplicationContextcontext = createApplicationContext();// 8.获取异常报告器exceptionReporters = getSpringFactoriesInstances(SpringBootExceptionReporter.class,new Class[] { ConfigurableApplicationContext.class }, context);// 9.调用各种初始化器的initialize方法,初始化容器prepareContext(context, environment, listeners, applicationArguments, printedBanner);//重点 10.准备Bean工厂,调用一个BeanDefinition和BeanFactory的后处理器,初始化各种Bean,初始化tomcatrefreshContext(context);// 11.执行初始化的后置逻辑,默认为空afterRefresh(context, applicationArguments);// 停止计时器stopWatch.stop();// 12.打印 Spring Boot 启动的时长日志if (this.logStartupInfo) {new StartupInfoLogger(this.mainApplicationClass).logStarted(getApplicationLog(), stopWatch);}// 13.通知监听器,SpringBoot启动完成listeners.started(context);// 14.调用 ApplicationRunner的运行方法callRunners(context, applicationArguments);}catch (Throwable ex) {handleRunFailure(context, ex, exceptionReporters, listeners);throw new IllegalStateException(ex);}try {// 通知监听器,SpringBoot正在运行listeners.running(context);}catch (Throwable ex) {handleRunFailure(context, ex, exceptionReporters, null);throw new IllegalStateException(ex);}return context;
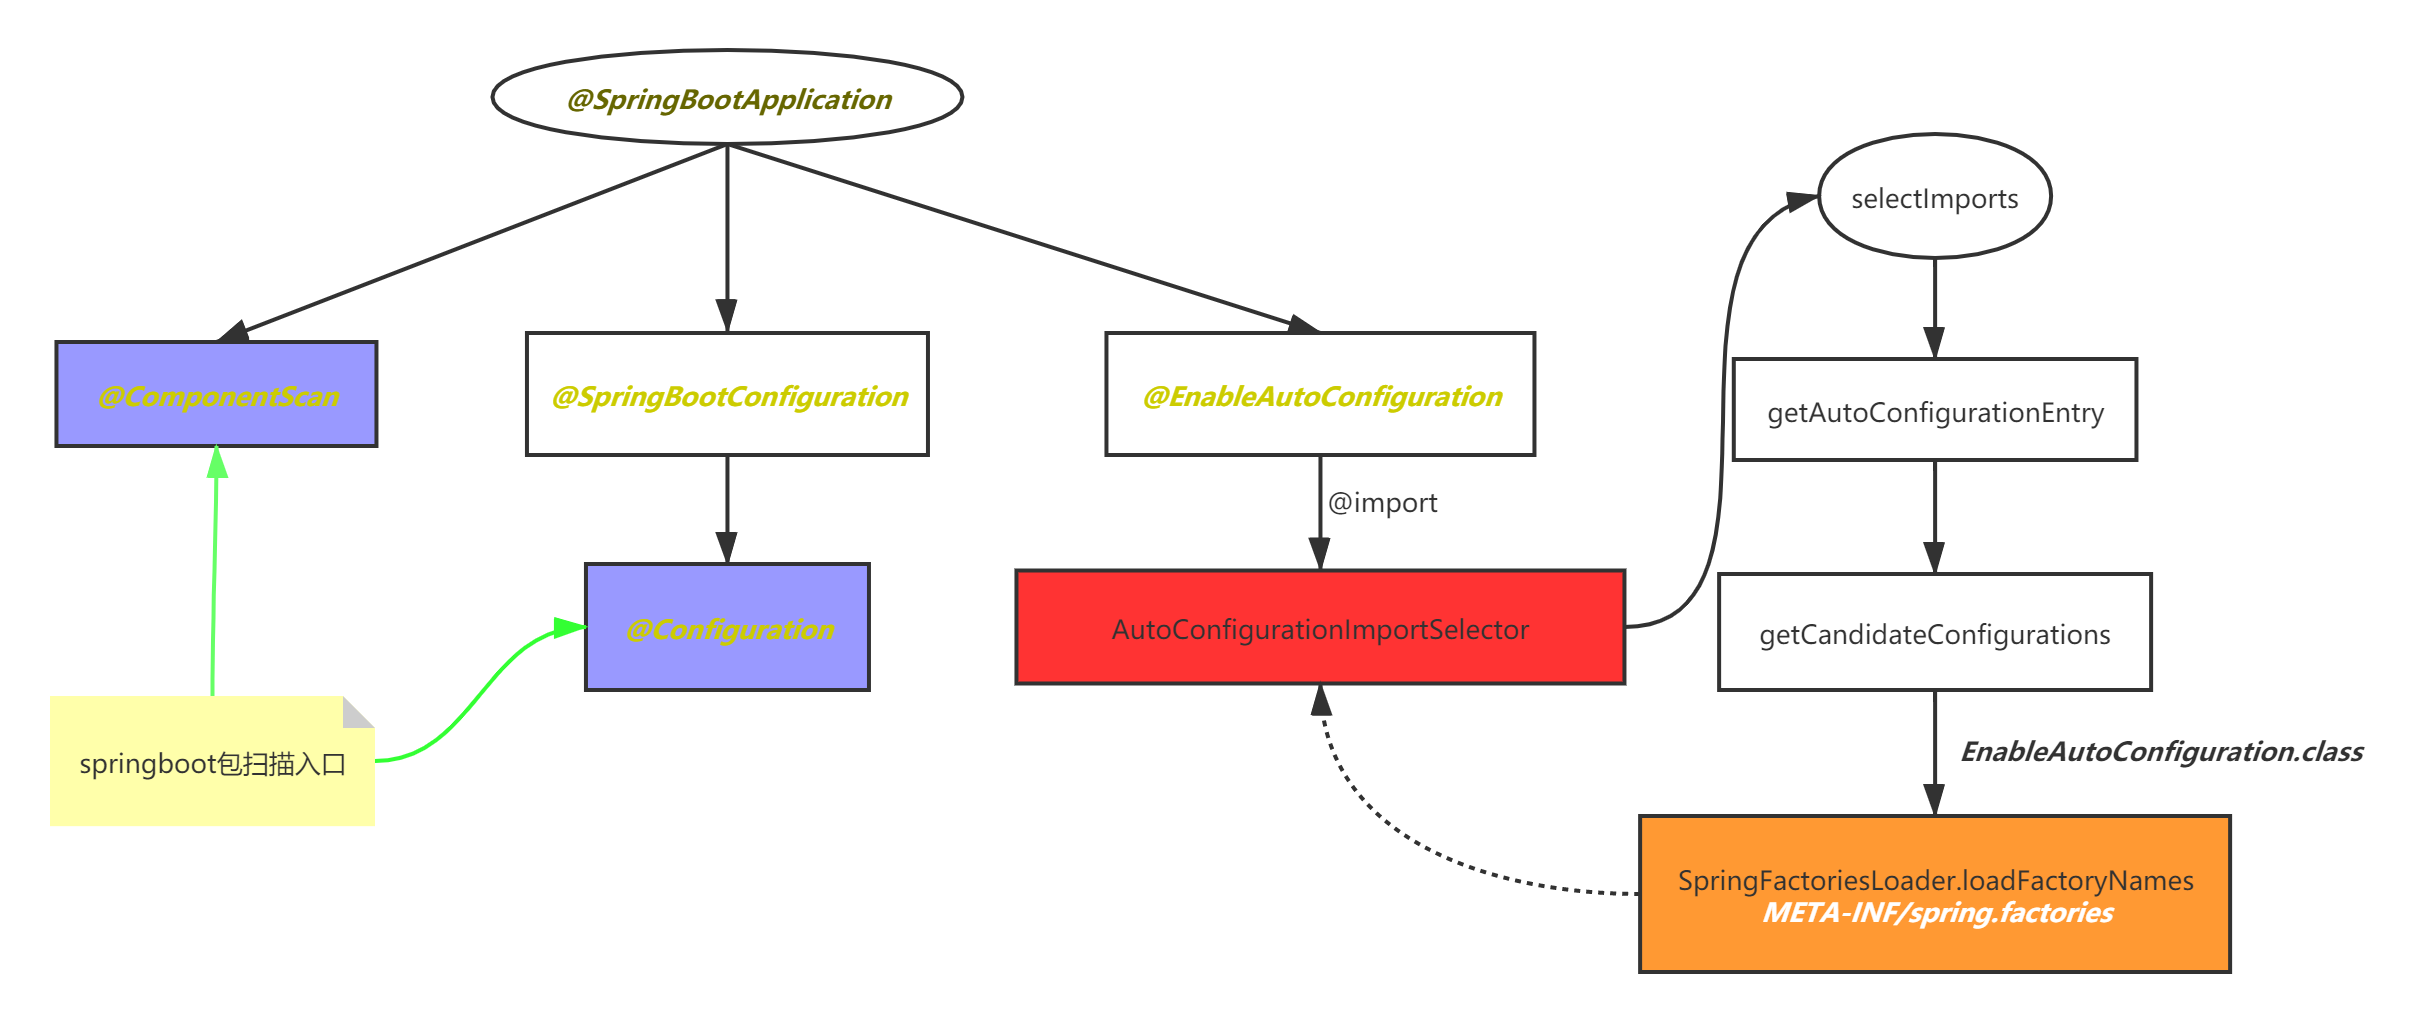
}3.SpringBoot自动配置的原理
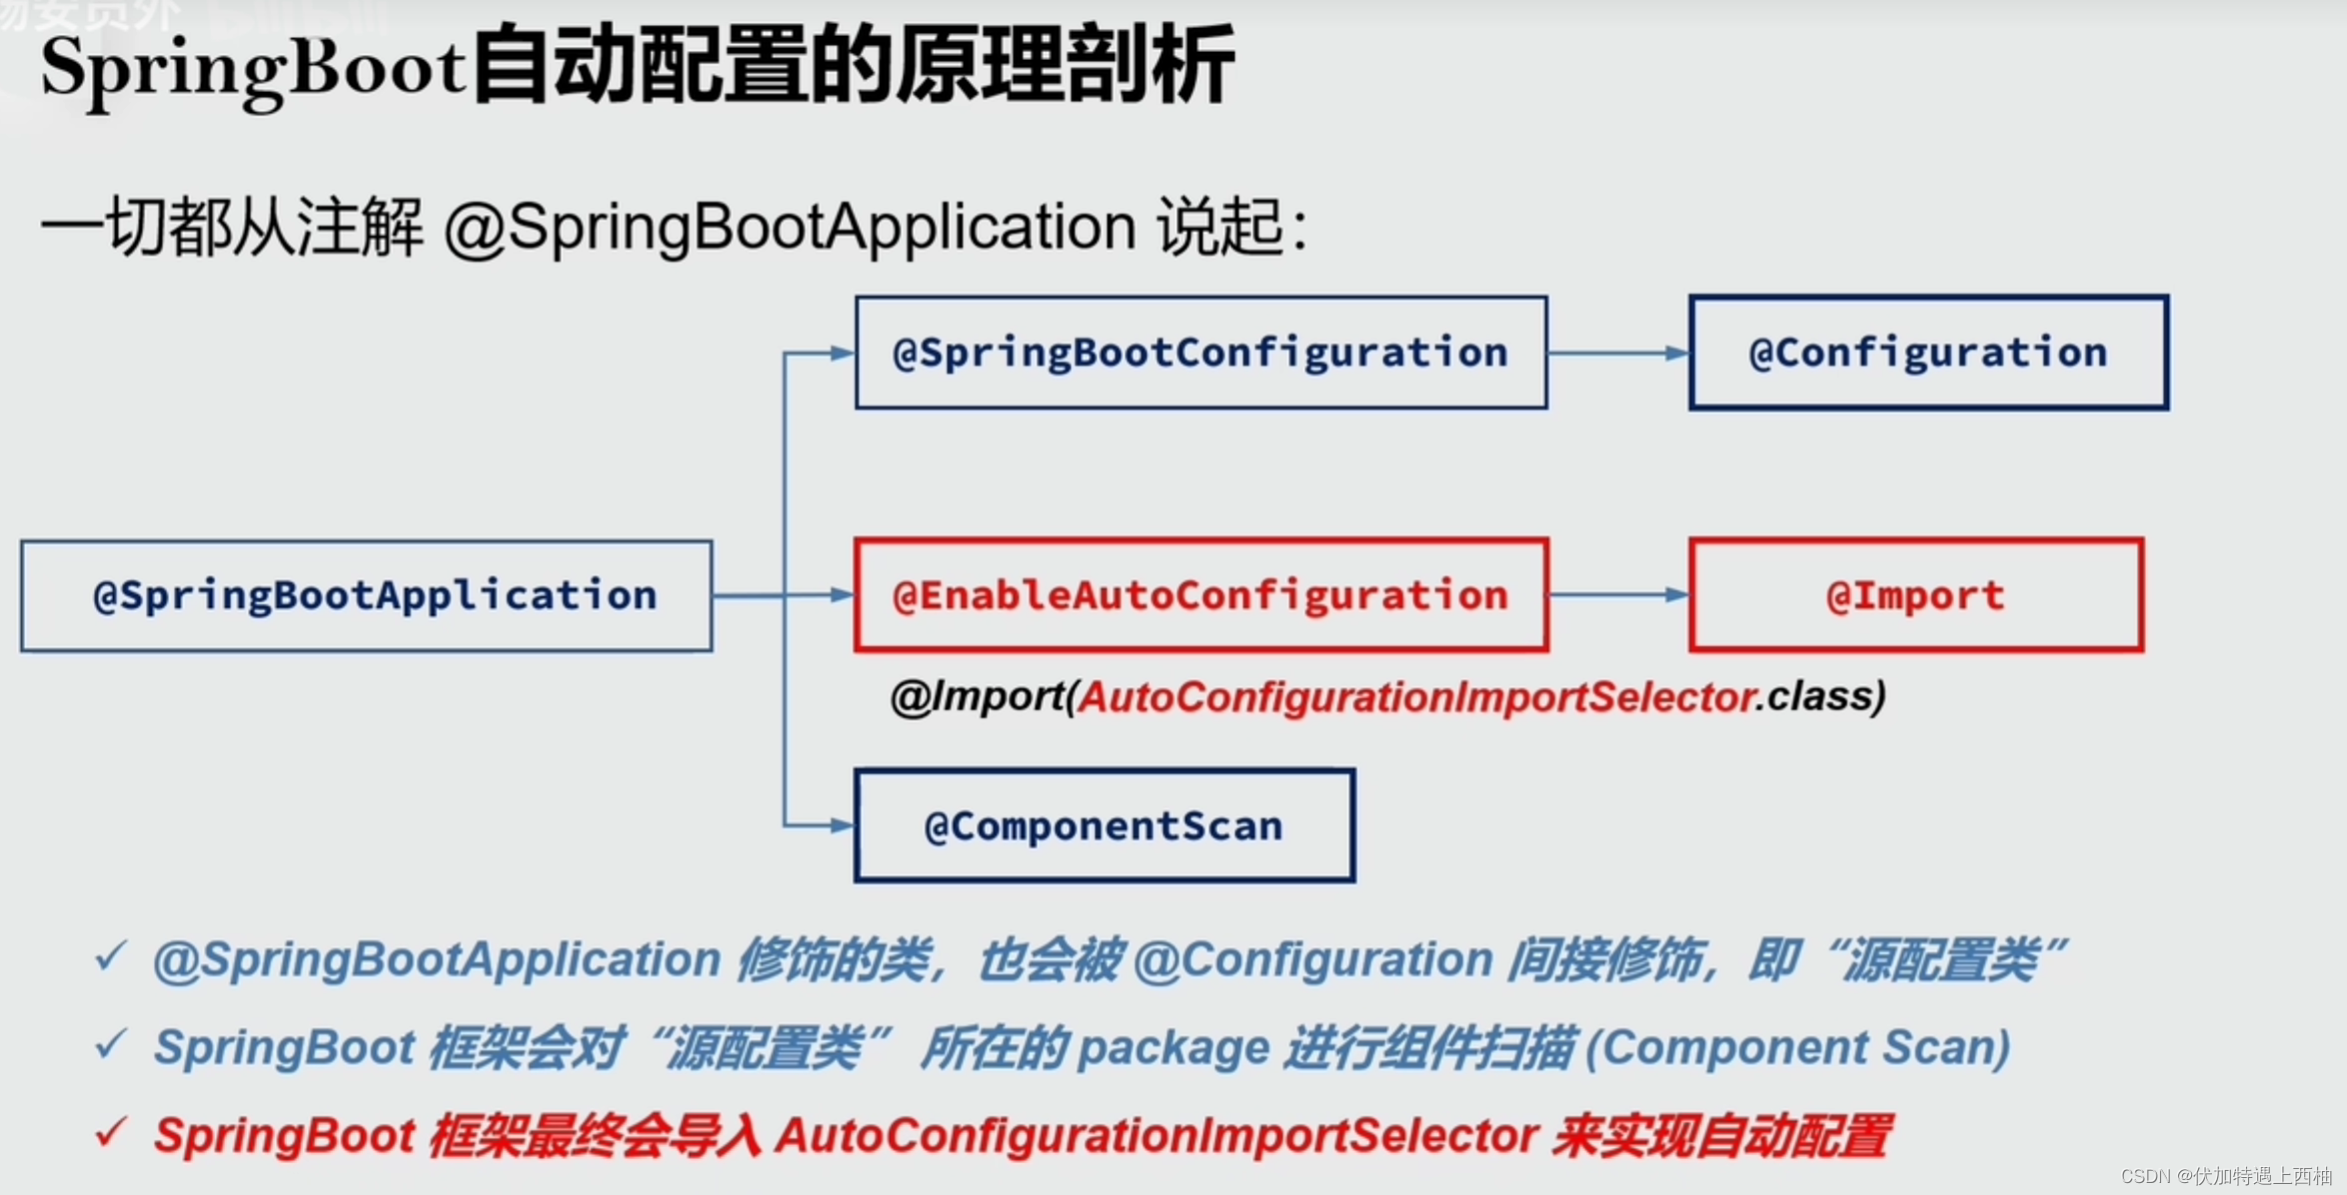
启动类的注解:@SpringBootApplication
最透彻的SpringBoot自动配置
@SpringBootApplication这个注解的源码:
点击进入,查看源码:
@Target(ElementType.TYPE)
@Retention(RetentionPolicy.RUNTIME)
@Documented
@Inherited
@SpringBootConfiguration //标明该类为配置类
@EnableAutoConfiguration //启动自动配置功能
@ComponentScan(excludeFilters = { //包扫描器<context:component-scan base-package="com.xxx.xxx"/>@Filter(type = FilterType.CUSTOM, classes = TypeExcludeFilter.class),@Filter(type = FilterType.CUSTOM, classes = AutoConfigurationExcludeFilter.class) })
public @interface SpringBootApplication {@AliasFor(annotation = EnableAutoConfiguration.class)Class<?>[] exclude() default {};@AliasFor(annotation = EnableAutoConfiguration.class)String[] excludeName() default {};@AliasFor(annotation = ComponentScan.class, attribute = "basePackages")String[] scanBasePackages() default {};@AliasFor(annotation = ComponentScan.class, attribute = "basePackageClasses")Class<?>[] scanBasePackageClasses() default {};
}
可以发现@SpringBootApplication上面又包含多个注解,重点的注解有3个:
- @SpringBootConfiguration
- @EnableAutoConfiguration
- @ComponentScan
逐个来看。
1.@SpringBootConfiguration
org.springframework.boot.@SpringBootConfiguration 注解,标记这是一个 Spring Boot 配置类。代码如下:
@Target(ElementType.TYPE)
@Retention(RetentionPolicy.RUNTIME)
@Documented
@Configuration
public @interface SpringBootConfiguration {}
可以看到,它上面继承自 @Configuration 注解,所以两者功能也一致,都是标记一个类作为配置类。而配置类里面可以做各种Java配置,也就是说我们可以在我们的main函数所在的启动类中写入java配置。
2.@ComponentScan
我们跟进源码,核心代码是:
@Retention(RetentionPolicy.RUNTIME)
@Target(ElementType.TYPE)
@Documented
@Repeatable(ComponentScans.class)
public @interface ComponentScan {/* 标记需要扫描的包,与basePackages作用一样*/@AliasFor("basePackages")String[] value() default {};@AliasFor("value")String[] basePackages() default {};Class<?>[] basePackageClasses() default {};Class<? extends BeanNameGenerator> nameGenerator() default BeanNameGenerator.class;Class<? extends ScopeMetadataResolver> scopeResolver() default AnnotationScopeMetadataResolver.class;ScopedProxyMode scopedProxy() default ScopedProxyMode.DEFAULT;String resourcePattern() default ClassPathScanningCandidateComponentProvider.DEFAULT_RESOURCE_PATTERN;boolean useDefaultFilters() default true;Filter[] includeFilters() default {};Filter[] excludeFilters() default {};boolean lazyInit() default false;....................
}
类上的一段注释说明了这个注解的作用:
大概的意思:
配置组件扫描的指令。提供了类似与
<context:component-scan>标签的作用通过basePackageClasses或者basePackages属性来指定要扫描的包。如果没有指定这些属性,那么将从声明这个注解的类所在的包开始,扫描包及子包
而我们的@SpringBootApplication注解声明的类就是main函数所在的启动类,因此扫描的包是该类所在包及其子包。因此,一般启动类会放在一个比较前的包目录中:
3.@EnableAutoConfiguration
关于这个注解,官网上有一段说明:
The second class-level annotation is
@EnableAutoConfiguration. This annotation
tells Spring Boot to “guess” how you want to configure Spring, based on the jar
dependencies that you have added. Sincespring-boot-starter-webadded Tomcat
and Spring MVC, the auto-configuration assumes that you are developing a web
application and sets up Spring accordingly.
简单翻译以下:
第二级的注解
@EnableAutoConfiguration,告诉SpringBoot基于你所添加的依赖,去“猜测”你想要如何配置Spring。比如我们引入了spring-boot-starter-web,而这个启动器中帮我们添加了tomcat、SpringMVC的依赖。此时自动配置就知道你是要开发一个web应用,所以就帮你完成了web及SpringMVC的默认配置了!
总结,SpringBoot内部对大量的第三方库或Spring内部库进行了默认配置,这些配置默认并未生效。
而@EnableAutoConfiguration就像一个开关,或者一个启动者,它会让这些SpringBoot准备的默认配置生效。
那么问题来了:
- 这些默认配置在哪里?
- @EnableAutoConfiguration是如何找到这些配置的?
- @EnableAutoConfiguration是如何从中筛选出想要启用的默认配置的?
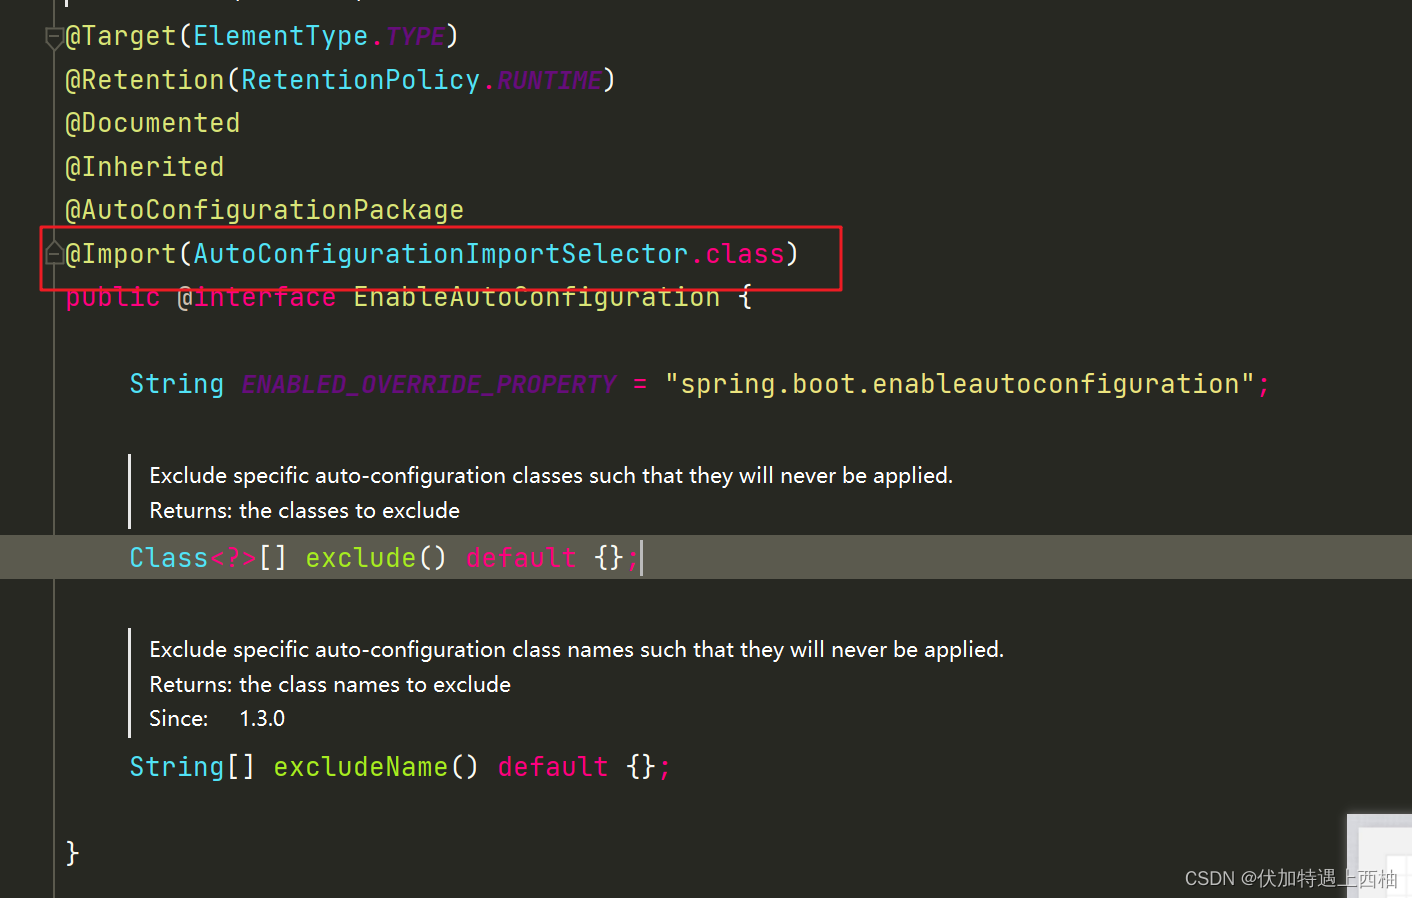
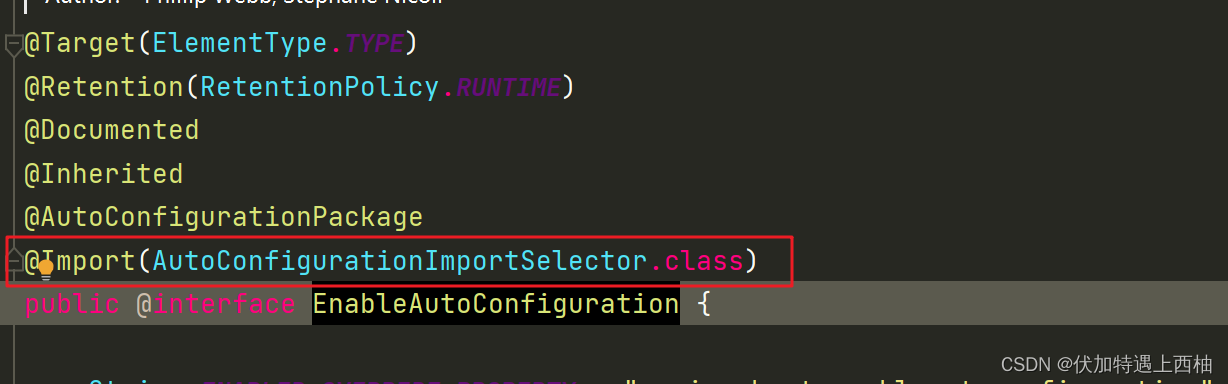
4.@EnableAutoConfiguration
@Target(ElementType.TYPE)
@Retention(RetentionPolicy.RUNTIME)
@Documented
@Inherited
@AutoConfigurationPackage
@Import(AutoConfigurationImportSelector.class)
public @interface EnableAutoConfiguration {String ENABLED_OVERRIDE_PROPERTY ="spring.boot.enableautoconfiguration";Class<?>[] exclude() default {};String[] excludeName() default {};
}
这个注解导入了一个新注解:
4.1.@Import
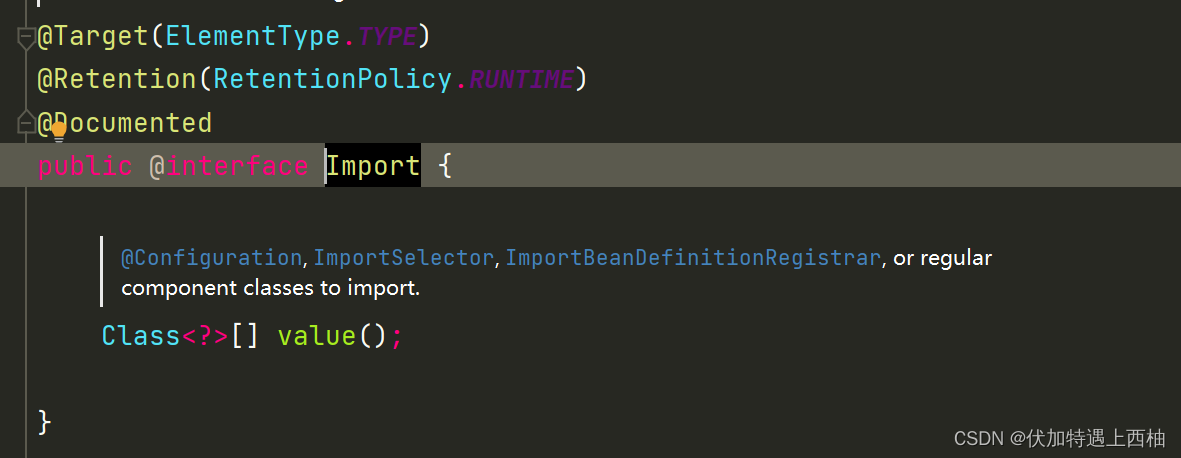
@Import注解的作用就是把一个或多个类导入到Spring容器中。不过,导入的方式多种多样:
-
可以直接通过类名导入:
@Import(User.class)就是把User这个类导入 -
可以通过
ImportSelector来导入。接口ImportSelector种有一个selectImports方法,它返回值是一个字符串数组,数组中的每一个元素分别代表一个将被导入的配置类的权限定名。 -
通过
ImportBeanDefinitionRegistrar来导入一些bean,通过它,我们可以手动将多个BeanDefinition注册到IOC容器中,从而实现个性化的定制
我们可以看到在@EnableAutoConfiguration使用@Import注解时,传递的参数是:
可以看到参数名是:AutoConfigurationImportSelector。显然,这是一个ImportSelector相关的类,与上述第二种方式一致:
利用该特性我们可以给IOC容器动态的导入多个配置类
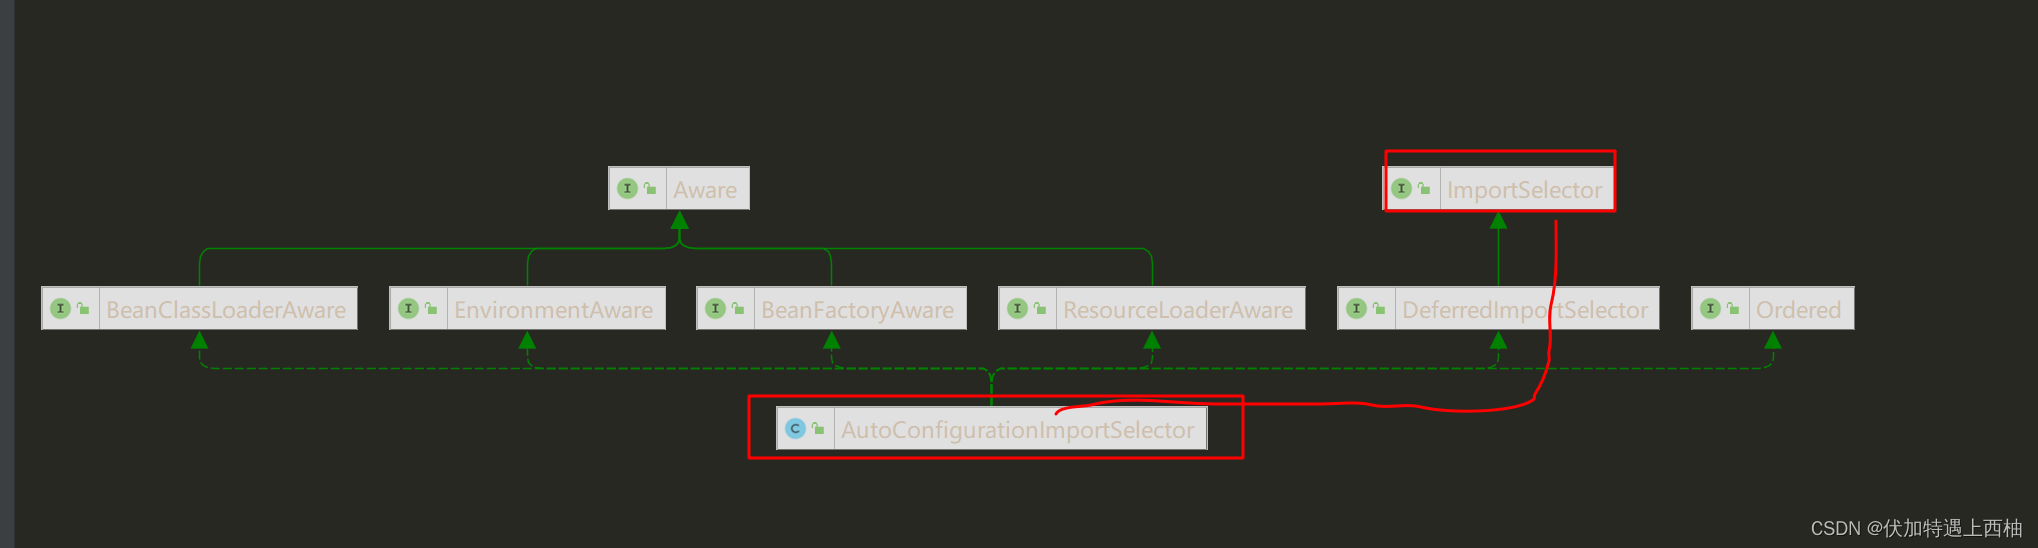
4.2.ImportSelector接口

基于AnnotationMetadata来导入多个@Configuration类型的类的名称数组并返回。也就是说这个方法就是去寻找Spring提供的默认配置类的。
那么AutoConfigurationImportSelector这个类肯定会实现这个方法,去加载Spring提供的默认配置。
4.3.AutoConfigurationImportSelector
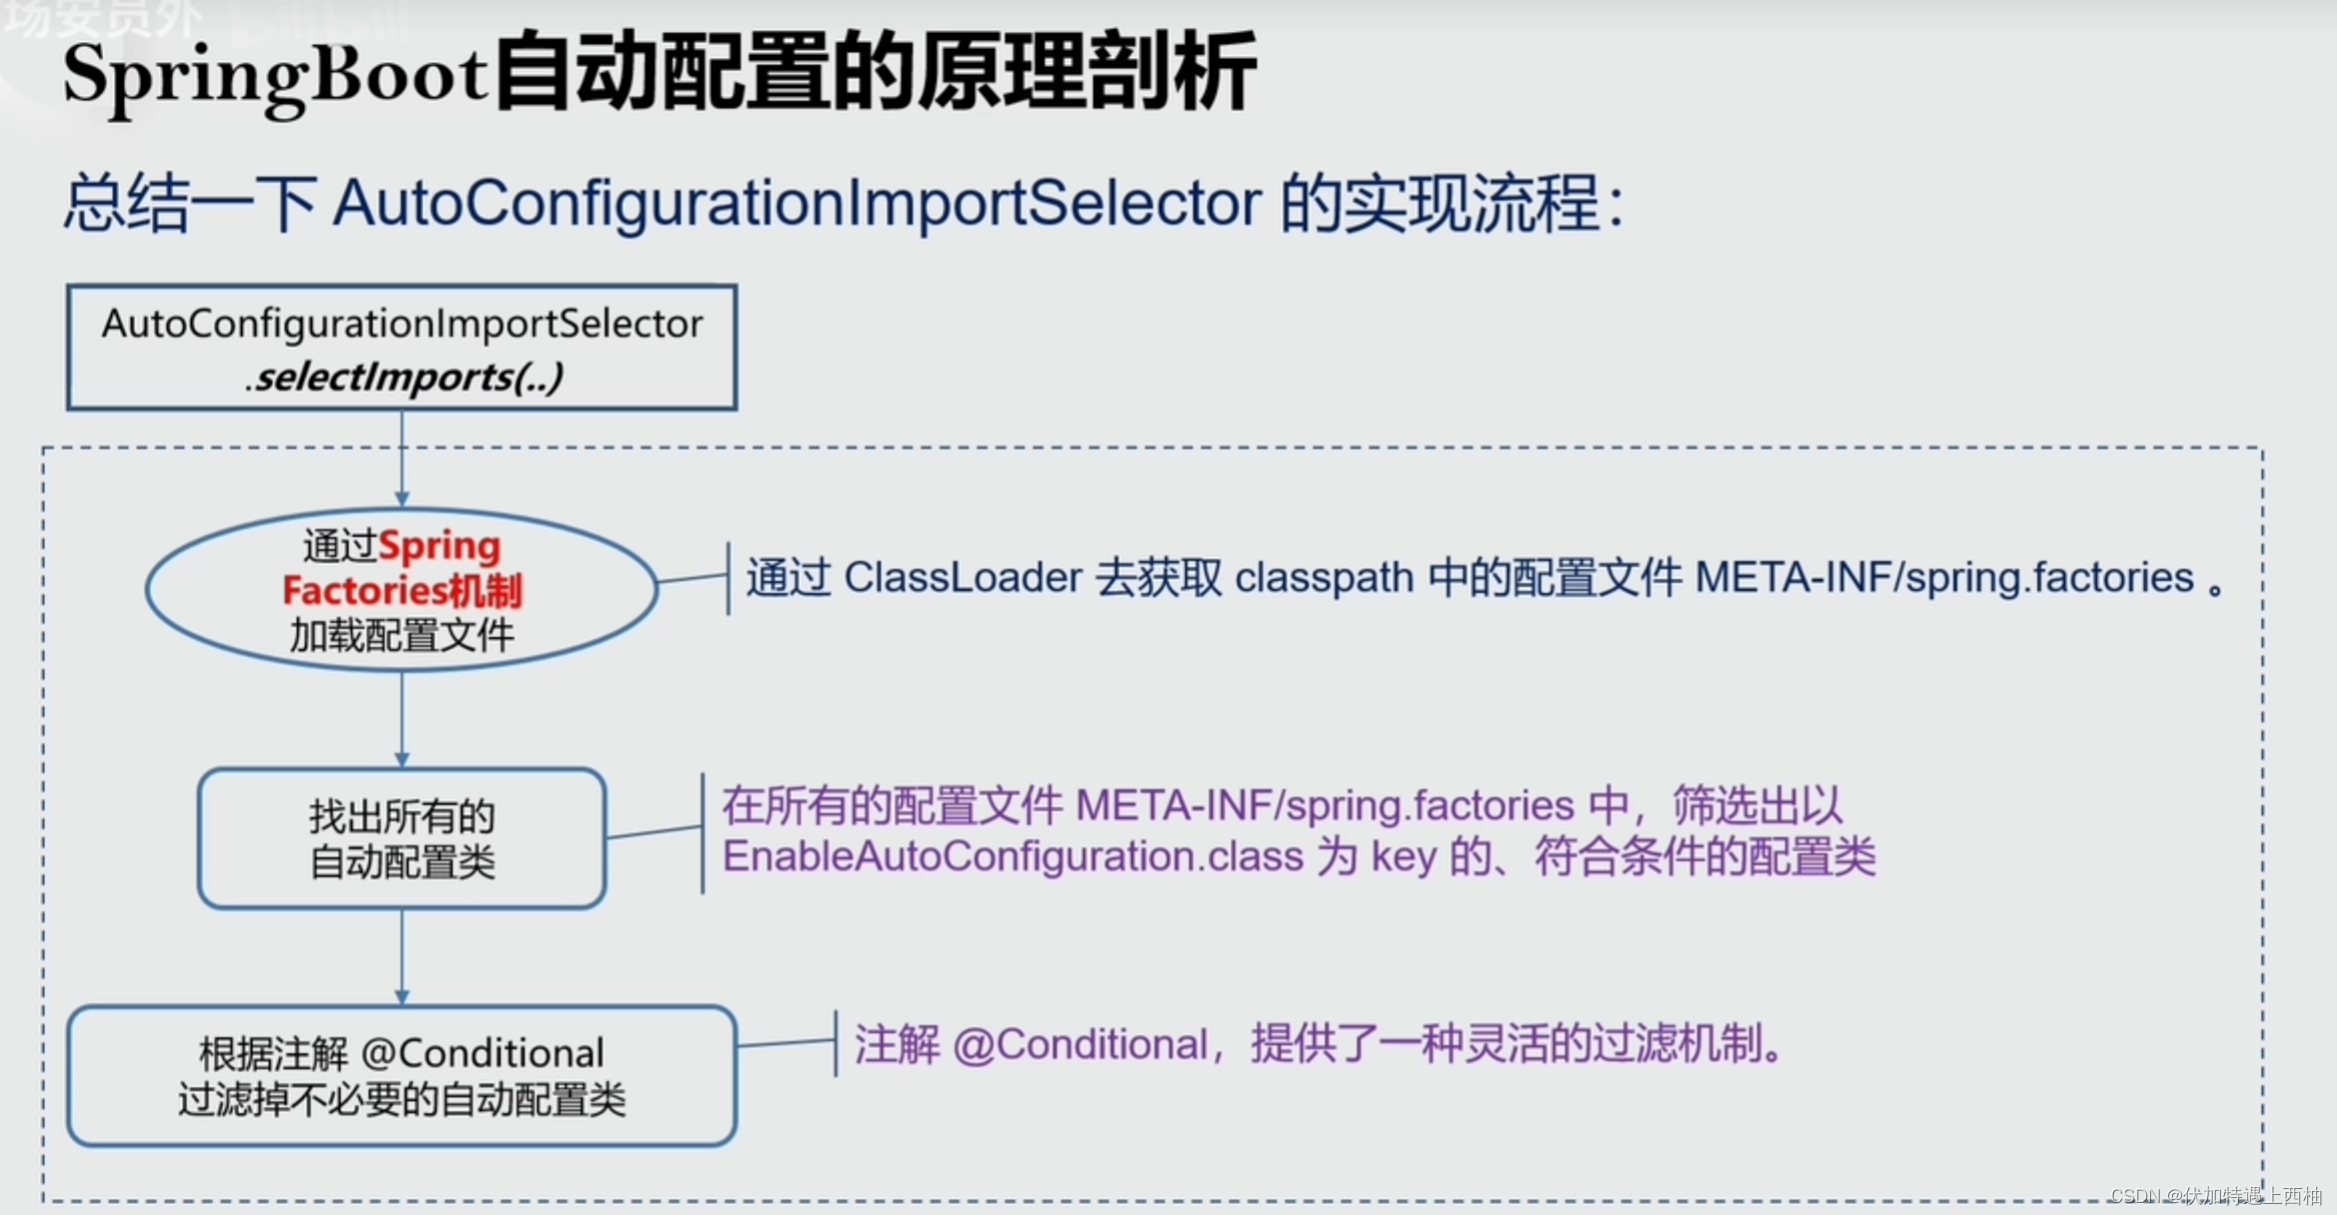
1)selectImports
这个类实现了ImportSelector,其中会有selectImports方法:
@Overridepublic String[] selectImports(AnnotationMetadata annotationMetadata) {if (!isEnabled(annotationMetadata)) {return NO_IMPORTS;}//加载默认配置AutoConfigurationEntry autoConfigurationEntry = getAutoConfigurationEntry(annotationMetadata);return StringUtils.toStringArray(autoConfigurationEntry.getConfigurations());}
2)加载并过滤自动配置
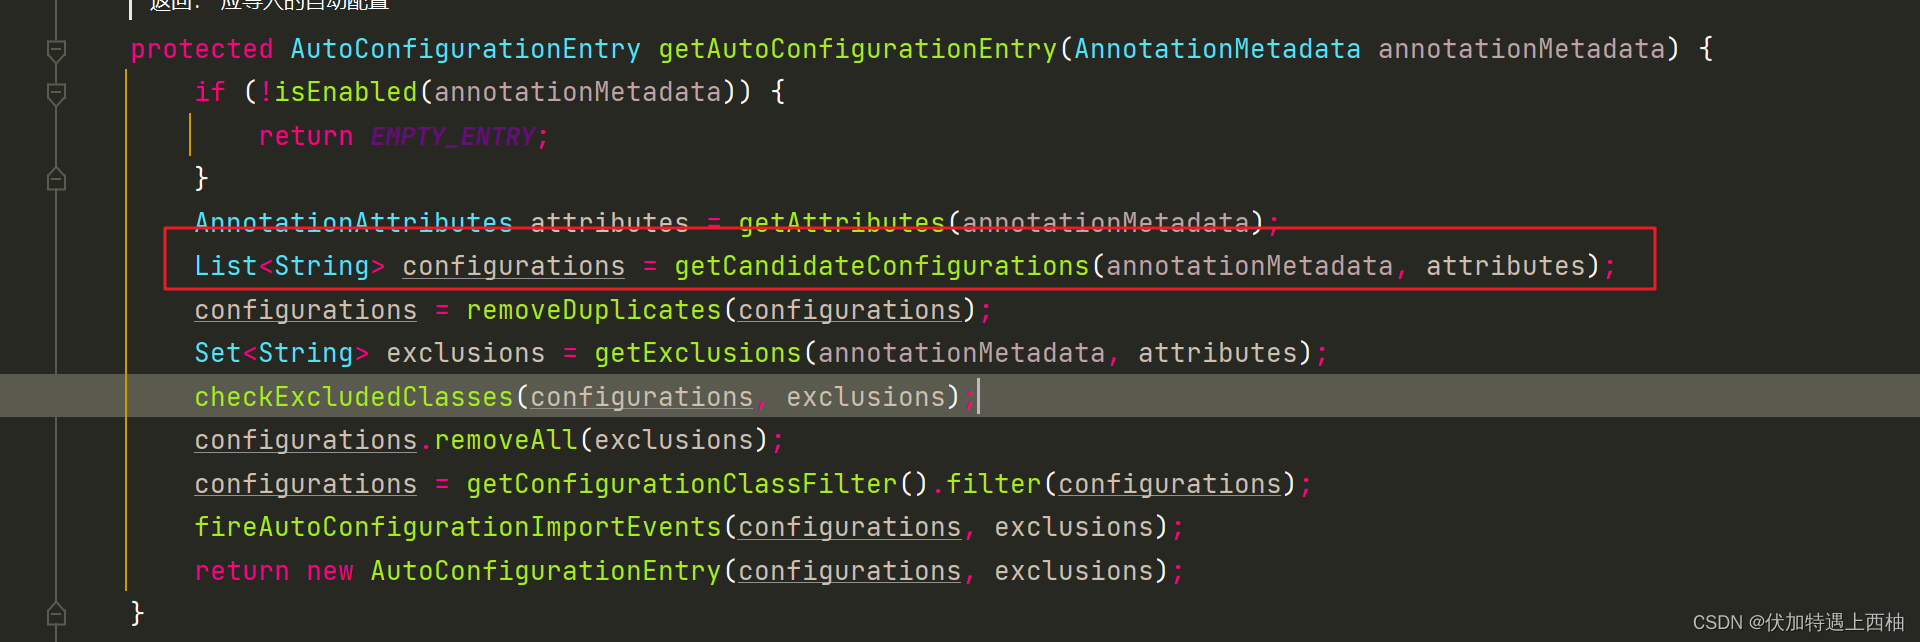
protected AutoConfigurationEntry getAutoConfigurationEntry(AnnotationMetadata annotationMetadata) {// 1 判断是否开启。如未开启,返回空数组。if (!isEnabled(annotationMetadata)) {return EMPTY_ENTRY;}// 2 获取annotationMetadata的注解@EnableAutoConfiguration的属性AnnotationAttributes attributes = getAttributes(annotationMetadata);// 3 从资源文件spring.factories中获取EnableAutoConfiguration对应的所有类 重点List<String> configurations = getCandidateConfigurations(annotationMetadata, attributes);// 3.1 移除重复的配置类configurations = removeDuplicates(configurations);// 4 获得需要排除的配置类Set<String> exclusions = getExclusions(annotationMetadata, attributes);// 4.1 校验排除的配置类是否合法,没有则跳过检查checkExcludedClasses(configurations, exclusions);// 4.2 通过@EnableAutoConfiguration设置的exclude相关属性,从 configurations 中,移除需要排除的配置类configurations.removeAll(exclusions);// 5 根据条件(@ConditionalOn注解),过滤掉不符合条件的配置类configurations = getConfigurationClassFilter().filter(configurations);// 6 触发自动配置类引入完成的事件fireAutoConfigurationImportEvents(configurations, exclusions);return new AutoConfigurationEntry(configurations, exclusions);}
重点关注的方法
3)getCandidateConfigurations 加载自动配置
protected List<String> getCandidateConfigurations(AnnotationMetadata metadata, AnnotationAttributes attributes) {// 利用SpringFactoriesLoader加载指定类型对应的类的全路径List<String> configurations = SpringFactoriesLoader.loadFactoryNames(getSpringFactoriesLoaderFactoryClass(),getBeanClassLoader());Assert.notEmpty(configurations, "No auto configuration classes found in META-INF/spring.factories. If you "+ "are using a custom packaging, make sure that file is correct.");return configurations;}
继续跟进
public static List<String> loadFactoryNames(Class<?> factoryType, @Nullable ClassLoader classLoader) {String factoryTypeName = factoryType.getName();return loadSpringFactories(classLoader).getOrDefault(factoryTypeName, Collections.emptyList());}
SpringFactoriesLoader
List configurations = SpringFactoriesLoader.loadFactoryNames(getSpringFactoriesLoaderFactoryClass(),
getBeanClassLoader());
``
这段代码的SpringFactoriesLoader.loadFactoryNames()方法我们已经见过一次了,它会去classpath下的/META-INF/spring.factories中寻找。
本例中是找以EnableAutoConfiguration为key的配置类的名称: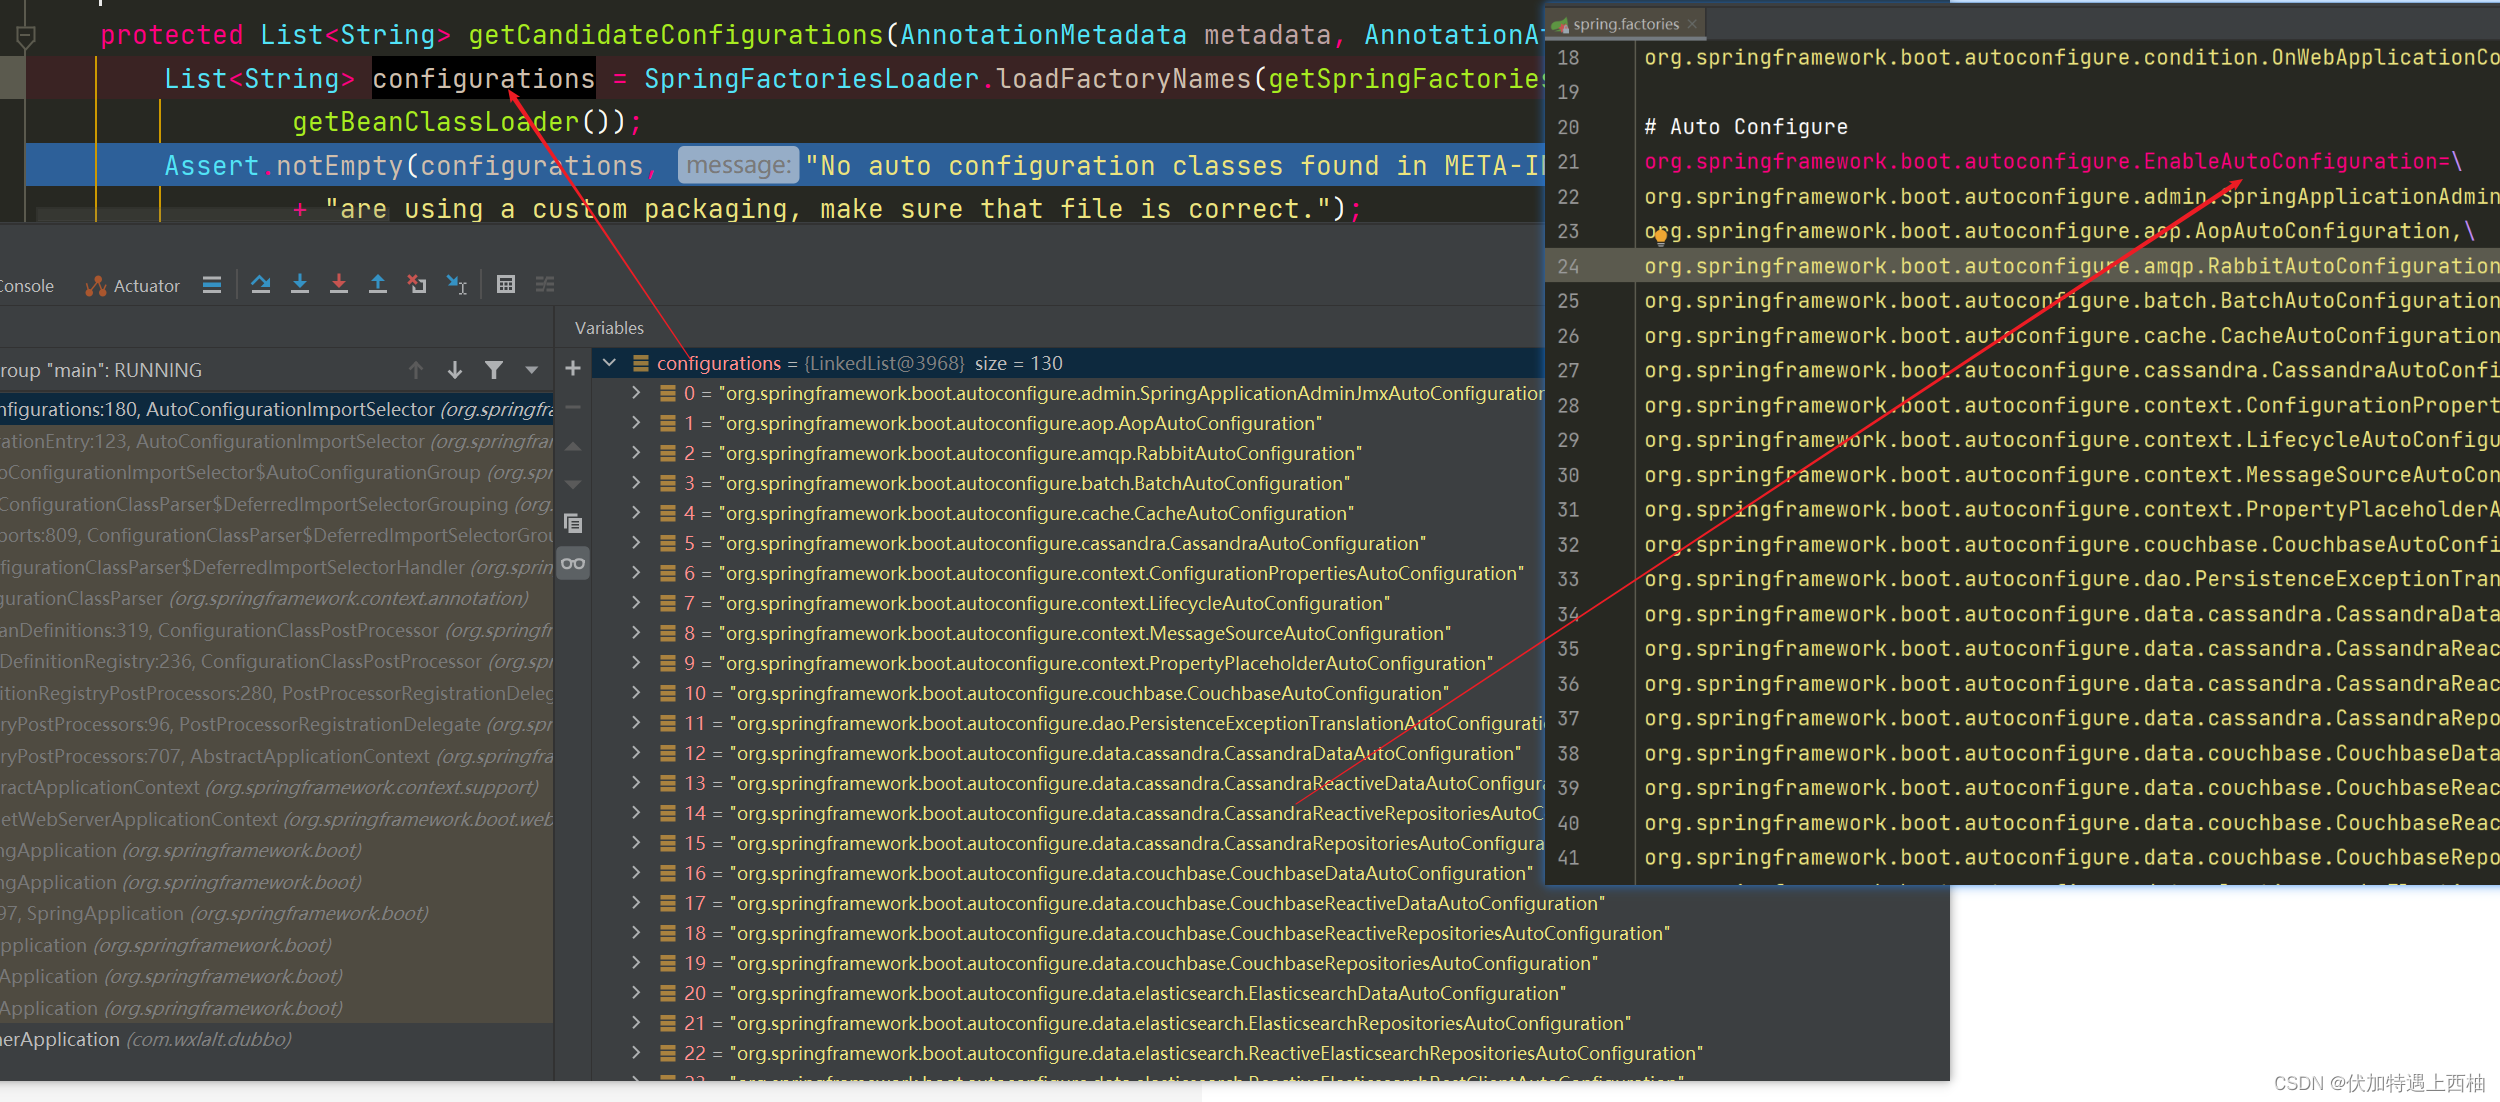
所有的自动配置类加载完毕
4.4.加载到的配置如何筛选
刚才加载的所有自动配置类,都可以再spring-boot-autoconfigure包中找到这些自动配置类:
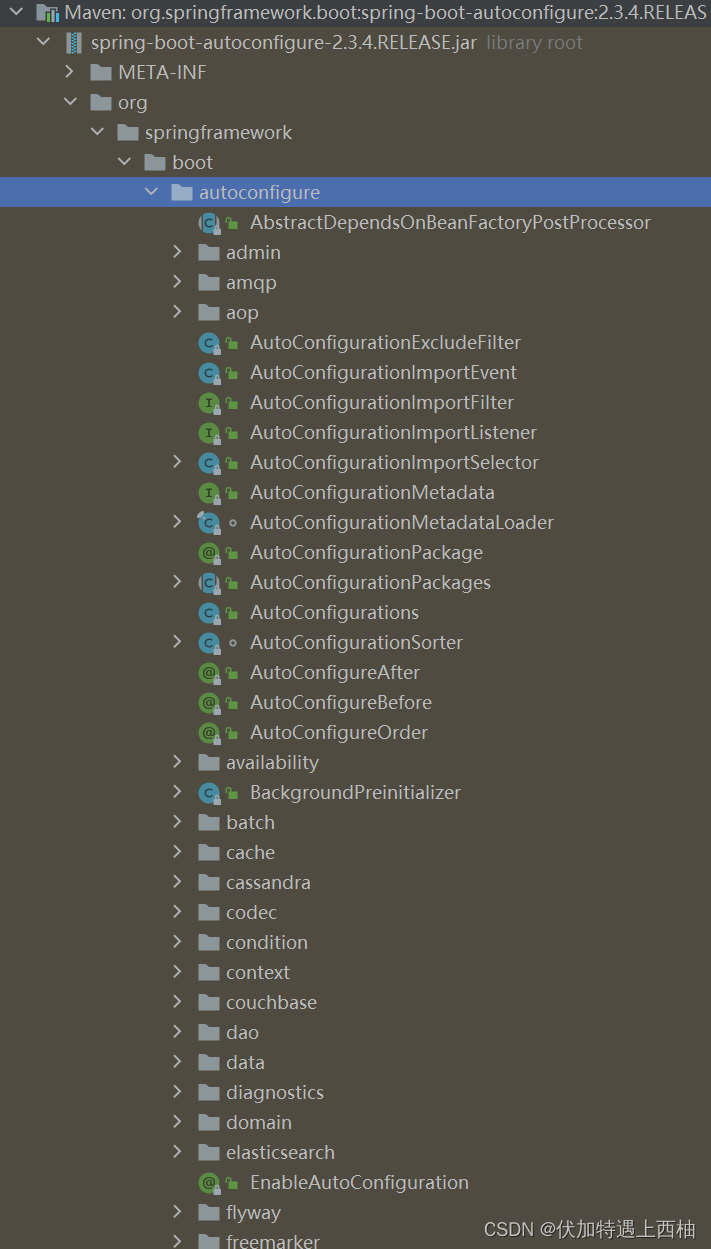
非常多,几乎涵盖了现在主流的开源框架,例如:
- redis
- jms
- amqp
- jdbc
- jackson
- mongodb
- jpa
- solr
- elasticsearch
… 等等
我们来看一个我们熟悉的,例如SpringMVC,查看mvc 的自动配置类: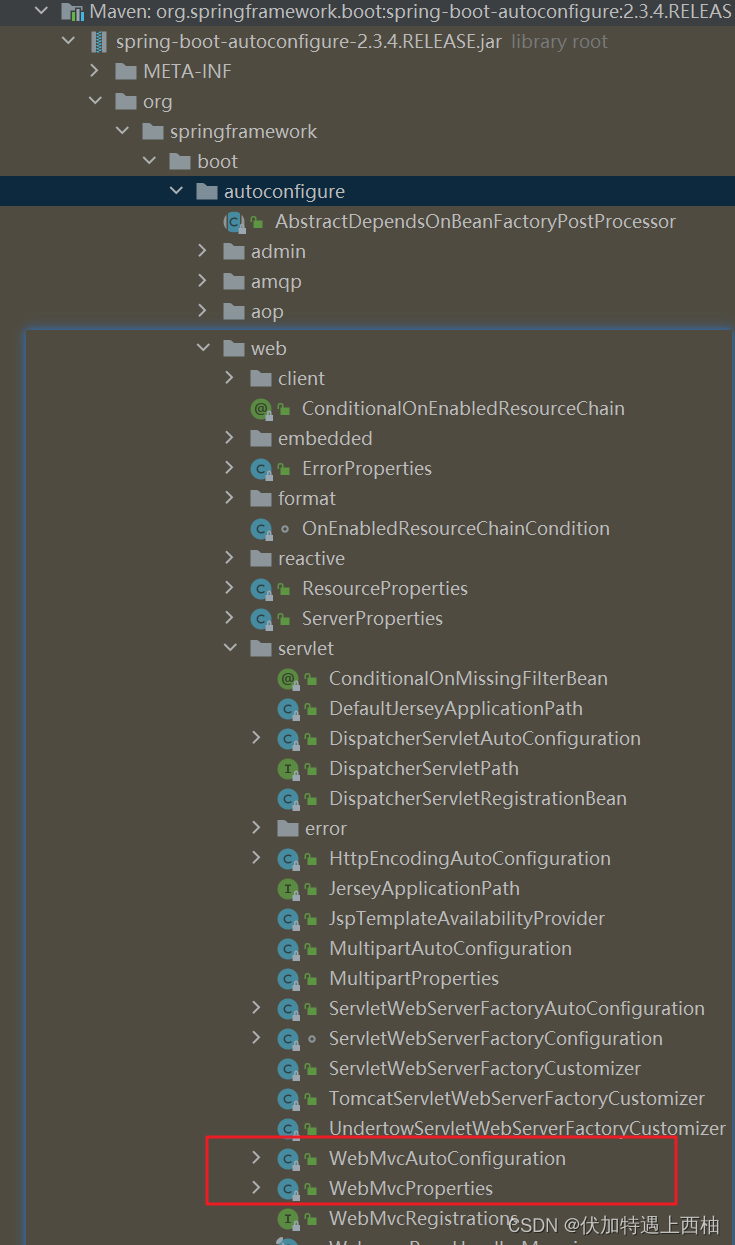
打开WebMvcAutoConfiguration: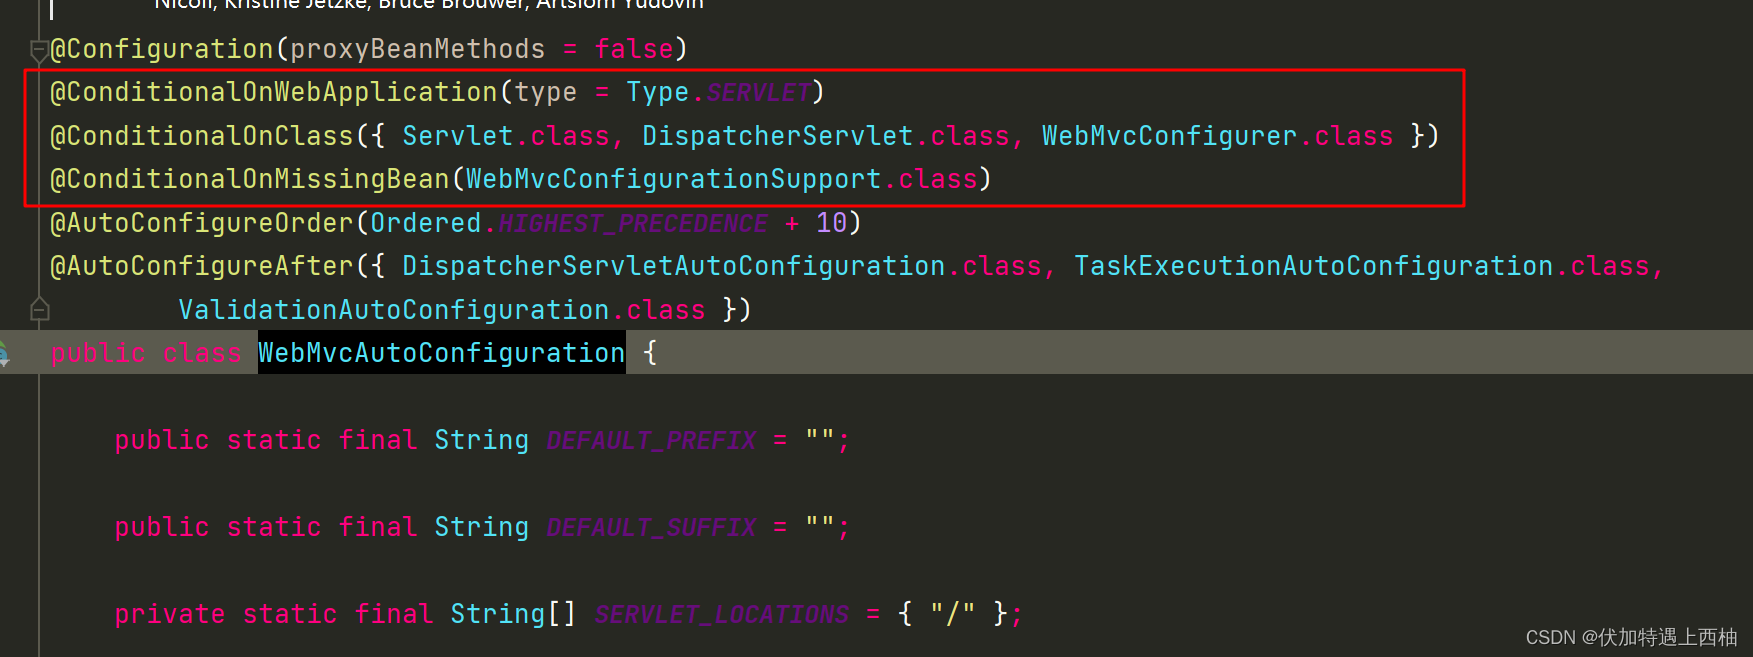
//表示这是一个配置类,以前编写的配置文件一样,也可以给容器中添加组件
@Configuration(proxyBeanMethods = false)
//Spring底层@Conditional注解(Spring注解版),根据不同的条件,如果满足指定的条件,整个配置类里面的配置就会生效;这里是判断当前应用是否是web应用,如果是,当前配置类生效
@ConditionalOnWebApplication(type = Type.SERVLET)
//判断当前项目有没有这个类Servlet.class, DispatcherServlet.class, WebMvcConfigurer.class
@ConditionalOnClass({ Servlet.class, DispatcherServlet.class, WebMvcConfigurer.class })
@ConditionalOnMissingBean(WebMvcConfigurationSupport.class)
@AutoConfigureOrder(Ordered.HIGHEST_PRECEDENCE + 10)
@AutoConfigureAfter({ DispatcherServletAutoConfiguration.class, TaskExecutionAutoConfiguration.class,ValidationAutoConfiguration.class })
public class WebMvcAutoConfiguration {public static final String DEFAULT_PREFIX = "";public static final String DEFAULT_SUFFIX = "";private static final String[] SERVLET_LOCATIONS = { "/" };@Bean@ConditionalOnMissingBean(HiddenHttpMethodFilter.class)@ConditionalOnProperty(prefix = "spring.mvc.hiddenmethod.filter", name = "enabled", matchIfMissing = false)public OrderedHiddenHttpMethodFilter hiddenHttpMethodFilter() {return new OrderedHiddenHttpMethodFilter();}@Bean@ConditionalOnMissingBean(FormContentFilter.class)@ConditionalOnProperty(prefix = "spring.mvc.formcontent.filter", name = "enabled", matchIfMissing = true)public OrderedFormContentFilter formContentFilter() {return new OrderedFormContentFilter();}static String[] getResourceLocations(String[] staticLocations) {String[] locations = new String[staticLocations.length + SERVLET_LOCATIONS.length];System.arraycopy(staticLocations, 0, locations, 0, staticLocations.length);System.arraycopy(SERVLET_LOCATIONS, 0, locations, staticLocations.length, SERVLET_LOCATIONS.length);return locations;}........................
}
我们看到这个类上的4个注解:
-
@Configuration:声明这个类是一个配置类 -
@ConditionalOnWebApplication(type = Type.SERVLET)ConditionalOn,翻译就是在某个条件下,此处就是满足项目的类是是Type.SERVLET类型,也就是一个普通web工程,显然我们就是
-
@ConditionalOnClass({ Servlet.class, DispatcherServlet.class, WebMvcConfigurer.class })
这里的条件是OnClass,也就是满足以下类存在:Servlet、DispatcherServlet、WebMvcConfigurer,其中Servlet只要引入了tomcat依赖自然会有,后两个需要引入SpringMVC才会有。这里就是判断你是否引入了相关依赖,引入依赖后该条件成立,当前类的配置才会生效!
4.SpringBoot学习总结
来总结下面试官问题的答案:
4.1.SpringBoot是做什么的?
SpringBoot是一个快速构建项目并简化项目配置的工具,内部集成了Tomcat及大多数第三方应用和Spring框架的默认配置。与我们学习的SpringMVC和Mybatis并无冲突,SpringBoot提供的这些默认配置,大大简化了SpringMVC、Mybatis等基于Spring的应用的开发。
4.2.SpringBoot自动装配是什么?解决了什么问题
自动装配简单的来说就是自动的把第三方组件的Bean装载到IOC容器里面,不需要开发人员再去写相关的配置。在SpringBoot里面只需要在启动类上去加上@SpringBootApplication注解就可以去实现自动装配。

4.2.SpringBoot的启动流程
SpringBoot项目启动第一步就是创建SpringApplication的实例,并且调用SpringApplication.run()这个方法。
创建SpringApplication实例主要完成三件事情:
- 记录当前启动类字节码
- 判断当前项目类型,普通Servlet、响应式WebFlux、NONE
- 加载/META-INF/spring.factories文件,初始化ApplicationContextInitializer和ApplicationListener实例
而后的run()方法则会创建spring容器,流程如下:
- 准备监听器,监听Spring启动的各个过程
- 创建并配置环境参数Environment
- 创建ApplicationContext
prepareContext():初始化ApplicationContext,准备运行环境refreshContext(context):准备Bean工厂,调用一个BeanDefinition和BeanFactory的后处理器,初始化各种Bean,初始化tomcatafterRefresh():拓展功能,目前为空- 发布容器初始化完毕的事件
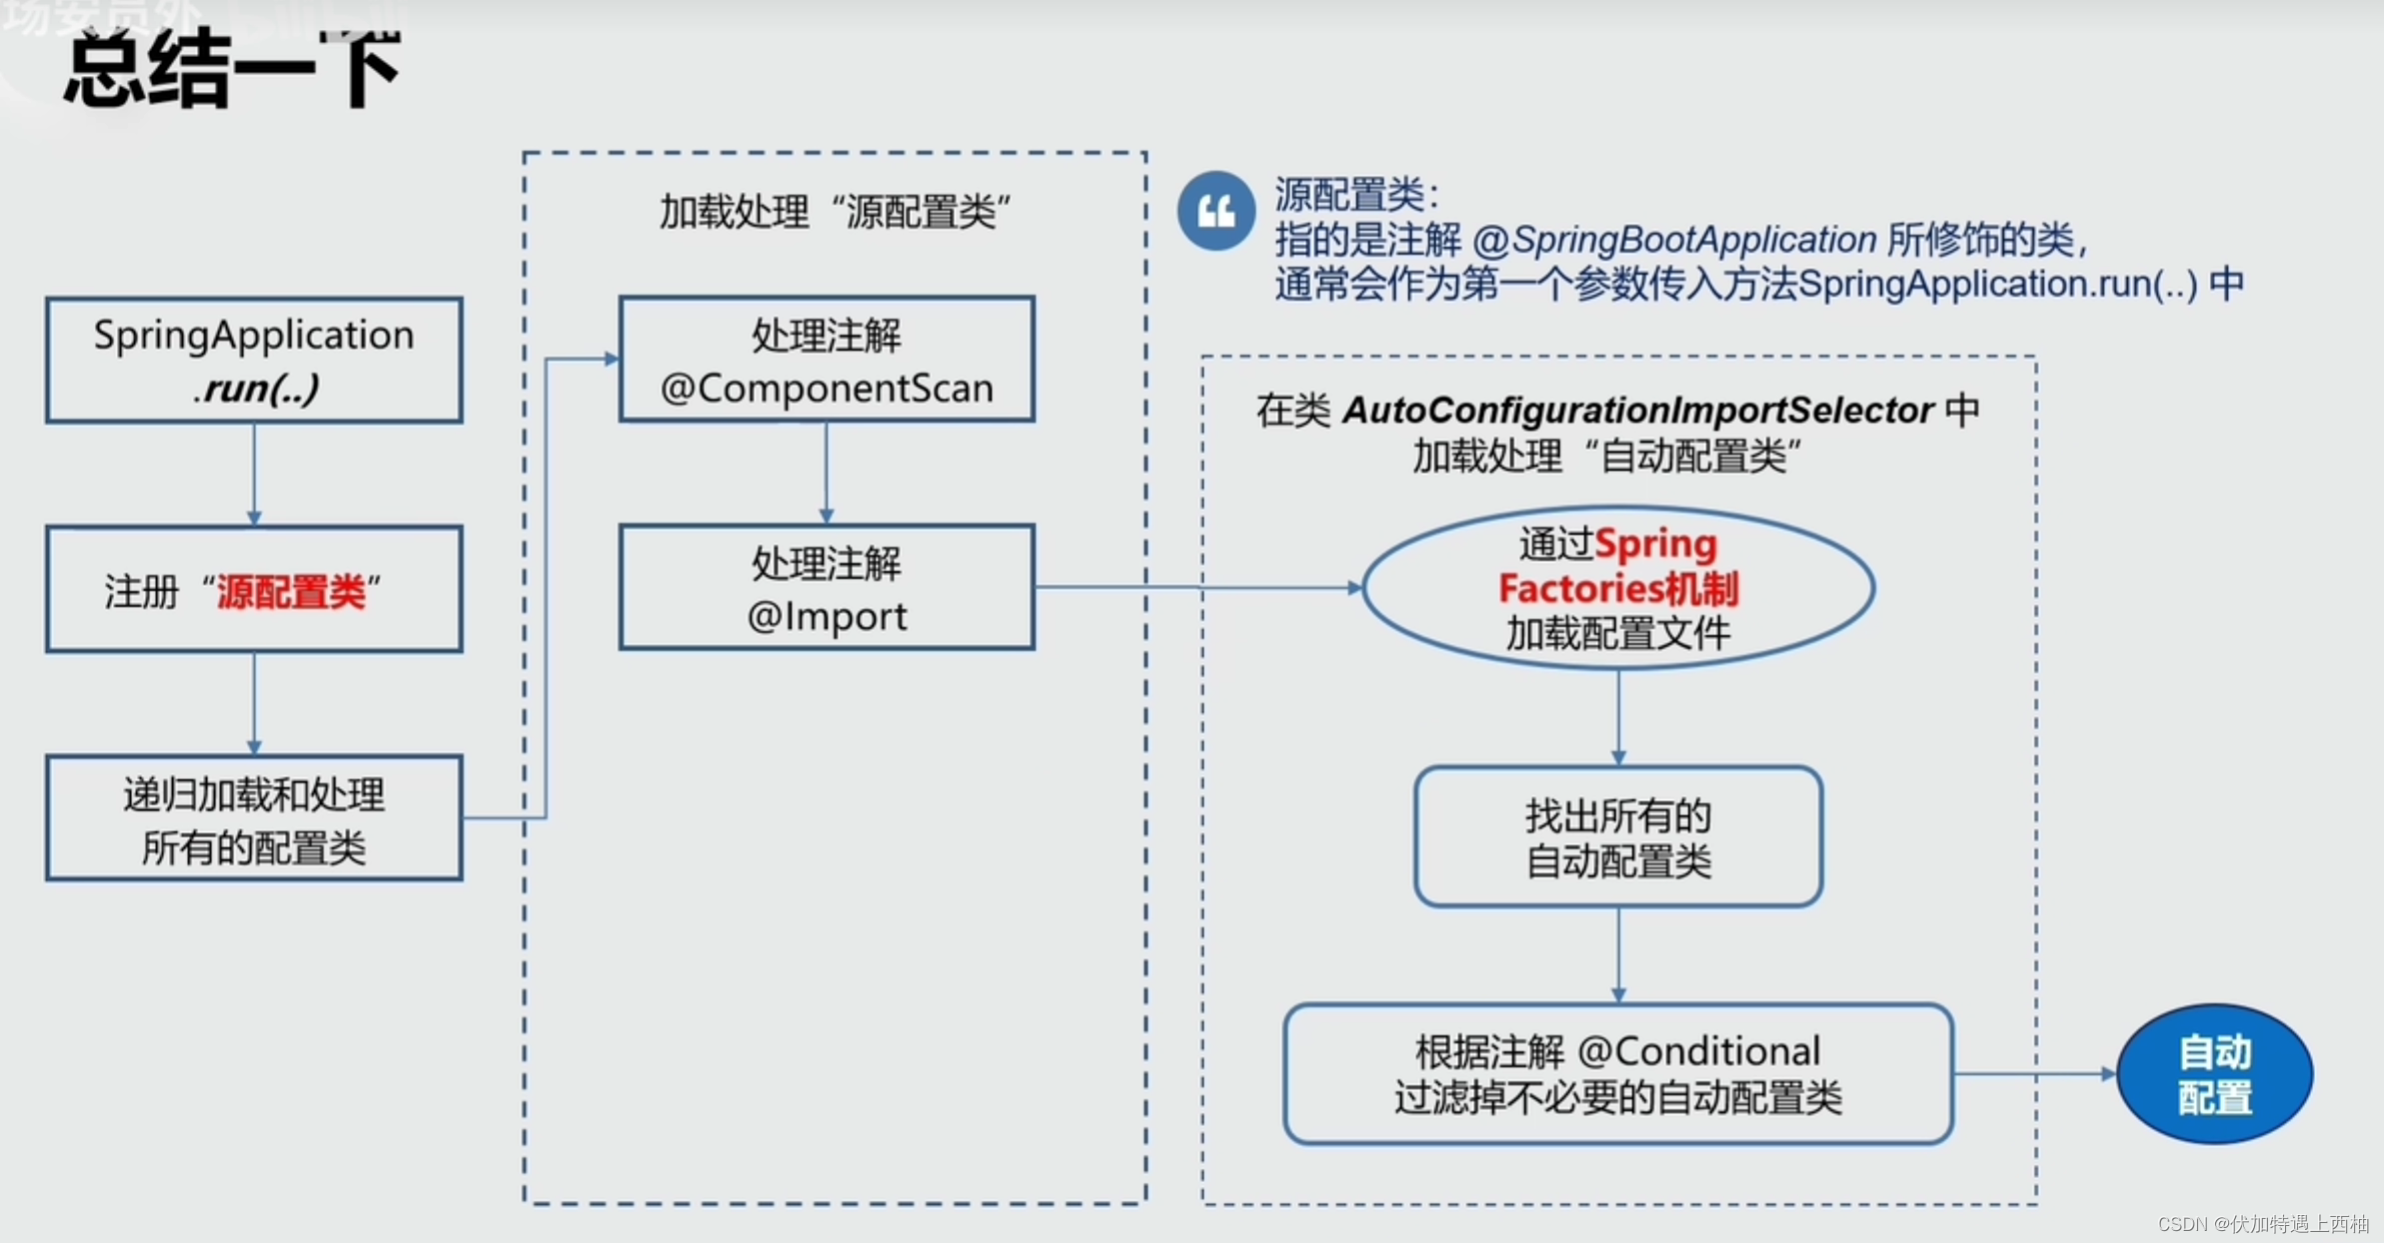
4.3.SpringBoot自动配置原理

Spring Boot 自动配置机制的原理?
SpringBoot为我们提供了各种框架的默认配置,而默认配置生效的步骤如下:
@EnableAutoConfiguration开启自动配置,会去寻找classpath下的META-INF/spring.factories文件,读取其中以EnableAutoConfiguration为key的所有类的名称,这些类就是提前写好的自动配置类- 这些类都声明了
@Configuration注解,并且通过@Bean注解提前配置了我们所需要的一切实例。完成自动配置 - 但是,这些配置不一定生效,因为有
@ConditionalOn注解,满足一定条件才会生效。比如条件之一:是一些相关的类要存在 - 类要存在,我们只需要引入了相关依赖(starter),依赖有了条件成立,自动配置生效。
- 如果我们自己配置了相关Bean,那么会覆盖默认的自动配置的Bean
- 我们还可以通过配置application.yml文件,来覆盖自动配置中的属性
因此,使用SpringBoot自动配置的关键有两点:
1)启动器starter
要想自动配置生效,只需要引入依赖即可,而依赖版本我们也不用操心,因为只要引入了SpringBoot提供的stater(启动器),就会自动管理依赖及版本了。
因此,玩SpringBoot的第一件事情,就是找starter,SpringBoot提供了大量的默认starter
2)全局配置yml文件
另外,SpringBoot的默认配置,都会读取默认属性,而这些属性可以通过自定义application.yml文件来进行覆盖。这样虽然使用的还是默认配置,但是配置中的值改成了我们自定义的。
因此,玩SpringBoot的第二件事情,就是通过application.yaml来覆盖默认属性值,形成自定义配置。