用Abp实现两步验证(Two-Factor Authentication,2FA)登录(二):Vue网页端开发

前端代码的框架采用vue.js + elementUI 这套较为简单的方式实现,以及typescript语法更方便阅读。
首先添加全局对象:
loginForm: 登录表单对象
twoFactorData: 两步验证数据,
showTwoFactorSuccess: 是否显示两步验证成功提示
loginForm: {//登录对象username: "",password: "",twoFactorAuthenticationToken: "",twoFactorAuthenticationProvider: "Phone",
},
twoFactorData: null,
showTwoFactorSuccess: false,
发送验证码
编写发送验证码函数sendVerificationCode,发送验证码后,启动定时器,60秒后可以再次发送验证码。
async sendVerificationCode() {this.smsSendCd = 60;this.timer = setInterval(() => {this.smsSendCd--;if (this.smsSendCd <= 0) {clearInterval(this.timer);}}, 1000);await request(`${this.host}api/TokenAuth/SendTwoFactorAuthenticateCaptcha`,"post",{provider: "Phone",userId: this.twoFactorData.userId,}).catch((re) => {var res = re.response.data;this.errorMessage(res.error.message);}).then((re) => {var res = re.data.result;this.showTwoFactorSuccess = true;this.showTwoFactorSuccess = false;this.successMessage("发送验证码成功");});},
request 是利用axios库发送带有访问凭证Header请求功能的封装 ,ajaxRequest.ts请参考博文使用 Abp.Zero 搭建第三方登录模块(三):网页端开发
这里使用js-cookie库获取cookie中的访问凭证,并添加到Header中
import { request } from "@/ajaxRequire";
import Cookies from "js-cookie";const tokenKey = "main_token";
const setToken = (token: string) => Cookies.set(tokenKey, token);
const cleanToken = () => Cookies.remove(tokenKey);
const getToken = () => Cookies.get(tokenKey);
登录
编写登录函数handleLogin:
async handleLogin() {this.loading = true;var userNameOrEmailAddress = this.loginForm.username;var password = this.loginForm.password;var twoFactorAuthenticationToken =this.loginForm.twoFactorAuthenticationToken;var twoFactorAuthenticationProvider =this.loginForm.twoFactorAuthenticationProvider;userNameOrEmailAddress = userNameOrEmailAddress.trim();await request(`${this.host}api/TokenAuth/Authenticate`, "post", {userNameOrEmailAddress,password,twoFactorAuthenticationToken,twoFactorAuthenticationProvider,}).catch((re) => {var res = re.response.data;this.errorMessage(res.error.message);}).then(async (res) => {var data = res.data.result;if (data.requiresTwoFactorAuthenticate) {this.twoFactorData = data;} else {setToken(data.accessToken);setRememberClientToken(data.rememberClientToken);await this.getCurrentUser();}}).finally(() => {setTimeout(() => {this.loading = false;}, 1.5 * 1000);});},
请注意,当需要进行两步验证时,requiresTwoFactorAuthenticate会返回true,同时返回
twoFactorAuthenticationProviders。
退出登录
登出, 将Token以及用户信息置空
<el-button:loading="loading"type="danger"style="width: 100%"@click.native.prevent="logout">退出登录
</el-button>
logout() {setToken(null);this.token = null;this.userInfo = null;
},
界面控件
在登录表单的HTML中,添加两步验证控件:
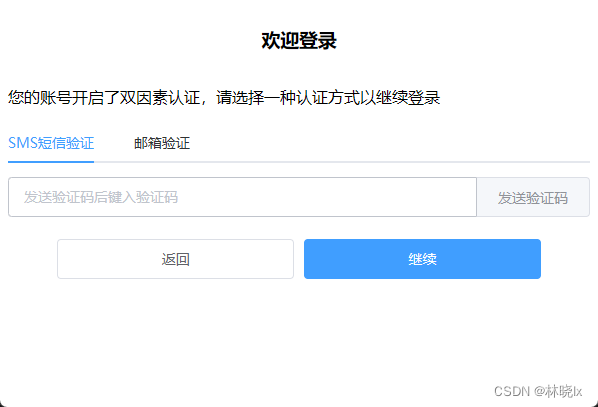
显示规则为,当需要两步验证时(即twoFactorData不为空),显示两步验证控件,否则显示登录控件。
根据twoFactorAuthenticationProviders。我们采用了两种方式,一种是短信验证码,一种是邮箱验证码,这里我们采用了elementUI的tab组件,来实现两种方式的切换。
<el-formref="loginForm":model="loginForm"class="login-form"autocomplete="on"label-position="left"><template v-if="twoFactorData == null">...</template><template v-else><p>您的账号开启了两步验证,请选择一种认证方式以继续登录</p><el-tabsv-model="loginForm.twoFactorAuthenticationProvider"tab-position="top"><el-tab-pane:lazy="true"label="SMS短信验证"name="Phone":disabled="twoFactorData.twoFactorAuthenticationProviders.indexOf('Email') == -1"><el-row><el-col:span="24"style="{margin-bottom: 10px;}"><el-alertv-if="showTwoFactorSuccess"title="验证码已发送至用户的手机号,请查收"type="info"></el-alert></el-col><el-col :span="24"><el-form-itemclass="item"prop="twoFactorAuthenticationToken"><el-inputv-model="loginForm.twoFactorAuthenticationToken":placeholder="'发送验证码后键入验证码'"tabindex="2"autocomplete="on"@blur="capsTooltip = false"><el-buttonslot="append":disabled="smsSendCd > 0"@click="sendVerificationCode">{{smsSendCd == 0 ? "发送验证码" : smsSendCd + "后重试"}}</el-button></el-input></el-form-item></el-col></el-row></el-tab-pane><el-tab-pane:lazy="true"label="邮箱验证"name="Email":disabled="twoFactorData.twoFactorAuthenticationProviders.indexOf('Email') == -1"><el-row><el-col :span="24"><el-alertv-if="showTwoFactorSuccess"title="验证码已发送至登录用户对应的邮箱,请查收"type="info"></el-alert></el-col><el-col :span="24">...</el-col></el-row></el-tab-pane></el-tabs></template><el-row type="flex" class="row-bg" justify="center" :gutter="10"><el-col :span="10" v-if="twoFactorData != null"><el-button:loading="loading"style="width: 100%"@click.native.prevent="twoFactorData = null">返回</el-button></el-col><el-col :span="10"><el-button:loading="loading"type="primary"style="width: 100%"@click.native.prevent="handleLogin">{{ twoFactorData == null ? "登录" : "继续" }}</el-button></el-col></el-row></el-form>
获取用户信息功能
登录成功后我们要拿到当前用户的信息,存入userInfo对象,并在页面上简单展示
<span>{{ userInfo }}</span>
创建一个获取当前用户的函数
async getCurrentUser() {await request(`${this.host}${this.prefix}/User/GetCurrentUser`,"get",null).catch((re) => {var res = re.response.data;this.errorMessage(res.error.message);}).then(async (re) => {var result = re.data.result as any;this.userInfo = result;this.token = getToken();clearInterval(this.timer);this.smsSendCd = 0;this.currentVerifyingType = null;this.successMessage("登录成功");});
}
最终效果
项目地址
Github:matoapp-samples