uni-app--》如何制作一个APP并使用?

🏍️作者简介:大家好,我是亦世凡华、渴望知识储备自己的一名在校大学生
🛵个人主页:亦世凡华、
🛺系列专栏:uni-app
🚲座右铭:人生亦可燃烧,亦可腐败,我愿燃烧,耗尽所有光芒。
👀引言
⚓经过web前端的学习,相信大家对于前端开发有了一定深入的了解,今天我开设了uni-app专栏,主要想从移动端开发方向进一步发展,而对于我来说写移动端博文的第二站就是uni-app开发,希望看到我文章的朋友能对你有所帮助。
目录
项目搭建
配置tabBar路由
设置基础内容
导航栏点击样式设置
新闻详情页布局
新闻列表数据的详细展示
实现上拉触底效果
获取参数并跳转到详情页
项目的打包上线
项目开源Github
项目搭建
今天实现一个简单的新闻列表的小案例,并制作成一个APP在手机上下载使用,项目很简单,仅仅就只需要有两个路由来实现:index和user。如果第一次接触uni-app的话,欢迎订阅一下本专栏,学习里面的文章,项目的实现原理基本可以搞懂,废话不多说,直接上手操作。
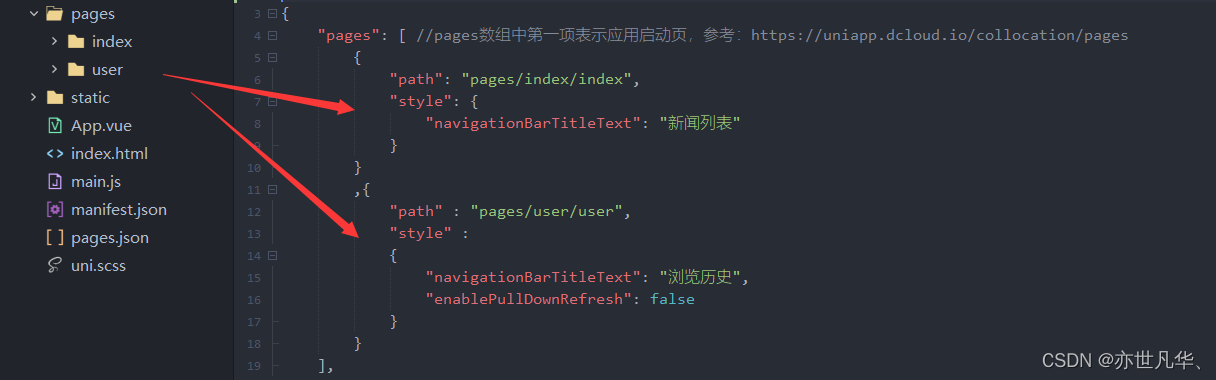
配置tabBar路由
因为仅有两个路由,所有在pages页面新建页面时,会自动生成配置路径,只要自己设置导航栏的标题即可,如下:
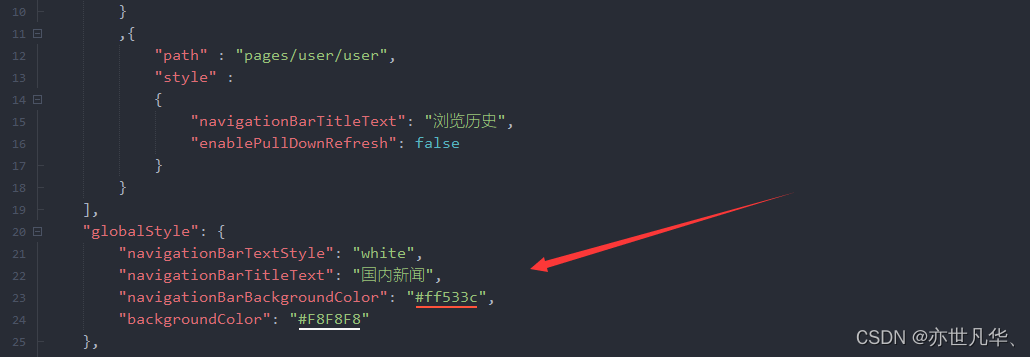
接下来需要对导航栏的标题颜色进行设置,这里我就设置在全局样式里面了,如果你对某一个页面需要指定特别的样式,可以在当前页面的路径的pages里单独设置颜色来覆盖全局样式,这里不再赘述,如下:
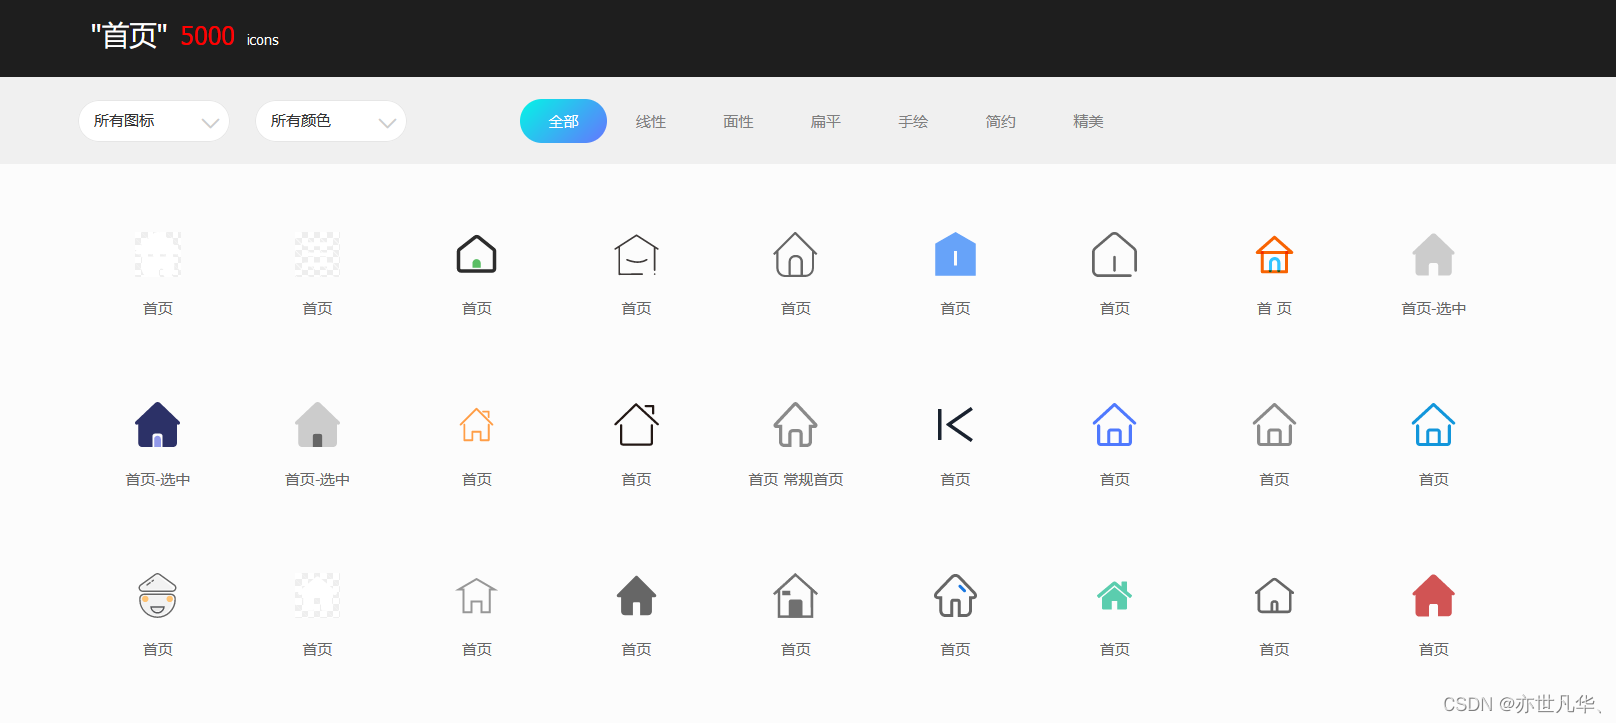
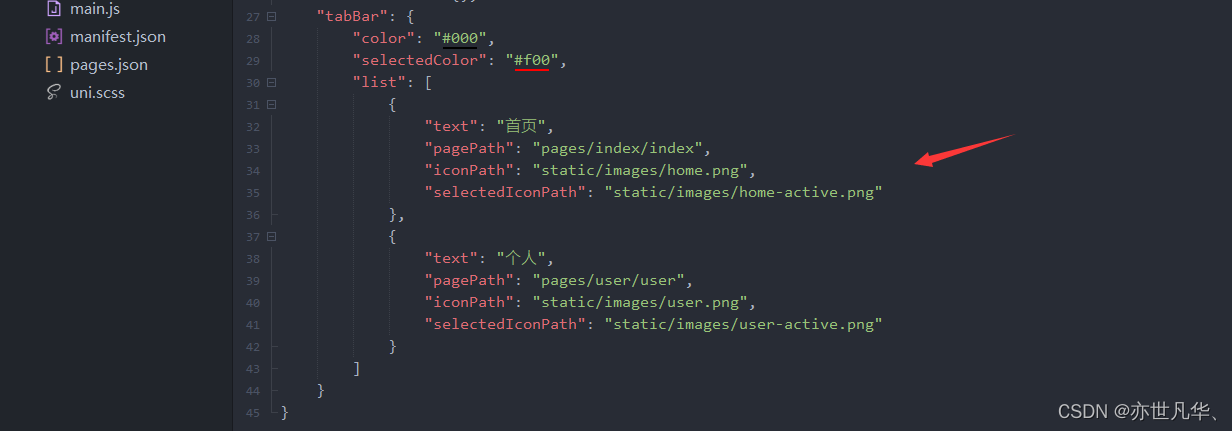
设置好导航栏的样式之后,便可以着手配置tabBar的相关样式设置了,这里的话可以设置一个点击的图表,图表可以自己在阿里云的字体图标库进行寻找,地址:iconfont-阿里巴巴矢量图标库 :
选择自己喜欢的图表样式,将图片下载下来即可,然后导入到本地中进行引入即可:

设置基础内容
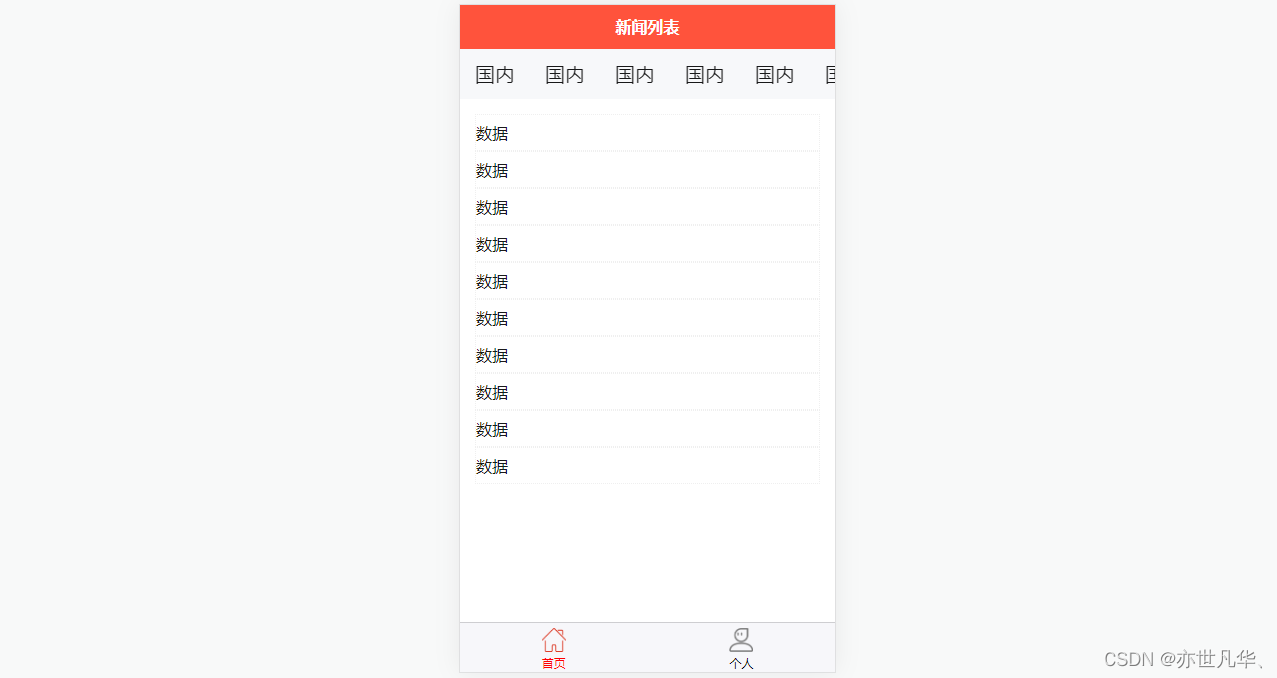
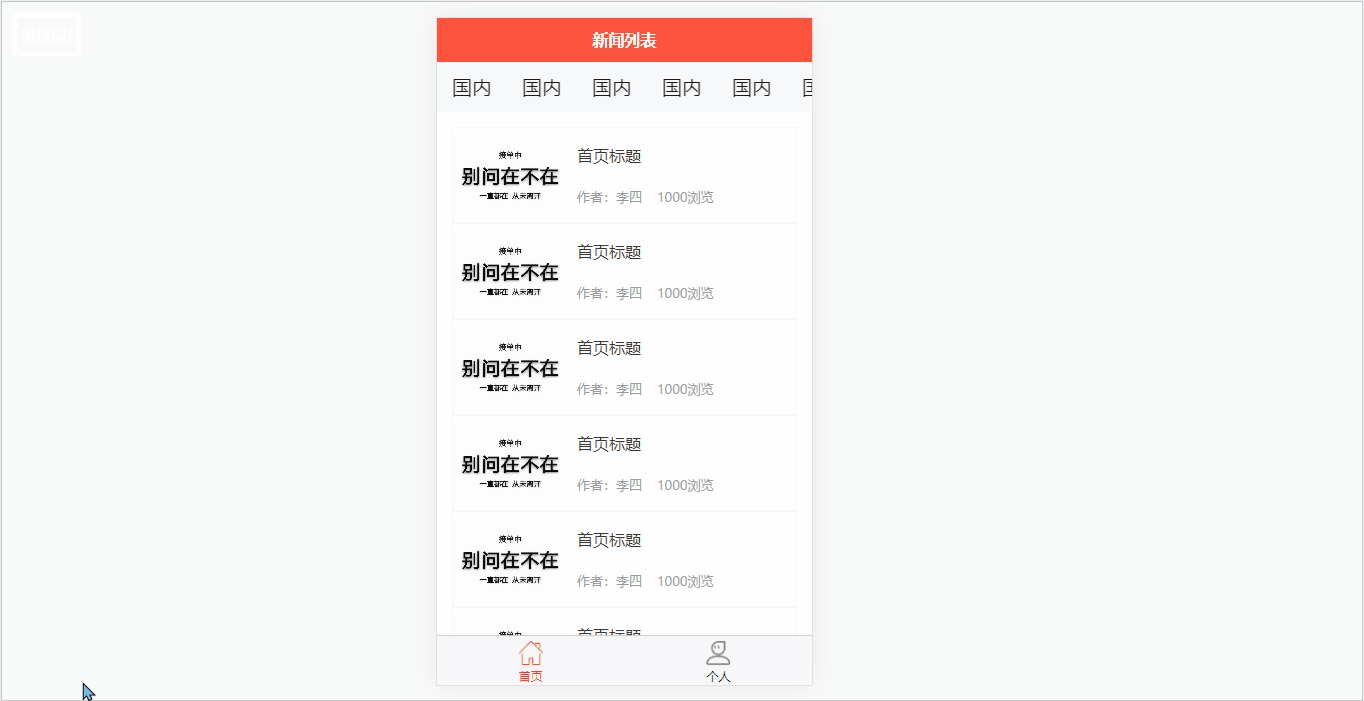
接下来实现新闻列表的基础内容,如下:
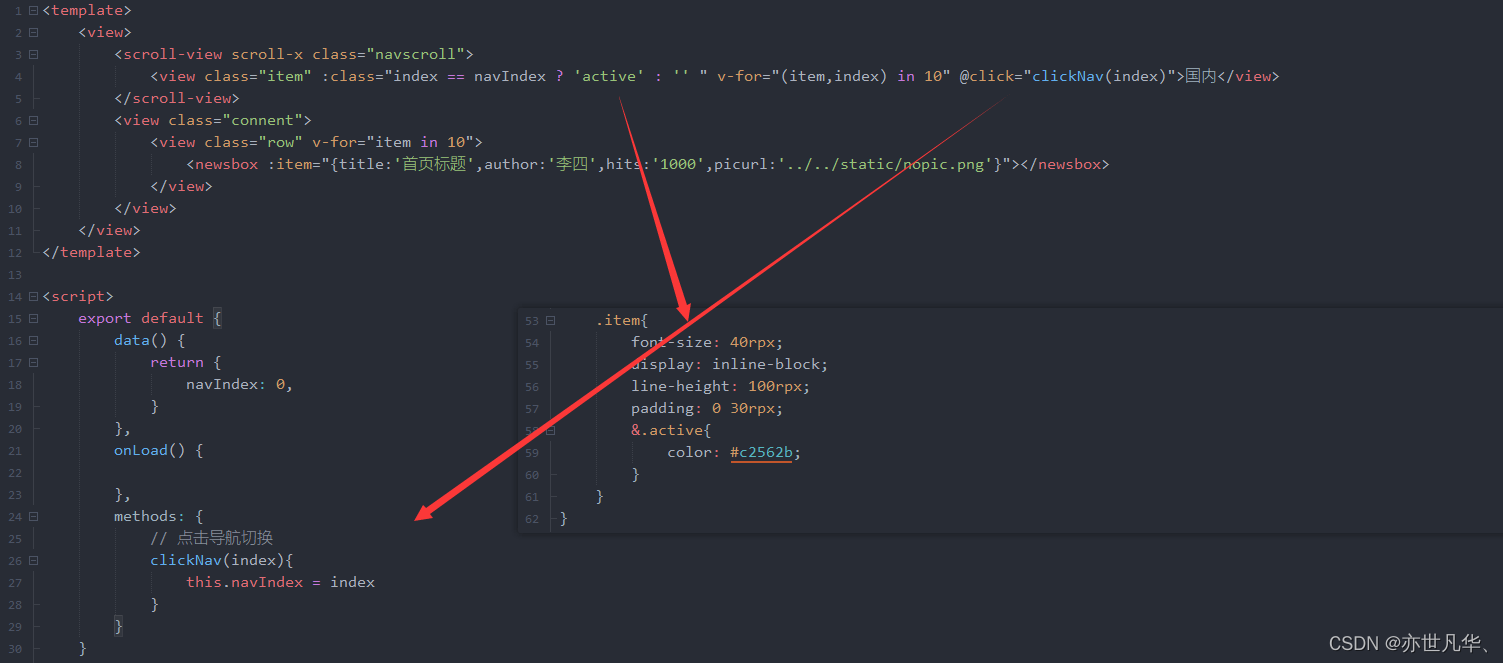
<template><view><scroll-view scroll-x class="navscroll"><view class="item">国内</view><view class="item">国内</view><view class="item">国内</view><view class="item">国内</view><view class="item">国内</view><view class="item">国内</view><view class="item">国内</view><view class="item">国内</view></scroll-view><view class="connent"><view class="row" v-for="item in 10">数据</view></view></view>
</template><script>export default {data() {return {title: 'Hello'}},onLoad() {},methods: {}}
</script><style lang="scss" scoped>
.navscroll{height: 100rpx;background: #F7F8FA;white-space: nowrap;// 去掉H5端的滚动条/deep/ ::-webkit-scrollbar {width: 4px !important;height: 1px !important;overflow: auto !important;background: transparent !important;-webkit-appearance: auto !important;display: block;}.item{font-size: 40rpx;display: inline-block;line-height: 100rpx;padding: 0 30rpx;}
}.connent {padding: 30rpx;.row{border: 1px dotted #efefef;padding: 15rpx 0;}
}
</style>
接下来实现浏览历史的基础内容,如下:
<template><view class="user"><view class="top"><image src="../../static/logo.png" mode=""></image><text>浏览历史</text></view><view class="connent">数据</view></view>
</template><script>export default {data() {return {};}}
</script><style lang="scss">
.user{.top{padding: 50rpx 0;background: #F8F8F8;color: #555;display: flex;flex-direction: column;justify-content: center;align-items: center;image{width: 150rpx;height: 150rpx;}.text{font-size: 38rpx;padding-top: 20rpx;}}.connent {padding: 30rpx;.row{border: 1px dotted #efefef;padding: 15rpx 0;}}
}
</style>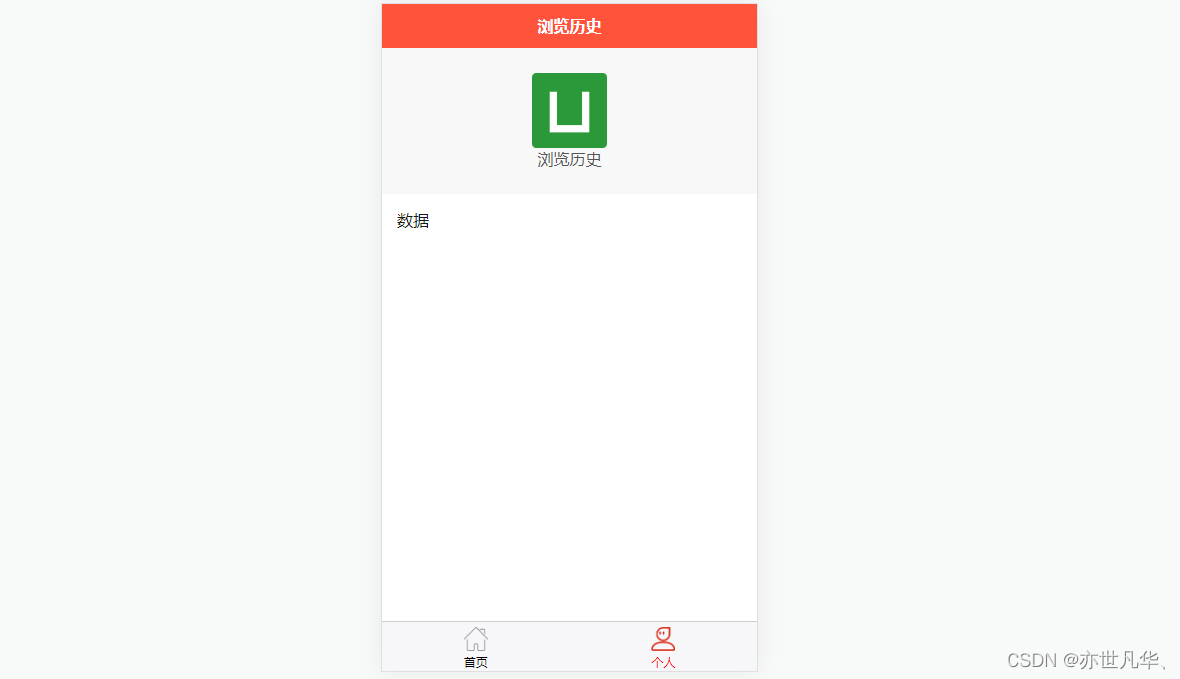
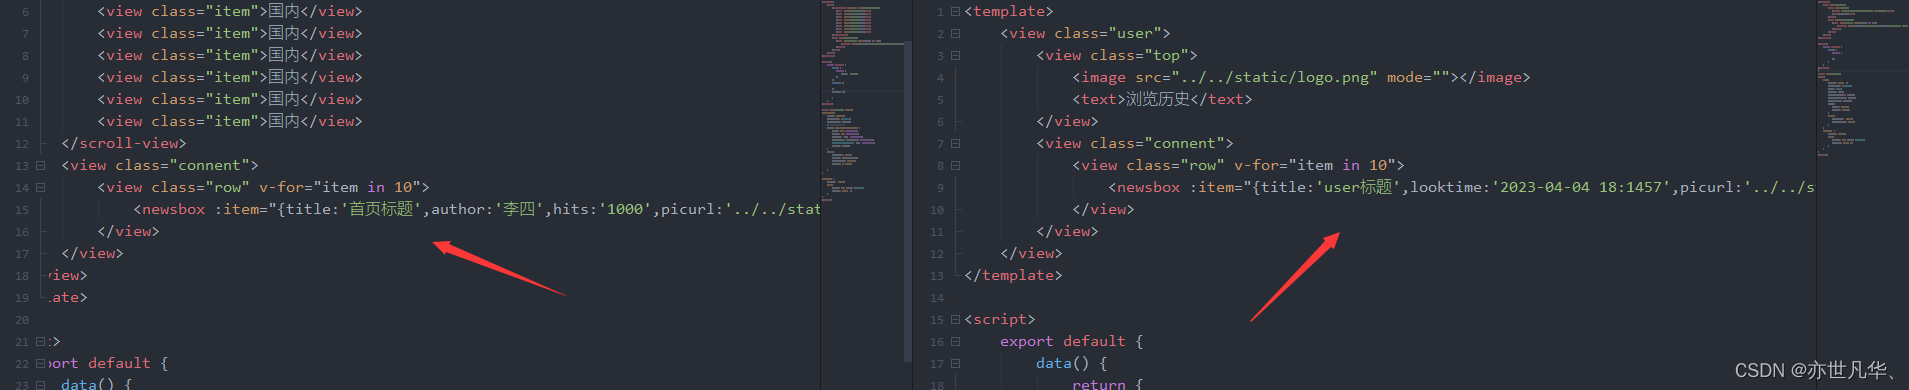
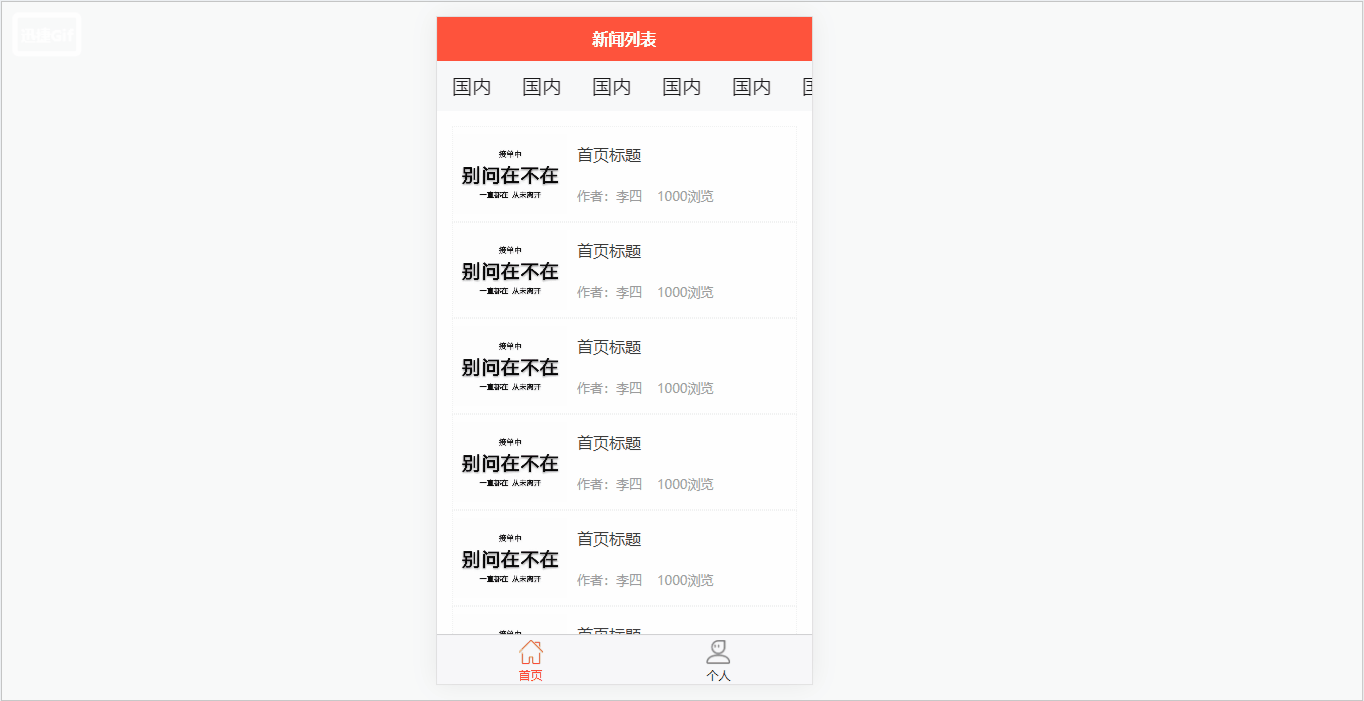
因为新闻列表界面和浏览历史界面都需要一些相同的数据,这里的话就可以将要展现的数据单独放在一个components组件里面进行一些数据的共享,通过设置一个props对象,将相关要展示的界面内容通过父组件传递过来的props数据进行相关展示,如下:
<template><view class="newsbox"><view class="pic"><image :src="item.picurl" mode="aspectFill"></image></view><view class="text"><view class="title">{{item.title}}</view><view class="info" v-if="!item.looktime"><text>作者:{{item.author}}</text><text>{{item.hits}}浏览</text></view><view class="info" v-else><text>浏览时间:{{item.looktime}}</text></view></view></view>
</template><script>export default {name:"newsbox",props:{item:{type:Object,default(){return {title:"组件内默认的标题",author:"张三",hits:668,picurl:"../../static/nopic.png",looktime:"2023-04-04 18:14:46"}}}},data() {return {};}}
</script><style lang="scss">
.newsbox{display: flex;.pic{width: 229.5rpx;height: 160rpx;image{width: 100%;height: 100%;}}.text{flex: 1;padding: 20rpx;display: flex;flex-direction: column; // 上下排列justify-content: space-between; // 两侧排列.title{font-size: 32rpx;color: #333;text-overflow: -o-ellipsis-lastline;overflow: hidden;				//溢出内容隐藏text-overflow: ellipsis;		//文本溢出部分用省略号表示display: -webkit-box;			//特别显示模式-webkit-line-clamp: 1;			//行数line-clamp: 2;					-webkit-box-orient: vertical;	//盒子中内容竖直排列}.info{font-size: 26rpx;color: #999;text{padding-right: 30rpx;}}}
}
</style>
新闻列表和浏览历史调用components组件,并通过props进行数据传参:
导航栏点击样式设置
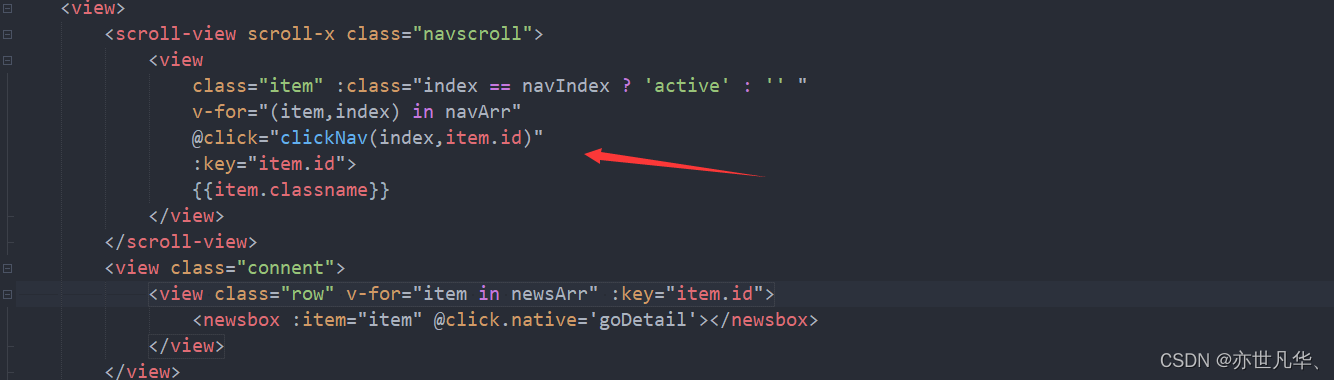
接下来设置导航栏的点击样式,当用户进行相关导航按钮的点击时,该文章会产生高亮效果,我们只需要动态绑定一个class属性,当我们选择的按钮等于当前的元素下标时,产生高亮效果,具体操作如下:
新闻详情页布局
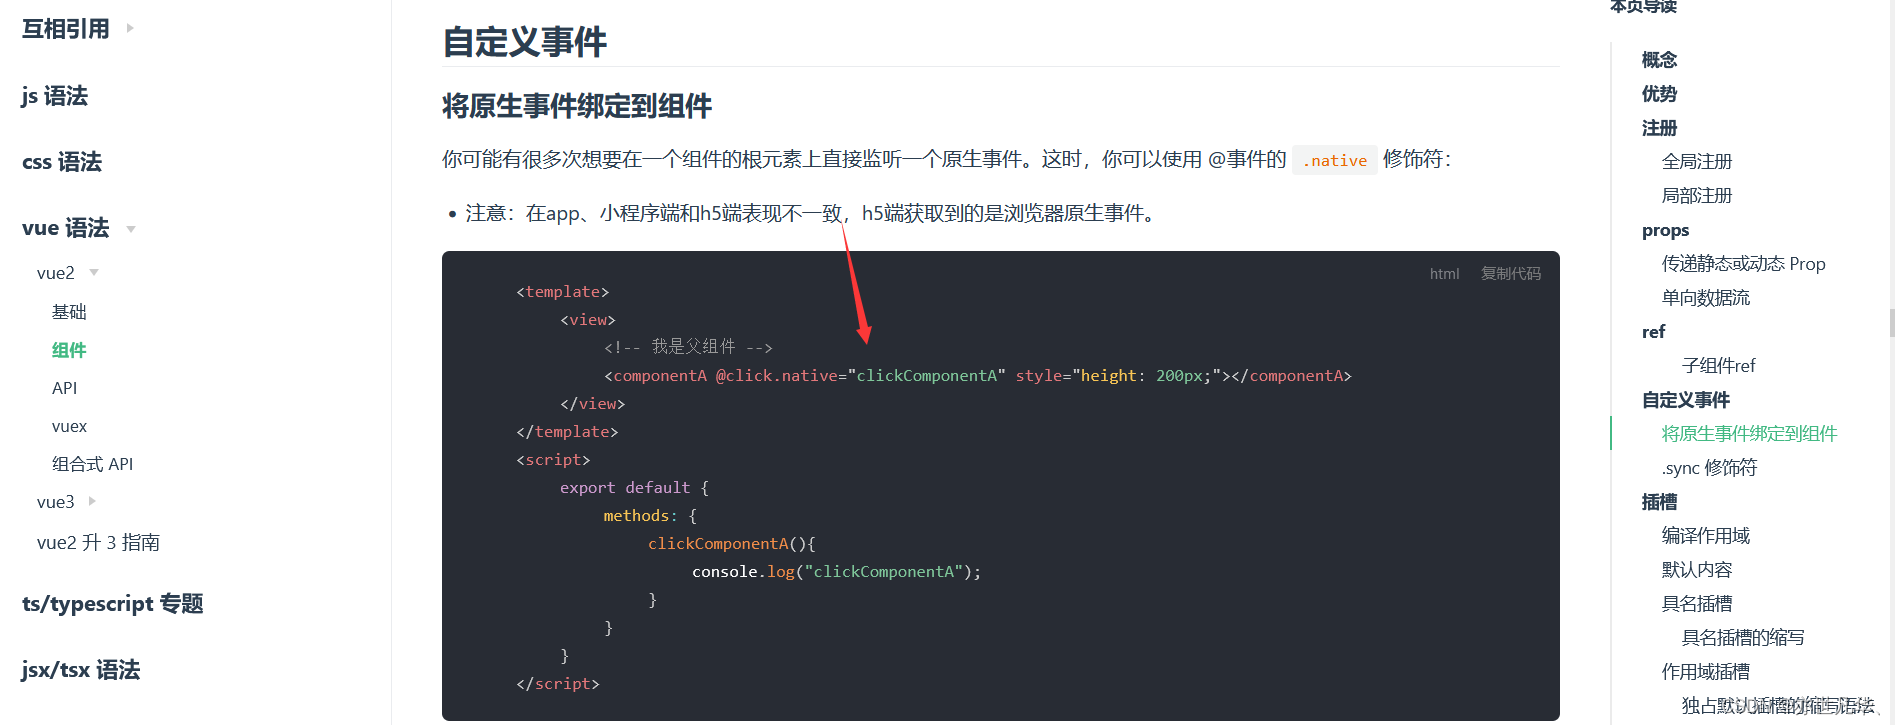
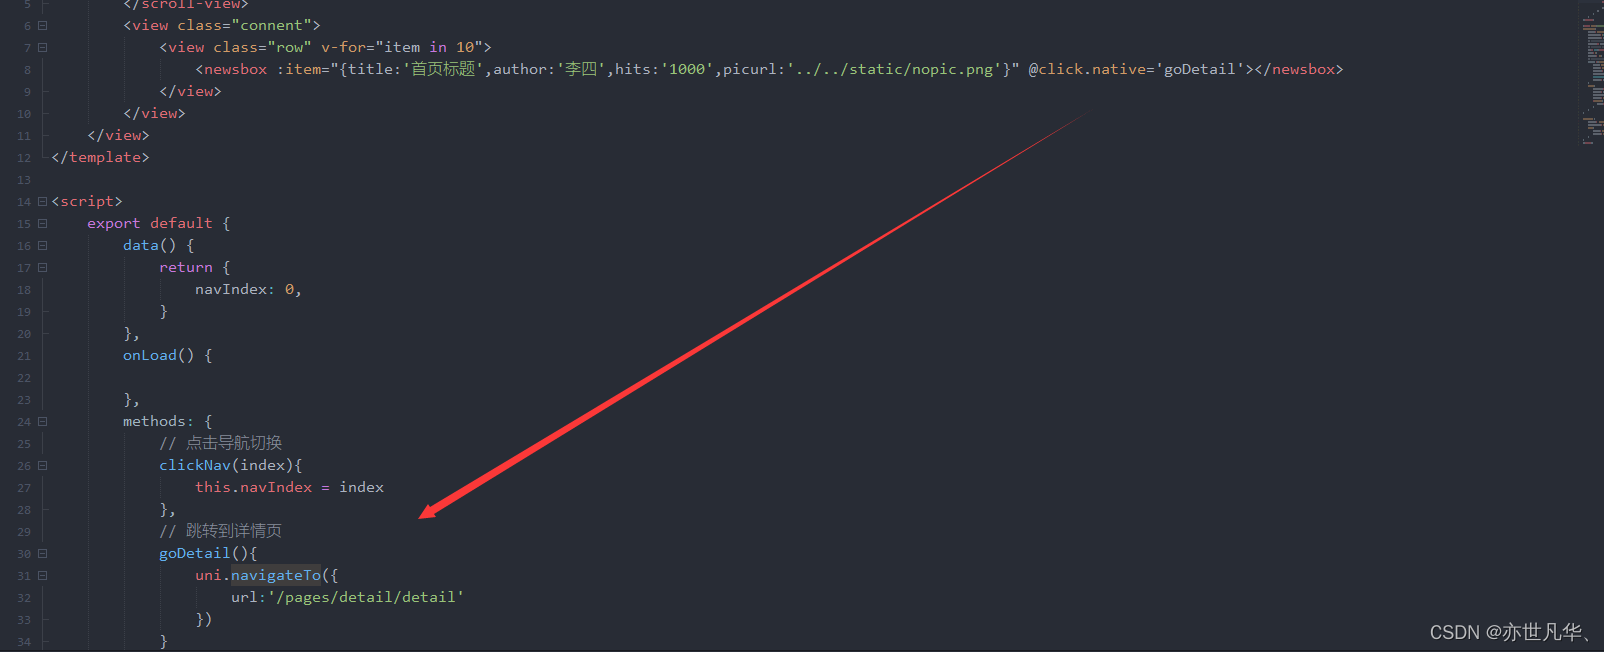
设置点击新闻列表页面的新闻内容进行页面的跳转,这里可以使用自定义事件,如果要将原生事件绑定到组件当中去,可以通过 .native 进行解决,详情可参考官方文档,如下:
这里我设置好新闻列表的路由界面后,设计点击事件可以通过navigateTo实现页面跳转,如下:
设置好跳转路径后,接下来可以通过设置新闻详情页的内容布局,大致情况设置如下:
<template><view class="detail"><view class="title">新闻标题</view><view class="info"><view class="author">编辑:张三</view><view class="time">2023-12-13 15:34:59</view></view><view class="content">内容内容内容内容内容内容内容内容内容内容内容内容内容内容内容内容内容内容内容内容内容内容内容内容内容内容内容内容as</view><view class="description">声明:本站的内容均采集与腾讯新闻,如果侵权请联系管理(12345676890@qq.com)进行整改删除,本站进行了内容采集不代表本站及作者观点,若有侵权请及时联系管理员,谢谢您的支持。</view></view>
</template><script>export default {data() {return {};}}
</script><style lang="scss">
.detail{padding: 30rpx;.title{font-size: 46tpx;color: #333;}.info{background: #f6f6f6;padding: 20rpx;font-size: 25rpx;color: #666;display: flex;justify-content: space-between;margin: 40rpx 0;}.content{padding-bottom: 50rpx;}.description{background: #FEF0F0;font-size: 26rpx;padding: 20rpx;color: #F89898;line-height: 1.8em;}
}
</style>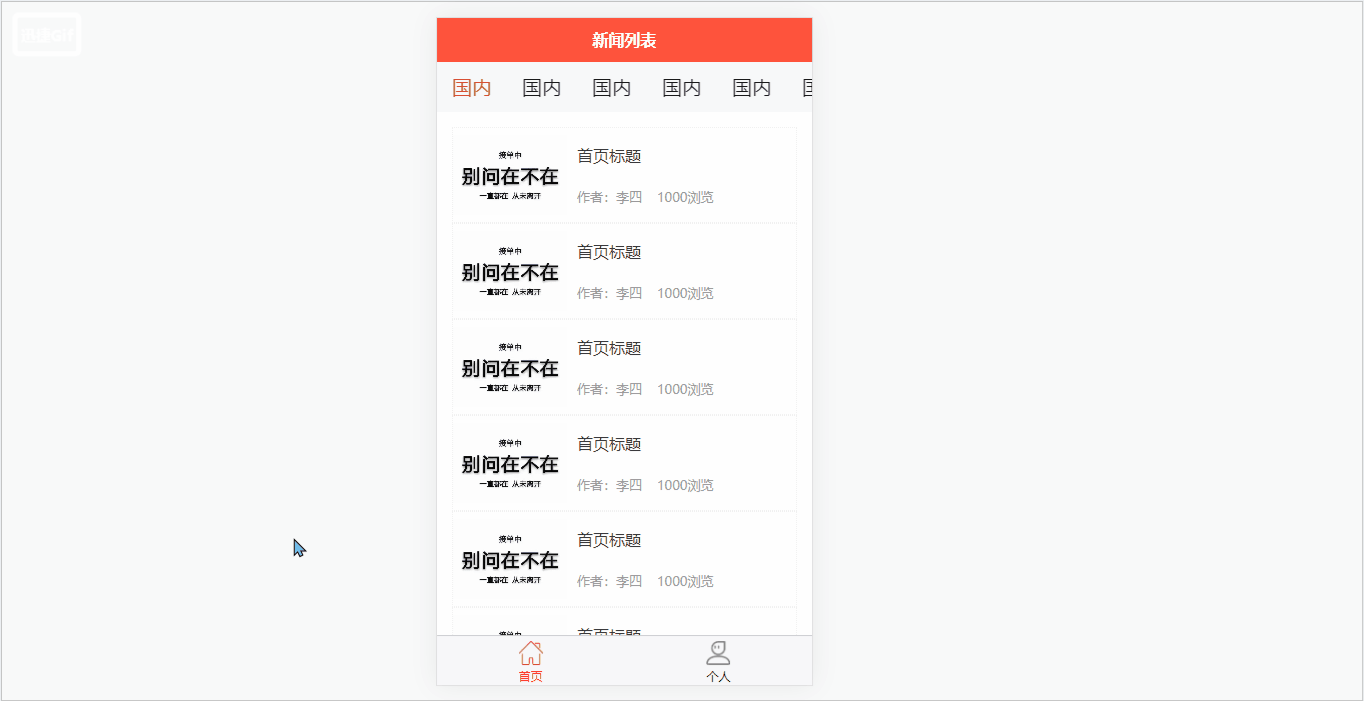
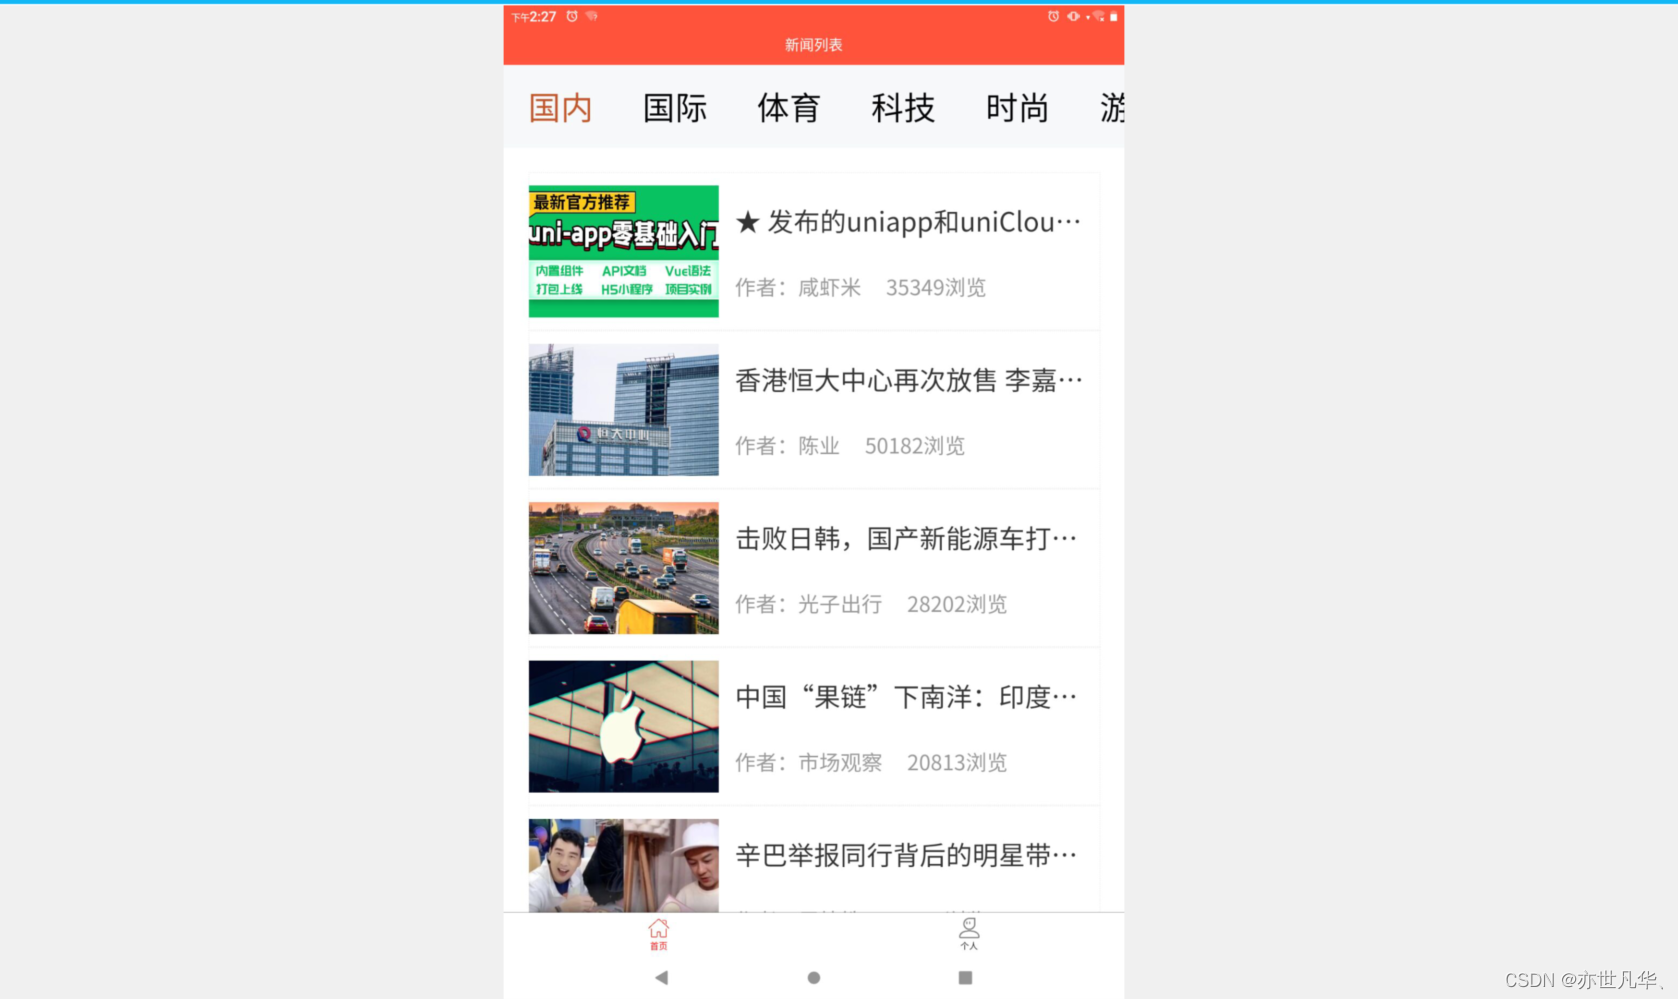
新闻列表数据的详细展示
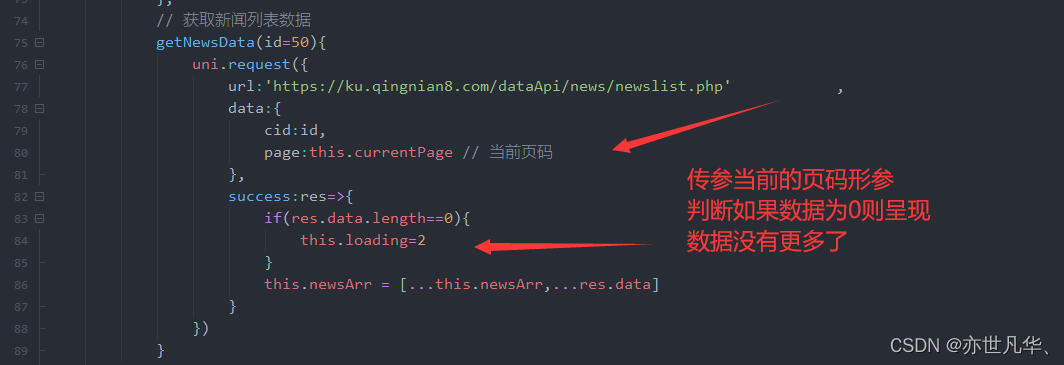
接下来实现调用接口来展示详细的数据,如下:
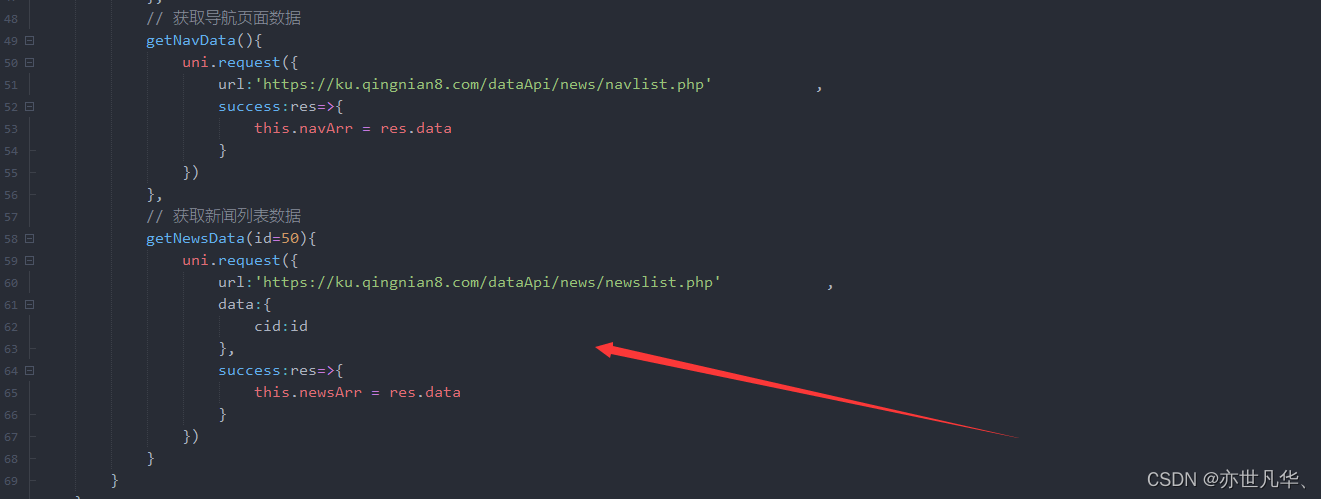
通过传递item的id来获取不同id下导航栏给我们展示的新闻数据
然后给一个图片用来展示,没有数据时页面的样式

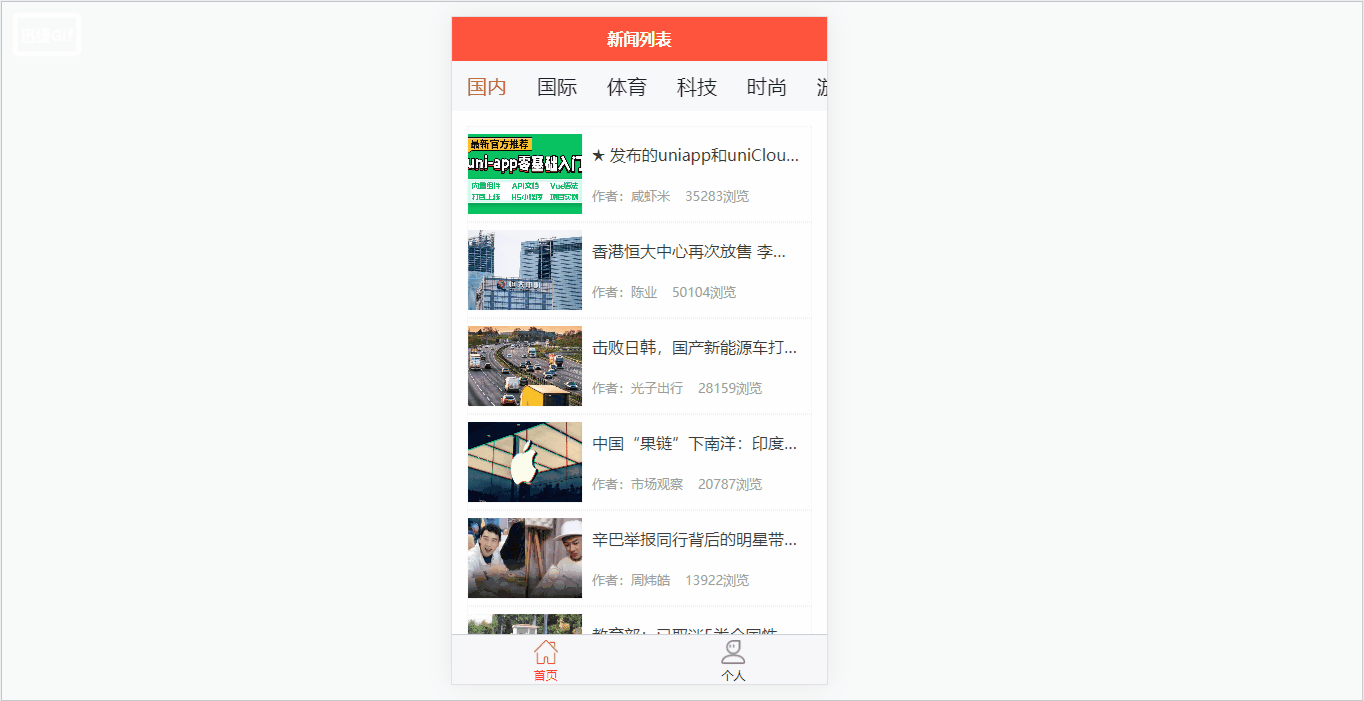
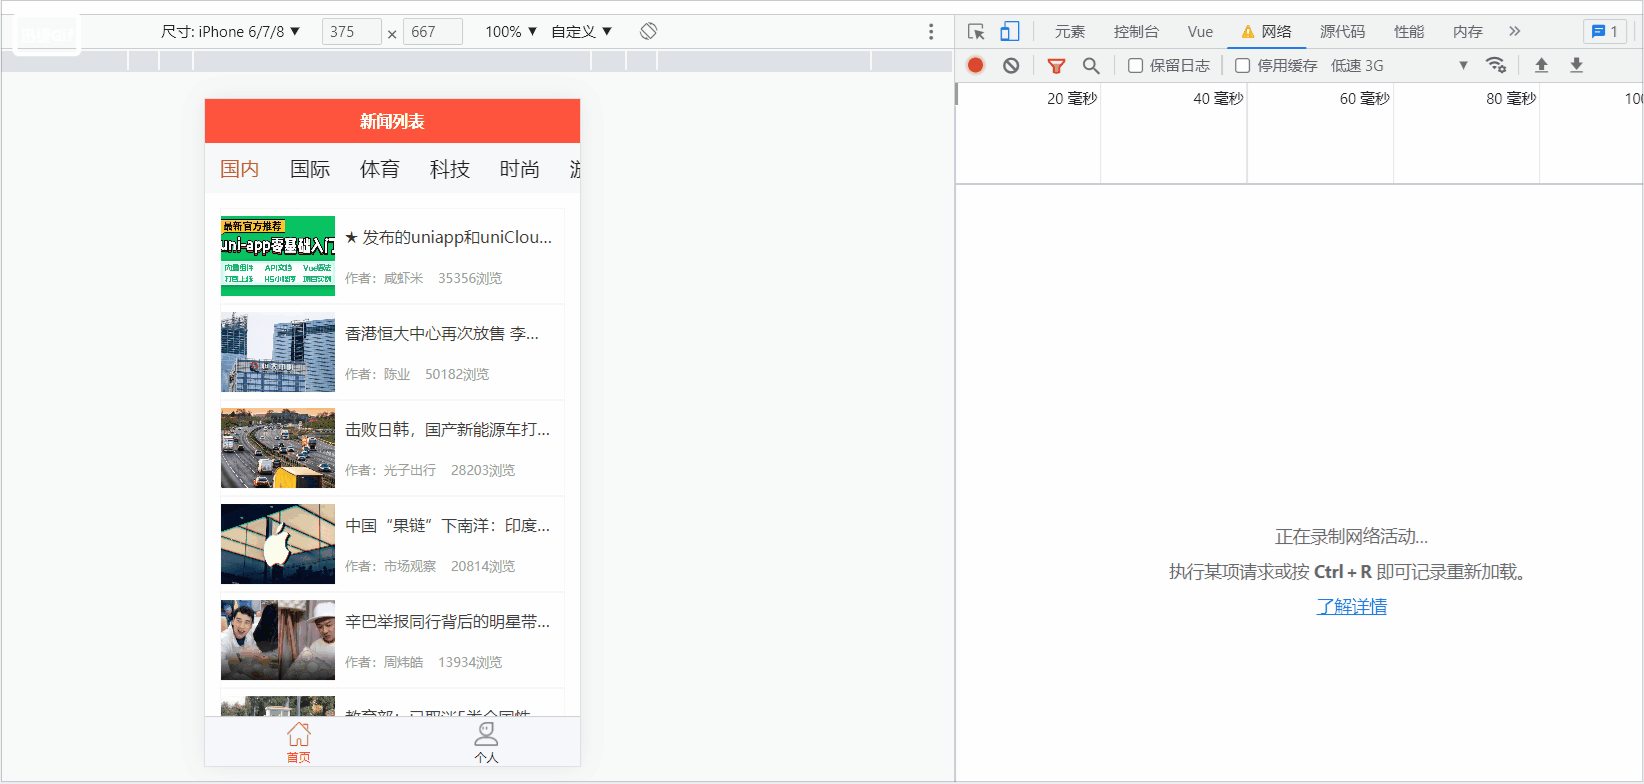
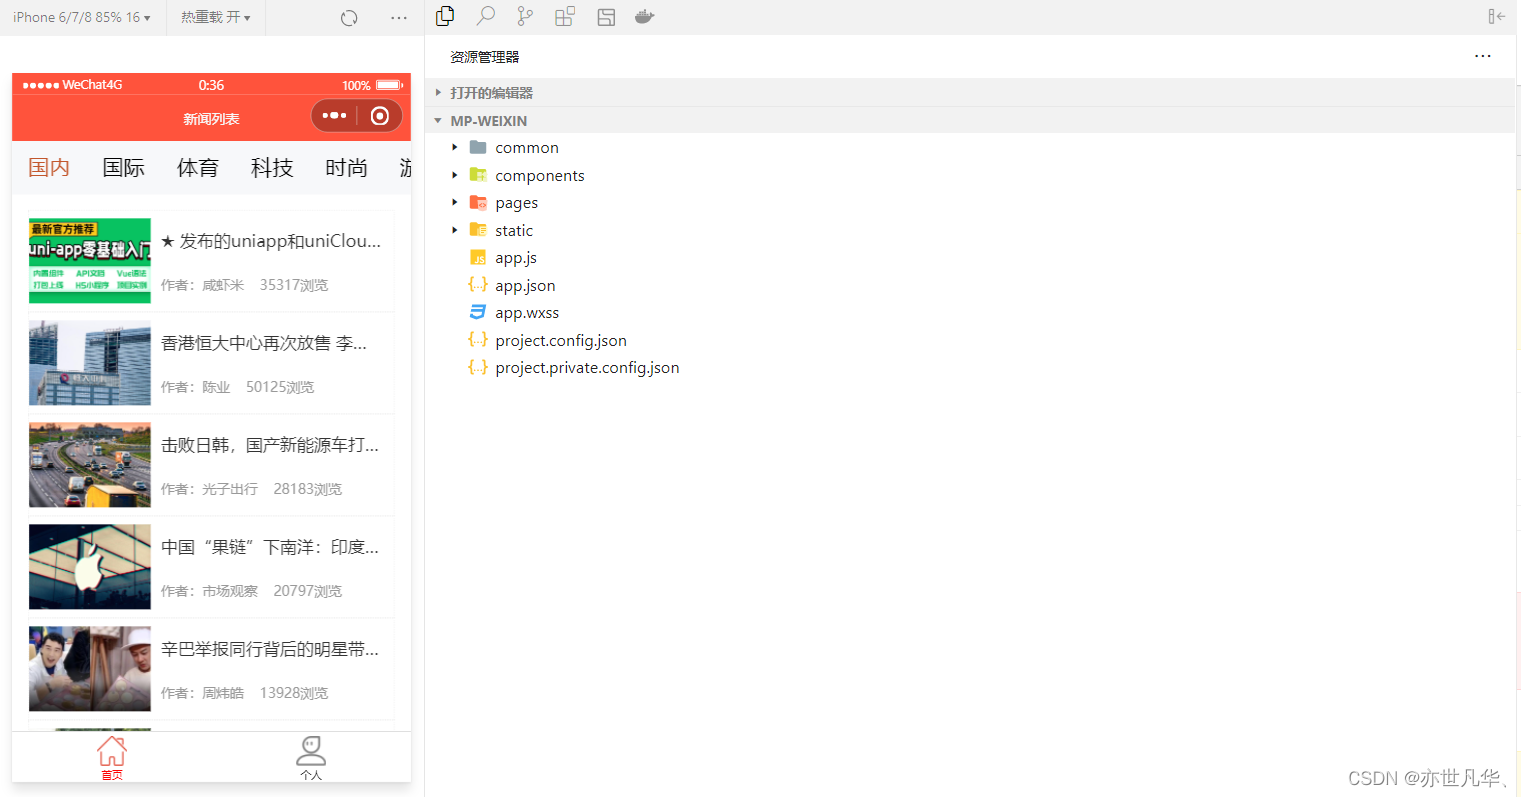
具体实现的结果如下:
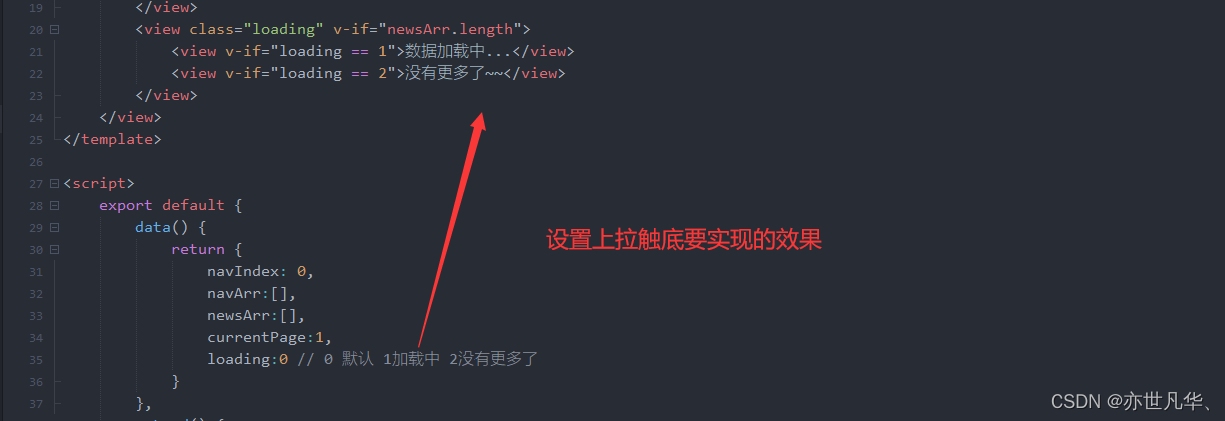
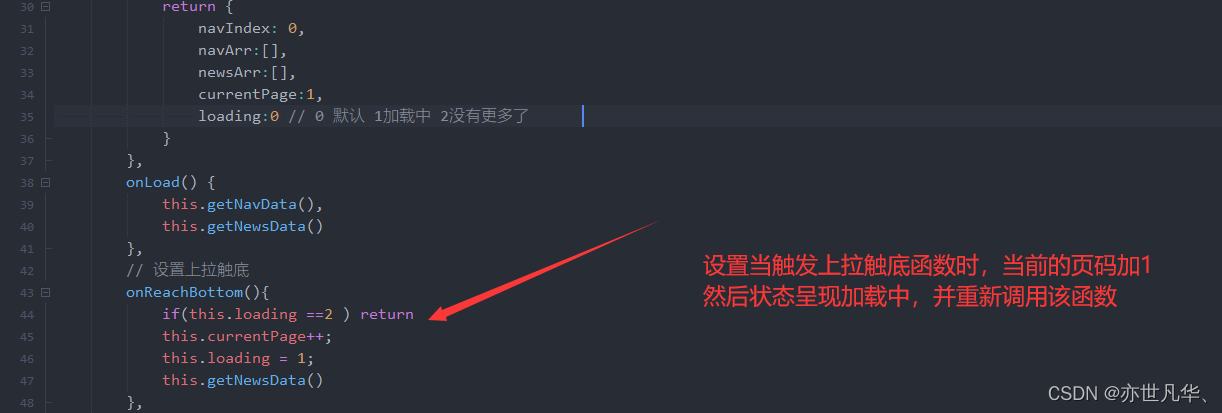
实现上拉触底效果
接下来需要实现上拉触底的效果,实现上拉触底效果的函数为:onReachBottom,如下:
为了呈现具体的效果,我将浏览器的网速设置为低速3G,如下:
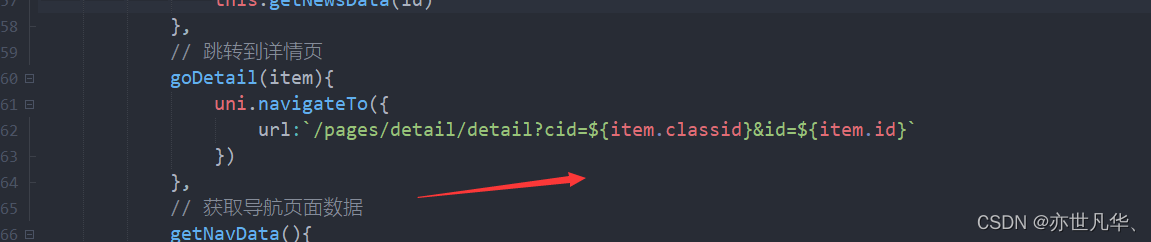
获取参数并跳转到详情页
通过设置点击函数传参,将item参数传递到函数当中,并通过模板字符串实现传参,如下:
传递完参数之后,设置新闻详情界面的布局,将访问的数据进行缓存,相同的数据进行去重,详细代码如下:
<template><view class="detail"><view class="title">{{detail.title}}</view><view class="info"><view class="author">编辑:{{detail.author}}</view><view class="time">发布日期:{{detail.posttime}}</view></view><view class="content"><rich-text :nodes="detail.content"></rich-text></view><view class="description">声明:本站的内容均采集与腾讯新闻,如果侵权请联系管理(12345676890@qq.com)进行整改删除,本站进行了内容采集不代表本站及作者观点,若有侵权请及时联系管理员,谢谢您的支持。</view></view>
</template><script>import { parseTime } from '../utils/tool.js'export default {data() {return {options:null,detail:{},};},onLoad(e) {this.options = ethis.getDetail()},methods:{getDetail(){uni.request({url:'https://ku.qingnian8.com/dataApi/news/detail.php',data:this.options,success:res=>{// res.data.posttime = parseTime(res.data.posttime) // 时间有点老,我就注释掉了换固定时间res.data.posttime = '2023-04-04 18:37:49'res.data.content = res.data.content.replace(/<img/gi,'<img style="max-width:100%"')this.detail = res.datathis.saveHistory()uni.setNavigationBarTitle({title:this.detail.title})}})},// 保存浏览历史saveHistory(){let historyArr = uni.getStorageSync("historyArr") || []let item = {id:this.detail.id,classid:this.detail.classid,picurl:this.detail.picurl,title:this.detail.title,looktime:parseTime(Date.now())}let index = historyArr.findIndex(i=>{return i.id == this.detail.id})if(index>=0){historyArr.splice(index,1)}historyArr.unshift(item)historyArr=historyArr.slice(0,10)		uni.setStorageSync("historyArr",historyArr)}}}
</script><style lang="scss">
.detail{padding: 30rpx;.title{font-size: 46tpx;color: #333;}.info{background: #f6f6f6;padding: 20rpx;font-size: 25rpx;color: #666;display: flex;justify-content: space-between;margin: 40rpx 0;}.content{padding-bottom: 50rpx;// H5端// /deep/ img{// 	max-width: 100%;// }}.description{background: #FEF0F0;font-size: 26rpx;padding: 20rpx;color: #F89898;line-height: 1.8em;}
}
</style>
设置完新闻列表的具体内容之后,当我们再点击浏览历史的路由之后,将获取传递过来的参数以及存放在浏览器缓存中的数据,并在页面中进行展现,详细代码如下:
<template><view class="user"><view class="top"><image src="../../static/logo.png" mode=""></image><text>浏览历史</text></view><view class="connent"><view class="row" v-for="item in listArr"><newsbox :item="item" @click.native='goDetail(item)'></newsbox></view></view><view class="nohistory" v-if="!listArr.length"><image src="../../static/images/no-data.jpg" mode="widthFix"></image><text>暂无浏览记录</text></view></view>
</template><script>export default {data() {return {listArr:[]};},onShow() {this.getData()},methods:{// 跳转到详情页goDetail(item){uni.navigateTo({url:`/pages/detail/detail?cid=${item.classid}&id=${item.id}`})},// 获取缓存浏览记录getData(){let hisArr = uni.getStorageSync("historyArr") || []this.listArr = hisArr}}}
</script><style lang="scss">
.user{.top{padding: 50rpx 0;background: #F8F8F8;color: #555;display: flex;flex-direction: column;justify-content: center;align-items: center;image{width: 150rpx;height: 150rpx;}.text{font-size: 38rpx;padding-top: 20rpx;}}.connent {padding: 30rpx;.row{border: 1px dotted #efefef;padding: 15rpx 0;}}.nohistory{display: flex;flex-direction: column;justify-content: center;align-items: center;image{width: 450rpx;}.text{font-size: 26rpx;color:#888;}}
}
</style>
具体效果如下:

项目的打包上线
项目没问题之后,可以在微信小程序下进行模拟运行,如下:
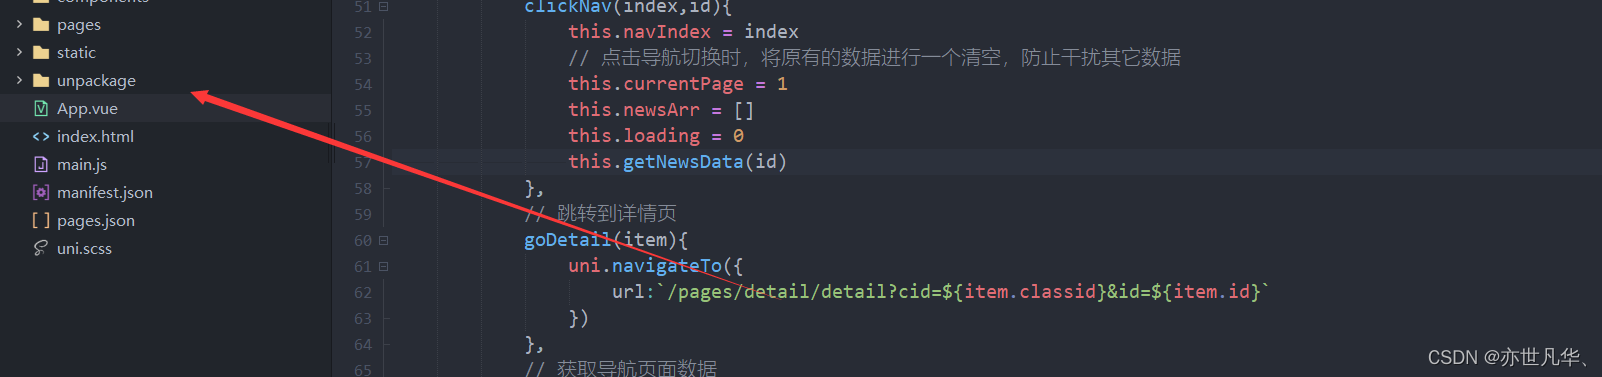
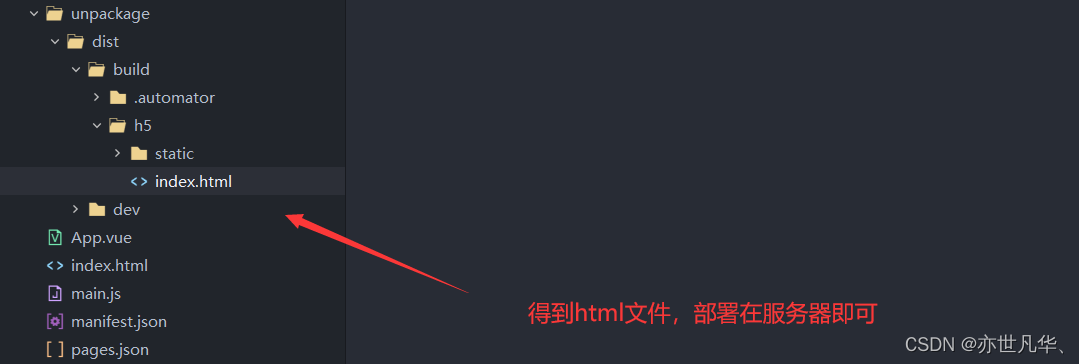
没有问题之后,项目文件就会出现一个打包的文件夹,unpackage,如下:
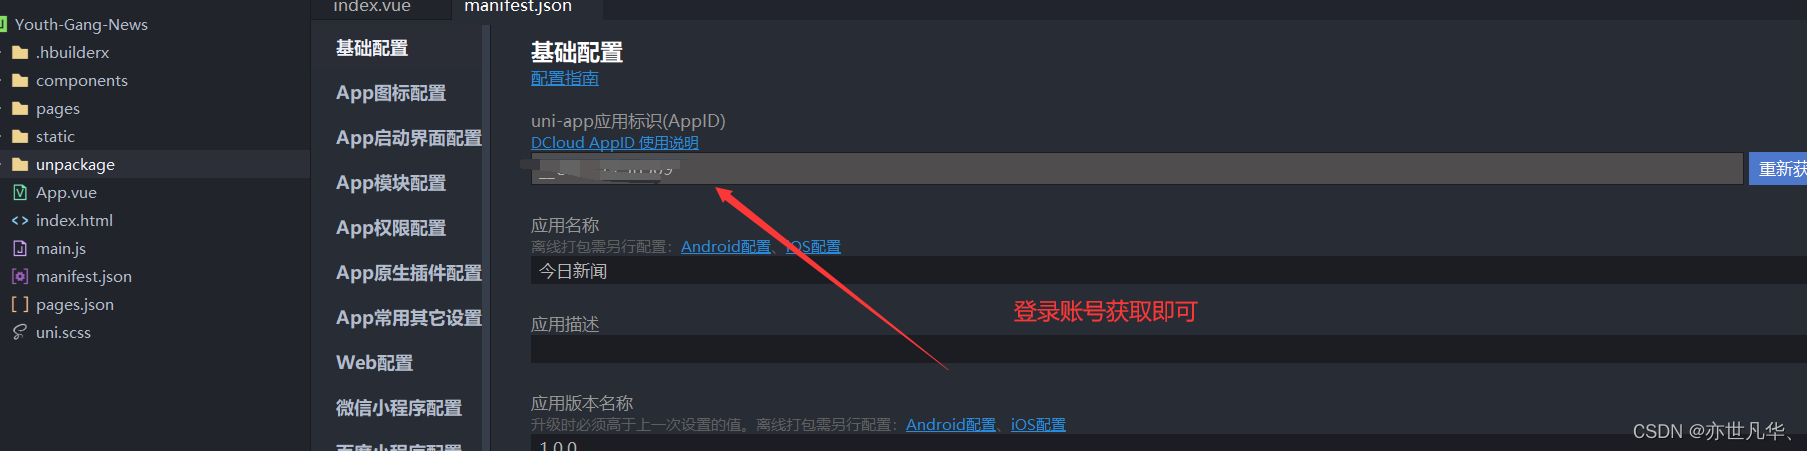
接下来进行各个平台进行上线,如果你是第一次使用这个工具的话,需要进行一些基础的配置:

H5平台上线
设置如下Web配置的基础设施
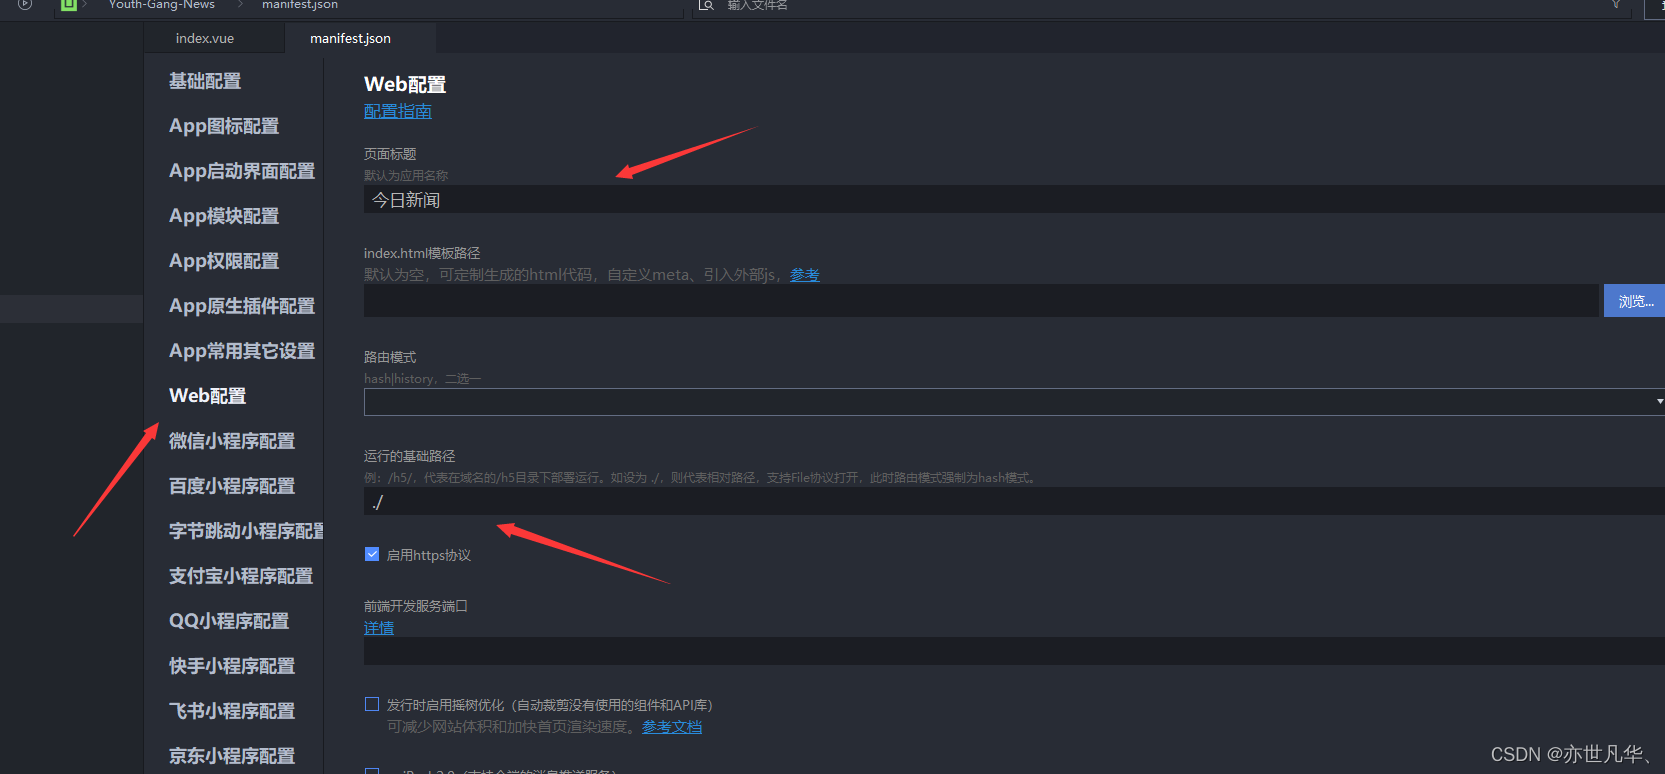
接下来点击编辑器工具栏上的发行选项,选择 网站-PC Web或手机H5

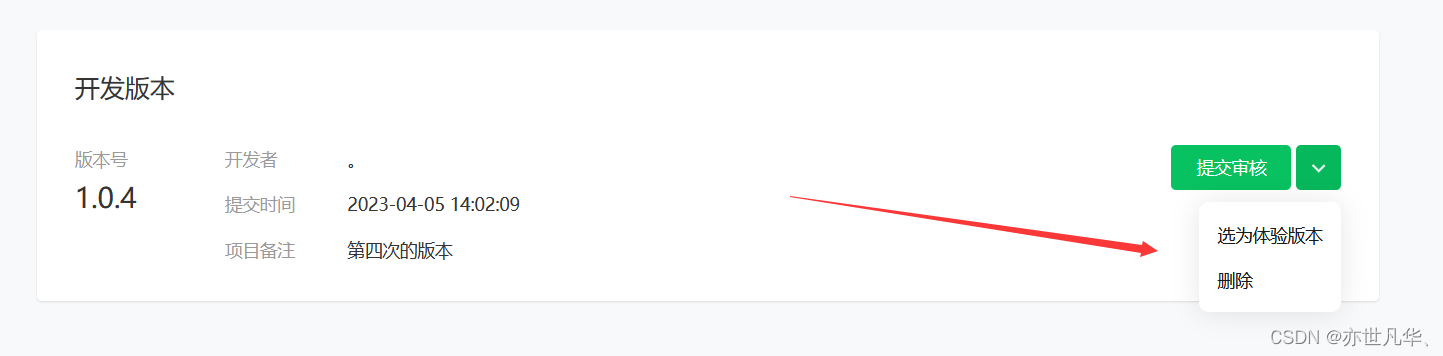
微信小程序平台上线
点击发行中的小程序-微信平台发行
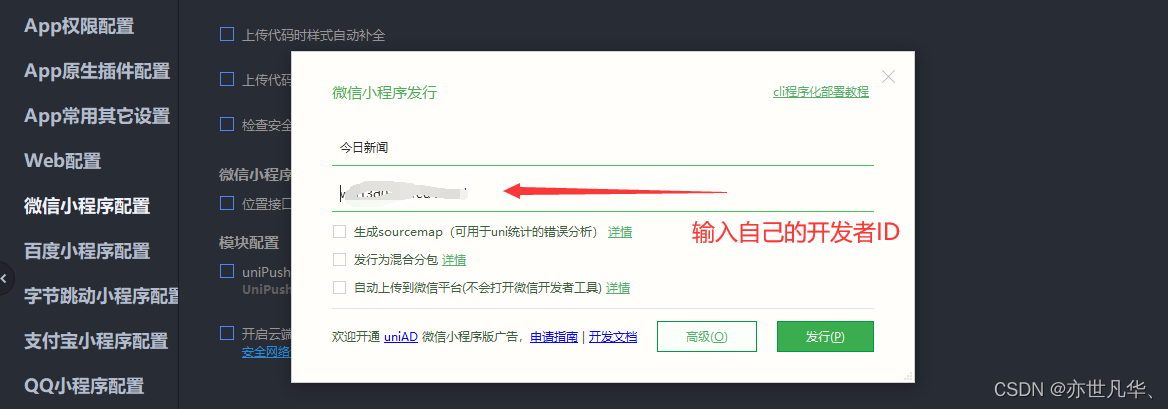
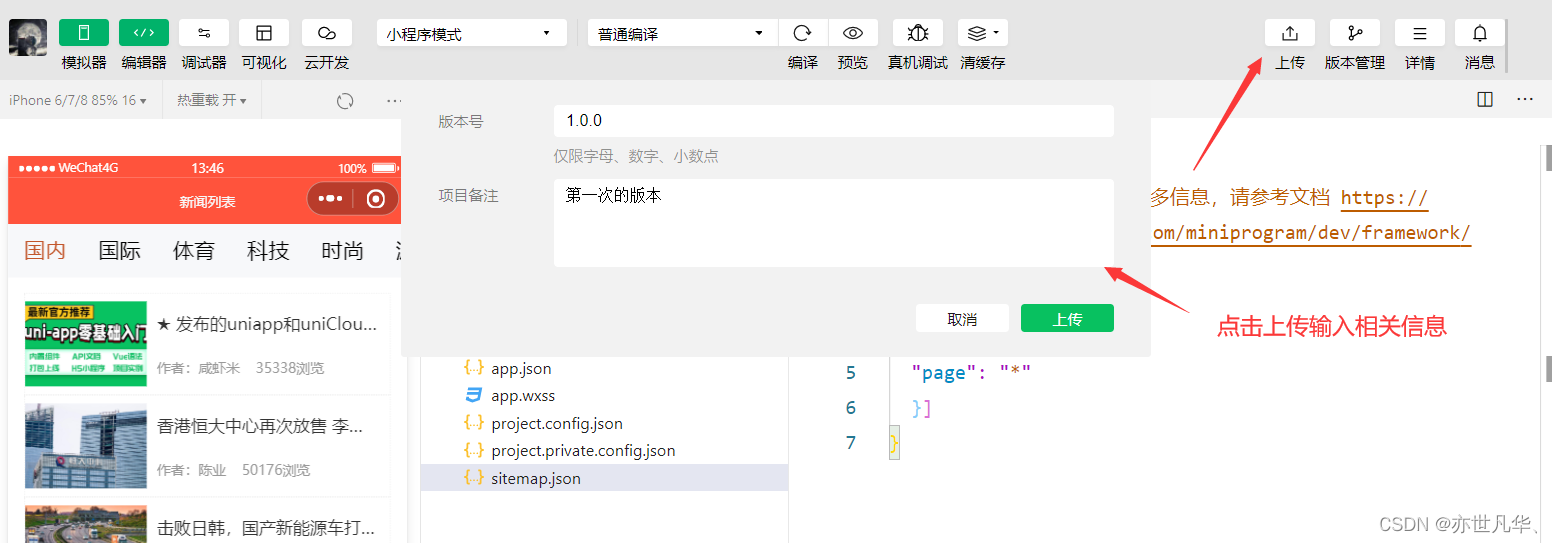
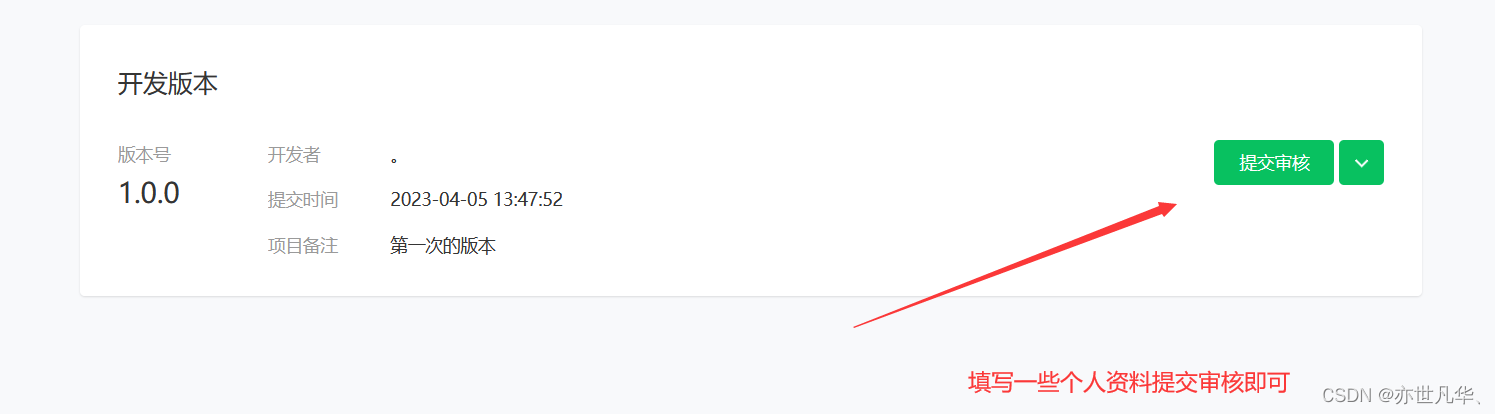
这里也可以设置为体验版,扫码进入之后应该是没数据的,可以通过手机打开调试模式来或取数据
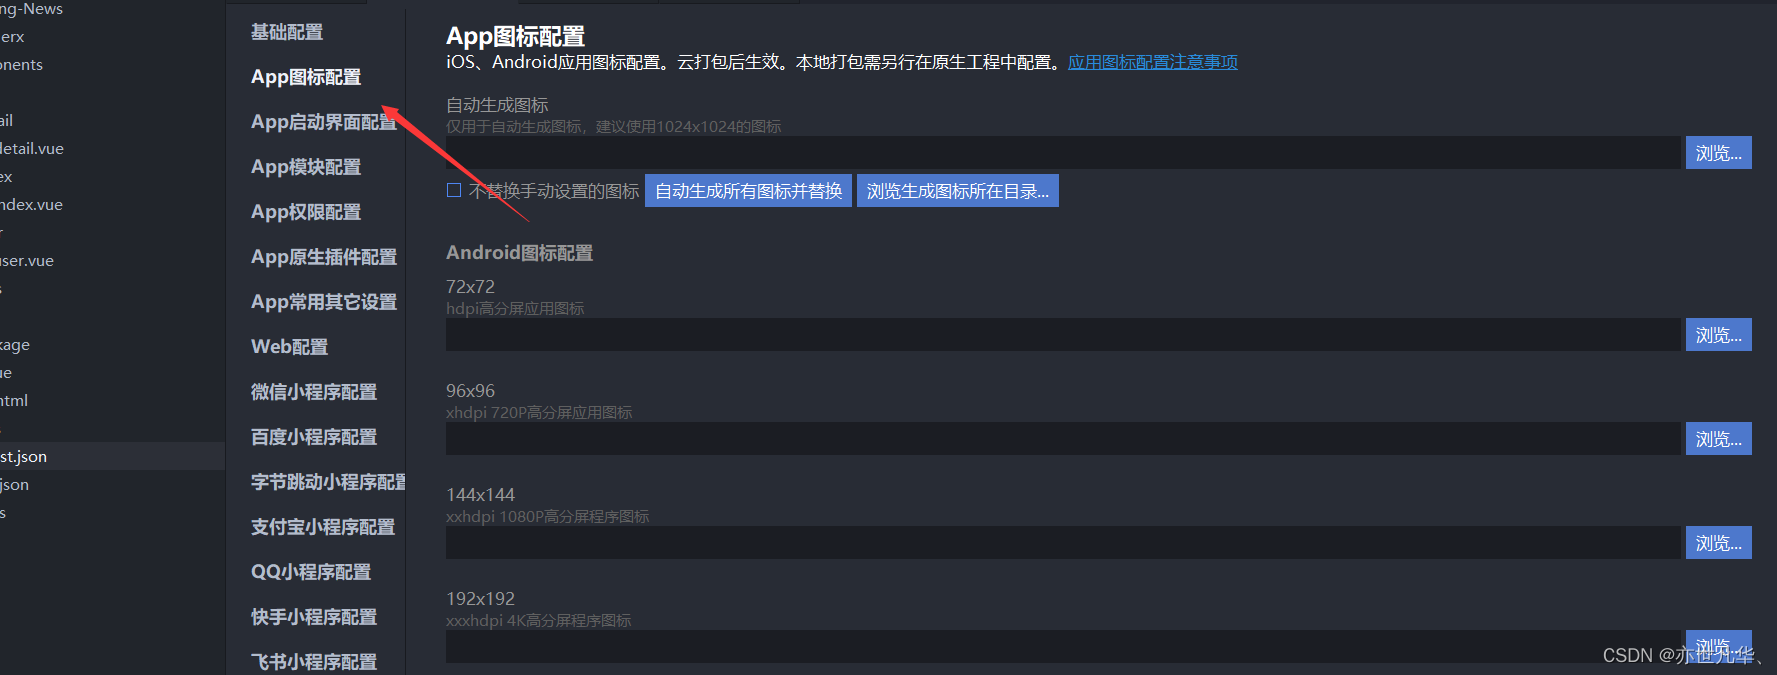
APP平台上线
这里先进行App图表进行设置,选择相应的图表
点击编辑器发行的第一个,原生App云打包,选择云端证书直接打包即可。
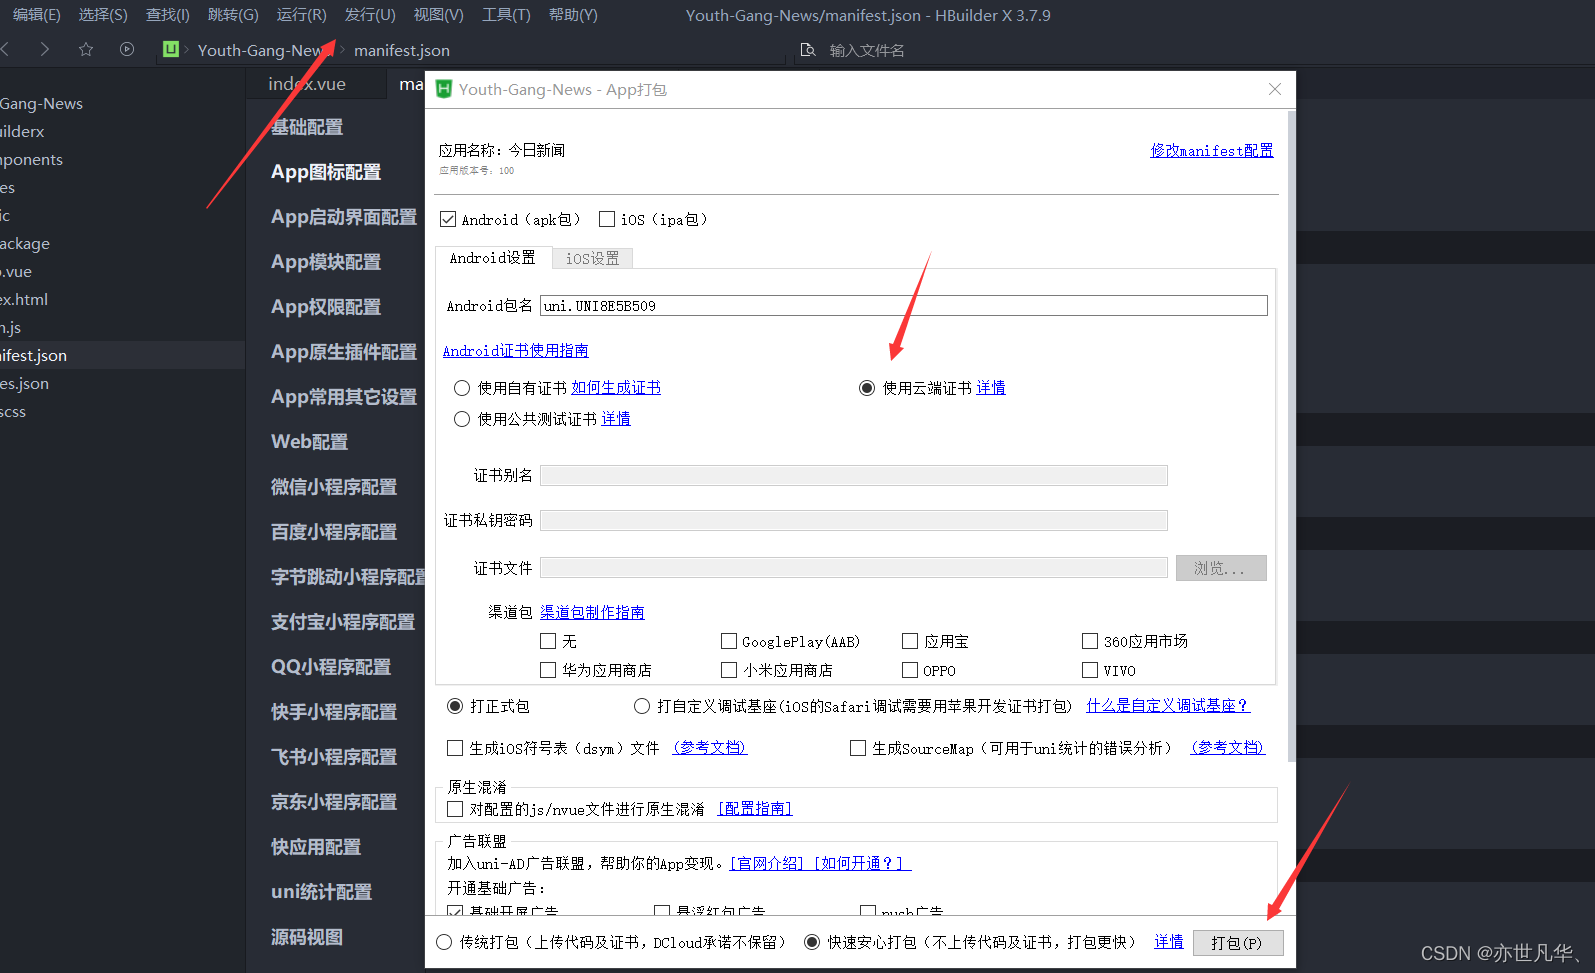
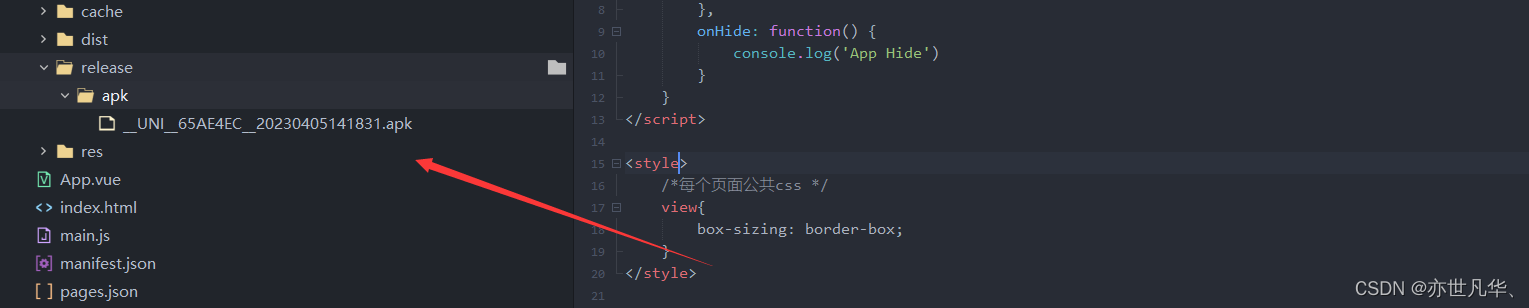
经过一段时间的等待,控制台提示我们打包成功,如下:

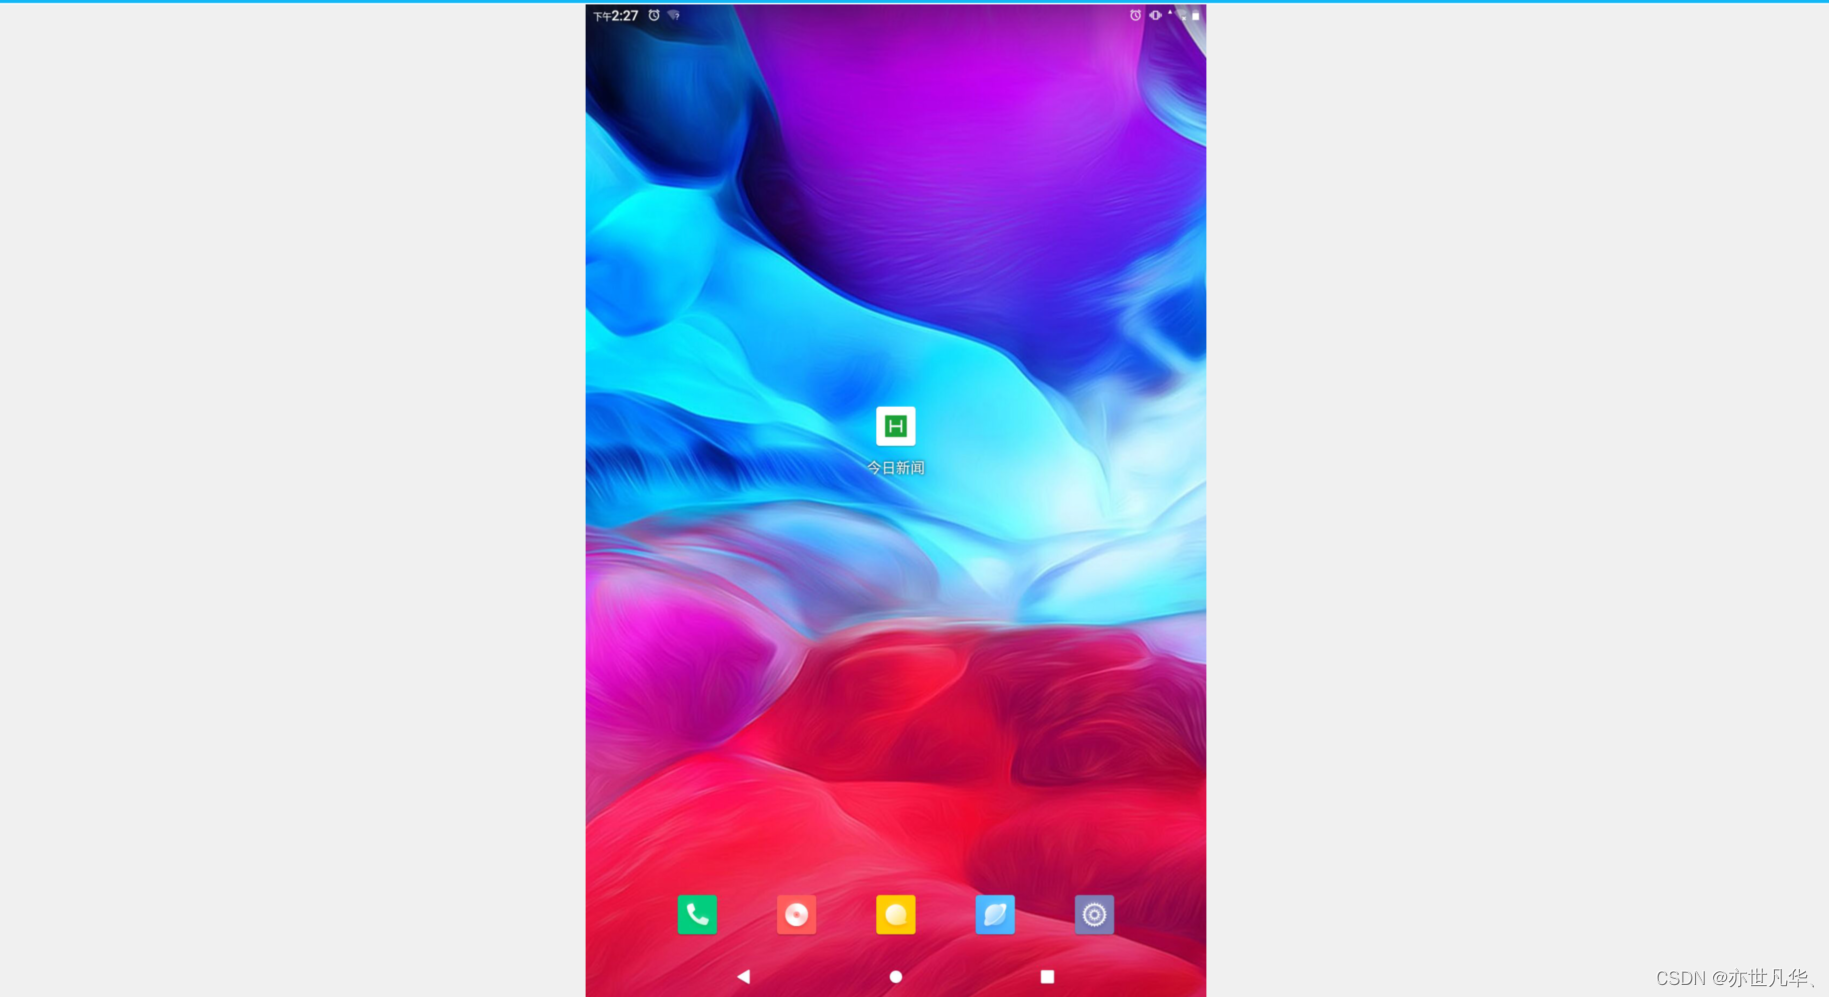
弄到这个apk文件之后,可以发到QQ或微信上进行安装下载即可
ok,传递到手机QQ上,点击下载即可,如下
项目开源Github
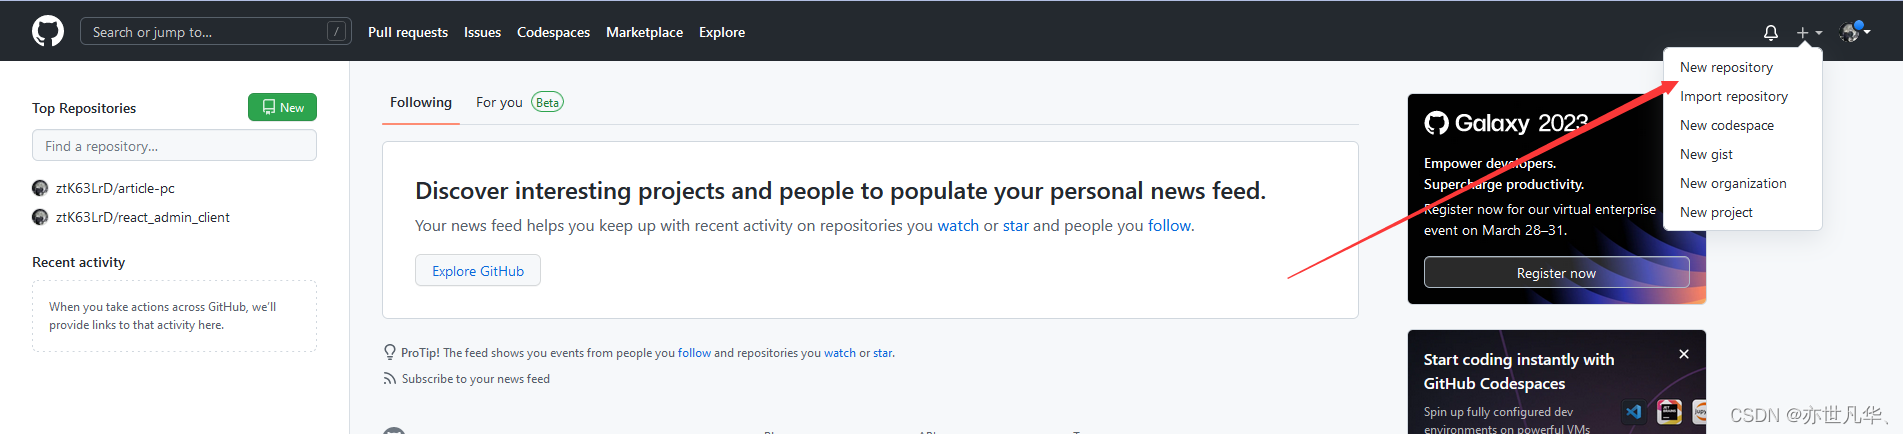
接下来进行项目的开源,给出如下详细步骤:
创建远程仓库:进入github网址,登录自己的账号后点击右上角头像新建仓库,如下
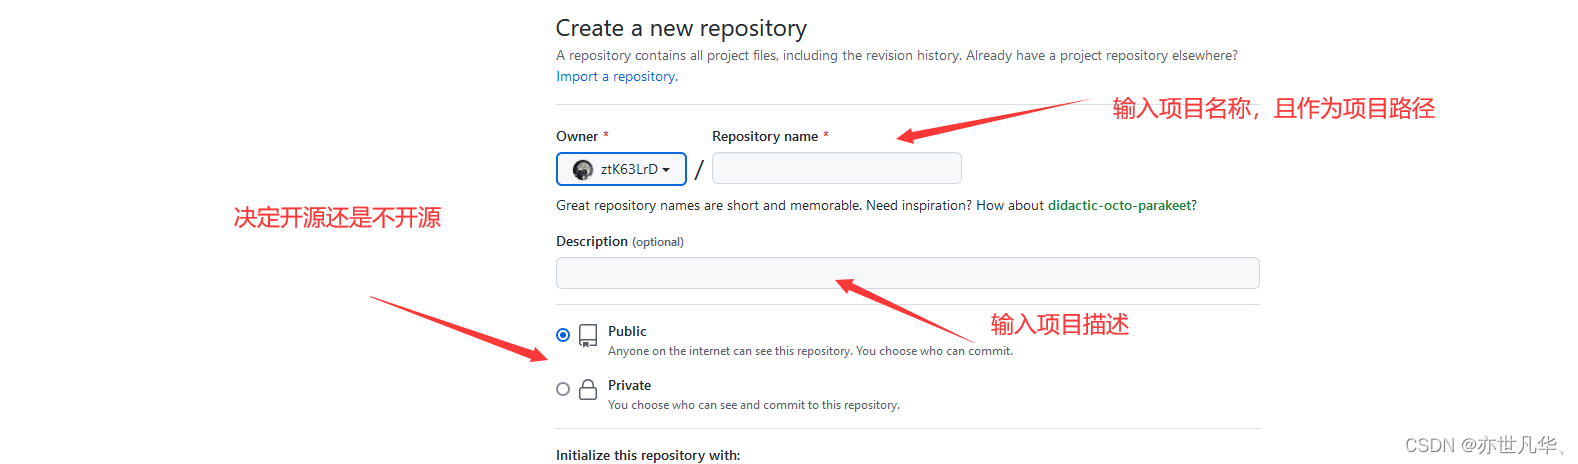
创建完成后,会跳转到如下界面,上面代码详细的告诉你如何将代码提交到远程库:
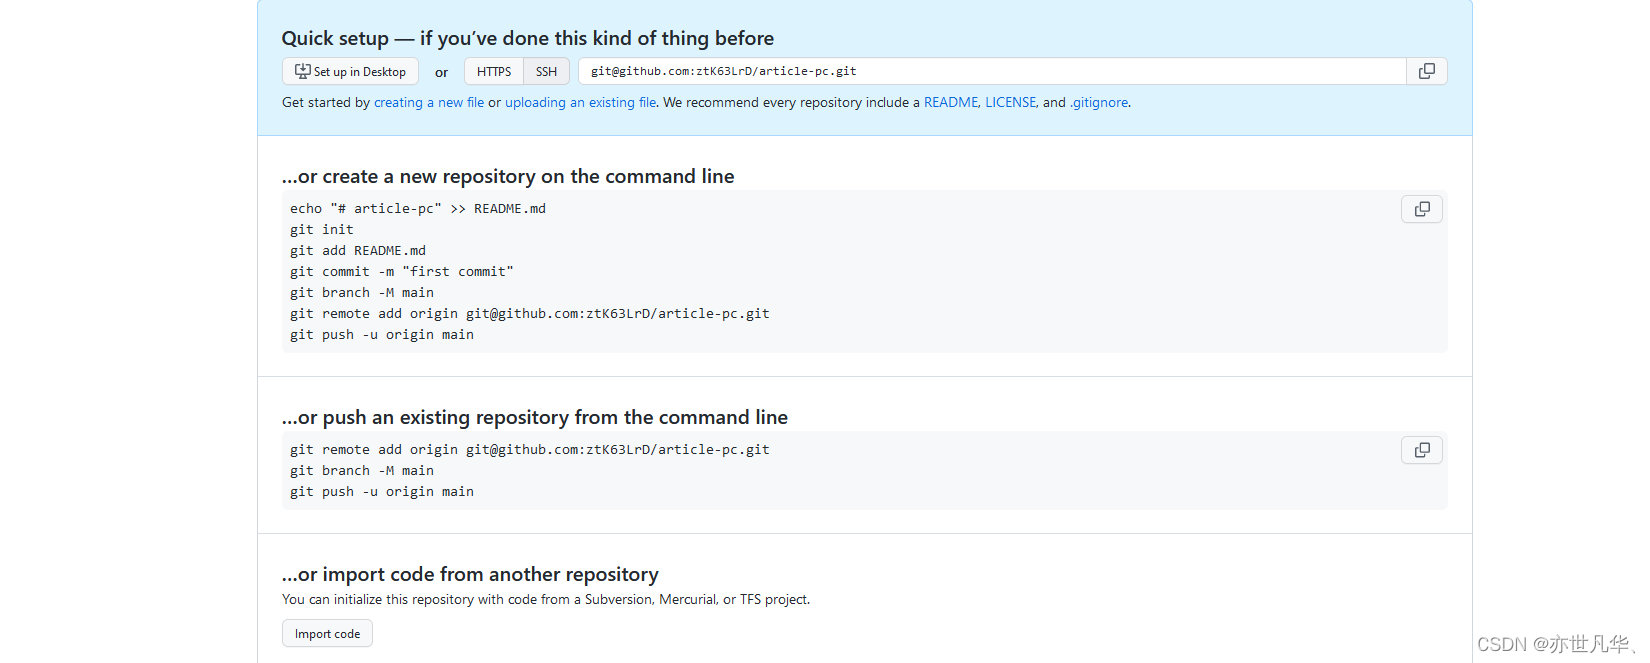
提交代码需要借用一个 git 工具,如何下载这里不再赘述,自行百度。如果想详细的了解git的使用,可以参考一下我之前的专栏:git专栏 ,详细操作如下:
生成本地仓库:具体步骤如下:
git init 生成工作区
git add . 提交到暂存区
git commit -m "news" 提交到版本区
推送到远程仓库:具体步骤如下:
git remote add origin git@github.com:ztK63LrD/Today-s- News.git 关联别名
git push -u origin main 推送分支
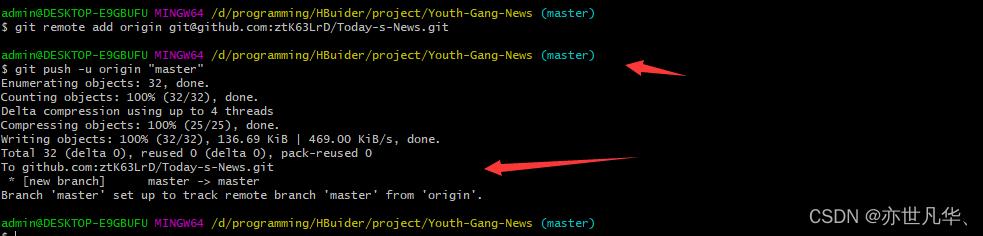
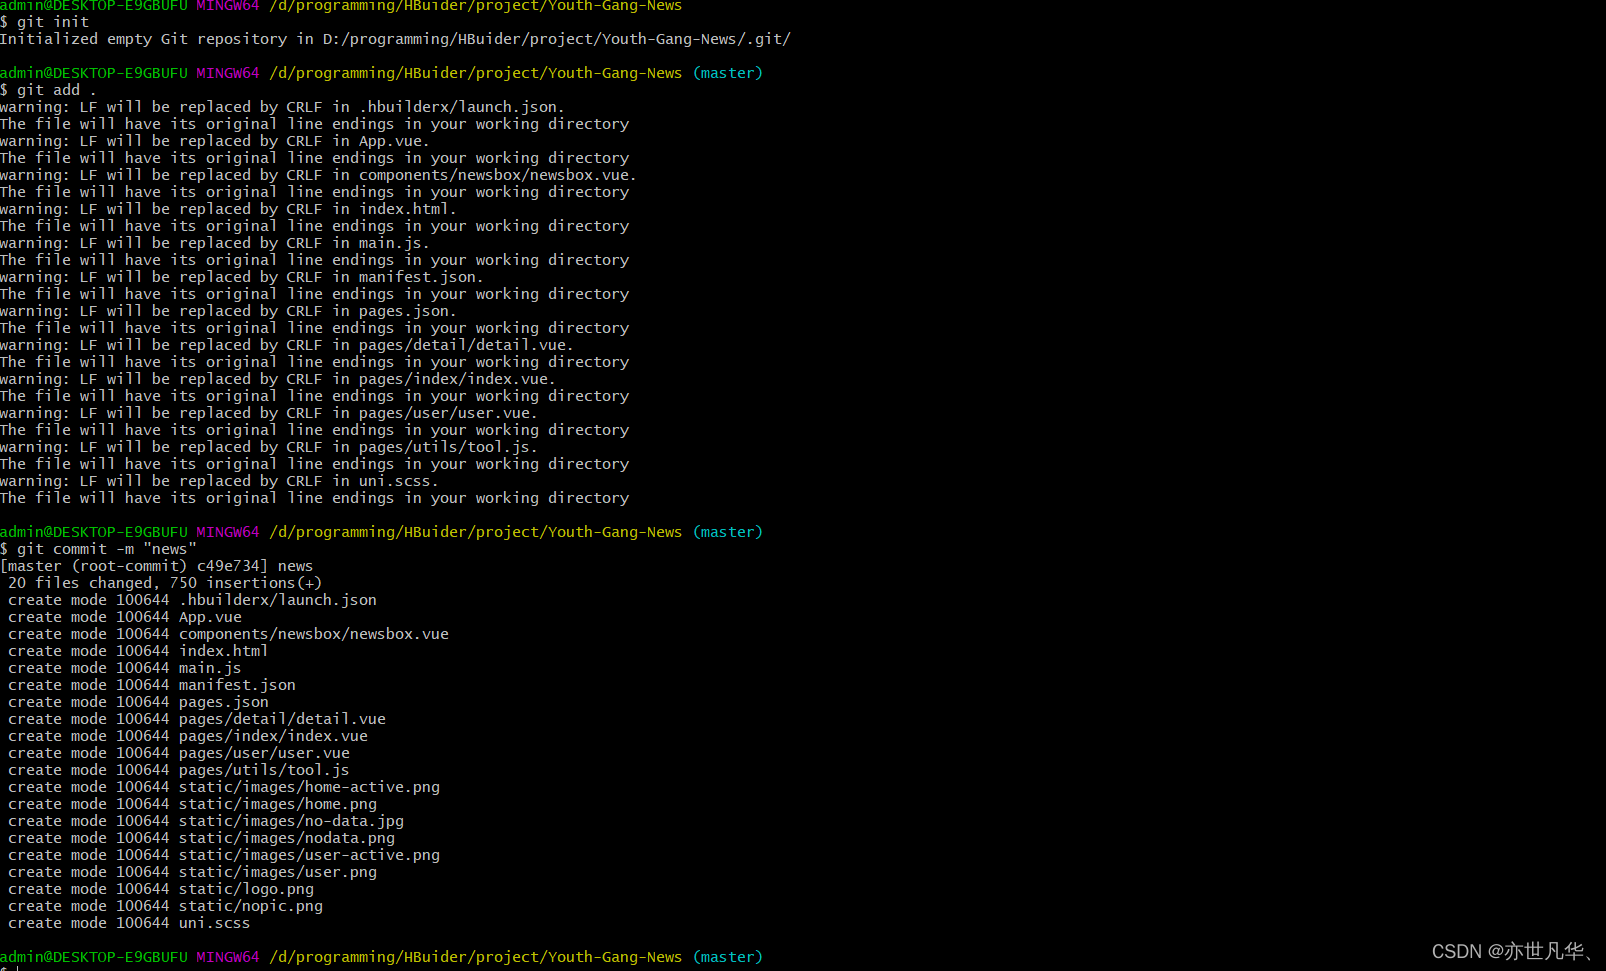
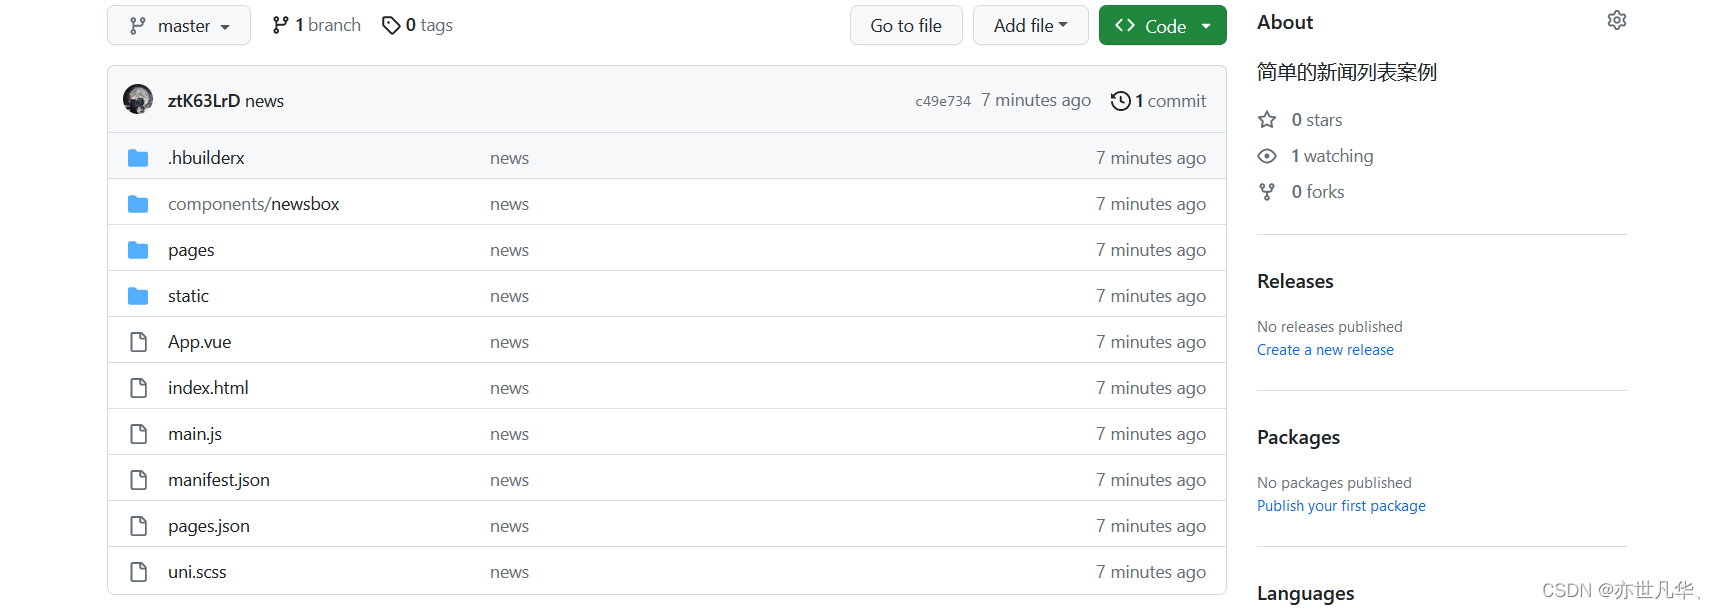
推送完成之后,刷新github页面就会将我们推送的代码呈现在页面上,如下:
因为我在写完项目之后再推送到远程仓库的,因为仅仅是个小案例,就不再创建其它子分支了,给出项目的源地址文件:GitHub - ztK63LrD/Today-s-News: 简单的新闻列表案例 ,可自行git clone 进行到本地进行测试,如果可以的话还请一键三联或者给项目点个小星星,您的支持就是我创作的最大动力。