iOS 自定义Tab页

在iOS里面可以用UISegmentedControl控件来表示Tab页,但其样式难以修改,我们一般会自定义Tab页。
1. 自定义Tab页
在这里我们首先定义UKTabItemView用来显示其中的标签页。
// 标签页代理
@protocol UKTabItemViewDelegate <NSObject>- (void)onTabItemViewSelected:(UKTabItemView *)tabItemView;@end@interface UKTabItemView : UIView@property(nonatomic, weak) id<UKTabItemViewDelegate> delegate;// 设置标签页标题
- (void)setText:(NSString *)text;
// 设置标签页状态
- (void)setSelected:(BOOL)selected;@end@interface UKTabItemView ()@property(nonatomic, strong) UIButton *itemButton;
@property(nonatomic, strong) UIView *indicatorView;@end@implementation UKTabItemView- (instancetype)init {self = [super init];if (self) {[self setupInitialUI];}return self;
}- (void)setupInitialUI {[self addSubview:self.itemButton];[self.itemButton mas_makeConstraints:^(MASConstraintMaker *make) {make.left.right.top.bottom.equalTo(self);}];[self addSubview:self.indicatorView];[self.indicatorView mas_makeConstraints:^(MASConstraintMaker *make) {make.bottom.equalTo(self);make.height.equalTo(@2);make.centerX.equalTo(self);make.width.equalTo(@60);}];
}- (void)setText:(NSString *)text {[self.itemButton setTitle:text forState:UIControlStateNormal];
}- (void)setSelected:(BOOL)selected {[self.itemButton setSelected:selected];self.indicatorView.hidden = !selected;if (selected) {[self.itemButton.titleLabel setFont:[UIFont systemFontOfSize:17]];} else {[self.itemButton.titleLabel setFont:[UIFont systemFontOfSize:15]];}
}- (UIButton *)itemButton {if (!_itemButton) {_itemButton = [[UIButton alloc] init];[_itemButton setTitleColor:[UIColor blackColor] forState:UIControlStateNormal];[_itemButton setTitleColor:[UIColor blueColor] forState:UIControlStateSelected];[_itemButton.titleLabel setFont:[UIFont systemFontOfSize:15]];[_itemButton addTarget:self action:@selector(onItemClick:) forControlEvents:UIControlEventTouchUpInside];}return _itemButton;
}- (void)onItemClick:(UIButton *)sender {if (self.delegate) {[self.delegate onTabItemViewSelected:self];}
}- (UIView *)indicatorView {if (!_indicatorView) {_indicatorView = [[UIView alloc] init];_indicatorView.layer.backgroundColor = [UIColor blueColor].CGColor;_indicatorView.layer.cornerRadius = 1;_indicatorView.layer.masksToBounds = YES;_indicatorView.hidden = YES;}return _indicatorView;
}@end
自定义UKTabView,包含若干个UKTabItemView,选中的选项卡字体和颜色会有变化,下面的提示也会变亮。
@protocol UKTabViewDelegate <NSObject>- (void)onTabViewSelected:(UKTabView *)tabView position:(NSInteger)position;@end@interface UKTabView : UIView@property(nonatomic, weak) id<UKTabViewDelegate> delegate;- (void)setItems:(NSArray<NSString *> *)items selection:(NSInteger)selection;
- (void)setSelection:(NSInteger)selection;@end@interface UKTabView() <UKTabItemViewDelegate>@property(nonatomic, assign) NSInteger selection;
@property(nonatomic, strong) NSMutableArray<UKTabItemView *> *tabItemViews;@end@implementation UKTabView- (instancetype)init {self = [super init];if (self) {[self setupInitialUI];}return self;
}- (instancetype)initWithFrame:(CGRect)frame {self = [super initWithFrame:frame];if (self) {[self setupInitialUI];}return self;
}- (void)setupInitialUI {_selection = -1;self.tabItemViews = [[NSMutableArray alloc] init];
}- (void)setItems:(NSArray<NSString *> *)items selection:(NSInteger)selection {[self.tabItemViews removeAllObjects];UKTabItemView *lastItemView = nil;for (NSString *item in items) {UKTabItemView *tabItemView = [[UKTabItemView alloc] init];[tabItemView setText:item];[self addSubview:tabItemView];// 所有的选项卡都等分排列[tabItemView mas_makeConstraints:^(MASConstraintMaker *make) {if (lastItemView) {make.left.equalTo(lastItemView.mas_right);} else {make.left.equalTo(self);}make.top.bottom.equalTo(self);make.width.equalTo(self).multipliedBy(1.0/item.length);}];lastItemView = tabItemView;[self internalAddTabItemView:tabItemView];}[self setSelection:selection];
}- (void)internalAddTabItemView:(UKTabItemView *)itemView {// 添加itemView,并用tag记录位置itemView.tag = self.tabItemViews.count;[self.tabItemViews addObject:itemView];itemView.delegate = self;
}- (void)setSelection:(NSInteger)selection {if (selection >= 0) {if (selection != self.selection) {if (self.selection >= 0) {[self.tabItemViews[self.selection] setSelected:NO];}_selection = selection;[self.tabItemViews[self.selection] setSelected:YES];}}
}#pragma mark - UKTabItemViewDelegate -
- (void)onTabItemViewSelected:(UKTabItemView *)tabItemView {[self setSelection:tabItemView.tag];[self.delegate onTabViewSelected:self position:tabItemView.tag];
}@end
在UIViewController里面,我们定义一个UKTabView,并添加三个选项卡
UKTabView *tabView = [[UKTabView alloc] initWithFrame:CGRectMake(10, 100, 320, 50)]
[tabView setItems:@[@"选项1", @"选项2", @"选项3"] selection:0];[self.view addSubview:self.tabView];
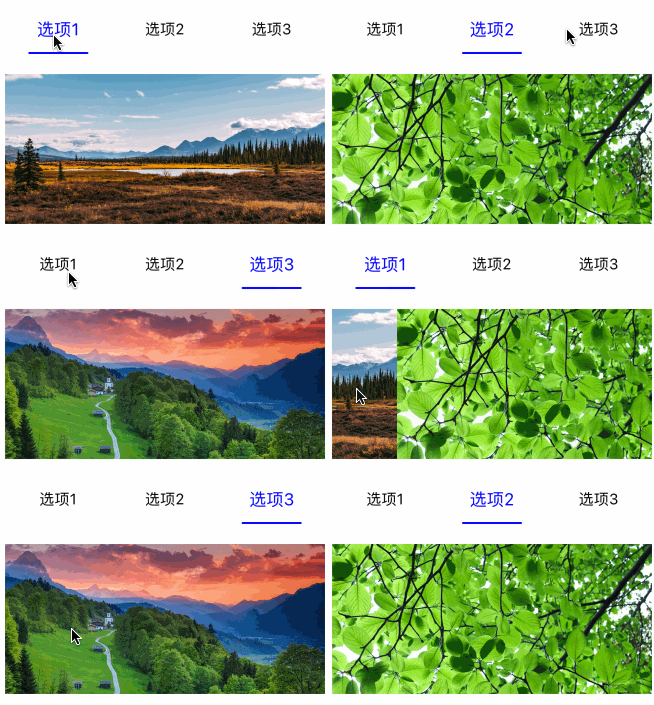
效果如下

2. 与UIScrollView的互动
一个Tab页往往下面会有互动的界面,比如说UIScrollView、UICollectionView等,这里我们以UIScrollView来举例说明。一般这里的互动有两种,一种是Tab选项卡被选中后UIScrollView跟着变化,另一种是UIScrollView滚动后Tab选项卡跟着变化。
我们先添加一个显示图片的UIScrollView,
UIScrollView *scrollView = [[UIScrollView alloc] initWithFrame:CGRectMake(10, 170, 320, 150)];
scrollView.contentSize = CGSizeMake(320*3, 150);
scrollView.pagingEnabled = YES;
scrollView.showsHorizontalScrollIndicator = NO;scrollView.delegate = self;
[self.view addSubview: scrollView];for (int index = 1; index <= 3; index++) {UIImageView *imageView = [[UIImageView alloc] initWithFrame:CGRectMake(320 * (index - 1), 0, 320, 150)];imageView.image = [UIImage imageNamed:[NSString stringWithFormat:@"switcher%d", index]];[scrollView addSubview:imageView];
}
添加UKTabView的代理,监听每次Tab选项卡变化
#pragma mark - UKTabViewDelegate -
- (void)onTabViewSelected:(UKTabView *)tabView position:(NSInteger)position {[self.scrollView setContentOffset:CGPointMake(320 * position, 0) animated:YES];
}
添加UIScrollView的代理,当UIScrollView的滚动结束时,修改Tab选项卡的状态
#pragma mark - UIScrollViewDelegate -
- (void)scrollViewDidEndDecelerating:(UIScrollView *)scrollView {CGFloat width = scrollView.contentOffset.x;NSInteger page = width/320 + 0.5;[self.tabView setSelection:page];
}
效果如下

3. 动态添加Tab选项卡
动态添加UKTabItemView,我们需要修改前面所有UKTabItemView的间距
- (void)addItemView:(UKTabItemView *)itemView {NSInteger len = self.subviews.count;for (UIView *view in self.subviews) {[view mas_updateConstraints:^(MASConstraintMaker *make) {make.width.equalTo(self).multipliedBy(1.0/(len + 1));}];}[self addSubview:itemView];[itemView mas_makeConstraints:^(MASConstraintMaker *make) {if (len == 0) {make.left.equalTo(self);} else {make.left.equalTo(self.subviews[len - 1].mas_right);}make.top.bottom.equalTo(self);make.width.equalTo(self).multipliedBy(1.0/(len + 1));}];[self internalAddTabItemView:itemView];
}
4. 提示栏
在上面的例子里面,提示栏都是包含在UITabItemView里面的,有时候我们可能需要提示栏有动态移动的效果,那么我们就把提示栏在UKTabView中定义。
// 设置提示栏的宽度、高度和颜色等
- (void)setIndicatorWidth:(NSInteger)width height:(NSInteger)height radius:(NSInteger)radius color:(UIColor *)color {self.indicatorWidth = width;self.indicatorHeight = height;self.indicatorRadius = radius;self.indicatorColor = color;if (width > 0) {self.indicatorLayer.fillColor = self.indicatorColor.CGColor;[self.layer addSublayer:self.indicatorLayer];} else {[self.indicatorLayer removeFromSuperlayer];}
}// 修改当前选项卡后,重新绘制提示栏
- (void)setSelection:(NSInteger)selection {if (selection >= 0) {if (selection != self.selection) {if (self.selection >= 0) {[self.tabItemViews[self.selection] setSelected:NO];}_selection = selection;[self.tabItemViews[self.selection] setSelected:YES];}[self drawIndicatorView];}
}// ratio为偏移度
- (void)setSelection:(NSInteger)selection offsetRatio:(CGFloat)ratio {if (selection >= 0) {self.offsetRatio = ratio;[self setSelection:selection];}
}// 绘制提示栏,我们利用CALayer的隐式动画来给提示栏添加动态效果
// 每次添加选项卡后,提示栏宽度都会被清空
// 提示栏宽度不能超过选项卡本身宽度
- (void)drawIndicatorView {if (self.indicatorWidth > 0 && self.frame.size.width > 0 && self.tabItemViews.count > 0) {CGFloat itemWidth = self.frame.size.width*1.0/self.tabItemViews.count;BOOL initialized = self.indicatorActualWidth != 0;CGFloat startX = itemWidth * self.selection + itemWidth * self.offsetRatio;if (!initialized) {self.indicatorActualWidth = self.indicatorWidth;if (itemWidth <= self.indicatorWidth) {self.indicatorActualWidth = itemWidth;}}if (self.indicatorActualWidth < itemWidth) {startX += (itemWidth - self.indicatorActualWidth) / 2;}// 绘制选项卡if (!initialized) {UIBezierPath *path = [UIBezierPath bezierPathWithRoundedRect:CGRectMake(0, 0, self.indicatorActualWidth, self.indicatorHeight) cornerRadius:self.indicatorRadius];self.indicatorLayer.path = path.CGPath;}// 如果有偏移量,去除CALayer隐式动画BOOL anim = self.offsetRatio == 0;        if (!anim) {[CATransaction begin];[CATransaction setDisableActions:true];}self.indicatorLayer.frame = CGRectMake(startX, self.frame.size.height - self.indicatorHeight, self.indicatorActualWidth, self.indicatorHeight);if (!anim) {[CATransaction commit];}}
}
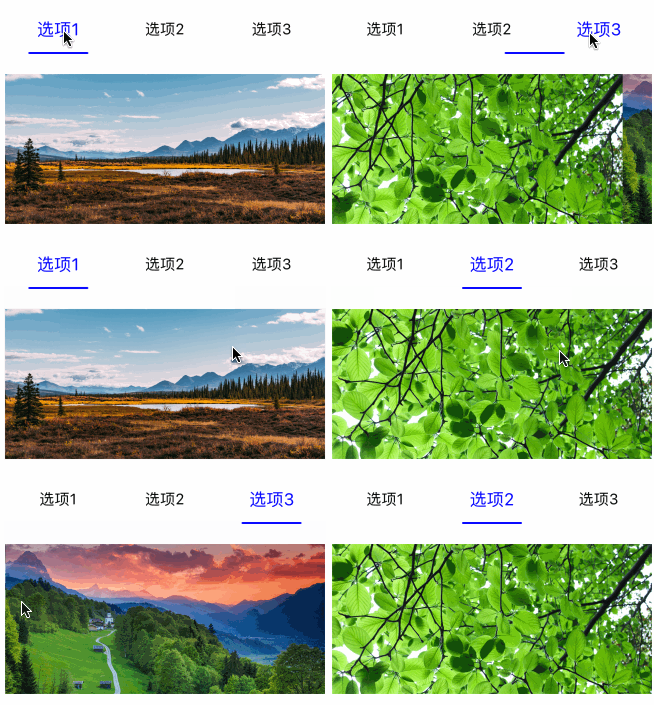
我们在scrollViewWillBeginDragging方法 里面区分UIScrollView的滚动是由手势触发的还是代码触发的。在scrollViewDidScroll方法里面,如果是手势触发的移动,状态栏按照比例跟着移动。
#pragma mark - UIScrollViewDelegate -
- (void)scrollViewWillBeginDragging:(UIScrollView *)scrollView {self.dragging = YES;
}- (void)scrollViewDidScroll:(UIScrollView *)scrollView {if (self.dragging) {CGFloat width = scrollView.contentOffset.x;NSInteger page = width/320 + 0.5;[self.tabView setSelection:page offsetRatio:(width/320 - page)];}
}- (void)scrollViewDidEndDecelerating:(UIScrollView *)scrollView {CGFloat width = scrollView.contentOffset.x;NSInteger page = width/320 + 0.5;[self.tabView setSelection:page];self.dragging = NO;
}
效果如下


