Springboot高级(一)缓存

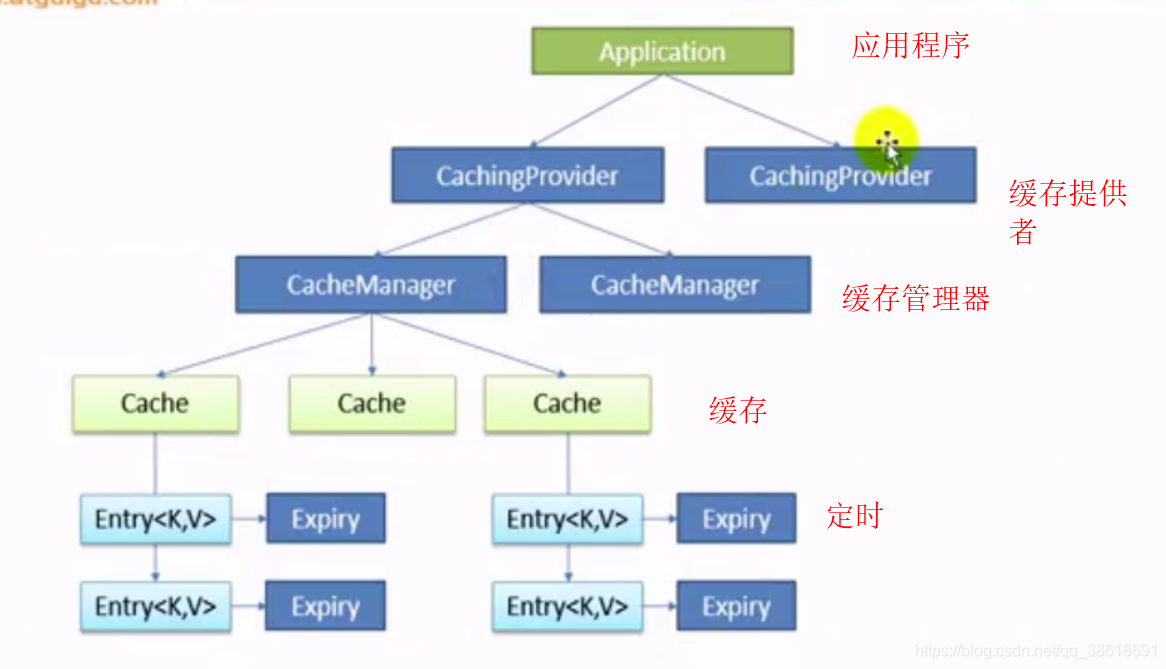
一、缓存结构
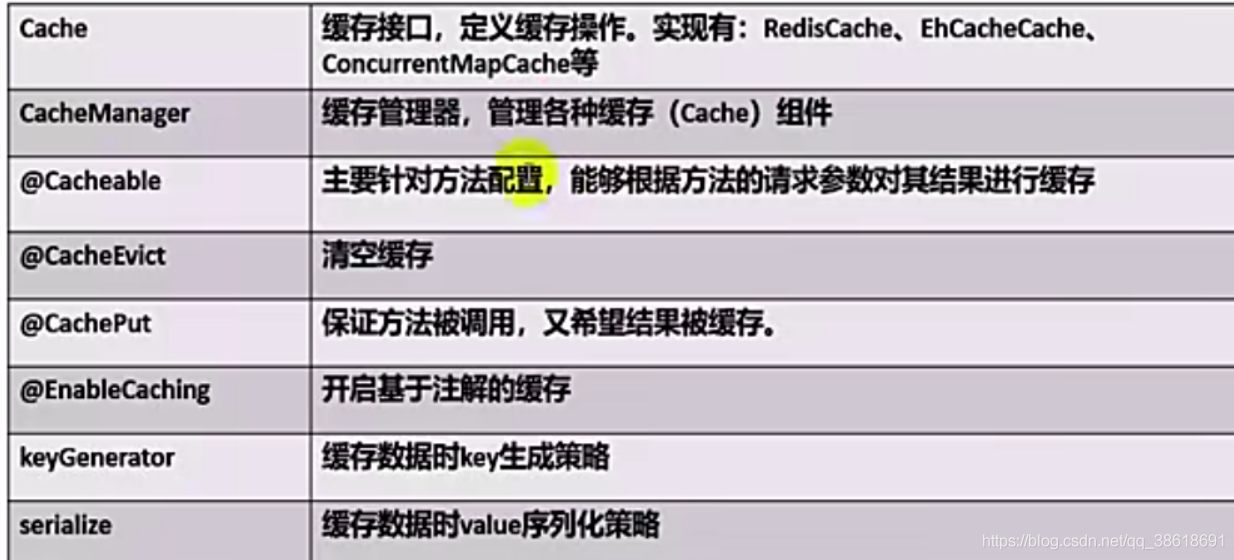
二、注解
三、体验缓存
1、开启缓存 @EnableCaching
@SpringBootApplication
@EnableCaching
public class SpringbootCacheApplication {
2、标志注解
(1)Cacheable
@Cacheable(value = "emp", condition ="#id==2", unless = "#result == null")public Employee getEmpById(Integer id) {Employee emp = employeeMapper.getEmpById(id);return emp;}
注意:Springboot2.X版本以上必须添加value属性
| 属性 | 作用 |
|---|---|
| value | 指定缓存的名字 |
| cacheNames | 指定缓存的名字 |
| key | 缓存数据时的key(默认使用参数,SpEL表达式) |
| keyGenerator | key的生成器 |
| cacheManager | 缓存管理器 |
| condition | 指定符合条件才缓存 |
| unless | 除非 |
| sync | 异步 |

运行流程:
@Cacheable:
- 方法运行之前,先去查询Cache(缓存组件),按照cacheNames指定的名字获取;
(CacheManager先获取相应的缓存),第一次获取缓存如果没有Cache组件会自动创建 - 去Cache中查找缓存的内容,使用一个key,默认就是方法的参数;
key是按照某种策略生成的:默认是使用keyGenerator生成的,默认使用SimpleKeyGenerator生成keyi
SimpleKeyGenerator生成key的默认策略;
如果没有参数;key=new SimpleKey();
如果有一个参数:key=参数的值
如果有多个参数:key=new SimpleKey(params); - 没有查到缓存就调用目标方法;
- 将目标方法返回的结果,放进缓存中
@Cacheable标注的方法执行之前先来检查缓存中有没有这个数据,默认按照参数的值作为key去查询缓存,
如果没有就运行方法并将结果放入缓存;以后再来调用就可以直接使用缓存中的数据;
核心:
1)、使用CacheManager【ConcurrentMapCacheManager】按照名字得到Cache【ConcurrentMapCache】组件
2)、key使用keyGenerator生成的,默认是SimpleKeyGenerator
指定自己的keyGenerator
@Cacheable(value = "emp", keyGenerator = "myKeyGenerator")@Configuration
public class KeyGeneratorConfig {@Bean("myKeyGenerator")public KeyGenerator keyGenerator() {return new KeyGenerator() {@Overridepublic Object generate(Object target, Method method, Object... objects) {return method.getName() + '[' + Arrays.asList(objects).toString() + ']';}};}
}
(2)@CachePut
既调用方法,又更新缓存,实现同步缓存。
先调用方法,再将结果缓存起来。
@CachePut(value = "emp", key = "#entity.id")public Employee edit(Employee entity){employeeMapper.updateEmp(entity);return entity;}
测试步骤:
-
先查询1号员工,放入缓存中
-
更新1号员工
-
再次查询
注:@CachePut和@Cacheable的key值必须一样,例如:查询的#id和更新的#entity.id都代表1
(3)@CacheEvict
@CacheEvict(value = "emp", key = "#id")public void remove(Integer id){System.err.println("删除的id" + id);employeeMapper.deleteEmpById(id);}
allEntries = true   // 删除所以缓存
beforeInvocation = true   //true在方法之前清除缓存,false在方法之后清除缓存
(4)@Caching 复杂注解
@Caching(cacheable = { @Cacheable(value = "emp", key = "#lastName")},put = { @CachePut(value = "emp", key = "#result.id"),@CachePut(value = "emp", key = "#result.email")})public Employee getByLastName(String lastName) {return employeeMapper.getByLastName(lastName);}
查询到数据放入到了put缓存中,key通过id和email查询缓存
(5)@CacheConfig
类上公共配置
@CacheConfig(cacheNames = "emp")
@Service
public class EmployeeService {
四、整合Redis
1、引入
<dependency><groupId>org.springframework.boot</groupId><artifactId>spring-boot-starter-data-redis</artifactId></dependency>
2、配置
spring.redis.port=6379
spring.redis.host=127.0.0.1
3、整合
(1)对Redis五种基本类型的操作
@AutowiredRedisTemplate redisTemplate;@AutowiredStringRedisTemplate stringRedisTemplate;@Testvoid test01(){//操作String类型stringRedisTemplate.opsForValue();//操作List类型stringRedisTemplate.opsForList();//操作set类型stringRedisTemplate.opsForSet();//操作hash类型stringRedisTemplate.opsForHash();//操作Zset类型stringRedisTemplate.opsForZSet();redisTemplate.opsForValue();}
//向redis中缓存msg@Testvoid test01(){stringRedisTemplate.opsForValue().append("msg", "第一个消息");stringRedisTemplate.opsForList().leftPush("nameList", "张三");stringRedisTemplate.opsForList().leftPush("nameList", "李四");stringRedisTemplate.opsForList().leftPush("nameList", "allen");}//从redis中获取缓存msg@Testvoid test02(){String msg = stringRedisTemplate.opsForValue().get("msg");System.err.println(msg);List<String> myList = stringRedisTemplate.opsForList().range("nameList", 0, -1);for (String str : myList) {System.err.println(str);}}(2)缓存实体
public class Employee implements Serializable {....}@Testvoid test03(){Employee entity = new Employee();entity.setId(1);entity.setName("小明");entity.setPassword("123456");redisTemplate.opsForValue().set("emp.01", entity);}
注意: 如此缓存,序列化会出问题(转义)

进行优化- -JSON格式化
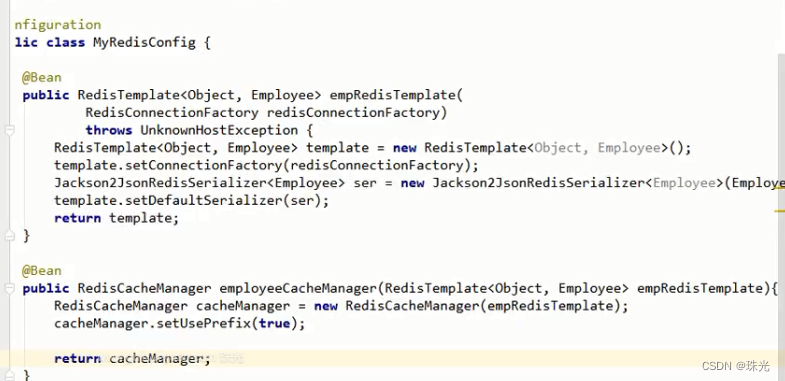
@Configuration
public class MyRedisTemplate {@Beanpublic RedisTemplate<Object, Employee> empRedisTemplate(RedisConnectionFactory redisConnectionFactory) {RedisTemplate<Object, Employee> template = new RedisTemplate();template.setConnectionFactory(redisConnectionFactory);Jackson2JsonRedisSerializer<Employee> serializer = new Jackson2JsonRedisSerializer<Employee>(Employee.class);template.setDefaultSerializer(serializer);return template;}
} @Testvoid test03(){Employee entity = new Employee();entity.setId(2);entity.setName("小红");entity.setPassword("123456");empRedisTemplate.opsForValue().set("emp.02", entity);}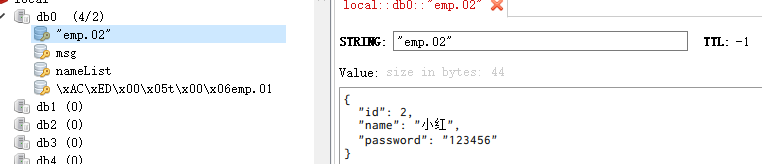
4、原理
缓存注解还是原先的,只是改变了CahceManager
1、引入redis的starter,容器中保存的是RedisCacheManager;
2、RedisCacheManager帮我们创建 RedisCache 来作为缓存组件;RedisCache通过操作redis缓存数据
3、默认保存数据 k-v 都是Object;利用序列化保存,使用jdk的序列化机制
4、自定义CacheManager