前端大概要知道的 AST

认识 AST
定义:在计算机科学中,抽象语法树是源代码语法结构的一种抽象表示。它以树状的形式表现编程语言的语法结构,树上的每个节点都表示源代码中的一种结构。之所以说语法是“抽象”的,是因为这里的语法并不会表示出真实语法中出现的每个细节。
从定义中我们只需要知道一件事就行,那就是 AST 是一种树形结构,并且是某种代码的一种抽象表示。
在线可视化网站:https://astexplorer.net/ ,利用这个网站我们可以很清晰的看到各种语言的 AST 结构。
estree[1]
estree 就是 es 语法对应的标准 AST,作为一个前端也比较方便理解。我们以官方文档为例
https://github.com/estree/estree/blob/master/es5.md
-
下面看一个代码
console.log('1')
AST 为
{"type": "Program","start": 0, // 起始位置"end": 16, // 结束位置,字符长度"body": [{"type": "ExpressionStatement", // 表达式语句"start": 0,"end": 16,"expression": {"type": "CallExpression", // 函数方法调用式"start": 0,"end": 16,"callee": {"type": "MemberExpression", // 成员表达式 console.log"start": 0,"end": 11,"object": {"type": "Identifier", // 标识符,可以是表达式或者结构模式"start": 0,"end": 7,"name": "console"},"property": {"type": "Identifier", "start": 8,"end": 11,"name": "log"},"computed": false, // 成员表达式的计算结果,如果为 true 则是 console[log], false 则为 console.log"optional": false},"arguments": [ // 参数{"type": "Literal", // 文字标记,可以是表达式"start": 12,"end": 15,"value": "1","raw": "'1'"}],"optional": false}}],"sourceType": "module"
}
-
看两个稍微复杂的代码
const b = { a: 1 };
const { a } = b;
function add(a, b) {return a + b;
}
这里建议读者自己将上述代码复制进上面提到的网站中,自行理解 estree 的各种节点类型。当然了,我们也不可能看一篇文章就记住那么多类型,只要心里有个大致的概念即可。
认识 acorn[2]
由 JavaScript 编写的 JavaScript 解析器,类似的解析器还有很多,比如 Esprima[3] 和 Shift[4] ,关于他们的性能,Esprima 的官网给了个测试地址[5],但是由于 acron 代码比较精简,且 webpack 和 eslint 都依赖 acorn,因此我们这次从 acorn 下手,了解如何使用 AST。

基本操作
acorn 的操作很简单
import * as acorn from 'acorn';
const code = 'xxx';
const ast = acorn.parse(code, options)
这样我们就能拿到代码的 ast 了,options 的定义如下
interface Options {ecmaVersion: 3 | 5 | 6 | 7 | 8 | 9 | 10 | 11 | 12 | 13 | 2015 | 2016 | 2017 | 2018 | 2019 | 2020 | 2021 | 2022 | 'latest'sourceType?: 'script' | 'module'onInsertedSemicolon?: (lastTokEnd: number, lastTokEndLoc?: Position) => voidonTrailingComma?: (lastTokEnd: number, lastTokEndLoc?: Position) => voidallowReserved?: boolean | 'never'allowReturnOutsideFunction?: booleanallowImportExportEverywhere?: booleanallowAwaitOutsideFunction?: booleanallowSuperOutsideMethod?: booleanallowHashBang?: booleanlocations?: booleanonToken?: ((token: Token) => any) | Token[]onComment?: ((isBlock: boolean, text: string, start: number, end: number, startLoc?: Position,endLoc?: Position) => void) | Comment[]ranges?: booleanprogram?: NodesourceFile?: stringdirectSourceFile?: stringpreserveParens?: boolean}
-
ecmaVersion ECMA 版本,默认时 es7
-
locations 默认为 false,设置为 true 时节点会携带一个 loc 对象来表示当前开始与结束的行数。
-
onComment 回调函数,每当代码执行到注释的时候都会触发,可以获取当前的注释内容
获得 ast 之后我们想还原之前的函数怎么办,这里可以使用 astring[6]
import * as astring from 'astring';const code = astring.generate(ast);
实现普通函数转换为箭头函数
接下来我们就可以利用 AST 来实现一些字符串匹配不太容易实现的操作,比如将普通函数转化为箭头函数。
我们先来看两个函数的AST有什么区别
function add(a, b) {return a + b;
}
const add = (a, b) => {return a + b;
}
{"type": "Program","start": 0,"end": 41,"body": [{"type": "FunctionDeclaration","start": 0,"end": 40,"id": {"type": "Identifier","start": 9,"end": 12,"name": "add"},"expression": false,"generator": false,"async": false,"params": [{"type": "Identifier","start": 13,"end": 14,"name": "a"},{"type": "Identifier","start": 16,"end": 17,"name": "b"}],"body": {"type": "BlockStatement","start": 19,"end": 40,"body": [{"type": "ReturnStatement","start": 25,"end": 38,"argument": {"type": "BinaryExpression","start": 32,"end": 37,"left": {"type": "Identifier","start": 32,"end": 33,"name": "a"},"operator": "+","right": {"type": "Identifier","start": 36,"end": 37,"name": "b"}}}]}}],"sourceType": "module"
}
{"type": "Program","start": 0,"end": 43,"body": [{"type": "VariableDeclaration","start": 0,"end": 43,"declarations": [{"type": "VariableDeclarator","start": 6,"end": 43,"id": {"type": "Identifier","start": 6,"end": 9,"name": "add"},"init": {"type": "ArrowFunctionExpression","start": 12,"end": 43,"id": null,"expression": false,"generator": false,"async": false,"params": [{"type": "Identifier","start": 13,"end": 14,"name": "a"},{"type": "Identifier","start": 16,"end": 17,"name": "b"}],"body": {"type": "BlockStatement","start": 22,"end": 43,"body": [{"type": "ReturnStatement","start": 28,"end": 41,"argument": {"type": "BinaryExpression","start": 35,"end": 40,"left": {"type": "Identifier","start": 35,"end": 36,"name": "a"},"operator": "+","right": {"type": "Identifier","start": 39,"end": 40,"name": "b"}}}]}}}],"kind": "const"}],"sourceType": "module"
}
找到区别之后我们就可以有大致的思路
-
找到
FunctionDeclaration
-
将其替换为
VariableDeclarationVariableDeclarator节点
-
在
VariableDeclarator节点的init属性下新建ArrowFunctionExpression节点
-
并将
FunctionDeclaration节点的相关属性替换到ArrowFunctionExpression上即可
但是由于 acorn 处理的 ast 只是单纯的对象,并不具备类似 dom 节点之类的对节点的操作能力,如果需要操作节点,需要写很多工具函数, 所以我这里就简单写一下。
import * as acorn from "acorn";
import * as astring from 'astring';
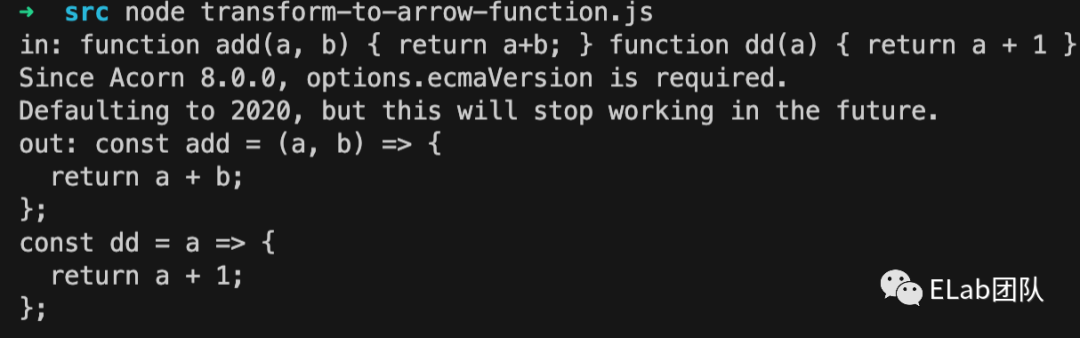
import { createNode, walkNode } from "./utils.js";const code = 'function add(a, b) { return a+b; } function dd(a) { return a + 1 }';
console.log('in:', code);
const ast = acorn.parse(code);walkNode(ast, (node) => {if(node.type === 'FunctionDeclaration') {node.type = 'VariableDeclaration';const variableDeclaratorNode = createNode('VariableDeclarator');variableDeclaratorNode.id = node.id;delete node.id;const arrowFunctionExpressionNode = createNode('ArrowFunctionExpression');arrowFunctionExpressionNode.params = node.params;delete node.params;arrowFunctionExpressionNode.body = node.body;delete node.body;variableDeclaratorNode.init = arrowFunctionExpressionNode;node.declarations = [variableDeclaratorNode];node.kind = 'const';}
})console.log('out:', astring.generate(ast))
结果如下
如果想要代码更加健壮,可以使用 recast[7],提供了对 ast 的各种操作
// 用螺丝刀解析机器
const ast = recast.parse(code);// ast可以处理很巨大的代码文件
// 但我们现在只需要代码块的第一个body,即add函数
const add  = ast.program.body[0]console.log(add)// 引入变量声明,变量符号,函数声明三种“模具”
const {variableDeclaration, variableDeclarator, functionExpression} = recast.types.builders// 将准备好的组件置入模具,并组装回原来的ast对象。
ast.program.body[0] = variableDeclaration("const", [variableDeclarator(add.id, functionExpression(null, // Anonymize the function expression.add.params,add.body))
]);//将AST对象重新转回可以阅读的代码
const output = recast.print(ast).code;console.log(output)
这里只是示例代码,展示 recast 的一些操作,最好的情况还是能遍历节点自动替换。
这样我们就完成了将普通函数转换成箭头函数的操作,但 ast 的作用不止于此,作为一个前端在工作中可能涉及 ast 的地方,就是自定义 eslint 、 stylelint 等插件。