axios起步——介绍和使用 post请求

axios起步——介绍和使用+基本用例+post请求
- 场景复现
- 核心干货
-
- axios简介
-
- axios是什么?
- axios特性
- axios安装
- axios基本用例
-
- 发起一个GET请求
- 用axios发起POST请求
-
- 发起一个POST请求
- 发起多个POST请求
- 利用json-server创建服务,发起四种请求
场景复现
最近学习与前端相关的小程序时,接触了异步请求api的封装和实现,涉及到了很多底层的基础知识,比如ajax和axios工具,因此计划用两个专栏来系统的学习关于axios和ajax的实用知识。
核心干货

🔥🔥🔥axios官方中文文档:https://axios-http.com/zh/
🔥🔥🔥ajax文档:https://www.runoob.com/ajax/ajax-tutorial.html
axios简介

axios是什么?
- Axios是目前最流行的ajax封装库,能够很方便地实现ajax请求的快速发送。
- Axios 是一个基于 promise 网络请求库,作用于node.js 和浏览器中。 它是 isomorphic 的(即同一套代码可以运行在浏览器和node.js中)。
- 在服务端它使用原生 node.js http 模块, 而在客户端 (浏览端) 则使用 XMLHttpRequests。
axios特性
- 从浏览器发出 XMLHttpRequests请求。
- 从 node.js 发出 http 请求。
- 支持 Promise API。
- 能拦截请求和响应。
- 能转换请求和响应数据。
- 取消请求。
- 实现JSON数据的自动转换。
- 客户端支持防止 XSRF攻击。
axios安装
推荐安装node.js,使用npm包进行安装。
使用 npm:
$ npm install axios
使用 bower:
$ bower install axios
使用 yarn:
$ yarn add axios
使用 jsDelivr CDN:
<script src="https://cdn.jsdelivr.net/npm/axios/dist/axios.min.js"></script>
使用 unpkg CDN:
<script src="https://unpkg.com/axios/dist/axios.min.js"></script>
axios基本用例
首先,我们需要注意CommonJS的用法,为了在CommonJS中使用 require() 导入时获得TypeScript类型推断(智能感知/自动完成),请使用以下方法:👇👇
const axios = require('axios').default;
// axios.<method> 能够提供自动完成和参数类型推断功能
发起一个GET请求
const axios = require('axios');// 向给定ID的用户发起请求
axios.get('/user?ID=12345').then(function (response) {// 处理成功情况console.log(response);}).catch(function (error) {// 处理错误情况console.log(error);}).finally(function () {// 总是会执行});// 上述请求也可以按以下方式完成(可选)
axios.get('/user', {params: {ID: 12345}}).then(function (response) {console.log(response);}).catch(function (error) {console.log(error);}).finally(function () {// 总是会执行});  // 支持async/await用法
async function getUser() {try {const response = await axios.get('/user?ID=12345');console.log(response);} catch (error) {console.error(error);}
}
注意:
- 由于
async/await是ECMAScript 2017中的一部分,而且在IE和一些旧的浏览器中不支持,所以使用时务必要小心。- 但是现在主流的异步请求多采用
async和await语法,优雅高质地实现异步请求。
用axios发起POST请求
- 可以借助
json-server创建一个简单的服务,供ajax发送请求,json-server是一个简单饿并且能够接受restful的服务。- github地址:https://github.com/typicode/json-server
发起一个POST请求
axios.post('/user', {firstName: 'Fred',lastName: 'Flintstone'}).then(function (response) {console.log(response);}).catch(function (error) {console.log(error);});
发起多个POST请求
function getUserAccount() {return axios.get('/user/12345');
}function getUserPermissions() {return axios.get('/user/12345/permissions');
}Promise.all([getUserAccount(), getUserPermissions()]).then(function (results) {const acct = results[0];const perm = results[1];});
利用json-server创建服务,发起四种请求
json-sever的使用:
- 安装——这里我们依然使用
npm包和命令行进行安装。(需要提前安装好最新版本的node.js)
npm install -g json-server
- 创建一个名为
db.json的文件,把网站的数据复制进去
{"posts": [{ "id": 1, "title": "json-server", "author": "typicode" }],"comments": [{ "id": 1, "body": "some comment", "postId": 1 }],"profile": { "name": "typicode" }
}
- 启动命令
json-server -- watch db.json
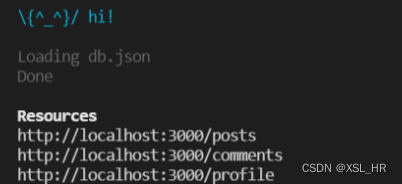
如果控制台显示以上内容,则说明json-server已经启动。下面试试访问http://localhost:3000/posts
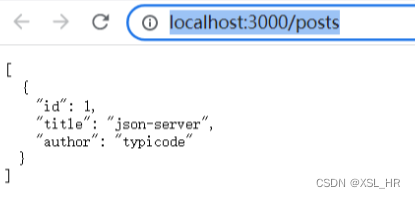
这个时候已经说明访问成功。
下面我们编写一个简单的逻辑来发起四种请求(get、post、put、delete)👇👇👇
详细代码示例:
<!DOCTYPE html>
<html lang="en">
<head><meta charset="UTF-8"><title>axios基本使用</title>
</head>
<body><button id="btn1">发送get请求</button> <br><br><button id="btn2">发送post请求</button><br><br><button id="btn3">发送put请求</button><br><br><button id="btn4">发送delete请求</button><hr><div>其他发送请求的api:</div><br><br><button id="btn5">发送get请求1</button> <br><br><button id="btn6">发送post请求1</button><br><br><button id="btn7">发送put请求1</button><br><br><button id="btn8">发送delete请求1</button>
</body>
<script src="https://cdn.jsdelivr.net/npm/axios/dist/axios.min.js"></script>
<script>//发送getdocument.getElementById("btn1").onclick = function(){axios({method:"GET",url:"http://localhost:3000/posts/1"}).then(response=>{console.log(response);})};//发送postdocument.getElementById("btn2").onclick = function(){axios({method:"POST",url:"http://localhost:3000/posts",data:{title:"axios学习",author:"Yehaocong"}}).then(response=>{console.log(response);})};//发送putdocument.getElementById("btn3").onclick = function(){axios({method:"PUT",url:"http://localhost:3000/posts/2",data:{title:"axios学习",author:"Liaoxiaoyan"}}).then(response=>{console.log(response);})};document.getElementById("btn4").onclick = function(){axios({method:"DELETE",url:"http://localhost:3000/posts/2",}).then(response=>{console.log(response);})};//其他发送请求的apidocument.getElementById("btn5").onclick = function(){//发送get,使用get,第一个参数时url,第二个参数时config配置对象axios.get("http://localhost:3000/posts/1").then(response=>{console.log(response);})};//发送postdocument.getElementById("btn6").onclick = function(){//发送post请求,第一个参数时url,第二个参数时请求体,第三个参数时config配置对象axios.post("http://localhost:3000/posts",{title:"axios学习2",author:"Yehaocong2"}).then(response=>{console.log(response);})};//发送put,document.getElementById("btn7").onclick = function(){//发送put,接收三个参数,url  请求体 、 config配置对象axios.put("http://localhost:3000/posts/2",{title:"axios学习",author:"Liaoxiaoyan"}).then(response=>{console.log(response);})};document.getElementById("btn8").onclick = function(){//发送delete请求,接收2个参数, url config配置对象axios.delete("http://localhost:3000/posts/3").then(response=>{console.log(response);})};//这个与axios({})基本相同// axios.request({// })
</script>
</html>
对于请求结果的结果分析:

以上就是关于axios起步入门和简单用例的分享,相信看完这篇文章的小伙伴们一定有了一定的收获。当然,可能有不足的地方,欢迎大家在评论区留言指正!
下期文章将介绍axios API的相关内容
感兴趣的小伙伴可以订阅本专栏,方便后续了解学习~
觉得这篇文章有用的小伙伴们可以点赞➕收藏➕关注哦~