iot-Scada免费Scada组态软件系列教程1-初识iot-Scada

iot-Scada免费Scada组态软件系列教程
系列文章目录
iot-Scada免费Scada组态软件系列教程1-初识iot-Scada
iot-Scada免费Scada组态软件系列教程2-架构设计
iot-Scada免费Scada组态软件系列教程3-各模块详细介绍
iot-Scada免费Scada组态软件系列教程4-二次开发与版本部署
前言
iot-Scada(意为:Internet of things Scada(物联网组态))是罕见的高度抽象组态平台,定位于满足各种物联网场景监控、可视化需求。本系列文章采取总分结构,能够让大家掌握整体的设计原理,再到实际应用。
# 设计思想:认识大局,把控整体,简化细节
# 技术栈:前端Vue + 后端java(springboot / cloud)+ 数据库MySQL
# 技术支持:(qq:907154198)
# demo演示地址:iot-Scada
1、物联网场景
iot-Scada组态最大优点在于高度抽象后的通用性,化繁为简,可以满足大部分物联网场景,如:
- 工业自动化系统
- 电力调度监控系统
- 管道监控
- 水利监控
- 锅炉监控
- 智慧农业物联网
- 智慧城市等
- 其他 ......
2、iot-Scada
- 高度抽象,通用、可扩展性极强
- 采用主流技术栈,方便二次开发
- 易学好上手,1小时可掌握全部
- 系统稳定可靠
3、便于集成
一键部署,功能简约而又覆盖全面
4、架构设计
前端:Vue(ElementUI、DataV、Quasar等)
后端:java(springboot)
数据库:MySQL
技术架构:由三部分构成,分别是前端组态、后端服务、前置通信服务组成,其中后端服务内置http通信接口,前置通信服务自行开发通过接口进行对接即可。
部分源代码如下:
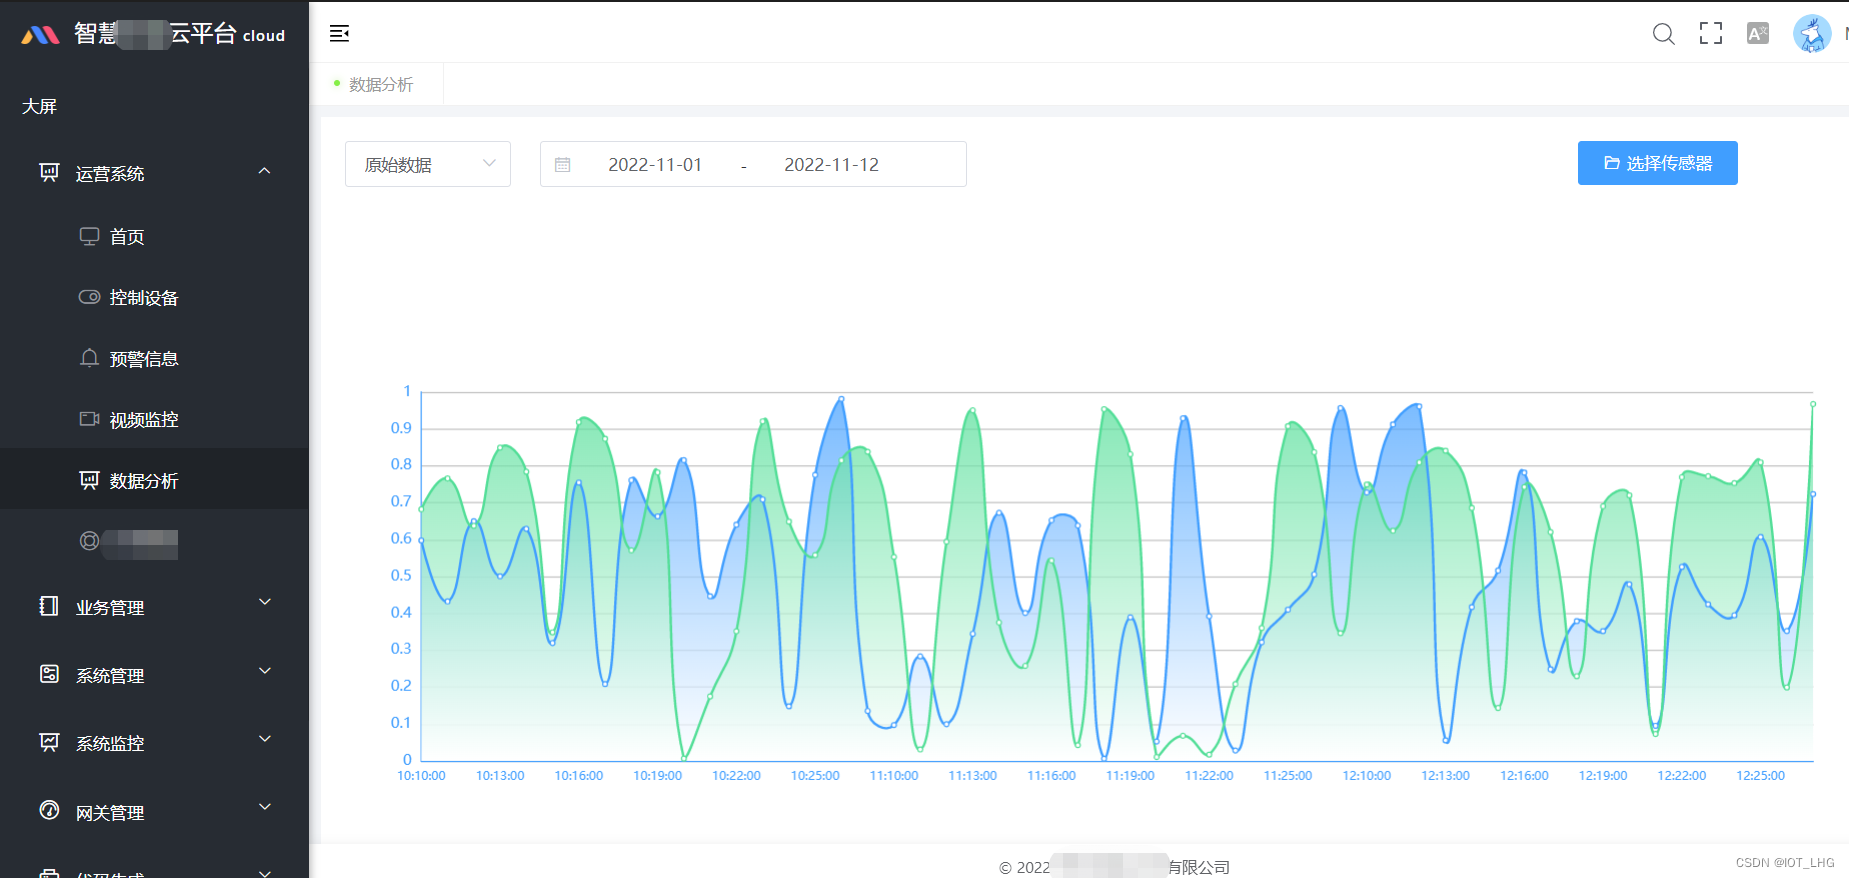
export default {name: 'VueRulerTool',components: {},props: {position: {type: String,default: 'relative',validator: function(val) {return ['absolute', 'fixed', 'relative', 'static', 'inherit'].indexOf(val) !== -1}}, // 规定元素的定位类型isHotKey: {type: Boolean, default: true}, // 热键开关isScaleRevise: {type: Boolean, default: false}, // 刻度修正(根据content进行刻度重置)presetLine: {type: Array,default: () => {return [] // { type: 'l', site: 50 }, { type: 'v', site: 180 }}}, // 预置参考线contentLayout: {type: Object,default: () => {return { top: 0, left: 0 }}}, // 内容部分布局parent: {type: Boolean,default: false}},data() {return {windowWidth: 0, // 窗口宽度windowHeight: 0, // 窗口高度xScale: [], // 水平刻度yScale: [], // 垂直刻度topSpacing: 0, // 标尺与窗口上间距leftSpacing: 0, // 标尺与窗口左间距isDrag: false,dragFlag: '', // 拖动开始标记,可能值x(从水平标尺开始拖动),y(从垂直标尺开始拖动)levelLineList: [], // 生成的水平线列表verticalLineList: [], // 生成的垂直线列表levelDottedLeft: -999, // 水平虚线位置verticalDottedTop: -999, // 垂直虚线位置rulerWidth: 0, // 垂直标尺的宽度rulerHeight: 0, // 水平标尺的高度dragLineId: '', // 被移动线的IDkeyCode: {r: 82}, // 快捷键参数rulerToggle: true // 标尺辅助线显示开关}},watch: {},mounted() {document.documentElement.addEventListener('mousemove', this.dottedLineMove, true)document.documentElement.addEventListener('mouseup', this.dottedLineUp, true)document.documentElement.addEventListener('keyup', this.keyboard, true)this.init()this.quickGeneration(this.presetLine) // 生成预置参考线const self = this // 绑定窗口调整大小onresize事件window.onresize = function() { // 如果直接使用this,this指向的不是vue实例self.xScale = []self.yScale = []self.init()}},beforeDestroy: function() {document.documentElement.removeEventListener('mousemove', this.dottedLineMove, true)document.documentElement.removeEventListener('mouseup', this.dottedLineUp, true)document.documentElement.removeEventListener('keyup', this.keyboard, true)},methods: {init() {this.box()this.scaleCalc()},box() {if (this.isScaleRevise) { // 根据内容部分进行刻度修正const content = document.getElementById('content')const contentLeft = content.offsetLeftconst contentTop = content.offsetTopfor (let i = 0; i < contentLeft; i += 1) {if (i % 50 === 0 && i + 50 <= contentLeft) {this.xScale.push({ id: i })}}for (let i = 0; i < contentTop; i += 1) {if (i % 50 === 0 && i + 50 <= contentTop) {this.yScale.push({ id: i })}}}if(this.parent){const style = window.getComputedStyle(this.$el.parentNode,null)this.windowWidth = parseInt(style.getPropertyValue('width'), 10)this.windowHeight = parseInt(style.getPropertyValue('height'), 10)}else {this.windowWidth = document.documentElement.clientWidth - this.leftSpacingthis.windowHeight = document.documentElement.clientHeight - this.topSpacing}this.rulerWidth = document.getElementById('verticalRuler').clientWidththis.rulerHeight = document.getElementById('levelRuler').clientHeightthis.topSpacing = document.getElementById('levelRuler').getBoundingClientRect().y //.offsetParent.offsetTopthis.leftSpacing =document.getElementById('verticalRuler').getBoundingClientRect().x// .offsetParent.offsetLeft}, // 获取窗口宽与高5、效果
组态功能

设计页面

其他功能