【Python学习笔记】44.Python3 MongoDB和urllib

前言
本章介绍Python的MongoDB和urllib。
Python MongoDB
MongoDB 是目前最流行的 NoSQL 数据库之一,使用的数据类型 BSON(类似 JSON)。
PyMongo
Python 要连接 MongoDB 需要 MongoDB 驱动,这里我们使用 PyMongo 驱动来连接。
pip 安装
pip 是一个通用的 Python 包管理工具,提供了对 Python 包的查找、下载、安装、卸载的功能。
安装 pymongo:
$ python3 -m pip3 install pymongo
也可以指定安装的版本:
$ python3 -m pip3 install pymongo==3.5.1
更新 pymongo 命令:
$ python3 -m pip3 install --upgrade pymongo
easy_install 安装
旧版的 Python 可以使用 easy_install 来安装,easy_install 也是 Python 包管理工具。
$ python -m easy_install pymongo
更新 pymongo 命令:
$ python -m easy_install -U pymongo
测试 PyMongo
接下来我们可以创建一个测试文件 demo_test_mongodb.py,代码如下:
demo_test_mongodb.py 文件代码:
#!/usr/bin/python3import pymongo
执行以上代码文件,如果没有出现错误,表示安装成功。
创建数据库
创建一个数据库
创建数据库需要使用 MongoClient 对象,并且指定连接的 URL 地址和要创建的数据库名。
如下实例中,我们创建的数据库 csdndb :
实例
#!/usr/bin/python3import pymongomyclient = pymongo.MongoClient("mongodb://localhost:27017/")
mydb = myclient["csdndb"]
注意: 在 MongoDB 中,数据库只有在内容插入后才会创建! 就是说,数据库创建后要创建集合(数据表)并插入一个文档(记录),数据库才会真正创建。
判断数据库是否已存在
我们可以读取 MongoDB 中的所有数据库,并判断指定的数据库是否存在:
实例
#!/usr/bin/python3import pymongomyclient = pymongo.MongoClient('mongodb://localhost:27017/')dblist = myclient.list_database_names()
# dblist = myclient.database_names()
if "csdndb" in dblist:print("数据库已存在!")
注意:database_names 在最新版本的 Python 中已废弃,Python3.7+ 之后的版本改为了 list_database_names()。
创建集合
MongoDB 中的集合类似 SQL 的表。
创建一个集合
MongoDB 使用数据库对象来创建集合,实例如下:
实例
#!/usr/bin/python3import pymongomyclient = pymongo.MongoClient("mongodb://localhost:27017/")
mydb = myclient["csdndb"]mycol = mydb["sites"]
注意: 在 MongoDB 中,集合只有在内容插入后才会创建! 就是说,创建集合(数据表)后要再插入一个文档(记录),集合才会真正创建。
判断集合是否已存在
我们可以读取 MongoDB 数据库中的所有集合,并判断指定的集合是否存在:
实例
#!/usr/bin/python3import pymongomyclient = pymongo.MongoClient('mongodb://localhost:27017/')mydb = myclient['csdndb']collist = mydb. list_collection_names()
# collist = mydb.collection_names()
if "sites" in collist:   # 判断 sites 集合是否存在print("集合已存在!")
注意:collection_names 在最新版本的 Python 中已废弃,Python3.7+ 之后的版本改为了 list_collection_names()。
Python urllib
Python urllib 库用于操作网页 URL,并对网页的内容进行抓取处理。
本文主要介绍 Python3 的 urllib。
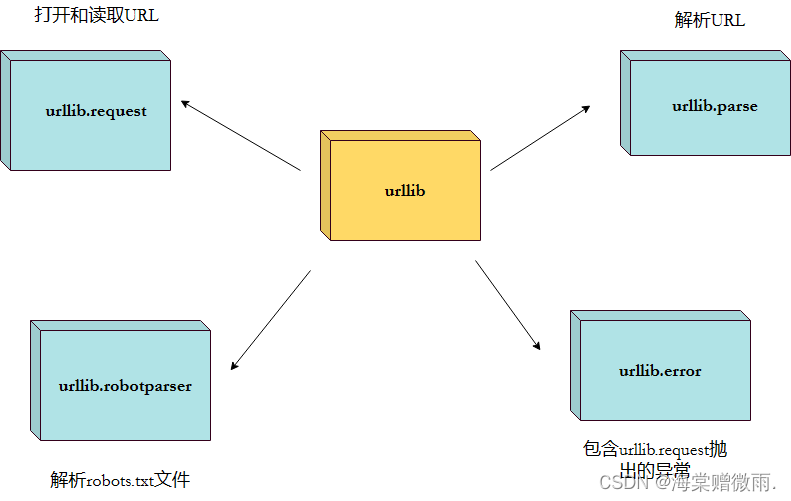
urllib 包 包含以下几个模块:
urllib.request- 打开和读取 URL。urllib.error- 包含 urllib.request 抛出的异常。urllib.parse- 解析 URL。urllib.robotparser- 解析 robots.txt 文件。
urllib.request
urllib.request 定义了一些打开 URL 的函数和类,包含授权验证、重定向、浏览器 cookies等。
urllib.request 可以模拟浏览器的一个请求发起过程。
我们可以使用 urllib.request 的 urlopen 方法来打开一个 URL,语法格式如下:
urllib.request.urlopen(url, data=None, [timeout, ]*, cafile=None, capath=None, cadefault=False, context=None)
- url:url 地址。
- data:发送到服务器的其他数据对象,默认为 None。
- timeout:设置访问超时时间。
- cafile 和 capath:cafile 为 CA 证书, capath 为 CA 证书的路径,使用 HTTPS 需要用到。
- cadefault:已经被弃用。
- context:ssl.SSLContext类型,用来指定 SSL 设置。
实例
from urllib.request import urlopenmyURL = urlopen("https://www.csdn.com/")
print(myURL.read())
以上代码使用 urlopen 打开一个 URL,然后使用 read() 函数获取网页的 HTML 实体代码。
read() 是读取整个网页内容,我们可以指定读取的长度:
实例
from urllib.request import urlopenmyURL = urlopen("https://www.csdn.com/")
print(myURL.read(300))
除了 read() 函数外,还包含以下两个读取网页内容的函数:
- readline() - 读取文件的一行内容
from urllib.request import urlopenmyURL = urlopen("https://www.csdn.com/")
print(myURL.readline()) #读取一行内容
- readlines() - 读取文件的全部内容,它会把读取的内容赋值给一个列表变量。
from urllib.request import urlopenmyURL = urlopen("https://www.csdn.com/")
lines = myURL.readlines()
for line in lines:print(line)
我们在对网页进行抓取时,经常需要判断网页是否可以正常访问,这里我们就可以使用 getcode() 函数获取网页状态码,返回 200 说明网页正常,返回 404 说明网页不存在:
实例
import urllib.requestmyURL1 = urllib.request.urlopen("https://www.csdn.com/")
print(myURL1.getcode())   # 200try:myURL2 = urllib.request.urlopen("https://www.csdn.com/no.html")
except urllib.error.HTTPError as e:if e.code == 404:print(404)   # 404
如果要将抓取的网页保存到本地,可以使用 Python3 File write() 方法 函数:
实例
from urllib.request import urlopenmyURL = urlopen("https://www.csdn.com/")
f = open("csdn_urllib_test.html", "wb")
content = myURL.read()  # 读取网页内容
f.write(content)
f.close()
执行以上代码,在本地就会生成一个 csdn_urllib_test.html 文件,里面包含了 https://www.csdn.com/ 网页的内容。
URL 的编码与解码可以使用 urllib.request.quote() 与 urllib.request.unquote() 方法:
实例
import urllib.requestencode_url = urllib.request.quote("https://www.csdn.com/")  # 编码
print(encode_url)unencode_url = urllib.request.unquote(encode_url)    # 解码
print(unencode_url)
输出结果为:
https%3A//www.csdn.com/
https://www.csdn.com/
模拟头部信息
我们抓取网页一般需要对 headers(网页头信息)进行模拟,这时候需要使用到 urllib.request.Request 类:
class urllib.request.Request(url, data=None, headers={}, origin_req_host=None, unverifiable=False, method=None)
- url:url 地址。
- data:发送到服务器的其他数据对象,默认为 None。
- headers:HTTP 请求的头部信息,字典格式。
- origin_req_host:请求的主机地址,IP 或域名。
- unverifiable:很少用整个参数,用于设置网页是否需要验证,默认是False。。
- method:请求方法, 如 GET、POST、DELETE、PUT等。
实例 - py3_urllib_test.py 文件代码
import urllib.request
import urllib.parseurl = 'https://www.csdn.com/?s='  # csdn教程搜索页面
keyword = 'Python 教程'
key_code = urllib.request.quote(keyword)  # 对请求进行编码
url_all = url+key_code
header = {'User-Agent':'Mozilla/5.0 (X11; Fedora; Linux x86_64) AppleWebKit/537.36 (KHTML, like Gecko) Chrome/58.0.3029.110 Safari/537.36'
}   #头部信息
request = urllib.request.Request(url_all,headers=header)
reponse = urllib.request.urlopen(request).read()fh = open("./urllib_test_csdn_search.html","wb")    # 将文件写入到当前目录中
fh.write(reponse)
fh.close()
执行以上 Python 代码,会在当前目录生成 urllib_test_csdn_search.html 文件,打开 urllib_test_csdn_search.html 文件(可以使用浏览器打开)。
表单 POST 传递数据,我们先创建一个表单,代码如下,我这里使用了 PHP 代码来获取表单的数据:
实例 - py3_urllib_test.php 文件代码:
<!DOCTYPE html>
<html>
<head>
<meta charset="utf-8">
<title>csdn教程(csdn.com) urllib POST  测试</title>
</head>
<body>
<form action="" method="post" name="myForm">Name: <input type="text" name="name"><br>Tag: <input type="text" name="tag"><br><input type="submit" value="提交">
</form>
<hr>
<?php
// 使用 PHP 来获取表单提交的数据,你可以换成其他的
if(isset($_POST['name']) && $_POST['tag'] ) {echo $_POST["name"] . ', ' . $_POST['tag'];
}
?>
</body>
</html>
实例
import urllib.request
import urllib.parseurl = 'https://www.csdn.com/try/py3/py3_urllib_test.php'  # 提交到表单页面
data = {'name':'csdn', 'tag' : 'csdn教程'}   # 提交数据
header = {'User-Agent':'Mozilla/5.0 (X11; Fedora; Linux x86_64) AppleWebKit/537.36 (KHTML, like Gecko) Chrome/58.0.3029.110 Safari/537.36'
}   #头部信息
data = urllib.parse.urlencode(data).encode('utf8')  # 对参数进行编码,解码使用 urllib.parse.urldecode
request=urllib.request.Request(url, data, header)   # 请求处理
reponse=urllib.request.urlopen(request).read()      # 读取结果fh = open("./urllib_test_post_csdn.html","wb")    # 将文件写入到当前目录中
fh.write(reponse)
fh.close()
执行以上代码,会提交表单数据到 py3_urllib_test.php 文件,输出结果写入到 urllib_test_post_csdn.html 文件。
打开 urllib_test_post_csdn.html 文件(可以使用浏览器打开)。
urllib.error
urllib.error 模块为 urllib.request 所引发的异常定义了异常类,基础异常类是 URLError。
urllib.error 包含了两个方法,URLError 和 HTTPError。
URLError 是 OSError 的一个子类,用于处理程序在遇到问题时会引发此异常(或其派生的异常),包含的属性 reason 为引发异常的原因。
HTTPError 是 URLError 的一个子类,用于处理特殊 HTTP 错误例如作为认证请求的时候,包含的属性 code 为 HTTP 的状态码, reason 为引发异常的原因,headers 为导致 HTTPError 的特定 HTTP 请求的 HTTP 响应头。
对不存在的网页抓取并处理异常:
实例
import urllib.request
import urllib.errormyURL1 = urllib.request.urlopen("https://www.csdn.com/")
print(myURL1.getcode())   # 200try:myURL2 = urllib.request.urlopen("https://www.csdn.com/no.html")
except urllib.error.HTTPError as e:if e.code == 404:print(404)   # 404
urllib.parse
urllib.parse 用于解析 URL,格式如下:
urllib.parse.urlparse(urlstring, scheme='', allow_fragments=True)
urlstring 为 字符串的 url 地址,scheme 为协议类型,
allow_fragments 参数为 false,则无法识别片段标识符。相反,它们被解析为路径,参数或查询组件的一部分,并 fragment 在返回值中设置为空字符串。
实例
from urllib.parse import urlparseo = urlparse("https://www.csdn.com/?s=python+%E6%95%99%E7%A8%8B")
print(o)
以上实例输出结果为:
ParseResult(scheme='https', netloc='www.csdn.com', path='/', params='', query='s=python+%E6%95%99%E7%A8%8B', fragment='')
从结果可以看出,内容是一个元组,包含 6 个字符串:协议,位置,路径,参数,查询,判断。
我们可以直接读取协议内容:
实例
from urllib.parse import urlparseo = urlparse("https://www.csdn.com/?s=python+%E6%95%99%E7%A8%8B")
print(o.scheme)
以上实例输出结果为:
https
完整内容如下:
| 属性 | 索引 | 值 | 值(如果不存在) |
|---|---|---|---|
| scheme | 0 | URL协议 | scheme 参数 |
| netloc | 1 | 网络位置部分 | 空字符串 |
| path | 2 | 分层路径 | 空字符串 |
| params | 3 | 最后路径元素的参数 | 空字符串 |
| query | 4 | 查询组件 | 空字符串 |
| fragment | 5 | 片段识别 | 空字符串 |
| username | 用户名 | None | |
| password | 密码 | None | |
| hostname | 主机名(小写) | None | |
| port | 端口号为整数(如果存在) | None |
urllib.robotparser
urllib.robotparser 用于解析 robots.txt 文件。
robots.txt(统一小写)是一种存放于网站根目录下的 robots 协议,它通常用于告诉搜索引擎对网站的抓取规则。
urllib.robotparser 提供了 RobotFileParser 类,语法如下:
class urllib.robotparser.RobotFileParser(url='')
这个类提供了一些可以读取、解析 robots.txt 文件的方法:
- set_url(url) - 设置 robots.txt 文件的 URL。
- read() - 读取 robots.txt URL 并将其输入解析器。
- parse(lines) - 解析行参数。
- can_fetch(useragent, url) - 如果允许 useragent 按照被解析 robots.txt 文件中的规则来获取url 则返回 True。
- mtime() -返回最近一次获取 robots.txt 文件的时间。 这适用于需要定期检查 robots.txt文件更新情况的长时间运行的网页爬虫。
- modified() - 将最近一次获取 robots.txt 文件的时间设置为当前时间。
- crawl_delay(useragent) -为指定的useragent 从 robots.txt 返回 Crawl-delay形参。 如果此形参不存在或不适用于指定的 useragent 或者此形参的 robots.txt 条目存在语法错误,则返回 None。
- request_rate(useragent) -以 named tuple RequestRate(requests, seconds)的形式从 robots.txt 返回 Request-rate 形参的内容。 如果此形参不存在或不适用于指定的 useragent或者此形参的 robots.txt 条目存在语法错误,则返回 None。
- site_maps() - 以 list() 的形式从 robots.txt 返回 Sitemap 形参的内容。如果此形参不存在或者此形参的 robots.txt 条目存在语法错误,则返回 None。
实例
>>> import urllib.robotparser
>>> rp = urllib.robotparser.RobotFileParser()
>>> rp.set_url("http://www.musi-cal.com/robots.txt")
>>> rp.read()
>>> rrate = rp.request_rate("*")
>>> rrate.requests
3
>>> rrate.seconds
20
>>> rp.crawl_delay("*")
6
>>> rp.can_fetch("*", "http://www.musi-cal.com/cgi-bin/search?city=San+Francisco")
False
>>> rp.can_fetch("*", "http://www.musi-cal.com/")
True