【探花交友】day02—完善个人信息

目录
1、完善用户信息
1.1、阿里云OSS
1.2、百度人脸识别
1.3、保存用户信息
1.4、上传用户头像
2、用户信息管理
2.1、查询用户资料
2.2、更新用户资料
3、统一token处理
3.1、代码存在的问题
3.2、解决方案
3.3、代码实现
4、统一异常处理
4.1、解决方案
4.2、代码实现
1、完善用户信息
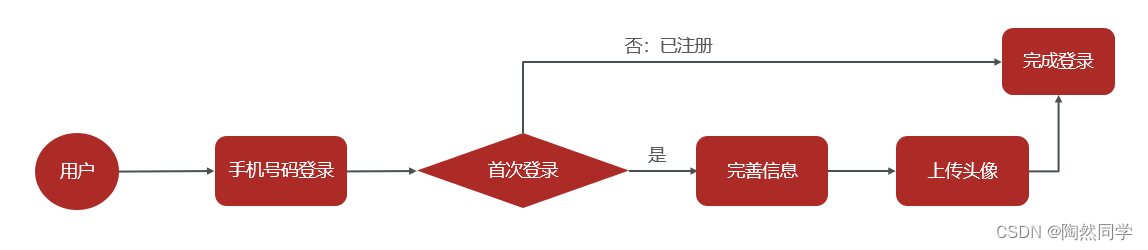
用户在首次登录时需要完善个人信息,包括性别、昵称、生日、城市、头像等。其中,头像数据需要做图片上传,这里采用阿里云的OSS服务作为我们的图片服务器,并且对头像要做人脸识别,非人脸照片不得上传。
-
首次登录时(手机号码不存在),需要创建用户存入数据库中
-
客户端检测首次登录需要完善用户信息
-
填写用户基本信息
-
上传用户头像(需要人脸认证)
-
1.1、阿里云OSS
实现图片上传服务,需要有存储的支持,那么我们的解决方案将以下几种:
-
直接将图片保存到服务的硬盘(springmvc将的文件上传)
-
优点:开发便捷,成本低
-
缺点:扩容困难
-
-
使用分布式文件系统进行存储
-
优点:容易实现扩容
-
缺点:开发复杂度稍大(有成熟的产品可以使用,比如:FastDFS)
-
-
使用第三方的存储服务
-
优点:开发简单,拥有强大功能,免维护
-
缺点:付费
-
在本套课程中选用阿里云的OSS服务进行图片存储。

1.1.1、概述
对象存储服务(Object Storage Service,OSS)是一种海量、安全、低成本、高可靠的云存储服务,适合存放任意类型的文件。容量和处理能力弹性扩展,多种存储类型供选择,全面优化存储成本。
地址:对象存储 OSS_云存储服务_企业数据管理_存储-阿里云

1.1.2、账号申请
购买服务
使用第三方服务最大的缺点就是需要付费,下面,我们看下如何购买开通服务。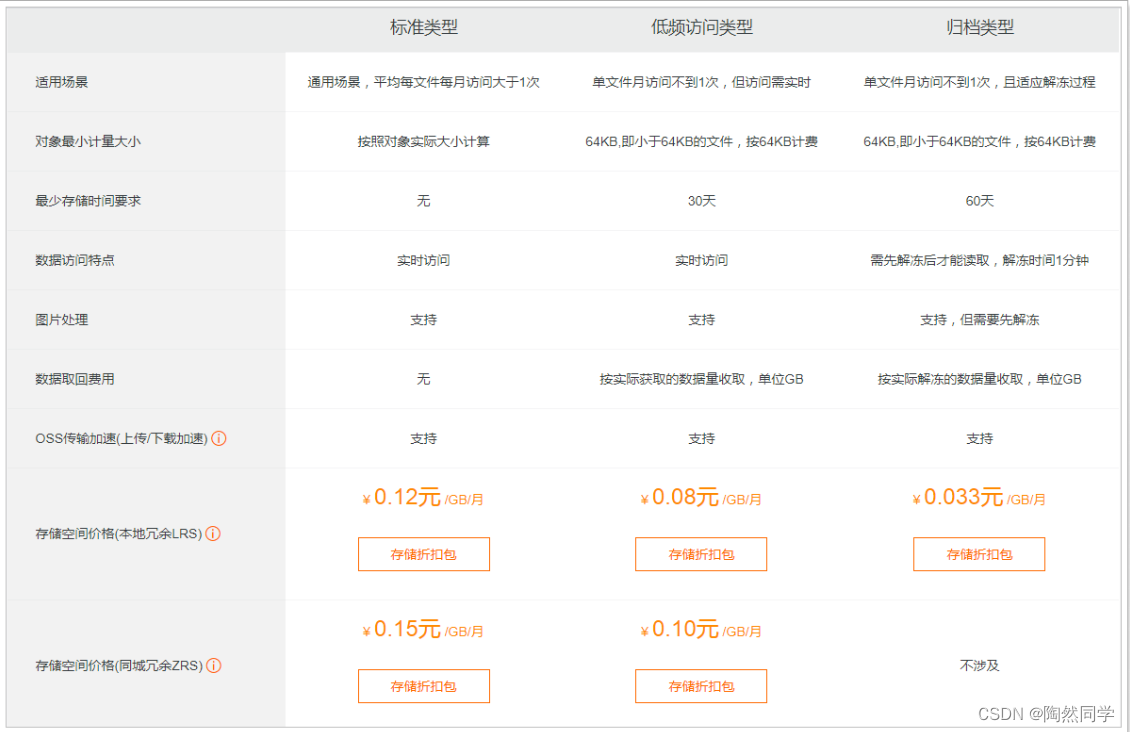
购买下行流量包: (不购买也可以使用,按照流量付费)
说明:OSS的上行流量是免费的,但是下行流量是需要购买的。
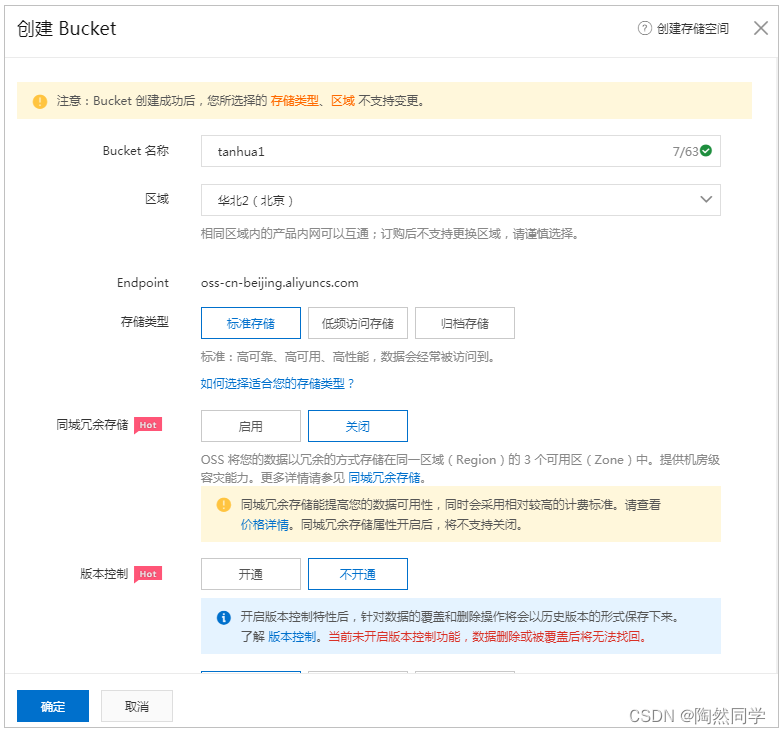
创建Bucket
使用OSS,首先需要创建Bucket,Bucket翻译成中文是水桶的意思,把存储的图片资源看做是水,想要盛水必须得有桶,就是这个意思了。
进入控制台,阿里云登录 - 欢迎登录阿里云,安全稳定的云计算服务平台
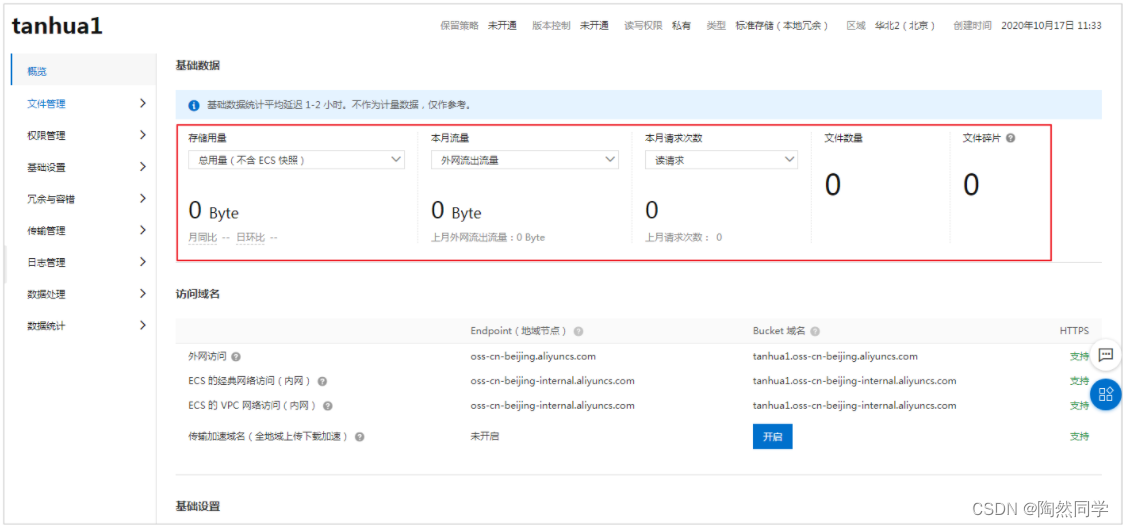
选择Bucket后,即可看到对应的信息,如:url、消耗流量等 :
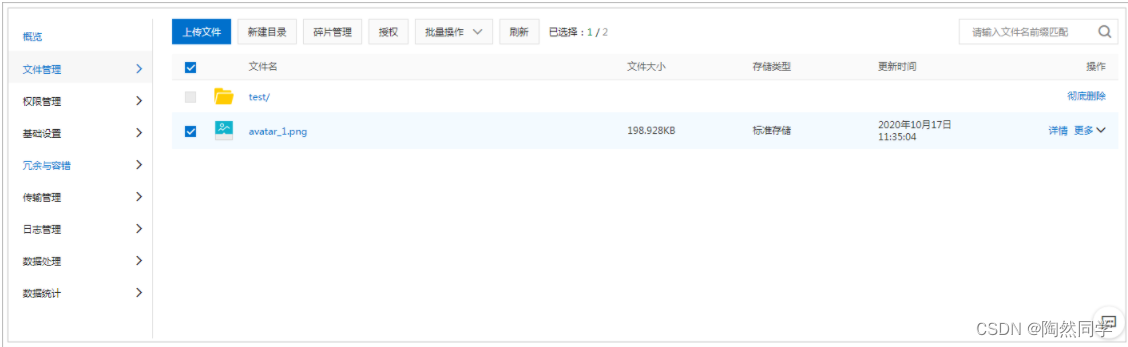
文件管理:
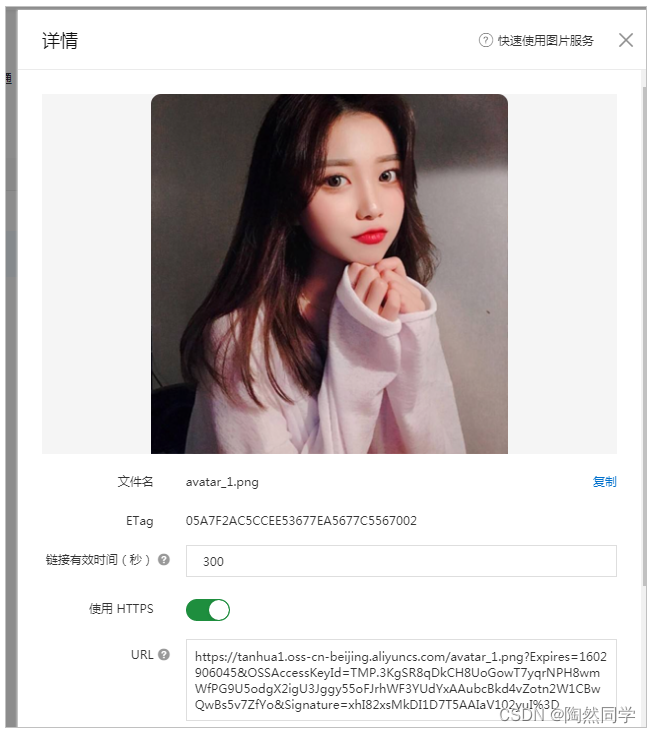
查看文件:
1.1.3、抽取模板工具
和发送短信类似,阿里云OSS也是采用自定义工具的形式进行封装
OssProperties
tanhua-autoconfig创建配置类
@Data
@ConfigurationProperties(prefix = "tanhua.oss")
public class OssProperties {private String accessKey; private String secret;private String bucketName;private String url; //域名private String endpoint;
}
OssTemplate
tanhua-autoconfig创建模板对象
package com.tanhua.autoconfig.template;import com.aliyun.oss.OSS;
import com.aliyun.oss.OSSClientBuilder;
import com.tanhua.autoconfig.properties.OssProperties;import java.io.InputStream;
import java.text.SimpleDateFormat;
import java.util.Date;
import java.util.UUID;public class OssTemplate {private OssProperties properties;public OssTemplate(OssProperties properties) {this.properties = properties;}/* 文件上传*   1:文件名称*   2:输入流*/public String upload(String filename, InputStream is) {//3、拼写图片路径filename = new SimpleDateFormat("yyyy/MM/dd").format(new Date())+"/"+ UUID.randomUUID().toString() + filename.substring(filename.lastIndexOf("."));// yourEndpoint填写Bucket所在地域对应的Endpoint。以华东1(杭州)为例,Endpoint填写为https://oss-cn-hangzhou.aliyuncs.com。String endpoint = properties.getEndpoint();// 阿里云主账号AccessKey拥有所有API的访问权限,风险很高。强烈建议您创建并使用RAM账号进行API访问或日常运维,请登录 https://ram.console.aliyun.com 创建RAM账号。String accessKeyId = properties.getAccessKey();String accessKeySecret = properties.getSecret();// 创建OSSClient实例。OSS ossClient = new OSSClientBuilder().build(endpoint, accessKeyId,accessKeySecret);// 填写Byte数组。// 填写Bucket名称和Object完整路径。Object完整路径中不能包含Bucket名称。ossClient.putObject(properties.getBucketName(), filename, is);// 关闭OSSClient。ossClient.shutdown();String url = properties.getUrl() +"/" + filename;return url;}
}
TanhuaAutoConfiguration
TanhuaAutoConfiguration加入配置
@EnableConfigurationProperties({SmsProperties.class,OssProperties.class
})
public class TanhuaAutoConfiguration {@Beanpublic SmsTemplate smsTemplate(SmsProperties properties) {return new SmsTemplate(properties);}@Beanpublic OssTemplate ossTemplate(OssProperties properties) {return new OssTemplate(properties);}
}
1.1.4、测试
tanhua-app-server加入配置内容,并测试
tanhua: oss:accessKey: LTAI4GKgob9vZ53k2SZdyAC7secret: LHLBvXmILRoyw0niRSBuXBZewQ30laendpoint: oss-cn-beijing.aliyuncs.combucketName: tanhua001url: https://tanhua001.oss-cn-beijing.aliyuncs.com/编写测试类
@RunWith(SpringRunner.class)
@SpringBootTest(classes = AppServerApplication.class)
public class OssTest {@Autowiredprivate OssTemplate template;@Testpublic void testTemplateUpload() throws FileNotFoundException {String path = "C:\\\\Users\\\\lemon\\\\Desktop\\\\课程资源\\\\02-完善用户信息\\\\03-资料\\\\2.jpg";FileInputStream inputStream = new FileInputStream(new File(path));String imageUrl = template.upload(path, inputStream);System.out.println(imageUrl);}
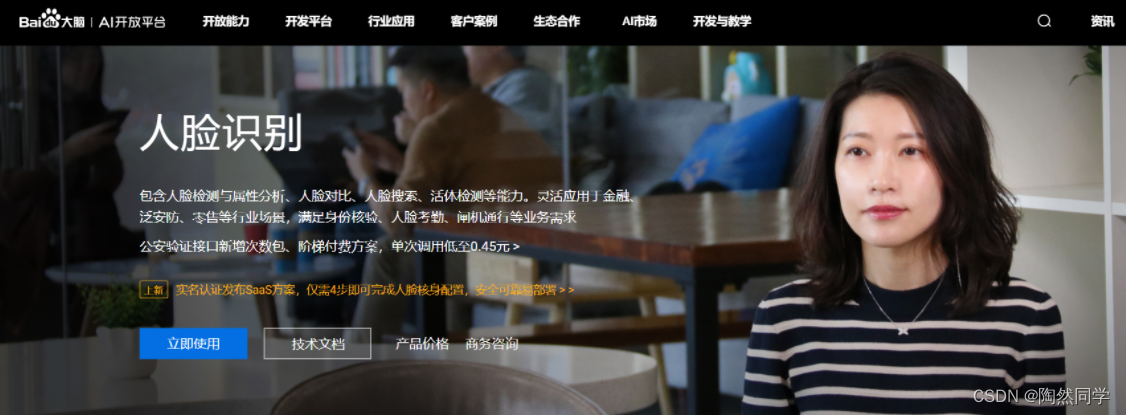
}1.2、百度人脸识别
人脸识别(Face Recognition)基于图像或视频中的人脸检测、分析和比对技术,提供对您已获授权前提下的私有数据的人脸检测与属性分析、人脸对比、人脸搜索、活体检测等能力。灵活应用于金融、泛安防、零售等行业场景,满足身份核验、人脸考勤、闸机通行等业务需求
1.2.1、概述
地址:人脸识别_人脸识别_准确率99.99%_免费试用-百度AI开放平台
1.2.2、账号申请
账号登录注册
百度云AI支持百度账号登录,也可以支持云账号。按需注册即可
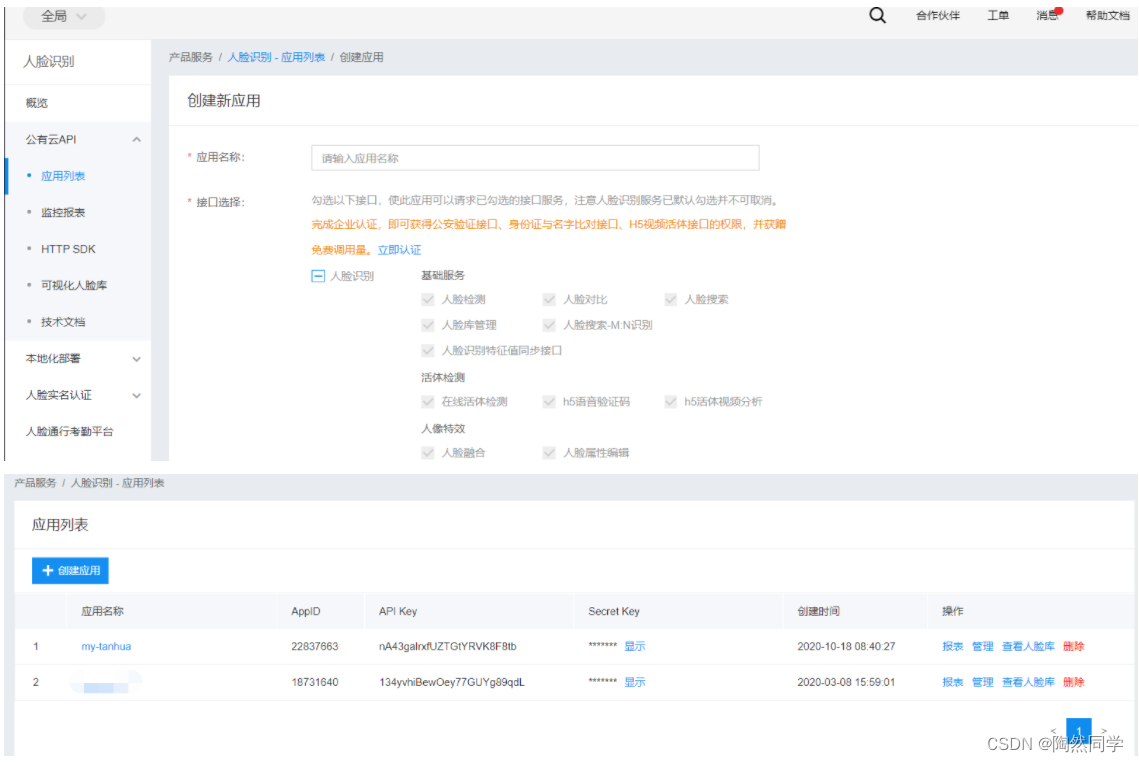
创建应用
按需创建应用
1.2.3、抽取模板工具
AipFaceProperties
@Data
@ConfigurationProperties("tanhua.aip")
public class AipFaceProperties {private String appId;private String apiKey;private String secretKey;@Beanpublic AipFace aipFace() {AipFace client = new AipFace(appId, apiKey, secretKey);// 可选:设置网络连接参数client.setConnectionTimeoutInMillis(2000);client.setSocketTimeoutInMillis(60000);return client;}
}
AipFaceTemplate
package com.tanhua.autoconfig.template;import com.baidu.aip.face.AipFace;
import org.json.JSONObject;
import org.springframework.beans.factory.annotation.Autowired;import java.util.HashMap;public class AipFaceTemplate {@Autowiredprivate AipFace client;/* 检测图片中是否包含人脸*  true:包含*  false:不包含*/public boolean detect(String imageUrl) {// 调用接口String imageType = "URL";HashMap<String, String> options = new HashMap<String, String>();options.put("face_field", "age");options.put("max_face_num", "2");options.put("face_type", "LIVE");options.put("liveness_control", "LOW");// 人脸检测JSONObject res = client.detect(imageUrl, imageType, options);System.out.println(res.toString(2));Integer error_code = (Integer) res.get("error_code");return error_code == 0;}
}
1.2.4、测试
tanhua-app-server加入百度AI的配置信息
tanhua:aip:appId: 27469915apiKey: sHiKW8u382xONufrmu0dHKdvsecretKey: YsrzV2EVDRROdlZRAxDoTWGDH5L5cNrF编写单元测试类
@RunWith(SpringRunner.class)
@SpringBootTest(classes = AppServerApplication.class)
public class FaceTest {@Autowiredprivate AipFaceTemplate template;@Testpublic void detectFace() {String image = "https://tanhua001.oss-cn-beijing.aliyuncs.com/2021/04/19/a3824a45-70e3-4655-8106-a1e1be009a5e.jpg";boolean detect = template.detect(image);}
}
1.3、保存用户信息
1.3.1、接口文档
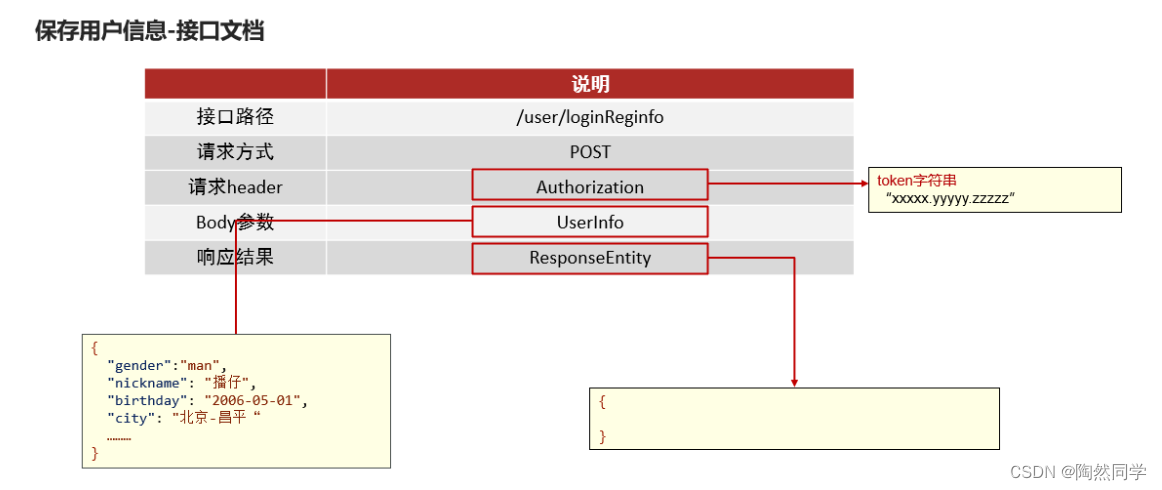
YAPI接口地址:http://192.168.136.160:3000/project/19/interface/api/88
1.3.2、需求分析
数据库表
tb_user_info(用户基本资料表)
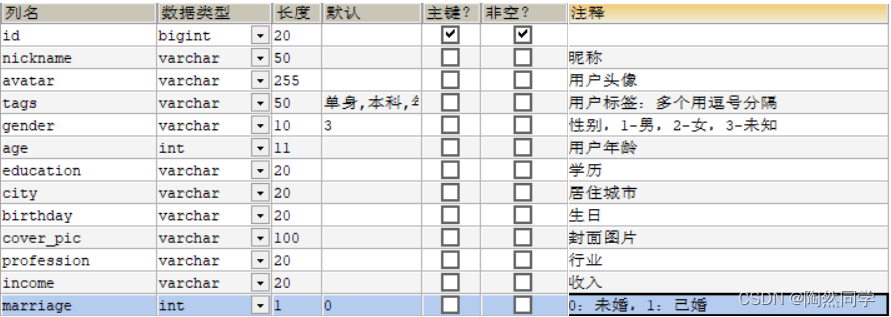
-
用户表和用户信息表是一对一的关系,两者采用主键关联的形式配置
-
主键关联:用户表主键和用户资料表主键要保持一致(如:用户表id=1,此用户的资料表id=1)
执行流程
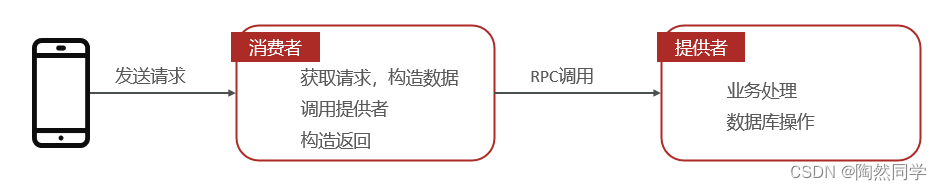
-
手机端发送请求到消费者
-
消费者构造数据,调用提供者
-
消费者完成业务处理,操作数据库
1.3.3、代码实现
UserInfo实体类
@Data
@NoArgsConstructor
@AllArgsConstructor
public class UserInfo implements Serializable {/* 由于userinfo表和user表之间是一对一关系*   userInfo的id来源于user表的id*/@TableId(type= IdType.INPUT)private Long id; //用户idprivate String nickname; //昵称private String avatar; //用户头像private String birthday; //生日private String gender; //性别private Integer age; //年龄private String city; //城市private String income; //收入private String education; //学历private String profession; //行业private Integer marriage; //婚姻状态private String tags; //用户标签:多个用逗号分隔private String coverPic; // 封面图片private Date created;private Date updated;//用户状态,1为正常,2为冻结@TableField(exist = false)private String userStatus = "1";
}
UserController
@RestController
@RequestMapping("/user")
public class UserController {@Autowiredprivate UserInfoService userInfoService;/* 保存用户信息*   UserInfo*   请求头中携带token*/@PostMapping("/loginReginfo")public ResponseEntity loginReginfo(@RequestBody UserInfo userInfo,@RequestHeader("Authorization") String token) {//1、解析tokenClaims claims = JwtUtils.getClaims(token);Integer id = (Integer) claims.get("id");//2、向userinfo中设置用户iduserInfo.setId(Long.valueOf(id));//3、调用serviceuserInfoService.save(userInfo);return ResponseEntity.ok(null);}
}
UserInfoService
@Service
public class UserInfoService {@DubboReferenceprivate UserInfoApi userInfoApi;public void save(UserInfo userInfo) {userInfoApi.save(userInfo);}
}
UserInfoApi
public interface UserInfoApi {public void save(UserInfo userInfo);
}
UserInfoApiImpl
@DubboService
public class UserInfoApiImpl implements  UserInfoApi {@Autowiredprivate UserInfoMapper userInfoMapper;@Overridepublic void save(UserInfo userInfo) {userInfoMapper.insert(userInfo);}
}
UserInfoMapper
public interface UserInfoMapper extends BaseMapper<UserInfo> {}1.4、上传用户头像
1.4.1、需求分析
接口文档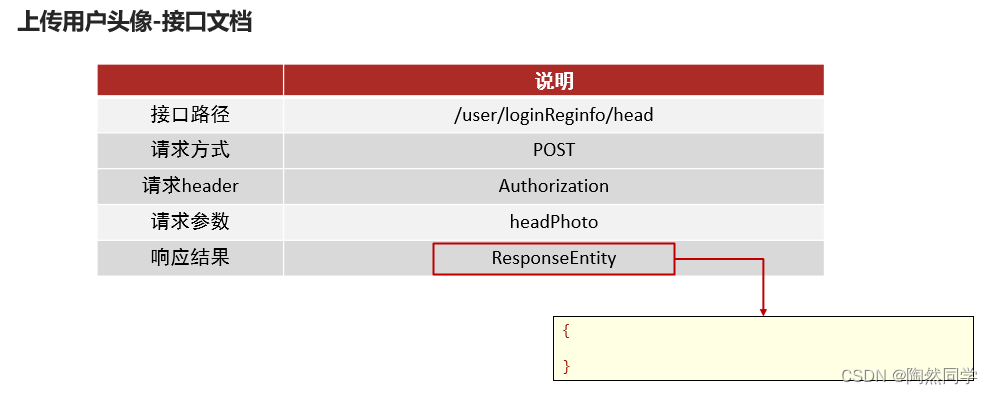
YAPI地址:http://192.168.136.160:3000/project/19/interface/api/91
文件上传采用POST传递,mvc中经过文件解析器转化为MultipartFile对象处理
后续请求中,请求headr中都有Authorization参数。
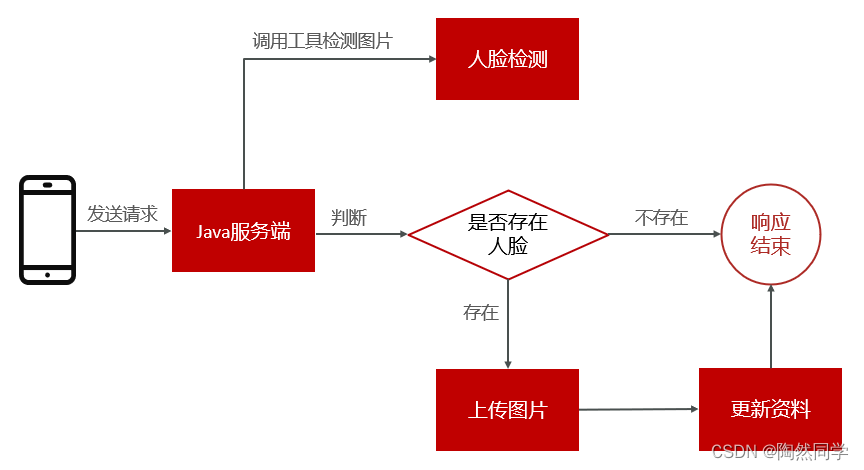
执行流程
1.4.2、代码实现
UserControler
/* 上传用户头像* @return*/@PostMapping("/loginReginfo/head")public ResponseEntity head(MultipartFile headPhoto,@RequestHeader("Authorization") String token) throws IOException {//1、判断token是合法boolean verifyToken = JwtUtils.verifyToken(token);if(!verifyToken){return ResponseEntity.status(401).body(null);}//2、向userinfo中设置用户idClaims claims = JwtUtils.getClaims(token);Integer id = (Integer) claims.get("id");//3、调用serviceuserInfoService.updateHead(headPhoto,id);return ResponseEntity.ok(null);}UserInfoService
//更新用户头像
public void updateHead(MultipartFile headPhoto, Long id) throws IOException {//1、将图片上传到阿里云ossString imageUrl = ossTemplate.upload(headPhoto.getOriginalFilename(), headPhoto.getInputStream());//2、调用百度云判断是否包含人脸boolean detect = aipFaceTemplate.detect(imageUrl);//2.1 如果不包含人脸,抛出异常if(!detect) {throw new RuntimeException();}else{//2.2 包含人脸,调用API更新UserInfo userInfo = new UserInfo();userInfo.setId(id);userInfo.setAvatar(imageUrl);userInfoApi.update(userInfo);}
}
UserInfoApi
public void update(UserInfo userInfo);UserInfoApiImpl
@Override
public void update(UserInfo userInfo) {userInfoMapper.updateById(userInfo);
}
2、用户信息管理
2.1、查询用户资料
2.1.1、接口文档
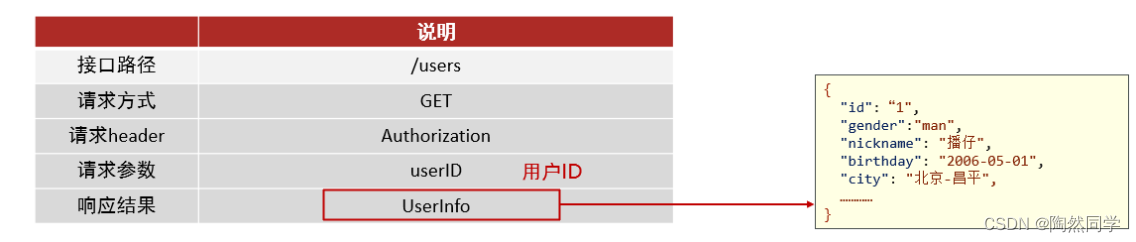
YAPI地址:http://192.168.136.160:3000/project/19/interface/api/265
参数userID: 用户id,当不传递时,查询当前用户的资料信息
2.1.2、代码实现
UserInfoVo
@Data
@NoArgsConstructor
@AllArgsConstructor
public class UserInfoVo implements Serializable {private Long id; //用户idprivate String nickname; //昵称private String avatar; //用户头像private String birthday; //生日private String gender; //性别private String age; //年龄private String city; //城市private String income; //收入private String education; //学历private String profession; //行业private Integer marriage; //婚姻状态
}
UsersController
@RestController
@RequestMapping("/users")
public class UsersControler {@Autowiredprivate UserInfoService userInfoService;/* 查询用户资料*/@GetMappingpublic ResponseEntity users(Long userID,@RequestHeader("Authorization") String token) {if(userID == null) {Claims claims = JwtUtils.getClaims(token);Integer id = (Integer) claims.get("id");userID = Long.valueOf(id);}UserInfoVo userInfo = userInfoService.findById(userID);return ResponseEntity.ok(userInfo);}
}
UserInfoService
//根据id查寻
public UserInfoVo findById(Long id) {UserInfo userInfo = userInfoApi.findById(id);UserInfoVo vo = new UserInfoVo();BeanUtils.copyProperties(userInfo,vo); //copy同名同类型的属性if(userInfo.getAge() != null) {vo.setAge(userInfo.getAge().toString());}return vo;
}
UserInfoApiImpl
@Override
public UserInfo findById(Long id) {return userInfoMapper.selectById(id);
}
2.2、更新用户资料
2.2.1、接口文档
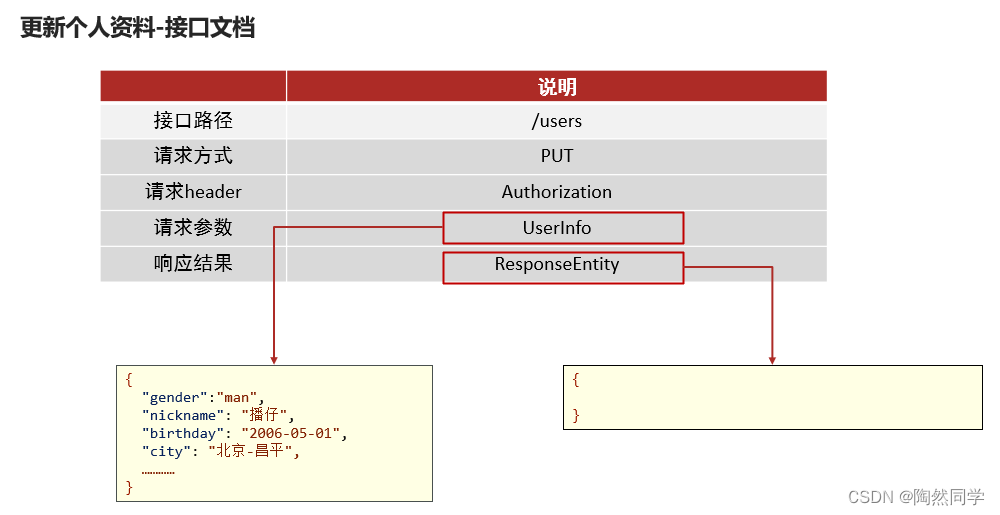
YAPI地址:http://192.168.136.160:3000/project/19/interface/api/259
2.2.2、代码实现
UsersController
/* 更新用户资料* @return*/@PutMappingpublic ResponseEntity updateUserInfo(@RequestBody UserInfo userInfo,@RequestHeader("Authorization") String token){//1、判断token是否合法boolean verifyToken = JwtUtils.verifyToken(token);if(!verifyToken){return ResponseEntity.status(401).body(null);}//2、获取用户idClaims claims = JwtUtils.getClaims(token);Integer id = (Integer) claims.get("id");//3、设置用户iduserInfo.setId(Long.valueOf(id));userInfoService.update(userInfo);return ResponseEntity.ok(null);}UserInfoService
//更新
public void update(UserInfo userInfo) {userInfoApi.update(userInfo);
}
UserInfoApiImpl
@Override
public void update(UserInfo userInfo) {userInfoMapper.updateById(userInfo);
}
3、统一token处理
3.1、代码存在的问题
3.2、解决方案
基于ThreadLocal + 拦截器的形式统一处理
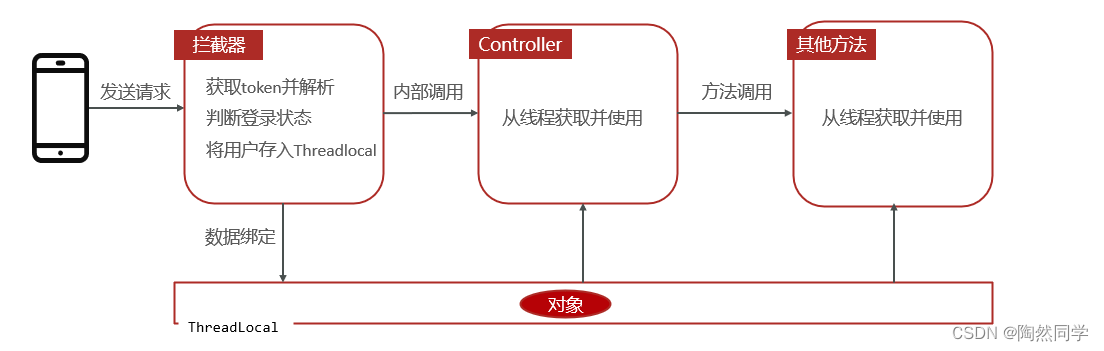
拦截器(Interceptor)
-
是一种动态拦截方法调用的机制;
-
类似于Servlet 开发中的过滤器Filter,用于对处理器进行前置处理和后置处理。

ThreadLocal
-
线程内部的存储类,赋予了线程存储数据的能力。
-
线程内调用的方法都可以从ThreadLocal中获取同一个对象。
-
多个线程中ThreadLocal数据相互隔离
Threadlocal使用方法很简单
ThreadLocal<T> threadLocal = new ThreadLocal<T>();
threadLocal.set() //将数据绑定到当前线程
threadLocal.get() //从当前线程中获取数据
3.3、代码实现
3.3.1、ThreadLocal工具类
定义ThreadLocal工具类,仅需要调用set方法即可将数据存入ThreadLocal中
/* 工具类:实现向threadlocal存储数据的方法*/
public class UserHolder {private static ThreadLocal<User> tl = new ThreadLocal<>();//将用户对象,存入Threadlocalpublic static void set(User user) {tl.set(user);}//从当前线程,获取用户对象public static User get() {return tl.get();}//从当前线程,获取用户对象的idpublic static Long getUserId() {return tl.get().getId();}//从当前线程,获取用户对象的手机号码public static String getMobile() {return tl.get().getMobile();}
}
3.3.2、定义拦截器
定义拦截器,在前置拦截方法preHandle中解析token并验证有效性,如果失效返回状态码401。如果有效,解析User对象,存入ThreadLocal中
public class TokenInterceptor implements HandlerInterceptor {@Overridepublic boolean preHandle(HttpServletRequest request, HttpServletResponse response, Object handler) throws Exception {//1、获取请求头String token = request.getHeader("Authorization");//2、使用工具类,判断token是否有效boolean verifyToken = JwtUtils.verifyToken(token);//3、如果token失效,返回状态码401,拦截 if(!verifyToken) {response.setStatus(401);return false;}//4、如果token正常可用,放行//解析token,获取id和手机号码,构造User对象,存入ThreadlocalClaims claims = JwtUtils.getClaims(token);String mobile = (String) claims.get("mobile");Integer id = (Integer) claims.get("id");User user = new User();user.setId(Long.valueOf(id));user.setMobile(mobile);UserHolder.set(user);return true;}
}
3.3.3、注册拦截器
拦截器需要注册到MVC容器中
@Configuration
public class WebConfig  implements WebMvcConfigurer {@Overridepublic void addInterceptors(InterceptorRegistry registry) {registry.addInterceptor(new TokenInterceptor()).addPathPatterns("/").excludePathPatterns(new String[]{"/user/login","/user/loginVerification"});}
}
3.3.4、测试
修改UsersController方法,从ThreadLoca中获取用户数据
/* 查询用户资料*/
@GetMapping
public ResponseEntity users(Long userID) {if(userID == null) {userID = UserHolder.getUserId();}UserInfoVo userInfo = userInfoService.findById(userID);return ResponseEntity.ok(userInfo);
}
4、统一异常处理
软件开发过程中,不可避免的是需要处理各种异常,常见的形式就是逐层向上抛出,web层进行处理。使用try {...} catch {...}很方便就能对异常做到业务处理
-
冗余代码多,影响代码可读性
-
异常处理和业务代码耦合
4.1、解决方案
SpringMVC提供了一套解决全局异常的处理方案,可以在代码无侵入的前提下完成异常处理。遵循逐层抛出,异常处理器统一处理的思路
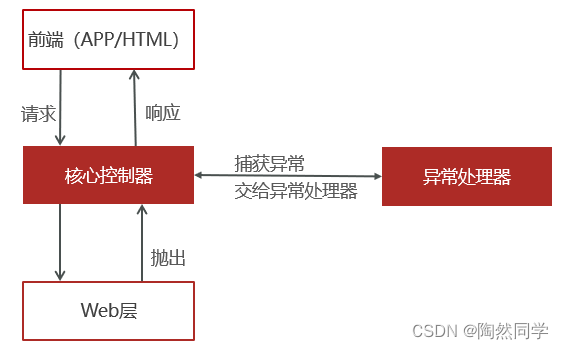
4.2、代码实现
项目中可能存在不可预知的各种异常,如:空指针,数组越界等。针对这类异常,可以直接在异常处理器中统一处理;
还有一类是可预知的错误,如图片不合法,验证码错误等等。这类错误也可以理解为业务异常,可以通过自定义异常类来处理;
4.2.1、业务异常对象
为了方便操作,将一些常见的业务错误封装到ErrorResult对象中
@Data
@NoArgsConstructor
@AllArgsConstructor
@Builder
public class ErrorResult {private String errCode = "999999";private String errMessage;public static ErrorResult error() {return ErrorResult.builder().errCode("999999").errMessage("系统异常稍后再试").build();}public static ErrorResult fail() {return ErrorResult.builder().errCode("000001").errMessage("发送验证码失败").build();}public static ErrorResult loginError() {return ErrorResult.builder().errCode("000002").errMessage("验证码失效").build();}public static ErrorResult faceError() {return ErrorResult.builder().errCode("000003").errMessage("图片非人像,请重新上传!").build();}public static ErrorResult mobileError() {return ErrorResult.builder().errCode("000004").errMessage("手机号码已注册").build();}public static ErrorResult contentError() {return ErrorResult.builder().errCode("000005").errMessage("动态内容为空").build();}public static ErrorResult likeError() {return ErrorResult.builder().errCode("000006").errMessage("用户已点赞").build();}public static ErrorResult disLikeError() {return ErrorResult.builder().errCode("000007").errMessage("用户未点赞").build();}public static ErrorResult loveError() {return ErrorResult.builder().errCode("000008").errMessage("用户已喜欢").build();}public static ErrorResult disloveError() {return ErrorResult.builder().errCode("000009").errMessage("用户未喜欢").build();}
}
4.2.2 业务异常类
自定义业务异常类,针对业务错误之间抛出业务异常即可
/* 自定义异常类*/
@Data
public class BusinessException extends RuntimeException {private ErrorResult errorResult;public BusinessException(ErrorResult errorResult) {super(errorResult.getErrMessage());this.errorResult = errorResult;}
}
4.2.3、异常处理器
/* 自定义统一异常处理*  1、通过注解,声明异常处理类*  2、编写方法,在方法内部处理异常,构造响应数据*  3、方法上编写注解,指定此方法可以处理的异常类型*/
@ControllerAdvice
public class ExceptionAdvice {//处理业务异常@ExceptionHandler(BusinessException.class)public ResponseEntity handlerException(BusinessException be) {be.printStackTrace();ErrorResult errorResult = be.getErrorResult();return ResponseEntity.status(HttpStatus.INTERNAL_SERVER_ERROR).body(errorResult);}//处理不可预知的异常@ExceptionHandler(Exception.class)public ResponseEntity handlerException1(Exception be) {be.printStackTrace();return ResponseEntity.status(HttpStatus.INTERNAL_SERVER_ERROR).body(ErrorResult.error());}
}