利用透射变换裁剪图像中的四边形

最近有个标注任务,需要从如下的一张图像中标注四边形,然后将四边形的图像区域从图像中裁剪出来,并且映射成标准的矩形图像。
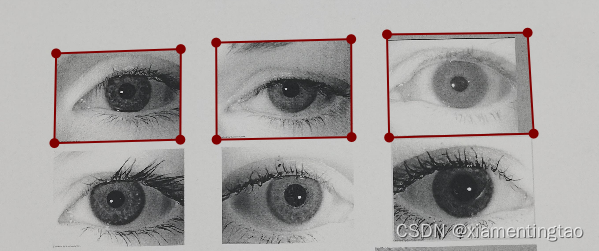
这个任务有两个难点:
1) 图中的四边形并非矩形,因此从四边形图像映射到一个标准的矩形图像,需要进行变换。
2)图中标注四边形的点的顺序有可能是不一致的。起点可能不一致,方向也可能不一致。如何从不一致的四个点中梳理出一致方向的点呢?比如是否可以从不一致的点中顺时针排序,或者取到左上、右上、左下和右下四个点呢?
针对第一个问题,可以采用透射变换来做,仿射变换不适合,因为这个四边形不是矩形,也不是平行四边形,而仿射变换能够保持图像的平直性和平行性,因此不适合。
针对第二个问题,我们需要从四个顶点中顺时针可以排序,可以参考文献【7】和【9】来进行。
一旦四个角点确定好,目标图像的四个角点位置也需要确定好。我们采用分别计算原始图像中四边形的上下两个边,和左右两个边,分别求其平均值,来确定目标图像的大小。
整个程序如下:
# -*- coding: utf-8 -*-
"""
Created on 20234-5@author: wcy
"""
import numpy as np
import scipy.misc
import cv2, math
import scipy.io
import os, sys
import time
import json
from os.path import join, splitext, split, isfile
import matplotlib.pyplot as pltdef parse_json(json_path):"""解析json文件,获取四边形,并将多个四边形的四个点坐标, 组成一个N*4*2的三维矩阵保存"""with open(json_path, 'r') as fcc_file:fcc_data = json.load(fcc_file)bbox_data = fcc_data['shapes']size = len(bbox_data)bboxes = np.empty([size, 4, 2], dtype=float)for i, item in enumerate(bbox_data):bboxes[i] = np.array(item['points'])return bboxes# method 1 https://zhuanlan.zhihu.com/p/106430624
# 按照顺时针方向排序,且最终的结果为[tl, tr, br, bl]
def order_points_new(pts):# sort the points based on their x-coordinatesxSorted = pts[np.argsort(pts[:, 0]), :]# grab the left-most and right-most points from the sorted# x-roodinate pointsleftMost = xSorted[:2, :]rightMost = xSorted[2:, :]if leftMost[0,1]!=leftMost[1,1]:leftMost=leftMost[np.argsort(leftMost[:,1]),:]else:leftMost=leftMost[np.argsort(leftMost[:,0])[::-1],:](tl, bl) = leftMostif rightMost[0,1]!=rightMost[1,1]:rightMost=rightMost[np.argsort(rightMost[:,1]),:]else:rightMost=rightMost[np.argsort(rightMost[:,0])[::-1],:](tr,br)=rightMost# return the coordinates in top-left, top-right,# bottom-right, and bottom-left orderreturn np.array([tl, tr, br, bl], dtype="float32")# method 2 https://mangoroom.cn/opencv/sort-polygon-vertices-as-clockwise-or-anticlockwise.html
# 按照顺时针方向排序,且最终的结果为[tl, tr, br, bl]
def order_points_new2(pts):centroid = np.mean(pts, axis=0)# offset_pt =  pts - centroid# inv = list(map(lambda x: cv2.fastAtan2(x[1], x[0]), offset_pt))# new_pts2 = pts[np.argsort(inv), :]# https://blog.csdn.net/lien0906/article/details/49587759new_pts = sorted(pts, key=lambda x: cv2.fastAtan2(x[1]-centroid[1],x[0]-centroid[0]))tl = new_pts[2]tr = new_pts[3]br = new_pts[0]bl = new_pts[1]return np.array([tl, tr, br, bl], dtype="float32")# * 求两点间距离*
def getDist_P2P(Point0, PointA):distance = math.pow((Point0[0] - PointA[0]), 2) + math.pow((Point0[1] - PointA[1]), 2)distance = math.sqrt(distance)return distance# * 根据原始box计算目标box的位置*
# https://docs.opencv.org/3.4/d4/d61/tutorial_warp_affine.html  []
def obtain_dst_corners(src_box):tl = src_box[0]tr = src_box[1]br = src_box[2]bl = src_box[3]width_t = getDist_P2P(tl, tr)width_b = getDist_P2P(br, bl)width = np.mean([width_t, width_b]).astype(np.int32)height_l = getDist_P2P(tl, bl)height_r = getDist_P2P(tr, br)height = np.mean([height_l, height_r]).astype(np.int32)dst_box = np.float32([[0, 0], [width - 1, 0], [width - 1, height - 1], [0, height - 1]])return dst_box, (width, height)# https://blog.csdn.net/liubing8609/article/details/109657686
#  https://www.cnblogs.com/pheasant/p/13226182.html
# https://docs.opencv.org/3.4/d4/d61/tutorial_warp_affine.html  []
# https://blog.csdn.net/guduruyu/article/details/72518340
# https://blog.csdn.net/libaineu2004/article/details/102607397
# https://blog.csdn.net/zhu_hongji/article/details/81660893
def crop_img_and_save(img, bboxes, save_path, fn):"""根据每个box的四个点的坐标,推断未来矩阵图像的坐标;然后进行透视变换,获取目标图像;最后保存图像fn 为文件名bboxes: N*4*2@return padded image"""for i, box in enumerate(bboxes):src_box = order_points_new2(box)dst_box, dst_size = obtain_dst_corners(src_box)M = cv2.getPerspectiveTransform(src_box, dst_box)# dst = cv2.warpPerspective(img, M, dst_size)dst = cv2.warpPerspective(img, M, dst_size, borderValue=(255, 255, 255))cv2.imwrite(join(save_path, fn + '_'+ str(i)+ '.jpg'), dst)plt.figure('Image Display')plt.subplot(121)# https://blog.csdn.net/saltriver/article/details/78173219img_s = cv2.cvtColor(img, cv2.COLOR_BGR2RGB)  # 注意这行。plt.imshow(img_s)plt.title('Input')plt.subplot(122)dst_s = cv2.cvtColor(dst, cv2.COLOR_BGR2RGB)  # 注意这行。plt.imshow(dst_s)plt.title('Output')plt.show()if __name__ == '__main__':img_path = 'K:/data/IRIS-PAD/'label_path = 'K:/data/label/'save_path = 'K:/data/IRIS-PAD-crop/'if not os.path.exists(save_path):os.makedirs(save_path)imgs = [i for i in os.listdir(img_path) if '.jpg' in i]nimgs = len(imgs)print("totally "+str(nimgs)+" images")start = time.time()for i in range(nimgs):fn, ext = splitext(imgs[i])img_path2 = join(img_path, imgs[i])img = cv2.imread(img_path2, 1)json_path = join(label_path, fn + '.json')if not os.path.isfile(json_path):continuebboxes = parse_json(json_path)crop_img_and_save(img, bboxes, save_path, fn)print("Processing %d of %d..."%(i + 1, nimgs))end = time.time()avg_time = (end-start)/nimgsprint("average time is %f seconds"%avg_time)
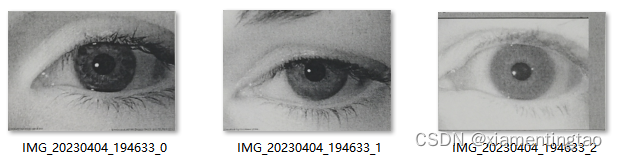
结果如下图所示:
参考文献:
1.opencv仿射变换和透视变换(一)理论篇
2. 【OpenCV学习笔记】之仿射变换(Affine Transformation)
3. python-opencv几何变换--仿射变换、透视变换
4. Python+OpenCV:仿射变换和透射变换
5. 【OpenCV3】透视变换——cv::getPerspectiveTransform()与cv::warpPerspective()详解
6. cv2.warpAffine 参数详解
7. Numpy:矩形框四个顶点顺时针排序 【方法一,*】
顺时针排序四个顶点坐标 - 知乎
使用Python和OpenCV顺时针排序坐标
8. 四个坐标点顺时针排序 【方法二】
9. 凸多边形顶点顺逆时针排序 【方法三,通用方法,*】