vite+vue3+ts搭建项目八(打包性能优化三:使用CDN)

vite+vue3+ts搭建项目八(打包性能优化三:使用CDN)
本文目录
-
- vite+vue3+ts搭建项目八(打包性能优化三:使用CDN)
-
- 使用vite-plugin-cdn-import
-
- 下载npm包
- 在vite.config.ts中通过importToCDN引入
- CDN参数获取方式
- 可用的CDN网址
- 打包并运行
- 报错整理
- 使用rollup-plugin-external-globals(推荐)
-
- 下载npm包
- 在vite.config.ts中引入
- 手动在打包后的index添加CDN
- 自动添加CDN
使用vite-plugin-cdn-import
下载npm包
官方github:https://github.com/MMF-FE/vite-plugin-cdn-import
npm install vite-plugin-cdn-import --save-dev
开发环境使用本地的npm包,cdn是打包时候才生效
在vite.config.ts中通过importToCDN引入
import { defineConfig } from 'vite'
import vue from '@vitejs/plugin-vue'
import { autoComplete, Plugin as importToCDN } from "vite-plugin-cdn-import";
import { visualizer } from 'rollup-plugin-visualizer';// https://vitejs.dev/config/
export default defineConfig({plugins: [vue(),importToCDN({// prodUrl: 'https://cdn.jsdelivr.net/npm/{name}@{version}/{path}',modules: [{name: 'vue',var: 'Vue',path: `https://unpkg.com/vue@3.2.45/dist/vue.global.js`,},{name: 'vue-demi',var: 'VueDemi',path: `https://unpkg.com/vue-demi@0.13.11`,},{name: 'vue-router',var: 'VueRouter',path: `https://unpkg.com/vue-router@4.1.6`,},{name: 'element-plus',var: 'ElementPlus',path: 'https://unpkg.com/element-plus@2.3.3/dist/index.full.js',// css: 'https://unpkg.com/element-plus@2.3.3/dist/index.css'},],}),],// build: {//   rollupOptions: {//     external: ['vue', 'vue-demi', 'element-plus'],//   },// }
})
注意事项:网上很多教程,还需要在build的rollupOptions添加对应的external,如上注释所示,其实是不需要的,vite-plugin-cdn-import插件会自动帮我们完成这部分工作。
CDN参数获取方式
-
name:npm包的名称
可以到https://www.jsdelivr.com进行查询,以element-plus为例


-
var:组件(main.ts)引用的名称
比如ElementPlusimport ElementPlus from 'element-plus' app.use(ElementPlus) -
path:cdn网站存储对应的js地址
输入对应名称,会自动跳转到对应的js文件,复制粘贴,需要修改版本,和自己项目的package.json版本一致
允许只写到版本,后面会自动补齐
{name: 'vue-demi',var: 'VueDemi',path: `https://unpkg.com/vue-demi@0.13.11`, }, -
css:对应位置,参考上图element-plus
需要注意的是,css可以使用本地的,使用本地的就不要添加css,使用远程cdn的就需要在打包前注释本地的,否则会出现样式重叠。
可用的CDN网址
| name | pordUrl |
|---|---|
| jsdelivr | https://cdn.jsdelivr.net/npm/vue@3.2.47/dist/vue.global.min.js(例子) |
| unpkg | //unpkg.com/{name}@{version}/{path} |
| cdnjs | //cdnjs.cloudflare.com/ajax/libs/{name}/{version}/{path} |
打包并运行
-
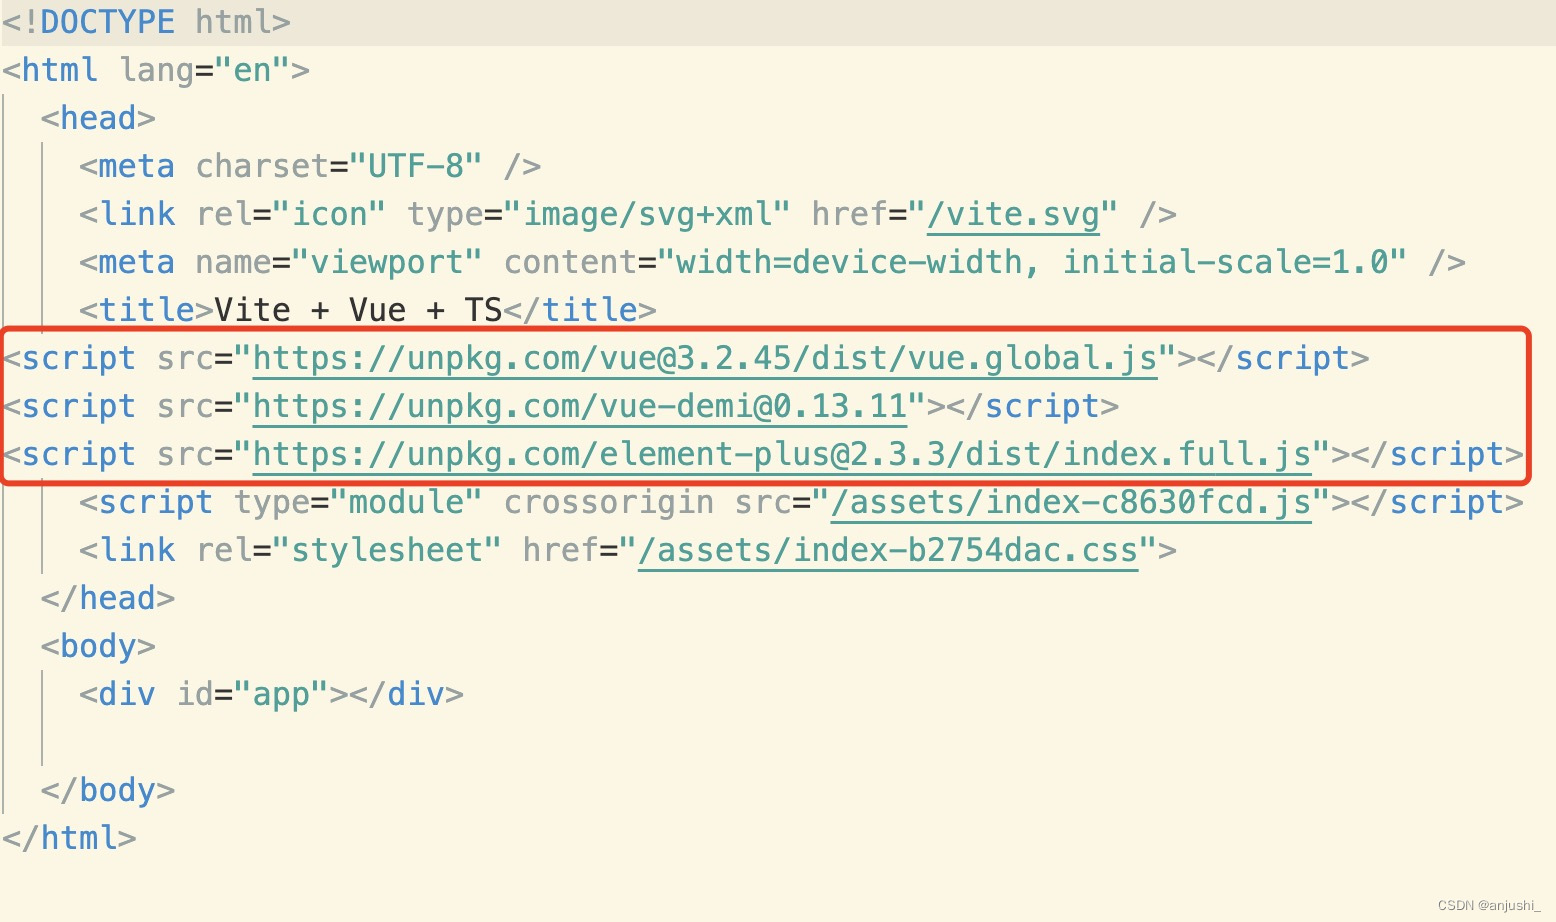
打包后
dist/index.html中自动添加了cdn链接
-
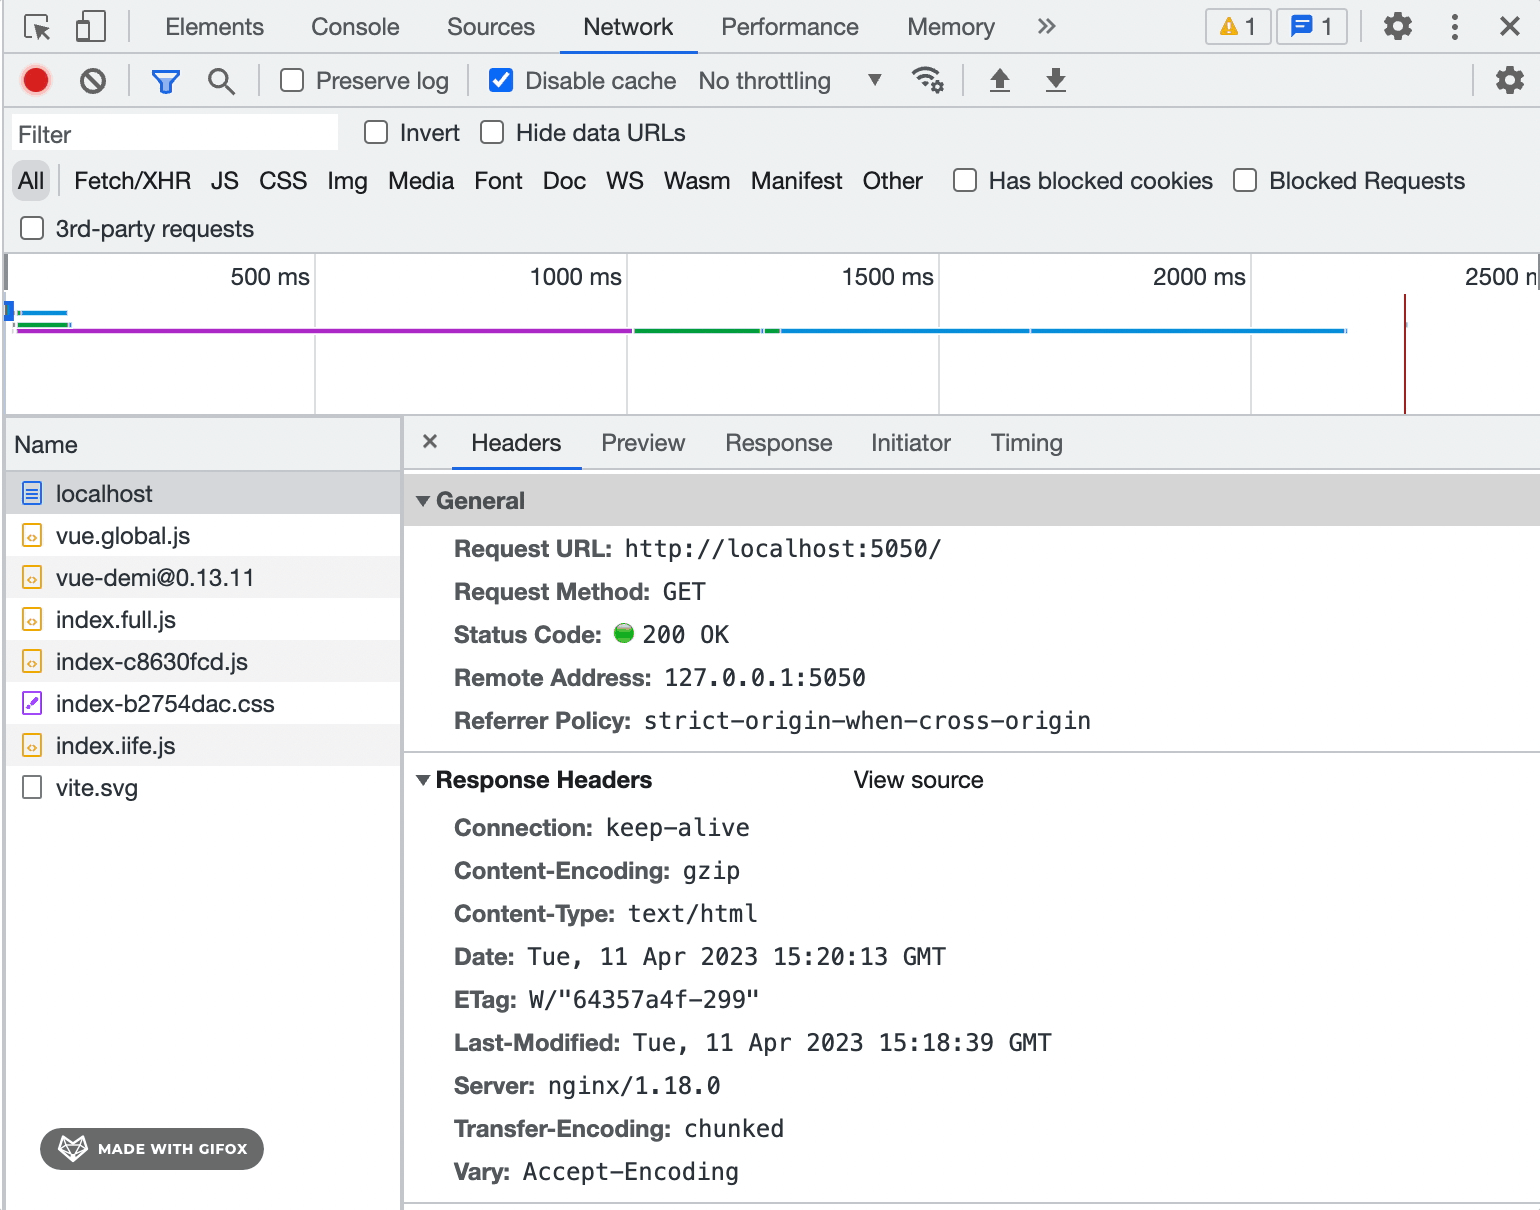
打包后放到nginx中运行,查看对应依赖的加载地址

-
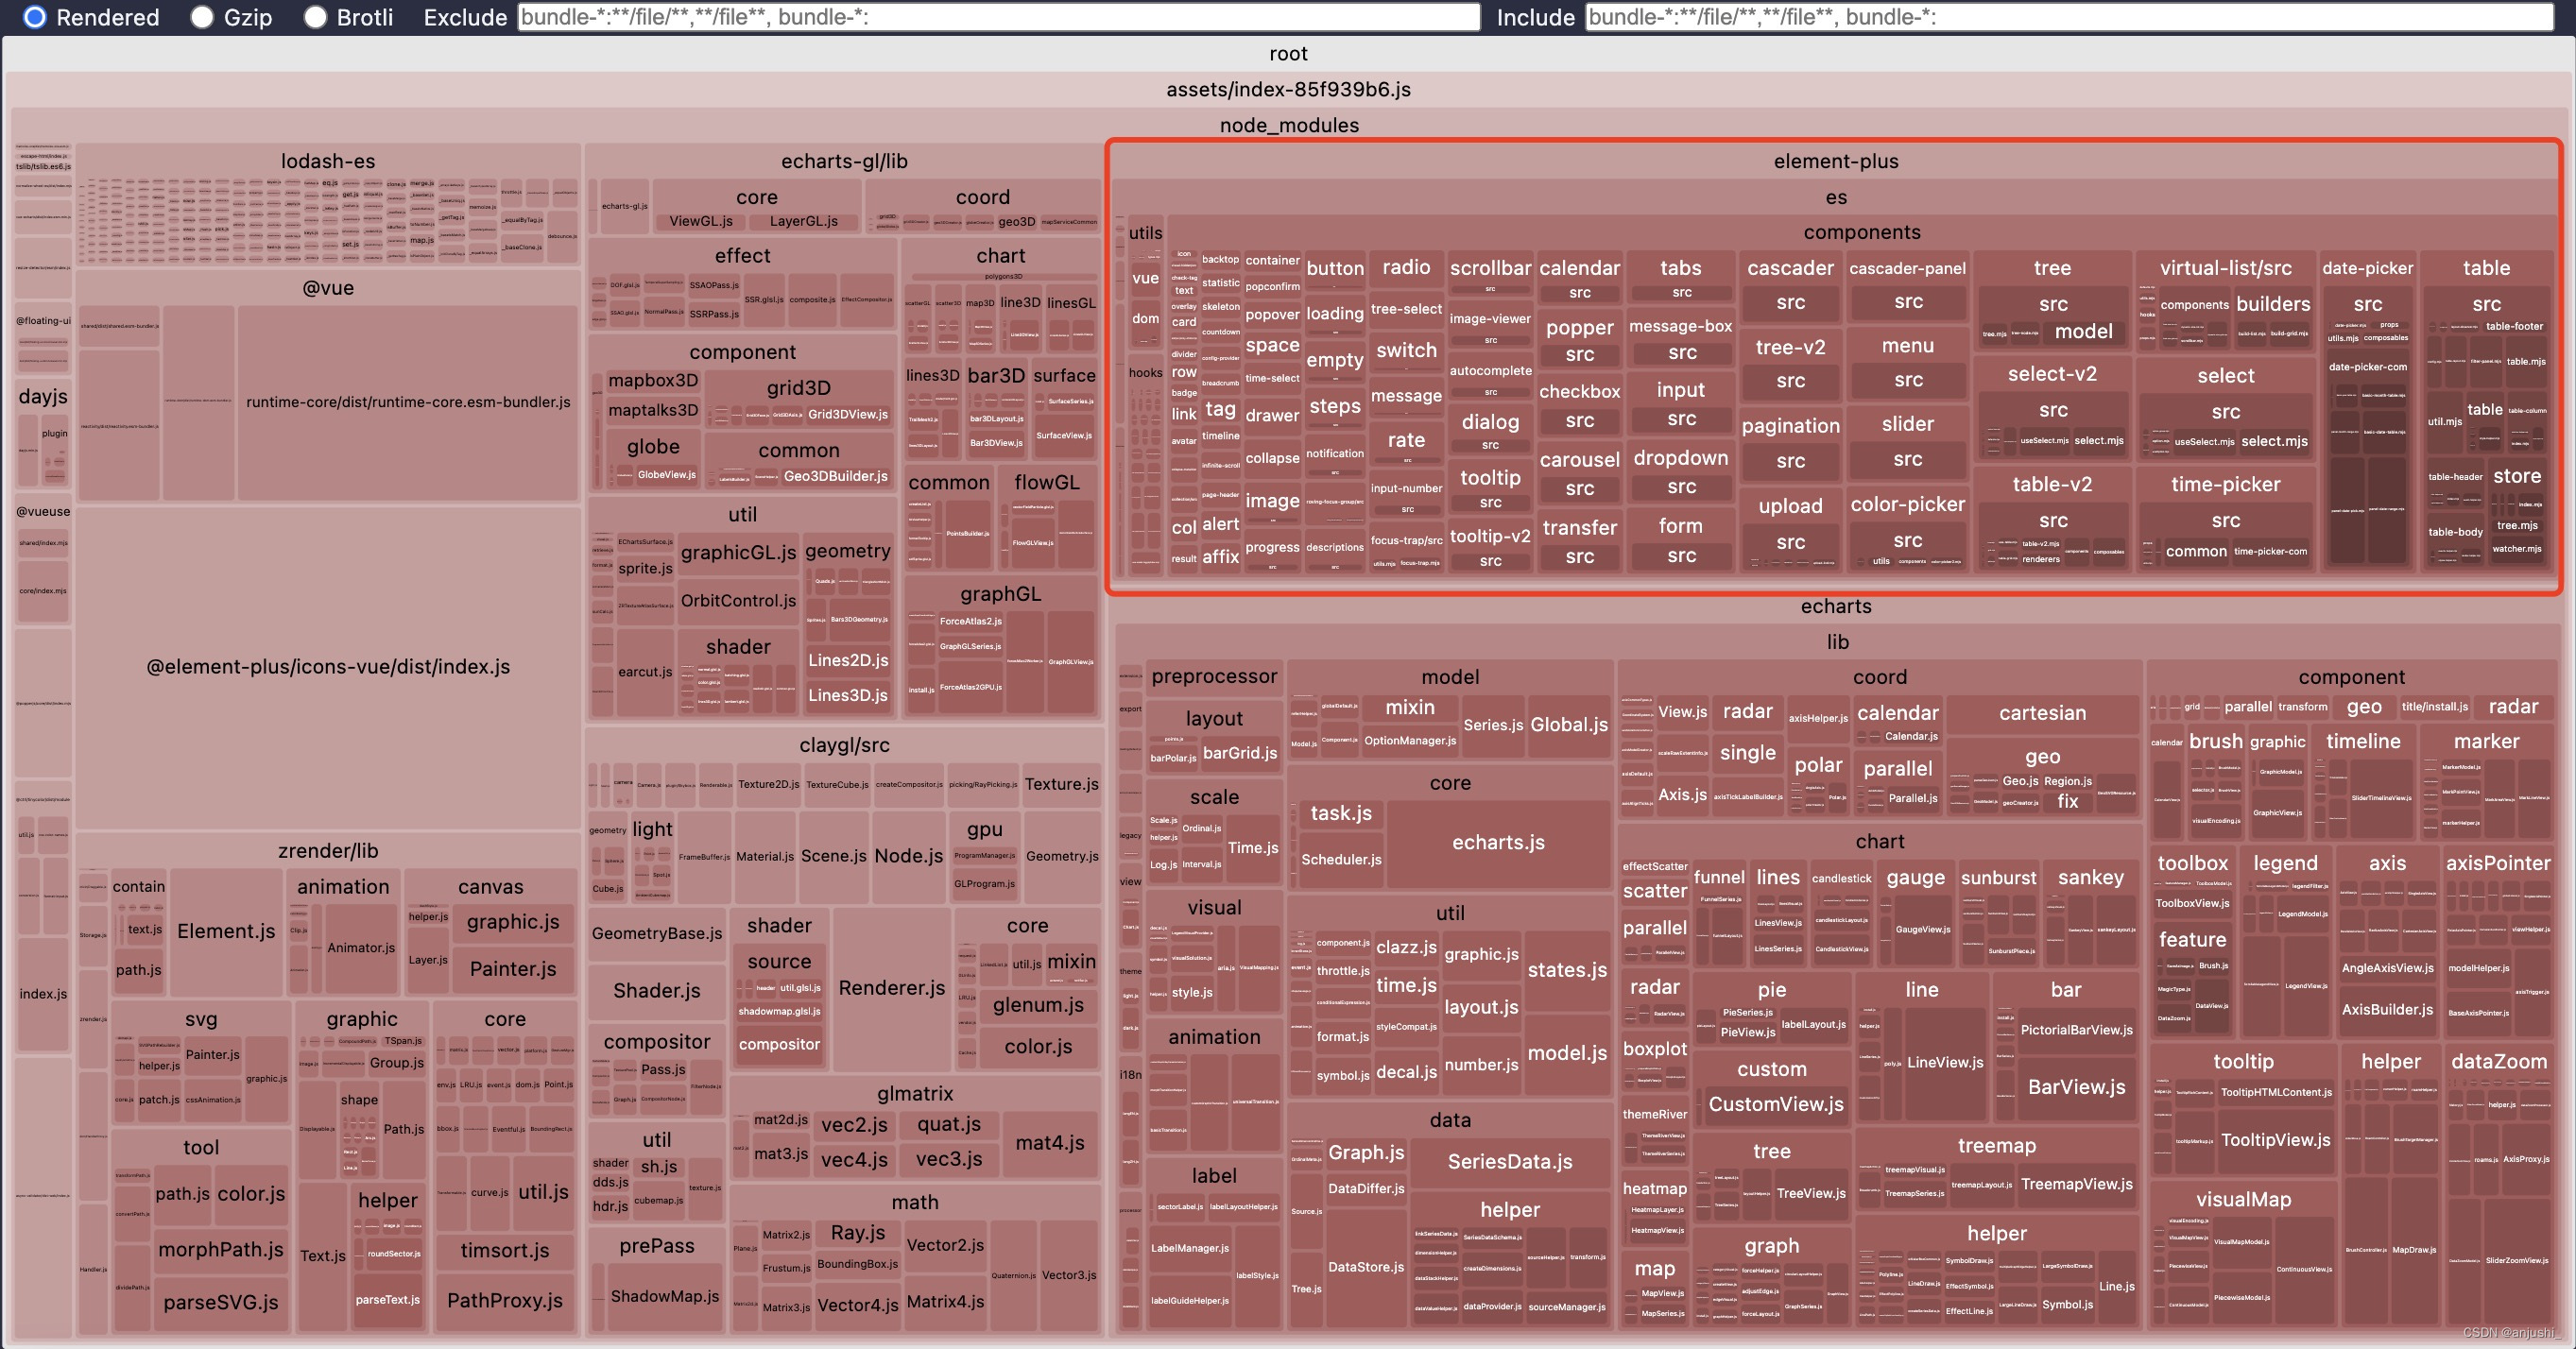
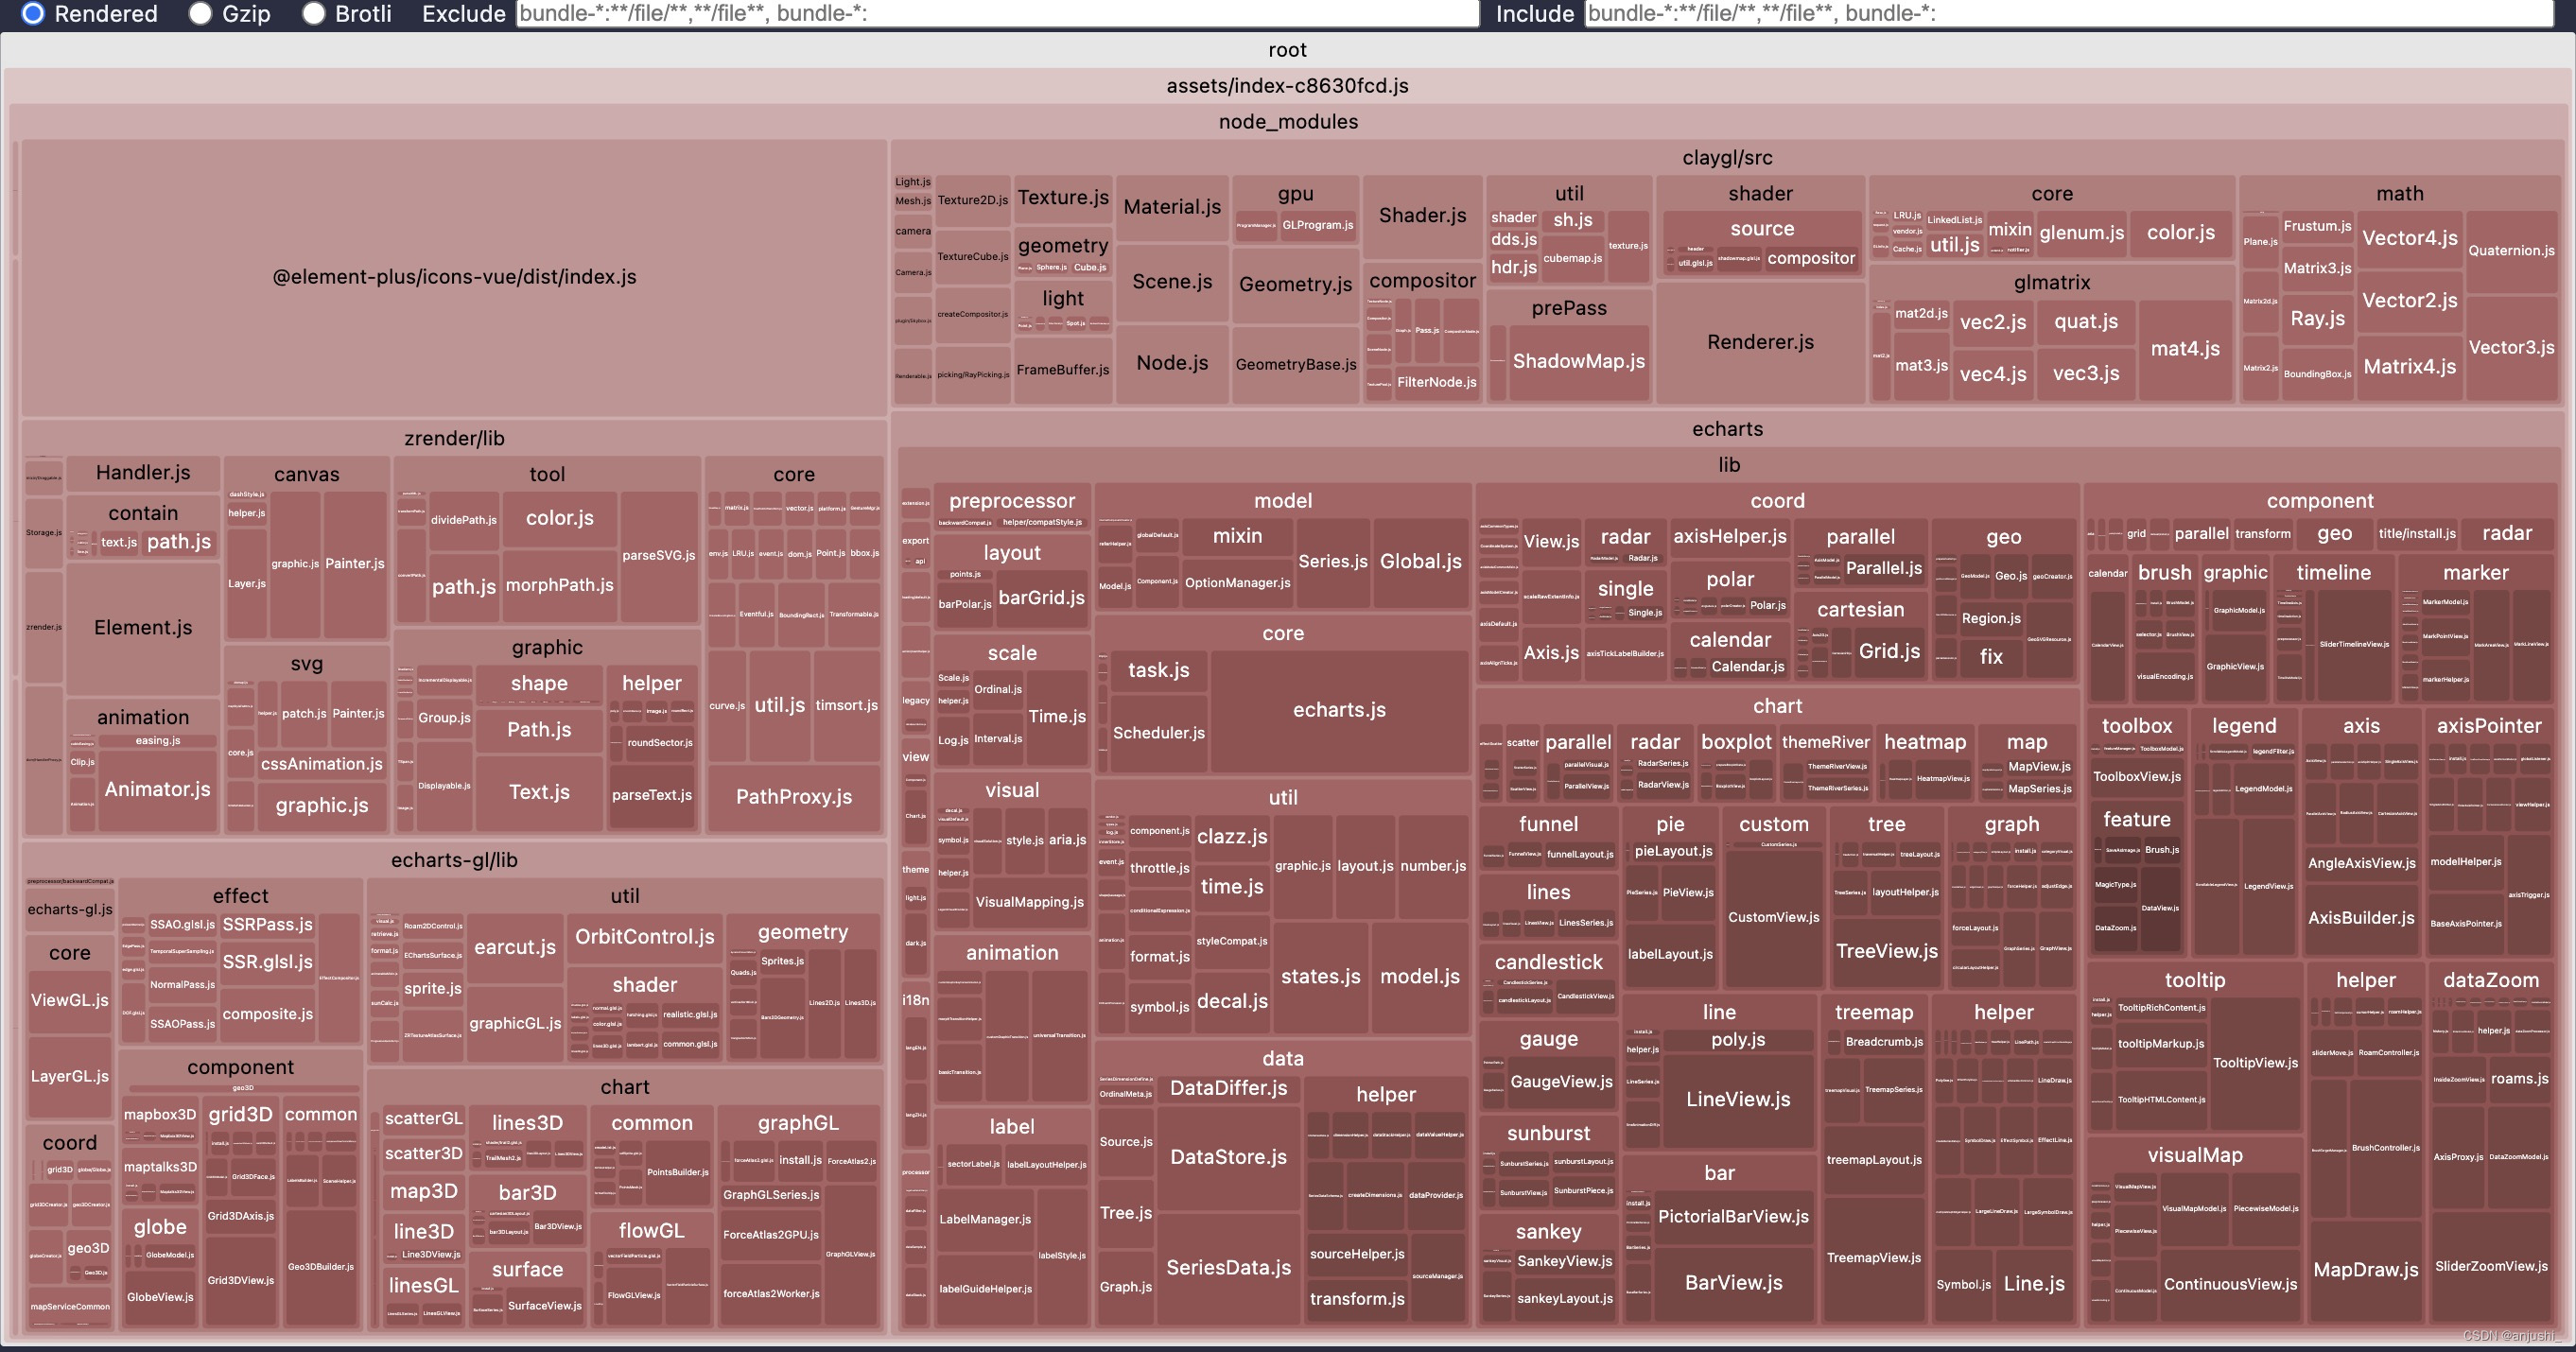
打包后查看包体积
例如element-plus,已经被排除在外了
报错整理
- 报错
TypeError: importToCDN is not a function

- 解决方法,修改import引入方式
官方issues:https://github.com/MMF-FE/vite-plugin-cdn-import/issues/22// import importToCDN from "vite-plugin-cdn-import"; import { autoComplete, Plugin as importToCDN } from "vite-plugin-cdn-import";
- 报错
Uncaught TypeError: Cannot read properties of undefined (reading 'createElementVNode')
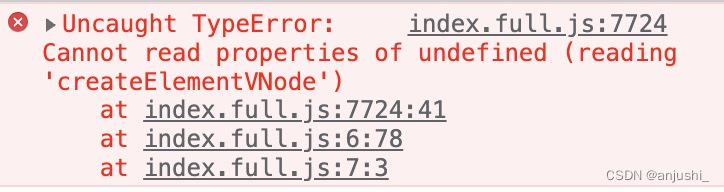
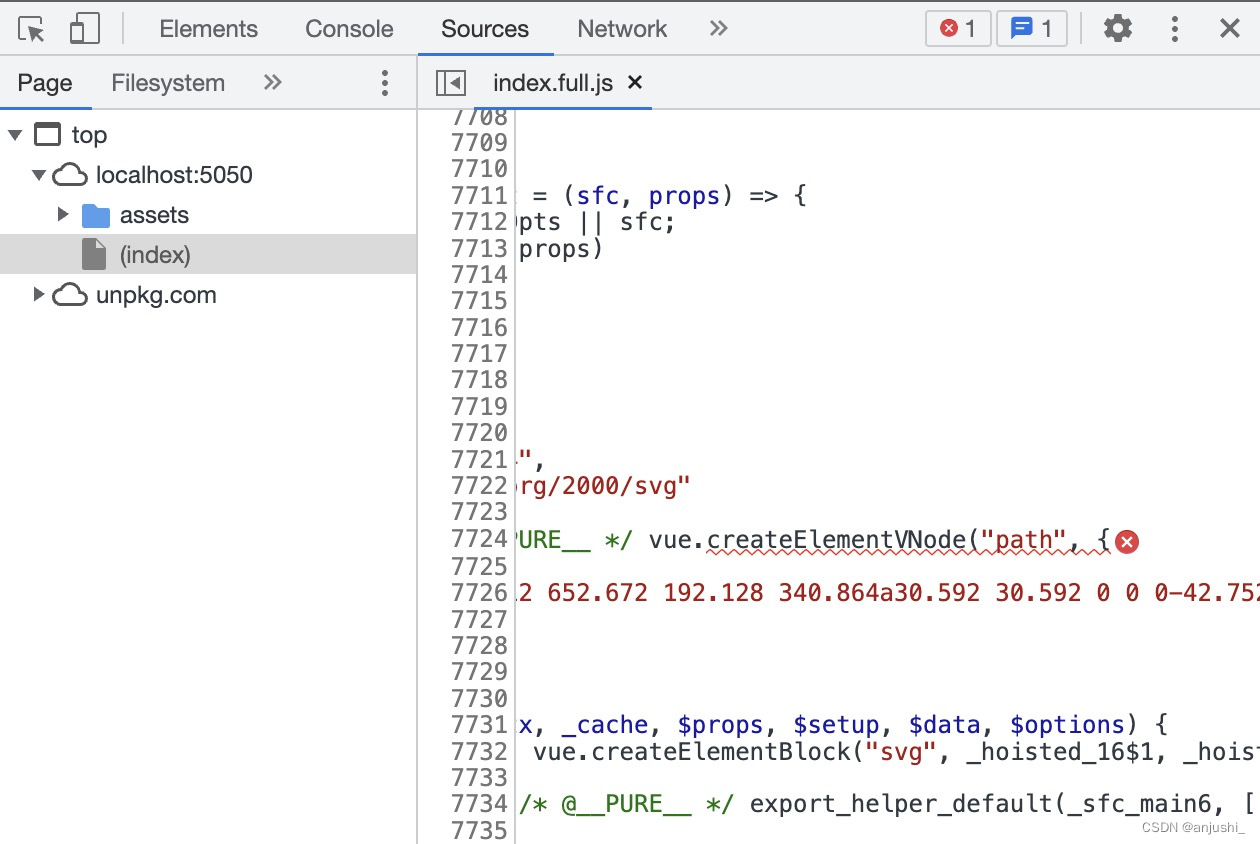
可以看到代码里用到了vue - 解决:将vue也通过cdn引入即可
- 报错
Uncaught ReferenceError: Vue is not defined

vue-router或某些组件需要依赖vue - 解决:将vue也通过cdn引入即可
-
报错
Uncaught TypeError: Failed to resolve module specifier "vue". Relative references must start with either "/", "./", or "../".

参考1:https://github.com/MMF-FE/vite-plugin-cdn-import/issues/13
参考2:https://github.com/MMF-FE/vite-plugin-cdn-import/issues/32
参考3:https://blog.csdn.net/qq_51634332/article/details/126325740 -
解决:importToCDN时在引入vue后添加vue-demi,已在vite.config.ts中给出,其他插件在vue-demi之后(顺序很重要)
vite-plugin-cdn-import与unplugin-vue-components和unplugin-auto-import不兼容
参考:https://github.com/MMF-FE/vite-plugin-cdn-import/issues/13#issuecomment-1226897835
使用importToCDN时,通过下面两个插件的组件不生效,需要在每个组件单独写importimport AutoImport from "unplugin-auto-import/vite" import Components from 'unplugin-vue-components/vite';- 原因
之所以使用 AutoImport 后就会有问题,是因为 unplugin-auto-import 的 enforce 为 post ,会最后才执行,导致通过 AutoImport 的注入的代码没有被此插件转换 - 解决方法
目前只能暂时不同时使用这两组插件,所以如果使用自动引入插件,这个插件不是最佳答案
直接按照下面这张方法是不行的,在vite.config.ts文件中,为importToCDN添加...扩展符,让它在其他所有插件之后再加载
import { defineConfig } from 'vite'
import vue from '@vitejs/plugin-vue'
import { autoComplete, Plugin as importToCDN } from "vite-plugin-cdn-import";
import { visualizer } from 'rollup-plugin-visualizer';
import AutoImport from "unplugin-auto-import/vite"
import Components from 'unplugin-vue-components/vite';export default defineConfig({plugins: [vue(),AutoImport({imports: ['vue', 'vue-router'],dts: "src/auto-import.d.ts",}),Components({//默认存放位置//dts: "src/components.d.ts",}),{...importToCDN({// prodUrl: 'https://cdn.jsdelivr.net/npm/{name}@{version}/{path}',modules: [{name: 'vue',var: 'Vue',path: `https://unpkg.com/vue@3.2.45/dist/vue.global.js`,},...],}),enforce: 'post',apply: 'build',},],// build: {// outDir: 'dist', // 指定输出路径// // minify: 'terser', // 混淆器,terser 构建后文件体积更小,'terser' | 'esbuild' ,默认为esbuild// rollupOptions: {// external: ['vue', 'vue-demi', 'element-plus'],// },// }
})
使用rollup-plugin-external-globals(推荐)
为了解决上面的问题,externalGlobals是可以用上面的方法延迟加载的
参考1:https://github.com/ttk-cli/vue3-template/tree/test/cdn1
参考2:https://free_pan.gitee.io/freepan-blog
下载npm包
npm install -D rollup-plugin-external-globals
在vite.config.ts中引入
- 允许设置延迟加载
- rollupOptions需要设置external
import externalGlobals from 'rollup-plugin-external-globals'const externalGlobalsObj = {vue: 'Vue','vue-demi': 'VueDemi','vue-router': 'VueRouter','element-plus': 'ElementPlus',
}export default defineConfig({plugins: [vue(),{...externalGlobals(externalGlobalsObj),enforce: 'post',apply: 'build',},],build: {outDir: 'dist', // 指定输出路径rollupOptions: {external: Object.keys(externalGlobalsObj),},}
})
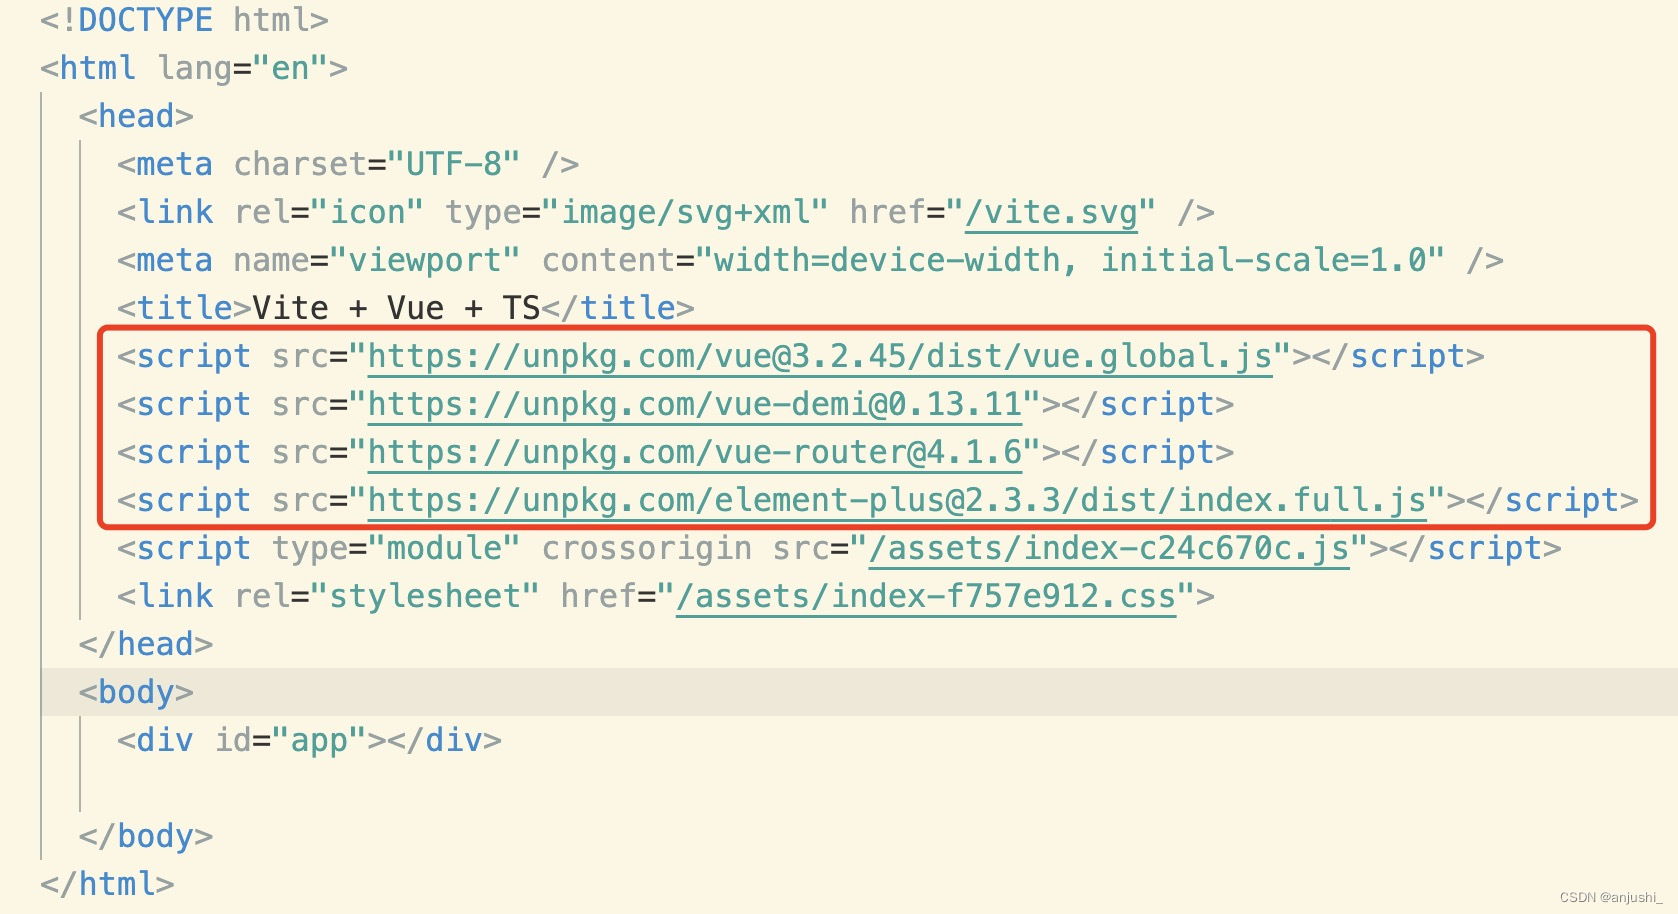
手动在打包后的index添加CDN
<!DOCTYPE html>
<html lang="en"><head><meta charset="UTF-8" /><link rel="icon" type="image/svg+xml" href="/vite.svg" /><meta name="viewport" content="width=device-width, initial-scale=1.0" /><title>Vite + Vue + TS</title><script src="https://unpkg.com/vue@3.2.45/dist/vue.global.js"></script><script src="https://unpkg.com/vue-demi@0.13.11"></script><script src="https://unpkg.com/vue-router@4.1.6"></script><script src="https://unpkg.com/element-plus@2.3.3/dist/index.full.js"></script><script type="module" crossorigin src="/assets/index-c24c670c.js"></script><link rel="stylesheet" href="/assets/index-f757e912.css"></head><body><div id="app"></div></body>
</html>
自动添加CDN
需要用到vite-plugin-html插件
github官方:https://github.com/vbenjs/vite-plugin-html
参考:https://segmentfault.com/q/1010000041958028
- 安装
npm i vite-plugin-html -D
- 在vite.config.ts中引入(完整配置文件内容)
import { defineConfig } from 'vite'
import vue from '@vitejs/plugin-vue'
import { autoComplete, Plugin as importToCDN } from "vite-plugin-cdn-import";
import { visualizer } from 'rollup-plugin-visualizer';
// 自动导入vue中hook reactive ref等
import AutoImport from "unplugin-auto-import/vite"
// 自动导入ui-组件 比如说ant-design-vue  element-plus等
import Components from 'unplugin-vue-components/vite';
import externalGlobals from 'rollup-plugin-external-globals'
import { createHtmlPlugin } from 'vite-plugin-html'const cdn = {css: [],js: ['https://unpkg.com/vue@3.2.45/dist/vue.global.js','https://unpkg.com/vue-demi@0.13.11','https://unpkg.com/vue-router@4.1.6','https://unpkg.com/element-plus@2.3.3/dist/index.full.js',],
}const externalGlobalsObj = {vue: 'Vue','vue-demi': 'VueDemi','vue-router': 'VueRouter',// pinia: 'Pinia','element-plus': 'ElementPlus',
}// https://vitejs.dev/config/
export default defineConfig(({ mode }) => {const isProduction = mode === 'production';return {plugins: [vue(),AutoImport({//安装两行后,在组件中不用再导入ref,reactive等imports: ['vue', 'vue-router'],dts: "src/auto-import.d.ts",//element}),Components({//element//默认存放位置//dts: "src/components.d.ts",}),visualizer({open: true,  //注意这里要设置为true,否则无效gzipSize: true,  //从源代码中收集 gzip 大小并将其显示在图表中brotliSize: true, //从源代码中收集 brotli 大小并将其显示在图表中emitFile: true, //在打包完的dist,否则在项目目录下filename: "stats.html", //分析图生成的文件名}),createHtmlPlugin({inject: {data: {cdnCss: isProduction ? cdn.css : [],cdnJs: isProduction ? cdn.js : [],},},}),{...externalGlobals(externalGlobalsObj),enforce: 'post',apply: 'build',},],build: {outDir: 'dist', // 指定输出路径// minify: 'terser', // 混淆器,terser 构建后文件体积更小,'terser' | 'esbuild' ,默认为esbuildrollupOptions: {external: Object.keys(externalGlobalsObj),},}}
})
-
在 index.html 中增加 EJS 标签
需要注意的是:这个index.html不是打包后的,是项目的入口index.html
<!DOCTYPE html>
<html lang="en"><head><meta charset="UTF-8" /><link rel="icon" type="image/svg+xml" href="/vite.svg" /><meta name="viewport" content="width=device-width, initial-scale=1.0" /><title>Vite + Vue + TS</title><!-- 使用CDN的CSS文件 --><% for (const i of cdnCss) { %><link href="<%= i %>" rel="stylesheet" /><% } %><!-- 使用CDN的JS文件 --><% for (const i of cdnJs) { %><script src="<%= i %>" defer></script><% } %>
</head><body><div id="app"></div><script type="module" src="/src/main.ts"></script>
</body></html>
环境变量:https://www.cnblogs.com/yayuya/p/17035869.html
- 打包后的结果
这样就不需要手动引入了,但是需要添加一个新的npm包,实际项目中可以自行选择是否添加