微服务学习-SpringCloud -Nacos (服务注册源码学习)

文章目录
- 源码版本及下载
- 服务注册核心流程图(看不清请双击打开大图)
- 源码详解
-
- 客户端注册源码
- 服务端注册源码
源码版本及下载
此次源码版本为1.4.1,2.x版本在服务请求时使用了grpc的方式,所以先以1.4.1版本学习,后续再看2.x版本。
源码下载地址:: link
打开页面后,下拉到最下面,下载nacos-1.4.1.zip,解压导入idea即可。
服务注册核心流程图(看不清请双击打开大图)
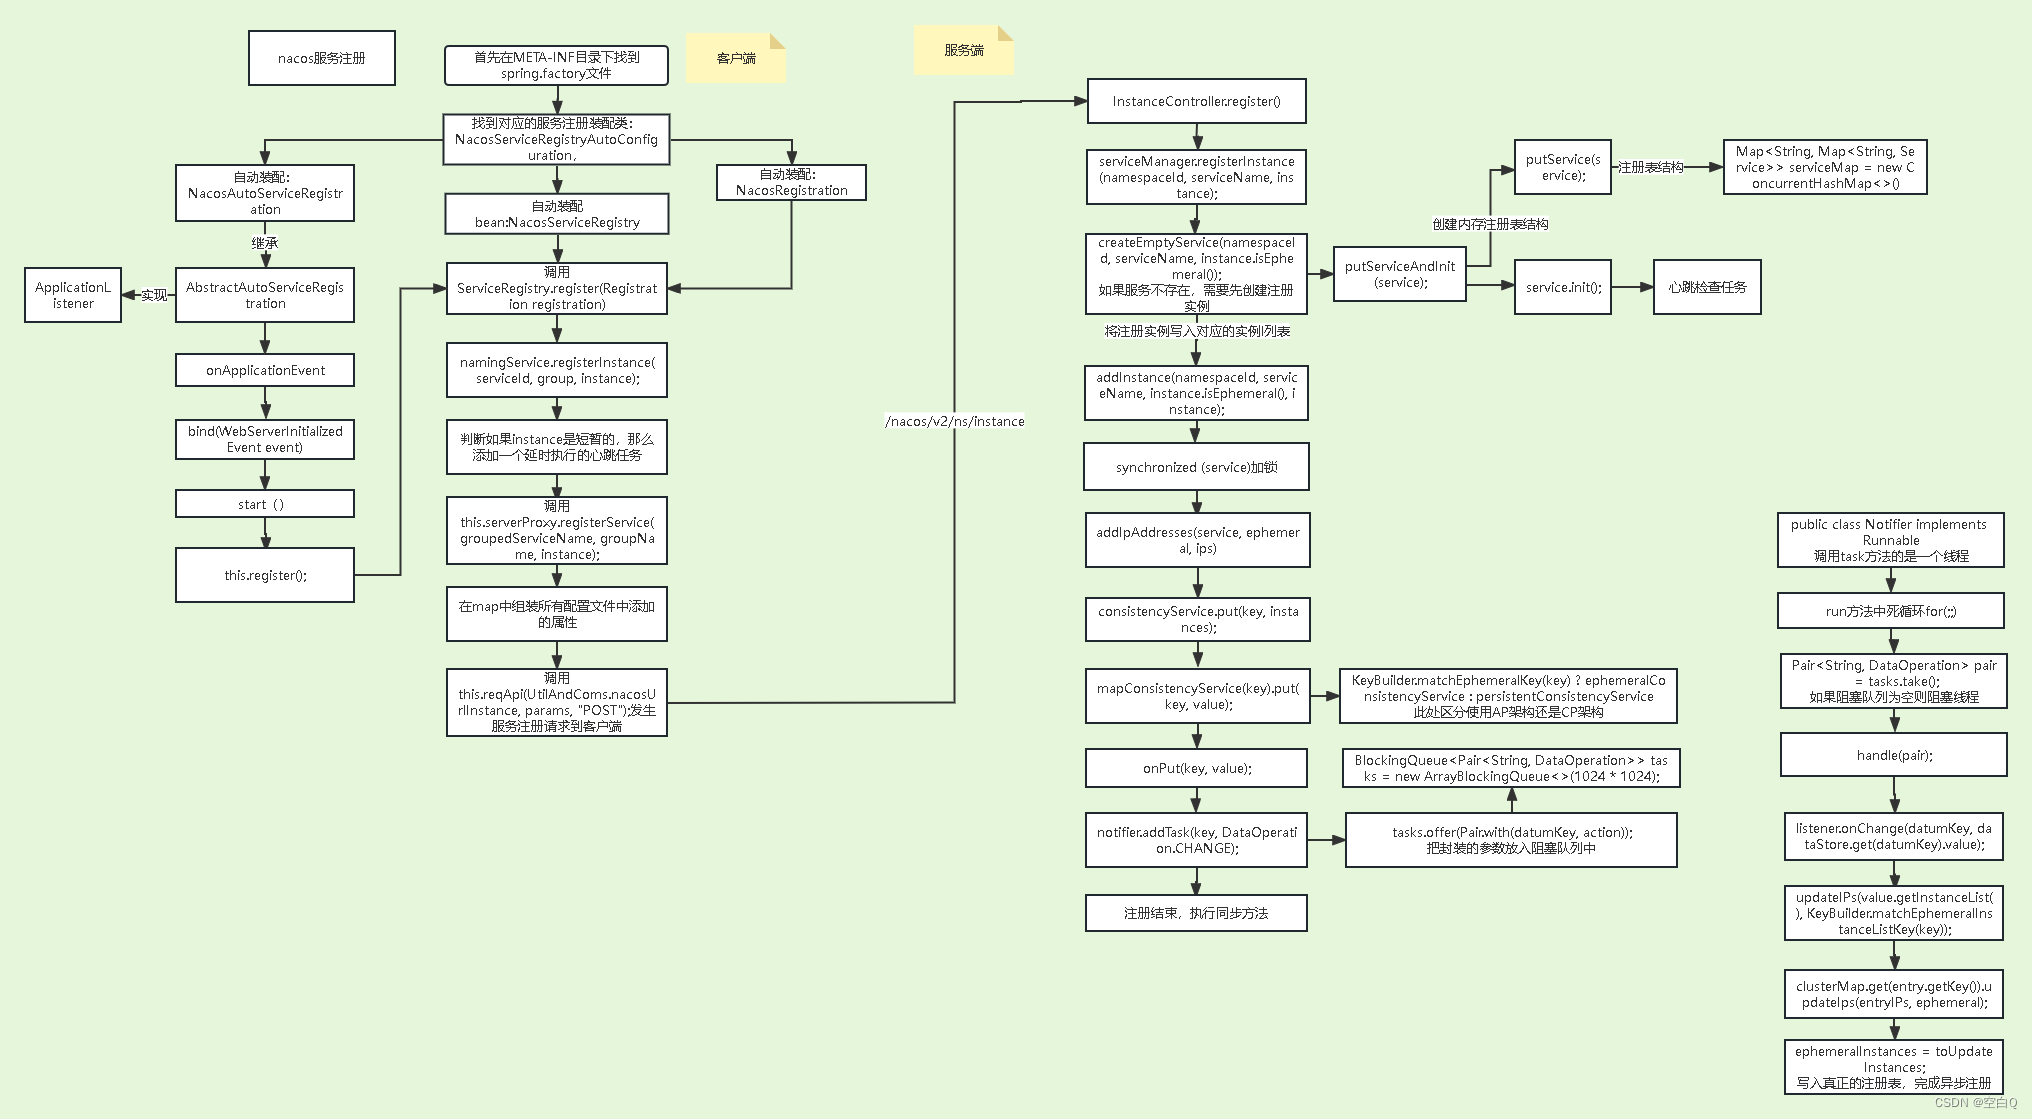
此图主要是对核心注册流程进行了大概梳理,可以在后续详细看源码时配合互补。
源码详解
客户端注册源码
在微服务使用nacos需要在pom文件中引入依赖:
<dependency><groupId>com.alibaba.cloud</groupId><artifactId>spring-cloud-starter-alibaba-nacos-discovery</artifactId><version>2.2.5.RELEASE</version>
</dependency>
- 开始分析客户端源码
SpringCloud这一套组件都是基于SpringBoot开发的,那么SpringBoot引入其它组件的方式是什么呢?
自动装配
所以第一步,我们先找它的在自动装配类。
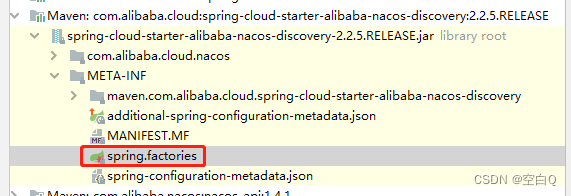
打开文件:
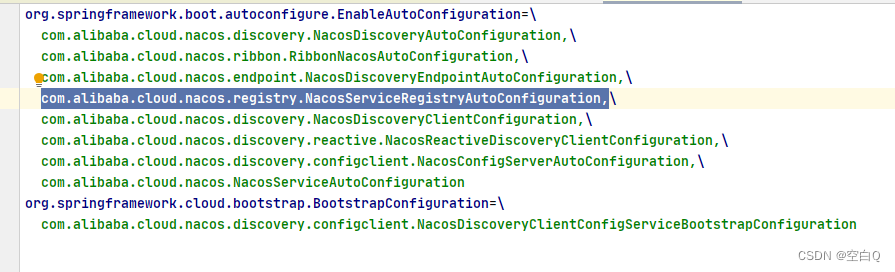
由类名推断服务注册的自动装配类为:
com.alibaba.cloud.nacos.registry.NacosServiceRegistryAutoConfiguration
我们打开此类:
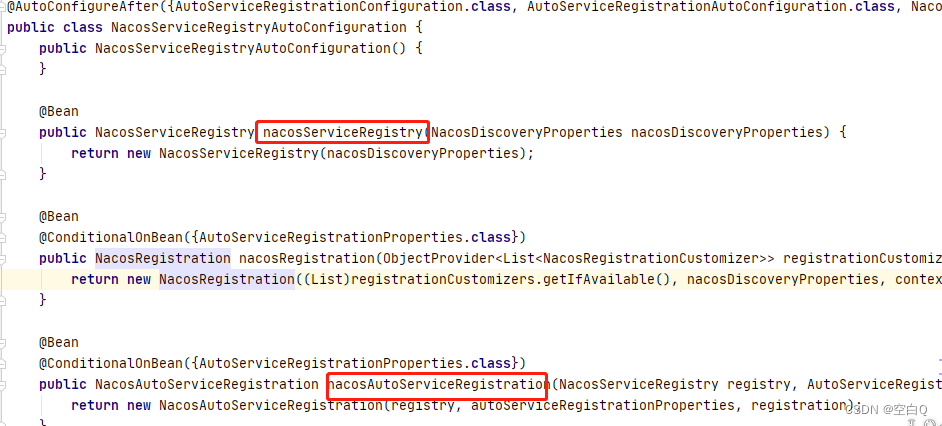
对应我画的流程图,我们重点关注第一个和第三个bean。
先看NacosAutoServiceRegistration。
当Springboot启动时,会发布事件。我们来看NacosAutoServiceRegistration,继承了AbstractAutoServiceRegistration,
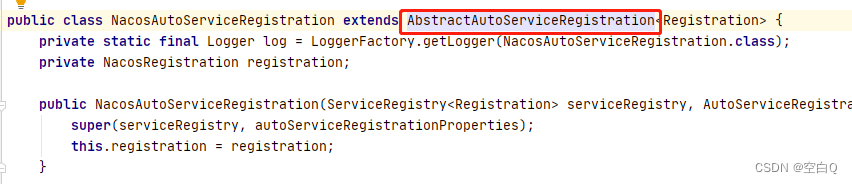
在看AbstractAutoServiceRegistration类,我们发现它实现了ApplicationListener。

当我们实现了ApplicationListener时,我们就需要实现它的onApplicationEvent方法。
public void onApplicationEvent(WebServerInitializedEvent event) {this.bind(event);}/ @deprecated */@Deprecatedpublic void bind(WebServerInitializedEvent event) {ApplicationContext context = event.getApplicationContext();if (!(context instanceof ConfigurableWebServerApplicationContext) || !"management".equals(((ConfigurableWebServerApplicationContext)context).getServerNamespace())) {this.port.compareAndSet(0, event.getWebServer().getPort());this.start();}}
onApplicationEvent监听了WebServerInitializedEvent事件。调用this.start()方法。
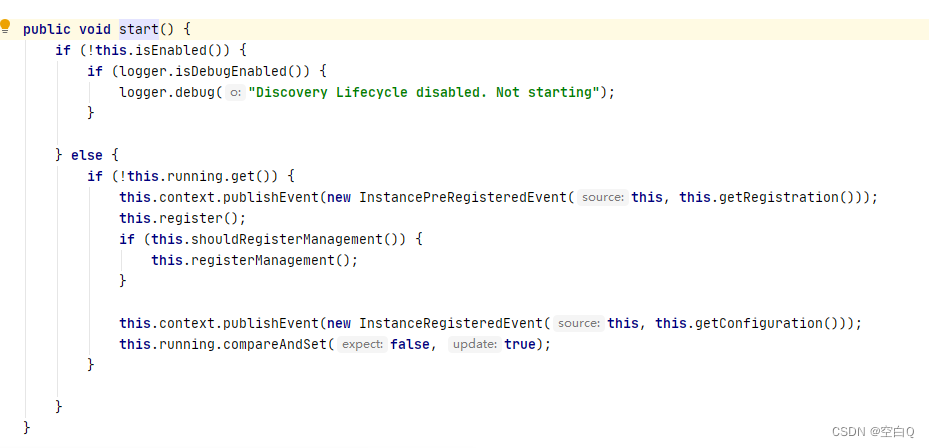
进入start方法,忽略分支内容,直接看主线,也就是this.register().
走到这个方法,可以在这边打断点,debug看代码。
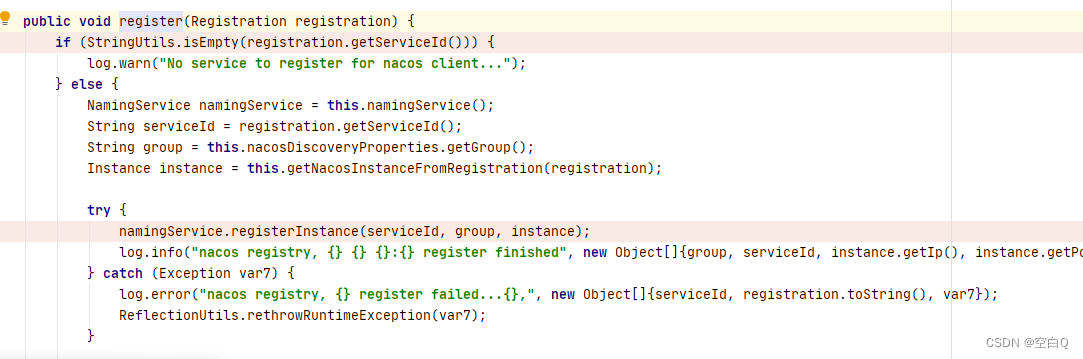
往下走,进入namingService.registerInstance(serviceId, group, instance)方法。
public void registerInstance(String serviceName, String groupName, Instance instance) throws NacosException {// 心跳检测NamingUtils.checkInstanceIsLegal(instance);String groupedServiceName = NamingUtils.getGroupedName(serviceName, groupName);if (instance.isEphemeral()) {BeatInfo beatInfo = this.beatReactor.buildBeatInfo(groupedServiceName, instance);this.beatReactor.addBeatInfo(groupedServiceName, beatInfo);}// 进入注册核心方法this.serverProxy.registerService(groupedServiceName, groupName, instance);}
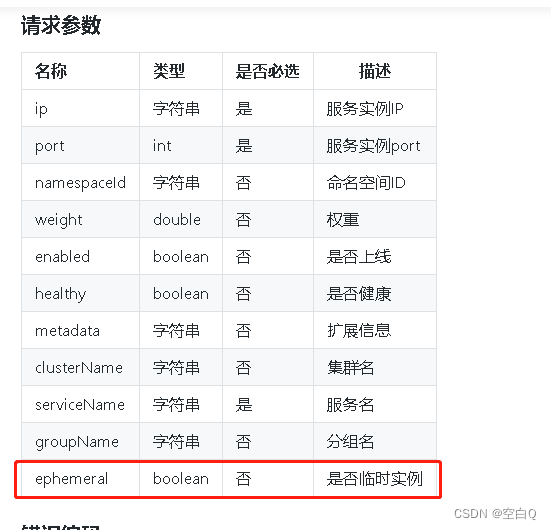
public void registerService(String serviceName, String groupName, Instance instance) throws NacosException {LogUtils.NAMING_LOGGER.info("[REGISTER-SERVICE] {} registering service {} with instance: {}", new Object[]{this.namespaceId, serviceName, instance});// 配置参数写入map中Map<String, String> params = new HashMap(16);params.put("namespaceId", this.namespaceId);params.put("serviceName", serviceName);params.put("groupName", groupName);params.put("clusterName", instance.getClusterName());params.put("ip", instance.getIp());params.put("port", String.valueOf(instance.getPort()));params.put("weight", String.valueOf(instance.getWeight()));params.put("enable", String.valueOf(instance.isEnabled()));params.put("healthy", String.valueOf(instance.isHealthy()));params.put("ephemeral", String.valueOf(instance.isEphemeral()));params.put("metadata", JacksonUtils.toJson(instance.getMetadata()));// 通过http请求发生注册信息this.reqApi(UtilAndComs.nacosUrlInstance, params, "POST");}
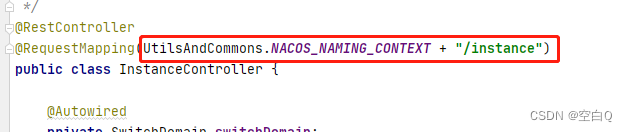
UtilAndComs.nacosUrlInstance=/nacos/v1/ns/instance
这个地址就是服务注册的地址,我们来看官网API:
官网API
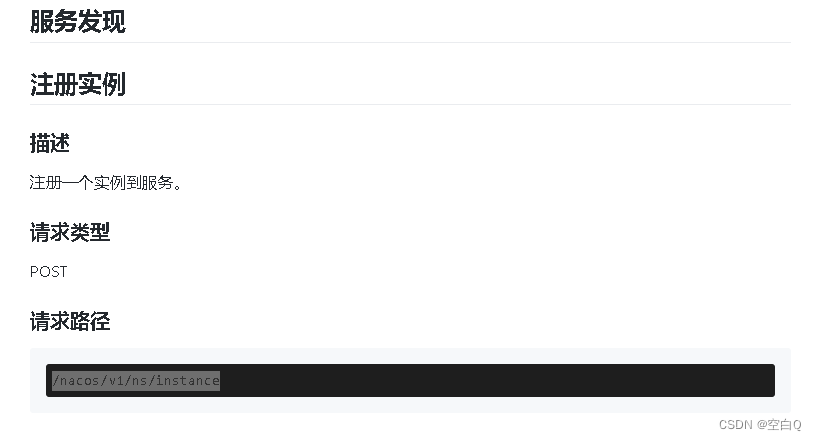
具体参数可以看官网。
再往下,简单看看主要代码:
HttpRestResult<String> restResult = this.nacosRestTemplate.exchangeForm(url, header, Query.newInstance().initParams(params), body, method, String.class);
this.execute(url, httpMethod, requestHttpEntity, responseType);
response = this.requestClient().execute(uri, httpMethod, requestEntity);
底层是调用了JdkHttpClientRequest方法发送请求。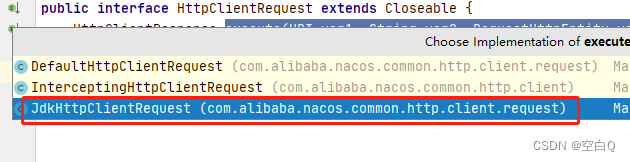
客户端主要注册源码就结束了。
服务端注册源码
服务端就是第一步下载并导入的源码。
找到服务注册方法类:
找到对应的注册的方法
/* Register new instance. @param request http request* @return 'ok' if success* @throws Exception any error during register*/@CanDistro@PostMapping@Secured(parser = NamingResourceParser.class, action = ActionTypes.WRITE)public String register(HttpServletRequest request) throws Exception {final String namespaceId = WebUtils.optional(request, CommonParams.NAMESPACE_ID, Constants.DEFAULT_NAMESPACE_ID);final String serviceName = WebUtils.required(request, CommonParams.SERVICE_NAME);NamingUtils.checkServiceNameFormat(serviceName);final Instance instance = parseInstance(request);// 服务注册核心方法serviceManager.registerInstance(namespaceId, serviceName, instance);return "ok";}
看注释注册一个新的实例。
往下走。
// 以AP模式创建注册实例public void registerInstance(String namespaceId, String serviceName, Instance instance) throws NacosException {// 创建空的服务实例createEmptyService(namespaceId, serviceName, instance.isEphemeral());Service service = getService(namespaceId, serviceName);if (service == null) {throw new NacosException(NacosException.INVALID_PARAM,"service not found, namespace: " + namespaceId + ", service: " + serviceName);}// 添加实例addInstance(namespaceId, serviceName, instance.isEphemeral(), instance);}
注意,此处是以AP模式创建的实例,是临时实例。
nacos注册实例分为AP和CP,我们看到服务注册时传入的参数有一个参数控制我们注册的实例是AP还是CP,就是这个参数:
此参数默认为true,也就是默认创建临时实例。后面会重点讲一下AP和CP架构。
我们先加入createEmptyService方法。
public void createEmptyService(String namespaceId, String serviceName, boolean local) throws NacosException {createServiceIfAbsent(namespaceId, serviceName, local, null);}
public void createServiceIfAbsent(String namespaceId, String serviceName, boolean local, Cluster cluster)throws NacosException {Service service = getService(namespaceId, serviceName);if (service == null) {Loggers.SRV_LOG.info("creating empty service {}:{}", namespaceId, serviceName);service = new Service();service.setName(serviceName);service.setNamespaceId(namespaceId);service.setGroupName(NamingUtils.getGroupName(serviceName));// now validate the service. if failed, exception will be thrownservice.setLastModifiedMillis(System.currentTimeMillis());service.recalculateChecksum();if (cluster != null) {cluster.setService(service);service.getClusterMap().put(cluster.getName(), cluster);}service.validate();putServiceAndInit(service);if (!local) {addOrReplaceService(service);}}}
- 先看下这个方法
Service service = getService(namespaceId, serviceName);
主要是用来从注册表中通过namespace获取对应的服务,如果没有获取到,返回null;如果有,返回对应的service。
看一下对应的getService方法:
public Service getService(String namespaceId, String serviceName) {if (serviceMap.get(namespaceId) == null) {return null;}return chooseServiceMap(namespaceId).get(serviceName);}public boolean containService(String namespaceId, String serviceName) {return getService(namespaceId, serviceName) != null;}
然后我们来看一下注册表的结构,也就是serviceMap。
private final Map<String, Map<String, Service>> serviceMap = new ConcurrentHashMap<>();
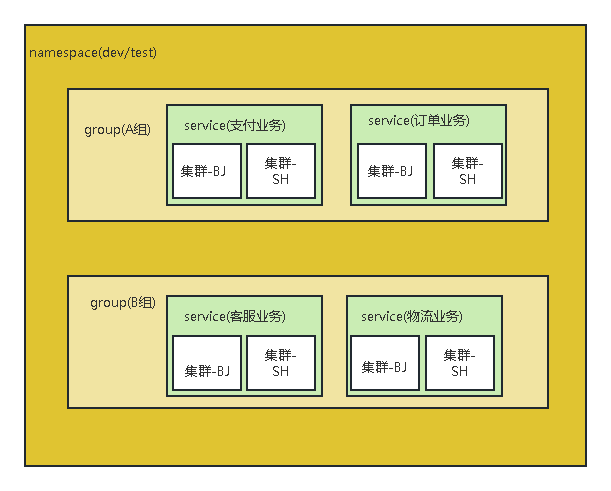
其实主要是这样一个结构:
Map<namespace, Map<group::serviceName, Service>>
在我们平时使用中,大概是这样一个结构:
- 再看下下面的这个主要方法,点击进入:
putServiceAndInit(service);
private void putServiceAndInit(Service service) throws NacosException {// 将服务信息写入serviceMapputService(service);// 初始化服务service.init();// 监听数据变化consistencyService.listen(KeyBuilder.buildInstanceListKey(service.getNamespaceId(), service.getName(), true), service);consistencyService.listen(KeyBuilder.buildInstanceListKey(service.getNamespaceId(), service.getName(), false), service);Loggers.SRV_LOG.info("[NEW-SERVICE] {}", service.toJson());}
将service数据写入serviceMap后,创建临时实例的方法就结束了,现在我们代码回到创建临时实例createEmptyService处继续向下走,然后再判断一次注册表中是否有service,此次没有的话就会抛出异常。
再往下走,进入核心方法:
addInstance(namespaceId, serviceName, instance.isEphemeral(), instance);
public void addInstance(String namespaceId, String serviceName, boolean ephemeral, Instance... ips)throws NacosException {String key = KeyBuilder.buildInstanceListKey(namespaceId, serviceName, ephemeral);Service service = getService(namespaceId, serviceName);synchronized (service) {// 比较并获取新的实例列表,这个列表中包含了此次新增的实例List<Instance> instanceList = addIpAddresses(service, ephemeral, ips);Instances instances = new Instances();instances.setInstanceList(instanceList);consistencyService.put(key, instances);}}
先看一下此方法:
String key = KeyBuilder.buildInstanceListKey(namespaceId, serviceName, ephemeral);
public static String buildInstanceListKey(String namespaceId, String serviceName, boolean ephemeral) {return ephemeral ? buildEphemeralInstanceListKey(namespaceId, serviceName): buildPersistentInstanceListKey(namespaceId, serviceName);}
ephemeral前面我们了解过,是否是临时实例,默认传true,所以一般返回 buildEphemeralInstanceListKey(namespaceId, serviceName)这个结果,所以这里主要是区分nacos是AP还是CP架构的地方。
再往下走:
consistencyService.put(key, instances);
public void put(String key, Record value) throws NacosException {onPut(key, value);distroProtocol.sync(new DistroKey(key, KeyBuilder.INSTANCE_LIST_KEY_PREFIX), DataOperation.CHANGE,globalConfig.getTaskDispatchPeriod() / 2);}
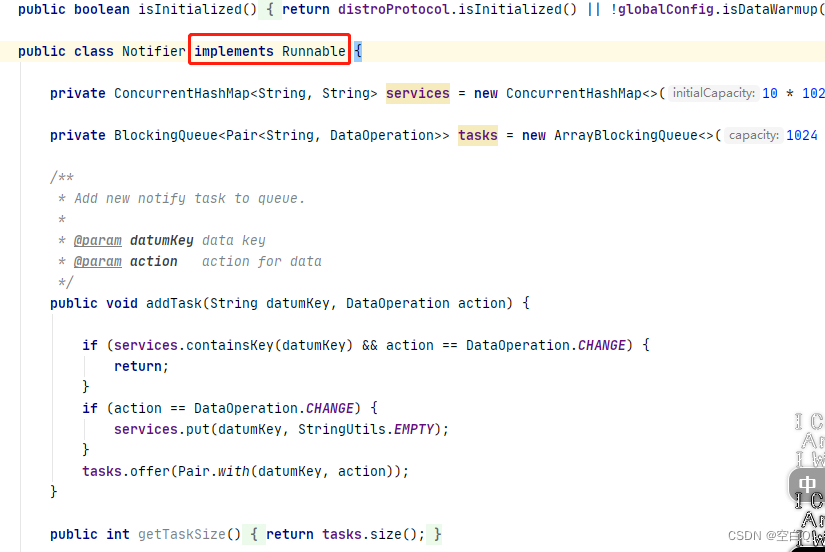
public void onPut(String key, Record value) {// 健壮性校验...// 核心方法,将任务添加到阻塞队列notifier.addTask(key, DataOperation.CHANGE);}
public void addTask(String datumKey, DataOperation action) {if (services.containsKey(datumKey) && action == DataOperation.CHANGE) {return;}if (action == DataOperation.CHANGE) {services.put(datumKey, StringUtils.EMPTY);}// 放入阻塞队列中,如果队列中无数据时会阻塞tasks.offer(Pair.with(datumKey, action));}
放入阻塞队列后,注册基本结束。
nacos会启用一个线程,一直循环将阻塞队列中的客户端的注册信息拿出来实现真正的注册。
下面看下源码:
实现了Runnable接口,所以我们主要看一下run方法:
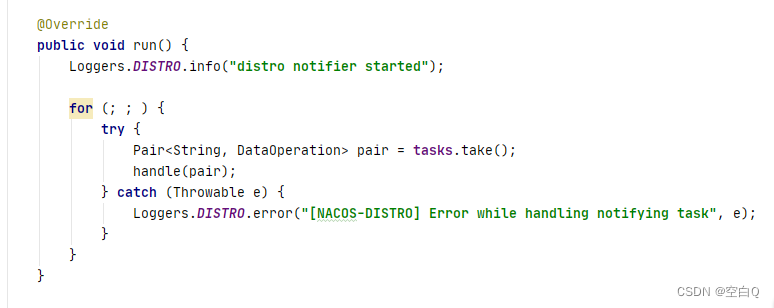
可以看到一个线程一直循环取数据,当队列为空时,阻塞线程。
private BlockingQueue<Pair<String, DataOperation>> tasks = new ArrayBlockingQueue<>(1024 * 1024);
// 进行实际的注册任务
handle(pair);
服务注册基本流程已经结束。