【微服务笔记09】微服务组件之Hystrix实现线程池隔离和信号量隔离

目录
一、线程池隔离
1.1、线程池隔离介绍
1.2、实现线程池隔离
(1)引入依赖
(2)编写Service层代码
(3)编写Controller层代码
(4)运行测试
二、信号量隔离
2.1、信号量隔离介绍
2.2、实现信号量隔离
(1)引入依赖
(2)编写Service层代码
(3)编写Controller层代码
(4)运行测试
一、线程池隔离
1.1、线程池隔离介绍
在一个微服务中,所有的接口如果都是运行在同一个线程池里面,那么如果其中某一个接口出现大量的请求,并且这个接口又没办法处理过来,这个时候服务就可能会出现资源耗尽的情况,从而导致整个服务崩溃。所以,Hystrix为了解决这个问题,提出了线程池隔离的方案,将不同的接口放到不同的线程池里面进行管理,并且不同的线程池互不干扰,这样即使其中一个线程池发生故障,也不会影响其他的线程池,也就降低了服务崩溃的可能性。

线程池隔离虽然解决了服务崩溃的问题,但是同时也带来了一个问题,那就是线程的创建和销毁是需要消耗系统资源的,如果采用线程池隔离,当这个微服务的请求越来越大,对应的线程也就会创建的越来越多,这就会导致线程的切换非常频繁,从而也就降低了系统的一个性能。线程池隔离适用于隔离实例较少的场景里面。
1.2、实现线程池隔离
(1)引入依赖
<!--hystrix 依赖-->
<dependency><groupId>org.springframework.cloud</groupId><artifactId>spring-cloud-starter-netflix-hystrix</artifactId>
</dependency>
(2)编写Service层代码
在service服务层中,我们在需要开启线程池隔离的方法上面,使用【@HystrixCommand】注解进行标记。
package com.gitcode.hystrix.service;import com.netflix.hystrix.contrib.javanica.annotation.HystrixCommand;
import com.netflix.hystrix.contrib.javanica.annotation.HystrixProperty;
import org.springframework.stereotype.Service;/* @version 1.0.0* @Date: 2023/4/9 19:49* @Copyright (C) ZhuYouBin* @Description:*/
@Service
public class HystrixThreadService {@HystrixCommand(// 命令key,默认是当前方法名称commandKey = "firstCommandKey",// 线程池分组的keygroupKey = "queryList-thread-pool",// 线程池的key,可以和 groupKey 设置相同threadPoolKey = "queryList-thread-pool",// 设置 hystrix 命令的属性commandProperties = {// 设置线程池隔离的超时时间,默认是1000ms@HystrixProperty(name = "execution.isolation.thread.timeoutInMilliseconds", value = "5000")},// 设置线程池的属性threadPoolProperties = {// 核心线程大小@HystrixProperty(name = "coreSize", value = "4"),// 队列大小@HystrixProperty(name = "maxQueueSize", value = "100"),// 存活时间,默认是 1 分钟,单位是分钟@HystrixProperty(name = "keepAliveTimeMinutes", value = "2"),// 超出队列执行拒绝策略的阈值@HystrixProperty(name = "queueSizeRejectionThreshold", value = "100"),},// 设置快速失败时候调用的方法,可以写,也可以不写,写了就会执行快速失败,不写就阻塞等待fallbackMethod = "fallbackDemo")public String queryList() {// TODO 这里模拟调用其他微服务try {Thread.sleep(6000);System.out.println("微服务调用成功:" + Thread.currentThread().getName());} catch (Exception e) {}return "success";}@HystrixCommand(// 命令key,默认是当前方法名称commandKey = "secondCommandKey",// 线程池分组的keygroupKey = "getDataById-thread-pool",// 线程池的key,可以和 groupKey 设置相同threadPoolKey = "getDataById-thread-pool",// 设置 hystrix 命令的属性commandProperties = {// 设置线程池隔离的超时时间,默认是1000ms@HystrixProperty(name = "execution.isolation.thread.timeoutInMilliseconds", value = "5000")},// 设置线程池的属性threadPoolProperties = {// 核心线程大小@HystrixProperty(name = "coreSize", value = "2"),// 队列大小@HystrixProperty(name = "maxQueueSize", value = "100"),// 存活时间,默认是 1 分钟,单位是分钟@HystrixProperty(name = "keepAliveTimeMinutes", value = "2"),// 超出队列执行拒绝策略的阈值@HystrixProperty(name = "queueSizeRejectionThreshold", value = "100"),})public String getDataById() {// TODO 这里模拟调用其他微服务System.out.println("微服务调用成功:" + Thread.currentThread().getName());return "success";}public String fallbackDemo() {return "接口调用失败,请稍后重试!";}
}
(3)编写Controller层代码
package com.gitcode.hystrix.controller;import com.gitcode.hystrix.service.HystrixThreadService;
import org.springframework.beans.factory.annotation.Autowired;
import org.springframework.web.bind.annotation.GetMapping;
import org.springframework.web.bind.annotation.RequestMapping;
import org.springframework.web.bind.annotation.RestController;/* @version 1.0.0* @Date: 2023/4/9 19:47* @Copyright (C) ZhuYouBin* @Description: Hystrix 线程池隔离*/
@RestController
@RequestMapping("/hystrix/thread")
public class HystrixThreadController {@Autowiredprivate HystrixThreadService hystrixThreadService;@GetMapping("/queryList")public String queryList() {return hystrixThreadService.queryList();}@GetMapping("/getDataById")public String getDataById() {return hystrixThreadService.getDataById();}
}
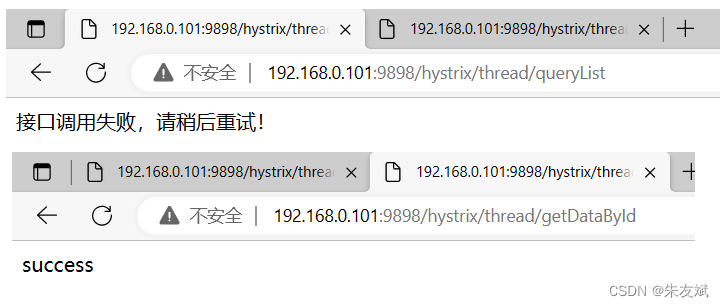
(4)运行测试
启动应用,浏览器访问两个接口。
二、信号量隔离
2.1、信号量隔离介绍
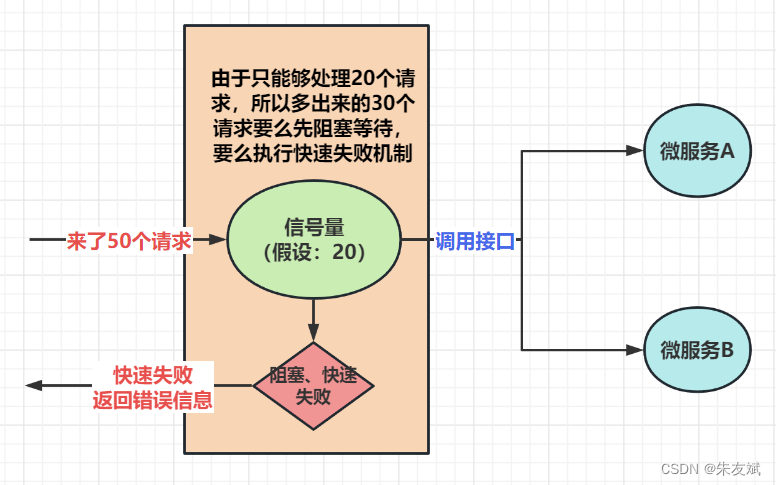
采用线程池隔离,可能会导致线程过多而降低系统的性能,所以为了解决这个问题,Hystrix又提出了一个信号量隔离。信号量隔离是采用同步阻塞等待的思想,它通过设置一个信号量,这个信号量用于表示可以同时访问的最大请求数量,当系统中到达的请求数量超过这个信号量之后,超出的请求就会处于阻塞状态,或者直接采用快速失败机制,返回一个错误提示。
信号量隔离,不会产生新的线程,所以也就不会存在大量线程之间的来回切换;但是信号量隔离也存在缺点,它不支持超时设置,所以它适用于非网络请求的。
2.2、实现信号量隔离
(1)引入依赖
<!--hystrix 依赖-->
<dependency><groupId>org.springframework.cloud</groupId><artifactId>spring-cloud-starter-netflix-hystrix</artifactId>
</dependency>
(2)编写Service层代码
信号量隔离,也是使用【@HystrixCommand】注解,指定隔离策略是【信号量隔离】即可。
package com.gitcode.hystrix.service;import com.netflix.hystrix.contrib.javanica.annotation.HystrixCommand;
import com.netflix.hystrix.contrib.javanica.annotation.HystrixProperty;
import org.springframework.stereotype.Service;/* @version 1.0.0* @Date: 2023/4/9 19:49* @Copyright (C) ZhuYouBin* @Description: 信号量隔离*/
@Service
public class HystrixSemaphoreService {@HystrixCommand(// 设置 hystrix 命令的属性commandProperties = {// 设置线程池隔离的超时时间,默认是1000ms@HystrixProperty(name = "execution.isolation.thread.timeoutInMilliseconds", value = "5000"),// 设置隔离策略是【信号量隔离】,默认是线程池隔离@HystrixProperty(name = "execution.isolation.strategy", value = "SEMAPHORE"),// 设置信号量最大请求数, 超过最大信号量数量,如果写了 fallbackMethod 属性,则会调用快速失败方法@HystrixProperty(name = "execution.isolation.semaphore.maxConcurrentRequests", value = "4")},// 设置快速失败时候调用的方法,可以写,也可以不写,写了就会执行快速失败,不写就阻塞等待fallbackMethod = "fallbackDemo")public String queryList() {// TODO 这里模拟调用其他微服务System.out.println("微服务调用成功:" + Thread.currentThread().getName());return "success";}public String fallbackDemo() {System.out.println("接口调用失败,请稍后重试!");return "接口调用失败,请稍后重试!";}
}
(3)编写Controller层代码
package com.gitcode.hystrix.controller;import com.gitcode.hystrix.service.HystrixSemaphoreService;
import org.springframework.beans.factory.annotation.Autowired;
import org.springframework.web.bind.annotation.GetMapping;
import org.springframework.web.bind.annotation.RequestMapping;
import org.springframework.web.bind.annotation.RestController;/* @version 1.0.0* @Date: 2023/4/9 19:47* @Copyright (C) ZhuYouBin* @Description: Hystrix 信号量隔离*/
@RestController
@RequestMapping("/hystrix/semaphore")
public class HystrixSemaphoreController {@Autowiredprivate HystrixSemaphoreService hystrixSemaphoreService;@GetMapping("/queryList")public String queryList() {return hystrixSemaphoreService.queryList();}
}
(4)运行测试
启动应用,使用jemeter模拟并发请求,查看控制台输入日志。

到此,Hystrix实现线程池隔离和信号量隔离就介绍完啦。
综上,这篇文章结束了,主要介绍微服务组件之Hystrix实现线程池隔离和信号量隔离。