Java_Spring:12. Spring 中的事务控制

目录
1 Spring 事务控制要明确的内容
2 Spring 中事务控制的 API 介绍
2.1 PlatformTransactionManager
2.2 TransactionDefinition
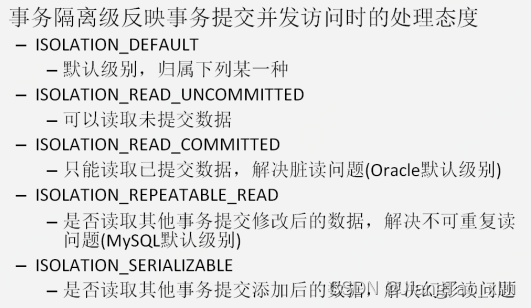
2.2.1 事务的隔离级别
2.2.2 事务的传播行为
2.2.3 超时时间
2.2.4 是否是只读事务
2.3 TransactionStatus
3 基于 XML 的声明式事务控制(配置方式)
3.1 环境搭建
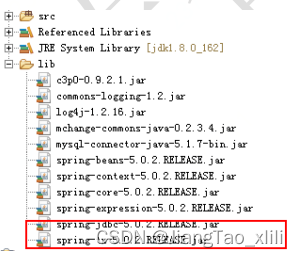
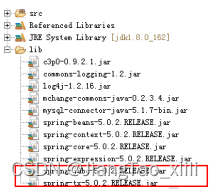
3.1.1 第一步:拷贝必要的 jar 包到工程的 lib 目录
3.1.2 第二步:创建 spring 的配置文件并导入约束
3.1.3 第三步:准备数据库表和实体类
3.1.4 第四步:编写业务层接口和实现类
3.1.5 第五步:编写 Dao 接口和实现类
3.1.6 第六步:在配置文件中配置业务层和持久层对
3.2 配置步骤
3.2.1 第一步:配置事务管理器
3.2.2 第二步:配置事务的通知引用事务管理器
3.2.3 第三步:配置事务的属性
3.2.4 第四步:配置 AOP 切入点表达式
3.2.5 第五步:配置切入点表达式和事务通知的对应关系
4 基于注解的配置方式
4.1 环境搭建
4.1.1 第一步:拷贝必备的 jar 包到工程的 lib 目录
4.1.2 第二步:创建 spring 的配置文件导入约束并配置扫描的包
4.1.3 第三步:创建数据库表和实体类
4.1.4 第四步:创建业务层接口和实现类并使用注解让 spring 管理
4.1.5 第五步:创建 Dao 接口和实现类并使用注解让 spring 管理
4.2 配置步骤
4.2.1 第一步:配置事务管理器并注入数据源
4.2.2 第二步:在业务层使用@Transactional 注解
4.2.3 第三步:在配置文件中开启 spring 对注解事务的支持
4.3 不使用 xml 的配置方式
-
1 Spring 事务控制要明确的内容
- 第一:JavaEE 体系进行分层开发,事务处理位于业务层,Spring 提供了分层设计业务层的事务处理解决方案。
- 第二:spring 框架提供了一组事务控制的接口。具体在后面的第二小节介绍。这组接口是在spring-tx-5.0.2.RELEASE.jar 中。
- 第三:spring 的事务控制都是基于 AOP 的,它既可以使用编程的方式实现,也可以使用配置的方式实现。学习的重点是使用配置的方式实现。
-
2 Spring 中事务控制的 API 介绍
-
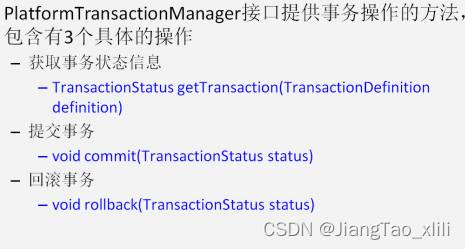
2.1 PlatformTransactionManager
- 此接口是 spring 的事务管理器,它里面提供了我们常用的操作事务的方法,如下图:
- 在开发中都是使用它的实现类,如下图:
- 真正管理事务的对象
- org.springframework.jdbc.datasource.DataSourceTransactionManager
- 使用 Spring JDBC 或 iBatis 进行持久化数据时使用
- org.springframework.orm.hibernate5.HibernateTransactionManager 使用
- Hibernate 版本进行持久化数据时使用
- org.springframework.jdbc.datasource.DataSourceTransactionManager
- 真正管理事务的对象
-
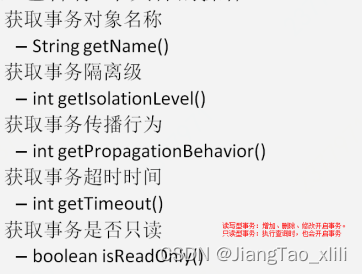
2.2 TransactionDefinition
- 事务的定义信息对象,里面有如下方法:
-
2.2.1 事务的隔离级别
-
2.2.2 事务的传播行为
- REQUIRED:如果当前没有事务,就新建一个事务,如果已经存在一个事务中,加入到这个事务中。一般的选择(默认值)
- SUPPORTS:支持当前事务,如果当前没有事务,就以非事务方式执行(没有事务)
- MANDATORY:使用当前的事务,如果当前没有事务,就抛出异常
- REQUERS_NEW:新建事务,如果当前在事务中,把当前事务挂起。
- NOT_SUPPORTED:以非事务方式执行操作,如果当前存在事务,就把当前事务挂起
- NEVER:以非事务方式运行,如果当前存在事务,抛出异常
- NESTED:如果当前存在事务,则在嵌套事务内执行。如果当前没有事务,则执行 REQUIRED 类似的操作。
-
2.2.3 超时时间
- 默认值是-1,没有超时限制。如果有,以秒为单位进行设置。
-
2.2.4 是否是只读事务
- 建议查询时设置为只读。
-
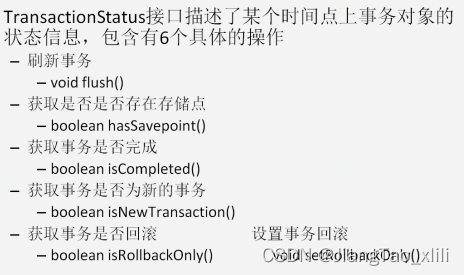
2.3 TransactionStatus
- 此接口提供的是事务具体的运行状态,方法介绍如下图:
-
-
3 基于 XML 的声明式事务控制(配置方式)
-
3.1 环境搭建
-
3.1.1 第一步:拷贝必要的 jar 包到工程的 lib 目录
-
3.1.2 第二步:创建 spring 的配置文件并导入约束
- 此处需要导入 aop 和 tx 两个名称空间
-
<?xml version="1.0" encoding="UTF-8"?>
<beans xmlns="http://www.springframework.org/schema/beans"xmlns:xsi="http://www.w3.org/2001/XMLSchema-instance"xmlns:aop="http://www.springframework.org/schema/aop"xmlns:tx="http://www.springframework.org/schema/tx"xsi:schemaLocation="http://www.springframework.org/schema/beans http://www.springframework.org/schema/beans/spring-beans.xsdhttp://www.springframework.org/schema/tx http://www.springframework.org/schema/tx/spring-tx.xsdhttp://www.springframework.org/schema/aop http://www.springframework.org/schema/aop/spring-aop.xsd">
</beans>
-
3.1.3 第三步:准备数据库表和实体类
- 创建数据库:
-
create database spring_day04; use spring_day04; - 创建表:
-
create table account(id int primary key auto_increment,name varchar(40),money float ) character set utf8 collate utf8_general_ci; - 账户的实体
-
public class Account implements Serializable {private Integer id;private String name;private Float money;public Integer getId() {return id;}public void setId(Integer id) {this.id = id;}    public String getName() {return name;}public void setName(String name) {this.name = name;}public Float getMoney() {return money;}public void setMoney(Float money) {this.money = money;}@Overridepublic String toString() {return "Account [id=" + id + ", name=" + name + ", money=" + money + "]";}
}
-
3.1.4 第四步:编写业务层接口和实现类
- 账户的业务层接口
-
public interface IAccountService {/* 根据 id 查询账户信息* @param id* @return*/Account findAccountById(Integer id);//查/* 转账* @param sourceName 转出账户名称* @param targeName 转入账户名称* @param money 转账金额*/void transfer(String sourceName,String targeName,Float money);//增删改 } - 账户的业务层实现类
-
public class AccountServiceImpl implements IAccountService {private IAccountDao accountDao;public void setAccountDao(IAccountDao accountDao) {this.accountDao = accountDao;}@Overridepublic Account findAccountById(Integer id) {return accountDao.findAccountById(id);}@Overridepublic void transfer(String sourceName, String targeName, Float money) {//1.根据名称查询两个账户Account source = accountDao.findAccountByName(sourceName);Account target = accountDao.findAccountByName(targeName);//2.修改两个账户的金额source.setMoney(source.getMoney()-money);//转出账户减钱target.setMoney(target.getMoney()+money);//转入账户加钱//3.更新两个账户accountDao.updateAccount(source);int i=1/0;accountDao.updateAccount(target);}
}
-
3.1.5 第五步:编写 Dao 接口和实现类
- 账户的持久层接口
-
public interface IAccountDao {/* 根据 id 查询账户信息* @param id* @return*/Account findAccountById(Integer id);/* 根据名称查询账户信息* @return*/Account findAccountByName(String name);/* 更新账户信息* @param account*/void updateAccount(Account account); } - 账户的持久层实现类
- 此版本 dao,只需要给它的父类注入一个数据源
-
public class AccountDaoImpl extends JdbcDaoSupport implements IAccountDao {@Overridepublic Account findAccountById(Integer id) {List<Account> list = getJdbcTemplate().query("select * from account where id = ? ",new AccountRowMapper(),id);return list.isEmpty()?null:list.get(0);}@Overridepublic Account findAccountByName(String name) {List<Account> list = getJdbcTemplate().query("select * from account where name = ? ",new AccountRowMapper(),name);if(list.isEmpty()){return null;}if(list.size()>1){throw new RuntimeException("结果集不唯一,不是只有一个账户对象");}return list.get(0);}@Overridepublic void updateAccount(Account account) {getJdbcTemplate().update("update account set money = ? where id = ? ",account.getMoney(),account.getId());}} - 账户的封装类 RowMapper 的实现类
-
public class AccountRowMapper implements RowMapper<Account>{@Overridepublic Account mapRow(ResultSet rs, int rowNum) throws SQLException {Account account = new Account();account.setId(rs.getInt("id"));account.setName(rs.getString("name"));account.setMoney(rs.getFloat("money"));return account;}
}
-
3.1.6 第六步:在配置文件中配置业务层和持久层对
-
<!-- 配置 service -->
<bean id="accountService" class="com.itheima.service.impl.AccountServiceImpl"><property name="accountDao" ref="accountDao"></property>
</bean><!-- 配置 dao -->
<bean id="accountDao" class="com.itheima.dao.impl.AccountDaoImpl"><!-- 注入 dataSource --><property name="dataSource" ref="dataSource"></property>
</bean><!-- 配置数据源 -->
<bean id="dataSource"class="org.springframework.jdbc.datasource.DriverManagerDataSource"><property name="driverClassName" value="com.mysql.jdbc.Driver"></property><property name="url" value="jdbc:mysql:///spring_day04"></property><property name="username" value="root"></property><property name="password" value="1234"></property>
</bean>
-
-
-
3.2 配置步骤
-
3.2.1 第一步:配置事务管理器
-
<!-- 配置一个事务管理器 -->
<bean id="transactionManager"class="org.springframework.jdbc.datasource.DataSourceTransactionManager"><!-- 注入 DataSource --><property name="dataSource" ref="dataSource"></property>
</bean>
-
-
3.2.2 第二步:配置事务的通知引用事务管理器
-
<!-- 事务的配置 -->
<tx:advice id="txAdvice" transaction-manager="transactionManager">
</tx:advice>
-
-
3.2.3 第三步:配置事务的属性
-
<!--在 tx:advice 标签内部 配置事务的属性 -->
<tx:attributes>
<!-- 指定方法名称:是业务核心方法read-only:是否是只读事务。默认 false,不只读。isolation:指定事务的隔离级别。默认值是使用数据库的默认隔离级别。propagation:指定事务的传播行为。timeout:指定超时时间。默认值为:-1。永不超时。rollback-for:用于指定一个异常,当执行产生该异常时,事务回滚。产生其他异常,事务不回滚。没有默认值,任何异常都回滚。no-rollback-for:用于指定一个异常,当产生该异常时,事务不回滚,产生其他异常时,事务回滚。没有默认值,任何异常都回滚。
--><tx:method name="*" read-only="false" propagation="REQUIRED"/><tx:method name="find*" read-only="true" propagation="SUPPORTS"/>
</tx:attributes>
-
-
3.2.4 第四步:配置 AOP 切入点表达式
-
<!-- 配置 aop -->
<aop:config><!-- 配置切入点表达式 --><aop:pointcut expression="execution(* com.itheima.service.impl.*.*(..))" id="pt1"/>
</aop:config>
-
-
3.2.5 第五步:配置切入点表达式和事务通知的对应关系
-
<!-- 在 aop:config 标签内部:建立事务的通知和切入点表达式的关系 -->
<aop:advisor advice-ref="txAdvice" pointcut-ref="pt1"/>
-
-
-
-
4 基于注解的配置方式
-
4.1 环境搭建
-
4.1.1 第一步:拷贝必备的 jar 包到工程的 lib 目录
-
4.1.2 第二步:创建 spring 的配置文件导入约束并配置扫描的包
-
<?xml version="1.0" encoding="UTF-8"?>
<beans xmlns="http://www.springframework.org/schema/beans"xmlns:aop="http://www.springframework.org/schema/aop"xmlns:tx="http://www.springframework.org/schema/tx"xmlns:context="http://www.springframework.org/schema/context"xmlns:xsi="http://www.w3.org/2001/XMLSchema-instance"xsi:schemaLocation="http://www.springframework.org/schema/beans http://www.springframework.org/schema/beans/spring-beans.xsdhttp://www.springframework.org/schema/aophttp://www.springframework.org/schema/aop/spring-aop.xsdhttp://www.springframework.org/schema/tx http://www.springframework.org/schema/tx/spring-tx.xsdhttp://www.springframework.org/schema/context http://www.springframework.org/schema/context/spring-context.xsd"><!-- 配置 spring 创建容器时要扫描的包 --><context:component-scan base-package="com.itheima"></context:component-scan><!-- 配置 JdbcTemplate--><bean id="jdbcTemplate" class="org.springframework.jdbc.core.JdbcTemplate"><property name="dataSource" ref="dataSource"></property></bean><!-- 配置 spring 提供的内置数据源 --><bean id="dataSource"class="org.springframework.jdbc.datasource.DriverManagerDataSource"><property name="driverClassName" value="com.mysql.jdbc.Driver"></property><property name="url" value="jdbc:mysql://localhost:3306/spring_day02"></property><property name="username" value="root"></property><property name="password" value="1234"></property></bean>
</beans>
-
-
4.1.3 第三步:创建数据库表和实体类
- 和基于 xml 的配置相同。略
-
4.1.4 第四步:创建业务层接口和实现类并使用注解让 spring 管理
- 账户的业务层实现类
-
@Service("accountService")
public class AccountServiceImpl implements IAccountService {@Autowiredprivate IAccountDao accountDao;//其余代码和基于 XML 的配置相同
}
-
4.1.5 第五步:创建 Dao 接口和实现类并使用注解让 spring 管理
- 账户的持久层实现类
-
@Repository("accountDao")
public class AccountDaoImpl implements IAccountDao {@Autowiredprivate JdbcTemplate jdbcTemplate;//其余代码和基于 XML 的配置相同
}
-
-
4.2 配置步骤
-
4.2.1 第一步:配置事务管理器并注入数据源
-
<!-- 配置事务管理器 -->
<bean id="transactionManager"class="org.springframework.jdbc.datasource.DataSourceTransactionManager"><property name="dataSource" ref="dataSource"></property>
</bean>
-
-
4.2.2 第二步:在业务层使用@Transactional 注解
- 该注解的属性和 xml 中的属性含义一致。该注解可以出现在接口上,类上和方法上。
- 出现接口上,表示该接口的所有实现类都有事务支持。
- 出现在类上,表示类中所有方法有事务支持
- 出现在方法上,表示方法有事务支持。
- 以上三个位置的优先级:方法>类>接口
-
@Service("accountService")
@Transactional(readOnly=true,propagation=Propagation.SUPPORTS)
public class AccountServiceImpl implements IAccountService {@Autowiredprivate IAccountDao accountDao;@Overridepublic Account findAccountById(Integer id) {return accountDao.findAccountById(id);}@Override@Transactional(readOnly=false,propagation=Propagation.REQUIRED)public void transfer(String sourceName, String targeName, Float money) {//1.根据名称查询两个账户Account source = accountDao.findAccountByName(sourceName);Account target = accountDao.findAccountByName(targeName);//2.修改两个账户的金额source.setMoney(source.getMoney()-money);//转出账户减钱target.setMoney(target.getMoney()+money);//转入账户加钱//3.更新两个账户accountDao.updateAccount(source);//int i=1/0;accountDao.updateAccount(target);}
}
-
4.2.3 第三步:在配置文件中开启 spring 对注解事务的支持
-
<!-- 开启 spring 对注解事务的支持 -->
<tx:annotation-driven transaction-manager="transactionManager"/>
-
-
-
4.3 不使用 xml 的配置方式
-
@Configuration
@EnableTransactionManagement
public class SpringTxConfiguration {//里面配置数据源,配置 JdbcTemplate,配置事务管理器。在之前的步骤已经写过了。
}
-
-