Django 实现瀑布流

需求分析
现在是 "图片为王"的时代,在浏览一些网站时,经常会看到类似于这种满屏都是图片。图片大小不一,却按空间排列,就这是瀑布流布局。

- 以瀑布流形式布局,从数据库中取出图片
- 每次取出等量(7 条)的图片,加载到页面
- 当滑轮滚动到最底端时,自动再加载图片
实现流程
- 以包形式管理模型
- 将图片自动上传到静态文件
static - 前端页面每行排列四张图片(四个 div )
- 当页面加载时,以 ajax 形式自动向后台发送请求,获取图片数据,再用 js 循环生成 img 标签添加到每个 div 中
- JS 循环图片信息列表,将当前循环元素的索引与每行排列的图片数目(4张)求余数,再利用余数定位每个 div 标签
模型设计
在这里,我以包的形式管理模型 models,编写 app/models/video/img_models.py:
from django.db import modelsclass Img(models.Model):"""upload_to: 上传文件地址"""src = models.FileField(max_length=64, verbose_name='图片地址', upload_to='app/static/app/upload')title = models.CharField(max_length=64, verbose_name='标题')summary = models.CharField(max_length=128, verbose_name='简介')class Meta:verbose_name_plural = '图片'def __str__(self):return self.title
视图函数
编写 app/views.py:
from django.shortcuts import render
from django.http import JsonResponse
from app.models.video.img_models import Imgdef img(request):return render(request, 'app/img.html')def getImgs(request):nid = request.GET.get('nid')print(nid)# nid 第一次取为 0,每次取 7 条last_position_id = int(nid) + 7postion_id = str(last_position_id)# 获取 0 < id < 7 的数据img_list = Img.objects.filter(id__gt=nid, id__lt=postion_id).values('id', 'title', 'src')img_list = list(img_list)   # 将字典格式转换为列表形式ret = {'status': True,'data': img_list}return JsonResponse(ret)
在后台取出符合条件的数据,然后打包成 JSON 格式数据,前端模板再通过 jQuery 将其循环生成 img 标签,并添加到 div 标签中。
模板
编写 app/templates/app/img.html:
{% load static %}
<!DOCTYPE html>
<html lang="en">
<head><meta charset="UTF-8"><title>瀑布流</title><style type="text/css">.box1{width: 1000px;margin: 0 auto;}.box1 .item{width: 25%;float: left;}.item img{width: 100%;}</style>
</head>
<body><h1>瀑布流</h1><div class="box1" id="container"><div class="item"></div><div class="item"></div><div class="item"></div><div class="item"></div></div><script src="{% static 'app/jquery/jquery-3.1.1.js' %}"></script><script>$(function () {initImg();scroll();});NID = 0;LASTPOSTION = 3;    // 循环最后那个的位置function initImg() {$.ajax({url: '/app/getImgs/',type: 'GET',data: {nid: NID},dataType: 'JSON',success: function (arg) {if (arg.status){var img_list = arg.data;$.each(img_list, function (index, value) {var n = (index + LASTPOSTION + 1) % 4;
{#                          console.log(n);    // 0、1 、2 、3    一直为 0、1 、2 、3#}var img = document.createElement('img');img.src = '/' + value.src;    //  app/static/app/upload/7.jpg// 也就是给第一、二、三、四给 div 添加 img 标签,eq(0) 为第一个$('#container').children().eq(n).append(img);if (index + 1 == img_list.length){console.log(n, value.id);LASTPOSTION = n;
{#                              NID = value.id;#}}});}}})}// 监听滑轮$(window).scroll(function () {// 文档高度var doc_height = $(document).height();// 窗口高度var window_height = $(window).height();// 滑轮高度var scroll_height = $(window).scrollTop();if (window_height + scroll_height == doc_height){initImg();}})</script>
</body>
</html>
settings 配置
TEMPLATES = [{'BACKEND': 'django.template.backends.django.DjangoTemplates',# templates 设置'DIRS': [os.path.join(BASE_DIR, 'templates')],'APP_DIRS': True,'OPTIONS': {'context_processors': ['django.template.context_processors.debug','django.template.context_processors.request','django.contrib.auth.context_processors.auth','django.contrib.messages.context_processors.messages',],},},
]LANGUAGE_CODE = 'zh-hans'TIME_ZONE = 'Asia/Shanghai'# 因为让模板能够找到 static 中图片,添加了 /app
STATIC_URL = '/app/static/'
STATICFILES_DIRS = (os.path.join(BASE_DIR, 'app', 'static'),
)TEMPLATE_DIRS = (os.path.join(BASE_DIR, 'app', 'templates'),)
urlconf 配置
这是我的 app/urls.py:
# Project/urls.py
from django.contrib import admin
from django.urls import path, includeurlpatterns = [path('admin/', admin.site.urls),path('app/', include('app.urls')),
]# app/urls.py
from django.urls import path
from app import viewsurlpatterns = [path('img/', views.img, name='img'),path('getImgs/', views.getImgs, name='getImgs'),
]
包管理模型
整个项目的模型部分,以包的形式管理,有些功能部分单独设计模型文件,因此要在包文件中导入相应模型。
编写 app/models/video/__init__.py:
from app.models.video.img_models import Img
使用对象封装全局变量
在上面 JS 代码中,我们使用了全局变量,实际开发中应该尽量避免使用全局变量,在这里用对象将其封装。
// 全局变量封装
$(function () {var obj = new ScrollImg();   // 定义一个对象obj.fetchImg();         obj.scrollEvent();
});// 对象 ScrollImg
function ScrollImg() {// 将之前的全局变量封装在对象内部,仅其内部能使用this.NID = 0;       this.LASTPOSITION = 3;// 向后台发送 ajax 请求,获取图片信息this.fetchImg = function () {var that = this;$.ajax({url: '/app/getImgs/',type: 'GET',data: {nid: that.NID},dataType: 'JSON',success: function (arg) {var img_list = arg.data;$.each(img_list, function (index, value) {var n = (index + that.LASTPOSITION + 1) % 4;var img = document.createElement('img');img.src = '/' + value.src;$('#container').children().eq(n).append(img);if (index + 1 == img_list.length) {that.LASTPOSITION = n;// 每取完一次,便把最后那条的 id 赋值给 NID 传到后台,再根据这个条件取 7 条数据that.NID = value.id;}});}})};this.scrollEvent = function () {var that = this;// 监听滑轮,当滑轮高度+窗口高度==文档高度时,即表示滑轮已经滑动到最底部,再执行 fetchImg() 函数,再从数据库取出数据$(window).scroll(function () {var scroll_height = $(window).scrollTop();var window_height = $(window).height();var doc_height = $(document).height();if (scroll_height + window_height == doc_height ) {that.fetchImg();}})}
}
这是整个项目大致分布:
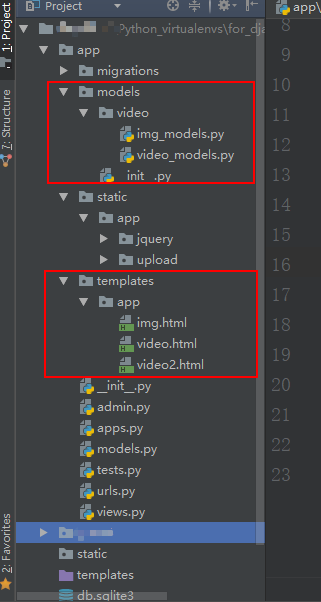
[外链图片转存失败,源站可能有防盗链机制,建议将图片保存下来直接上传(img-mYAM6WY5-1679406971121)(https://raw.githubusercontent.com/hj1933/img/master/iimg/%E7%80%91%E5%B8%83%E6%B5%81.gif)]
参考博客
-
小功能瀑布流的实现
-
django实现瀑布流、组合搜索、阶梯评论、验证码