java-正装照换底色小demo-技术分享

文章目录
- 前言
-
-
- java-正装照换底色小demo-技术分享
-
- 01 实现思路
- 02 效果
-
- 02::01 原图:
- 02::02 执行单元测试:
- 02::03 效果:
- 03 编码实现
-
前言
如果您觉得有用的话,记得给博主点个赞,评论,收藏一键三连啊,写作不易啊^ _ ^。
而且听说点赞的人每天的运气都不会太差,实在白嫖的话,那欢迎常来啊!!!
java-正装照换底色小demo-技术分享
本来闲着没事想写个小demo玩玩,结果没想到坑还挺多,写个博客记录一下。
01 实现思路
其实这个需求如果加上人脸识别的话,然后截取人像部分,替换背景色,应该是最佳的选择。
而我的思路就只用java的awt包来解决,可能对于那些不是很标准的正装照来说,可能会有些瑕疵,但对于那些标签的正装照来说,是没有问题的。
下面是我的实现思路:
- 获取目标图片流;
- 取左上角30-30的位置作为图片原始背景色,即我们要替换的背景色;
- 遍历图片的像素(遍历长和宽上的每个像素),把指定像素上的颜色换成目标颜色;
- 当出现第一次出现指定像素上的颜色与图像上颜色不一致的时候,进行第二次范围RGB范围判断,因为有些正装照的背景色,不太标准,背景色有可能有些地方虽然都在 一个色素的范围之内,肉眼难以辨别,但是有可能有些差异,所以我又加了一个像素范围的过滤,判断图像上的颜色是否在这个指定像素范围之内, 如果在范围之内,那么替换目标像素,当第三次出现指定像素上的颜色与图像上颜色不一致的时候,不走范围RGB判断,因为如果没有控制的话, 可能将人物衣服上某些不该替换的颜色被目标颜色替换;
- 将修改完的图片生成新的图片文件输出;
02 效果
02::01 原图:

02::02 执行单元测试:
public class PhotographToColorTest {@Testpublic void test(){String path = "D:\\\\Photograph\\\\证件照测试.jpg";//红色PhotographToColor.imageBackgroundRGB(path,PhotographToColor.TYPE.RED);//蓝色PhotographToColor.imageBackgroundRGB(path,PhotographToColor.TYPE.BLUE);}}

02::03 效果:
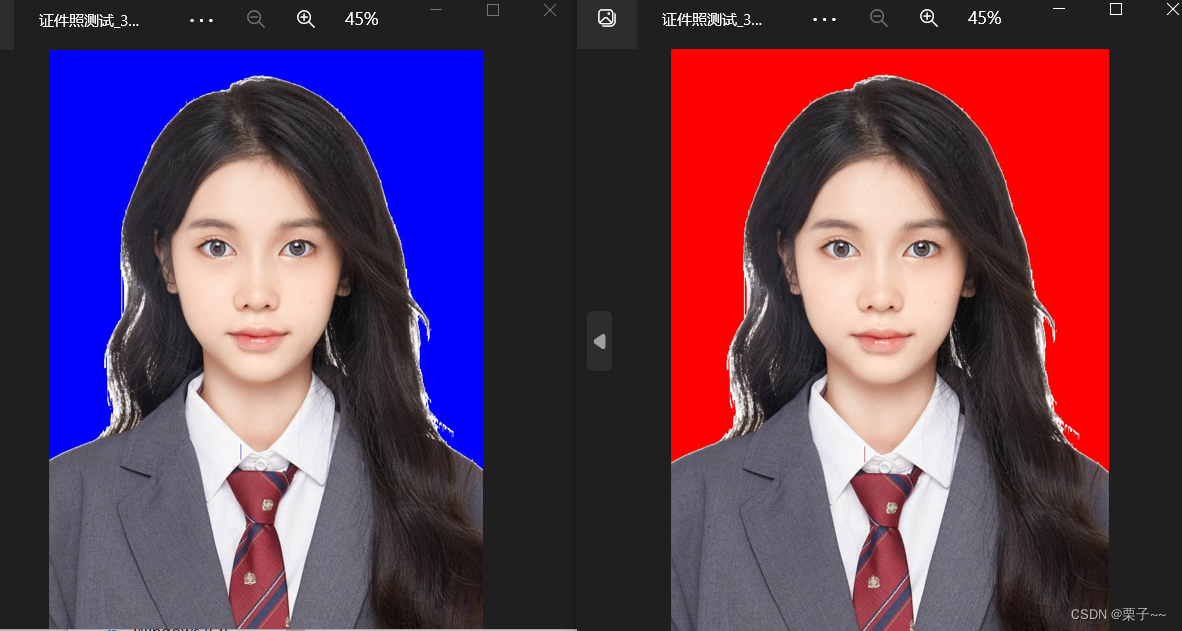

毕竟拿的是网图,这个正装照有些地方不是很标准,如果是标准的正装照,背景色素是一样的,使用这个办法就没有问题。
03 编码实现
引用:
import org.apache.commons.lang3.StringUtils;
import org.slf4j.Logger;
import org.slf4j.LoggerFactory;import javax.imageio.ImageIO;
import java.awt.*;
import java.awt.image.BufferedImage;
import java.io.*;
import java.util.Map;
import java.util.UUID;
import java.util.concurrent.ConcurrentHashMap;
具体小demo实现:
/* @author yangzhenyu* @version 1.0* @description:* @date 2023/3/10 10:20*/public class PhotographToColor {private final static String BLUE = "BLUE";private final static String RED = "RED";private final static String WHITE ="WHITE";private static Map<String,PhotographToColor.RGB> init =   new ConcurrentHashMap<>();static {init.put(BLUE,new PhotographToColor.RGB(0,0,255));init.put(RED,new PhotographToColor.RGB(255,0,0));init.put(WHITE,new PhotographToColor.RGB(255,255,255));}private static final Logger log = LoggerFactory.getLogger(PhotographToColor.class);private static final int CRITICAL = 30;private static final int NUM = 1;// int转rgbpublic static String converArgbToRgb(int argb){int [] rgb  = new int[3];rgb[0] = (argb & 0xff0000) >> 16;rgb[1] = (argb & 0xff00) >> 8;rgb[2] = (argb & 0xff);return "rgb("+rgb[0]+","+rgb[1]+","+rgb[2]+")";}// rgb转intpublic static int rgbToArgb(int r,int g,int b){return ((0xFF << 24)|(r << 16)|(g << 8)|b);}public static int rule(int nowR,int nowG,int nowB,int p,int targetRgb){//蓝色if(nowR<188&&nowR>-1 && nowG<256&&nowG>133 && nowB<256&&nowB>204 ) {p = targetRgb;}//白色if(nowR<256&&nowR>240 && nowG<256&&nowG>240 && nowB<256&&nowB>240 ) {p = targetRgb;}//红色if(nowR<256&&nowR>149 && nowG<107&&nowG>-1 && nowB<100&&nowB>-1 ) {p = targetRgb;}return p;}/ 处理图片背景色* @param path 原图地址*/public static void imageBackgroundRGB(String path,PhotographToColor.TYPE type)  {RGB rgb = init.get(type.code);int targetRgb = rgbToArgb(rgb.getR(),rgb.getG(),rgb.getB());File file = new File(path);//格式String[] data = path.split("\\\\.");String format = data [1];//输出的路径String srcPath = StringUtils.join(data[0], "_", UUID.randomUUID(),".", format);File srcPathFile = new File(srcPath);//用来处理图片的缓冲流BufferedImage bi = null;BufferedImage image = null;try {//用ImageIO将图片读入到缓冲中bi = ImageIO.read(file);//得到图片的长宽int width = bi.getWidth();int height = bi.getHeight();image = new BufferedImage(width, height, BufferedImage.TYPE_INT_RGB);// 获取左上角颜色,默认左上角像素块颜色为背景色int pixel = bi.getRGB(CRITICAL, CRITICAL);String s = converArgbToRgb(pixel);log.info("=============="+s);log.info("图片名称:{}, targetRgb:{}, width:{}, height:{}, pixel:{}",file.getName(), targetRgb, width, height, pixel);/* 这里是遍历图片的像素,因为要处理图片的背色,所以要把指定像素上的颜色换成目标颜色* 这里 是一个二层循环,遍历长和宽上的每个像素*/Graphics graphics = image.getGraphics();Boolean flag =Boolean.FALSE;int num = 0;for (int x = 0; x < width; x++) {for (int y = 0; y < height; y++) {// 得到指定像素(i,j)上的RGB值,int nowPixel = bi.getRGB(x, y);int p = nowPixel;if (flag){int nowR = (nowPixel & 0xff0000) >> 16;int nowG = (nowPixel & 0xff00) >> 8;int nowB = (nowPixel & 0xff);p = rule(nowR,nowG,nowB,p,targetRgb);}else {p = pixel == nowPixel ? targetRgb : nowPixel;}if (targetRgb == p){flag = Boolean.TRUE;}else{flag = Boolean.FALSE;}graphics.setColor(new Color(p));graphics.fillRect(x, y, 1, 1);}}log.info("处理完毕:{}", file.getName());ImageIO.write(image, format, srcPathFile);}catch (Exception e){log.error("错误",e);}}enum TYPE{BLUE("BLUE"),RED("RED"),WHITE("WHITE");private final String code;TYPE(String code) {this.code = code;}public String getCode() {return code;}}static class RGB{private int r;private int g;private int b;public RGB(int r, int g, int b) {this.r = r;this.g = g;this.b = b;}public int getR() {return r;}public void setR(int r) {this.r = r;}public int getG() {return g;}public void setG(int g) {this.g = g;}public int getB() {return b;}public void setB(int b) {this.b = b;}}
}