Netty 源码解析(下)

接上一篇博客 Netty 源码解析(上)继续分析
上一篇博客中已经分析了绝大部分 ChannelFuture cf = bootstrap.bind(9000).sync(); 这一行代码,当这一行代码运行完时,Netty服务端就已经启动好了,接下来就是接收链接,处理数据的逻辑分析,但在测试之前还是先准备客户端代码 。
public class NettyClient {public static void main(String[] args) throws Exception {//客户端需要一个事件循环组EventLoopGroup group = new NioEventLoopGroup();try {//创建客户端启动对象//注意客户端使用的不是ServerBootstrap而是BootstrapBootstrap bootstrap = new Bootstrap();//设置相关参数bootstrap.group(group) //设置线程组.channel(NioSocketChannel.class) // 使用NioSocketChannel作为客户端的通道实现.handler(new ChannelInitializer<SocketChannel>() {@Overrideprotected void initChannel(SocketChannel ch) throws Exception {//加入处理器ch.pipeline().addLast(new NettyClientHandler());}});System.out.println("netty client start。。");//启动客户端去连接服务器端ChannelFuture cf = bootstrap.connect("127.0.0.1", 9000).sync();//对通道关闭进行监听cf.channel().closeFuture().sync();} finally {group.shutdownGracefully();}}
}public class NettyByteBuf {public static void main(String[] args) {// 创建byteBuf对象,该对象内部包含一个字节数组byte[10]// 通过readerindex和writerIndex和capacity,将buffer分成三个区域// 已经读取的区域:[0,readerindex)// 可读取的区域:[readerindex,writerIndex)// 可写的区域: [writerIndex,capacity)ByteBuf byteBuf = Unpooled.buffer(1);System.out.println("byteBuf=" + byteBuf);for (int i = 0; i < 8; i++) {byteBuf.writeByte(i);}System.out.println("byteBuf=" + byteBuf);for (int i = 0; i < 5; i++) {System.out.println(byteBuf.getByte(i));}System.out.println("byteBuf=" + byteBuf);for (int i = 0; i < 5; i++) {System.out.println(byteBuf.readByte());}System.out.println("byteBuf=" + byteBuf);//用Unpooled工具类创建ByteBufByteBuf byteBuf2 = Unpooled.copiedBuffer("hello,zhuge!", CharsetUtil.UTF_8);//使用相关的方法if (byteBuf2.hasArray()) {byte[] content = byteBuf2.array();//将 content 转成字符串System.out.println(new String(content, CharsetUtil.UTF_8));System.out.println("byteBuf2=" + byteBuf2);System.out.println(byteBuf2.getByte(0)); // 获取数组0这个位置的字符h的ascii码,h=104int len = byteBuf2.readableBytes(); //可读的字节数  12System.out.println("len=" + len);//使用for取出各个字节for (int i = 0; i < len; i++) {System.out.println((char) byteBuf2.getByte(i));}//范围读取System.out.println(byteBuf2.getCharSequence(0, 6, CharsetUtil.UTF_8));System.out.println(byteBuf2.getCharSequence(6, 6, CharsetUtil.UTF_8));}}
}
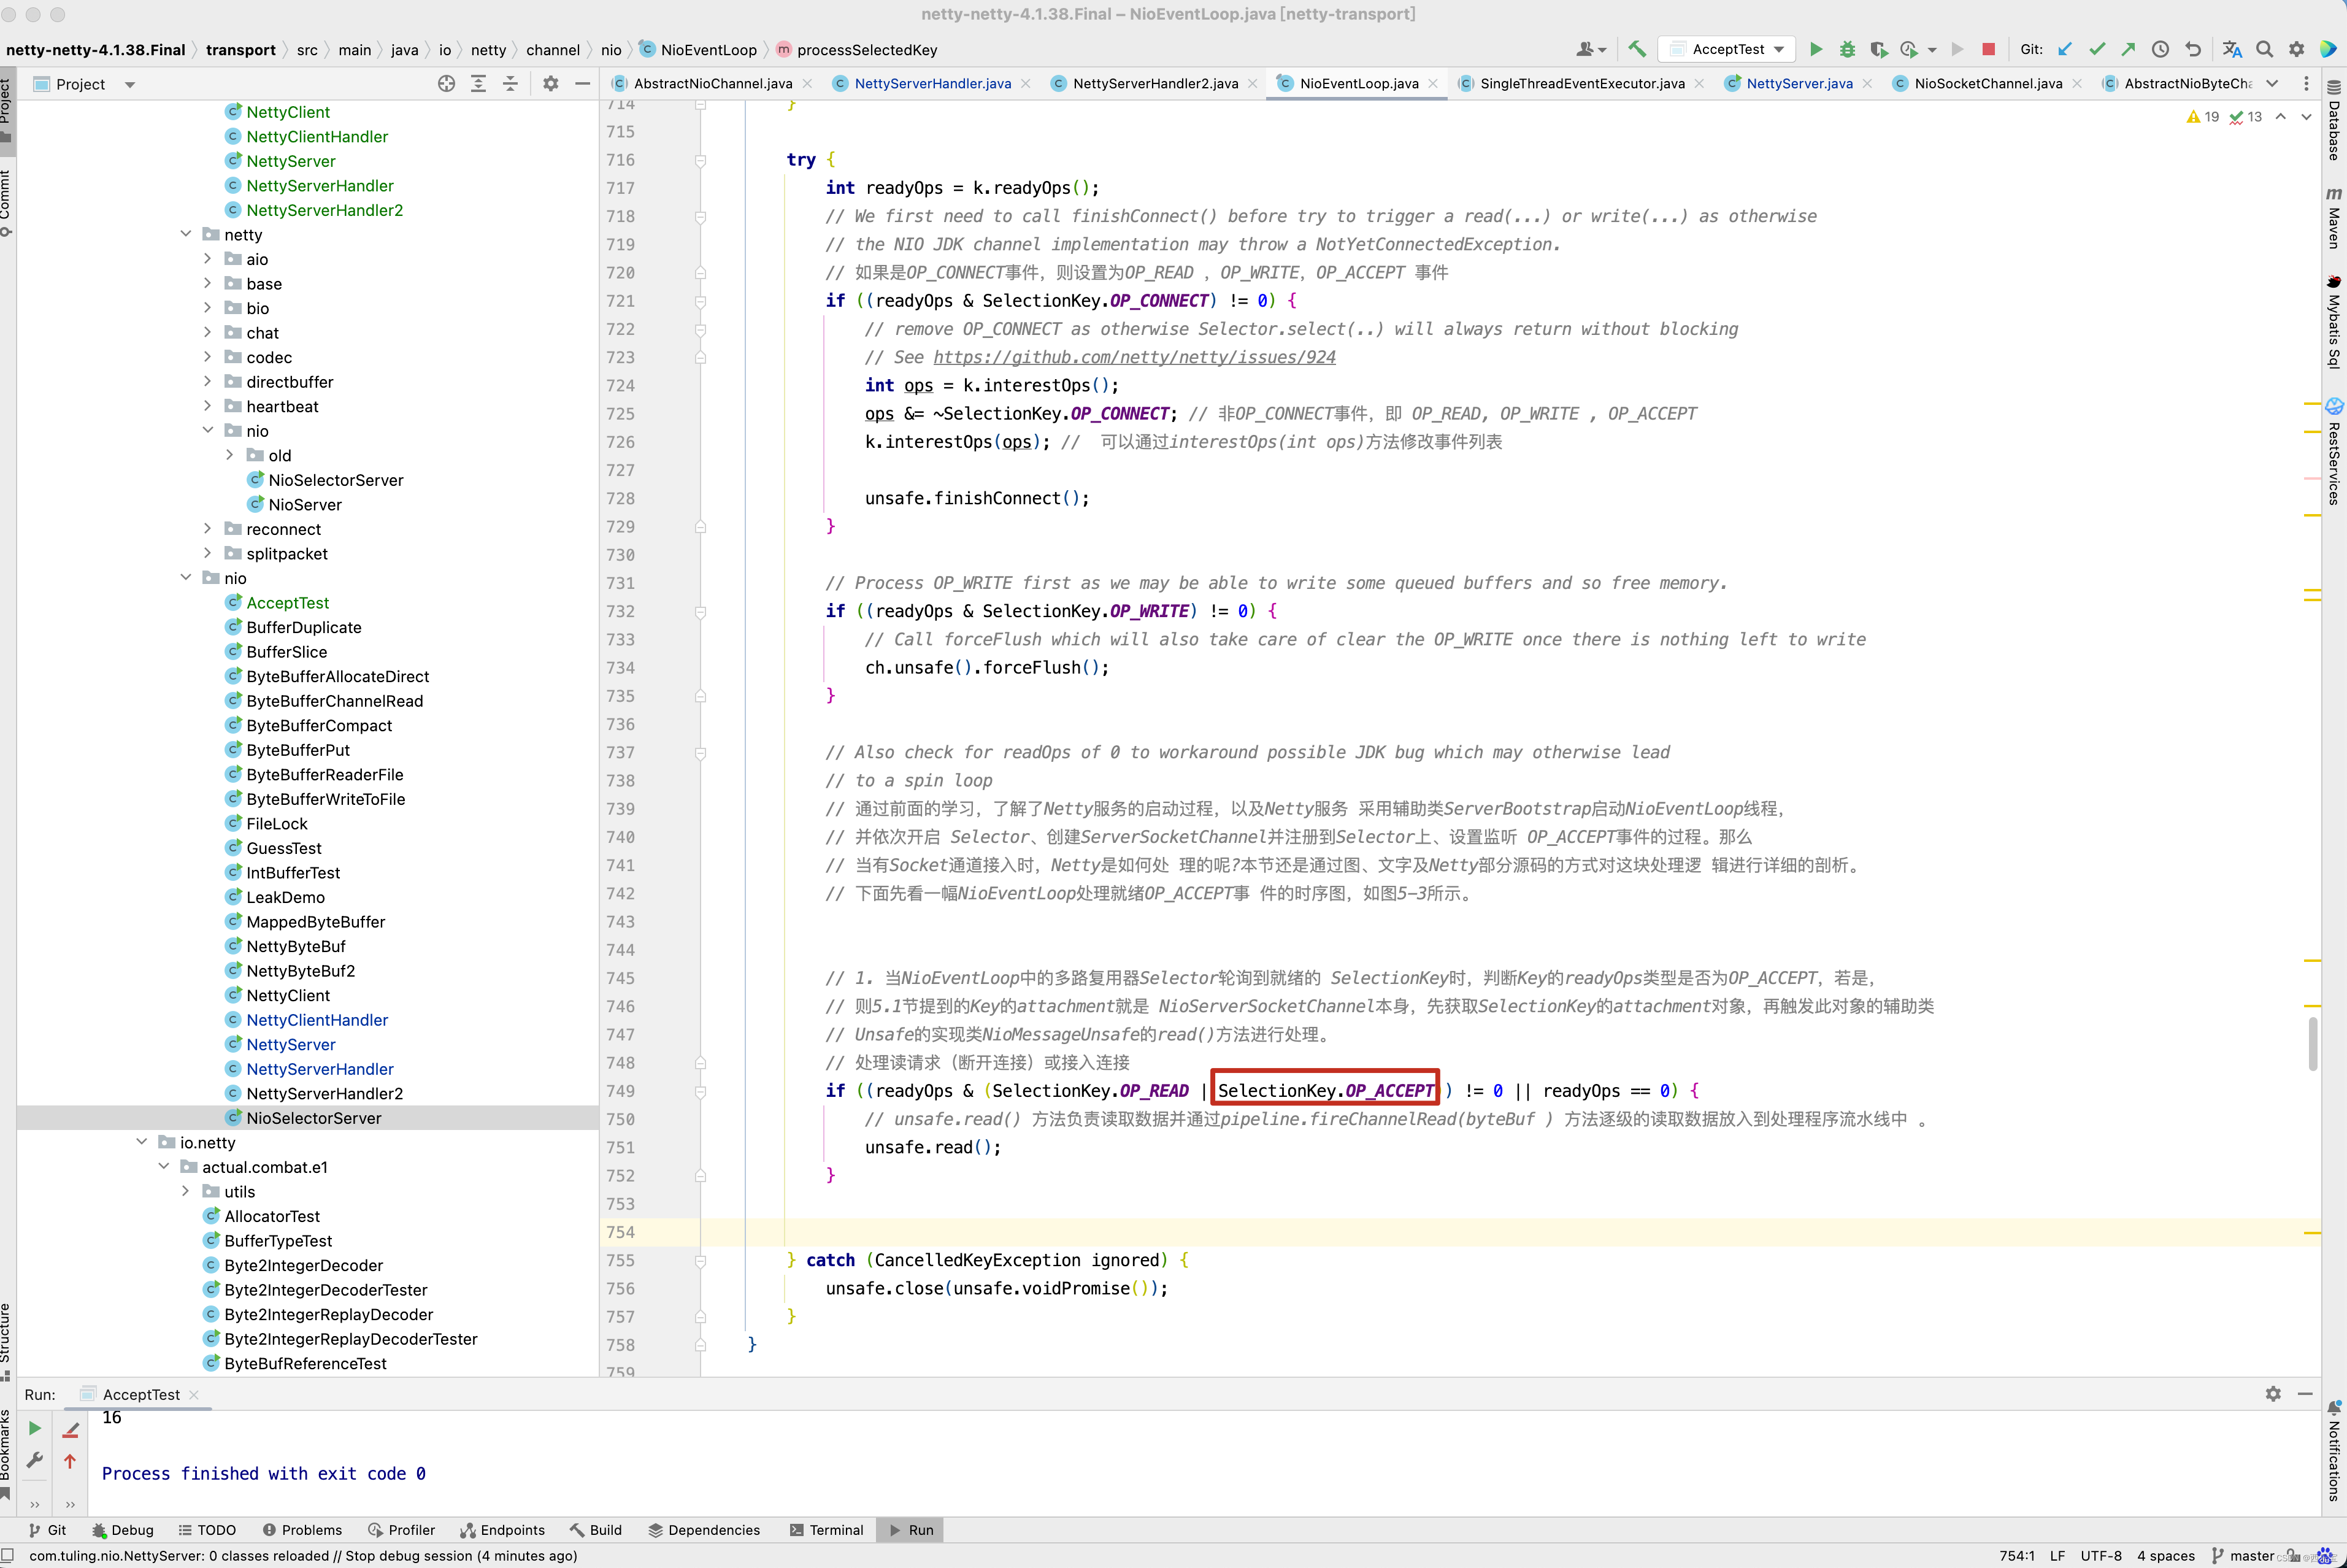
在上一篇博客中,已经分析了ServerSocketChannel的SelectKey已经注册了SelectionKey.OP_ACCEPT事件,既然已经注册了接收事件,那么可以接收客户端连接,又要回到之前的NioEventLoop()方法的select()方法的分析了,在之前NioEventLoop方法中,有一个processSelectedKeys()方法还没有分析,接下来进入此方法 。
private void processSelectedKeys() {// 判断优化后的selectedKeys是否为空if (selectedKeys != null) {// 优化处理processSelectedKeysOptimized();} else {// 原始处理processSelectedKeysPlain(selector.selectedKeys());}
}
processSelectedKeysOptimized()方法和processSelectedKeysPlain()方法差不多, 既然有优化处理方式,接下来进入优化处理方法 ,非优化方案,有兴趣的小伙伴自行去研究。
private void processSelectedKeysOptimized() {for (int i = 0; i < selectedKeys.size; ++i) {final SelectionKey k = selectedKeys.keys[i];// null out entry in the array to allow to have it GC'ed once the Channel close// See https://github.com/netty/netty/issues/2363// 将selectedKeys.keys[i] = null;,并快速被JVM回收// 无须等到调用其重置再去回收,因为Key 的attachement比较大,很容易千万内存泄漏selectedKeys.keys[i] = null;final Object a = k.attachment();if (a instanceof AbstractNioChannel) {// 根据key的就绪事件触发对应的事件方法processSelectedKey(k, (AbstractNioChannel) a);} else {NioTask<SelectableChannel> task = (NioTask<SelectableChannel>) a;processSelectedKey(k, task);}/* 判断是否应该再次轮询* 每当256个Channel从Selector 上移除时* 就标记needsToSelectAgain 为true*/if (needsToSelectAgain) {// null out entries in the array to allow to have it GC'ed once the Channel close// See https://github.com/netty/netty/issues/2363// 清空 i + 1 之后的selectedKeysselectedKeys.reset(i + 1);// 重新调用selectNow()方法selectAgain();// -1 + 1 = 0 ,从0开始遍历i = -1;}}
}
上面processSelectedKey()方法中,还有一个需要注意的是k.attachment()参数值,是什么时候设置的呢?请看之前的doRegister()方法,如果是NioServerSocketChannel,则此时的attachment值就是NioServerSocketChannel,如果是NioSocketChannel,则attachment的值就是NioSocketChannel。

无论是NioServerSocketChannel还是NioSocketChannel都是继承AbstractNioChannel,因此这里进入AbstractNioChannel相关的processSelectedKey进行分析 。

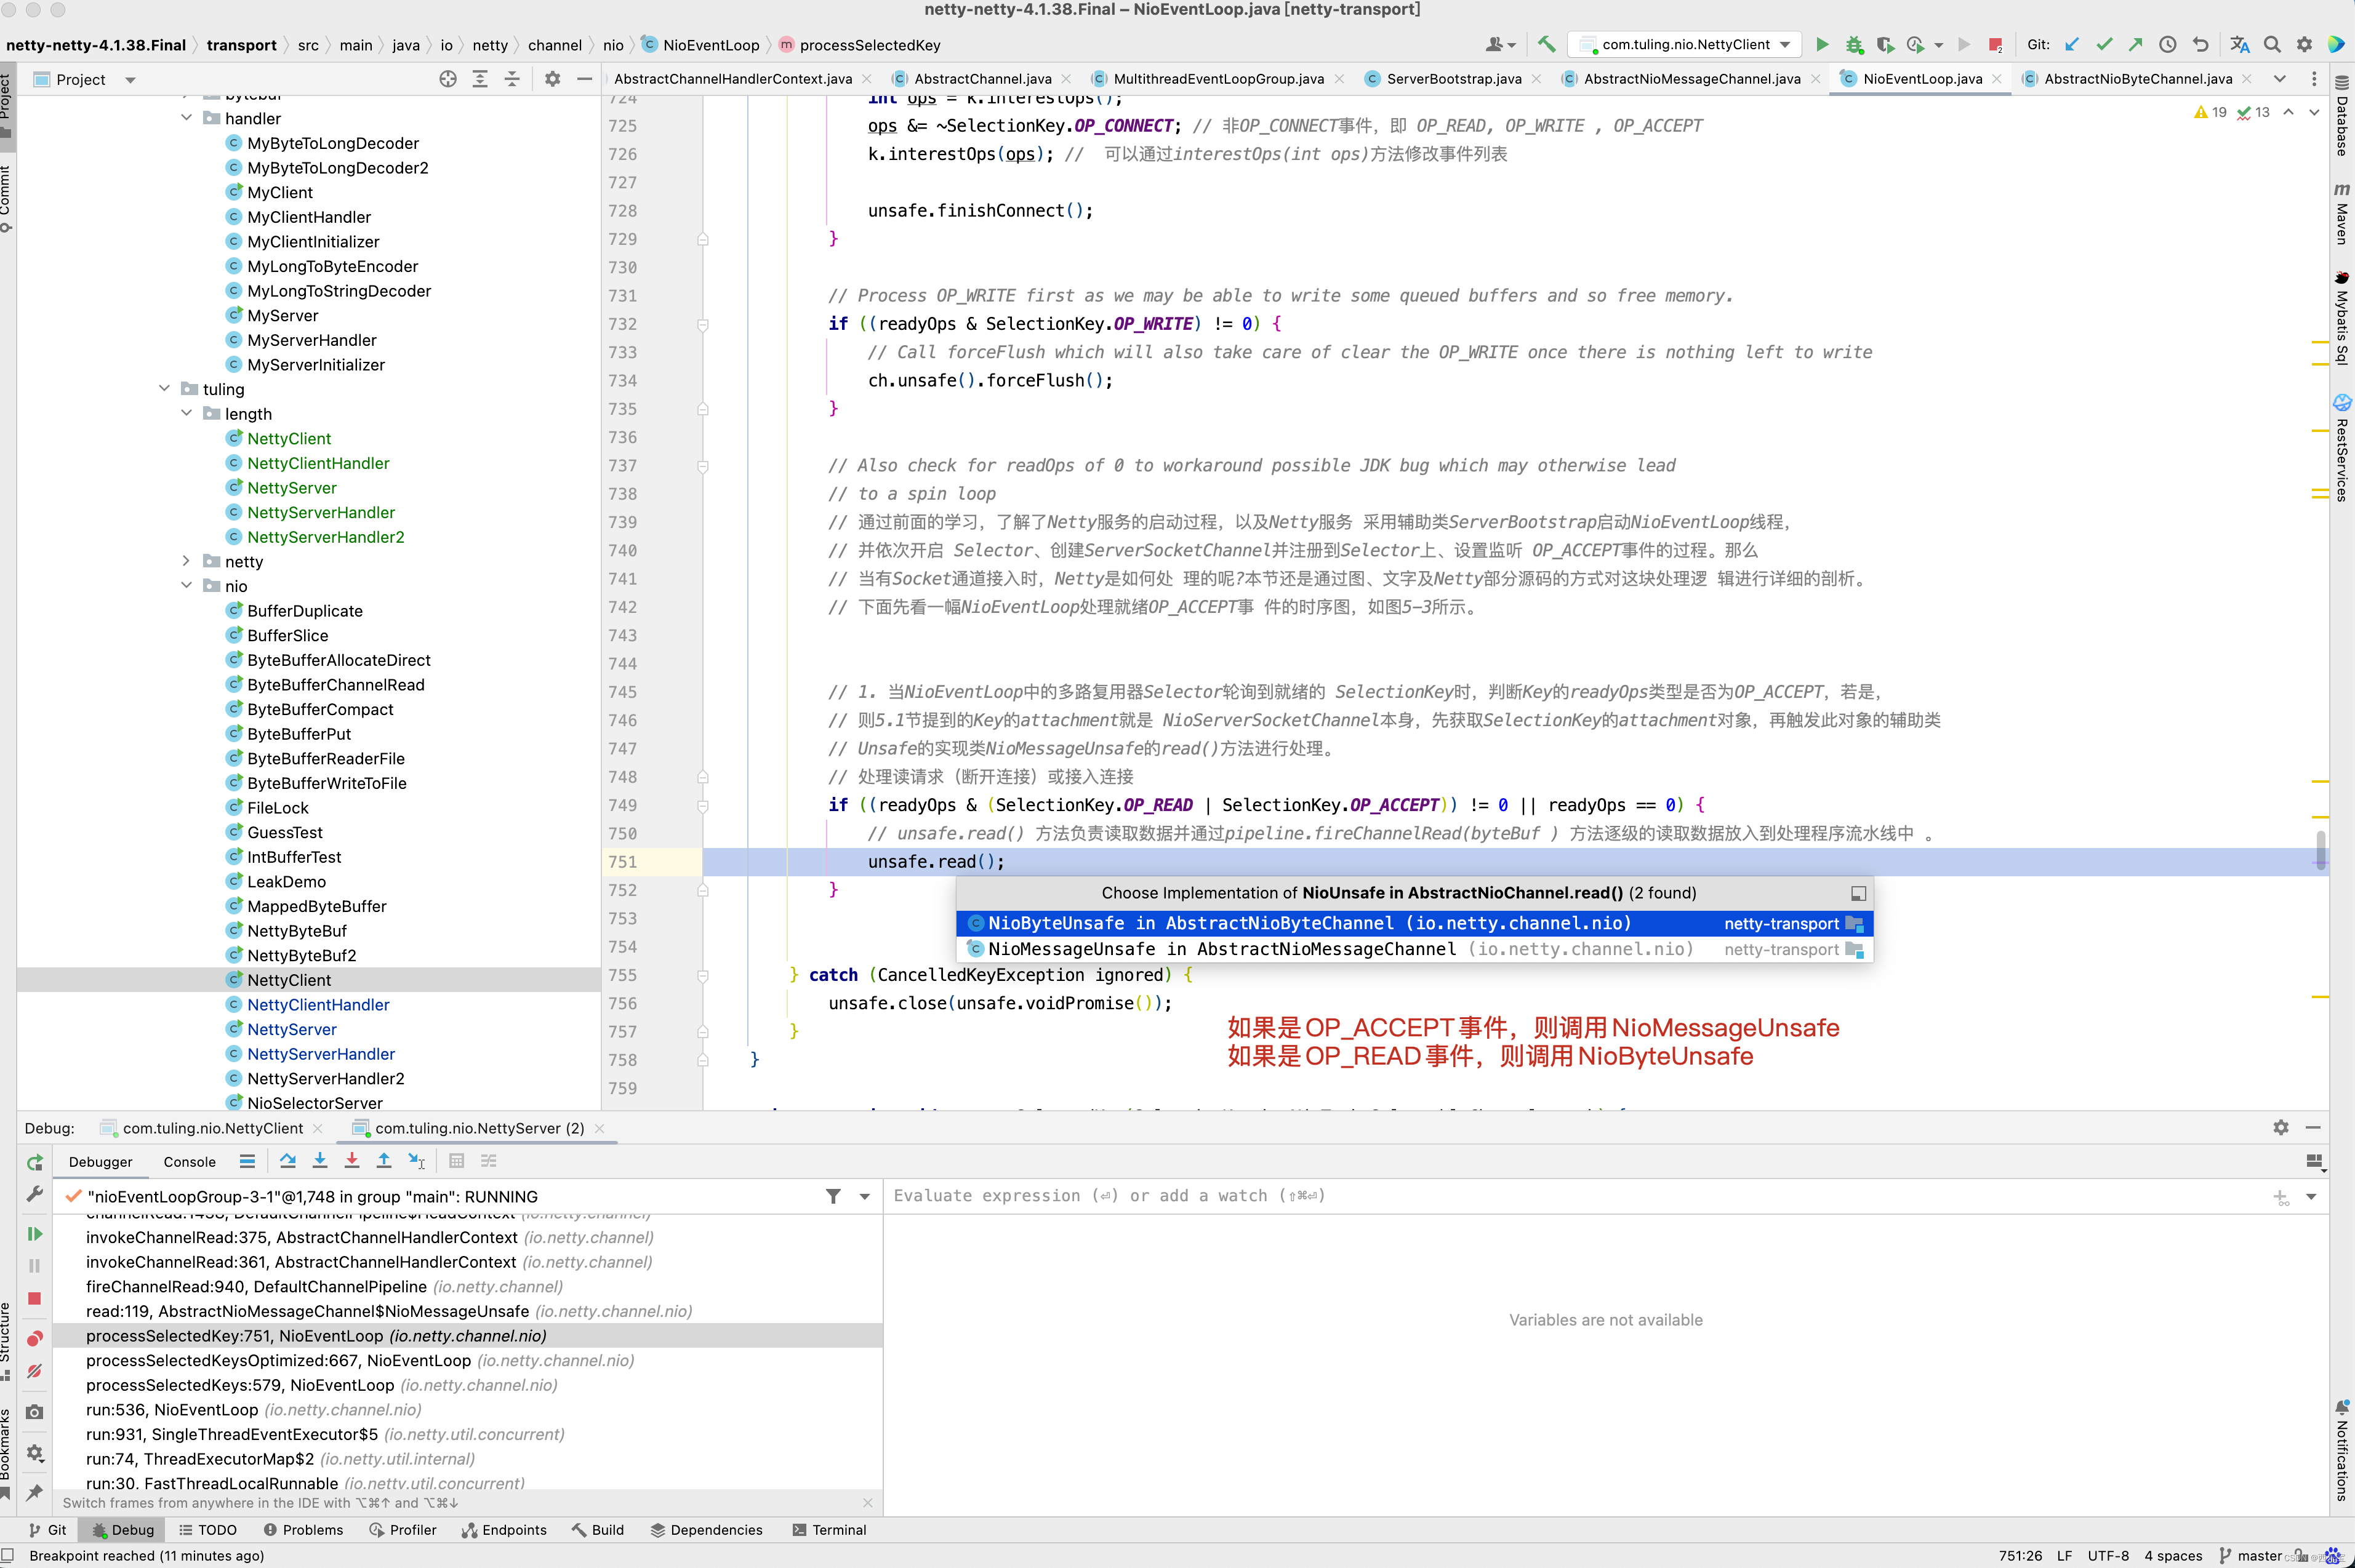
private void processSelectedKey(SelectionKey k, AbstractNioChannel ch) {final AbstractNioChannel.NioUnsafe unsafe = ch.unsafe();if (!k.isValid()) {final EventLoop eventLoop;try {eventLoop = ch.eventLoop();} catch (Throwable ignored) {// If the channel implementation throws an exception because there is no event loop, we ignore this// because we are only trying to determine if ch is registered to this event loop and thus has authority// to close ch.return;}// Only close ch if ch is still registered to this EventLoop. ch could have deregistered from the event loop// and thus the SelectionKey could be cancelled as part of the deregistration process, but the channel is// still healthy and should not be closed.// See https://github.com/netty/netty/issues/5125if (eventLoop != this || eventLoop == null) {return;}// close the channel if the key is not valid anymoreunsafe.close(unsafe.voidPromise());return;}try {int readyOps = k.readyOps();// We first need to call finishConnect() before try to trigger a read(...) or write(...) as otherwise// the NIO JDK channel implementation may throw a NotYetConnectedException.// 如果是OP_CONNECT事件,则设置为OP_READ ,OP_WRITE,OP_ACCEPT 事件if ((readyOps & SelectionKey.OP_CONNECT) != 0) {// remove OP_CONNECT as otherwise Selector.select(..) will always return without blocking// See https://github.com/netty/netty/issues/924int ops = k.interestOps();ops &= ~SelectionKey.OP_CONNECT; // 非OP_CONNECT事件,即 OP_READ, OP_WRITE , OP_ACCEPTk.interestOps(ops); //  可以通过interestOps(int ops)方法修改事件列表unsafe.finishConnect();}// Process OP_WRITE first as we may be able to write some queued buffers and so free memory.if ((readyOps & SelectionKey.OP_WRITE) != 0) {// Call forceFlush which will also take care of clear the OP_WRITE once there is nothing left to writech.unsafe().forceFlush();}// Also check for readOps of 0 to workaround possible JDK bug which may otherwise lead// to a spin loop// 通过前面的学习,了解了Netty服务的启动过程,以及Netty服务 采用辅助类ServerBootstrap启动NioEventLoop线程,// 并依次开启 Selector、创建ServerSocketChannel并注册到Selector上、设置监听 OP_ACCEPT事件的过程。那么// 当有Socket通道接入时,Netty是如何处 理的呢?本节还是通过图、文字及Netty部分源码的方式对这块处理逻 辑进行详细的剖析。// 下面先看一幅NioEventLoop处理就绪OP_ACCEPT事 件的时序图,如图5-3所示。// 1. 当NioEventLoop中的多路复用器Selector轮询到就绪的 SelectionKey时,判断Key的readyOps类型是否为OP_ACCEPT,若是,// 则5.1节提到的Key的attachment就是 NioServerSocketChannel本身,先获取SelectionKey的attachment对象,再触发此对象的辅助类// Unsafe的实现类NioMessageUnsafe的read()方法进行处理。// 处理读请求(断开连接)或接入连接if ((readyOps & (SelectionKey.OP_READ | SelectionKey.OP_ACCEPT)) != 0 || readyOps == 0) {// unsafe.read() 方法负责读取数据并通过pipeline.fireChannelRead(byteBuf ) 方法逐级的读取数据放入到处理程序流水线中 。unsafe.read();}} catch (CancelledKeyException ignored) {unsafe.close(unsafe.voidPromise());}
}
先重点关心SelectionKey.OP_ACCEPT和SelectionKey.OP_READ事件,如果当前ch为NioServerSocketChannel,那么它对应的unsafe就是NioMessageUnsafe,为什么呢? 看NioServerSocketChannel的父类构造方法AbstractChannel。

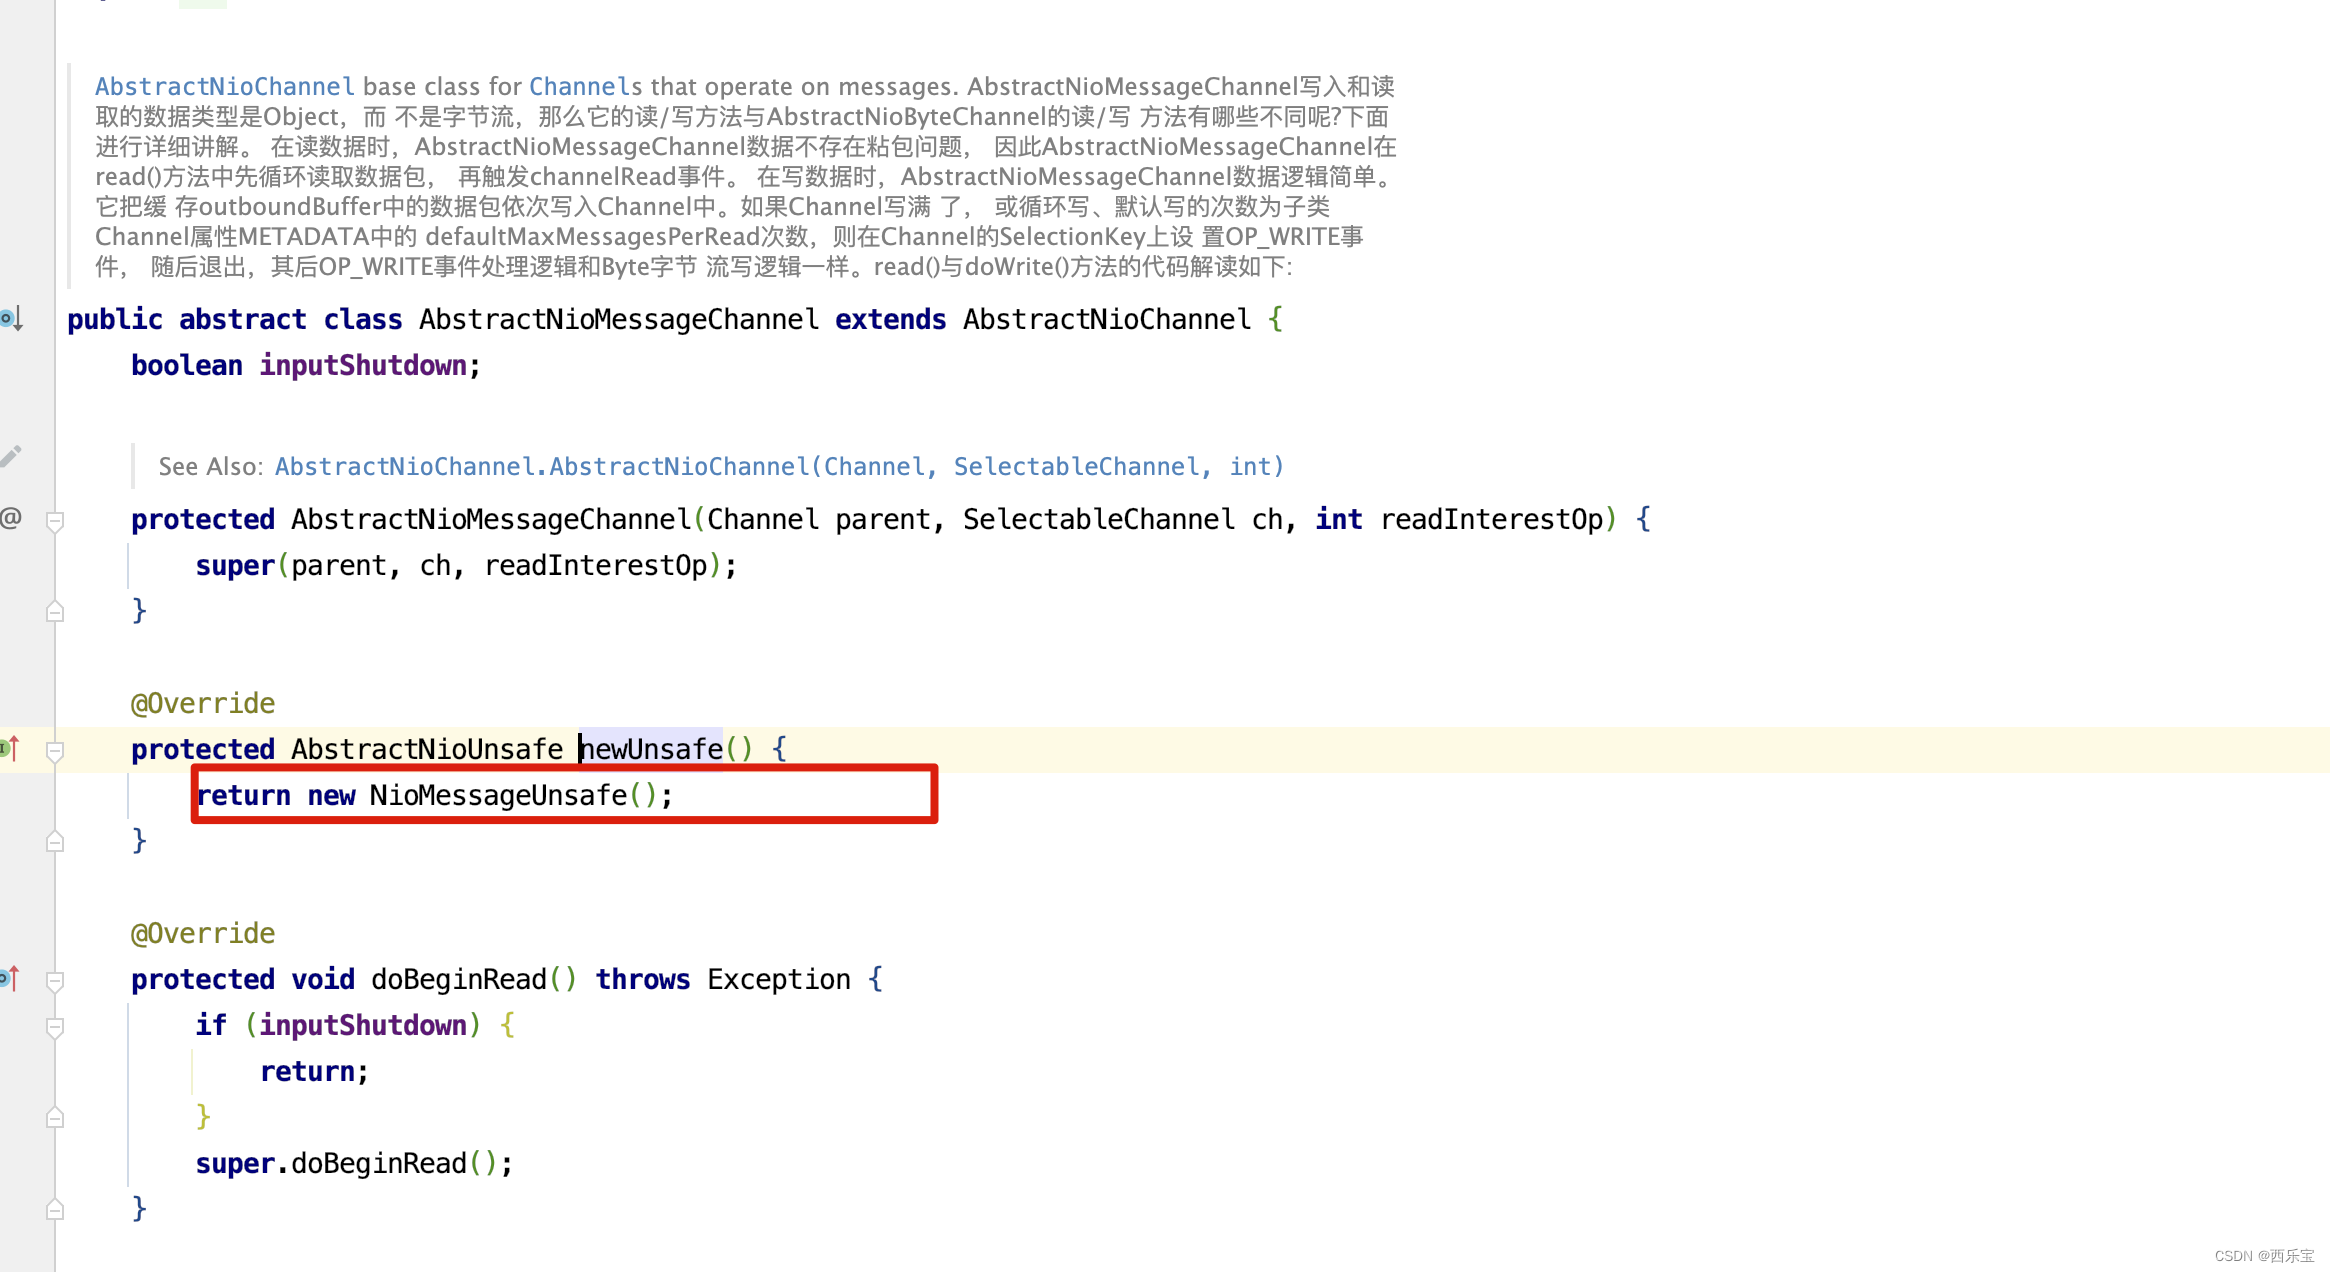
而newUnsafe()方法是一个抽象方法,真正的实现是子类。 从NioServerSocketChannel的类结构来看。
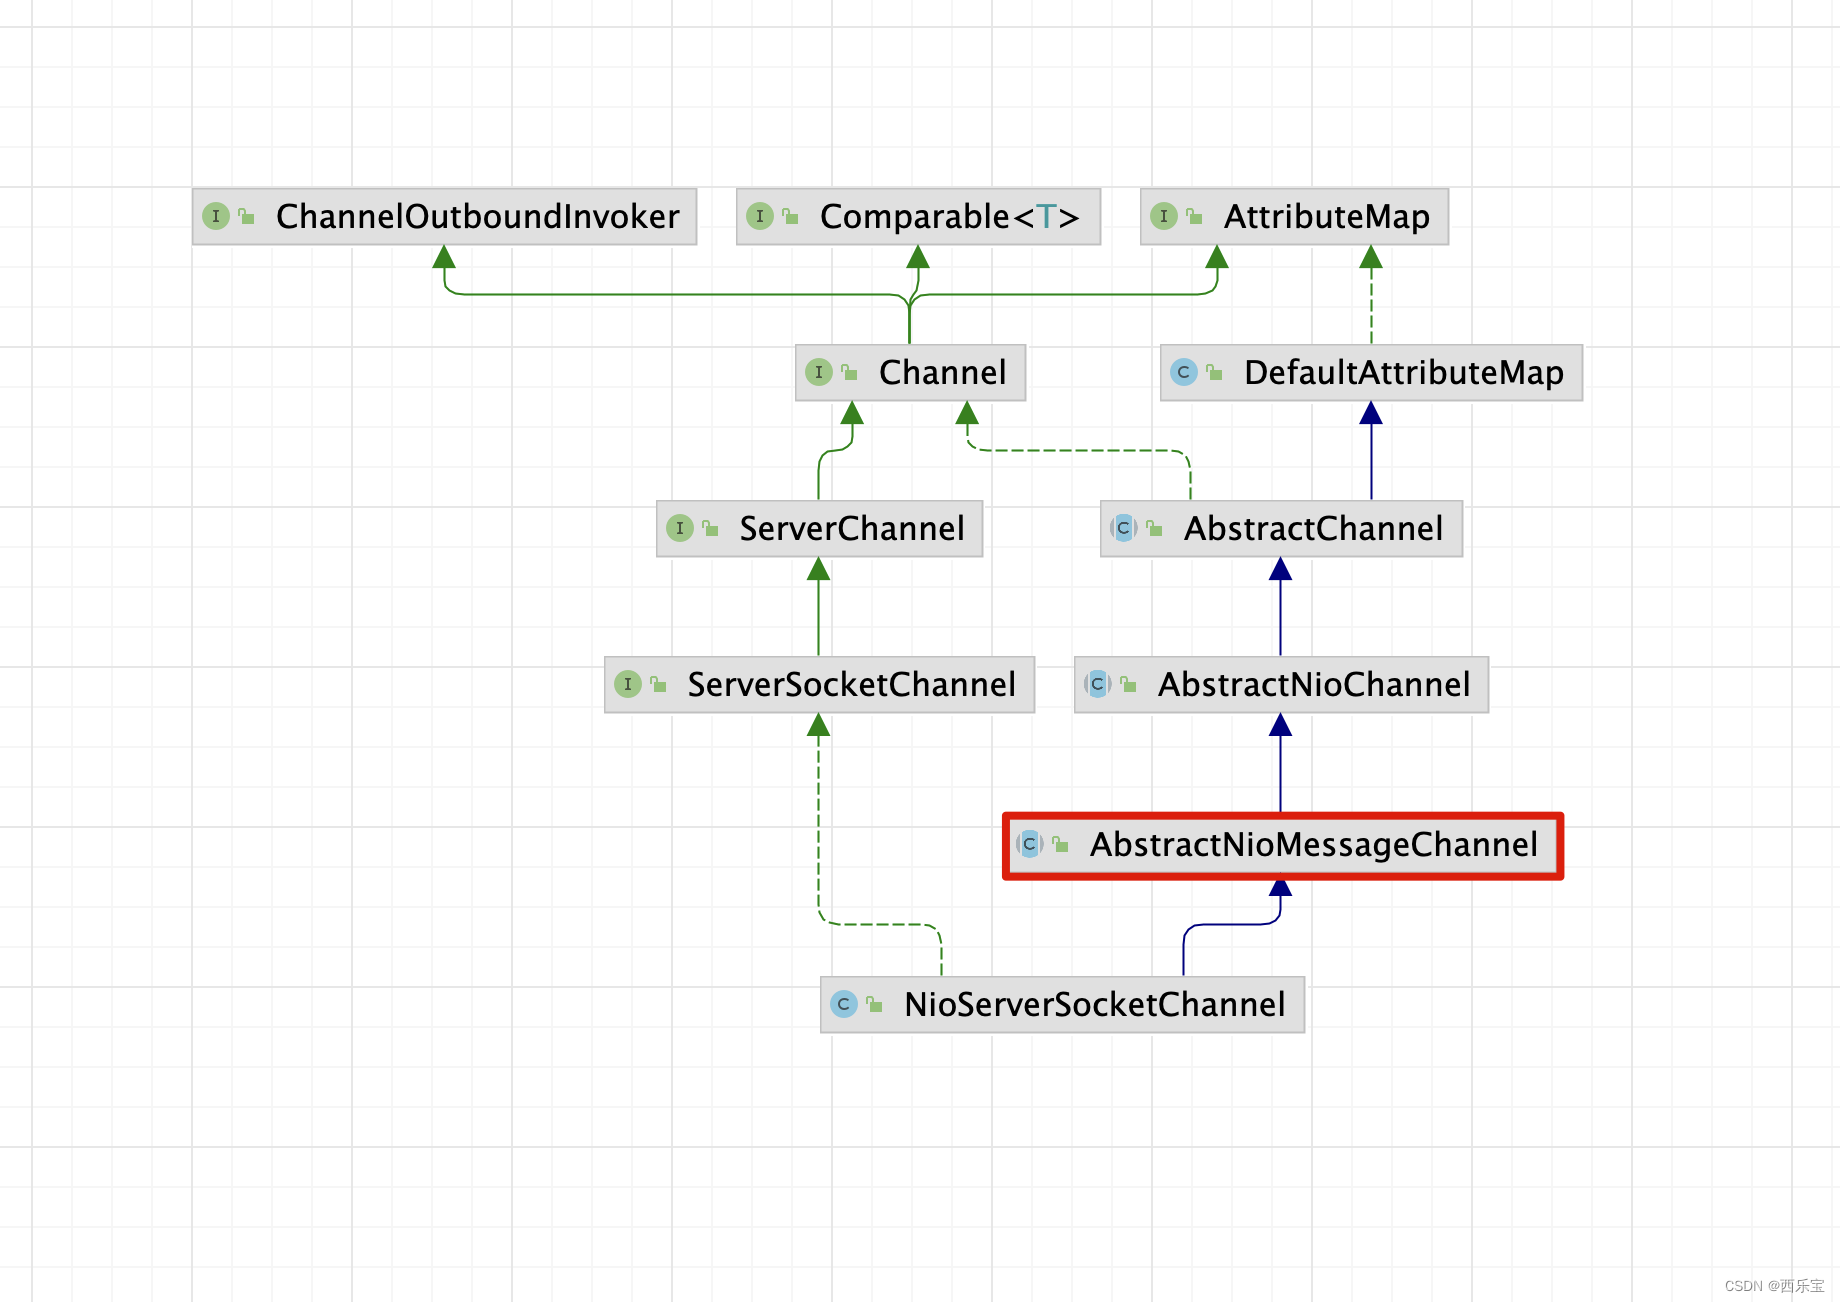
在AbstractNioMessageChannel的newUnsafe()方法中,创建了NioMessageUnsafe对象。
对于NioServerSocketChannel,则进入NioMessageUnsafe的read()方法 。
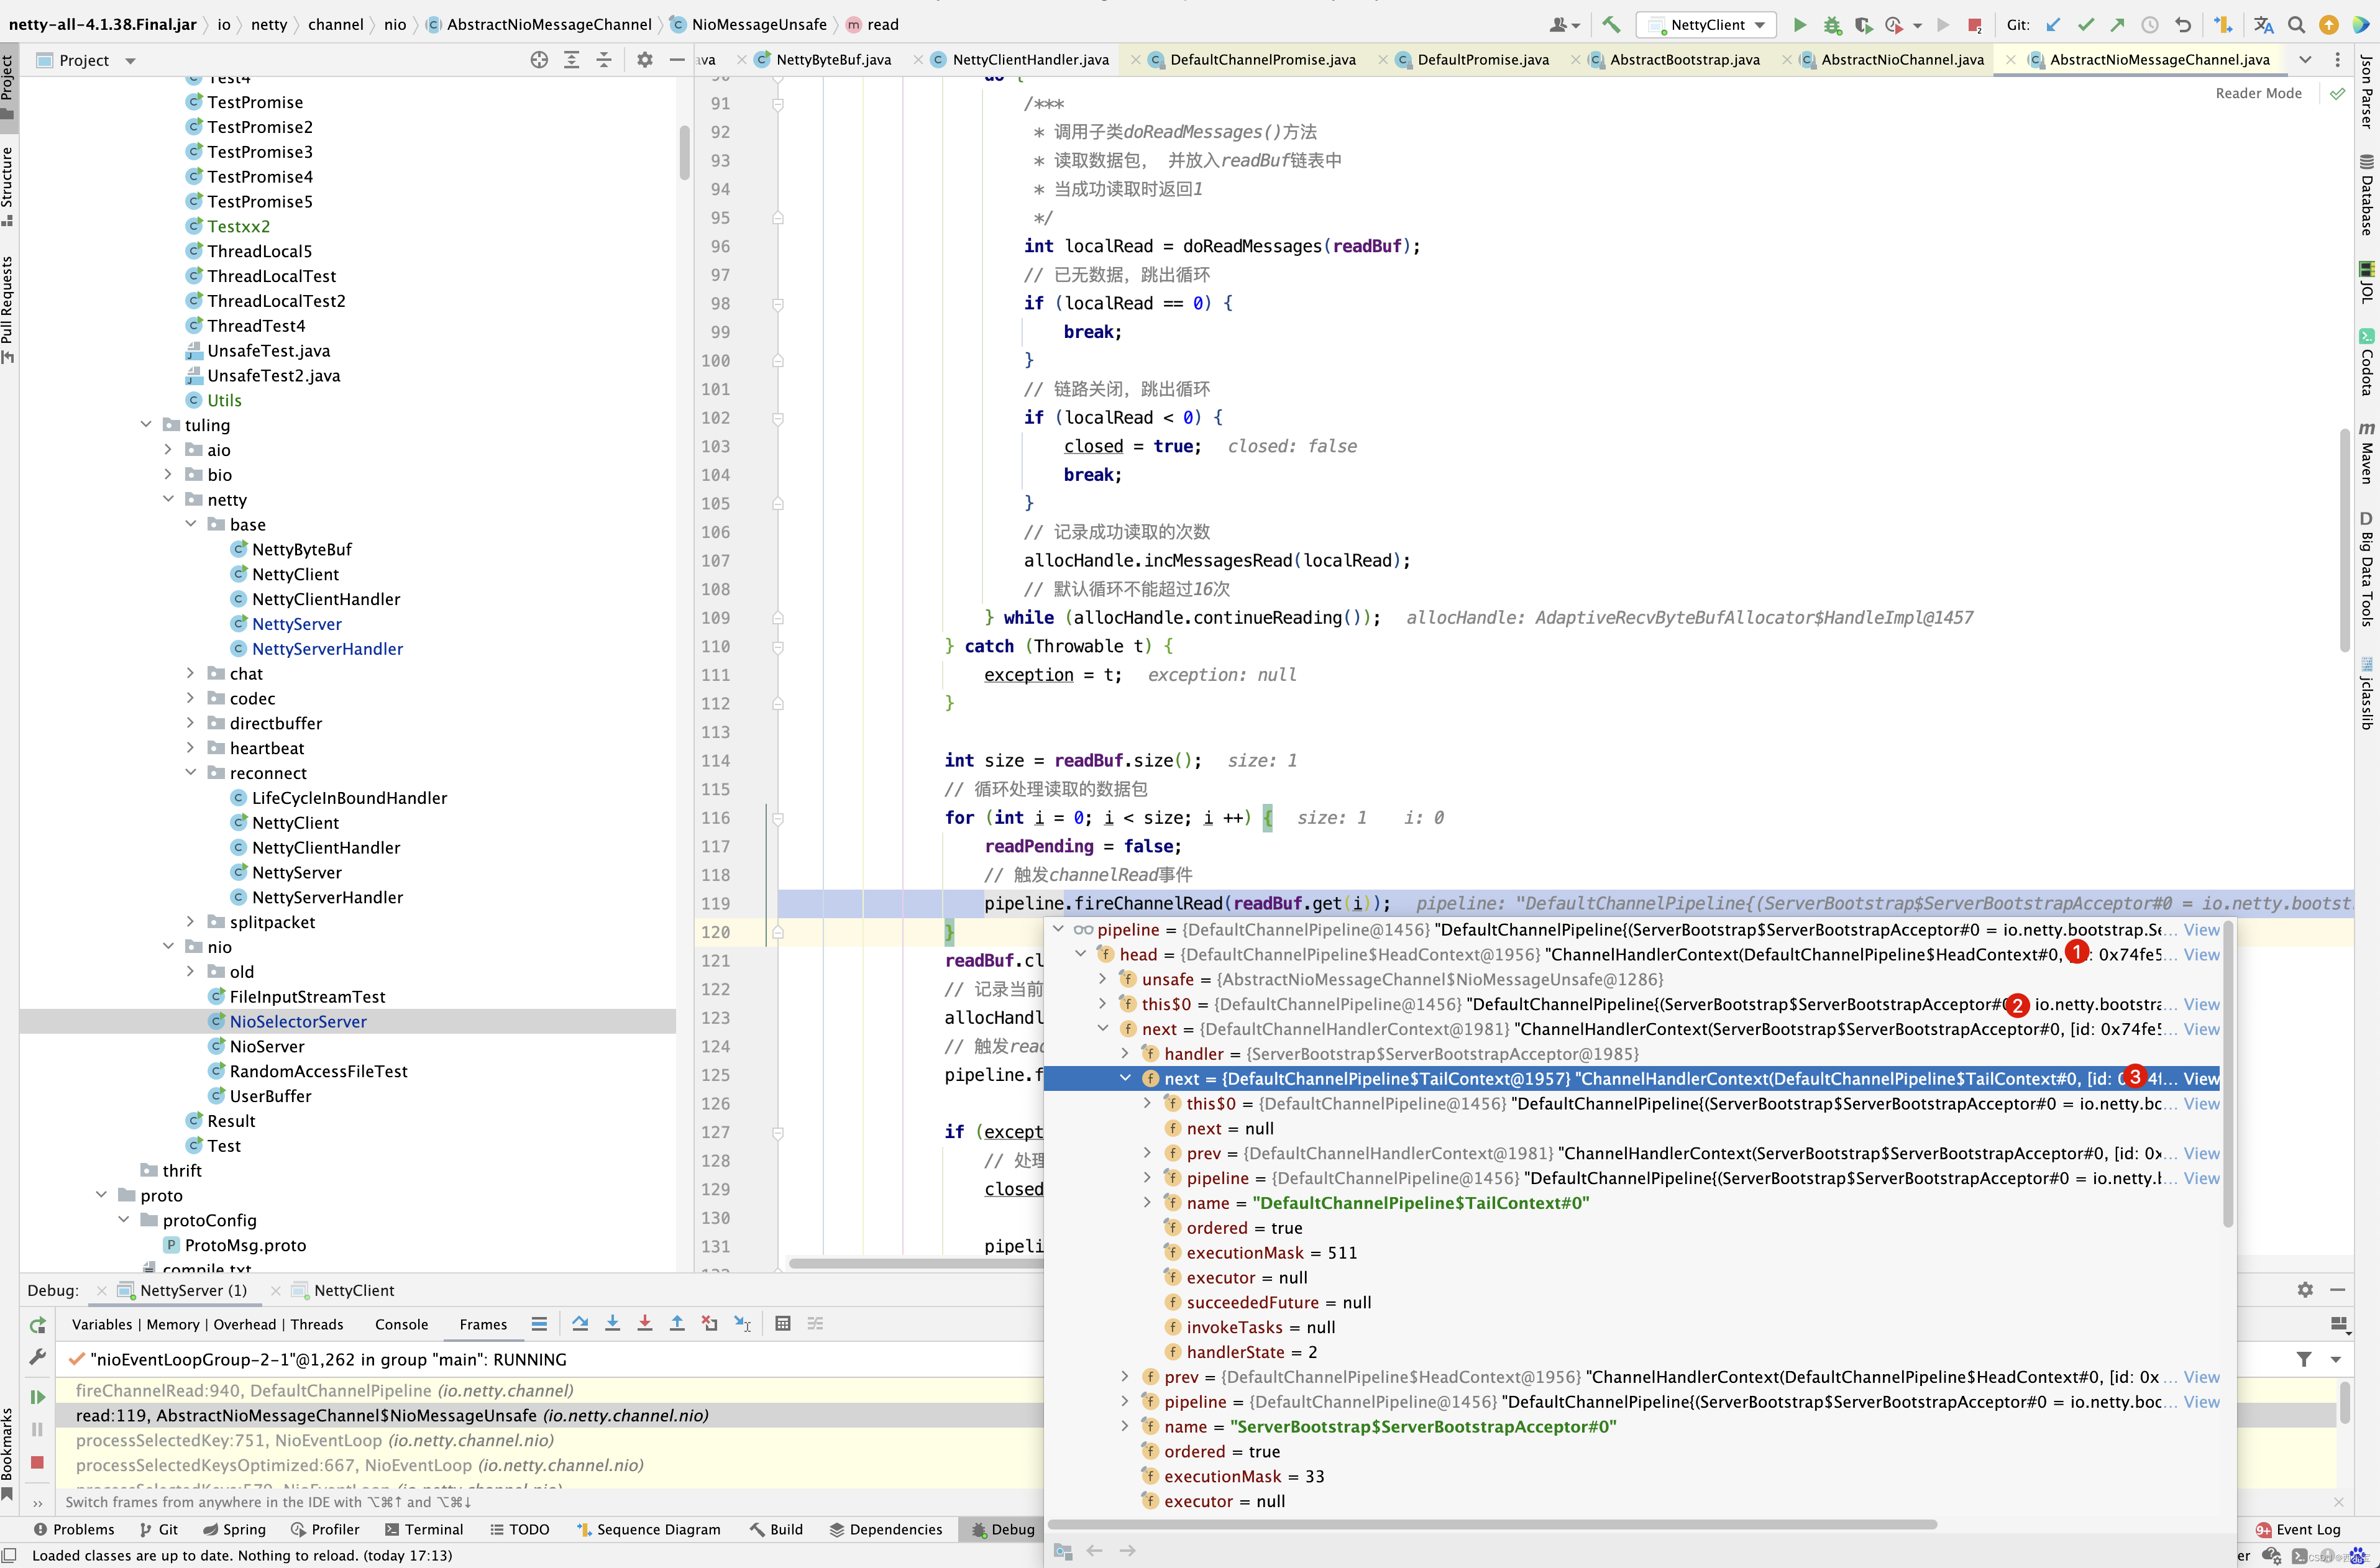
private final class NioMessageUnsafe extends AbstractNioUnsafe {private final List<Object> readBuf = new ArrayList<Object>();@Override// 在 NioMessageUnsafe 的 read() 方 法 中 会 执 行 doReadMessages(此处用到了模板设计模式)。真正调用的是 AbstractNioMessageChannel// 的 子 类 NioServerSocketChannel 的 doReadMessages() 方 法 。 此 方 法 最 终 调 用 ServerSocketChannel 的 accept()方法,// 以获取接入的SocketChannel。将accept()方法在 AbstractNioChannel的构造方法中设置为非阻塞状态,不管是否有 Channel接入,// 都会立刻返回,并且一次最多默认获取16个,可以通过 设 置 option 参 数 MAX_MESSAGES_PER_READ 来 调 整 。 获 取 到 SocketChannel 后 ,// 构 建 NioSocketChannel , 并 把 构 建 好 的 NioSocketChannel对象作为消息msg传送给Handler(此Handler是 ServerBootstrapAcceptor ) ,// 触 发 Pipeline 管 道 的 fireChannelRead()方法,进而触发read事件,最后会调用Handler的 channelRead()方法。public void read() {assert eventLoop().inEventLoop();// 获取Channel的配置对象final ChannelConfig config = config();final ChannelPipeline pipeline = pipeline();// 获取计算内存分配 Handlefinal RecvByteBufAllocator.Handle allocHandle = unsafe().recvBufAllocHandle();// 清空上次记录allocHandle.reset(config);boolean closed = false;Throwable exception = null;try {try {do {/ 调用子类doReadMessages()方法* 读取数据包, 并放入readBuf链表中* 当成功读取时返回1*/int localRead = doReadMessages(readBuf);// 已无数据,跳出循环if (localRead == 0) {break;}// 链路关闭,跳出循环if (localRead < 0) {closed = true;break;}// 记录成功读取的次数allocHandle.incMessagesRead(localRead);// 默认循环不能超过16次} while (allocHandle.continueReading());} catch (Throwable t) {exception = t;}int size = readBuf.size();// 循环处理读取的数据包for (int i = 0; i < size; i ++) {readPending = false;// 触发channelRead事件pipeline.fireChannelRead(readBuf.get(i));}readBuf.clear();// 记录当前读取记录,以便下次分配合理的内存allocHandle.readComplete();// 触发readComplete事件pipeline.fireChannelReadComplete();if (exception != null) {// 处理Channel 异常关闭closed = closeOnReadError(exception);pipeline.fireExceptionCaught(exception);}if (closed) {inputShutdown = true;// 处理Channel正常关闭if (isOpen()) {close(voidPromise());}}} finally {// Check if there is a readPending which was not processed yet.// This could be for two reasons:// * The user called Channel.read() or ChannelHandlerContext.read() in channelRead(...) method// * The user called Channel.read() or ChannelHandlerContext.read() in channelReadComplete(...) method//// See https://github.com/netty/netty/issues/2254// 读操作完毕,且没有配置自动读if (!readPending && !config.isAutoRead()) {// 移除读操作事件removeReadOp();}}}
}
因为
final AbstractNioChannel.NioUnsafe unsafe = ch.unsafe();
unsafe.read();
,所以在read()方法的内部调用
int localRead = doReadMessages(readBuf);
方法,实际上还是调用NioServerSocketChannel的doReadMessages()方法 。
// NioMessageUnsafe先调 用 NioServerSocketChannel 的 doReadMessages() 方 法 读 取 接 入 的 Channel。
// 而本小节中的NioByteUnsafe不断地调用NioSocketChannel 的doReadBytes()方法从Channel中读取数据,
// 再把读取到的ByteBuf交 给管道Pipeline,并触发后续一系列ChannelInboundHandler的 channelRead()方法。
// 整个读取数据的过程涉及的Handler都是以 HeadContext开头的,按顺序运行用户自定义的各个解码器和服务端业 务逻辑处理Handler。
protected int doReadMessages(List<Object> buf) throws Exception {// 调用serverSocketChannel.accept()监听新加入的链接// 因此可以接收连接了,在服务器接收到连接之后,创建连接的过程就是创建SocketChannel SocketChannel ch = SocketUtils.accept(javaChannel());try {if (ch != null) {// 每个新链接都会构建一个NioSocketChannel buf.add(new NioSocketChannel(this, ch));return 1;}} catch (Throwable t) {logger.warn("Failed to create a new channel from an accepted socket.", t);try {// 若连接出现异常, 则关闭 ch.close();} catch (Throwable t2) {logger.warn("Failed to close a socket.", t2);}}return 0;
}
是不是看到了我们久违的方法 accept(),那这个方法的内部做了哪些事情呢?
public static SocketChannel accept(final ServerSocketChannel serverSocketChannel) throws IOException {try {return AccessController.doPrivileged(new PrivilegedExceptionAction<SocketChannel>() {@Overridepublic SocketChannel run() throws IOException {return serverSocketChannel.accept();}});} catch (PrivilegedActionException e) {throw (IOException) e.getCause();}
}
是不是又找到了似曾相识的感觉。
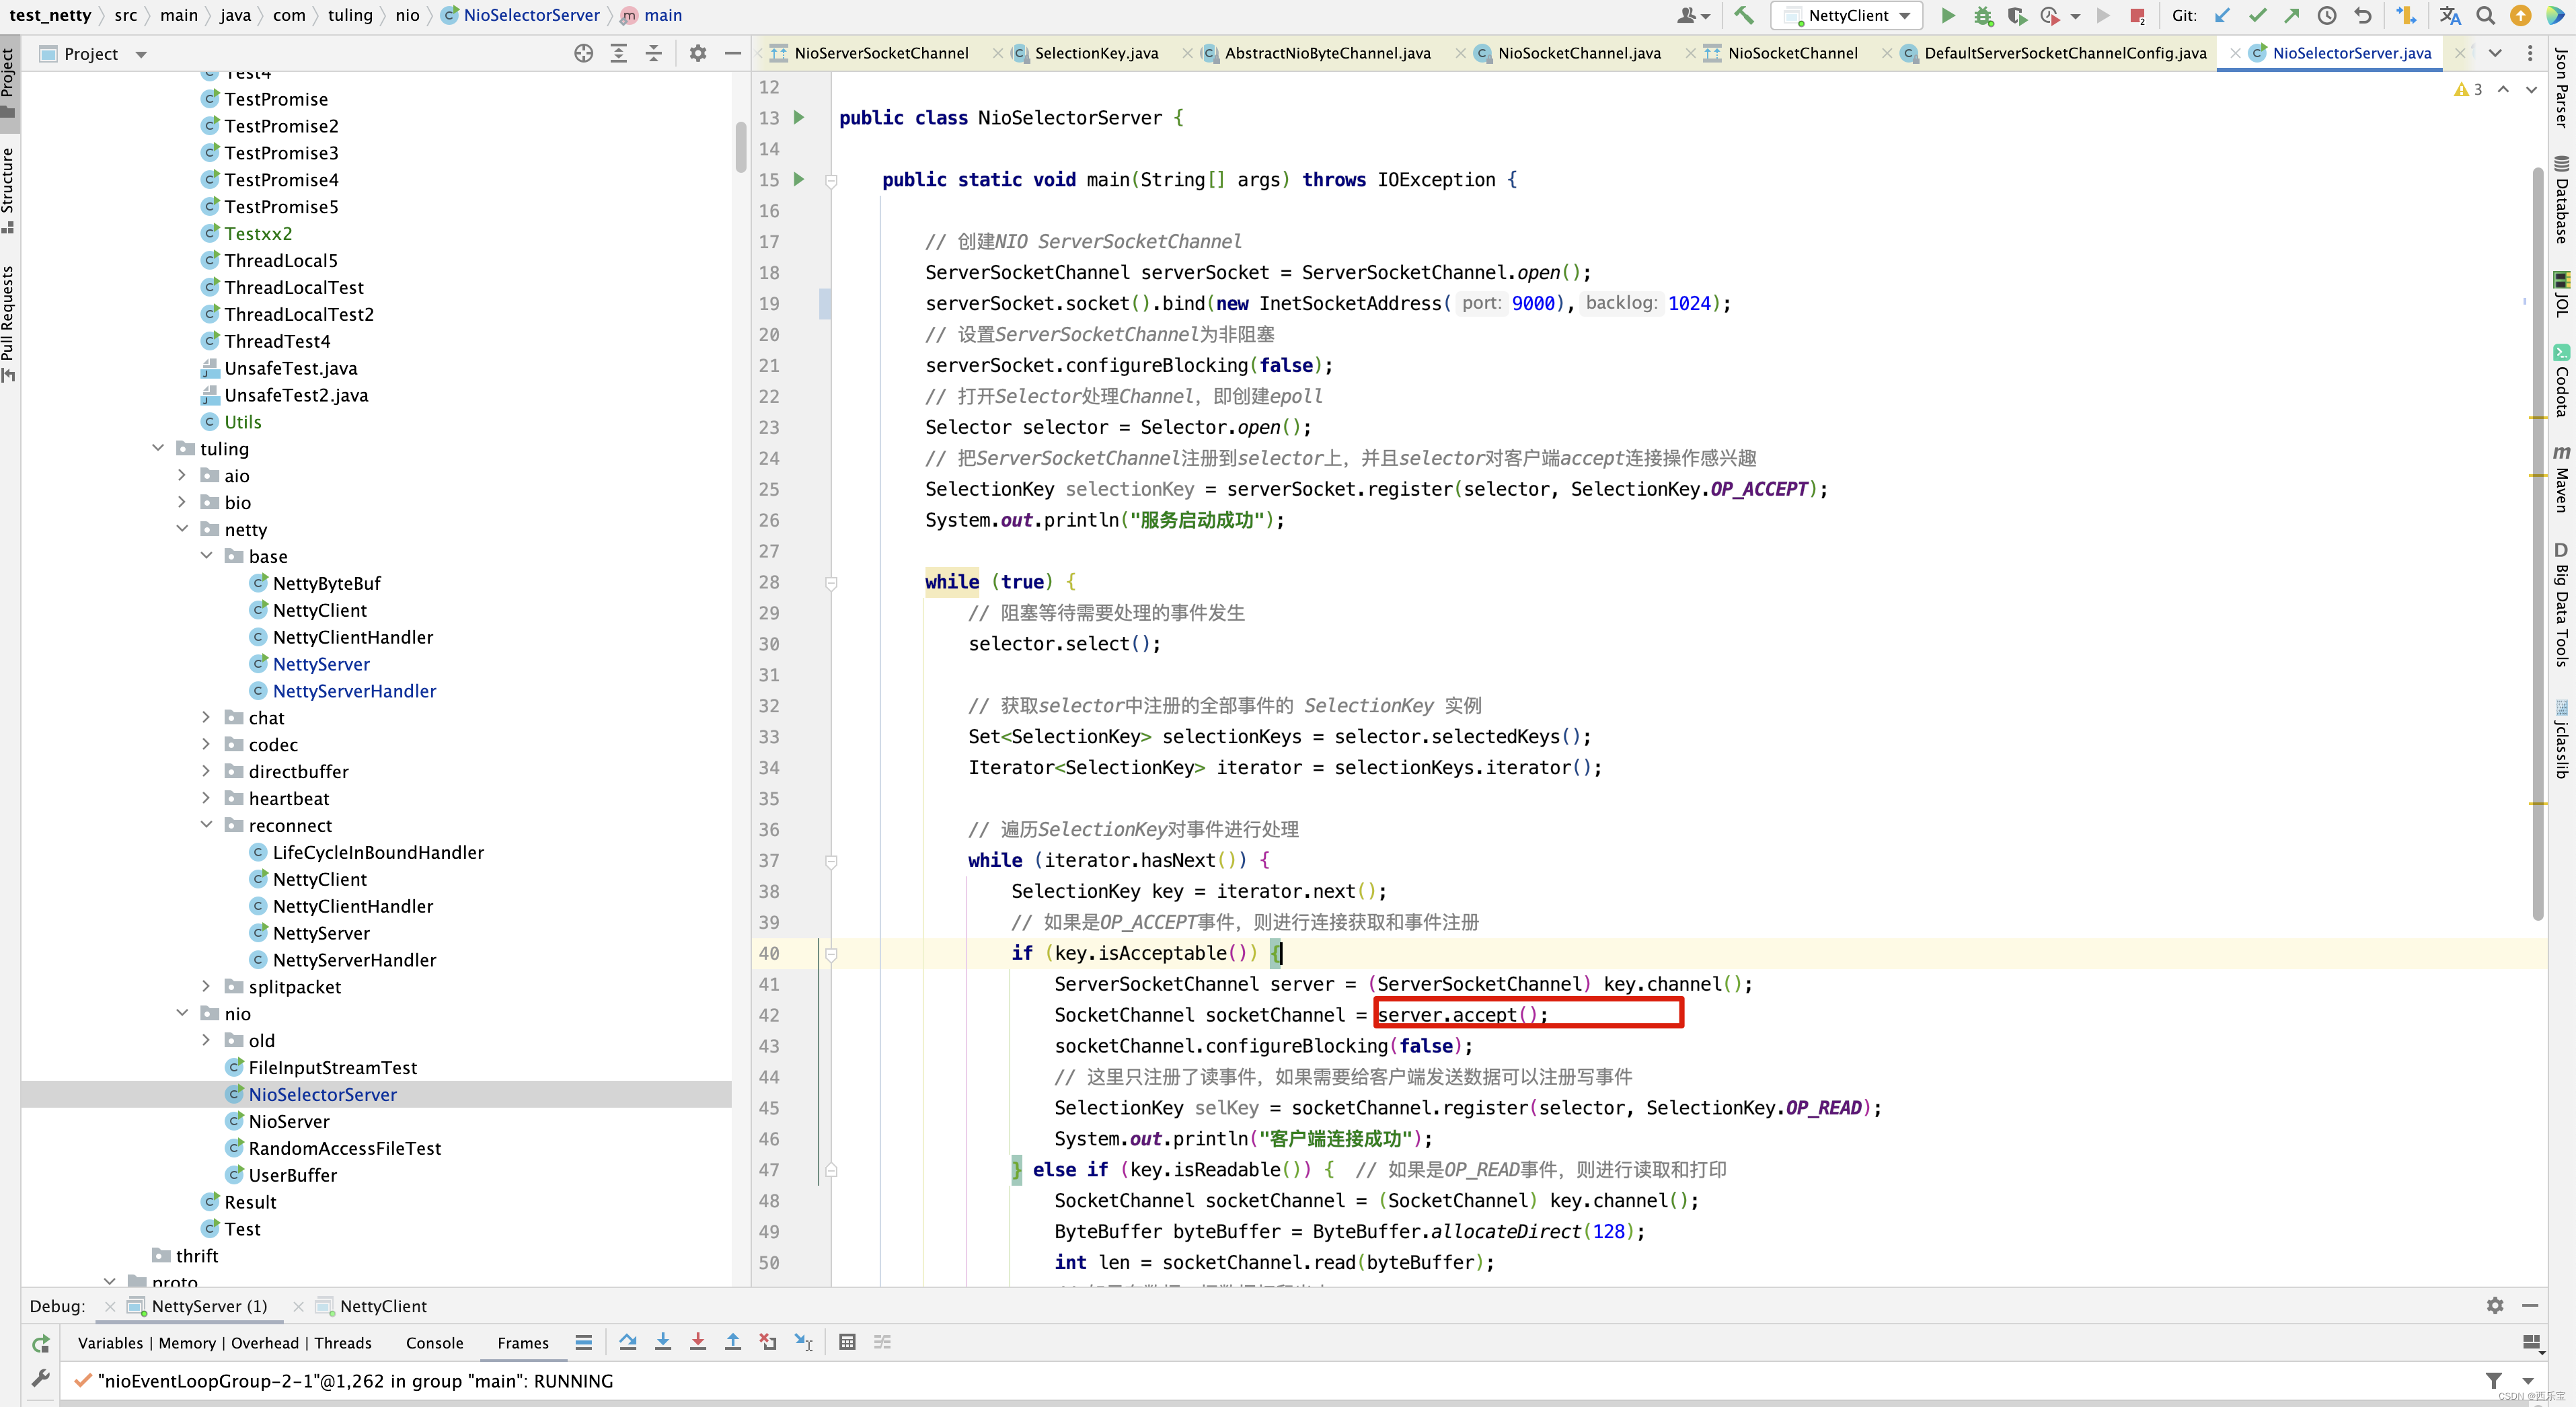
不就是ServerSocketChannel调用accept()方法不?那么接下来的代码就围绕着这两行分析 。

回顾之前的NioServerSocketChannel,我们是通过反射创建的,这里的NioSocketChannel是直接new创建。 而NioSocketChannel的内部做了哪些事情呢? 其实和NioServerSocketChannel类似,但有些参数的初始化还是需要注意,因此这里还是进入分析一下。
public NioSocketChannel(Channel parent, SocketChannel socket) {super(parent, socket);config = new NioSocketChannelConfig(this, socket.socket());
}
这里需要注意了,之前在NioServerSocketChannel
构造函数中,创建的config对象是NioServerSocketChannelConfig,而NioSocketChannel的构造函数中config对象是NioSocketChannelConfig,当然NioServerSocketChannel还指定了事件类型为SelectionKey.OP_ACCEPT,在NioServerSocketChannel的构造函数中,还没有看到指定,当然啦,NioSocketChannel指定了它的parent属性为NioServerSocketChannel, 跟进到NioServerSocketChannel的父类 。
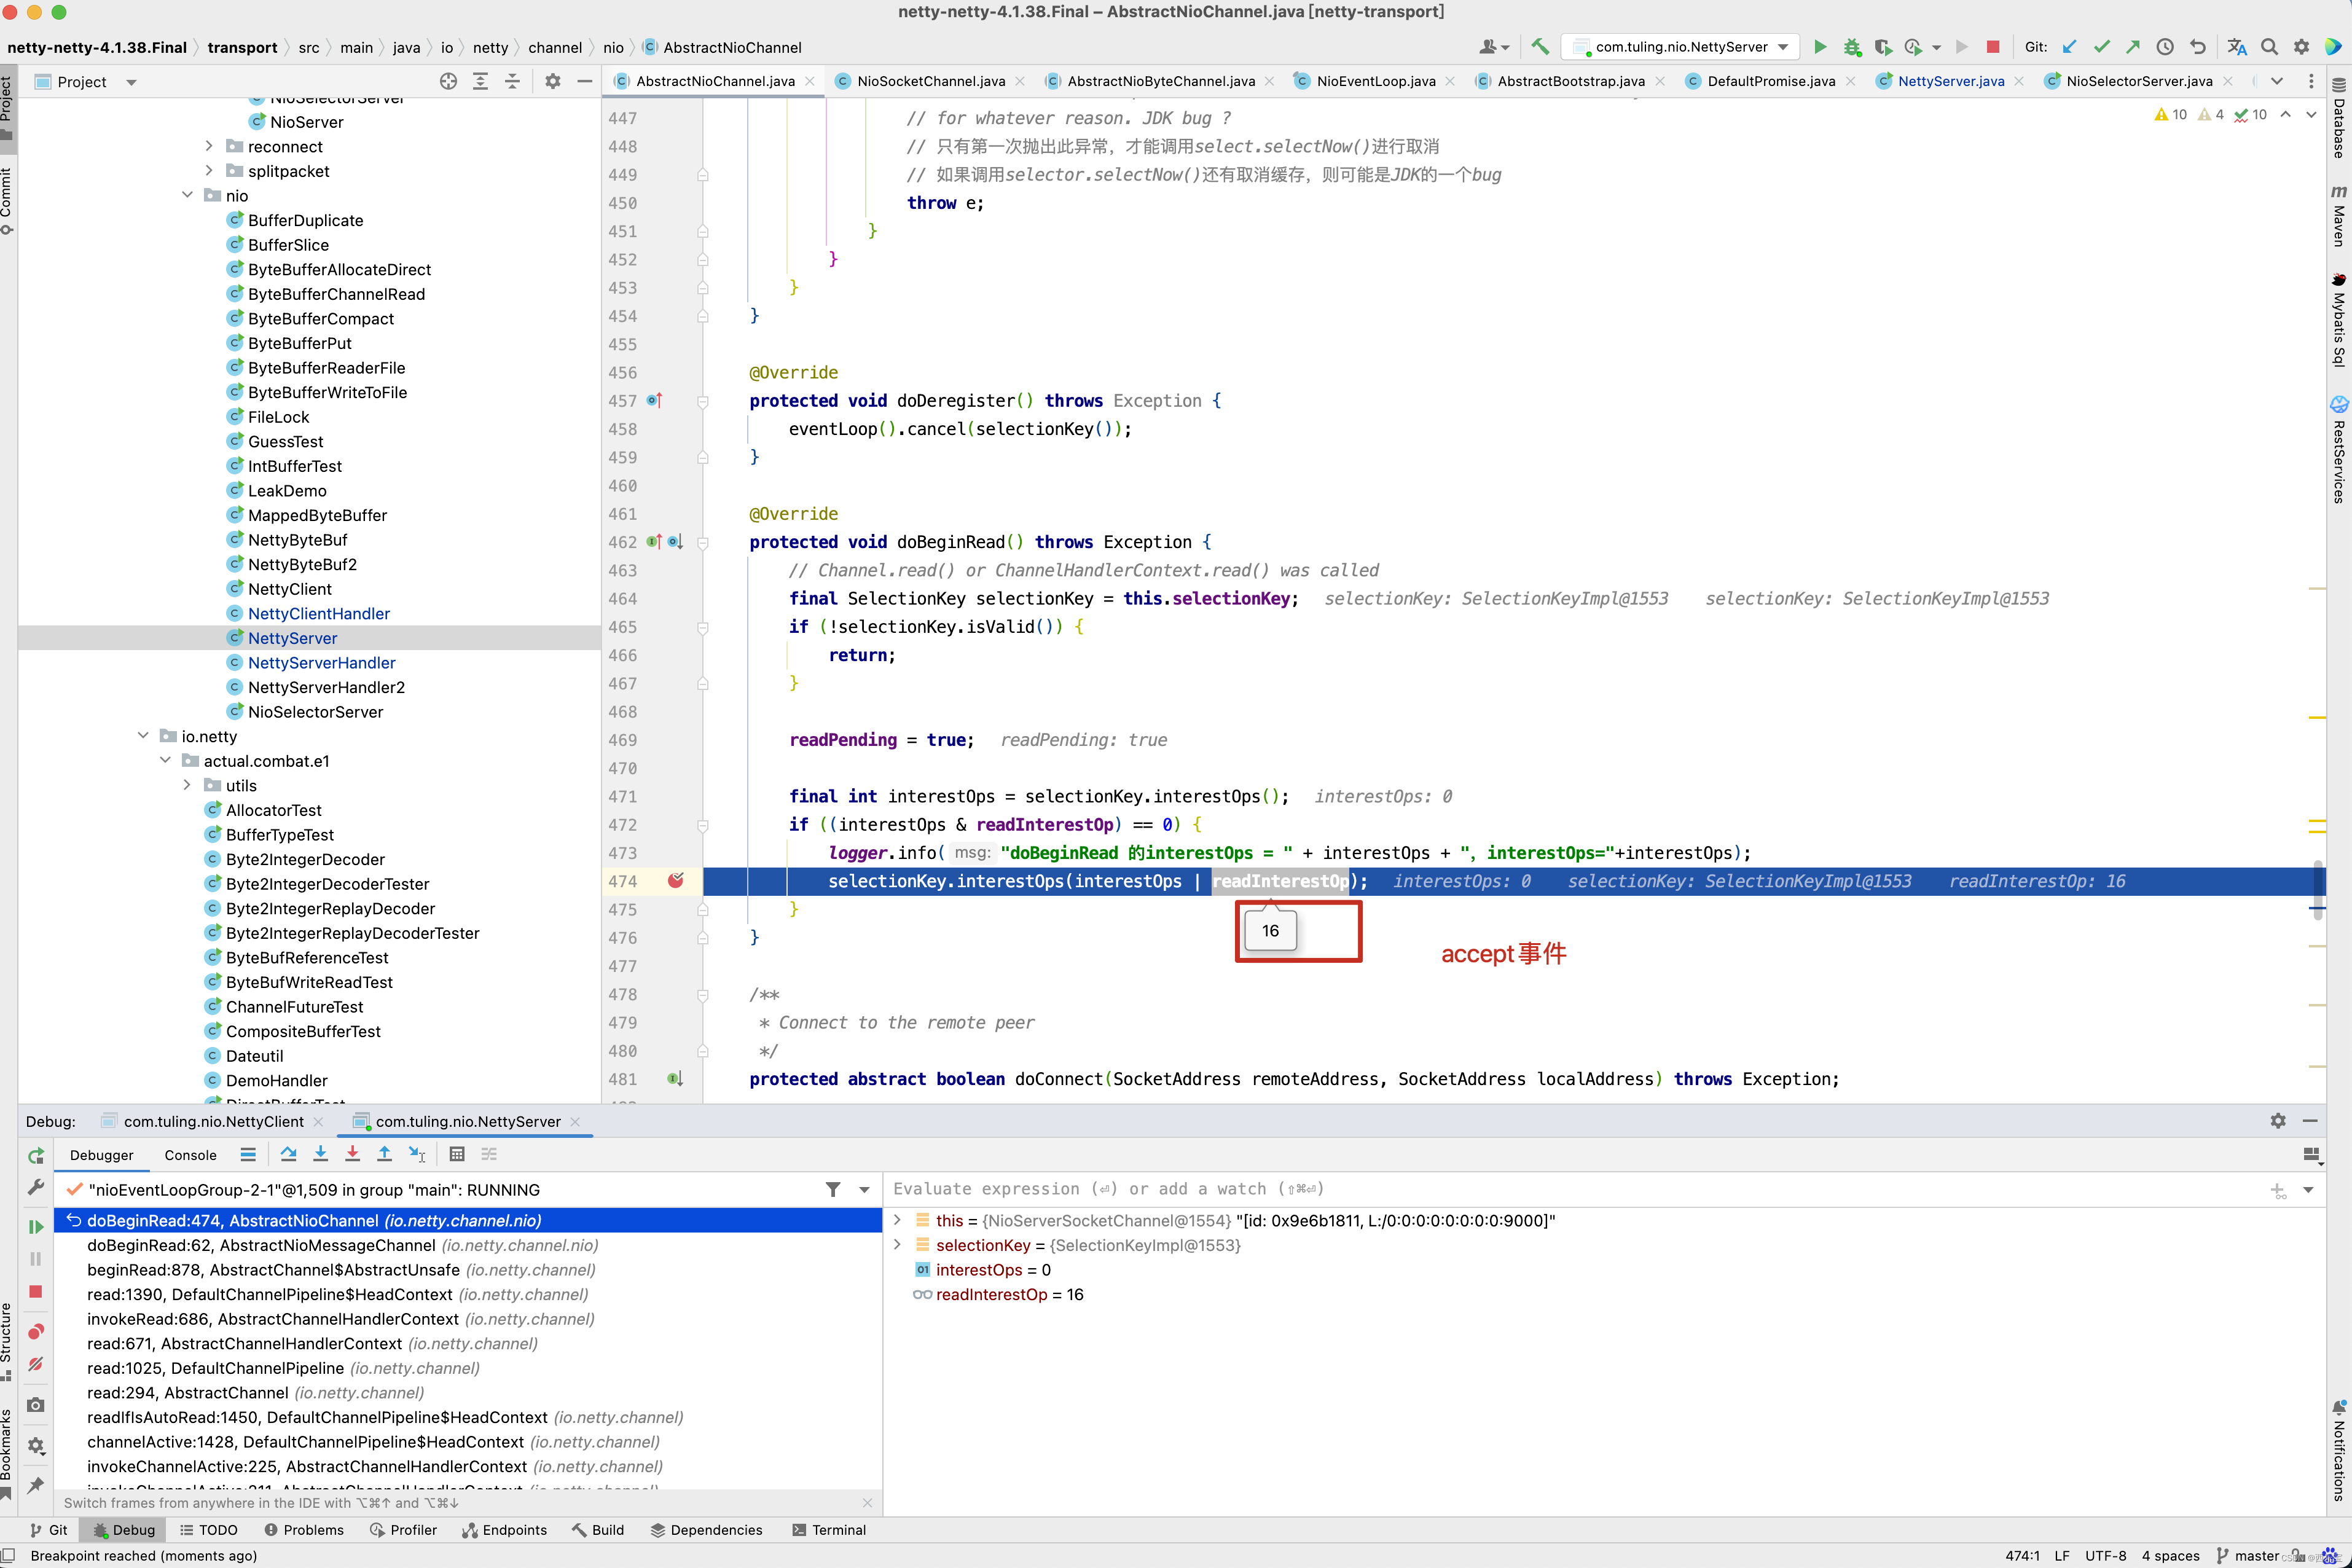
protected AbstractNioByteChannel(Channel parent, SelectableChannel ch) {super(parent, ch, SelectionKey.OP_READ);
}
看到没有,这里指定了NioSocketChannel的事件类型为SelectionKey.OP_READ,这点很重要,后面的注册方法分析到。
protected AbstractNioChannel(Channel parent, SelectableChannel ch, int readInterestOp) {super(parent);this.ch = ch;this.readInterestOp = readInterestOp;try {ch.configureBlocking(false);} catch (IOException e) {try {ch.close();} catch (IOException e2) {if (logger.isWarnEnabled()) {logger.warn("Failed to close a partially initialized socket.", e2);}}throw new ChannelException("Failed to enter non-blocking mode.", e);}
}
在AbstractNioChannel中,是不是又看到我久违的代码,ch.configureBlocking(false);这一行代码已经看到过两次了吧。对应于例子中的下面两行代码 。

第一次见到是NioServerSocketChannel的初始化,第二次见到就是现在,NioSocketChannel的初始化 。接下来继续进入AbstractNioChannel的父类AbstractChannel的构造函数中。
protected AbstractChannel(Channel parent) {this.parent = parent;                           // 父通道id = newId();unsafe = newUnsafe();     // 底层的NIO通道,完成的实际的IO操作pipeline = newChannelPipeline();   // 一条通道,拥有一条流水线
}
在之前的分析中,已经知道了unsafe的重要性,因此这里继续分析newUnsafe()方法 ,因为NioSocketChannel本身就实现了newUnsafe()方法,因此进入其中 。
protected AbstractNioUnsafe newUnsafe() {return new NioSocketChannelUnsafe();
}
这里我们终于明白了, NioServerSocketChannel创建的是NioMessageUnsafe,而NioSocketChannel创建的是NioSocketChannelUnsafe,将所有的NioSocketChannel存储于readBuf中,然后遍历readBuf中的元素,调用NioServerSocketChannel的pipeline的fireChannelRead()方法,这里需要注意,是NioServerSocketChannel的pipeline,而不是NioSocketChannel创建的pipeline。
传入的参数就是刚刚创建的NioSocketChannel。

进入pipeline的fireChannelRead()方法 。
public final ChannelPipeline fireChannelRead(Object msg) {AbstractChannelHandlerContext.invokeChannelRead(head, msg);return this;
}static void invokeChannelRead(final AbstractChannelHandlerContext next, Object msg) {final Object m = next.pipeline.touch(ObjectUtil.checkNotNull(msg, "msg"), next);EventExecutor executor = next.executor();if (executor.inEventLoop()) {next.invokeChannelRead(m);} else {executor.execute(new Runnable() {@Overridepublic void run() {next.invokeChannelRead(m);}});}
}private void invokeChannelRead(Object msg) {if (invokeHandler()) {try {((ChannelInboundHandler) handler()).channelRead(this, msg);} catch (Throwable t) {notifyHandlerException(t);}} else {fireChannelRead(msg);}
}
上面调了那么多,最终还是从HeadContext的handler()开始调用 。
public void channelRead(ChannelHandlerContext ctx, Object msg) {ctx.fireChannelRead(msg);
}public ChannelHandlerContext fireChannelRead(final Object msg) {invokeChannelRead(findContextInbound(MASK_CHANNEL_READ), msg);return this;
}private void invokeChannelRead(Object msg) {if (invokeHandler()) {try {((ChannelInboundHandler) handler()).channelRead(this, msg);} catch (Throwable t) {notifyHandlerException(t);}} else {fireChannelRead(msg);}
}
之前分析过findContextInbound()方法。 从之前的分析得知,他会先跳过自己,也就是HeadContext。
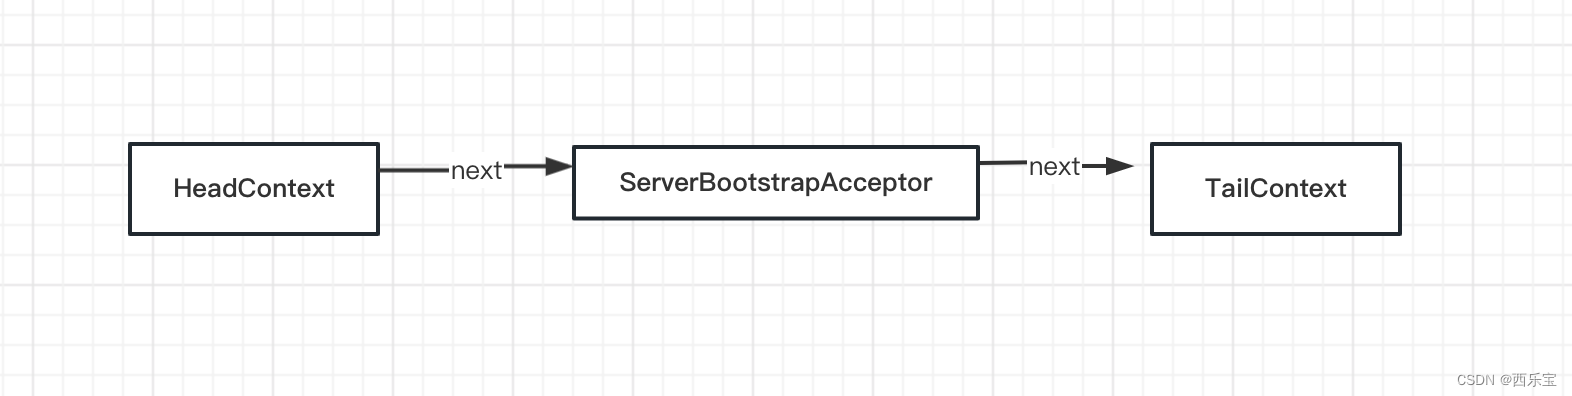
而ServerBootstrapAcceptor 本身就实现了channelRead()方法 。
private static class ServerBootstrapAcceptor extends ChannelInboundHandlerAdapter {private final EventLoopGroup childGroup;
private final ChannelHandler childHandler;
private final Entry<ChannelOption<?>, Object>[] childOptions;
private final Entry<AttributeKey<?>, Object>[] childAttrs;
private final Runnable enableAutoReadTask;ServerBootstrapAcceptor(final Channel channel, EventLoopGroup childGroup, ChannelHandler childHandler,Entry<ChannelOption<?>, Object>[] childOptions, Entry<AttributeKey<?>, Object>[] childAttrs) {this.childGroup = childGroup;this.childHandler = childHandler;this.childOptions = childOptions;this.childAttrs = childAttrs;// Task which is scheduled to re-enable auto-read.// It's important to create this Runnable before we try to submit it as otherwise the URLClassLoader may// not be able to load the class because of the file limit it already reached.//// See https://github.com/netty/netty/issues/1328enableAutoReadTask = new Runnable() {@Overridepublic void run() {channel.config().setAutoRead(true);}};
}@Override
@SuppressWarnings("unchecked")
// 在ServerBootstrapAcceptor的channelRead()方法中,把 NioSocketChannel注册到Worker线程上,同时绑定Channel的Handler 链。
// 这与5.1节中将NioServerSocketChannel注册到Boss线程上类似, 代码流程基本上都一样,只是实现的子类不一样,如后续添加的事件
// 由OP_ACCEPT换成了OP_READ。通过这一步的分析,读者可以思考, Netty为何要把Channel抽象化?
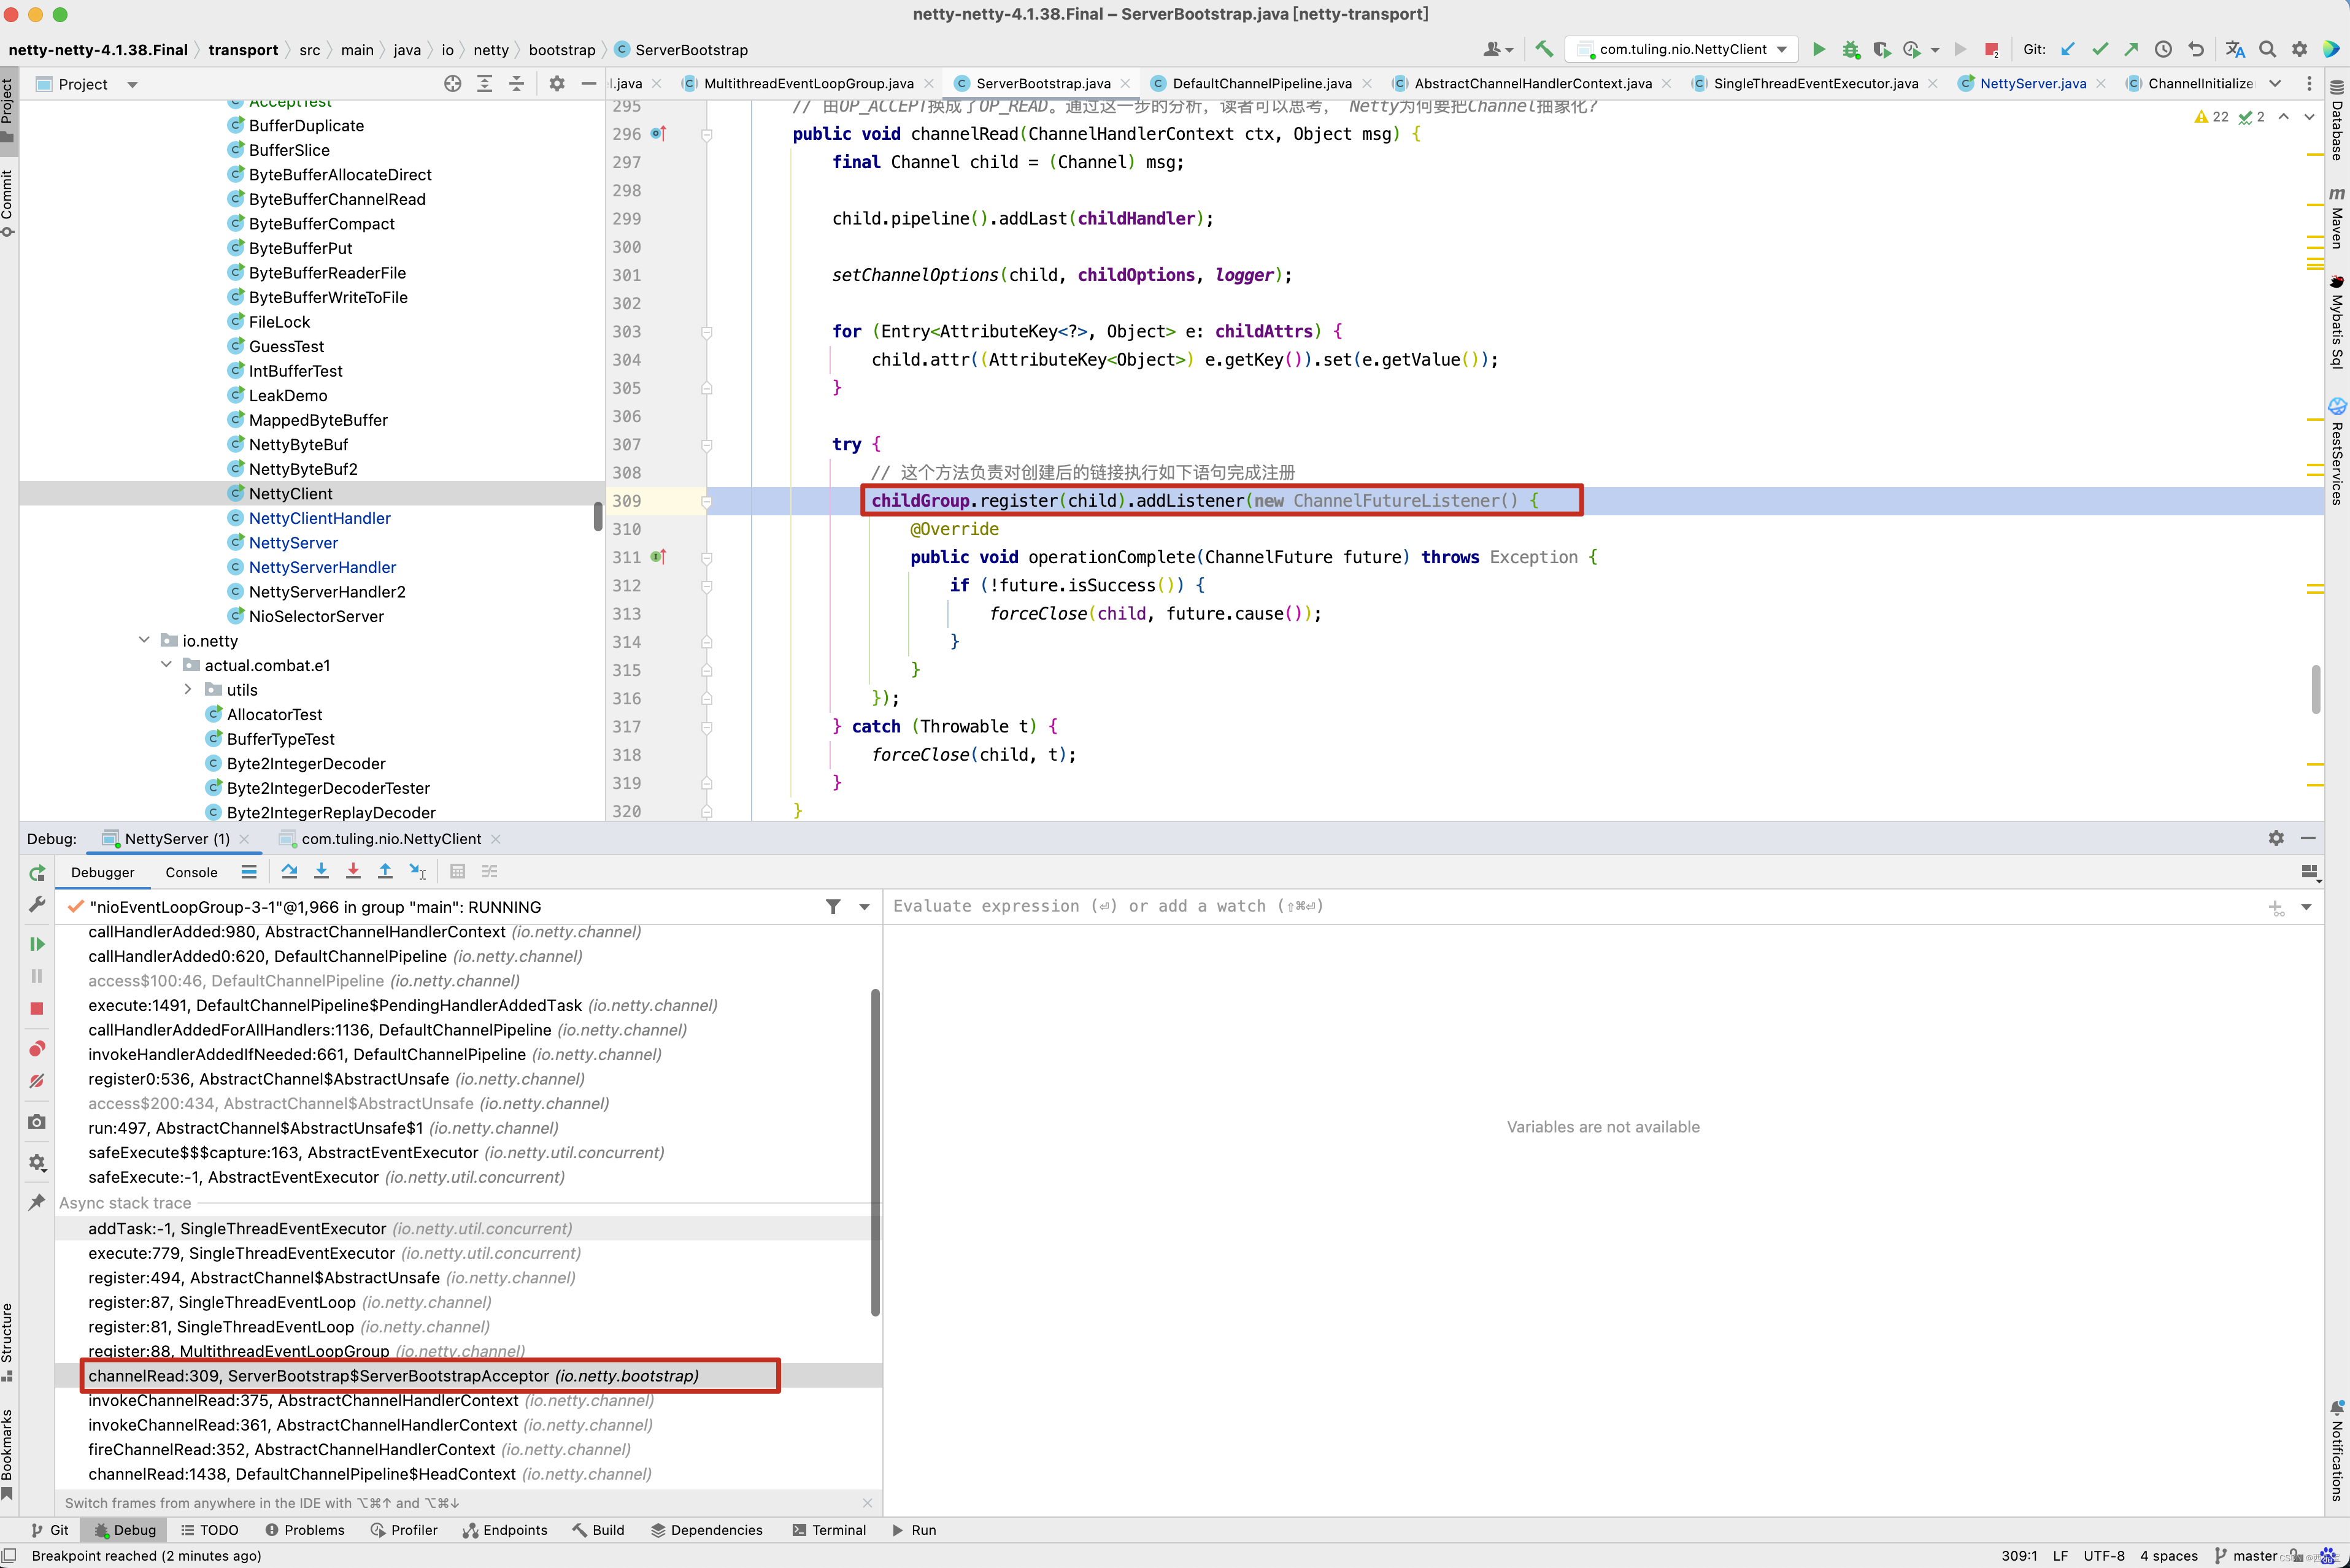
public void channelRead(ChannelHandlerContext ctx, Object msg) {final Channel child = (Channel) msg;child.pipeline().addLast(childHandler);setChannelOptions(child, childOptions, logger);for (Entry<AttributeKey<?>, Object> e: childAttrs) {child.attr((AttributeKey<Object>) e.getKey()).set(e.getValue());}try {// 这个方法负责对创建后的链接执行如下语句完成注册childGroup.register(child).addListener(new ChannelFutureListener() {@Overridepublic void operationComplete(ChannelFuture future) throws Exception {if (!future.isSuccess()) {forceClose(child, future.cause());}}});} catch (Throwable t) {forceClose(child, t);}
}
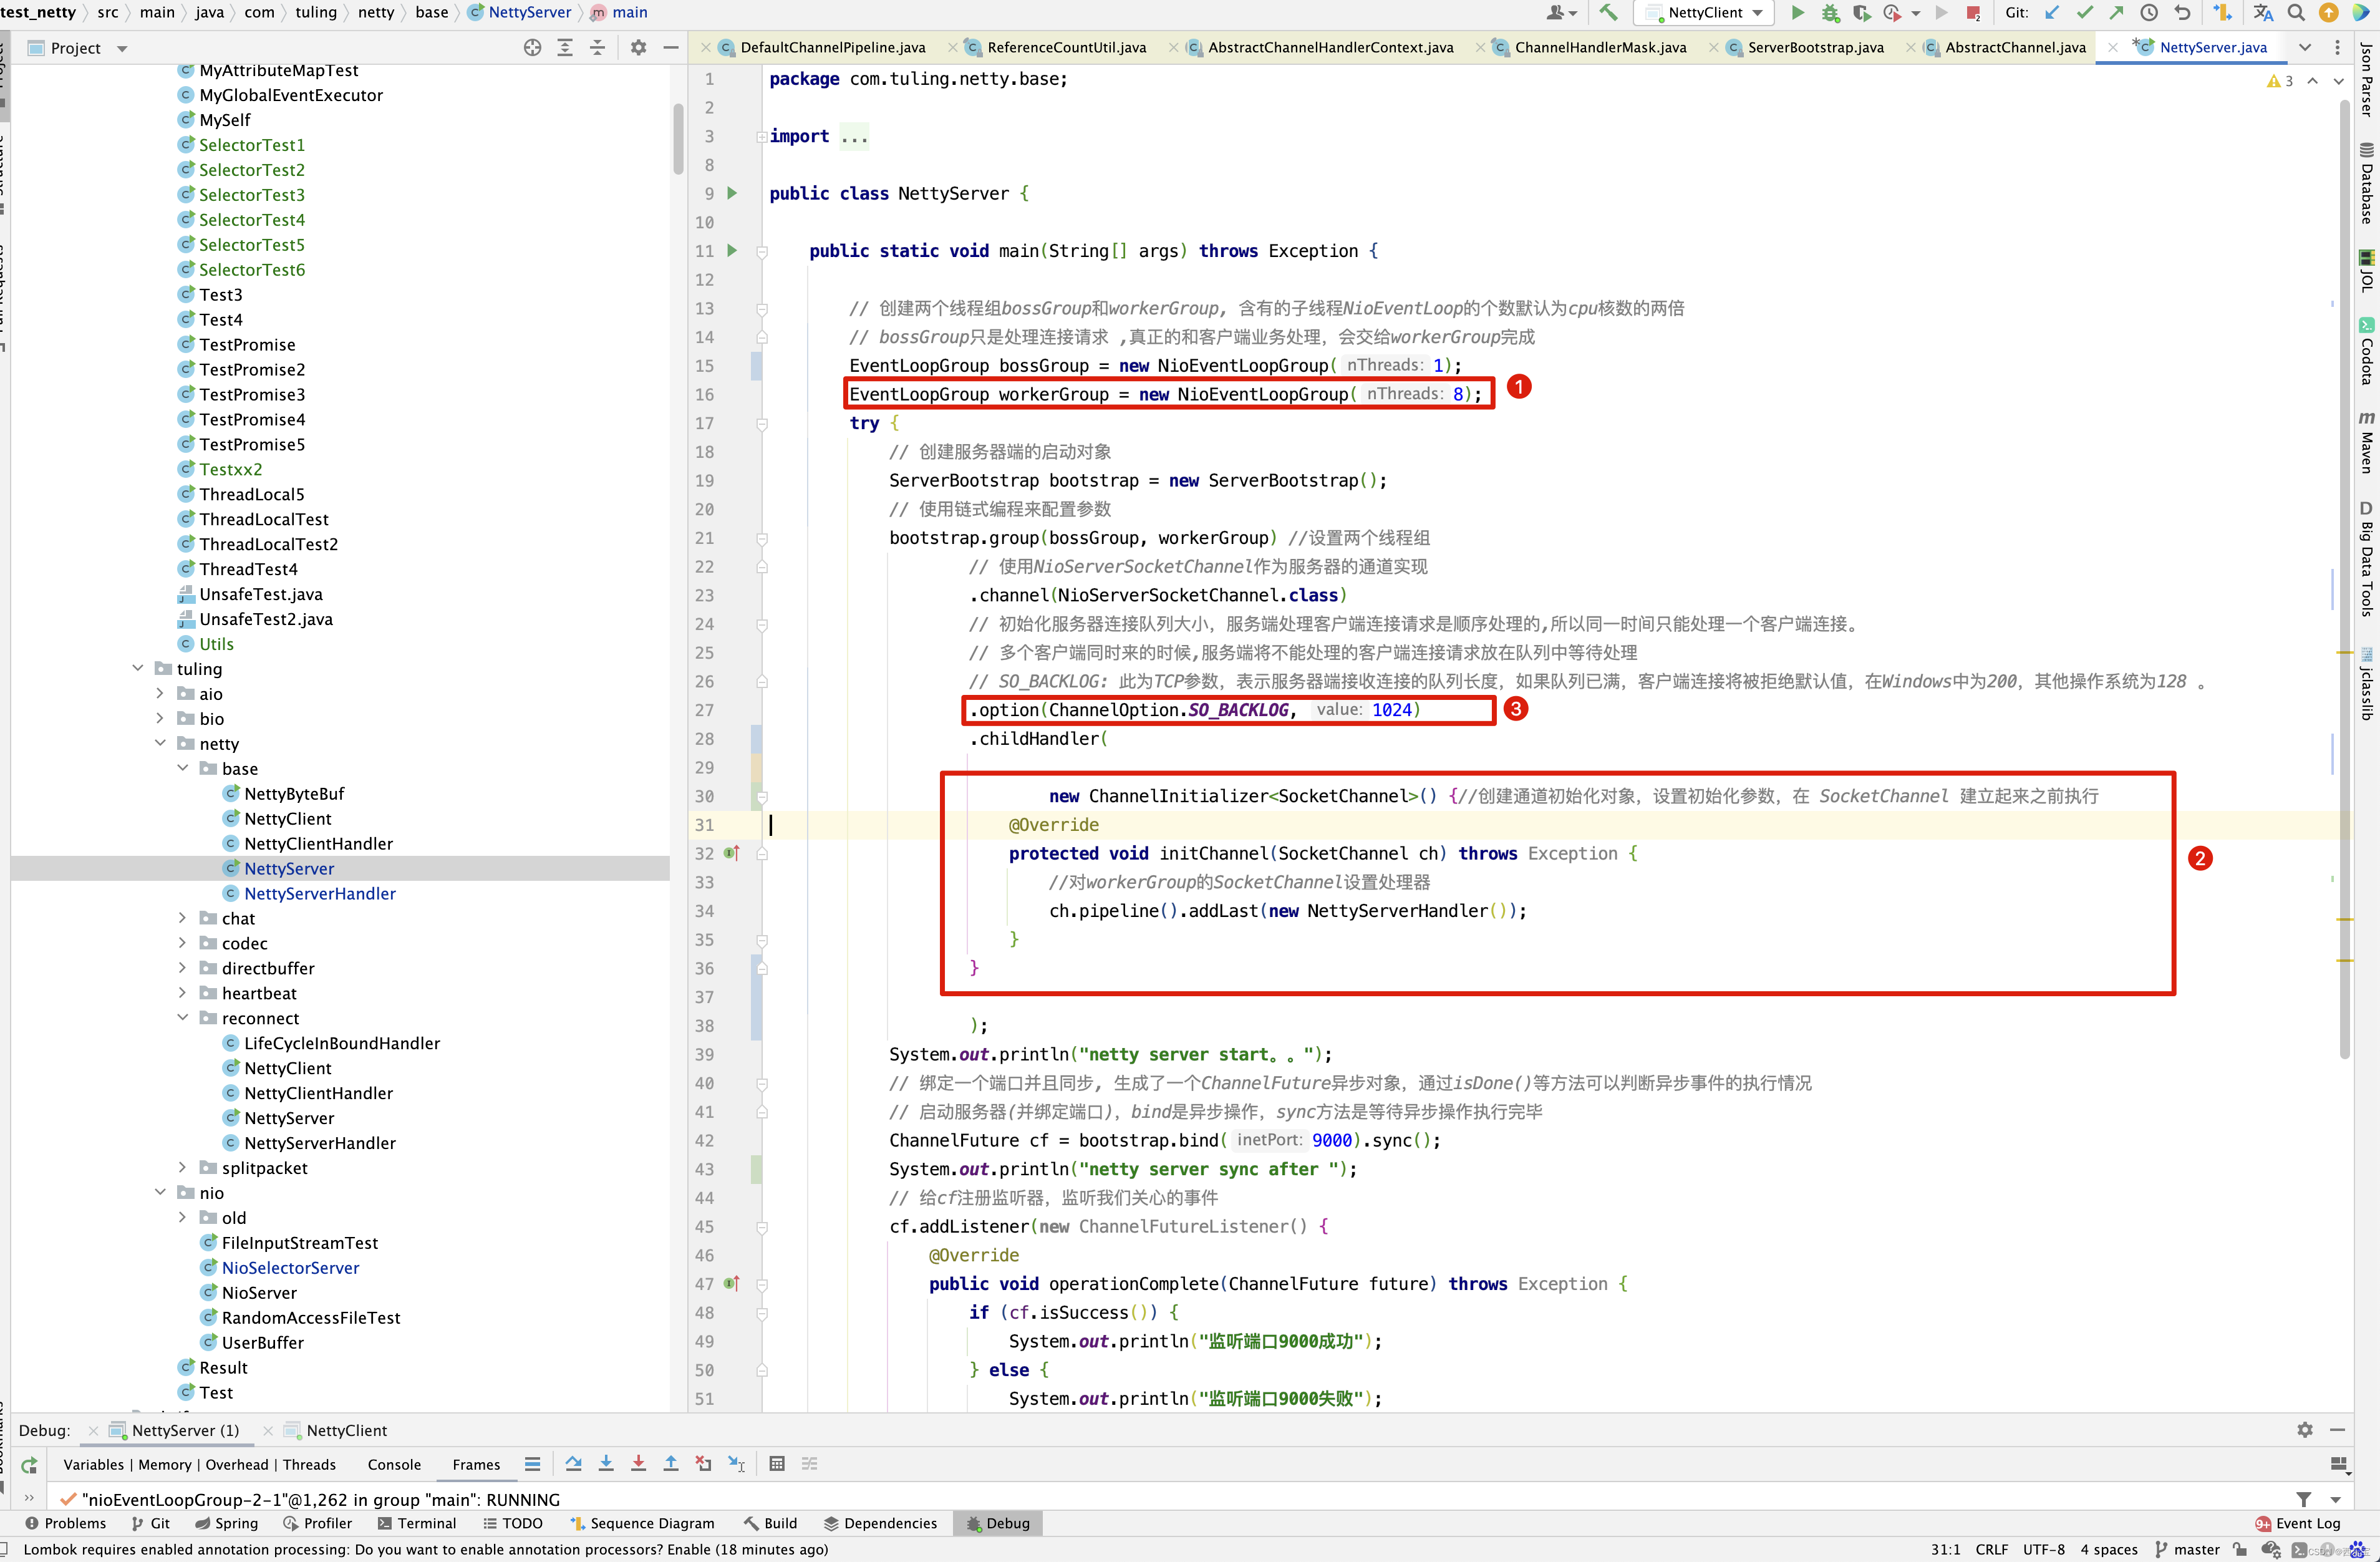
程序运行到这里,我相信大家都晕了, 这些参数是什么啊? 不要晕,回顾之前的代码。 找到ServerBootstrapAcceptor构造方法调用的地方。

这不就是我们之前调用ServerBootstrap的bind()时,init()方法中初始化的参数不? 而这些参数就是我们NettyServer 这个例子中的初始化的参数 。 当然上图中 4 标识的attrs,在本例中并没有设置值 。
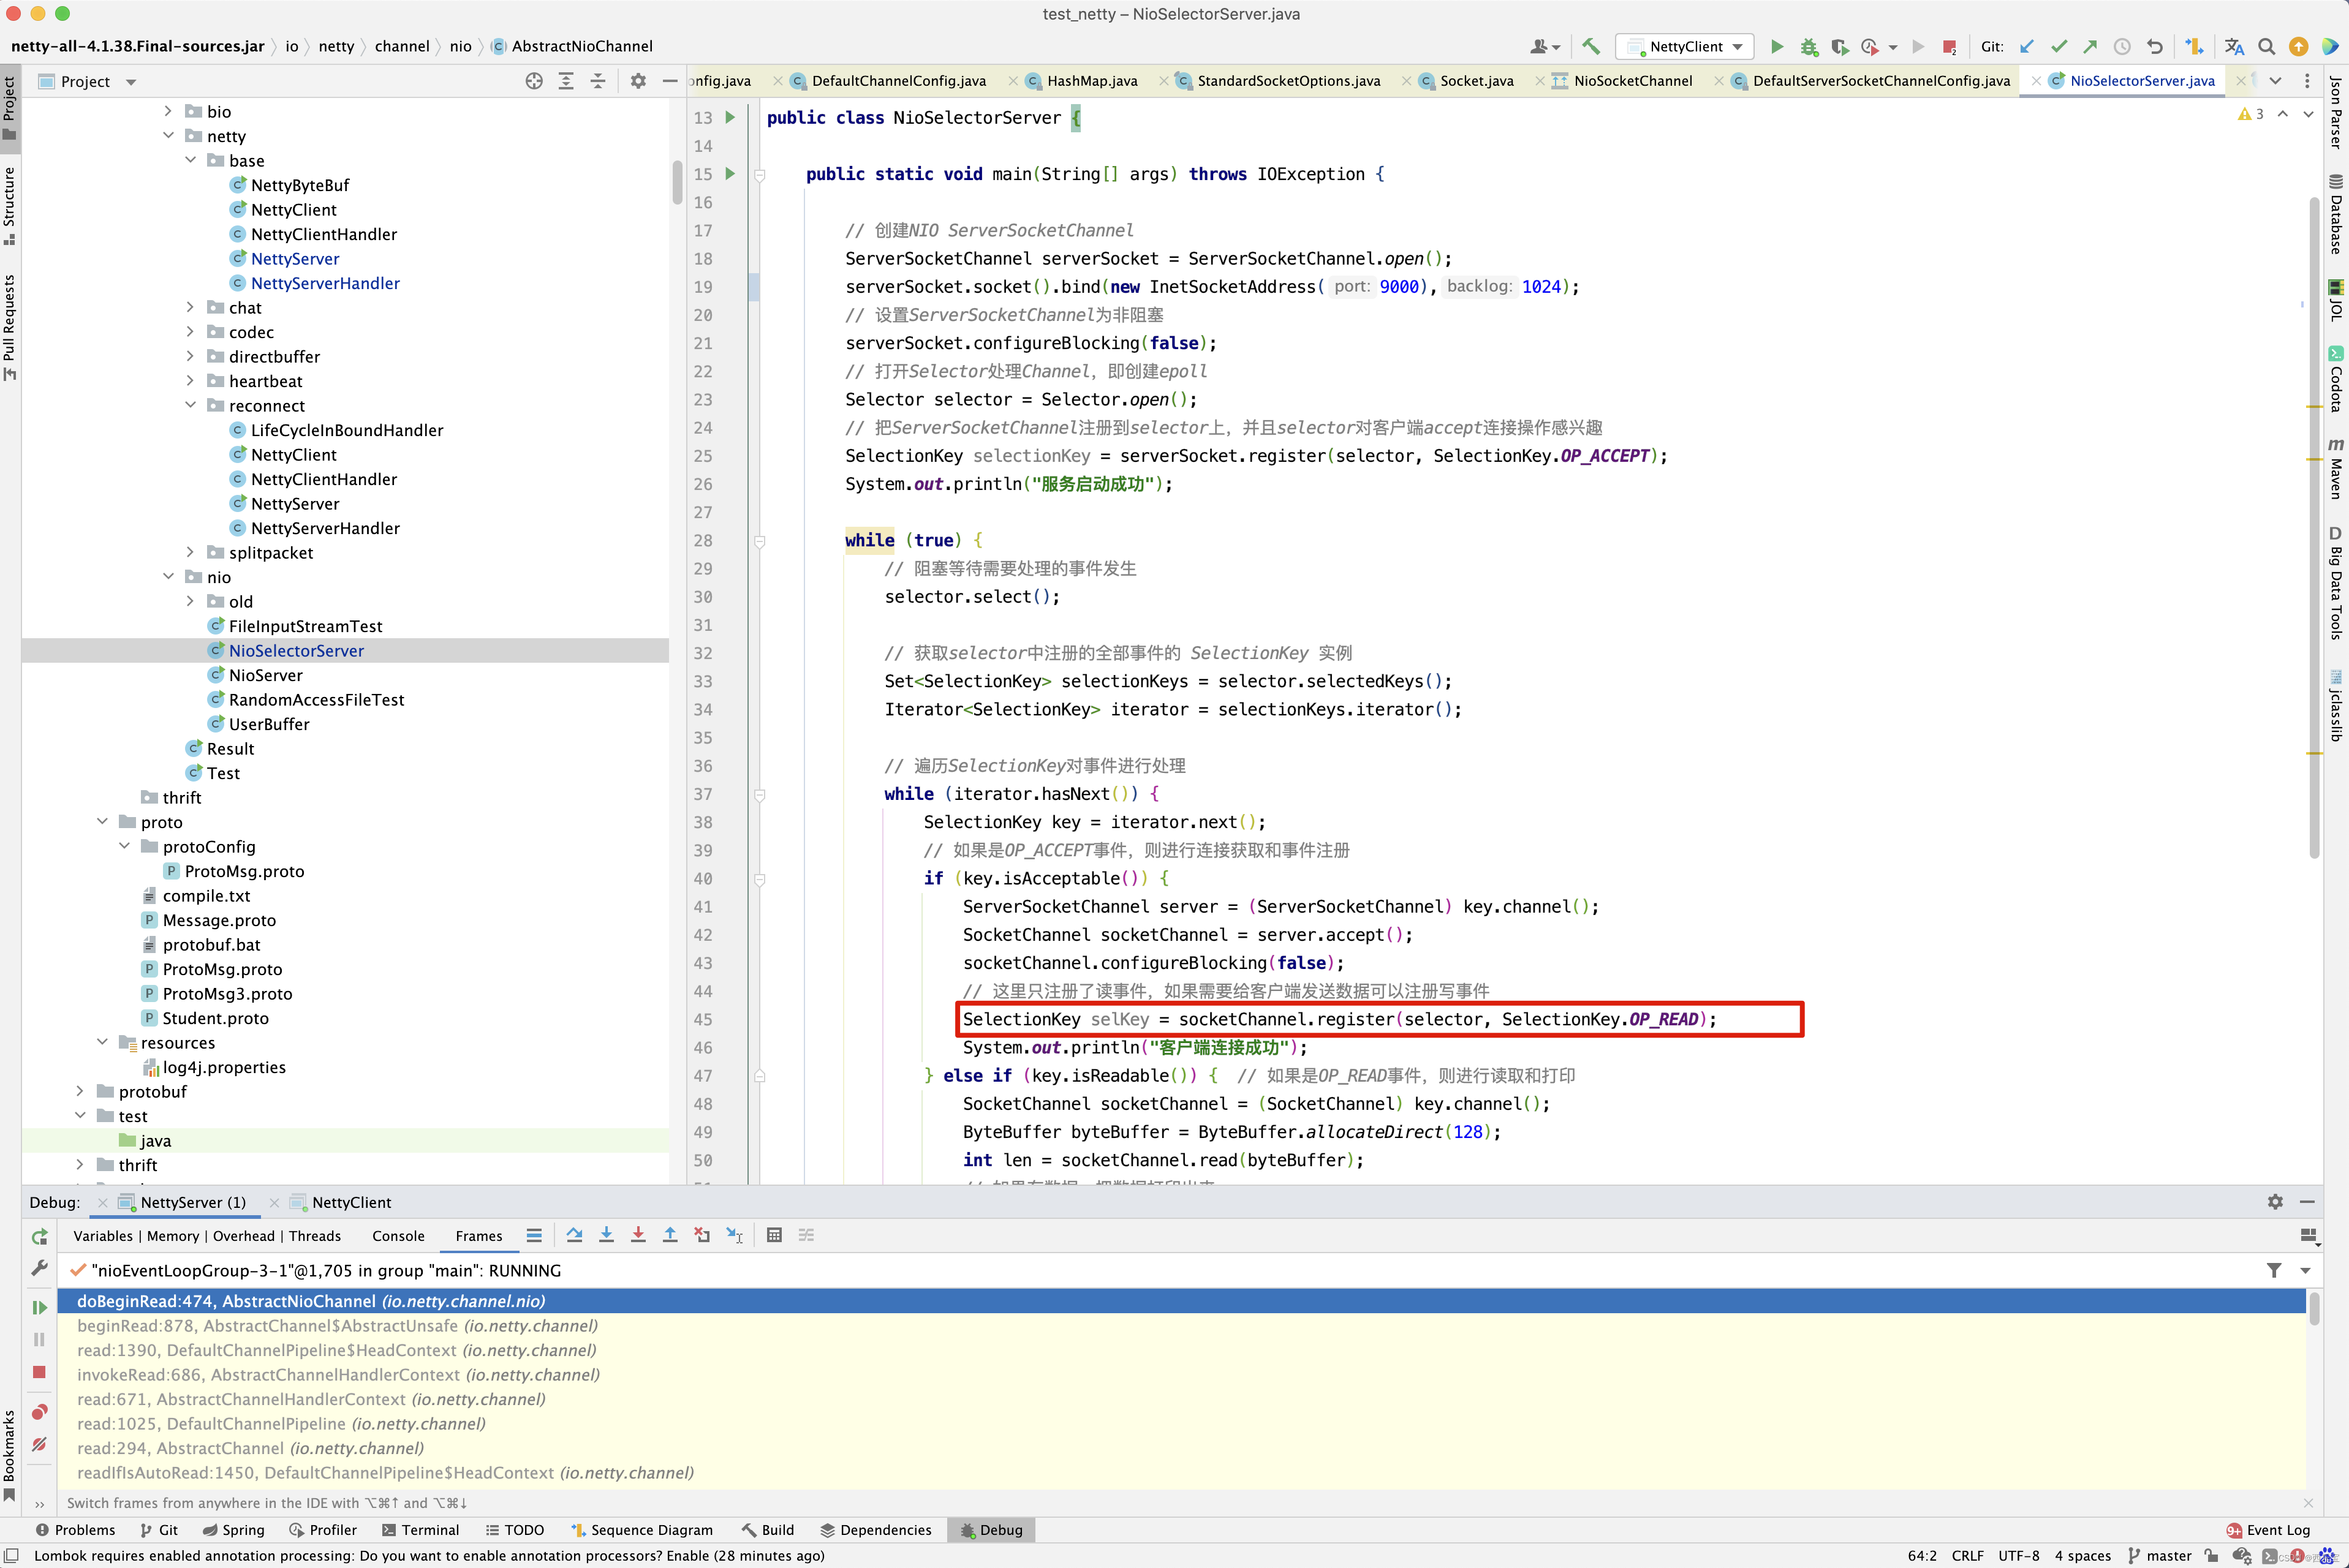
当然啦, 上述加粗代码childGroup.register(child),在上一篇博客中,已经做了详细的分析,唯一要注意的就是。

对应于之前例子中的socketChannel.register(selector, SelectionKey.OP_READ) 。
分析到这里,我觉得Netty的代码还是写得非常好的,为什么呢? bossGroup 和 workerGroup的区别
bossGroup:
channel : NioServerSocketChannel
config : ServerSocketChannelConfig
unsafe : NioMessageUnsafe
workerGroup
channel: NioSocketChannel
unsafe : NioByteUnsafe
而register()内部的其他方法的调用基本上都是一样。
接下来继续回到processSelectedKey()方法的分析,对于SelectionKey.OP_READ事件,此时会走unsafe.read()处理,但unsafe不再是NioMessageUnsafe,而是NioByteUnsafe类。
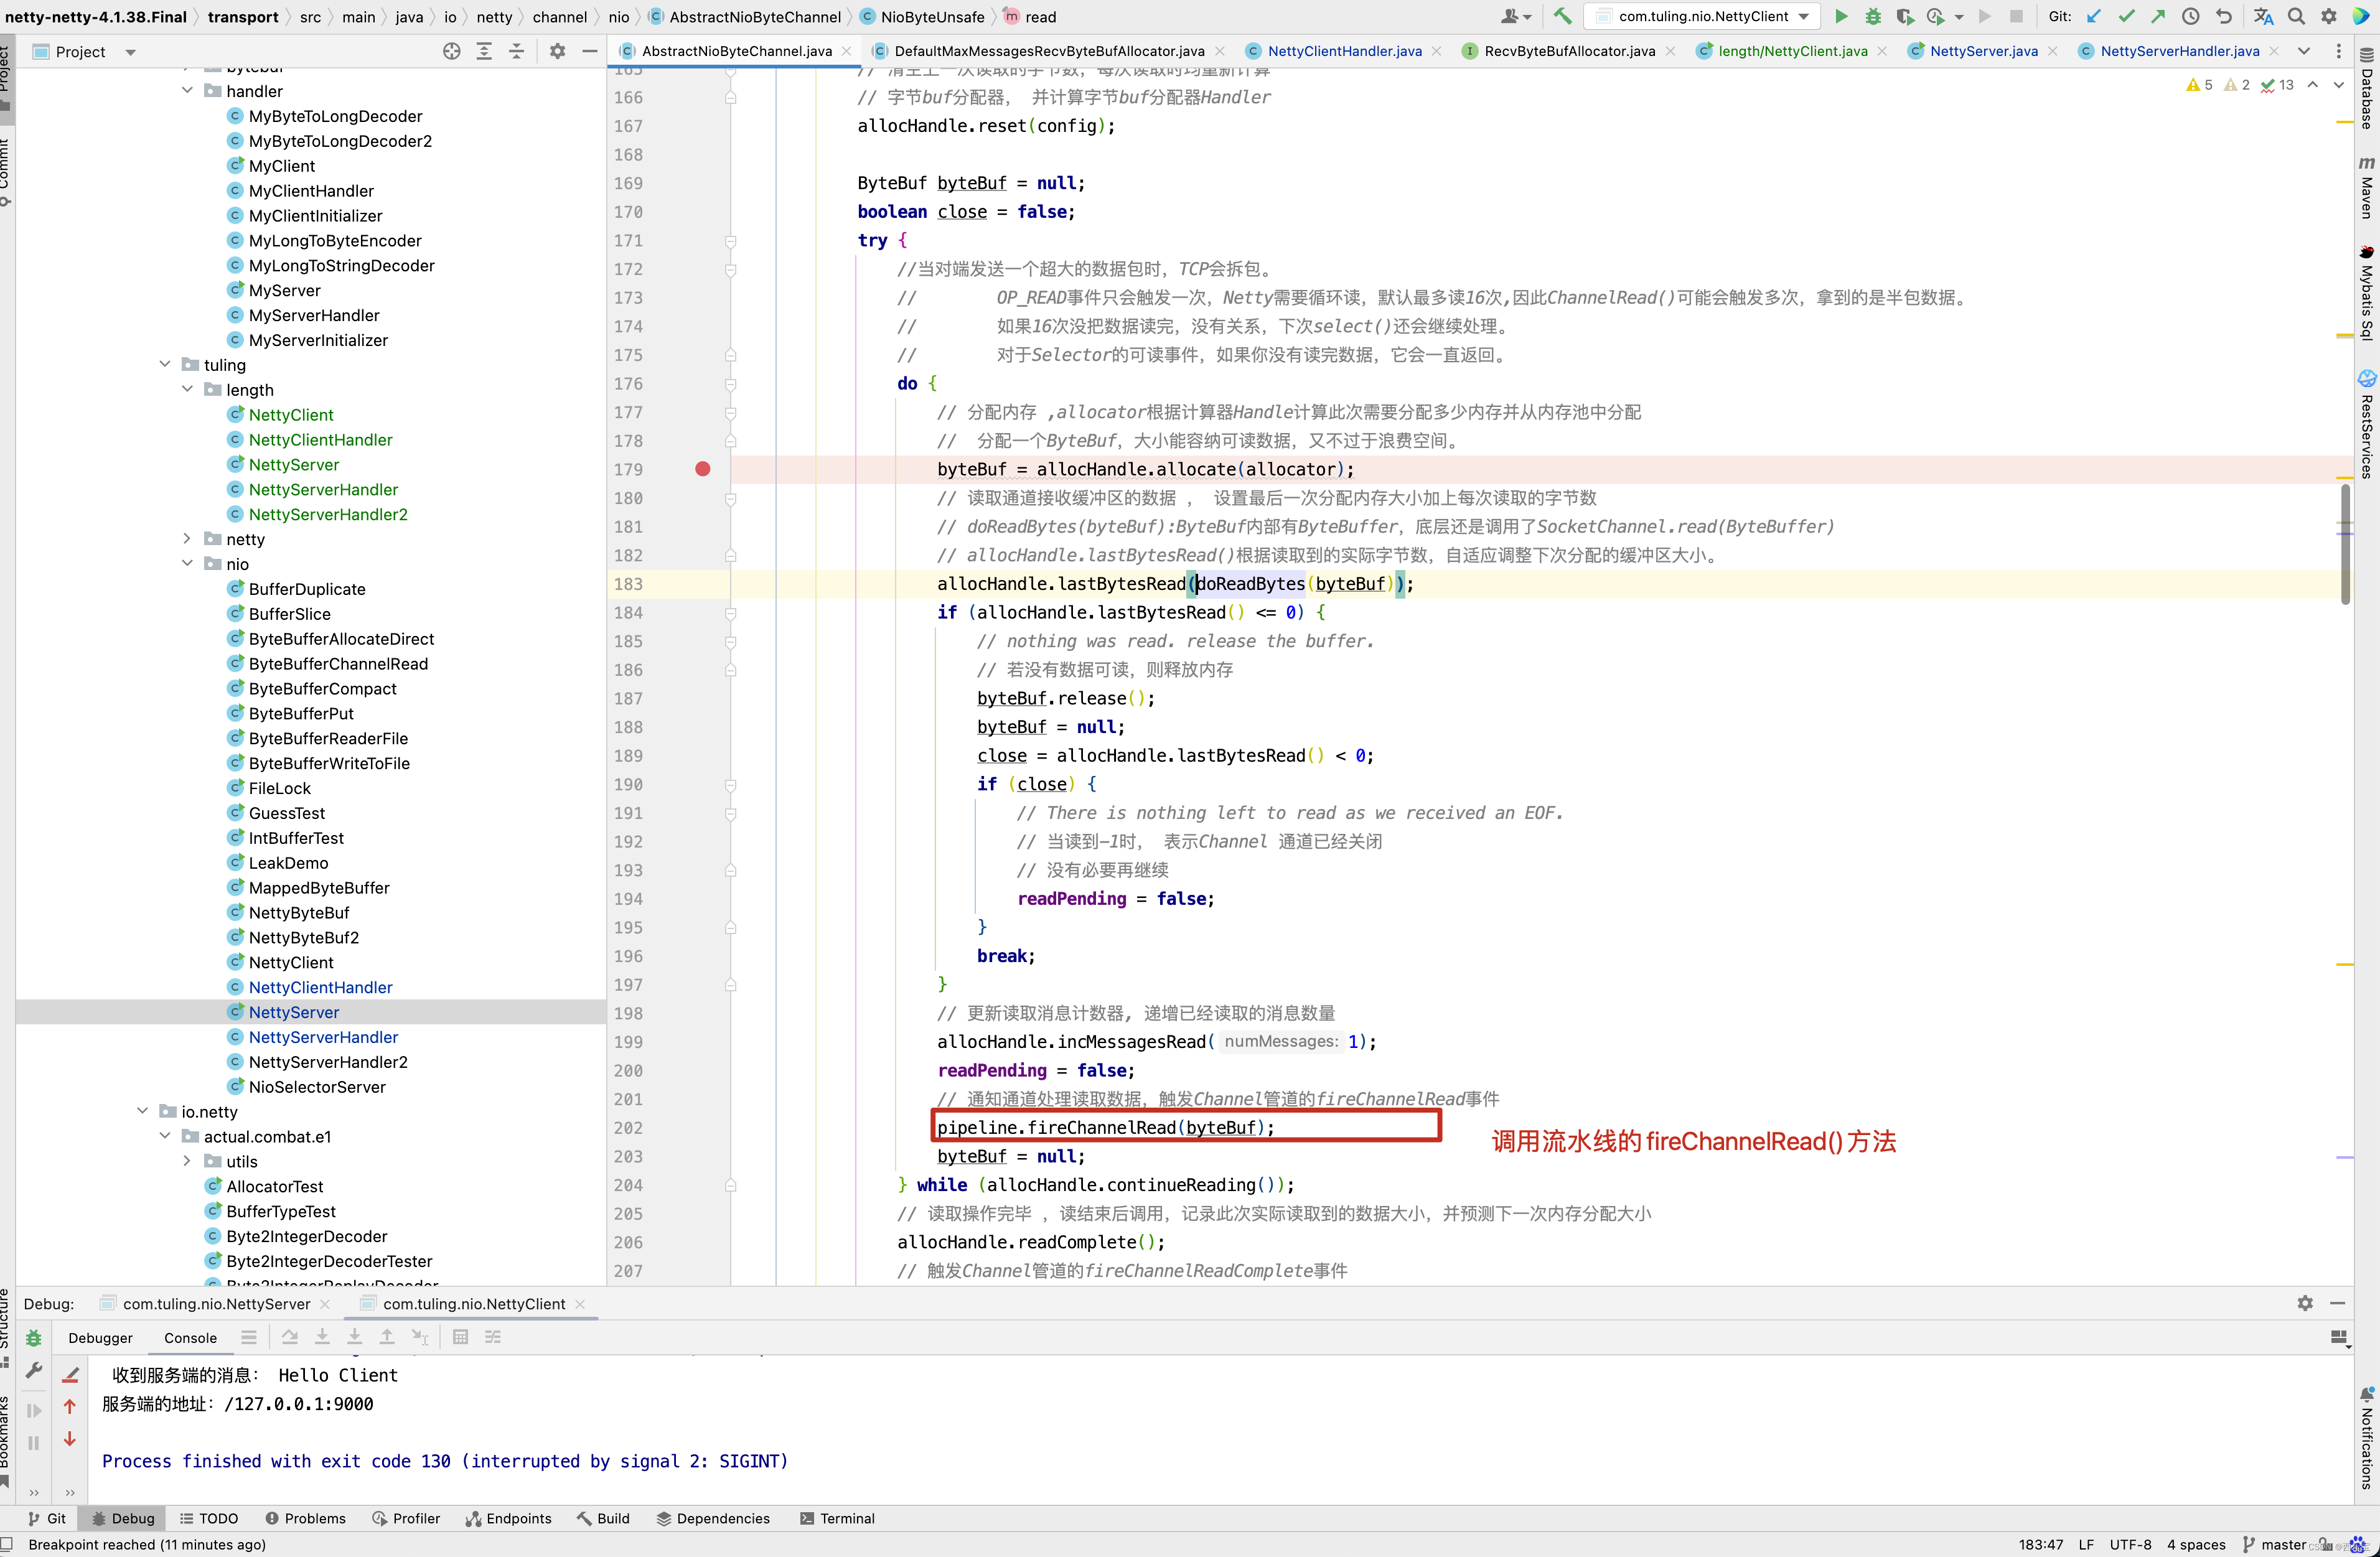
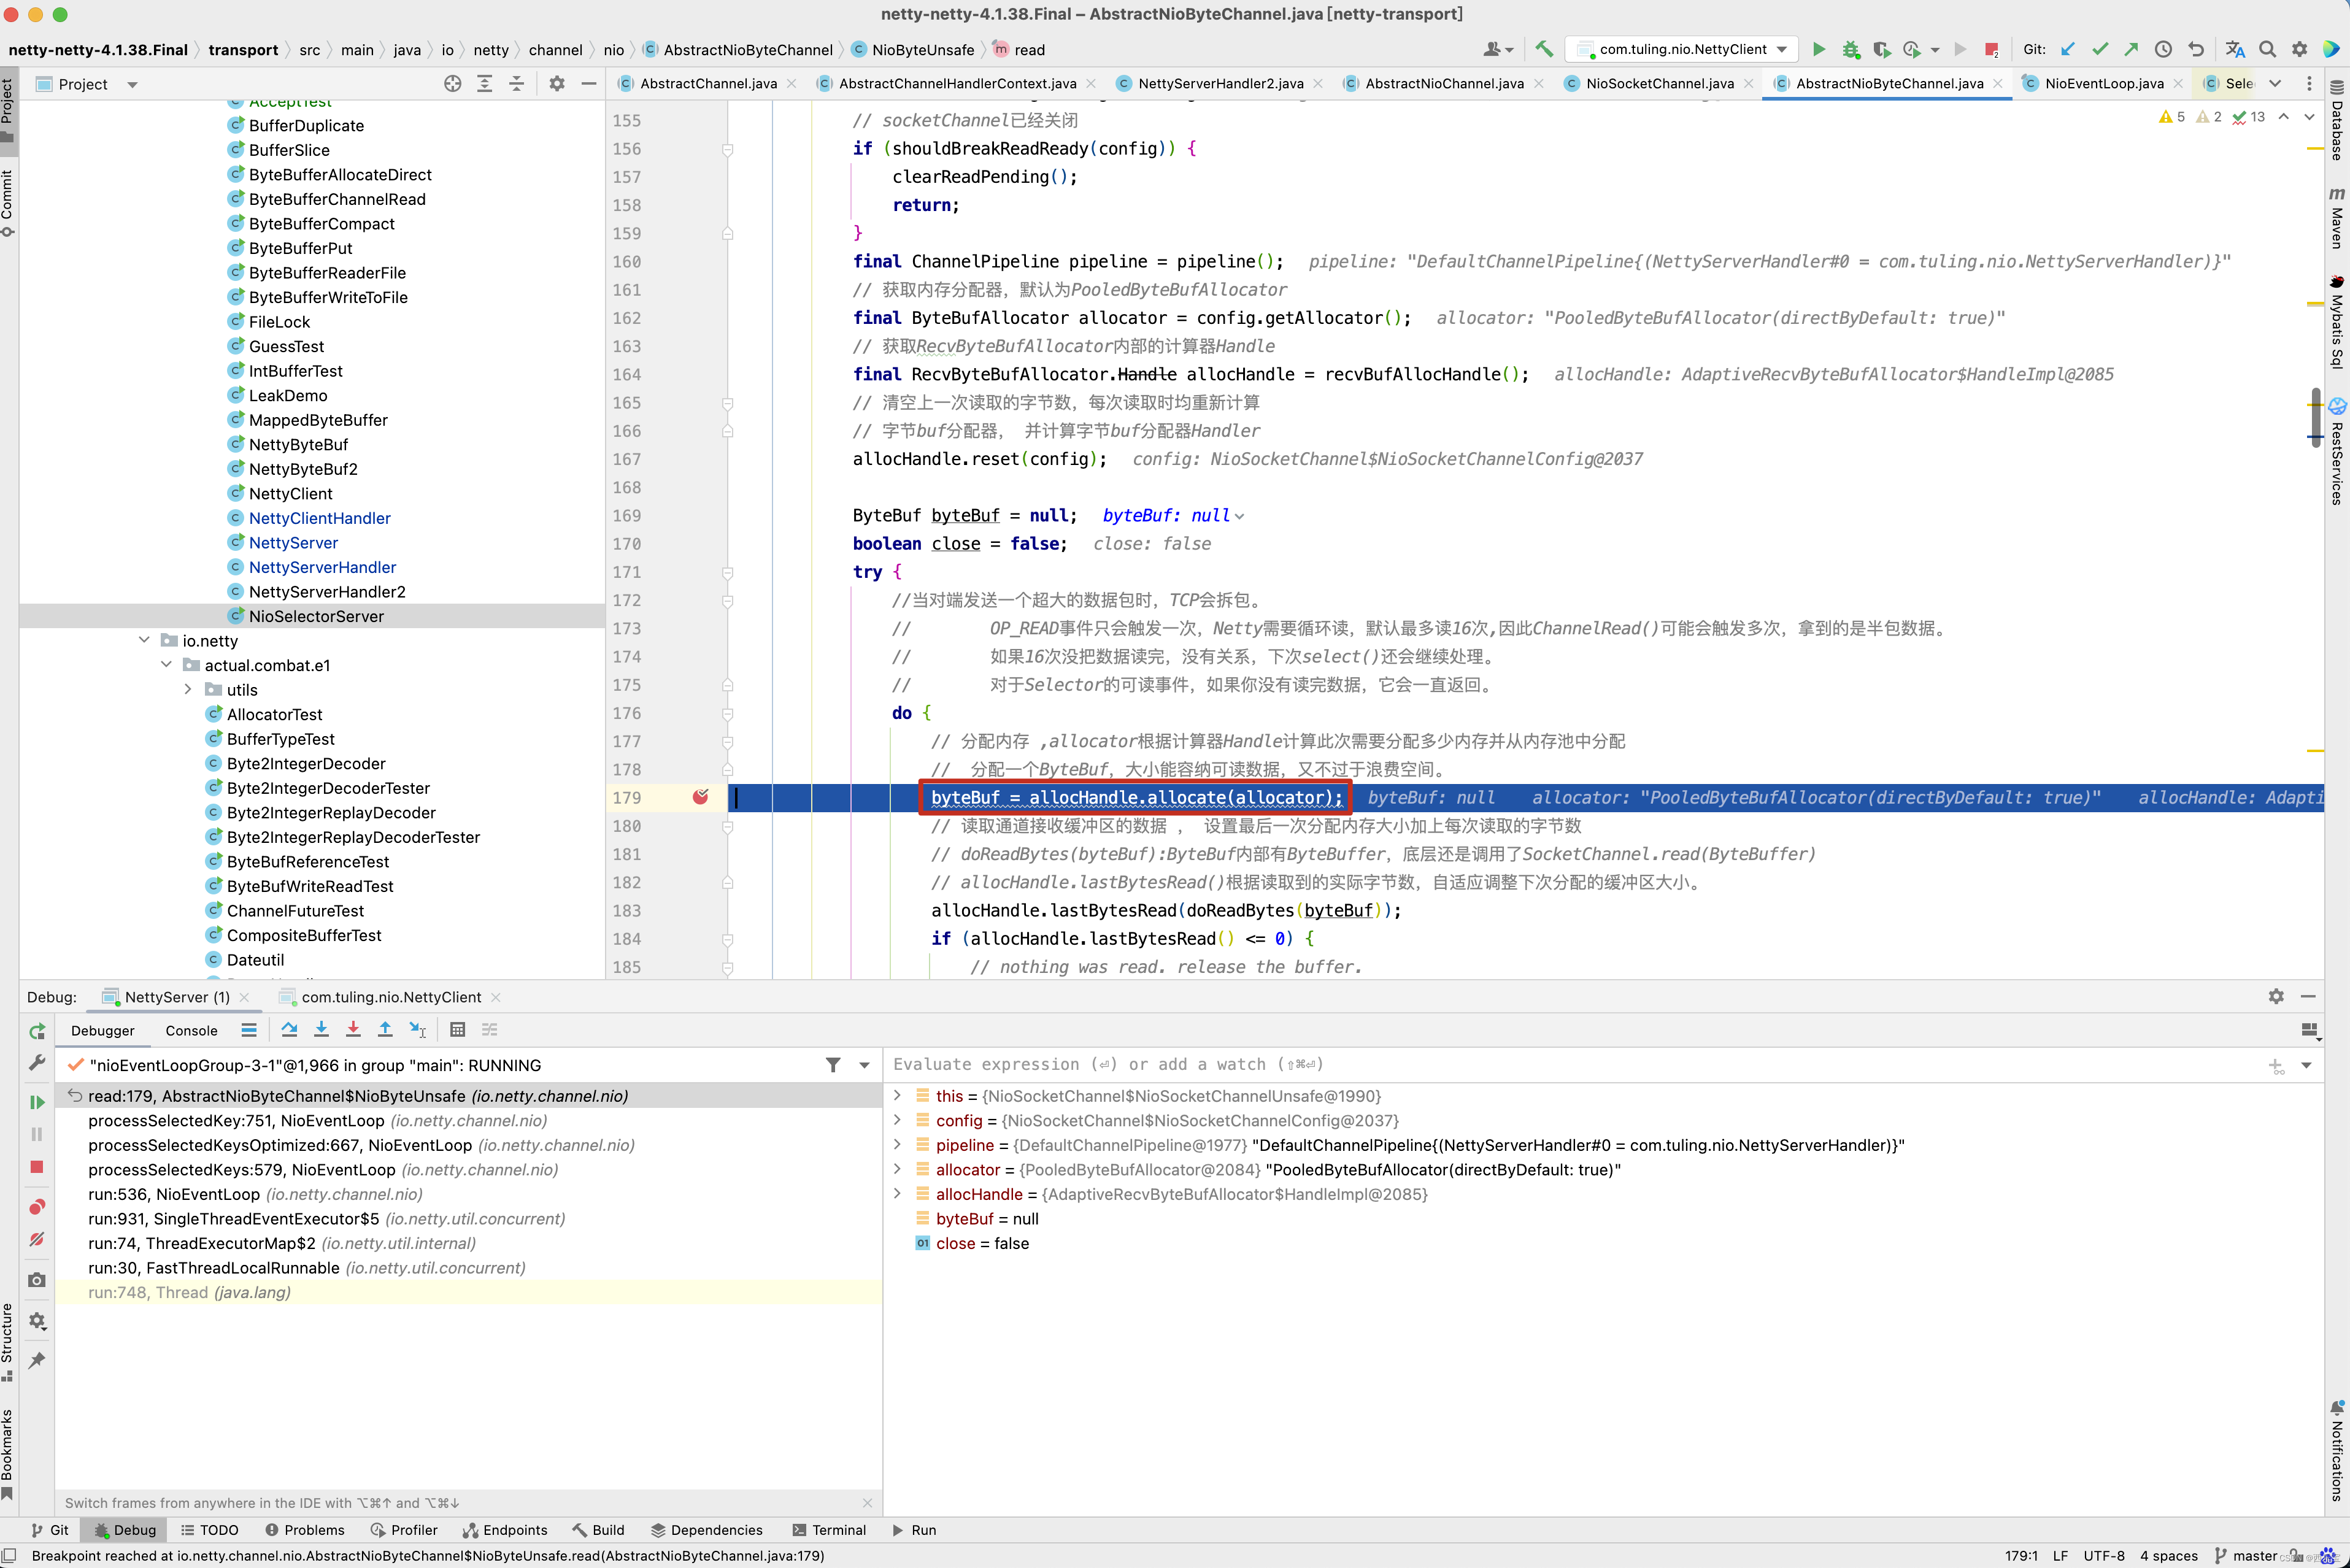
public final void read() {// 获取pipeline通道配置,Channel管道final ChannelConfig config = config();// socketChannel已经关闭if (shouldBreakReadReady(config)) {clearReadPending();return;}final ChannelPipeline pipeline = pipeline();// 获取内存分配器,默认为PooledByteBufAllocatorfinal ByteBufAllocator allocator = config.getAllocator();// 获取RecvByteBufAllocator内部的计算器Handlefinal RecvByteBufAllocator.Handle allocHandle = recvBufAllocHandle();// 清空上一次读取的字节数,每次读取时均重新计算// 字节buf分配器, 并计算字节buf分配器HandlerallocHandle.reset(config);ByteBuf byteBuf = null;boolean close = false;try {do {// 分配内存 ,allocator根据计算器Handle计算此次需要分配多少内存并从内存池中分配byteBuf = allocHandle.allocate(allocator);// 读取通道接收缓冲区的数据 , 设置最后一次分配内存大小加上每次读取的字节数allocHandle.lastBytesRead(doReadBytes(byteBuf));if (allocHandle.lastBytesRead() <= 0) {// nothing was read. release the buffer.// 若没有数据可读,则释放内存byteBuf.release();byteBuf = null;close = allocHandle.lastBytesRead() < 0;if (close) {// There is nothing left to read as we received an EOF.// 当读到-1时, 表示Channel 通道已经关闭// 没有必要再继续readPending = false;}break;}// 更新读取消息计数器allocHandle.incMessagesRead(1);readPending = false;// 通知通道处理读取数据,触发Channel管道的fireChannelRead事件pipeline.fireChannelRead(byteBuf);byteBuf = null;} while (allocHandle.continueReading());// 读取操作完毕 ,读结束后调用,记录此次实际读取到的数据大小,并预测下一次内存分配大小allocHandle.readComplete(); // 触发Channel管道的fireChannelReadComplete事件pipeline.fireChannelReadComplete();if (close) {// 如果Socket通道关闭,则关闭读操作closeOnRead(pipeline);}} catch (Throwable t) {// 处理读取异常handleReadException(pipeline, byteBuf, t, close, allocHandle);} finally {// Check if there is a readPending which was not processed yet.// This could be for two reasons:// * The user called Channel.read() or ChannelHandlerContext.read() in channelRead(...) method// * The user called Channel.read() or ChannelHandlerContext.read() in channelReadComplete(...) method//// See https://github.com/netty/netty/issues/2254if (!readPending && !config.isAutoRead()) {// 若操作完毕,且没有配置自动读// 则从选择Key兴趣集中移除读操作事件removeReadOp();}}}
}
NioByteUnsafe的read()方法的实现思路大概分为以下3步
- 获取Channel的配置对象、内存分配器ByteBufAllocator, 并计算内存分配器RecvByteBufAllocator.Handle。
- 进入for循环。循环体的作用:使用内存分配器获取数据容 器ByteBuf,调用doReadBytes()方法将数据读取到容器中,
如果本次 循环没有读到数据或链路已关闭,则跳出循环。另外,当循环次数达 到属性METADATA的defaultMaxMessagesPerRead次数(默认为16)时,
也会跳出循环。由于TCP传输会产生粘包问题,因此每次读取都会触发 channelRead事件,进而调用业务逻辑处理Handler。 - 跳出循环后,表示本次读取已完成。调用allocHandle的 readComplete()方法,并记录读取记录,用于下次分配合理内存。
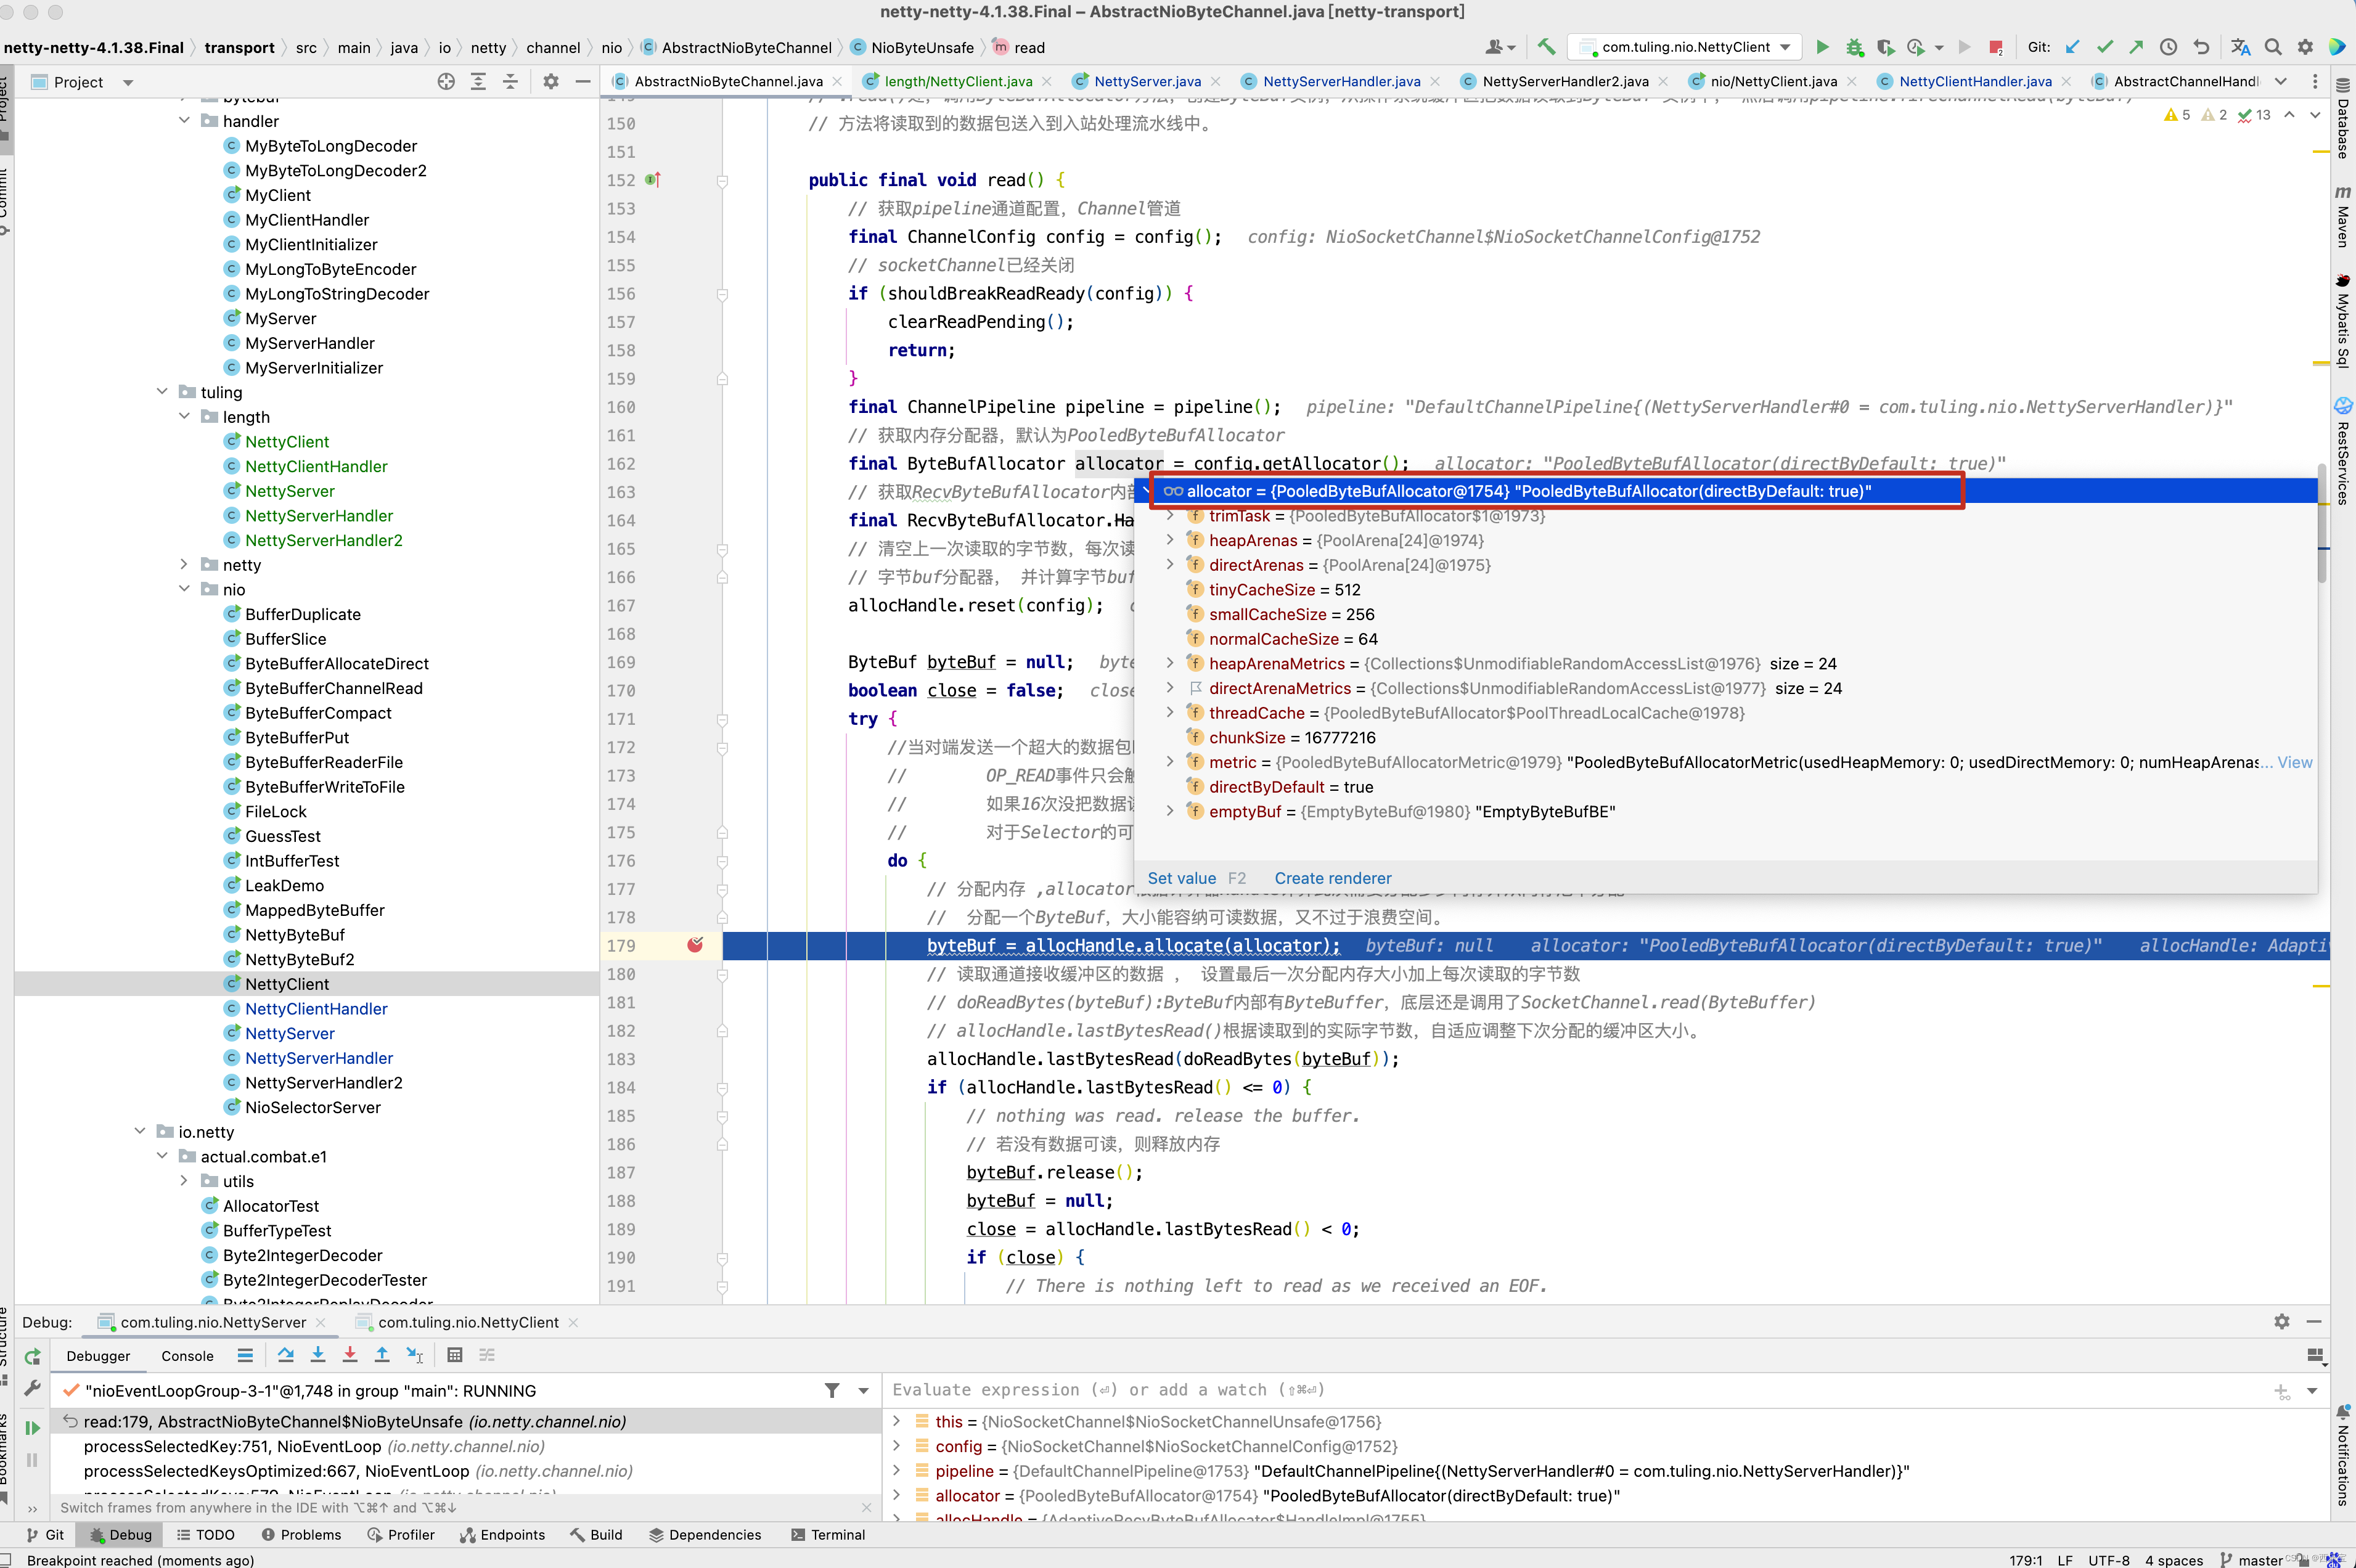
NioEventLoop线程在处理OP_READ事件,进入NioByteUnsafe循环读取数据时,使用了两个类来处理内存的分配:一个是 ByteBufAllocator,PooledByteBufAllocator为它的默认实现类;另 一个是RecvByteBufAllocator,AdaptiveRecvByteBufAllocator是它 的默认实现类,在DefaultChannelConfig初始化时设置。 PooledByteBufAllocator主要用来处理内存的分配,并最终委托 PoolArena去完成。
AdaptiveRecvByteBufAllocator主要用来计算每次 读循环时应该分配多少内存。NioByteUnsafe之所以需要循环读取,主 要是因为分配的初始ByteBuf不一定能够容纳读取到的所有数据。 NioByteUnsafe循环读取的核心代码解读如下:
入站处理时, Netty 是如何自动创建入站的ByteBuf 的呢 ?
查看Netty源代码,我们可以看到,Netty 的Reactor反应器线程会在底层的Java NIO 通道读取数据时,也就是AbstractNioByteChannel.NioByteUnsafe.read()处,调用ByteBufAllocator方法,创建ByteBuf实例,从操作系统缓冲区把数据读取到ByteBuf 实例中, 然后调用pipeline.fireChannelRead(byteBuf)方法将读取到的数据包送入到入站处理流水线中。
之前写了近3篇博客 RecvByteBufAllocator内存分配计算 , Netty缓冲区ByteBuf源码解析 , Netty源码解析之内存管理-PooledByteBufAllocator-PoolArena 来分析上面read()方法相关的源码,如果读者源码也分析到这里,建议先去弄明白上面提到的三篇博客相关内存,再来看read()方法,不然你会觉得不知所云 。
对于lastBytesRead()和readComplete()方法,之前在 RecvByteBufAllocator内存分配计算 这篇博客中做了详细的分析,这里就再赘述了。 先来分析continueReading()这个方法 。
public boolean continueReading() {return continueReading(defaultMaybeMoreSupplier);
}public boolean continueReading(UncheckedBooleanSupplier maybeMoreDataSupplier) {// ChannelConfig的设置为可自动读取。即,autoRead属性为1。return config.isAutoRead() &&//  maybeMoreDataSupplier.get()返回为true,。也就是当‘最近一次读操作所期望读取的字节数’//  与‘最近一次读操作真实读取的字节数’一样,则表示当前可能还有数据等待被读取。则就会返回true。(!respectMaybeMoreData || maybeMoreDataSupplier.get()) &&// totalMessages < maxMessagePerRead : 已经读取的消息次数 < 一个读循环最大能读取消息的次数totalMessages < maxMessagePerRead &&// totalBytesRead > 0 :因为totalBytesRead是int类型,所以totalBytesRead的最大值是’Integer.MAX_VALUE’(即,2147483647)。// 所以,也限制了一个读循环最大能读取的字节数为2147483647。totalBytesRead > 0;
}
private final UncheckedBooleanSupplier defaultMaybeMoreSupplier = new UncheckedBooleanSupplier() {@Overridepublic boolean get() {return attemptBytesRead == lastBytesRead;}
};
上述加粗代码attemptBytesRead == lastBytesRead这一行代码是有意思的。 attemptBytesRead表示缓冲区剩余可读取字节容量,lastBytesRead表示本次实际读取的字节数,如果两者相等,表示本次读取将缓冲区填充满了,Channel中很大可能有未读取完的字节,因此需要继续while()循环读取字节到byteBuf中,什么时候设置attemptBytesRead的值的呢? 请看doReadBytes()方法 。
// 实现doReadBytes()方法,从SocketChannel中读取数据。
protected int doReadBytes(ByteBuf byteBuf) throws Exception {// 获取计算内存分配器Handlefinal RecvByteBufAllocator.Handle allocHandle = unsafe().recvBufAllocHandle();// 设置尝试读取字节数组的buf的可写字节数allocHandle.attemptedBytesRead(byteBuf.writableBytes());// 从Channel中读取字节并写入到buf中,返回读取的字节数return byteBuf.writeBytes(javaChannel(), allocHandle.attemptedBytesRead());
}
writableBytes()方法返回的容量减去写索引,因此得到的是可读字节数。
关于read()方法,大概也分析得差不多了, 接下来看他的一个重要的方法fireChannelRead()方法,在 RecvByteBufAllocator内存分配计算 这篇博客的结尾,我们留下了一些疑问,随着fireChannelRead()方法的分析,我希望这些疑问被解决 。
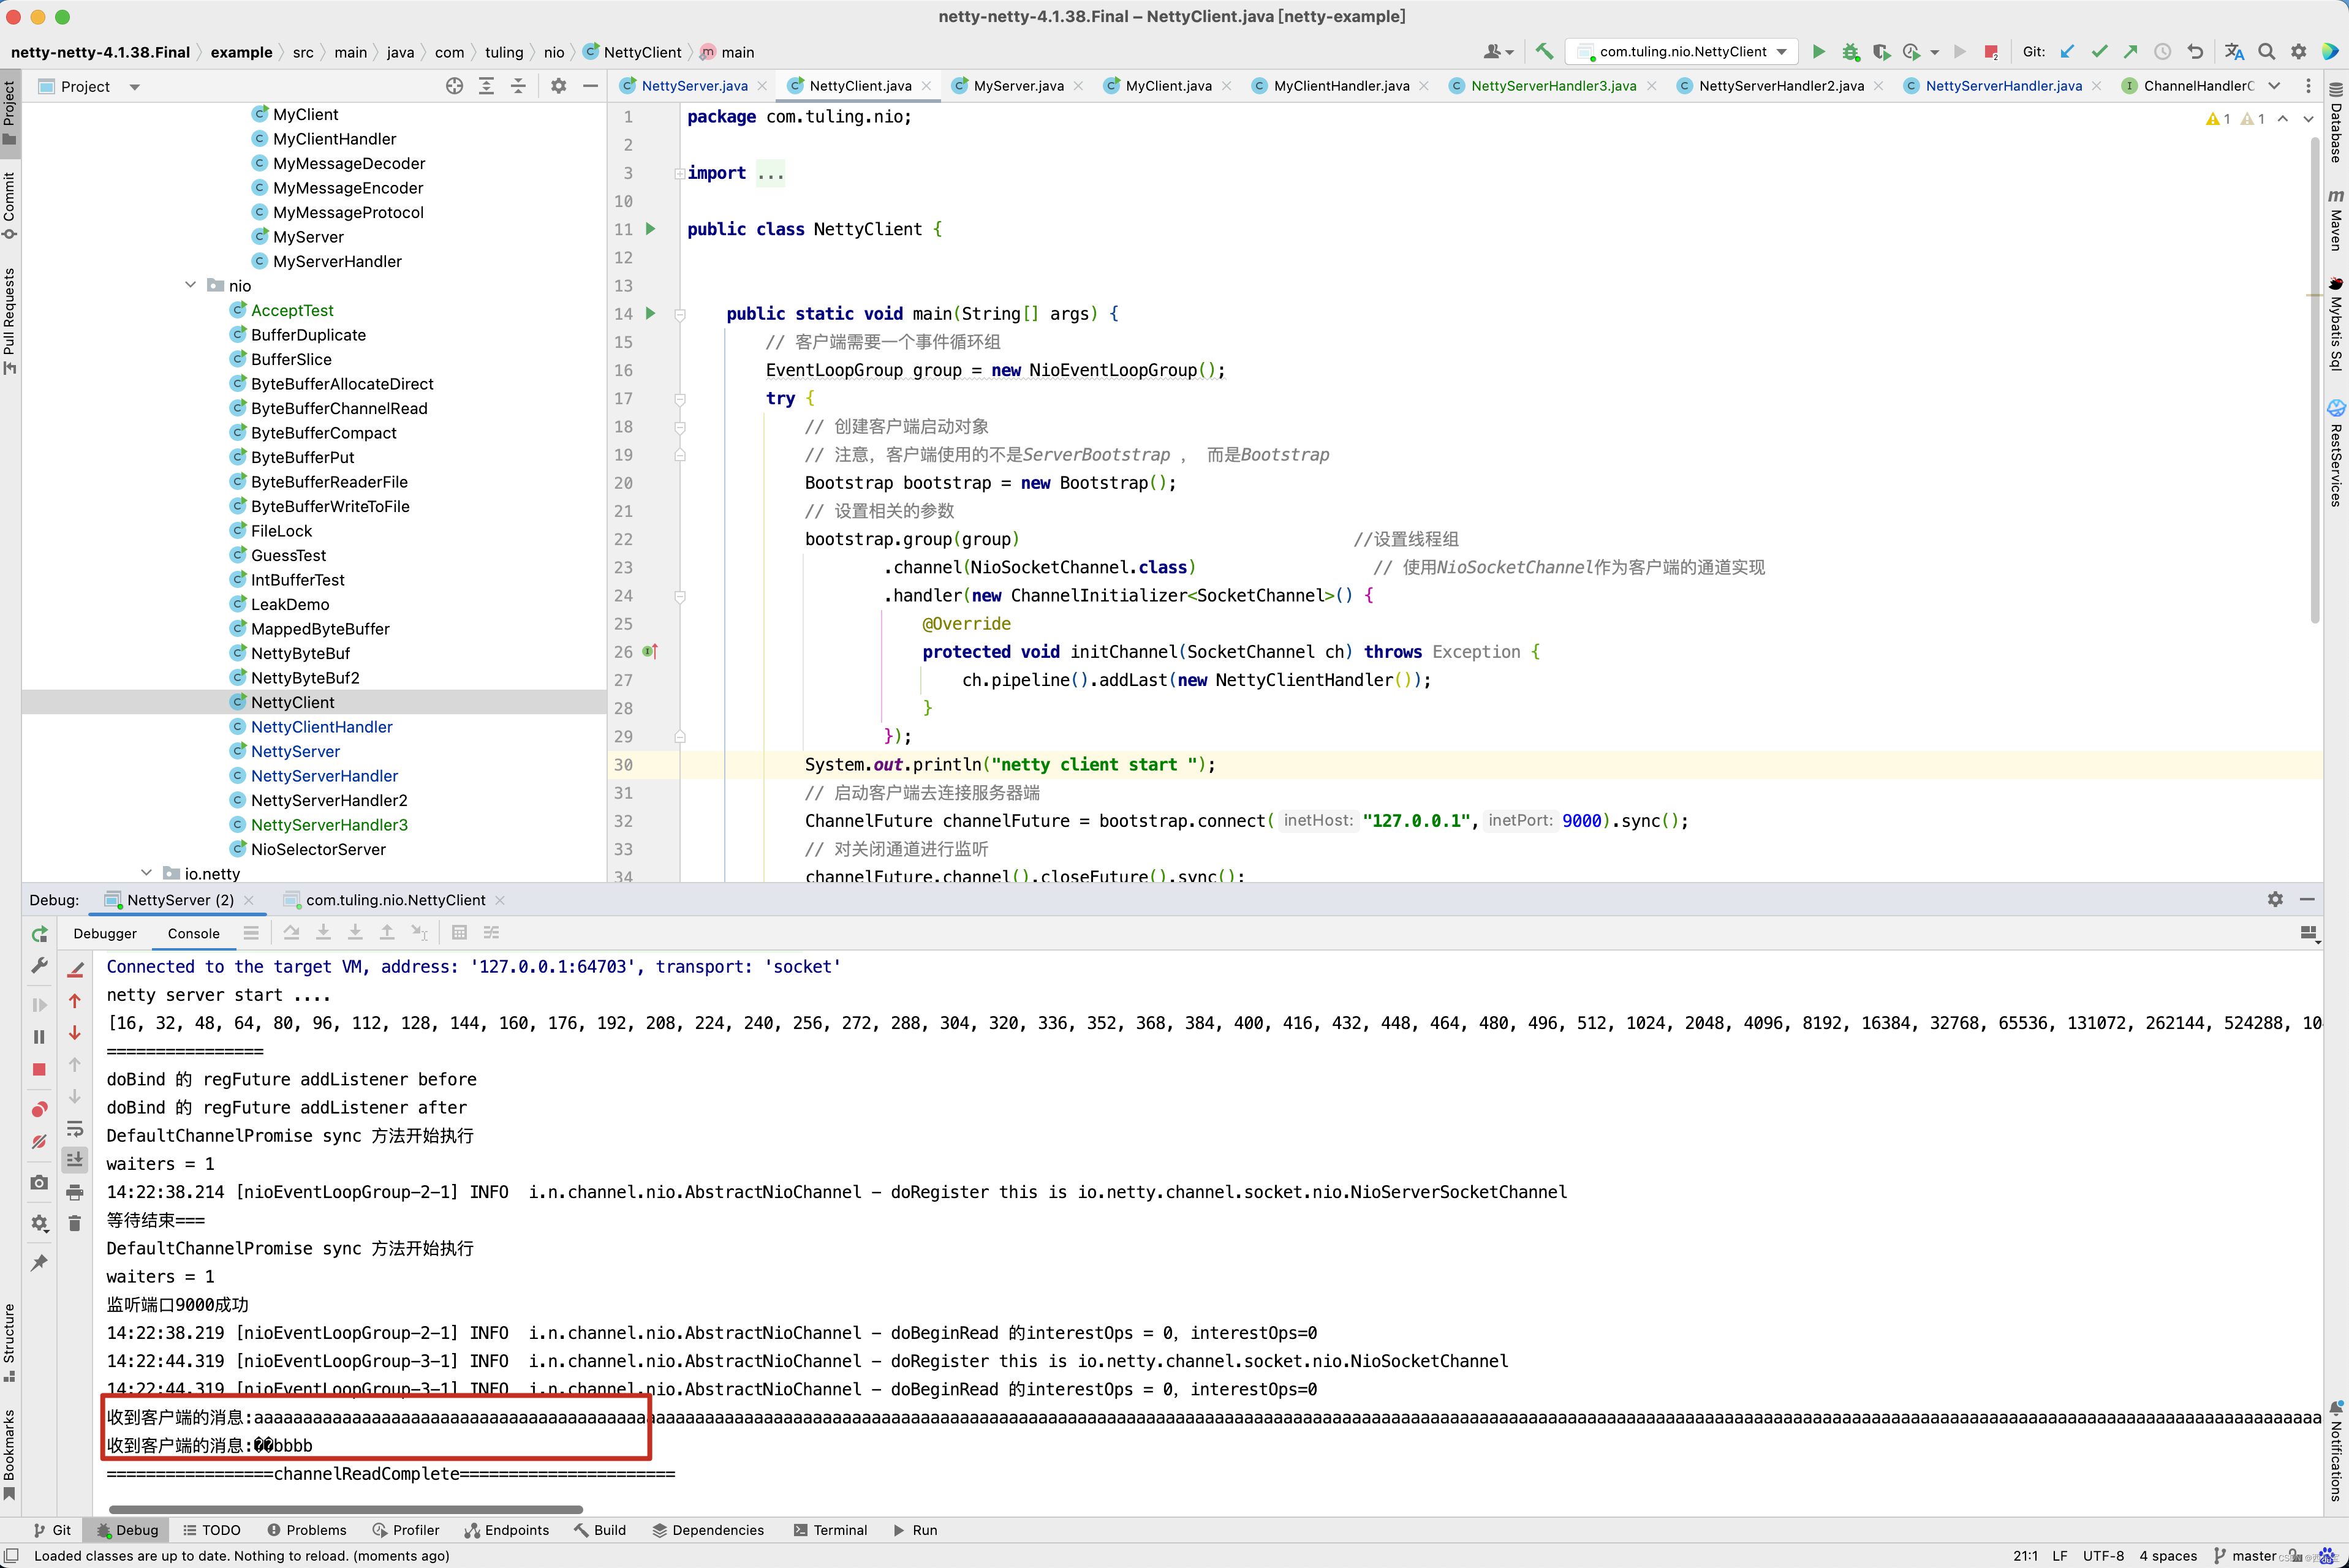
我们还是以最基础的NettyServer和NettyClient来分析 。
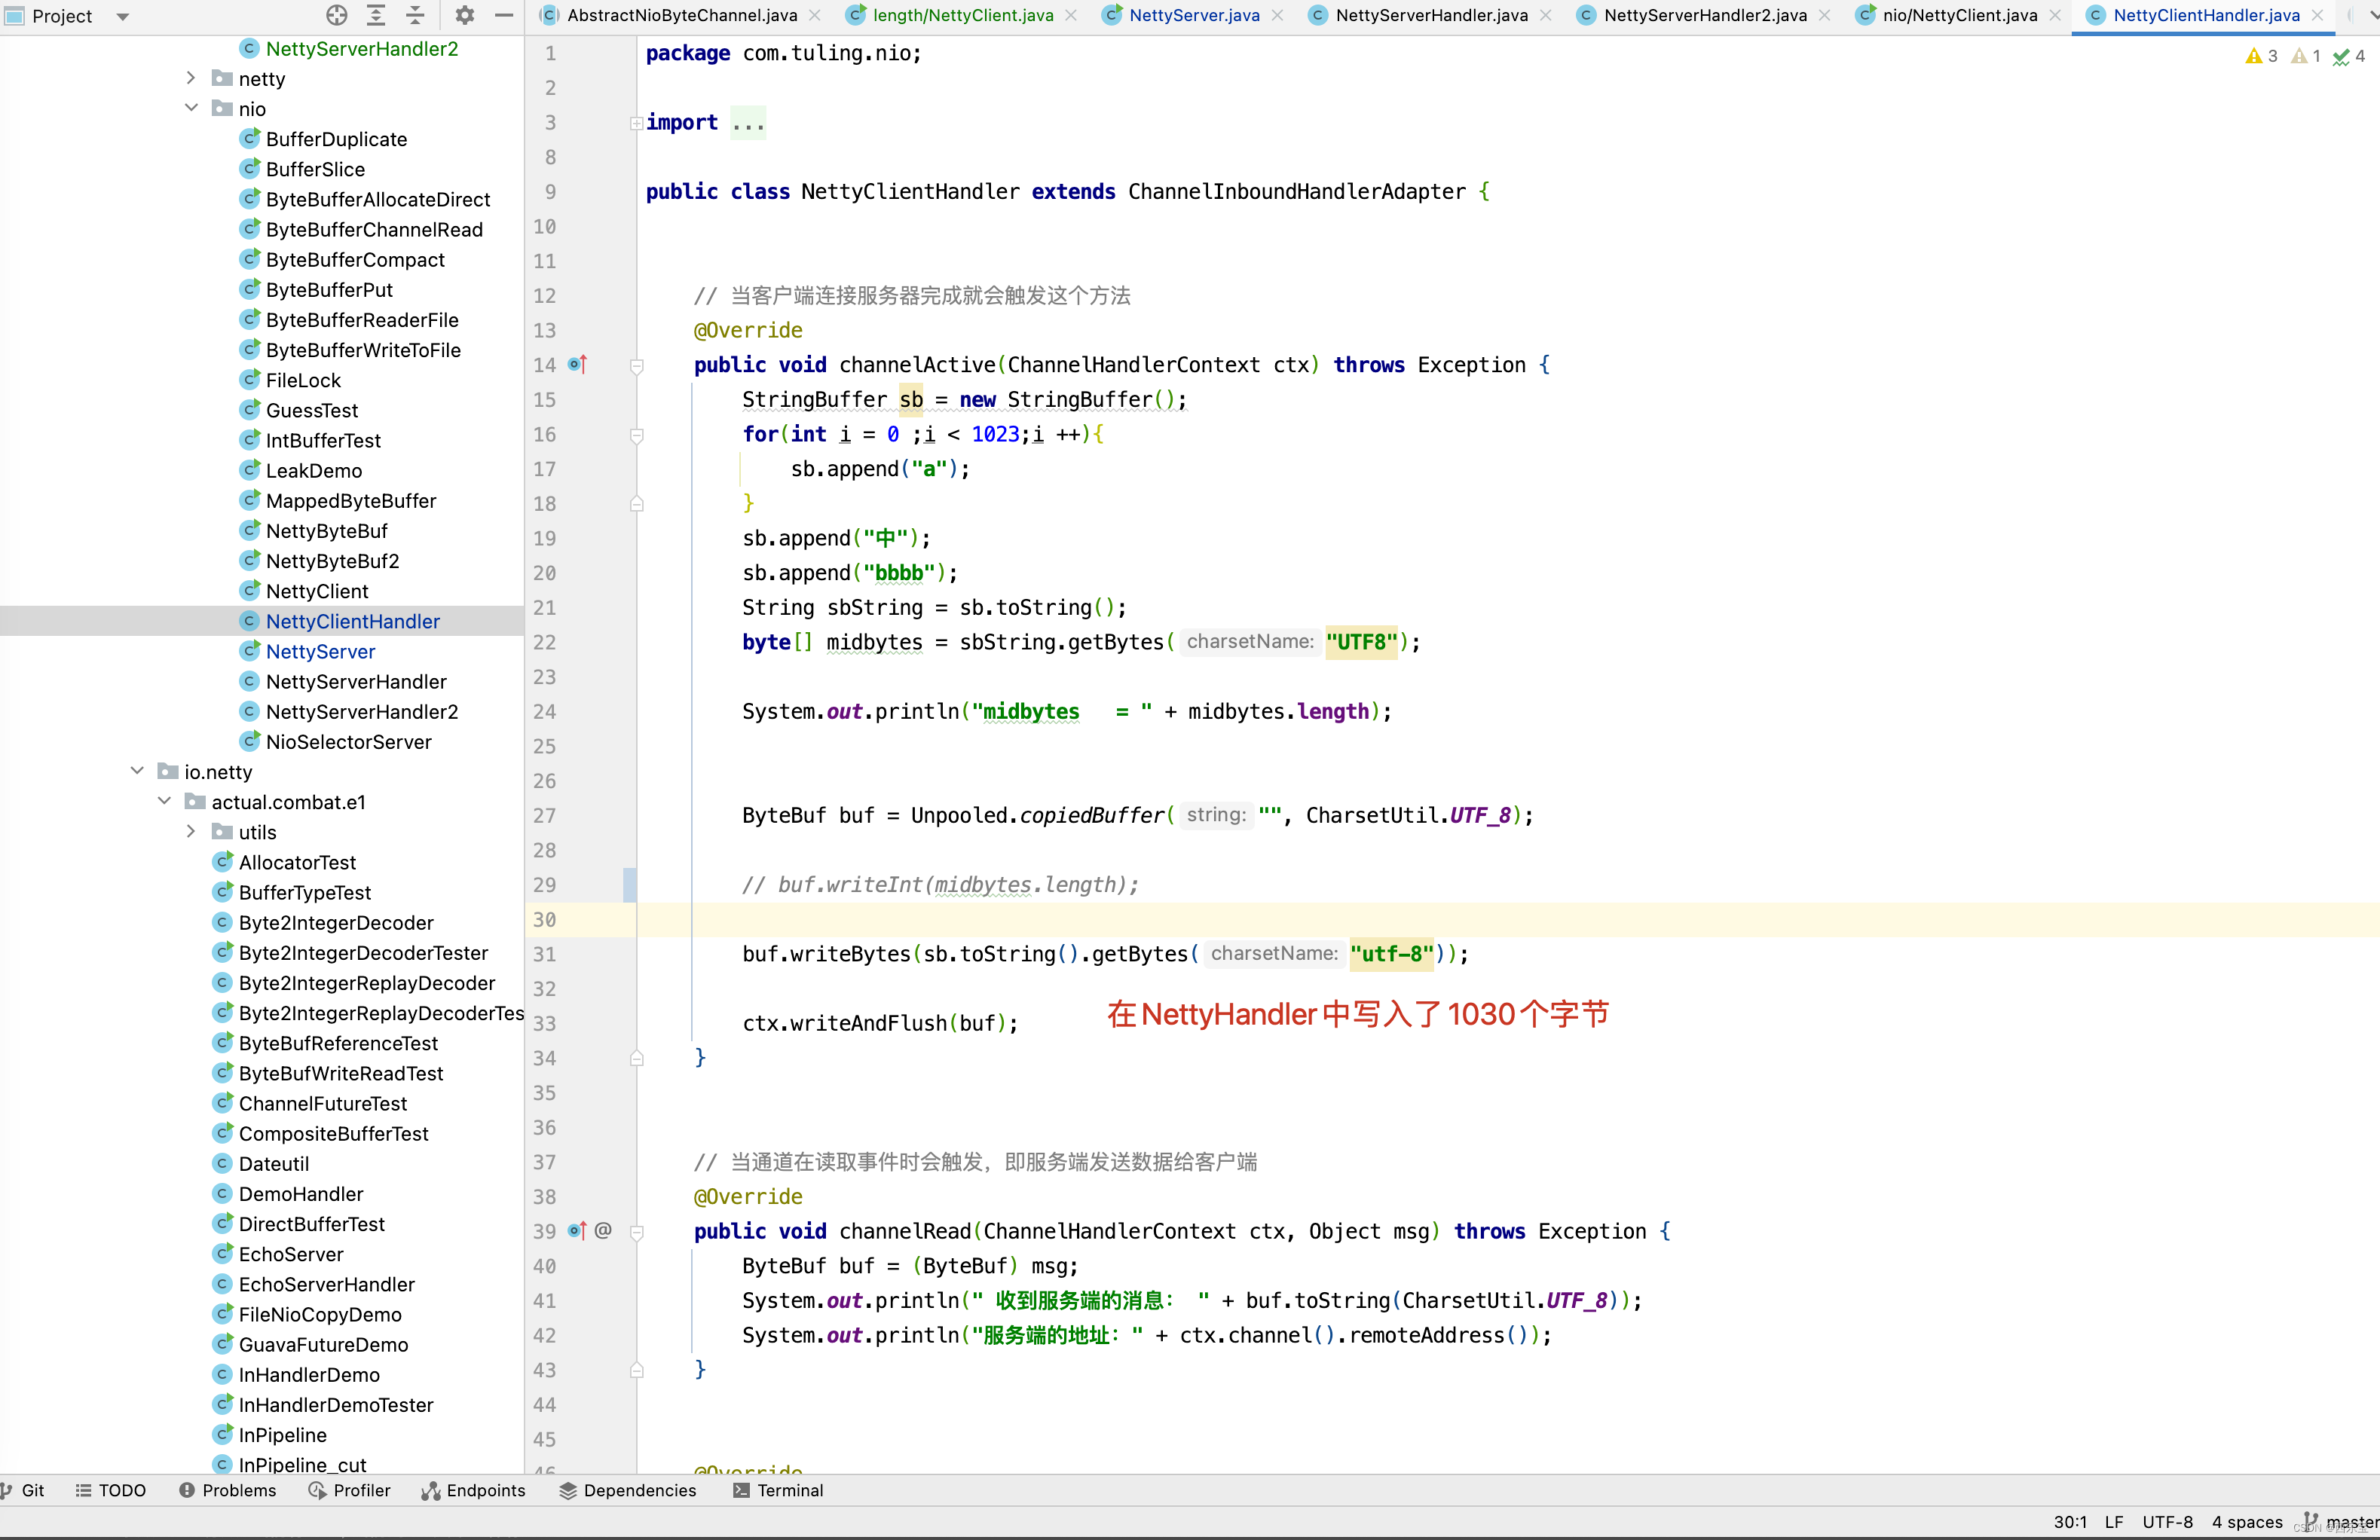
在NettyHandler中实现channelRead()方法,读取并打印出客户端发送过来的数据 。
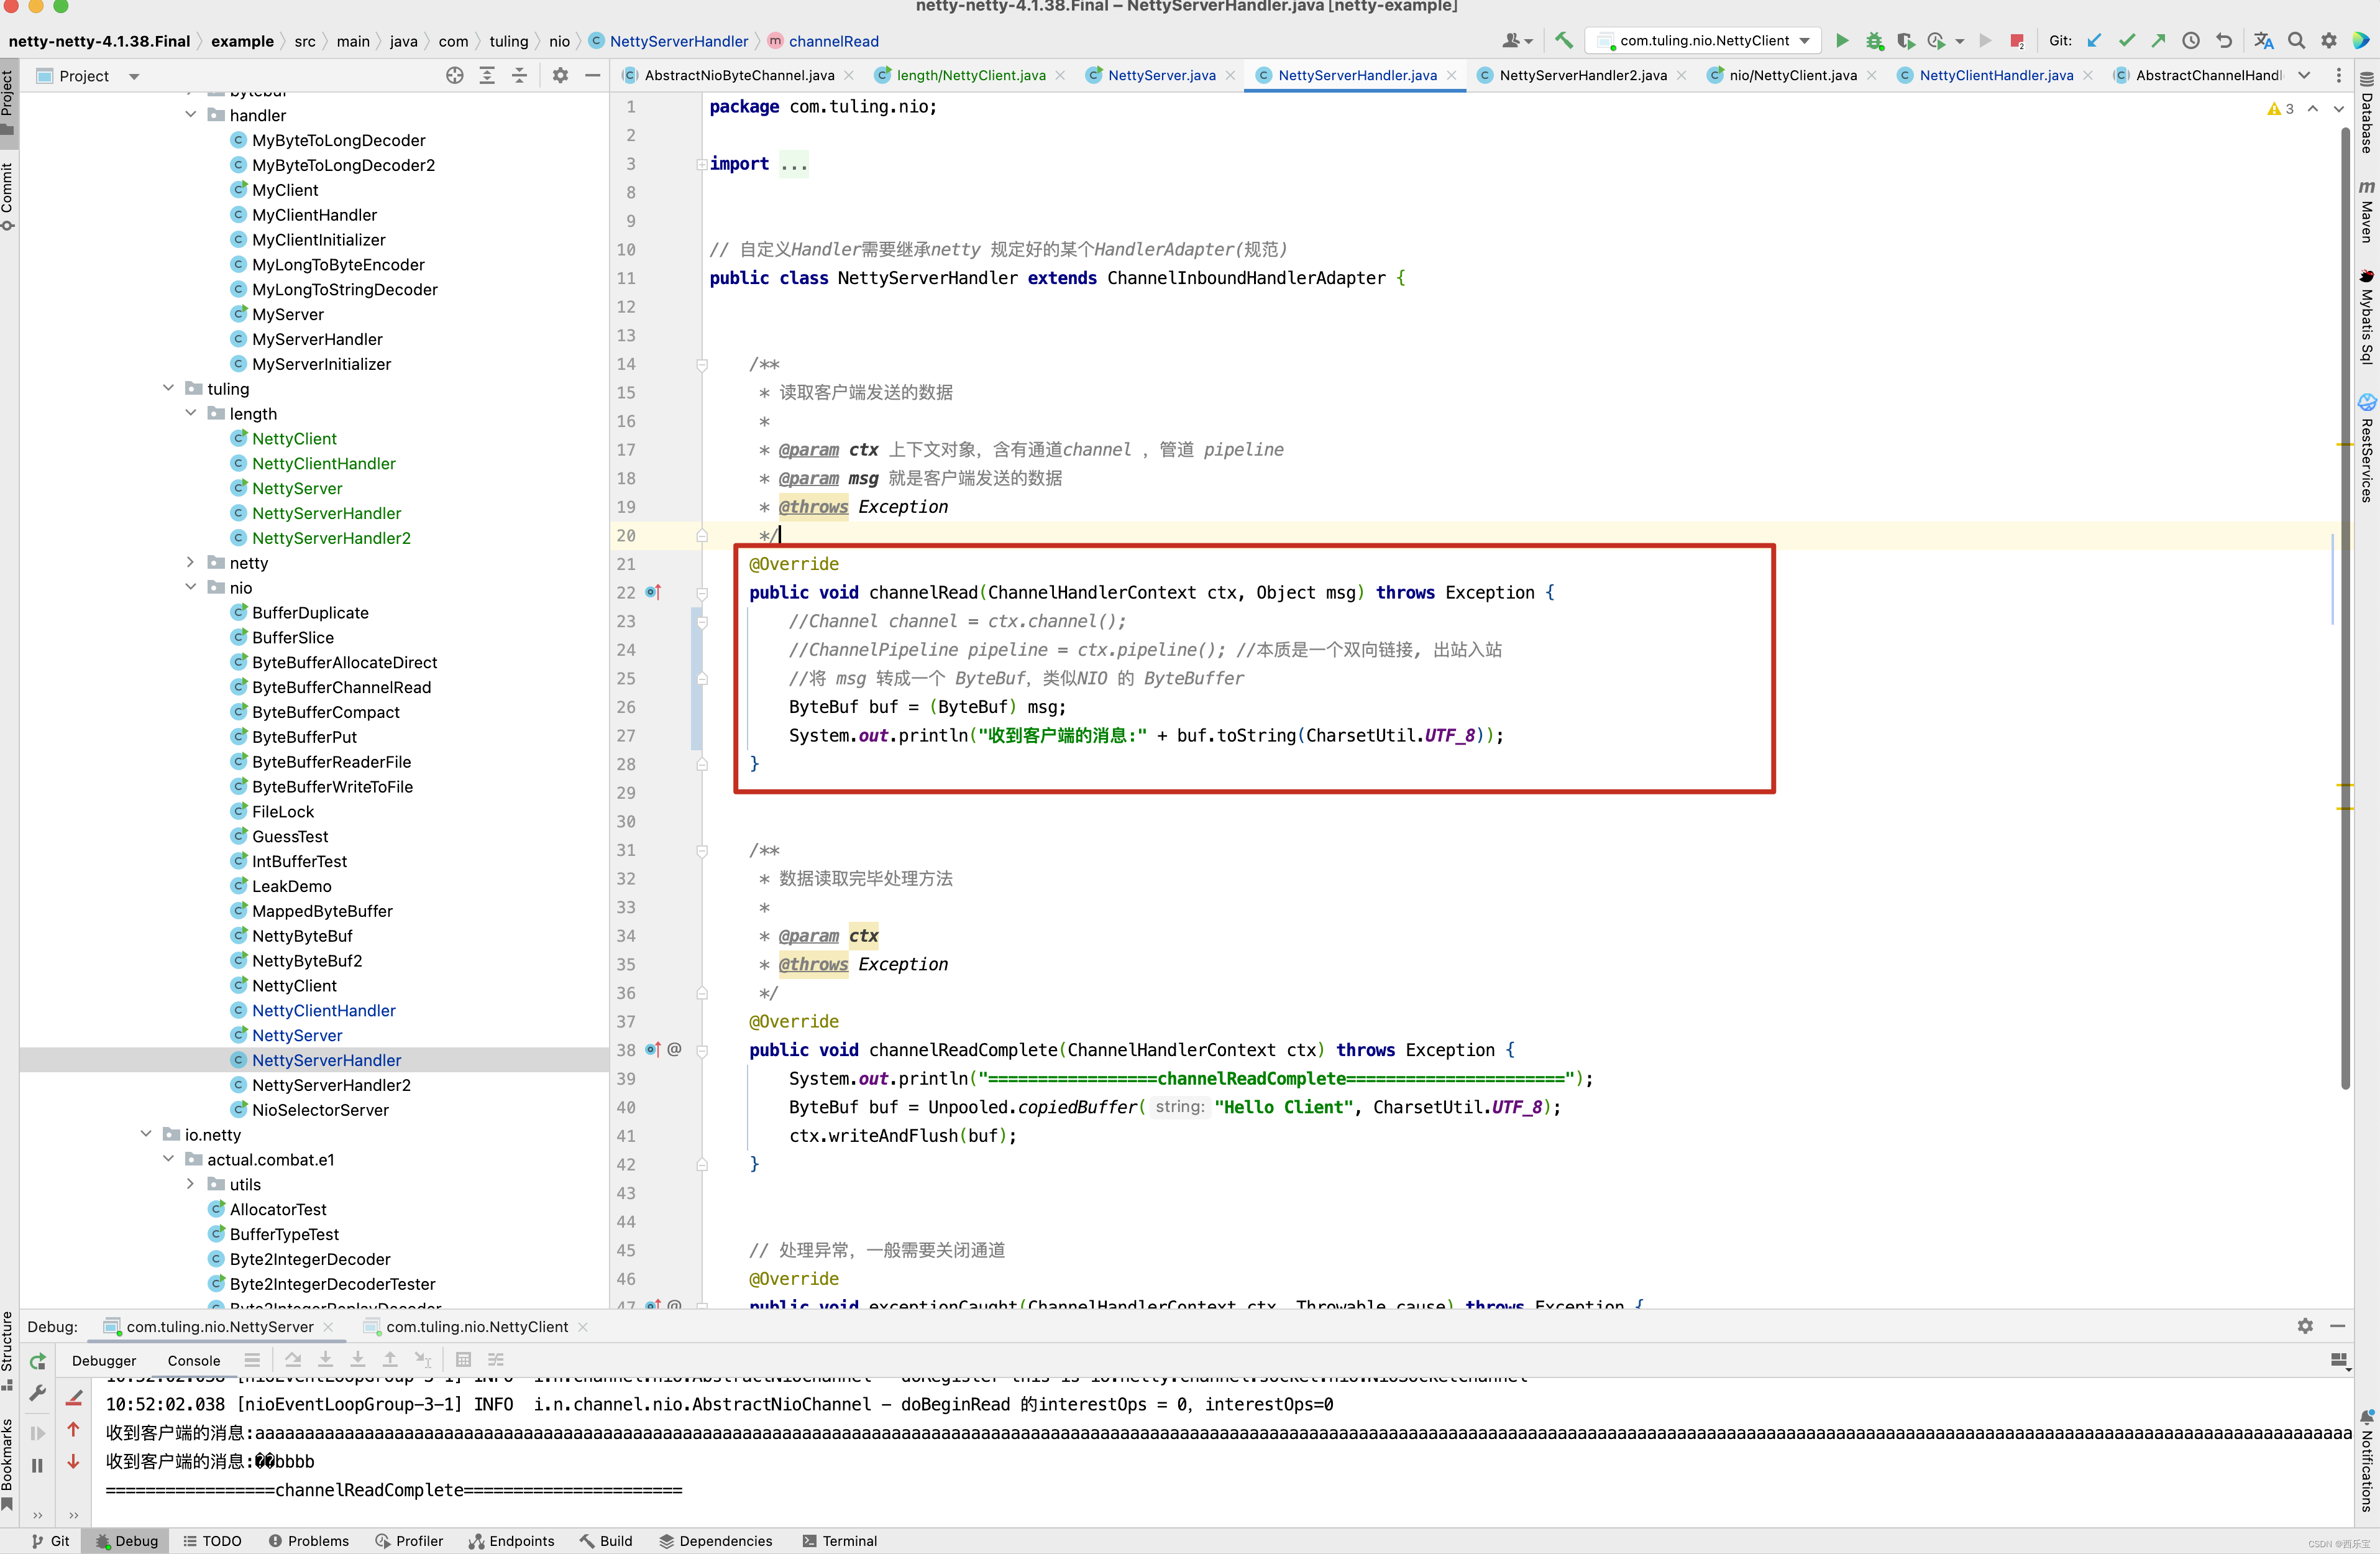
输出打印结果如下 。
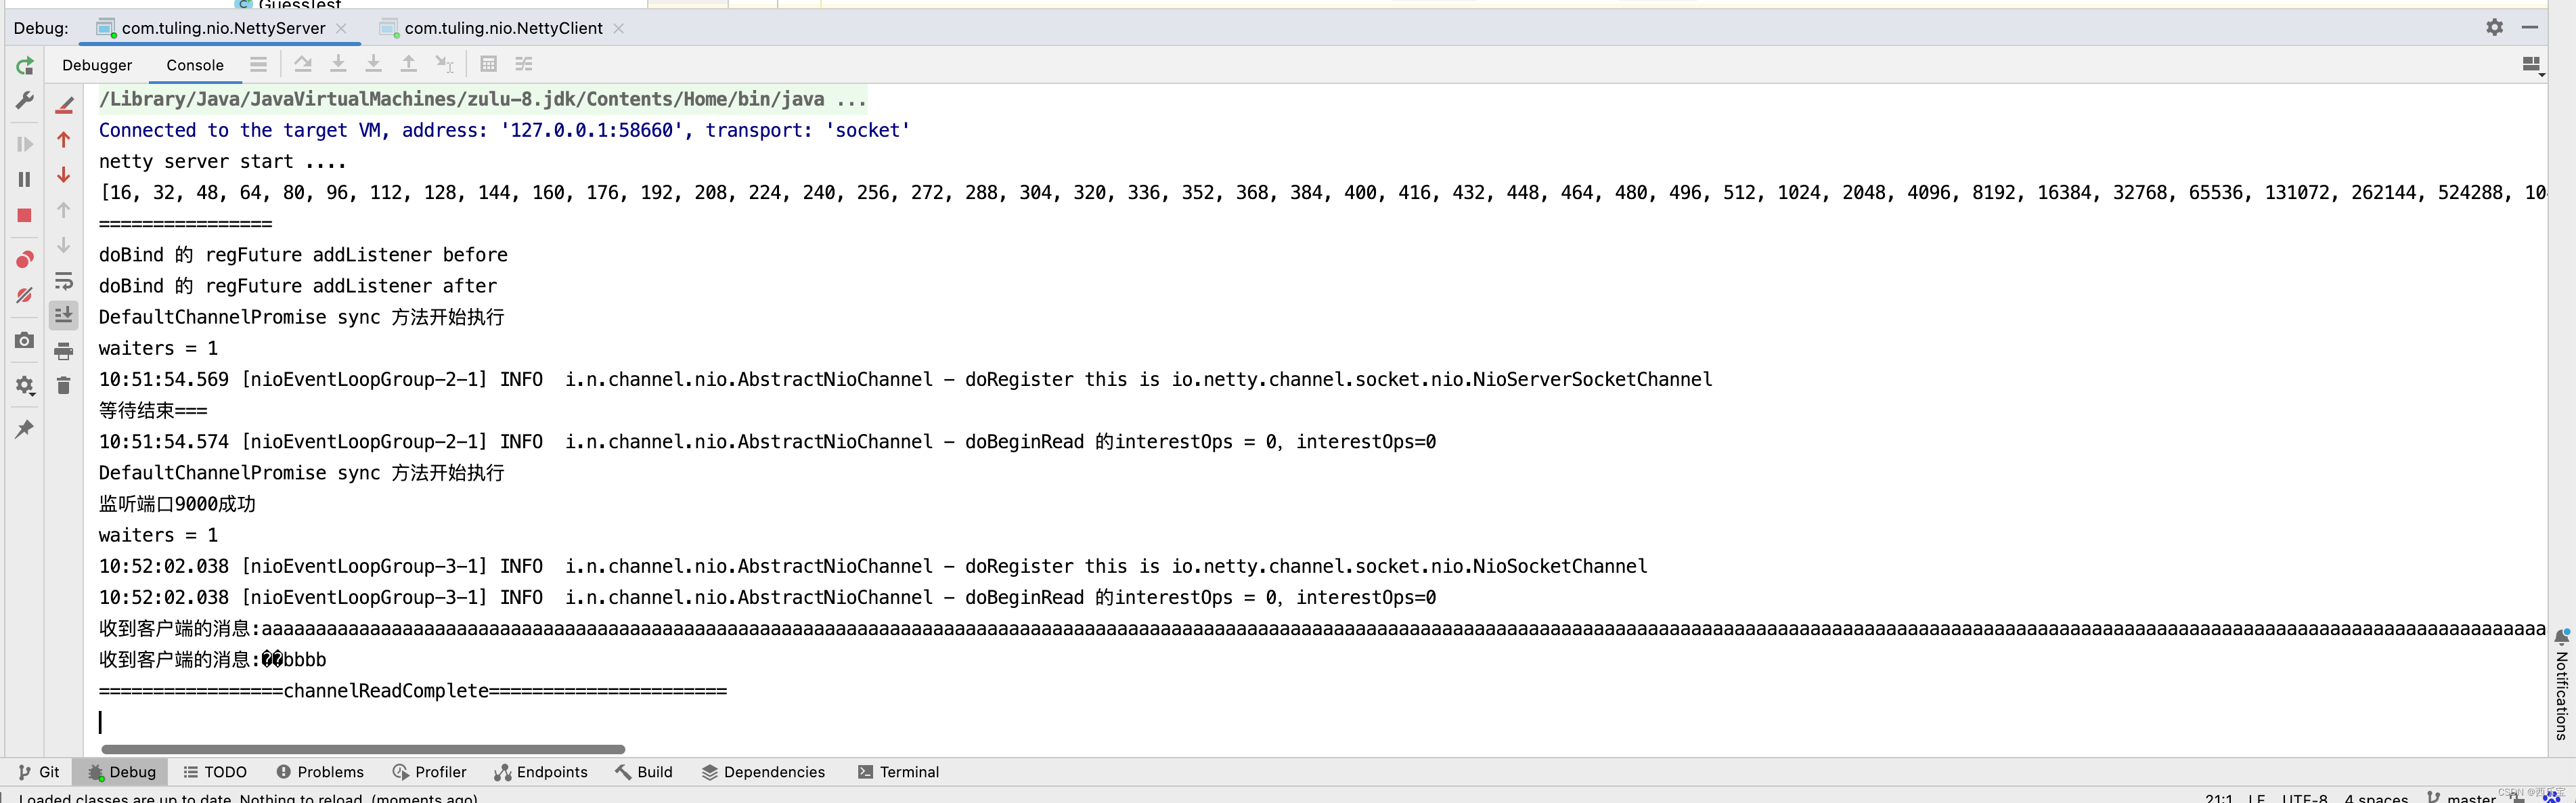
毫无疑问,出现了中文乱码,出现中文乱码的原因是什么呢? 在 RecvByteBufAllocator内存分配计算 这篇博客中已经分析过出现问题的原因是Netty默认使用的PooledByteBufAllocator 分配器。
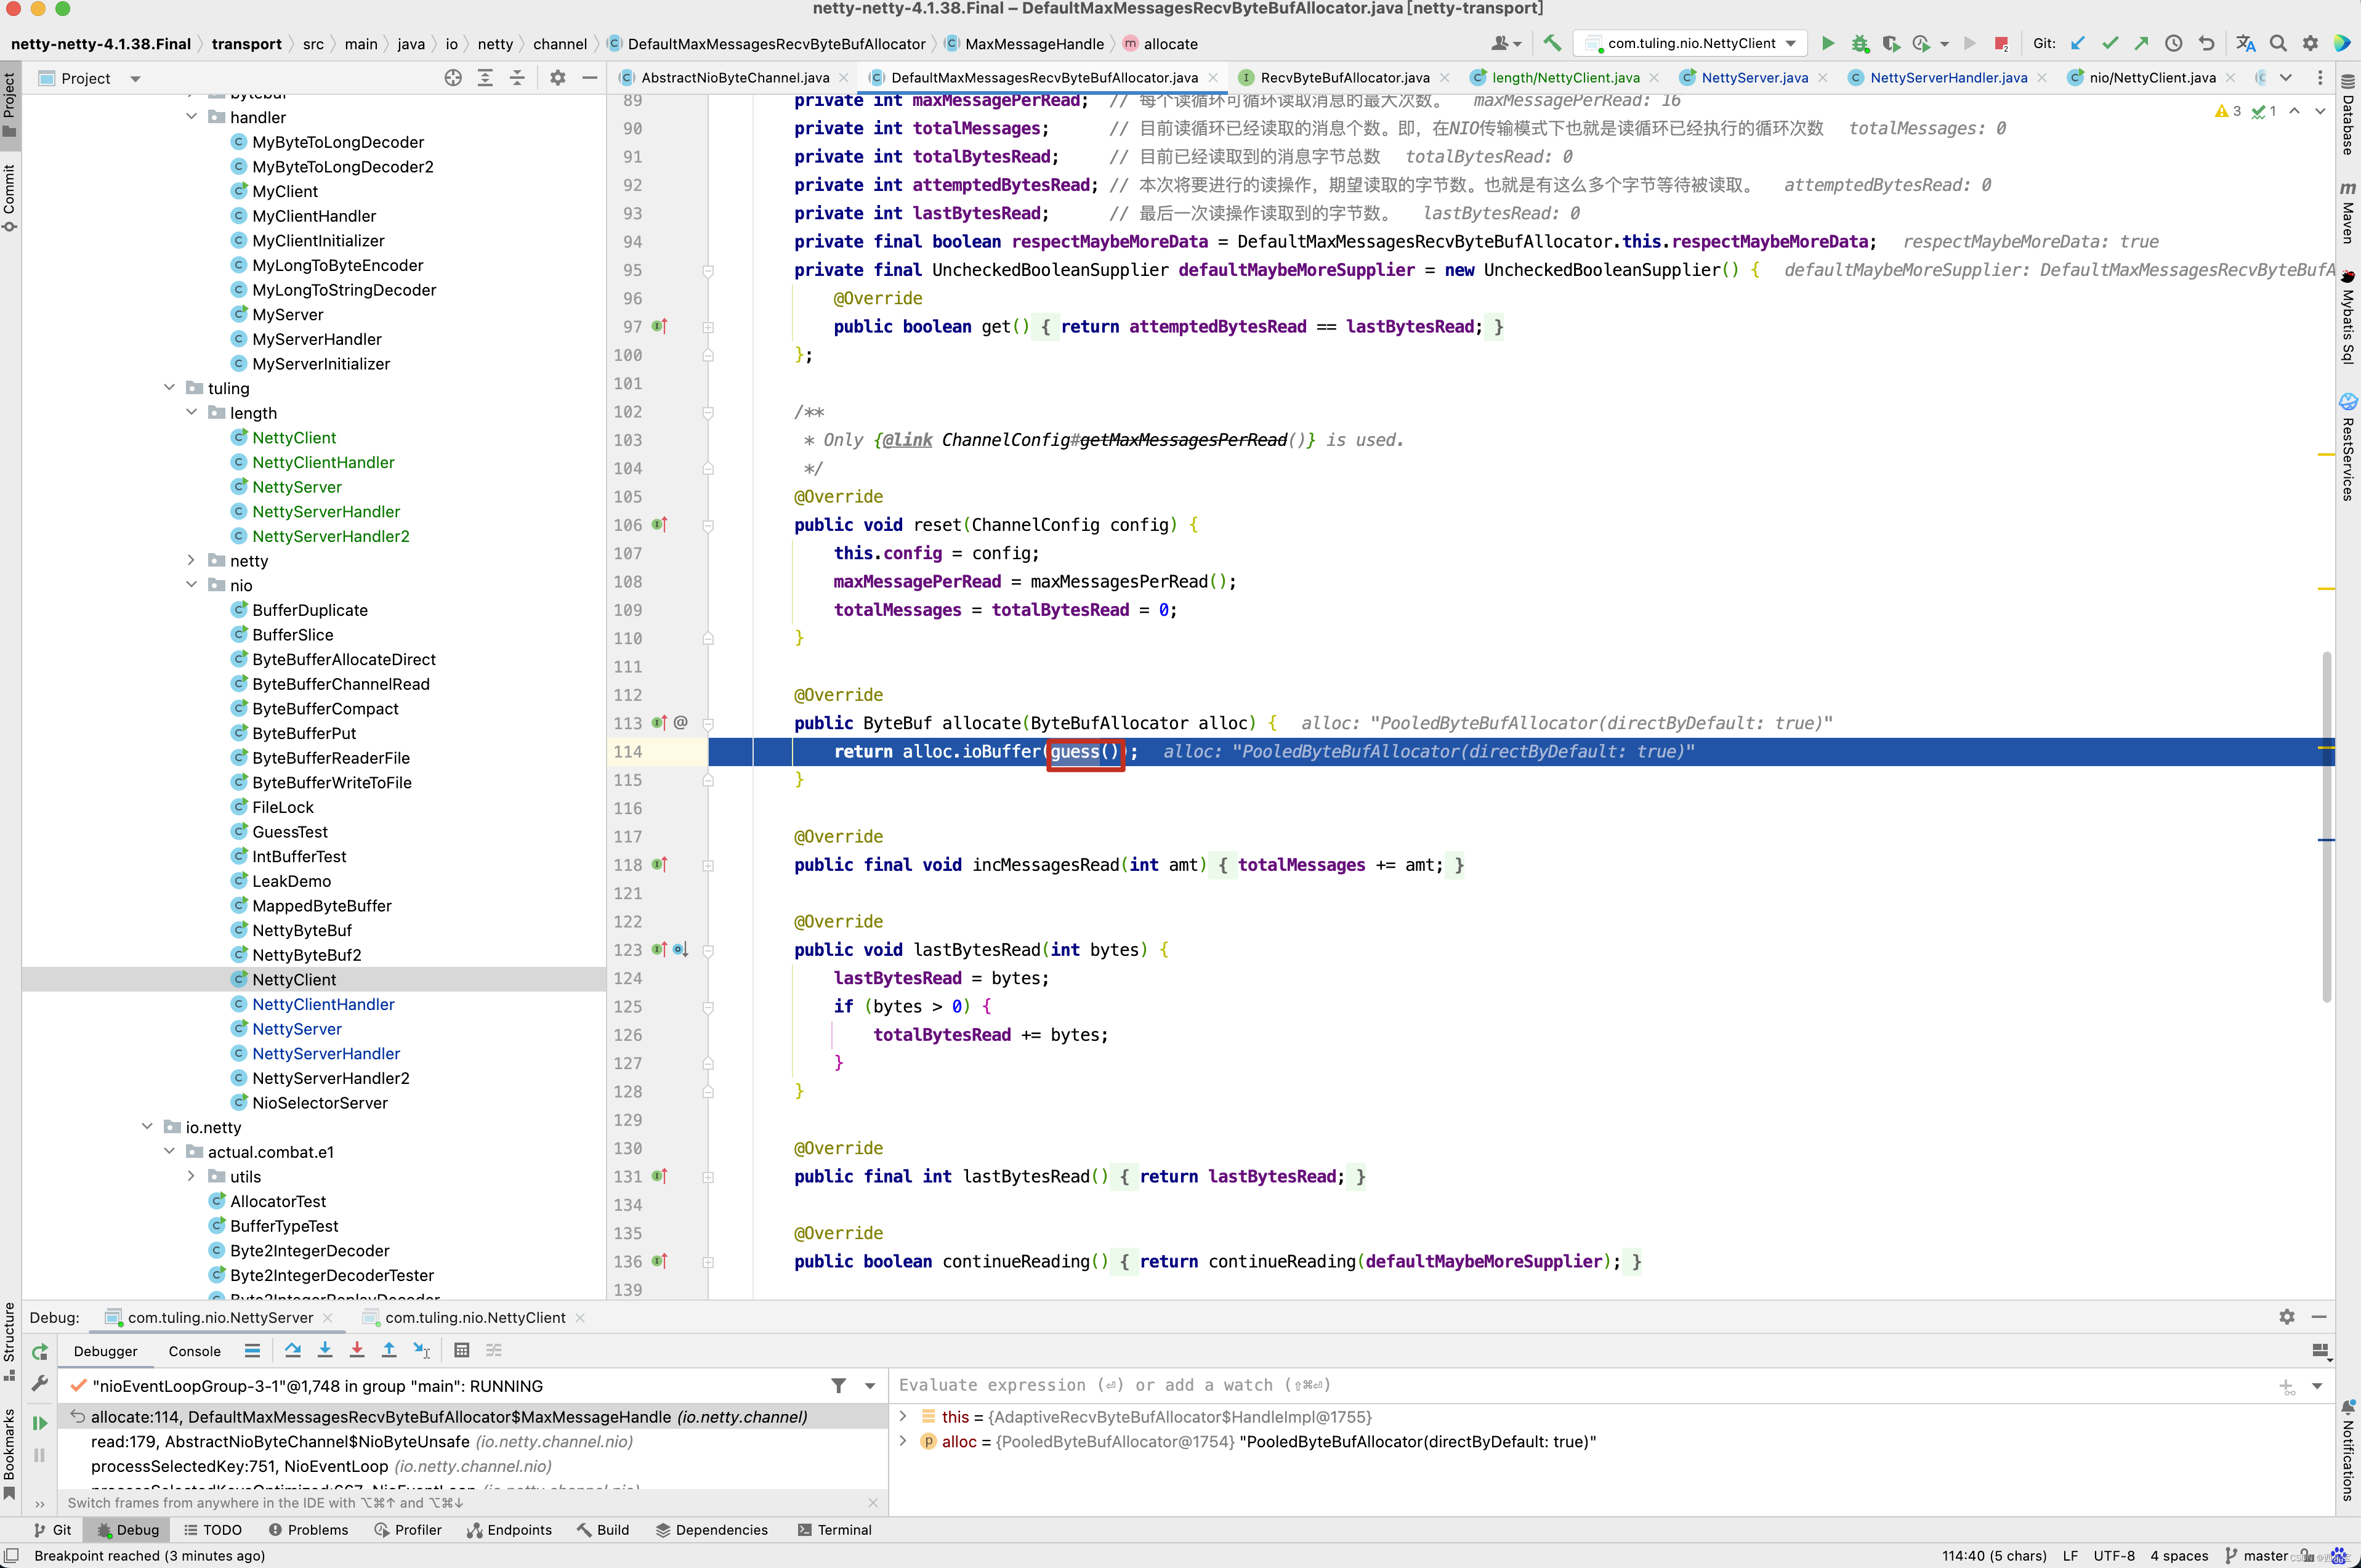
而在第一次调用byteBuf = allocHandle.allocate(allocator) 这一行代码时guess()方法猜测内存大小为1024B。
而刚好在传输数据的1024~1026个字节中写入了“中”字。

而PooledByteBufAllocator第一次只创建了一个容量为1024个字节的ByteBuf,因此打印byteBuf中的字节时,出现了中文乱码,在分析解决方案时,还是来看一下打印出乱码的具体细节,而最终调用NettyServerHandler处理器类是通过流水线调用的。
先回顾NettyServerHandler是何时被加入到流水线中的,在ChannelInitializer的initChannel()方法中打一个断点 。

看到了进入了断点,那这个方法时何时被调用的呢? 根据方法调用栈向前回溯 。

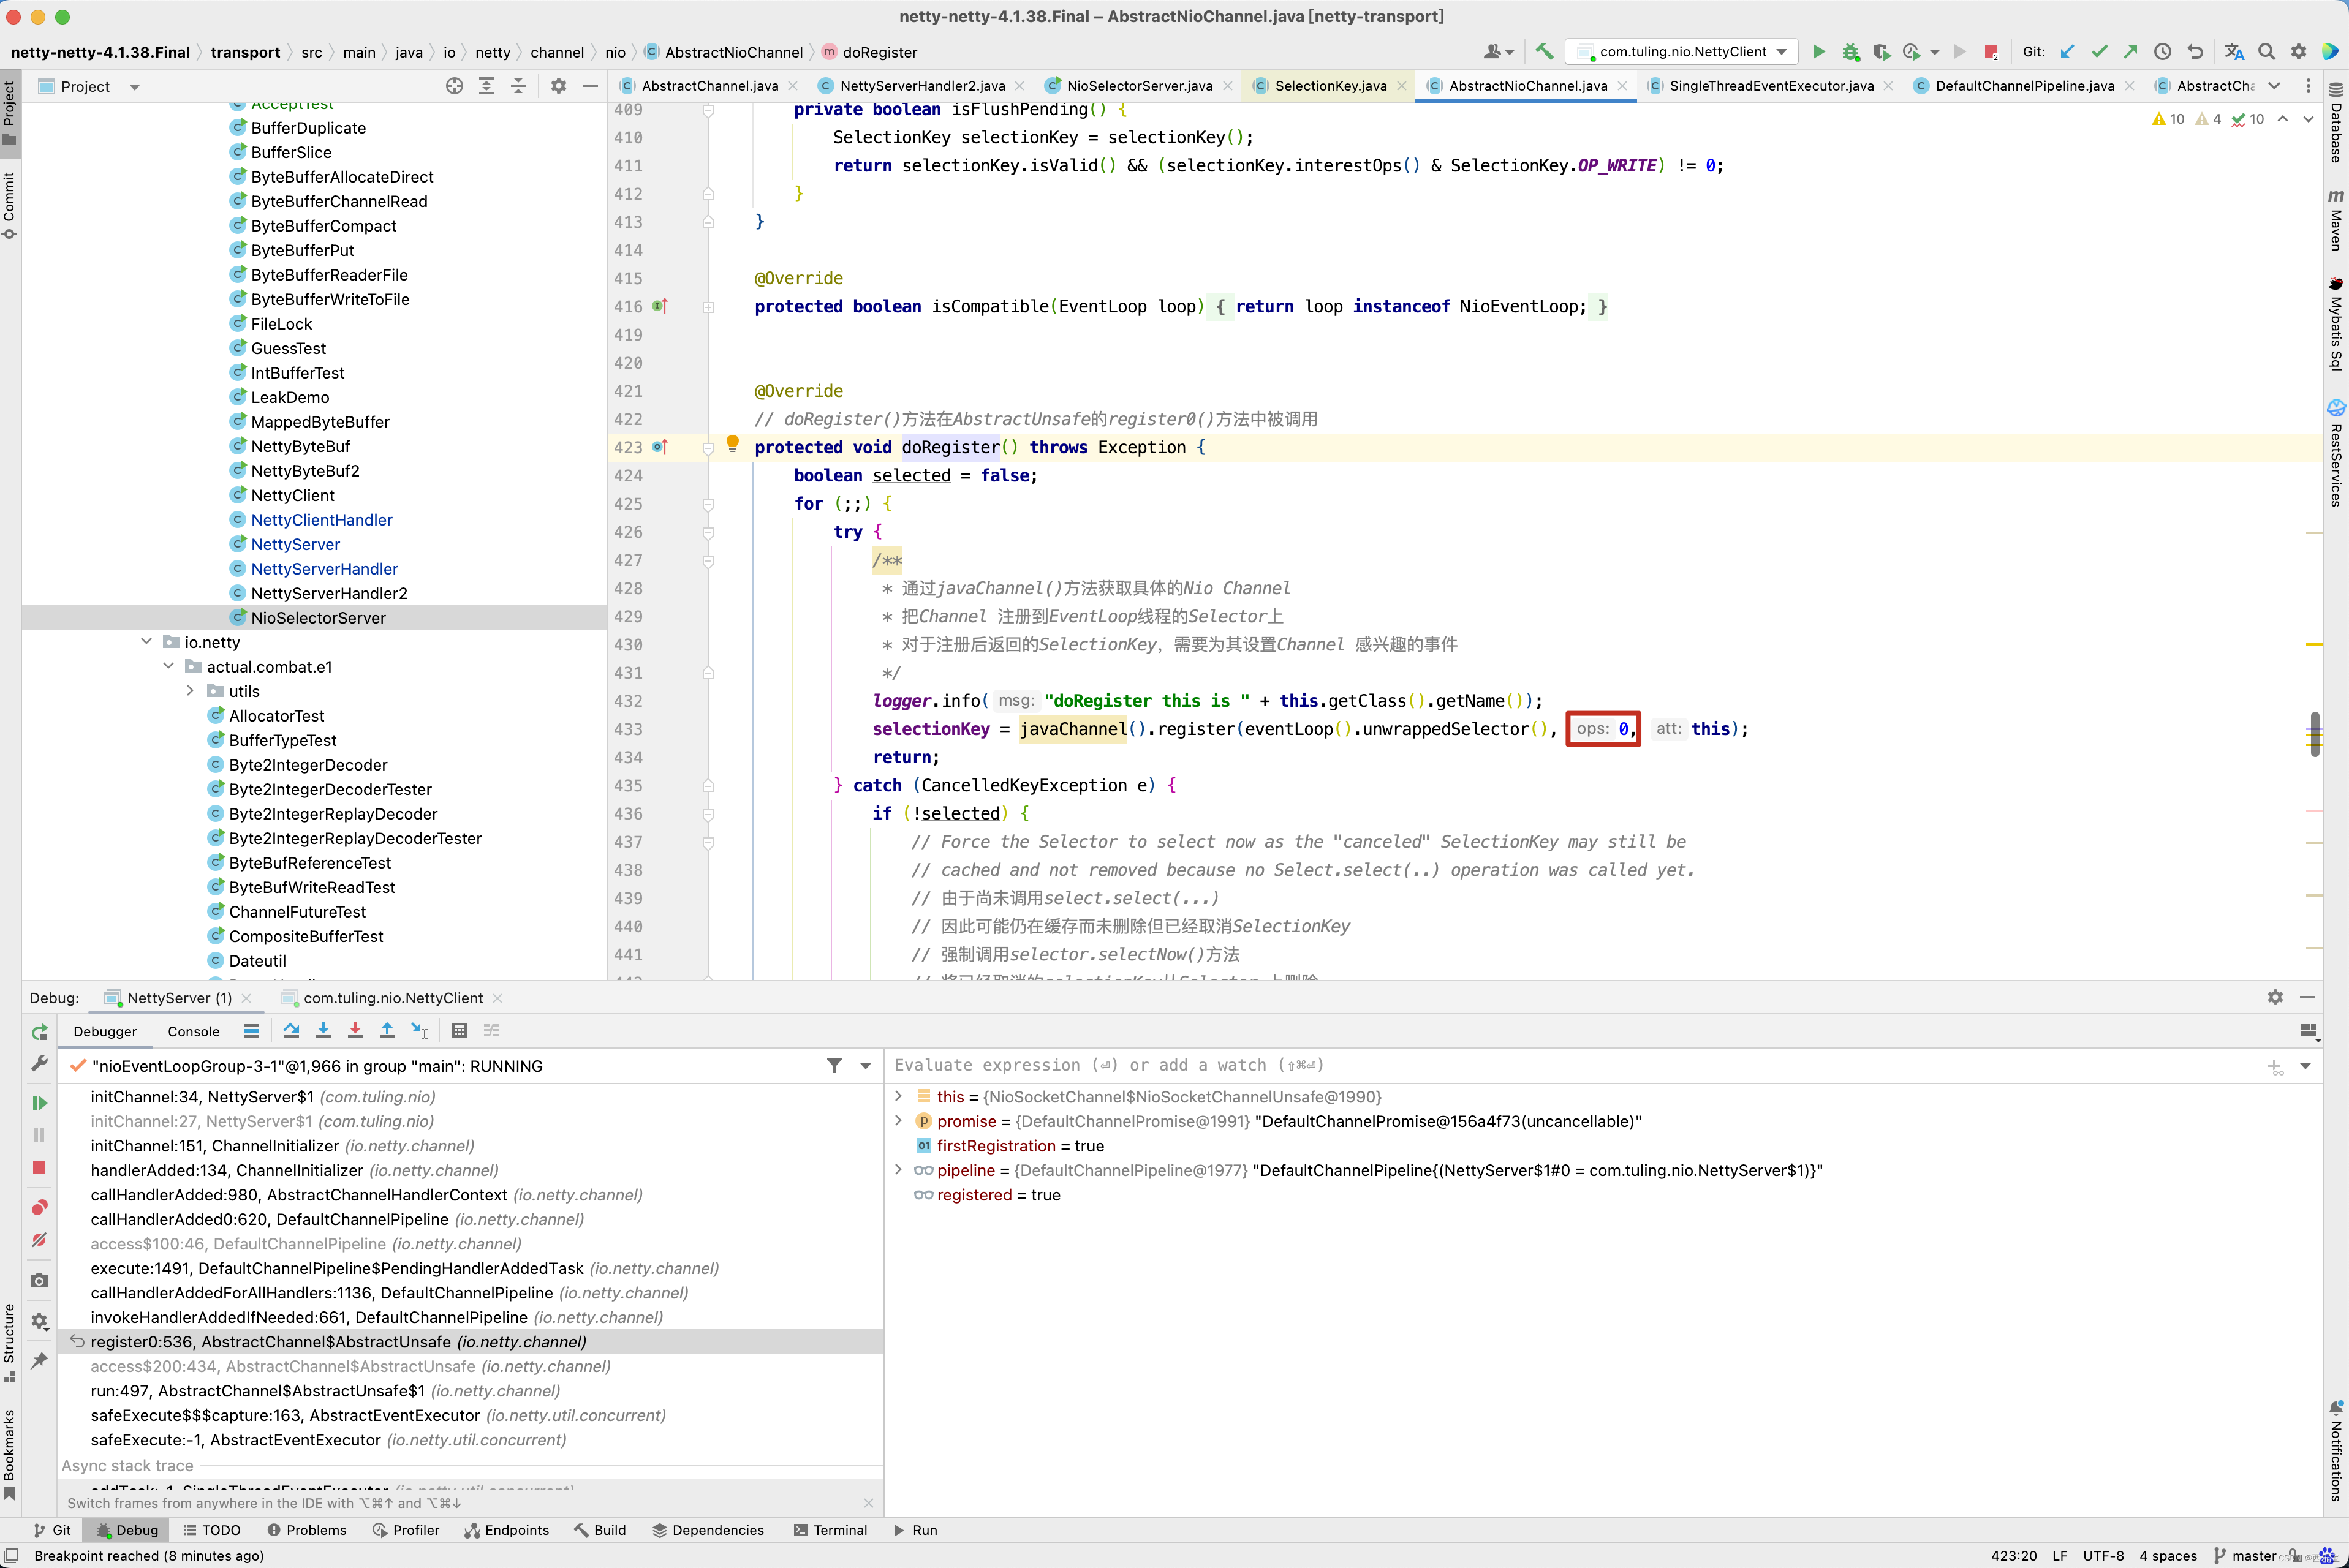
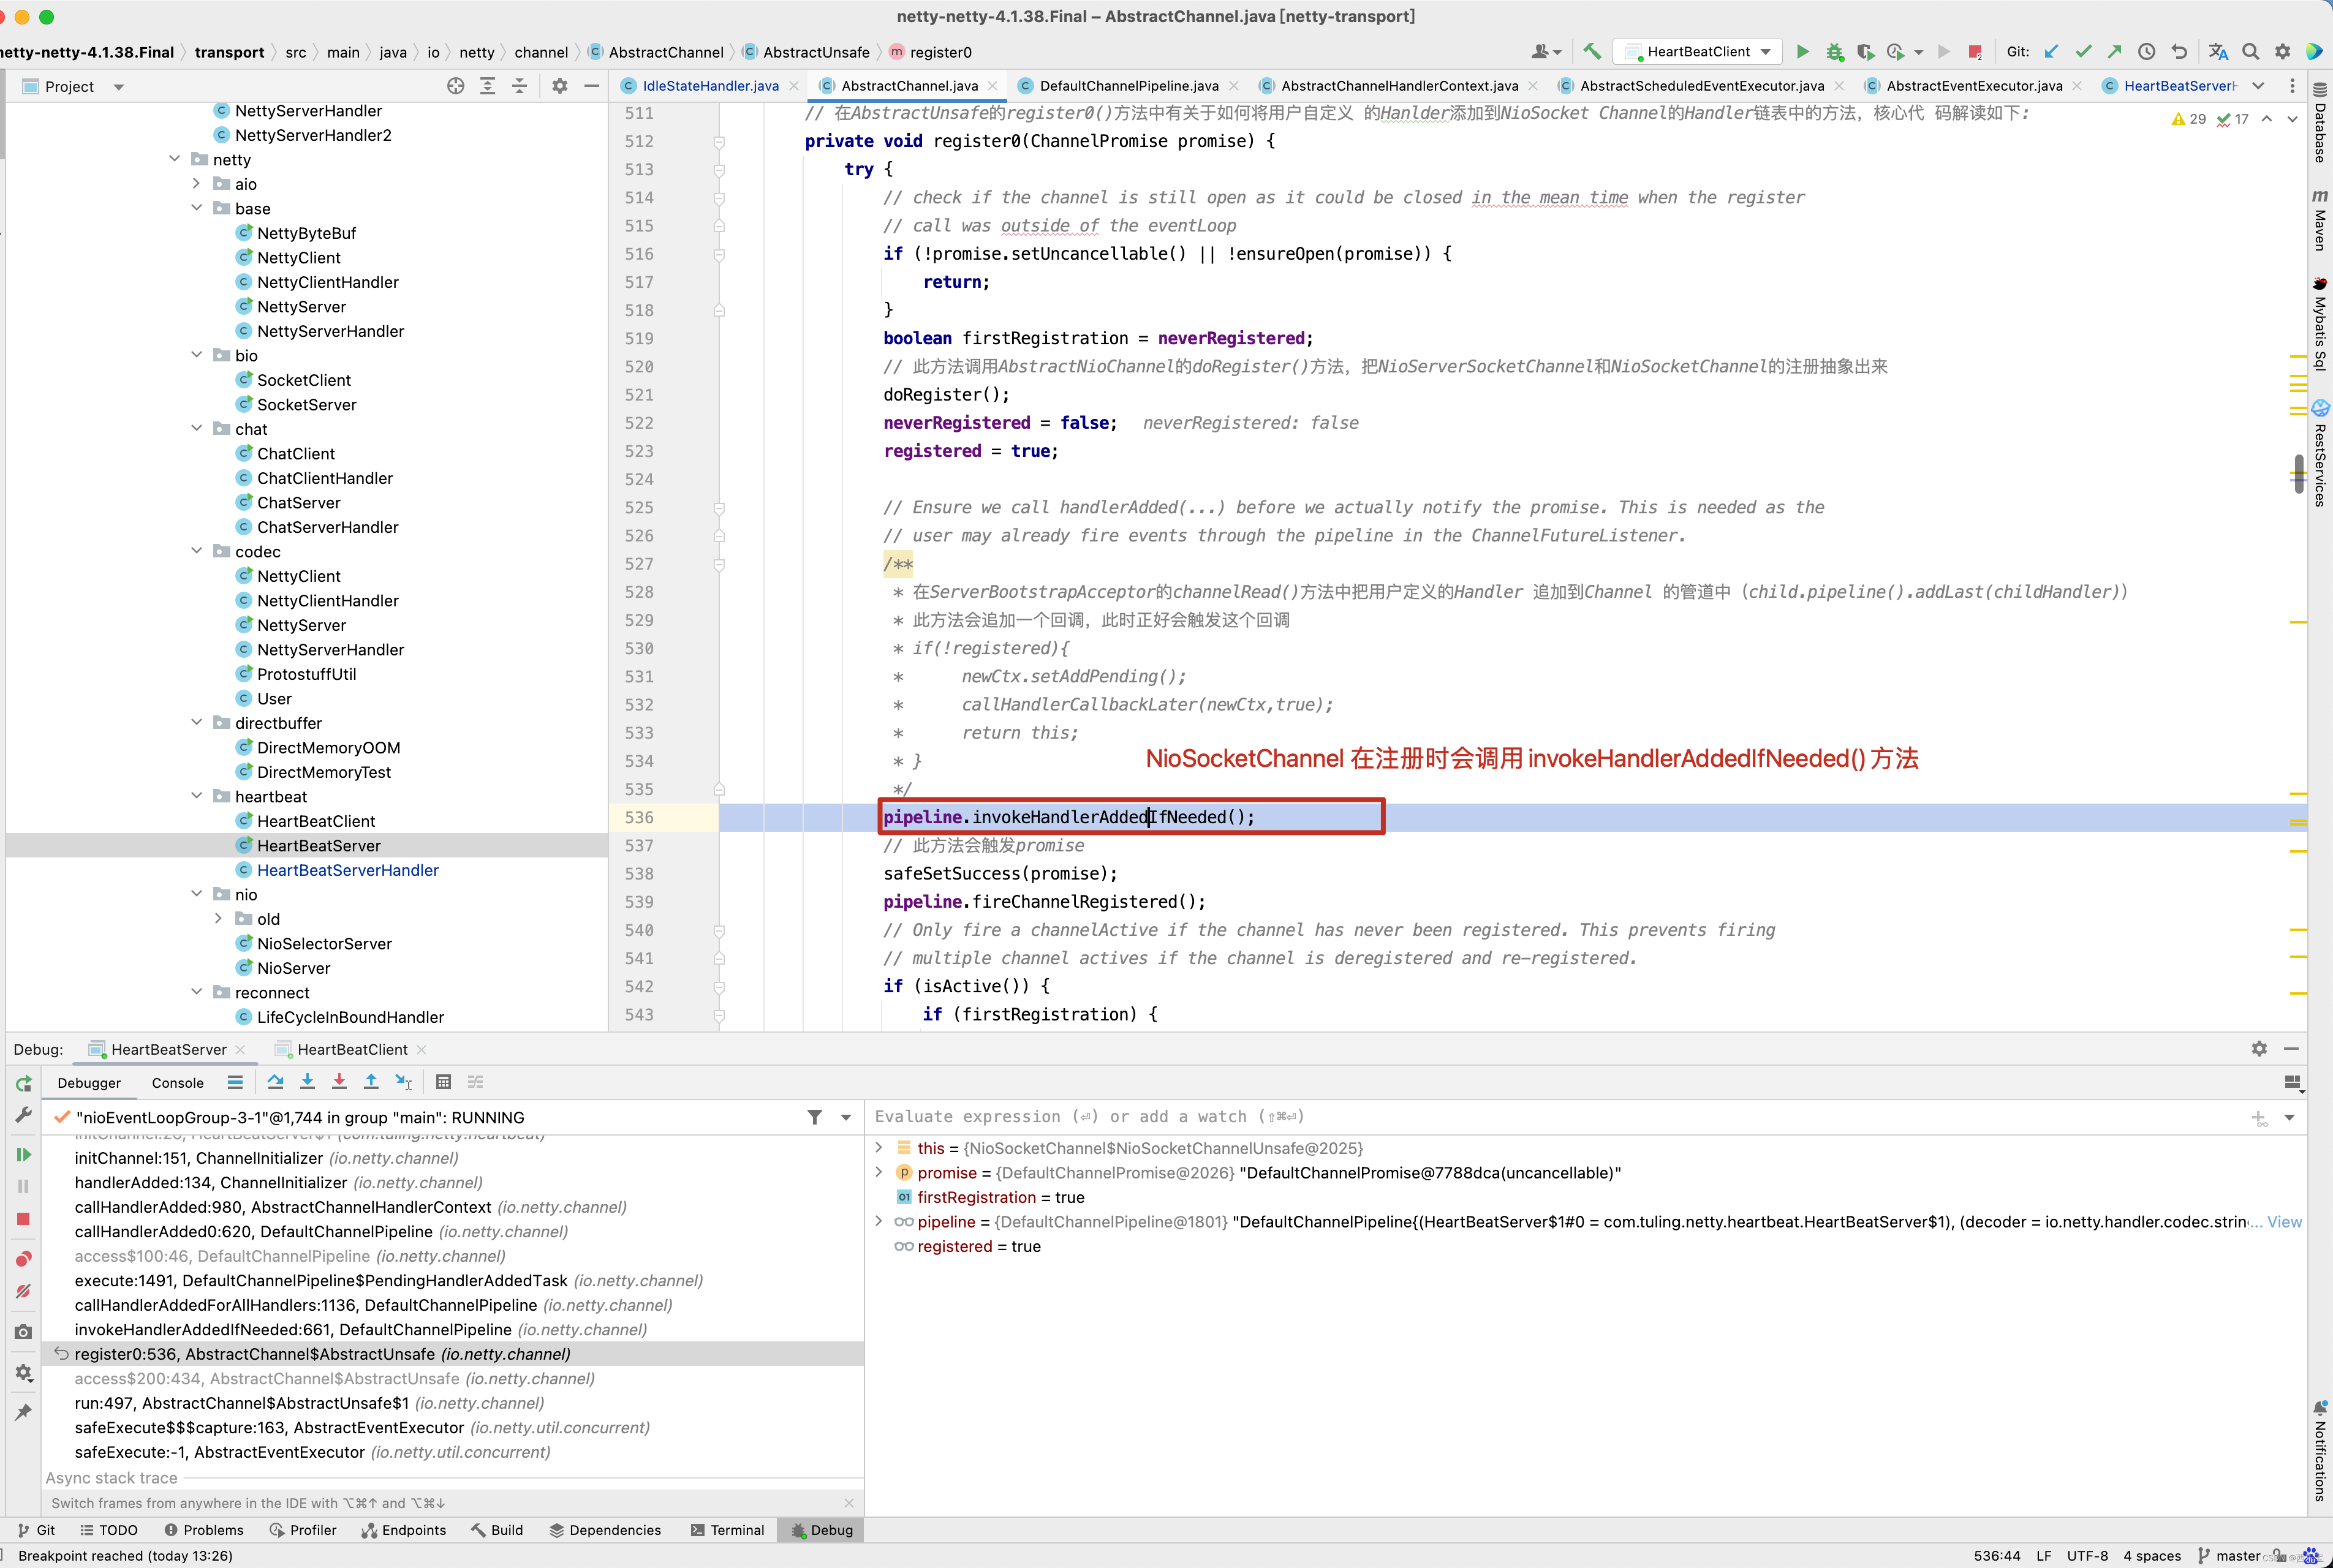
看到没有,是在NioSocketChannel的register0()方法中调用了pipeline的invokeHandlerAddedIfNeeded()方法 。 我们继续向前追溯,
当Netty代码接收到 SelectionKey.OP_ACCEPT时, childGroup.register(child)进行注册,而最终调用了我们自定义的ChannelInitializer 的initChannel()方法,将自定义的handler加入到流水线中。

我们来分析这一块代码的整体逻辑。
-
首先调用了bootstrap.bind(9000)方法
-
最终调用了NioSocketChannel的doBeginRead()方法注册了OP_ACCEPT事件 。
-
同时启动了一个线程,不断的死循环,监听OP_ACCEPT
-
如果监听到了SelectionKey.OP_ACCEPT事件
-
当有SelectionKey.OP_ACCEPT事件到来之时,会调用unsafe.read()方法。

-
此时会触发childGroup.register(child)方法调用 。
-
在childGroup的register0()方法中,先会触发pipeline.invokeHandlerAddedIfNeeded()调用,接着会调用我们自定义的ChannelInitializer的initChannel()方法。

-
当然在此之前会注册一个ops=0 的无效事件。

-
当然在最后的 pipeline.fireChannelActive() 方法中调用AbstractNioChannel的doBeginRead()方法注册监听OP_READ事件。
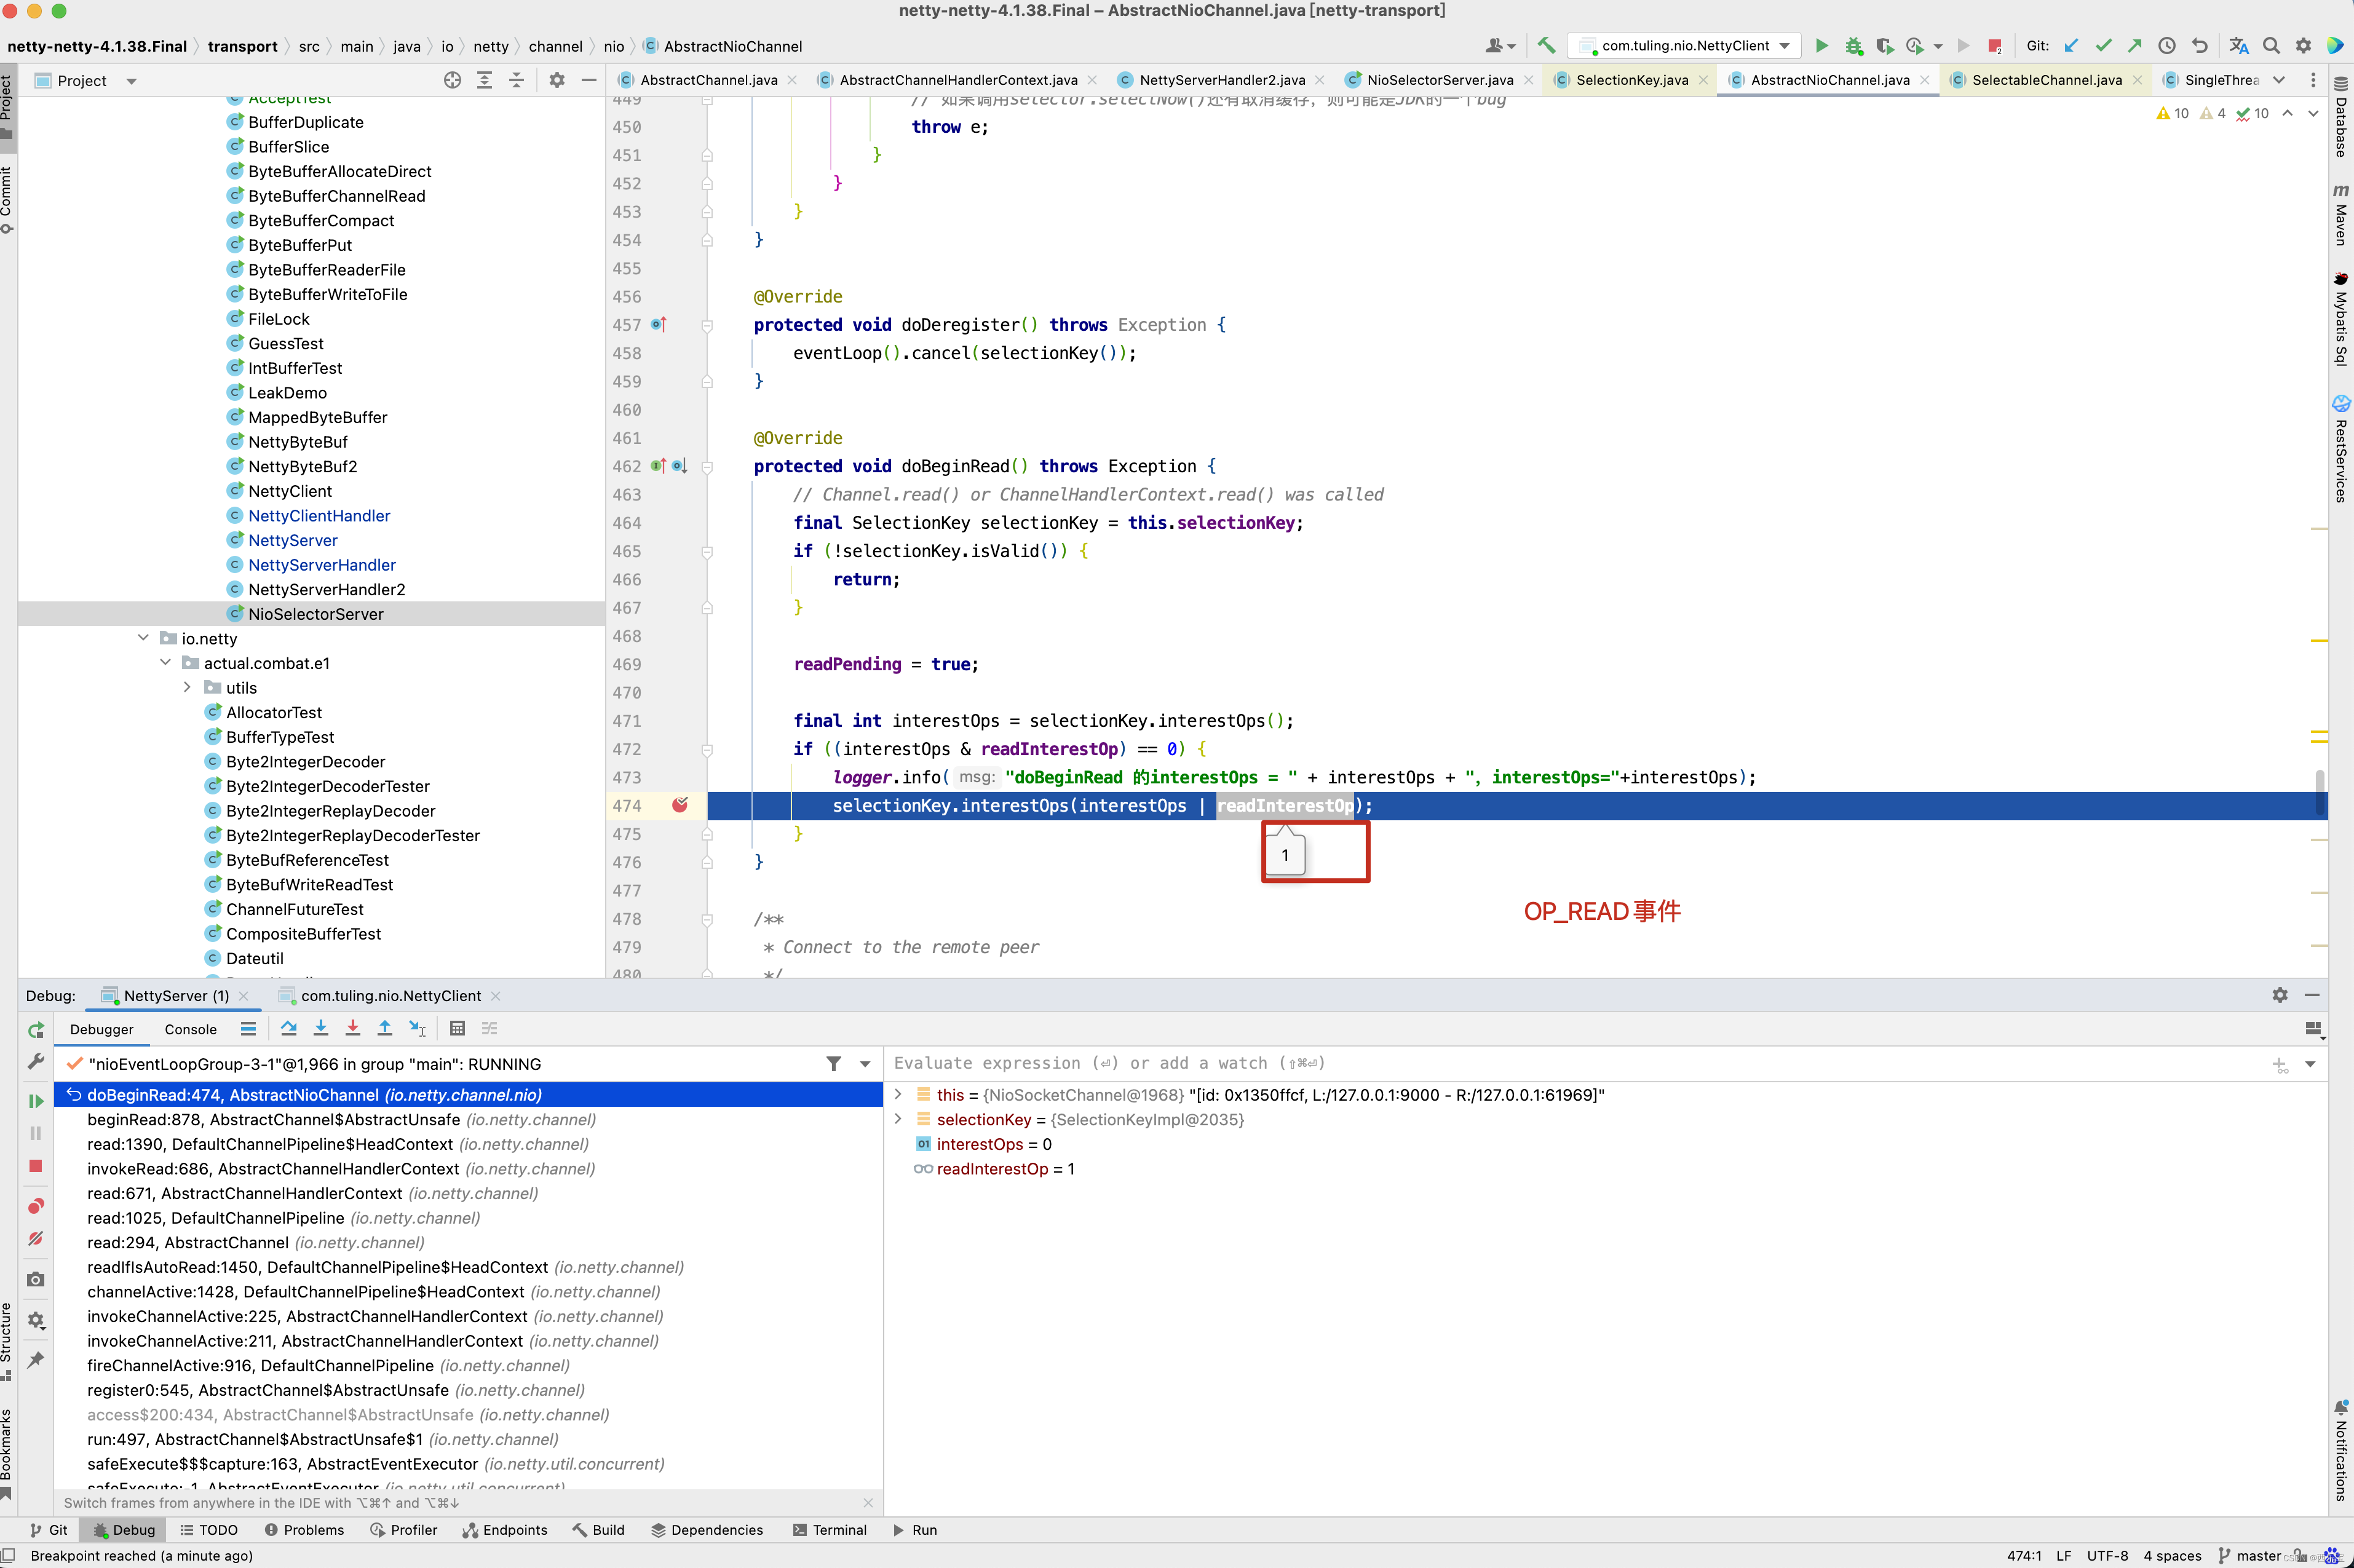
此时此刻,是不是已经有了OP_READ事件监听方法 ,当有OP_READ事件触发时。

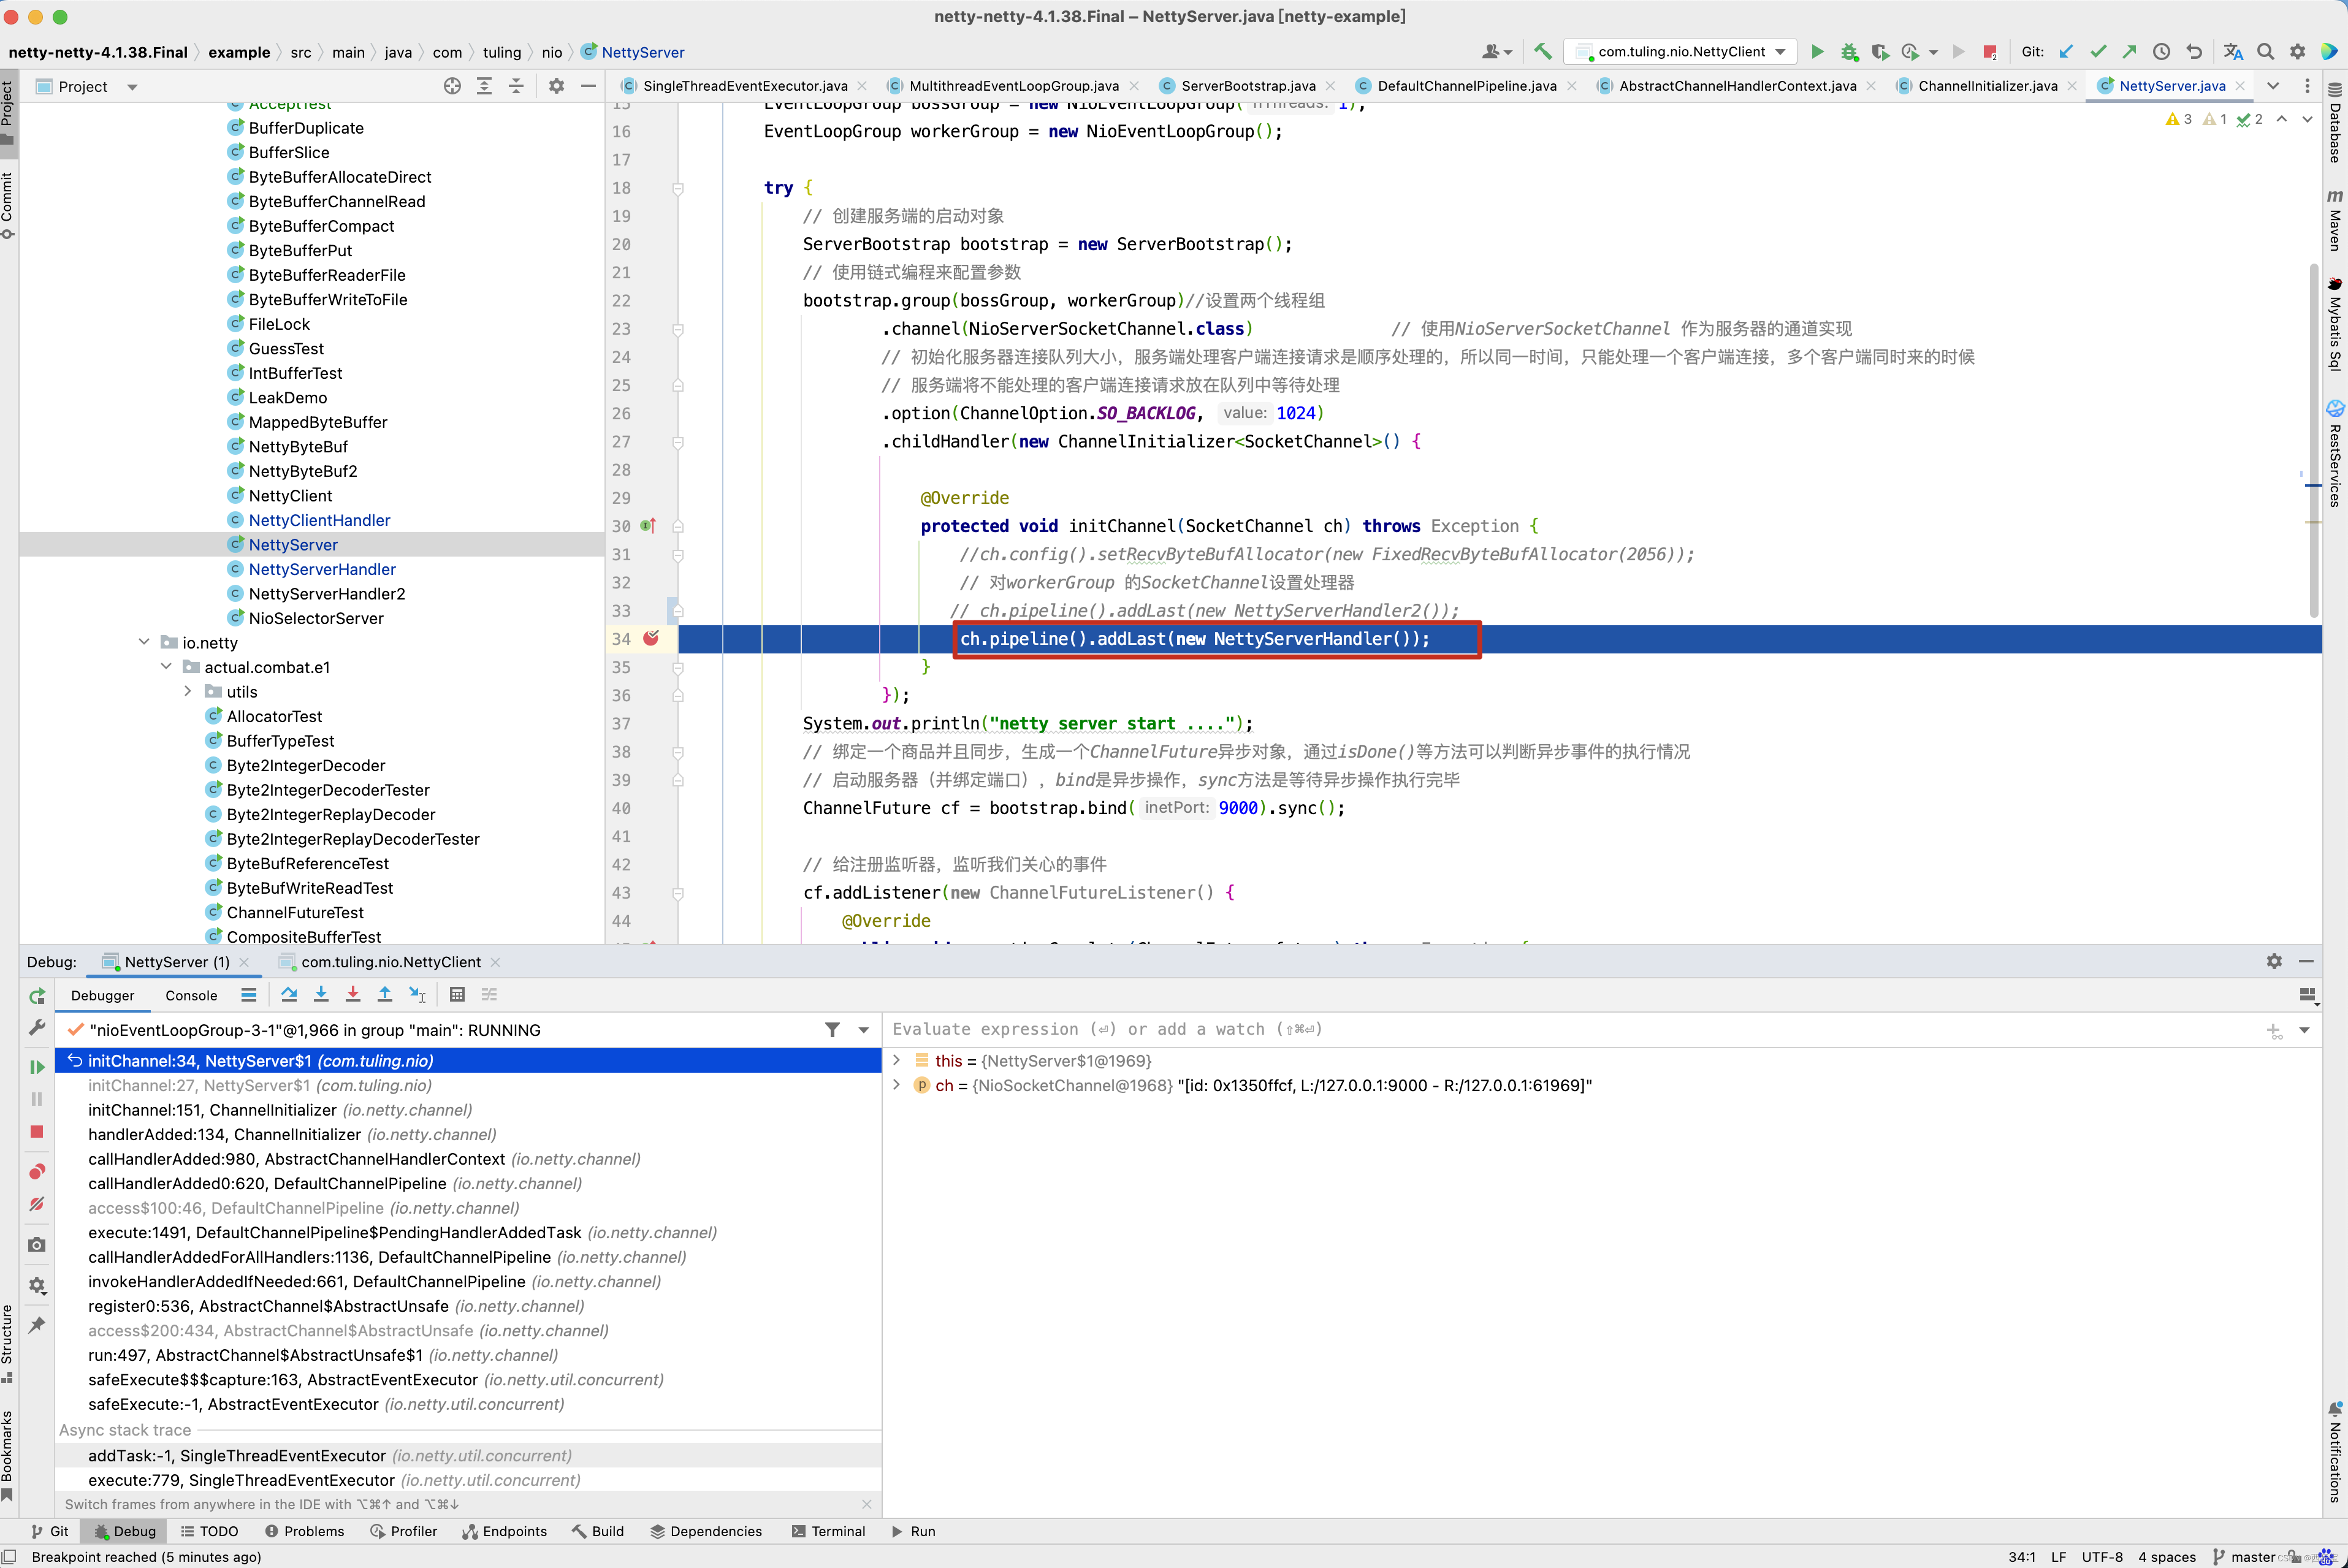
最终开始调用doReadBytes()将channel中的数据读取到byteBuf中。 前面的分析,是对之前代码的回顾,也是对接下来的源码分析做辅垫,接下来从ch.pipeline().addLast(new NettyServerHandler())中分析,看Netty如何将我们自定义的NettyServerHandler加入到流水线中。
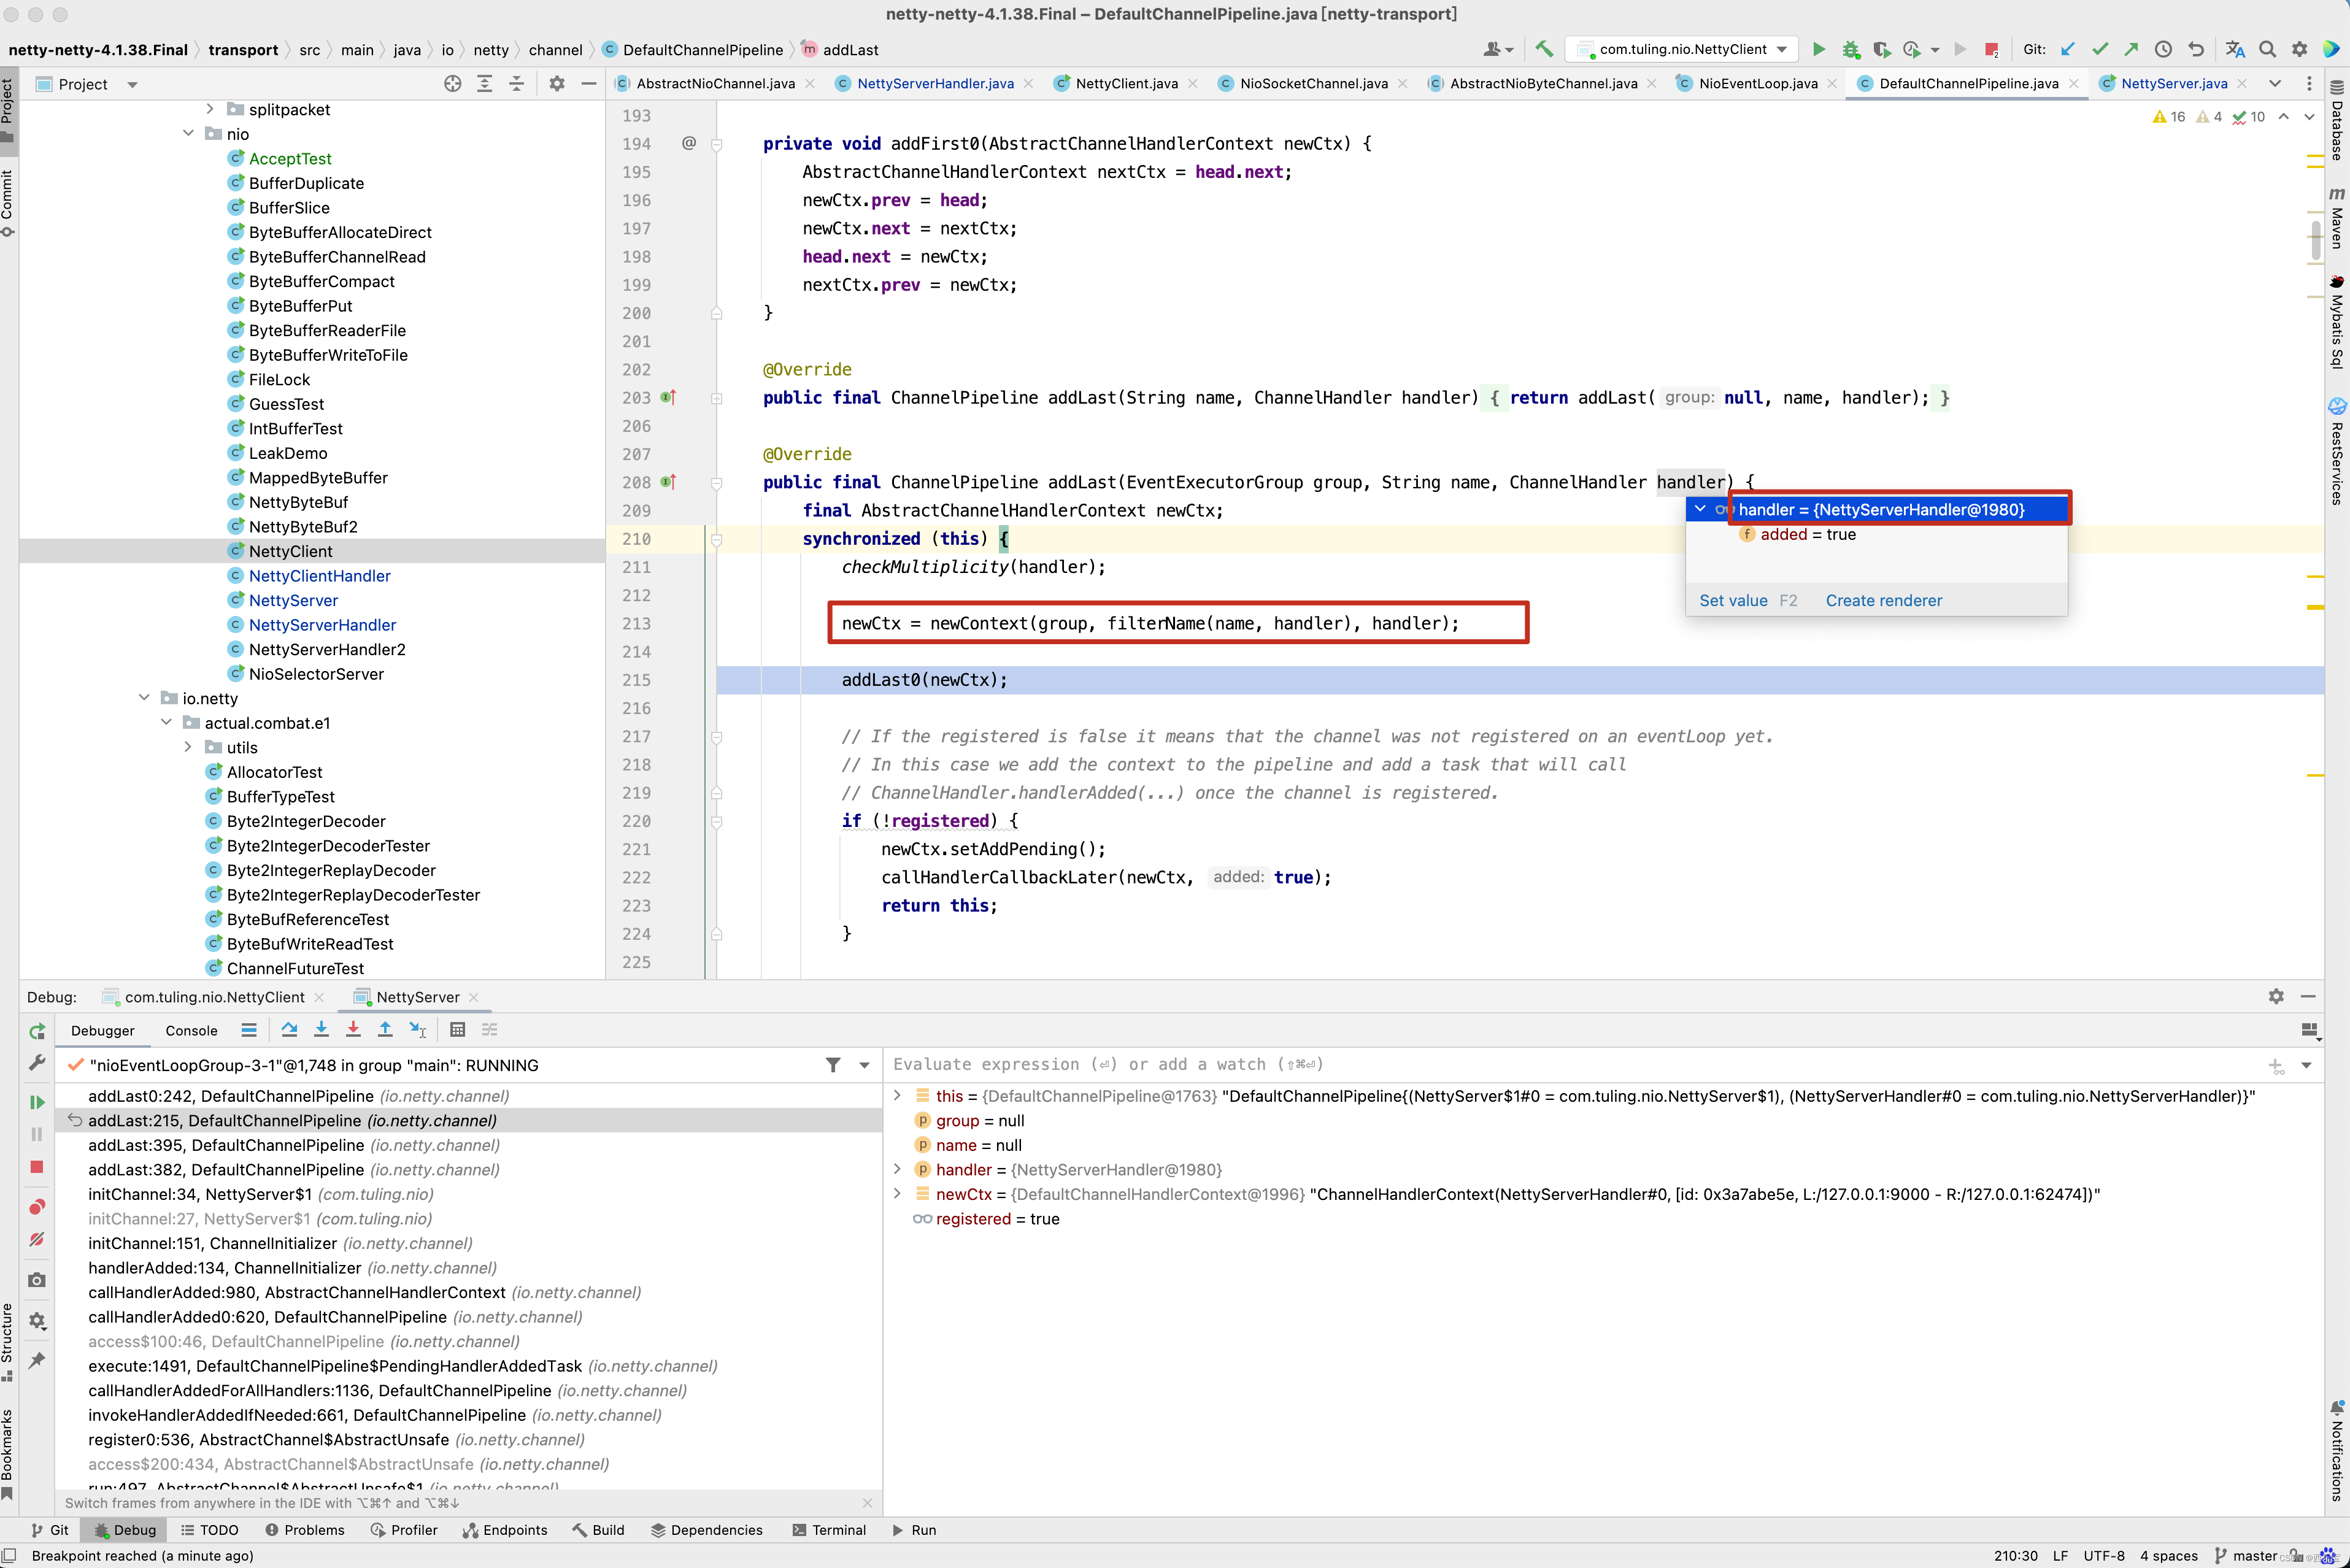
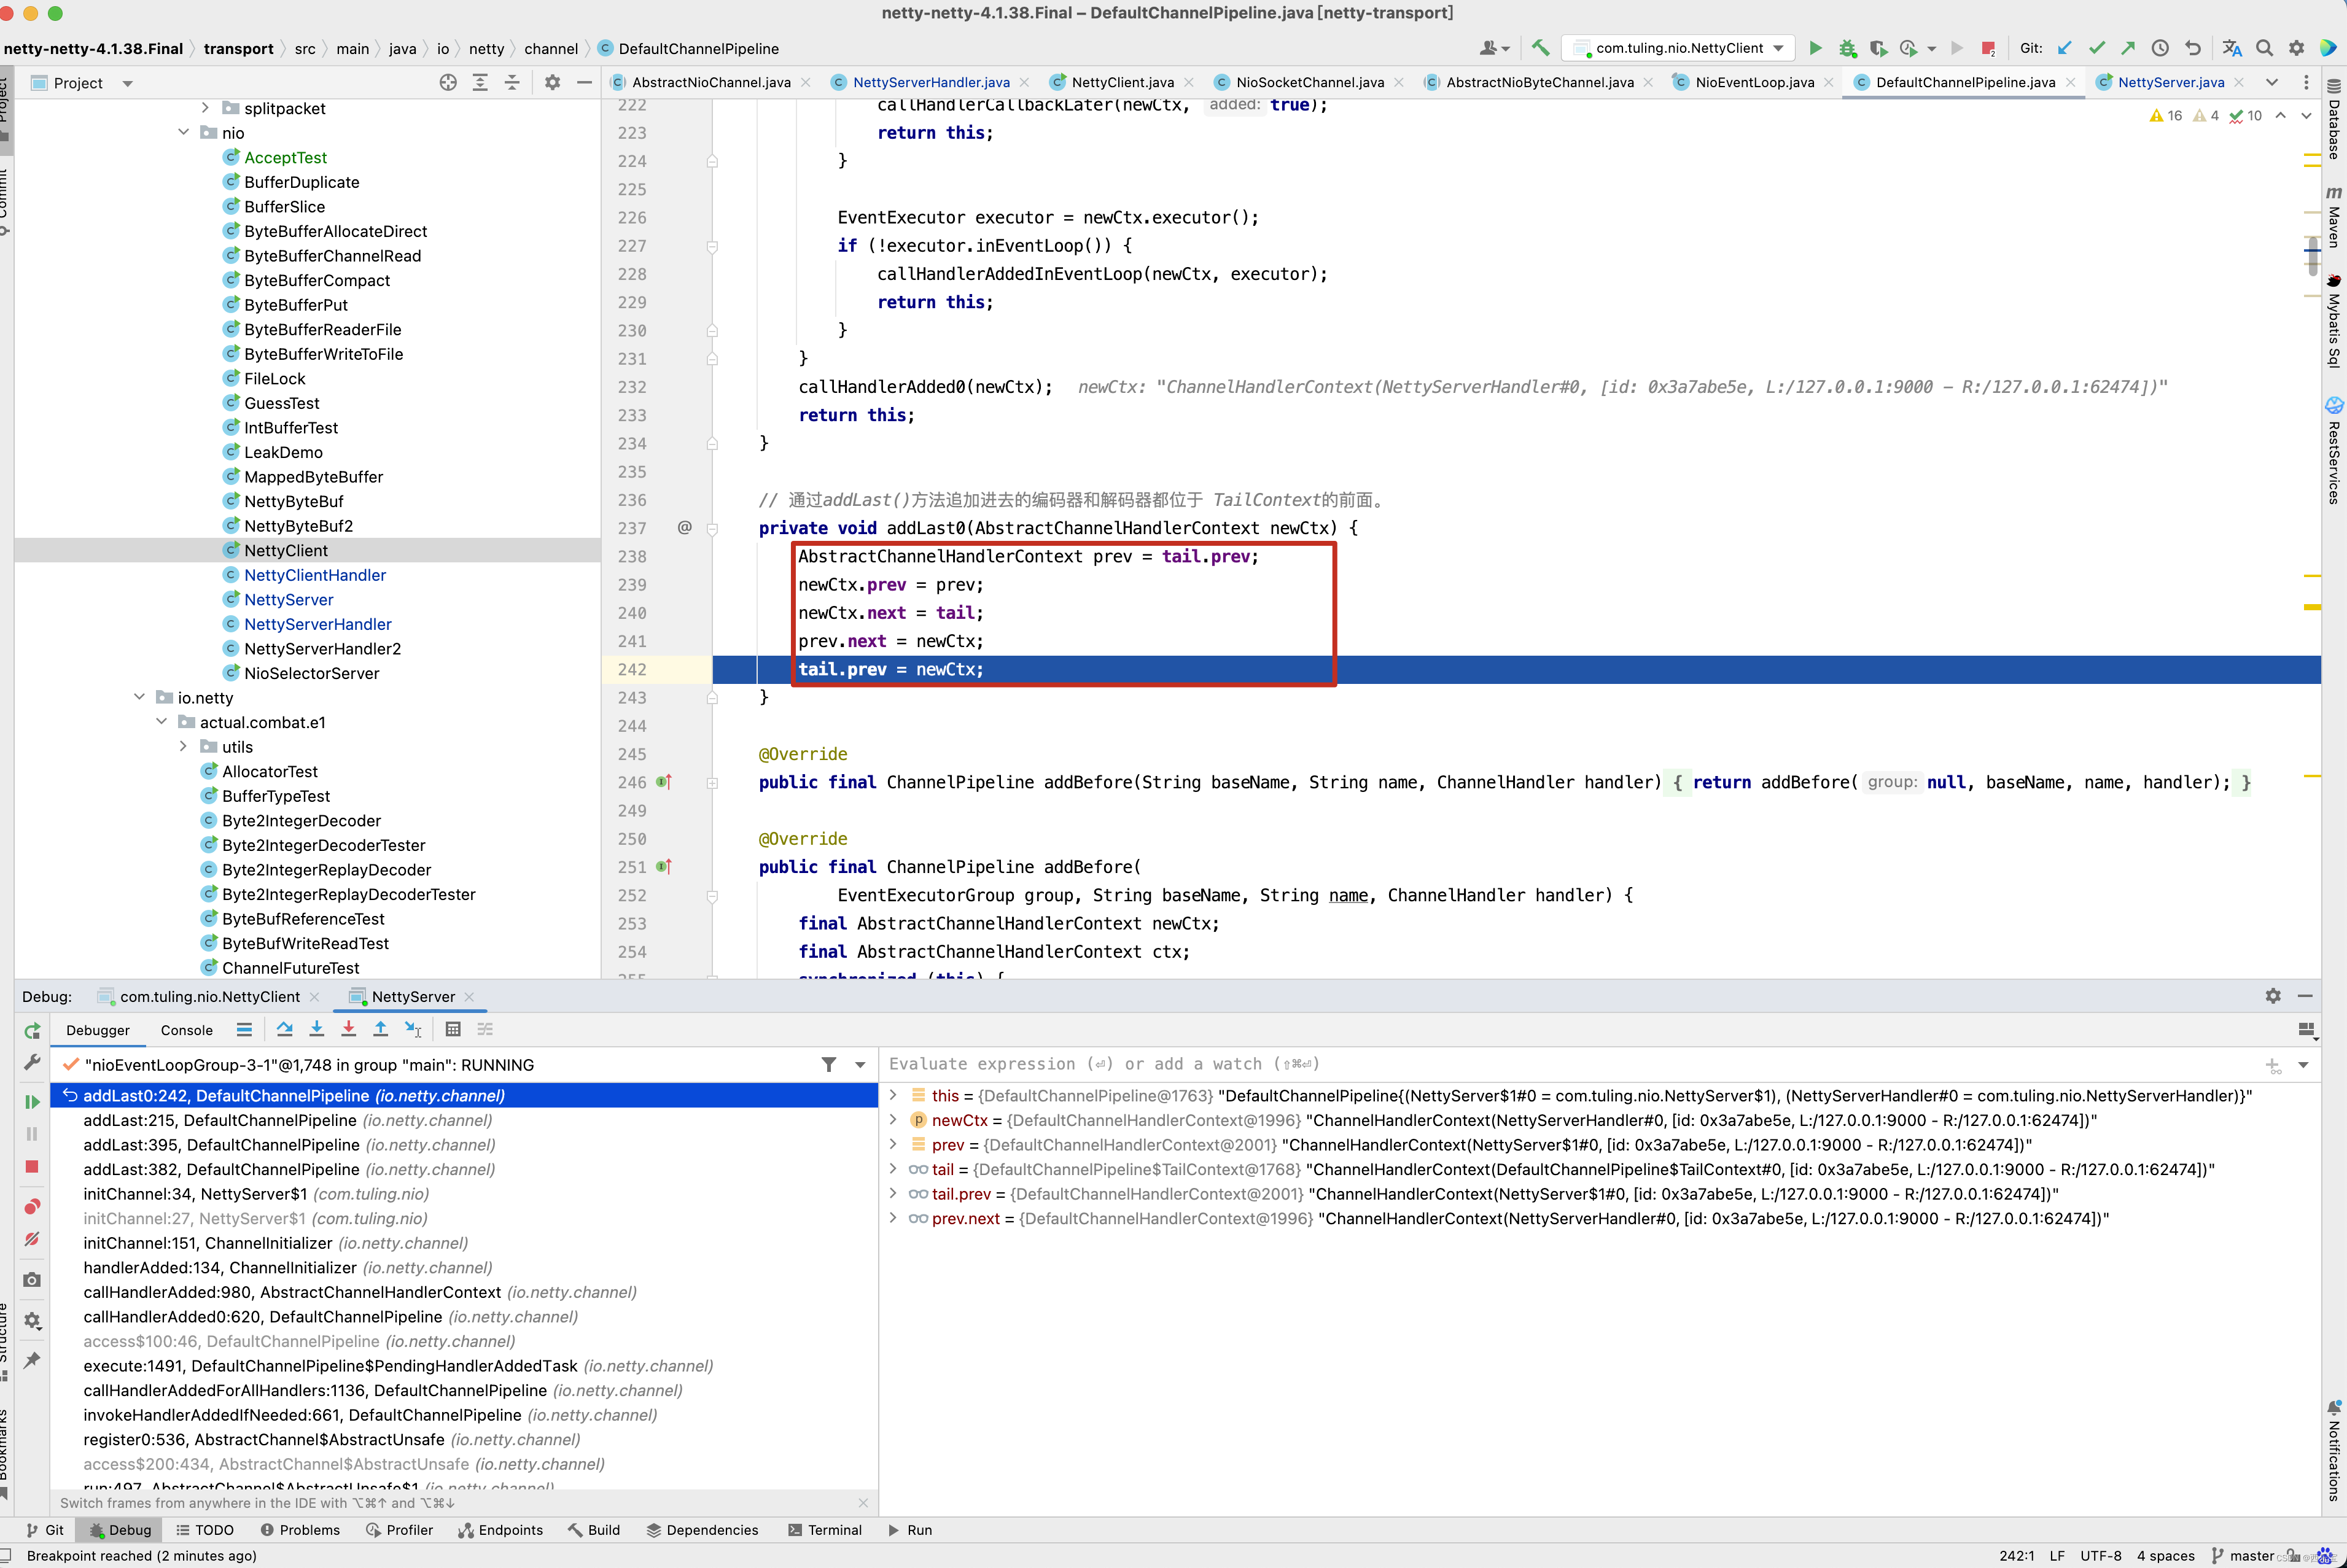
从截图中可以看出,我们自定义的NettyServerHandler首先封装成了一个DefaultChannelHandlerContext,添加到了tail节点有前面。
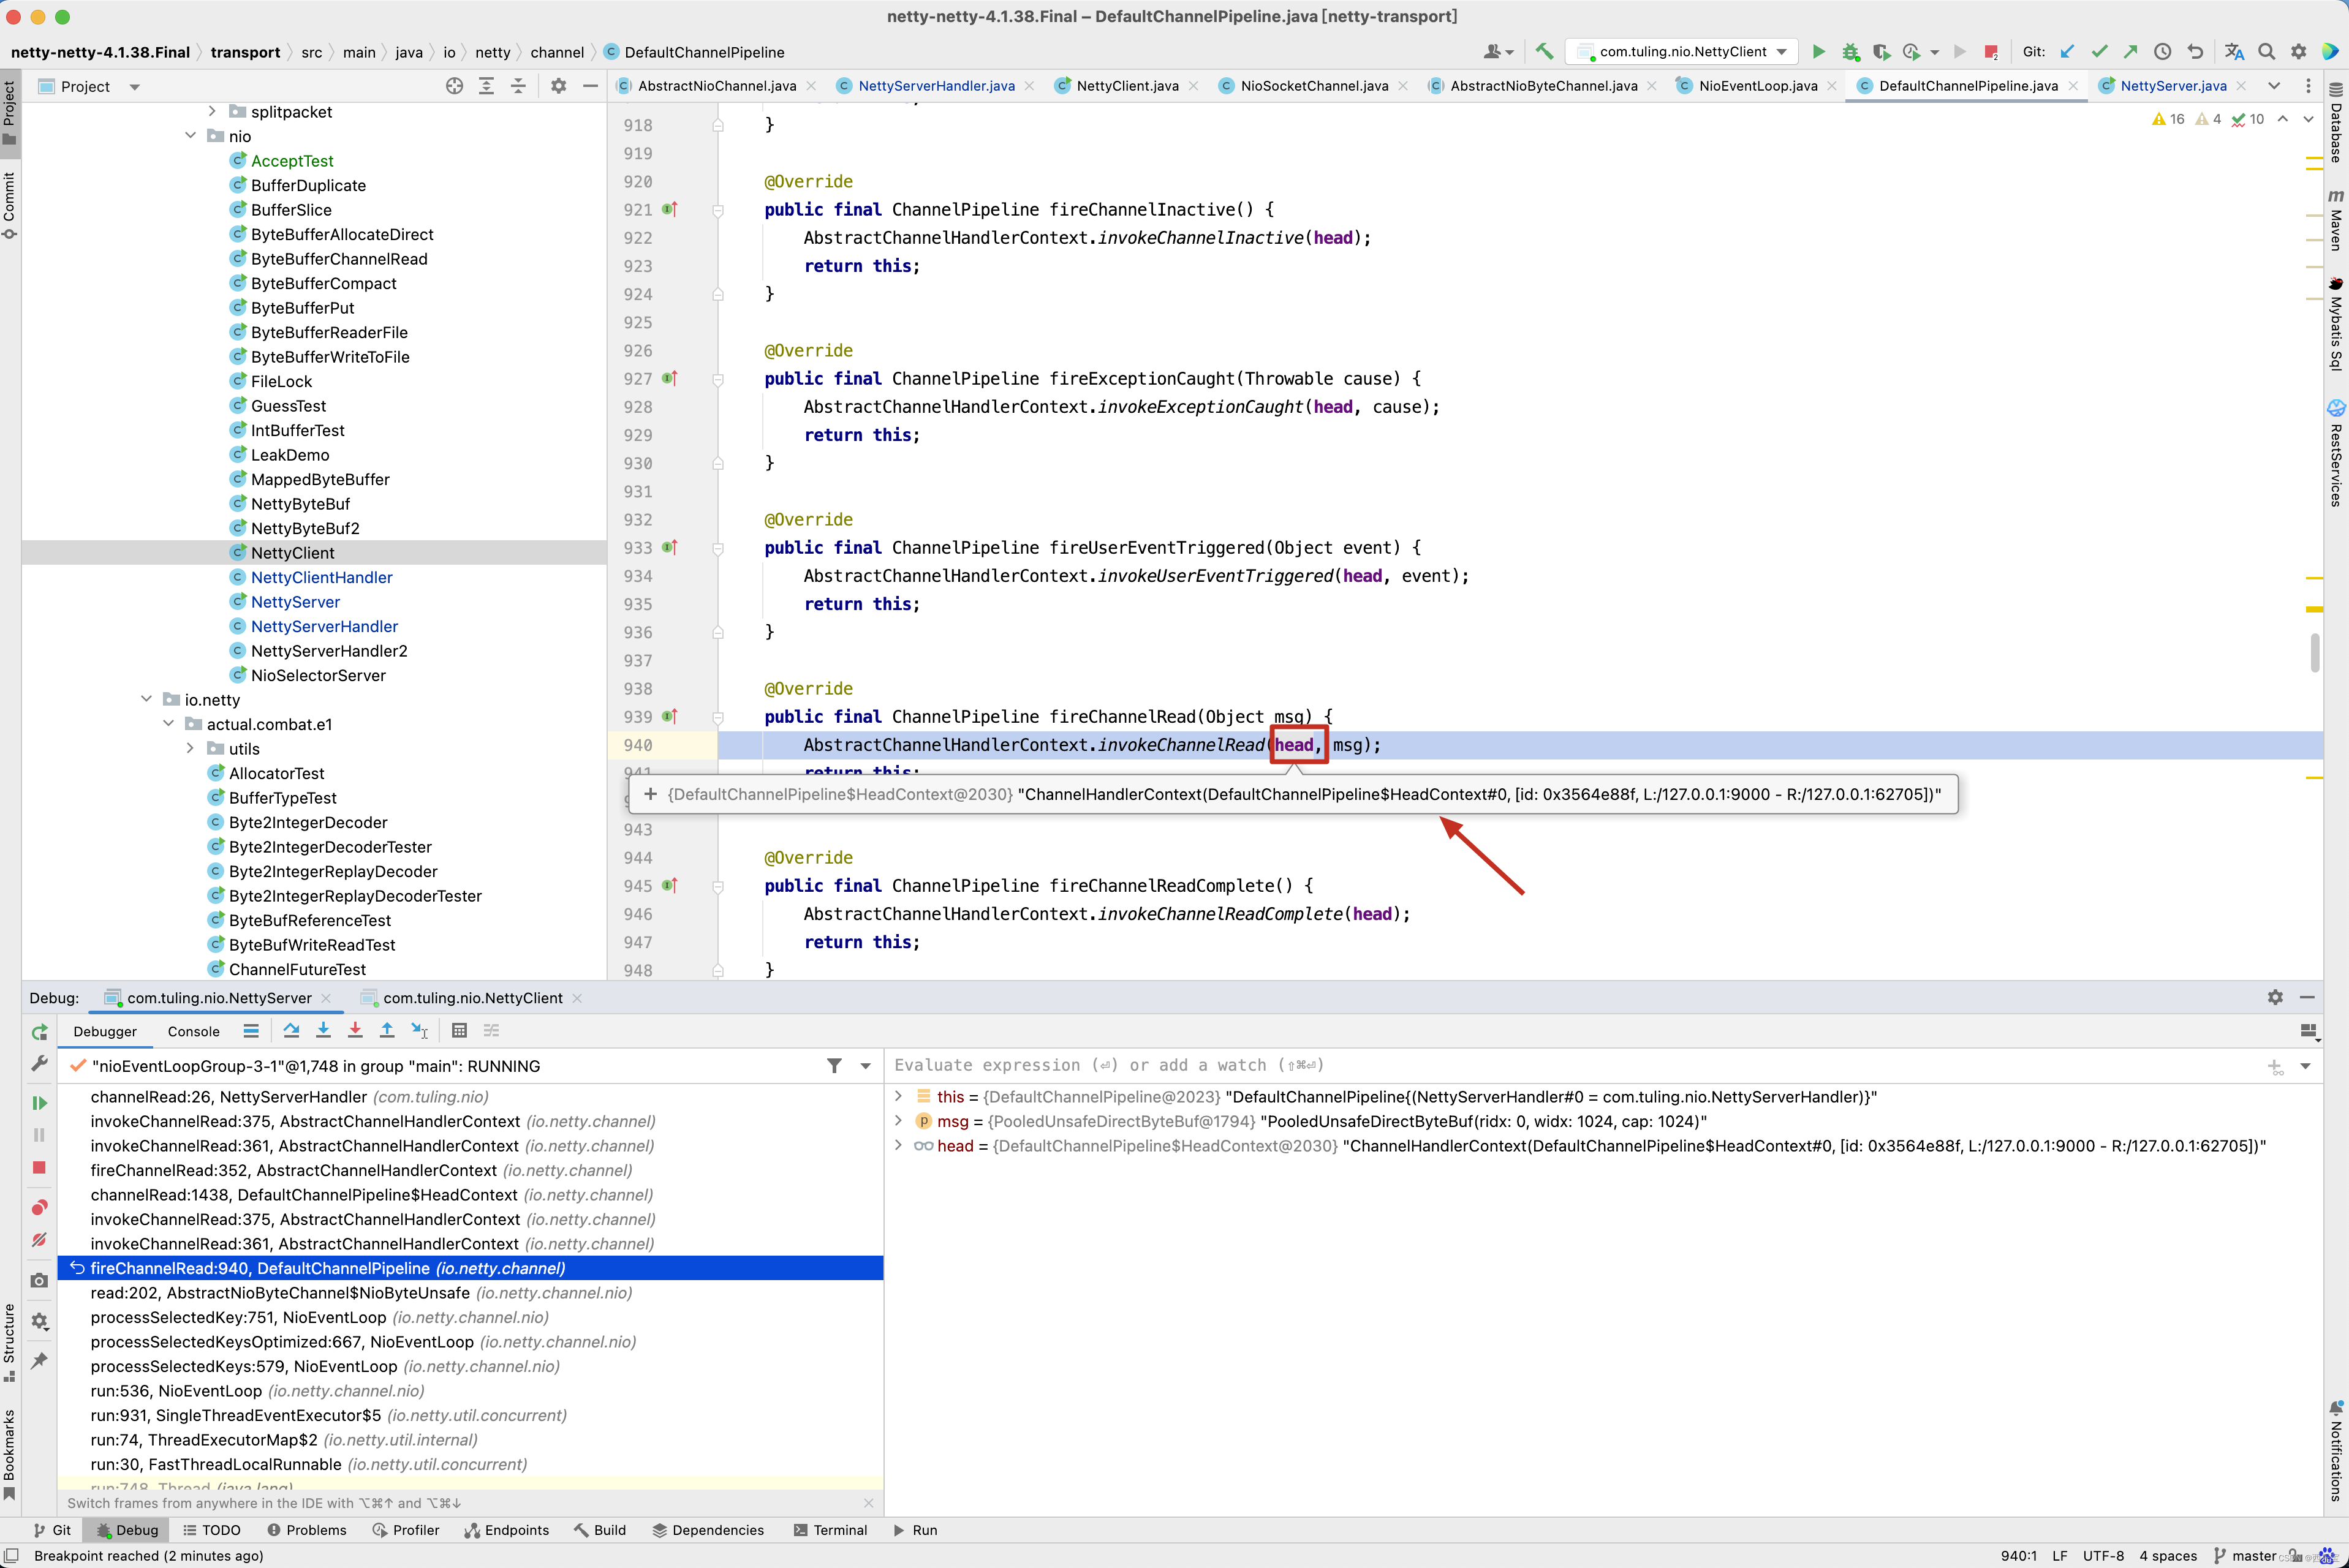
接下来在我们自定义的NettyServerHandler的channelRead()方法中打一个断点,从方法的调用栈中来看。 首先会调用 DefaultChannelPipeline的fireChannelRead(byteBuf)方法 。

接着通过反射调用head的channelRead()方法 ,如下图所示。
而在head的channelRead()方法中实际上是调用ctx.fireChannelRead(msg)方法,而fireChannelRead()方法实际上调用的是invokeChannelRead(findContextInbound(MASK_CHANNEL_READ), msg)方法,而findContextInbound()方法内部又是找到了next。

而next是一个Context,而Context就是获取到其Handler并调用Handler的channelRead(this, msg)方法。

再看下面的图。
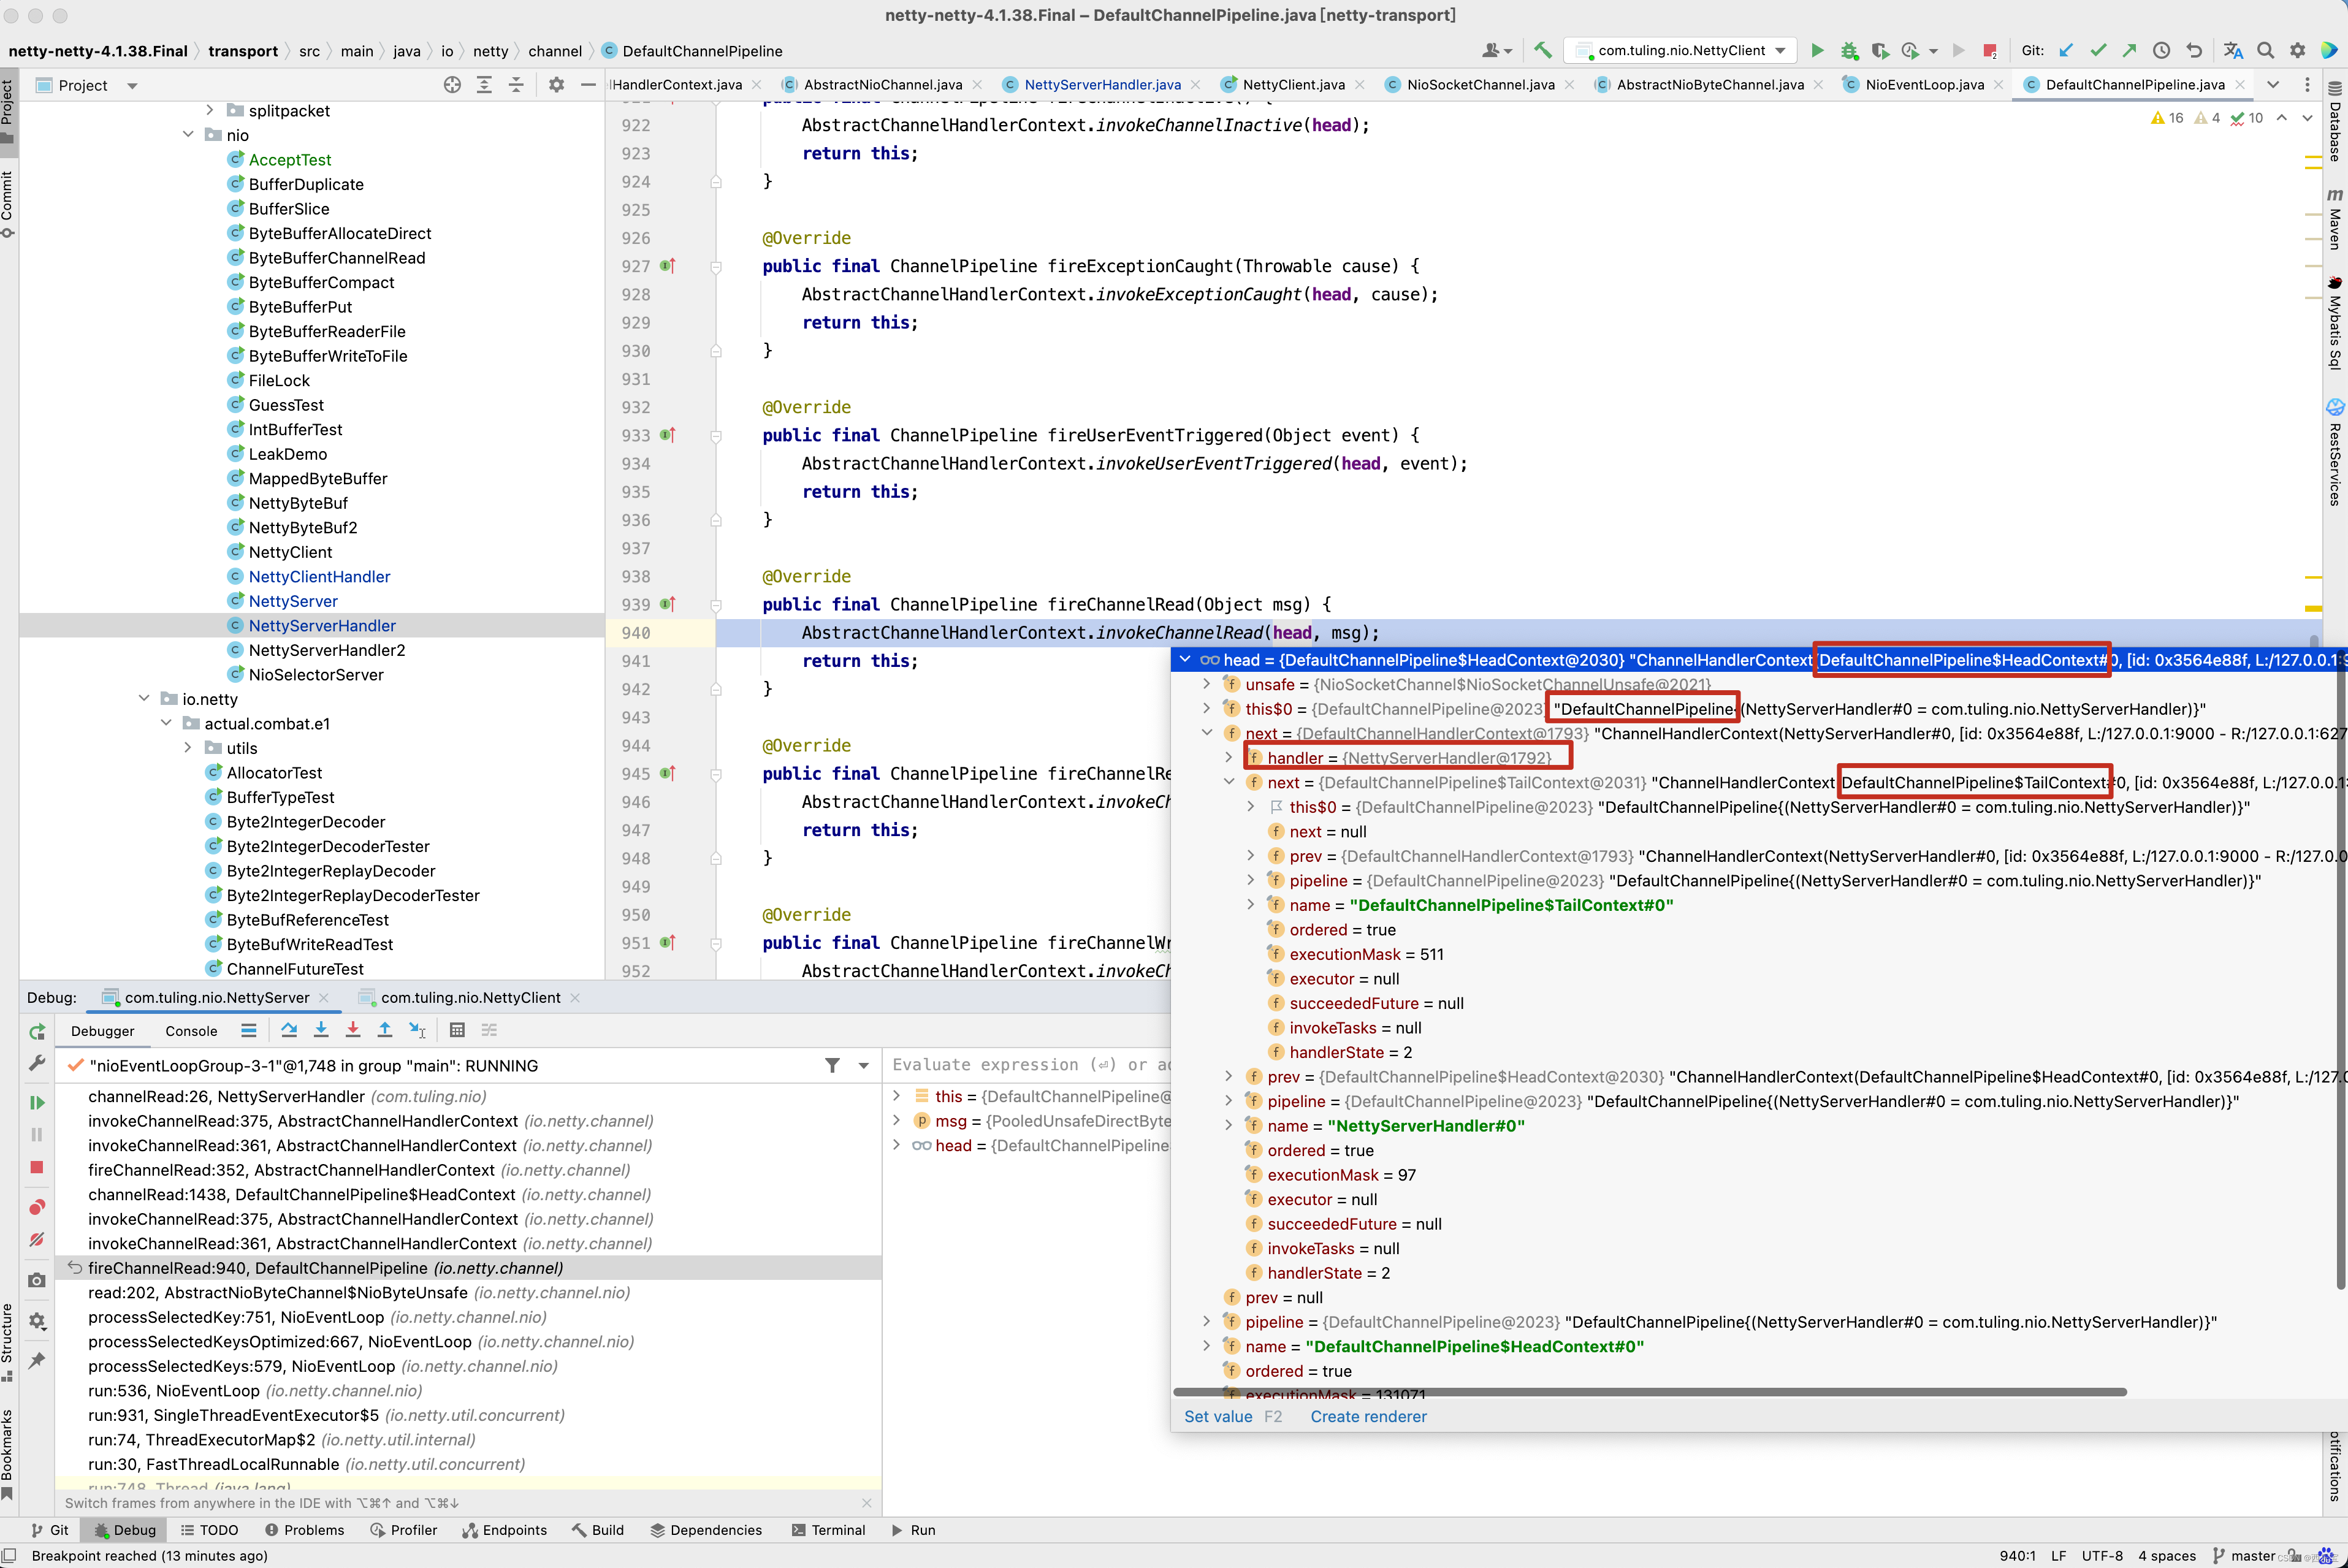
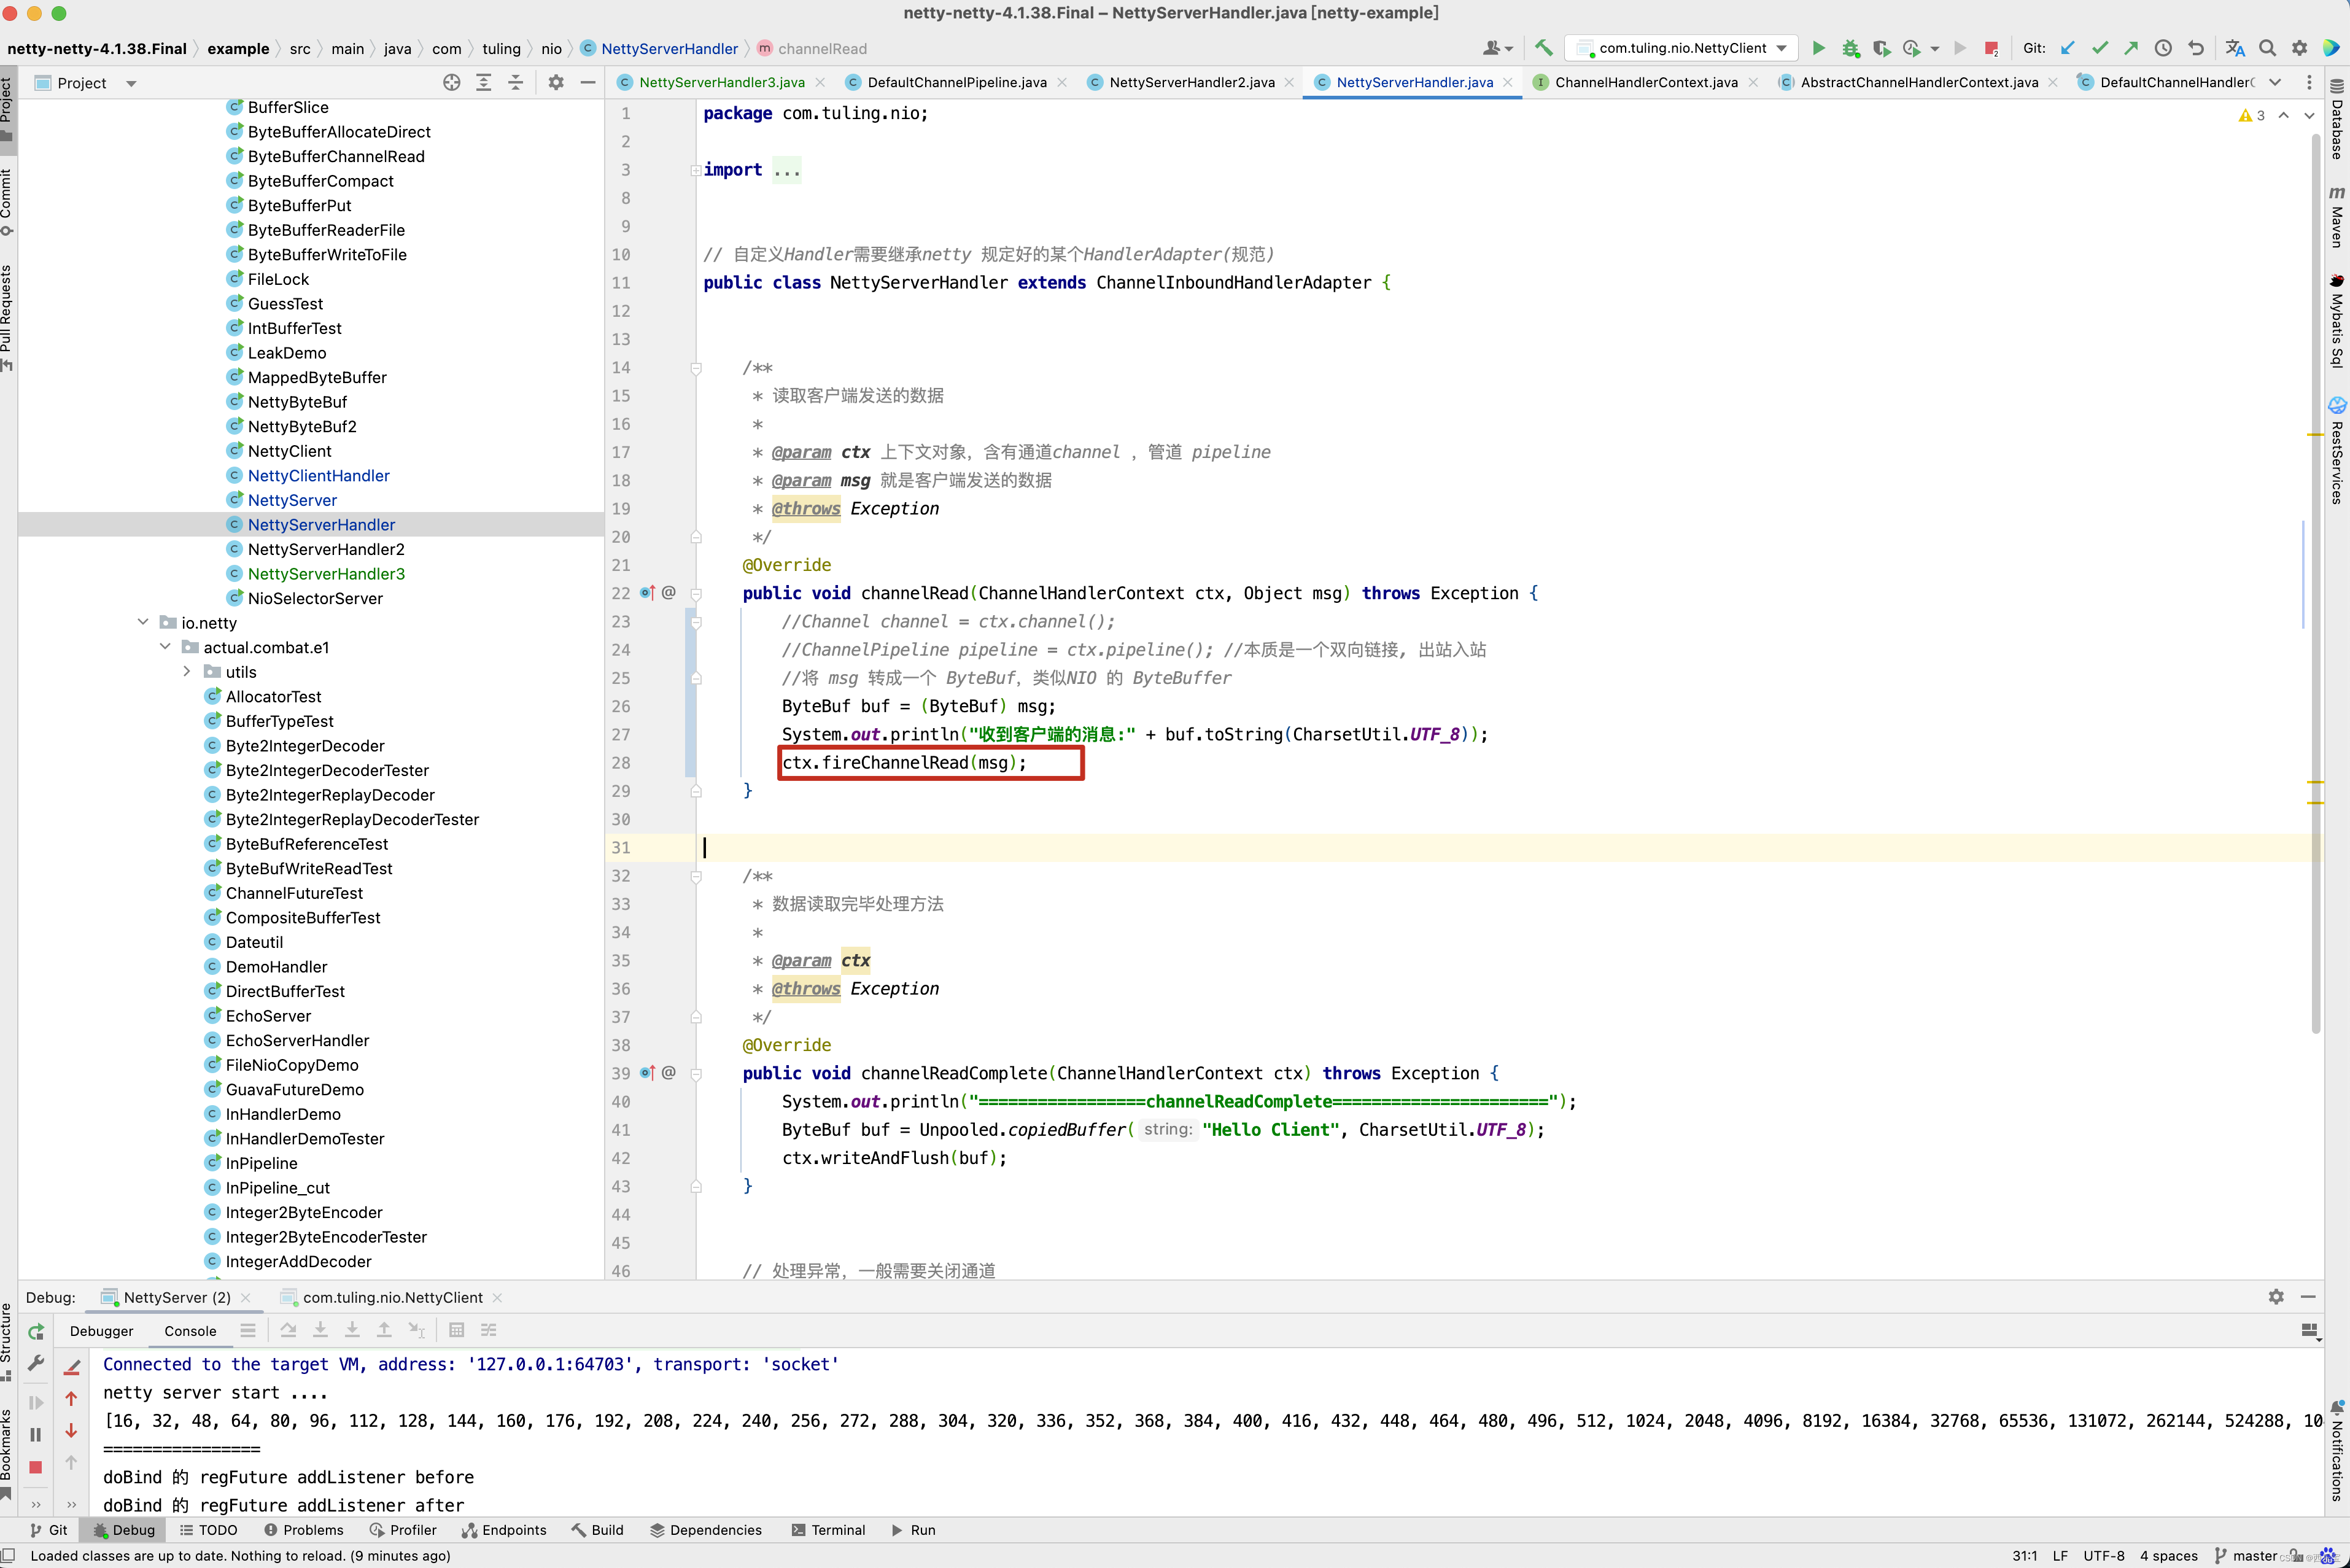
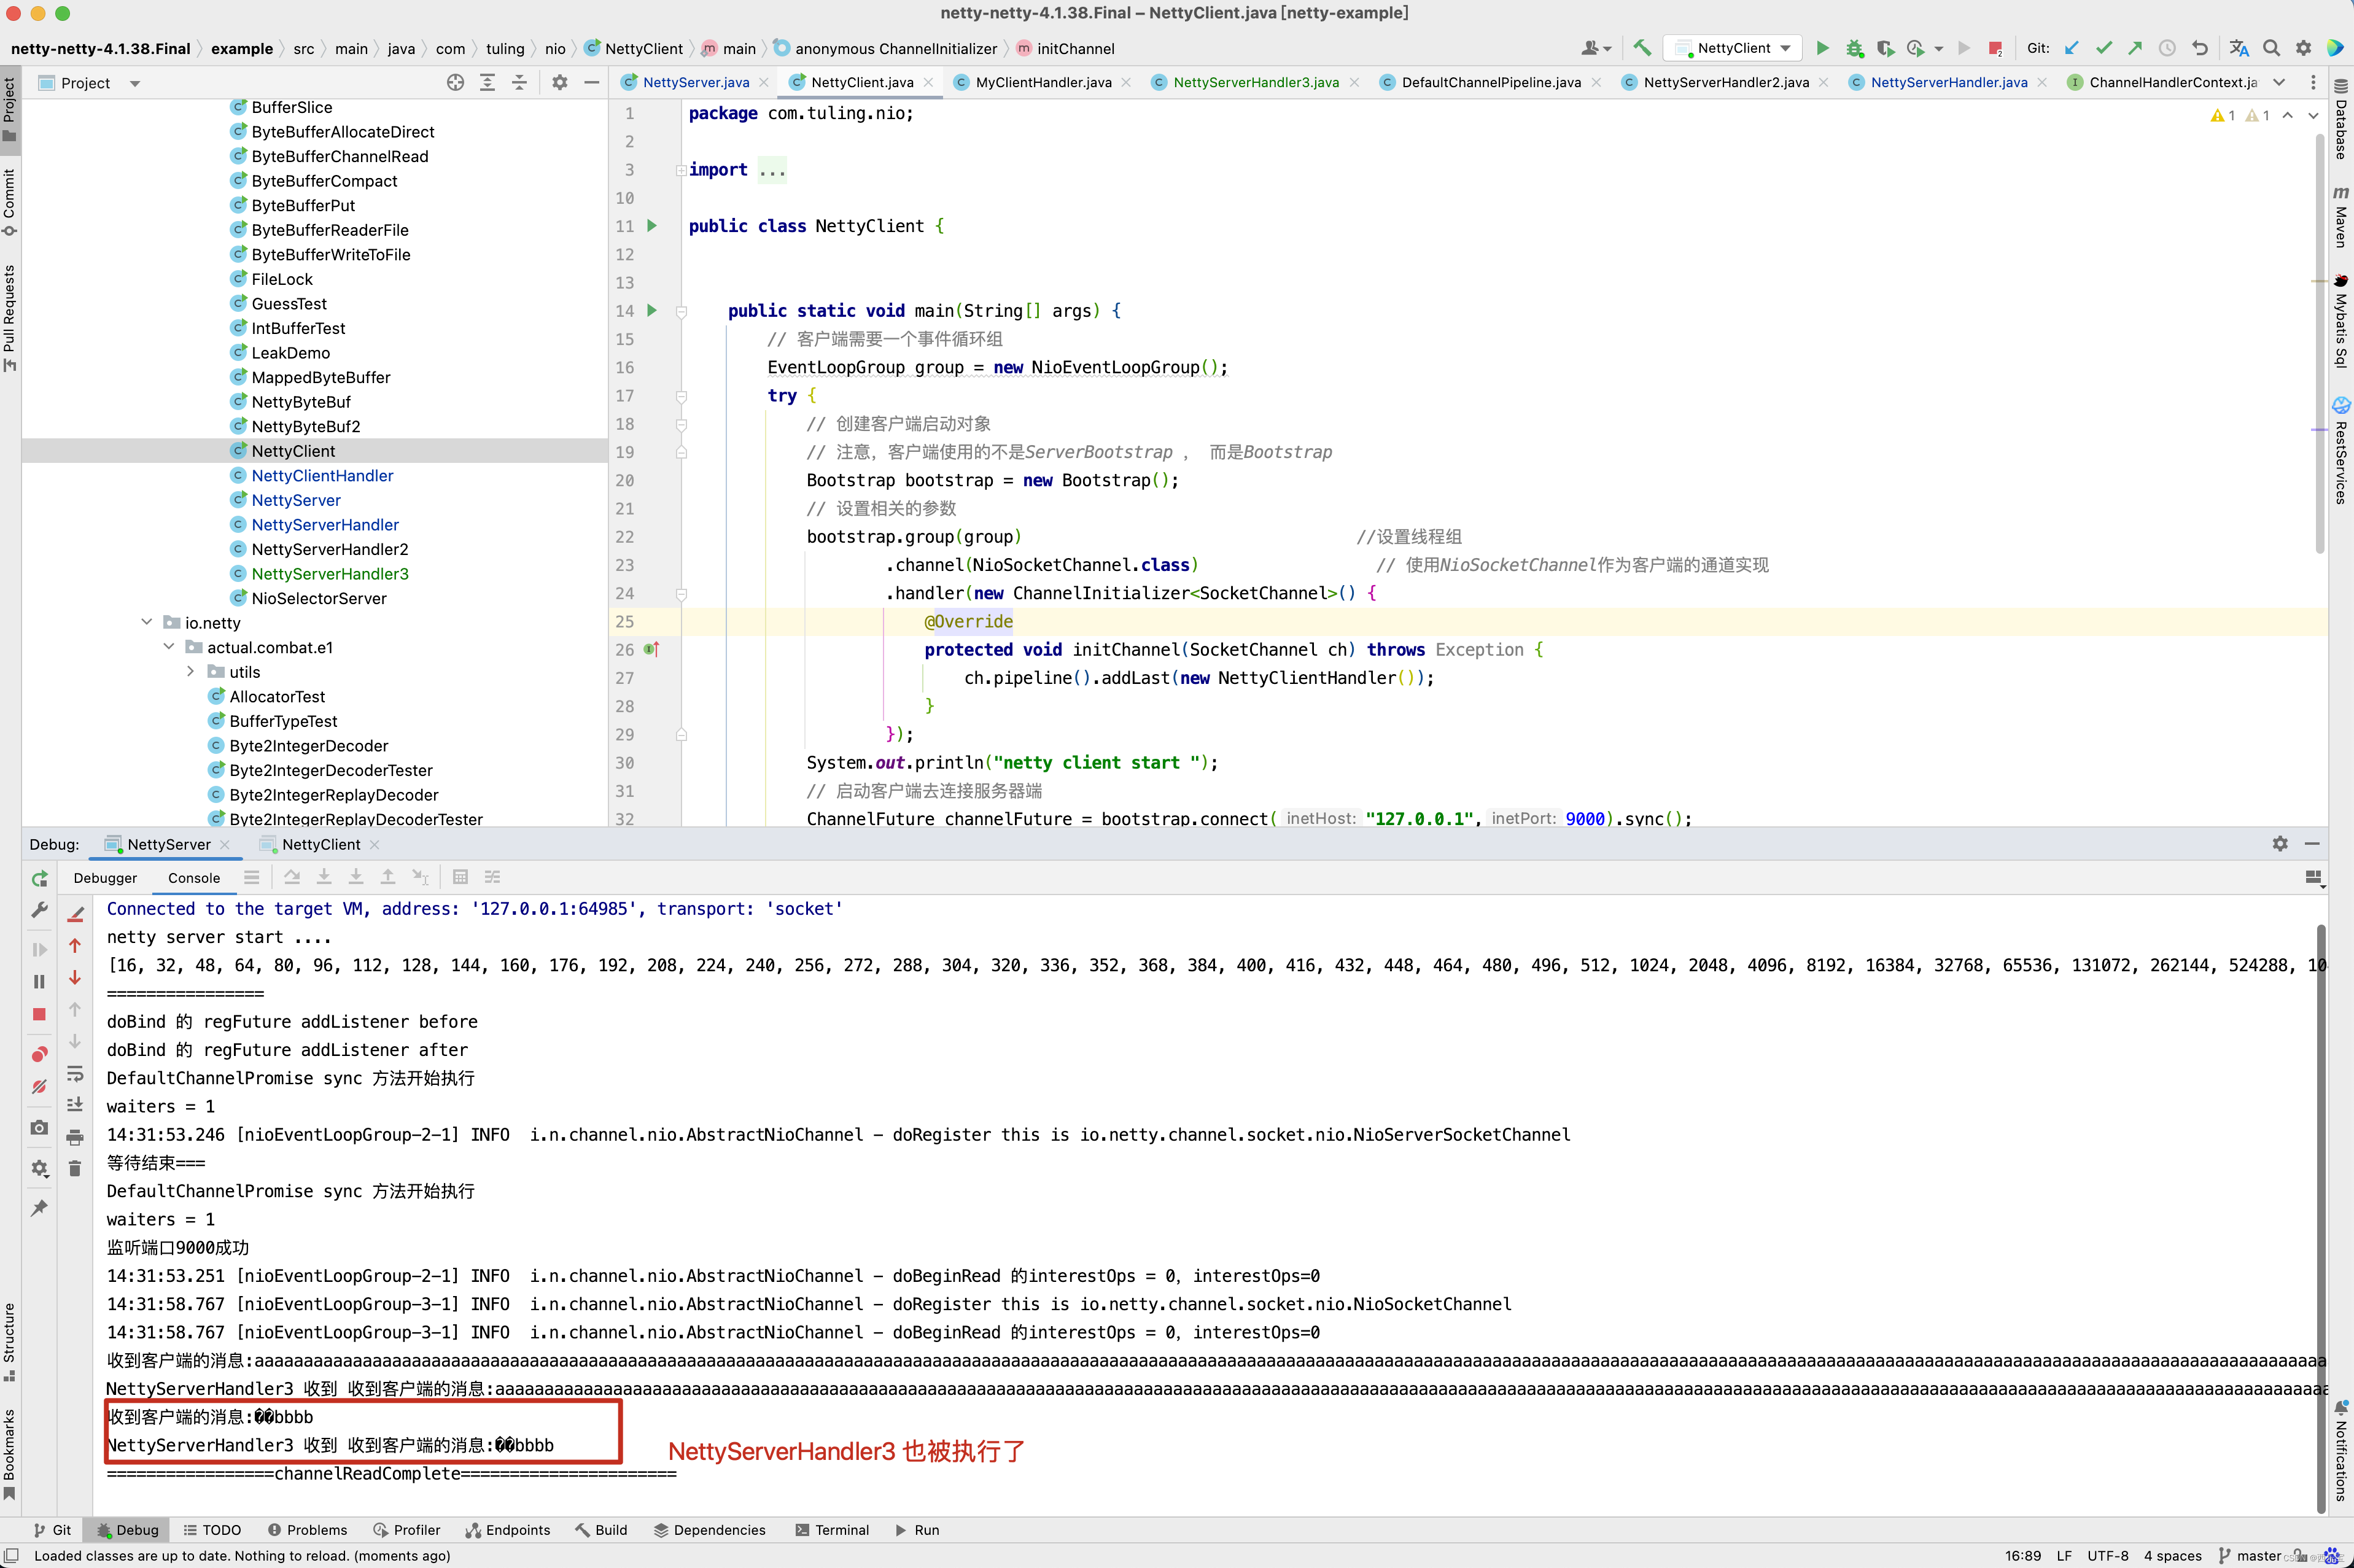
从下面的图中,已经很清楚整个流水线的执行流程了,调用pipeline的fireChannelRead()方法,而fireChannelRead()方法首先调用HeadContext的channelRead()方法,而HeadContext的channelRead()方法并没有做其他事情,而是找到next Context,并调用其invokeChannelRead()方法,而默认Context的内部实际上他的handler的channelRead()方法,当然,对于传递过来的ByteBuf数据,对于不同的业务做不同的处理,那么再写一个NettyServerHandler3,代码的实现逻辑一样,打印出ByteBuf的内容 。

并加入到流水线中。
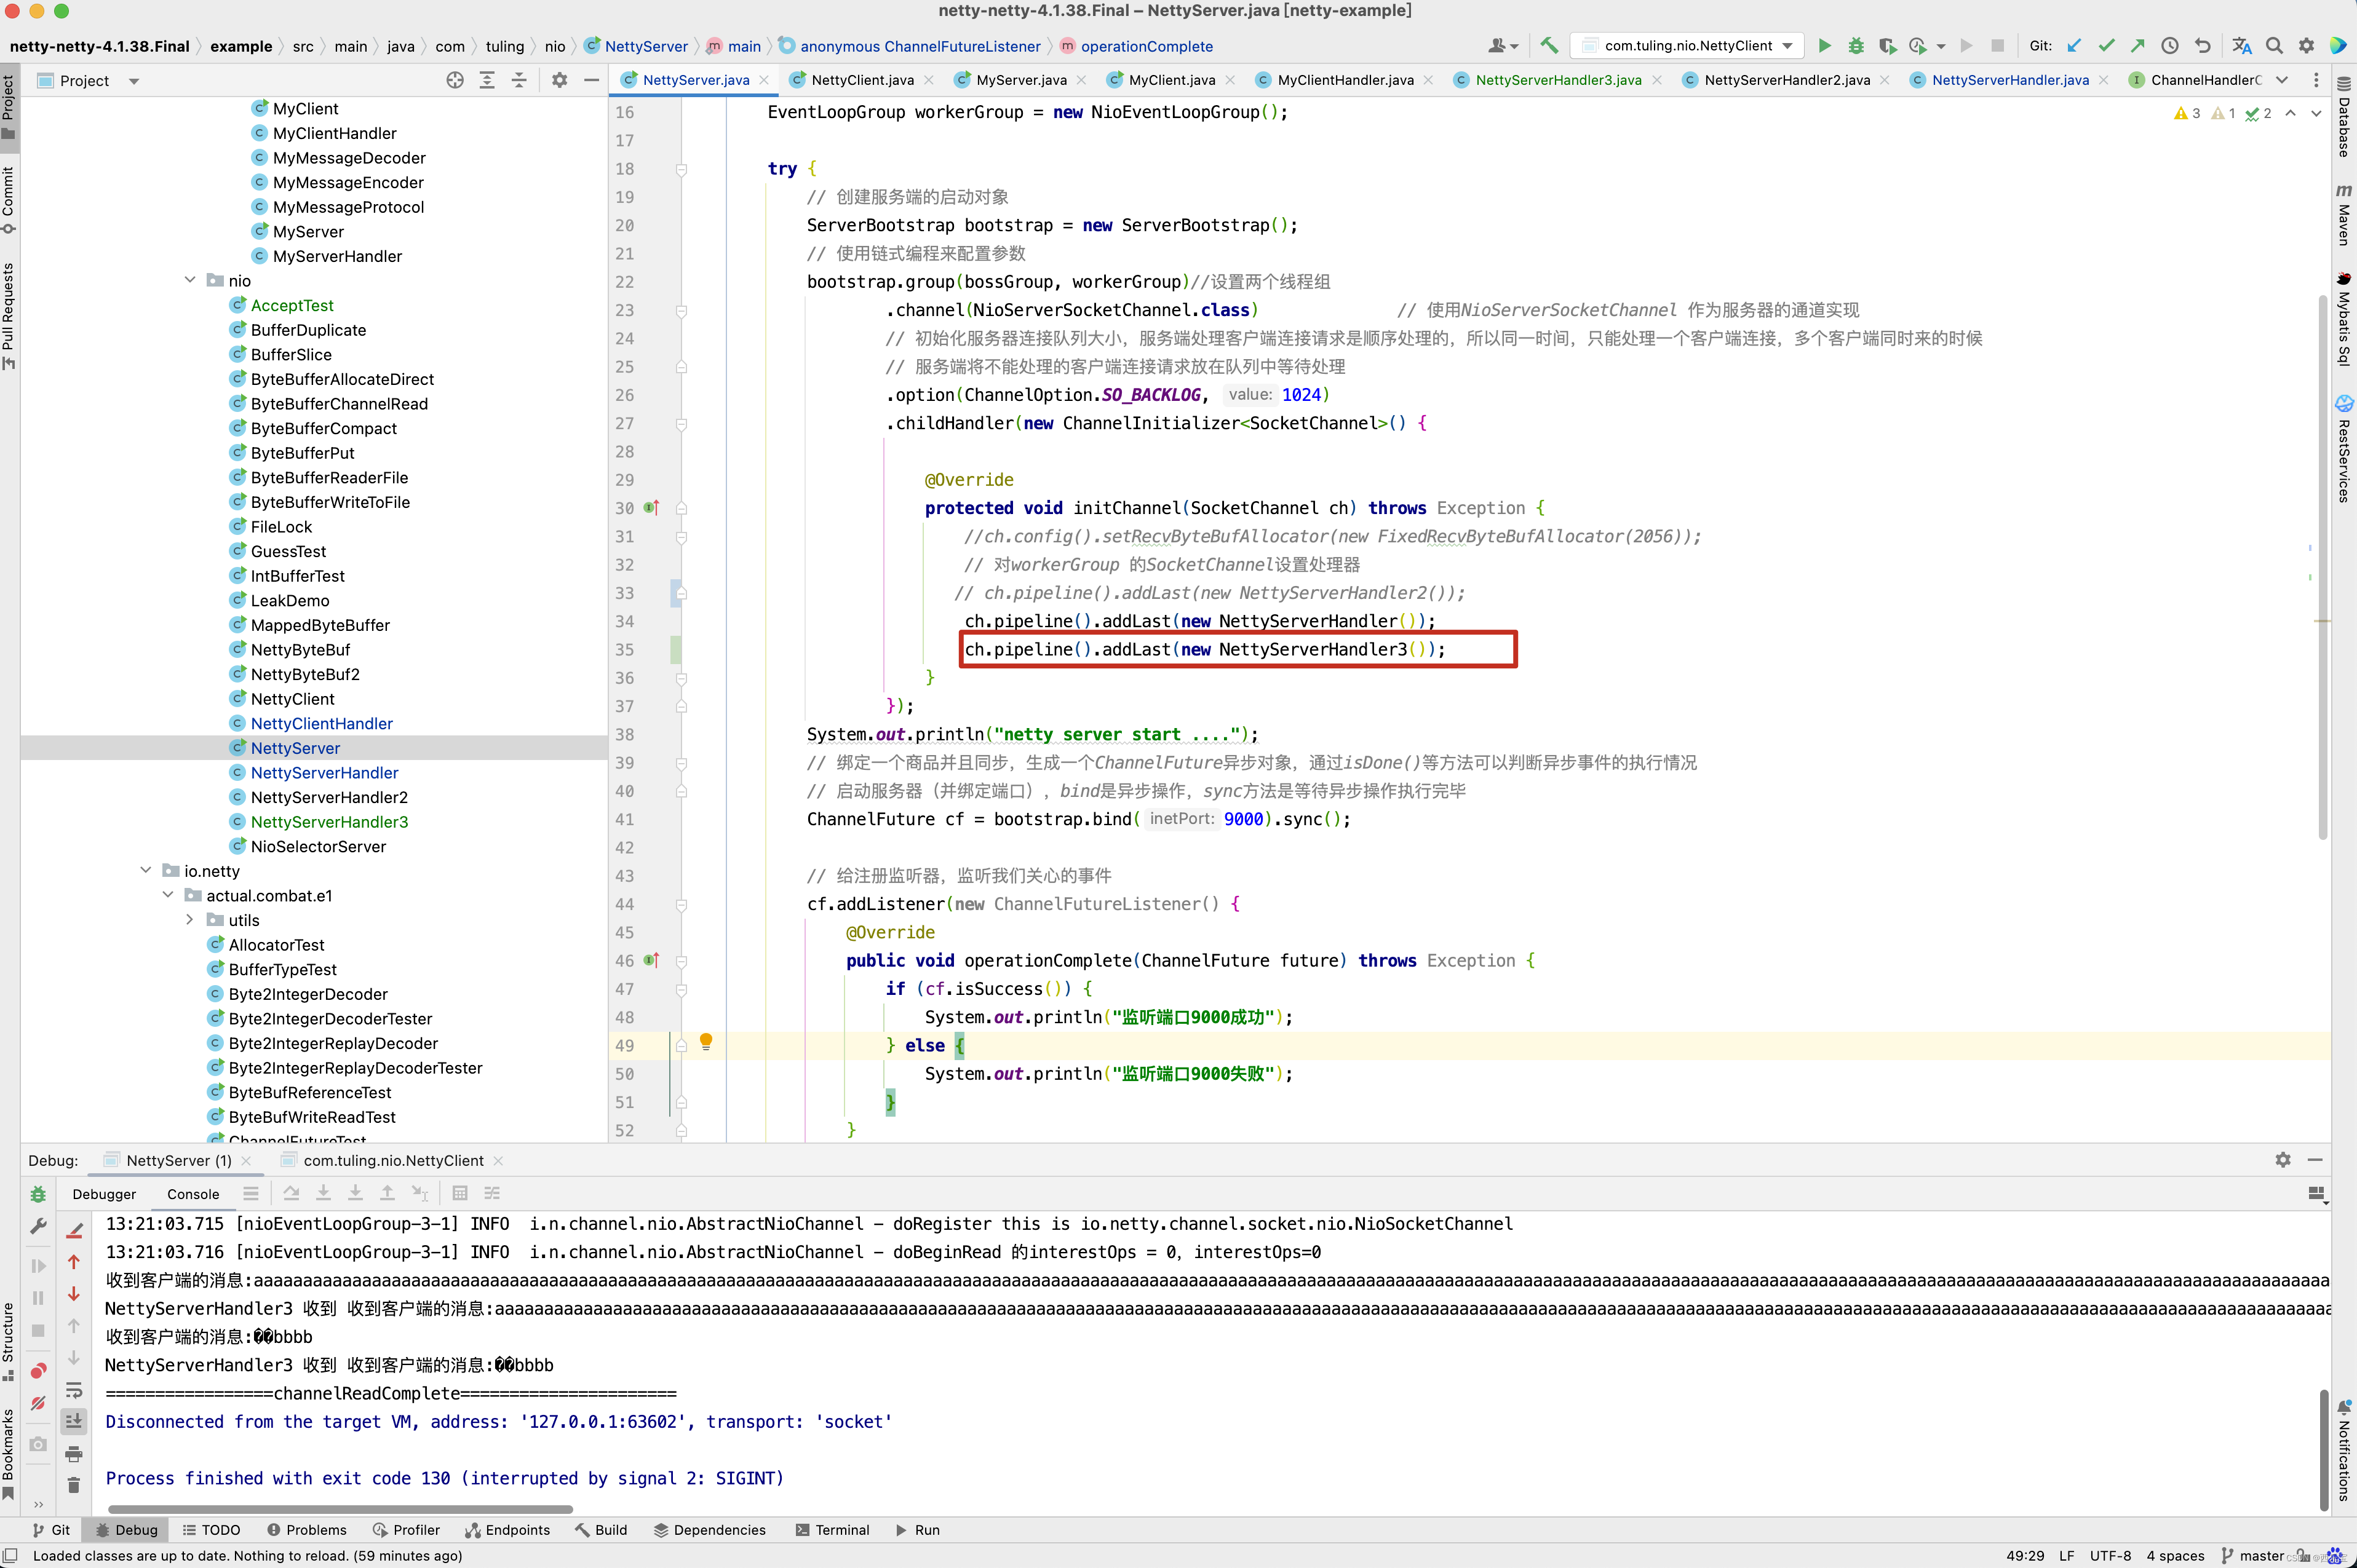
但遗憾的是, NettyServerHandler3中的channelRead()方法并没有执行。
原因是什么呢? 还是回头看DefaultChannelHandlerContext方法 。invokeChannelRead()方法调用了Handler的channelRead()方法,此时就中断了。并没有调用next Context的fireChannelRead()方法。
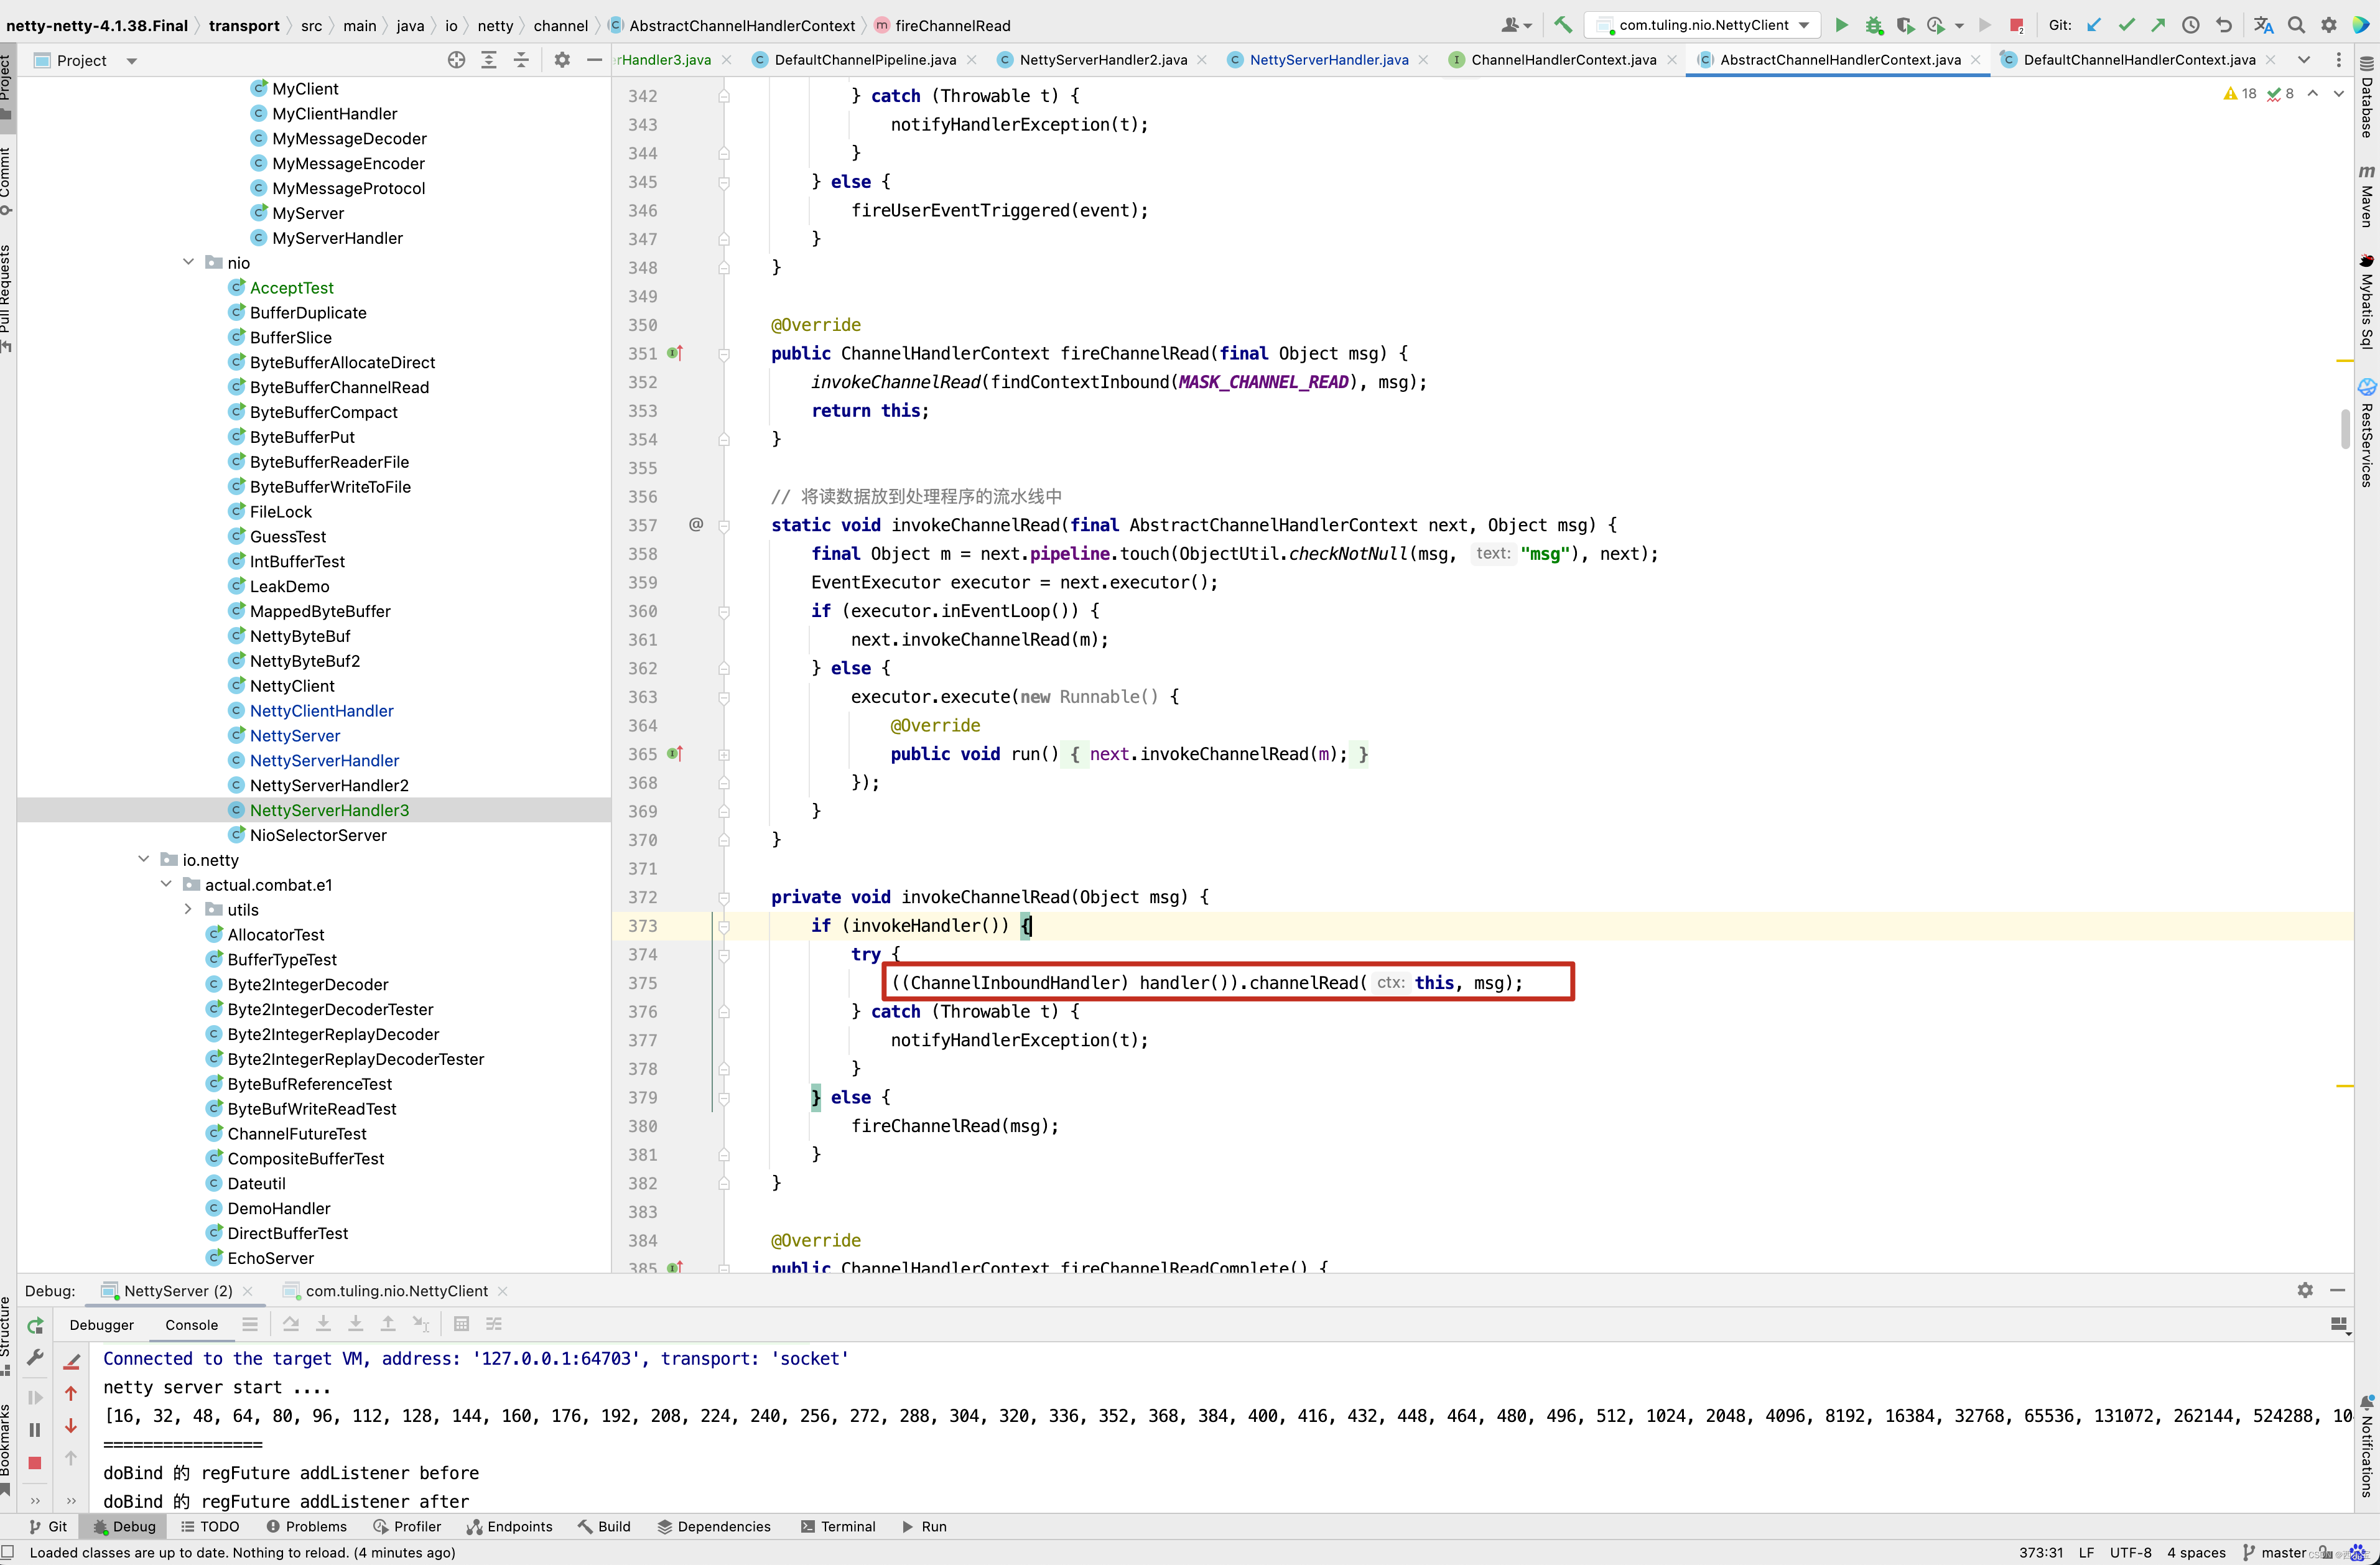
而为什么HeadContext会调用next Context的invokeChannelRead()方法呢?

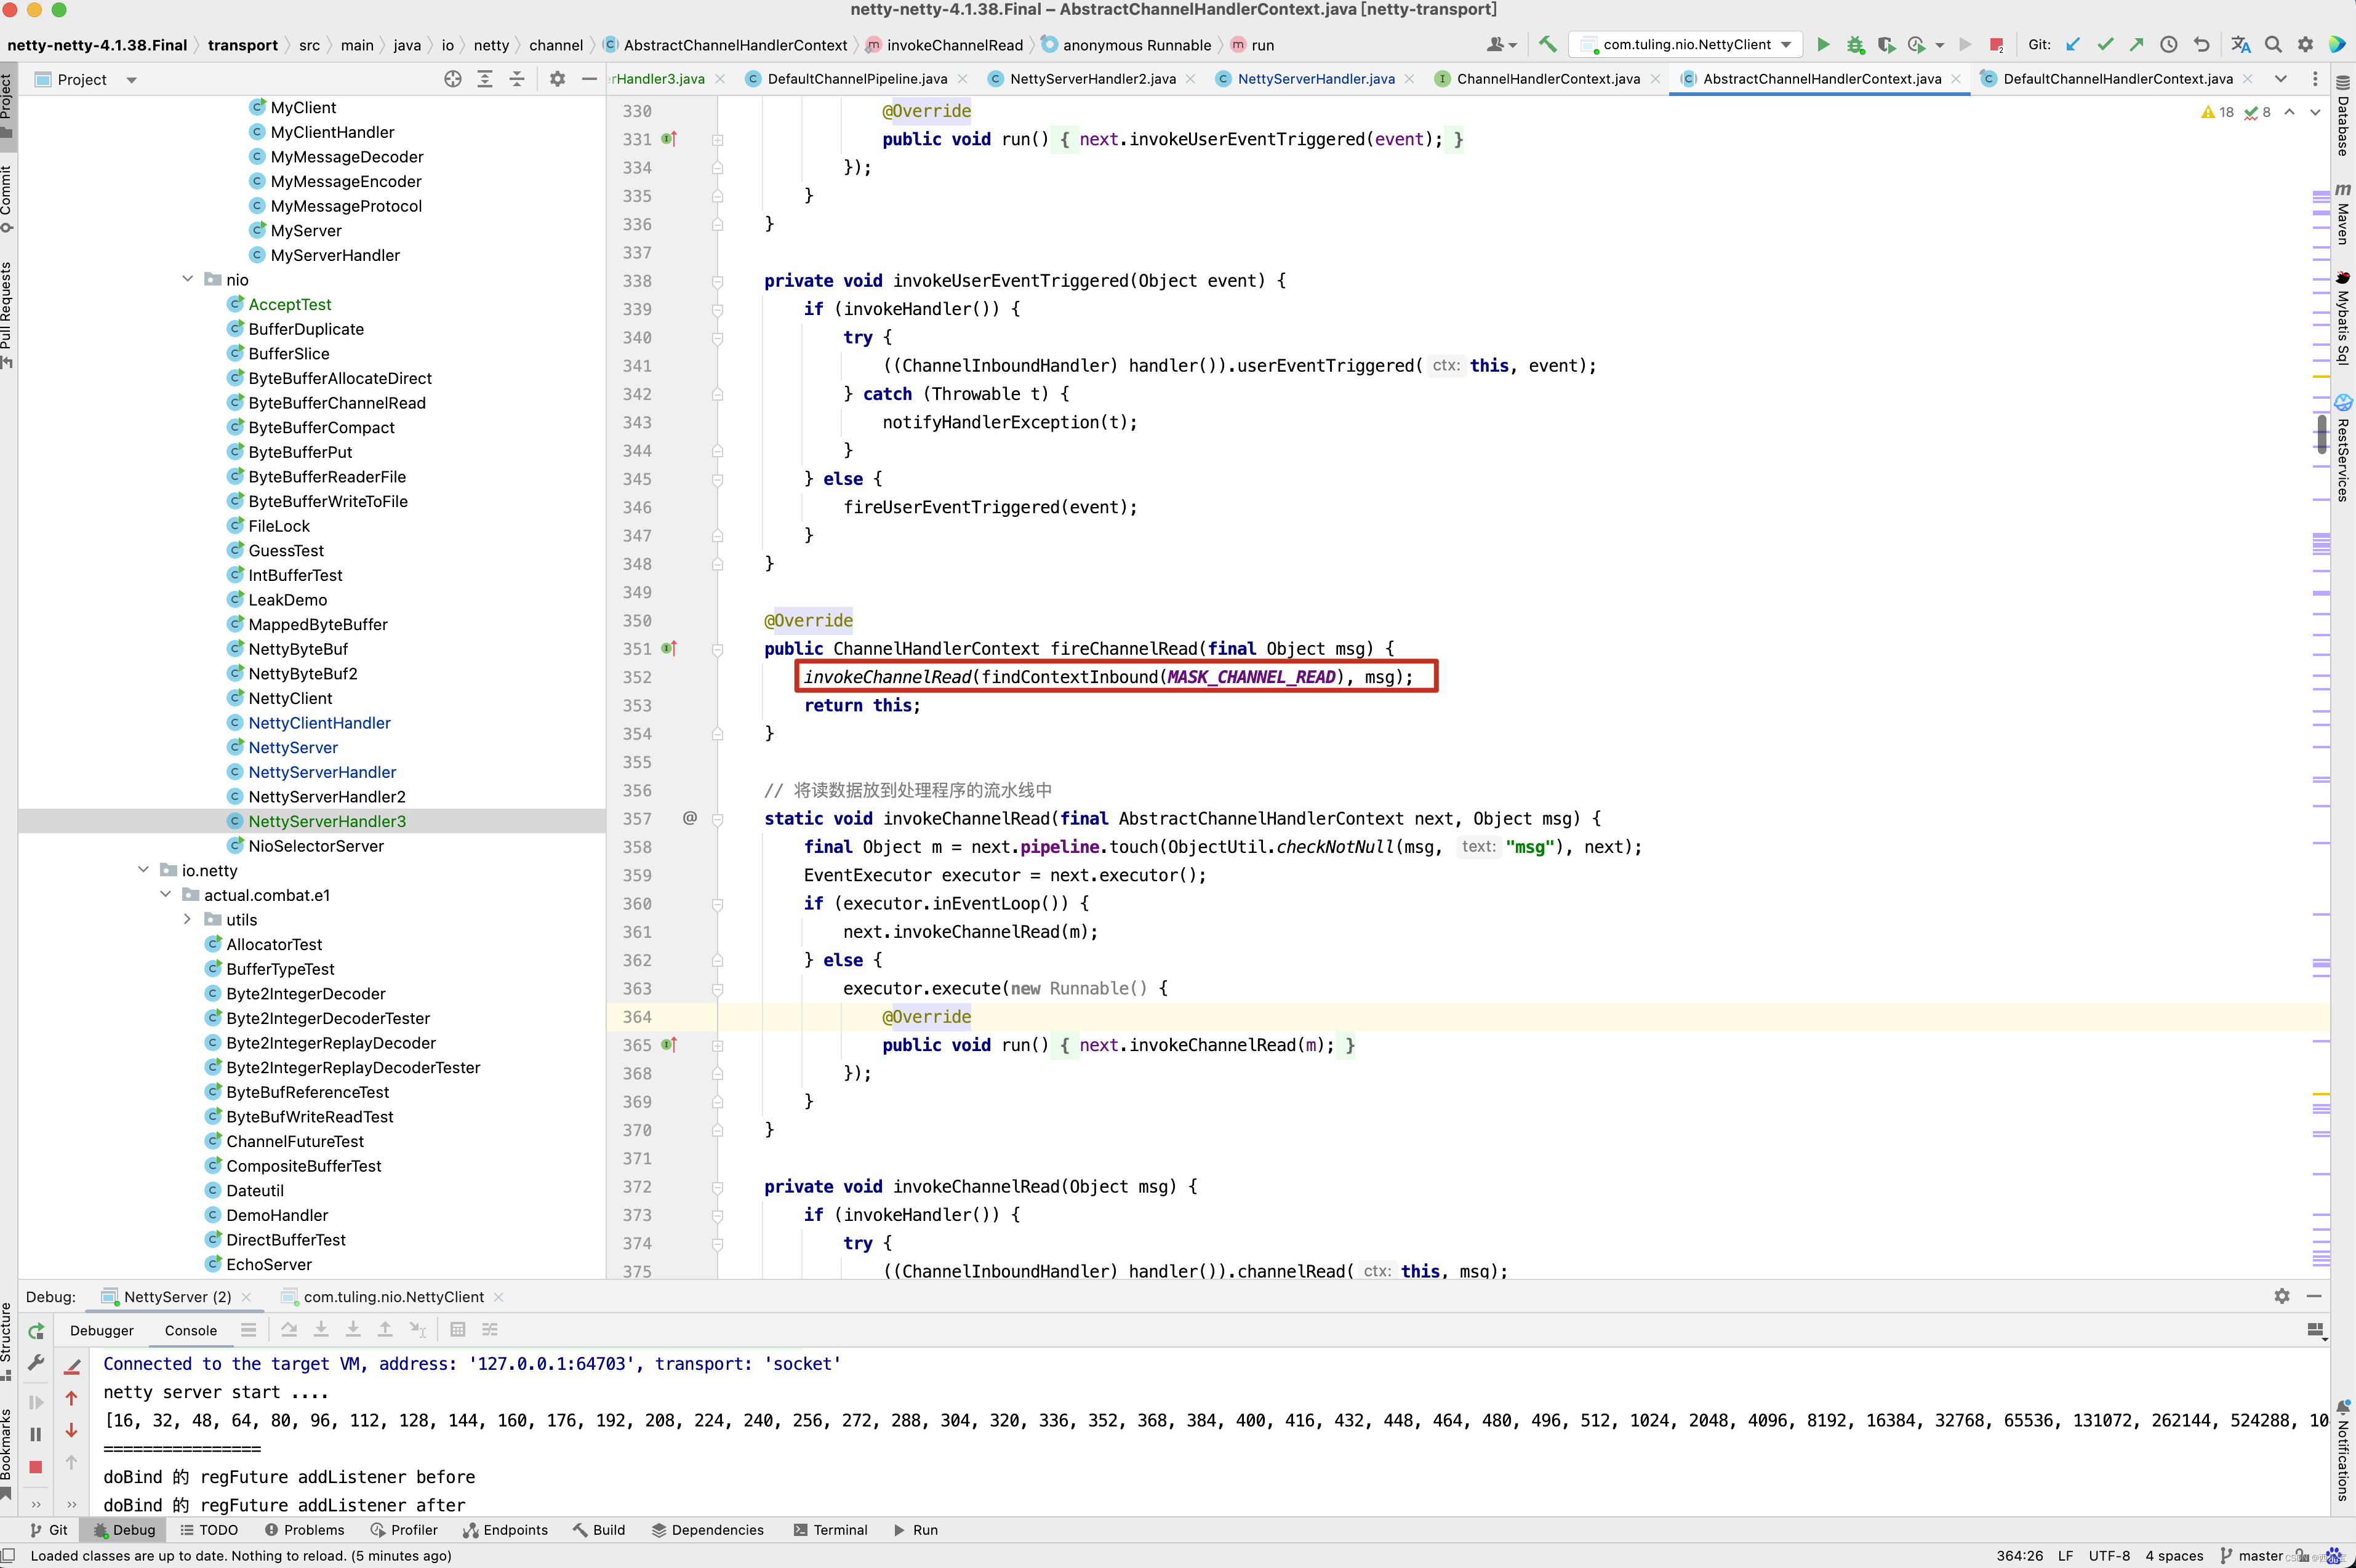
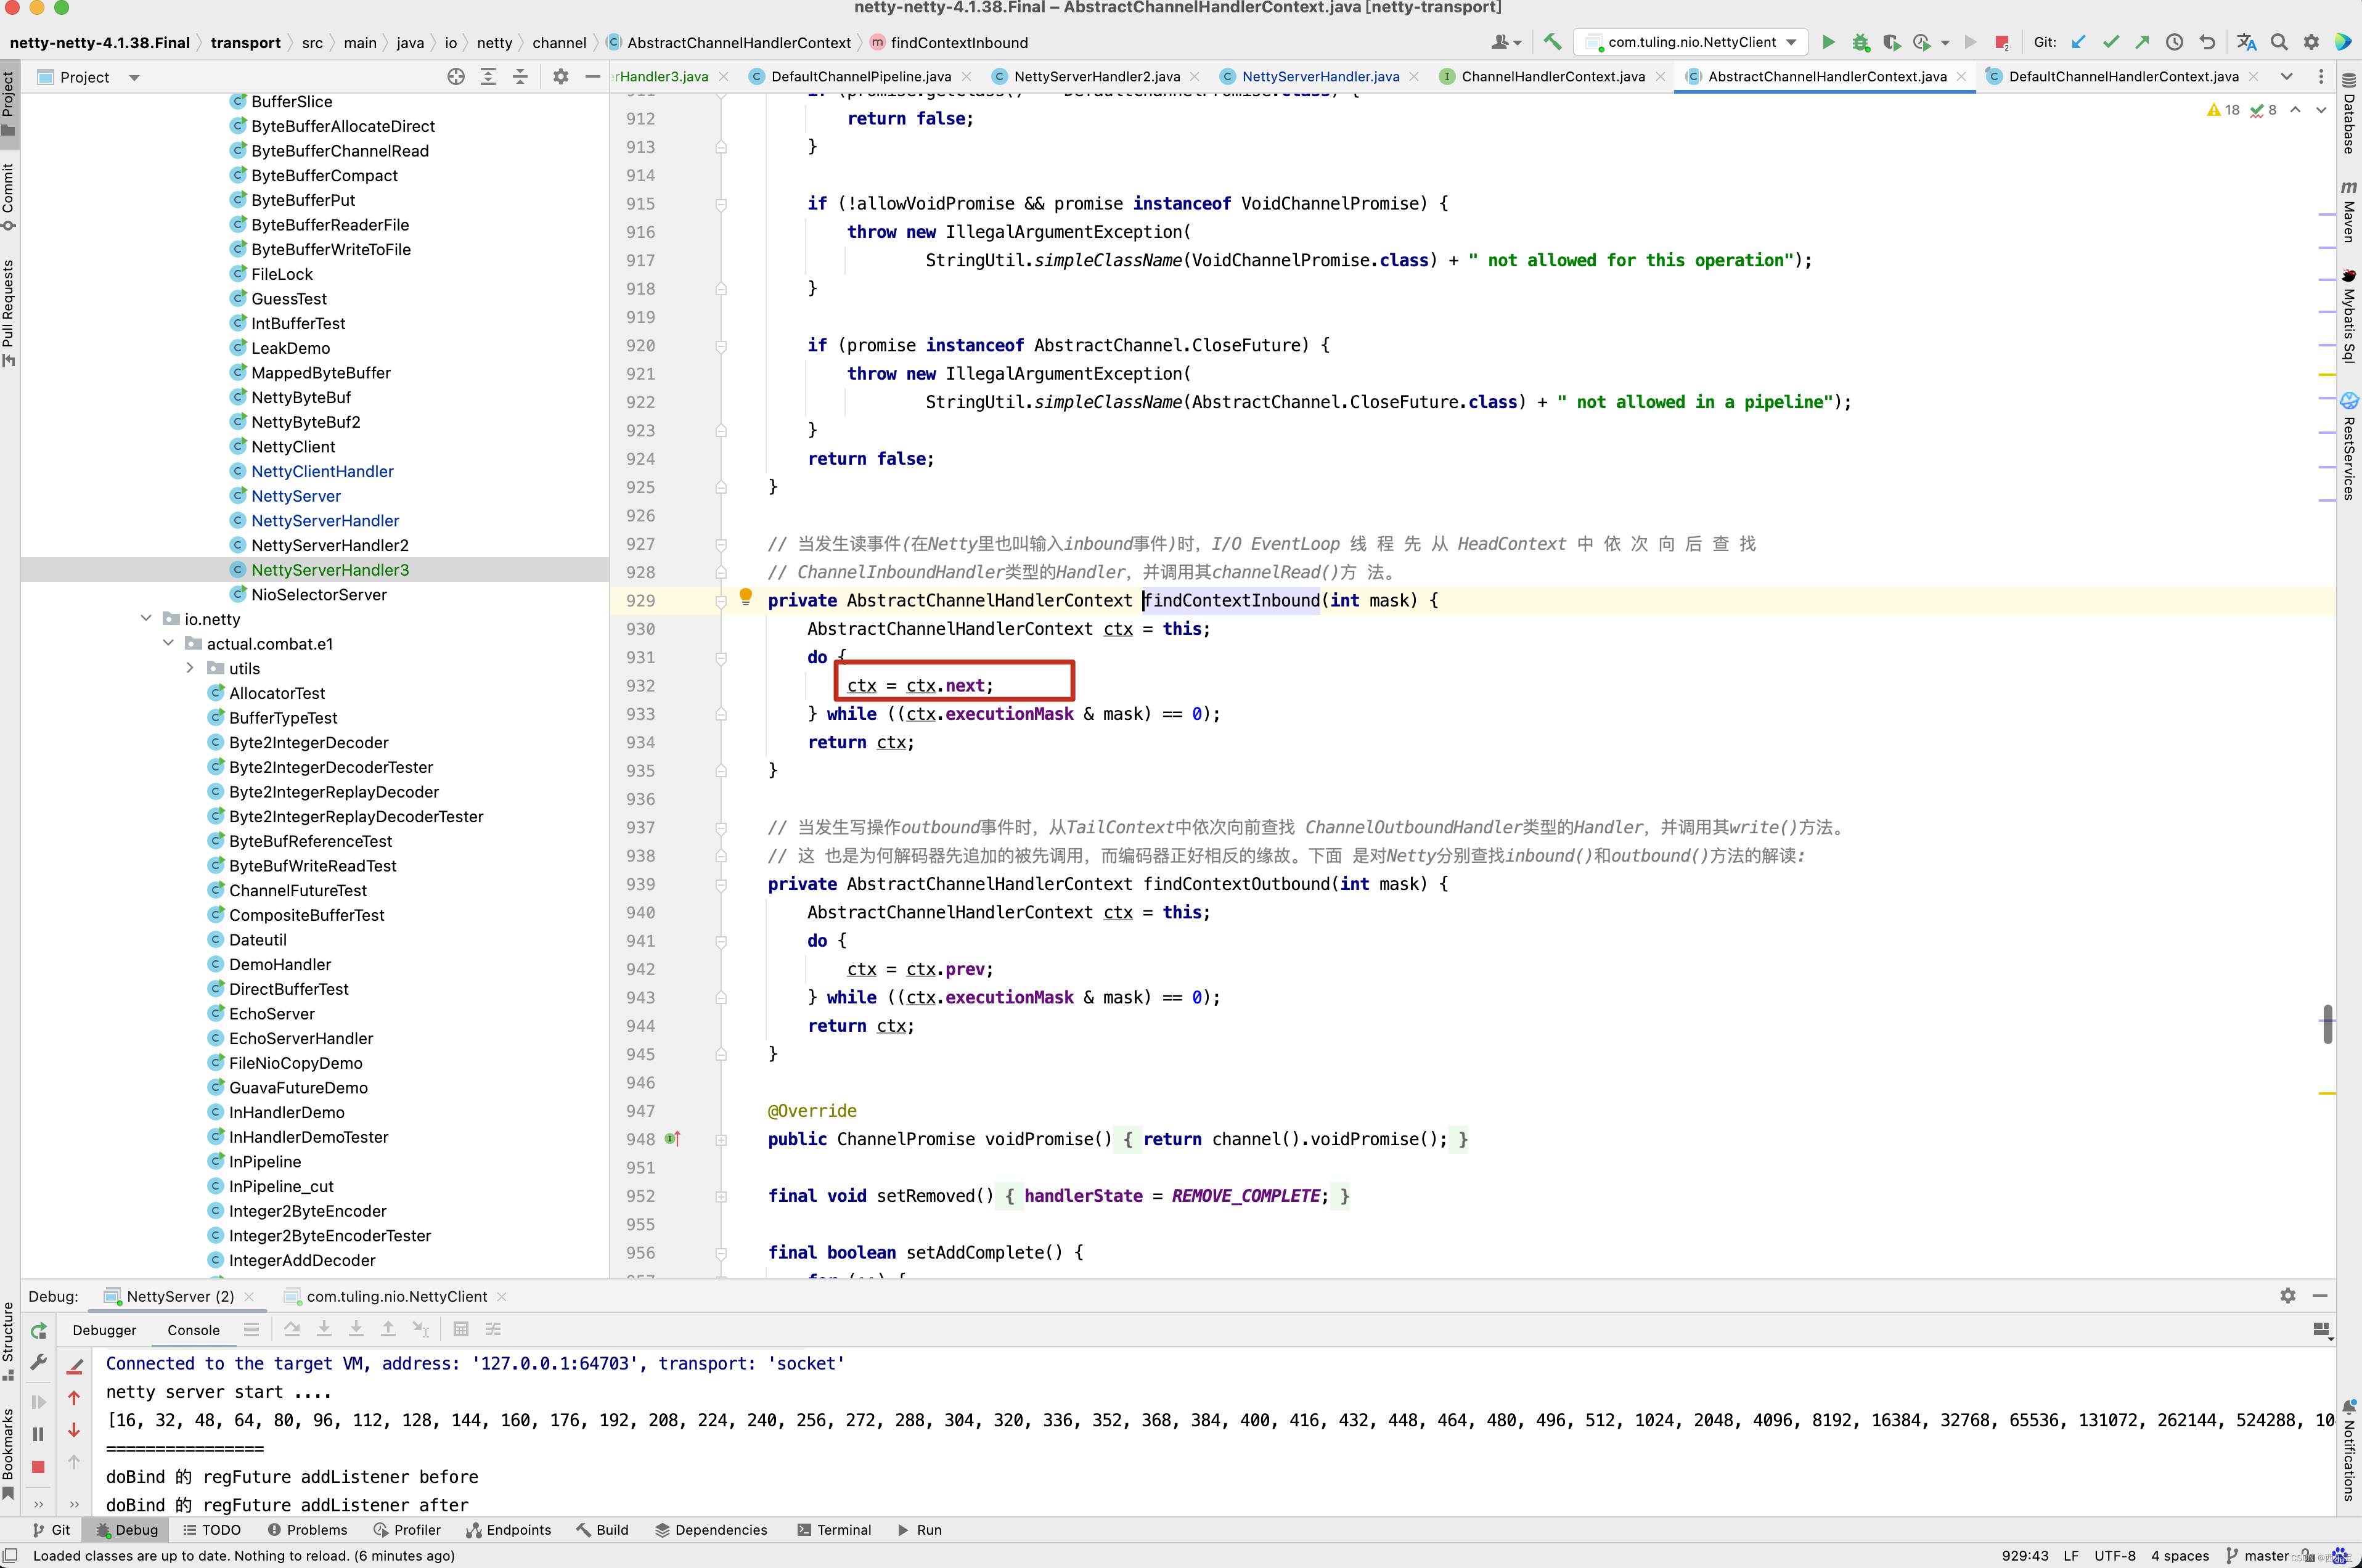
从上图中的三个截图中即可得知。 HeadContext的fireChannelRead()方法最终调用了 invokeChannelRead(findContextInbound(MASK_CHANNEL_READ), msg);这一行代码,而findContextInbound()找到下一下next Context并调用他的invokeChannelRead()方法,在invokeChannelRead()内部又会调用handler的channelRead()方法,因此想让NettyServerHandler3()也被加入到流水线中,只需要在NettyServerHandler中模拟HeadContext一样,加一行ctx.fireChannelRead(msg)代码即可。
执行结果如下 。
关于Netty从客户端读取数据的源码也分析得差不多了,接下来我们以一个个具体的例子来分析源码的实现。首先看第一个例子。
例子1
对于RecvByteBufAllocator内存分配计算 当第一次字节数大于1024,并且在1024~1026个字节中写的是一个utf-8的中文,此时打印ByteBuf会出现中文乱码。 在之前的博客中第一种方案中,在ChannelInitializer的initChannel()方法中加一行ch.config().setRecvByteBufAllocator(new FixedRecvByteBufAllocator(2056));

即可解决中文乱码问题,为什么呢? ,在read()方法的final RecvByteBufAllocator.Handle allocHandle = recvBufAllocHandle();这一行代码,recvBufAllocHandle()方法内部 ,config().getRecvByteBufAllocator()获取的实际上是我们自定义的FixedRecvByteBufAllocator分配器。
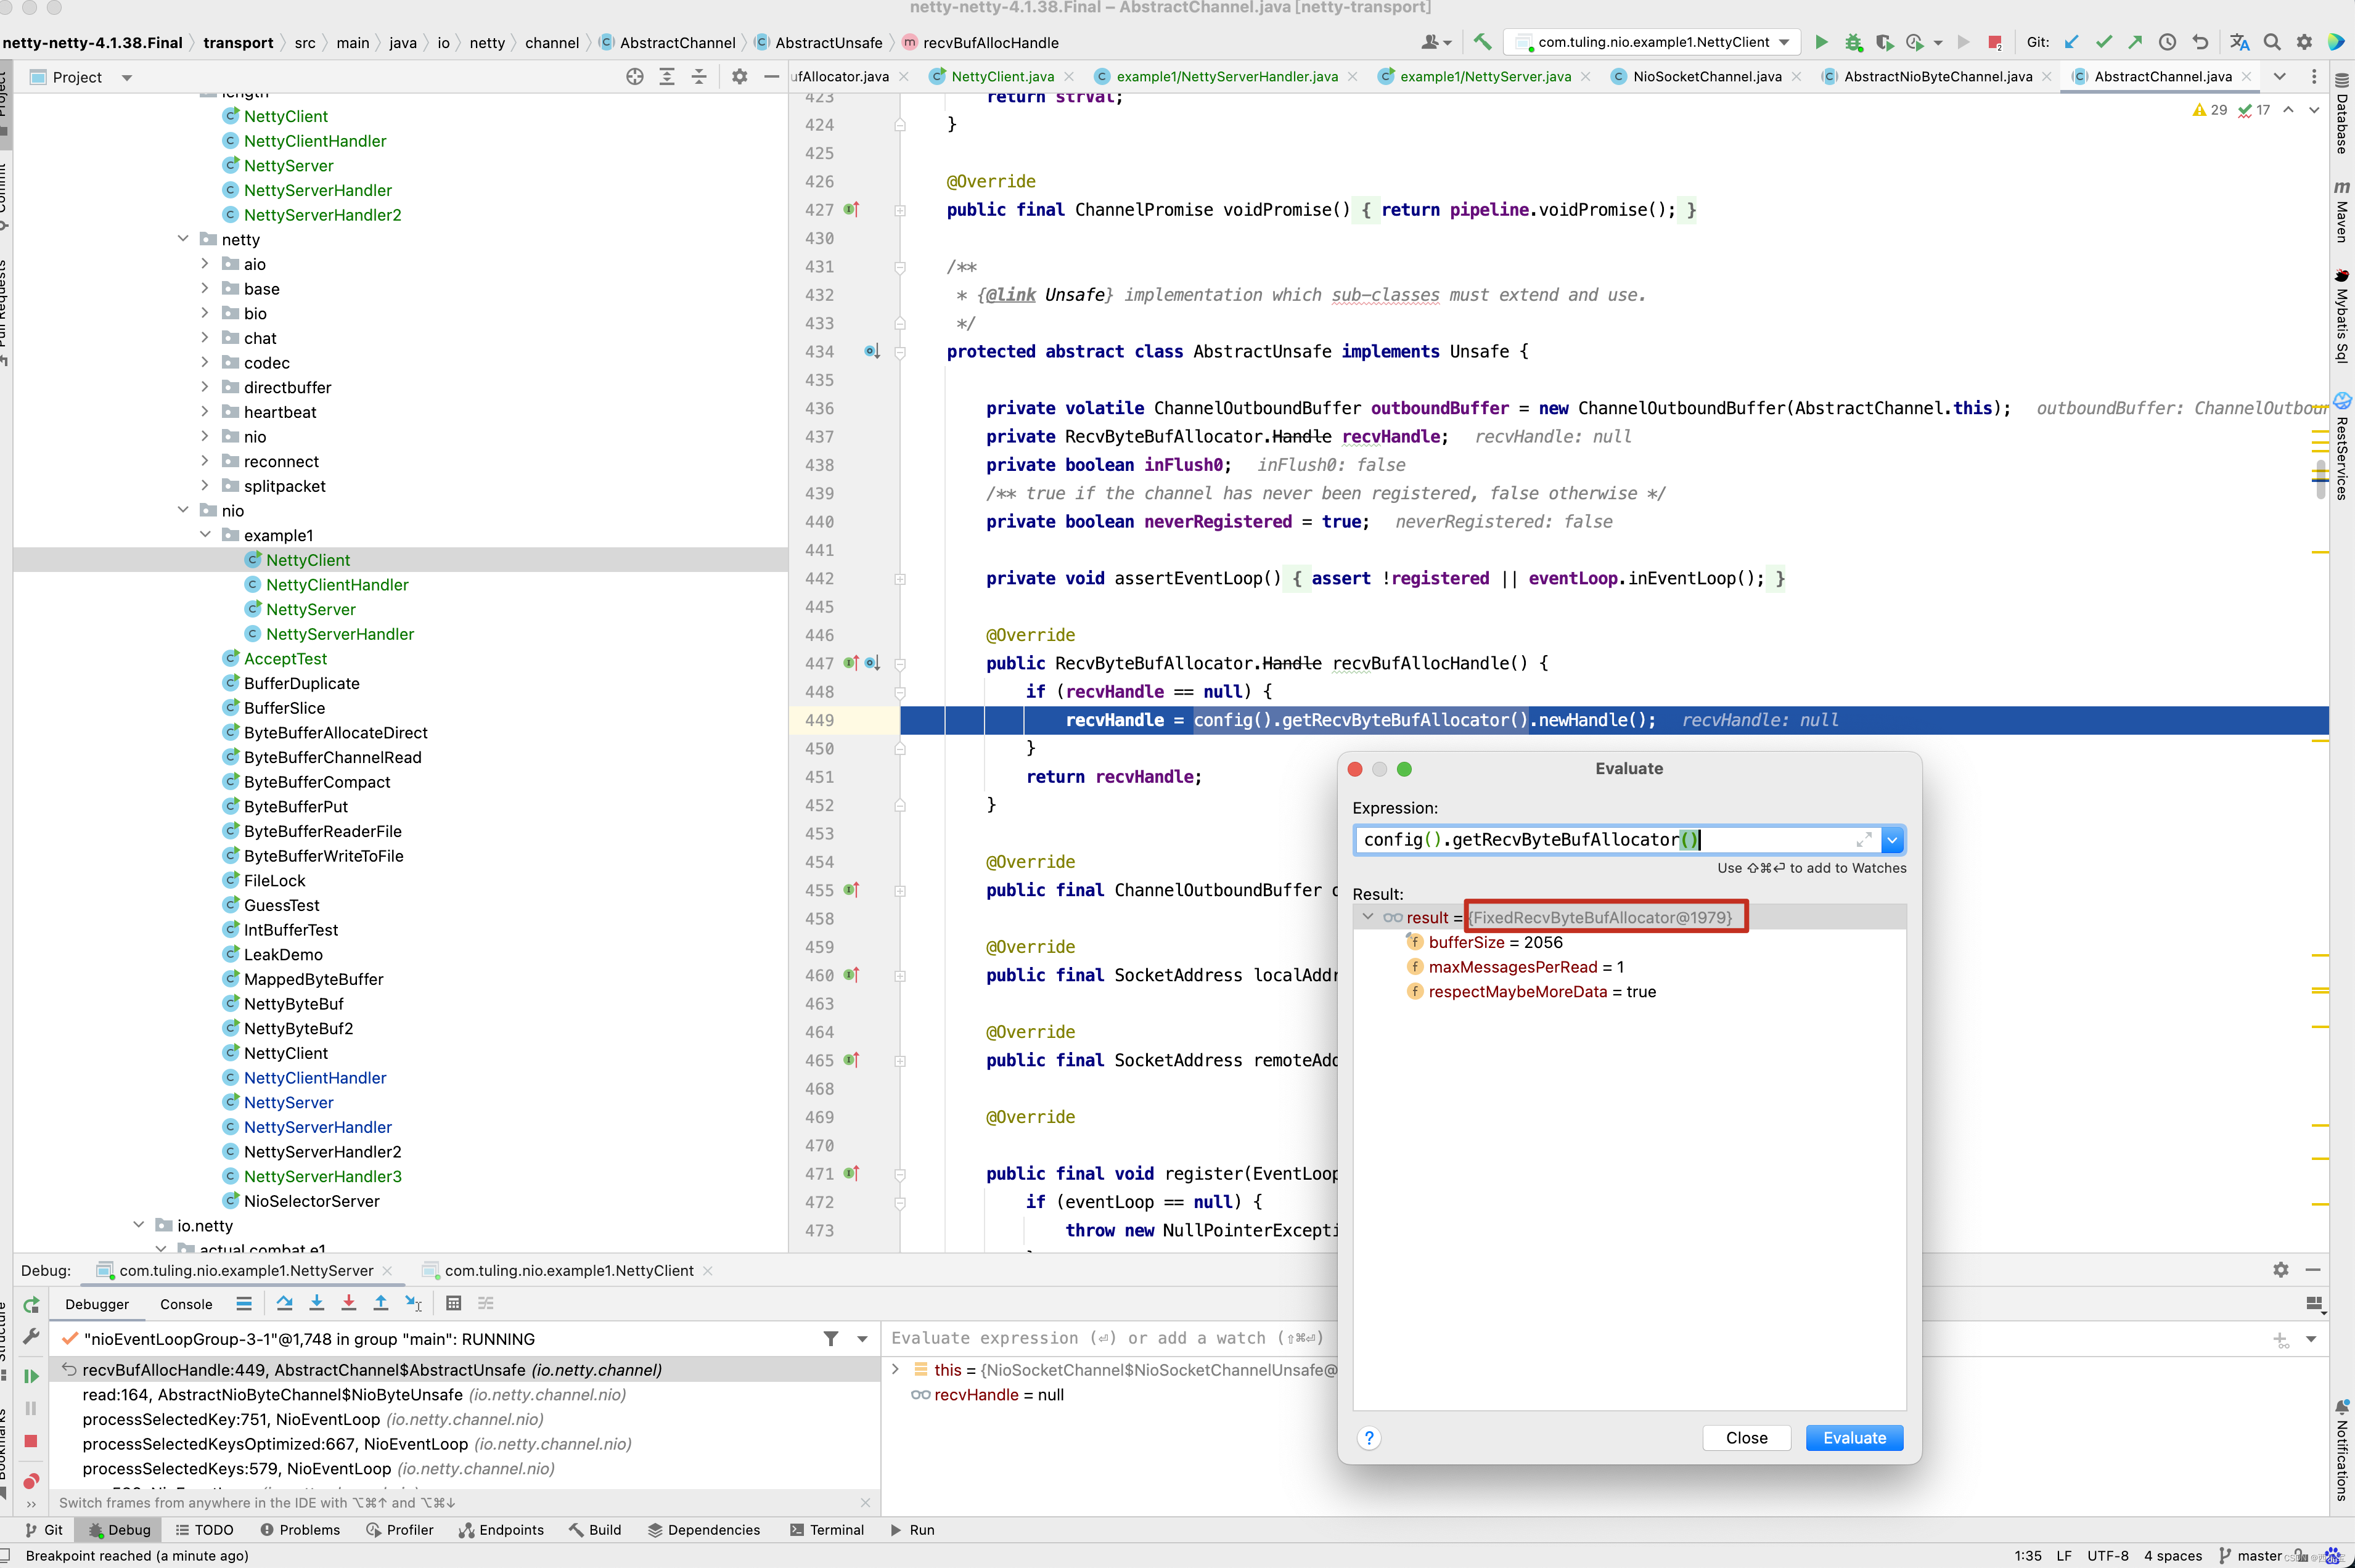
而newHandle()方法实际上是调用FixedRecvByteBufAllocator的newHandle()方法。
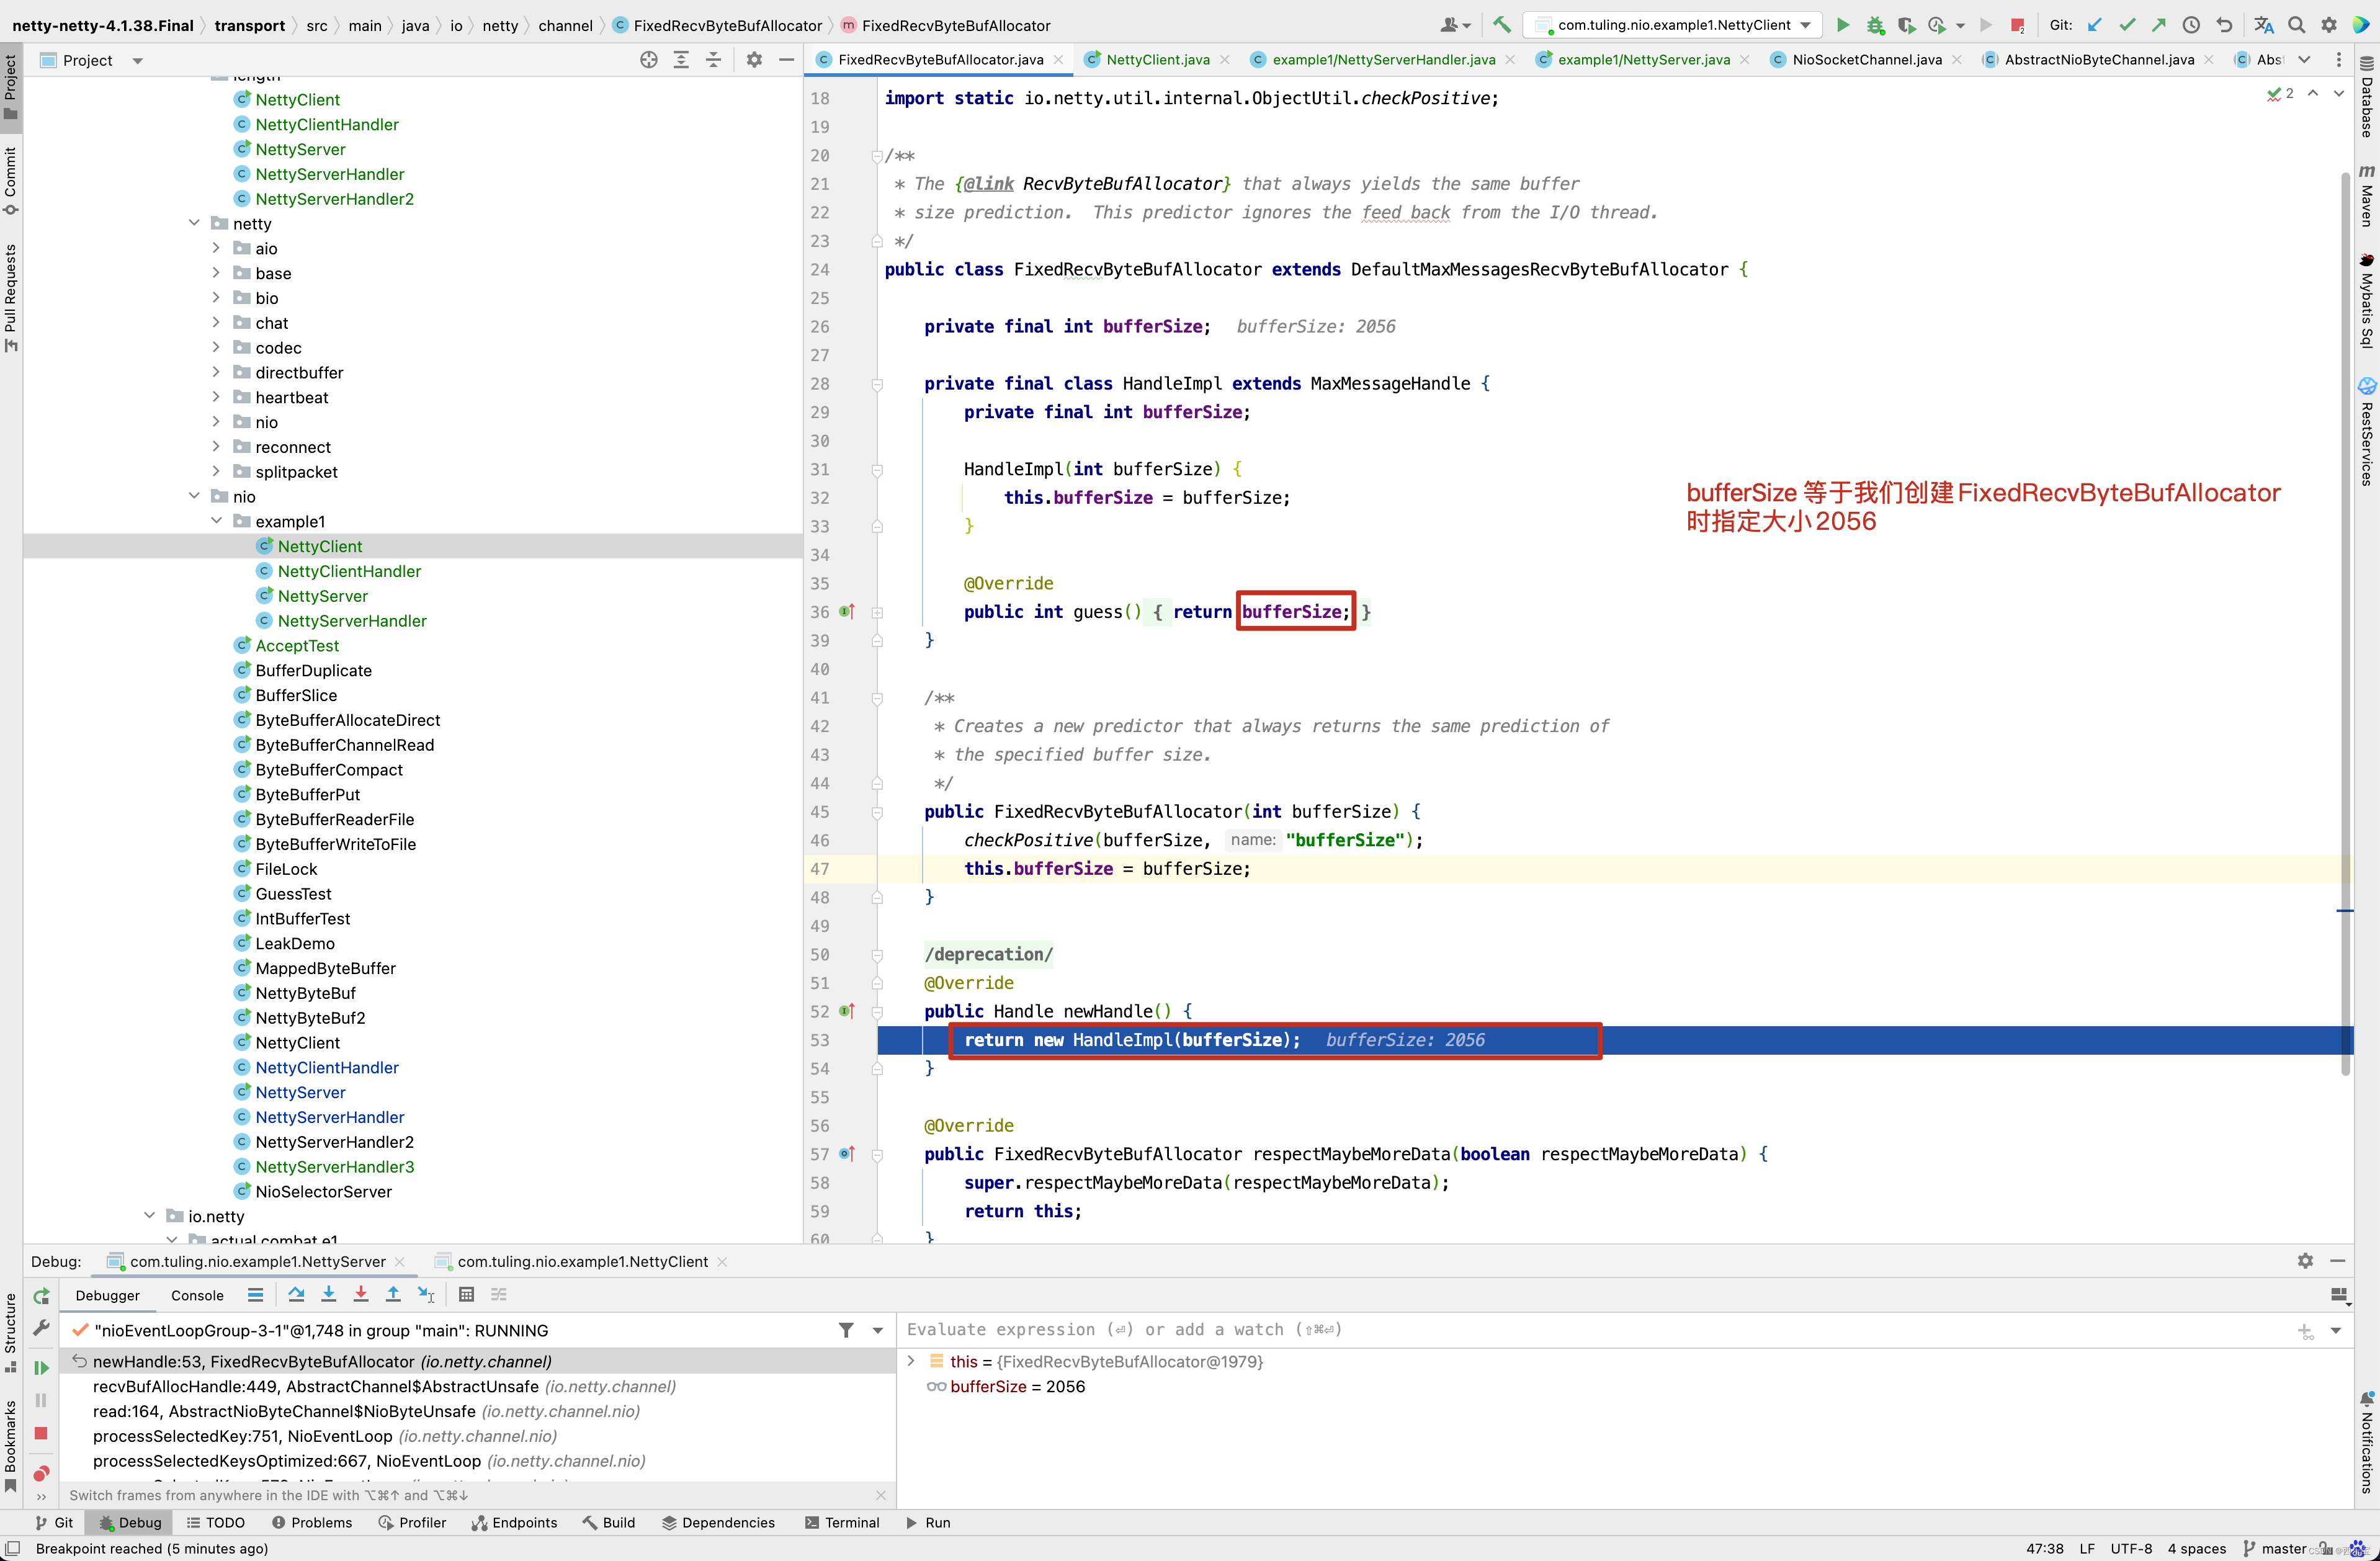
而创建的HandleImpl的bufferSize为我们创建FixedRecvByteBufAllocator指定bufferSize的大小为2056。
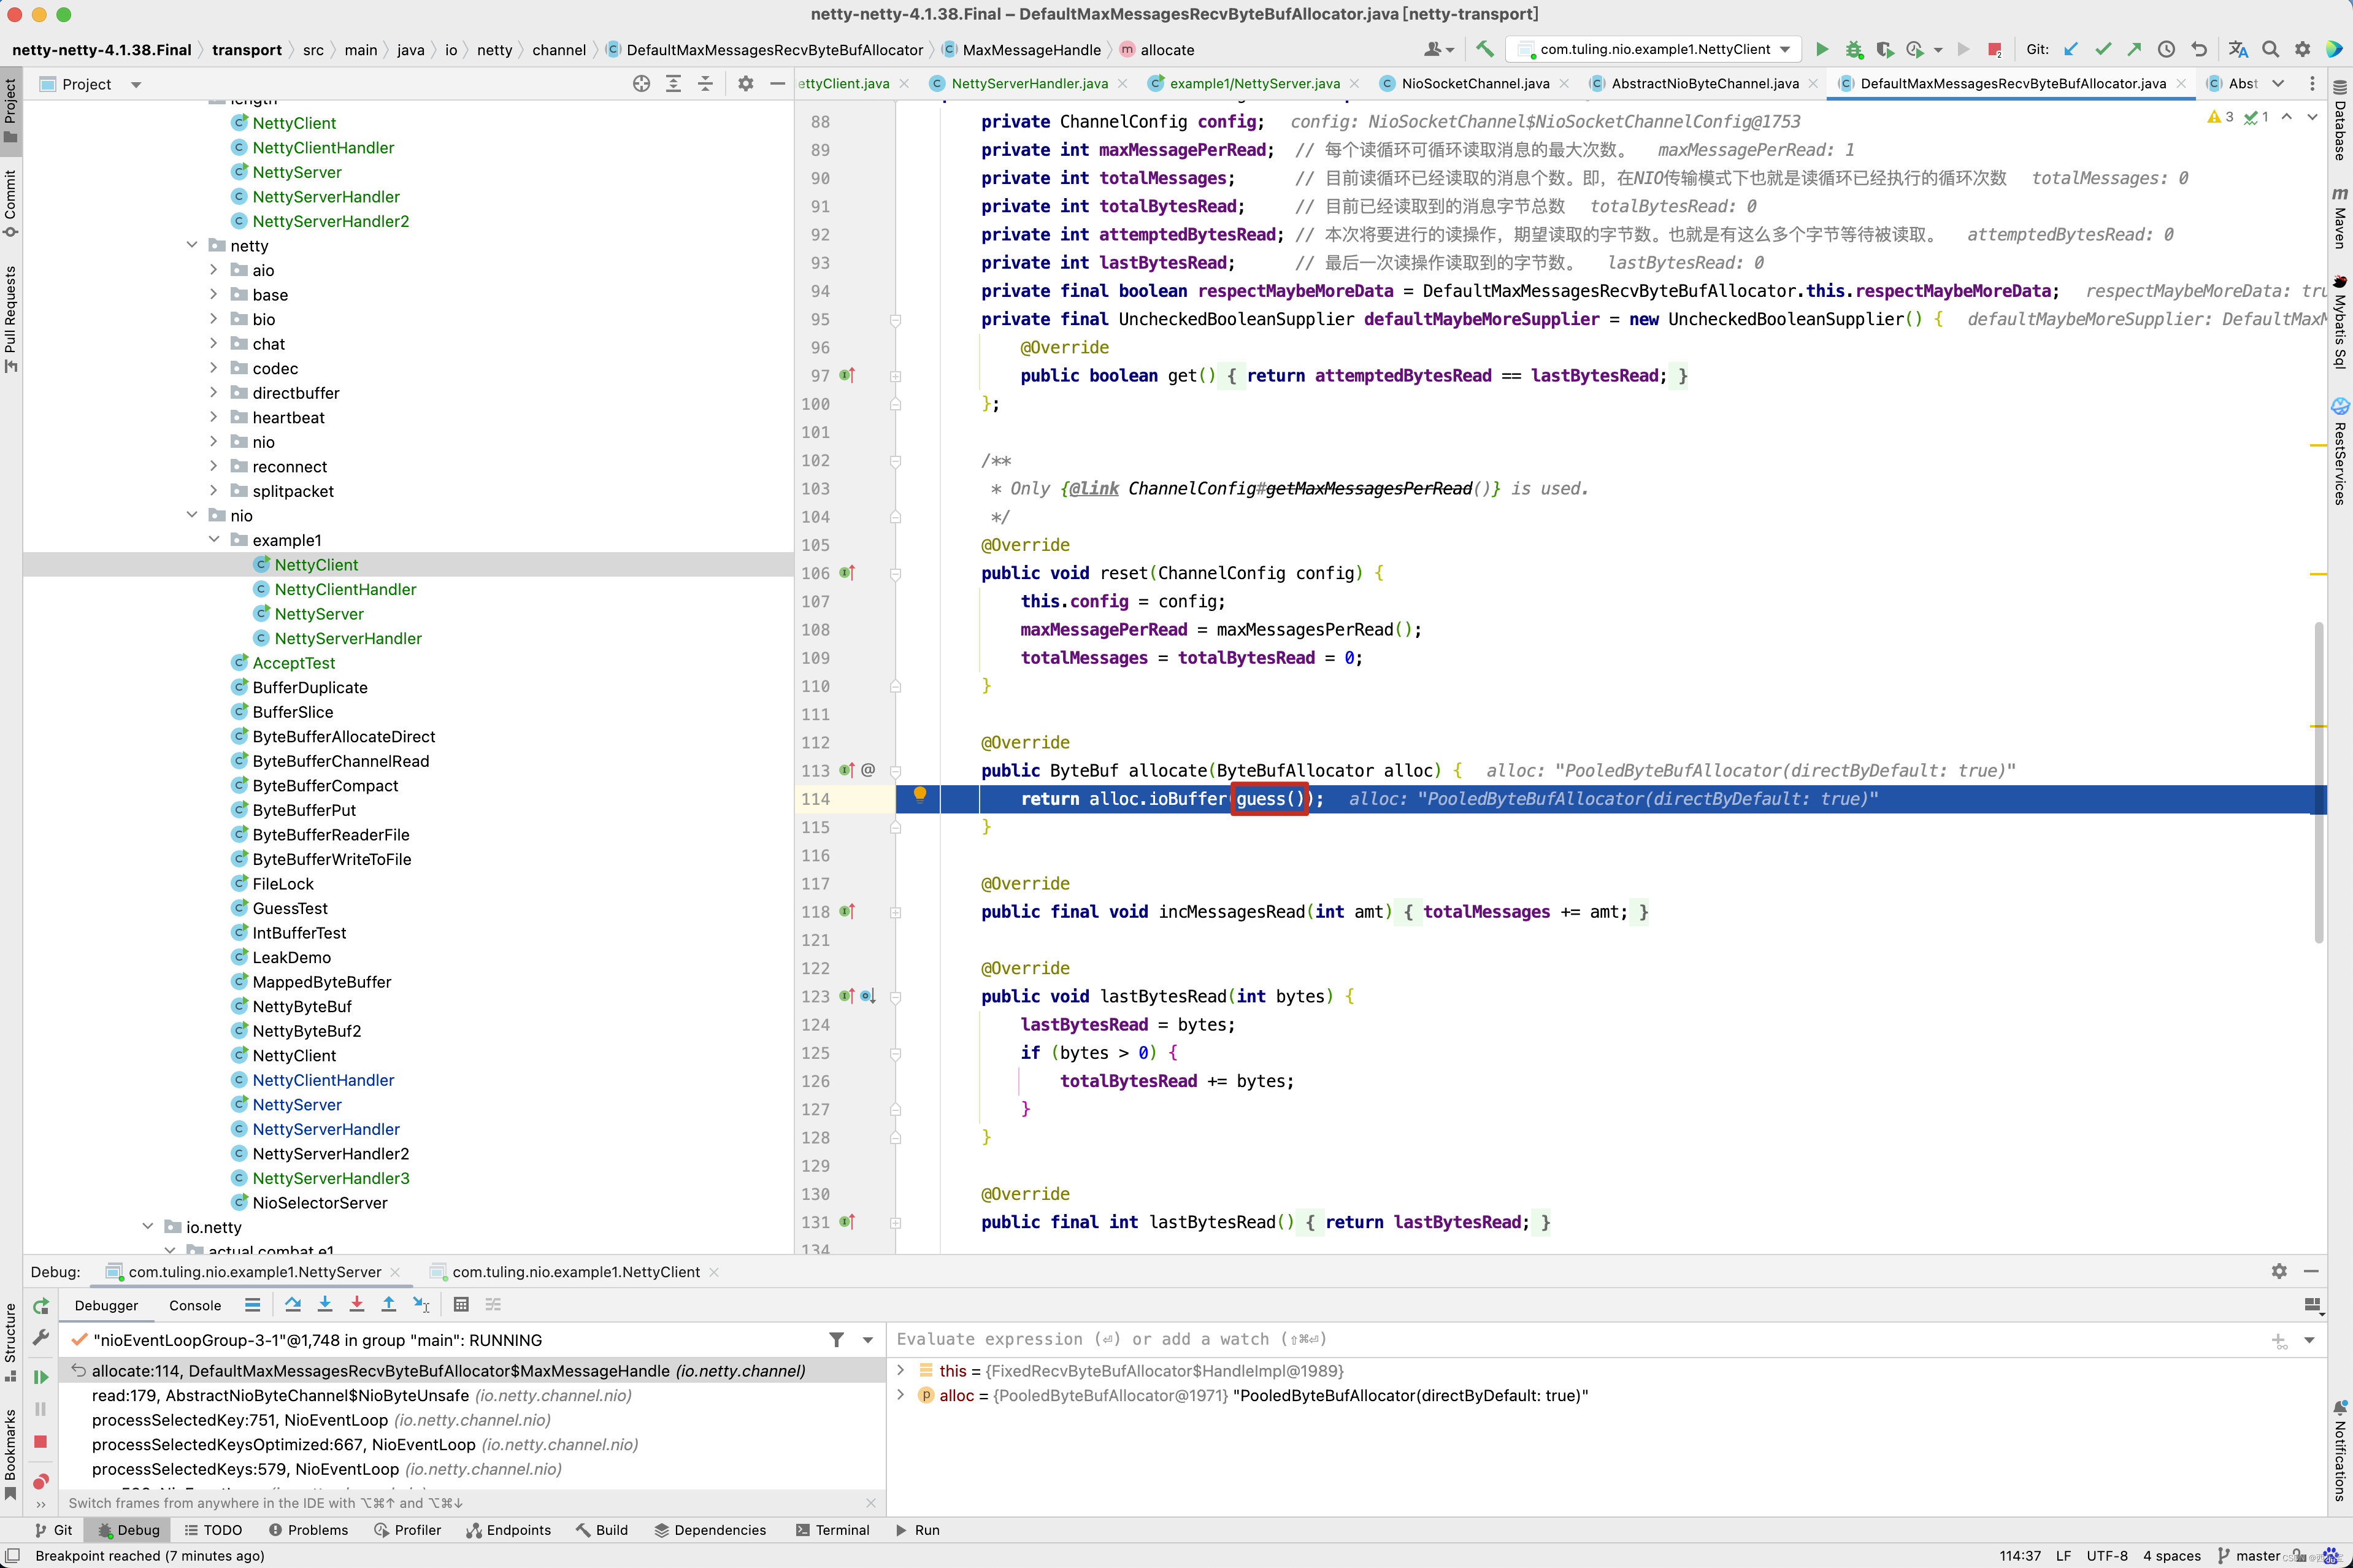
因此在调用 byteBuf = allocHandle.allocate(allocator)时,guess()方法实际上调用的是FixedRecvByteBufAllocator的内部类HandleImpl的guess()方法,返回2056。
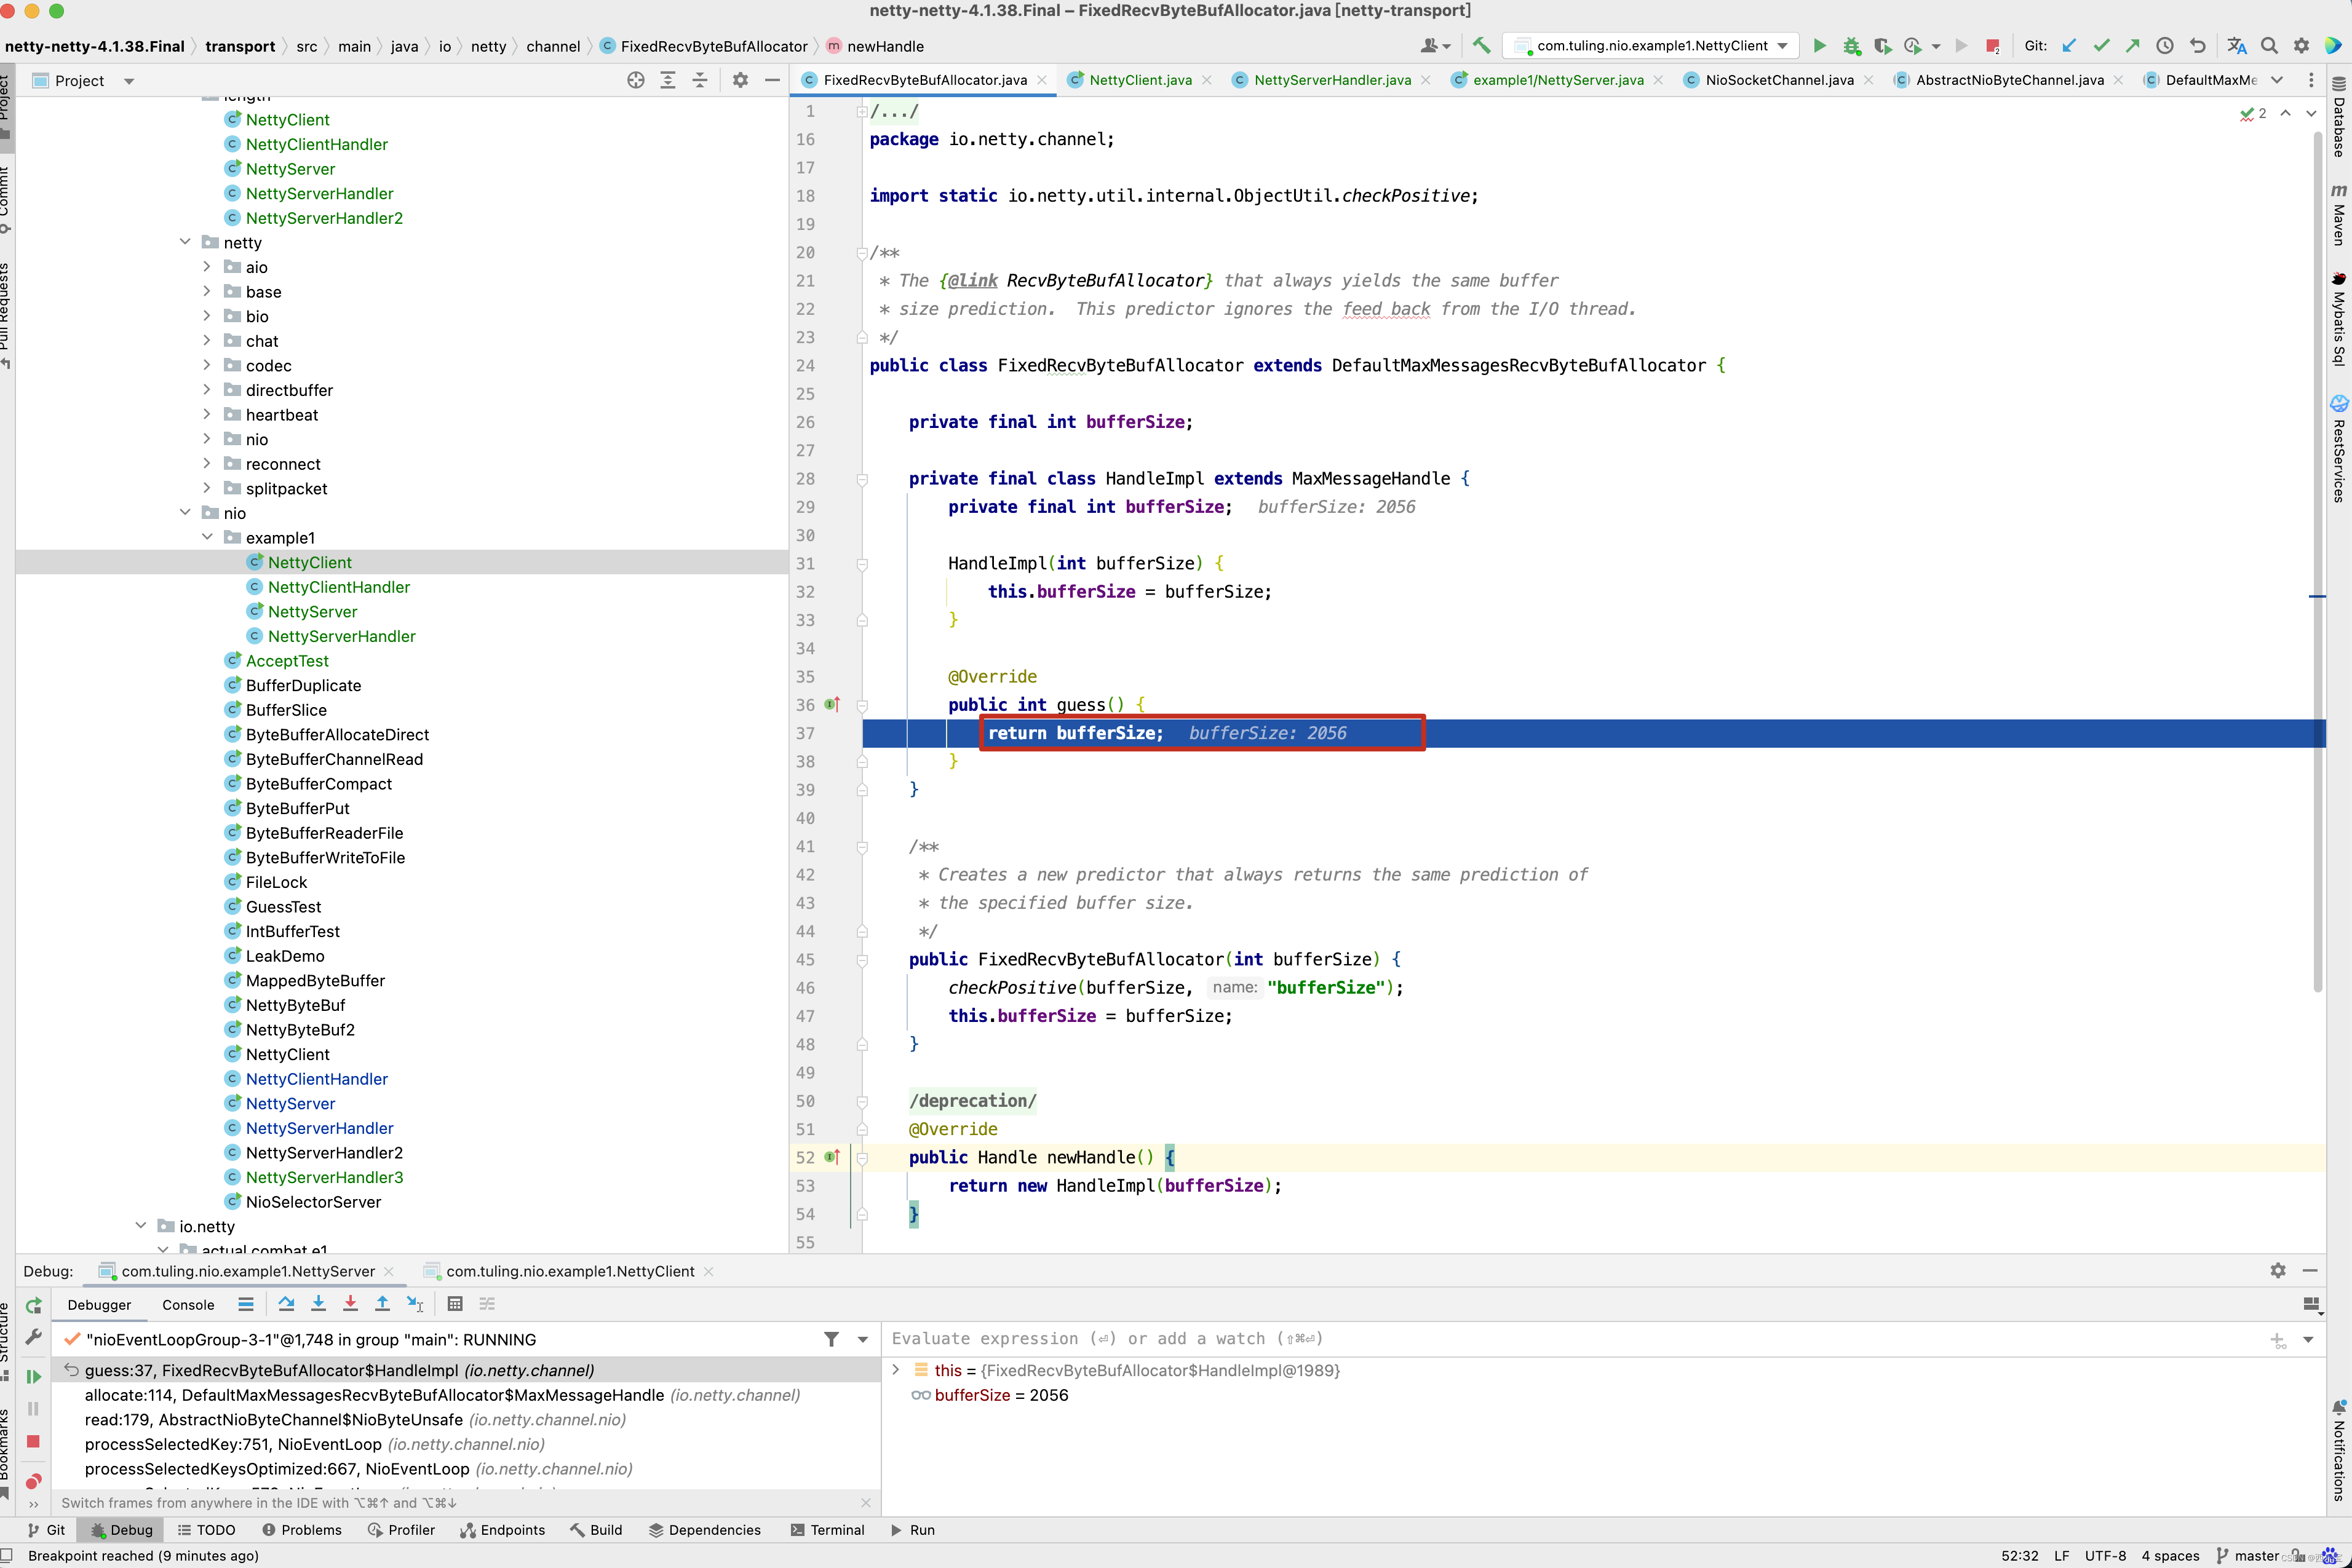
因此创建ByteBuf的容量就是2056个字节,读取1030个字节足足在余,所以不会出现中文乱码问题。
RecvByteBufAllocator内存分配计算 的第二种方案也是我自己瞎yy的,不知道能不能用于生产,因此关于他的源码我也不想分析了,有兴趣自己去论证,我们看第三种方案。
例子3
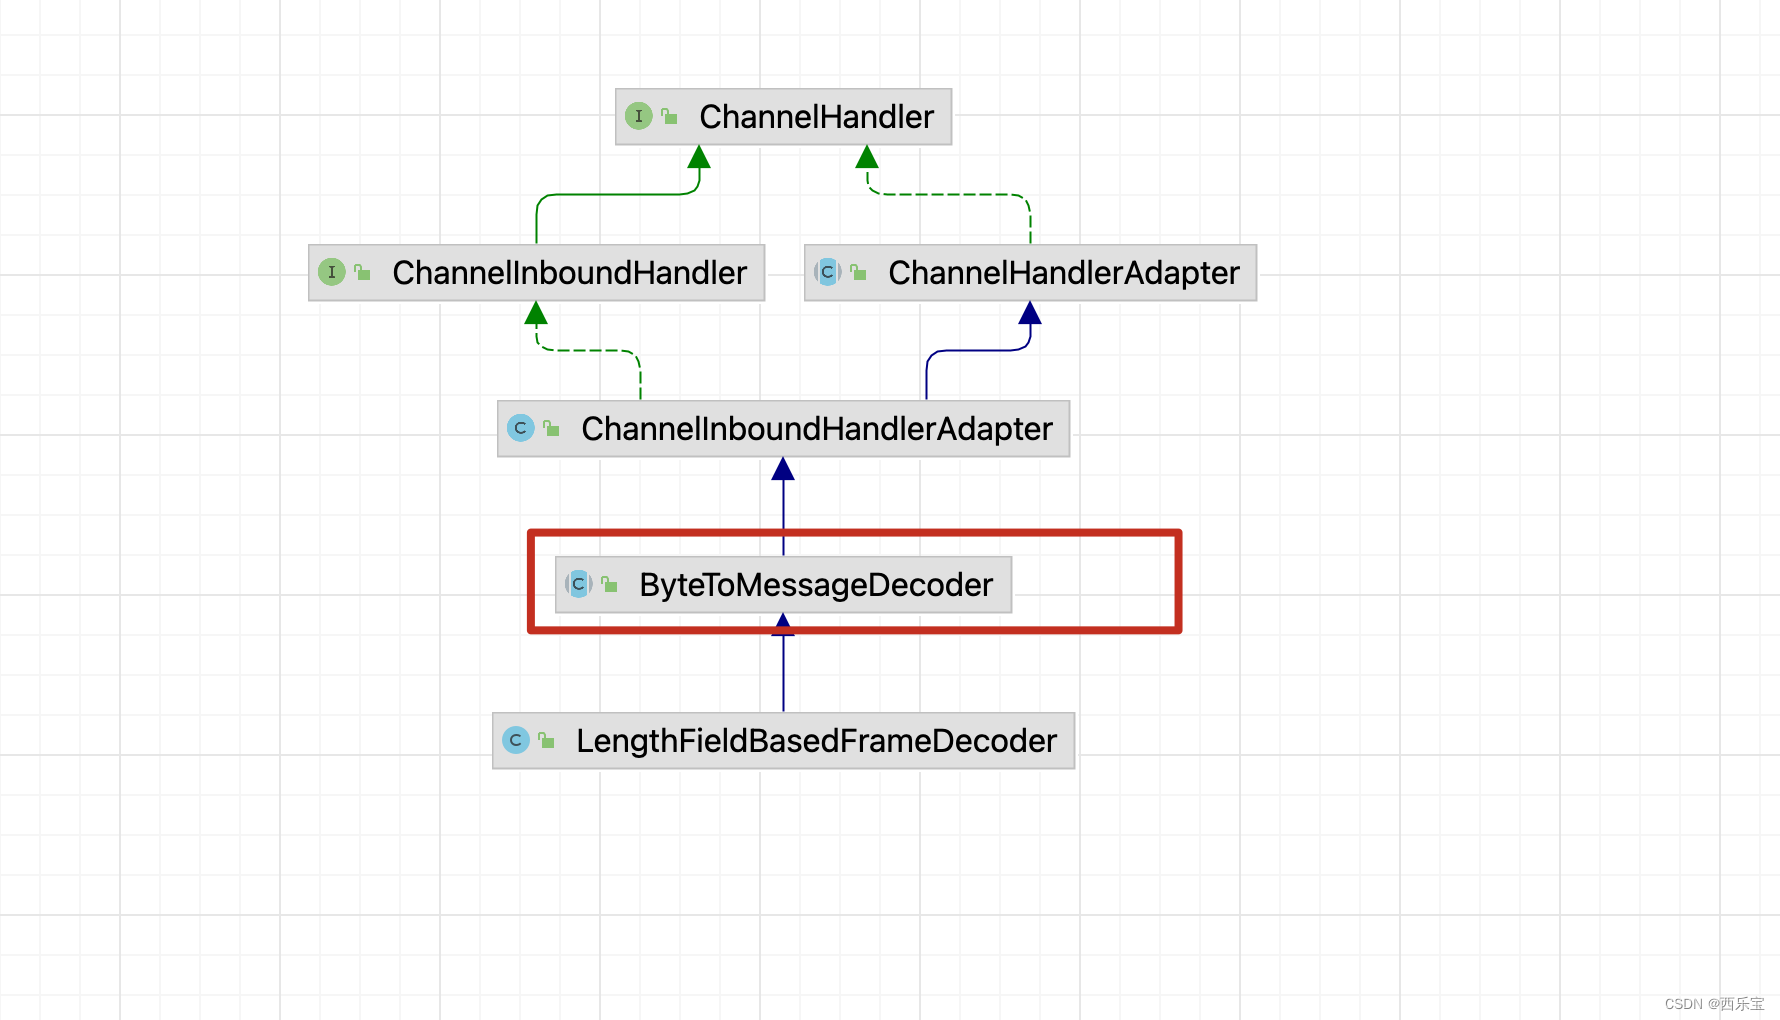
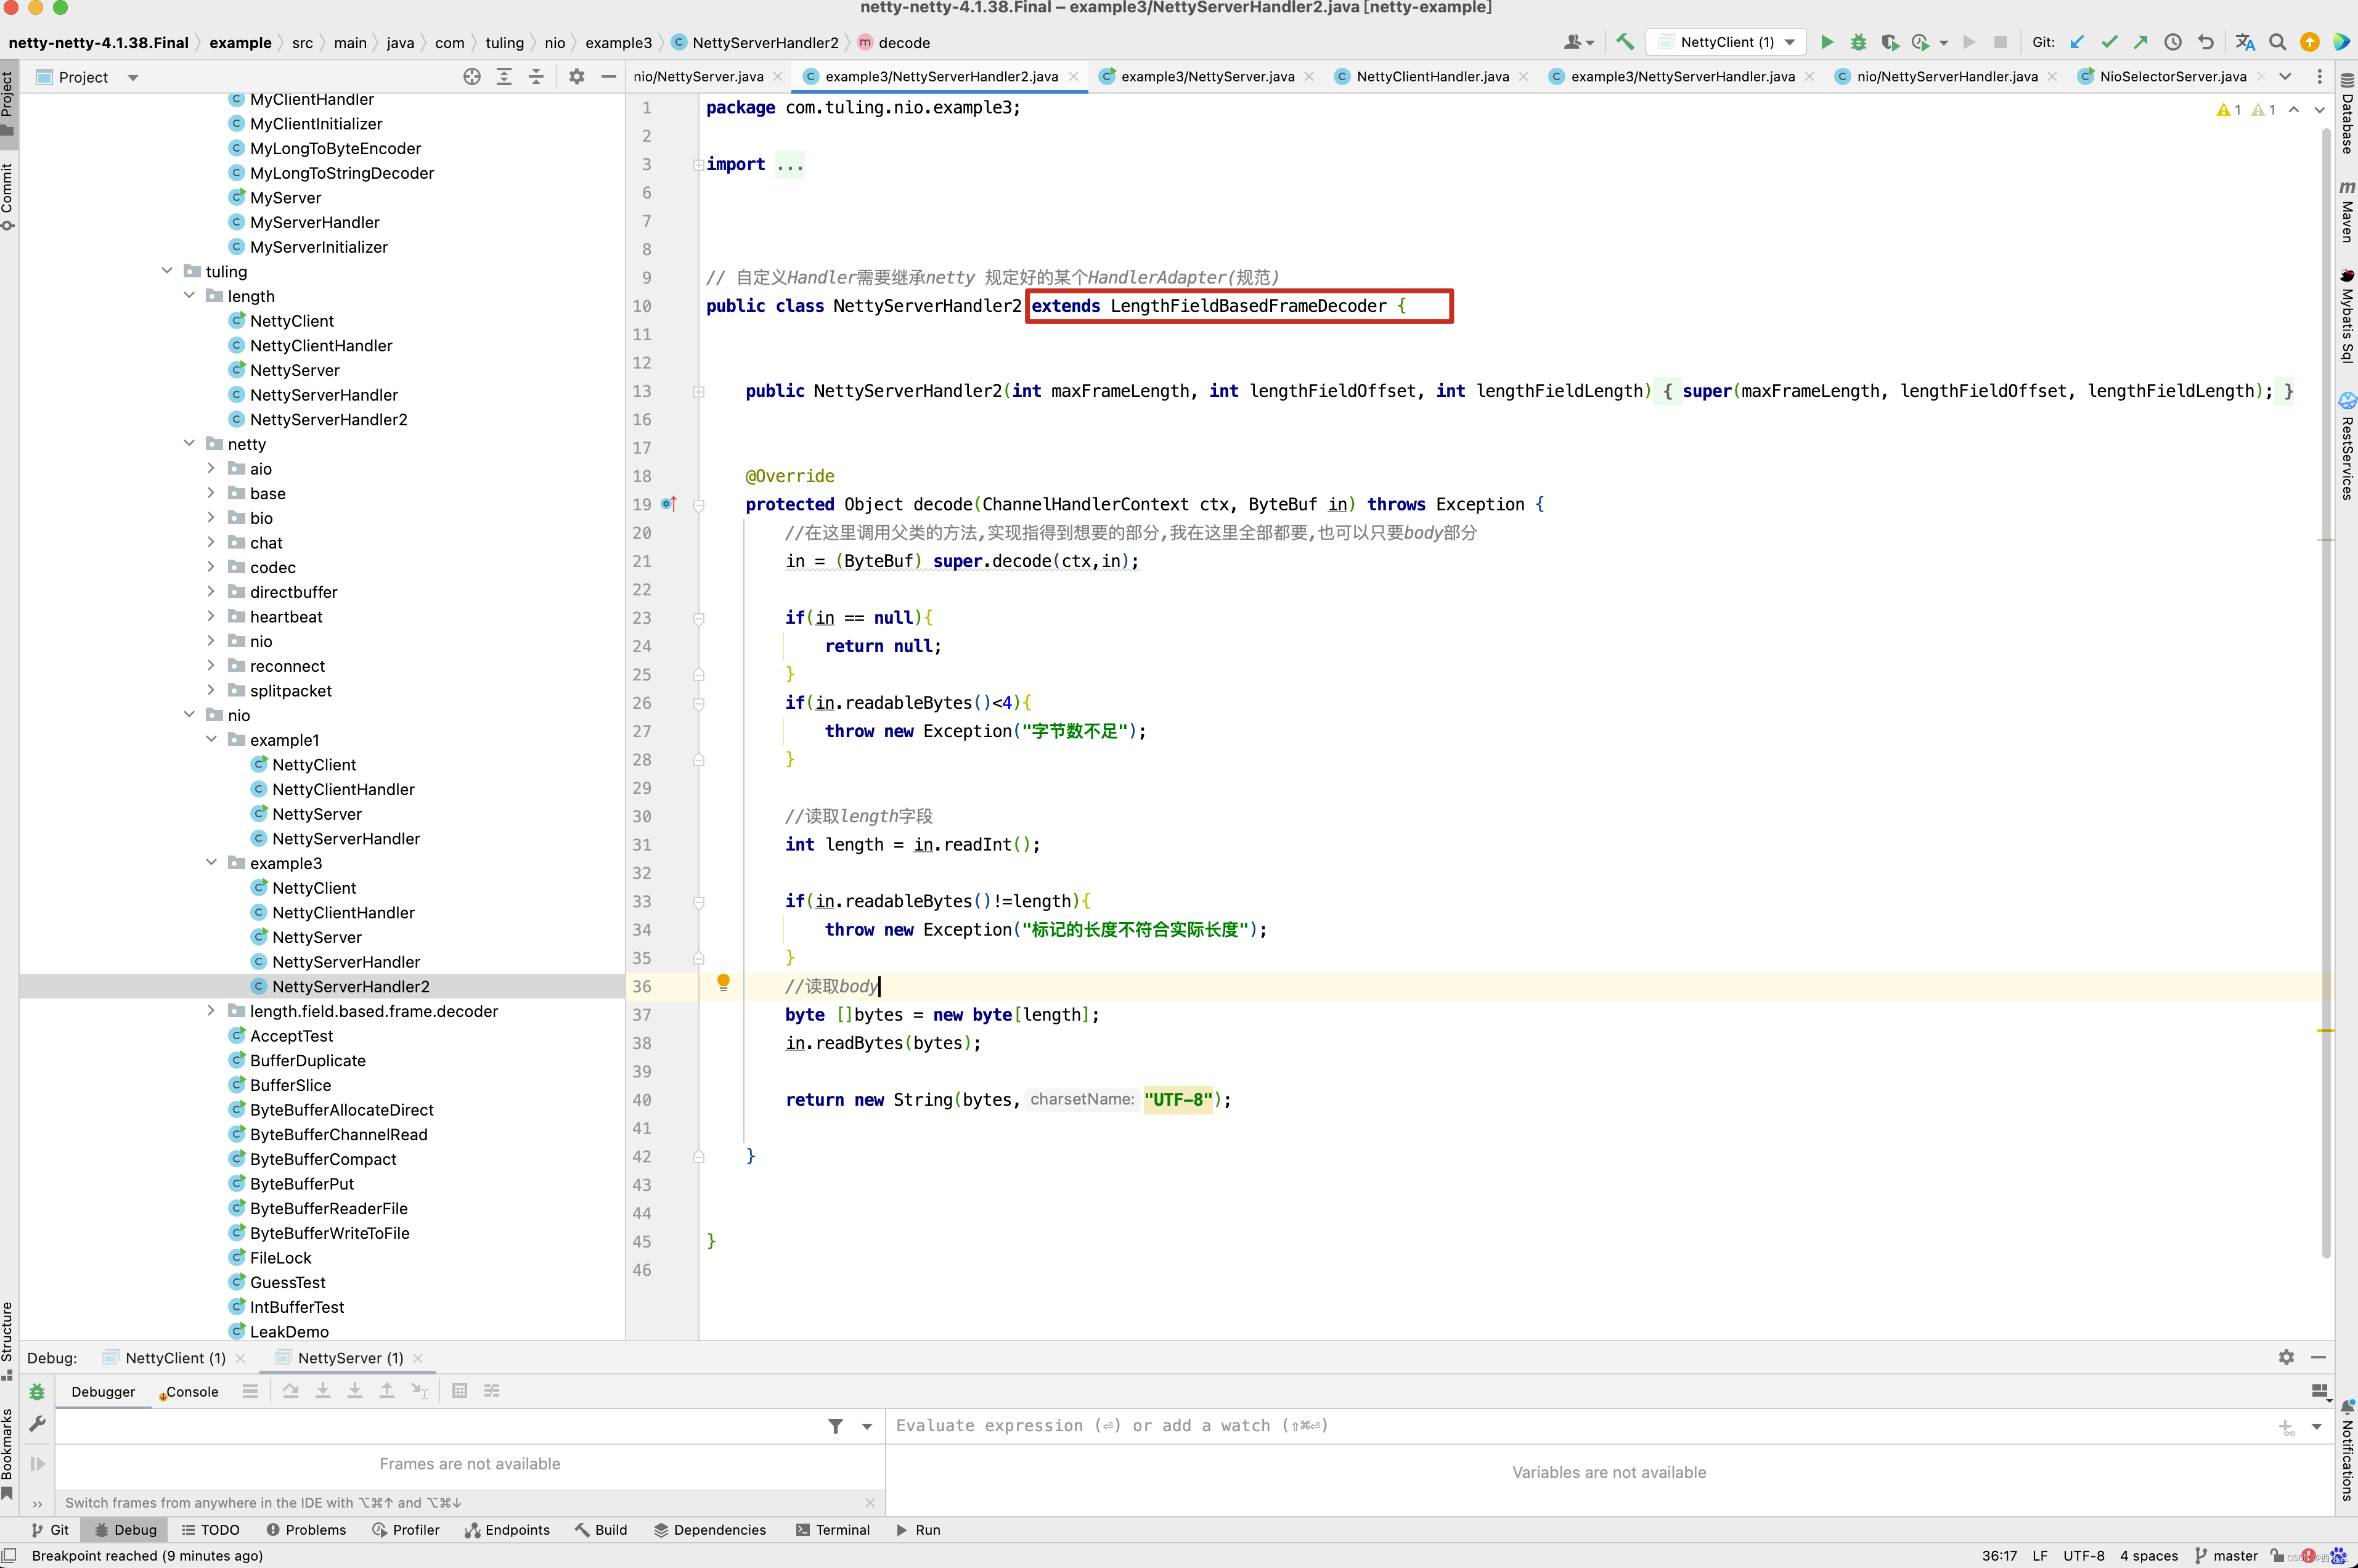
第三种方案创建了一个NettyServerHandler2类,并继承了LengthFieldBasedFrameDecoder,而LengthFieldBasedFrameDecoder继承了ByteToMessageDecoder类。
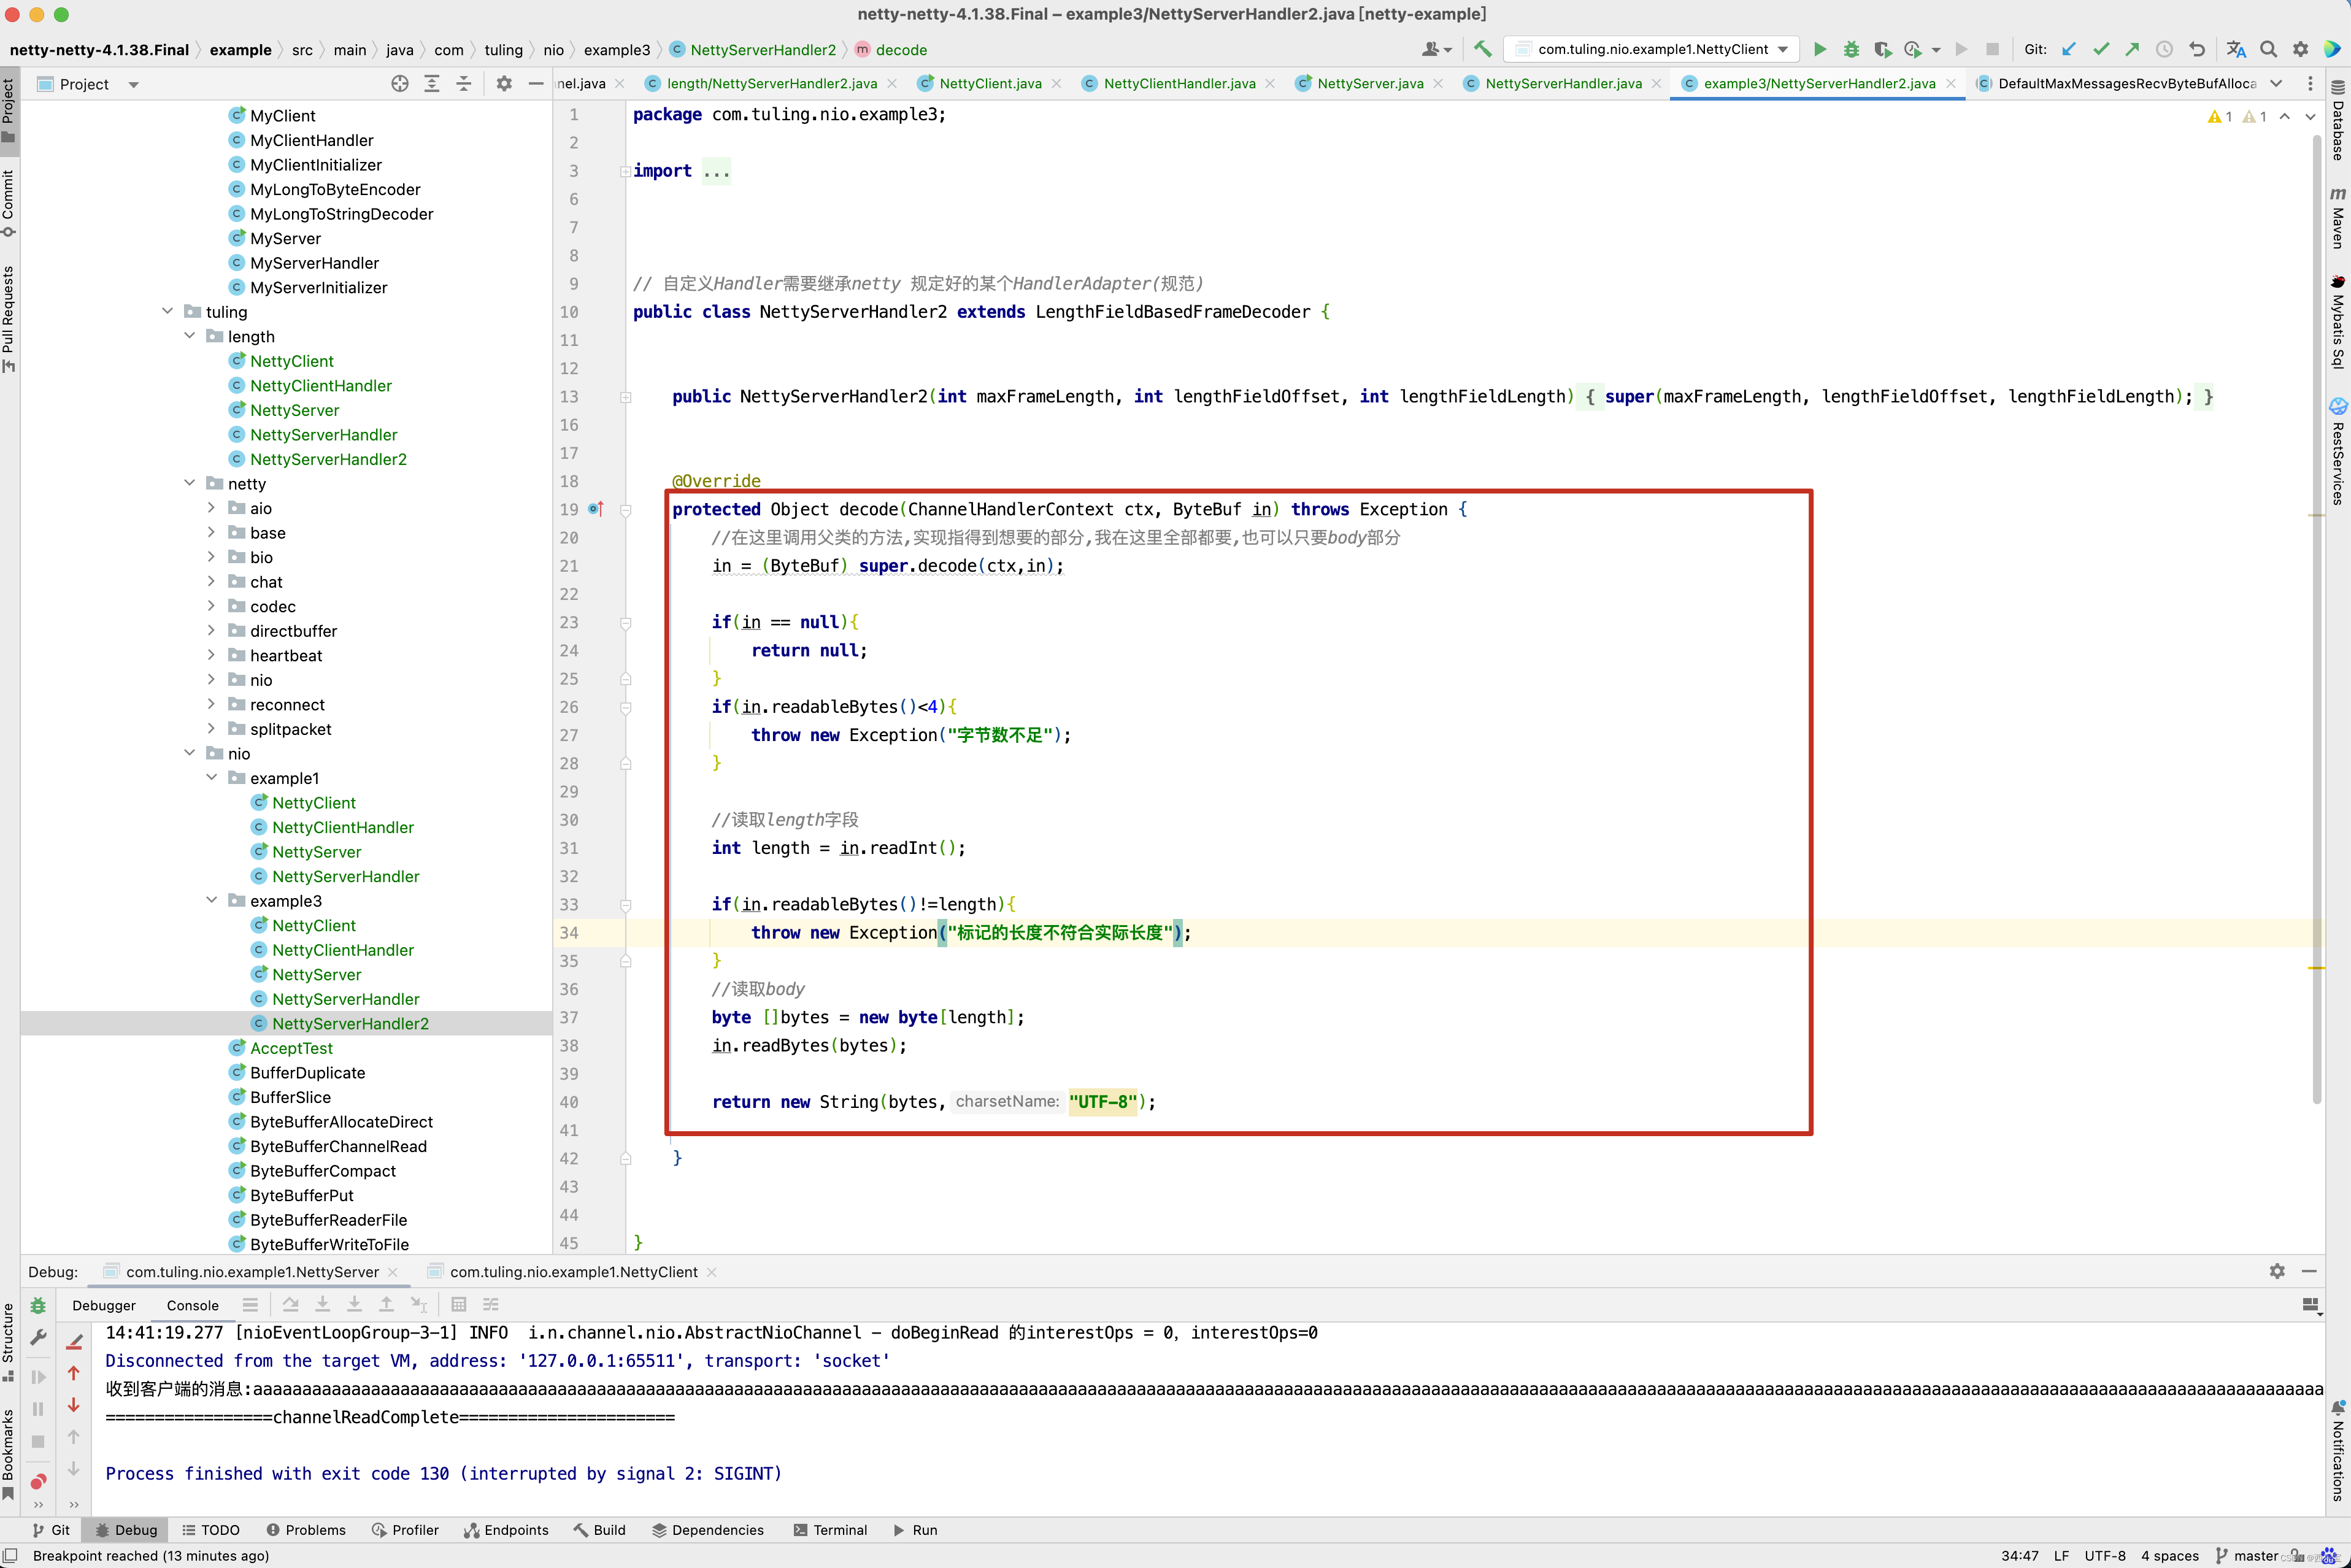
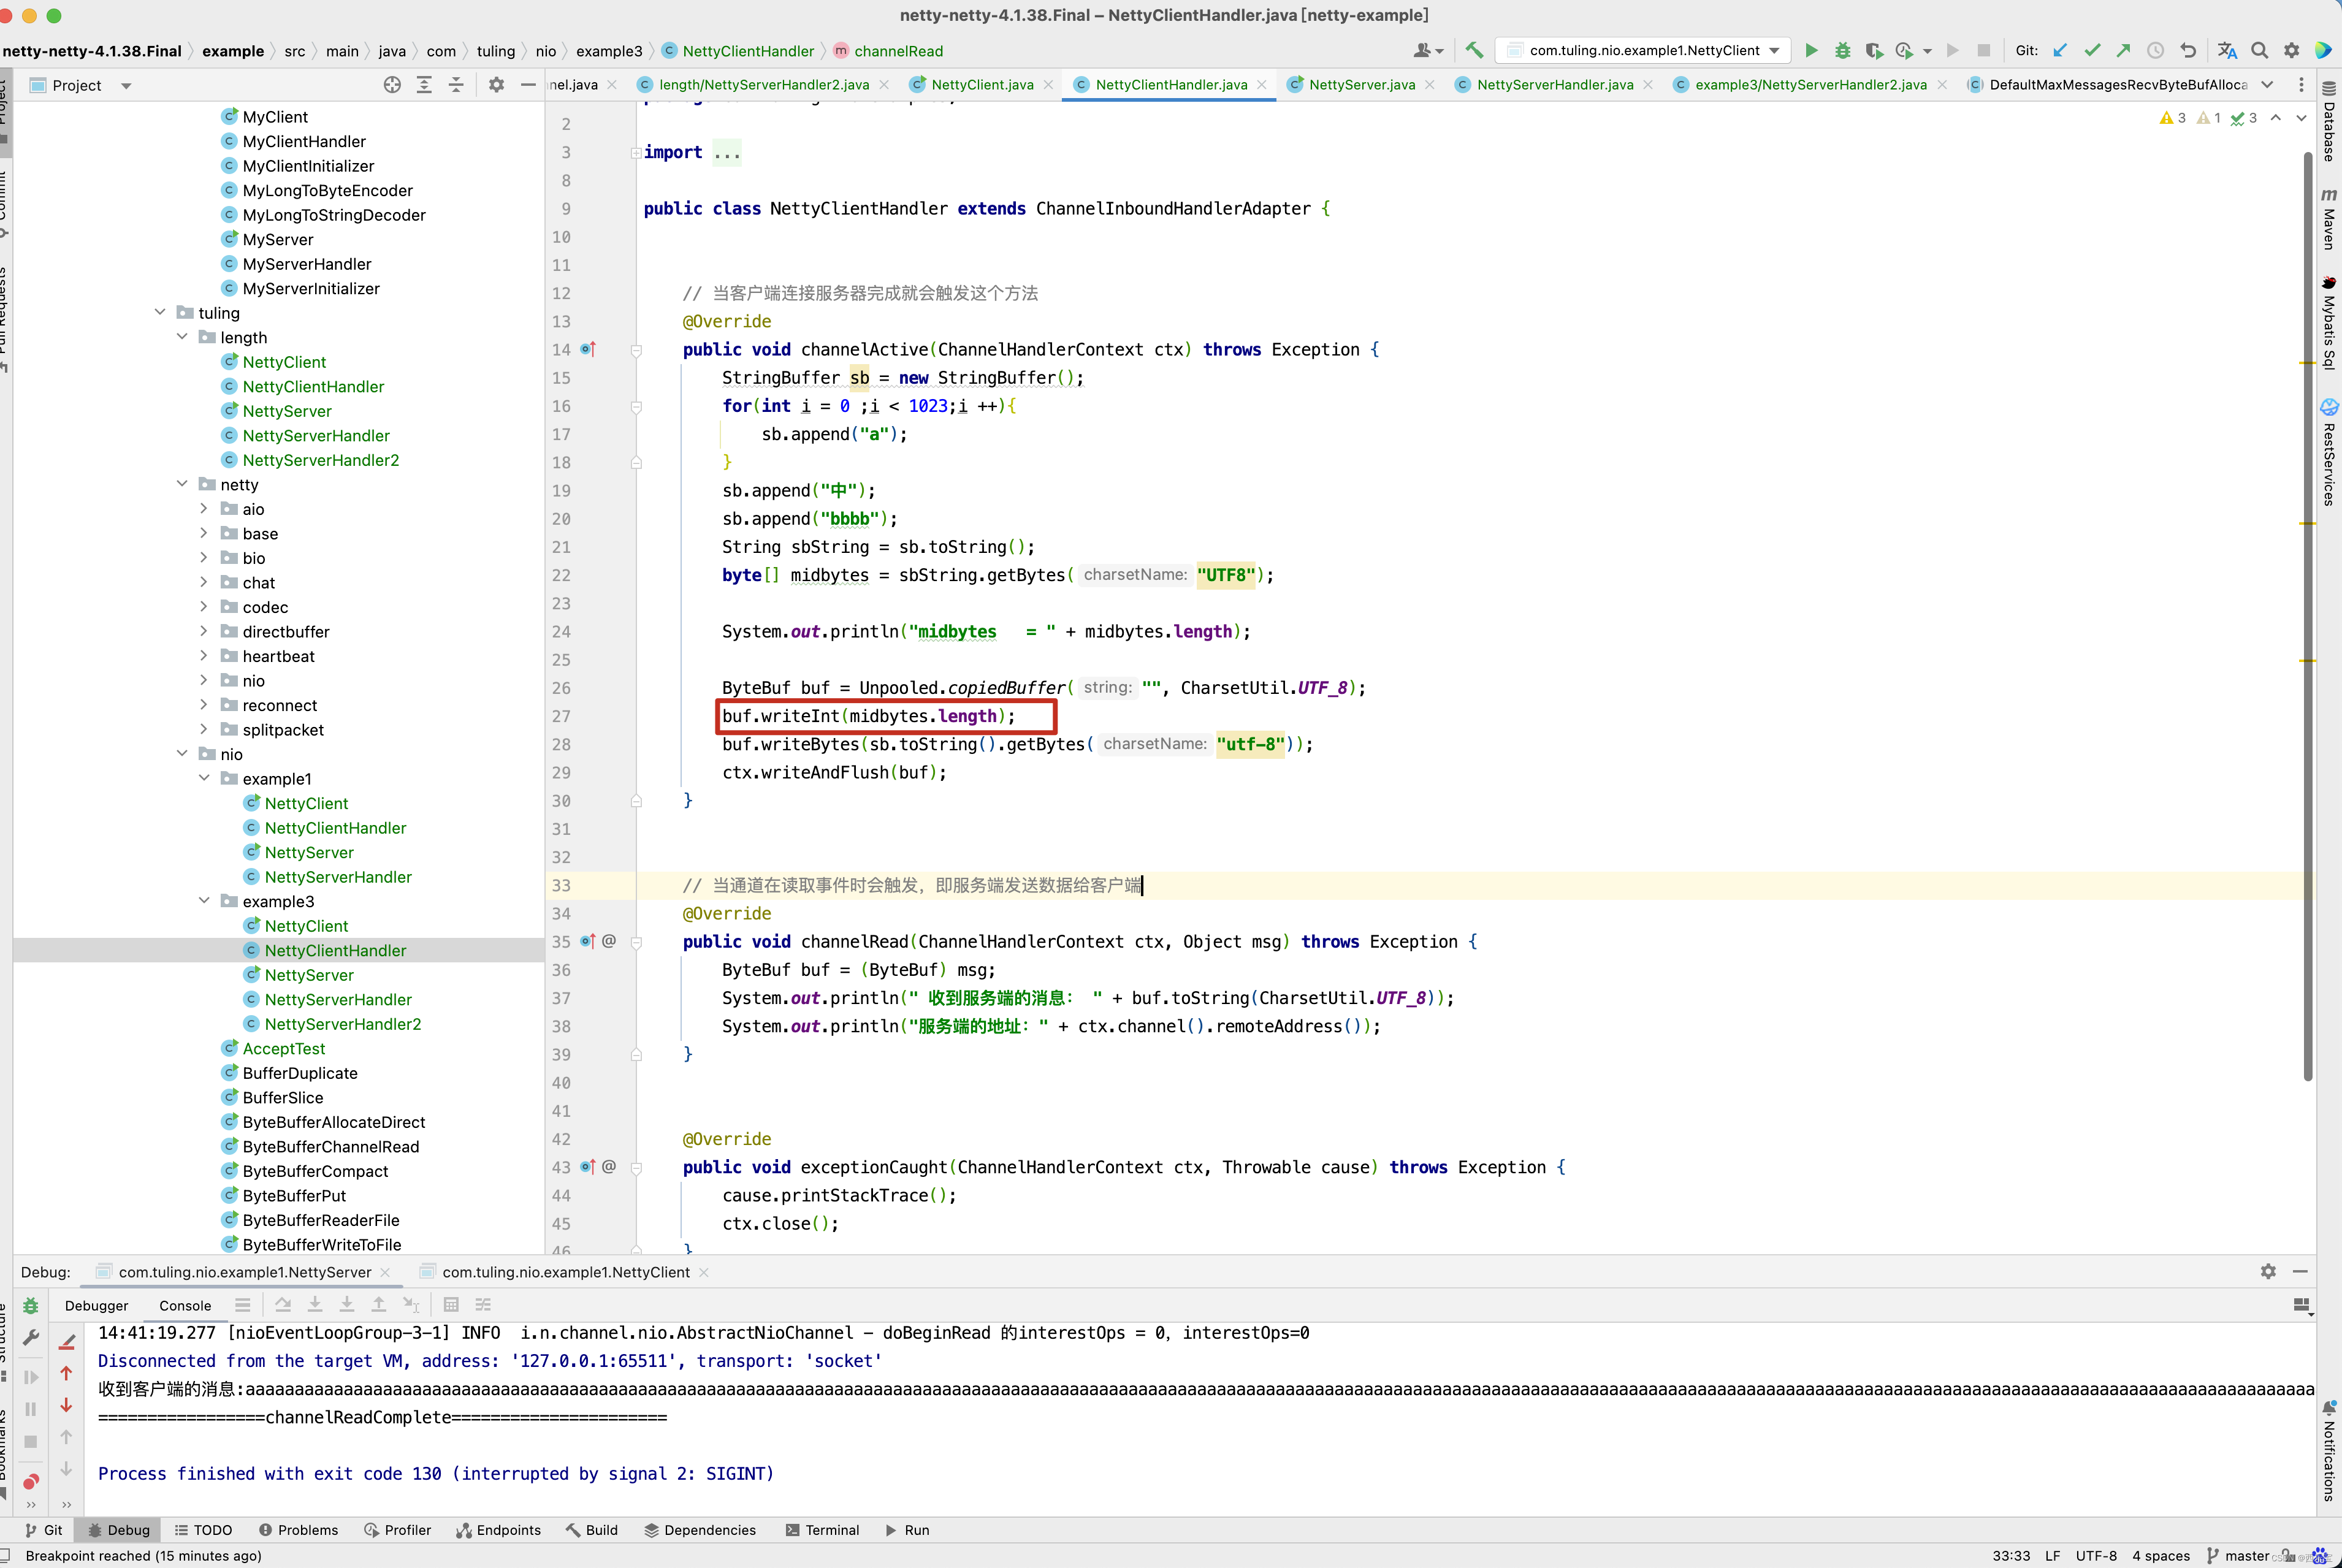
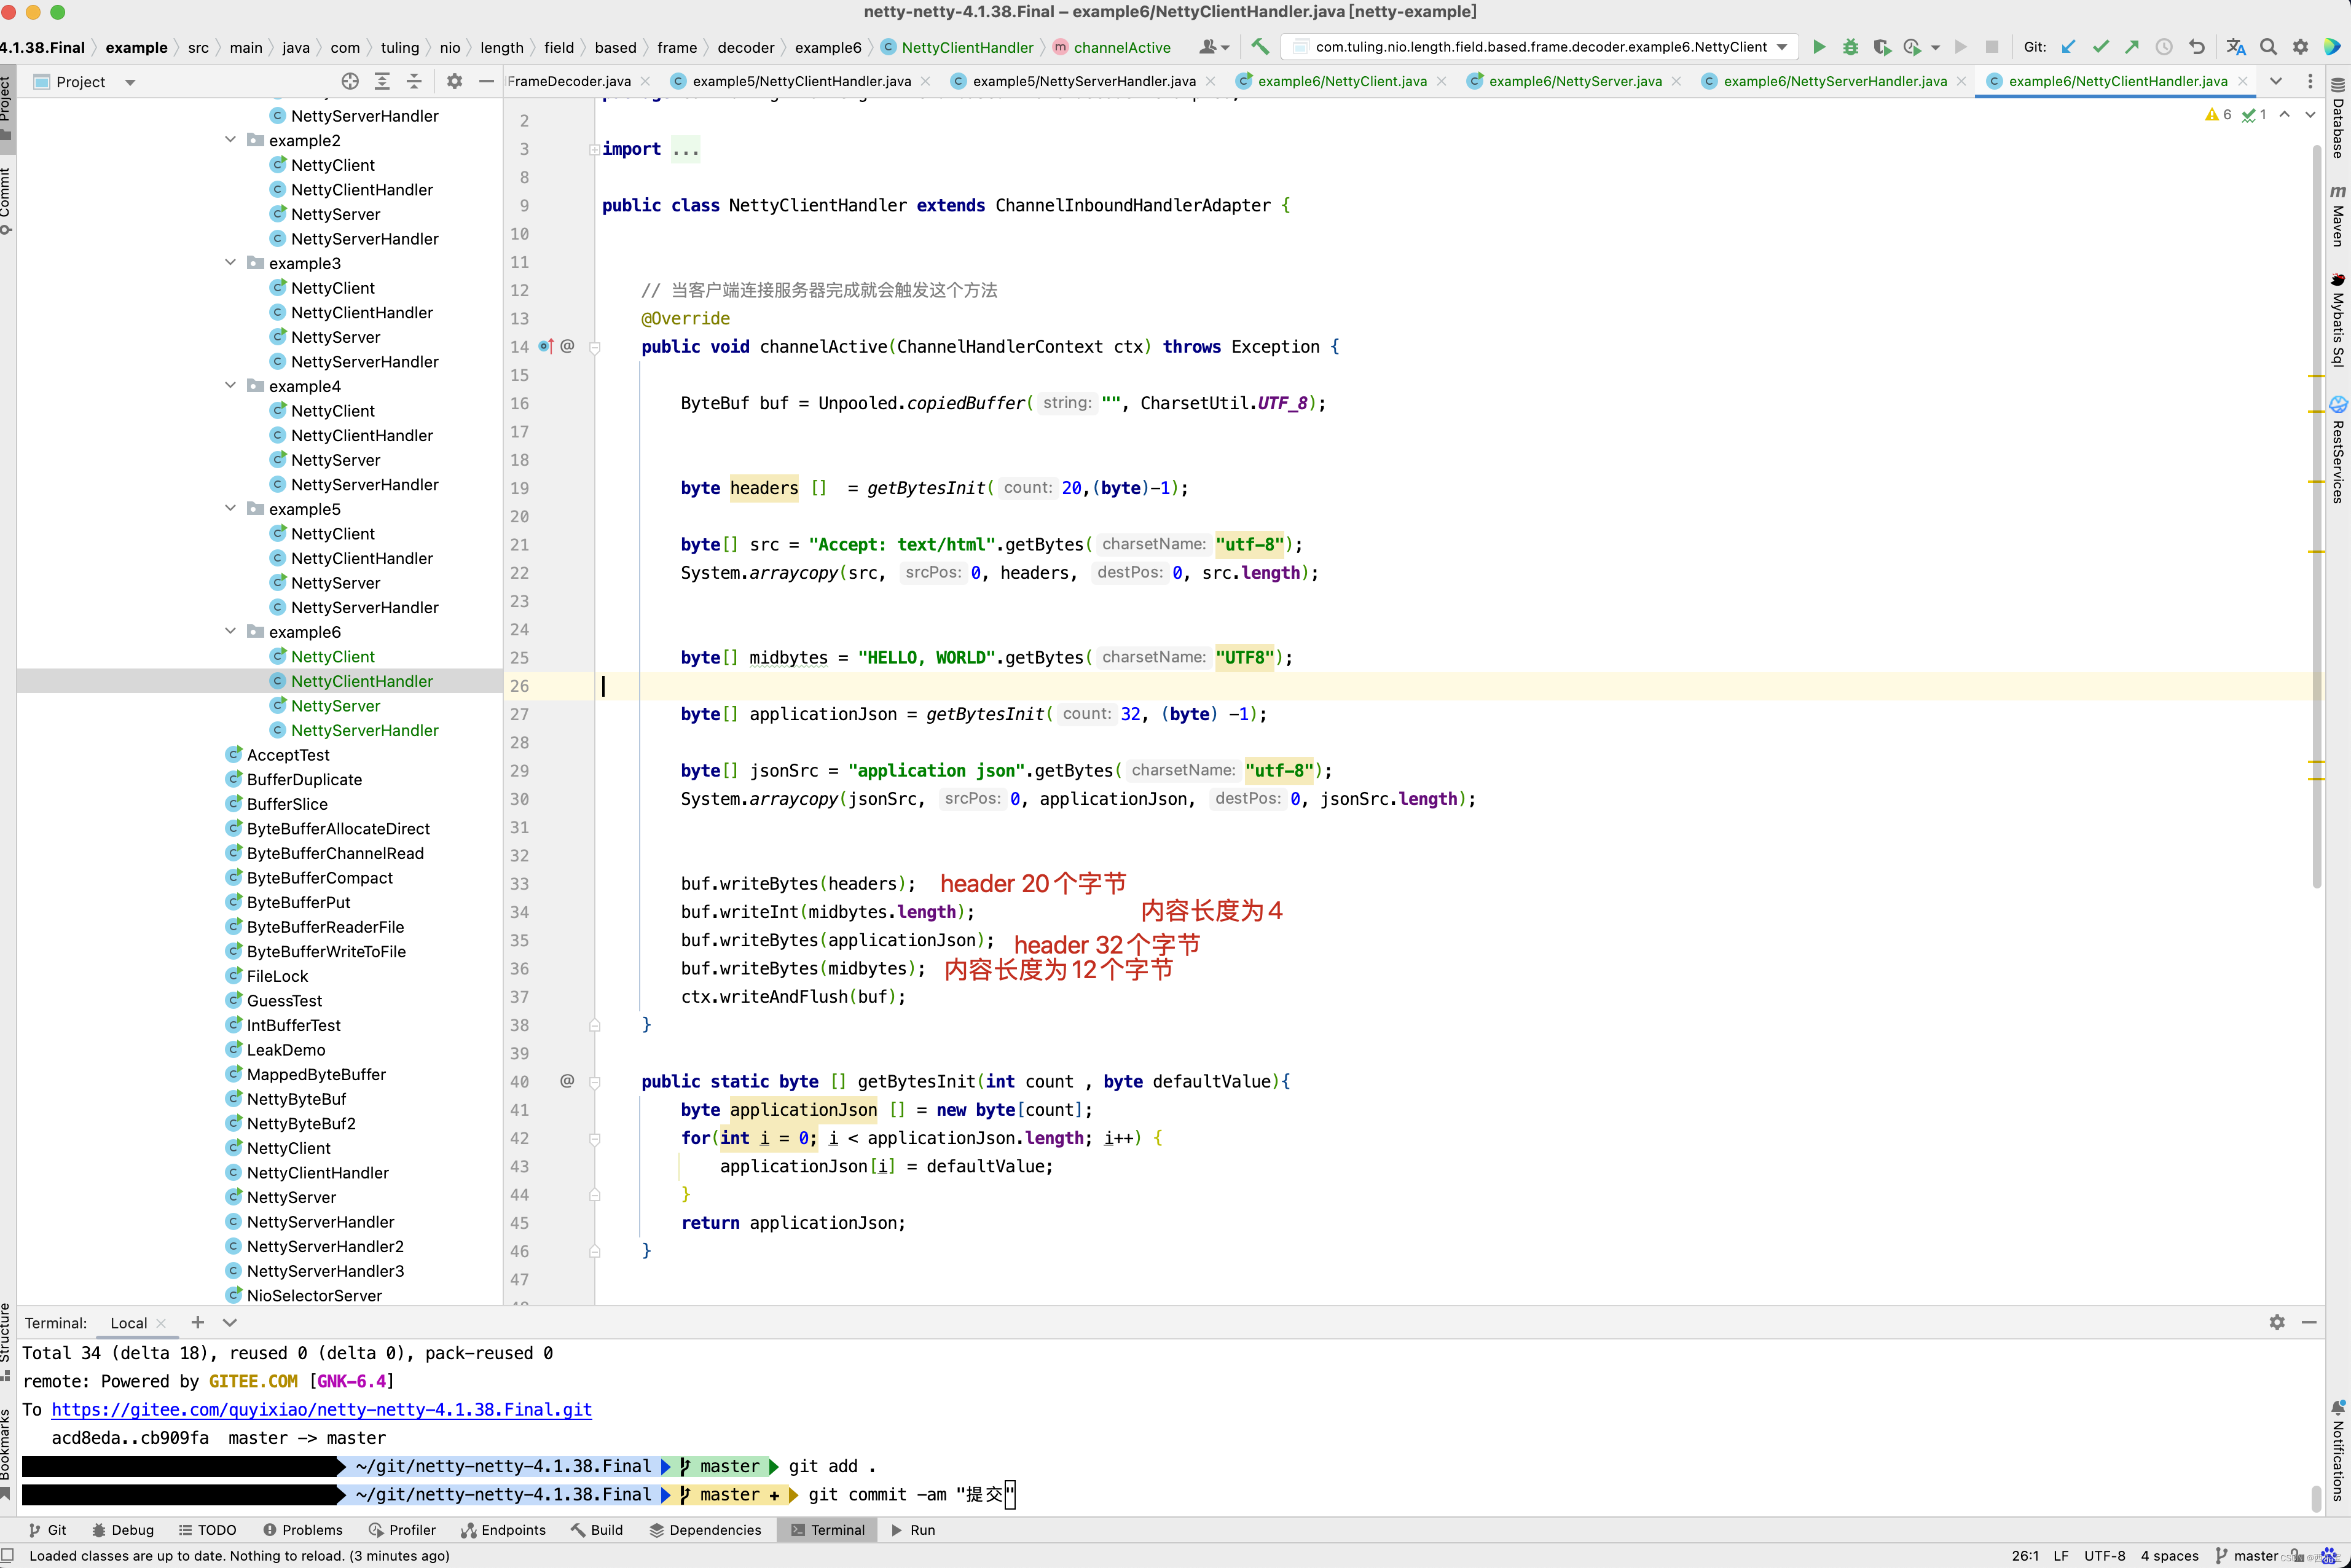
在客户端Handler中,在传输的字节头部加了一个int类型4个字节来记录传输数据的长度 。
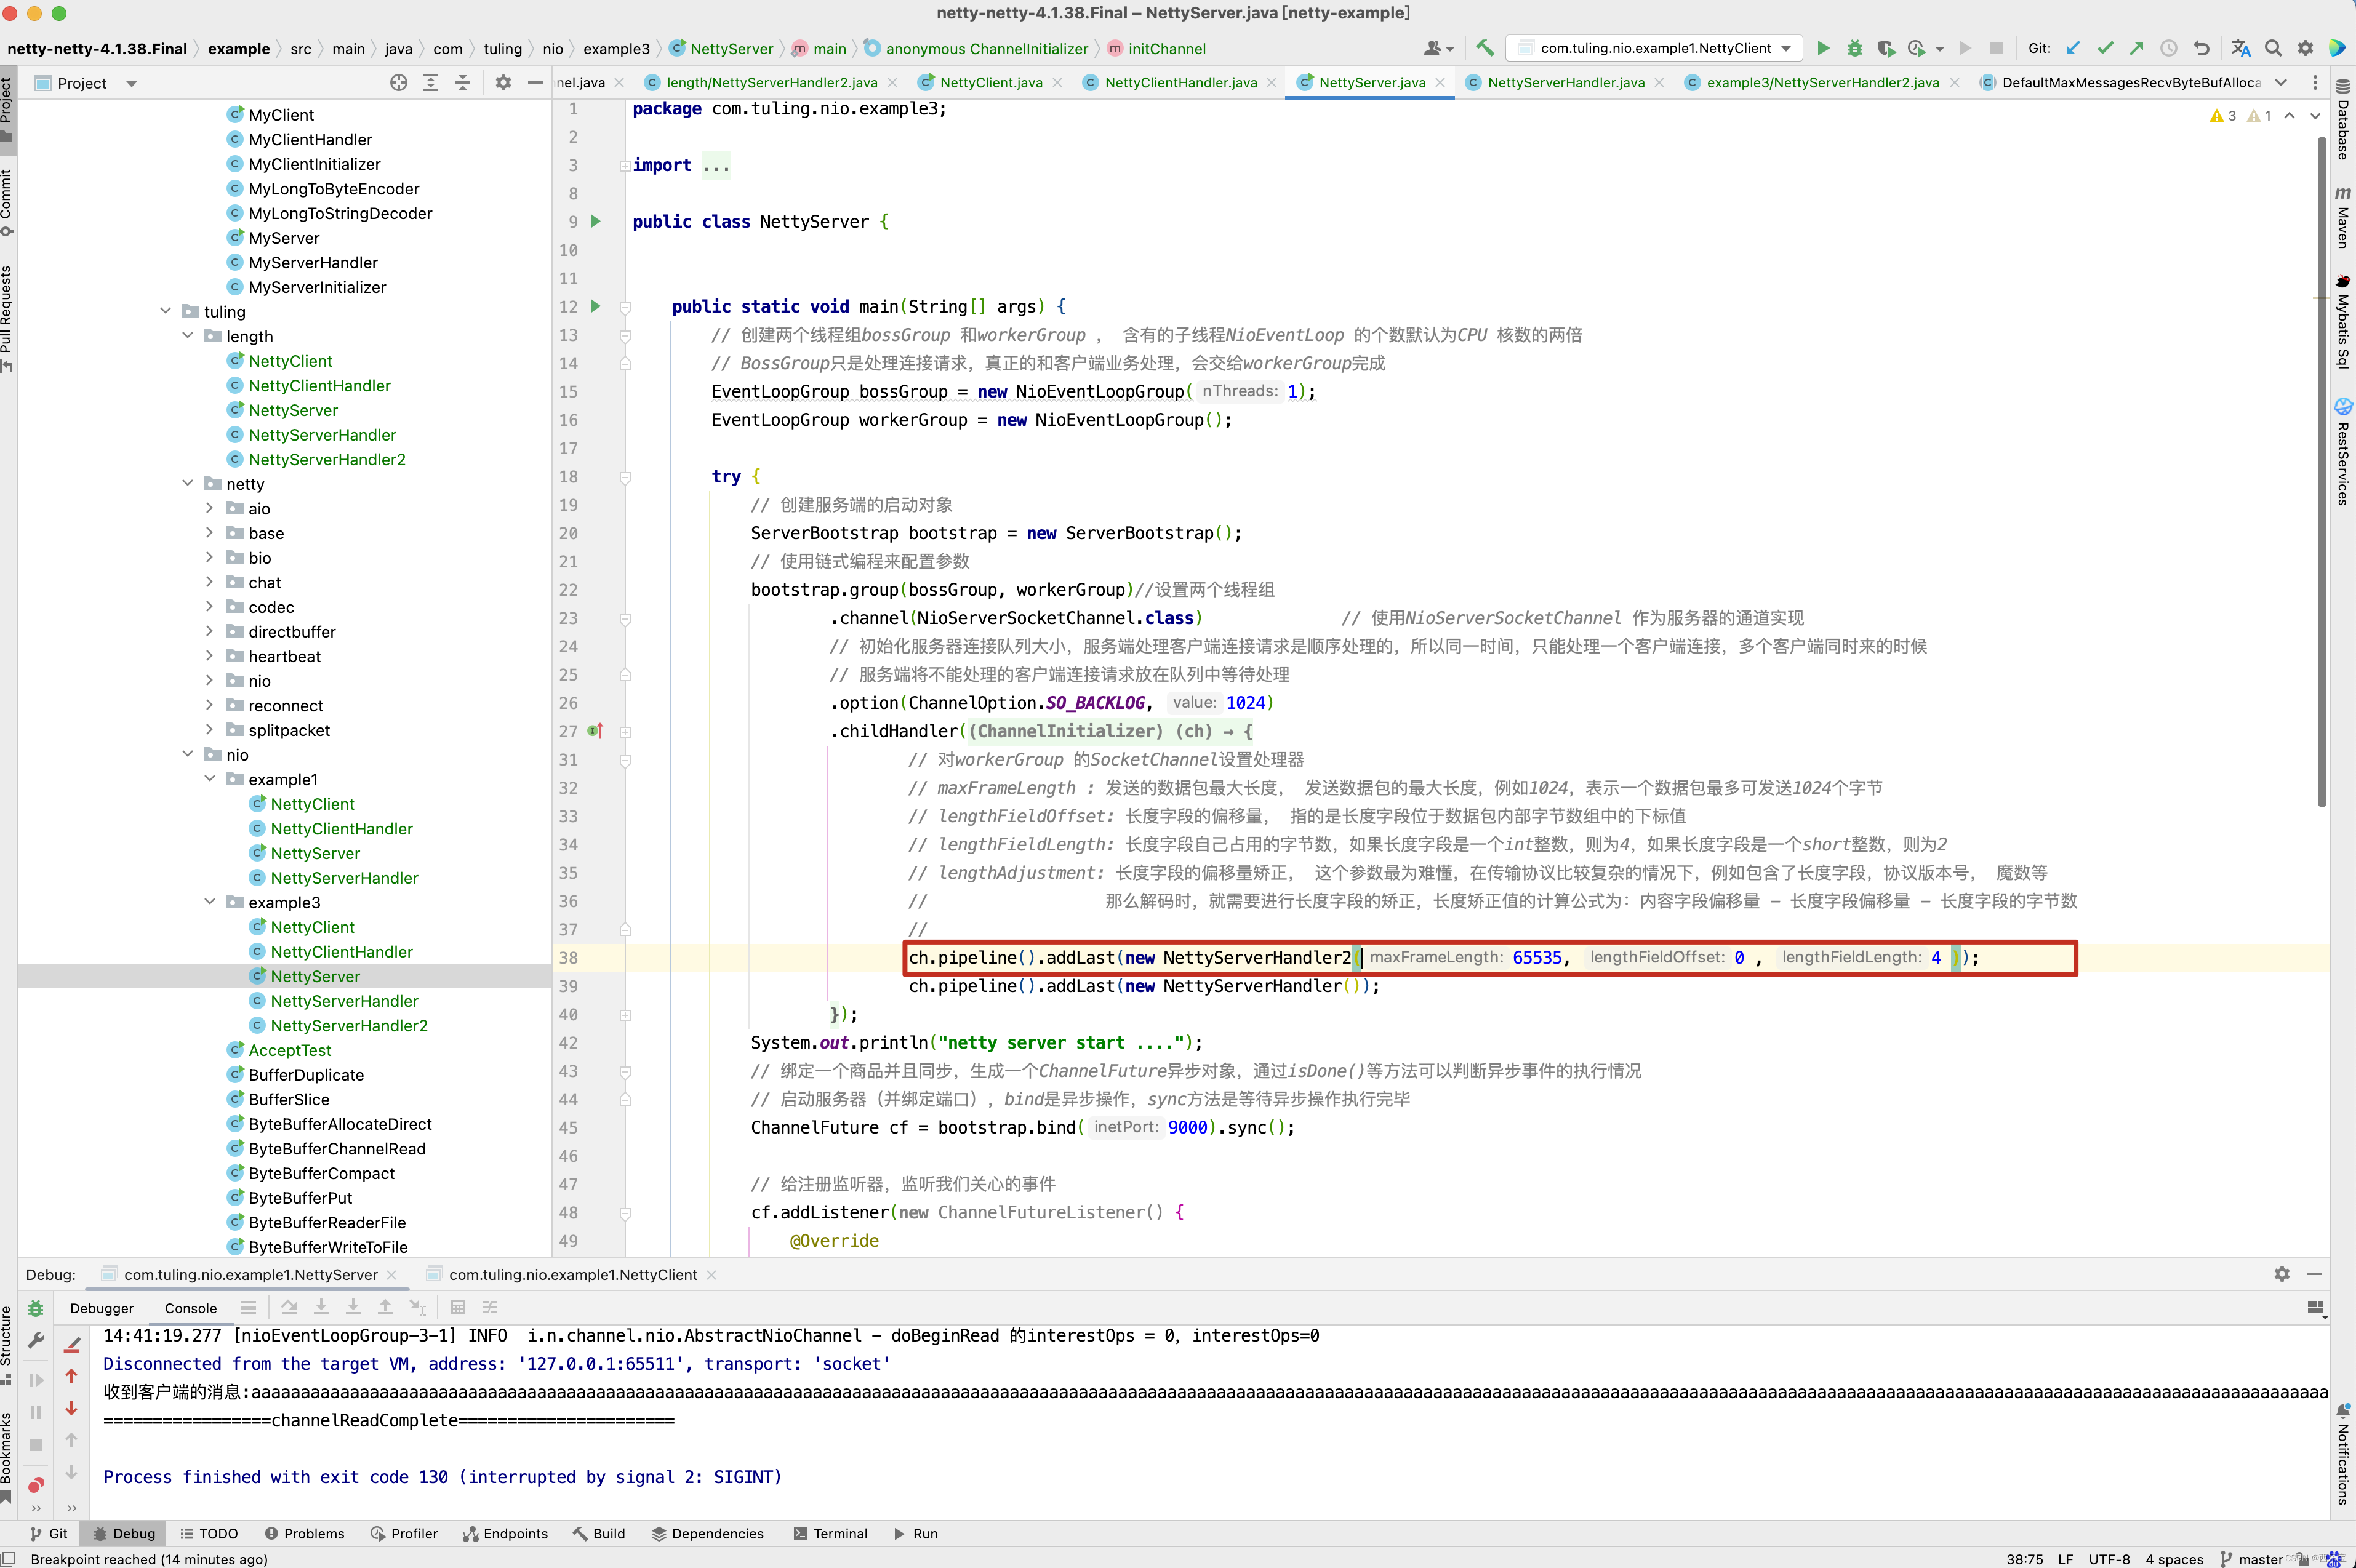
在服务端将之前创建的NettyServerHandler2添加到Server的处理流水线中。
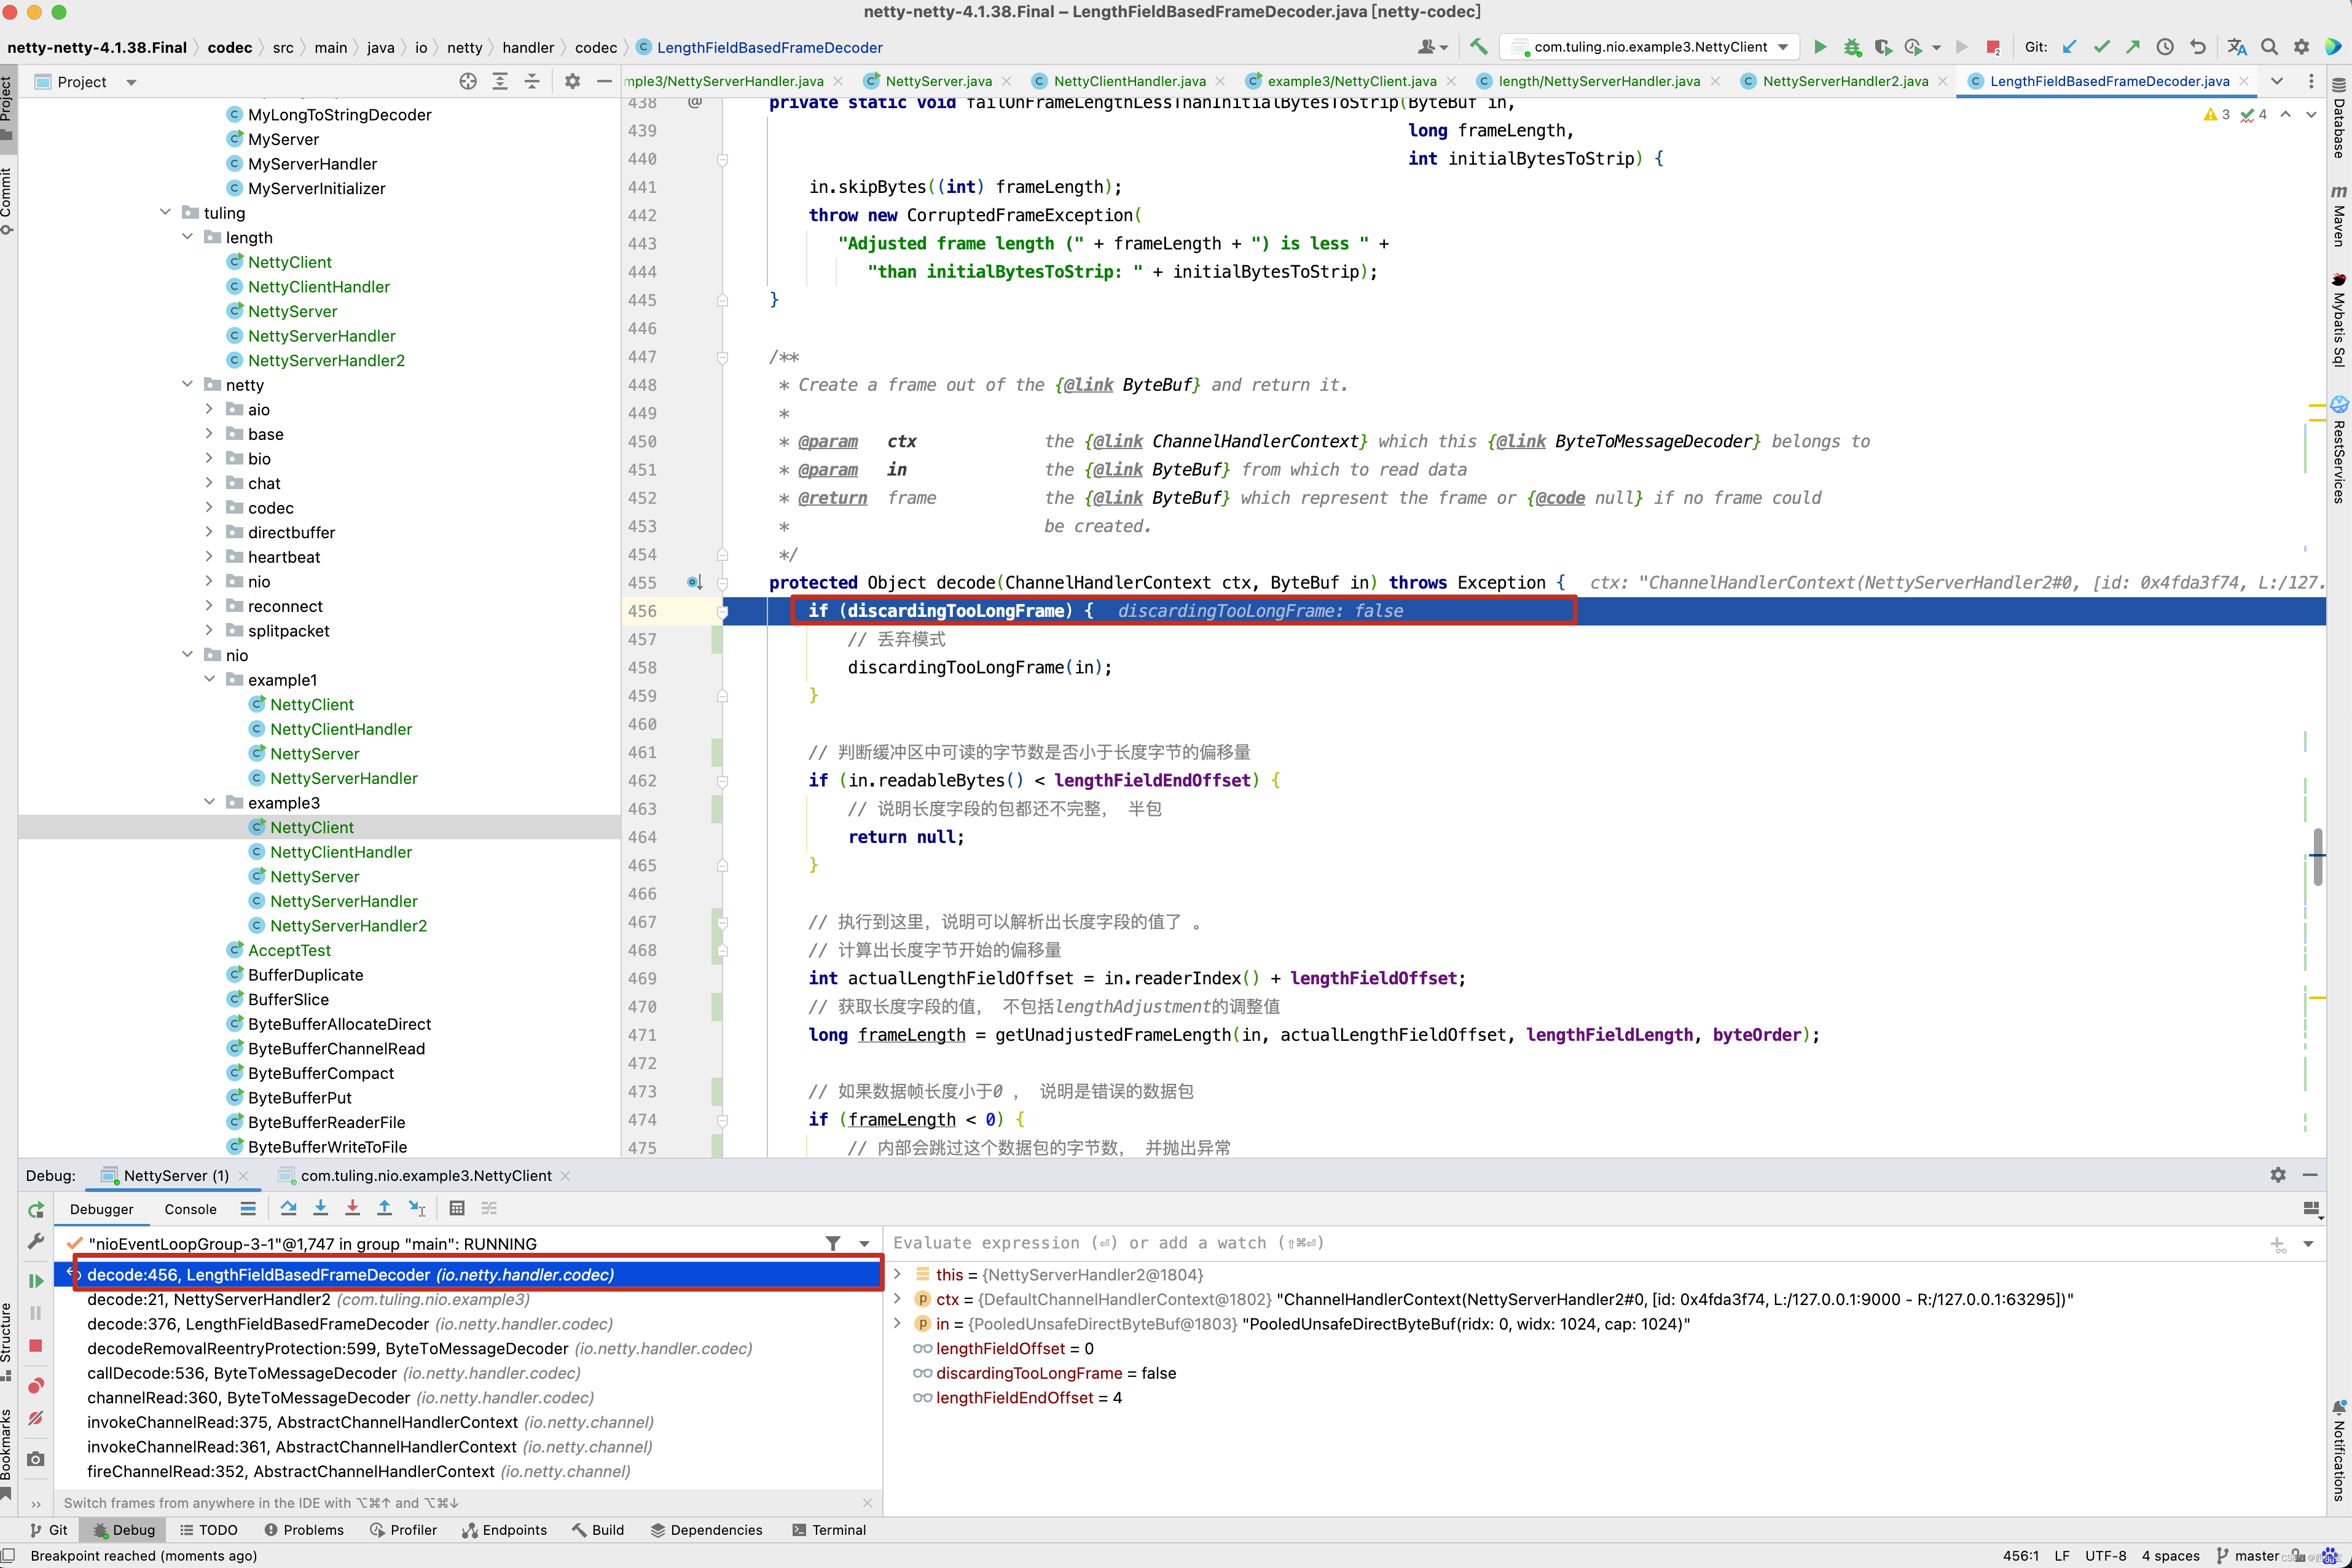
此时此刻 ,在NettyServerHandler打印ByteBuf数据时,就不会出现传输数据被切割的情况,不会出现中文乱码,原因是什么呢? 这个就需要研究LengthFieldBasedFrameDecoder的源代码了。 首先在NettyServerHandler2的decode()方法中打一个断点 。 最终进入了LengthFieldBasedFrameDecoder的decode()方法 。
接下来不得不对LengthFieldBasedFrameDecoder源码进行分析了。 在网上看到其他人的一篇博客LengthFieldBasedFrameDecoder源码分析 ,我觉得还是写得非常好的,有兴趣可以自己去看看,我自己也是一个学习的过程 ,因此我将他的博客抄录到我的博客当中,证明我认认真真的研读过他的博客 。
看LengthFieldBasedFrameDecoder的构造函数 。
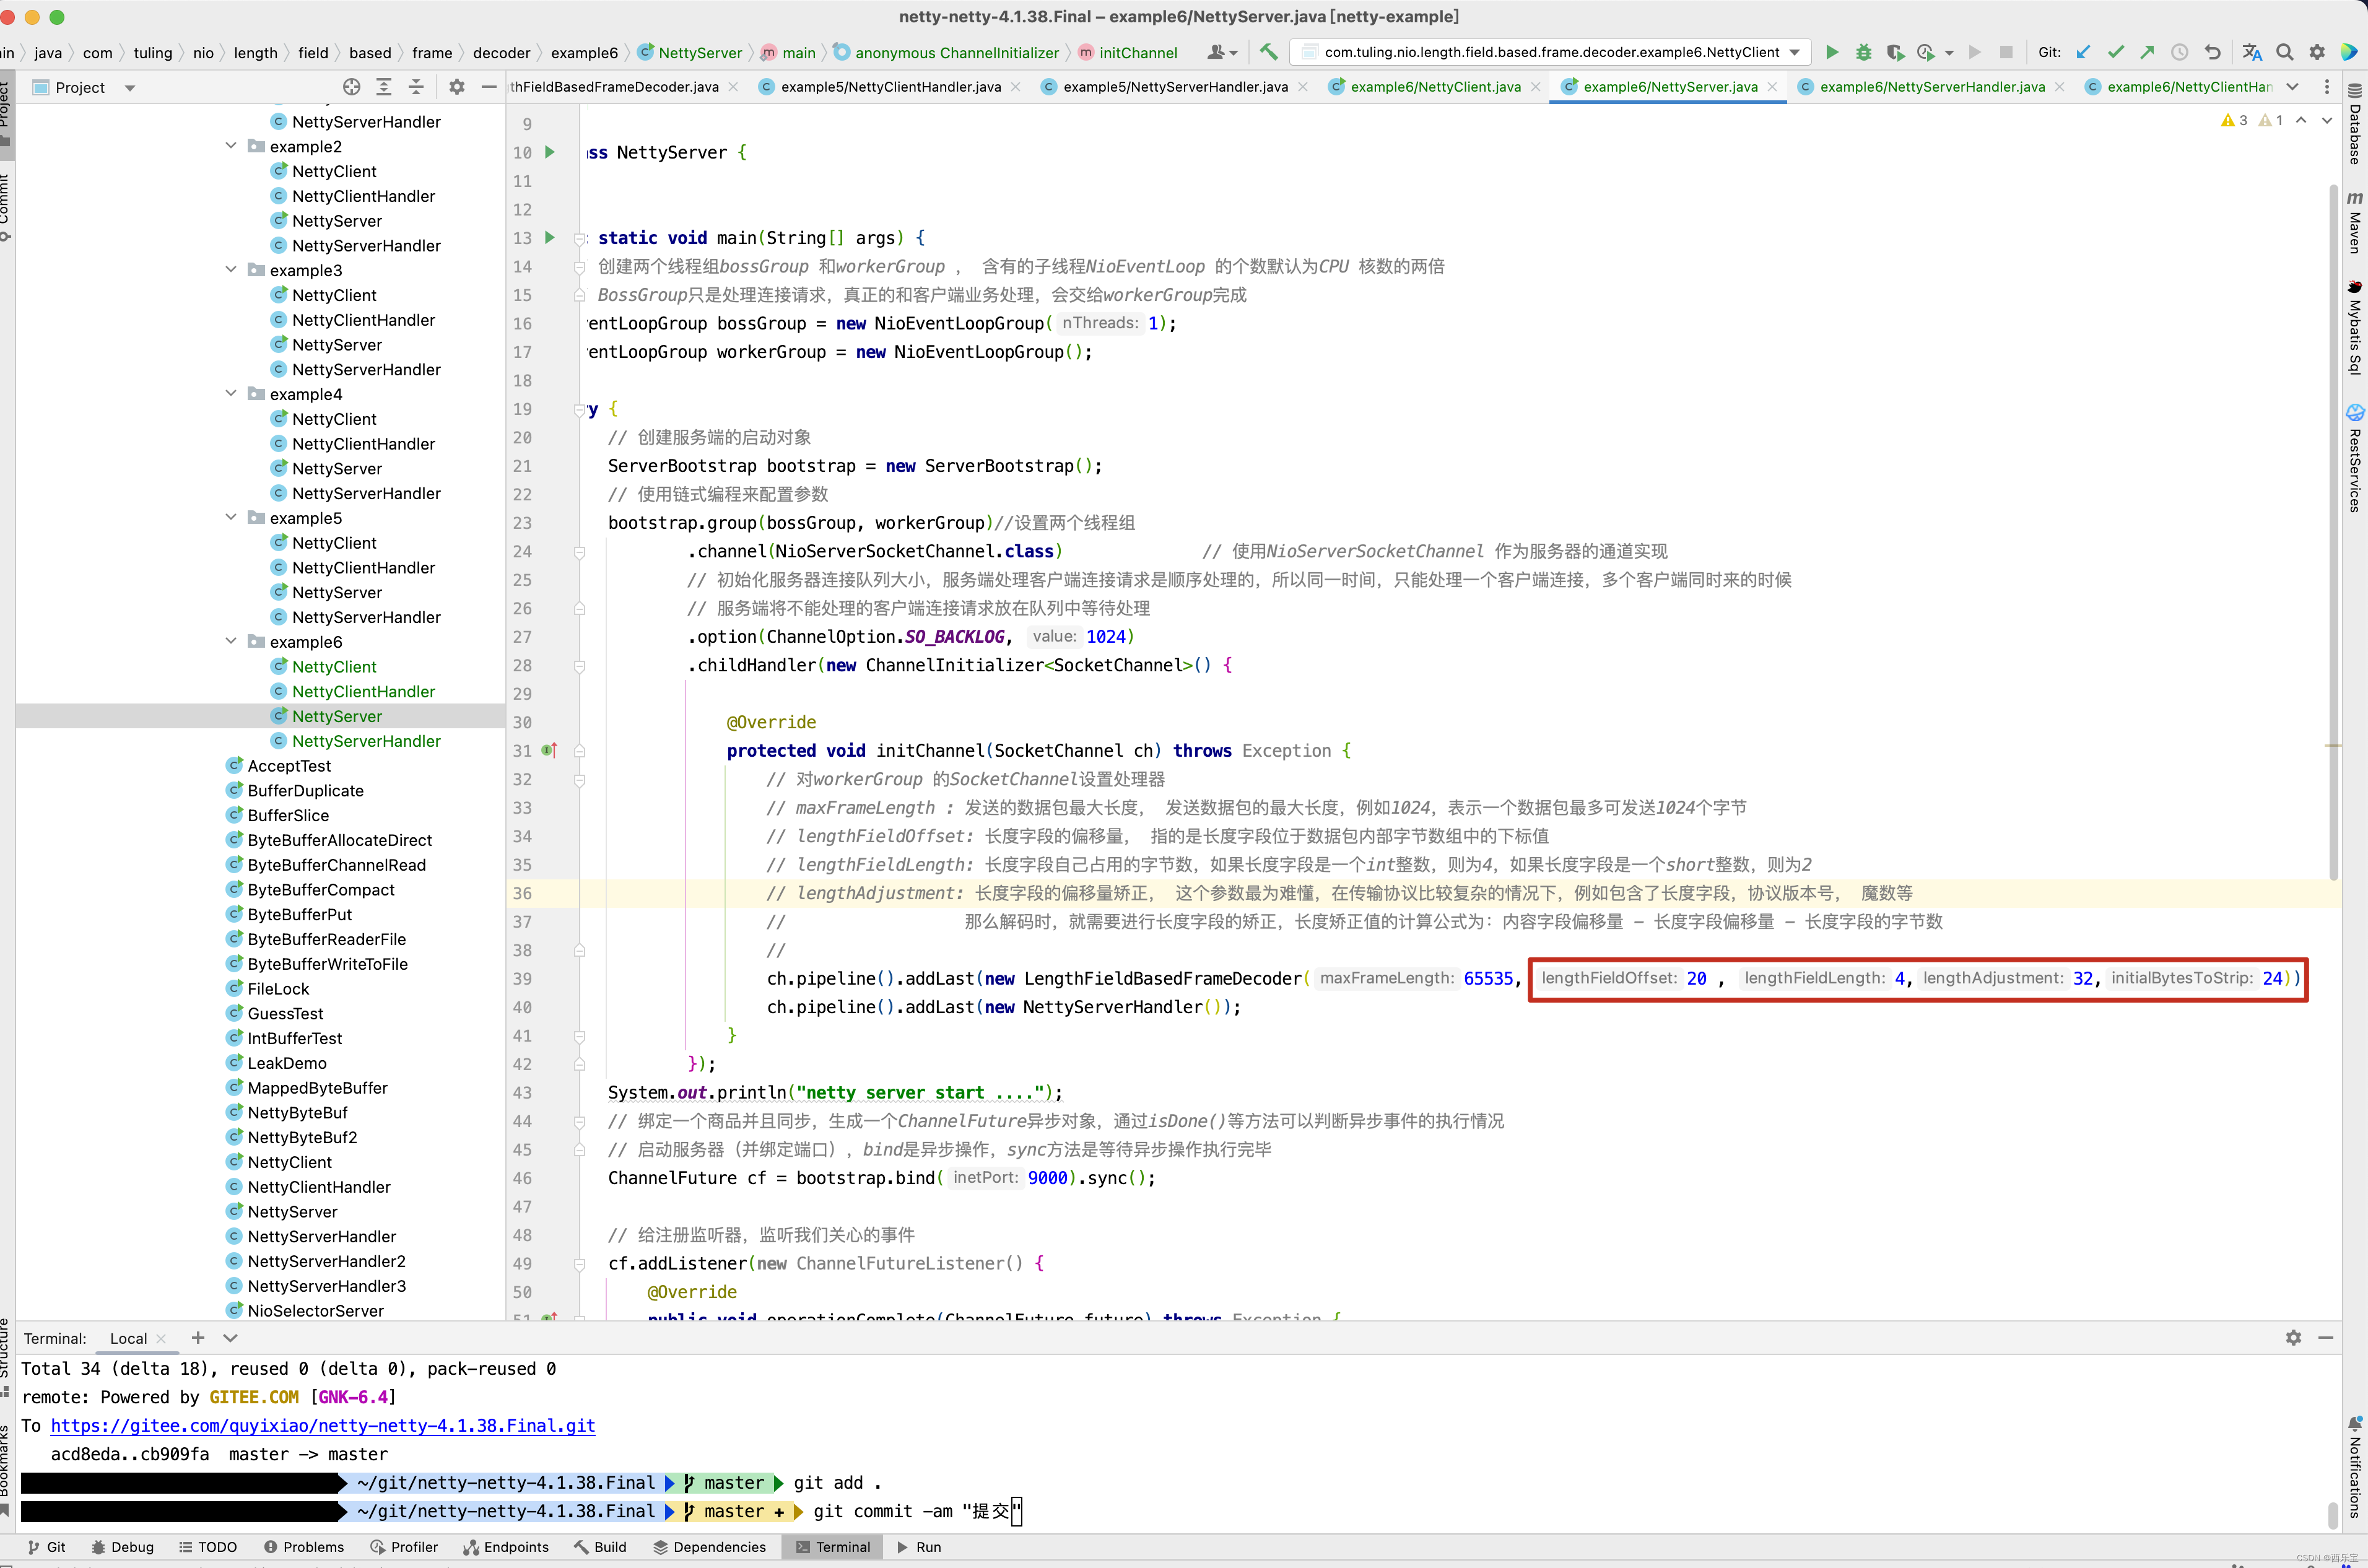
// maxFrameLength : 发送的数据包最大长度, 发送数据包的最大长度,例如1024,表示一个数据包最多可发送1024个字节
// lengthFieldOffset: 长度字段的偏移量, 指的是长度字段位于数据包内部字节数组中的下标值
// lengthFieldLength: 长度字段自己占用的字节数,如果长度字段是一个int整数,则为4,如果长度字段是一个short整数,则为2
// lengthAdjustment: 长度字段的偏移量矫正, 这个参数最为难懂,在传输协议比较复杂的情况下,例如包含了长度字段,协议版本号, 魔数等
//                  那么解码时,就需要进行长度字段的矫正,长度矫正值的计算公式为:内容字段偏移量 - 长度字段偏移量 - 长度字段的字节数
//
// initialBytesToStrip: 丢弃的起始字节数 , 在有效数据字段Context 前面,还有一些其他的字段的字节,作为最终的解析结果,可以丢弃。
// 例如,上面的示例程序中, 前面有4个字节的长度字段,起到辅助作用,最终的结果中不需要这个长度,所以丢弃字节数为4 。
// LengthFieldBasedFrameDecoder spliter =
//                    new LengthFieldBasedFrameDecoder(1024, 0, 4, 0, 4)
public LengthFieldBasedFrameDecoder(int maxFrameLength,int lengthFieldOffset, int lengthFieldLength,int lengthAdjustment, int initialBytesToStrip) {this(maxFrameLength,lengthFieldOffset, lengthFieldLength, lengthAdjustment,initialBytesToStrip, true);
}
可能上面maxFrameLength,lengthFieldOffset,lengthFieldLength,lengthAdjustment,initialBytesToStrip这几个字段的具体含义还不是很明白,接下来,根据具体的案例来学习LengthFieldBasedFrameDecoder的几个参数如何配置。
LengthFieldBasedFrameDecoder案例分析
案例1:
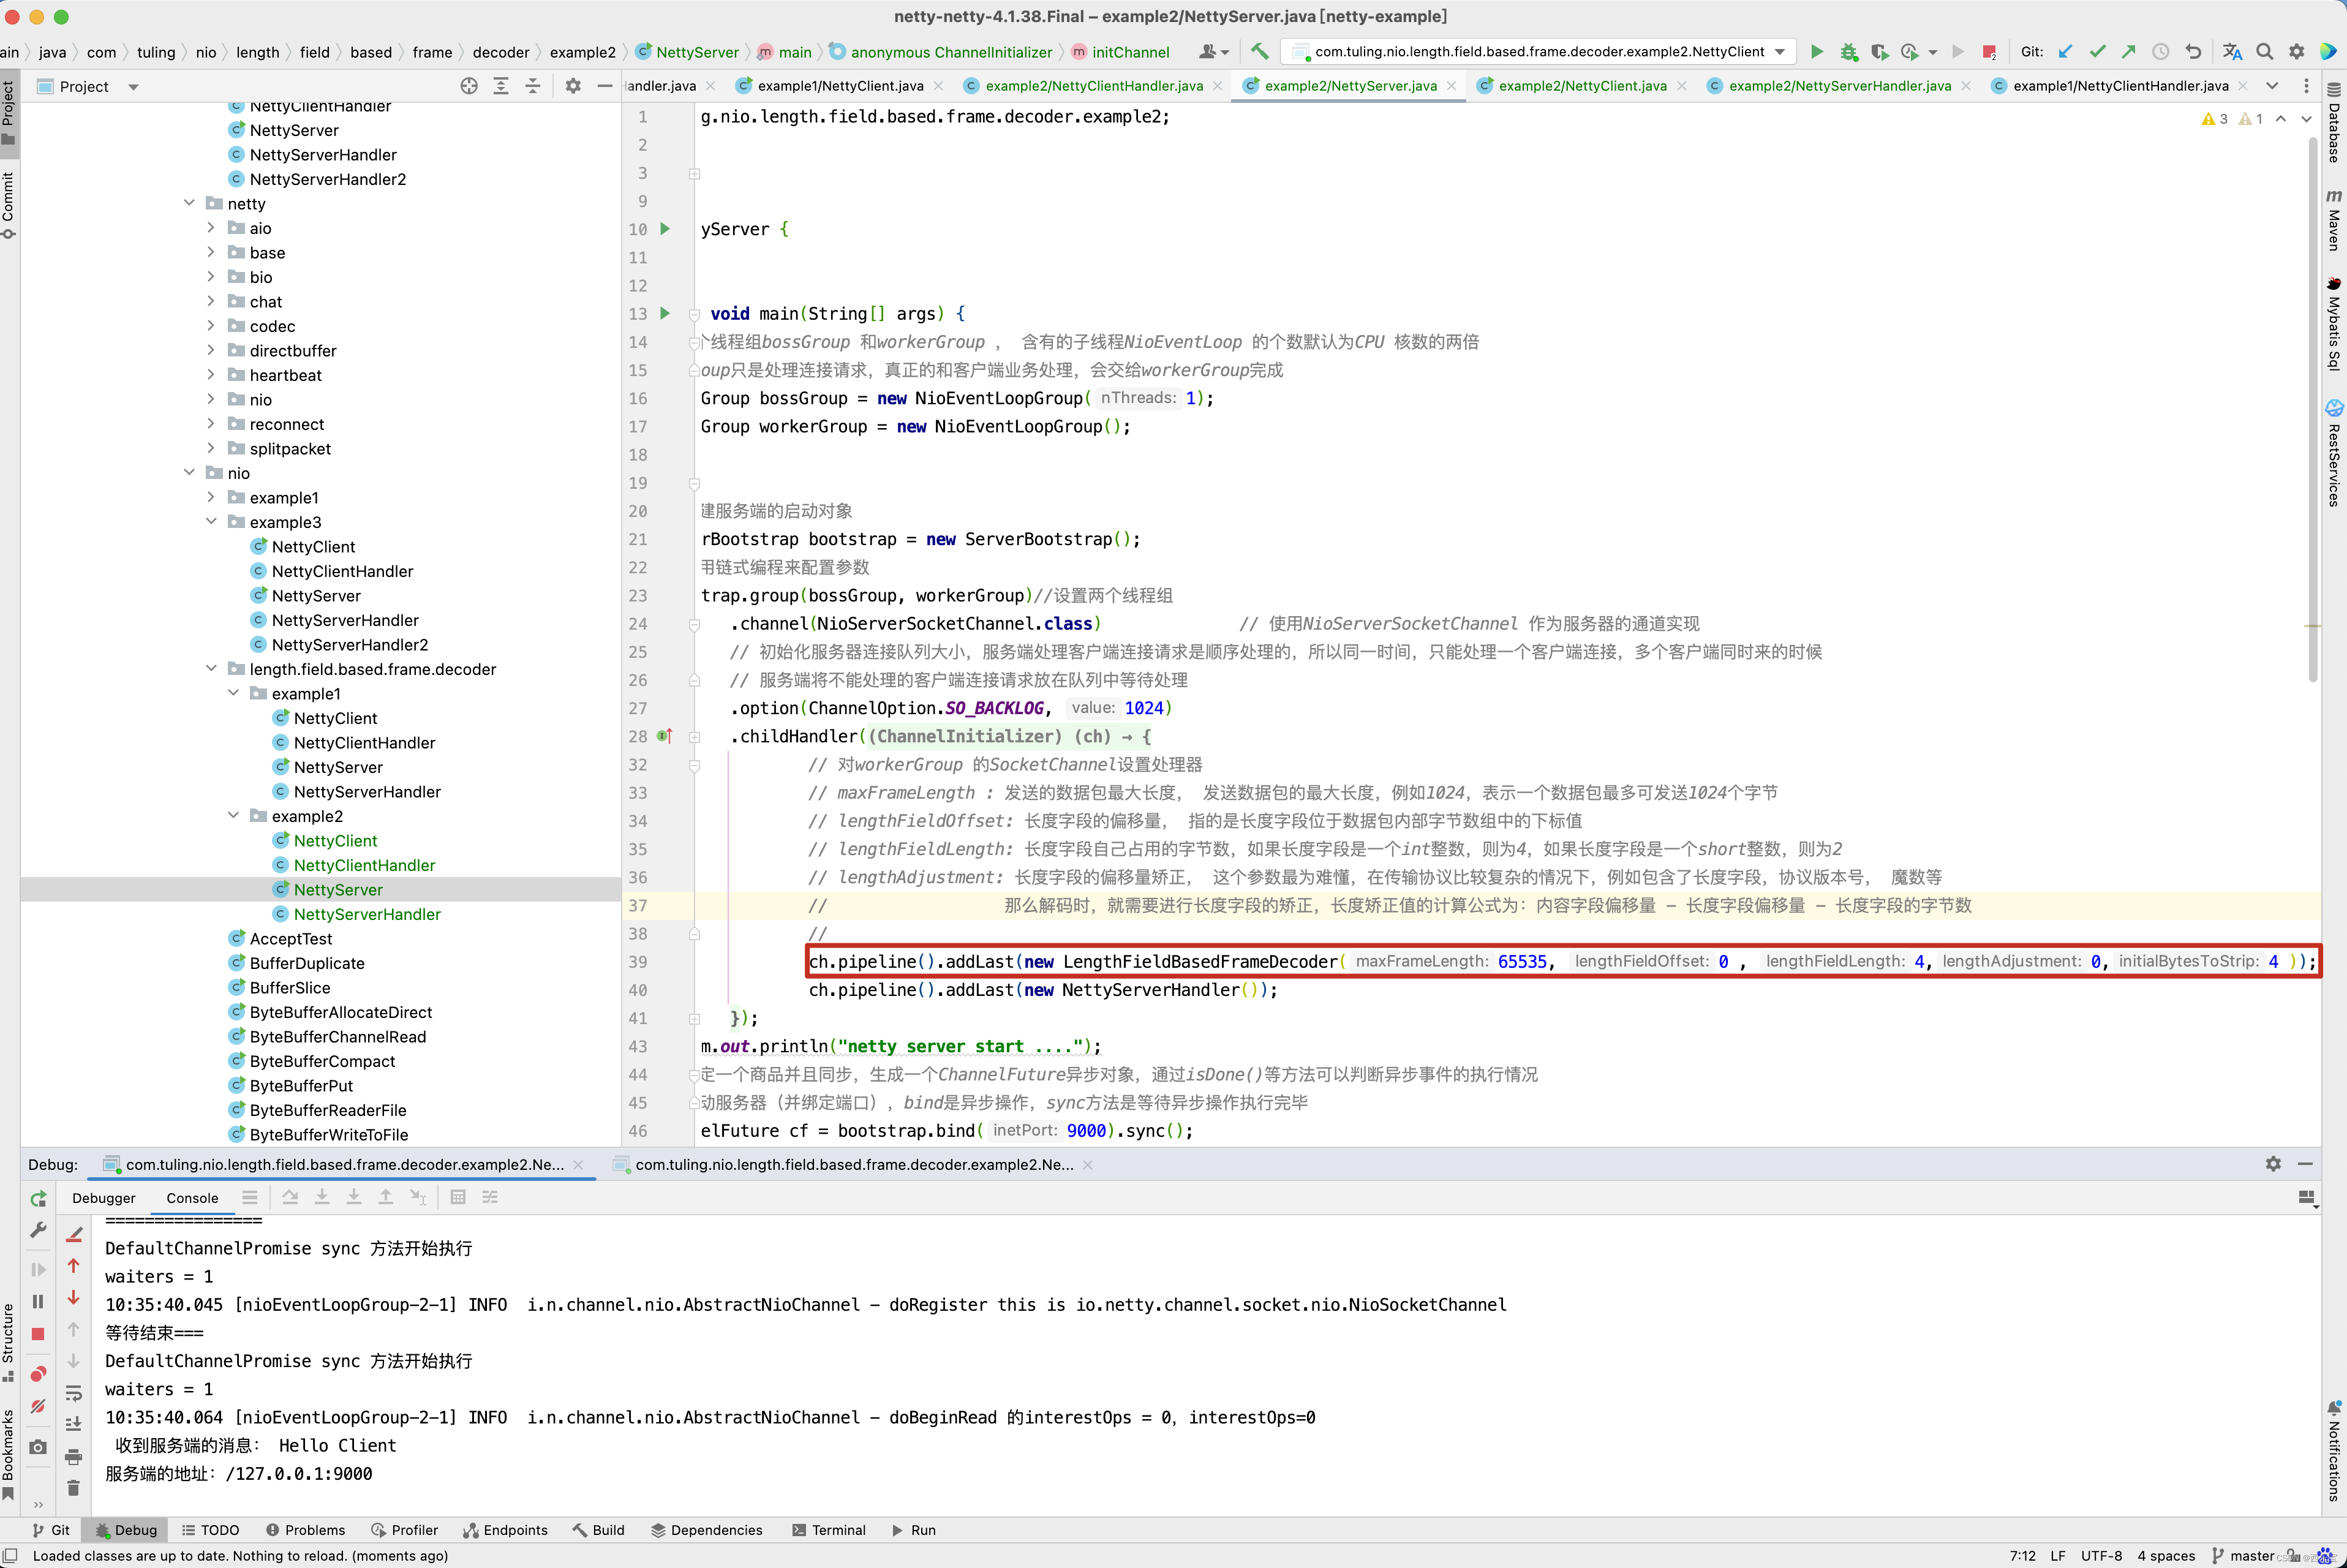
- lengthFieldOffset=0 长度字段从0开始
- lengthFieldLength=2 长度字段本身占2个字节
- lengthAdjustment=0 需要调整0字节
- initialBytesToStrip=0 解码后跳过0字节
整个包长度为14字节
| Length(长度) | Actual Content(真实数据) |
|---|---|
| 0x000C | HELLO, WORLD |
| 0x000C==12,该字段为2个字节 | 数据总共有12个字节,所以长度字段指的是数据的长度 |
解码后
| Length | Actual Content |
|---|---|
| 0x000C | HELLO, WORLD |
例1
服务端代码
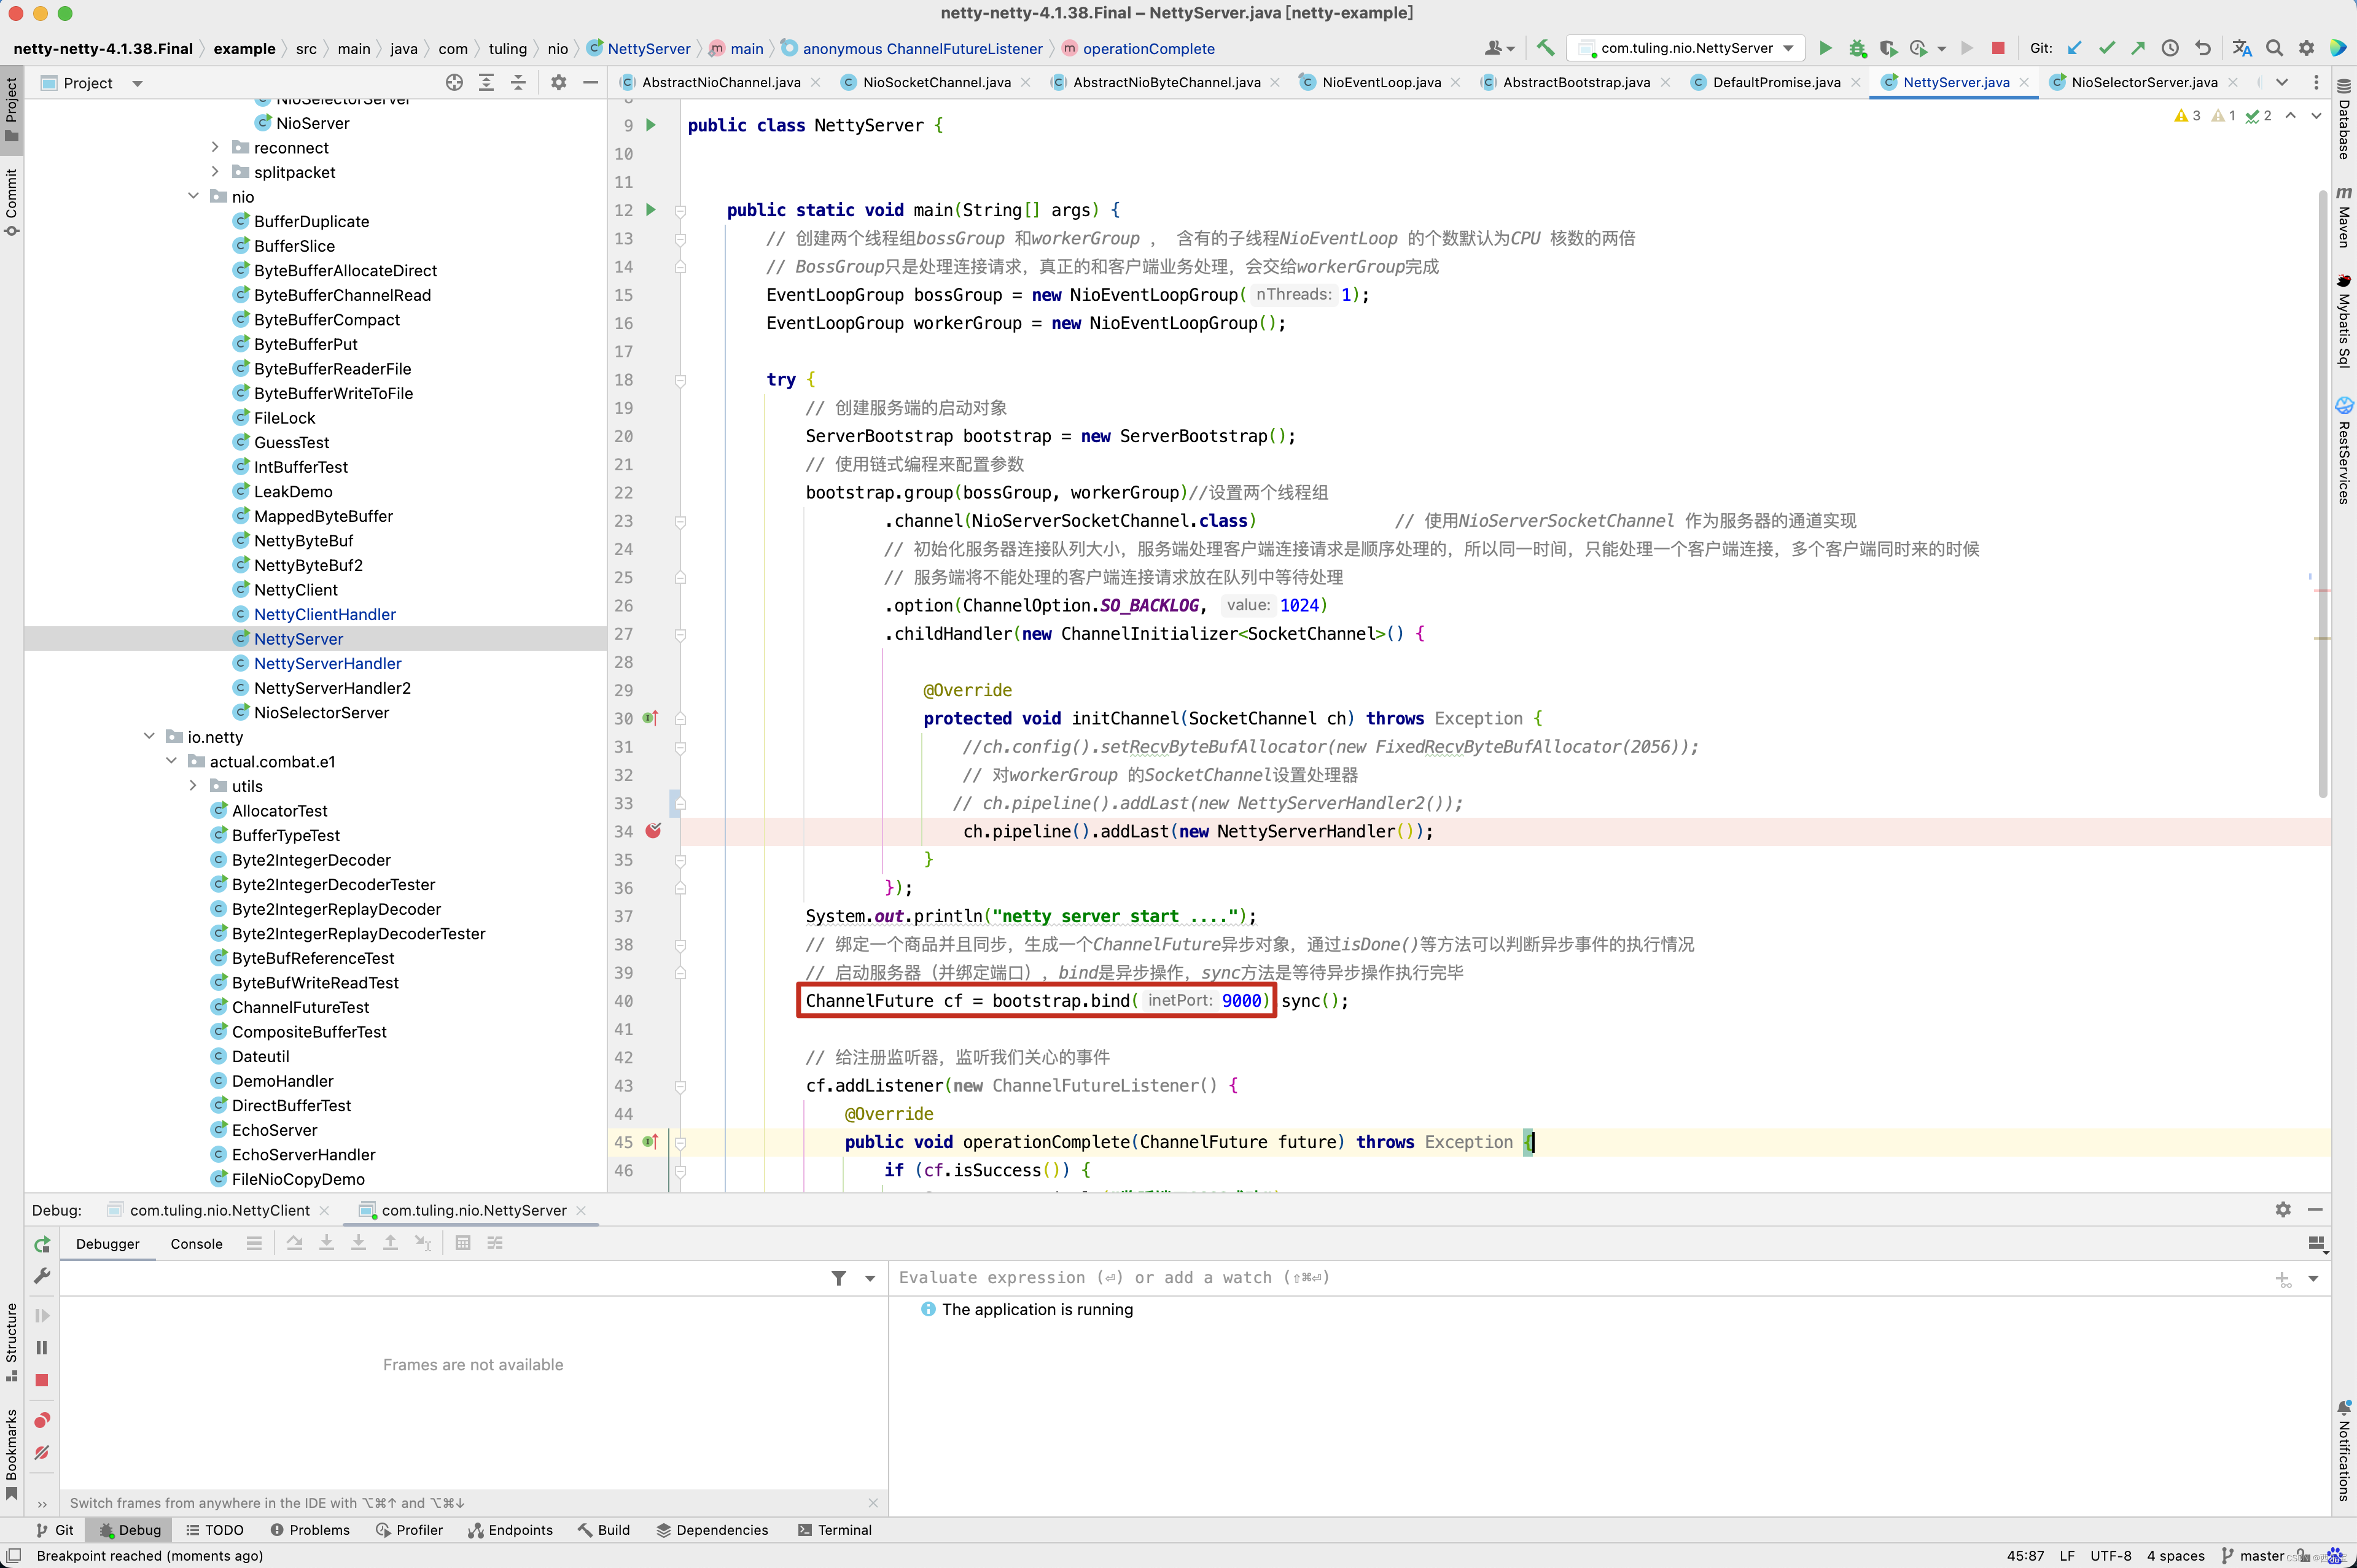
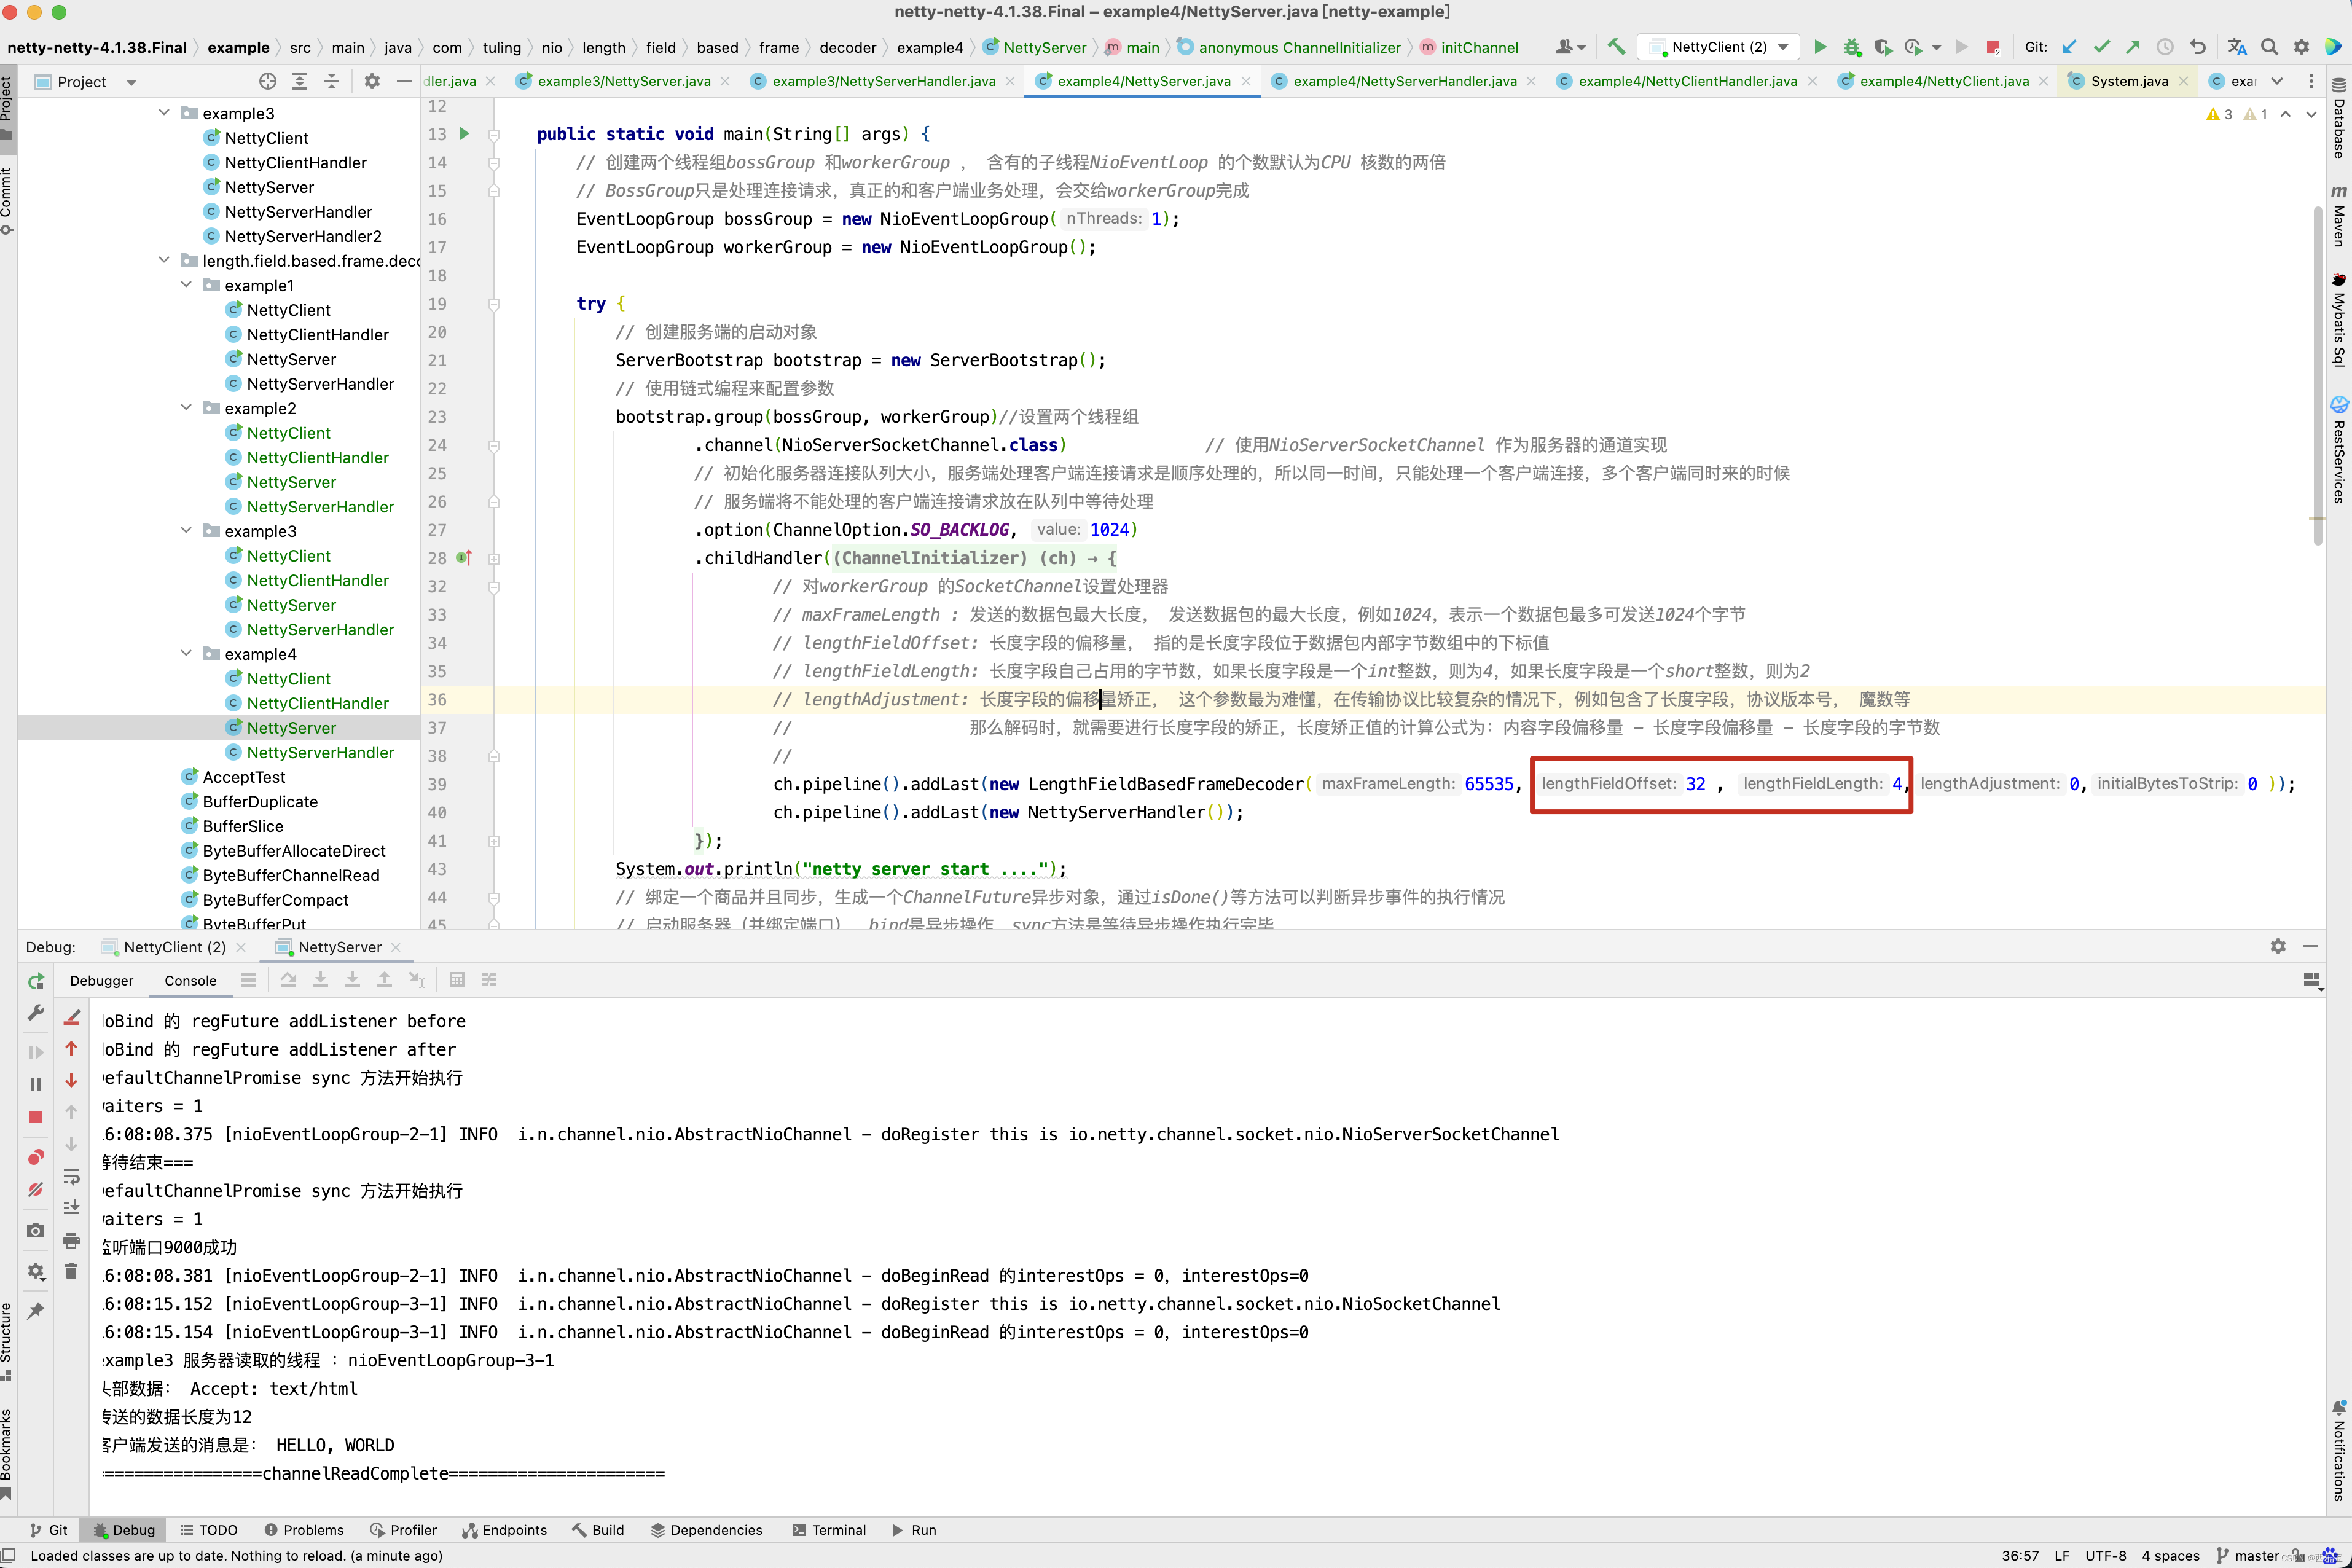
public class NettyServer {public static void main(String[] args) {// 创建两个线程组bossGroup 和workerGroup , 含有的子线程NioEventLoop 的个数默认为CPU 核数的两倍// BossGroup只是处理连接请求,真正的和客户端业务处理,会交给workerGroup完成EventLoopGroup bossGroup = new NioEventLoopGroup(1);EventLoopGroup workerGroup = new NioEventLoopGroup();try {// 创建服务端的启动对象ServerBootstrap bootstrap = new ServerBootstrap();// 使用链式编程来配置参数bootstrap.group(bossGroup, workerGroup)//设置两个线程组.channel(NioServerSocketChannel.class) // 使用NioServerSocketChannel 作为服务器的通道实现// 初始化服务器连接队列大小,服务端处理客户端连接请求是顺序处理的,所以同一时间,只能处理一个客户端连接,多个客户端同时来的时候// 服务端将不能处理的客户端连接请求放在队列中等待处理.option(ChannelOption.SO_BACKLOG, 1024).childHandler(new ChannelInitializer<SocketChannel>() {@Overrideprotected void initChannel(SocketChannel ch) throws Exception {// 对workerGroup 的SocketChannel设置处理器// maxFrameLength : 发送的数据包最大长度, 发送数据包的最大长度,例如1024,表示一个数据包最多可发送1024个字节// lengthFieldOffset: 长度字段的偏移量, 指的是长度字段位于数据包内部字节数组中的下标值// lengthFieldLength: 长度字段自己占用的字节数,如果长度字段是一个int整数,则为4,如果长度字段是一个short整数,则为2// lengthAdjustment: 长度字段的偏移量矫正, 这个参数最为难懂,在传输协议比较复杂的情况下,例如包含了长度字段,协议版本号, 魔数等// 那么解码时,就需要进行长度字段的矫正,长度矫正值的计算公式为:内容字段偏移量 - 长度字段偏移量 - 长度字段的字节数//ch.pipeline().addLast(new LengthFieldBasedFrameDecoder(65535, 0 , 4,0,0 ));ch.pipeline().addLast(new NettyServerHandler());}});System.out.println("netty server start ....");// 绑定一个商品并且同步,生成一个ChannelFuture异步对象,通过isDone()等方法可以判断异步事件的执行情况// 启动服务器(并绑定端口),bind是异步操作,sync方法是等待异步操作执行完毕ChannelFuture cf = bootstrap.bind(9000).sync();// 给注册监听器,监听我们关心的事件cf.addListener(new ChannelFutureListener() {@Overridepublic void operationComplete(ChannelFuture future) throws Exception {if (cf.isSuccess()) {System.out.println("监听端口9000成功");} else {System.out.println("监听端口9000失败");}}});// 对通道关闭进行监听,closeFuture是异步操作,监听通道关闭// 通过sync方法同步等待通道关闭处理完毕,这里会阻塞等待通道关闭完成cf.channel().closeFuture().sync();} catch (Exception e) {e.printStackTrace();} finally {bossGroup.shutdownGracefully();workerGroup.shutdownGracefully();}}
}// 自定义Handler需要继承netty 规定好的某个HandlerAdapter(规范)
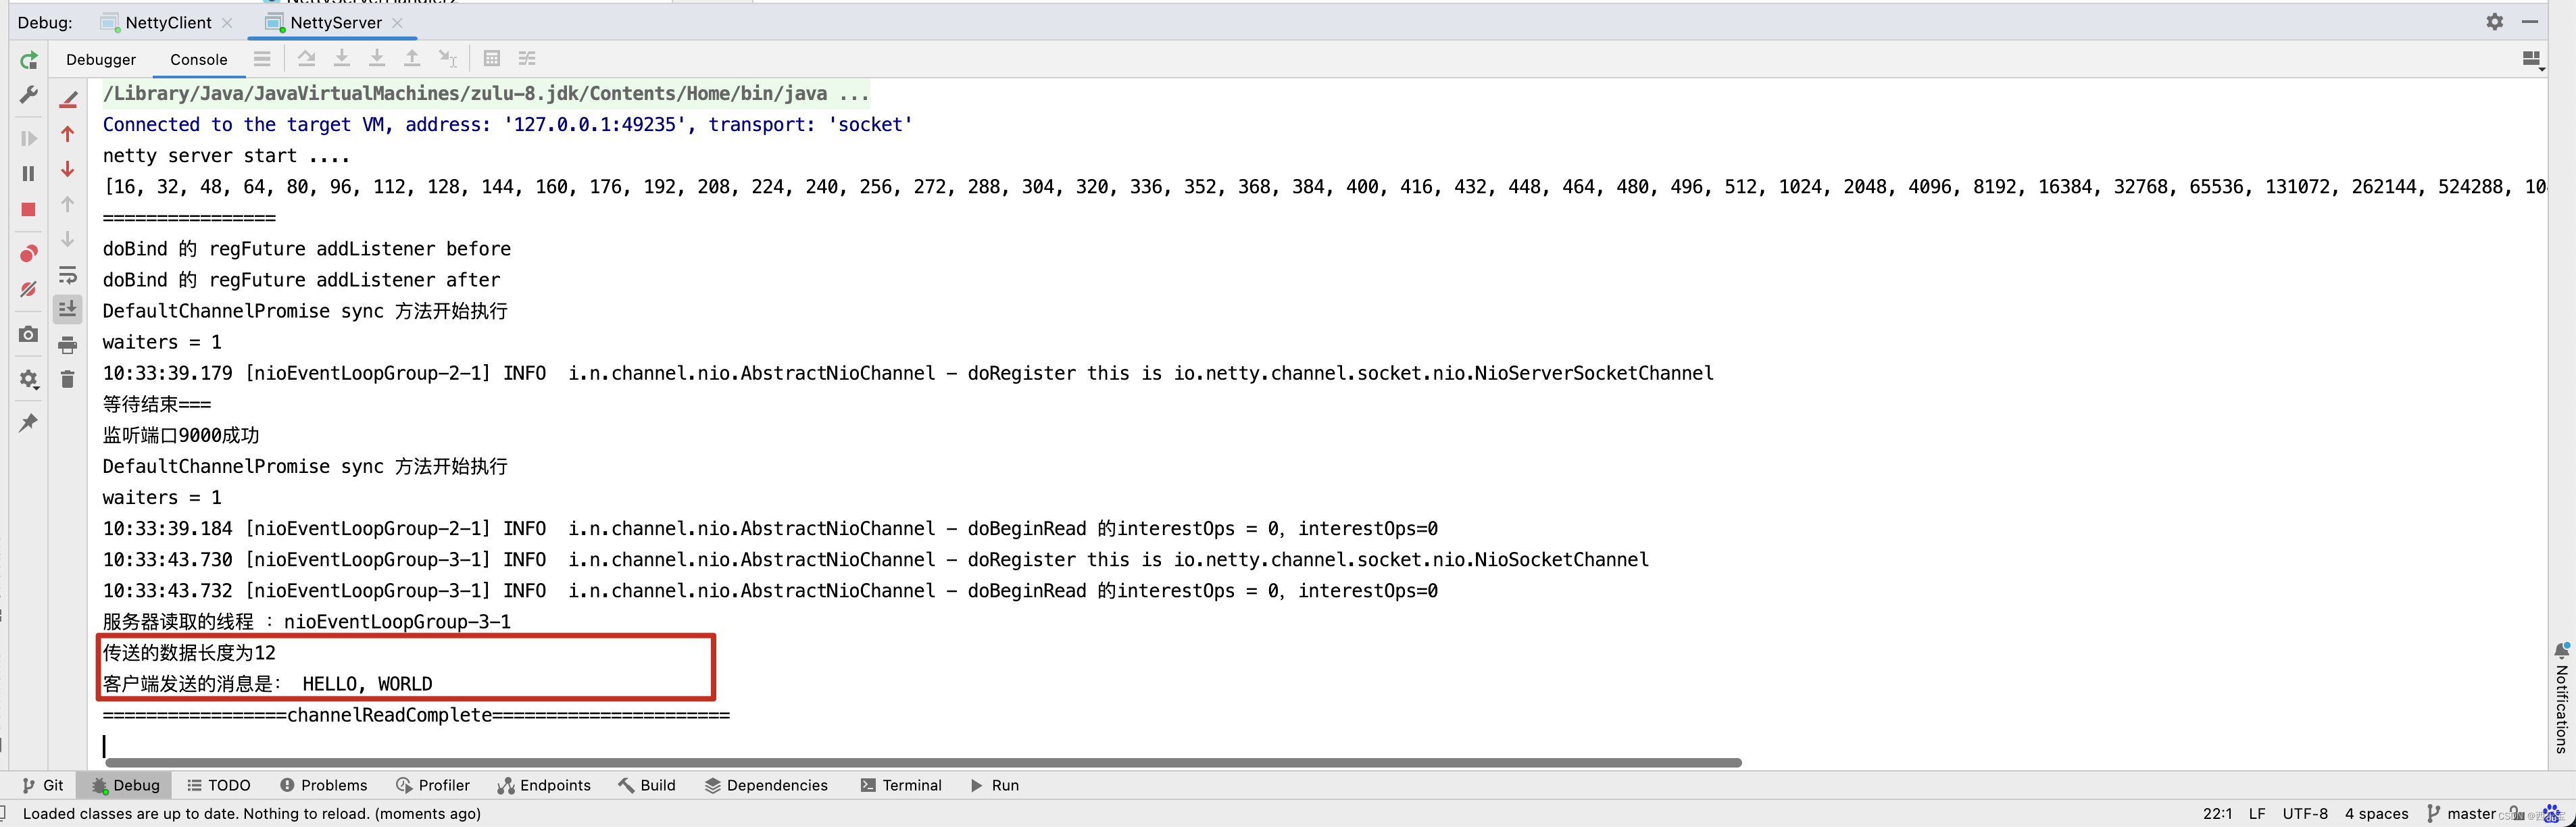
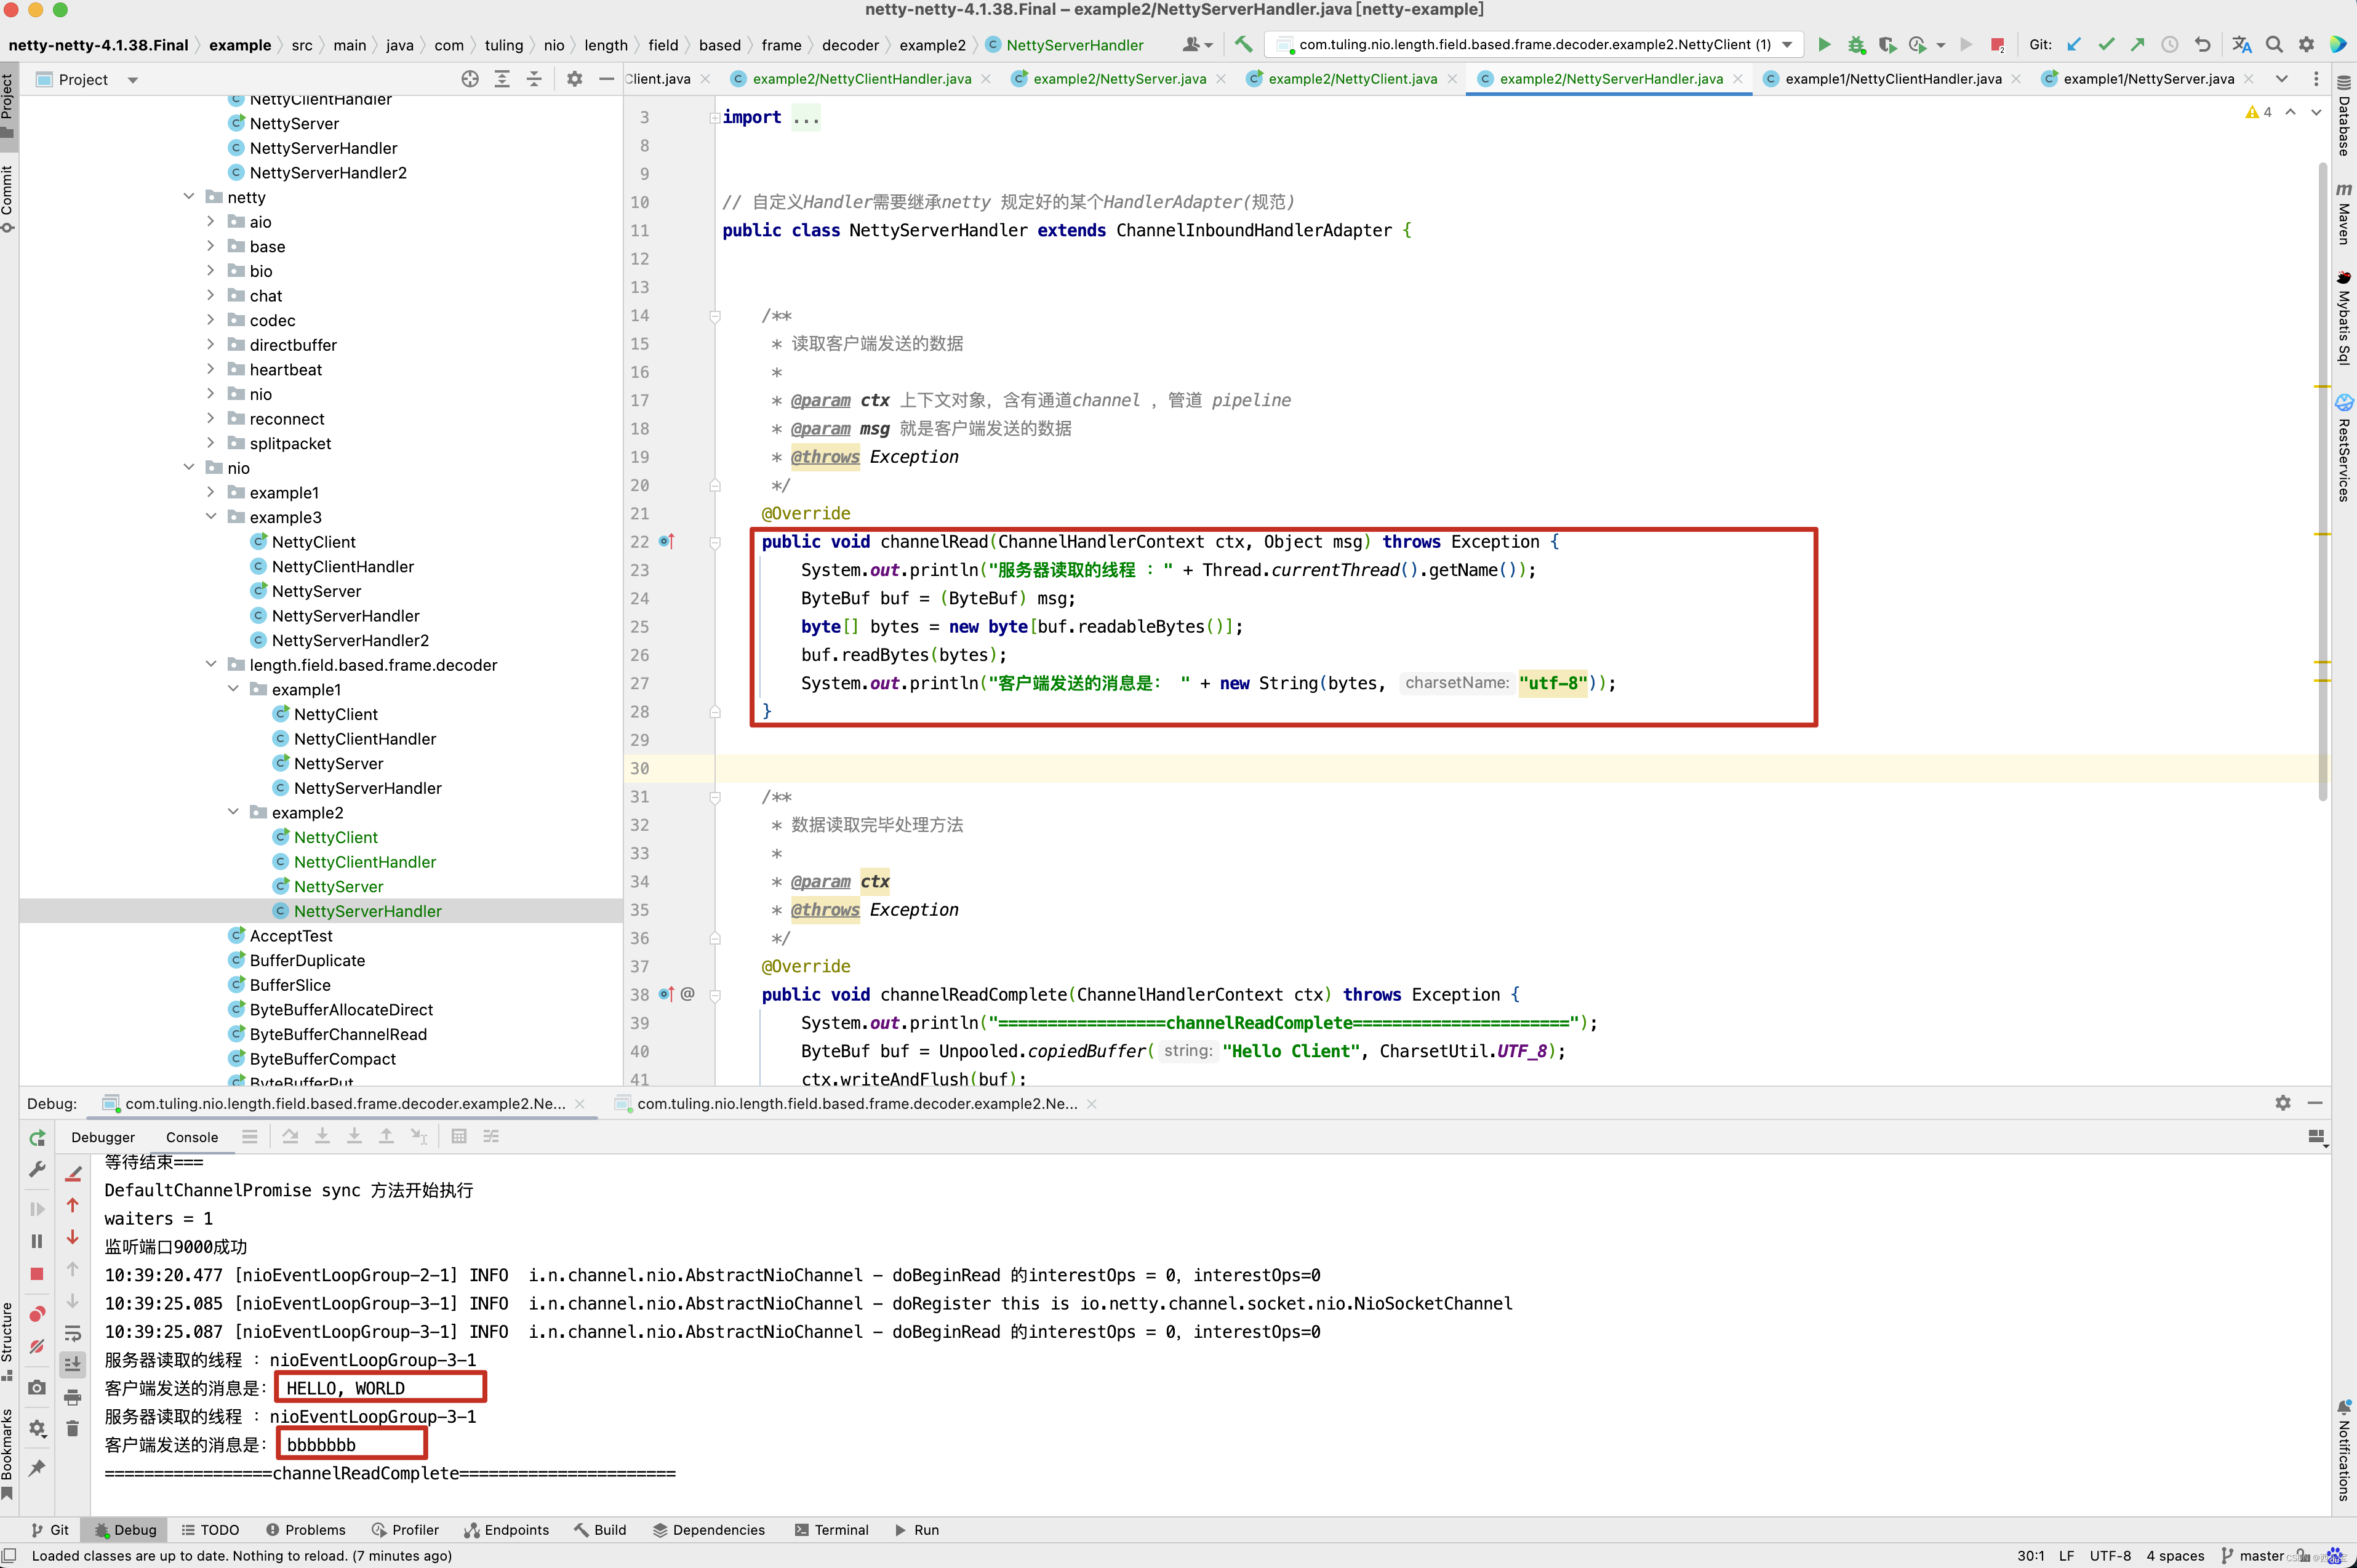
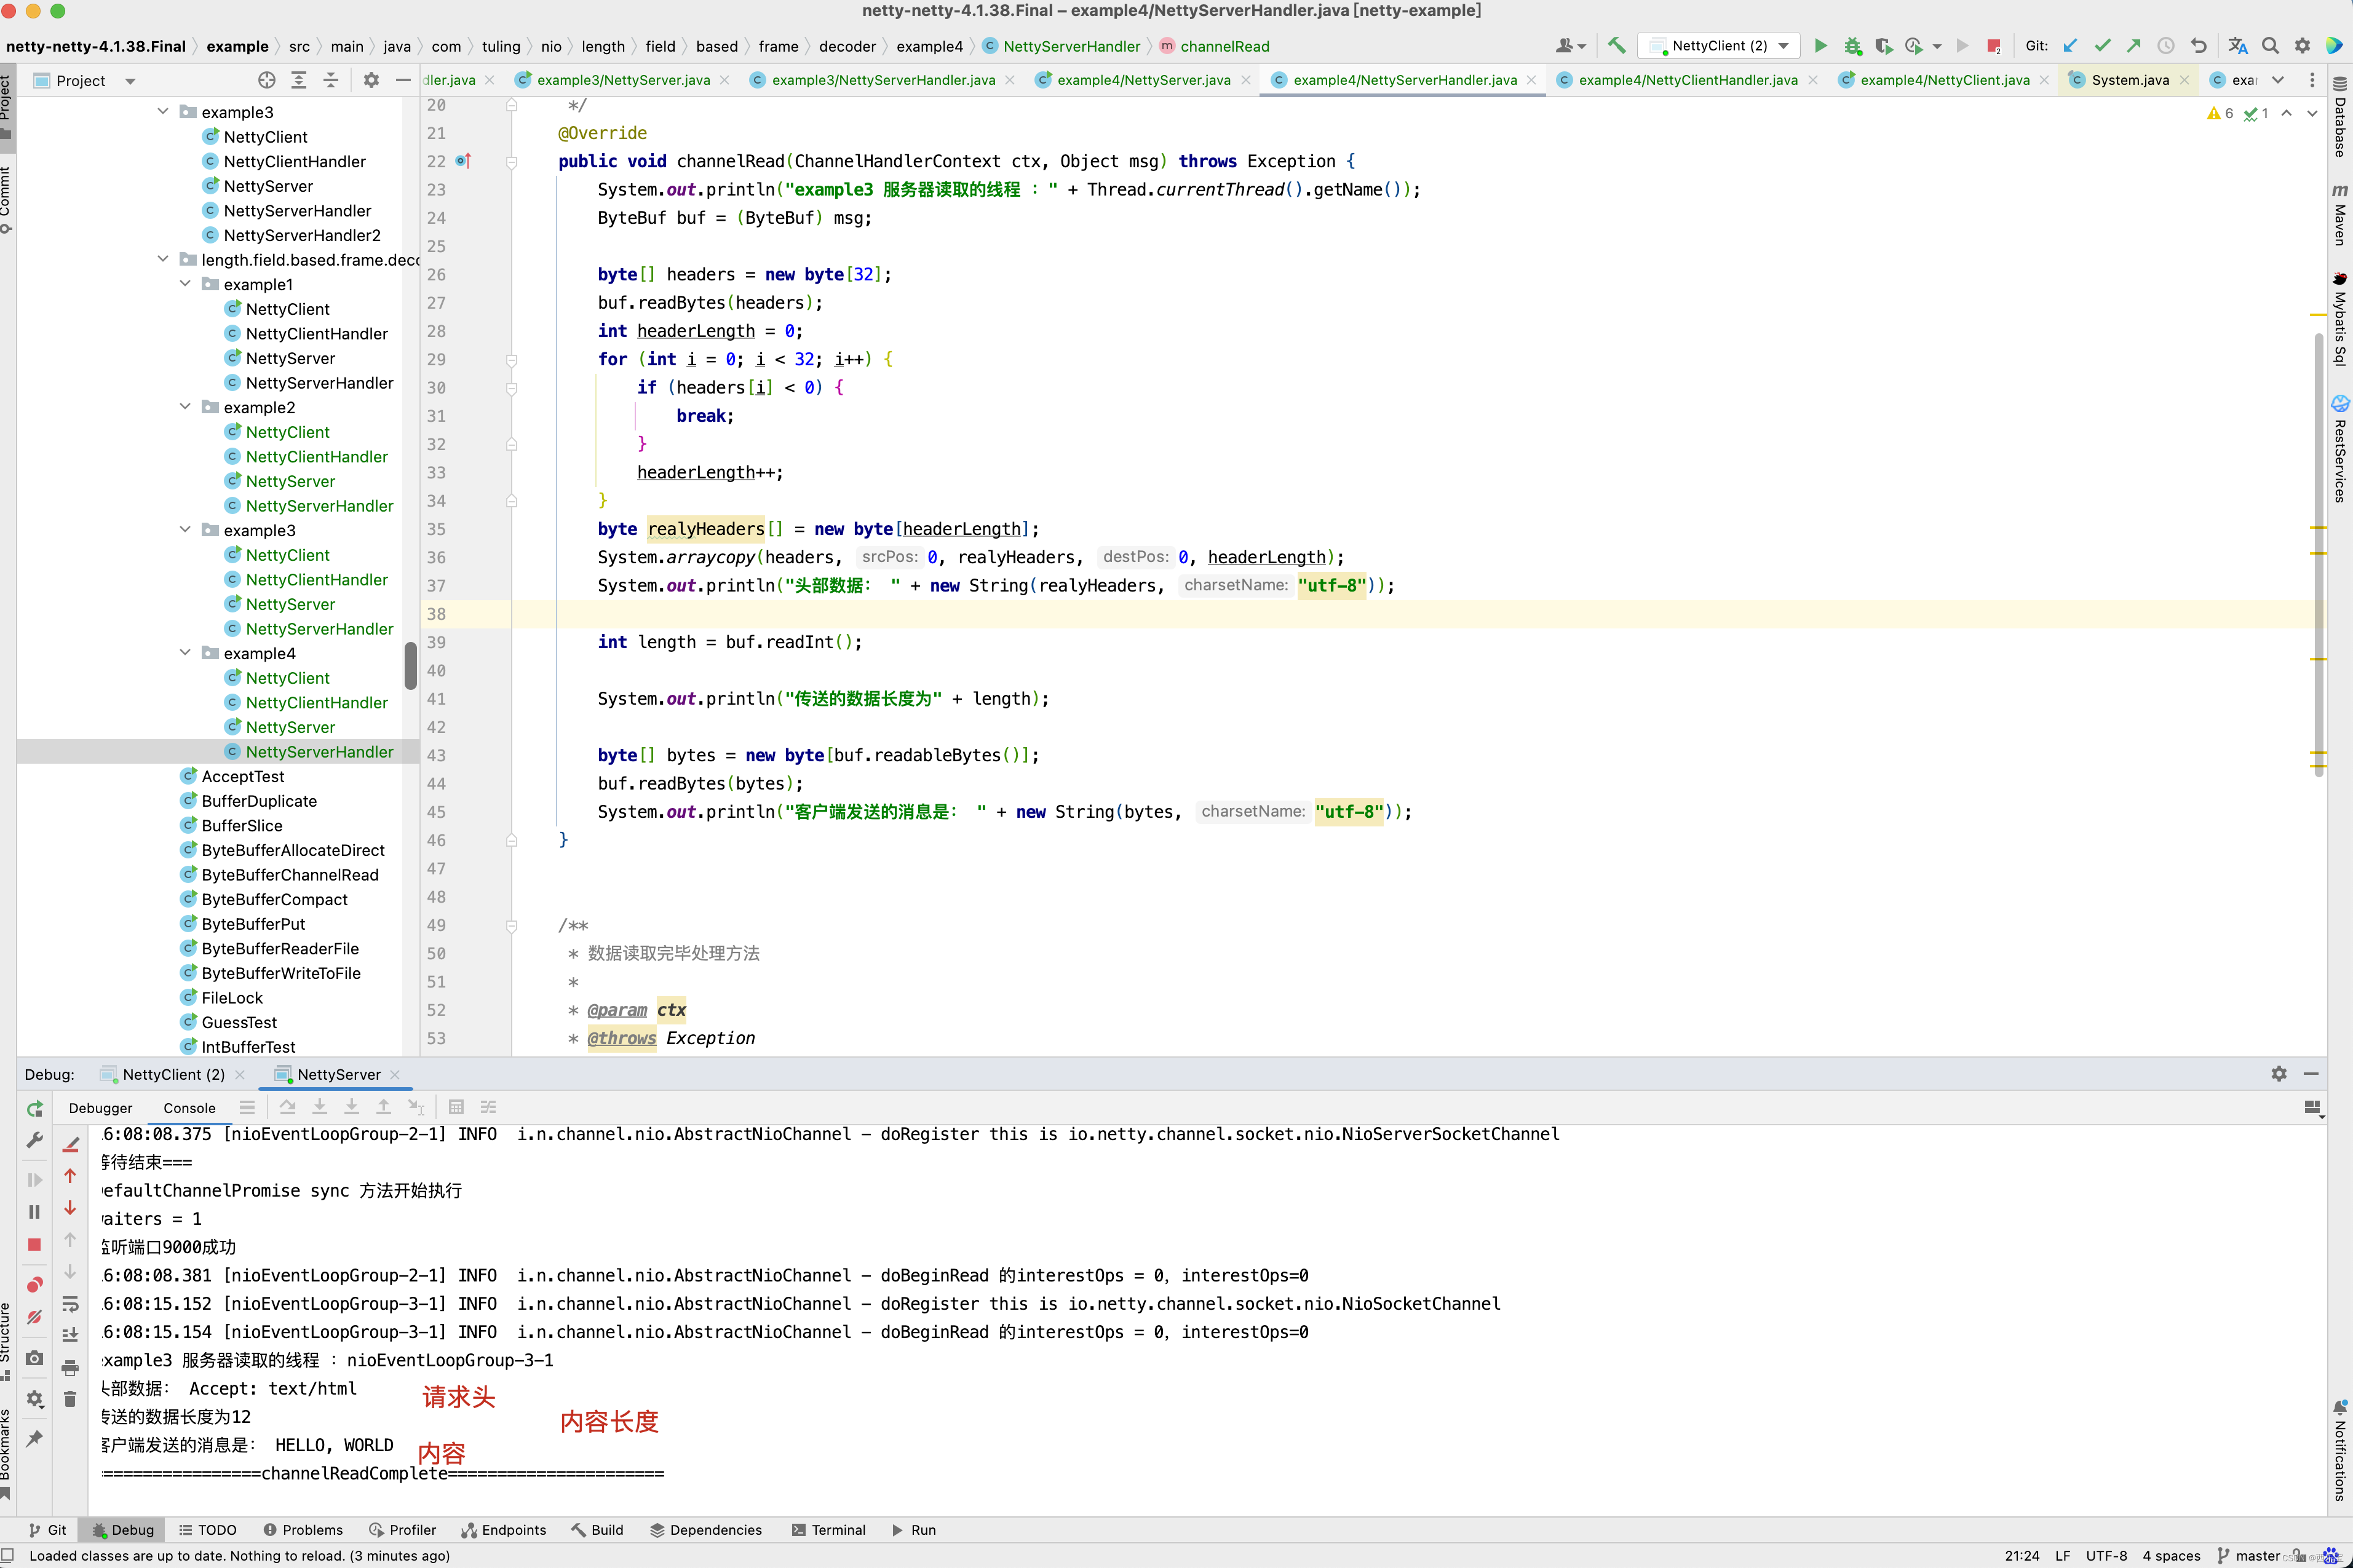
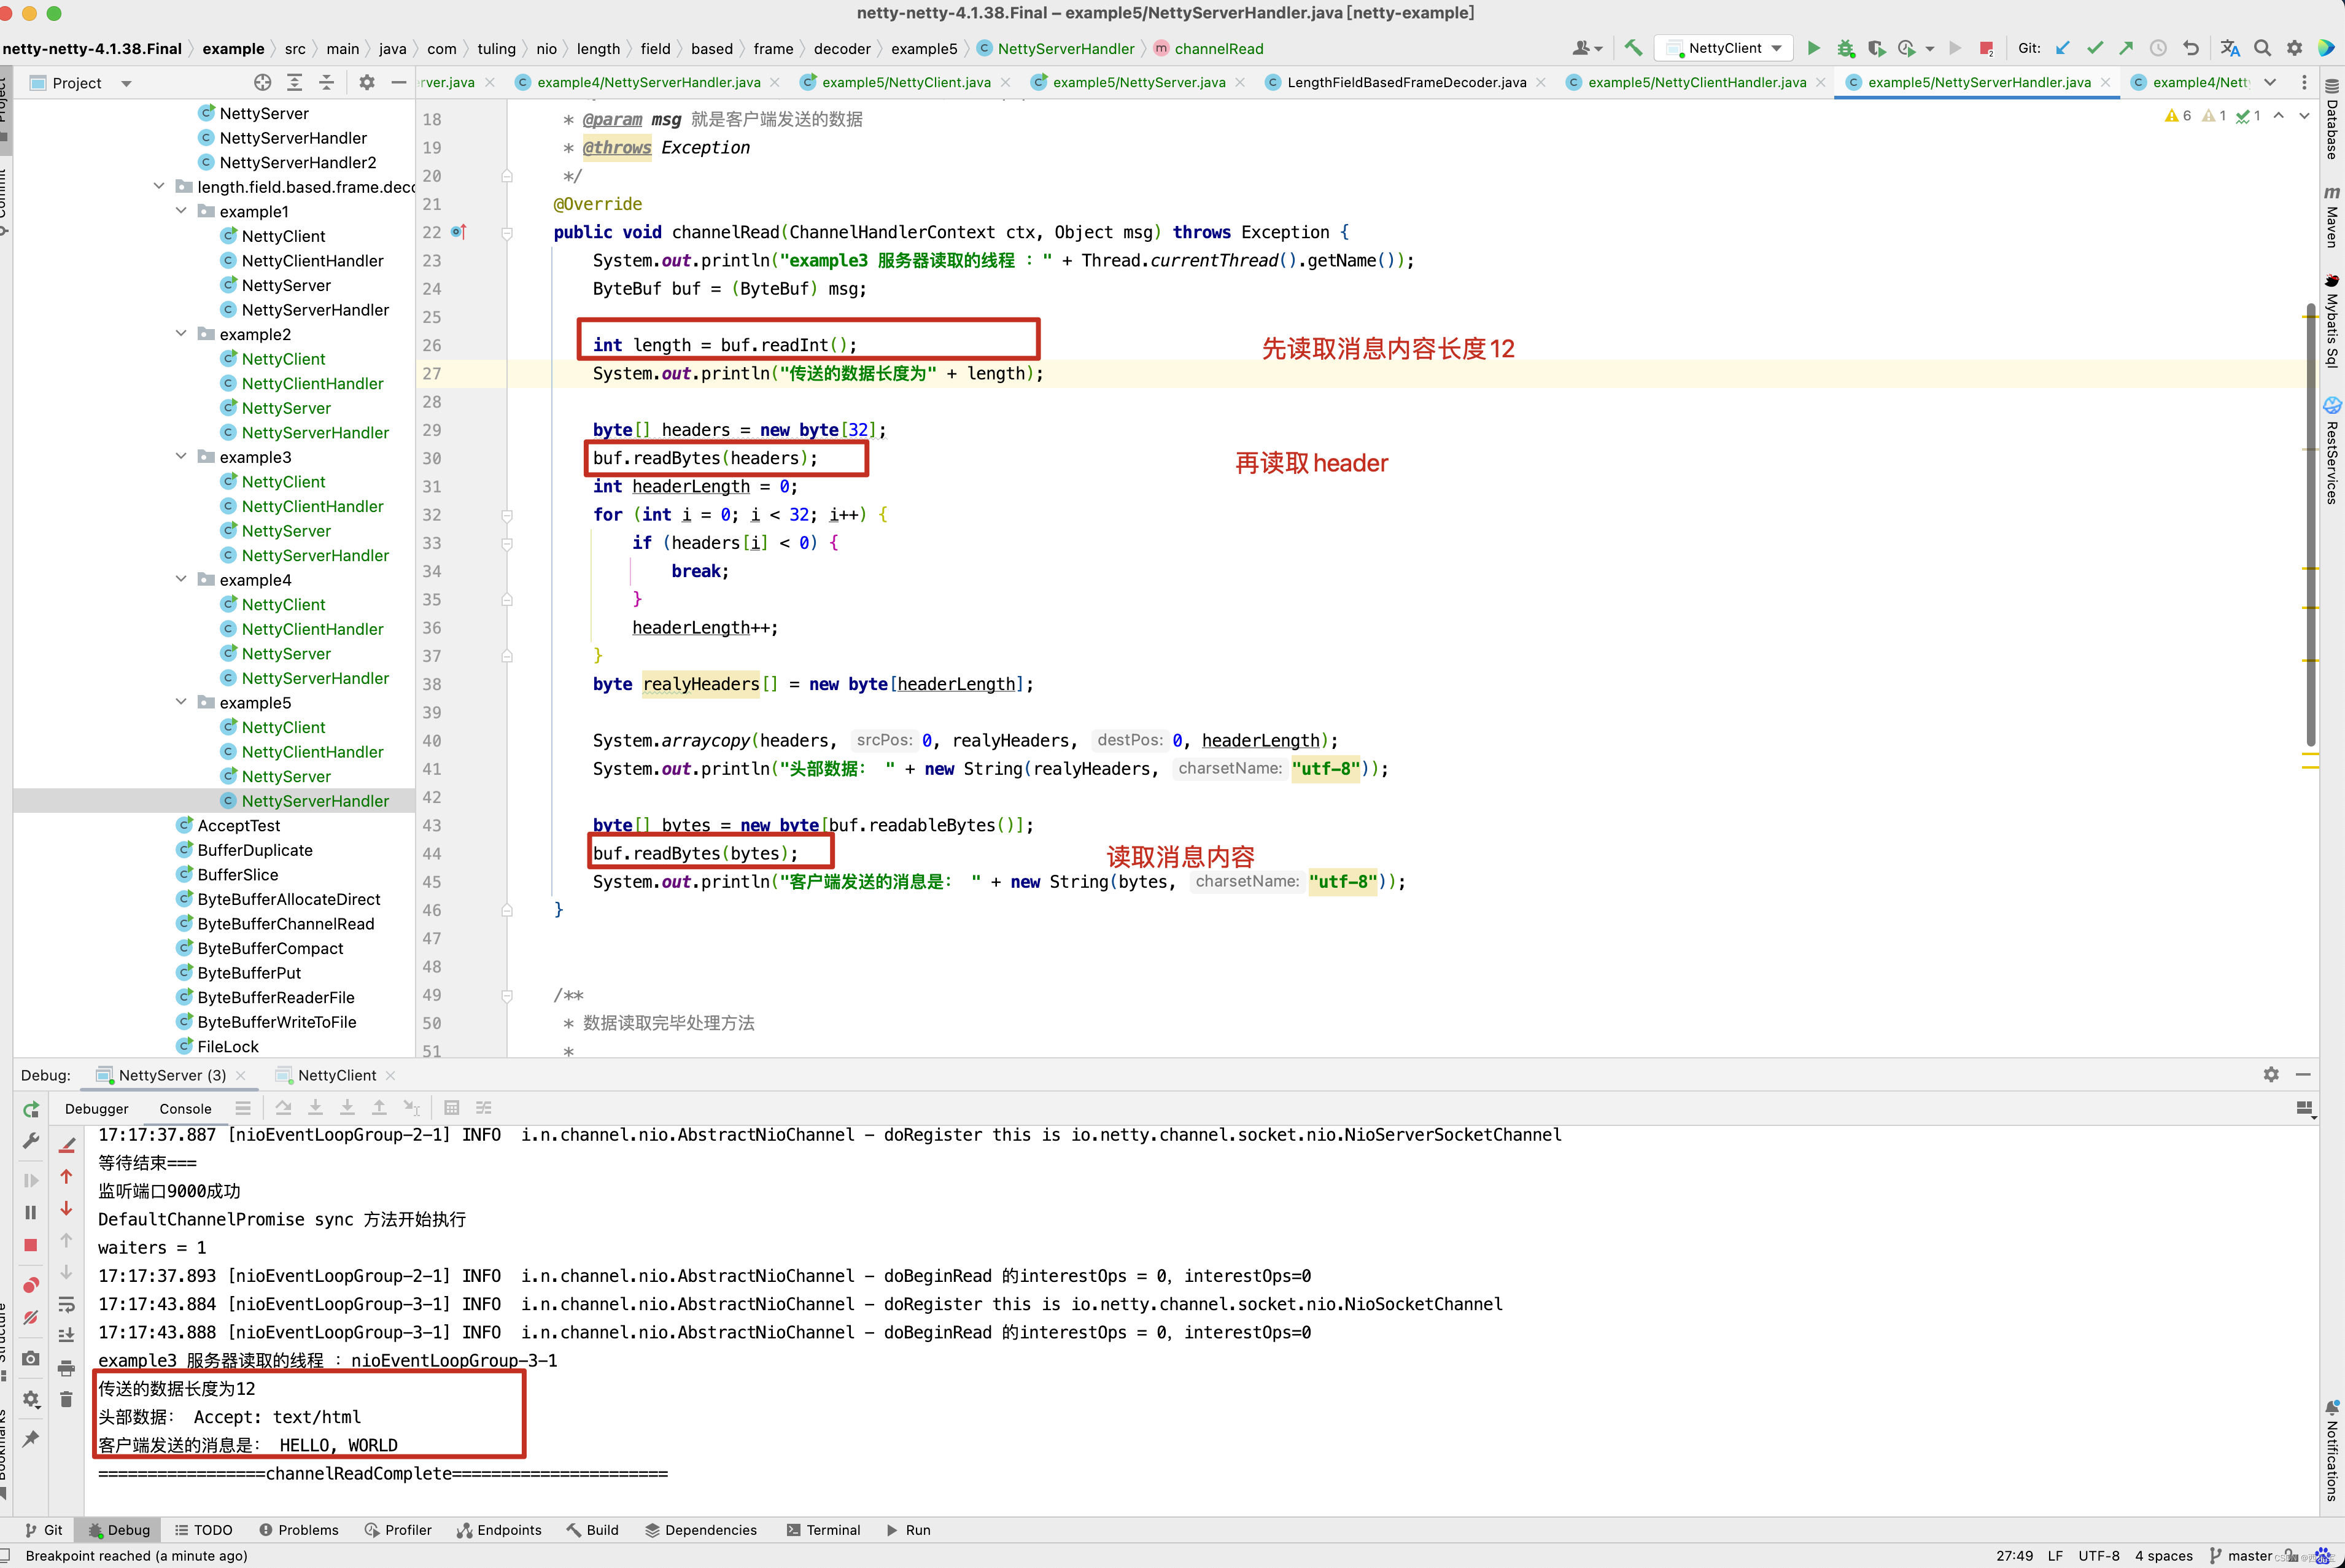
public class NettyServerHandler extends ChannelInboundHandlerAdapter {/* 读取客户端发送的数据 @param ctx 上下文对象,含有通道channel ,管道 pipeline* @param msg 就是客户端发送的数据* @throws Exception*/@Overridepublic void channelRead(ChannelHandlerContext ctx, Object msg) throws Exception {System.out.println("服务器读取的线程 :" + Thread.currentThread().getName());ByteBuf buf = (ByteBuf) msg;int length = buf.readInt();System.out.println("传送的数据长度为" + length);byte[] bytes = new byte[length];buf.readBytes(bytes);System.out.println("客户端发送的消息是: " + new String(bytes, "utf-8"));}/* 数据读取完毕处理方法 @param ctx* @throws Exception*/@Overridepublic void channelReadComplete(ChannelHandlerContext ctx) throws Exception {System.out.println("=================channelReadComplete======================");ByteBuf buf = Unpooled.copiedBuffer("Hello Client", CharsetUtil.UTF_8);ctx.writeAndFlush(buf);}// 处理异常,一般需要关闭通道@Overridepublic void exceptionCaught(ChannelHandlerContext ctx, Throwable cause) throws Exception {ctx.close();}
}
再来看客户端代码
public class NettyClient {public static void main(String[] args) {// 客户端需要一个事件循环组EventLoopGroup group = new NioEventLoopGroup();try {// 创建客户端启动对象// 注意,客户端使用的不是ServerBootstrap , 而是BootstrapBootstrap bootstrap = new Bootstrap();// 设置相关的参数bootstrap.group(group) //设置线程组.channel(NioSocketChannel.class) // 使用NioSocketChannel作为客户端的通道实现.handler(new ChannelInitializer<SocketChannel>() {@Overrideprotected void initChannel(SocketChannel ch) throws Exception {ch.pipeline().addLast(new NettyClientHandler());}});System.out.println("netty client start ");// 启动客户端去连接服务器端ChannelFuture channelFuture = bootstrap.connect("127.0.0.1",9000).sync();// 对关闭通道进行监听channelFuture.channel().closeFuture().sync();}catch (Exception e ){e.printStackTrace();}finally {group.shutdownGracefully();}
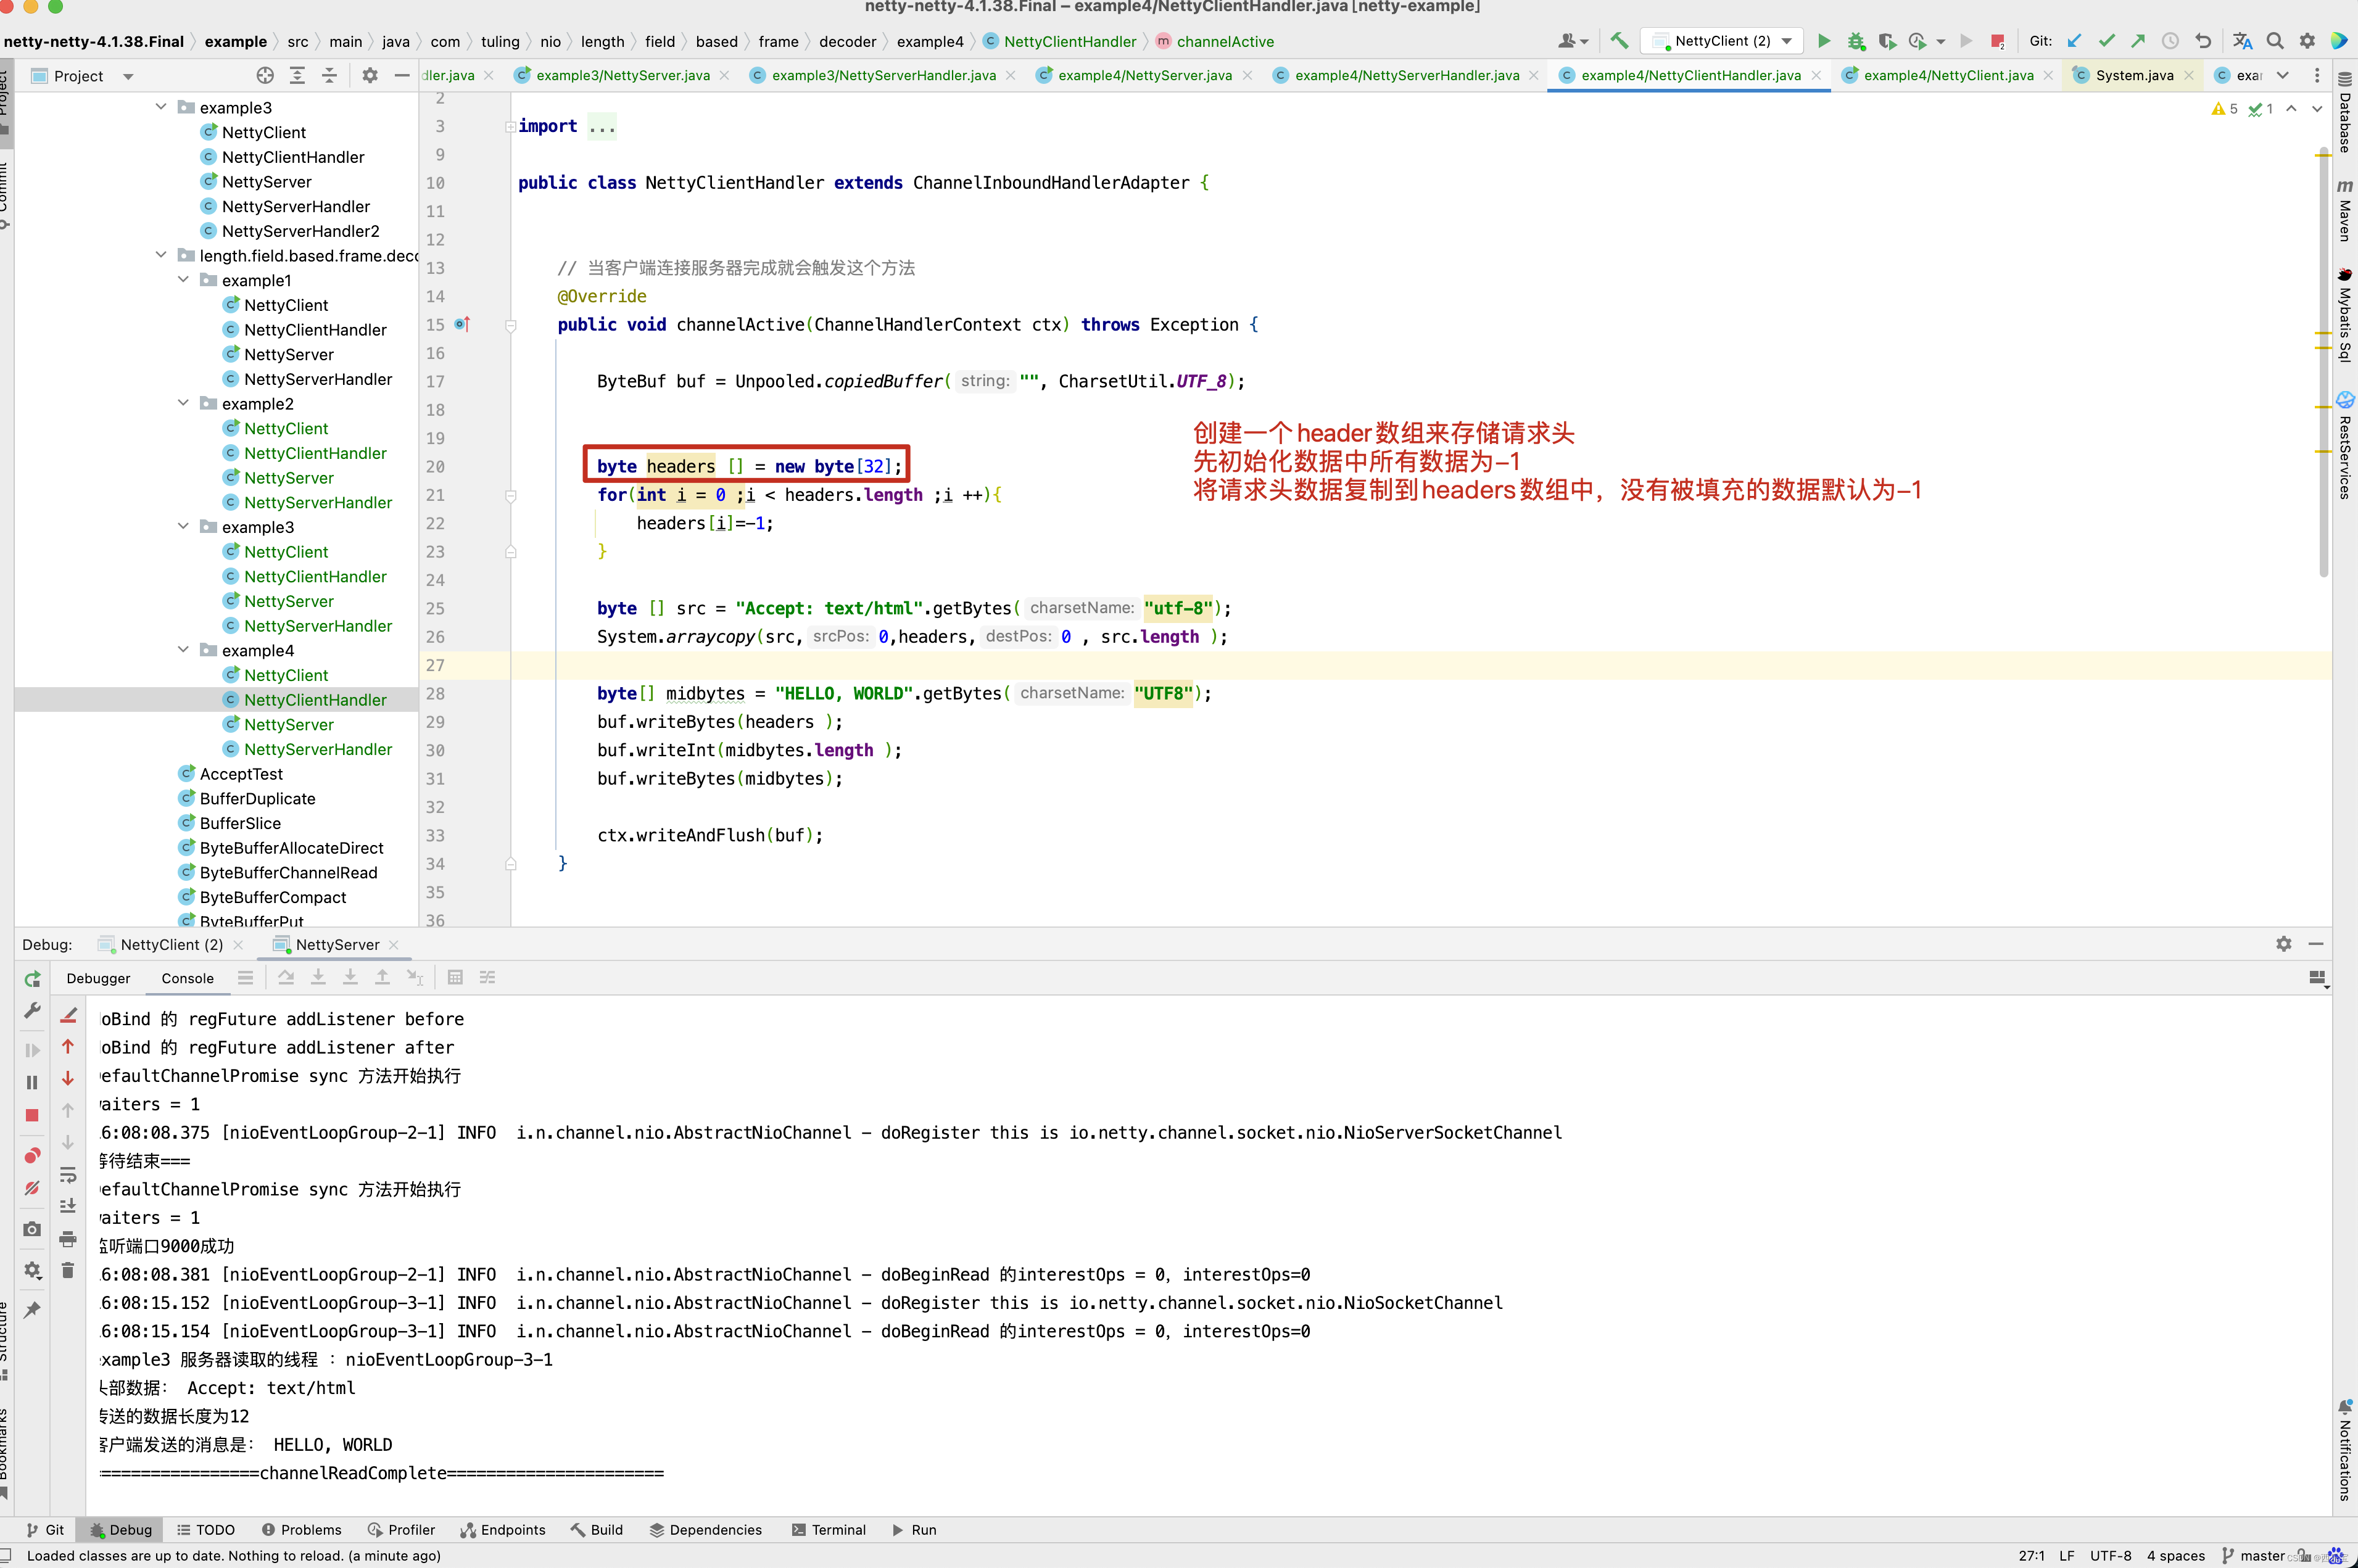
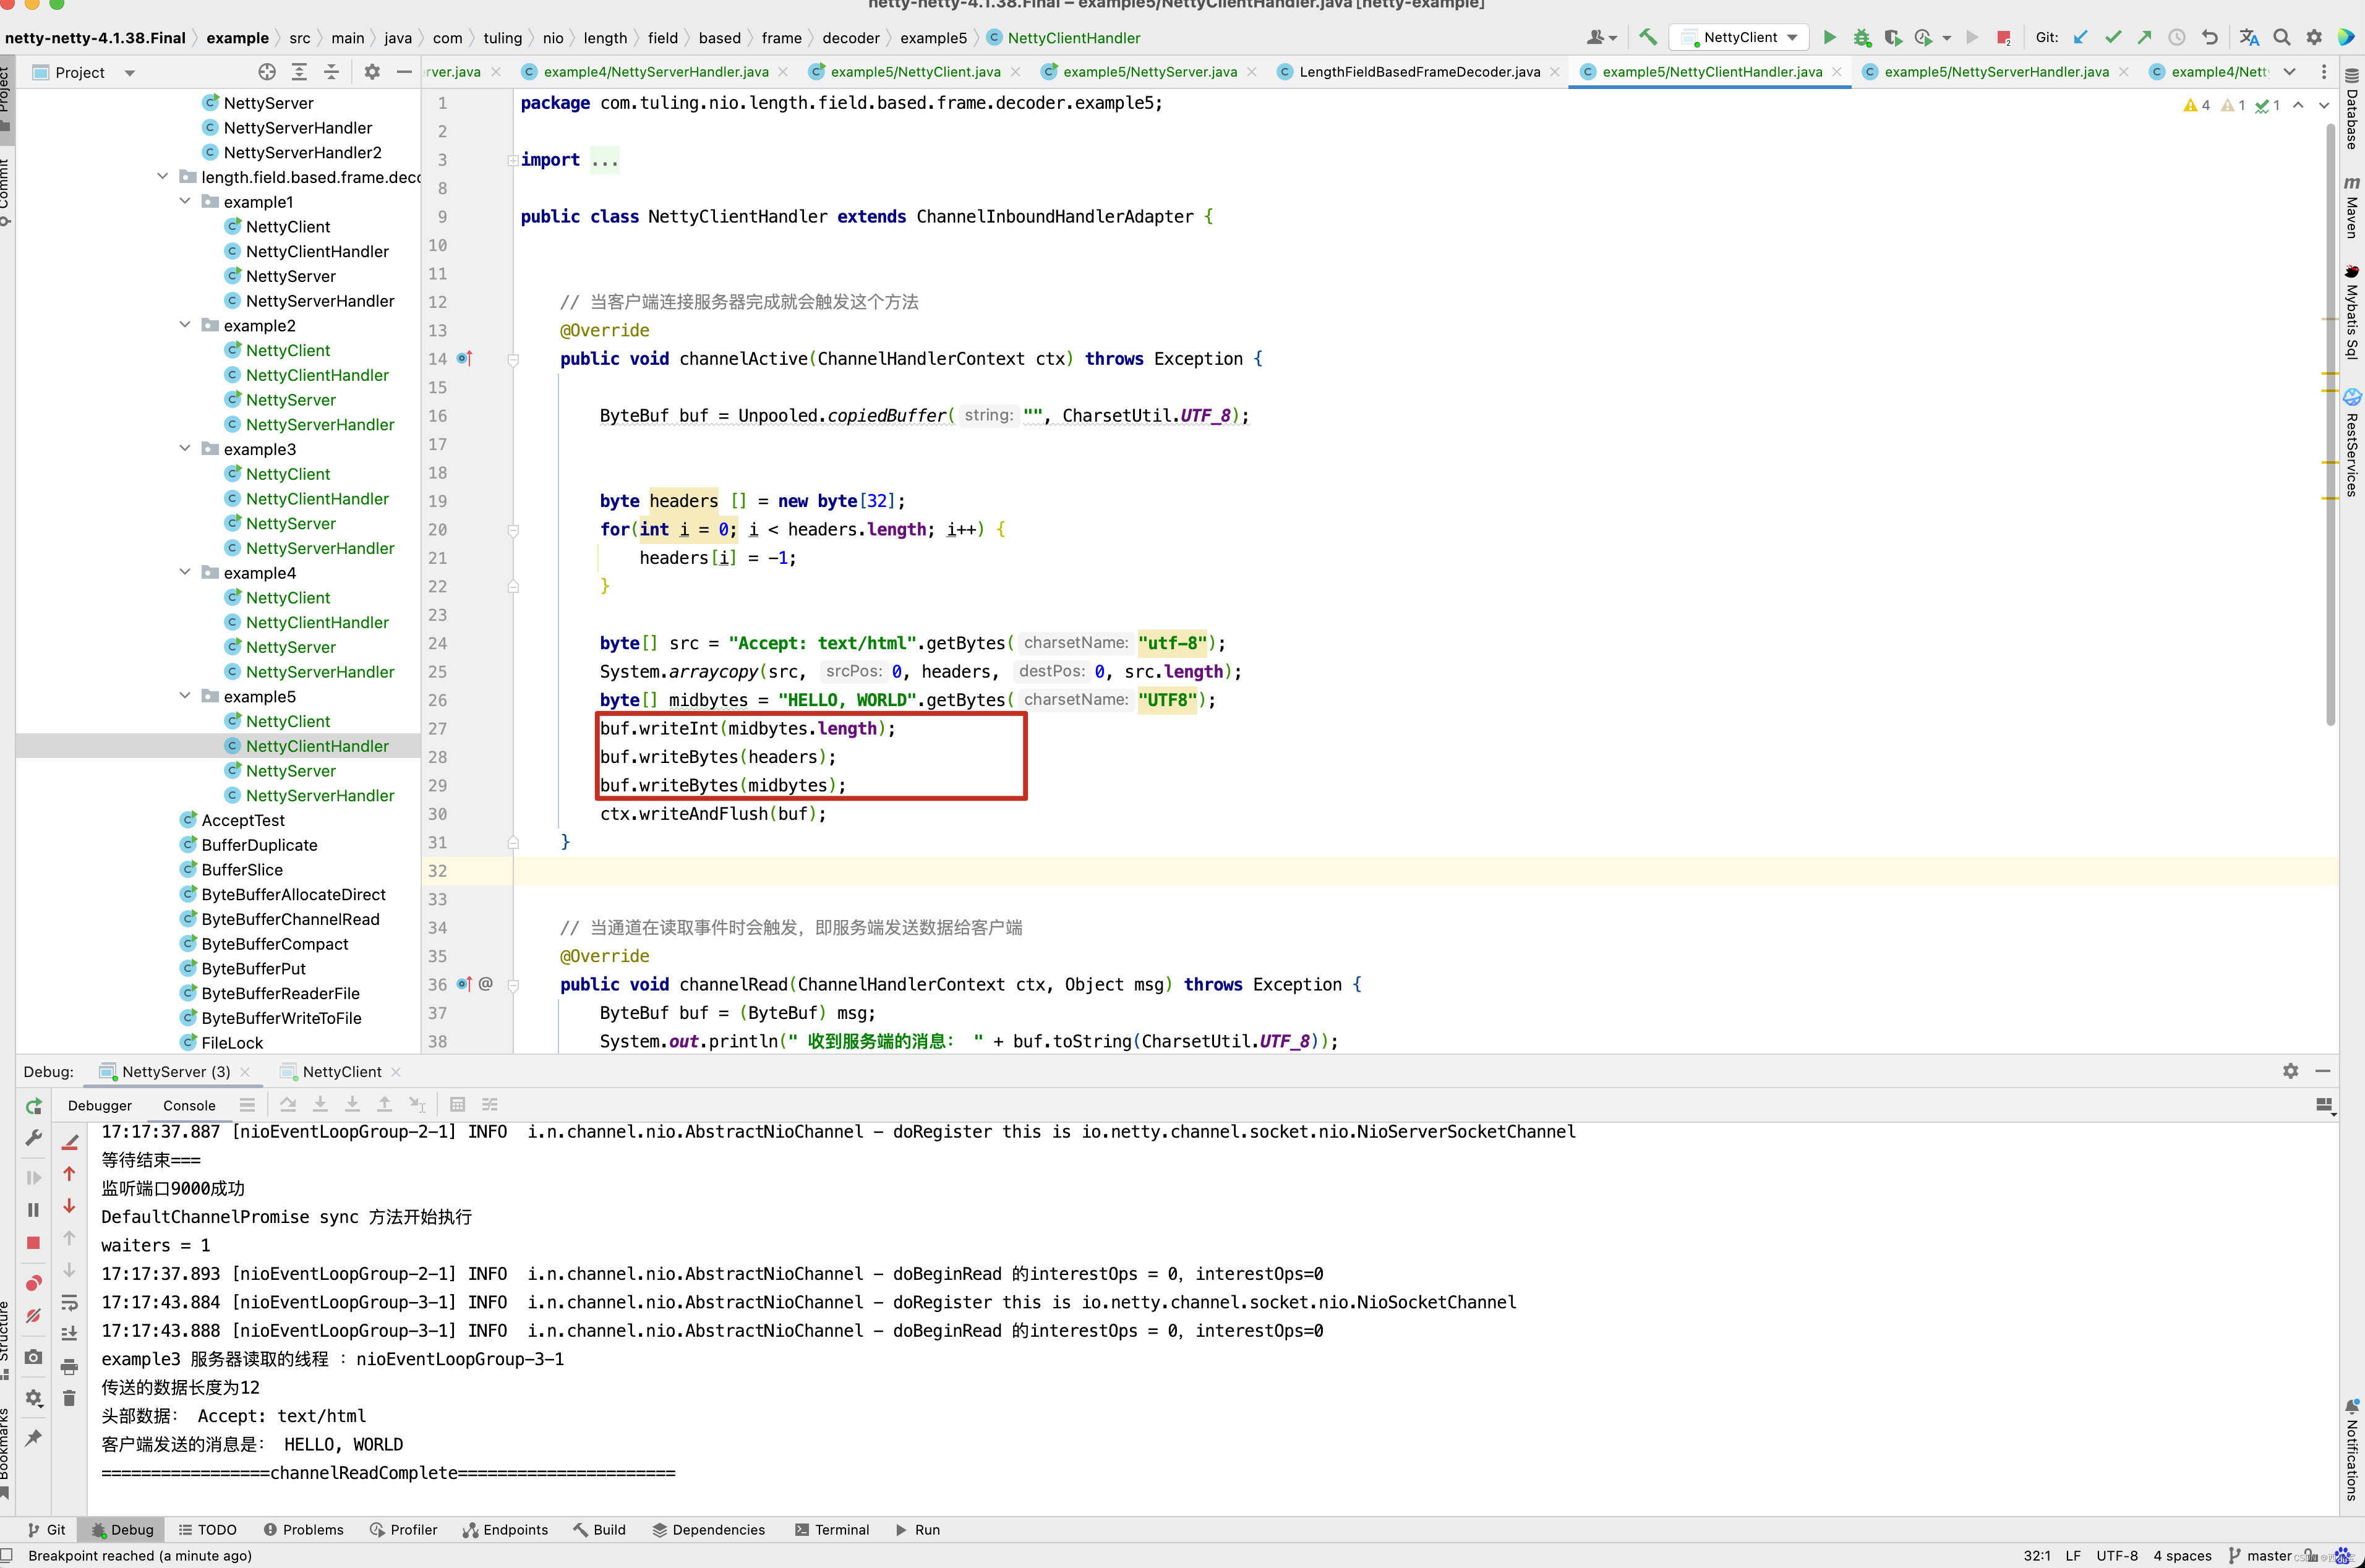
}public class NettyClientHandler extends ChannelInboundHandlerAdapter {// 当客户端连接服务器完成就会触发这个方法@Overridepublic void channelActive(ChannelHandlerContext ctx) throws Exception {byte[] midbytes = "HELLO, WORLD".getBytes("UTF8");ByteBuf buf = Unpooled.copiedBuffer("", CharsetUtil.UTF_8);buf.writeInt(midbytes.length);buf.writeBytes(midbytes);ctx.writeAndFlush(buf);}// 当通道在读取事件时会触发,即服务端发送数据给客户端@Overridepublic void channelRead(ChannelHandlerContext ctx, Object msg) throws Exception {ByteBuf buf = (ByteBuf) msg;System.out.println(" 收到服务端的消息: " + buf.toString(CharsetUtil.UTF_8));System.out.println("服务端的地址:" + ctx.channel().remoteAddress());}@Overridepublic void exceptionCaught(ChannelHandlerContext ctx, Throwable cause) throws Exception {cause.printStackTrace();ctx.close();}
}
客户端代码很好理解,向服务端发送了长度和真实数据,而服务端也收到了真实数据的长度和真实数据 。
案例2
- lengthFieldOffset=0 长度字段从0开始
- lengthFieldLength=2 长度字段本身占2个字节
- lengthAdjustment=0 需要调整0字节
- initialBytesToStrip=2 解码后跳过2字节
整个包长度为14字节
| Length 长度 | ActualContent(真实数据) |
|---|---|
| 0x000C | HELLO, WORLD |
| 0x000C==12 , 该字段为2个字节 | 数据总共12个字节,所以长度字段指的是数据的长度 |
这个时候initialBytesToStrip字段就起作用了, 在解码后会将前面的2个字节跳过 , 所以解码后只剩余了数据部分。 解码后
| Actual Content(真实的数据) |
|---|
| HELLO, WORLD |
由于很多的测试代码和例1中的一样,因此这里只将不同的部分截图出来。
客户端写了两份数据
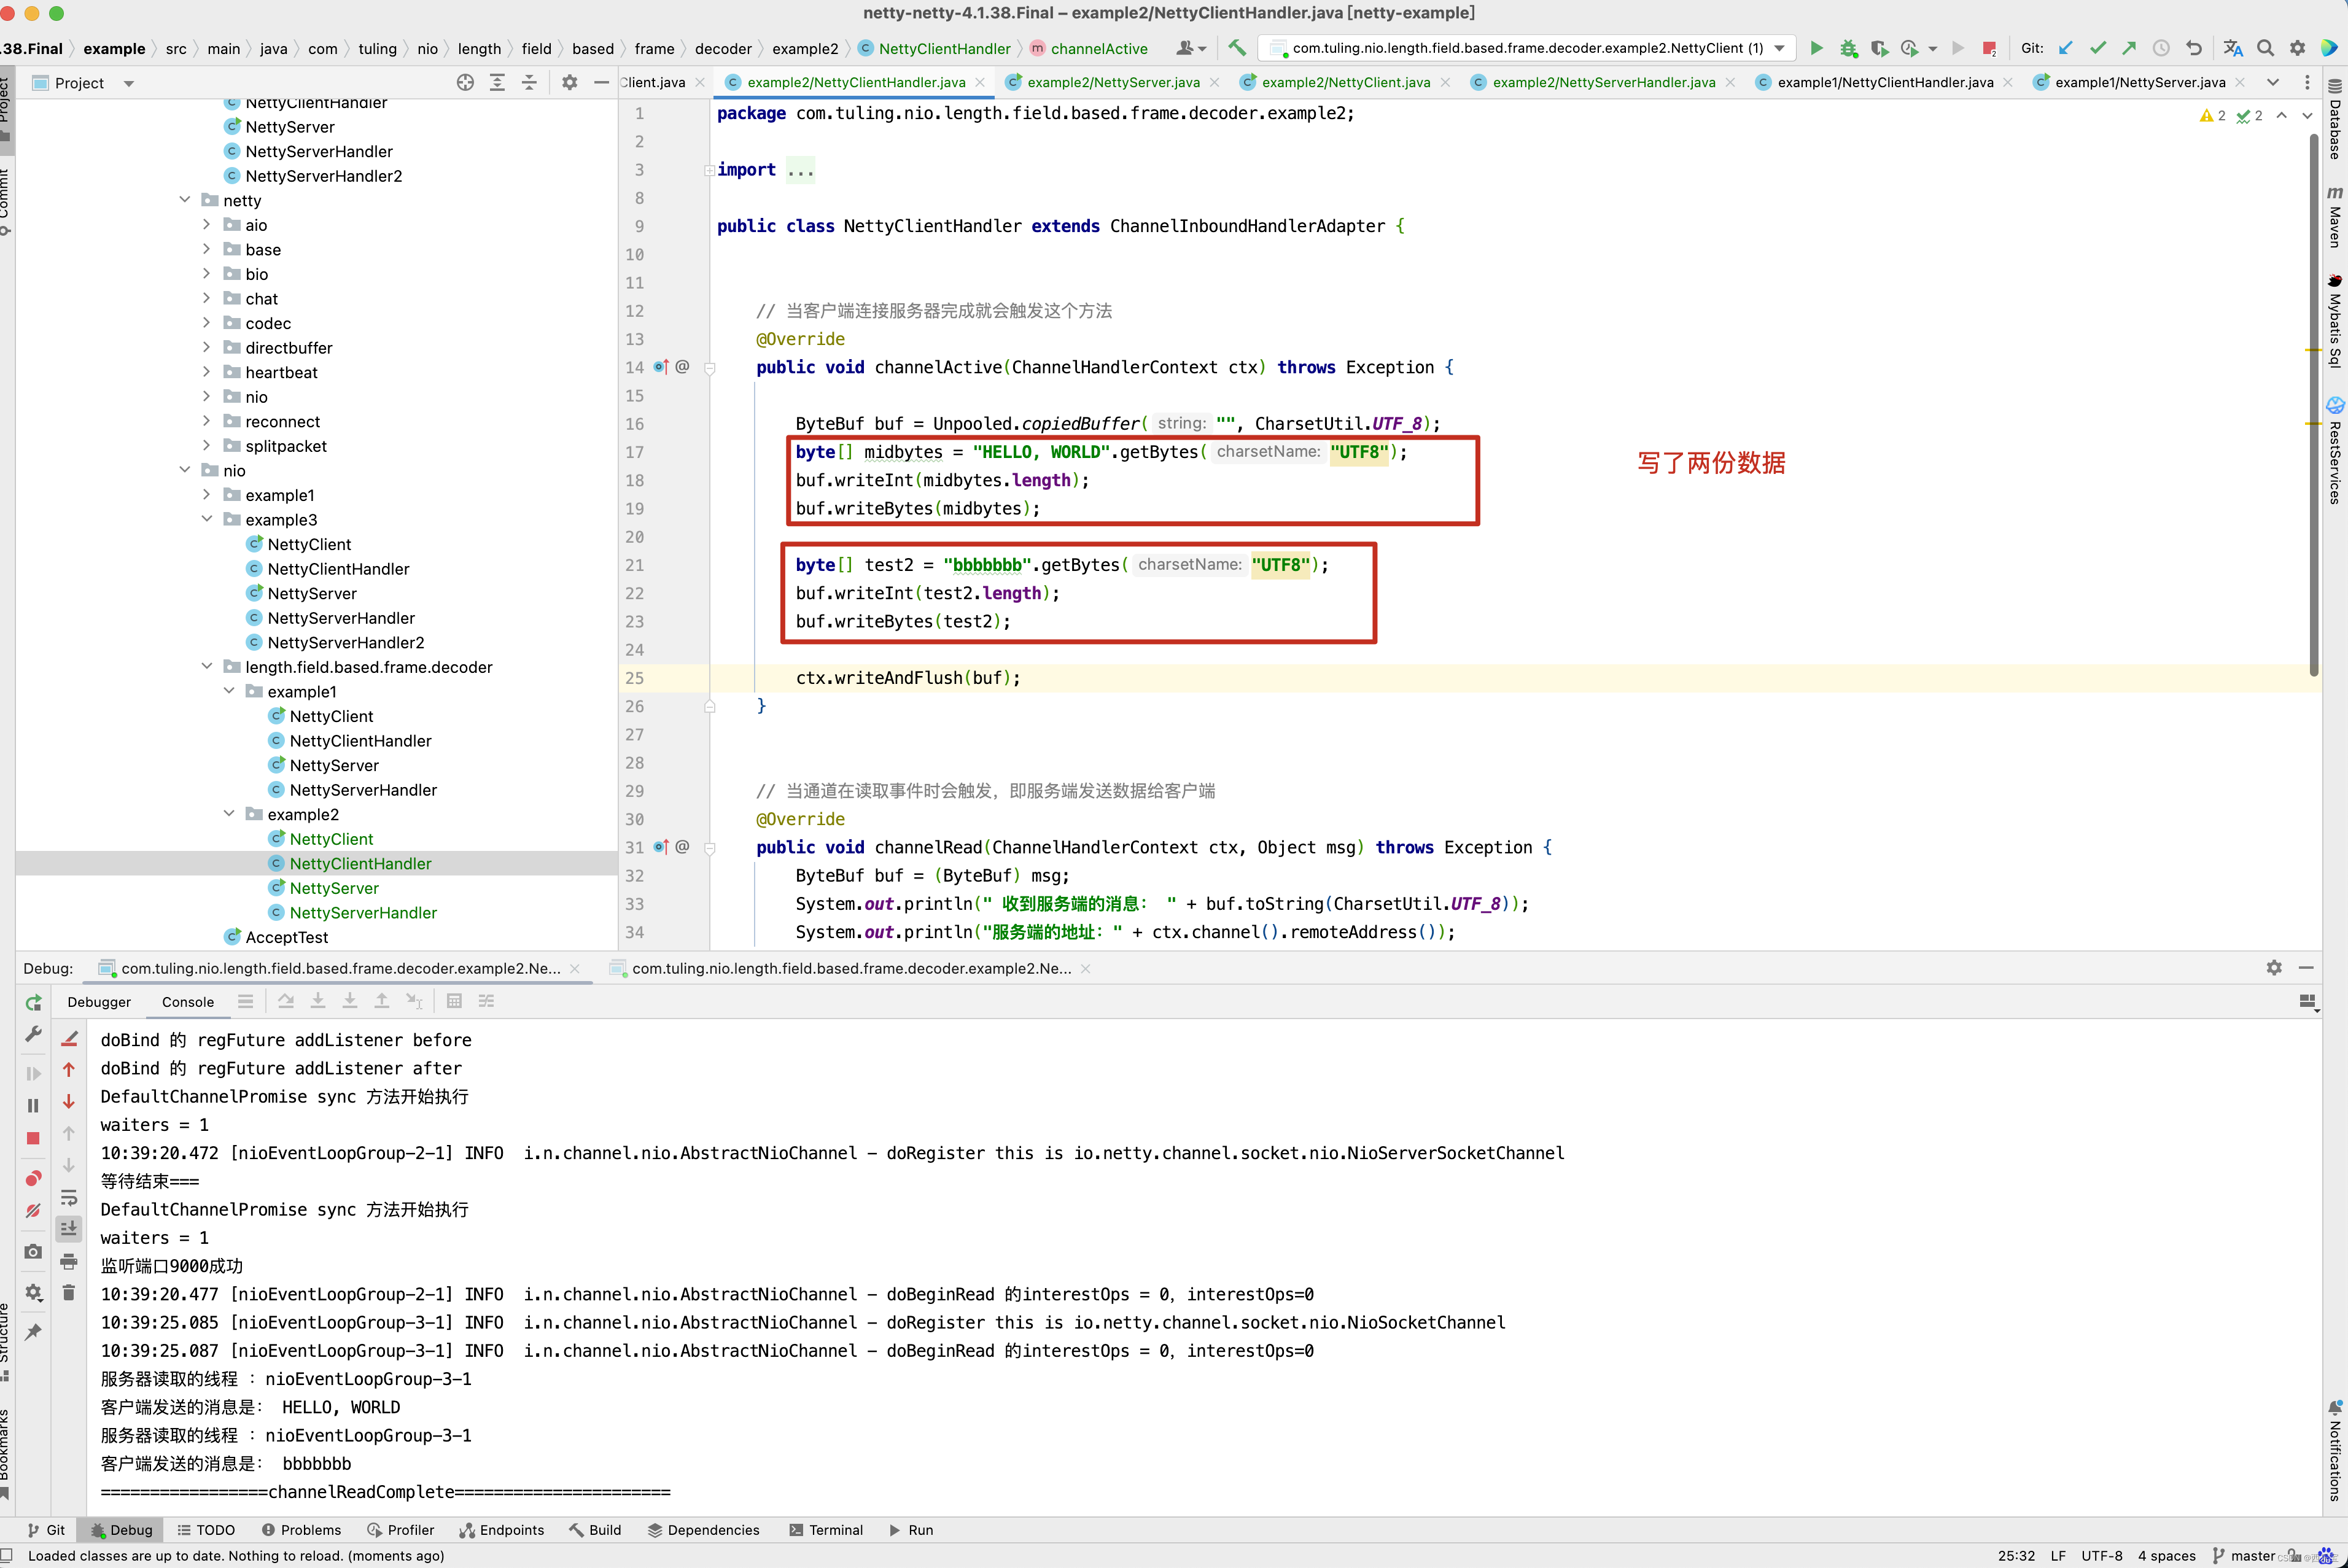
NettyServerHandler代码及测试结果如下
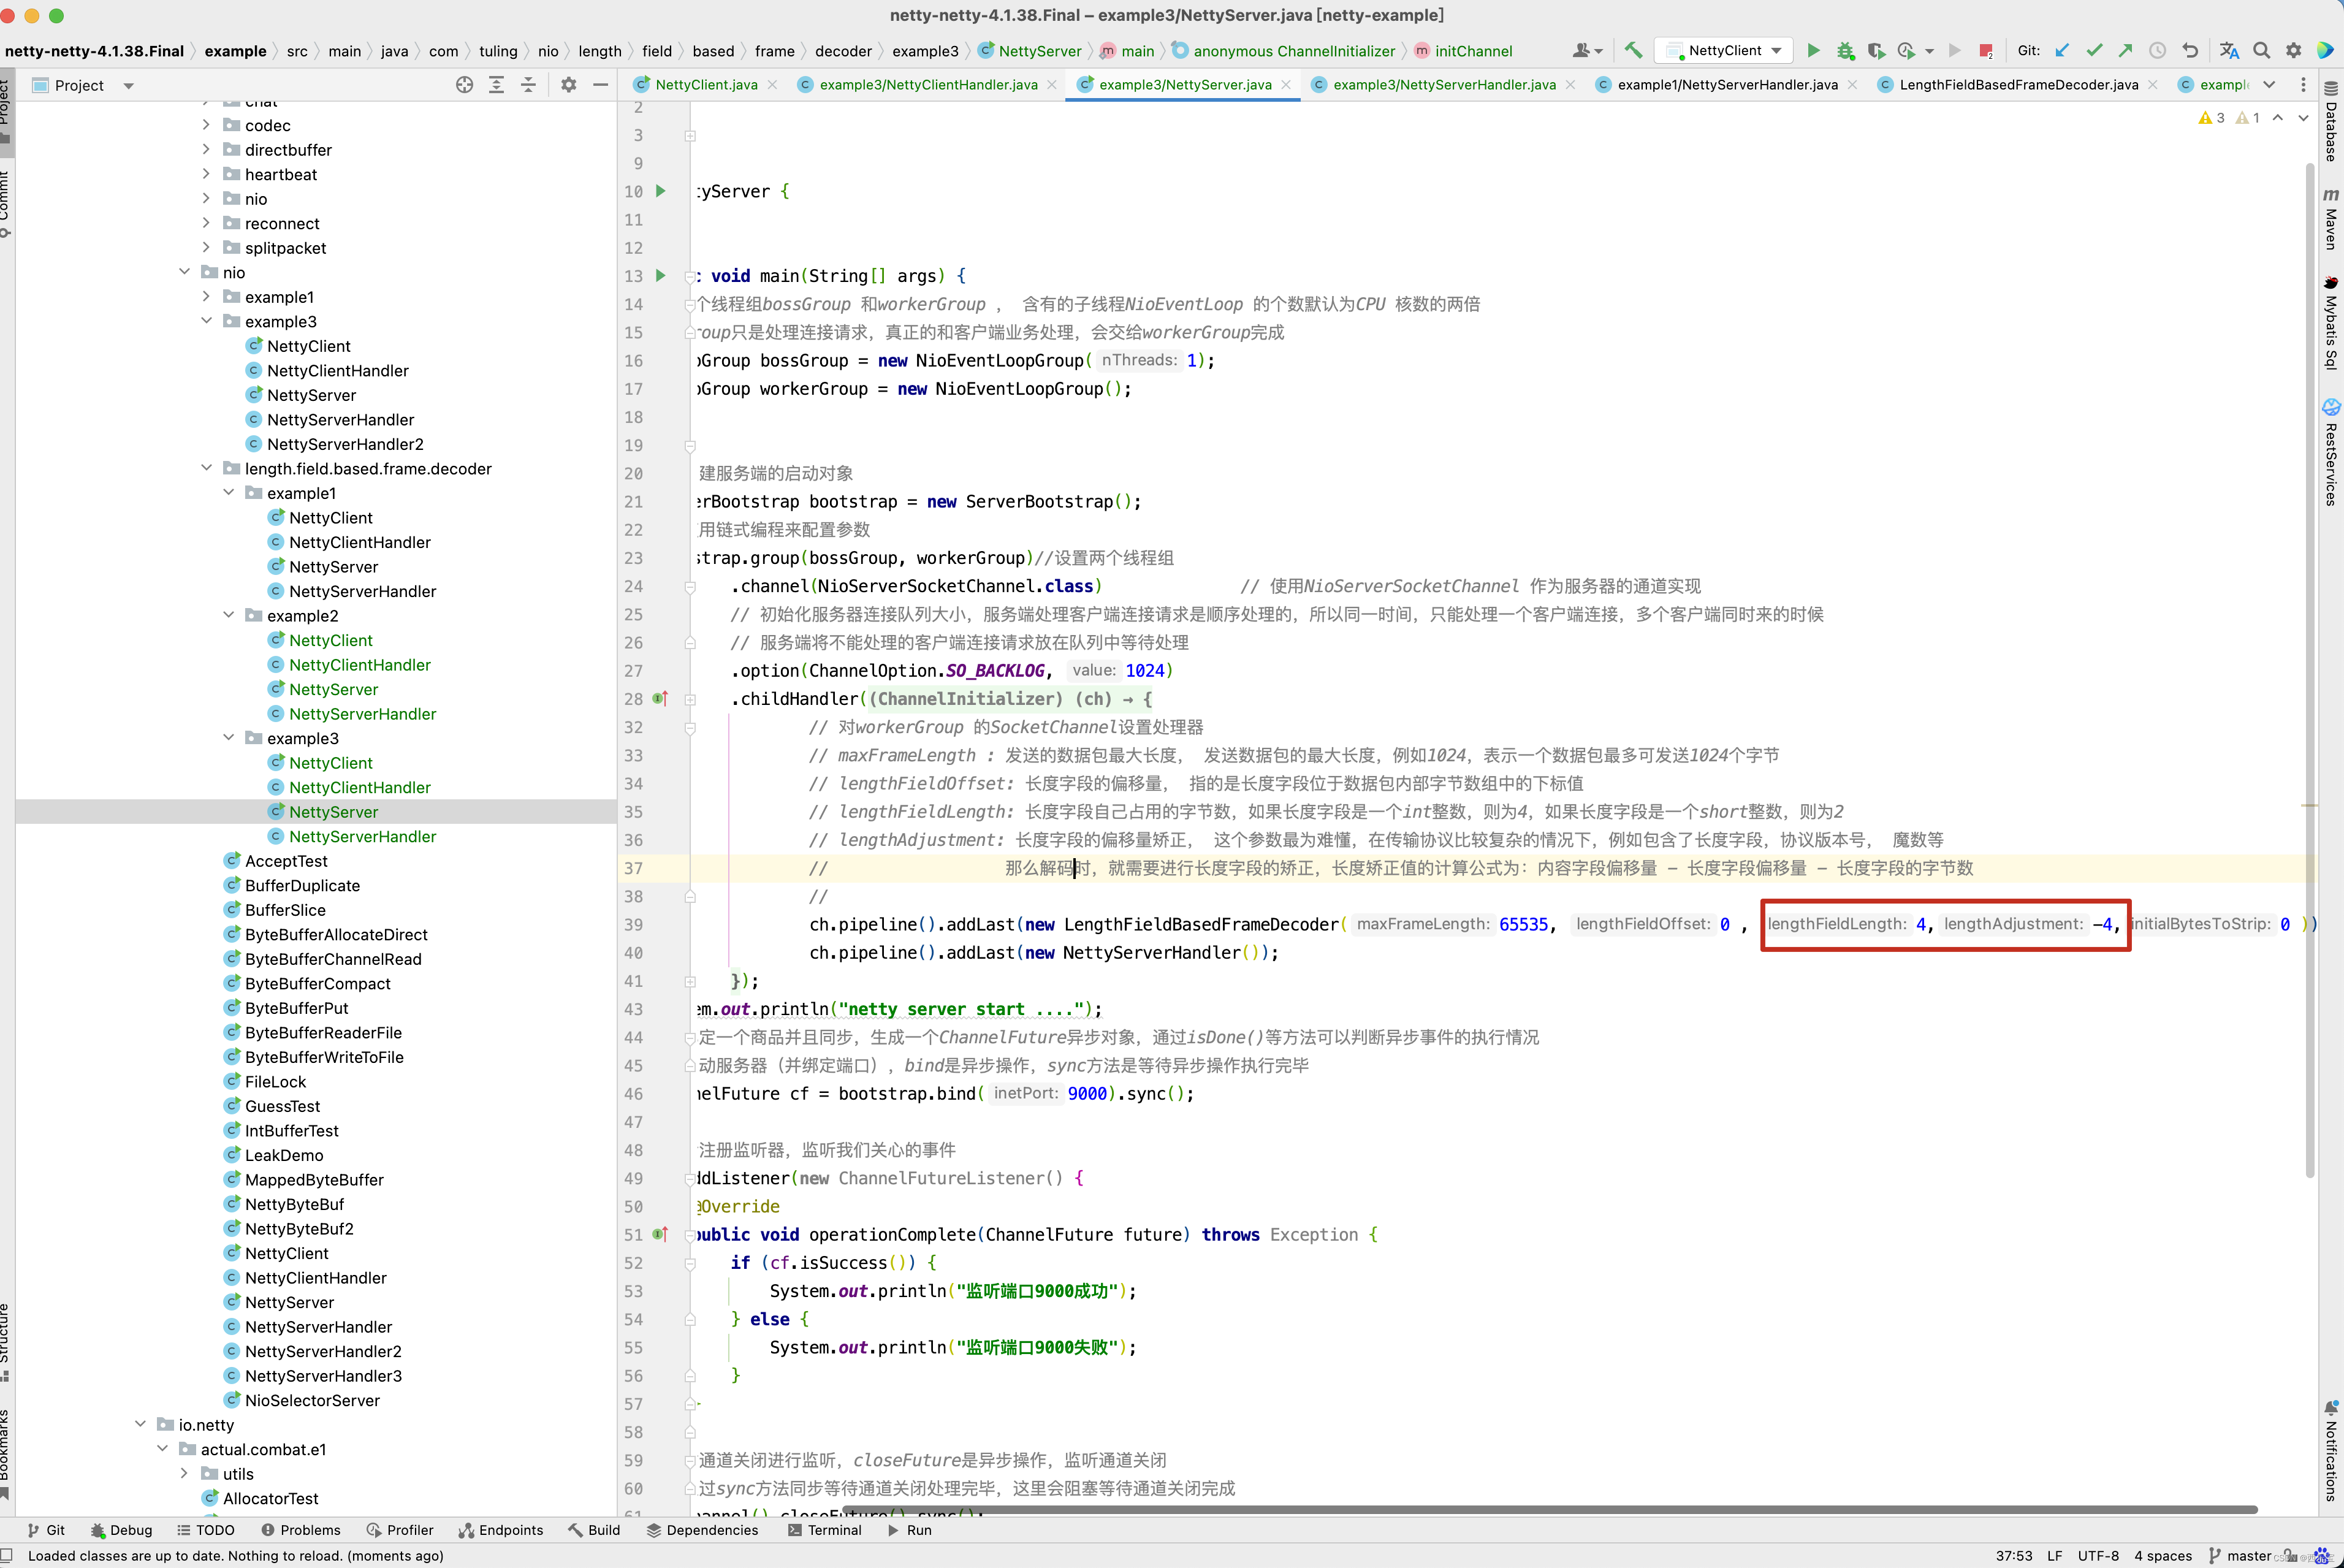
案例3
- lengthFieldOffset=0 长度字段从0开始
- lengthFieldLength=2 长度字段本身占2个字节
- lengthAdjustment= -2 需要调整 -2 字节
- initialBytesToStrip=0 解码后跳过2字节
整个包的长度为14个字节
| Length(长度) | Actual Content(真实数据) |
|---|---|
| 0x000E | HELLO, WORLD |
| 0x000E==14,该字段为2字节 | 数据总共12字节,长度字段指的是整个包的长度 |
这时lengthAdjustment起作用了, 因为长度字节的值包含了长度字段本身的2个字节,如果要获取数据的字节数, 需要加上lengthAdjustment的值,就是14 + (-2 ) = 12 ,这样才算出来数据的长度 。
解码后
| Length | Actual Content |
|---|---|
| 0x000E | HELLO, WORLD |

结果输出

案例4:
- lengthFieldOffset=2 长度字段从第2个字节开始
- lengthFieldLength=3 长度字段本身占3个字节
- lengthAdjustment=0 需要调整0字节
- initialBytesToStrip=0 解码后跳过0字节
整个包长度为17字节
| Header(头) | Length(长度) | Actual Content(真实数据) |
|---|---|---|
| OxCAFE | 0x00000C | HELLO, WORLD |
| 2个字节 | 0x00000C==12,该字段为3字节 | 数据总共12个字节, 长度字段指的是数据的长度 |
由于数据包最前面加了2个字节的Header, 所以lengthFieldOffset为2 , 说明长度字段是从第2个字节开始的,然后lengthFieldLength为3,说明长度字段本身占3个字节 。
解码后
| Header | Length | Actual Content |
|---|---|---|
| 0xCAFE | 0x000C | HELLO, WORLD |
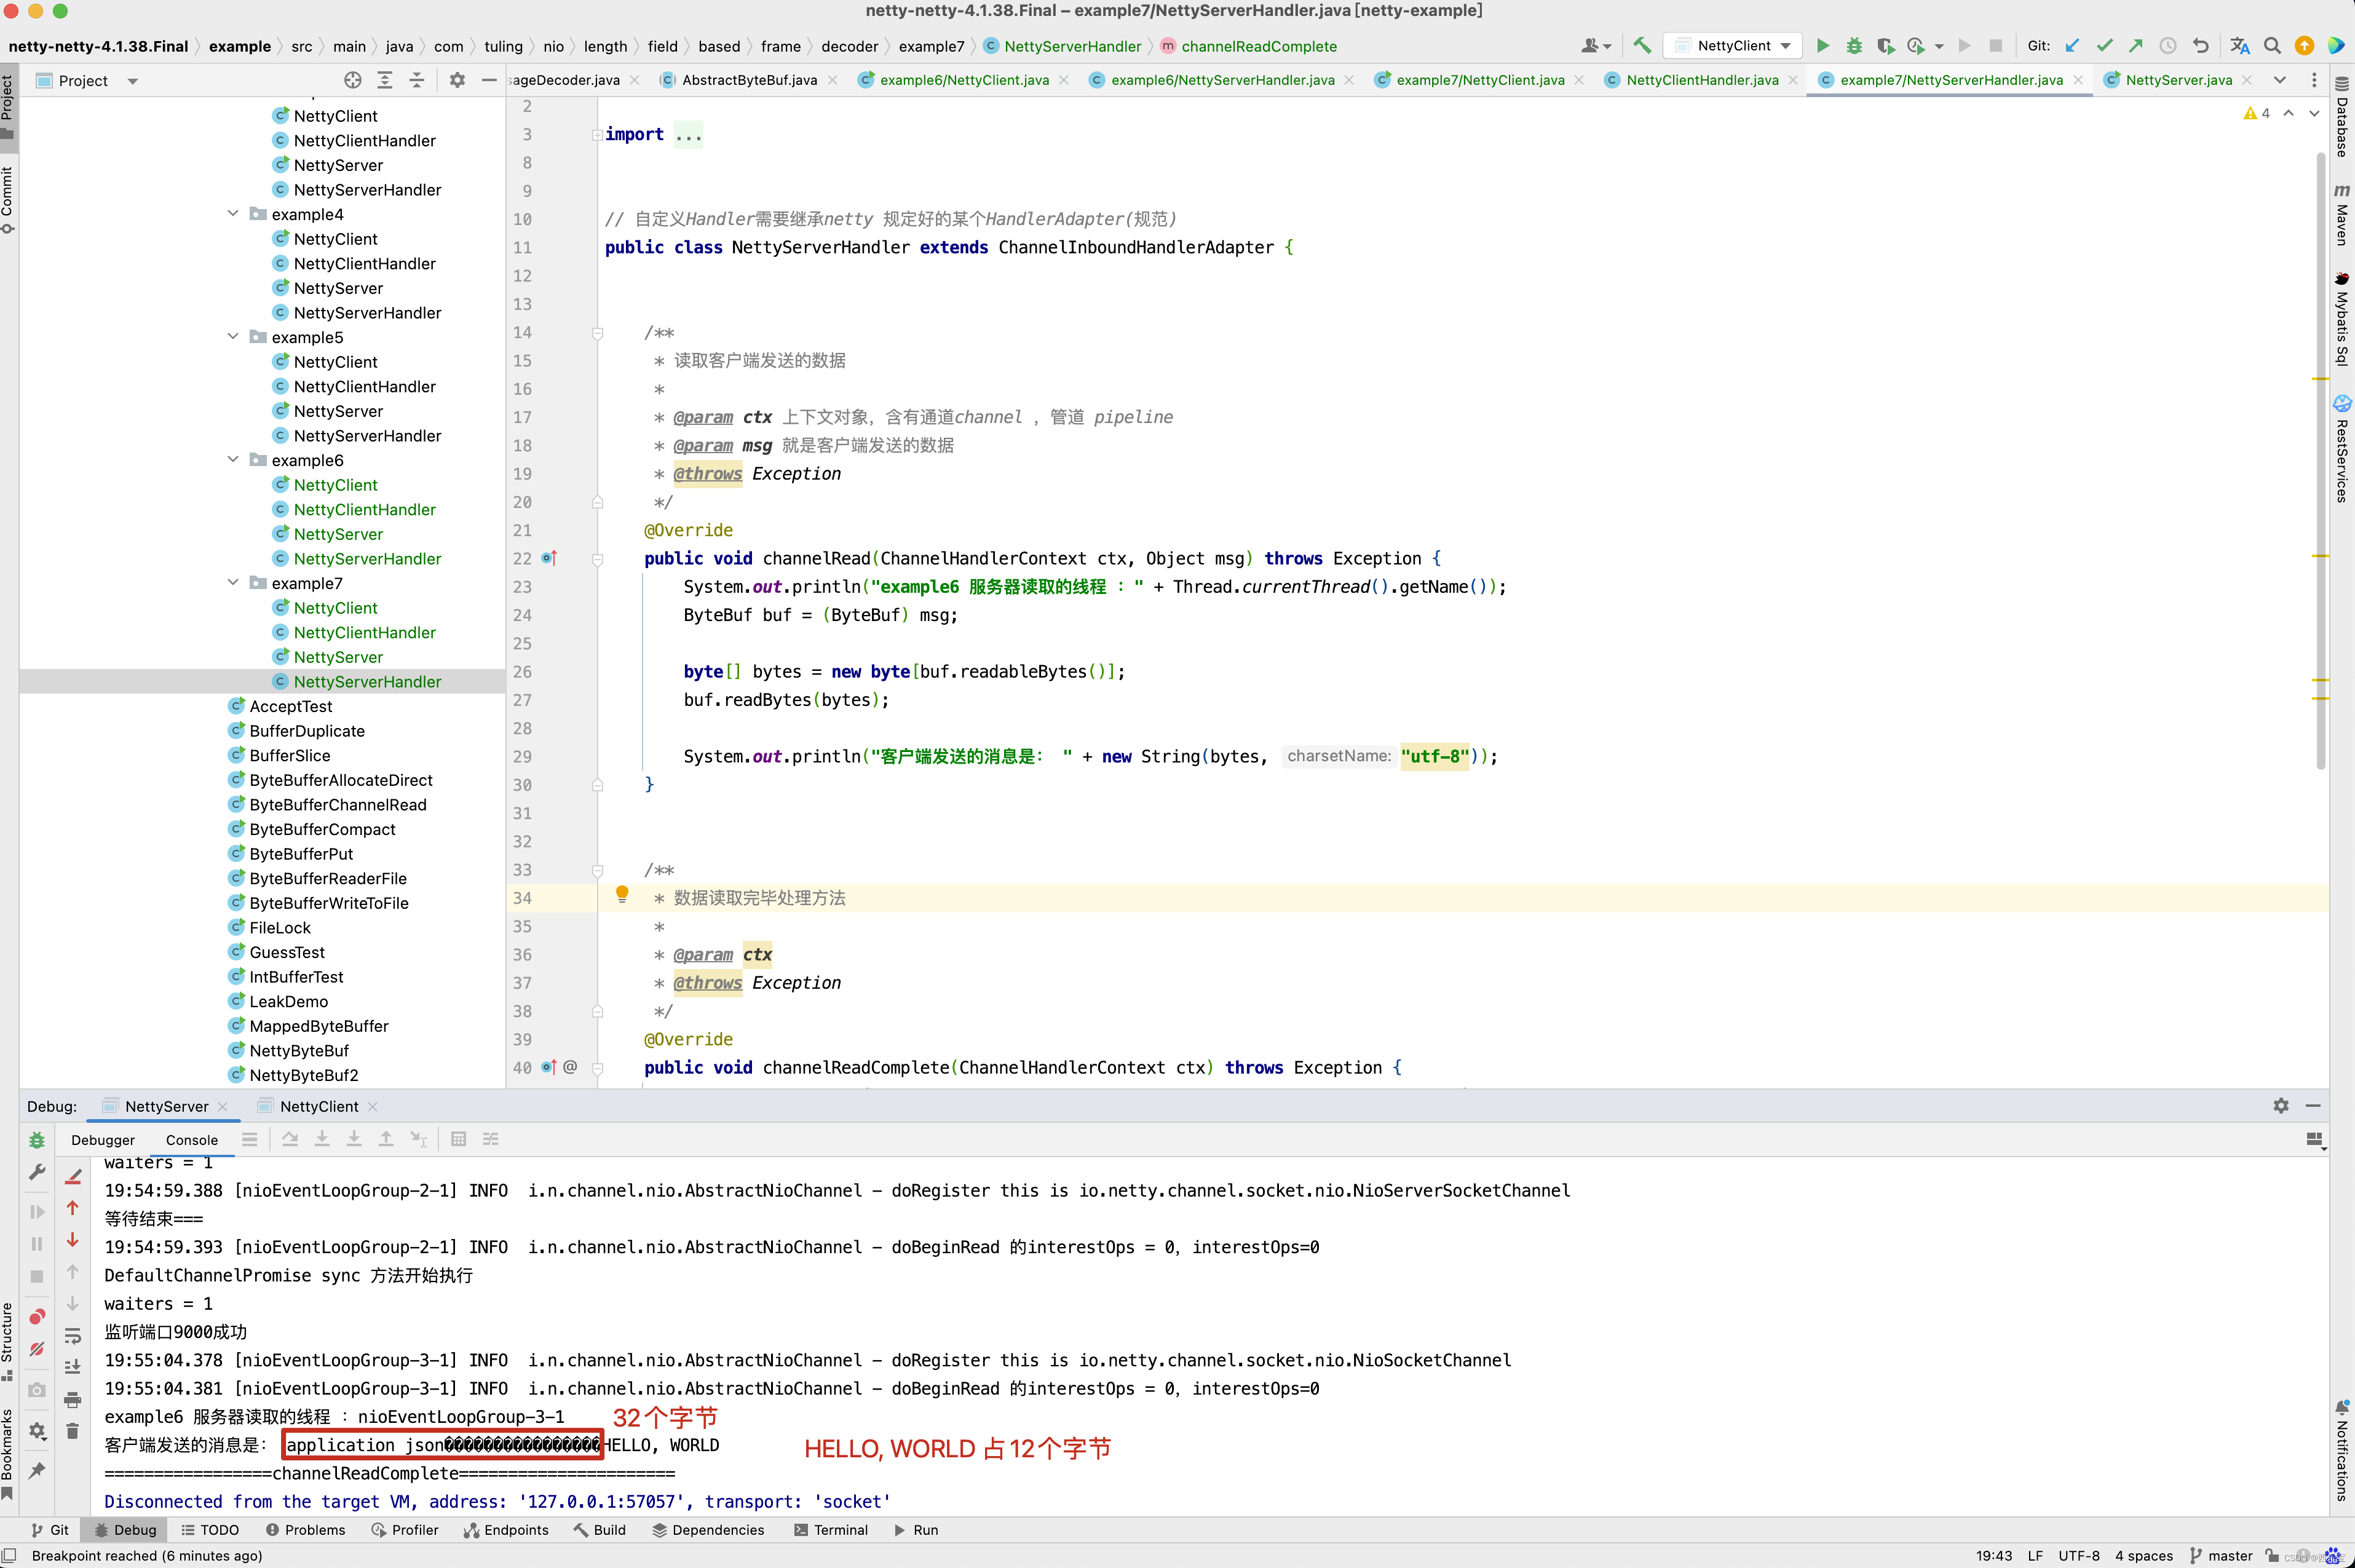
设置请求头为32个字节, Length 为4个字节 。
案例5
- lengthFieldOffset=0 长度字段从第0个字节开始
- lengthFieldLength=3 长度字段本身占3个字节
- lengthAdjustment=2 需要调整2字节
- initialBytesToStrip=0 解码后跳过0字节
整个包长度为17字节
| Length(长度) | Header(头) | Actual Content(真实的数据) |
|---|---|---|
| 0x00000C | OxCAFE | HELLO, WORLD |
| 0x00000C==12,该字段为3字节 | 2字节 | 数据总共12字节,长度字段指的是数据的长度 |
lengthFieldOffset为0 ,所以长度字段从0字节开始,lengthFieldLength为3,长度总共占3个字节,因为长度字段后面还剩余14个字节的总长度,但是长度字段的值为12,只表示了数据的长度,不包含头的长度,所以lengthAdjustment为2,就是12 + 2 = 14 ,计算出Header + Content的总长度 。
解码后
| Length(长度) | Header(头) | Actual Content(真实的数据) |
|---|---|---|
| 0x00000C | OxCAFE | HELLO, WORLD |

案例6:
- lengthFieldOffset=1 长度字段从第1个字节开始
- lengthFieldLength=2 长度字段本身占2个字节
- lengthAdjustment=1 需要调整1字节
- initialBytesToStrip=3 解码后跳过3字节
整个包的长度为16个字节
| Header(头) | Length(长度) | Header(头) | Actual Content(真实的数据) |
|---|---|---|---|
| oxCA | 0x000C | 0xFE | HELLO, WORLD |
| 1个字节 | 0x000C==12,该字段为2个字节 | 1个字节 | 数据总共12个字节,长度字段指的是数据的长度 |
这一次将Header分为两个1字节的部分,lengthFieldOffset为1表示长度从第1个字节开始,lenghFieldLength为2表示长度字段占2个字节,因为长度字段的值为12,只表示数据的长度,所以lenghAdjustment为1,12 + 1 = 13 ,表示Header 的第二部分加上数据总长度为13 , 因为initialBytesToStrip为3,所以解码后跳过前3个字节 。
解码后
| Header (头) | Actual Content(真实的数据) |
|---|---|
| 0xFE | HELLO, WORLD |

案例7:
- lengthFieldOffset=1 长度字段从第1个字节开始
- lengthFieldLength=2 长度字段本身占2个字节
- lengthAdjustment=-3 需要调整 -3 字节
- initialBytesToStrip=3 解码后跳过3字节
整个包的长度为16字节
| Header(头) | Length(长度) | Header(头) | Actual Content(真实的数据) |
|---|---|---|---|
| 0xCA | 0x0010 | 0xFE | HELLO, WORLD |
| 1字节 | 0x0010==16,该字段为2字节 | 1字节 | 数据总共12字节,长度字段指的是包的总长度 |
这一次长度字段的值为16 , 表示包的总长度 , 所以lengthAdjustment为 -3 , 16+ (-3)=13,表示Header的第二部分加数据部分的总长度为13字节。initialBytesToStrip为3,解码后跳过前3个字节。
解码后
| Header(头) | Actual Content ( 真实的数据) |
|---|---|
| 0xFE | HELLO, WORLD |

7 个案例,每一个案例都举了一个例子,如果还不懂,可以将源代码下载下来,自己打断点调试。 此时再来分析LengthFieldBasedFrameDecoder的源码就很简单了。 LengthFieldBasedFrameDecoder继承了ByteToMessageDecoder。
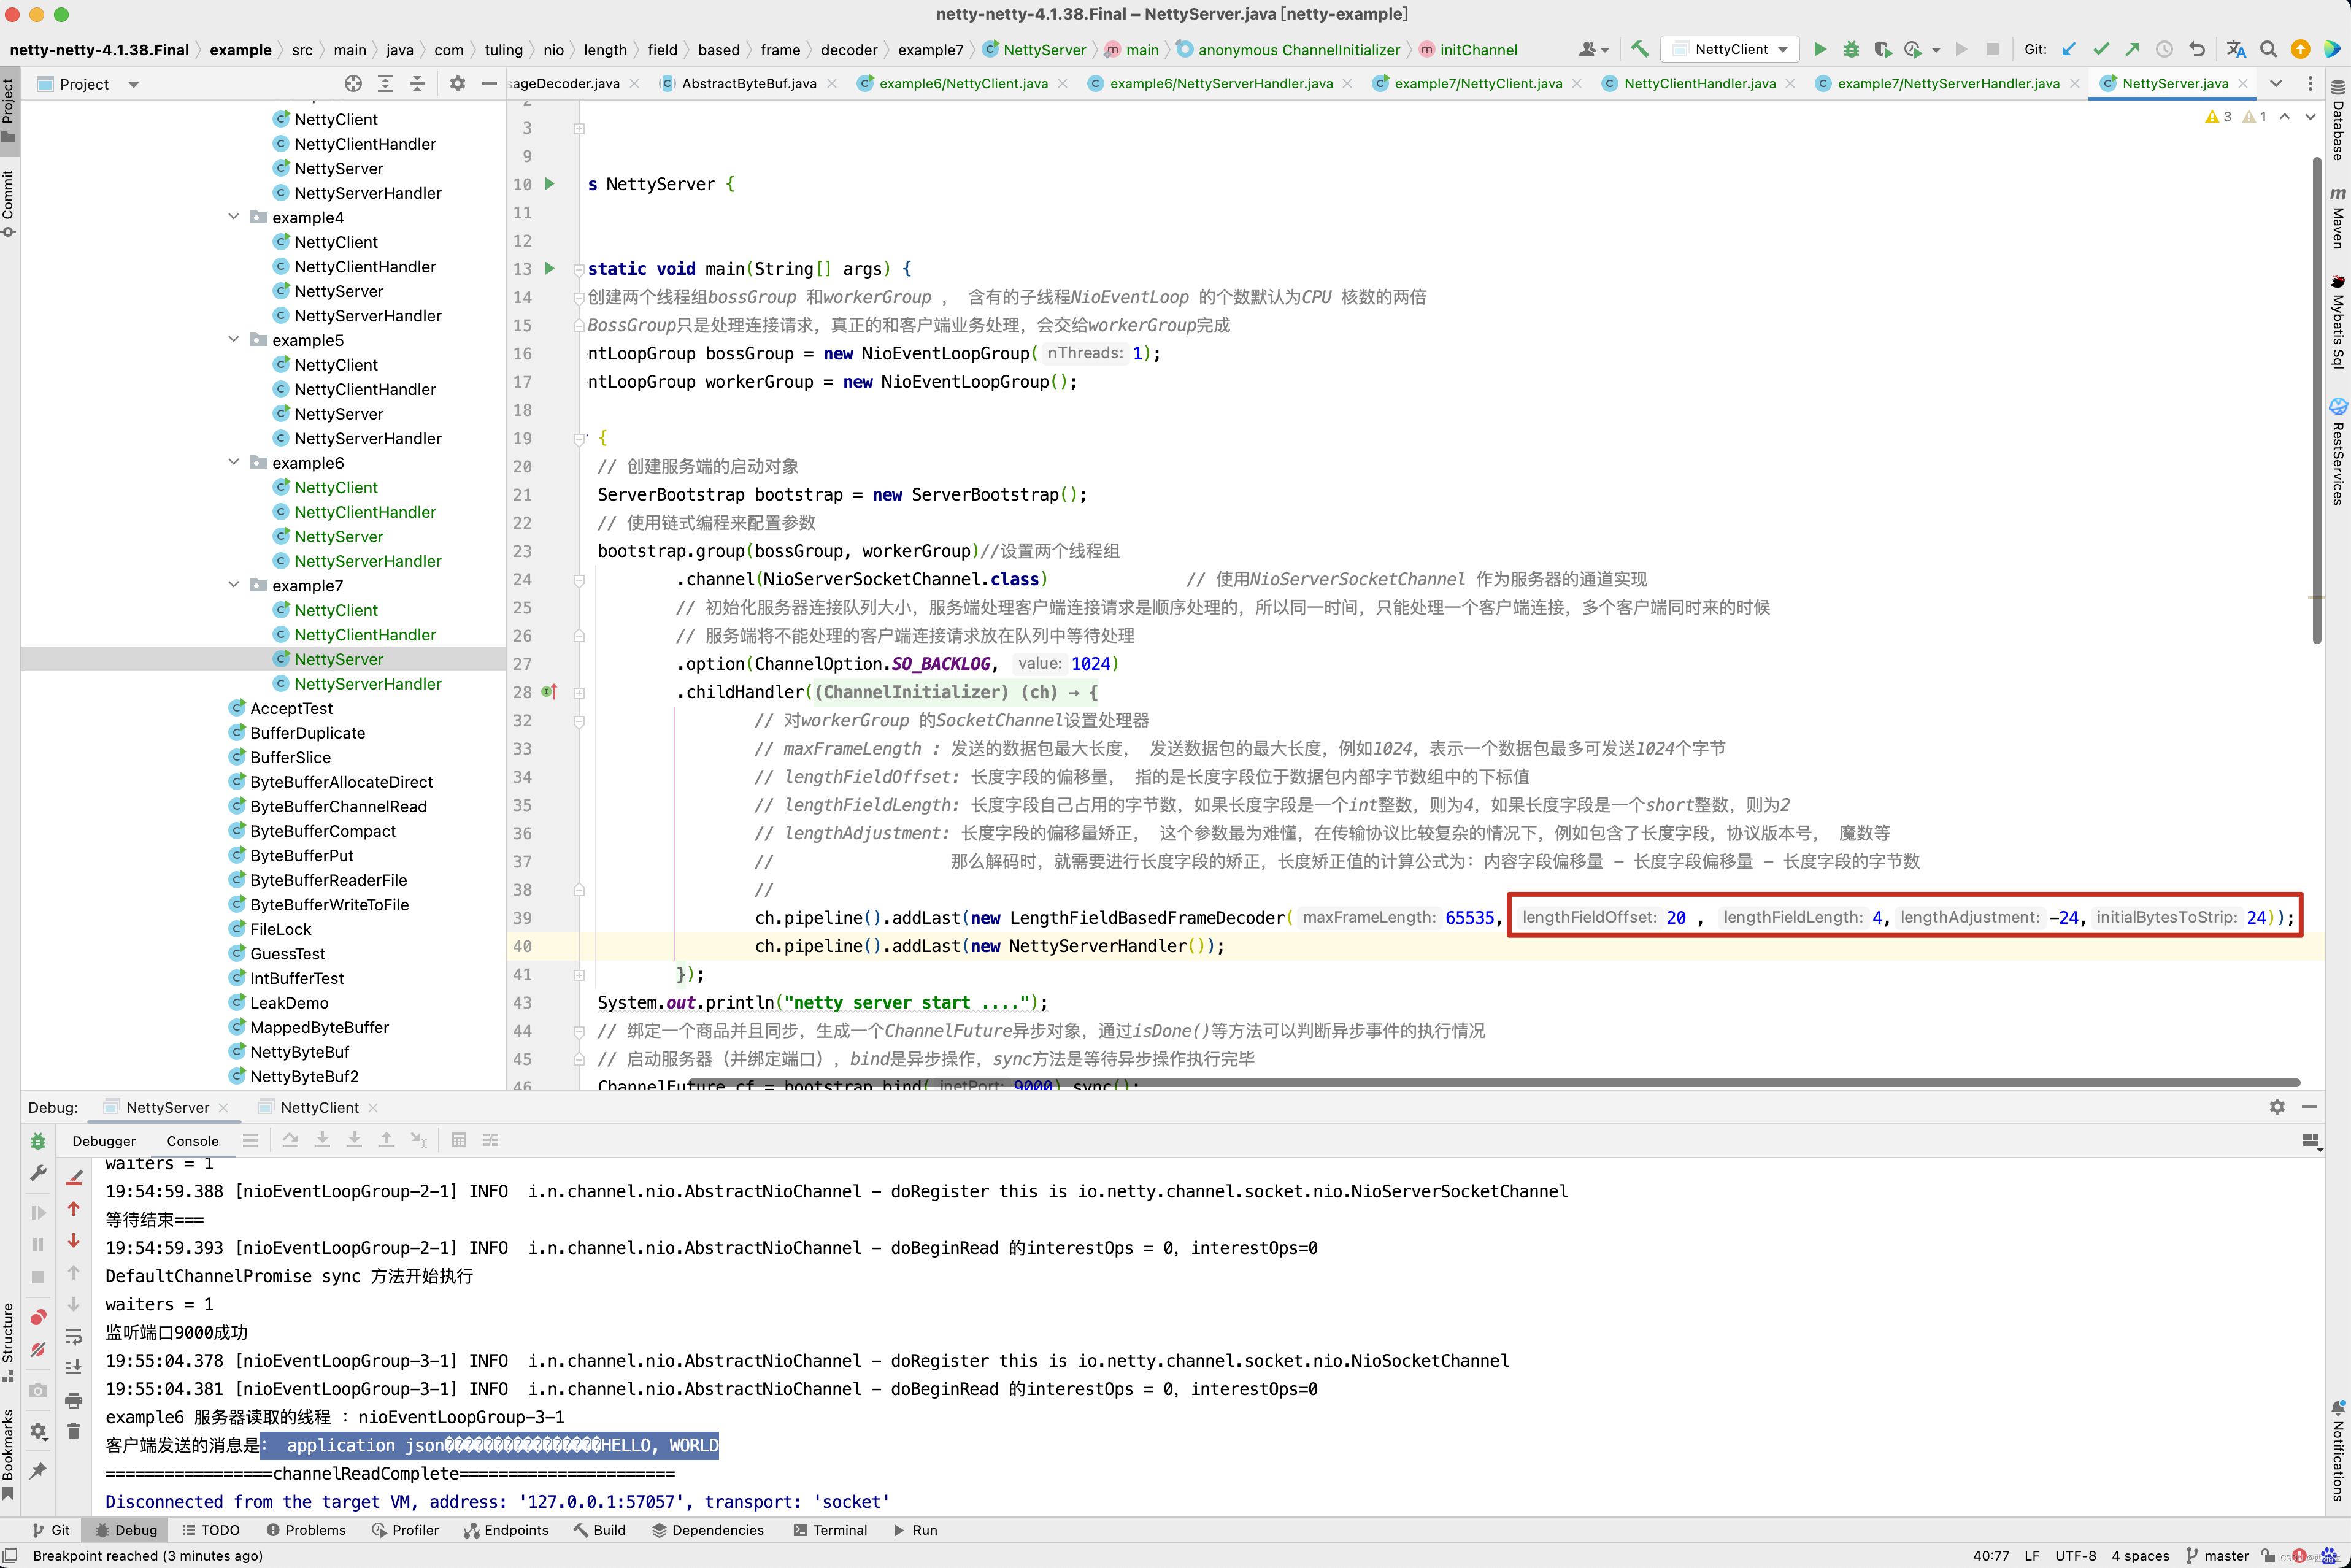
这一行代码ch.pipeline().addLast(new LengthFieldBasedFrameDecoder(65535, 20 , 4,-24,24)) 会将LengthFieldBasedFrameDecoder加入到流水线中。

因此会调用LengthFieldBasedFrameDecoder的channelRead()方法 。
public void channelRead(ChannelHandlerContext ctx, Object msg) throws Exception {// 1. channelRead()方法首先会判断msg是否为ByteBuf类型,只 有在是的情况下才会进行解码。这也是为什么将StringDecoder等// MessageToMessageCodec解码器放在ByteToMessageDecoder子类解码器 后面的原因,这时的msg一般是堆外直接内存DirectByteBuf,// 因为采 用堆外直接内存在传输时可以少一次复制。然后判断是否为第一次解 码,若是,则直接把msg赋值给cumulation(cumulation是读半包字节// 容器);若不是,则需要把msg写入cumulation中,写入之前要判断是 否需要扩容。if (msg instanceof ByteBuf) {// 解码后消息列表CodecOutputList out = CodecOutputList.newInstance();try {ByteBuf data = (ByteBuf) msg;// 是否为第一次解码first = cumulation == null;if (first) {// 在第一次解码时需要把data(data是msg的类型强转)赋给字节容器即可cumulation = data;} else {// 若不是第一次解码,则需要把msg 写入到cumulation中,写入前需要判断是否需要扩容cumulation = cumulator.cumulate(ctx.alloc(), cumulation, data);}// 从cumulation字节中解码出消息// 2. 把新读取到的数据写入cumulation后,调用callDecode()方 法。在callDecode()方法中会不断地调用子类的decode()方法,// 直到 当前cumulation无法继续解码。无法继续解码分两种情况:第一种情 况是无可读字节;第二种情况是经历过decode()方法后,可读字节数 没有任何变化。callDecode(ctx, cumulation, out);} catch (DecoderException e) {throw e;} catch (Exception e) {throw new DecoderException(e);} finally {// 3. 执行完callDecode()方法后,进入finally代码块进行收尾 工作。若cumulation不为空,且不可读时,需要把cumulation释放掉// 并赋空值,若连续16次(discardAfterReads的默认值)字节容器 cumulation中仍然有未被业务拆包器读取的数据,则需要进行一次压缩:// 将有效数据段整体移到容器首部,同时用一个成员变量 firedChannelRead来标识本次读取数据是否拆到了一个业务数据包,// 并触发fireChannelRead事件,将拆到的业务数据包传递给后续的 Handler,最后把out放回对象池中。// 当字节容器不为空且不可读时,需要释放,并置空,直接回收,将下次解码认为是第一次if (cumulation != null && !cumulation.isReadable()) {numReads = 0;cumulation.release();cumulation = null;} else if (++ numReads >= discardAfterReads) {// We did enough reads already try to discard some bytes so we not risk to see a OOME.// See https://github.com/netty/netty/issues/4275// 如果读取的字节数大于或等于discardAfterReads,则设置读取字节数为0 , 并移除字节容器中的一部分读取的字节numReads = 0;discardSomeReadBytes();}int size = out.size();// firedChannelRead 属性在channelReadComplete()方法中被调用firedChannelRead |= out.insertSinceRecycled();// 遍历解码消息集合,转发消息到下一个Handler 处理器中fireChannelRead(ctx, out, size);// 回收解码消息集合,以便下次循环利用out.recycle();}} else {ctx.fireChannelRead(msg);}
}
在上述channelRead()方法中,我们需要注意的是cumulation = cumulator.cumulate(ctx.alloc(), cumulation, data) 这一行代码,那什么时候会进入到这一行代码中去呢? 我们回顾之前的例子。 之前是不是写过这样一个例子,来解决第一次发送 ByteBuf数据长度大于1024个字节时中文乱码问题不?
之前知道,在NioSocketChannel的read()方法中,第一次读取数据时,默认情况下初始化ByteBuf的容量为1024,当客户端发送的数据大于1024时,此时就会分两次读取,在我们的例子中,第二次读取就会走cumulator.cumulate(ctx.alloc(), cumulation, data) 这一行代码 。

cumulator的默认值为MERGE_CUMULATOR,接下来进入cumulate()方法。
public static final Cumulator MERGE_CUMULATOR = new Cumulator() {@Overridepublic ByteBuf cumulate(ByteBufAllocator alloc, ByteBuf cumulation, ByteBuf in) {try {final ByteBuf buffer;// 判断是否需要扩容 , 其逻辑与组合缓冲区类似if (cumulation.writerIndex() > cumulation.maxCapacity() - in.readableBytes()|| cumulation.refCnt() > 1 || cumulation.isReadOnly()) {// Expand cumulation (by replace it) when either there is not more room in the buffer// or if the refCnt is greater then 1 which may happen when the user use slice().retain() or// duplicate().retain() or if its read-only.//// See:// - https://github.com/netty/netty/issues/2327// - https://github.com/netty/netty/issues/1764buffer = expandCumulation(alloc, cumulation, in.readableBytes());} else {buffer = cumulation;}// 把需要解码的字节写入读半包字节容器中buffer.writeBytes(in);return buffer;} finally {// We must release in in all cases as otherwise it may produce a leak if writeBytes(...) throw// for whatever release (for example because of OutOfMemoryError)// 非组合缓冲区,需要释放bufin.release();}}
};
cumulate()方法的主要目的就是合并ByteBuf,为什么呢? 就以本例子为分析对象。 在第一次从Channel中读取1024个字节时。

会调用LengthFieldBasedFrameDecoder的decode()方法,而ByteBuf中可读字节数只有1024,而在NettyClientHandler的channelActive()中,我们写入到Buf中的数据为一个int数4个字节 + 1030 实际内容 ,总共为1034个字节,因此达不到读取条件,因此会将ByteBuf存储在cumulation,当第二次从Channel中读取数据时,此时会将上一次未读取的ByteBuf合并到本次读取的ByteBuf中,而cumulate()方法就是做这件事情 ,接下来进入callDecode()方法 。
protected void callDecode(ChannelHandlerContext ctx, ByteBuf in, List<Object> out) {try {// 循环解码while (in.isReadable()) {int outSize = out.size();// 判断是否已经有可用的消息if (outSize > 0) {// 触发下一个Handler 去处理这些解码出来的消息fireChannelRead(ctx, out, outSize);out.clear();// Check if this handler was removed before continuing with decoding.// If it was removed, it is not safe to continue to operate on the buffer.//// See:// - https://github.com/netty/netty/issues/4635// 检测Handler是否被从通道处理器上下文移除了,若被移除了,则不能继续操作if (ctx.isRemoved()) {break;}outSize = 0;}// 获取字节容器的可读字节数int oldInputLength = in.readableBytes();// 解码字节buf中的数据为消息对象,并将其放入out 中,如果解码器被从通道处理器上下文移除了,则处理移除事件decodeRemovalReentryProtection(ctx, in, out);// Check if this handler was removed before continuing the loop.// If it was removed, it is not safe to continue to operate on the buffer.//// See https://github.com/netty/netty/issues/1664if (ctx.isRemoved()) {break;}if (outSize == out.size()) {// 如果可读字节数无变化,则说明解码失败,无须继续解码if (oldInputLength == in.readableBytes()) {break;} else {continue;}}// 异常if (oldInputLength == in.readableBytes()) {throw new DecoderException(StringUtil.simpleClassName(getClass()) +".decode() did not read anything but decoded a message.");}// 是否只能解码一次if (isSingleDecode()) {break;}}} catch (DecoderException e) {throw e;} catch (Exception cause) {throw new DecoderException(cause);}
}
如果decodeRemovalReentryProtection()方法前后可读取字节数没有变化,则说明解码失败,直接退出循环。 那decodeRemovalReentryProtection()方法做了哪些事情呢?
final void decodeRemovalReentryProtection(ChannelHandlerContext ctx, ByteBuf in, List<Object> out)throws Exception {decodeState = STATE_CALLING_CHILD_DECODE;try {// 由子类完成decode(ctx, in, out);} finally {// Channel 的处理器是否正在移除boolean removePending = decodeState == STATE_HANDLER_REMOVED_PENDING;decodeState = STATE_INIT;if (removePending) {// 处理Handler 从通道处理器移除事件handlerRemoved(ctx);}}
}
我们以LengthFieldBasedFrameDecoder为例子,分析decode()方法 。
protected final void decode(ChannelHandlerContext ctx, ByteBuf in, List<Object> out) throws Exception {Object decoded = decode(ctx, in);if (decoded != null) {out.add(decoded);}
}protected Object decode(ChannelHandlerContext ctx, ByteBuf in) throws Exception {if (discardingTooLongFrame) {// 丢弃模式discardingTooLongFrame(in);}// 判断缓冲区中可读的字节数是否小于长度字节的偏移量if (in.readableBytes() < lengthFieldEndOffset) {// 说明长度字段的包都还不完整, 半包return null;}// 执行到这里,说明可以解析出长度字段的值了 。// 计算出长度字节开始的偏移量int actualLengthFieldOffset = in.readerIndex() + lengthFieldOffset;// 获取长度字段的值, 不包括lengthAdjustment的调整值long frameLength = getUnadjustedFrameLength(in, actualLengthFieldOffset, lengthFieldLength, byteOrder);// 如果数据帧长度小于0 , 说明是错误的数据包if (frameLength < 0) {// 内部会跳过这个数据包的字节数, 并抛出异常failOnNegativeLengthField(in, frameLength, lengthFieldEndOffset);}// 套用前面的公式,长度字段后的数据字节数  = 长度字段的值 + lengthAdjustment// frameLength就是长度字段的值, 加上 lengthAdjustment等于长度字段后的数据字节数// lengthFieldEndOffset为lengthFieldOffset+lengthFieldLength// 那说明最后计算出的frameLength就是整个数据包的长度frameLength += lengthAdjustment + lengthFieldEndOffset;// 判断是否为错误的数据包if (frameLength < lengthFieldEndOffset) {failOnFrameLengthLessThanLengthFieldEndOffset(in, frameLength, lengthFieldEndOffset);}// 整个数据包的长度是否大于最大帧长度// 丢弃模式就是在这里开启的// 如果数据包长度大于最大长度if (frameLength > maxFrameLength) {// 丢弃超出的部分,丢弃模式 。 对超出部分进行处理exceededFrameLength(in, frameLength);return null;}// never overflows because it's less than maxFrameLength// 执行到这里说明是正常模式// 数据包的大小int frameLengthInt = (int) frameLength;/// 判断缓冲区可读字节数是否小于数据包的字节数if (in.readableBytes() < frameLengthInt) {// 半包,等于再来解析return null;}// 执行到这里说明缓冲区数据已经包含了数据包// 跳过的字节数是否大于数据包的长度if (initialBytesToStrip > frameLengthInt) {failOnFrameLengthLessThanInitialBytesToStrip(in, frameLength, initialBytesToStrip);}// 跳过的字节数是否大于数据包的长度in.skipBytes(initialBytesToStrip);// extract frame// 解码// 获取当前可读下标int readerIndex = in.readerIndex();// 获取跳过后的真实数据长度int actualFrameLength = frameLengthInt - initialBytesToStrip;// 更新一下可读下标ByteBuf frame = extractFrame(ctx, in, readerIndex, actualFrameLength);// 返回数据in.readerIndex(readerIndex + actualFrameLength);return frame;
}private void discardingTooLongFrame(ByteBuf in) {// 保存还需要丢弃多少字节long bytesToDiscard = this.bytesToDiscard;// 获取当前可以丢弃的字节数, 有可能出现半包情况int localBytesToDiscard = (int) Math.min(bytesToDiscard, in.readableBytes()); // 丢弃in.skipBytes(localBytesToDiscard);// 更新还需要丢弃的字节数bytesToDiscard -= localBytesToDiscard;this.bytesToDiscard = bytesToDiscard;// 是否需要快速失败,回到上面的逻辑failIfNecessary(false);
}/* Decodes the specified region of the buffer into an unadjusted frame length.  The default implementation is* capable of decoding the specified region into an unsigned 8/16/24/32/64 bit integer.  Override this method to* decode the length field encoded differently.  Note that this method must not modify the state of the specified* buffer (e.g. {@code readerIndex}, {@code writerIndex}, and the content of the buffer.) @throws DecoderException if failed to decode the specified region* 解析长度字段的值* offset : 长度字段开始的偏移量* length : 长度字节的字节数*/
protected long getUnadjustedFrameLength(ByteBuf buf, int offset, int length, ByteOrder order) {// 大小端排序buf = buf.order(order);// 长度字段的值long frameLength;// 根据长度字段的字节数,获取长度字段的值switch (length) {case 1:// byteframeLength = buf.getUnsignedByte(offset);break;case 2:// shortframeLength = buf.getUnsignedShort(offset);break;case 3:// int 占32位,这里取出后24位,返回int类型frameLength = buf.getUnsignedMedium(offset);break;case 4:// intframeLength = buf.getUnsignedInt(offset);break;case 8:// longframeLength = buf.getLong(offset);break;default:throw new DecoderException("unsupported lengthFieldLength: " + lengthFieldLength + " (expected: 1, 2, 3, 4, or 8)");}// 返回长度字段的值return frameLength;
}// frameLength :数据包的长度
private void exceededFrameLength(ByteBuf in, long frameLength) {// 数据包长度-可读字节数 两种模式// 1.数据包总长度为100,可读字节数为50 , 说明还剩下50个字节需要丢弃但还未接收到// 2.数据包总长度为100,可读的字节数为150,说明缓冲区已经包含了整个数据包long discard = frameLength - in.readableBytes();// 记录一下最大的数据包的长度tooLongFrameLength = frameLength;if (discard < 0) {// buffer contains more bytes then the frameLength so we can discard all now// 说明是第二种情况,直接丢弃当前数据包in.skipBytes((int) frameLength);} else {// 说明是第一种情况,还有部分数据未接收到。// Enter the discard mode and discard everything received so far.// 开启丢弃模式discardingTooLongFrame = true;// 记录下次还需要丢弃多少字节bytesToDiscard = discard;// 丢弃缓冲区所有的数据in.skipBytes(in.readableBytes());} // 跟进去failIfNecessary(true);
}// 程序最终会执行fail()方法并抛出TooLongFrameException异常
private void fail(long frameLength) {// 丢弃完成或未完成都抛出异常if (frameLength > 0) {throw new TooLongFrameException("Adjusted frame length exceeds " + maxFrameLength +": " + frameLength + " - discarded");} else {throw new TooLongFrameException("Adjusted frame length exceeds " + maxFrameLength +" - discarding");}
}// 获取真实的数据
// index : 可读的下标
// length : 要读取的长度
protected ByteBuf extractFrame(ChannelHandlerContext ctx, ByteBuf buffer, int index, int length) {return buffer.retainedSlice(index, length);
}private void failIfNecessary(boolean firstDetectionOfTooLongFrame) {if (bytesToDiscard == 0) {// Reset to the initial state and tell the handlers that// the frame was too large.// 说明需要丢弃的数据已经丢弃完成// 保存一下被丢弃的数据包的长度long tooLongFrameLength = this.tooLongFrameLength;this.tooLongFrameLength = 0;// 关闭丢弃模式discardingTooLongFrame = false;// failFast : 默认为true// firstDetectionOfTooLongFrame : 传入trueif (!failFast || firstDetectionOfTooLongFrame) {// 快速失败fail(tooLongFrameLength);}} else {// 说明还未丢弃完成// Keep discarding and notify handlers if necessary.if (failFast && firstDetectionOfTooLongFrame) {// 快速失败fail(tooLongFrameLength);}}
}
在整个分析过程中,我们着重注意LengthFieldBasedFrameDecoder的decode()方法 。

如果本次解析得到的对象不为空,则表明解析成功,将对象添加到out集合中。 而在LengthFieldBasedFrameDecoder的父类ByteToMessageDecoder的channelRead()的finally代码块中,有一个fireChannelRead()方法。
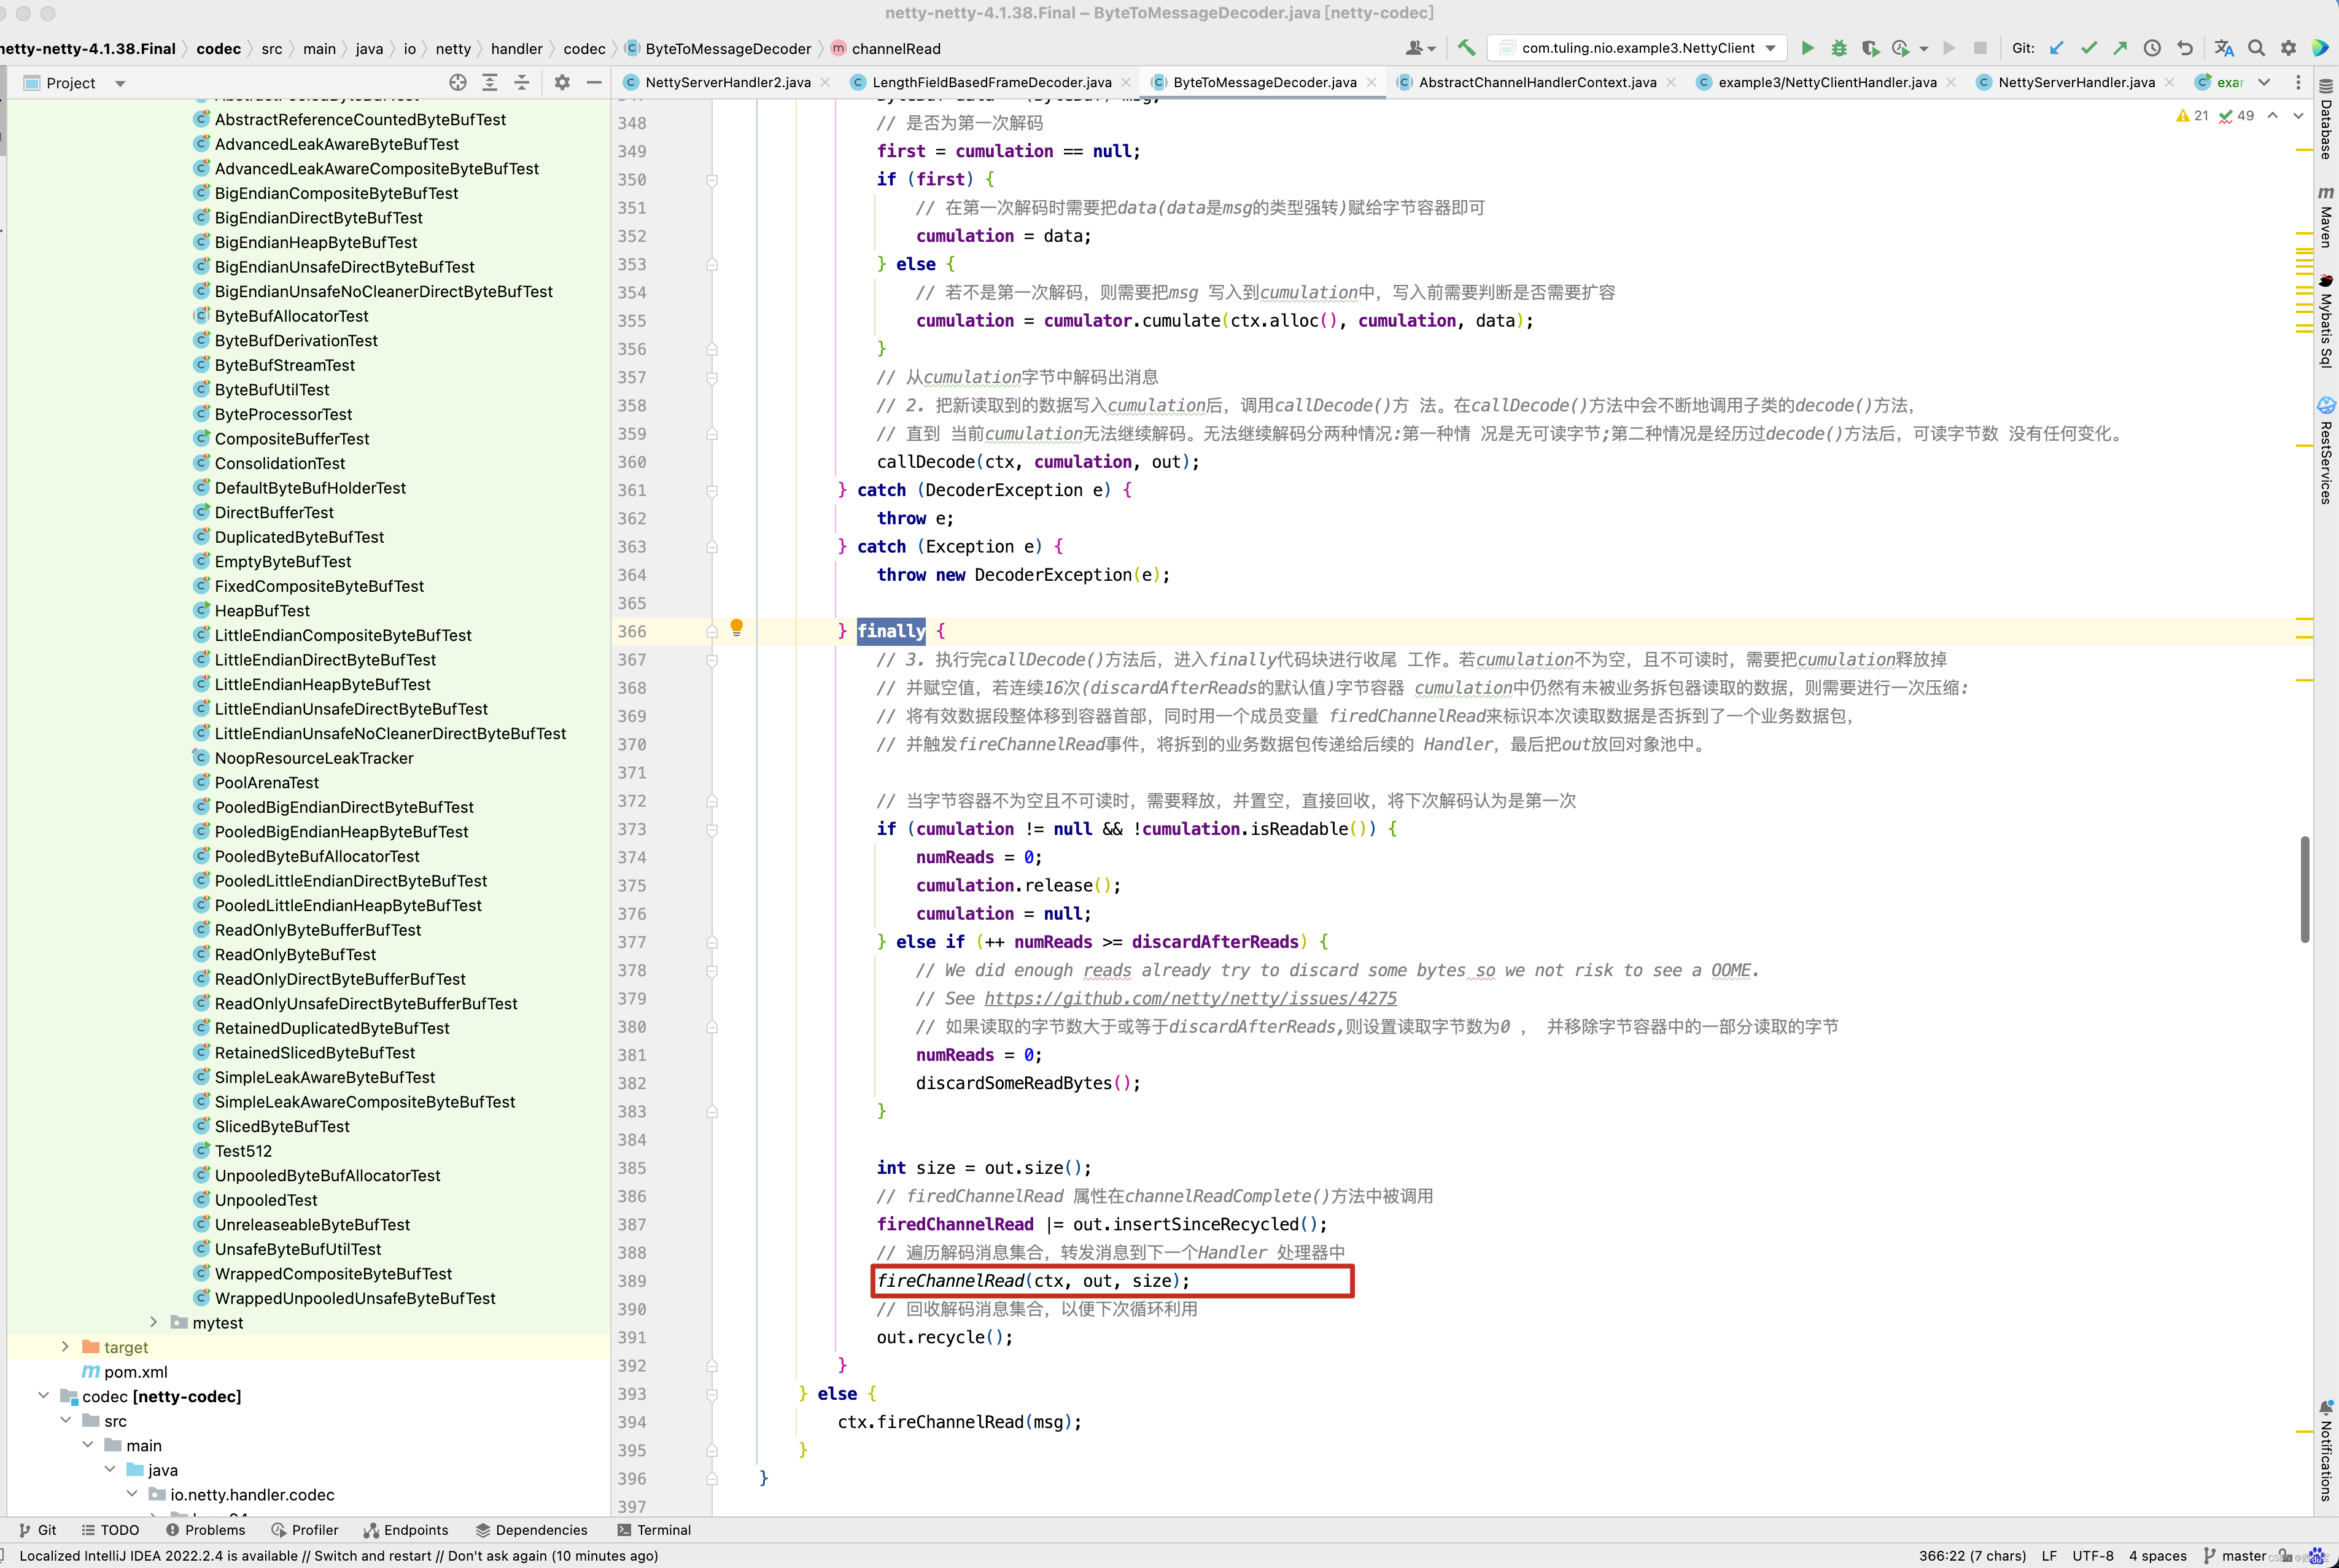
这个方法会遍历所有的out集合中的对象,并传递给一下个Handler。并调用下一个Handler的channelRead()方法 。
static void fireChannelRead(ChannelHandlerContext ctx, CodecOutputList msgs, int numElements) {for (int i = 0; i < numElements; i ++) {ctx.fireChannelRead(msgs.getUnsafe(i));}
}
程序执行到这里,我们应该对LengthFieldBasedFrameDecoder的源码有一定的了解,对于解决之前乱码问题的原理也知道了,在这里总节一下,当第一次从Channel中读取到1024个字节到ByteBuf中,先将这个ByteBuf缓存在LengthFieldBasedFrameDecoder的cumulation字段中,再通过decode()方法进行解码,解码前先读取4个字节,注意这里调用的是getUnsignedInt()方法,不存在读索引的移动,而4个字节的内容长度为1030,而本次发送的内容总长度为1030 + 4(头部int占4个字节) = 1034个字节,而ByteBuf中总共只有1024个字节,因此本次解析失败,等待下一次从Channel中读取ByteBuf ,当第二次从Channel中读取字节时,此时ButeBuf中有10个字节,先调用cumulator.cumulate(ctx.alloc(), cumulation, data)方法将本次读取的字节和上一次读取的字节合并,再调用LengthFieldBasedFrameDecoder的decode进行解码,解码时,发现合并后的ByteBuf中有1034个字节,已经达到解析条件,因此调用buffer.retainedSlice(index, length) 方法,返回读取的ByteBuf并添加到out中,在ByteToMessageDecoder的channelRead()方法中的finally中,调用fireChannelRead(ctx, out, size)方法,将新组装的ByteBuf传递到一下个Handler中。 当然,到这里,我们已经对 RecvByteBufAllocator内存分配计算 这篇博客的第三种方案的原理已经做了详细的解析。关于LengthFieldBasedFrameDecoder这一块的源码解析也告一段落 。
DelimiterBasedFrameDecoder源码解析
先来看一个例子。
最终打印数据如下:

自定义分隔符解码器DelimiterBasedFrameDecoder也是实现了ByteToMessageDecoder,他的源码和LengthFieldBasedFrameDecoder非常类似 。
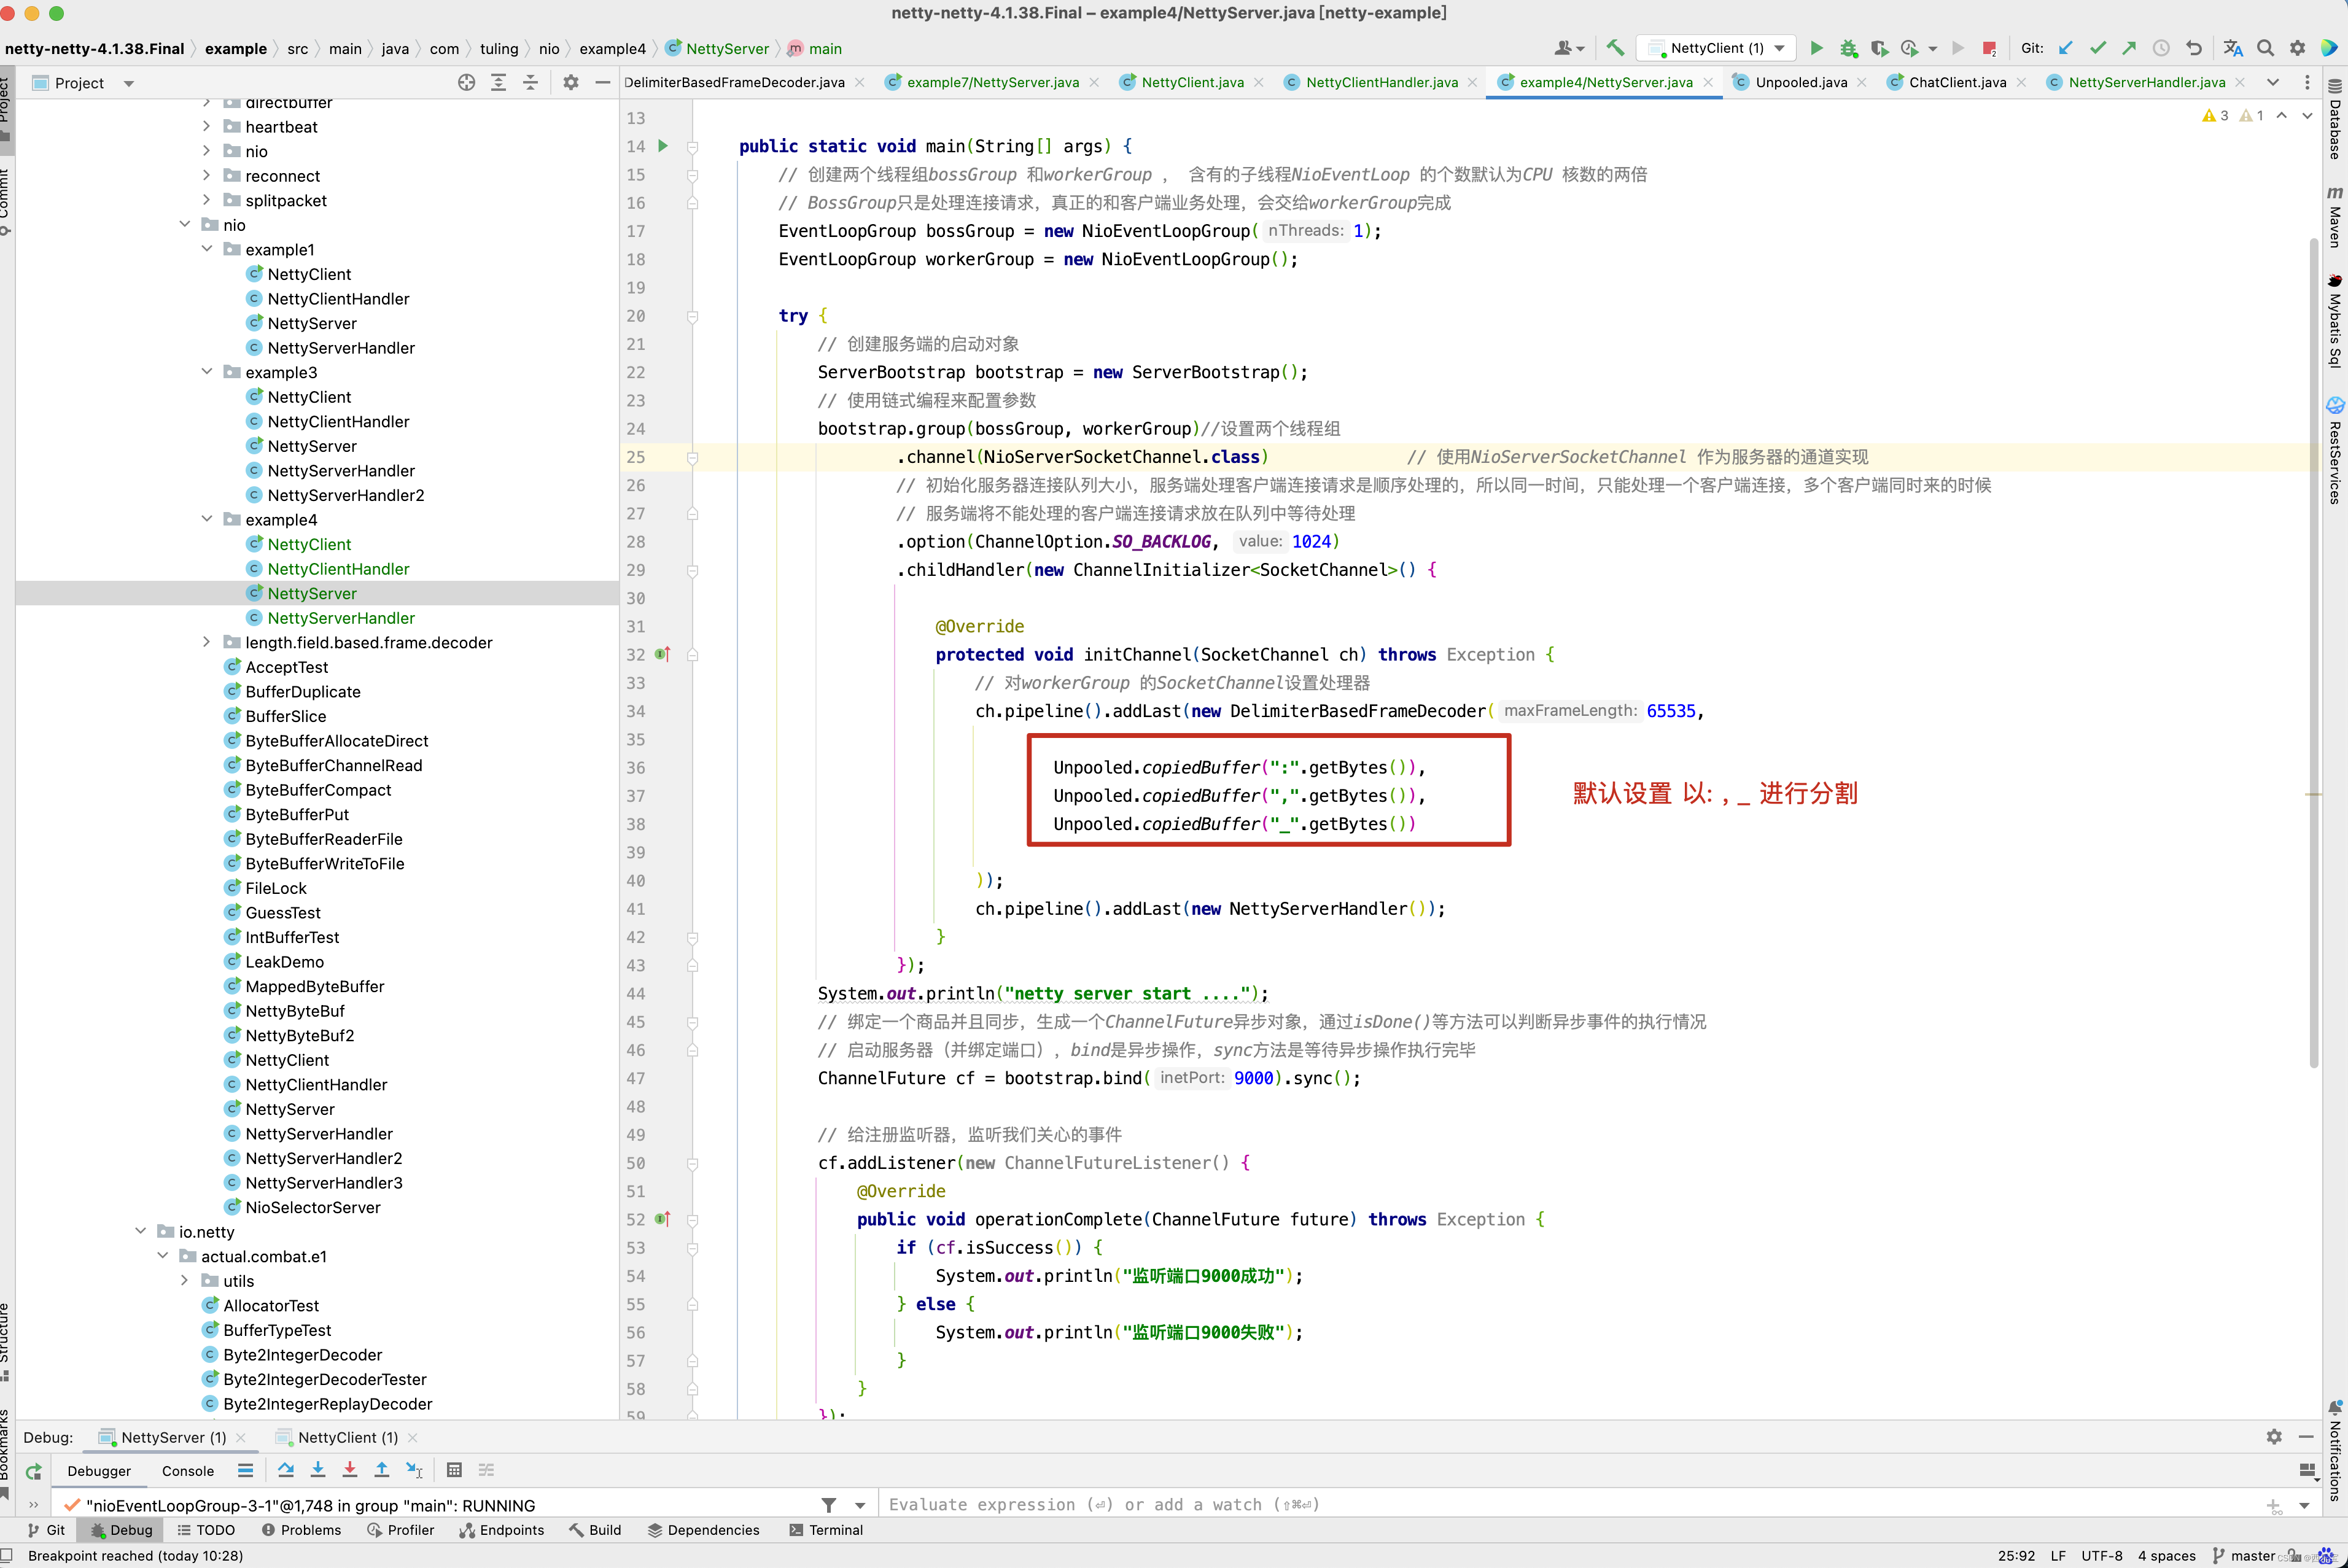
public class DelimiterBasedFrameDecoder extends ByteToMessageDecoder {private final ByteBuf[] delimiters; //自定义多个分隔符,可以使用多个private final int maxFrameLength;       // 每个消息段落的最大长度private final boolean stripDelimiter;       // 解码消息时,是否丢弃分隔符private final boolean failFast;         // 遇到错误时,是否抛出异常private boolean discardingTooLongFrame;         // 状态变量,是否正在丢弃一个段的消息private int tooLongFrameLength;             //丢弃总长度/ Set only when decoding with "\\n" and "\\r\\n" as the delimiter.  */private final LineBasedFrameDecoder lineBasedDecoder;                   // \\r \\n 的解码器public DelimiterBasedFrameDecoder(int maxFrameLength, boolean stripDelimiter, boolean failFast, ByteBuf... delimiters) {validateMaxFrameLength(maxFrameLength);if (delimiters == null) {throw new NullPointerException("delimiters");}if (delimiters.length == 0) {throw new IllegalArgumentException("empty delimiters");}// delimiters里的分隔符是否是 \\r \\nif (isLineBased(delimiters) && !isSubclass()) {lineBasedDecoder = new LineBasedFrameDecoder(maxFrameLength, stripDelimiter, failFast);this.delimiters = null;} else {// 创建数组this.delimiters = new ByteBuf[delimiters.length];for (int i = 0; i < delimiters.length; i ++) {ByteBuf d = delimiters[i];validateDelimiter(d);// 创建d的分区放入数组this.delimiters[i] = d.slice(d.readerIndex(), d.readableBytes());}lineBasedDecoder = null;}this.maxFrameLength = maxFrameLength;this.stripDelimiter = stripDelimiter;this.failFast = failFast;}
}/ Returns true if the delimiters are "\\n" and "\\r\\n".  */
// 判断是否是以 \\r \\n 分割
private static boolean isLineBased(final ByteBuf[] delimiters) {if (delimiters.length != 2) {return false;}ByteBuf a = delimiters[0];ByteBuf b = delimiters[1];if (a.capacity() < b.capacity()) {a = delimiters[1];b = delimiters[0];}return a.capacity() == 2 && b.capacity() == 1&& a.getByte(0) == '\\r' && a.getByte(1) == '\\n'&& b.getByte(0) == '\\n';
}
接下来看他的decode()方法和LengthFieldBasedFrameDecoder一样,都是先进行解码,如果解码成功,则将解码后的对象添加到out中。
protected final void decode(ChannelHandlerContext ctx, ByteBuf in, List<Object> out) throws Exception {Object decoded = decode(ctx, in);if (decoded != null) {out.add(decoded);}
}
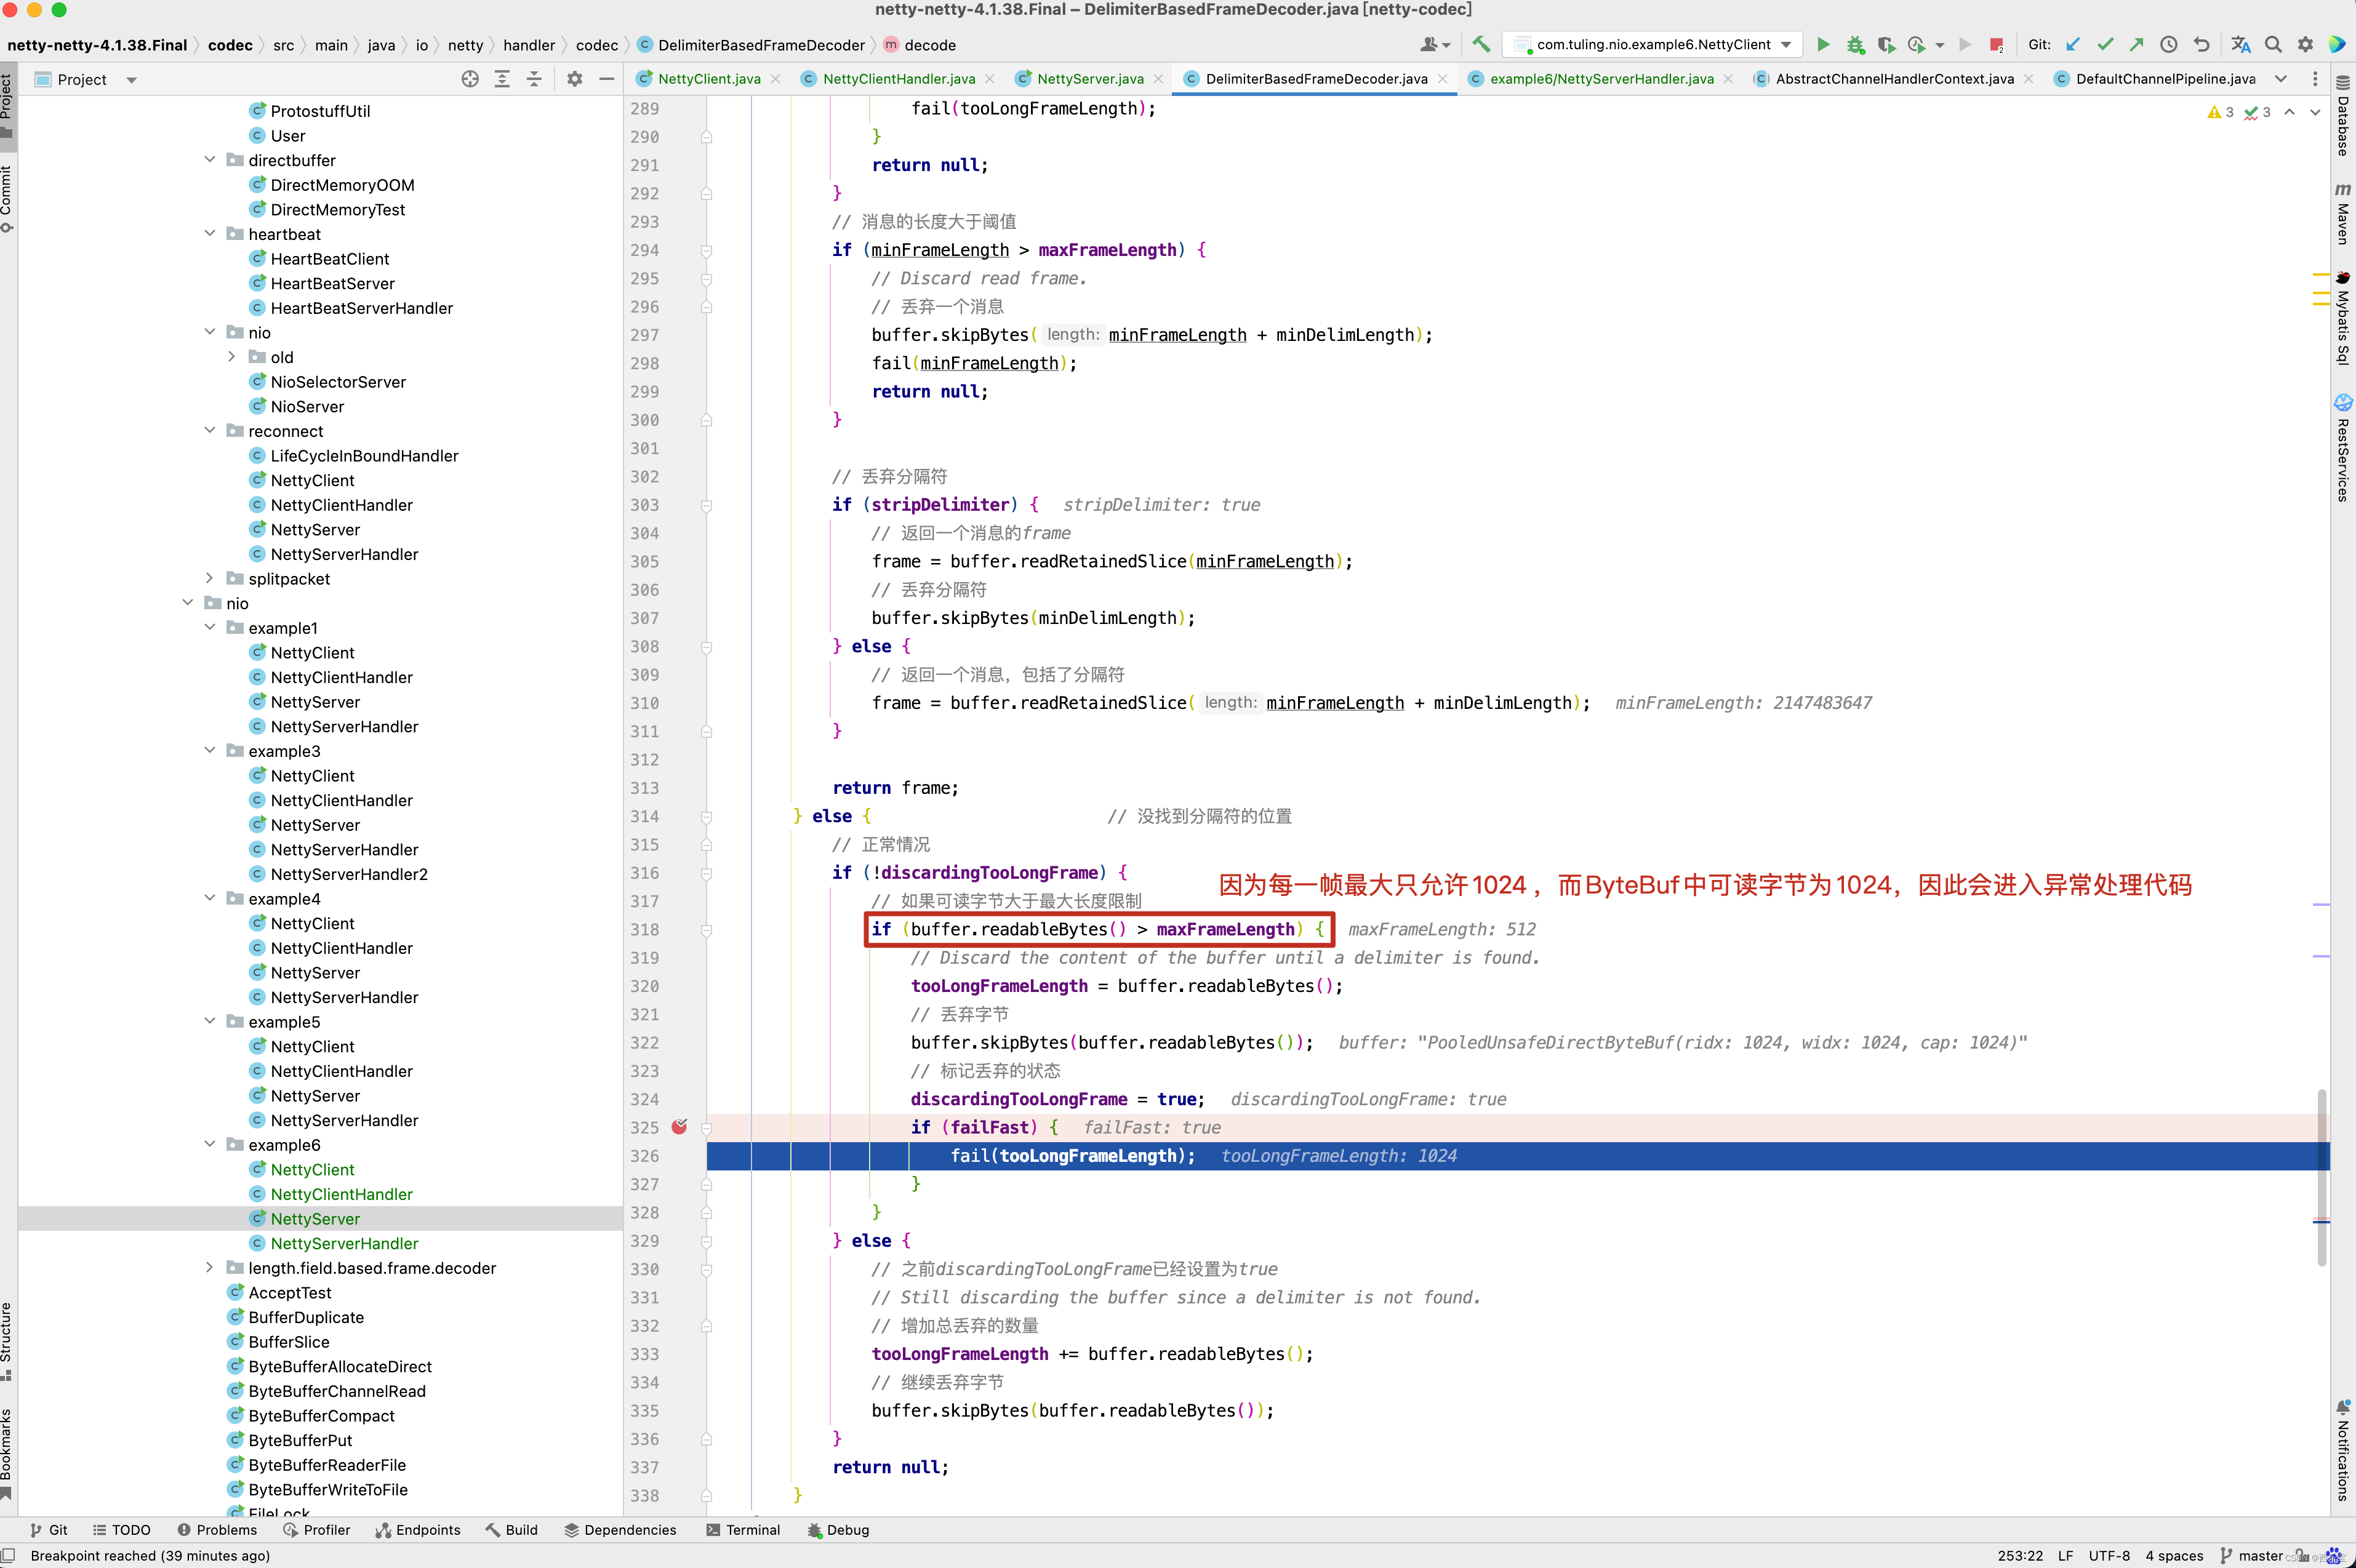
protected Object decode(ChannelHandlerContext ctx, ByteBuf buffer) throws Exception {// 如果分割符是以\\r\\n,则用lineBasedDecoder解码器解析if (lineBasedDecoder != null) {// 此类相当于lineBasedDecoderreturn lineBasedDecoder.decode(ctx, buffer);}// Try all delimiters and choose the delimiter which yields the shortest frame.int minFrameLength = Integer.MAX_VALUE;ByteBuf minDelim = null;// 循环所有的分隔符, 挨个去匹配for (ByteBuf delim: delimiters) {// 匹配分隔符的起始位置int frameLength = indexOf(buffer, delim);// 大于0 , 并且小于int最大值,说明匹配成功if (frameLength >= 0 && frameLength < minFrameLength) {minFrameLength = frameLength;minDelim = delim;}}// 如果匹配成功if (minDelim != null) {// 分隔符的capacity 就代表了分配符的长度int minDelimLength = minDelim.capacity();ByteBuf frame;// 如果之前已经开始丢弃字节if (discardingTooLongFrame) {// We've just finished discarding a very large frame.// Go back to the initial state.// 恢复标记位discardingTooLongFrame = false;// 跳过minFrameLength + 分隔符的长度,表示丢弃了前一个完整的消息buffer.skipBytes(minFrameLength + minDelimLength);int tooLongFrameLength = this.tooLongFrameLength;// 丢弃的字节总数this.tooLongFrameLength = 0;if (!failFast) {fail(tooLongFrameLength);}return null;}// 消息的长度大于阈值if (minFrameLength > maxFrameLength) {// Discard read frame.// 丢弃一个消息buffer.skipBytes(minFrameLength + minDelimLength);fail(minFrameLength);return null;}// 丢弃分隔符if (stripDelimiter) {// 返回一个消息的frameframe = buffer.readRetainedSlice(minFrameLength);// 丢弃分隔符buffer.skipBytes(minDelimLength);} else {// 返回一个消息,包括了分隔符frame = buffer.readRetainedSlice(minFrameLength + minDelimLength);}return frame;} else { // 没找到分隔符的位置// 正常情况if (!discardingTooLongFrame) {// 如果可读字节大于最大长度限制if (buffer.readableBytes() > maxFrameLength) {// Discard the content of the buffer until a delimiter is found.tooLongFrameLength = buffer.readableBytes();// 丢弃字节buffer.skipBytes(buffer.readableBytes());// 标记丢弃的状态discardingTooLongFrame = true;if (failFast) {fail(tooLongFrameLength);}}} else {// 之前discardingTooLongFrame已经设置为true// Still discarding the buffer since a delimiter is not found.// 增加总丢弃的数量tooLongFrameLength += buffer.readableBytes();// 继续丢弃字节buffer.skipBytes(buffer.readableBytes());}return null;}
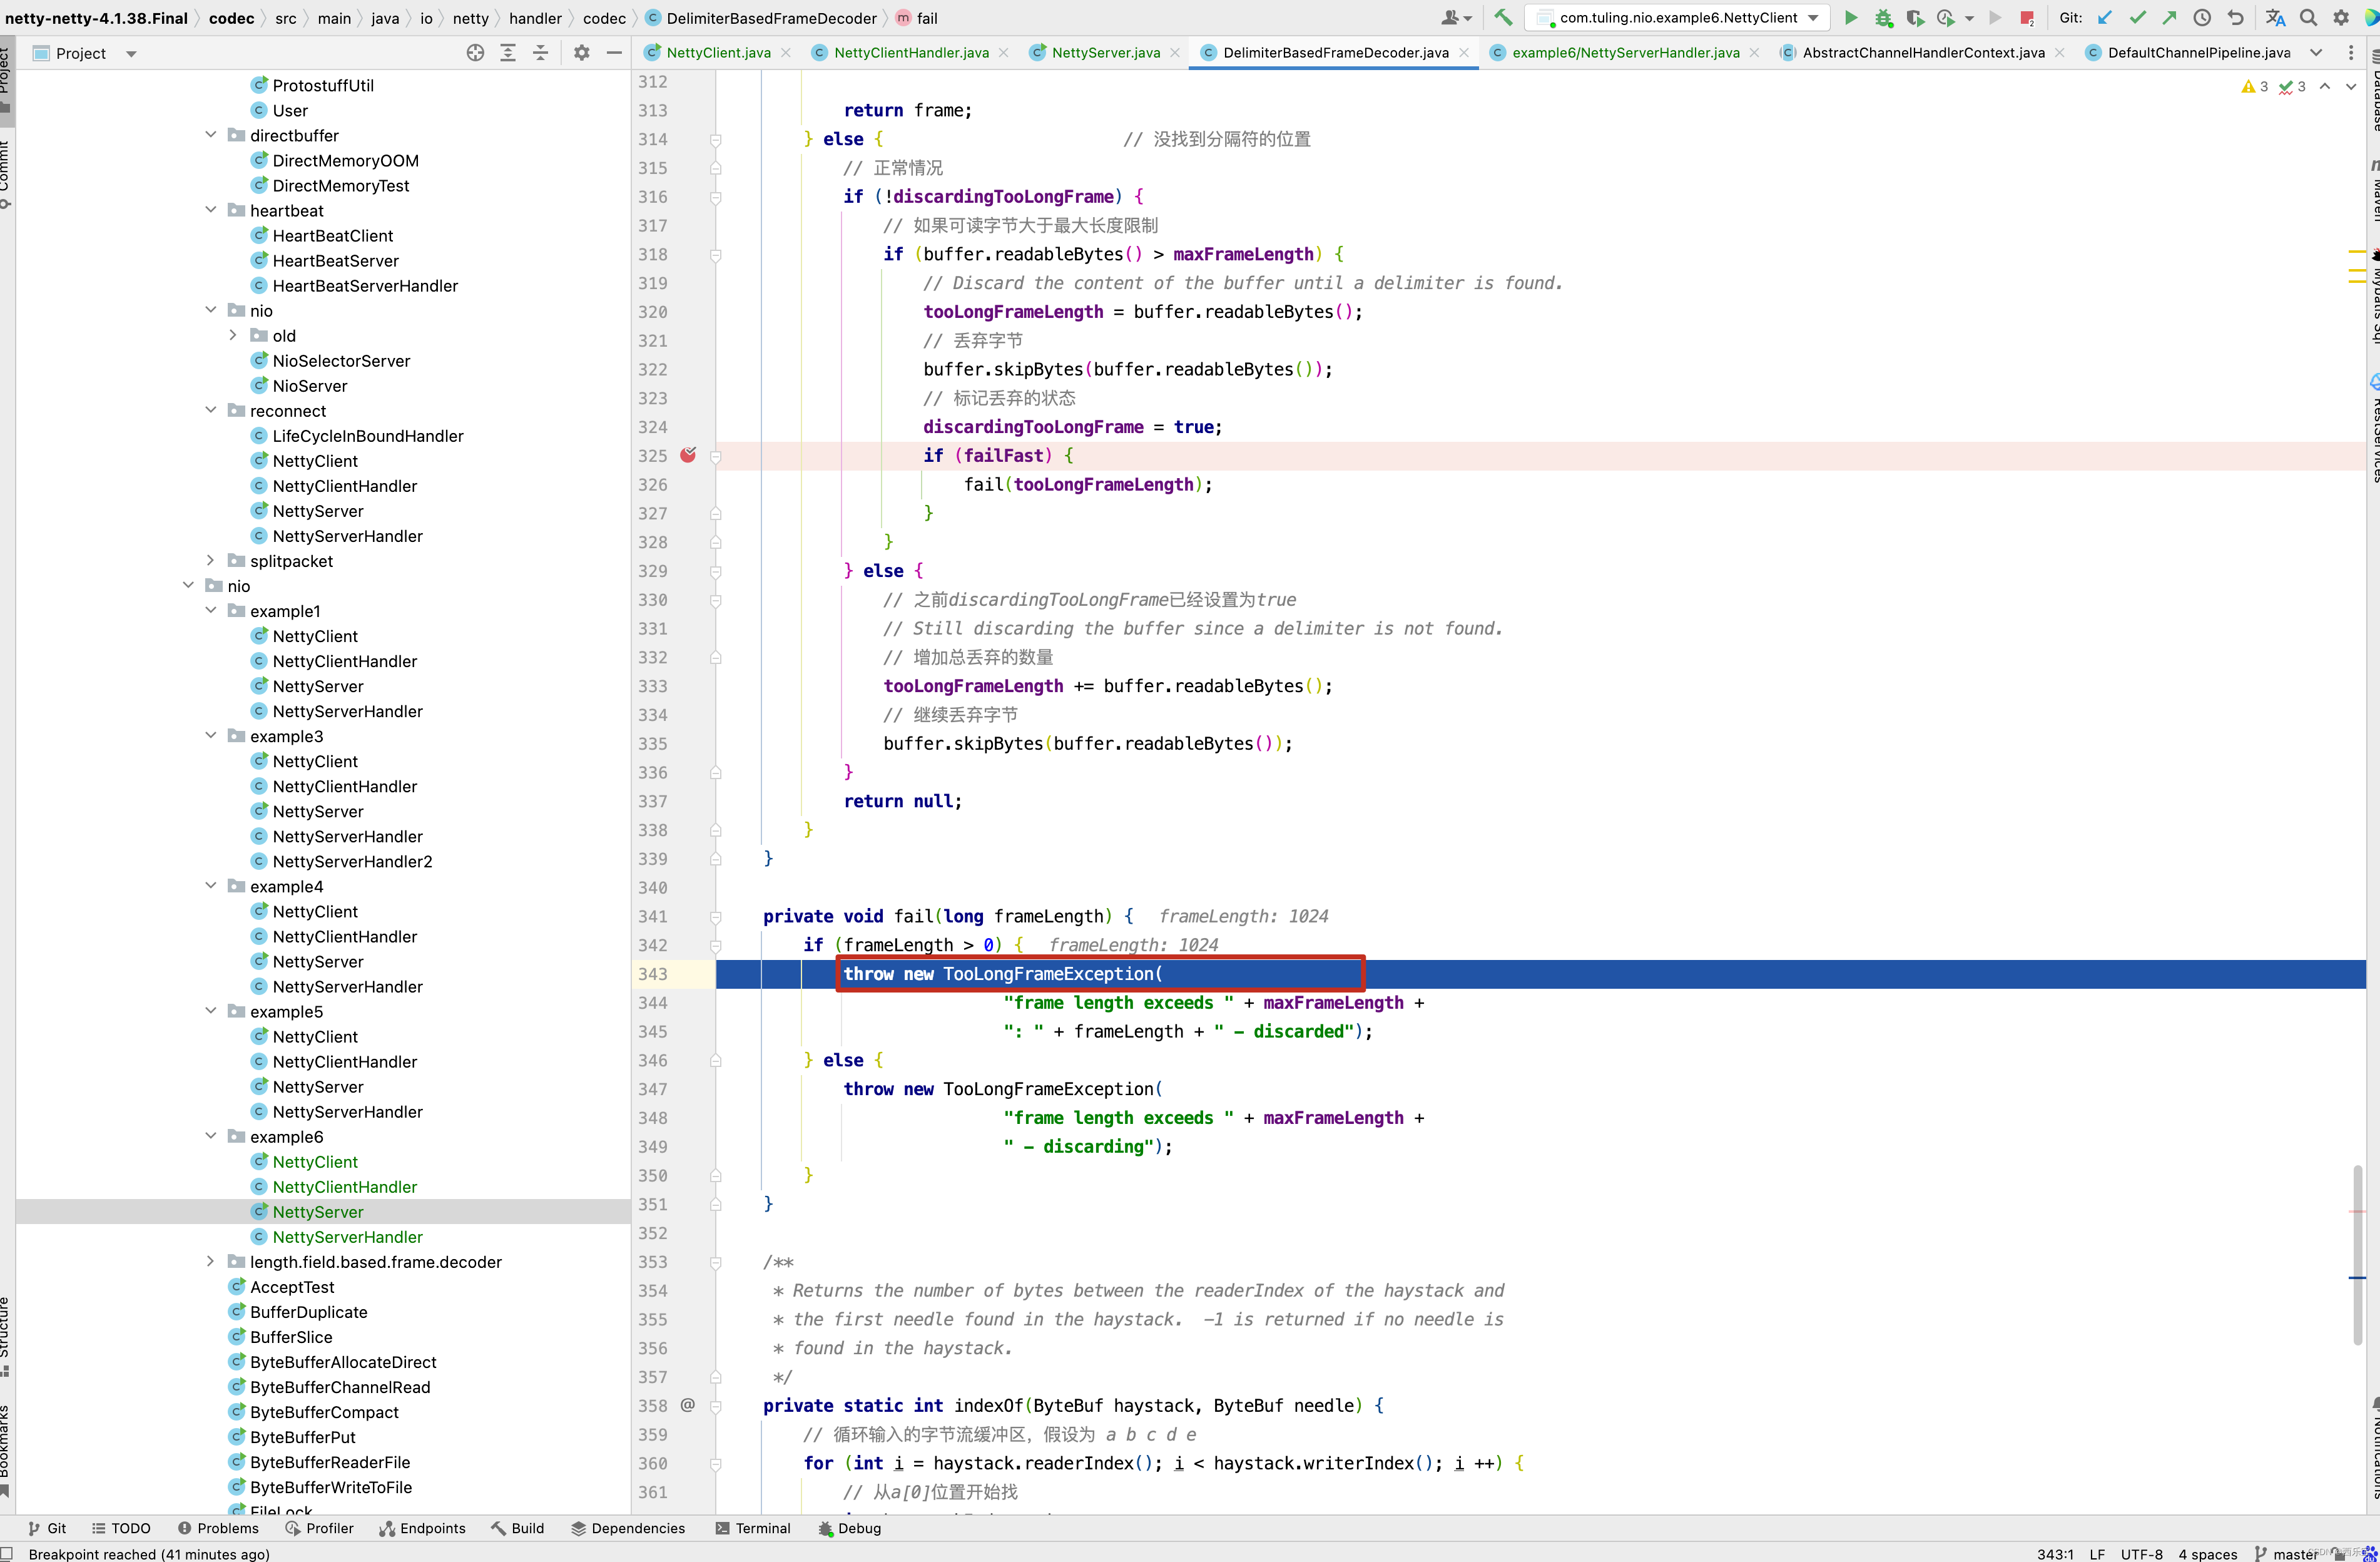
}private void fail(long frameLength) {if (frameLength > 0) {throw new TooLongFrameException("frame length exceeds " + maxFrameLength +": " + frameLength + " - discarded");} else {throw new TooLongFrameException("frame length exceeds " + maxFrameLength +" - discarding");}
}/* Returns the number of bytes between the readerIndex of the haystack and* the first needle found in the haystack. -1 is returned if no needle is* found in the haystack.*/
private static int indexOf(ByteBuf haystack, ByteBuf needle) {// 循环输入的字节流缓冲区,假设为 a b c d efor (int i = haystack.readerIndex(); i < haystack.writerIndex(); i ++) {// 从a[0]位置开始找int haystackIndex = i;int needleIndex;// 循环分隔符for (needleIndex = 0; needleIndex < needle.capacity(); needleIndex ++) {// 如果分隔符与haystack.getByte(haystackIndex) 不同,则结束当前循环// haystack.getByte(haystackIndex) 从b开始继续查询if (haystack.getByte(haystackIndex) != needle.getByte(needleIndex)) {break;} else {haystackIndex ++;// 依次拿出bcde进行匹配,如果输出的缓冲区达到了末尾 , 并且分隔符缓冲区还没有达到末尾,说明匹配失败if (haystackIndex == haystack.writerIndex() &&needleIndex != needle.capacity() - 1) {return -1;}}}// 如果分隔符缓冲区达到末尾 ,还没有发生上面的情况,说明匹配到了if (needleIndex == needle.capacity()) {// Found the needle from the haystack!// i 减去haystack.readerIndex()的位置就是分隔符的位置return i - haystack.readerIndex();}}return -1;
}
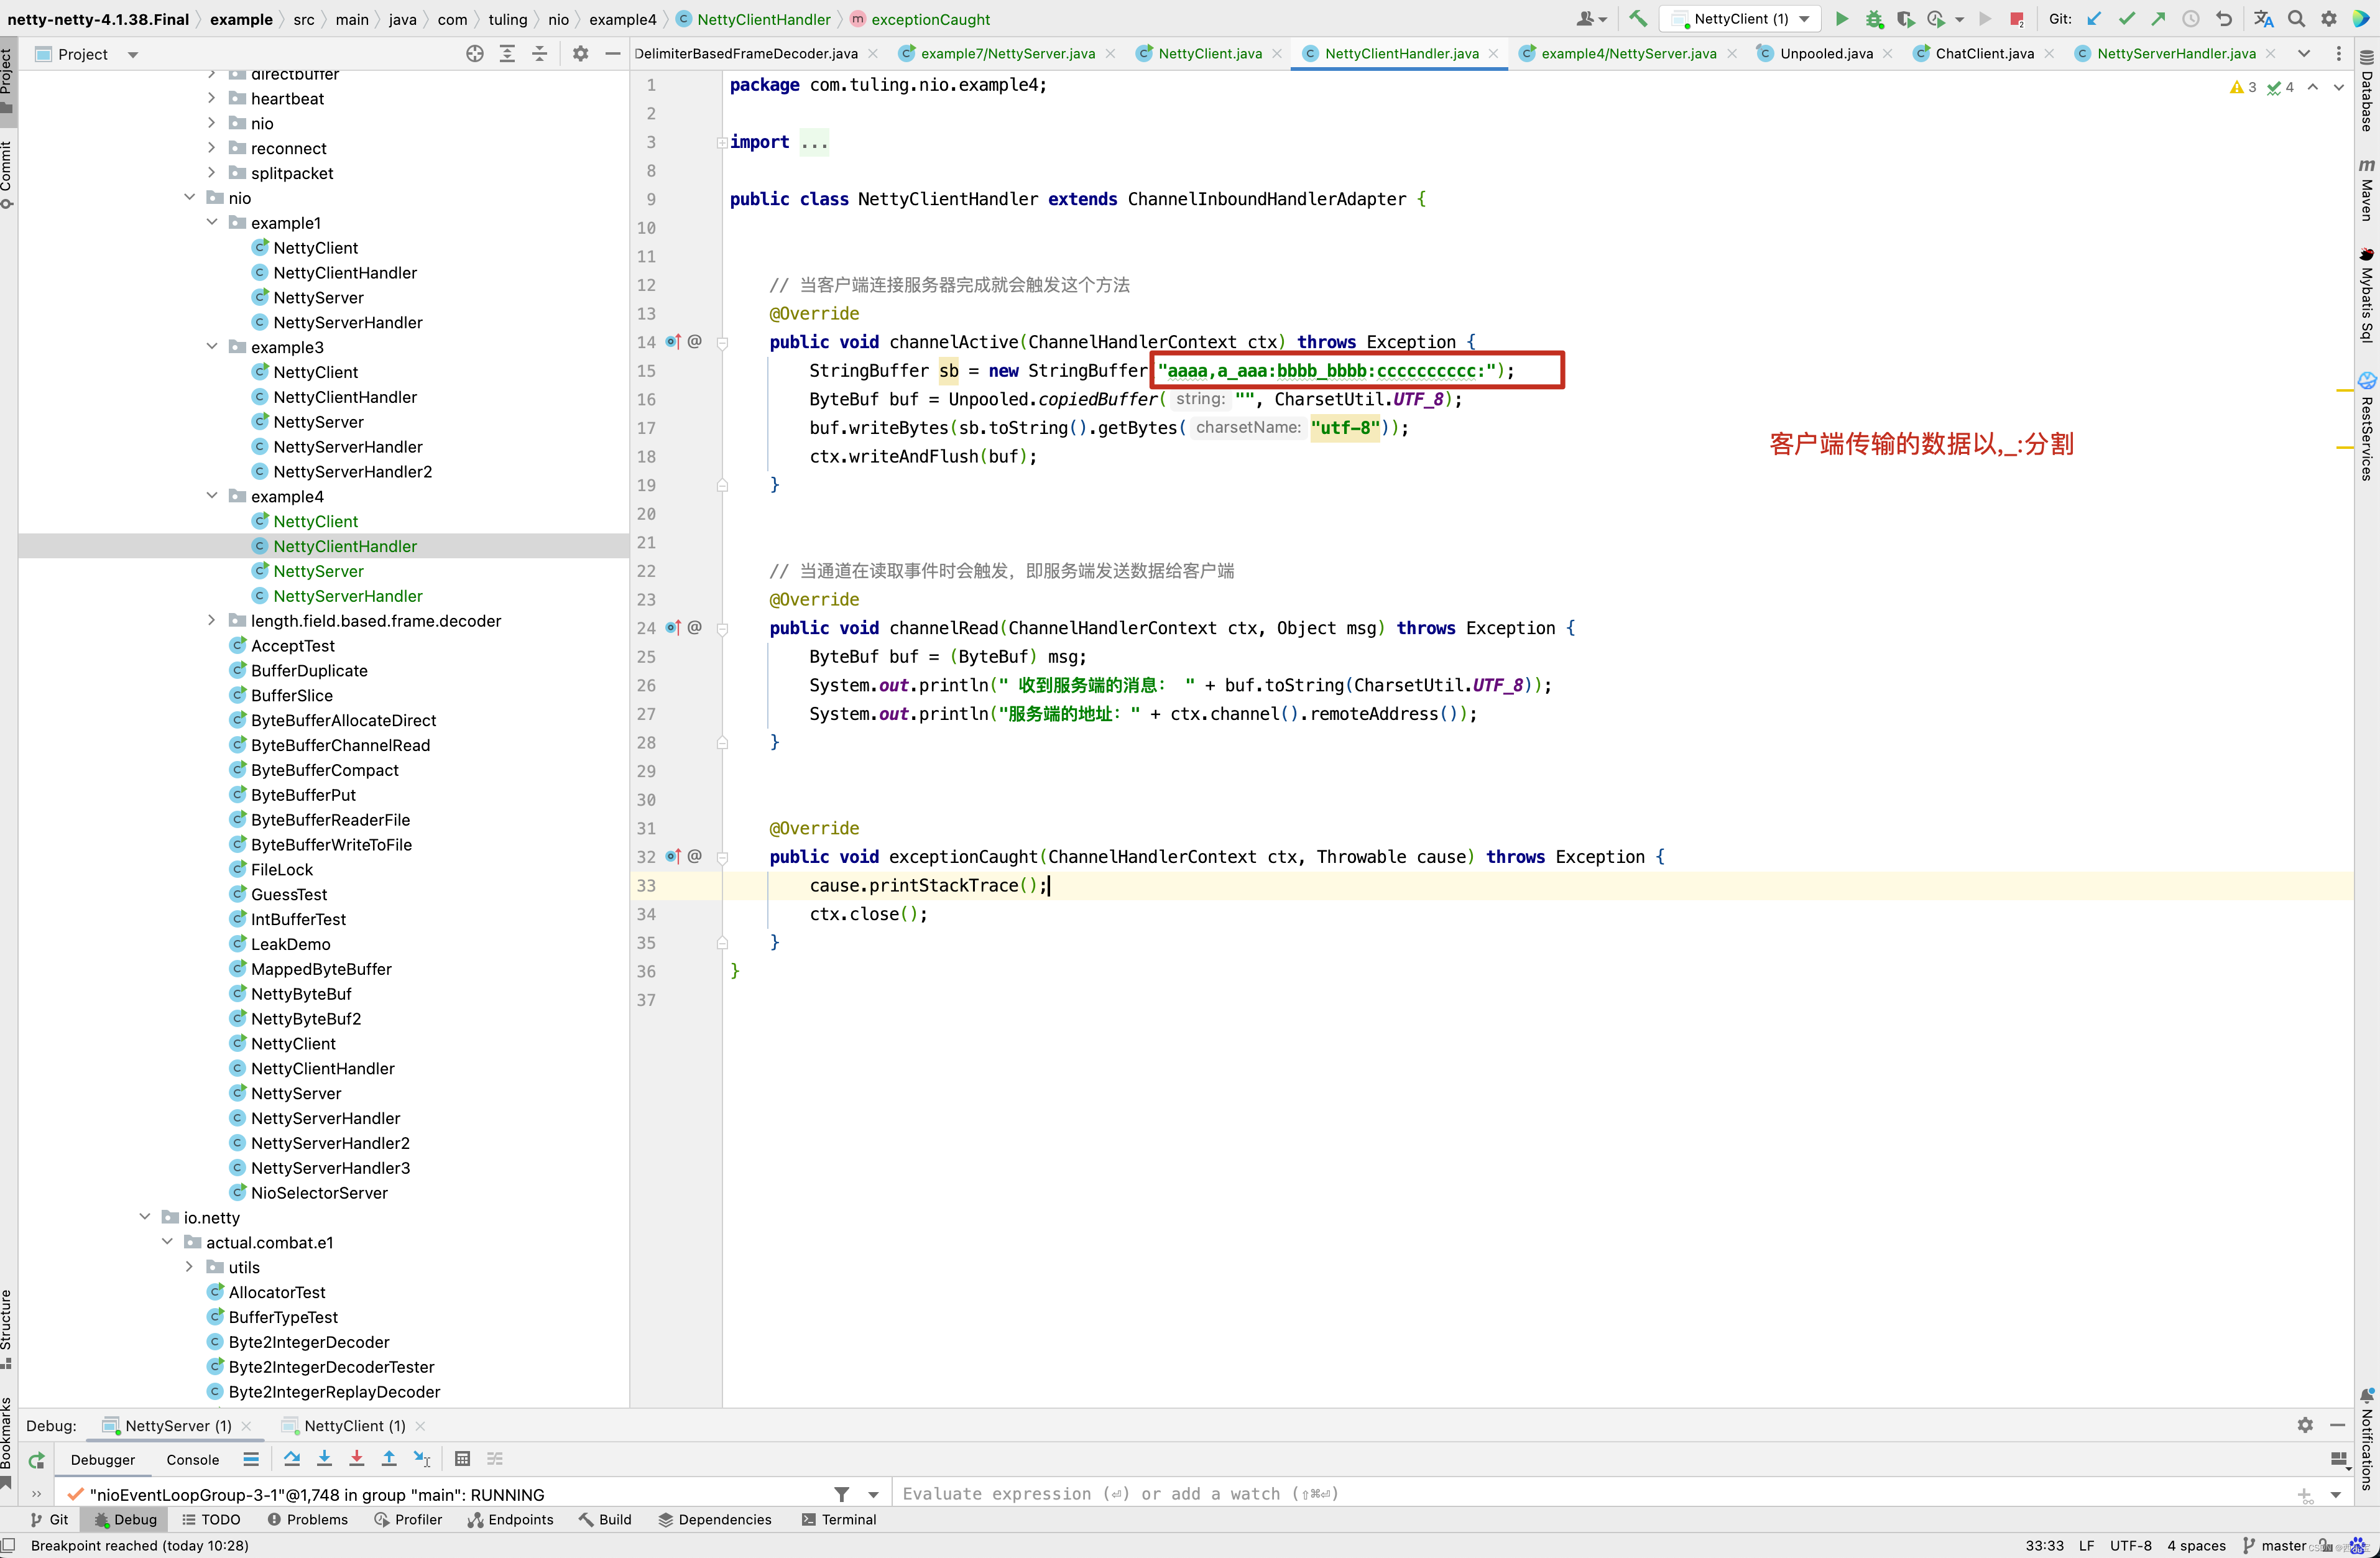
从之前的例4来看。
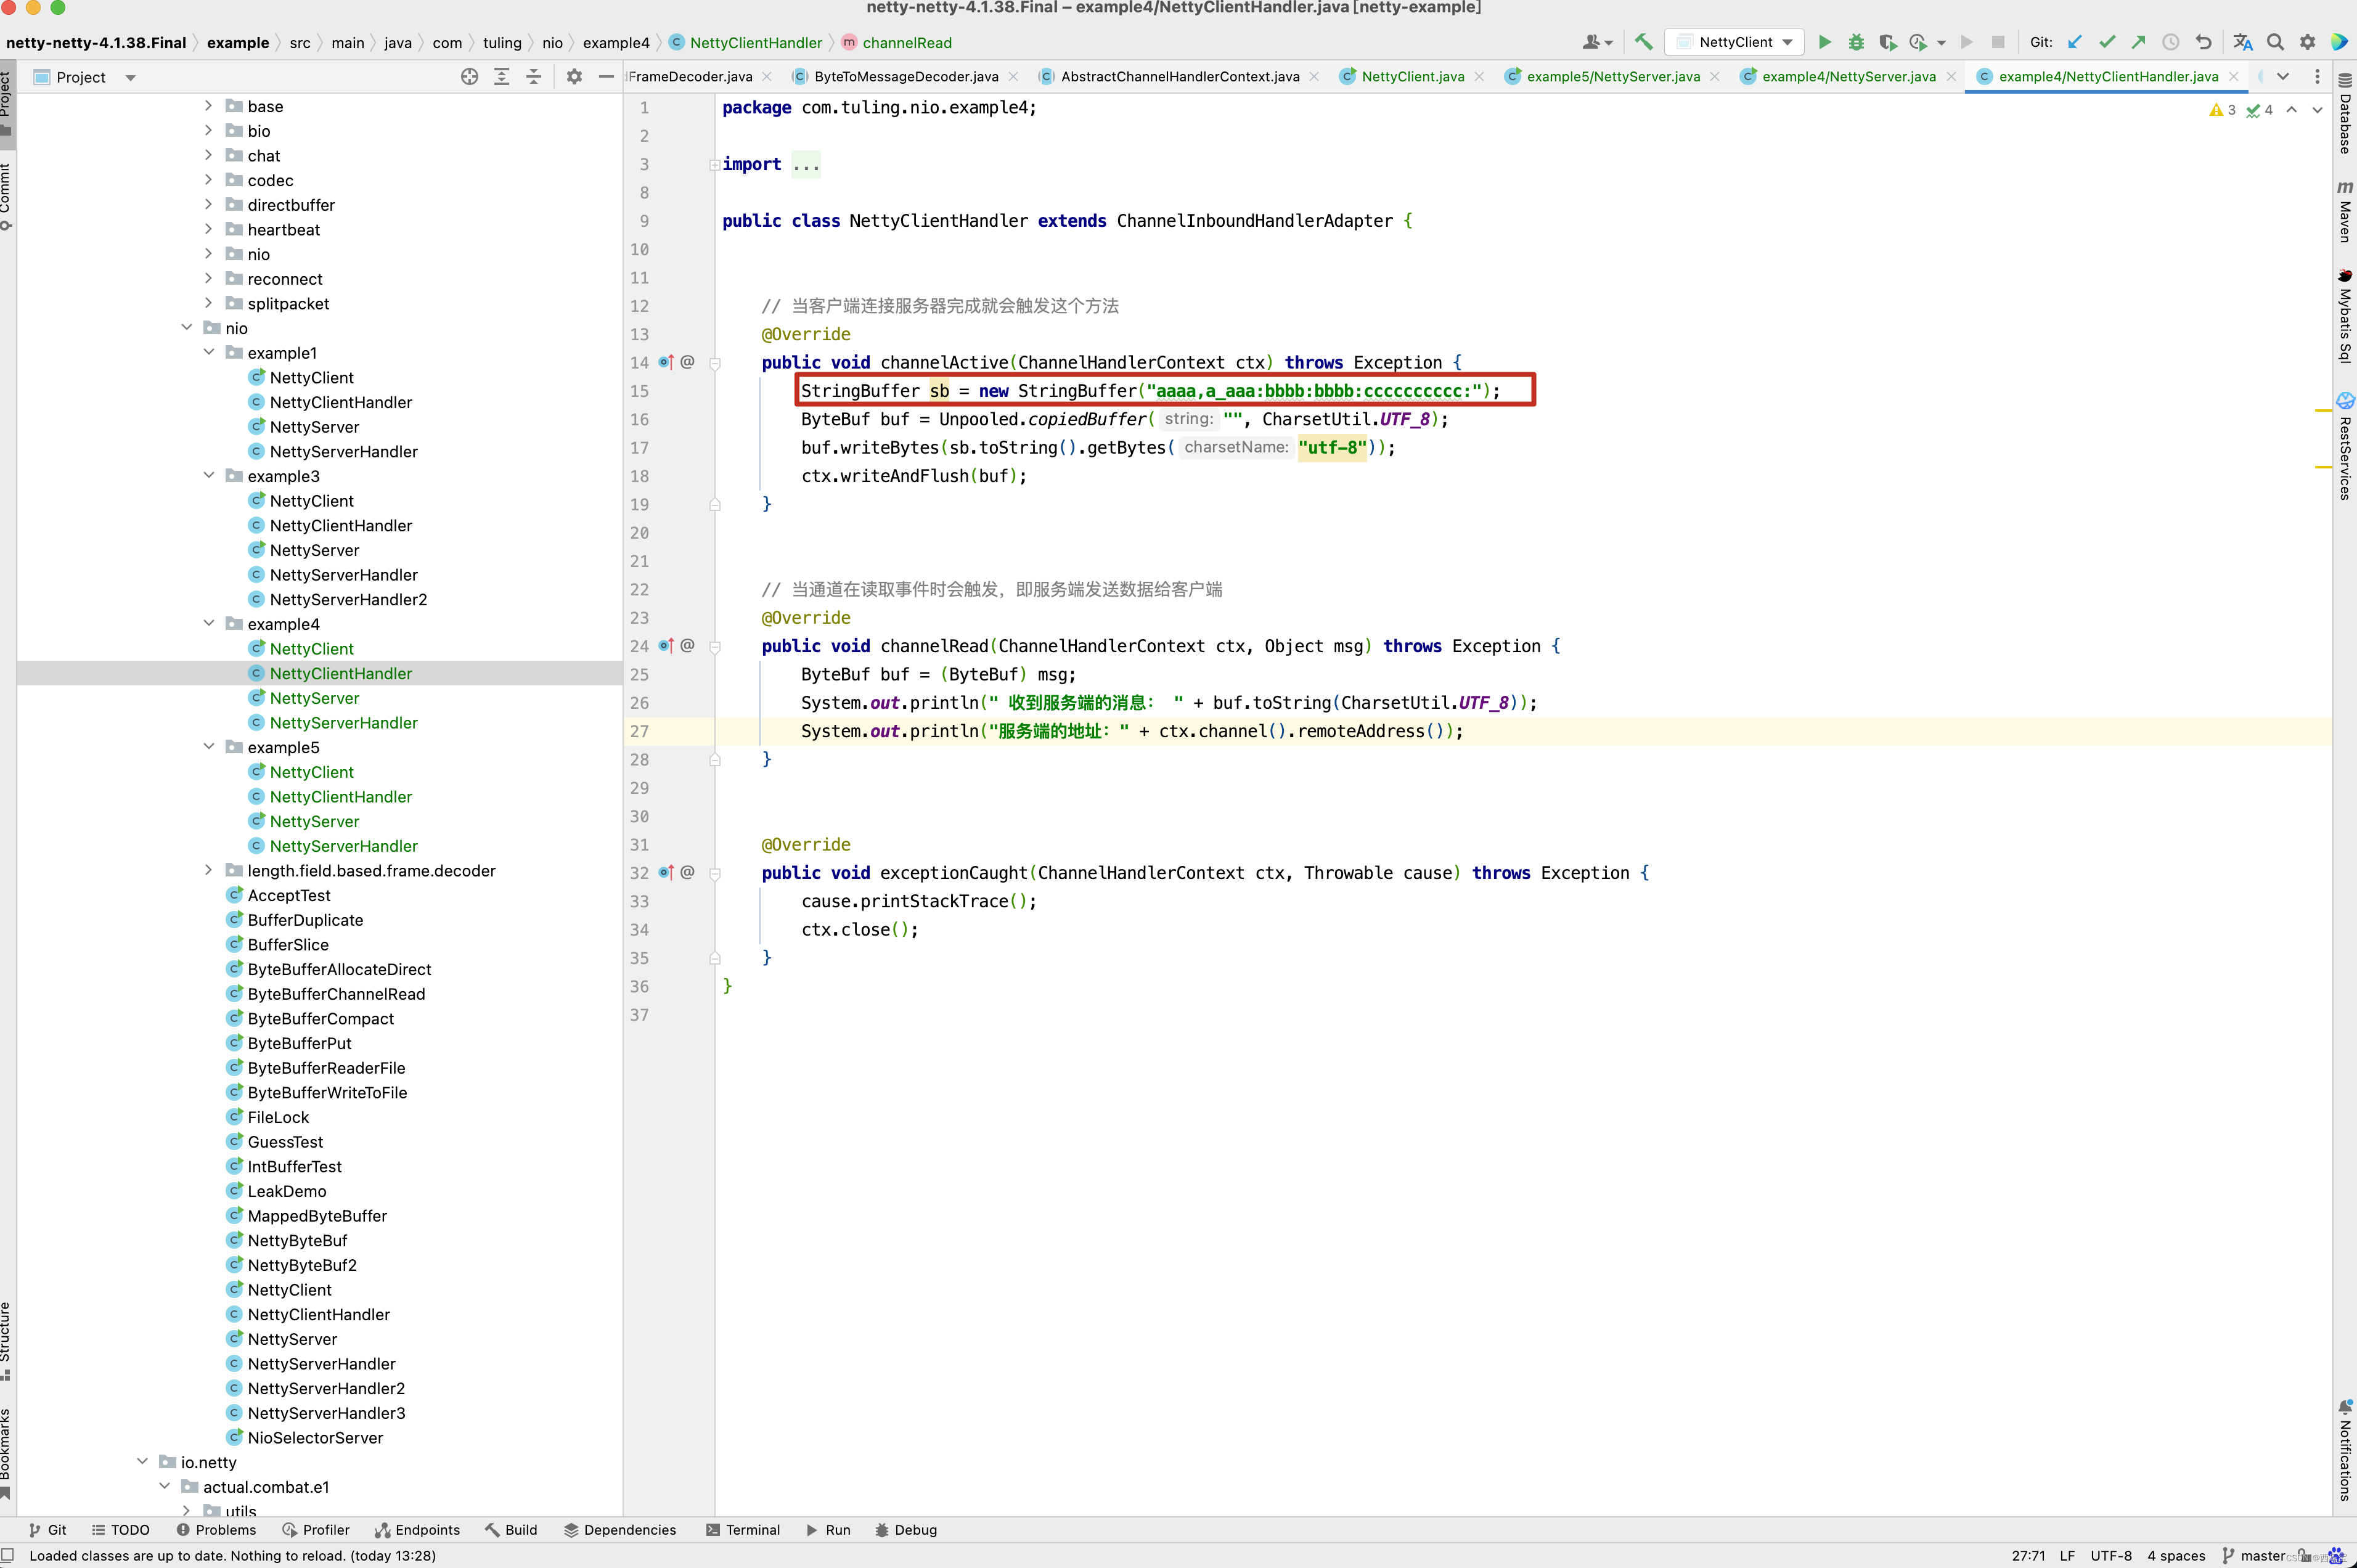
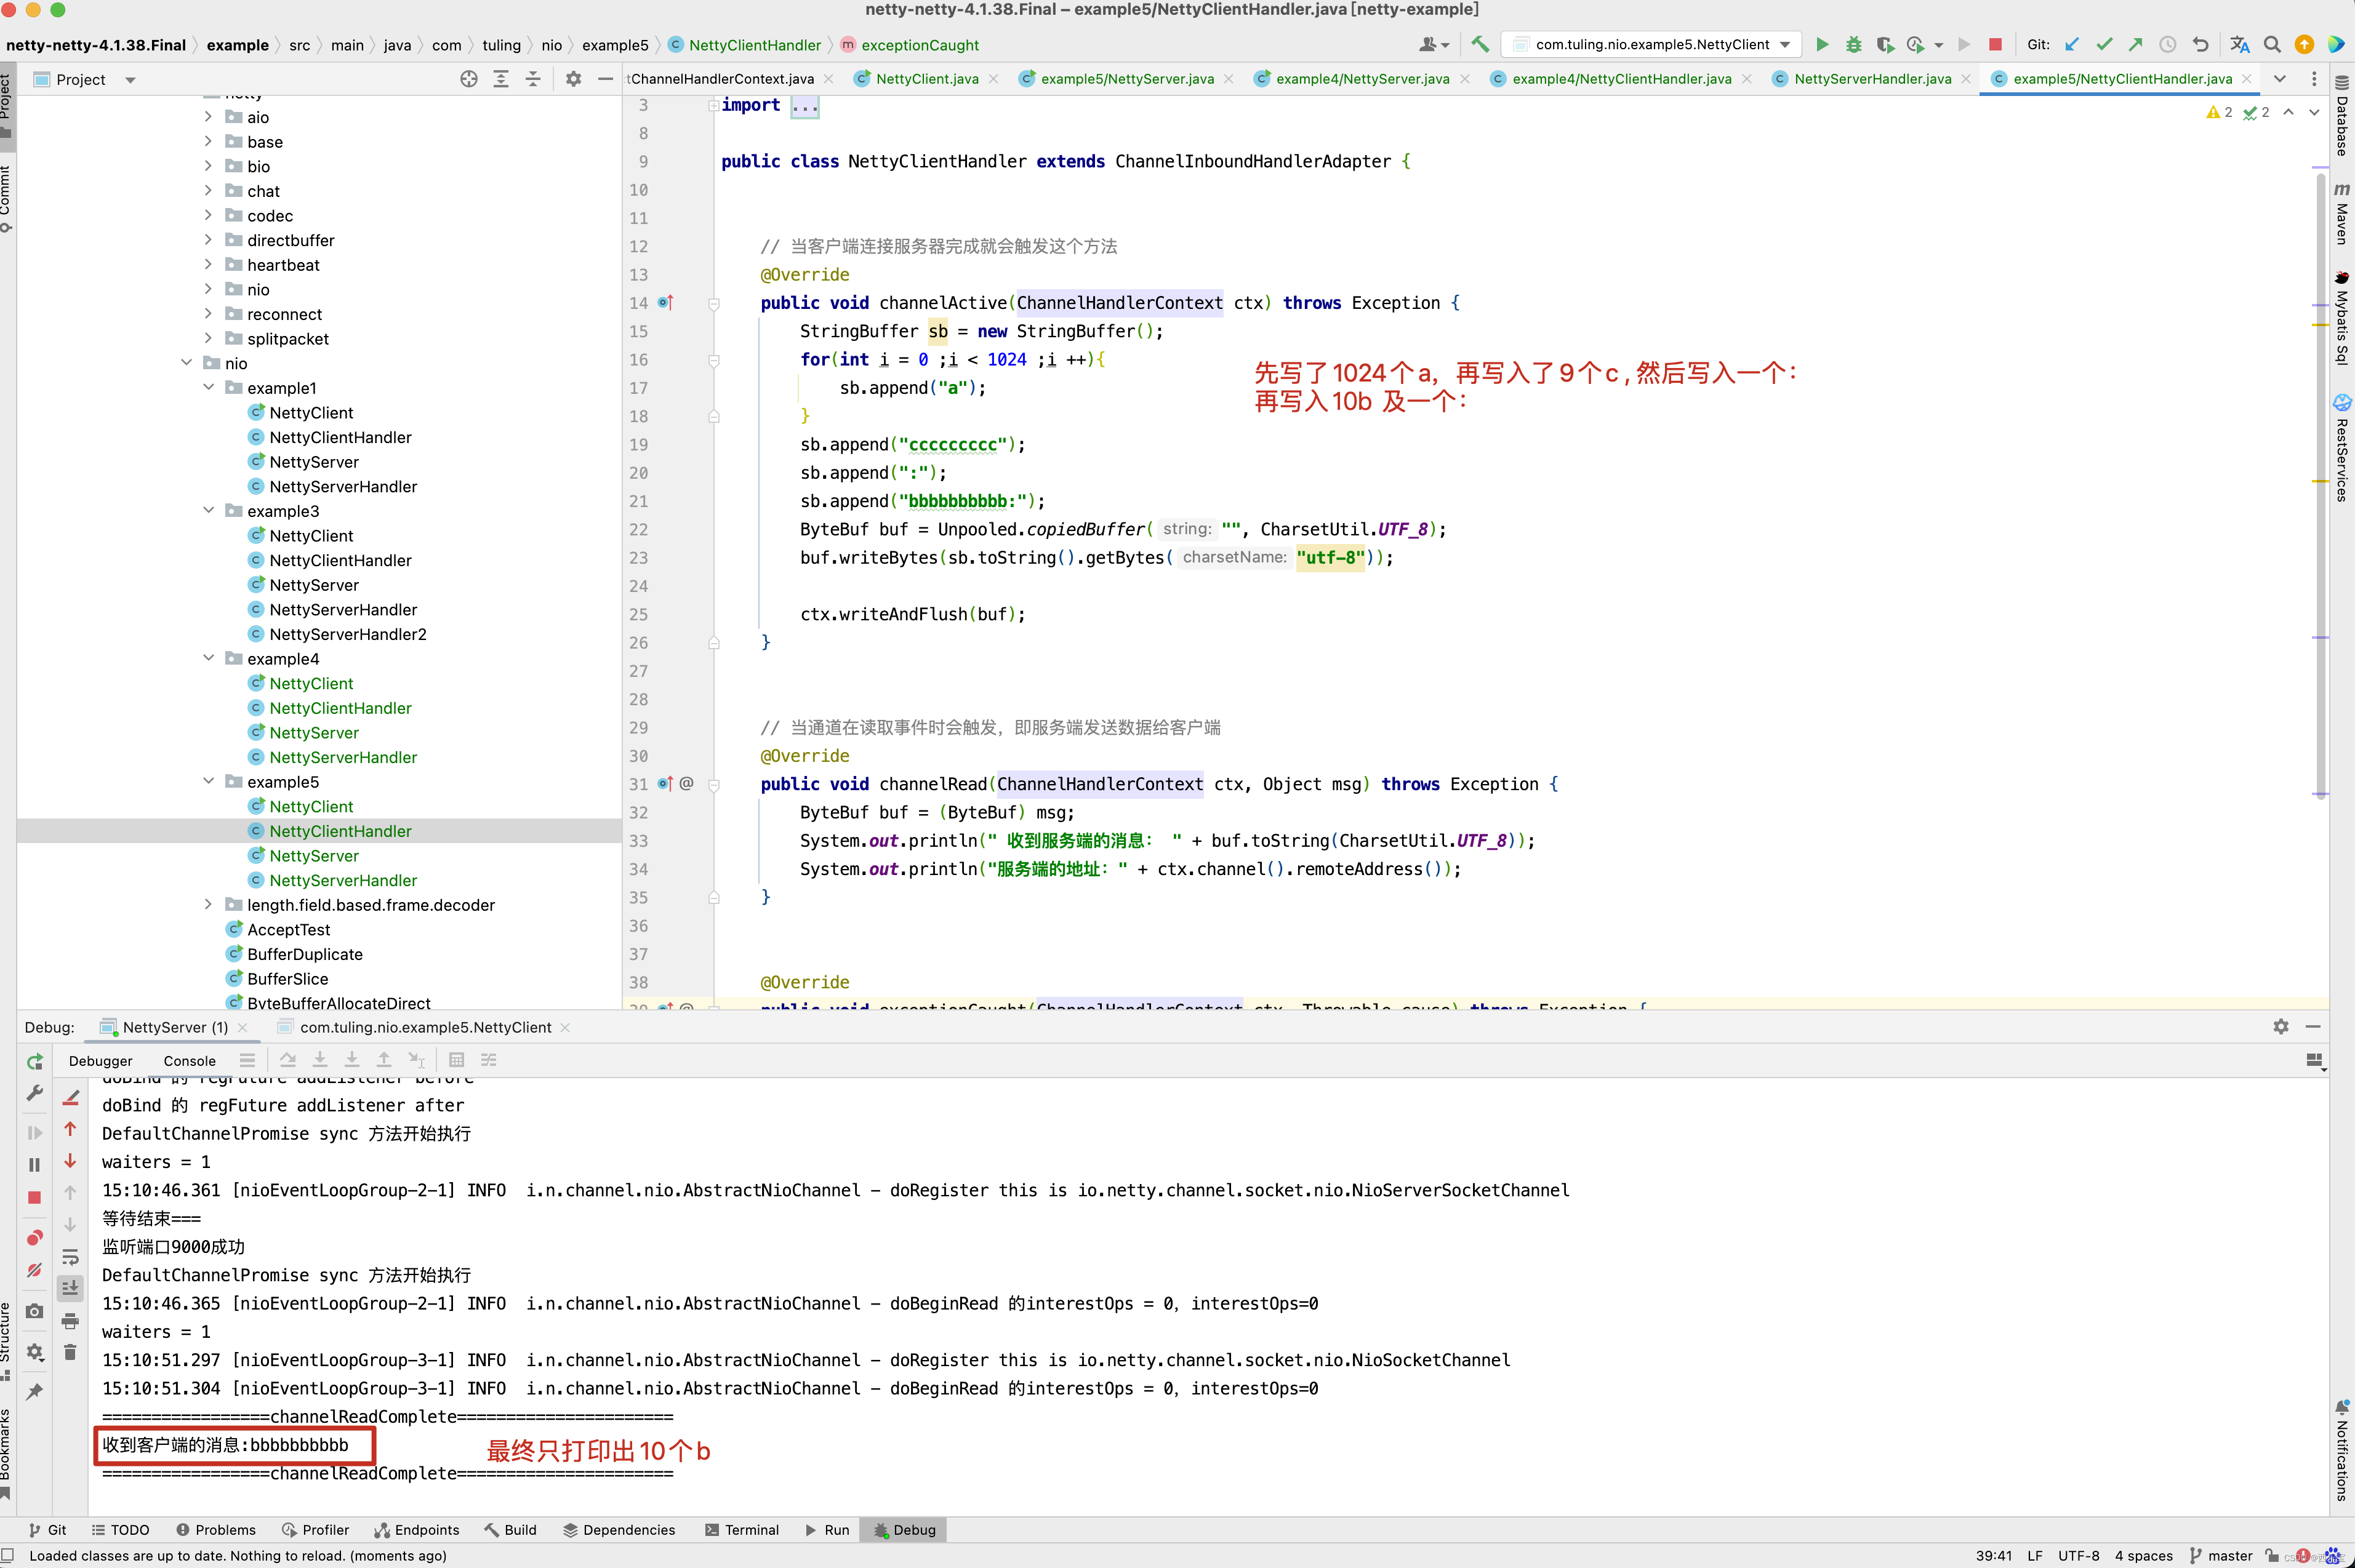
客户端写了一个字符串aaaa,a_aaa:bbbb:bbbb:cccccccccc:,而我们DelimiterBasedFrameDecoder中定义的分割符为 : , _ ,因此他会遍历我们的分隔符 : , _ ,从传入的ByteBuf (内容为 aaaa,a_aaa:bbbb:bbbb:cccccccccc: )中找到分割符索引最小的位置同,如 aaaa,a_aaa:bbbb:bbbb:cccccccccc: 字符串,分隔符索引最小的位置为红色逗号位置为4 ,因此会调用readRetainedSlice()方法,获取本次读取到的ByteBuf,此时未读取的字符串内容为 a_aaa:bbbb:bbbb:cccccccccc: ,同样的方式,分隔符索引最小的位置为红色下划线位置为1,因此第二次读取的字符为a,其他情况以此类推,这个例子中主要运行的代码在decode()方法的加粗代码。当然啦,有人可能对丢弃这一块的逻辑有所困惑,可以通过一个例子来分析上述源码,如果要测试丢弃这一块的逻辑,在创建DelimiterBasedFrameDecoder时,需要设置maxFrameLength参数。
关于这一块代码的源码理解方面,小伙伴可以将代码下载下来,然后打断点调试去理解,注释也写得非常清楚了,这里就不再赘述 。
这里还有一点需要注意,在NettyServerHandler中实现了exceptionCaught()异常。

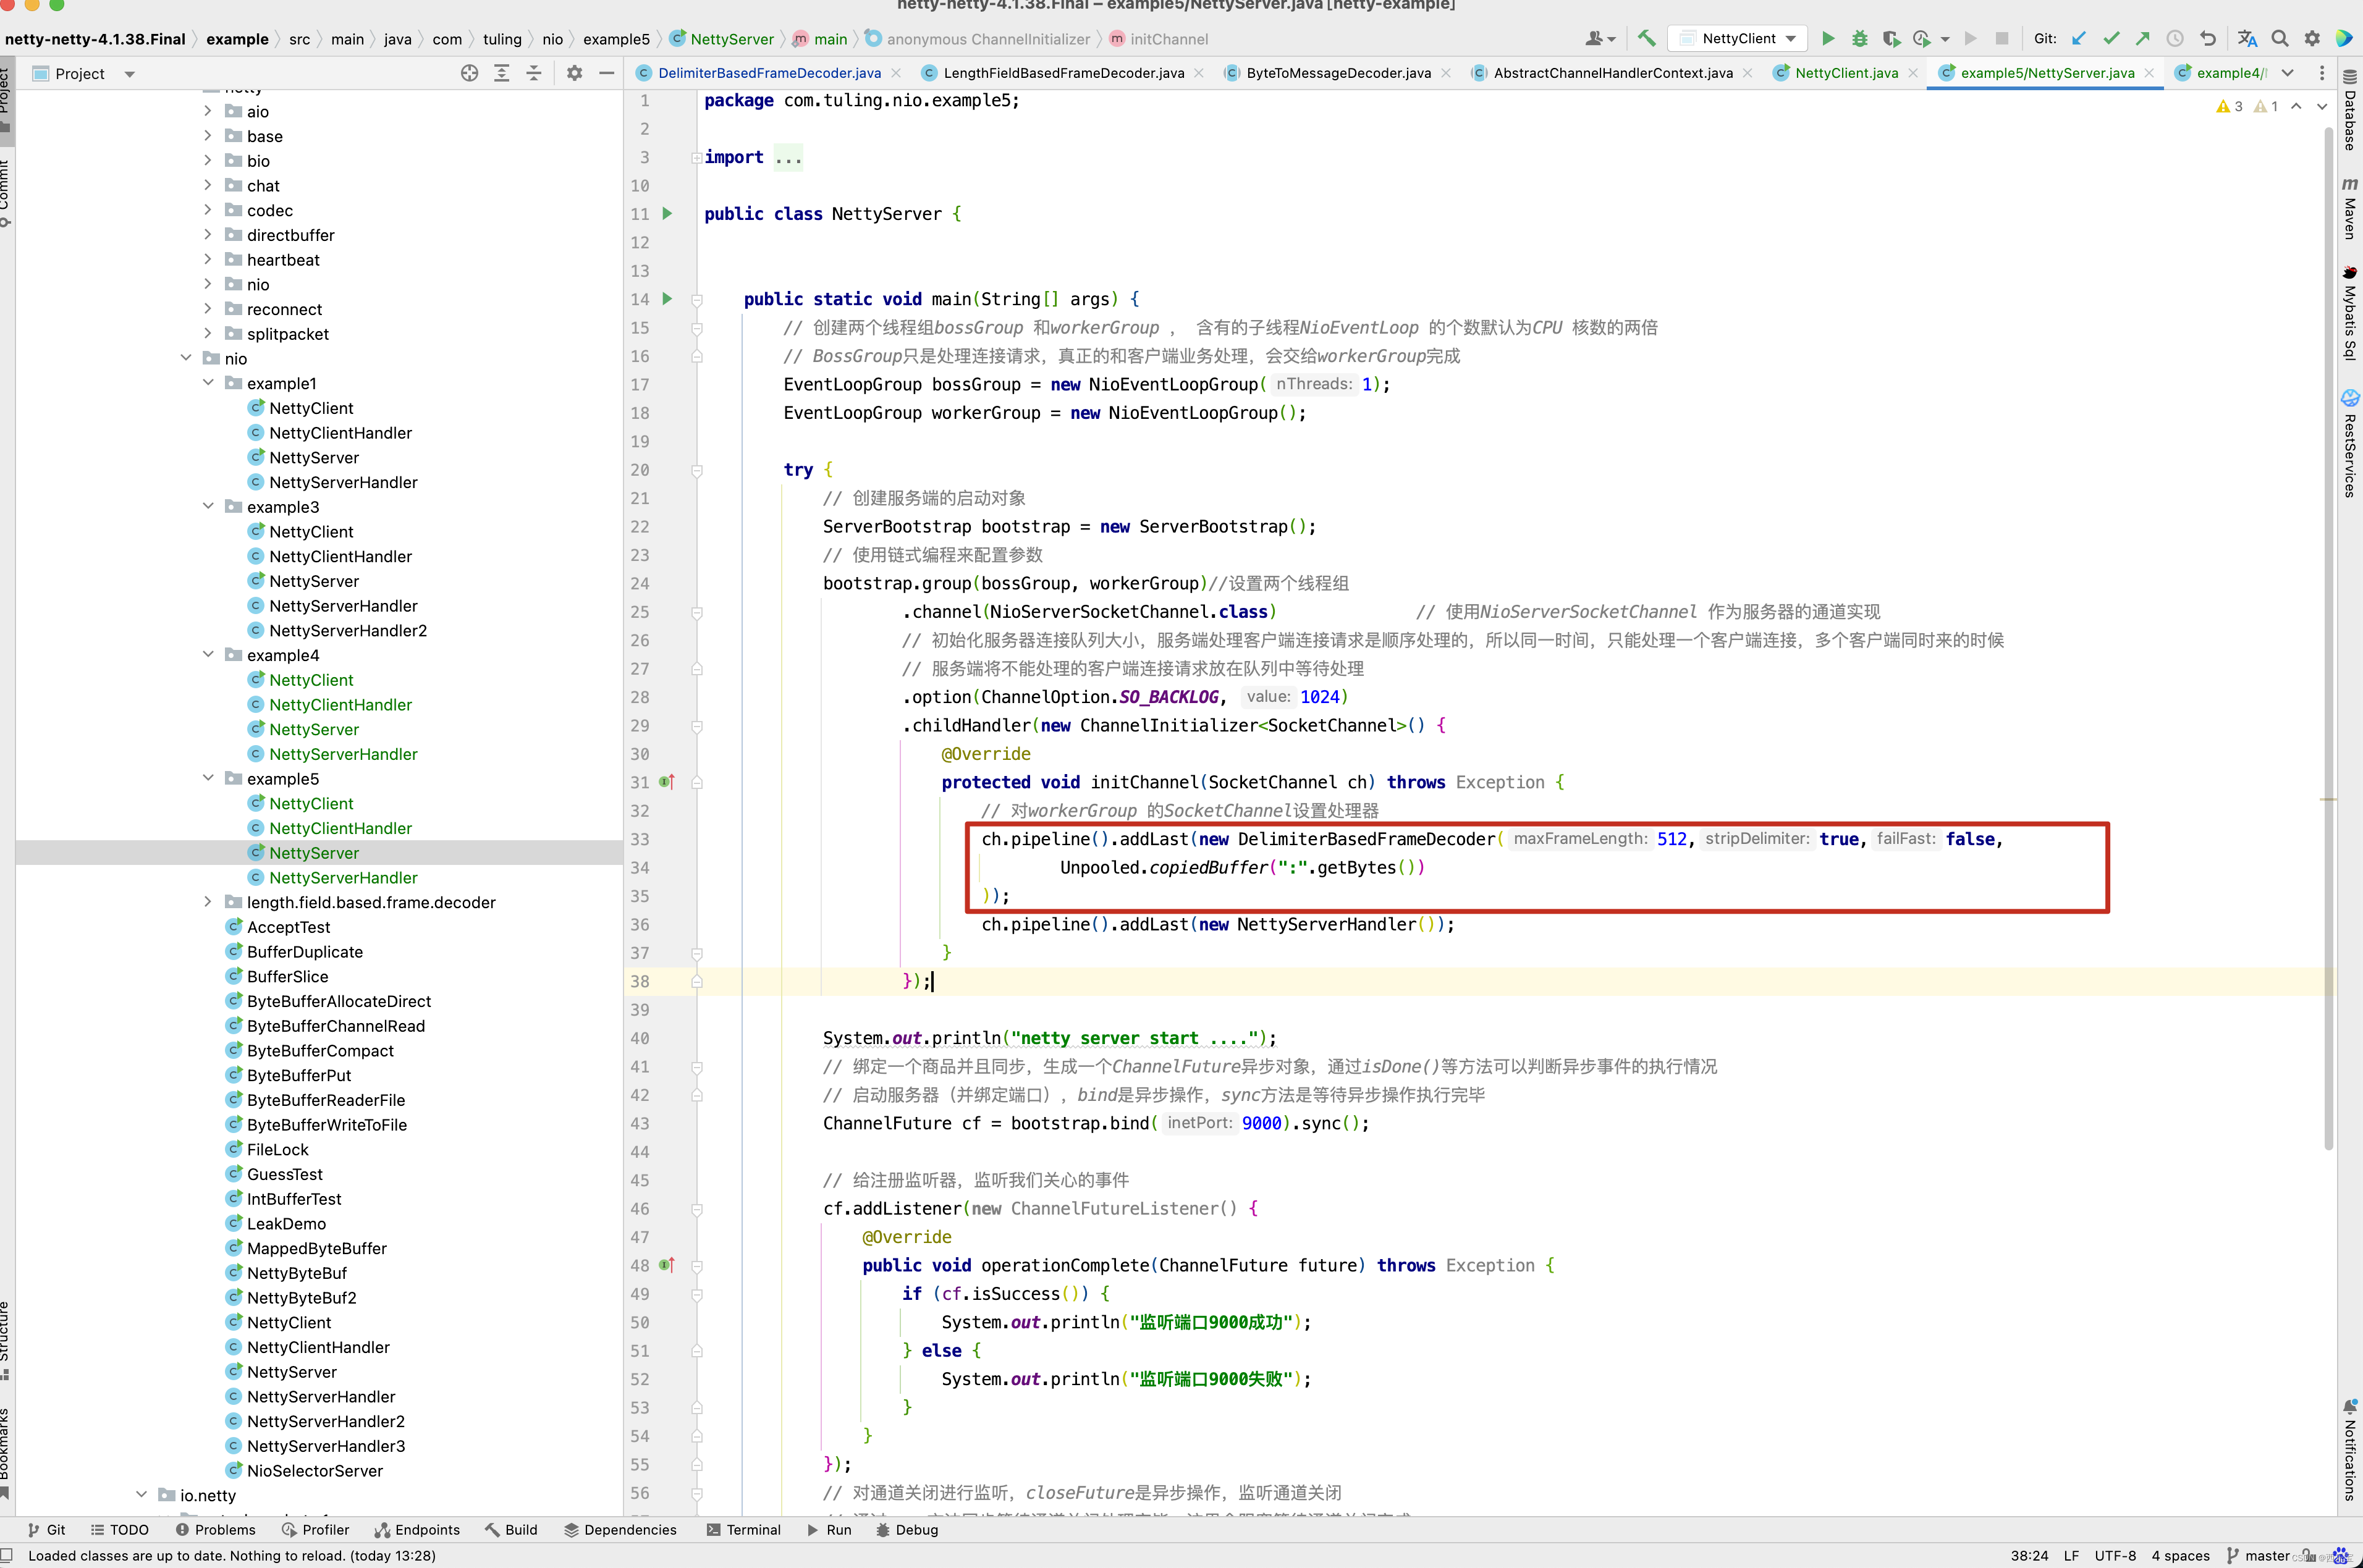
那这个异常什么时候调用呢? 我们还是以DelimiterBasedFrameDecoder为例子来测试异常处理流程。

和example5例子的区别是DelimiterBasedFrameDecoder的failFast参数设置为true,而这个字段的含义是遇到错误时,是否抛出异常。
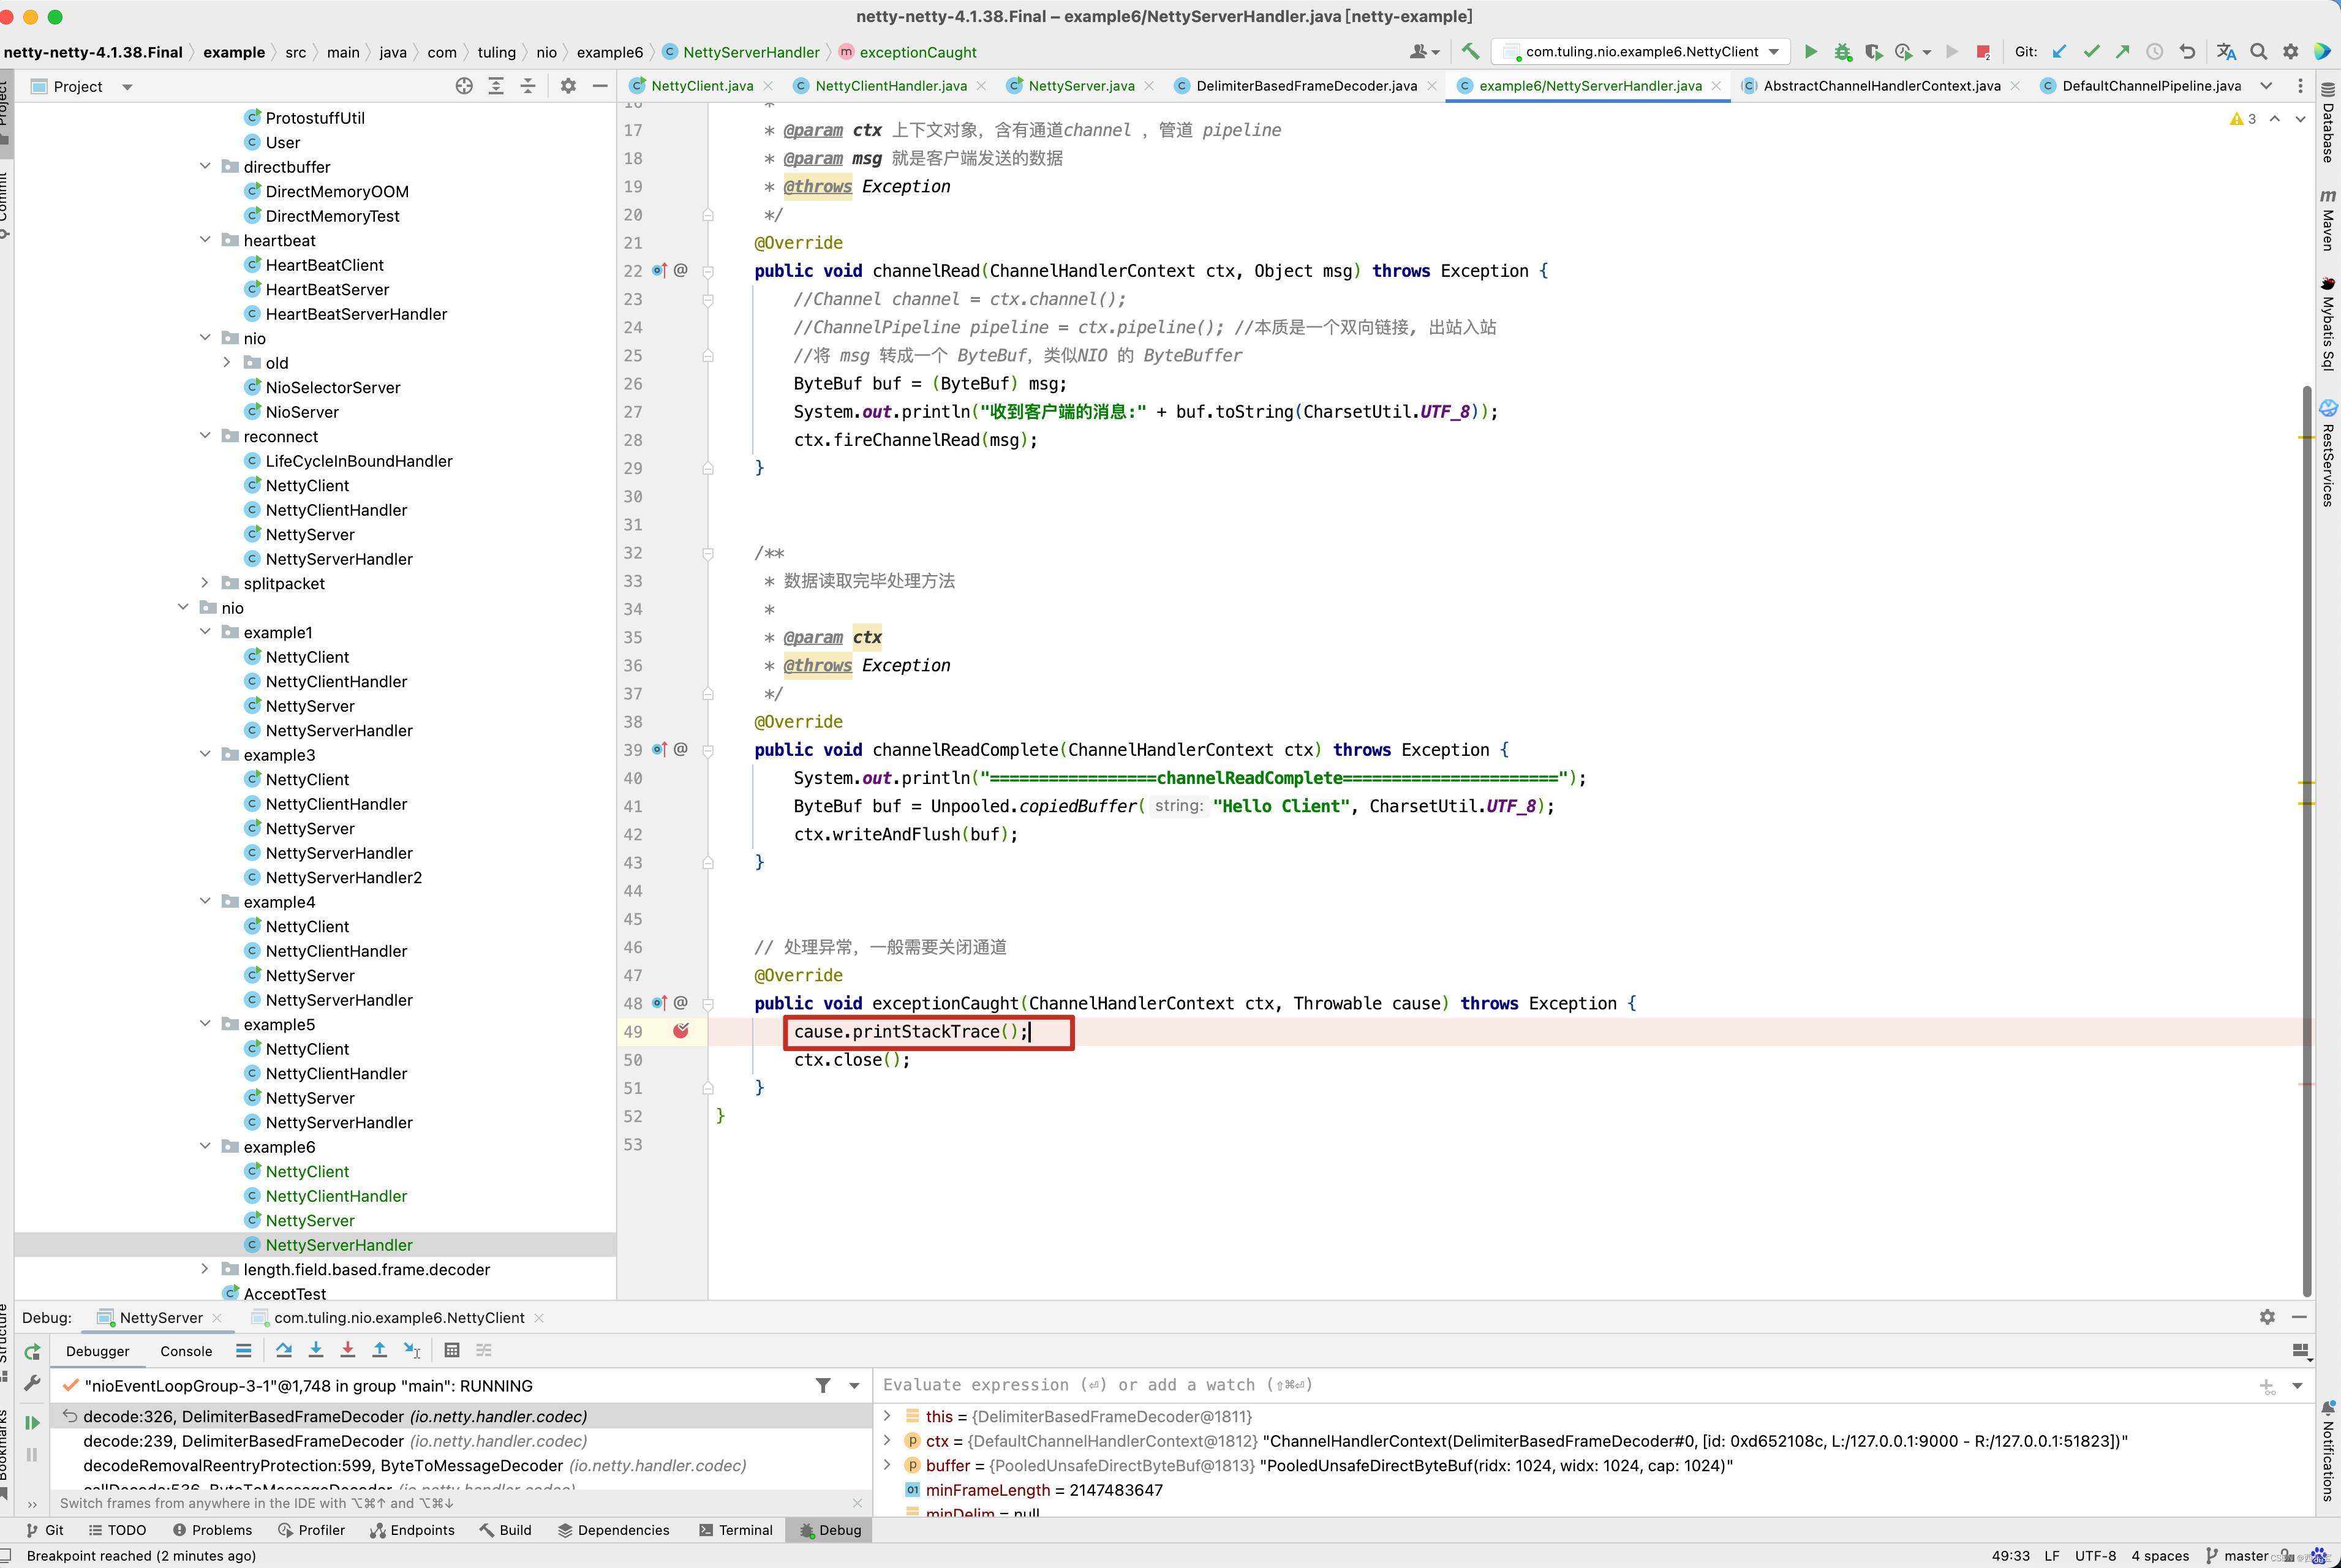
进入fail()方法。 抛出TooLongFrameException异常
最终被invokeChannelRead()方法异常捕获,进入

private void invokeChannelRead(Object msg) {if (invokeHandler()) {try {((ChannelInboundHandler) handler()).channelRead(this, msg);} catch (Throwable t) {notifyHandlerException(t);}} else {fireChannelRead(msg);}
}private void notifyHandlerException(Throwable cause) {if (inExceptionCaught(cause)) {if (logger.isWarnEnabled()) {logger.warn("An exception was thrown by a user handler " +"while handling an exceptionCaught event", cause);}return;}invokeExceptionCaught(cause);
}private void invokeExceptionCaught(final Throwable cause) {if (invokeHandler()) {try {handler().exceptionCaught(this, cause);} catch (Throwable error) {if (logger.isDebugEnabled()) {logger.debug("An exception {}" +"was thrown by a user handler's exceptionCaught() " +"method while handling the following exception:",ThrowableUtil.stackTraceToString(error), cause);} else if (logger.isWarnEnabled()) {logger.warn("An exception '{}' [enable DEBUG level for full stacktrace] " +"was thrown by a user handler's exceptionCaught() " +"method while handling the following exception:", error, cause);}}} else {fireExceptionCaught(cause);}
}// 最终调用我们的业务方法处理异常
public void exceptionCaught(ChannelHandlerContext ctx, Throwable cause) throws Exception {cause.printStackTrace();ctx.close();
}
心跳检测用例源码分析
这个用例的主要功能就是每3秒检测一次是否没有读事件,如果连续3次没有检测到读事件,通知客户端关闭链接,先看服务端代码 。
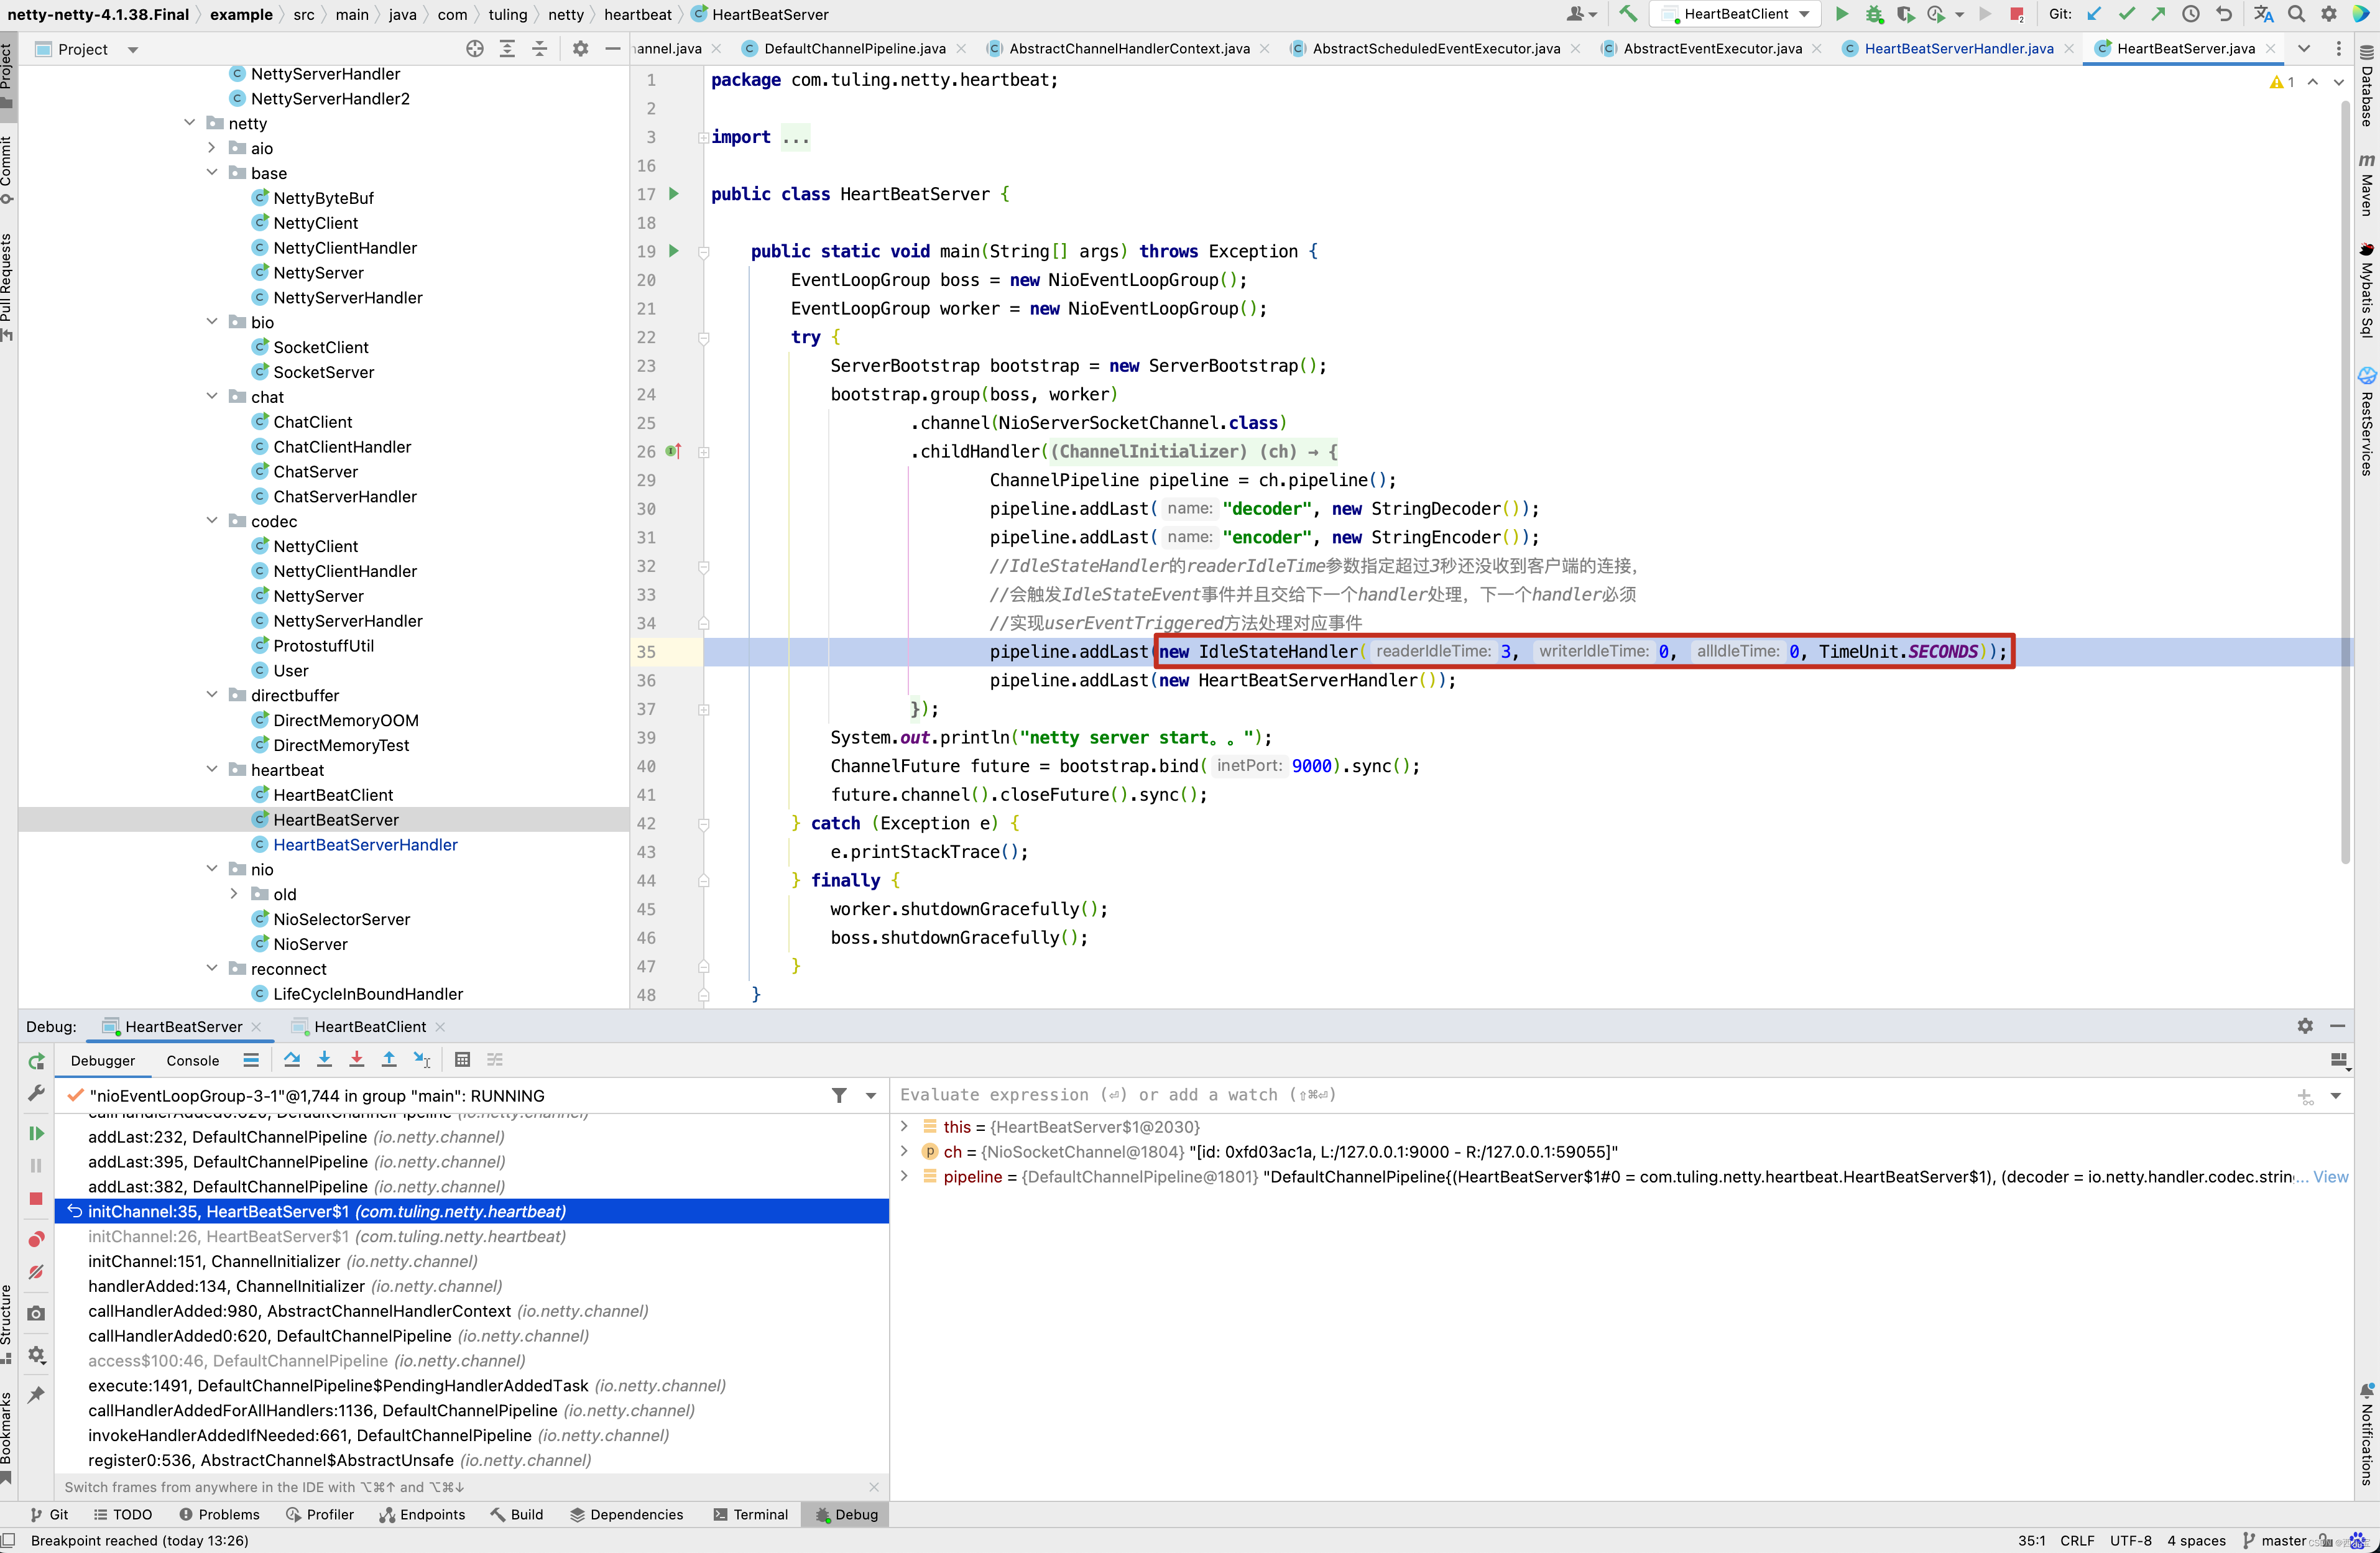
public class HeartBeatServer {public static void main(String[] args) throws Exception {EventLoopGroup boss = new NioEventLoopGroup();EventLoopGroup worker = new NioEventLoopGroup();try {ServerBootstrap bootstrap = new ServerBootstrap();bootstrap.group(boss, worker).channel(NioServerSocketChannel.class).childHandler(new ChannelInitializer<SocketChannel>() {@Overrideprotected void initChannel(SocketChannel ch) throws Exception {ChannelPipeline pipeline = ch.pipeline();pipeline.addLast("decoder", new StringDecoder());pipeline.addLast("encoder", new StringEncoder());//IdleStateHandler的readerIdleTime参数指定超过3秒还没收到客户端的连接,//会触发IdleStateEvent事件并且交给下一个handler处理,下一个handler必须//实现userEventTriggered方法处理对应事件pipeline.addLast(new IdleStateHandler(3, 0, 0, TimeUnit.SECONDS));pipeline.addLast(new HeartBeatServerHandler());}});System.out.println("netty server start。。");ChannelFuture future = bootstrap.bind(9000).sync();future.channel().closeFuture().sync();} catch (Exception e) {e.printStackTrace();} finally {worker.shutdownGracefully();boss.shutdownGracefully();}}
}public class HeartBeatServerHandler extends SimpleChannelInboundHandler<String> {int readIdleTimes = 0;@Overridepublic void channelReadComplete(ChannelHandlerContext ctx) throws Exception {super.channelReadComplete(ctx);// 保证连续3次都没有读事件,因此每次发生读完成事件,就重置readIdleTimes readIdleTimes = 0 ;}@Overrideprotected void channelRead0(ChannelHandlerContext ctx, String s) throws Exception {System.out.println(" ====== > [server] message received : " + s);if ("Heartbeat Packet".equals(s)) {ctx.channel().writeAndFlush("ok");} else {System.out.println(" 其他信息处理 ... ");}}@Overridepublic void userEventTriggered(ChannelHandlerContext ctx, Object evt) throws Exception {IdleStateEvent event = (IdleStateEvent) evt;String eventType = null;switch (event.state()) {case READER_IDLE:eventType = "读空闲";readIdleTimes++; // 读空闲的计数加1break;case WRITER_IDLE:eventType = "写空闲";// 不处理break;case ALL_IDLE:eventType = "读写空闲";// 不处理break;}System.out.println(ctx.channel().remoteAddress() + "超时事件:" + eventType);if (readIdleTimes > 3) {System.out.println(" [server]读空闲超过3次,关闭连接,释放更多资源");ctx.channel().writeAndFlush("idle close");ctx.channel().close();}}@Overridepublic void channelActive(ChannelHandlerContext ctx) throws Exception {System.err.println("=== " + ctx.channel().remoteAddress() + " is active ===");}
}
接下来看客户端代码 。
public class HeartBeatClient {public static void main(String[] args) throws Exception {EventLoopGroup eventLoopGroup = new NioEventLoopGroup();try {Bootstrap bootstrap = new Bootstrap();bootstrap.group(eventLoopGroup).channel(NioSocketChannel.class).handler(new ChannelInitializer<SocketChannel>() {@Overrideprotected void initChannel(SocketChannel ch) throws Exception {ChannelPipeline pipeline = ch.pipeline();pipeline.addLast("decoder", new StringDecoder());pipeline.addLast("encoder", new StringEncoder());pipeline.addLast(new HeartBeatClientHandler());}});System.out.println("netty client start。。");Channel channel = bootstrap.connect("127.0.0.1", 9000).sync().channel();String text = "Heartbeat Packet";Random random = new Random();while (channel.isActive()) {int num = random.nextInt(8);Thread.sleep(num * 1000);channel.writeAndFlush(text);}} catch (Exception e) {e.printStackTrace();} finally {eventLoopGroup.shutdownGracefully();}}static class HeartBeatClientHandler extends SimpleChannelInboundHandler<String> {@Overrideprotected void channelRead0(ChannelHandlerContext ctx, String msg) throws Exception {System.out.println(" client received :" + msg);if (msg != null && msg.equals("idle close")) {// 服务端告诉客户端关闭链接,客户端也关闭链接 System.out.println(" 服务端关闭连接,客户端也关闭");ctx.channel().closeFuture();}}}
}
先看IdleStateHandler的构造方法 。
 public IdleStateHandler(long readerIdleTime, long writerIdleTime, long allIdleTime,TimeUnit unit) {this(false, readerIdleTime, writerIdleTime, allIdleTime, unit);
}public IdleStateHandler(boolean observeOutput,long readerIdleTime, long writerIdleTime, long allIdleTime,TimeUnit unit) {if (unit == null) {throw new NullPointerException("unit");}this.observeOutput = observeOutput;if (readerIdleTime <= 0) {readerIdleTimeNanos = 0;} else {readerIdleTimeNanos = Math.max(unit.toNanos(readerIdleTime), MIN_TIMEOUT_NANOS);}if (writerIdleTime <= 0) {writerIdleTimeNanos = 0;} else {writerIdleTimeNanos = Math.max(unit.toNanos(writerIdleTime), MIN_TIMEOUT_NANOS);}if (allIdleTime <= 0) {allIdleTimeNanos = 0;} else {allIdleTimeNanos = Math.max(unit.toNanos(allIdleTime), MIN_TIMEOUT_NANOS);}
}
本例中,主要设置读超时时间,readerIdleTimeNanos存储的是纳秒值,接下来看IdleStateHandler的initialize()方法,先理清楚什么时候调用initialize()方法,可以在initialize()方法中打一个断点。
而这个方法会调用我们自定义的ChannelInitializer的initChannel()方法 。
而pipeline.addLast(new IdleStateHandler(3, 0, 0, TimeUnit.SECONDS)) 这一行代码会初始化IdleStateHandler,并且将IdleStateHandler添加到流水线中,之前在分析addLast()方法时,还漏掉了一个方法callHandlerAdded0()没有分析 。
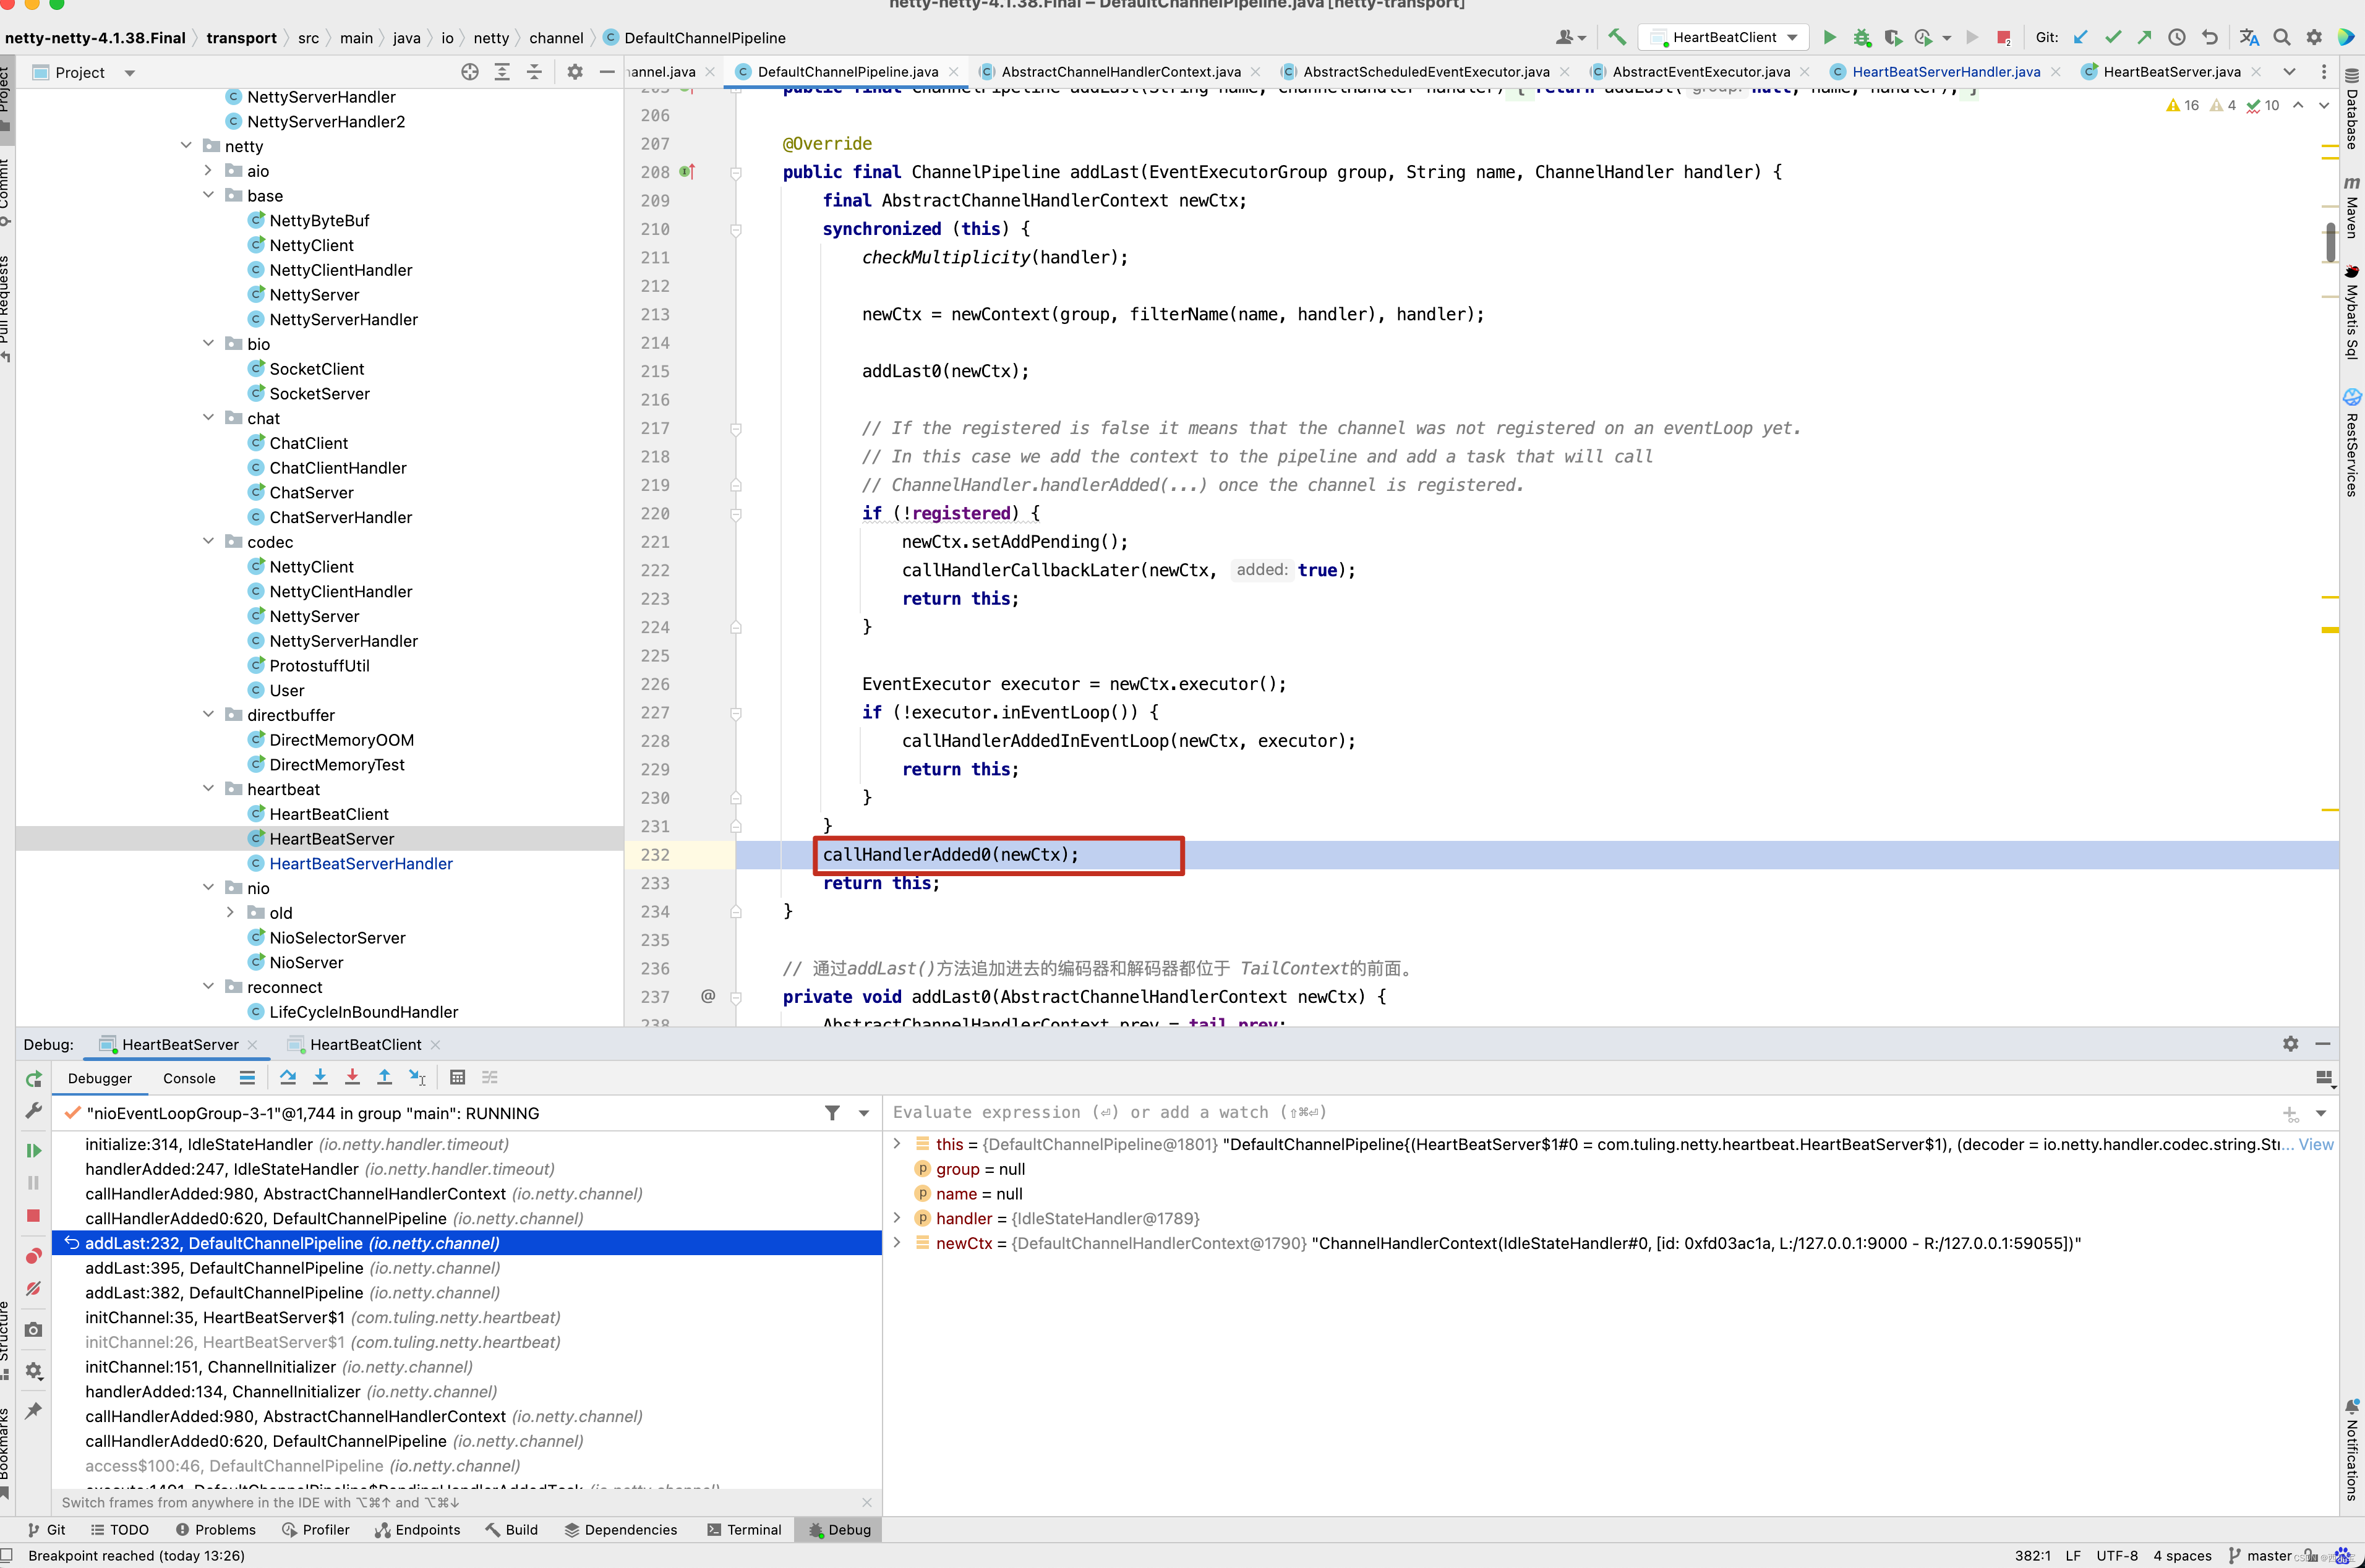
接下来看callHandlerAdded0()方法的具体实现。
private void callHandlerAdded0(final AbstractChannelHandlerContext ctx) {try {ctx.callHandlerAdded();} catch (Throwable t) {boolean removed = false;try {remove0(ctx);ctx.callHandlerRemoved();removed = true;} catch (Throwable t2) {if (logger.isWarnEnabled()) {logger.warn("Failed to remove a handler: " + ctx.name(), t2);}}if (removed) {fireExceptionCaught(new ChannelPipelineException(ctx.handler().getClass().getName() +".handlerAdded() has thrown an exception; removed.", t));} else {fireExceptionCaught(new ChannelPipelineException(ctx.handler().getClass().getName() +".handlerAdded() has thrown an exception; also failed to remove.", t));}}
}final void callHandlerAdded() throws Exception {// We must call setAddComplete before calling handlerAdded. Otherwise if the handlerAdded method generates// any pipeline events ctx.handler() will miss them because the state will not allow it.if (setAddComplete()) {handler().handlerAdded(this);}
}public void handlerAdded(ChannelHandlerContext ctx) throws Exception {if (ctx.channel().isActive() && ctx.channel().isRegistered()) {// channelActive() event has been fired already, which means this.channelActive() will// not be invoked. We have to initialize here instead.initialize(ctx);} else {// channelActive() event has not been fired yet.  this.channelActive() will be invoked// and initialization will occur there.}
}private void initialize(ChannelHandlerContext ctx) {// Avoid the case where destroy() is called before scheduling timeouts.// See: https://github.com/netty/netty/issues/143switch (state) {case 1:       // 初始化进行中或者已经完成case 2:      // 销毁进行中或者已经完成return;}state = 1;initOutputChanged(ctx);// 初始化的工作较为简单,设定最近一次读取时间lastReadTime为当前系统时间,然后在用户设置的读超时时间readerIdleTimeNanos截止时,// 执行一个ReaderIdleTimeoutTask进行检测。lastReadTime = lastWriteTime = ticksInNanos();if (readerIdleTimeNanos > 0) {readerIdleTimeout = schedule(ctx, new ReaderIdleTimeoutTask(ctx),readerIdleTimeNanos, TimeUnit.NANOSECONDS);}if (writerIdleTimeNanos > 0) {writerIdleTimeout = schedule(ctx, new WriterIdleTimeoutTask(ctx),writerIdleTimeNanos, TimeUnit.NANOSECONDS);}if (allIdleTimeNanos > 0) {allIdleTimeout = schedule(ctx, new AllIdleTimeoutTask(ctx),allIdleTimeNanos, TimeUnit.NANOSECONDS);}
}
首先要明白 initialize()方法是何时调用,他是流水线在调用addLast()方法的结尾时调用了callHandlerAdded0()方法,而这个方法会调用Handler的handlerAdded()方法。最终会调用initialize()方法,而initialize()最重要的是做了lastReadTime = lastWriteTime = ticksInNanos() 这件事情,将最后读取时间和最后写时间初始化为当前时间,如果我们在初始化IdleStateHandler设置了readerIdleTime空闲时间监控,此时会创建一个任务并添加到NioEventLoop的任务列表中,关于创建一个任务并添加到NioEventLoop的任务列表这一块的代码,我们跟进分析分析 。
ScheduledFuture<?> schedule(ChannelHandlerContext ctx, Runnable task, long delay, TimeUnit unit) {return ctx.executor().schedule(task, delay, unit);
}ScheduledFuture<?> schedule(ChannelHandlerContext ctx, Runnable task, long delay, TimeUnit unit) {return ctx.executor().schedule(task, delay, unit);
}public ScheduledFuture<?> schedule(Runnable command, long delay, TimeUnit unit) {ObjectUtil.checkNotNull(command, "command");ObjectUtil.checkNotNull(unit, "unit");if (delay < 0) {delay = 0;}validateScheduled0(delay, unit);return schedule(new ScheduledFutureTask<Void>(this, command, null, ScheduledFutureTask.deadlineNanos(unit.toNanos(delay))));
}<V> ScheduledFuture<V> schedule(final ScheduledFutureTask<V> task) {if (inEventLoop()) {scheduledTaskQueue().add(task);} else {execute(new Runnable() {@Overridepublic void run() {scheduledTaskQueue().add(task);}});}return task;
}PriorityQueue<ScheduledFutureTask<?>> scheduledTaskQueue;public PriorityQueue<ScheduledFutureTask<?>> scheduledTaskQueue() {if (scheduledTaskQueue == null) {scheduledTaskQueue = new DefaultPriorityQueue<ScheduledFutureTask<?>>(SCHEDULED_FUTURE_TASK_COMPARATOR,// Use same initial capacity as java.util.PriorityQueue11);}return scheduledTaskQueue;
}
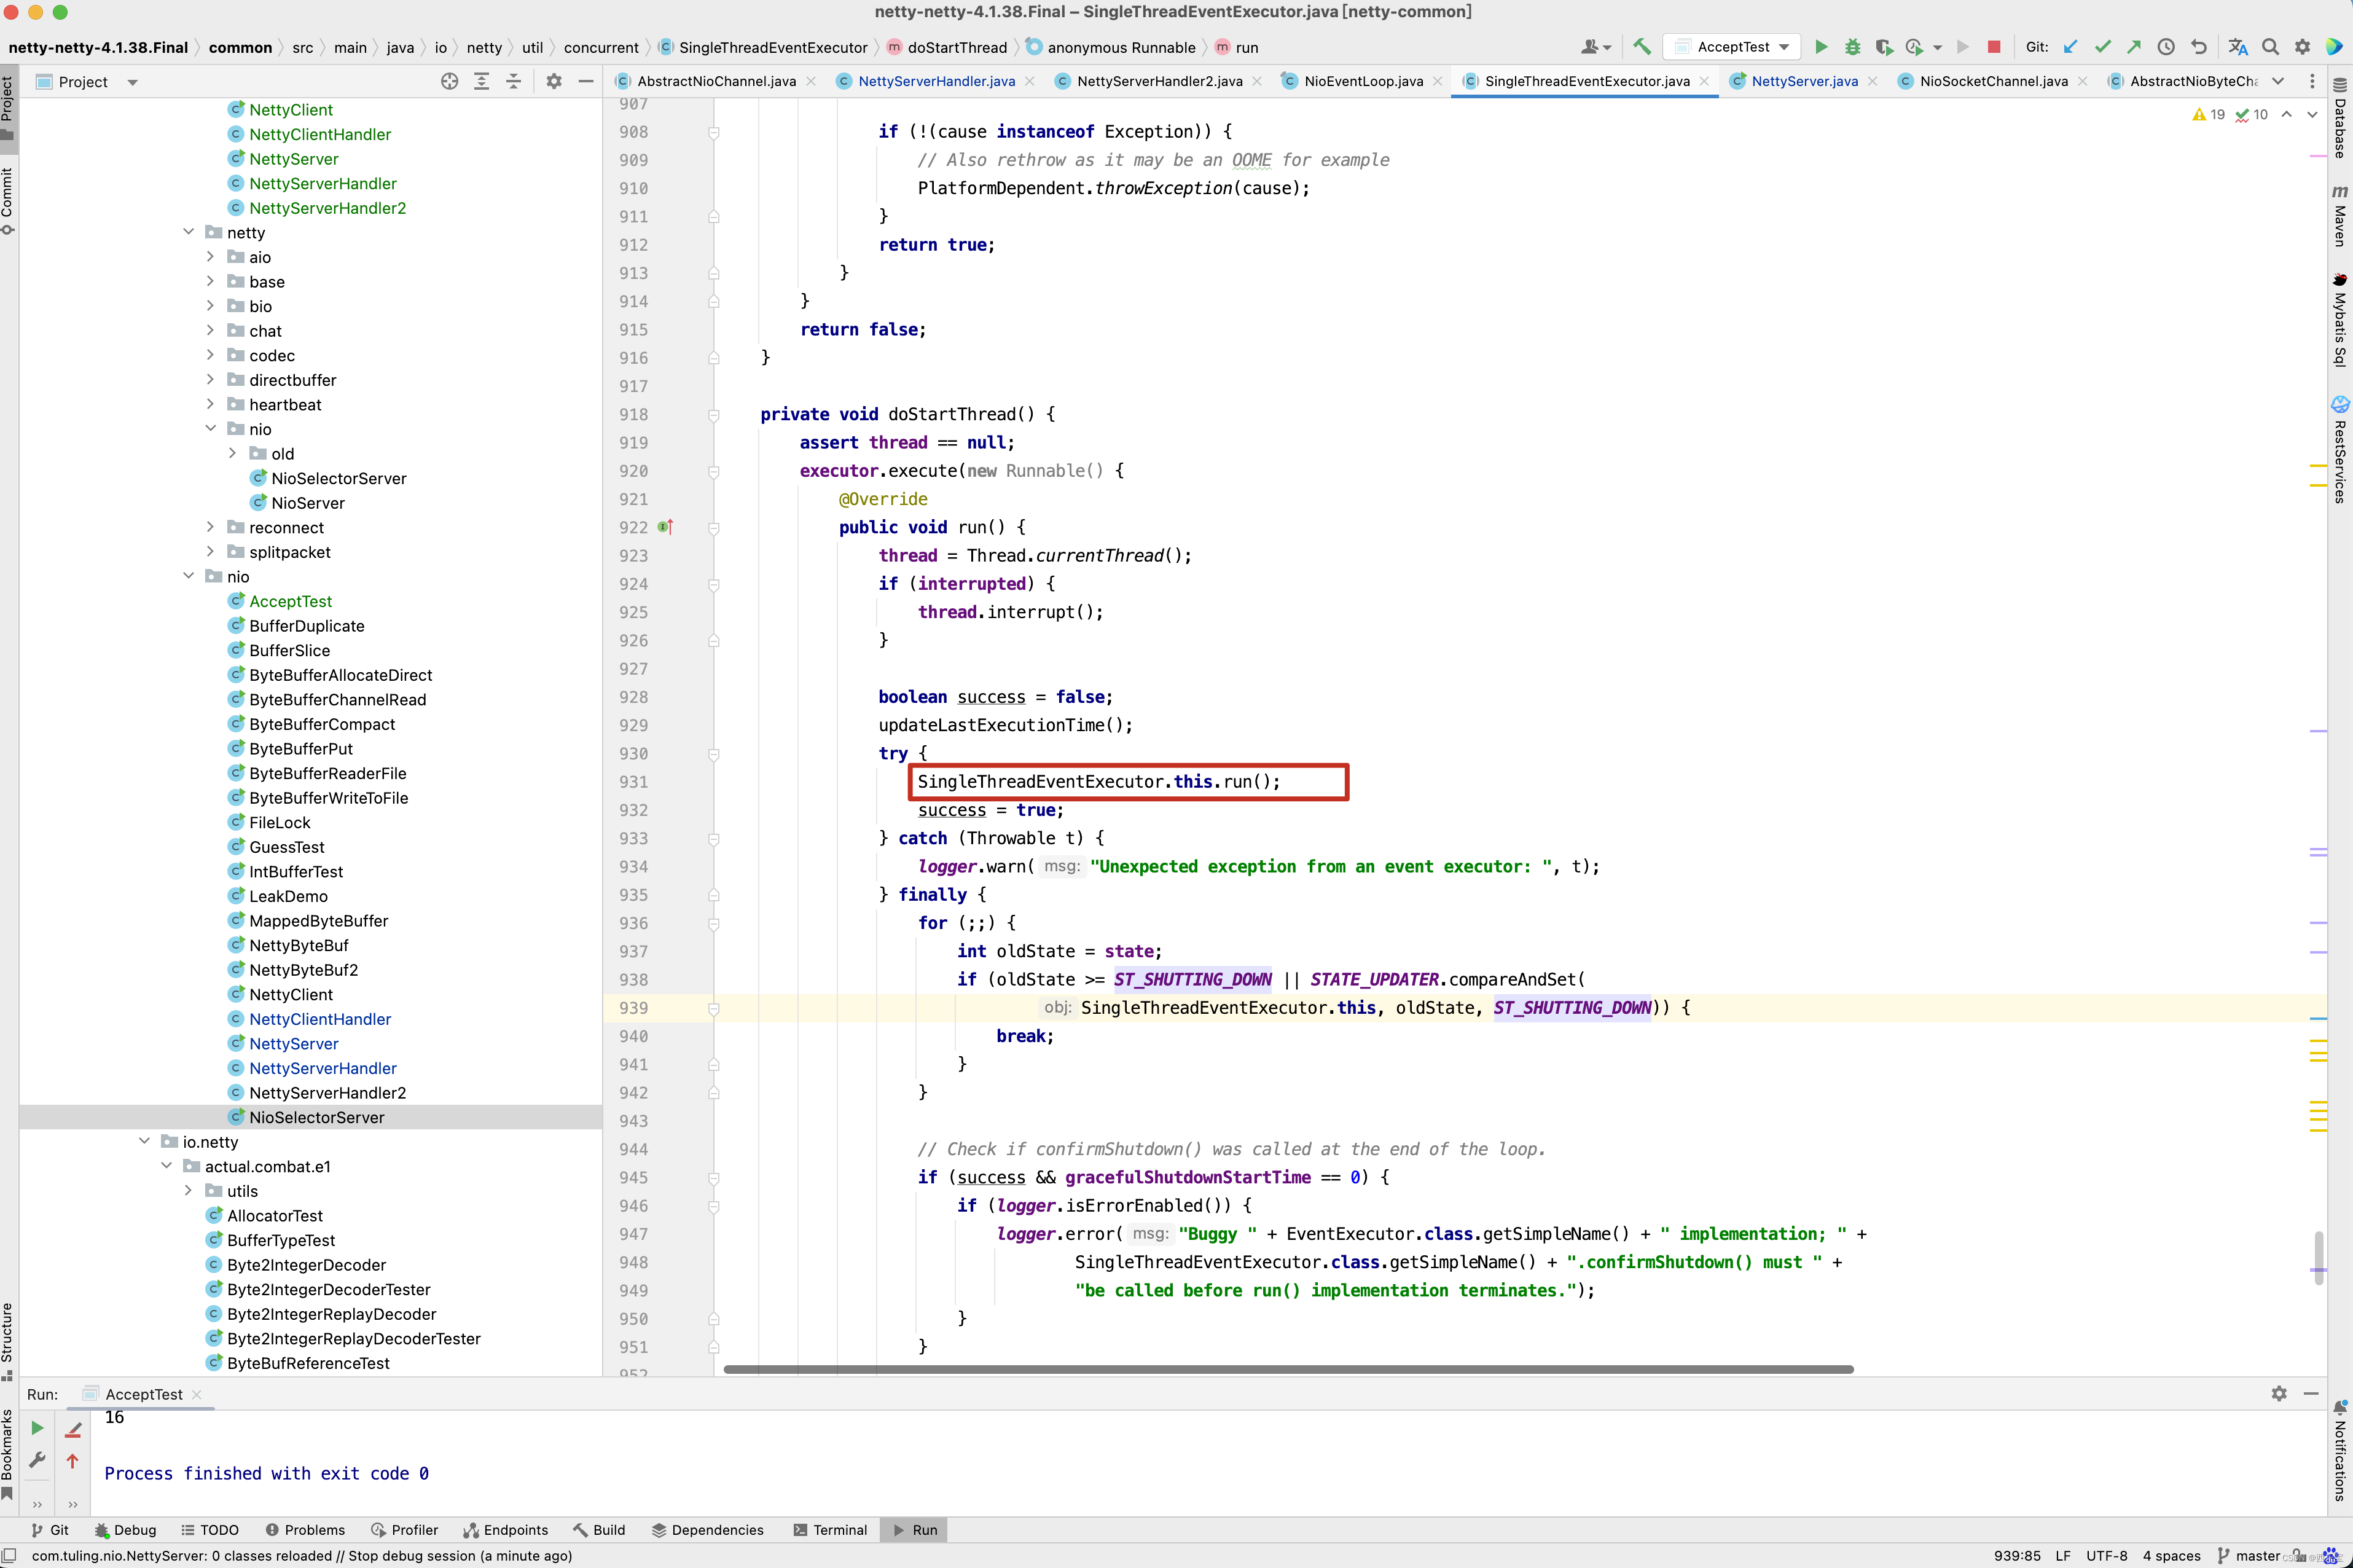
scheduledTaskQueue这个队列是不是特别熟悉了,首先scheduledTaskQueue队列是一个优先级队列,之前写过一篇博客 ArrayBlockingQueue&LinkedBlockingQueue&DelayQueue&SynchronousQueue&PriorityBlockingQueue源码解析 专门分析优先级队列的原理,有兴趣可以去看看,但有一个结论需要记住,如设置延迟时间为3秒,3秒之后一定能从PriorityQueue中poll()中得到元素,在之前的博客中 Netty 源码解析(上) 对NioEventLoop的select()方法中了详细的分析 。
而在schedule()方法中ctx.executor()获得的是NioEventLoop对象。
ScheduledFuture<?> schedule(ChannelHandlerContext ctx, Runnable task, long delay, TimeUnit unit) {return ctx.executor().schedule(task, delay, unit);
}
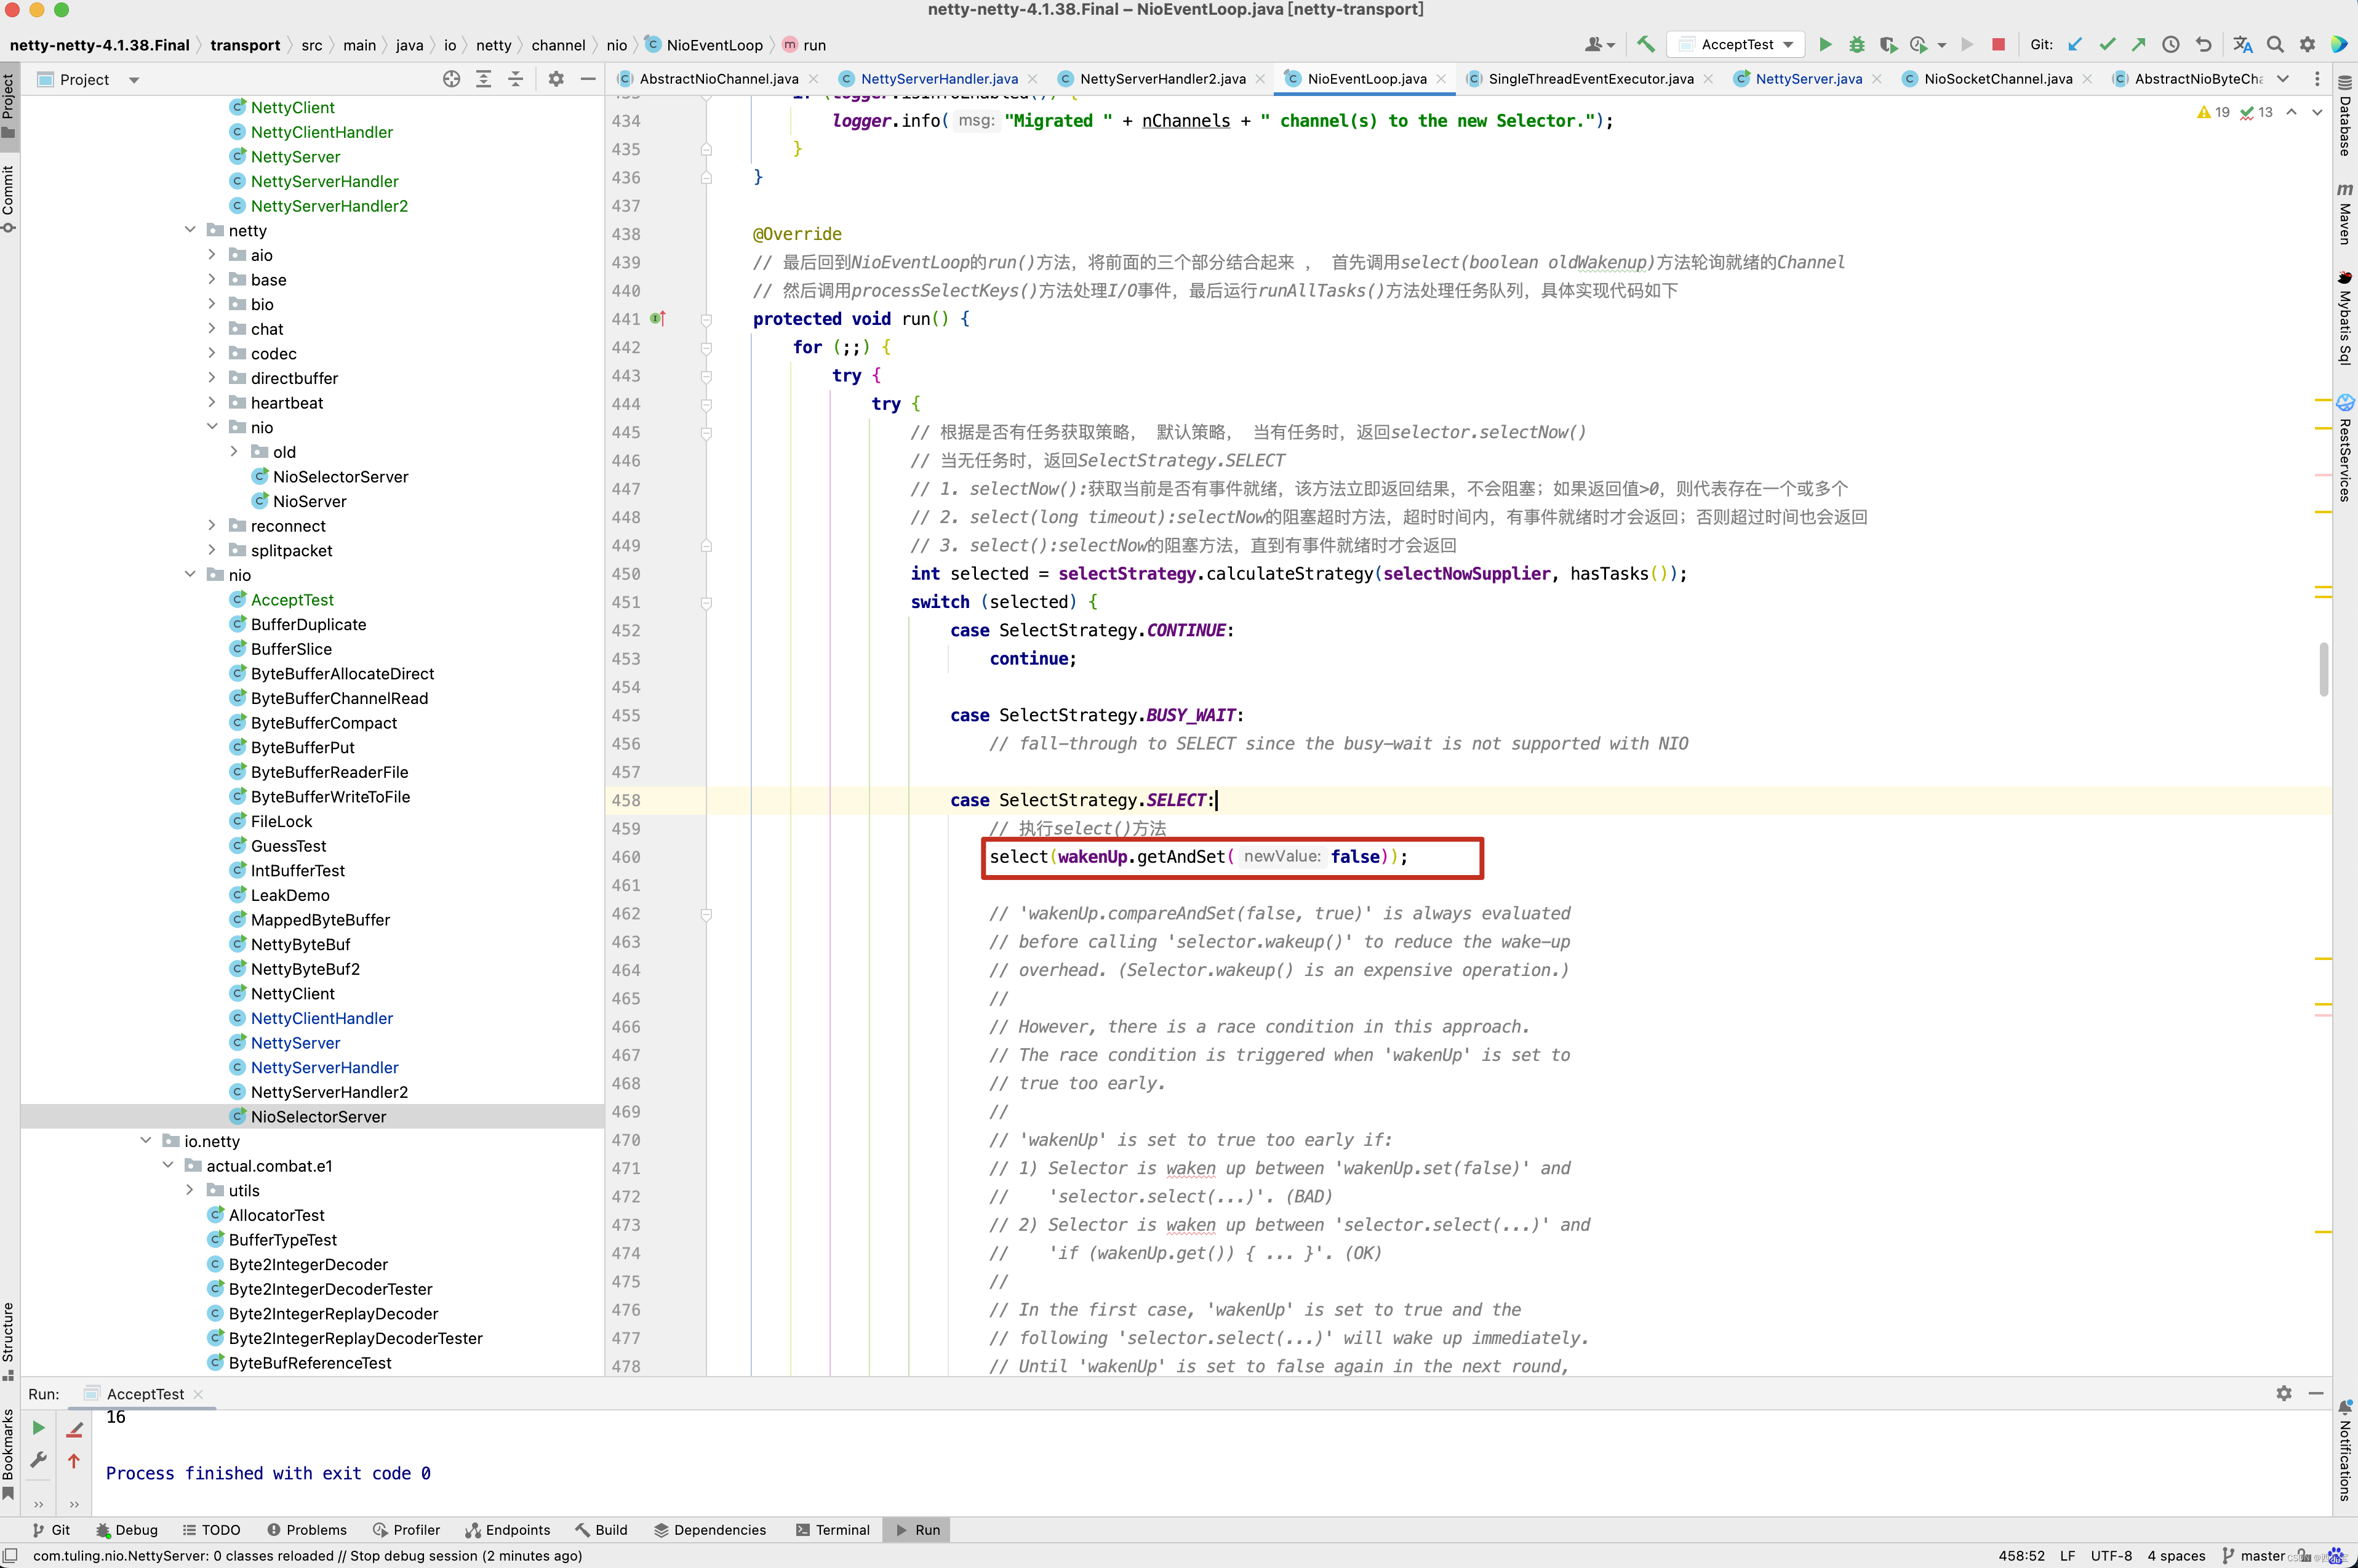
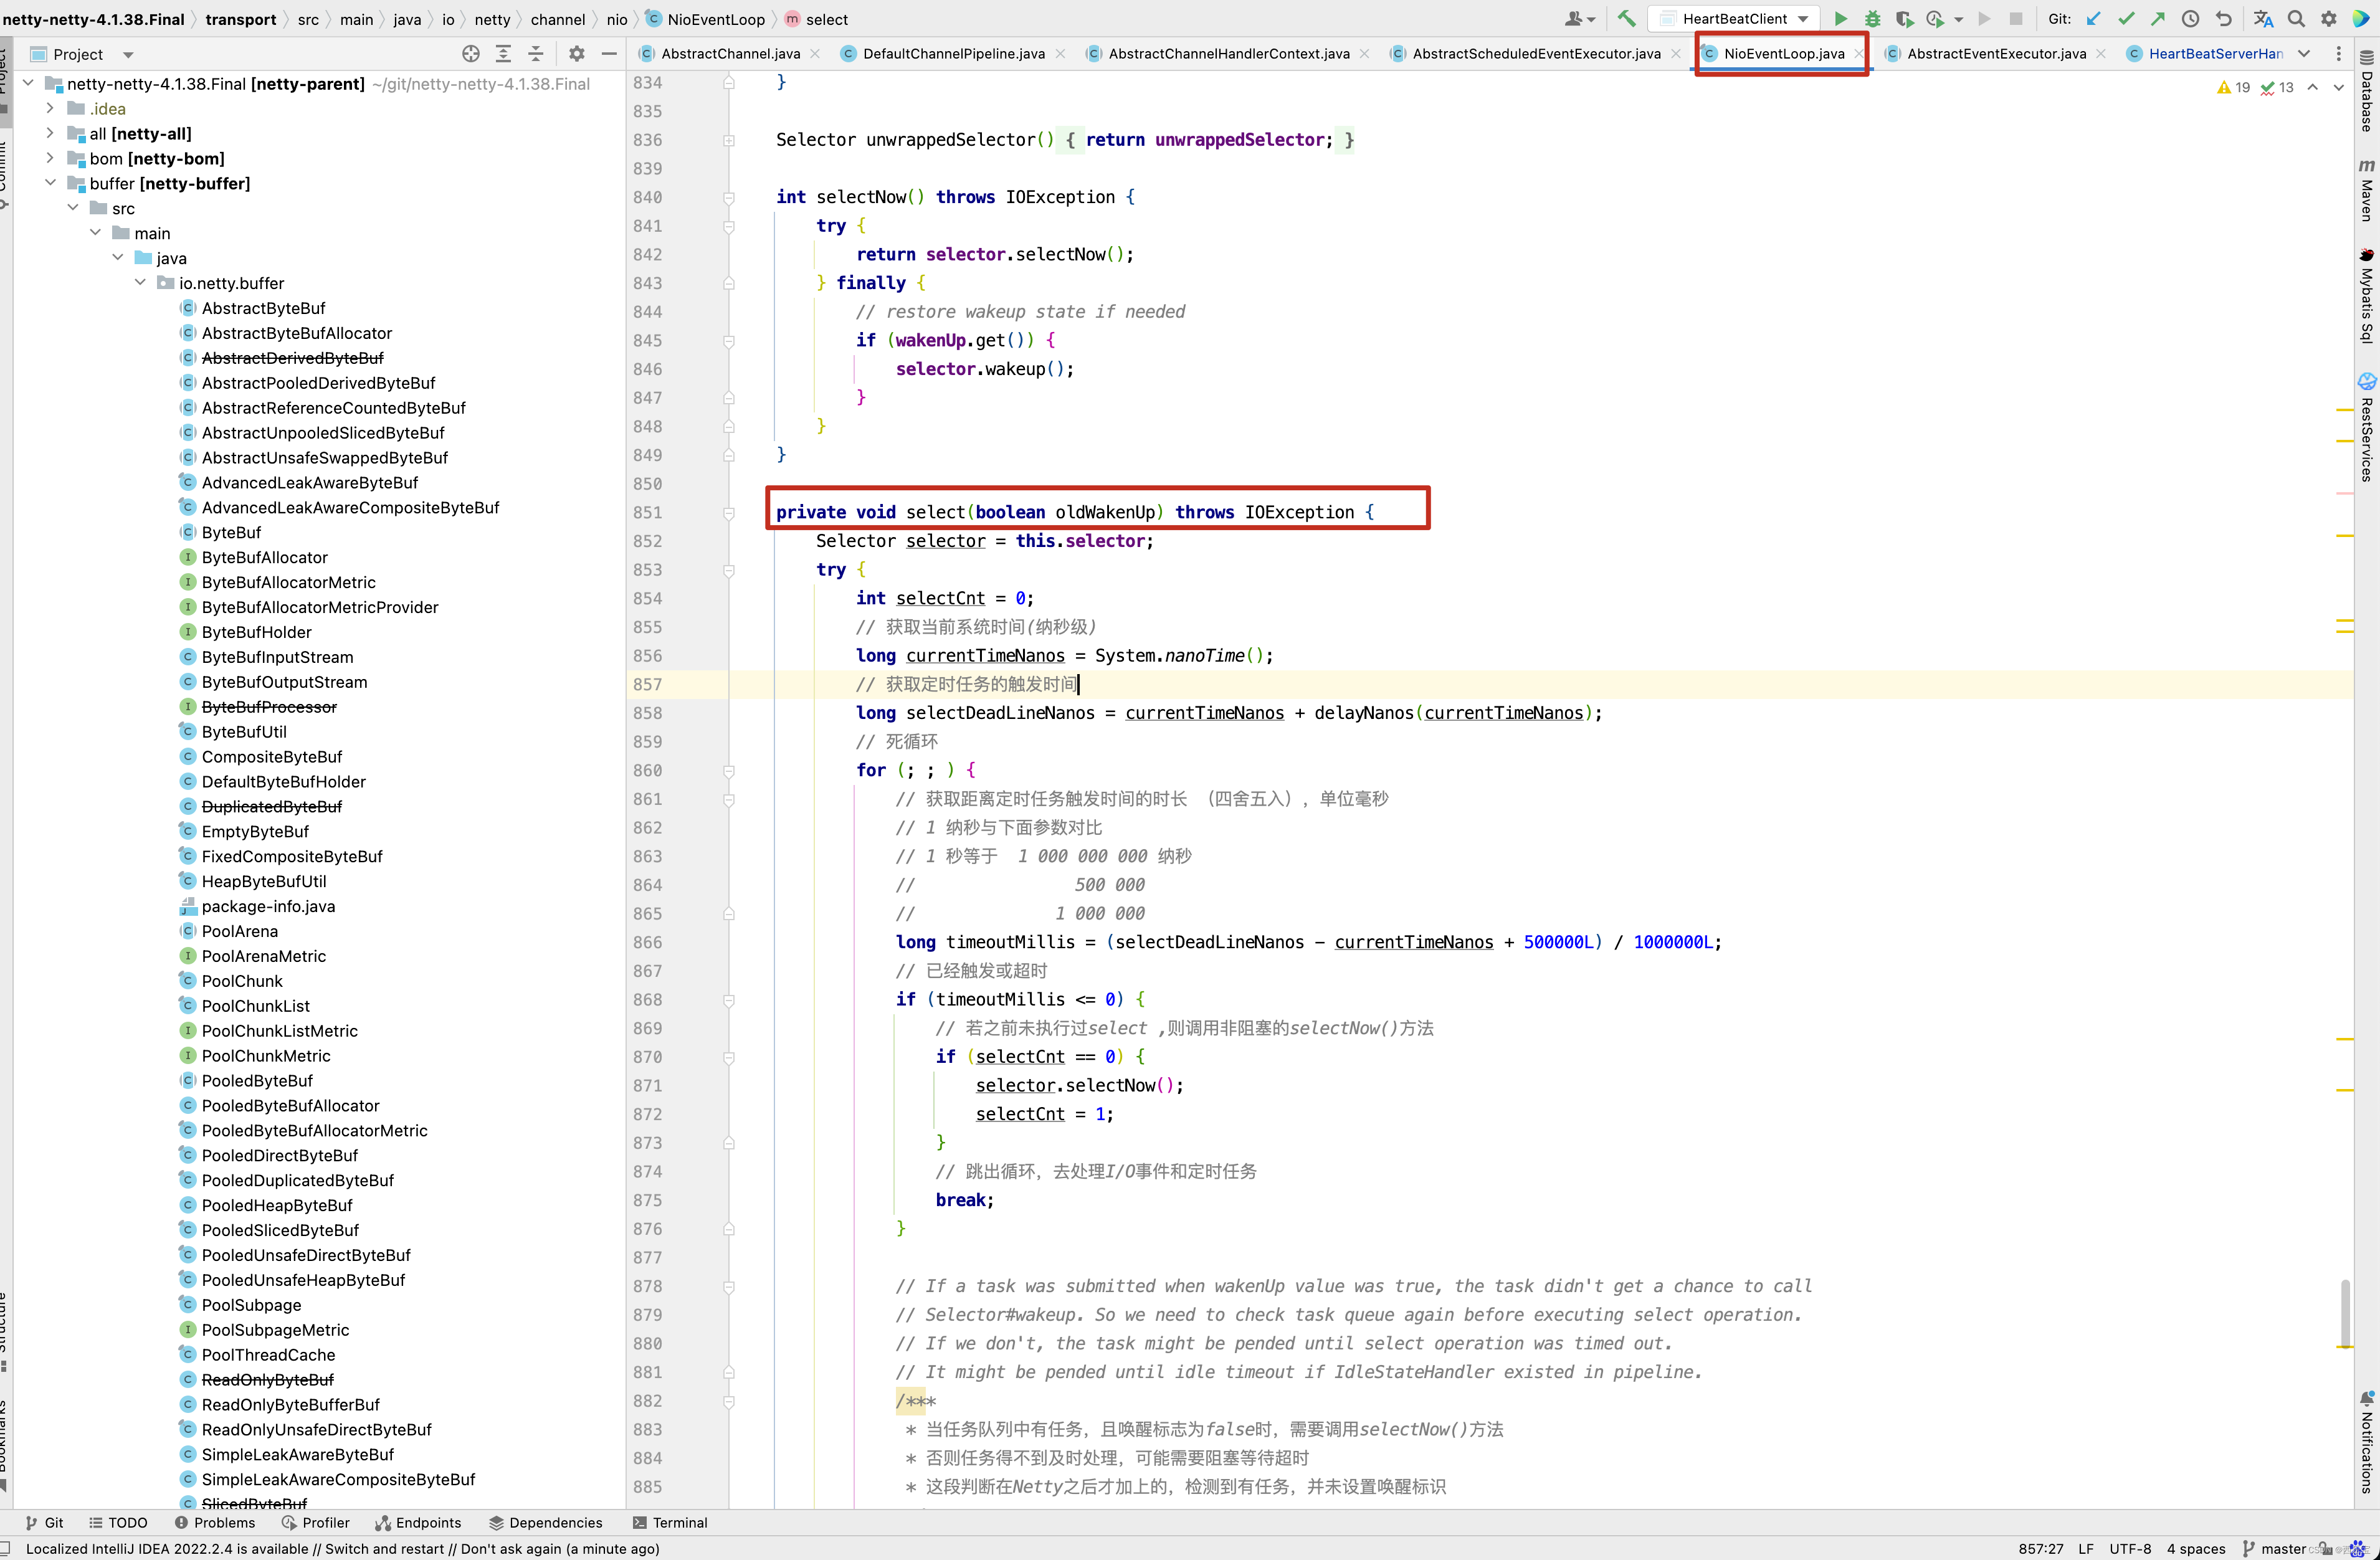
也就是最后,在IdleStateHandler的初始化方法中创建的ReaderIdleTimeoutTask任务被添加到NioEventLoop的scheduledTaskQueue队列中。 我们再回顾之前的select()方法 。
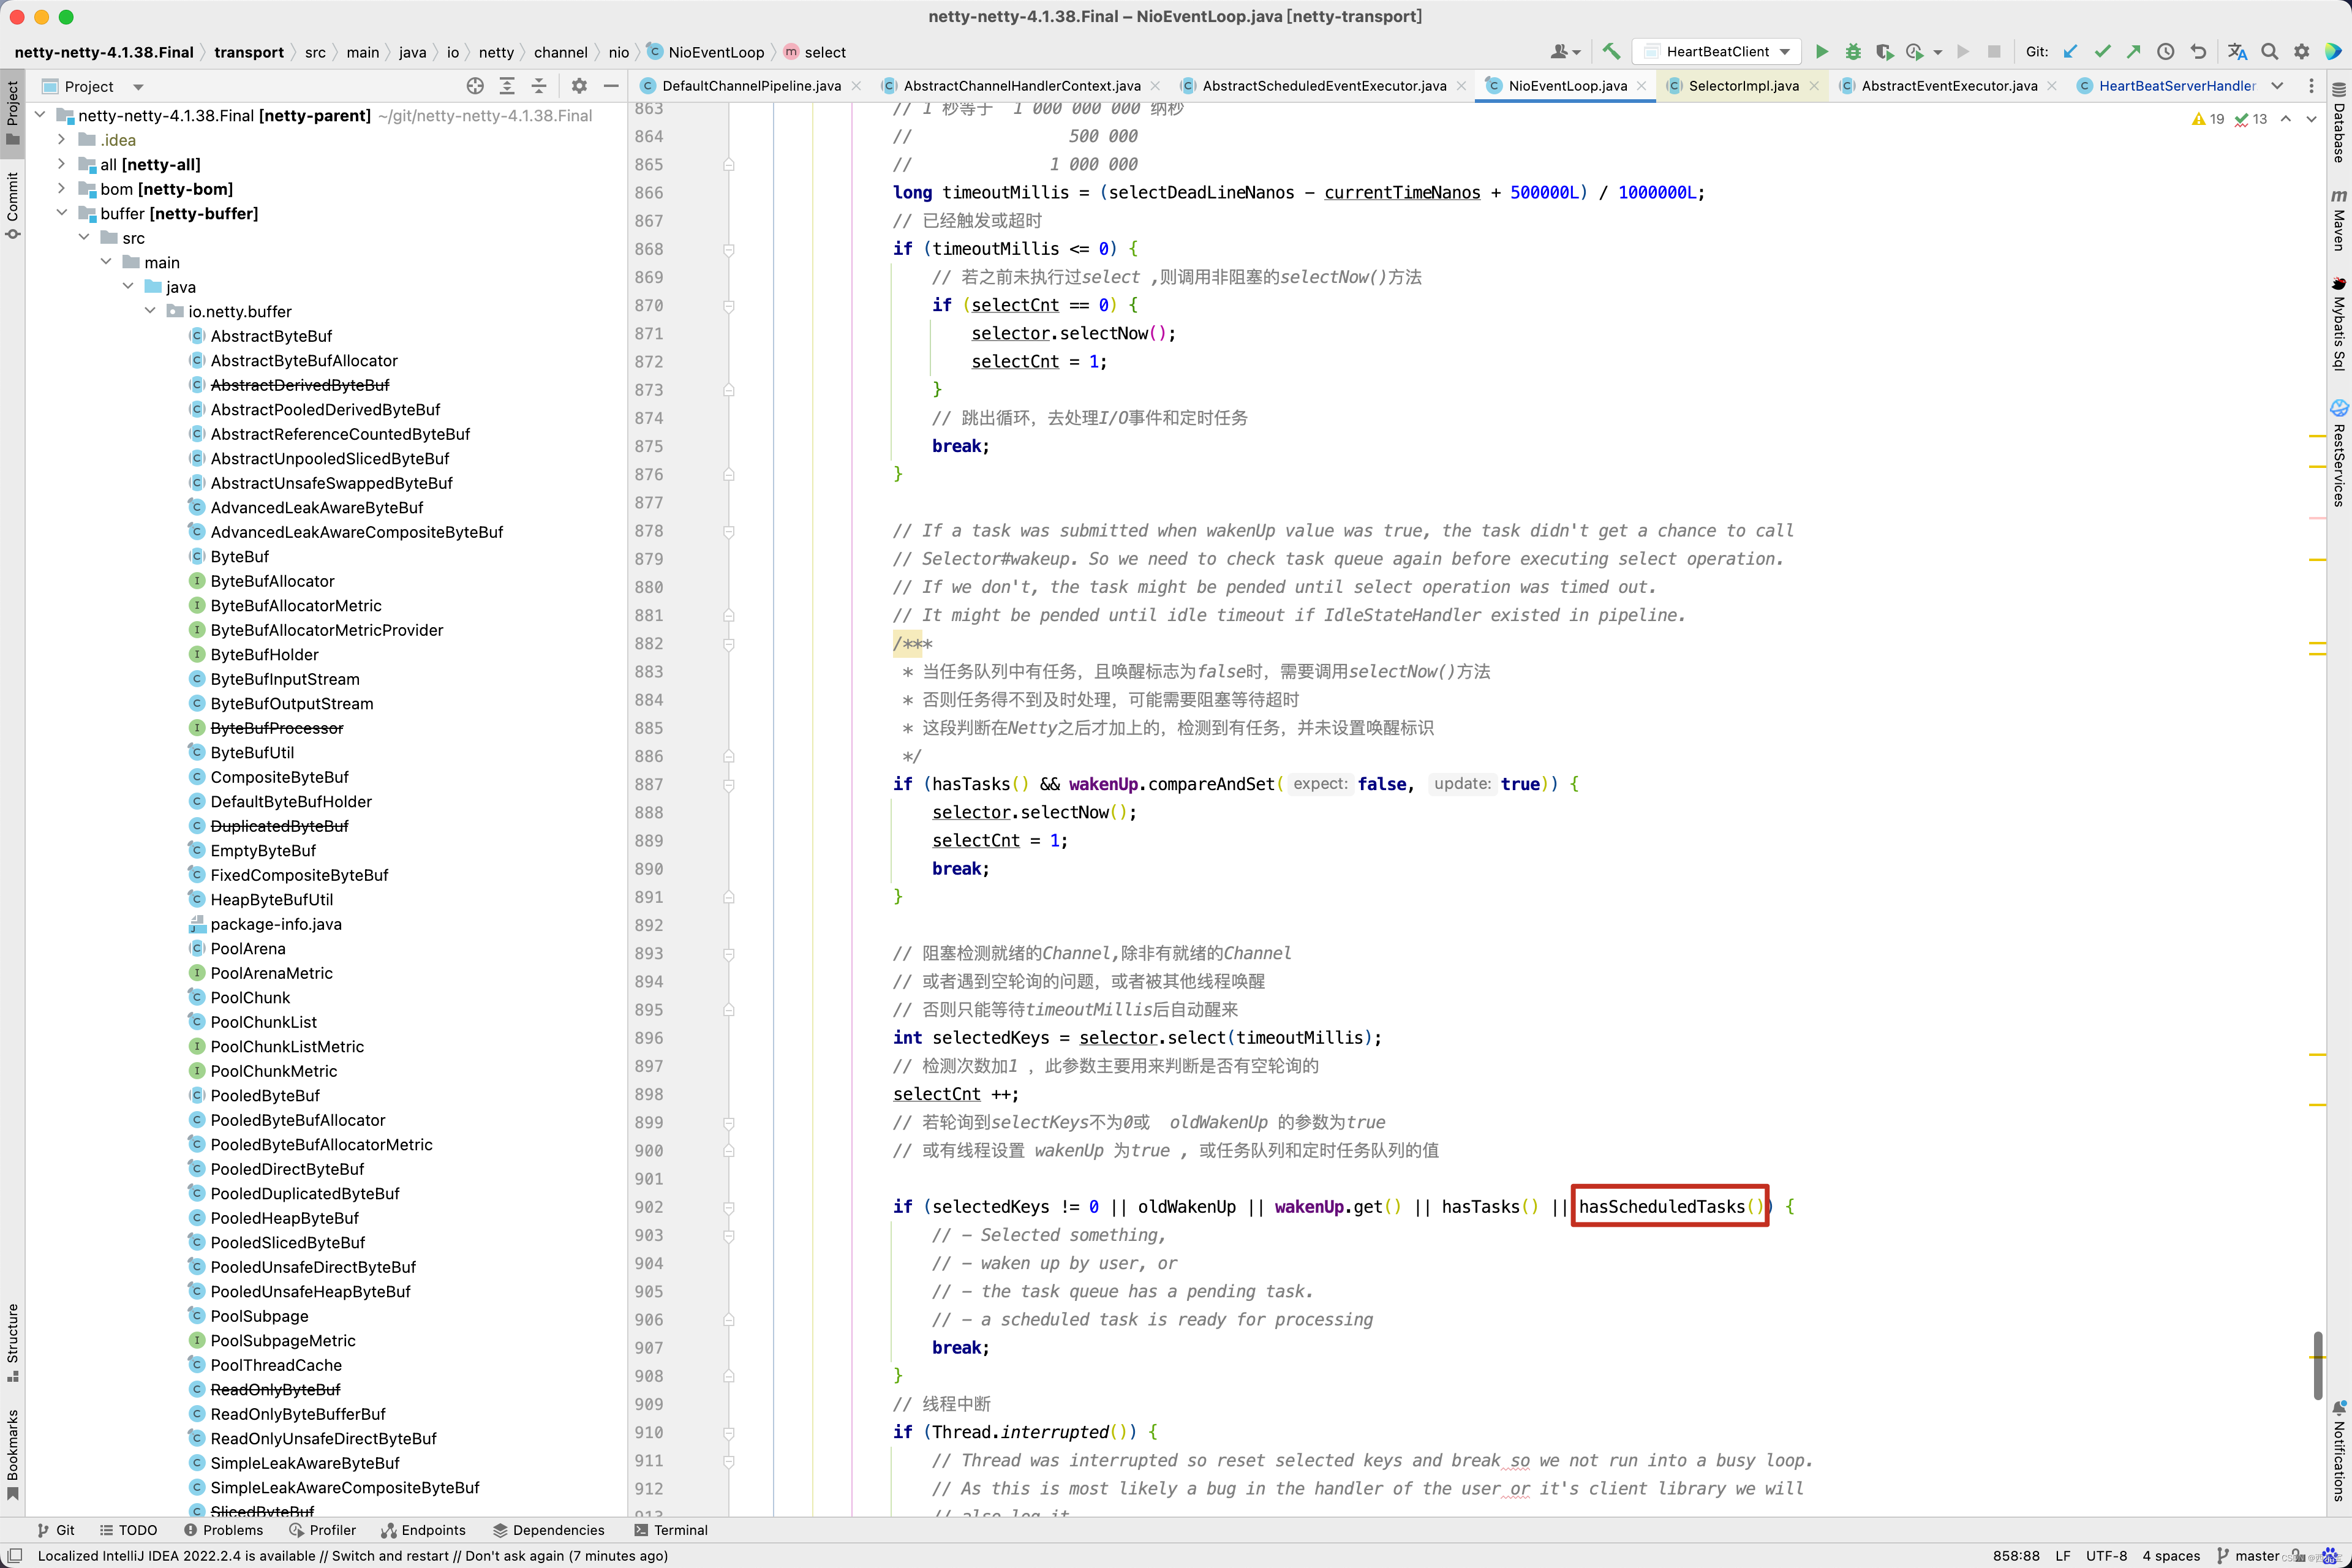
在select()方法,如果scheduledTaskQueue中有任务,则会执行后面的runAllTasks()方法。
protected final boolean hasScheduledTasks() {Queue<ScheduledFutureTask<?>> scheduledTaskQueue = this.scheduledTaskQueue;ScheduledFutureTask<?> scheduledTask = scheduledTaskQueue == null ? null : scheduledTaskQueue.peek();return scheduledTask != null && scheduledTask.deadlineNanos() <= nanoTime();
}
runAllTasks()方法中又通过fetchFromScheduledTaskQueue()从scheduledTaskQueue中拉取所有的任务添加到taskQueue中,最后再调用safeExecute(task)方法运行scheduledTask,当执行完后调用pollTask()方法,继续从taskQueue中拉取任务,如果任务不为空,则继续调用safeExecute(task)方法执行任务…

现在终于知道任务的执行过程了吧,接着看ReaderIdleTimeoutTask源码。
protected IdleStateEvent newIdleStateEvent(IdleState state, boolean first) {switch (state) {case ALL_IDLE:return first ? IdleStateEvent.FIRST_ALL_IDLE_STATE_EVENT : IdleStateEvent.ALL_IDLE_STATE_EVENT;case READER_IDLE:return first ? IdleStateEvent.FIRST_READER_IDLE_STATE_EVENT : IdleStateEvent.READER_IDLE_STATE_EVENT;case WRITER_IDLE:return first ? IdleStateEvent.FIRST_WRITER_IDLE_STATE_EVENT : IdleStateEvent.WRITER_IDLE_STATE_EVENT;default:throw new IllegalArgumentException("Unhandled: state=" + state + ", first=" + first);}
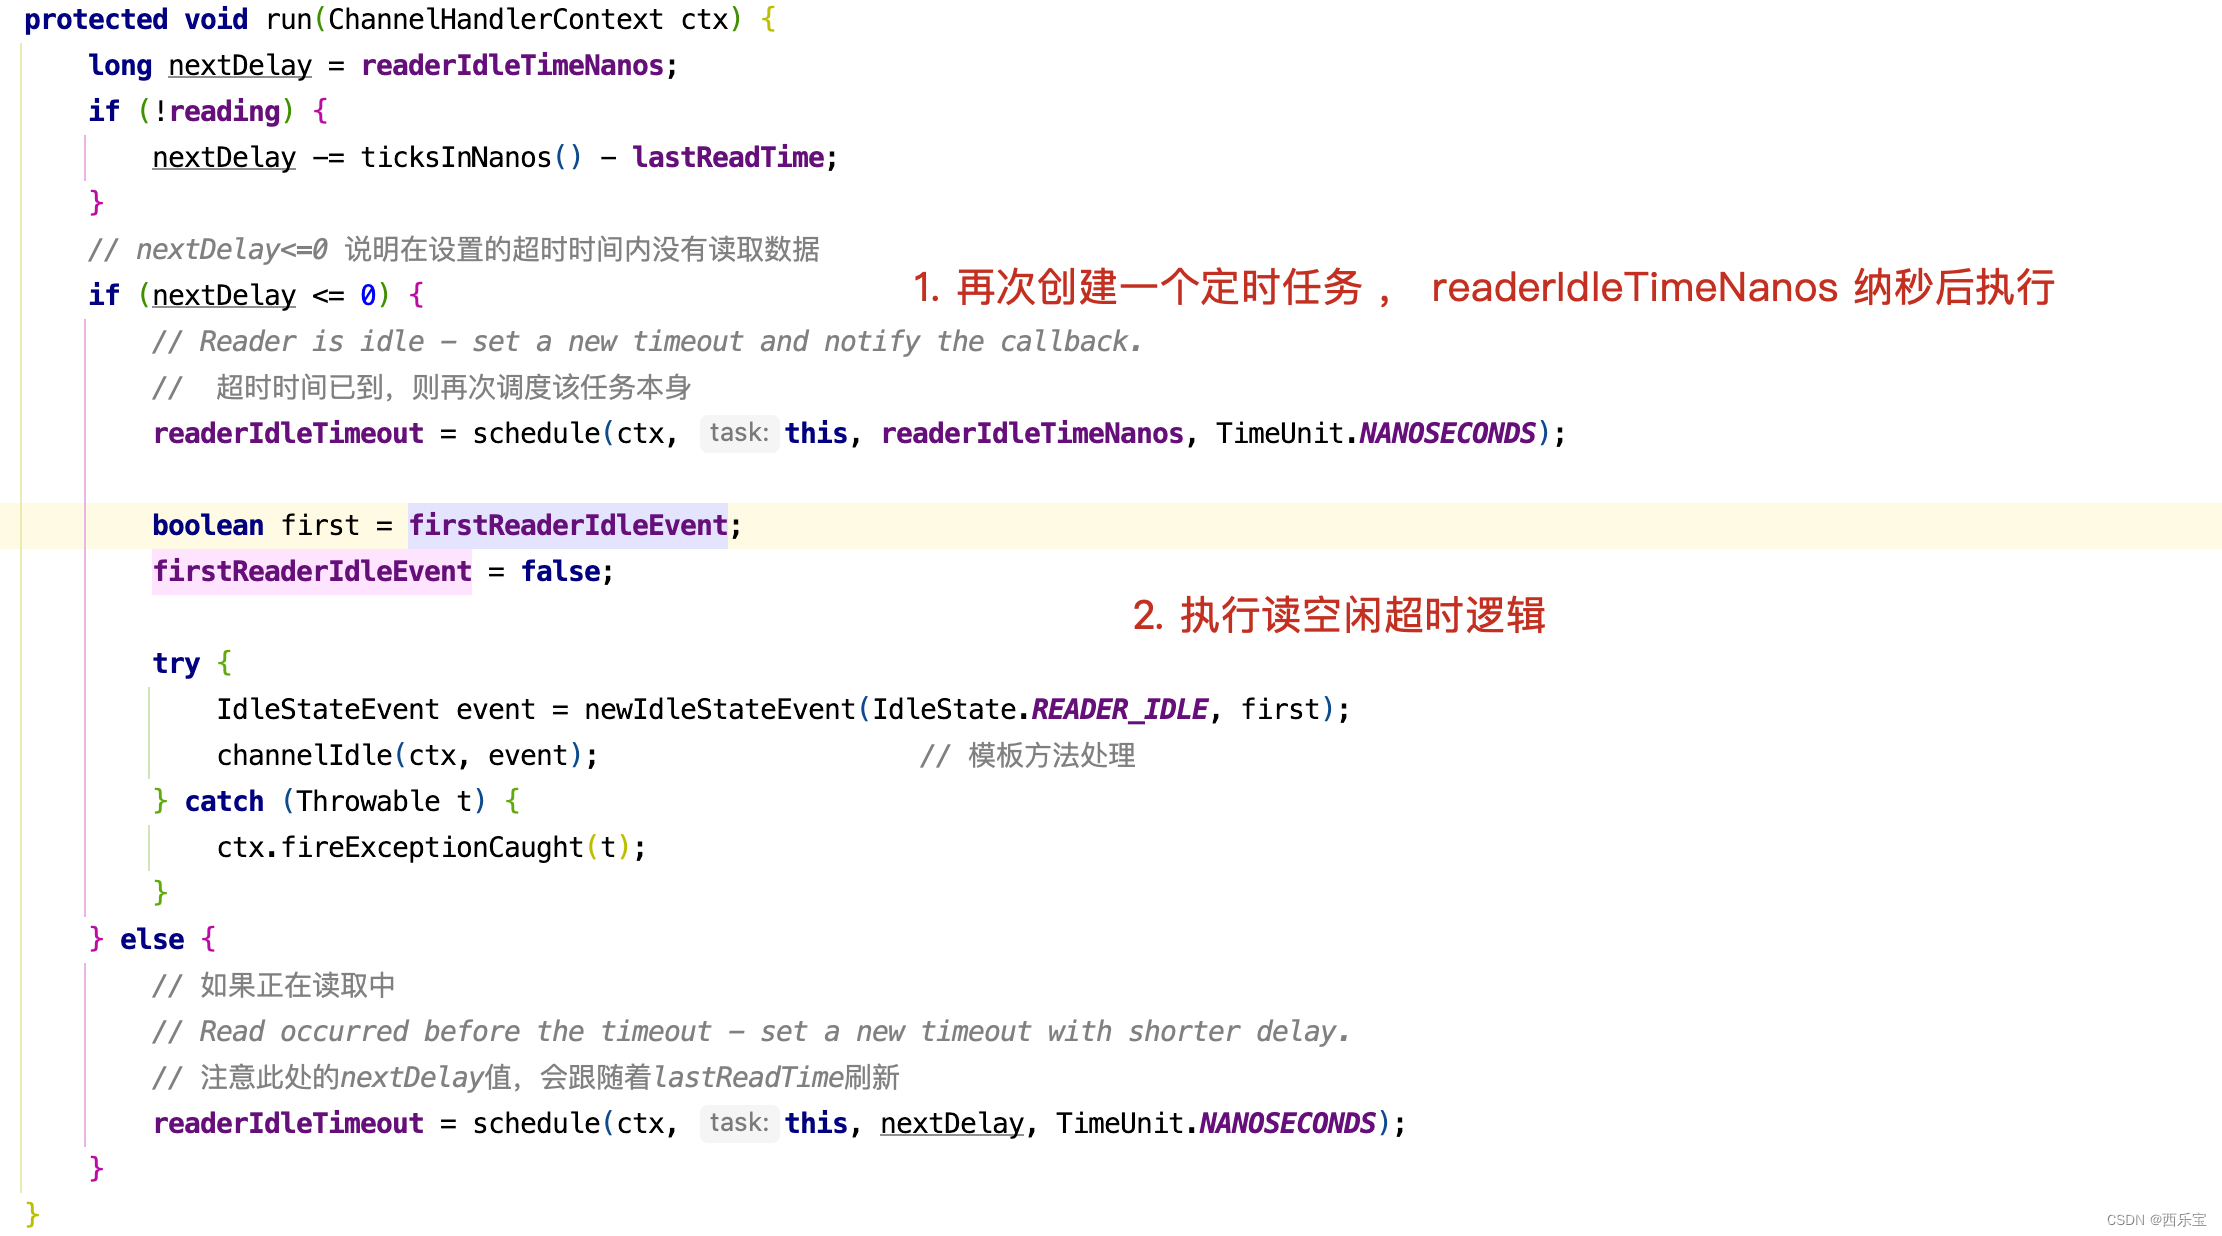
}private final class ReaderIdleTimeoutTask extends AbstractIdleTask {ReaderIdleTimeoutTask(ChannelHandlerContext ctx) {super(ctx);}@Overrideprotected void run(ChannelHandlerContext ctx) {long nextDelay = readerIdleTimeNanos;if (!reading) {nextDelay -= ticksInNanos() - lastReadTime;}// nextDelay<=0 说明在设置的超时时间内没有读取数据if (nextDelay <= 0) {// Reader is idle - set a new timeout and notify the callback.// 超时时间已到,则再次调度该任务本身readerIdleTimeout = schedule(ctx, this, readerIdleTimeNanos, TimeUnit.NANOSECONDS);boolean first = firstReaderIdleEvent;firstReaderIdleEvent = false;try {IdleStateEvent event = newIdleStateEvent(IdleState.READER_IDLE, first);channelIdle(ctx, event); // 模板方法处理} catch (Throwable t) {ctx.fireExceptionCaught(t);}} else {// 如果正在读取中// Read occurred before the timeout - set a new timeout with shorter delay.// 注意此处的nextDelay值,会跟随着lastReadTime刷新readerIdleTimeout = schedule(ctx, this, nextDelay, TimeUnit.NANOSECONDS);}}
}
ReaderIdleTimeoutTask中的run()方法写得非常巧妙,首先看reading字段,什么情况不会走nextDelay -= ticksInNanos() - lastReadTime 这一行代码呢 ? 也就是reading为true的时候,那什么时候reading会被设置为true呢 ?我们看IdleStateHandler的channelRead()方法。如果正在读取ByteBuf中的数据时, reading会被设置为true。

如果reading为true,会走下面的情况。
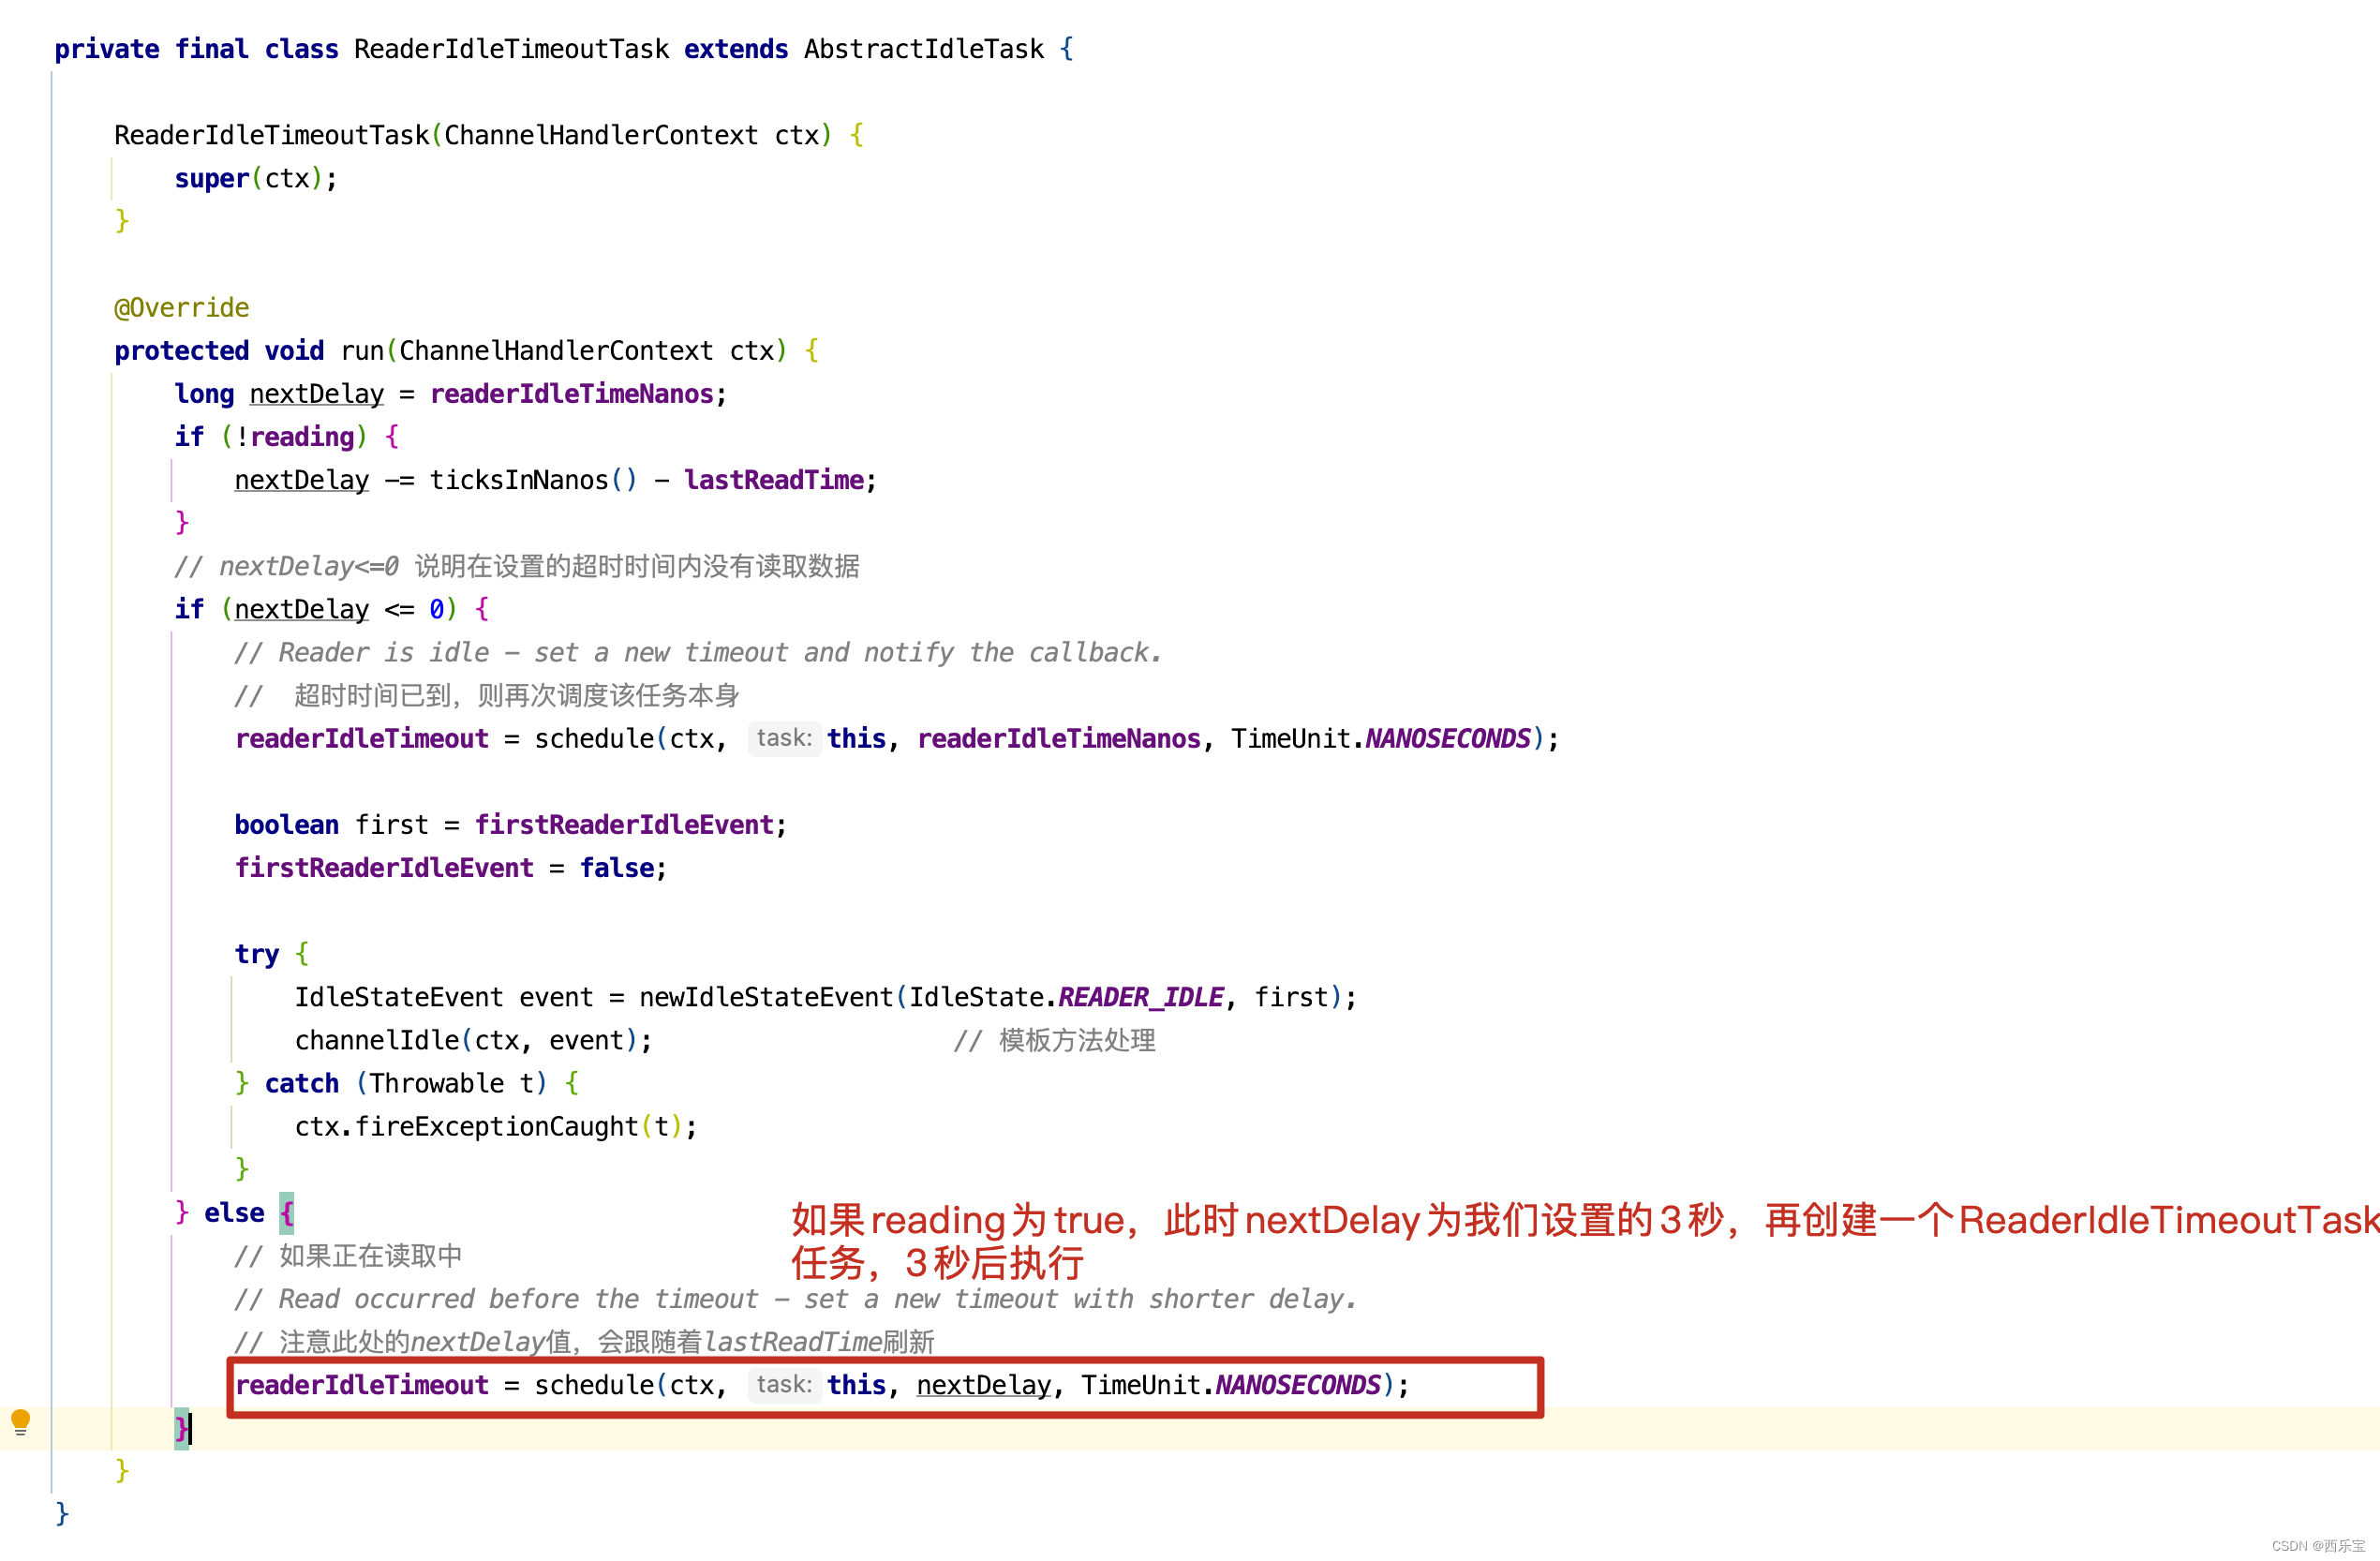
当然,nextDelay -= ticksInNanos() - lastReadTime还有一种情况,我们设置的是3秒检测一个读空闲,但在1秒前Netty有数据读取完成,在IdleStateHandler的channelReadComplete()方法中。
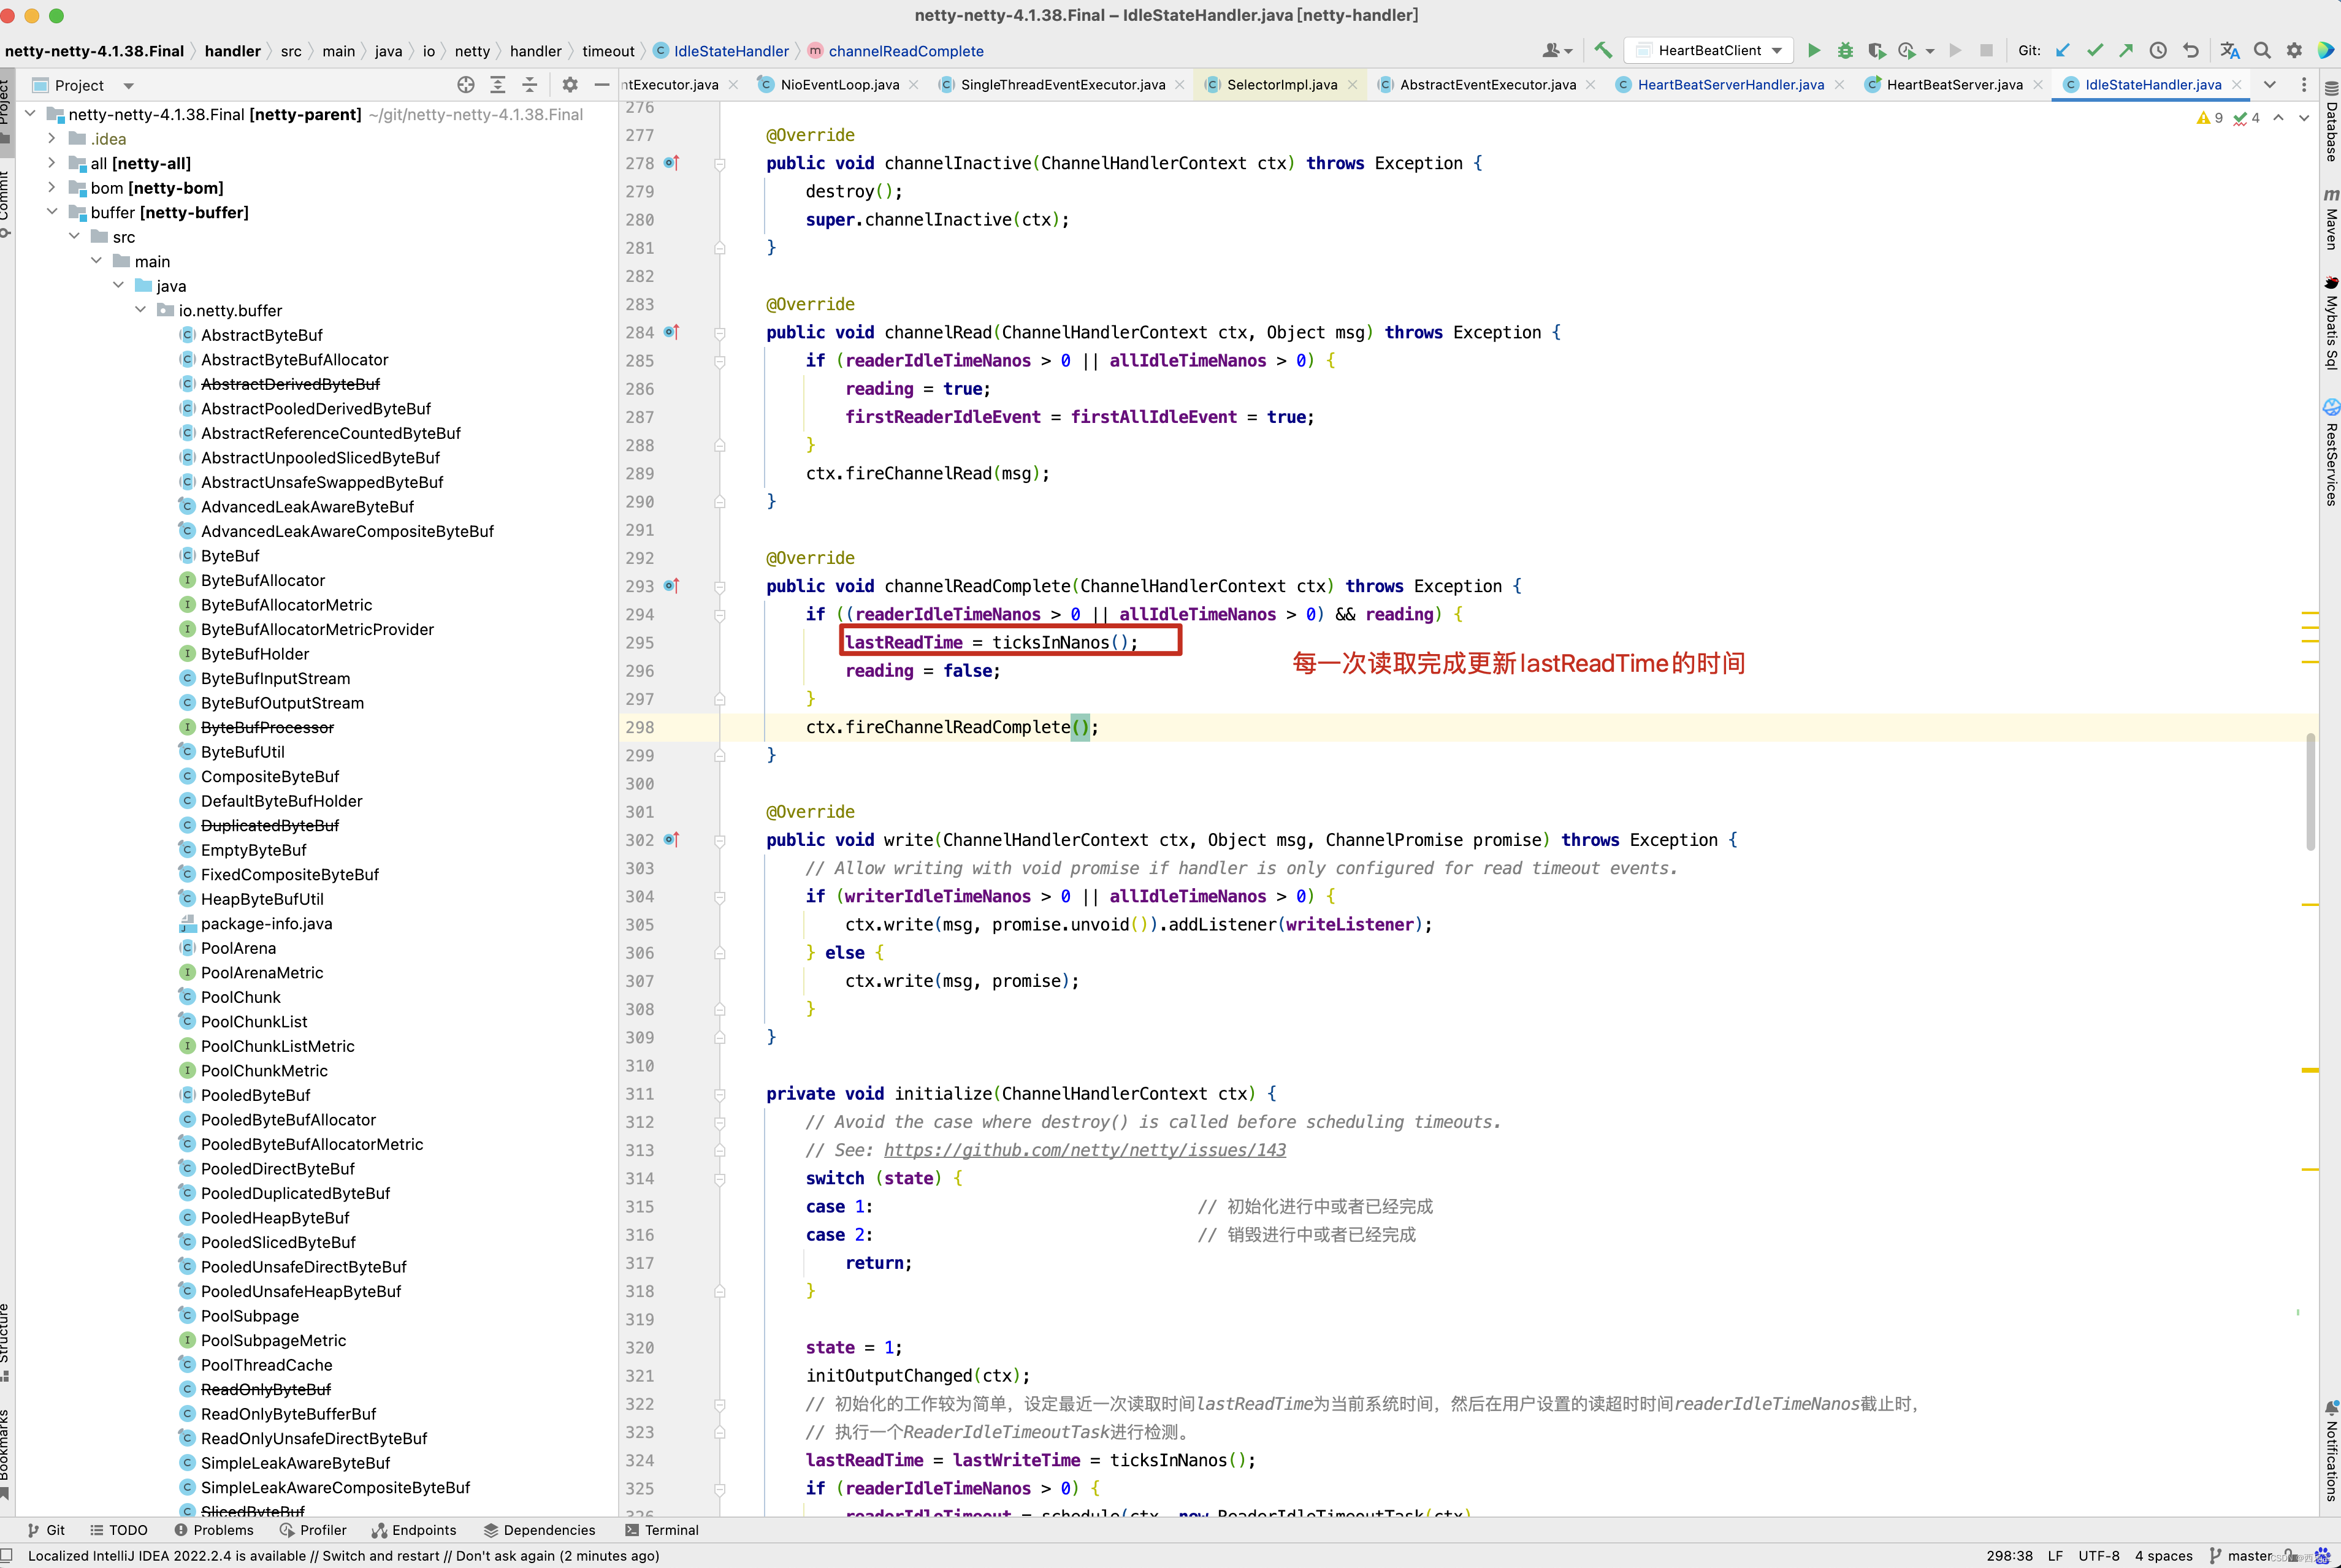
会修改lastReadTime = ticksInNanos()的值,因此此时nextDelay -= ticksInNanos() - lastReadTime的值为2秒,即使再走readerIdleTimeout = schedule(ctx, this, nextDelay, TimeUnit.NANOSECONDS) 代码,也是创建一个任务 ,2秒后再执行读空闲检查。当然,如果读空闲检测超时,此时会走nextDelay <= 0的分支 。
protected void channelIdle(ChannelHandlerContext ctx, IdleStateEvent evt) throws Exception {ctx.fireUserEventTriggered(evt);
}public ChannelHandlerContext fireUserEventTriggered(final Object event) {invokeUserEventTriggered(findContextInbound(MASK_USER_EVENT_TRIGGERED), event);return this;
}static void invokeUserEventTriggered(final AbstractChannelHandlerContext next, final Object event) {ObjectUtil.checkNotNull(event, "event");EventExecutor executor = next.executor();if (executor.inEventLoop()) {next.invokeUserEventTriggered(event);} else {executor.execute(new Runnable() {@Overridepublic void run() {next.invokeUserEventTriggered(event);}});
}private void invokeUserEventTriggered(Object event) {if (invokeHandler()) {try {((ChannelInboundHandler) handler()).userEventTriggered(this, event);} catch (Throwable t) {notifyHandlerException(t);}} else {fireUserEventTriggered(event);}
}
userEventTriggered()这个方法,是不是很熟悉了,这不就是自定义的HeartBeatServerHandler中继承的userEventTriggered()方法不? 这个方法可以根据IdleStateEvent事件,做不同的业务处理。 当然啦,在本例中,如果连续3次读空闲了,此时向客户端发送一个idle close消息,客户端收到idle close消息,会调用 ctx.channel().closeFuture() 关闭链接 。在研究源码的过程中,我们发现很多地方使用了channelActive(), channelRead(),channelReadComplete(), handlerAdded(),这些方法何时被调用的呢?写一个统一的例子来学习。
先看服务端代码 。
public class NettyServer {public static void main(String[] args) throws Exception {// 创建两个线程组bossGroup和workerGroup, 含有的子线程NioEventLoop的个数默认为cpu核数的两倍// bossGroup只是处理连接请求 ,真正的和客户端业务处理,会交给workerGroup完成EventLoopGroup bossGroup = new NioEventLoopGroup(1);EventLoopGroup workerGroup = new NioEventLoopGroup(8);try {// 创建服务器端的启动对象ServerBootstrap bootstrap = new ServerBootstrap();// 使用链式编程来配置参数bootstrap.group(bossGroup, workerGroup) //设置两个线程组// 使用NioServerSocketChannel作为服务器的通道实现.channel(NioServerSocketChannel.class)// 初始化服务器连接队列大小,服务端处理客户端连接请求是顺序处理的,所以同一时间只能处理一个客户端连接。// 多个客户端同时来的时候,服务端将不能处理的客户端连接请求放在队列中等待处理.option(ChannelOption.SO_BACKLOG, 1024).childHandler(new ChannelInitializer<SocketChannel>() {//创建通道初始化对象,设置初始化参数,在 SocketChannel 建立起来之前执行@Overrideprotected void initChannel(SocketChannel ch) throws Exception {//对workerGroup的SocketChannel设置处理器ch.pipeline().addLast(new LifeCycleInBoundHandler());ch.pipeline().addLast(new NettyServerHandler());}});System.out.println("netty server start。。");// 绑定一个端口并且同步, 生成了一个ChannelFuture异步对象,通过isDone()等方法可以判断异步事件的执行情况// 启动服务器(并绑定端口),bind是异步操作,sync方法是等待异步操作执行完毕ChannelFuture cf = bootstrap.bind(9000).sync();// 给cf注册监听器,监听我们关心的事件/*cf.addListener(new ChannelFutureListener() {@Overridepublic void operationComplete(ChannelFuture future) throws Exception {if (cf.isSuccess()) {System.out.println("监听端口9000成功");} else {System.out.println("监听端口9000失败");}}});*/// 等待服务端监听端口关闭,closeFuture是异步操作// 通过sync方法同步等待通道关闭处理完毕,这里会阻塞等待通道关闭完成,内部调用的是Object的wait()方法cf.channel().closeFuture().sync();} finally {bossGroup.shutdownGracefully();workerGroup.shutdownGracefully();}}
}/* 自定义Handler需要继承netty规定好的某个HandlerAdapter(规范)*/
public class NettyServerHandler extends ChannelInboundHandlerAdapter {/* 读取客户端发送的数据 @param ctx 上下文对象, 含有通道channel,管道pipeline* @param msg 就是客户端发送的数据* @throws Exception*/@Overridepublic void channelRead(ChannelHandlerContext ctx, Object msg) throws Exception {System.out.println("服务器读取线程 " + Thread.currentThread().getName());//Channel channel = ctx.channel();//ChannelPipeline pipeline = ctx.pipeline(); //本质是一个双向链接, 出站入站//将 msg 转成一个 ByteBuf,类似NIO 的 ByteBufferByteBuf buf = (ByteBuf) msg;System.out.println("客户端发送消息是:" + buf.toString(CharsetUtil.UTF_8));}/* 数据读取完毕处理方法 @param ctx* @throws Exception*/@Overridepublic void channelReadComplete(ChannelHandlerContext ctx) throws Exception {ByteBuf buf = Unpooled.copiedBuffer("HelloClient".getBytes(CharsetUtil.UTF_8));ctx.writeAndFlush(buf);}/* 处理异常, 一般是需要关闭通道 @param ctx* @param cause* @throws Exception*/@Overridepublic void exceptionCaught(ChannelHandlerContext ctx, Throwable cause) throws Exception {ctx.close();}
}/*  handler的生命周期回调接口调用顺序:*  handlerAdded -> channelRegistered -> channelActive -> channelRead -> channelReadComplete*  -> channelInactive -> channelUnRegistered -> handlerRemoved handlerAdded: 新建立的连接会按照初始化策略,把handler添加到该channel的pipeline里面,也就是channel.pipeline.addLast(new LifeCycleInBoundHandler)执行完成后的回调;* channelRegistered: 当该连接分配到具体的worker线程后,该回调会被调用。* channelActive:channel的准备工作已经完成,所有的pipeline添加完成,并分配到具体的线上上,说明该channel准备就绪,可以使用了。* channelRead:客户端向服务端发来数据,每次都会回调此方法,表示有数据可读;* channelReadComplete:服务端每次读完一次完整的数据之后,回调该方法,表示数据读取完毕;* channelInactive:当连接断开时,该回调会被调用,说明这时候底层的TCP连接已经被断开了。* channelUnRegistered: 对应channelRegistered,当连接关闭后,释放绑定的workder线程;* handlerRemoved: 对应handlerAdded,将handler从该channel的pipeline移除后的回调方法。*/
public class LifeCycleInBoundHandler extends ChannelInboundHandlerAdapter {@Override// 该连接分配到具体的worker线程后,该回调会被调用。public void channelRegistered(ChannelHandlerContext ctx)throws Exception {System.out.println("channelRegistered: channel注册到NioEventLoop");super.channelRegistered(ctx);}@Override// 对应channelRegistered,当连接关闭后,释放绑定的workder线程;public void channelUnregistered(ChannelHandlerContext ctx) throws Exception {System.out.println("channelUnregistered: channel取消和NioEventLoop的绑定");super.channelUnregistered(ctx);}@Override// channelActive:channel的准备工作已经完成,所有的pipeline添加完成,并分配到具体的线上上,说明该channel准备就绪,可以使用了。public void channelActive(ChannelHandlerContext ctx) throws Exception {System.out.println("channelActive: channel准备就绪");super.channelActive(ctx);}// 当连接断开时,该回调会被调用,说明这时候底层的TCP连接已经被断开了。@Overridepublic void channelInactive(ChannelHandlerContext ctx) throws Exception {System.out.println("channelInactive: channel被关闭");super.channelInactive(ctx);}// 客户端向服务端发来数据,每次都会回调此方法,表示有数据可读;@Overridepublic void channelRead(ChannelHandlerContext ctx, Object msg) throws Exception {System.out.println("channelRead: channel中有可读的数据" );super.channelRead(ctx, msg);}// 服务端每次读完一次完整的数据之后,回调该方法,表示数据读取完毕;@Overridepublic void channelReadComplete(ChannelHandlerContext ctx) throws Exception {System.out.println("channelReadComplete: channel读数据完成");super.channelReadComplete(ctx);}@Override// handlerAdded: 新建立的连接会按照初始化策略,把handler添加到该channel的pipeline里面,也就是channel.pipeline.addLast(new LifeCycleInBoundHandler)执行完成后的回调;public void handlerAdded(ChannelHandlerContext ctx) throws Exception {System.out.println("handlerAdded: handler被添加到channel的pipeline");super.handlerAdded(ctx);}// handlerRemoved: 对应handlerAdded,将handler从该channel的pipeline移除后的回调方法。@Overridepublic void handlerRemoved(ChannelHandlerContext ctx) throws Exception {System.out.println("handlerRemoved: handler从channel的pipeline中移除");super.handlerRemoved(ctx);}
}
如何研究这些源码呢? 我们可以在方法的内部打一个断点 。

然后通过断点查询调用栈, 回溯源码的执行过程,通过这种方法研究源码是一个不错的选择。 接下来看另外的例子。
用Netty实现聊天程序
public class ChatServer {public static void main(String[] args) throws Exception {EventLoopGroup bossGroup = new NioEventLoopGroup(1);EventLoopGroup workerGroup = new NioEventLoopGroup(8);try {ServerBootstrap bootstrap = new ServerBootstrap();bootstrap.group(bossGroup, workerGroup).channel(NioServerSocketChannel.class).option(ChannelOption.SO_BACKLOG, 1024).childHandler(new ChannelInitializer<SocketChannel>() {@Overrideprotected void initChannel(SocketChannel ch) throws Exception {ChannelPipeline pipeline = ch.pipeline();//加入特殊分隔符分包解码器//pipeline.addLast(new DelimiterBasedFrameDecoder(1024, Unpooled.copiedBuffer("_"// .getBytes())));//向pipeline加入解码器pipeline.addLast("decoder", new StringDecoder());//向pipeline加入编码器pipeline.addLast("encoder", new StringEncoder());//加入自己的业务处理handlerpipeline.addLast(new ChatServerHandler());}});System.out.println("聊天室server启动。。");ChannelFuture channelFuture = bootstrap.bind(9000).sync();//关闭通道channelFuture.channel().closeFuture().sync();} finally {bossGroup.shutdownGracefully();workerGroup.shutdownGracefully();}}
}public class ChatServerHandler extends SimpleChannelInboundHandler<String> {//GlobalEventExecutor.INSTANCE 是全局的事件执行器,是一个单例private static ChannelGroup channelGroup = new DefaultChannelGroup(GlobalEventExecutor.INSTANCE);SimpleDateFormat sdf = new SimpleDateFormat("yyyy-MM-dd HH:mm:ss");//表示 channel 处于就绪状态, 提示上线@Overridepublic void channelActive(ChannelHandlerContext ctx) {Channel channel = ctx.channel();//将该客户加入聊天的信息推送给其它在线的客户端//该方法会将 channelGroup 中所有的 channel 遍历,并发送消息channelGroup.writeAndFlush("[ 客户端 ]" + channel.remoteAddress() + " 上线了 " + sdf.format(newjava.util.Date()) + "\\n");//将当前 channel 加入到 channelGroupchannelGroup.add(channel);System.out.println(ctx.channel().remoteAddress() + " 上线了" + "\\n");}//表示 channel 处于不活动状态, 提示离线了@Overridepublic void channelInactive(ChannelHandlerContext ctx) {Channel channel = ctx.channel();//将客户离开信息推送给当前在线的客户channelGroup.writeAndFlush("[ 客户端 ]" + channel.remoteAddress() + " 下线了" + "\\n");System.out.println(ctx.channel().remoteAddress() + " 下线了" + "\\n");System.out.println("channelGroup size=" + channelGroup.size());}//读取数据@Overrideprotected void channelRead0(ChannelHandlerContext ctx, String msg) {//获取到当前 channelChannel channel = ctx.channel();//这时我们遍历 channelGroup, 根据不同的情况, 回送不同的消息channelGroup.forEach(ch -> {if (channel != ch) { //不是当前的 channel,转发消息ch.writeAndFlush("[ 客户端 ]" + channel.remoteAddress() + " 发送了消息:" + msg + "\\n");} else {//回显自己发送的消息给自己ch.writeAndFlush("[ 自己 ]发送了消息:" + msg + "\\n");}});}@Overridepublic void exceptionCaught(ChannelHandlerContext ctx, Throwable cause) {//关闭通道ctx.close();}
}
再看客户端代码 。
public class ChatClient {public static void main(String[] args) throws Exception {EventLoopGroup group = new NioEventLoopGroup();try {Bootstrap bootstrap = new Bootstrap();bootstrap.group(group).channel(NioSocketChannel.class).handler(new ChannelInitializer<SocketChannel>() {@Overrideprotected void initChannel(SocketChannel ch) throws Exception {ChannelPipeline pipeline = ch.pipeline();//pipeline.addLast(new DelimiterBasedFrameDecoder(1024, Unpooled.copiedBuffer("_"// .getBytes())));//向pipeline加入解码器pipeline.addLast("decoder", new StringDecoder());//向pipeline加入编码器pipeline.addLast("encoder", new StringEncoder());//加入自己的业务处理handlerpipeline.addLast(new ChatClientHandler());}});ChannelFuture channelFuture = bootstrap.connect("127.0.0.1", 9000).sync();//得到 channelChannel channel = channelFuture.channel();System.out.println("========" + channel.localAddress() + "========");//客户端需要输入信息, 创建一个扫描器Scanner scanner = new Scanner(System.in);while (scanner.hasNextLine()) {String msg = scanner.nextLine();//通过 channel 发送到服务器端channel.writeAndFlush(msg);} /*for (int i = 0; i < 200; i++) {channel.writeAndFlush("hello,诸葛!" + "_");}*/} finally {group.shutdownGracefully();}}
}public class ChatClientHandler extends SimpleChannelInboundHandler<String> {@Overrideprotected void channelRead0(ChannelHandlerContext ctx, String msg){System.out.println(msg.trim());}
}
服务端channelActive(), channelRead0() 方法还是很好理解的,如果有用户上线,将channel添加到ChannelGroup中,当有用户发消息时,遍历ChannelGroup中的所有channel写一条消息,这一块的逻辑还是很好理解的,但channelInactive()方法就不好理解了,为什么有用户下线时,并没有将channel从ChannelGroup中移除呢? 我们看一下channelGroup的add()方法的实现逻辑 。
public boolean add(Channel channel) {ConcurrentMap<ChannelId, Channel> map =channel instanceof ServerChannel? serverChannels : nonServerChannels;boolean added = map.putIfAbsent(channel.id(), channel) == null;if (added) {channel.closeFuture().addListener(remover);}if (stayClosed && closed) {// First add channel, than check if closed.// Seems inefficient at first, but this way a volatile// gives us enough synchronization to be thread-safe.//// If true: Close right away.// (Might be closed a second time by ChannelGroup.close(), but this is ok)//// If false: Channel will definitely be closed by the ChannelGroup.// (Because closed=true always happens-before ChannelGroup.close())//// See https://github.com/netty/netty/issues/4020channel.close();}return added;
}private final ChannelFutureListener remover = new ChannelFutureListener() {@Overridepublic void operationComplete(ChannelFuture future) throws Exception {remove(future.channel());}
};
看到没有,在将Channel添加到channelGroup时,添加了一个ChannelFutureListener监听器,当channel.closeFuture()完成时,会调用ChannelFutureListener监听器的operationComplete()方法,将channel从serverChannels或nonServerChannels移除掉,即使没有在channelInactive显式的调用channelGroup的remove()方法,channel最终也会从channelGroup中移除掉。关于Netty应用方面的源码分析到这里已经告一段落。接下来看当接收完客户端请求的数据,服务端向客户端写数据的过程又是怎样子的呢?
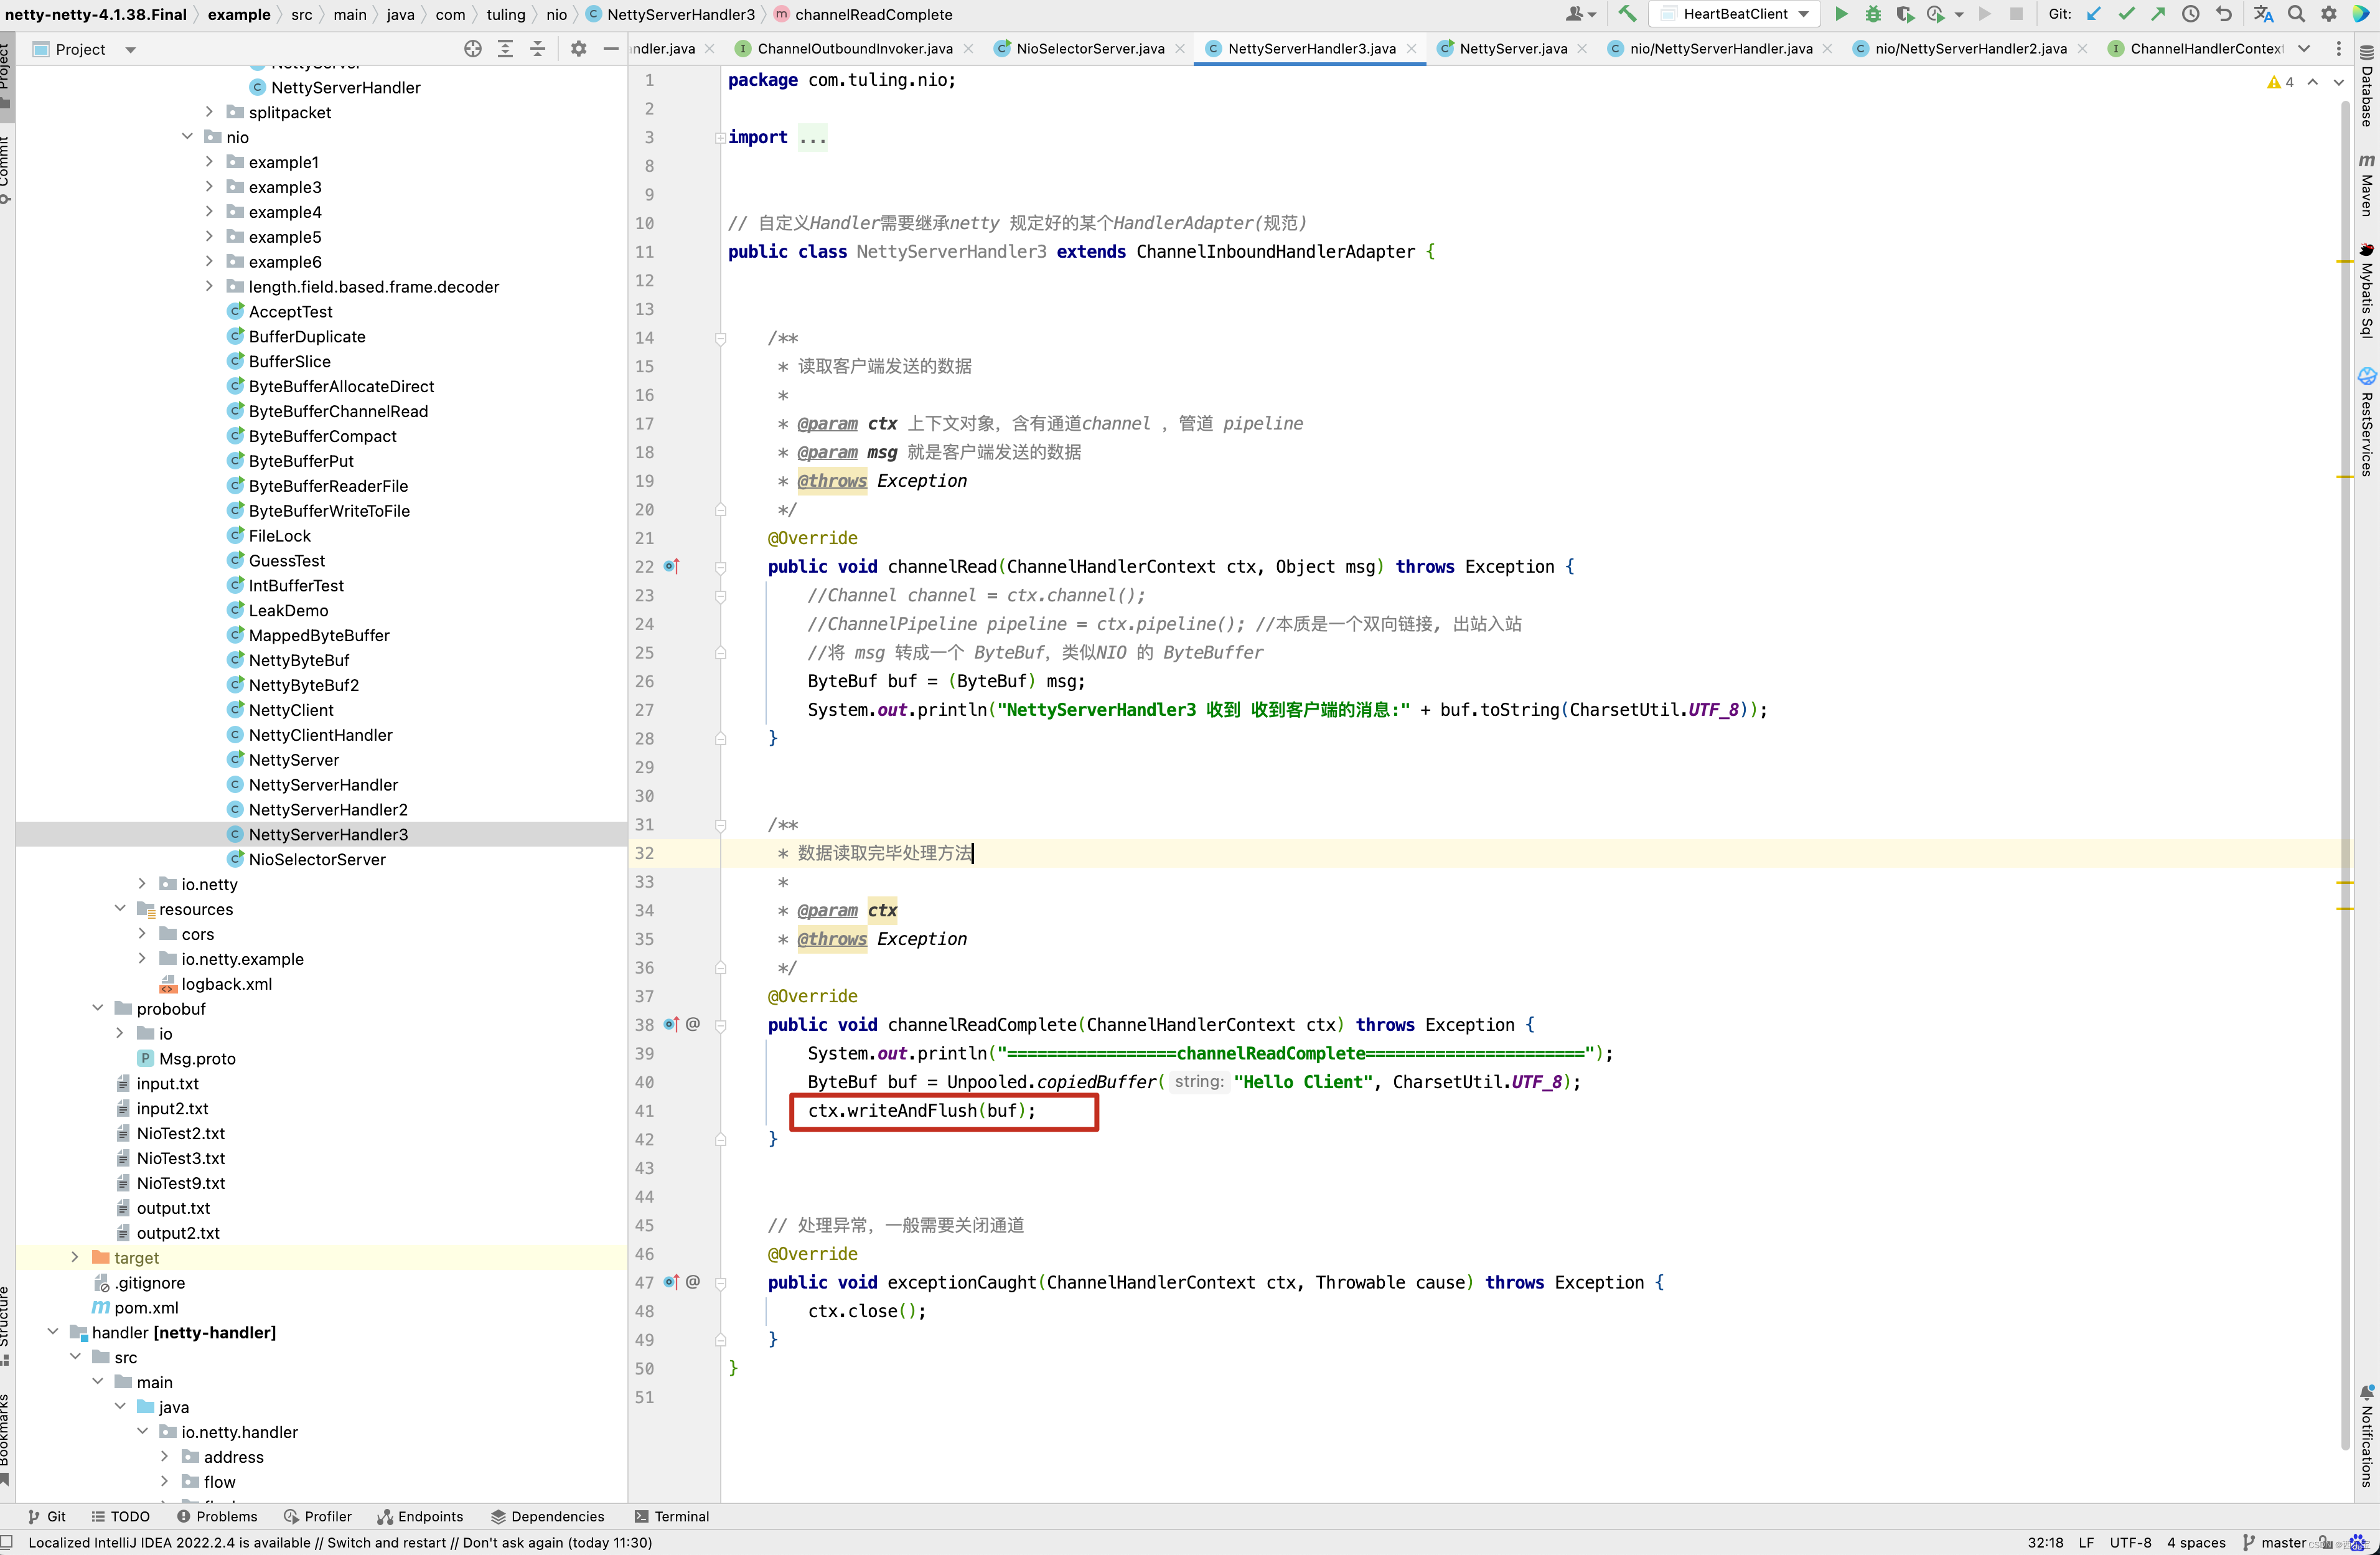
写数据writeAndFlush源码解读
对于写数据,还是以一个例子作为出发点来分析,先看例子的服务端代码 。
public class NettyServer {public static void main(String[] args) {// 创建两个线程组bossGroup 和workerGroup , 含有的子线程NioEventLoop 的个数默认为CPU 核数的两倍// BossGroup只是处理连接请求,真正的和客户端业务处理,会交给workerGroup完成EventLoopGroup bossGroup = new NioEventLoopGroup(1);EventLoopGroup workerGroup = new NioEventLoopGroup();try {// 创建服务端的启动对象ServerBootstrap bootstrap = new ServerBootstrap();// 使用链式编程来配置参数bootstrap.group(bossGroup, workerGroup)//设置两个线程组.channel(NioServerSocketChannel.class)              // 使用NioServerSocketChannel 作为服务器的通道实现// 初始化服务器连接队列大小,服务端处理客户端连接请求是顺序处理的,所以同一时间,只能处理一个客户端连接,多个客户端同时来的时候// 服务端将不能处理的客户端连接请求放在队列中等待处理.option(ChannelOption.SO_BACKLOG, 1024).childHandler(new ChannelInitializer<SocketChannel>() {@Overrideprotected void initChannel(SocketChannel ch) throws Exception {ch.pipeline().addLast(new UserEncoder());ch.pipeline().addLast(new NettyServerHandler());}});System.out.println("netty server start ....");// 绑定一个商品并且同步,生成一个ChannelFuture异步对象,通过isDone()等方法可以判断异步事件的执行情况// 启动服务器(并绑定端口),bind是异步操作,sync方法是等待异步操作执行完毕ChannelFuture cf = bootstrap.bind(9000).sync();// 给注册监听器,监听我们关心的事件cf.addListener(new ChannelFutureListener() {@Overridepublic void operationComplete(ChannelFuture future) throws Exception {if (cf.isSuccess()) {System.out.println("监听端口9000成功");} else {System.out.println("监听端口9000失败");}}});// 对通道关闭进行监听,closeFuture是异步操作,监听通道关闭// 通过sync方法同步等待通道关闭处理完毕,这里会阻塞等待通道关闭完成cf.channel().closeFuture().sync();} catch (Exception e) {e.printStackTrace();} finally {bossGroup.shutdownGracefully();workerGroup.shutdownGracefully();}}}// 自定义Handler需要继承netty 规定好的某个HandlerAdapter(规范)
public class NettyServerHandler extends ChannelInboundHandlerAdapter {/* 读取客户端发送的数据 @param ctx 上下文对象,含有通道channel ,管道 pipeline* @param msg 就是客户端发送的数据* @throws Exception*/@Overridepublic void channelRead(ChannelHandlerContext ctx, Object msg) throws Exception {//Channel channel = ctx.channel();//ChannelPipeline pipeline = ctx.pipeline(); //本质是一个双向链接, 出站入站//将 msg 转成一个 ByteBuf,类似NIO 的 ByteBufferByteBuf buf = (ByteBuf) msg;System.out.println("收到客户端的消息:" + buf.toString(CharsetUtil.UTF_8));}/* 数据读取完毕处理方法 @param ctx* @throws Exception*/@Overridepublic void channelReadComplete(ChannelHandlerContext ctx) throws Exception {System.out.println("=================channelReadComplete======================");ctx.writeAndFlush(new User("zhangsan",18));}// 处理异常,一般需要关闭通道@Overridepublic void exceptionCaught(ChannelHandlerContext ctx, Throwable cause) throws Exception {ctx.close();}
}@Data
public class User {private String userName;private Integer age ;public User(String userName, Integer age) {this.userName = userName;this.age = age;}}public class UserEncoder extends MessageToByteEncoder {@Overrideprotected void encode(ChannelHandlerContext ctx, Object msg, ByteBuf out) throws Exception {if (msg instanceof User) {out.writeBytes(JSON.toJSONString(msg).getBytes("utf-8"));}}
}
服务端代码其实很简单,在NettyServerHandler的channelReadComplete()方法中,向客户端写入一个User对象,在UserEncoder类中,将User对象转化为byte数组并写到ByteBuf中。
public class NettyClient {public static void main(String[] args) {// 客户端需要一个事件循环组EventLoopGroup group = new NioEventLoopGroup();try {// 创建客户端启动对象// 注意,客户端使用的不是ServerBootstrap , 而是BootstrapBootstrap bootstrap = new Bootstrap();// 设置相关的参数bootstrap.group(group)                                  //设置线程组.channel(NioSocketChannel.class)                  // 使用NioSocketChannel作为客户端的通道实现.handler(new ChannelInitializer<SocketChannel>() {@Overrideprotected void initChannel(SocketChannel ch) throws Exception {ch.pipeline().addLast(new NettyClientHandler());}});System.out.println("netty client start ");// 启动客户端去连接服务器端ChannelFuture channelFuture = bootstrap.connect("127.0.0.1",9000).sync();// 对关闭通道进行监听channelFuture.channel().closeFuture().sync();}catch (Exception e ){e.printStackTrace();}finally {group.shutdownGracefully();}}
}public class NettyClientHandler extends ChannelInboundHandlerAdapter {// 当客户端连接服务器完成就会触发这个方法@Overridepublic void channelActive(ChannelHandlerContext ctx) throws Exception {StringBuffer sb = new StringBuffer();for(int i = 0 ;i < 1023;i ++){sb.append("a");}sb.append("中");sb.append("bbbb");String sbString = sb.toString();byte[] midbytes = sbString.getBytes("UTF8");System.out.println("midbytes   = " + midbytes.length);ByteBuf buf = Unpooled.copiedBuffer("", CharsetUtil.UTF_8);buf.writeBytes(sb.toString().getBytes("utf-8"));ctx.writeAndFlush(buf);}// 当通道在读取事件时会触发,即服务端发送数据给客户端@Overridepublic void channelRead(ChannelHandlerContext ctx, Object msg) throws Exception {ByteBuf buf = (ByteBuf) msg;System.out.println(" 收到服务端的消息: " + buf.toString(CharsetUtil.UTF_8));System.out.println("服务端的地址:" + ctx.channel().remoteAddress());}@Overridepublic void exceptionCaught(ChannelHandlerContext ctx, Throwable cause) throws Exception {cause.printStackTrace();ctx.close();}
}
客户端代码没有什么变动,很简单的发送数据和读取数据,接下来跟进writeAndFlush()方法 。
public ChannelFuture writeAndFlush(Object msg) {return writeAndFlush(msg, newPromise());
}public ChannelFuture writeAndFlush(Object msg, ChannelPromise promise) {write(msg, true, promise);return promise;
}private void write(Object msg, boolean flush, ChannelPromise promise) {ObjectUtil.checkNotNull(msg, "msg");try {if (isNotValidPromise(promise, true)) {ReferenceCountUtil.release(msg);// cancelledreturn;}} catch (RuntimeException e) {ReferenceCountUtil.release(msg);throw e;}final AbstractChannelHandlerContext next = findContextOutbound(flush ?(MASK_WRITE | MASK_FLUSH) : MASK_WRITE);final Object m = pipeline.touch(msg, next);EventExecutor executor = next.executor();if (executor.inEventLoop()) {       // 判断是否是 EventLoop 线程if (flush) {next.invokeWriteAndFlush(m, promise);} else {next.invokeWrite(m, promise);}} else {                // 当为非EventLoop线程时需要构建 taskfinal AbstractWriteTask task;if (flush) {task = WriteAndFlushTask.newInstance(next, m, promise);}  else {task = WriteTask.newInstance(next, m, promise);}// 把task加入到executor 中,这个executor 就是NioEventLoop ,若是失败,则取消task执行if (!safeExecute(executor, task, promise, m)) {// We failed to submit the AbstractWriteTask. We need to cancel it so we decrement the pending bytes// and put it back in the Recycler for re-use later.//// See https://github.com/netty/netty/issues/8343.task.cancel();}}
}private AbstractChannelHandlerContext findContextOutbound(int mask) {AbstractChannelHandlerContext ctx = this;do {ctx = ctx.prev;} while ((ctx.executionMask & mask) == 0);return ctx;
}
findContextOutbound()方法很有意思,从Handler向前查找可用Handler,请看下图。
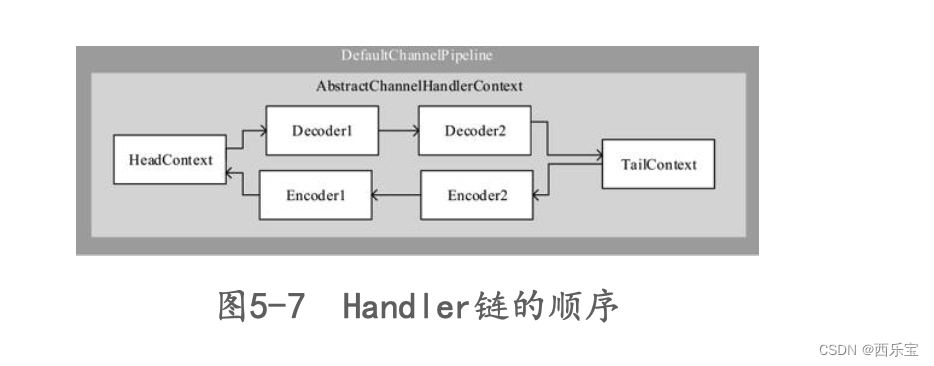
我们是不是有一种错觉,当读数据时,从HeadContext开始,一直读到TailContext中,其实不然,之前也分析过,如果Handler没有调用ctx.fireChannelRead(),是不会向后执行的,同理,当在Handler的channelReadComplete()方法中调用ctx.writeAndFlush(new User(“zhangsan”,18))方法,此时向前调用并不是从TailContext开始,而是从我们自定义的Handler向前查找Handler并调用他的writeAndFlush()方法 。在write()方法的加粗代码中有一个executor.inEventLoop(),这又是何意呢 ?如果executor.inEventLoop()为false,什么情况下会出现呢? 如果在业务Handler中,若开启了额外的业务线程,那么在Netty 内部是如何把业务线程结果数据经过I/O线程发送出去的呢? executor.inEventLoop()为false就是处理这一块逻辑,首先看个例子,我们重点看channelReadComplete的写法。
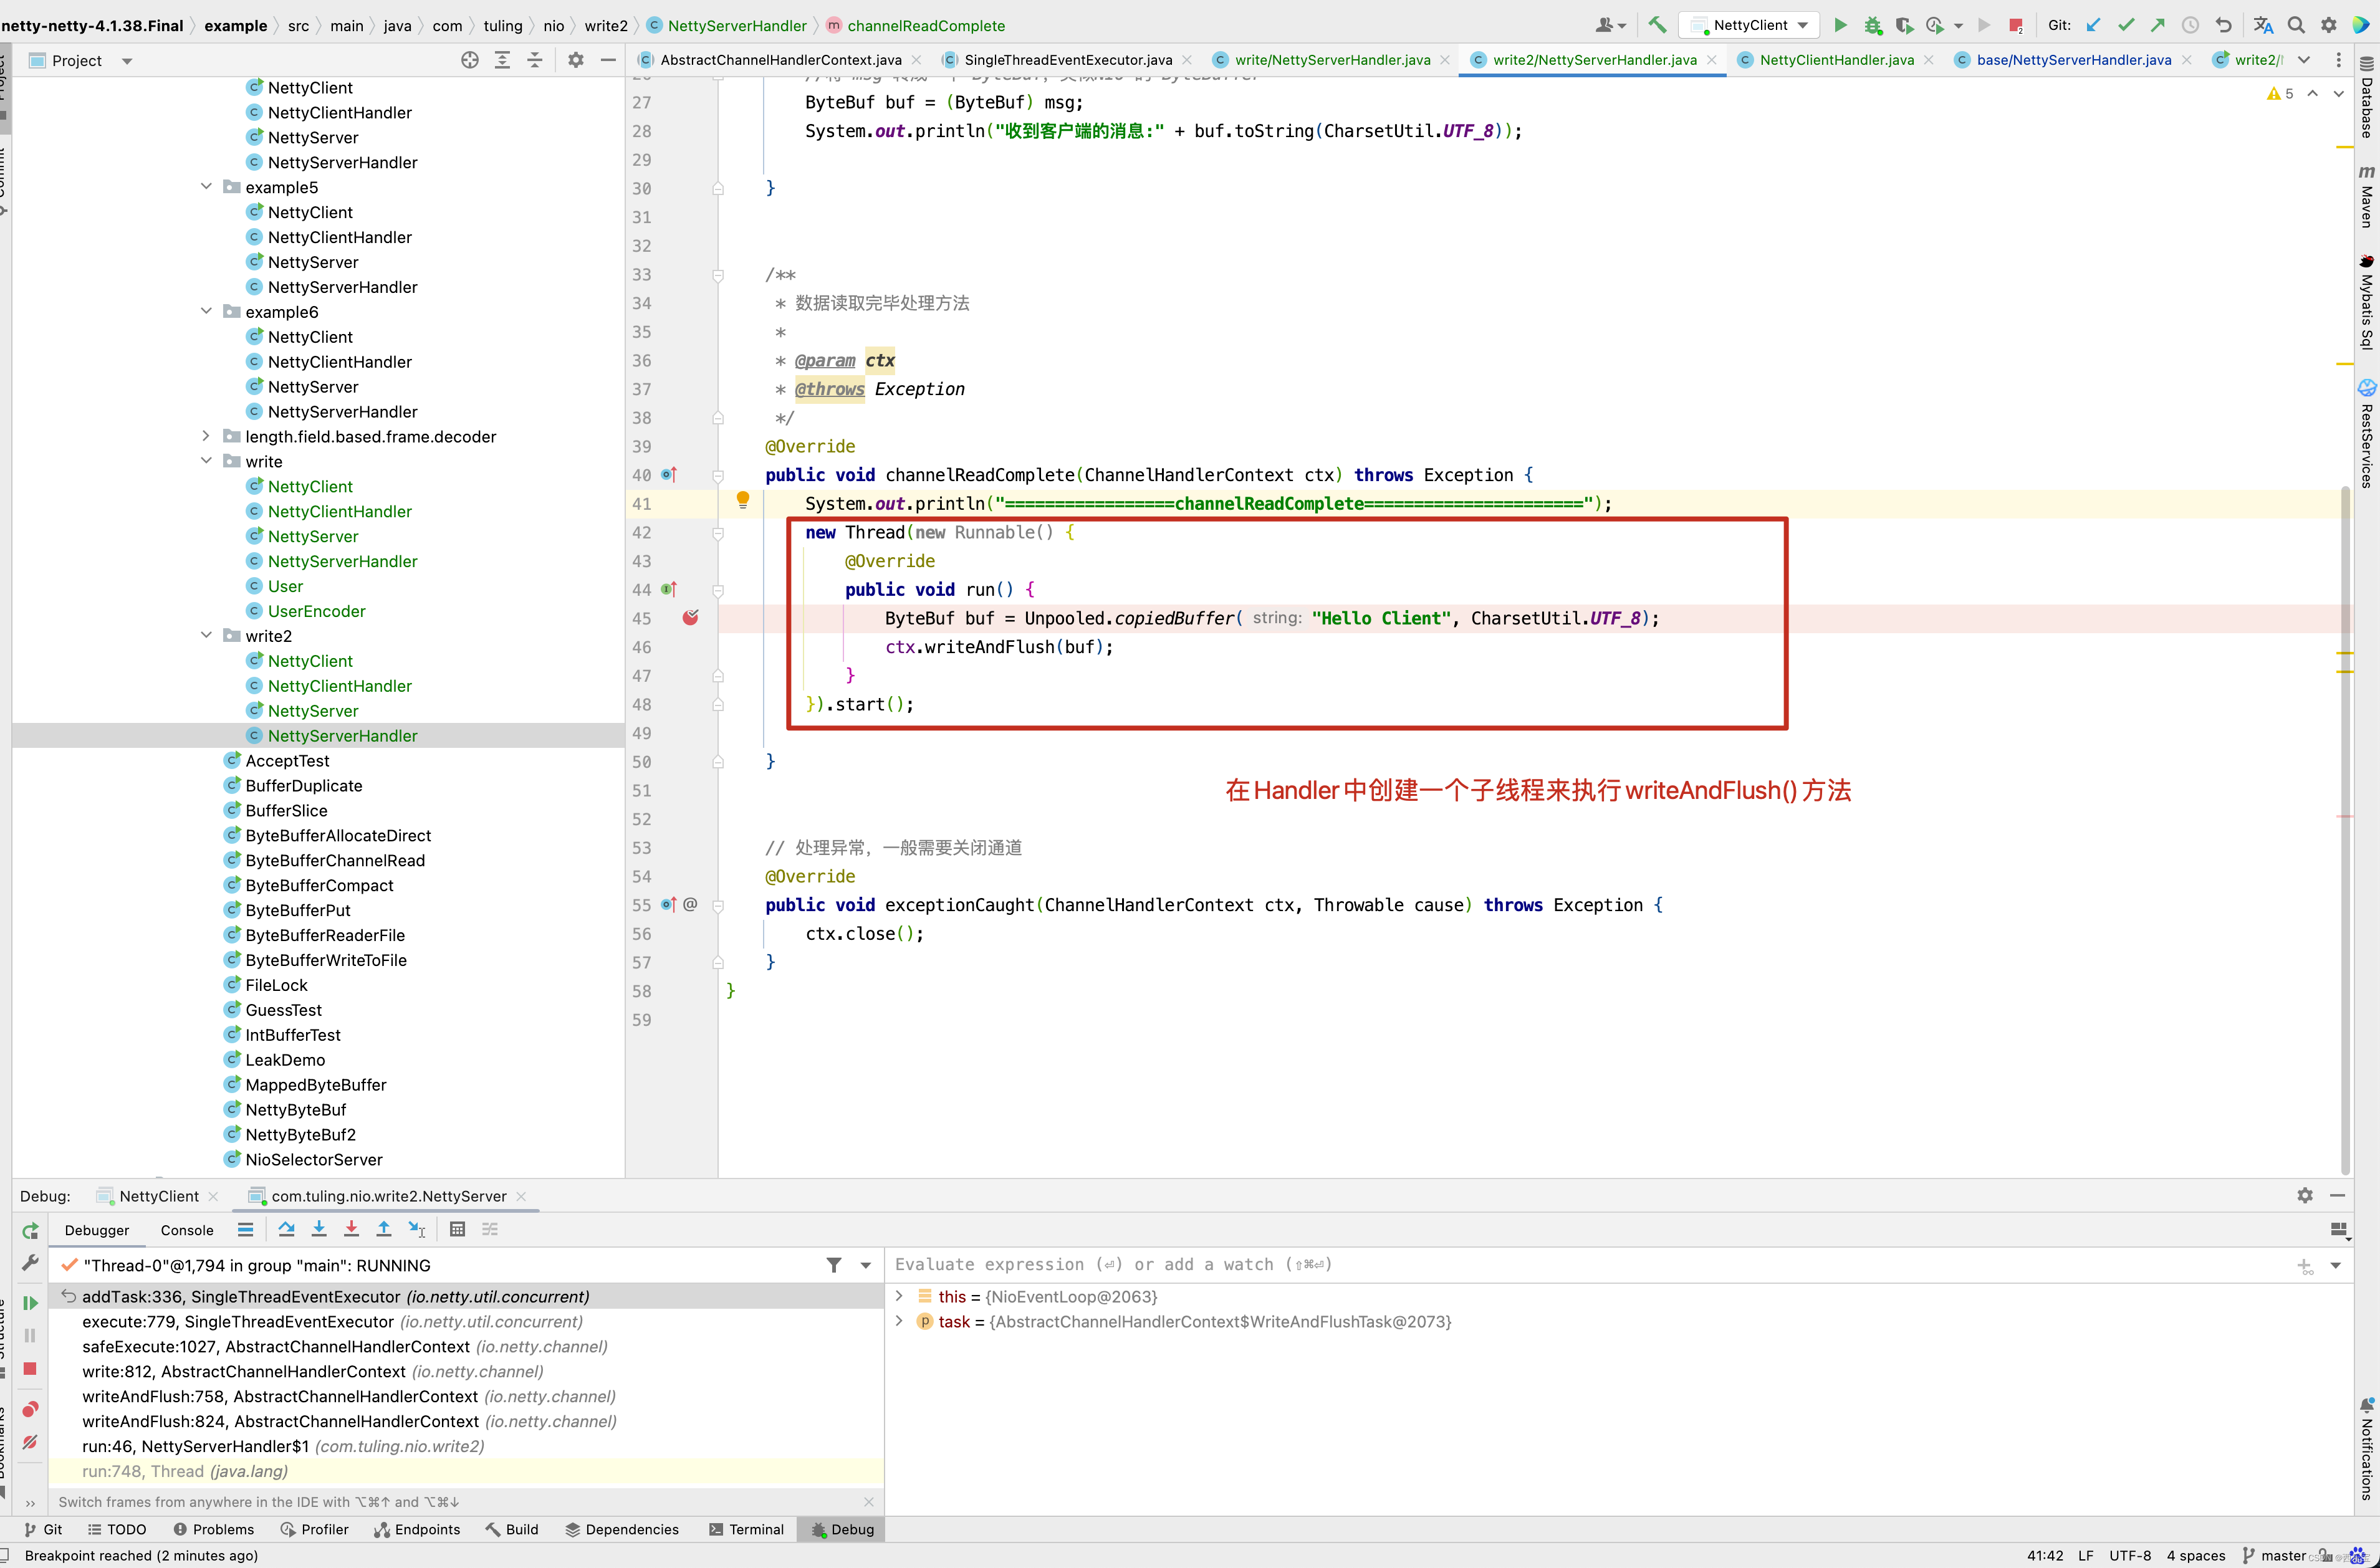
在ServerHandler里开启额外线程去执行 ctx.channel().writeAndFlush(response)时,NioEventLoop线程如何获取response内容并写回给 Channel呢?
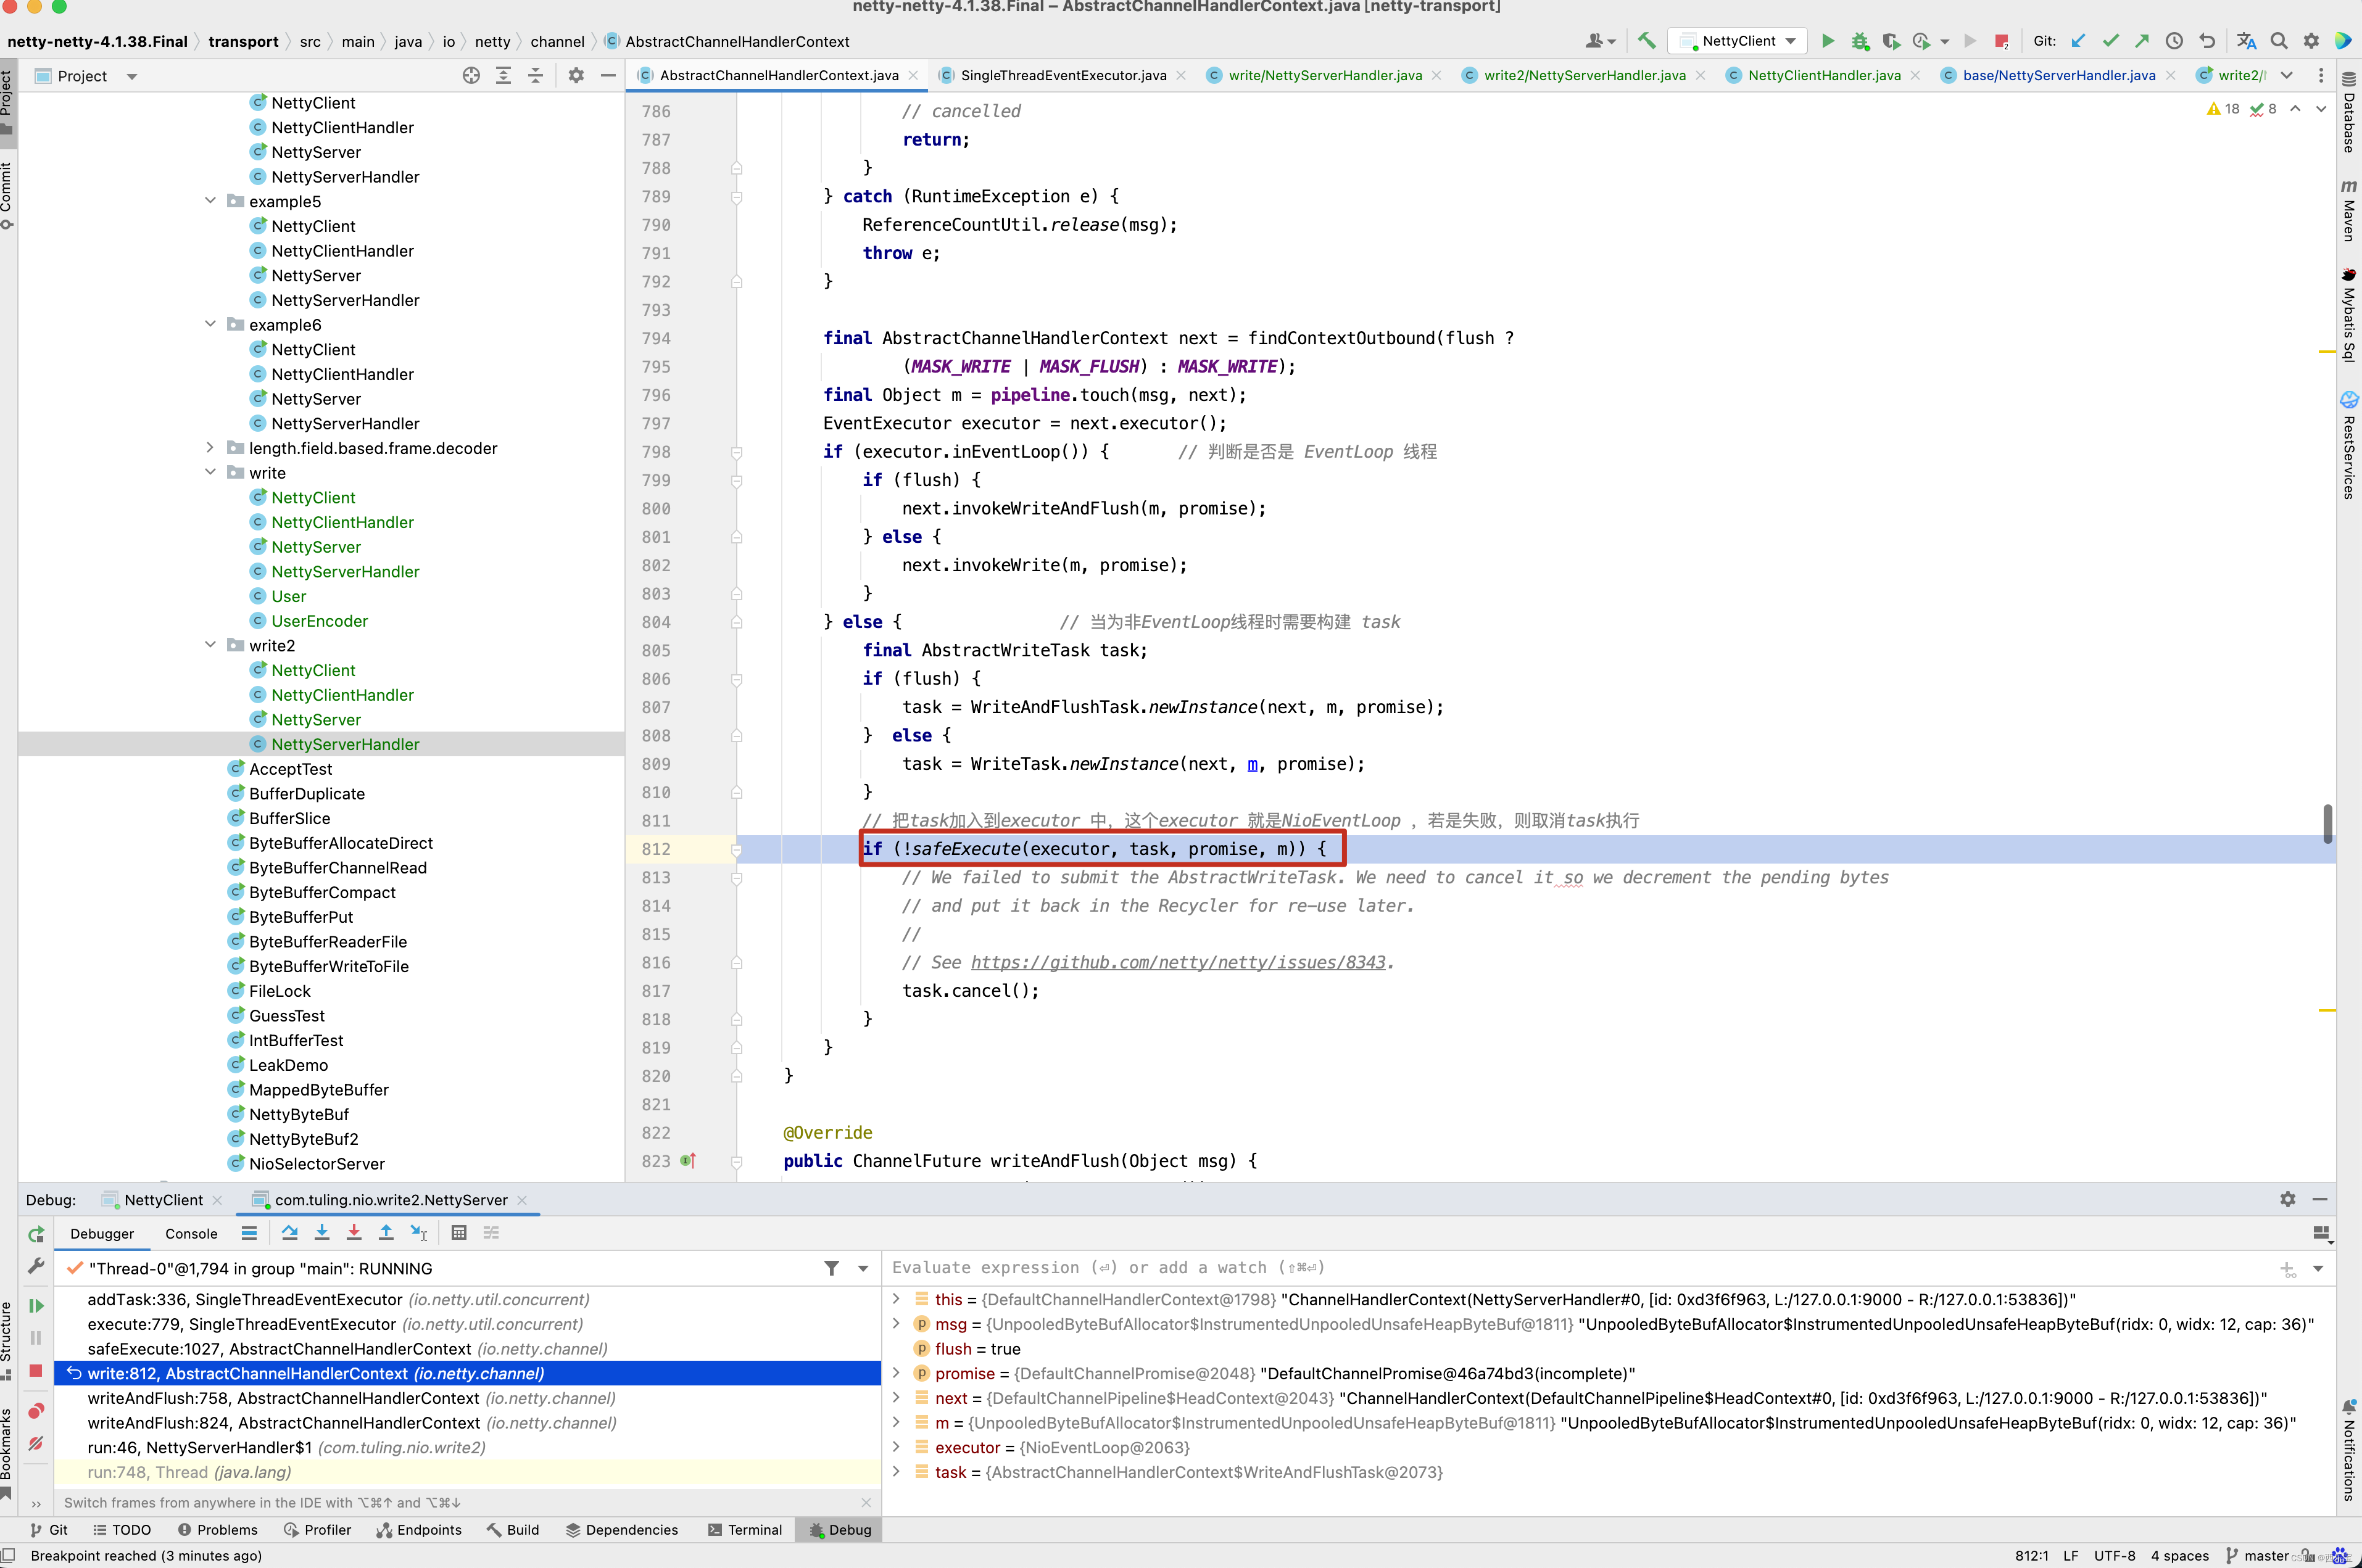
在写过程中有两种task,分别是WriteTask和WriteAndFlushTask,主要是根据是否刷新来决定使用哪种task,在NioSocketChannel中,每个Channel都有一条NioEventLoop线程与之对应,在NioEventLoop的父类SingleThreadEventExecutor的execute()方法存放非EventLoop线程的任务,包括WriteTask和WriteAndFlushTask这两种WriteTask,当调用添加任务时, 会唤醒EventLoop 线程,从而I/O线程会调用这些任务的run()方法,并把结果写回到Socket通道 。
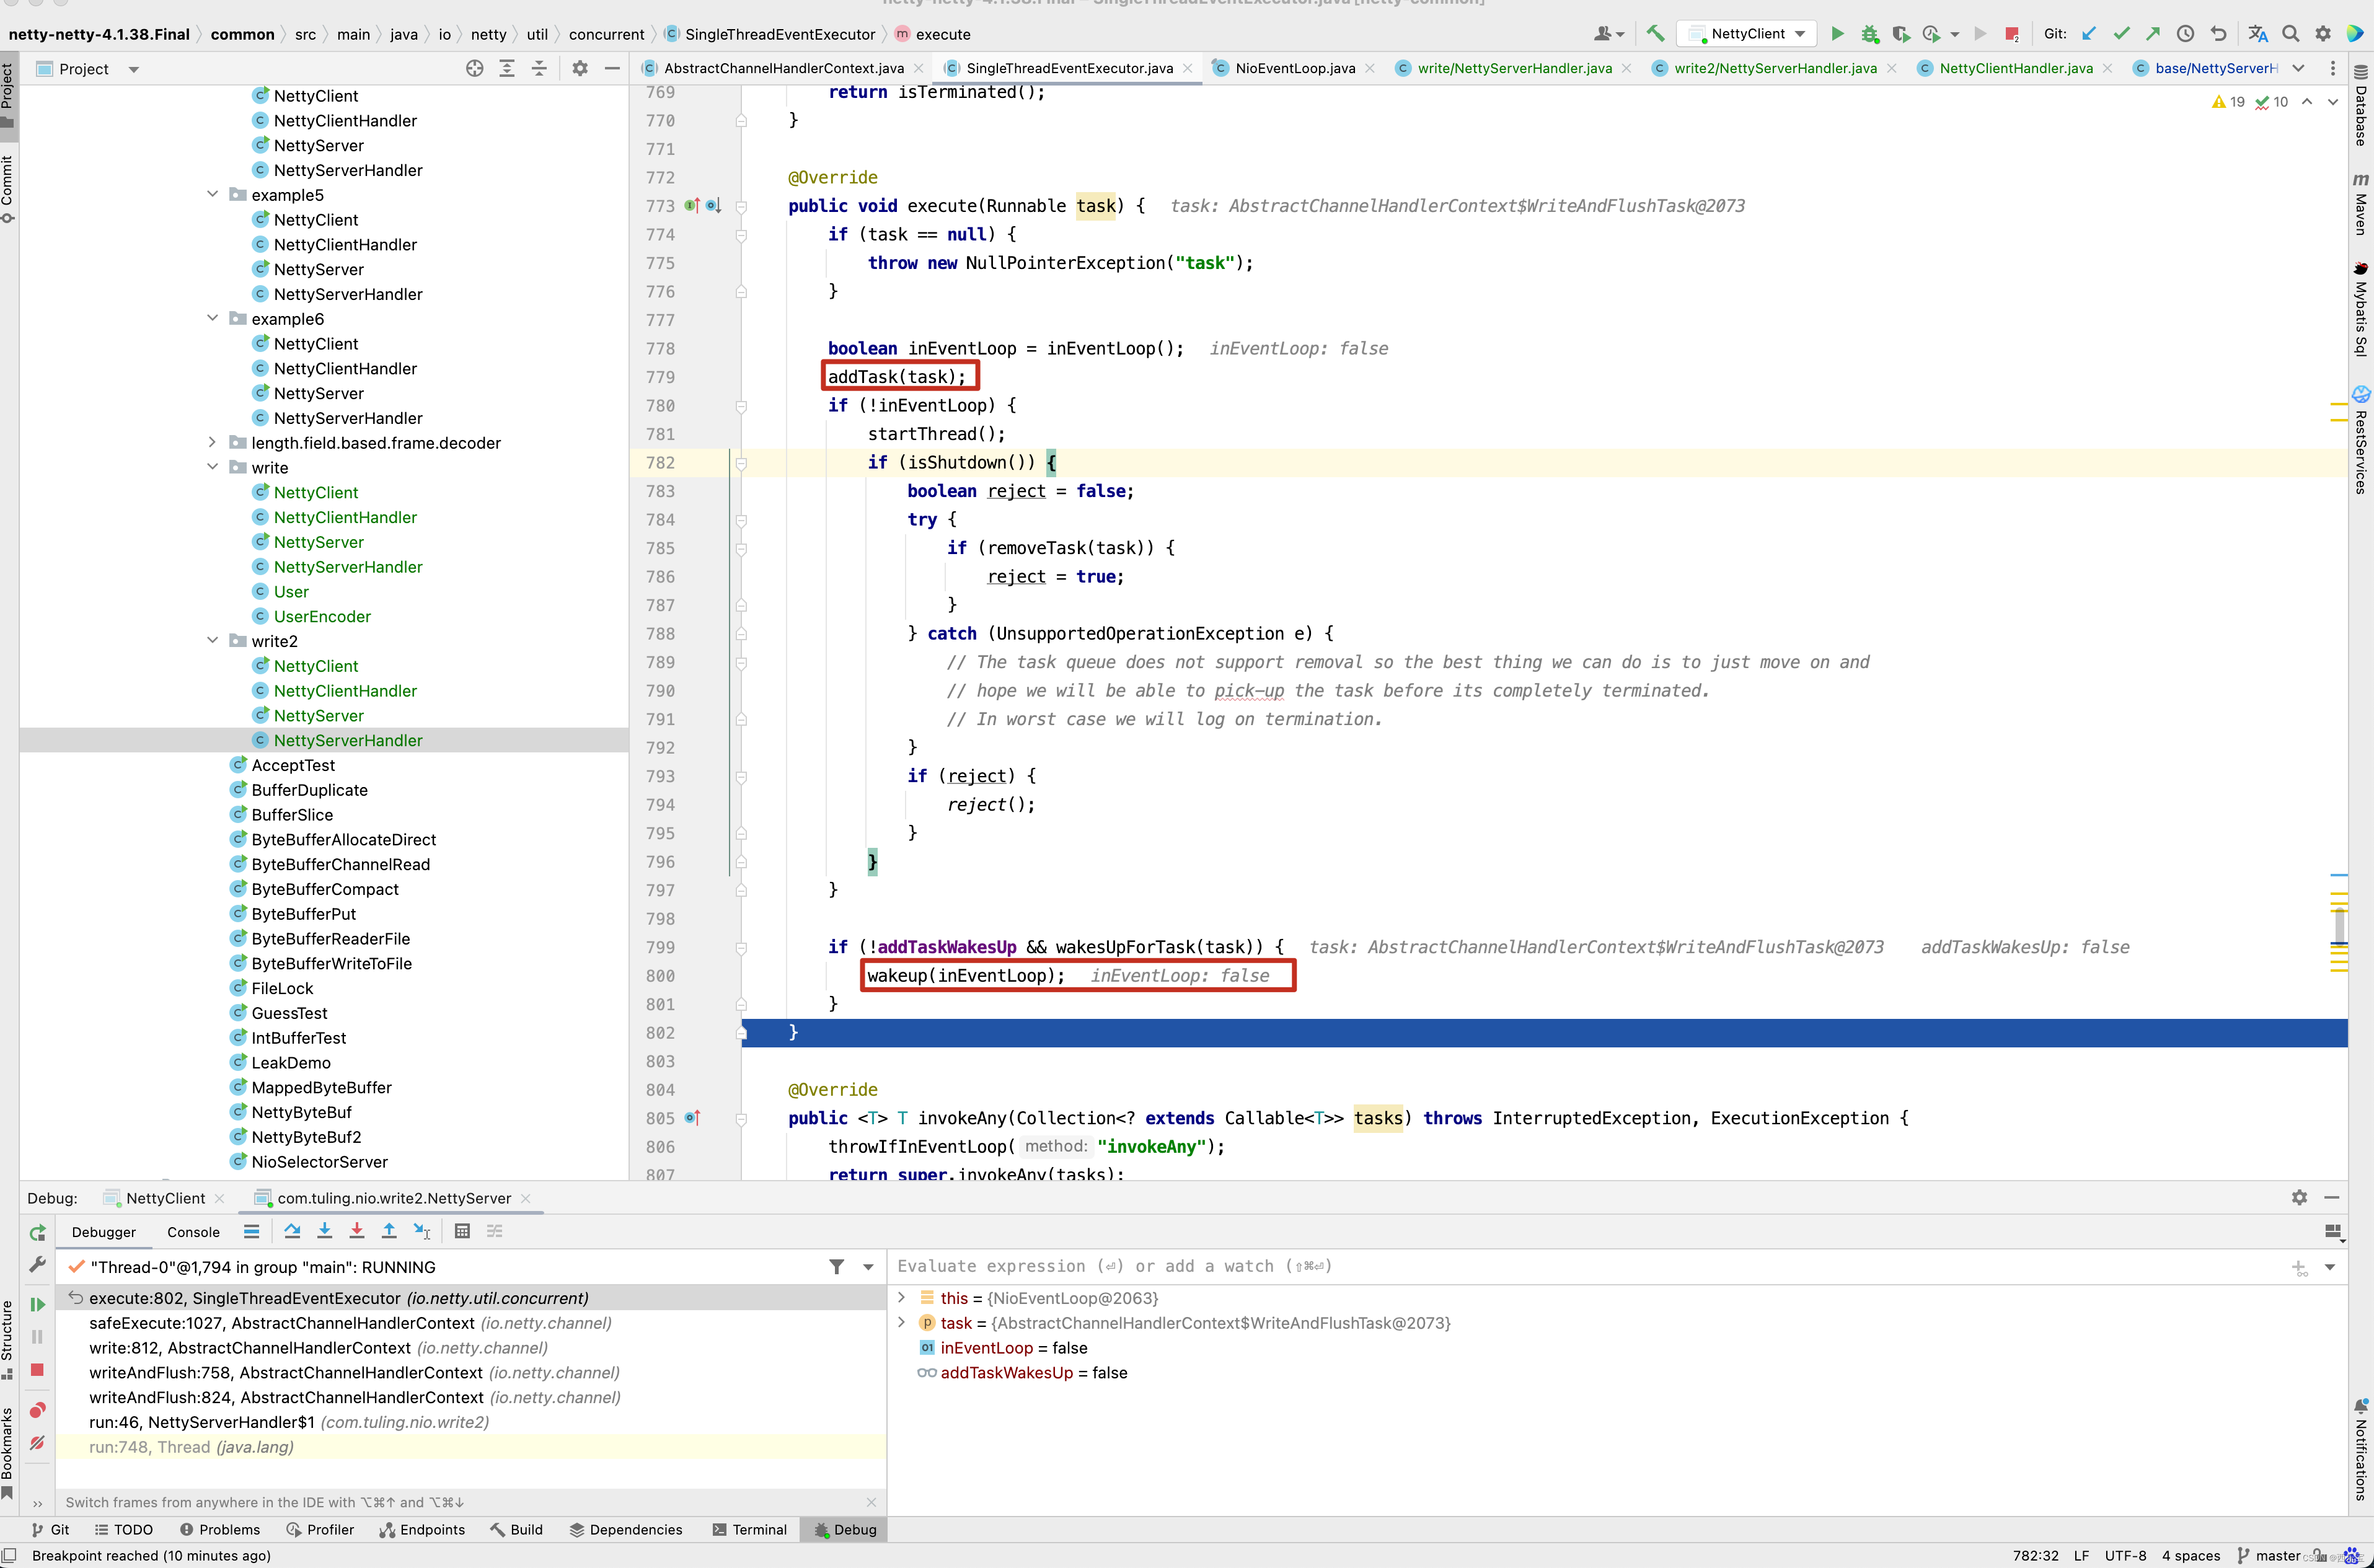
当然还需要理明白一点,ChannelHandlerContext有哪些东西 。
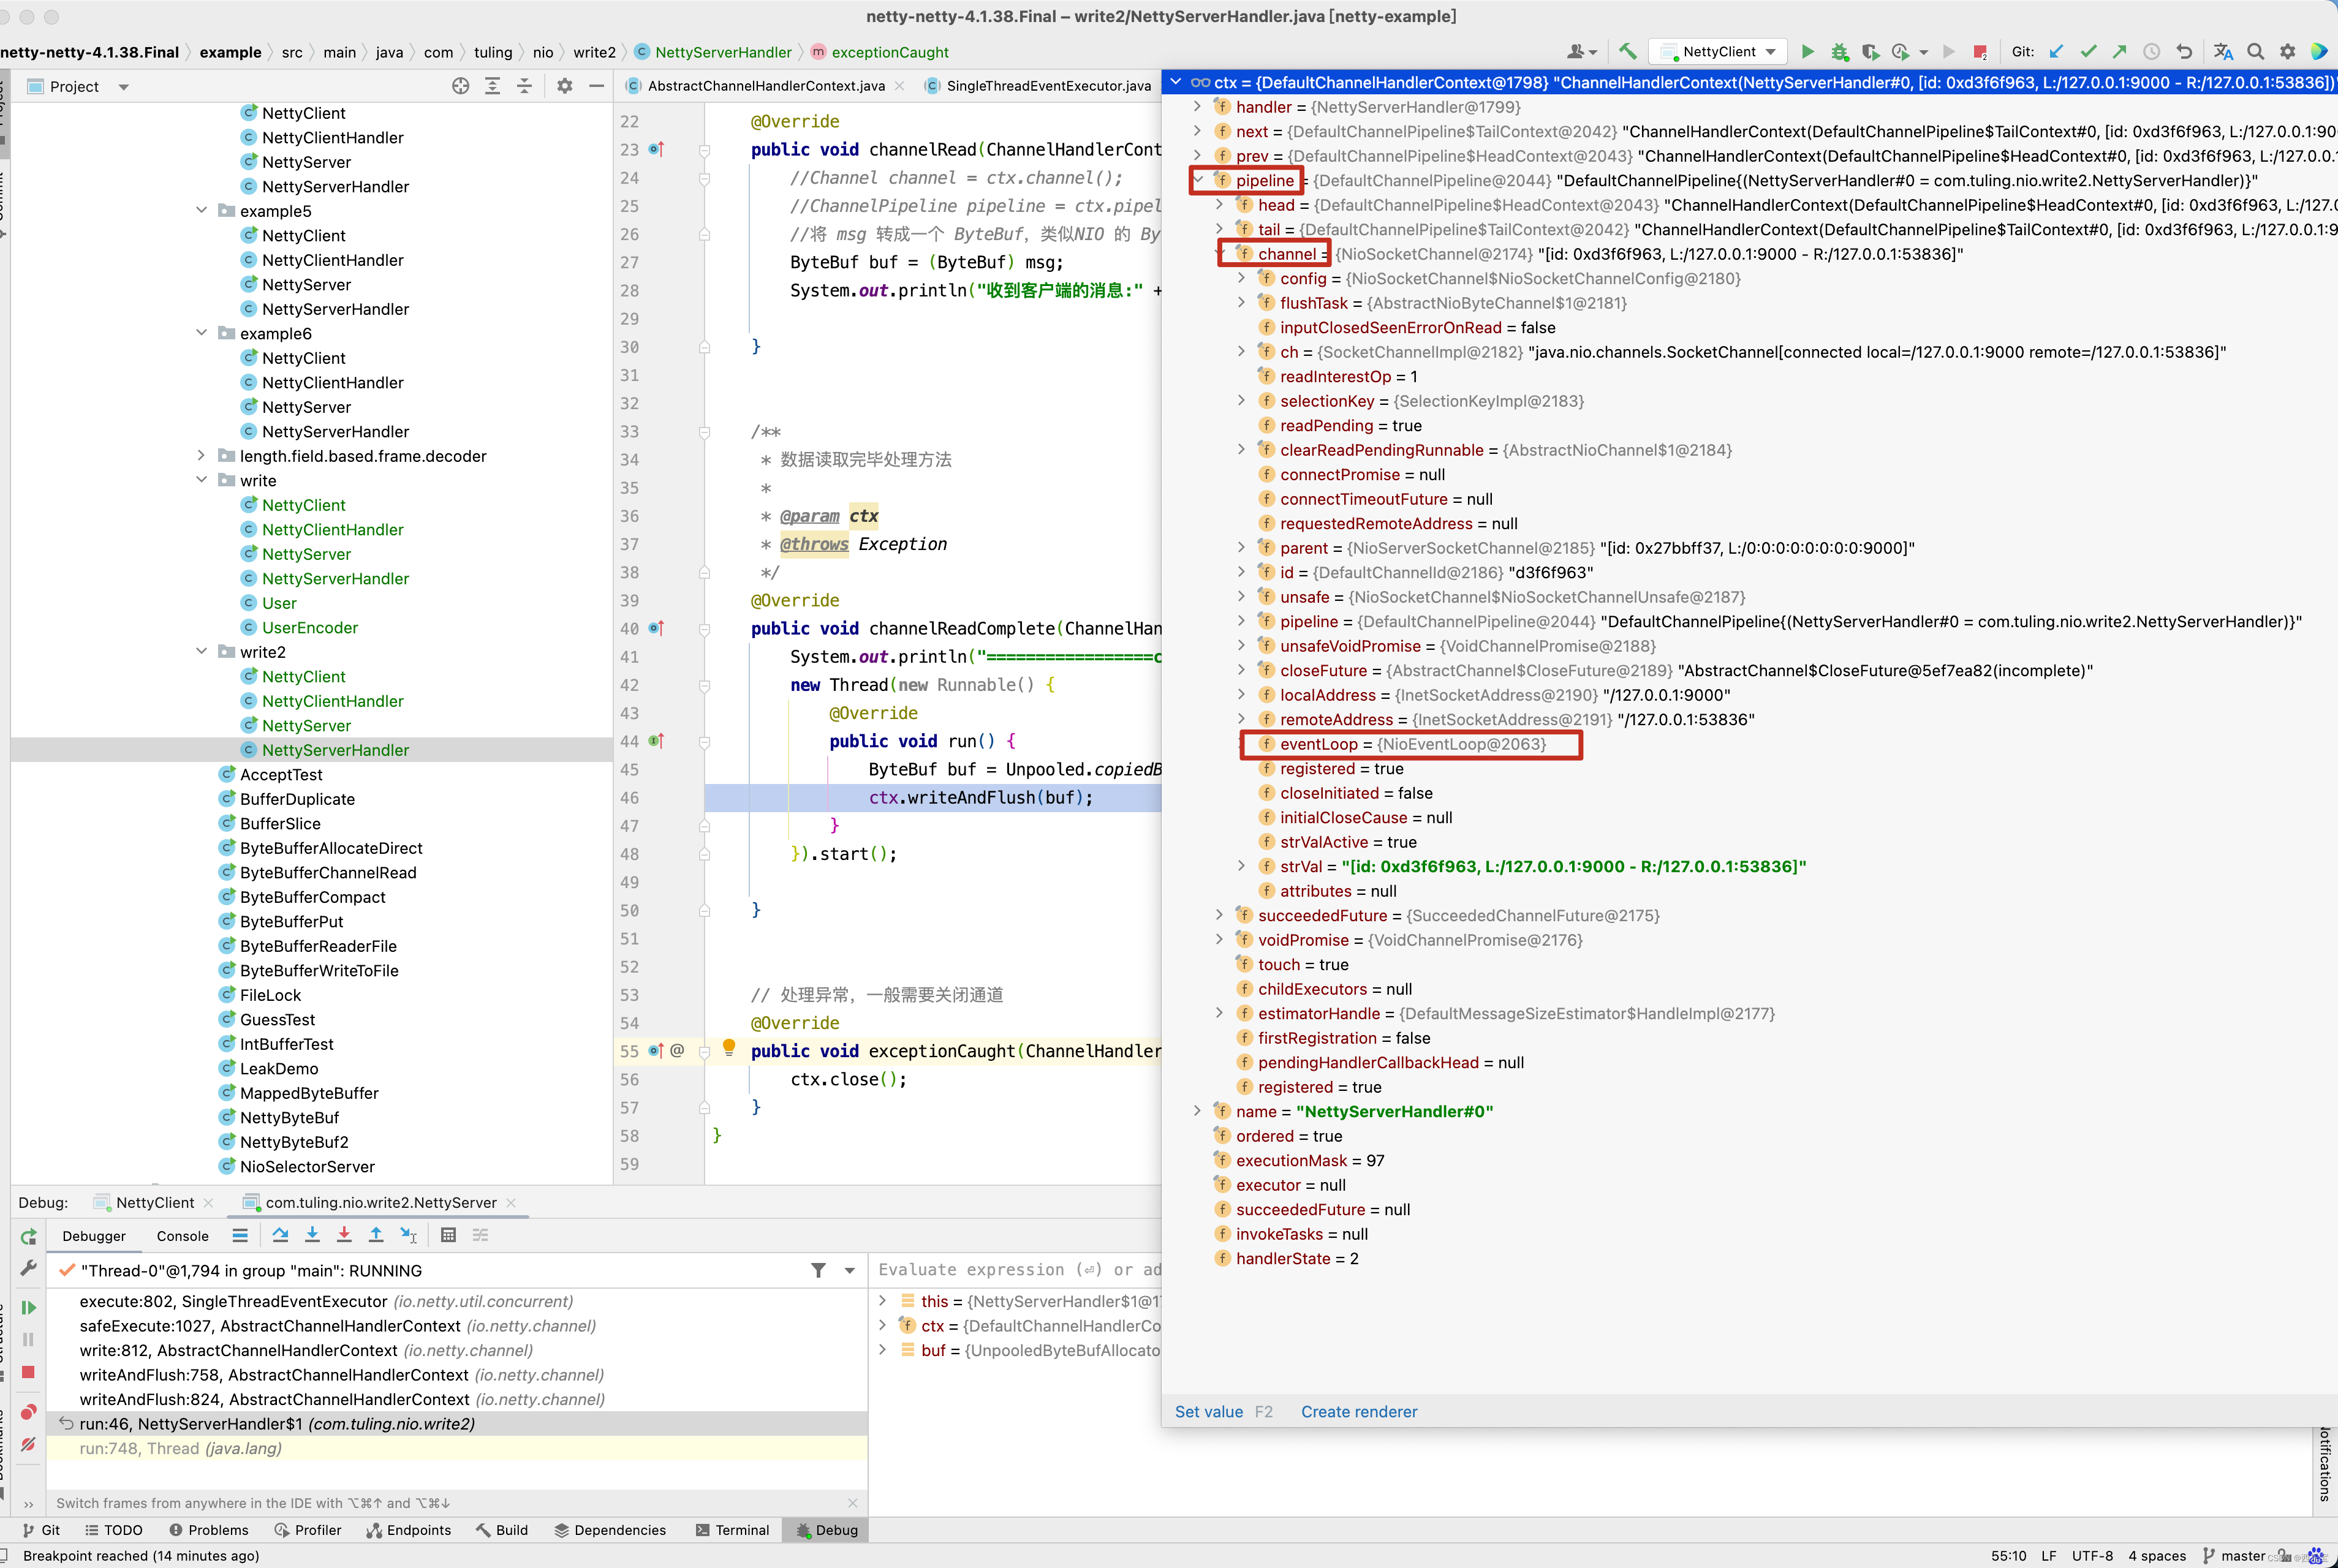
发现没有ChannelHandlerContext中有pipeline,每个pipeline中有SocketChannel,而channel中又有NioEventLoop,而NioEventLoop又有serverSocket注册的selector,有了这些, NioEventLoop执行器回写数据给客户端就很容易了。
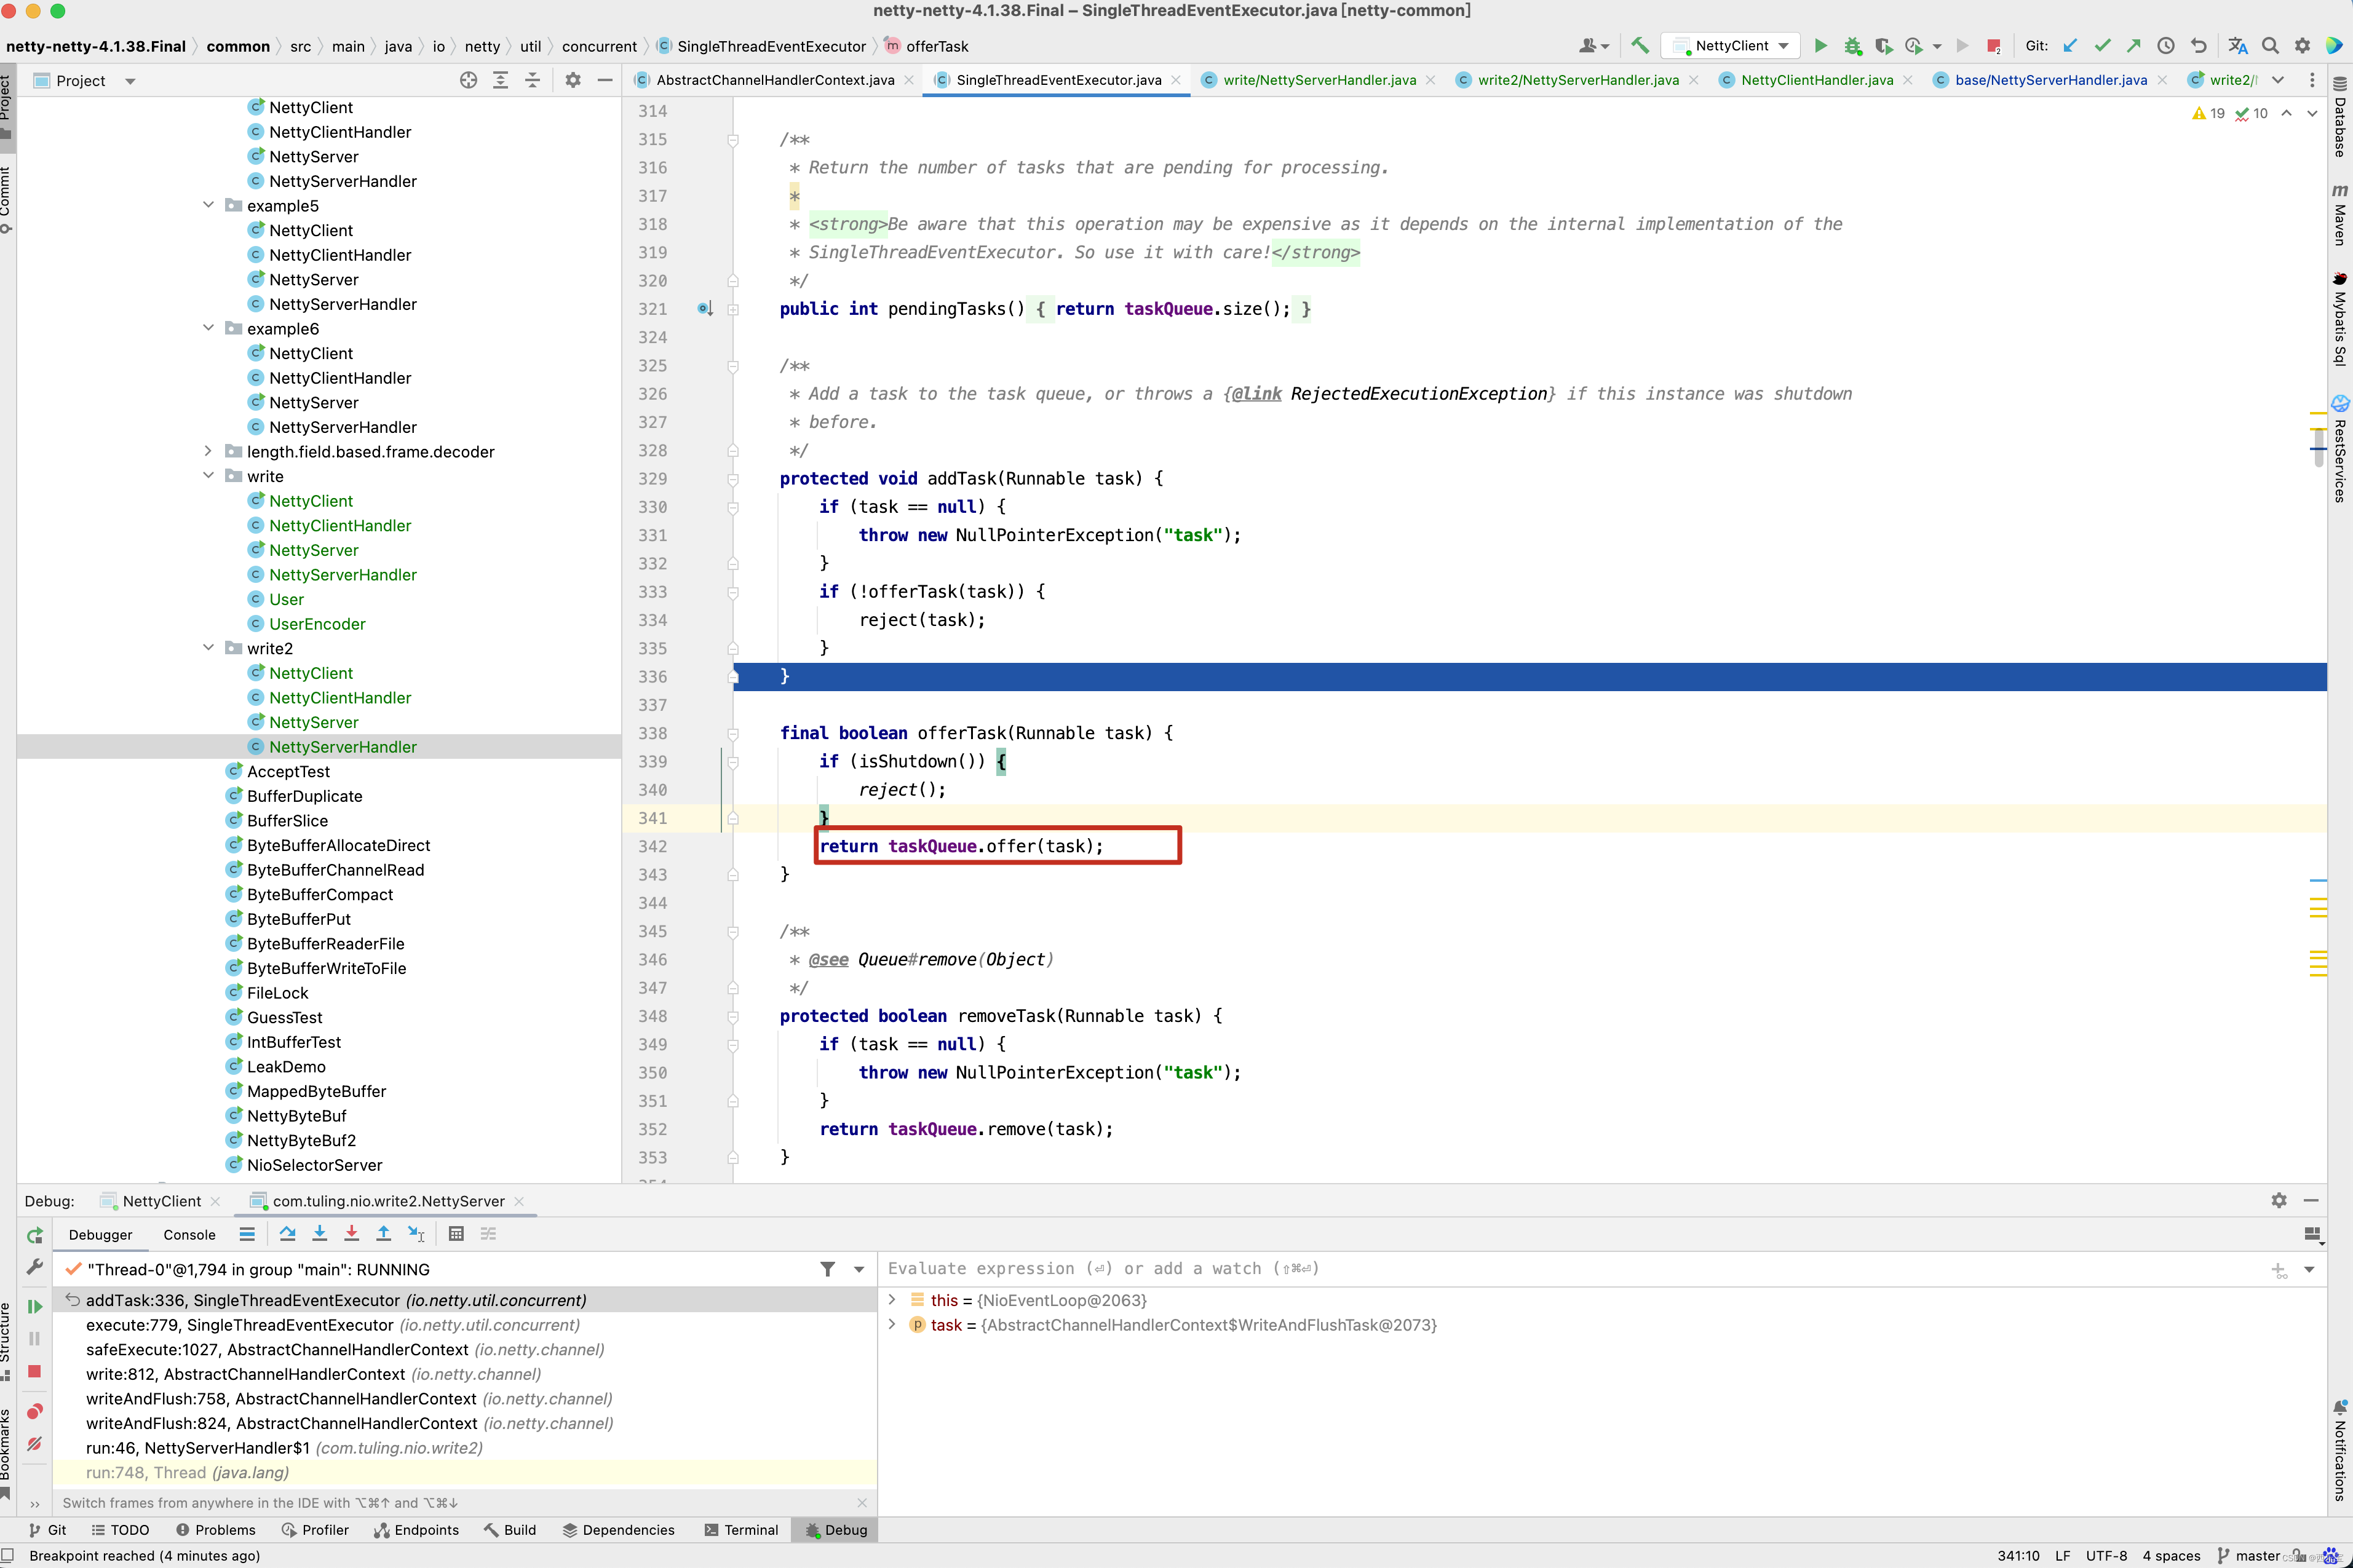
这一块逻辑已经在上一篇博客中分析得很清楚了,这里不再赘述 ,接下来继续看invokeWriteAndFlush()方法的实现逻辑。
private void invokeWriteAndFlush(Object msg, ChannelPromise promise) {if (invokeHandler()) {invokeWrite0(msg, promise);invokeFlush0();} else {writeAndFlush(msg, promise);}
}private void invokeWrite0(Object msg, ChannelPromise promise) {try {((ChannelOutboundHandler) handler()).write(this, msg, promise);} catch (Throwable t) {notifyOutboundHandlerException(t, promise);}
}public void write(ChannelHandlerContext ctx, Object msg, ChannelPromise promise) throws Exception {ByteBuf buf = null;try {if (acceptOutboundMessage(msg)) {@SuppressWarnings("unchecked")I cast = (I) msg;buf = allocateBuffer(ctx, cast, preferDirect);try {encode(ctx, cast, buf);} finally {ReferenceCountUtil.release(cast);}if (buf.isReadable()) {ctx.write(buf, promise);} else {buf.release();ctx.write(Unpooled.EMPTY_BUFFER, promise);}buf = null;} else {ctx.write(msg, promise);}} catch (EncoderException e) {throw e;} catch (Throwable e) {throw new EncoderException(e);} finally {if (buf != null) {buf.release();}}
}
acceptOutboundMessage方法是很有意思的。如果我们自定义的UserEncoder对象继承MessageToByteEncoder指定了泛型对象。

那这个Encoder 编码器只对写入值为泛型对象的数据做编码处理,而这个功能实现源码就在acceptOutboundMessage()方法中,因为逻辑很简单,有兴趣自己打断点看看,无论我们定义多少个encoder Handler,最终都会调用HeadContext的write()方法 。
public void write(ChannelHandlerContext ctx, Object msg, ChannelPromise promise) {unsafe.write(msg, promise);
}
而write()方法最终调用了NioSocketChannelUnsafe的write方法,进入NioSocketChannelUnsafe的write()方法 。
public final void write(Object msg, ChannelPromise promise) {assertEventLoop();ChannelOutboundBuffer outboundBuffer = this.outboundBuffer;if (outboundBuffer == null) {// If the outboundBuffer is null we know the channel was closed and so// need to fail the future right away. If it is not null the handling of the rest// will be done in flush0()// See https://github.com/netty/netty/issues/2362safeSetFailure(promise, newClosedChannelException(initialCloseCause));// release message now to prevent resource-leakReferenceCountUtil.release(msg);return;}int size;try {msg = filterOutboundMessage(msg);size = pipeline.estimatorHandle().size(msg);if (size < 0) {size = 0;}} catch (Throwable t) {safeSetFailure(promise, t);ReferenceCountUtil.release(msg);return;}outboundBuffer.addMessage(msg, size, promise);
}public void addMessage(Object msg, int size, ChannelPromise promise) {// 把msg消息数据包装成Entry 对象Entry entry = Entry.newInstance(msg, size, total(msg), promise);// 若链表为空, 则尾节点为当前节点if (tailEntry == null) {flushedEntry = null;} else {// 当链表不为空时,把新的Entry对象添加到链表尾部Entry tail = tailEntry;tail.next = entry;}// unflushedEntry 为空,表示调用addFlush()方法将链表中之前的元素都已经全部加入了需要发送的节点,否则链表为空tailEntry = entry;if (unflushedEntry == null) {unflushedEntry = entry;}// increment pending bytes after adding message to the unflushed arrays.// See https://github.com/netty/netty/issues/1619// 修改通过缓存总数据的大小,若缓存总数据大小超过了高水位 , 则会触发 fireChannelWritabilityChanged 事件,进入背压incrementPendingOutboundBytes(entry.pendingSize, false);
}private void incrementPendingOutboundBytes(long size, boolean invokeLater) {if (size == 0) {return;}long newWriteBufferSize = TOTAL_PENDING_SIZE_UPDATER.addAndGet(this, size);if (newWriteBufferSize > channel.config().getWriteBufferHighWaterMark()) {setUnwritable(invokeLater);}
}
在看上述代码之前先来看ChannelOutboundBuffer的几个属性。
// The Entry that is the first in the linked-list structure that was flushed
// 链表中被刷新的第一个元素,此元素准备第一个写入Socket
private Entry flushedEntry;
// The Entry which is the first unflushed in the linked-list structure
// 链表中第一个未刷新的元素, 当调用addMessage()方法后, 从原链表tailEntry到Entry (现链表tailEntry)节点都是未被刷新的数据
private Entry unflushedEntry;
// The Entry which represents the tail of the buffer
// 链表末尾结点
private Entry tailEntry;
// The number of flushed entries that are not written yet
// 表示已经刷新但还没有写到Socket 中的Entry 的数据
private int flushed;
前面3个属性都是指针,构造了刷新和未刷新的数据链表,ChannelOutboundBuffer缓冲区处理过程如图所示 。
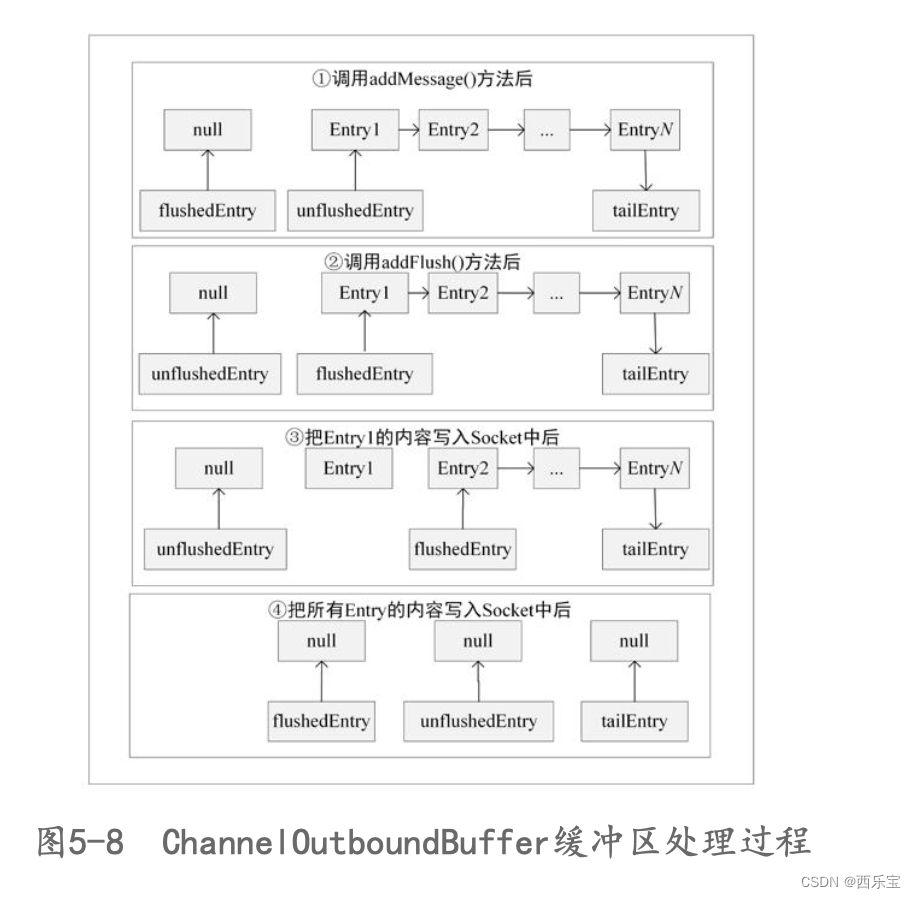
在调用addMessage()方法后,采用CAS方法增加待发送的字节数,此时如果待发送的字节数大于通道写buf的最高阈值writeBufferHighWaterMark,此时更新通道状态为不可写, 同时触发channelWritabilityChanged事件 ,防止内存溢出,在ServerHandler的channelWritabilityChanged() 方法中进行怎样的处理呢? 请看下图 。
当消费者的消费速率低于生产者的发送速率时,会造成背压,此时消费者无法从TCP通道读取数据,因为它无法再从内存池中获取内存,从而造成TCP通道阻塞,生产都无法把数据发送出去,这就使生产者不再向缓冲队列中写入数据,从而降低了生产速率,当消费者的消费速率提升且TCP通道不再阻塞时, 生产者发送速率又会提到提升,整个链路运行恢复正常。
invokeWrite0()执行完,接着看invokeFlush0()方法的实现。
private void invokeFlush0() {try {((ChannelOutboundHandler) handler()).flush(this);} catch (Throwable t) {notifyHandlerException(t);}
}public void flush(ChannelHandlerContext ctx) {unsafe.flush();
}
无论我们定义了多少个Handler,并实现了flush方法,最终都会调用HeadContext的flush()方法,而HeadContext的unsafe为NioSocketChannelUnsafe ,因此进入NioSocketChannelUnsafe的flush()方法 。
public final void flush() {assertEventLoop();ChannelOutboundBuffer outboundBuffer = this.outboundBuffer;if (outboundBuffer == null) {return;}outboundBuffer.addFlush();flush0();
}public void addFlush() {// There is no need to process all entries if there was already a flush before and no new messages// where added in the meantime.//// See https://github.com/netty/netty/issues/2577Entry entry = unflushedEntry;if (entry != null) {if (flushedEntry == null) {// there is no flushedEntry yet, so start with the entryflushedEntry = entry;}do {// 从unflushedEntry开始循环设置,将这些entry状态设置为非取消状态flushed ++;if (!entry.promise.setUncancellable()) {// Was cancelled so make sure we free up memory and notify about the freed bytesint pending = entry.cancel();/ entry如果已经取消,则释放entry对应的内存,减少ChannelOutBoundBuffer的大小 , 如果缓存总数据的大小低于低水位,则触发* fireChannelWritabilityChanged事件,调用业务 Handler的 channelWritabilityChanged() 方法*/decrementPendingOutboundBytes(pending, false, true);}entry = entry.next;} while (entry != null);// All flushed so reset unflushedEntry// 每次设置完后都需要把unflushedEntry设置为空,在下次添加数据时,unflushedEntry为最先添加的entryunflushedEntry = null;}
}
主要做的事情有哪些呢? 还是请看图5-8

接着继续进入flush0()方法。
protected void flush0() {if (inFlush0) {// Avoid re-entrancereturn;}final ChannelOutboundBuffer outboundBuffer = this.outboundBuffer;if (outboundBuffer == null || outboundBuffer.isEmpty()) {return;}inFlush0 = true;// Mark all pending write requests as failure if the channel is inactive.if (!isActive()) {try {if (isOpen()) {outboundBuffer.failFlushed(new NotYetConnectedException(), true);} else {// Do not trigger channelWritabilityChanged because the channel is closed already.outboundBuffer.failFlushed(newClosedChannelException(initialCloseCause), false);}} finally {inFlush0 = false;}return;}try {doWrite(outboundBuffer);} catch (Throwable t) {if (t instanceof IOException && config().isAutoClose()) {/* Just call {@link #close(ChannelPromise, Throwable, boolean)} here which will take care of* failing all flushed messages and also ensure the actual close of the underlying transport* will happen before the promises are notified. This is needed as otherwise {@link #isActive()} , {@link #isOpen()} and {@link #isWritable()}* may still return {@code true} even if the channel should be closed as result of the exception.*/initialCloseCause = t;close(voidPromise(), t, newClosedChannelException(t), false);} else {try {shutdownOutput(voidPromise(), t);} catch (Throwable t2) {initialCloseCause = t;close(voidPromise(), t2, newClosedChannelException(t), false);}}} finally {inFlush0 = false;}
}
上述方法中其他的细枝末节就不深入分析了,直接进入doWrite()方法 。
// 重写doWrite()方法、实现doWriteBytes()方法,将数据写入 Socket中。
protected void doWrite(ChannelOutboundBuffer in) throws Exception {// 获取SocketChannelSocketChannel ch = javaChannel();// 获取配置属性writeSpinCount(循环写的最大次数)int writeSpinCount = config().getWriteSpinCount();do {// 缓存中数据为空,无数据可写if (in.isEmpty()) {// All written so clear OP_WRITE// 移除写事件,并直接返回clearOpWrite();// Directly return here so incompleteWrite(...) is not called.return;}// Ensure the pending writes are made of ByteBufs only.// 获取一次最大可写字节数int maxBytesPerGatheringWrite = ((NioSocketChannelConfig) config).getMaxBytesPerGatheringWrite();/* 缓存由多个Entry组成,每次写时都可能写多个Entry* 具体一次性该发送多少数据* 由ByteBuffer数组的最大长度和一次最大可写字节数决定*/ByteBuffer[] nioBuffers = in.nioBuffers(1024, maxBytesPerGatheringWrite);int nioBufferCnt = in.nioBufferCount();// Always us nioBuffers() to workaround data-corruption.// See https://github.com/netty/netty/issues/2761// 缓存中有多少个nioBufferswitch (nioBufferCnt) {case 0:// 非ByteBuffer数据,交给父类实现// We have something else beside ByteBuffers to write so fallback to normal writes.writeSpinCount -= doWrite0(in);break;case 1: {// Only one ByteBuf so use non-gathering write// Zero length buffers are not added to nioBuffers by ChannelOutboundBuffer, so there is no need// to check if the total size of all the buffers is non-zero.ByteBuffer buffer = nioBuffers[0];// buf可读写字节数int attemptedBytes = buffer.remaining();// 把buf发送到Socket缓存中final int localWrittenBytes = ch.write(buffer);// 发送失败if (localWrittenBytes <= 0) {// 将写事件添加到事件兴趣集中incompleteWrite(true);return;}/* 根据成功写入字节数和尝试写入字节数调整下次最大可写字节数* 当两者相等时,若尝试写入字节数* 2 大于当前最大写入字节数* 则下次最大可写字节数等于尝试写入字节数 * 2* 当两者不相等时, 成功写入字节数小于尝试写入字节数/2, 且尝试写入字节数大于4096时* 下次最大可写字节数等于尝试写入字节数 /2*/adjustMaxBytesPerGatheringWrite(attemptedBytes, localWrittenBytes, maxBytesPerGatheringWrite);// 从缓存中移除写入的字节数in.removeBytes(localWrittenBytes);// 循环写次数减1--writeSpinCount;break;}default: {// Zero length buffers are not added to nioBuffers by ChannelOutboundBuffer, so there is no need// to check if the total size of all the buffers is non-zero.// We limit the max amount to int above so cast is safe// 尝试写入字节数long attemptedBytes = in.nioBufferSize();// 真正发送Socket 缓存中的字节数final long localWrittenBytes = ch.write(nioBuffers, 0, nioBufferCnt);// 如果发送失败if (localWrittenBytes <= 0) {// 将写事件添加到感兴趣集中// 以便下次NioEventLoop继续触发写操作incompleteWrite(true);return;}// Casting to int is safe because we limit the total amount of data in the nioBuffers to int above.// 调整下次最大可写字节数adjustMaxBytesPerGatheringWrite((int) attemptedBytes, (int) localWrittenBytes,maxBytesPerGatheringWrite);// 从缓存中移除发送成功的字节in.removeBytes(localWrittenBytes);// 循环写次数减1--writeSpinCount;break;}}} while (writeSpinCount > 0);// 未全部发送完// 若writeSpinCount < 0// 则说明Socket 缓冲区已满,未发送成功// 若writeSpinCount = 0// 则说明Netty 缓存数据太大, 写了16次还未写完incompleteWrite(writeSpinCount < 0);
}protected final int doWrite0(ChannelOutboundBuffer in) throws Exception {Object msg = in.current();if (msg == null) {// Directly return here so incompleteWrite(...) is not called.return 0;}return doWriteInternal(in, in.current());
}private int doWriteInternal(ChannelOutboundBuffer in, Object msg) throws Exception {if (msg instanceof ByteBuf) {ByteBuf buf = (ByteBuf) msg;if (!buf.isReadable()) {// 若可读字节数为0,则从缓存区中移除in.remove();return 0;}// 实际发送字节数据final int localFlushedAmount = doWriteBytes(buf);if (localFlushedAmount > 0) {// 更新字节数据的发送速度in.progress(localFlushedAmount);if (!buf.isReadable()) {// 若可读字节数为0,则从缓存区中移除in.remove();}return 1;}} else if (msg instanceof FileRegion) {// 如果是文件FileRegion消息FileRegion region = (FileRegion) msg;if (region.transferred() >= region.count()) {in.remove();return 0;}// 实际写操作long localFlushedAmount = doWriteFileRegion(region);if (localFlushedAmount > 0) {// 更新数据的发送进度in.progress(localFlushedAmount);if (region.transferred() >= region.count()) {// 若region已经全部发送成功,则从缓存中移除in.remove();}return 1;}} else {// Should not reach here.// 不支持发送其他类型的数据throw new Error();}// 当实际发送的字节数为0时, 返回Integer.MAX_VALUEreturn WRITE_STATUS_SNDBUF_FULL;
}
doWrite()与doWriteInternal()方法在AbstractChannel的flush0()方法中被调用,主要功能是从ChannelOutBoundBuffer缓冲中获取待发送的数据,进行循环发送,发送的结果分为以下3种。
- 发送成功,跳出循环直接返回。
- 由于TCP缓冲区已满,成功发送的字节数为0 ,跳出循环, 并将写操作OP_WRITE事件添加到选择Key兴趣事件中。
- 默认写了16次数据还未发送完时, 把选择Key的OP_WRITE事件从兴趣的事件中移除,并添加了一个flushTask任务,先去执行其他任务,当检测到此任务时再发送。
protected final void incompleteWrite(boolean setOpWrite) {// Did not write completely.if (setOpWrite) {// 将OP_WRITE写操作事件添加到Channel的选择Key兴趣事件集中setOpWrite();} else {// It is possible that we have set the write OP, woken up by NIO because the socket is writable, and then// use our write quantum. In this case we no longer want to set the write OP because the socket is still// writable (as far as we know). We will find out next time we attempt to write if the socket is writable// and set the write OP if necessary.// 清除Channel选择Key兴趣事件集中的OP_WRITE写操作事件clearOpWrite();// Schedule flush again later so other tasks can be picked up in the meantime// 将写操作任务添加到EventLoop线程上,以便后续继续发送eventLoop().execute(flushTask);}
}
// 属性flushTask为task任务,主要负责刷新发送缓存链表中的数 据,由于write的数据没有直接写在Socket中,而是写在了 ChannelOutboundBuffer缓存中,
// 所以当调用flush()方法时,会把数 据写入Socket中并向网络中发送。因此当缓存中的数据未发送完成 时,需要将此任务添加到EventLoop线程中,
// 等待EventLoop线程的再 次发送。
private final Runnable flushTask = new Runnable() {@Overridepublic void run() {// Calling flush0 directly to ensure we not try to flush messages that were added via write(...) in the// meantime.((AbstractNioUnsafe) unsafe()).flush0();}
};
protected final void setOpWrite() {final SelectionKey key = selectionKey();// Check first if the key is still valid as it may be canceled as part of the deregistration// from the EventLoop// See https://github.com/netty/netty/issues/2104if (!key.isValid()) {return;}final int interestOps = key.interestOps();if ((interestOps & SelectionKey.OP_WRITE) == 0) {key.interestOps(interestOps | SelectionKey.OP_WRITE);}
}
注册一个写事件,最终会被 selector.select(timeoutMillis) 监控到。

最终调用ch.unsafe().forceFlush()方法再次刷新数据到socket中。因为NIO的SocketChannel只能写ByteBuffer类型的数据, nioBuffers()方法把缓冲区中需要发送的数据转换成了ByteBuffer。
/* 在发送数据时需要把ChannelOutBoundBuffer中的msg转换成ByteBuffer* maxCount : 本次最多获取buf的个数为1024* maxBytes : 本次获取最大字节数*nioBuffers()方法把缓冲区中需要发送的数据转换成了 ByteBuffer , 因 为 NIO 的 SocketChannel 只 能 写 ByteBuffer 类 型 的 数 据。具体代码解读如下:*/
public ByteBuffer[] nioBuffers(int maxCount, long maxBytes) {assert maxCount > 0;assert maxBytes > 0;long nioBufferSize = 0;int nioBufferCount = 0;final InternalThreadLocalMap threadLocalMap = InternalThreadLocalMap.get();// 从线程本地缓存中获取ByteBuffer数组ByteBuffer[] nioBuffers = NIO_BUFFERS.get(threadLocalMap);//  从准备第一个写入的Socket 的元素开始Entry entry = flushedEntry;// 循环遍历 entry ,entry必须为准备写入Socket 的元素且为非取消状态while (isFlushedEntry(entry) && entry.msg instanceof ByteBuf) {if (!entry.cancelled) {// 获取entry节点中实际发送的数据ByteBuf buf = (ByteBuf) entry.msg;final int readerIndex = buf.readerIndex();// 获取可发送的字节数final int readableBytes = buf.writerIndex() - readerIndex;// 若可发送的字节数大于 0 则继续:否则跳过if (readableBytes > 0) {// 累计发送字节数不能大于 maxBytes// maxBytes  < nioBufferSize + readableBytes ,本次发送的字节 + 累计发送的字节是否大于最大字节限制if (maxBytes - readableBytes < nioBufferSize && nioBufferCount != 0) {// If the nioBufferSize + readableBytes will overflow maxBytes, and there is at least one entry// we stop populate the ByteBuffer array. This is done for 2 reasons:// 1. bsd/osx don't allow to write more bytes then Integer.MAX_VALUE with one writev(...) call// and so will return 'EINVAL', which will raise an IOException. On Linux it may work depending// on the architecture and kernel but to be safe we also enforce the limit here.// 2. There is no sense in putting more data in the array than is likely to be accepted by the// OS.//// See also:// - https://www.freebsd.org/cgi/man.cgi?query=write&sektion=2// - http://linux.die.net/man/2/writevbreak;}// 累计发送字节数nioBufferSize += readableBytes;int count = entry.count;// 获取字节中的ByteBuffer的个数if (count == -1) {//noinspection ConstantValueVariableUseentry.count = count = buf.nioBufferCount();}// 需要存放多少个ByteBufferint neededSpace = min(maxCount, nioBufferCount + count);// nioBuffers长度不够,需要扩容if (neededSpace > nioBuffers.length) {nioBuffers = expandNioBufferArray(nioBuffers, neededSpace, nioBufferCount);NIO_BUFFERS.set(threadLocalMap, nioBuffers);}// 如果byteBuffer 的个数为1,则直接获取ByteBuffer并放入nioBuffers数组中if (count == 1) {ByteBuffer nioBuf = entry.buf;if (nioBuf == null) {// cache ByteBuffer as it may need to create a new ByteBuffer instance if its a// derived bufferentry.buf = nioBuf = buf.internalNioBuffer(readerIndex, readableBytes);}nioBuffers[nioBufferCount++] = nioBuf;} else {// The code exists in an extra method to ensure the method is not too big to inline as this// branch is not very likely to get hit very frequently.// 如果有多个循环获取ByteBuffer 放入nioBuffers数组中nioBufferCount = nioBuffers(entry, buf, nioBuffers, nioBufferCount, maxCount);}// 不能超过最大个数限制if (nioBufferCount == maxCount) {break;}}}// 获取下一个节点entry = entry.next;}this.nioBufferCount = nioBufferCount;this.nioBufferSize = nioBufferSize;return nioBuffers;
}
通过nioBuffers()方法获取到需要发送的ByteBuffer数组,然后通过SocketChannel写到网络中, 并返回写成功了多少字节,此时ChannelOutboundBuffer需要把这些字节从链表中移除,同时需要把刚刚生成的ByteBuffer数组也一起移除 。 下面看remote()方法的解读 。
/*  移除写成功的字节数*/
public void removeBytes(long writtenBytes) {for (;;) {// 与nioBuffers()方法一样, 从准备写入Socket 的节点开始,获取此节点的Buf 数据Object msg = current();if (!(msg instanceof ByteBuf)) {assert writtenBytes == 0;break;}final ByteBuf buf = (ByteBuf) msg;final int readerIndex = buf.readerIndex();// 获取buf可发送的字节数final int readableBytes = buf.writerIndex() - readerIndex;// 如果当前节点的字节数小于或等于已经发送的字节数,则直接删除整个节点,并更新进度if (readableBytes <= writtenBytes) {if (writtenBytes != 0) {progress(readableBytes);writtenBytes -= readableBytes;}remove();} else { // readableBytes > writtenBytes// 若当前节点还有一部分未发送,则缩小当前节点的可发送字节长度if (writtenBytes != 0) {// 修改其readerIndex并更新进度buf.readerIndex(readerIndex + (int) writtenBytes);progress(writtenBytes);}break;}}// 由于每次在发送时,都需要从线程本地缓存点点获取ByteBuffer数组,且每次获取的数组应无任何数据,因此此处需要清空它clearNioBuffers();
}public void progress(long amount) {Entry e = flushedEntry;assert e != null;ChannelPromise p = e.promise;long progress = e.progress + amount;e.progress = progress;if (p instanceof ChannelProgressivePromise) {((ChannelProgressivePromise) p).tryProgress(progress, e.total);}
}/ Will remove the current message, mark its {@link ChannelPromise} as success and return {@code true}. If no* flushed message exists at the time this method is called it will return {@code false} to signal that no more* messages are ready to be handled.* 节点数据都发送完后, 需要把节点从链表中移除*/public boolean remove() {Entry e = flushedEntry;if (e == null) {// 如果获取不到链头节点,则清空ByteBuf缓存clearNioBuffers();return false;}Object msg = e.msg;ChannelPromise promise = e.promise;int size = e.pendingSize;// 从链表中移除此节点,同时将flushedEntry指针指向下一个节点removeEntry(e);if (!e.cancelled) {// only release message, notify and decrement if it was not canceled before.// 节点在非取消状态下,由于没有地方用得上节点数据,因此需要释放其内存空间,并通知处理成功,同时缓存总数据大小相应的减少ReferenceCountUtil.safeRelease(msg);safeSuccess(promise);decrementPendingOutboundBytes(size, false, true);}// recycle the entry// 回收Entry 对象并放回对象池e.recycle();return true;
}// 移除节点,同时修改flushedEntry指针
private void removeEntry(Entry e) {if (-- flushed == 0) {// processed everything// 若最后的节点也被移除了,则所有的指针为nullflushedEntry = null;if (e == tailEntry) {tailEntry = null;unflushedEntry = null;}} else {// 否则预写入指针会不断向前移动flushedEntry = e.next;}
}// Clear all ByteBuffer from the array so these can be GC'ed.
// See https://github.com/netty/netty/issues/3837
private void clearNioBuffers() {int count = nioBufferCount;if (count > 0) {nioBufferCount = 0;// 填null对象Arrays.fill(NIO_BUFFERS.get(), 0, count, null);}
}
总结
到这里,终于将Netty的服务端源码分析完毕,当然还有一些细节部分的代码,自己感兴趣可以自己打断点调试。 多调试,反复思考,这样才能真正的理解Netty源码,相对于半年前,我感觉我对Netty充满了自信,Netty客户端源码,我觉得和服务端源码差不多,就不分析了。当然了,当然啦, 有兴趣可以去看看《Netty源码剖析与应用》这本书,我觉得还是写得非常好的,博客中大部分理论知识都来源于这本书。 我也从中收益非浅,因此还是非常感谢作者刘耀林的,下一篇博客可能再研究一下Netty的时间轮及应该,Netty的源码学习也就告一段落了。如果看我的博客,也希望读者能从中学习到你想要的,或者从中得到启发 ,对我也是一种激励 。 下一篇博客见。
源码地址
https://gitee.com/quyixiao/netty-netty-4.1.38.Final.git