【CocosCreator入门】CocosCreator组件 | Button(按钮)组件

Cocos Creator 是一款流行的游戏开发引擎,具有丰富的组件和工具,其中的Button组件可以通过设置按钮的状态和点击事件,实现在游戏中添加按钮交互的功能。
目录
一、组件介绍
二、组件属性
三、点击事件
Ⅰ、通过属性检查器添加回调
Ⅱ、通过脚本添加回调
四、脚本示例
一、组件介绍
Button组件是Cocos Creator提供的一种交互组件,主要用于实现按钮的交互和响应。通过设置Button组件的属性和事件,可以实现按钮的样式、状态和点击效果等功能。
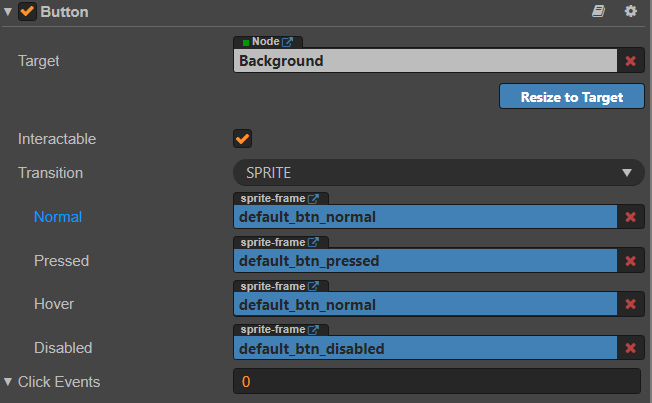
二、组件属性
| 属性 | 功能说明 |
|---|---|
| Target | Node 类型,当 Button 发生 Transition 的时候,会相应地修改 Target 节点的 SpriteFrame,颜色或者 Scale。 |
| interactable | 布尔类型,设为 false 时,则 Button 组件进入禁用状态。 |
| Enable Auto Gray Effect | 布尔类型,当设置为 true 的时候,如果 button 的 interactable 属性为 false,则 button 的 sprite Target 会变为灰度。 |
| Transition | 枚举类型,包括 NONE、COLOR、SPRITE 和 SCALE。每种类型对应不同的 Transition 设置。详情见下方的 Button Transition 部分。 |
| Click Event | 列表类型,默认为空,用户添加的每一个事件由节点引用、组件名称和一个响应函数组成。 |
Button 的 Transition 用来指定当用户点击 Button 时的状态表现。目前主要有 NONE、COLOR、SPRITE 和 SCALE 四种类型。
Color Transition
| 属性 | 功能说明 |
|---|---|
| Normal | Button 在 Normal 状态下的颜色。 |
| Pressed | Button 在 Pressed 状态下的颜色。 |
| Hover | Button 在 Hover 状态下的颜色。 |
| Disabled | Button 在 Disabled 状态下的颜色。 |
| Duration | Button 状态切换需要的时间间隔。 |
Sprite Transition
| 属性 | 功能说明 |
|---|---|
| Normal | Button 在 Normal 状态下的 SpriteFrame。 |
| Pressed | Button 在 Pressed 状态下的 SpriteFrame。 |
| Hover | Button 在 Hover 状态下的 SpriteFrame。 |
| Disabled | Button 在 Disabled 状态下的 SpriteFrame。 |
Scale Transition
| 属性 | 功能 |
|---|---|
| Duration | Button 状态切换需要的时间间隔。 |
| ZoomScale | 当用户点击按钮后,按钮会缩放到一个值,这个值等于 Button 原始 scale * zoomScale,zoomScale 可以为负数。 |
Click Event
详见下方点击事件
三、点击事件
Button 可以额外添加 Click 事件,用于响应玩家的点击操作。有以下两种方法。
Ⅰ、通过属性检查器添加回调

| 属性 | 功能说明 |
|---|---|
| Target | 带有脚本组件的节点。 |
| Component | 脚本组件名称。 |
| Handler | 指定一个回调函数,当用户点击 Button 时会触发此函数。 |
| CustomEventData | 用户指定任意的字符串作为事件回调的最后一个参数传入。 |
Ⅱ、通过脚本添加回调
通过脚本添加回调有以下两种方式:
- 这种方法添加的事件回调和使用编辑器添加的事件回调是一样的,都是通过 Button 组件实现。首先需要构造一个
cc.Component.EventHandler对象,然后设置好对应的target、component、handler和customEventData参数。
// here is your component file, file name = MyComponent.js cc.Class({extends: cc.Component,properties: {},onLoad: function () {var clickEventHandler = new cc.Component.EventHandler();clickEventHandler.target = this.node; // 这个 node 节点是你的事件处理代码组件所属的节点clickEventHandler.component = "MyComponent";// 这个是代码文件名clickEventHandler.handler = "callback";clickEventHandler.customEventData = "foobar";var button = this.node.getComponent(cc.Button);button.clickEvents.push(clickEventHandler);},callback: function (event, customEventData) {// 这里 event 是一个 Event 对象,你可以通过 event.target 取到事件的发送节点var node = event.target;var button = node.getComponent(cc.Button);// 这里的 customEventData 参数就等于你之前设置的 "foobar"}});- 通过
button.node.on('click', ...)的方式来添加,这是一种非常简便的方式,但是该方式有一定的局限性,在事件回调里面无法 获得当前点击按钮的屏幕坐标点。
cc.Class({extends: cc.Component,properties: {button: cc.Button},onLoad: function () {this.button.node.on('click', this.callback, this);},callback: function (button) {// do whatever you want with button// 另外,注意这种方式注册的事件,也无法传递 customEventData}});四、脚本示例
下面是一个使用Button组件实现按钮交互的示例代码:
cc.Class({extends: cc.Component,properties: {buttonNode: cc.Node, // 按钮节点normalColor: cc.Color, // 正常状态下的颜色pressedColor: cc.Color, // 按下状态下的颜色hoverColor: cc.Color, // 悬停状态下的颜色targetSprite: cc.SpriteFrame, // 背景精灵图},onLoad () {let button = this.buttonNode.getComponent(cc.Button);button.transition = cc.Button.Transition.COLOR;button.normalColor = this.normalColor;button.pressedColor = this.pressedColor;button.hoverColor = this.hoverColor;button.targetSprite = this.targetSprite;button.clickEvents.push(new cc.Component.EventHandler(this.node, 'onBtnClick', 'gameCtrl'));},onBtnClick () {console.log('Button Clicked');}// update (dt) {},
});
通过以上代码,我们可以动态地创建一个按钮节点,并添加Button组件和其他属性。在实际开发中,可以根据需要修改和扩展代码。
总之,使用Cocos Creator的Button组件可以帮助我们快速实现按钮交互。通过设置按钮的状态、样式和点击事件,可以让玩家在游戏中进行交互和操作。