Spring Security OAuth2.0(一)-----前言-授权码模式及代码实例

什么是 OAuth2
OAuth 是一个开放标准,该标准允许用户让第三方应用访问该用户在某一网站上存储的私密资源(如头像、照片、视频等),而在这个过程中无需将用户名和密码提供给第三方应用。实现这一功能是通过提供一个令牌(token),而不是用户名和密码来访问他们存放在特定服务提供者的数据。采用令牌(token)的方式可以让用户灵活的对第三方应用授权或者收回权限。
OAuth2 是 OAuth 协议的下一版本,但不向下兼容 OAuth 1.0。传统的 Web 开发登录认证一般都是基于 session 的,但是在前后端分离的架构中继续使用 session 就会有许多不便,因为移动端(Android、iOS、微信小程序等)要么不支持 cookie(微信小程序),要么使用非常不便,对于这些问题,使用 OAuth2 认证都能解决。
对于大家而言,我们在互联网应用中最常见的 OAuth2 应该就是各种第三方登录了,例如 QQ 授权登录、微信授权登录、微博授权登录、GitHub 授权登录等等。
认证
用户认证就是判断一个用户的身份是否合法的过程,用户去访问系统资源时系统要求验证用户的身份信
息,身份合法方可继续访问,不合法则拒绝访问。常见的用户身份认证方式有:用户名密码登录,二维
码登录,手机短信登录,指纹认证等方式。
系统为什么要认证?
认证是为了保护系统的隐私数据与资源,用户的身份合法方可访问该系统的资源。
怎么进行认证?
授权
授权是用户认证通过后,根据用户的权限来控制用户访问资源的过程,拥有资源的访问权限则正常访
问,没有权限则拒绝访问。
为什么要授权?
认证是为了保证用户身份的合法性,授权则是为了更细粒度的对隐私数据进行划分,授权是在认证通过
后发生的,
控制不同的用户能够访问不同的资源。
会话
用户认证通过后,为了避免用户的每次操作都进行认证可将用户的信息保证在会话中。会话就是系统为
了保持当前用户的登录状态所提供的机制,常见的有基于session方式、基于token方式等。
RBAC模型
主体 -》 角色 -》 资源 -》行为
四种模式
OAuth2 协议一共支持 4 种不同的授权模式:
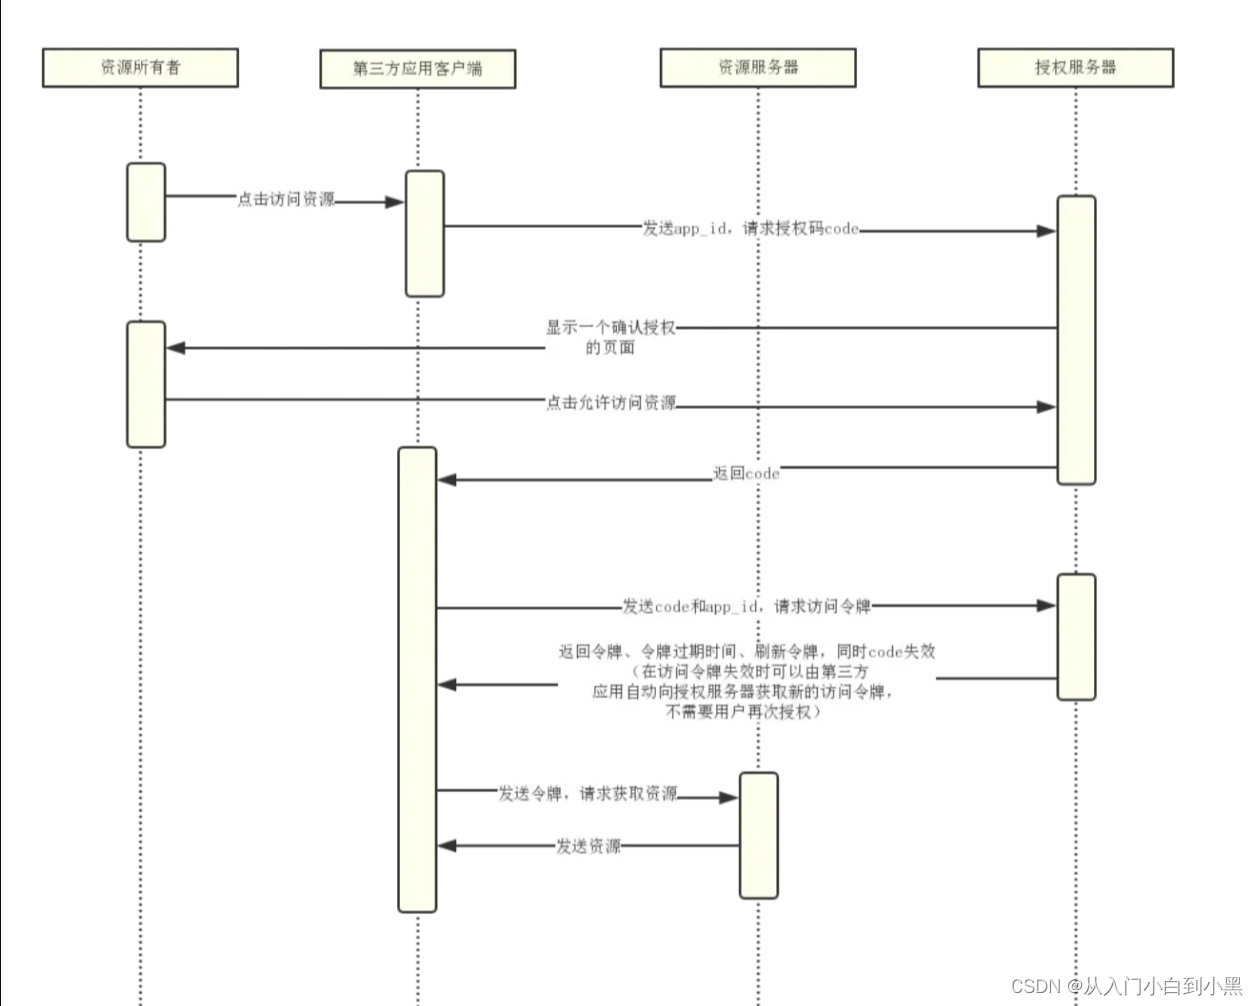
授权码模式:常见的第三方平台登录功能基本都是使用这种模式。
简化模式:简化模式是不需要客户端服务器参与,直接在浏览器中向授权服务器申请令牌(token),一般如果网站是纯静态页面则可以采用这种方式。
密码模式:密码模式是用户把用户名密码直接告诉客户端,客户端使用说这些信息向授权服务器申请令牌(token)。这需要用户对客户端高度信任,例如客户端应用和服务提供商就是同一家公司,我们自己做前后端分离登录就可以采用这种模式。
客户端模式:客户端模式是指客户端使用自己的名义而不是用户的名义向服务提供者申请授权,严格来说,客户端模式并不能算作 OAuth 协议要解决的问题的一种解决方案,但是,对于开发者而言,在一些前后端分离应用或者为移动端提供的认证授权服务器上使用这种模式还是非常方便的。
OAuth2.0协议包含以下几个角色:
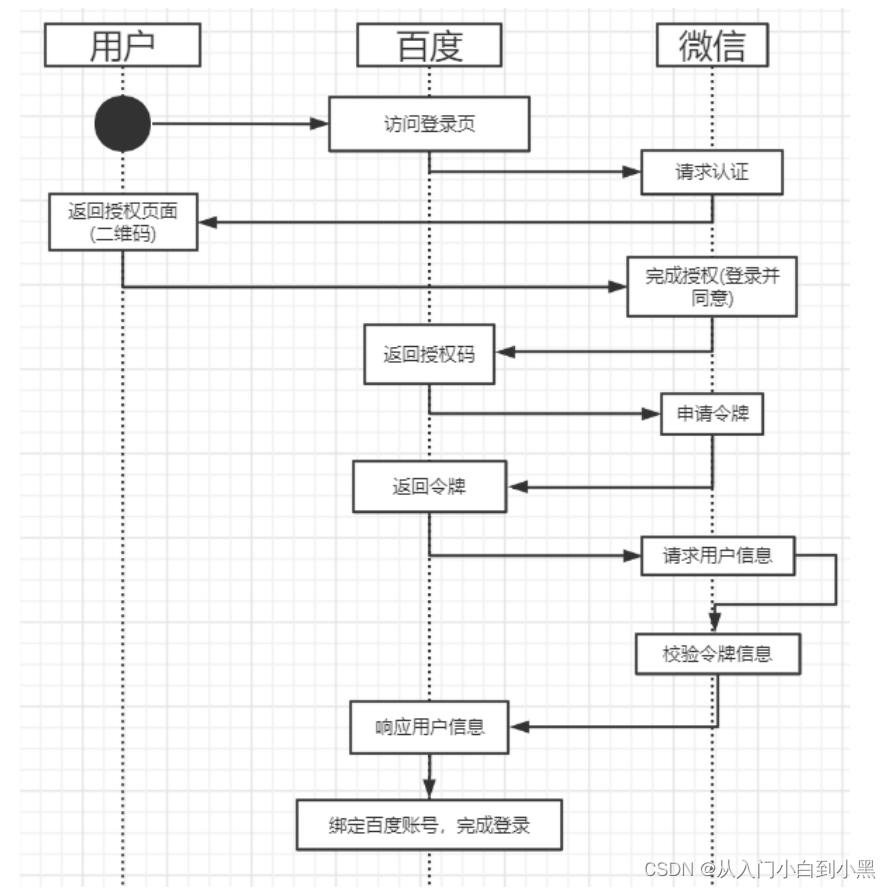
1、客户端 - 示例中的浏览器、微信客户端
本身不存储资源,需要通过资源拥有者的授权去请求资源服务器的资源。
2、资源拥有者 - 示例中的用户(拥有微信账号)
通常是用户,也可以是应用程序,即该资源的拥有者。
3、授权服务器(也称为认证服务器) - 示例中的微信
用于服务提供者对资源拥有的身份进行认证,对访问资源进行授权,认证成功后会给客户端发放令牌
(access_token),作为客户端访问资源服务器的凭据。
4、资源服务器 - 示例中的微信 和 百度
存储资源的服务器。本示例中,微信 通过OAuth协议让百度可以获取到自己存储的用户信息,而百度则
通过OAuth协议,让用户可以访问自己的受保护资源。
这其中还有几个重要的概念:
clientDetails(client_id):客户信息。代表百度 在微信中的唯一索引。 在微信中用appid区分
secret:秘钥。代表百度获取微信信息需要提供的一个加密字段。这跟微信采用的加密算法有关。
scope:授权作用域。代表百度可以获取到的微信的信息范围。例如登录范围的凭证无法获取用户信息
范围的信息。
access_token:授权码。百度获取微信用户信息的凭证。微信中叫做接口调用凭证。
grant_type: 授权类型。例如微信目前仅支持基于授权码的 authorization_code 模式。而OAuth2.0
还可以有其他的授权方式,例如输入微信的用户名和密码的方式。
userDetails(user_id):授权用户标识。在示例中代表用户的微信号。 在微信中用openid区分.
然后,关于微信登录的功能介绍,可以查看微信的官方文档:https://developers.weixin.qq.com/doc/
oplatform/Mobile_App/WeChat_Login/Development_Guide.html
授权码模式
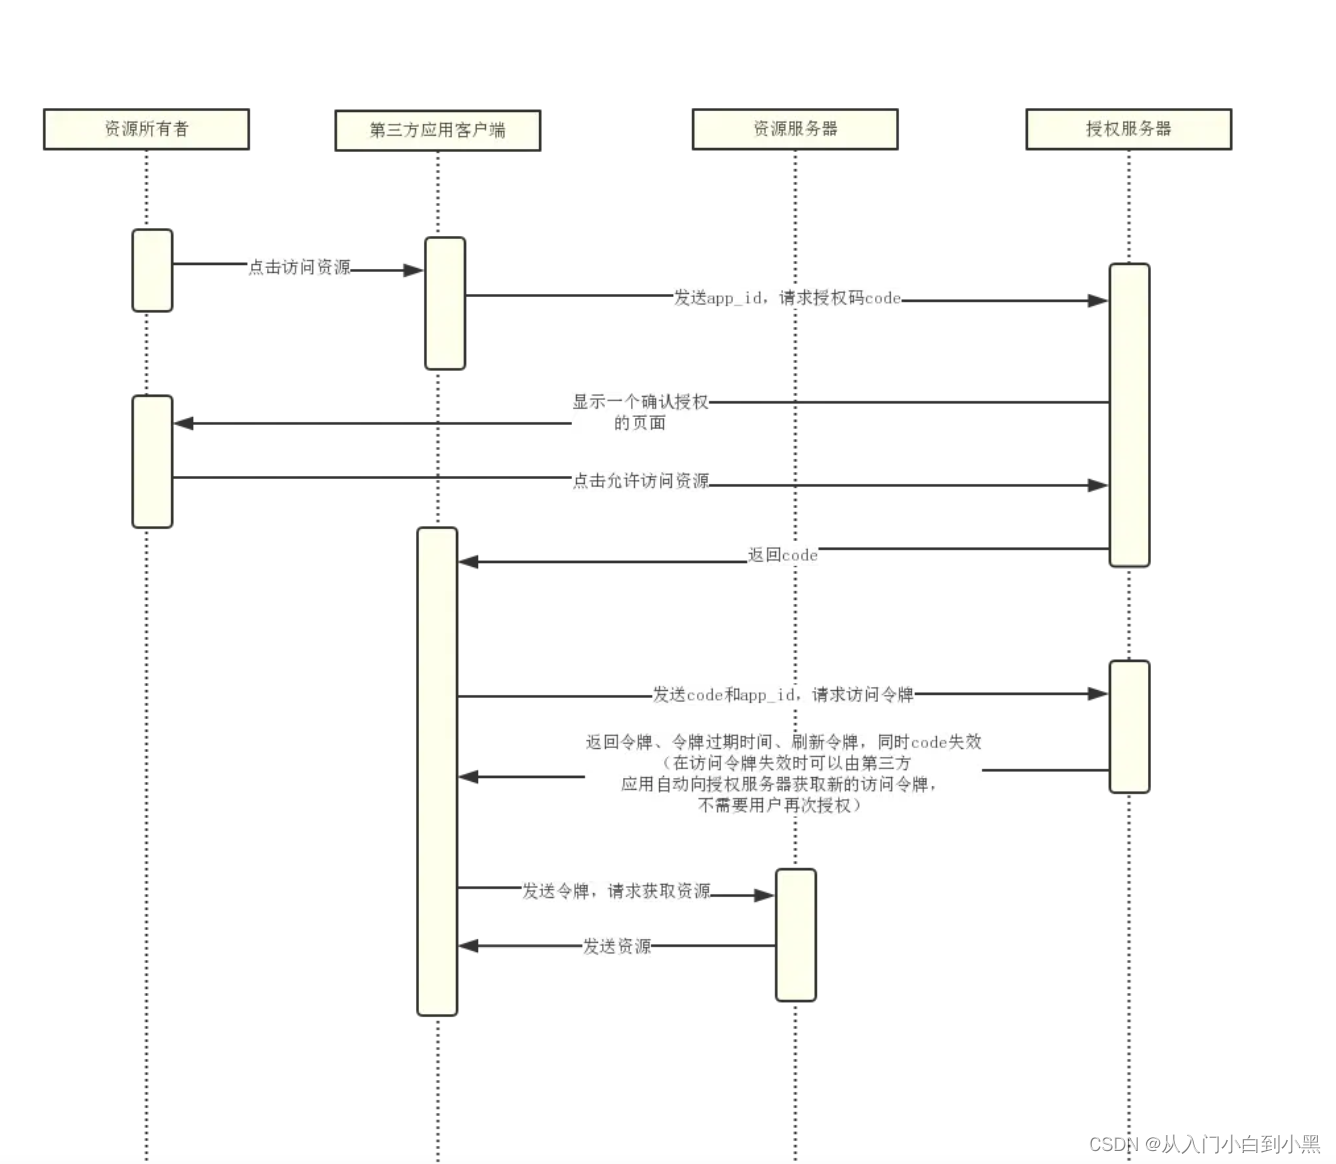
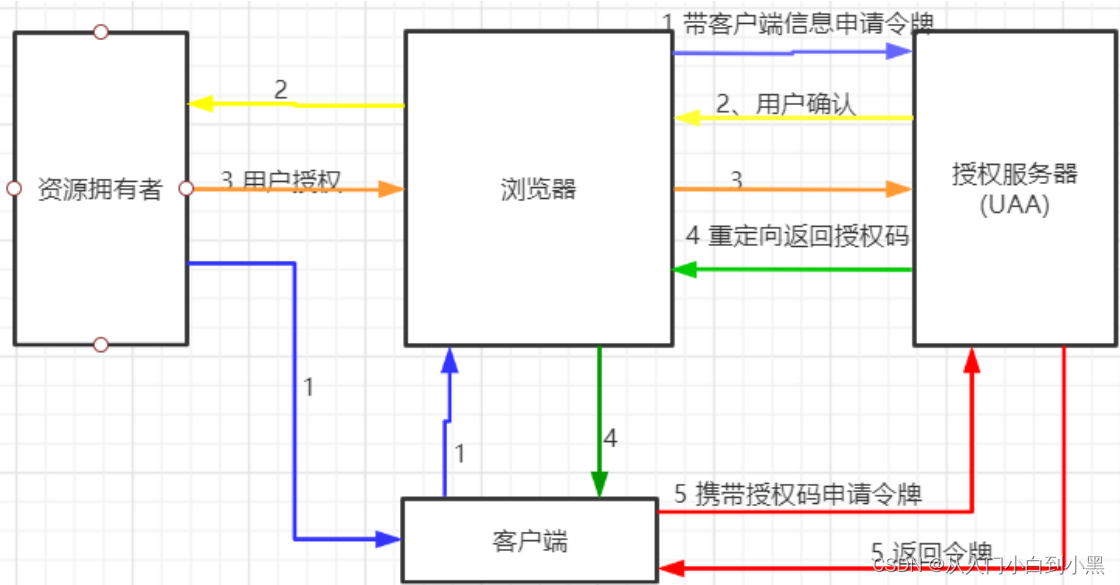
在授权码模式中,我们分授权服务器和资源服务器,授权服务器用来派发 Token,拿着 Token 则可以去资源服务器获取资源,这两个服务器可以分开,也可以合并。
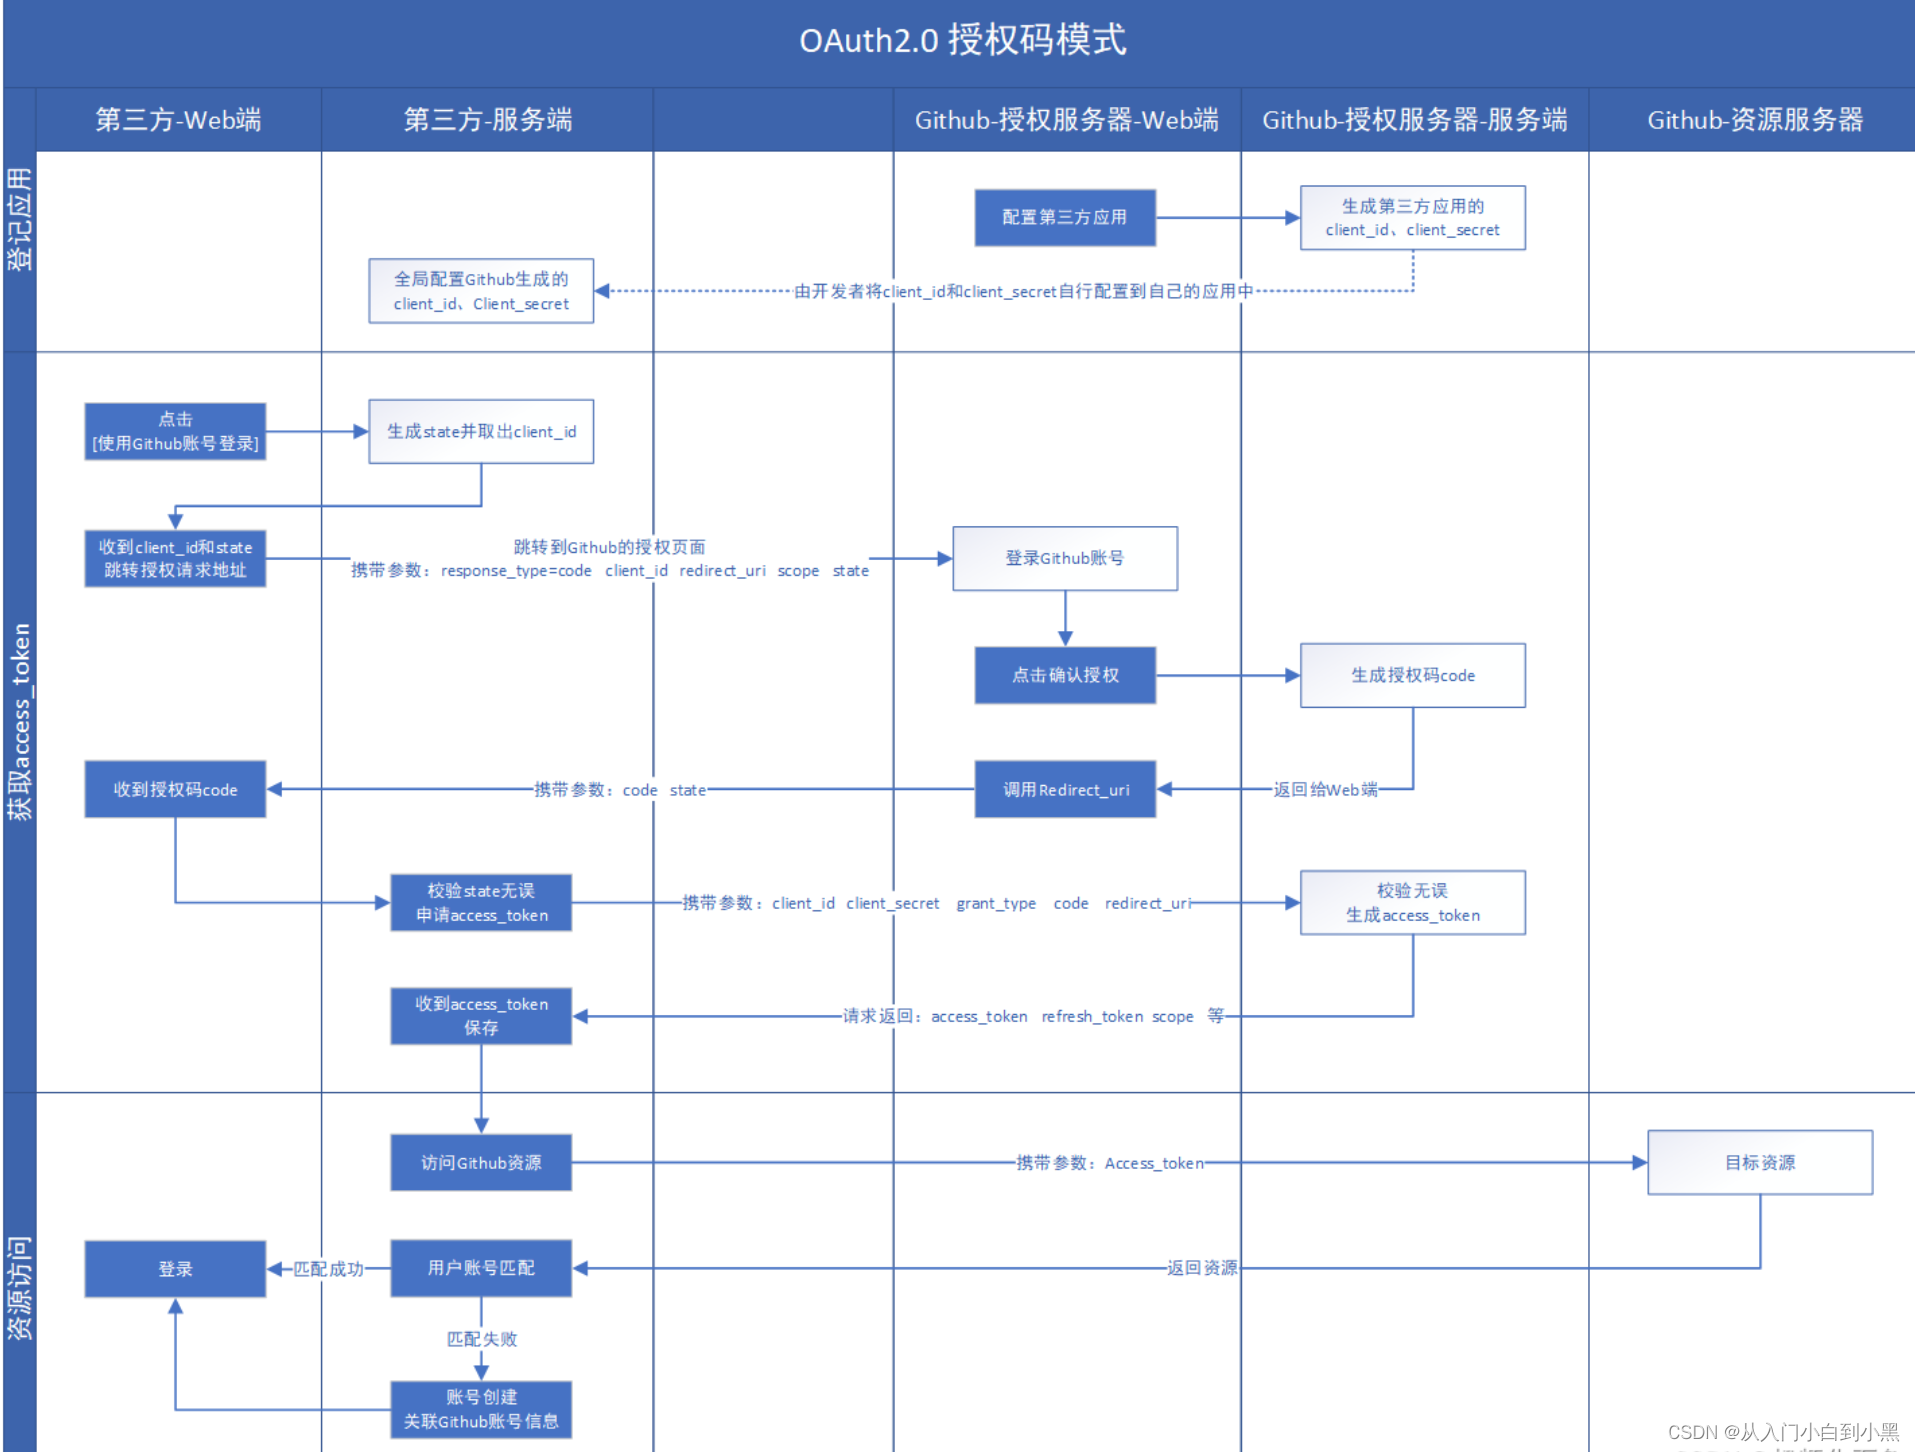
- 向Github登记一下该第三方网站,Github会给出一个凭据。记下该凭据。
- 第三方网站提供了Github授权按钮,通常是在登录页面提供。
- 用户点击授权按钮来同意Github授权,则携带凭据跳转到Github的管理页面,此时需登录。若已经登录则执行步骤4。
- 登录Github后,验证凭据,同意授权,则生成一个access_token返回。
- 第三方网站保存该access_token并向Github请求数据。
- Github返回数据,第三方网站使用这些数据匹配已有账号,匹配成功则登录;否则创建新账号并关联,然后登录。
代码案例架构
- 第三方应用
- 授权服务器
- 资源服务器
- 用户
那我们首先来创建一个空的 Maven 父工程,创建好之后,里边什么都不用加,也不用写代码。我们将在这个父工程中搭建这个子模块。
新建父工程
pom文件如下
<?xml version="1.0" encoding="UTF-8"?>
<project xmlns="http://maven.apache.org/POM/4.0.0"xmlns:xsi="http://www.w3.org/2001/XMLSchema-instance"xsi:schemaLocation="http://maven.apache.org/POM/4.0.0 http://maven.apache.org/xsd/maven-4.0.0.xsd"><modelVersion>4.0.0</modelVersion><groupId>com.xql</groupId><artifactId>security_oauth</artifactId><version>1.0-SNAPSHOT</version><packaging>pom</packaging><properties><maven.compiler.source>8</maven.compiler.source><maven.compiler.target>8</maven.compiler.target><project.build.sourceEncoding>UTF-8</project.build.sourceEncoding><spring-boot-version>2.6.6</spring-boot-version><java.version>1.8</java.version><mysql.version>8.0.28</mysql.version><fastjson.version>1.2.83</fastjson.version><oauth2.version>2.1.2.RELEASE</oauth2.version><servlet.version>3.1.0</servlet.version><spring-cloud-version>2021.0.4</spring-cloud-version><security-jwt.version>1.0.10.RELEASE</security-jwt.version></properties><modules><module>authorization_server</module><module>resource_server</module></modules><dependencyManagement><dependencies><dependency><groupId>org.springframework.boot</groupId><artifactId>spring-boot-dependencies</artifactId><version>${spring-boot-version}</version><type>pom</type><scope>import</scope></dependency><dependency><groupId>org.springframework.cloud</groupId><artifactId>spring-cloud-dependencies</artifactId><version>${spring-cloud-version}</version><type>pom</type><scope>import</scope></dependency><dependency><groupId>javax.servlet</groupId><artifactId>javax.servlet-api</artifactId><version>${servlet.version}</version></dependency><dependency><groupId>mysql</groupId><artifactId>mysql-connector-java</artifactId><version>${mysql.version}</version></dependency><dependency><groupId>com.alibaba</groupId><artifactId>fastjson</artifactId><version>${fastjson.version}</version></dependency><dependency><groupId>org.springframework.security</groupId><artifactId>spring-security-jwt</artifactId><version>${security-jwt.version}</version></dependency><dependency><groupId>org.springframework.security.oauth.boot</groupId><artifactId>spring-security-oauth2-autoconfigure</artifactId><version>${oauth2.version}</version></dependency><dependency><groupId>org.springframework.cloud</groupId><artifactId>spring-cloud-starter-security</artifactId><version>${oauth2.version}</version></dependency><dependency><groupId>org.springframework.cloud</groupId><artifactId>spring-cloud-starter-oauth2</artifactId><version>${oauth2.version}</version></dependency></dependencies></dependencyManagement></project>
新建authorization_server授权服务模块
pom依赖
<?xml version="1.0" encoding="UTF-8"?>
<project xmlns="http://maven.apache.org/POM/4.0.0" xmlns:xsi="http://www.w3.org/2001/XMLSchema-instance"xsi:schemaLocation="http://maven.apache.org/POM/4.0.0 https://maven.apache.org/xsd/maven-4.0.0.xsd"><modelVersion>4.0.0</modelVersion><parent><groupId>com.xql</groupId><artifactId>security_oauth</artifactId><version>1.0-SNAPSHOT</version><relativePath/> <!-- lookup parent from repository --></parent><groupId>com.xql</groupId><artifactId>authorization_server</artifactId><version>0.0.1-SNAPSHOT</version><name>authorization_server</name><description>authorization_server</description><properties><java.version>8</java.version></properties><dependencies><dependency><groupId>org.springframework.boot</groupId><artifactId>spring-boot-starter-web</artifactId></dependency><dependency><groupId>org.springframework.cloud</groupId><artifactId>spring-cloud-starter-security</artifactId></dependency><dependency><groupId>org.springframework.cloud</groupId><artifactId>spring-cloud-starter-oauth2</artifactId></dependency><dependency><groupId>org.springframework.security</groupId><artifactId>spring-security-jwt</artifactId></dependency><dependency><groupId>javax.interceptor</groupId><artifactId>javax.interceptor-api</artifactId><version>1.2</version></dependency><dependency><groupId>com.alibaba</groupId><artifactId>fastjson</artifactId></dependency><dependency><groupId>org.springframework.boot</groupId><artifactId>spring-boot-starter-jdbc</artifactId></dependency><dependency><groupId>mysql</groupId><artifactId>mysql-connector-java</artifactId></dependency></dependencies></project>
项目创建完成后,首先提供一个 Spring Security 的基本配置:
package com.xql.authorization_server.config;import org.springframework.context.annotation.Bean;
import org.springframework.context.annotation.Configuration;
import org.springframework.security.config.annotation.authentication.builders.AuthenticationManagerBuilder;
import org.springframework.security.config.annotation.web.builders.HttpSecurity;
import org.springframework.security.config.annotation.web.configuration.WebSecurityConfigurerAdapter;
import org.springframework.security.crypto.bcrypt.BCryptPasswordEncoder;
import org.springframework.security.crypto.password.PasswordEncoder;@Configuration
public class SecurityConfig extends WebSecurityConfigurerAdapter {@BeanPasswordEncoder passwordEncoder() {return new BCryptPasswordEncoder();}@Overrideprotected void configure(AuthenticationManagerBuilder auth) throws Exception {auth.inMemoryAuthentication().withUser("lyp").password(new BCryptPasswordEncoder().encode("123456")).roles("admin").and().withUser("xql").password(new BCryptPasswordEncoder().encode("123456")).roles("user");}@Overrideprotected void configure(HttpSecurity http) throws Exception {http.csrf().disable().formLogin();}
}
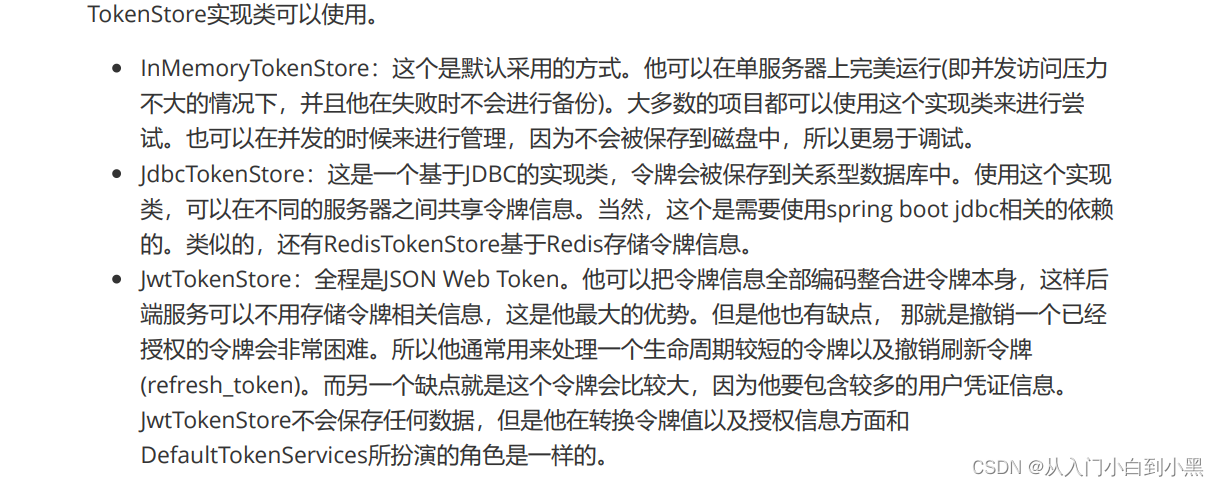
首先我们提供了一个 TokenStore 的实例,这个是指你生成的 Token 要往哪里存储,我们可以存在 Redis 中,也可以存在内存中,也可以结合 JWT 等等,这里,我们就先把它存在内存中,所以提供一个 InMemoryTokenStore 的实例即可。
package com.xql.authorization_server.config;import org.springframework.context.annotation.Bean;
import org.springframework.context.annotation.Configuration;
import org.springframework.security.oauth2.provider.token.TokenStore;
import org.springframework.security.oauth2.provider.token.store.InMemoryTokenStore;/* @author xuqinglei* @date 2023/04/19 15:08/
@Configuration
public class TokenConfig {//首先我们提供了一个 TokenStore 的实例,这个是指你生成的 Token 要往哪里存储,// 我们可以存在 Redis 中,也可以存在内存中,也可以结合 JWT 等等,这// 里,我们就先把它存在内存中,所以提供一个 InMemoryTokenStore 的实例即可。@Beanpublic TokenStore tokenStore(){//使用基于内存的普通令牌return new InMemoryTokenStore();}
}
authorizationServerTokenServices这个 Bean 主要用来配置 Token 的一些基本信息,例如 Token 是否支持刷新、Token 的存储位置、Token 的有效期以及刷新 Token 的有效期等等。Token 有效期这个好理解,刷新 Token 的有效期我说一下,当 Token 快要过期的时候,我们需要获取一个新的 Token,在获取新的 Token 时候,需要有一个凭证信息,这个凭证信息不是旧的 Token,而是另外一个 refresh_token,这个 refresh_token 也是有有效期的。
package com.xql.authorization_server.bean;import org.springframework.beans.factory.annotation.Autowired;
import org.springframework.context.annotation.Bean;
import org.springframework.context.annotation.Configuration;
import org.springframework.security.oauth2.provider.ClientDetailsService;
import org.springframework.security.oauth2.provider.code.AuthorizationCodeServices;
import org.springframework.security.oauth2.provider.code.InMemoryAuthorizationCodeServices;
import org.springframework.security.oauth2.provider.token.AuthorizationServerTokenServices;
import org.springframework.security.oauth2.provider.token.DefaultTokenServices;
import org.springframework.security.oauth2.provider.token.TokenStore;/* @author xuqinglei* @date 2023/04/21 08:37/
@Configuration
public class AuthorizationBean {@Autowiredprivate TokenStore tokenStore;@Autowiredprivate ClientDetailsService clientDetailsService;@Beanpublic AuthorizationCodeServices authorizationCodeServices(){//内存return new InMemoryAuthorizationCodeServices();//JdbcAuthorizationCodeServices}/* 这个 Bean 主要用来配置 Token 的一些基本信息,* 例如 Token 是否支持刷新、Token 的存储位置、Token 的有效期以及刷新 Token 的有效期等等。* Token 有效期这个好理解,刷新 Token 的有效期我说一下,当 Token 快要过期的时候,* 我们需要获取一个新的 Token,在获取新的 Token 时候,需要有一个凭证信息,* 这个凭证信息不是旧的 Token,而是另外一个 refresh_token,这个 refresh_token 也是有有效期的。*/@BeanAuthorizationServerTokenServices authorizationServerTokenServices() {DefaultTokenServices services = new DefaultTokenServices();//客户端详情服务services.setClientDetailsService(clientDetailsService);//允许令牌自动刷新services.setSupportRefreshToken(true);//令牌存储策略-内存services.setTokenStore(tokenStore);// 令牌默认有效期2小时services.setAccessTokenValiditySeconds(60 * 60 * 2);// 刷新令牌默认有效期3天services.setRefreshTokenValiditySeconds(60 * 60 * 24 * 3);return services;}}
配置授权服务器:
在 AuthorizationServer 类中,我们其实主要重写三个 configure 方法。
AuthorizationServerSecurityConfigurer 用来配置令牌端点的安全约束,也就是这个端点谁能访问,谁不能访问。checkTokenAccess 是指一个 Token 校验的端点,这个端点我们设置为可以直接访问(在后面,当资源服务器收到 Token 之后,需要去校验 Token 的合法性,就会访问这个端点)。
ClientDetailsServiceConfigurer 用来配置客户端的详细信息,授权服务器要做两方面的检验,一方面是校验客户端,另一方面则是校验用户,校验用户,我们前面已经配置了,这里就是配置校验客户端。客户端的信息我们可以存在数据库中,这其实也是比较容易的,和用户信息存到数据库中类似,但是这里为了简化代码,我还是将客户端信息存在内存中,这里我们分别配置了客户端的 id,secret、资源 id、授权类型、授权范围以及重定向 uri。授权类型四种,四种之中不包含 refresh_token 这种类型,但是在实际操作中,refresh_token 也被算作一种。
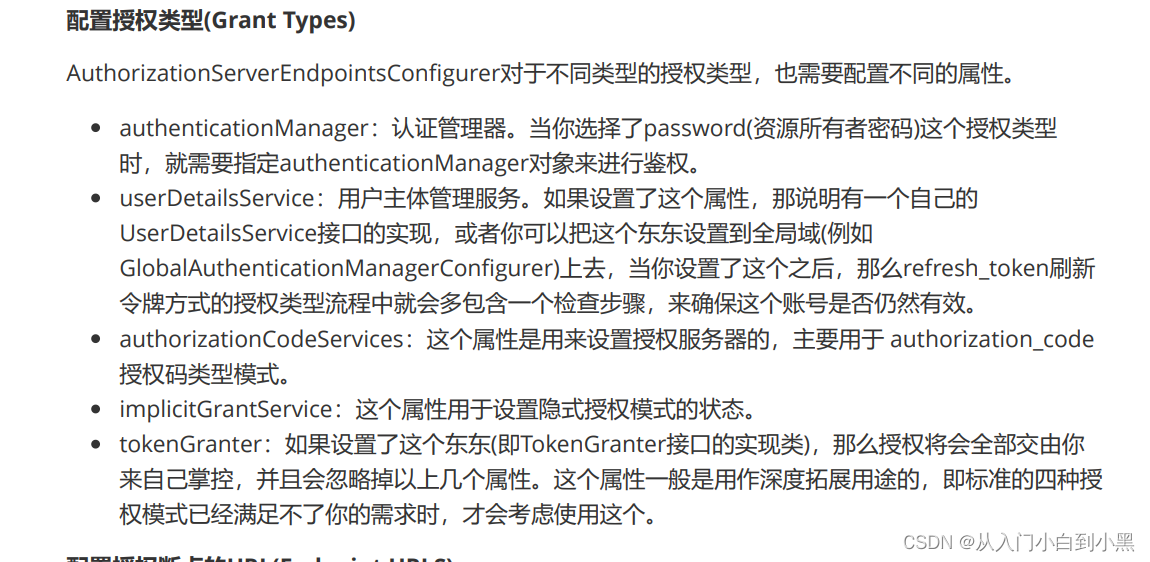
AuthorizationServerEndpointsConfigurer 这里用来配置令牌的访问端点和令牌服务。authorizationCodeServices用来配置授权码的存储,这里我们是存在在内存中,tokenServices 用来配置令牌的存储,即 access_token 的存储位置,这里我们也先存储在内存中。有小伙伴会问,授权码和令牌有什么区别?授权码是用来获取令牌的,使用一次就失效,令牌则是用来获取资源的
package com.xql.authorization_server.adapter;import org.springframework.beans.factory.annotation.Autowired;
import org.springframework.context.annotation.Configuration;
import org.springframework.security.crypto.bcrypt.BCryptPasswordEncoder;
import org.springframework.security.oauth2.config.annotation.configurers.ClientDetailsServiceConfigurer;
import org.springframework.security.oauth2.config.annotation.web.configuration.AuthorizationServerConfigurerAdapter;
import org.springframework.security.oauth2.config.annotation.web.configurers.AuthorizationServerEndpointsConfigurer;
import org.springframework.security.oauth2.config.annotation.web.configurers.AuthorizationServerSecurityConfigurer;
import org.springframework.security.oauth2.provider.code.AuthorizationCodeServices;
import org.springframework.security.oauth2.provider.token.AuthorizationServerTokenServices;/* @author xuqinglei* @date 2023/04/20 15:31/
@Configuration
public class AuthorizationConfig extends AuthorizationServerConfigurerAdapter {@Autowiredprivate AuthorizationCodeServices authorizationCodeServices;@Autowiredprivate AuthorizationServerTokenServices authorizationServerTokenServices;/* 用来配置令牌端点的安全约束.* 用来配置令牌端点的安全约束,也就是这个端点谁能访问,谁不能访问。* checkTokenAccess 是指一个 Token 校验的端点,这个端点我们设置为可以直接访问* (在后面,当资源服务器收到 Token 之后,需要去校验 Token 的合法性,就会访问这个端点)。/@Overridepublic void configure(AuthorizationServerSecurityConfigurer security) throws Exception {//tokenKeyAccess oauth/token_key公开//checkTokenAccess oauth/check_token公开security.tokenKeyAccess("permitAll()").checkTokenAccess("permitAll()").allowFormAuthenticationForClients(); // 表单认证,申请令牌}@Overridepublic void configure(ClientDetailsServiceConfigurer clients) throws Exception {//内存配置的方式配置用户信息//内存方式clients.inMemory()//内存模拟client_id.withClient("xql")//客户端 秘钥 以及加密方式BCryptPasswordEncoder.secret(new BCryptPasswordEncoder().encode("xql123"))//客户端拥有的资源列表.resourceIds("res1")//该client允许的授权类型.authorizedGrantTypes("authorization_code","password", "client_credentials", "implicit","refresh_token")//允许的授权范围.scopes("all")//跳转到授权页面.autoApprove(false)//回调地址.redirectUris("http://localhost:8089/goods/index");//继续注册其他客户端// .and()// .withClient()// 加载自定义的客户端管理服务// clients.withClientDetails(clientDetailsService);}@Overridepublic void configure(AuthorizationServerEndpointsConfigurer endpoints) throws Exception {endpoints.authorizationCodeServices(authorizationCodeServices).tokenServices(authorizationServerTokenServices);}
}
配置跨域
package com.xql.authorization_server.config;import org.springframework.context.annotation.Configuration;
import org.springframework.web.servlet.config.annotation.CorsRegistry;
import org.springframework.web.servlet.config.annotation.WebMvcConfigurer;/* @description: 配置跨域* @author* @date 2023/03/31 16:39* @version 1.0*/
@Configuration
public class CorsConfig implements WebMvcConfigurer {@Overridepublic void addCorsMappings(CorsRegistry registry) {// 设置允许跨域的路径registry.addMapping("/")// 设置允许跨域请求的域名.allowedOriginPatterns("*")// 是否允许cookie.allowCredentials(true)// 设置允许的请求方式.allowedMethods("GET", "POST", "DELETE", "PUT")// 设置允许的header属性.allowedHeaders("*")// 跨域允许时间.maxAge(3600);}
}
配置启动类
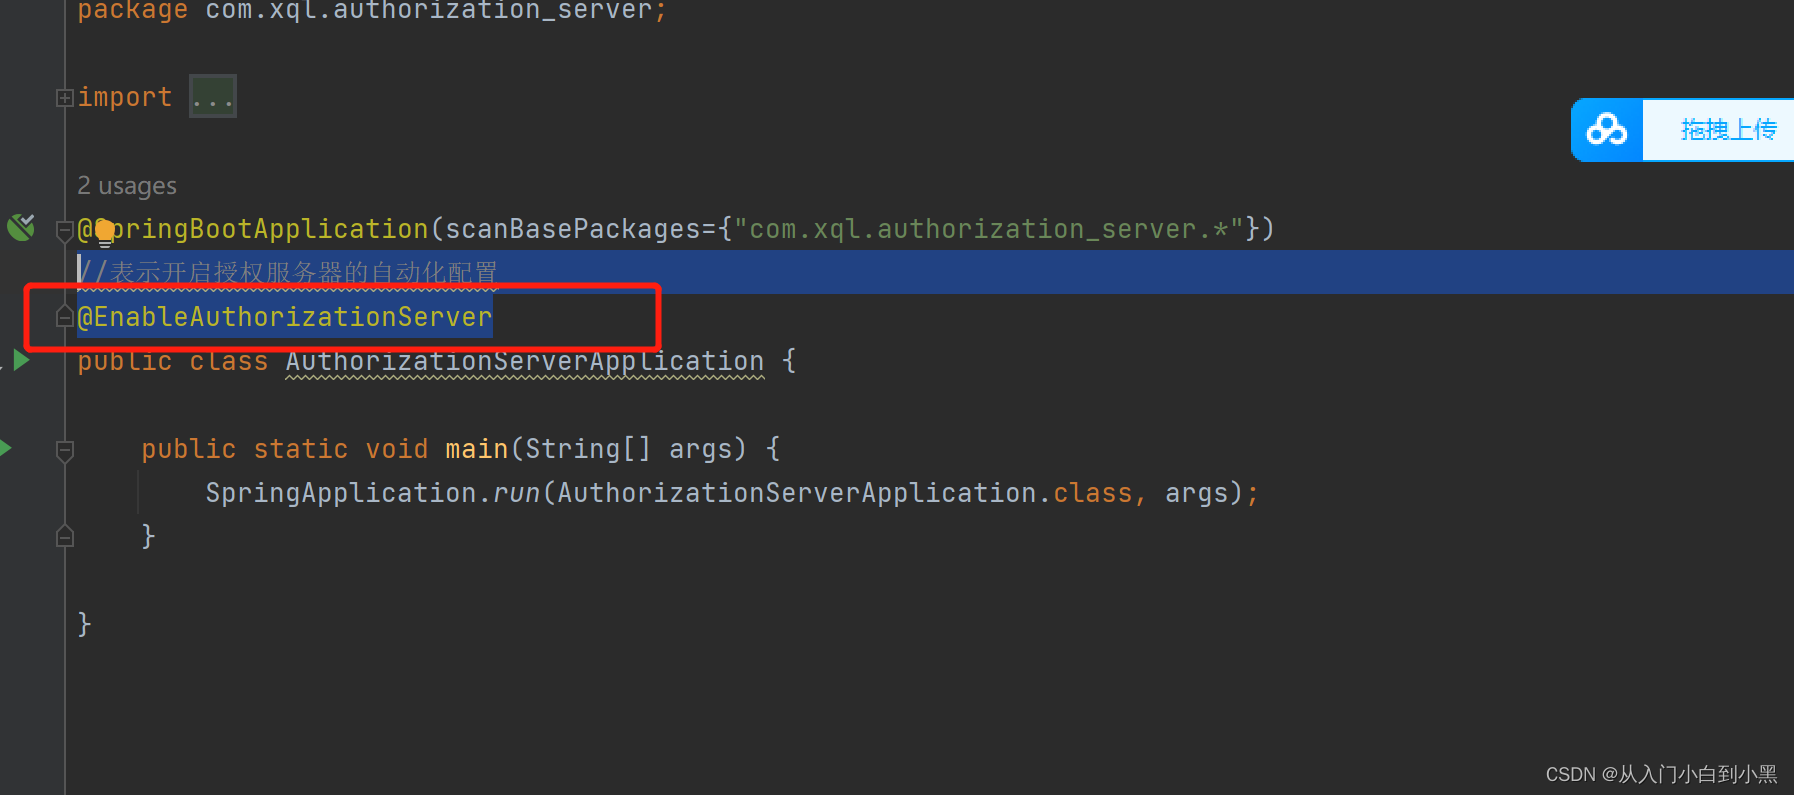
//表示开启授权服务器的自动化配置
@EnableAuthorizationServer
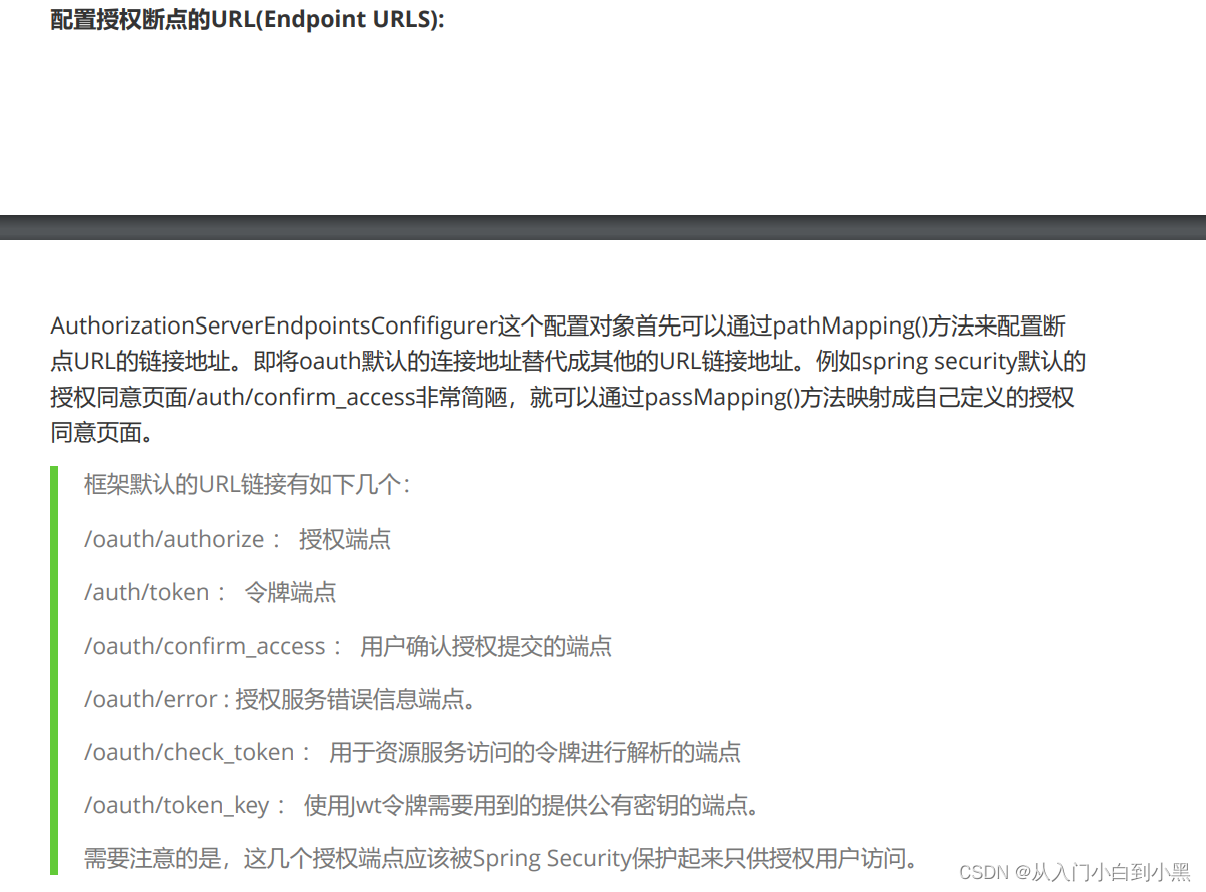
默认url
AuthorizationServerEndpointsConfifigurer这个配置对象首先可以通过pathMapping()方法来配置断
点URL的链接地址。即将oauth默认的连接地址替代成其他的URL链接地址。例如spring security默认的
授权同意页面/auth/confirm_access非常简陋,就可以通过passMapping()方法映射成自己定义的授权
同意页面。
这些接口在
org.springframework.security.oauth2.provider.endpoint包下面的
CheckTokenEndpoint/TokenEndpoint/TokenKeyEndpoint/WhitelabelApprovalEndpoint/WhitelabelErrorEndpoint
框架默认的URL链接有如下几个:
/oauth/authorize : 授权端点
/auth/token : 令牌端点
/oauth/confirm_access : 用户确认授权提交的端点
/oauth/error : 授权服务错误信息端点。
/oauth/check_token : 用于资源服务访问的令牌进行解析的端点
/oauth/token_key : 使用Jwt令牌需要用到的提供公有密钥的端点。
需要注意的是,这几个授权端点应该被Spring Security保护起来只供授权用户访问
新建资源服务器resource_server
然后,与之前的配置方式类似,Spring Security也提供了ResourceServerConfigurerAdapter适配器来
- 协助完成资源服务器的配置。这个适配器提供了多个configure方法,对以下两个核心对象进行配置。
ResourceServerSecurityConfigurer中主要包含: - tokenServices : ResourceServerTokenServices类的实例,用来实现令牌服务,即如何验证令
牌。 - tokenStore : TokenStore类的实例,指定令牌如何访问,与tokenServices配置可选
- resourceId : 这个资源服务的ID,是可选的。但是推荐设置并在授权服务中进行验证。
其他的扩展属性例如tokenExtractor令牌提取器用来提取请求中的令牌。 - HttpSecurity,这个配置与Spring Security类似:
authorizeRequests()方法验证请求。antMatchers方法匹配访问路径。access()方法配置需要的权限。 - .sessionManagement()方法配置session管理策略。
其他自定义权限保护规则也通过HttpSecurity来配置。 - @EnableResourceServer注解会自动增加一个类型为OAuth2AuthenticationProcessingFilter的过滤器链。
资源服务器就是用来存放用户的资源,例如你在微信上的图像、openid 等信息,用户从授权服务器上拿到 access_token 之后,接下来就可以通过 access_token 来资源服务器请求数据。
pom依赖
<?xml version="1.0" encoding="UTF-8"?>
<project xmlns="http://maven.apache.org/POM/4.0.0" xmlns:xsi="http://www.w3.org/2001/XMLSchema-instance"xsi:schemaLocation="http://maven.apache.org/POM/4.0.0 https://maven.apache.org/xsd/maven-4.0.0.xsd"><modelVersion>4.0.0</modelVersion><parent><groupId>com.xql</groupId><artifactId>security_oauth</artifactId><version>1.0-SNAPSHOT</version><relativePath/> <!-- lookup parent from repository --></parent><groupId>com.xql</groupId><artifactId>resource_server</artifactId><version>0.0.1-SNAPSHOT</version><name>resource_server</name><description>resource_server</description><properties><java.version>8</java.version></properties><dependencies><dependency><groupId>org.springframework.boot</groupId><artifactId>spring-boot-starter-web</artifactId></dependency><dependency><groupId>org.springframework.cloud</groupId><artifactId>spring-cloud-starter-security</artifactId></dependency><dependency><groupId>org.springframework.cloud</groupId><artifactId>spring-cloud-starter-oauth2</artifactId></dependency><dependency><groupId>org.springframework.security</groupId><artifactId>spring-security-jwt</artifactId></dependency><dependency><groupId>javax.interceptor</groupId><artifactId>javax.interceptor-api</artifactId><version>1.2</version></dependency><dependency><groupId>com.alibaba</groupId><artifactId>fastjson</artifactId></dependency></dependencies></project>
配置代码
package com.xql.resource_server.configuration;import org.springframework.context.annotation.Bean;
import org.springframework.context.annotation.Configuration;
import org.springframework.security.config.annotation.web.builders.HttpSecurity;
import org.springframework.security.oauth2.config.annotation.web.configuration.ResourceServerConfigurerAdapter;
import org.springframework.security.oauth2.config.annotation.web.configurers.ResourceServerSecurityConfigurer;
import org.springframework.security.oauth2.provider.token.RemoteTokenServices;@Configuration
public class ResourceServerConfig extends ResourceServerConfigurerAdapter {/* tokenServices 我们配置了一个 RemoteTokenServices 的实例,* 这是因为资源服务器和授权服务器是分开的,资源服务器和授权服务器是放在一起的,就不需要配置* RemoteTokenServices 了。*/@BeanRemoteTokenServices tokenServices() {RemoteTokenServices services = new RemoteTokenServices();services.setCheckTokenEndpointUrl("http://localhost:53020/uaa-service/oauth/check_token");services.setClientId("xql");services.setClientSecret("xql123");return services;}/* RemoteTokenServices 中我们配置了 access_token* 的校验地址、client_id、client_secret 这三个信息,当用户来资源服务器请求资源时,* 会携带上一个 access_token,通过这里的配置,就能够校验出 token 是否正确等*/@Overridepublic void configure(ResourceServerSecurityConfigurer resources) throws Exception {resources.resourceId("res1").tokenServices(tokenServices());}/* 最后配置一下资源的拦截规则,这就是 Spring Security 中的基本写法,我就不再赘述。*/@Overridepublic void configure(HttpSecurity http) throws Exception {http.authorizeRequests().antMatchers("/admin/").hasRole("admin").anyRequest().authenticated().and().cors();}
}
一样配置跨域
package com.xql.resource_server.configuration;import org.springframework.context.annotation.Configuration;
import org.springframework.web.servlet.config.annotation.CorsRegistry;
import org.springframework.web.servlet.config.annotation.WebMvcConfigurer;/* @description: 配置跨域* @author* @date 2023/03/31 16:39* @version 1.0*/
@Configuration
public class CorsConfig implements WebMvcConfigurer {@Overridepublic void addCorsMappings(CorsRegistry registry) {// 设置允许跨域的路径registry.addMapping("/")// 设置允许跨域请求的域名.allowedOriginPatterns("*")// 是否允许cookie.allowCredentials(true)// 设置允许的请求方式.allowedMethods("GET", "POST", "DELETE", "PUT")// 设置允许的header属性.allowedHeaders("*")// 跨域允许时间.maxAge(3600);}
}
tokenServices 我们配置了一个 RemoteTokenServices 的实例,这是因为资源服务器和授权服务器是分开的,资源服务器和授权服务器是放在一起的,就不需要配置 RemoteTokenServices 了。
RemoteTokenServices 中我们配置了 access_token 的校验地址、client_id、client_secret 这三个信息,当用户来资源服务器请求资源时,会携带上一个 access_token,通过这里的配置,就能够校验出 token 是否正确等。
最后配置一下资源的拦截规则,这就是 Spring Security 中的基本写法
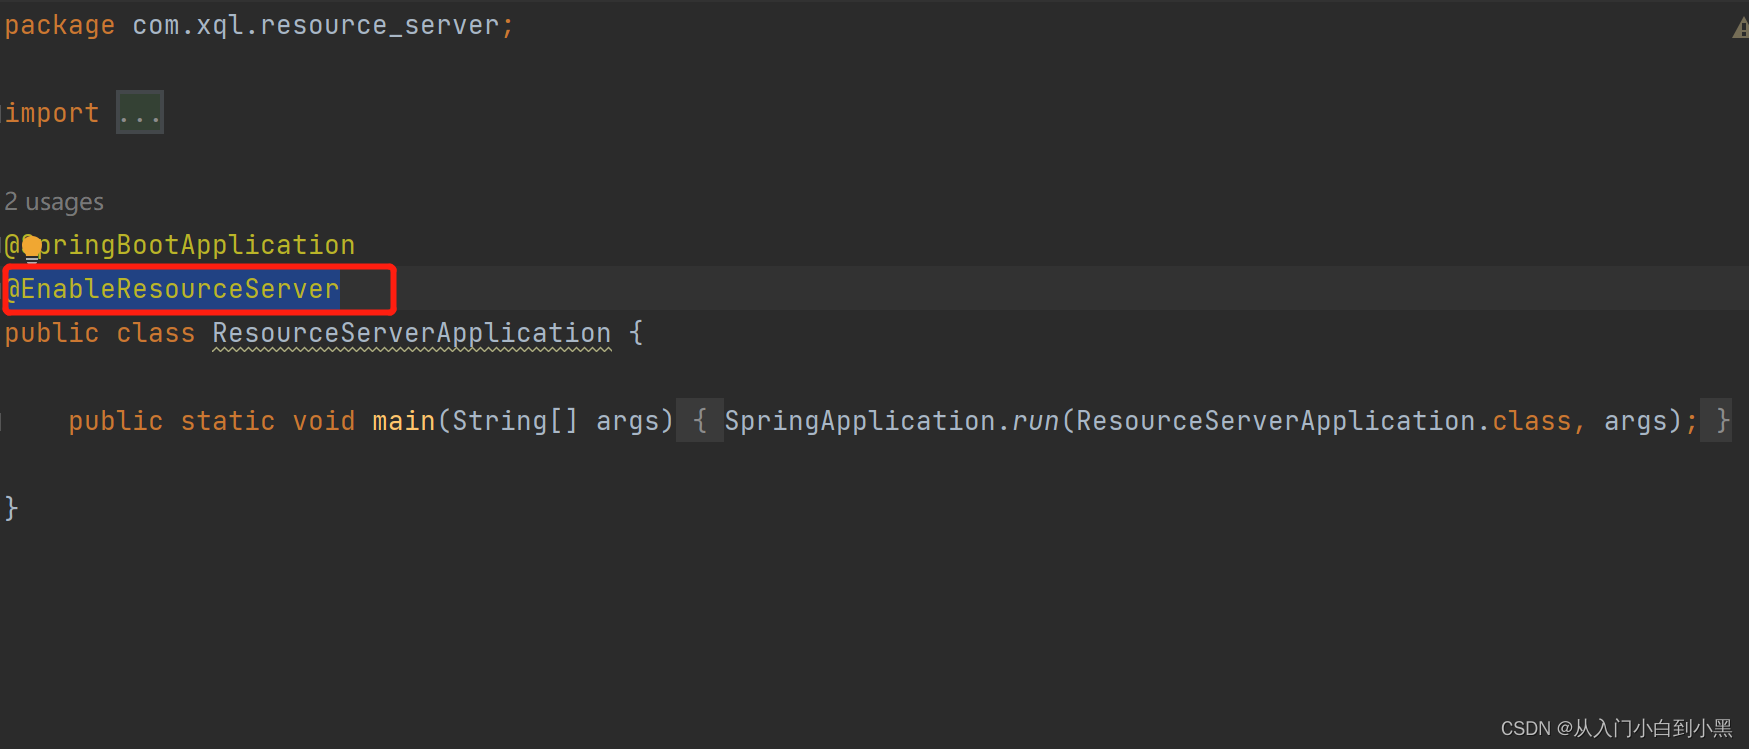
启动类加上注解
@EnableResourceServer
在资源服务器配置两个访问接口
package com.xql.resource_server.controller;import org.springframework.web.bind.annotation.GetMapping;
import org.springframework.web.bind.annotation.RestController;@RestController
public class HelloController {@GetMapping("/hello")public String hello() {return "hello";}@GetMapping("/admin/hello")public String admin() {return "admin";}
}
第三方应用项目搭建模拟请求
index.jsp
<%@ page contentType="text/html;charset=UTF-8" language="java" isELIgnored="false" %>
<%@ taglib prefix="c" uri="http://java.sun.com/jsp/jstl/core" %>
<c:set var="path" value="${pageContext.request.contextPath}"></c:set>
<%@ taglib prefix="fmt" uri="http://java.sun.com/jsp/jstl/fmt" %>
<!DOCTYPE html>
<html lang="en" xmlns:th="http://www.thymeleaf.org">
<head><meta charset="UTF-8"><title>第三方测试</title>
</head>
<body>
第三方测试!<a href="http://localhost:53020/uaa-service/oauth/authorize?client_id=xql&response_type=code&scope=all&redirect_uri=http://localhost:8089/goods/index">第三方登录</a><h1 th:text="${msg}"></h1>
</body>
</html>
package com.zlm.goods.controller;import org.springframework.beans.factory.annotation.Autowired;
import org.springframework.http.HttpEntity;
import org.springframework.http.HttpHeaders;
import org.springframework.http.HttpMethod;
import org.springframework.http.ResponseEntity;
import org.springframework.stereotype.Controller;
import org.springframework.ui.Model;
import org.springframework.util.LinkedMultiValueMap;
import org.springframework.util.MultiValueMap;
import org.springframework.web.bind.annotation.GetMapping;
import org.springframework.web.client.RestTemplate;import java.util.Map;@Controller
public class HelloController {@AutowiredRestTemplate restTemplate;@GetMapping("/index")public String hello(String code, Model model) {if (code != null) {MultiValueMap<String, String> map = new LinkedMultiValueMap<>();map.add("code", code);map.add("client_id", "xql");map.add("client_secret", "xql123");map.add("redirect_uri", "http://localhost:8089/goods/index");map.add("grant_type", "authorization_code");Map<String,String> resp = restTemplate.postForObject("http://localhost:53020/uaa-service/oauth/token", map, Map.class);String access_token = resp.get("access_token");System.out.println(access_token);HttpHeaders headers = new HttpHeaders();headers.add("Authorization", "Bearer " + access_token);HttpEntity<Object> httpEntity = new HttpEntity<>(headers);ResponseEntity<String> entity = restTemplate.exchange("http://localhost:53021/resource-service/admin/hello", HttpMethod.GET, httpEntity, String.class);model.addAttribute("msg", entity.getBody());}return "index";}
}
测试
接下来我们去测试。
首先我们去访问 http://localhost:8089/goods/index.jsp页面,结果如下:

然后我们点击 第三方登录 这个超链接,点完之后,会进入到授权服务器的默认登录页面:

接下来我们输入在授权服务器中配置的用户信息来登录,登录成功后,会看到如下页面:

在这个页面中,我们可以看到一个提示,询问是否授权 javaboy 这个用户去访问被保护的资源,我们选择 approve(批准),然后点击下方的 Authorize 按钮,点完之后,页面会自动跳转回我的第三方应用中:
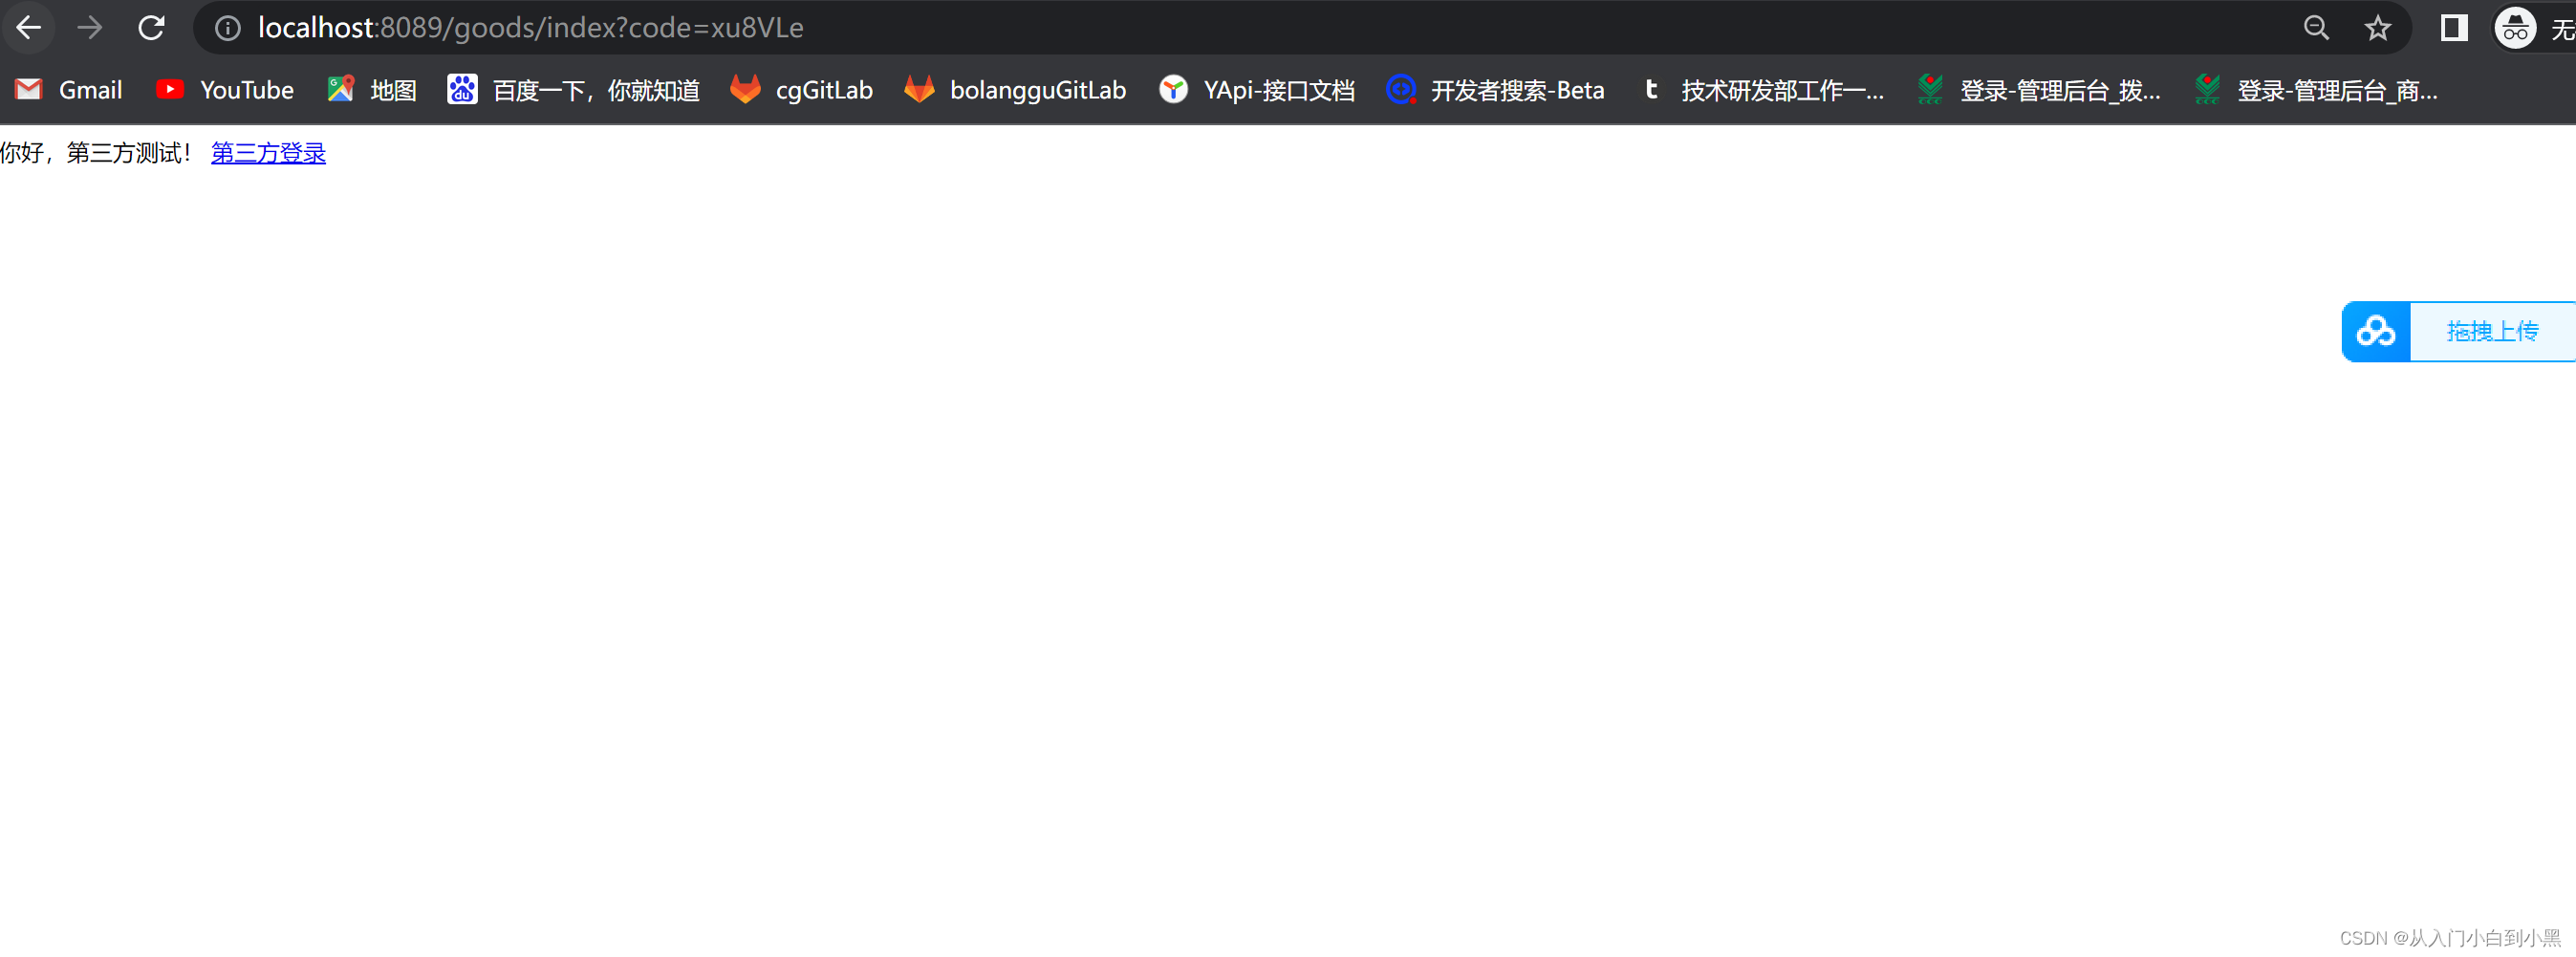

大家注意,这个时候地址栏多了一个 code 参数,这就是授权服务器给出的授权码,拿着这个授权码,我们就可以去请求 access_token,授权码使用一次就会失效。
同时大家注意到页面多了一个 admin,这个 admin 就是从资源服务器请求到的数据。
当然,我们在授权服务器中配置了两个用户,大家也可以尝试用 xql 这个用户去登录,因为这个用户不具备 admin 角色,所以使用这个用户将无法获取到 admin 这个字符串,报错信息如下:

小结
- 1.我们访问第三方页面 点击登录触发请求
http://localhost:53020/uaa-service/oauth/authorize?client_id=xql&response_type=code&scope=all&redirect_uri=http://localhost:8089/goods/index
路径解析:授权服务器路径/oauth/authorize+?+参数client_id+授权码模式默认code+scope范围
以及认证成功回调地址 http://localhost:8089/goods/index(这个地址是我们第三方应用项目搭建的接口路径)
-
2.进入授权服务器登录页面用户登录点击授权 这个时候如果同意授权会调用我们的回调接口并且带上参数code=当前授权码

-
3.回调方法内部携带code、client_id、client_secret、redirect_uri、grant_type请求授权服务器
的/oauth/token接口获取access_token

-
4.获取到access_token存放到当前head请求头访问资源服务器的接口路径

-
5.资源服务器内部回去调用我们配置的授权服务器的/oauth/check_token接口

-
6.如何检验当前身份的角色以及路径权限
-
7.如果角色和权限都拥有则返回结果
-
