由浅入深MFC学习摘记--第四部分上

目录
- 第八章 Document-View结构
-
- 为什么使用Document-View结构
-
- Document
- view
- DocumentFrame
- DocumentTemplate
- CDocTemplate、CDocument、CView、CFrameWnd 之间的关系
- Document - 数据结构设计
-
- 容器选用
- 范例修改
- 线条与点
- View-重绘与编辑
-
- 代码修改
- View 的重绘
- 鼠标消息处理
- 类向导
- Serialize 序列化
-
- CFile 操作文件
- Serialize过程
- serialize实现
- DYNAMIC、DYNCREATE、SERIAL
- Serializable 的必要条件
- CObject 类
-
- IsKindOf
- IsSerializable
- CObject::Serialize
- CArchive 类
-
- operator<< 和 operator>>
- 效率考量
- 自定 SERIAL 宏给抽象类使用
- Document 与View 交流
- 第九章 消息映射与命令路由
-
- 消息分类
- Command Target(CCmdTarget)
- 关键的三个宏
-
- DECLARE_MESSAGE_MAP
- BEGIN_MESSAGE_MAP与END_MESSAGE_MAP
- 消息推送
- 消息流动
- 消息响应函数调用
- 第十章 MFC与对话框
-
- 对话框编辑器
- 关联对话框和类
- 对话框的消息处理函数
- DDX & DDV
- 弹出对话框
- 第十一章 View功能及重绘
-
- 同时修改多个 Views
- 滚动条CScrollView
-
- 拆分窗口Splitter
- 第十二章 打印与预览
-
- 打印的背景原理(windows接口)
- MFC预设的打印机制
- 修改范例Scribble
-
- 配置GDI 绘图工具
- 关于映射模式(坐标系统)
- 分页
- 页眉页脚
- 动态计算页码
- 打印预览( Print Preview)
第八章 Document-View结构
为什么使用Document-View结构
数据和界面操作分离
Document
由于CDocument 派生自CObject,所以它就有了CObject 所支持的一切性质,包括运行时类型识别(RTTI)、动态生成(Dynamic Creation)、文件读写(Serialization)。又由于它也派生自CCmdTarget,所以它可以接收来自菜单或工具栏的WM_COMMAND 消息。
view
view 负责展示信息,常用做法是 创建一个类继承自 CView并重写 OnDraw 函数。
CView 继承CWnd,所以它可以接收一般Windows 消息(如WM_SIZE、WM_PAINT 等等)。
它也继承CCmdTarget,所以它可以接收来自菜单或工具栏的WM_COMMAND 消息。
在window sdk编程中,一般调用BeginPaint获取设备描述表DC绘画来处理WM_PAINT。
在MFC中,WM_PAINT消息还会触发 OnDraw 函数。
DocumentFrame
认为是view的载体,view窗口之下有frame
DocumentTemplate
Document Template负责管理view、frame、document。可派生出
CMultiDocTemplate,还有一个成员变量CPtrList m_docList;操作多种类型文件;
CSingleDocTemplate,还有一个成员变量CDocument* m_pOnlyDoc;操作单文档。
// in AFXWIN.H
class CDocTemplate : public CCmdTarget
{...UINT m_nIDResource; // IDR_ for frame/menu/accel as wellCRuntimeClass* m_pDocClass; // class for creating new documentsCRuntimeClass* m_pFrameClass; // class for creating new framesCRuntimeClass* m_pViewClass; // class for creating new viewsCString m_strDocStrings; // '\\n' separated names...
}
成员m_pDocClass、m_pViewClass、m_pFrameClass动态生成、管理文档、视图、窗口
CDocTemplate、CDocument、CView、CFrameWnd 之间的关系
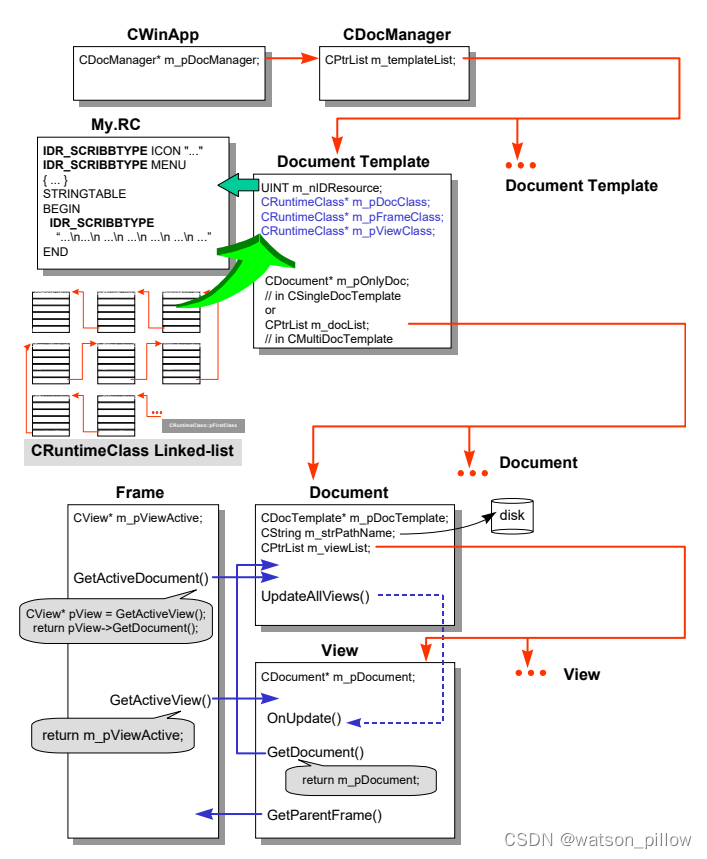
CWinApp管理CDocTemplate,如下所示:
BOOL CScribbleApp::InitInstance()
{...CMultiDocTemplate* pDocTemplate;pDocTemplate = new CMultiDocTemplate(IDR_SCRIBTYPE,RUNTIME_CLASS(CScribbleDoc),RUNTIME_CLASS(CChildFrame),RUNTIME_CLASS(CScribbleView));AddDocTemplate(pDocTemplate);...
}
以打开、创建文档为例,虽然打开文档事件的响应是cwinapp
BEGIN_MESSAGE_MAP(CScribbleApp, CWinApp)ON_COMMAND(ID_APP_ABOUT, OnAppAbout)ON_COMMAND(ID_FILE_NEW, CWinApp::OnFileNew)ON_COMMAND(ID_FILE_OPEN, CWinApp::OnFileOpen)ON_COMMAND(ID_FILE_PRINT_SETUP, CWinApp::OnFilePrintSetup)
END_MESSAGE_MAP()
但是实际操作创建文档及视图的是Document Template,其流程如下:
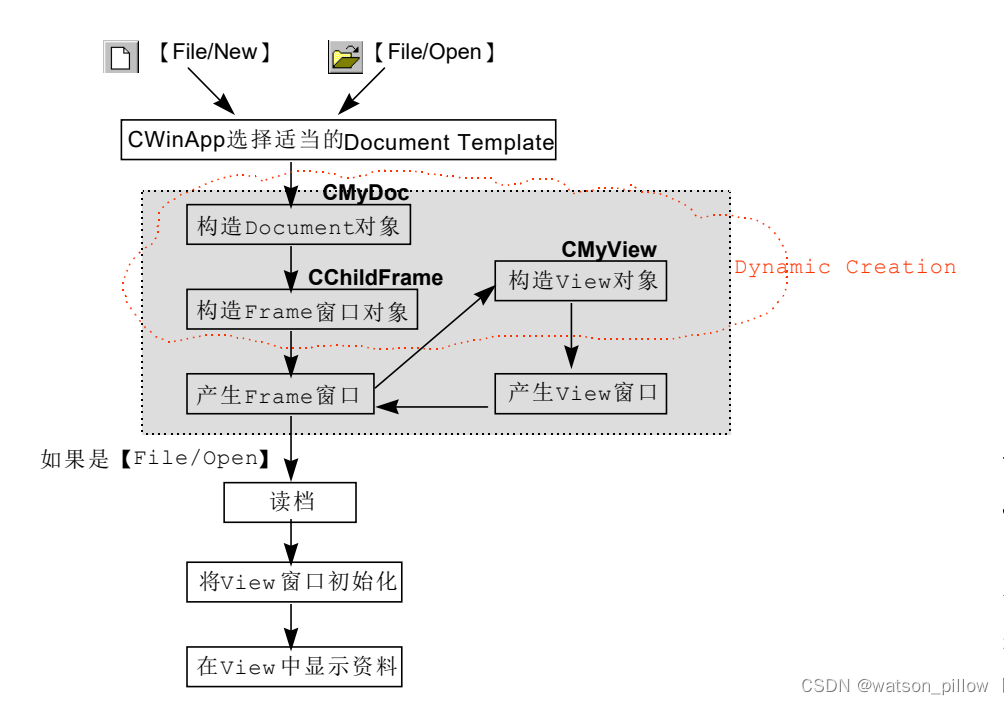
函数调用流程:
CWinApp::OnFileNew→CDocManager::OnFileNew→CWinApp::OpenDocumentFile→CDocManager::OpenDocumentFile→CMultiDocTemplate::OpenDocumentFile
// in DOCMULTI.CPP
CDocument* CMultiDocTemplate::OpenDocumentFile(LPCTSTR lpszPathName, BOOL bMakeVisible)
{CDocument* pDocument = CreateNewDocument();...CFrameWnd* pFrame = CreateNewFrame(pDocument, NULL);...if (lpszPathName == NULL){// create a new document - with default document name...}else{// open an existing document...}InitialUpdateFrame(pFrame, pDocument, bMakeVisible);return pDocument;
}
CreateNewDocument 利用CRuntimeClass的CreateObject 动态产生Document,CreateNewFrame 同样利用CRuntimeClass的CreateObject 动态产生Document Frame。
// in DOCTEMPL.CPP
CDocument* CDocTemplate::CreateNewDocument()
{...CDocument* pDocument = (CDocument*)m_pDocClass->CreateObject();...AddDocument(pDocument);return pDocument;
}
CFrameWnd* CDocTemplate::CreateNewFrame(CDocument* pDoc, CFrameWnd* pOther)
{// create a frame wired to the specified documentCCreateContext context;context.m_pCurrentFrame = pOther;context.m_pCurrentDoc = pDoc;context.m_pNewViewClass = m_pViewClass;context.m_pNewDocTemplate = this;...CFrameWnd* pFrame = (CFrameWnd*)m_pFrameClass->CreateObject();...// create new from resourcepFrame->LoadFrame(m_nIDResource,WS_OVERLAPPEDWINDOW | FWS_ADDTOTITLE, // default frame stylesNULL, &context)//应该是这里创建了view...return pFrame;
}
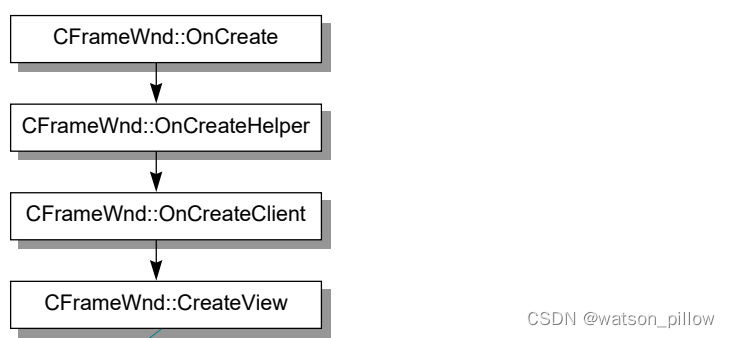
窗口创建过程:
// in WINFRM.CPP
CWnd* CFrameWnd::CreateView(CCreateContext* pContext, UINT nID)
{...CWnd* pView = (CWnd*)pContext->m_pNewViewClass->CreateObject();...// views are always created with a border!pView->Create(NULL, NULL, AFX_WS_DEFAULT_VIEW,CRect(0,0,0,0), this, nID, pContext))...if (afxData.bWin4 && (pView->GetExStyle() & WS_EX_CLIENTEDGE)){// remove the 3d style from the frame, since the view is// providing it.// make sure to recalc the non-client areaModifyStyleEx(WS_EX_CLIENTEDGE, 0, SWP_FRAMECHANGED);}return pView;
}
以上函数创建了view和对应窗口。
总结:
CWinApp拥有一个对象指针:CDocManager* m_pDocManager。CDocManager拥有一个指针CPtrList m_templateList, 用来维护多个Document Template。一个程序若支持两「种」文件类型,就应该有两份Document Templates,应用程序应该在CMyWinApp::InitInstance中调用AddDocTemplate将这些Document Templates加入由CDocManager所维护的CPtrList m_templateList之中。CDocTemplate拥有三个成员变量, 分别持有Document 、View、Frame的CRumtimeClass指针,另有一个成员变量m_nIDResource,用来表示此Document展示时对应的UI 对象。这四个对象应该在MyWinApp::InitInstance函数构造CDocTemplate时指定,成为构造函数的参数。当使用者打开一份文件(通常是借着【File/Open】或【File/New】命令项),CDocTemplate通过Document/View/Frame的CRuntimeClass指针进行动态生成。CDocument有一个成员变量CDocTemplate* m_pDocTemplate,指向自己Document Template;另有一个成员变量CPtrList m_viewList,表示它可以同时维护一系列的Views。CFrameWnd有一个成员变量CView* m_pViewActive,指向目前正作用中的ViewCView有一个成员变量CDocument* m_pDocument,指向关联的Document。
Document - 数据结构设计
容器选用
MFC容器类:
- Array:数组,有序(需依序处理),可动态增减大小,索引值为整数。
- List:双向链表,有序(需依序处理),无索引。有头尾,可从头尾或从任何位置安插元素,速度极快。
- Map:又称为Dictionary,其内对象成对存在,键对象(key object),值对象(value object)。
性能如下表:
| 类型 | 有序 | 索引 | 插入元素 | 搜寻特定元素 | 复制元素 |
|---|---|---|---|---|---|
| List | Yes | No | 快 | 慢 | 可 |
| Array | Yes | Yes(利用整数索引值) | 慢 | 慢 | 可 |
| Map | No | Yes(利用键) | 快 | 快 | 键(key)不可复制,值(value)可复制 |
MFC Collection classes 容器存放的对象,有两种特别需要说明,一是Ob 一是Ptr:
- Ob 表示继承自CObject 的任何对象。MFC 提供CObList、CObArray 两种类。
- Ptr 表示对象指针。MFC 提供CPtrList、CPtrArray 两种类。
MFC的容器:
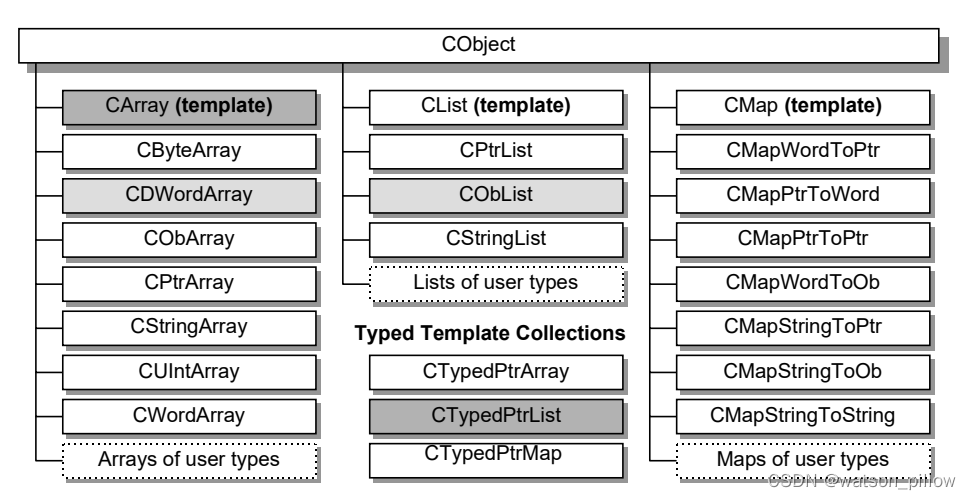
MFC容器还包含序列化、打印信息等功能需要考虑。
还可分类为:
- 简单型- CArray、CList、CMap。它们都继承了CObject,所以它们都可以序列化、运行时类型识别、动态生成。
- 指针型- CTypedPtrArray、CTypedPtrList、CTypedPtrMap。这些类要求你在参数中指定基类, 而基类必须是MFC 之中的non-template pointer collections,例如CObList 或CPtrArray。你的新类将继承基类的所有性质(没太明白)
关于 CArray 的定义CArray<TYPE, ARG_TYPE>:
TYPE是CArray所存储的数据的类型
ARG_TYPE则主要用于insert,add等等,
即传入参数的类型,对简单数据可以跟type一样,对类和struct,可以用引用。
一个参数为数组元素的类型,该例中是CPoint,即m_Array是CPoint数组;第二个参数为引用类型,一般有两种选择,一种选择与第一个参数类型相同,它意味着数组对象作为参数传递时,传递的是数组对象。第二种选择是第一个参数类型的引用,它意味着数组对象作为参数传递时,传递的是数组对象的指针。因此,尤其对于较复杂的数组结构类型,推荐使用引用传递,节约内存同时加快程序运行速度
还有就是 存放容器的容器(个人认为,也没看懂):
- CTypedPtrArray<BASE_CLASS, TYPE>
- CTypedPtrList<BASE_CLASS, TYPE>
- CTypedPtrMap<BASE_CLASS, KEY, VALUE>
使用如CTypedPtrList<CObList,CStroke*> m_strokeList;(CStroke是CObList的派生类吧?)
范例修改
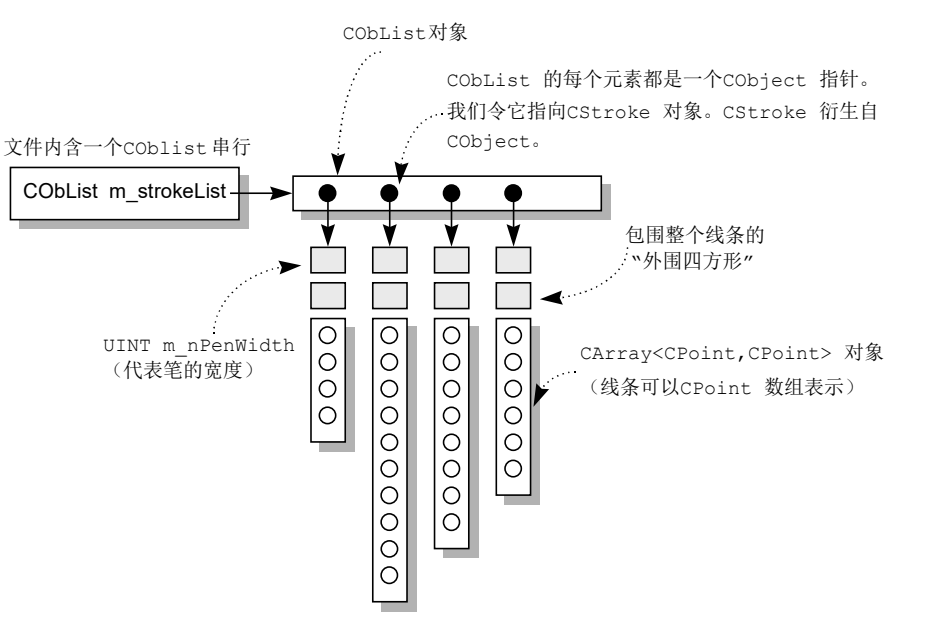
class CScribbleDoc : public CDocument的一个成员:
CTypedPtrList<CObList,CStroke*> m_strokeList;(理解为对象指针的链表)
而CStroke类有两个成员:
UINT m_nPenWidth;
CArray<CPoint,CPoint> m_pointArray;(又是一个数组)
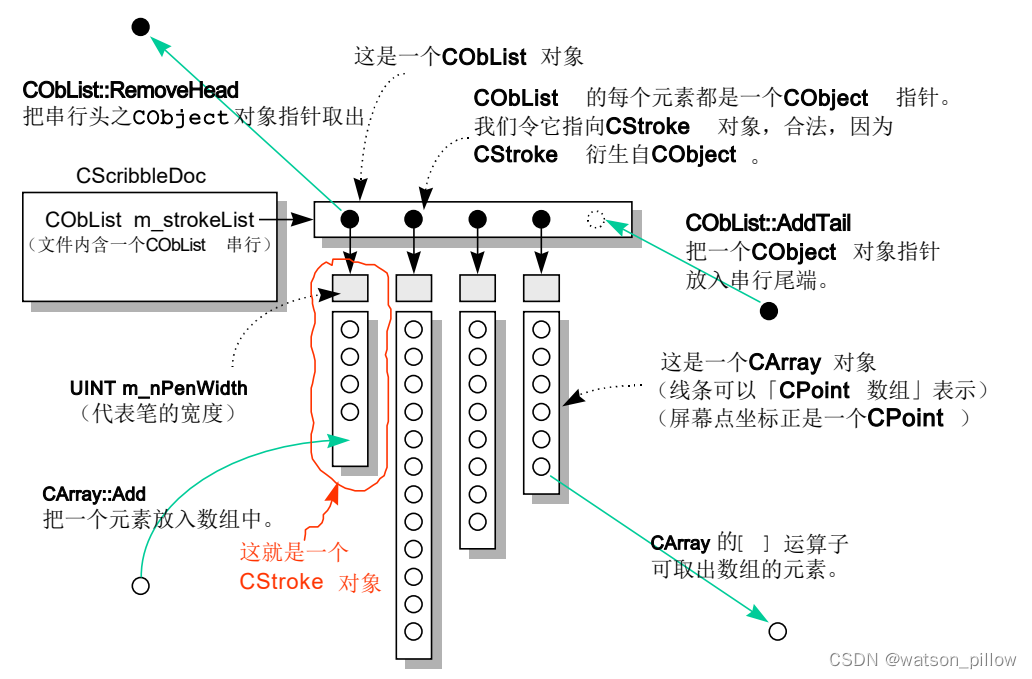
CScribbleDoc 内嵌一个CObList 对象,CObList 中的每个元素都是一个CStroke 对象指针,而CStroke 又内嵌一个CArray 对象。
代码(未验证)
//SCRIBBLEDOC.H
/
// class CStroke
//
// A stroke is a series of connected points in the scribble drawing.
// A scribble document may have multiple strokes.class CStroke : public CObject
{
public:
CStroke(UINT nPenWidth);protected:
CStroke();
DECLARE_SERIAL(CStroke)// Attributes
protected:
UINT m_nPenWidth; // one pen width applies to entire stroke
public:
CArray<CPoint, CPoint> m_pointArray; // series of connected points// Operations
public:
BOOL DrawStroke(CDC* pDC);public:
virtual void Serialize(CArchive& ar);
};/class CScribbleDoc : public CDocument
{
protected: // create from serialization only
CScribbleDoc();
DECLARE_DYNCREATE(CScribbleDoc)// Attributes
protected:
// The document keeps track of the current pen width on
// behalf of all views. We'd like the user interface of
// Scribble to be such that if the user chooses the Draw
// Thick Line command, it will apply to all views, not just
// the view that currently has the focus.UINT m_nPenWidth; // current user-selected pen width
CPen m_penCur; // pen created according to
// user-selected pen style (width)
public:
CTypedPtrList<CObList, CStroke*> m_strokeList;
CPen* GetCurrentPen() { return &m_penCur; }// Operations
public:
CStroke* NewStroke();// Overrides
// ClassWizard generated virtual function overrides
//{{AFX_VIRTUAL(CScribbleDoc)
public:
virtual BOOL OnNewDocument();
virtual void Serialize(CArchive& ar);
virtual BOOL OnOpenDocument(LPCTSTR lpszPathName);
virtual void DeleteContents();
//}}AFX_VIRTUAL// Implementation
public:
virtual ~CScribbleDoc();
#ifdef _DEBUGvirtual void AssertValid() const;
virtual void Dump(CDumpContext& dc) const;
#endifprotected:
void InitDocument();// Generated message map functions
protected:
//{{AFX_MSG(CScribbleDoc)// NOTE - the ClassWizard will add and remove member functions here.// DO NOT EDIT what you see in these blocks of generated code !//}}AFX_MSGDECLARE_MESSAGE_MAP()
};
//Scribble.cpp
#include "stdafx.h"
#include "Scribble.h"#include "ScribbleDoc.h"#ifdef _DEBUG
#define new DEBUG_NEW
#undef THIS_FILE
static char THIS_FILE[] = __FILE__;
#endif/
// CScribbleDocIMPLEMENT_DYNCREATE(CScribbleDoc, CDocument)BEGIN_MESSAGE_MAP(CScribbleDoc, CDocument)
//{{AFX_MSG_MAP(CScribbleDoc)
// NOTE - the ClassWizard will add and remove mapping macros here.
// DO NOT EDIT what you see in these blocks of generated code!
//}}AFX_MSG_MAP
END_MESSAGE_MAP()
// CScribbleDoc construction/destructionCScribbleDoc::CScribbleDoc()
{// TODO: add one-time construction code here}CScribbleDoc::~CScribbleDoc()
{
}BOOL CScribbleDoc::OnNewDocument()
{if (!CDocument::OnNewDocument())return FALSE;InitDocument();return TRUE;
}/
// CScribbleDoc serializationvoid CScribbleDoc::Serialize(CArchive& ar)
{
if (ar.IsStoring()){}
else
{
}
m_strokeList.Serialize(ar);
}/
// CScribbleDoc diagnostics#ifdef _DEBUG
void CScribbleDoc::AssertValid() const
{CDocument::AssertValid();}void CScribbleDoc::Dump(CDumpContext& dc) const
{CDocument::Dump(dc);}
#endif //_DEBUG
BOOL CScribbleDoc::OnOpenDocument(LPCTSTR lpszPathName)
{if (!CDocument::OnOpenDocument(lpszPathName))return FALSE;InitDocument();return TRUE;}void CScribbleDoc::DeleteContents()
{while (!m_strokeList.IsEmpty()){delete m_strokeList.RemoveHead();}CDocument::DeleteContents();}void CScribbleDoc::InitDocument()
{
m_nPenWidth = 2; // default 2 pixel pen width
// solid, black penm_penCur.CreatePen(PS_SOLID, m_nPenWidth, RGB(0, 0, 0));
}CStroke* CScribbleDoc::NewStroke()
{CStroke* pStrokeItem = new CStroke(m_nPenWidth);m_strokeList.AddTail(pStrokeItem);SetModifiedFlag(); // Mark the document as having been modified, for// purposes of confirming File Close.return pStrokeItem;
}
// CStrokeIMPLEMENT_SERIAL(CStroke, CObject, 1)
CStroke::CStroke()
{// This empty constructor should be used by serialization only}
CStroke::CStroke(UINT nPenWidth)
{m_nPenWidth = nPenWidth;}void CStroke::Serialize(CArchive& ar)
{if (ar.IsStoring()){ar << (WORD)m_nPenWidth;m_pointArray.Serialize(ar);}else{WORD w;ar >> w;m_nPenWidth = w;m_pointArray.Serialize(ar);}}BOOL CStroke::DrawStroke(CDC* pDC)
{CPen penStroke;if (!penStroke.CreatePen(PS_SOLID, m_nPenWidth, RGB(0, 0, 0)))return FALSE;CPen* pOldPen = pDC->SelectObject(&penStroke);pDC->MoveTo(m_pointArray[0]);for (int i = 1; i < m_pointArray.GetSize(); i++){pDC->LineTo(m_pointArray[i]);}pDC->SelectObject(pOldPen);
return TRUE;
}
线条与点
CScribbleDoc用于存储线条信息,每个线条是一系列的点集,其结构如下:
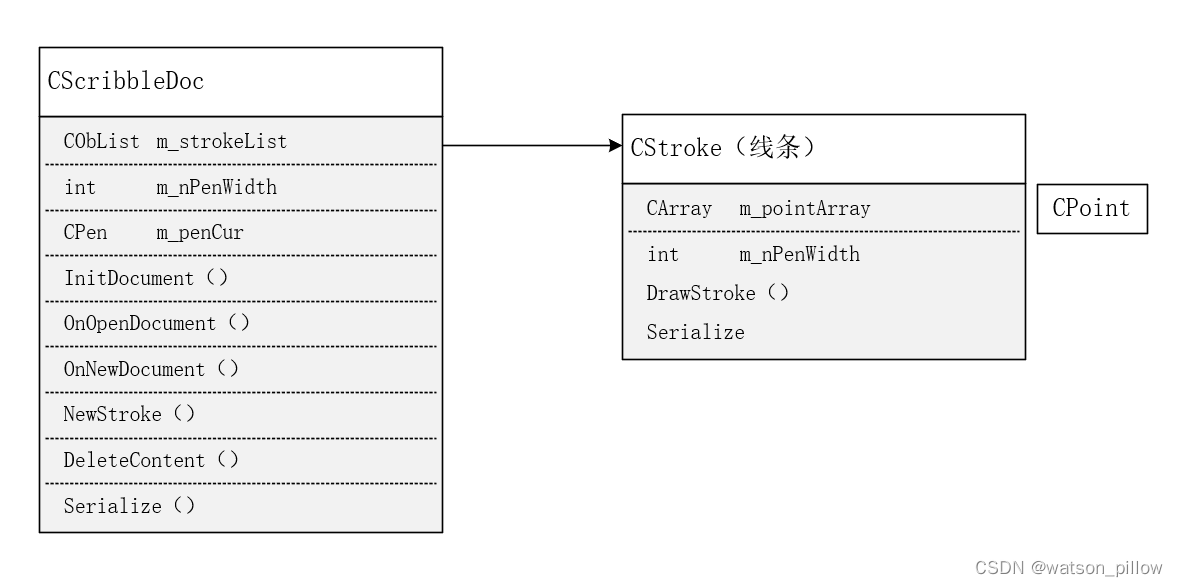
线条的绘制放在CStroke中,其过程如下
View-重绘与编辑
主要为设计 CScribbleView 类。
当Framework 收到WM_PAINT,表示画面需要重绘,它会先调用OnPaint,OnPaint 再调用OnDraw,由OnDraw 执行真正的绘图动作。
什么时候会产生重绘消息WM_PAINT 呢:当使用者改变窗口大小,或是将窗口最小化之后再恢复原状,或是来自程序(自己或别人)刻意的制造。除了在必须重绘时重绘之外,做为一个绘图软件,Scribble 还必须「实时」反应鼠标左键在窗口上移动的轨迹,不能等到WM_PAINT 产生了才有所反应。所以,我们必须在OnMouseMove 中也做绘图动作,那是针对一个点一个点的绘图,而OnDraw 是
大规模的全部重绘。
代码修改
创建基于单个文档的mfc工程,其中 CscribbledocView 代码:
//头文件
// scribbledocView.h: CscribbledocView 类的接口
#pragma onceclass CscribbledocView : public CView
{
protected: // 仅从序列化创建CscribbledocView() noexcept;DECLARE_DYNCREATE(CscribbledocView)
// 特性
public:CscribbledocDoc* GetDocument() const;
protected:CStroke* m_pStrokeCur; // the stroke in progressCPoint m_ptPrev; // the last mouse pt in the stroke in progress
// 操作
public:
// 重写
public:virtual void OnDraw(CDC* pDC);  // 重写以绘制该视图virtual BOOL PreCreateWindow(CREATESTRUCT& cs);
protected:virtual BOOL OnPreparePrinting(CPrintInfo* pInfo);virtual void OnBeginPrinting(CDC* pDC, CPrintInfo* pInfo);virtual void OnEndPrinting(CDC* pDC, CPrintInfo* pInfo);
// 实现
public:virtual ~CscribbledocView();
#ifdef _DEBUGvirtual void AssertValid() const;virtual void Dump(CDumpContext& dc) const;
#endif
protected:
// 生成的消息映射函数
protected:afx_msg void OnFilePrintPreview();//afx_msg void OnRButtonUp(UINT nFlags, CPoint point);//afx_msg void OnContextMenu(CWnd* pWnd, CPoint point);afx_msg void OnLButtonDown(UINT nFlags, CPoint point);afx_msg void OnLButtonUp(UINT nFlags, CPoint point);afx_msg void OnMouseMove(UINT nFlags, CPoint point);DECLARE_MESSAGE_MAP()
};
#ifndef _DEBUG  // scribbledocView.cpp 中的调试版本
inline CscribbledocDoc* CscribbledocView::GetDocument() const{ return reinterpret_cast<CscribbledocDoc*>(m_pDocument); }
#endif
//实现文件
// scribbledocView.cpp: CscribbledocView 类的实现
#include "pch.h"
#include "framework.h"
// SHARED_HANDLERS 可以在实现预览、缩略图和搜索筛选器句柄的
// ATL 项目中进行定义,并允许与该项目共享文档代码。
#ifndef SHARED_HANDLERS
#include "scribbledoc.h"
#endif#include "scribbledocDoc.h"
#include "scribbledocView.h"#ifdef _DEBUG
#define new DEBUG_NEW
#endif// CscribbledocView
IMPLEMENT_DYNCREATE(CscribbledocView, CView)BEGIN_MESSAGE_MAP(CscribbledocView, CView)// 标准打印命令ON_COMMAND(ID_FILE_PRINT, &CView::OnFilePrint)ON_COMMAND(ID_FILE_PRINT_DIRECT, &CView::OnFilePrint)ON_COMMAND(ID_FILE_PRINT_PREVIEW, &CscribbledocView::OnFilePrintPreview)//ON_WM_CONTEXTMENU()//ON_WM_RBUTTONUP()ON_WM_LBUTTONDOWN()ON_WM_LBUTTONUP()ON_WM_MOUSEMOVE()
END_MESSAGE_MAP()
// CscribbledocView 构造/析构
CscribbledocView::CscribbledocView() noexcept
{// TODO: 在此处添加构造代码
}CscribbledocView::~CscribbledocView()
{
}BOOL CscribbledocView::PreCreateWindow(CREATESTRUCT& cs)
{// TODO: 在此处通过修改// CREATESTRUCT cs 来修改窗口类或样式return CView::PreCreateWindow(cs);
}
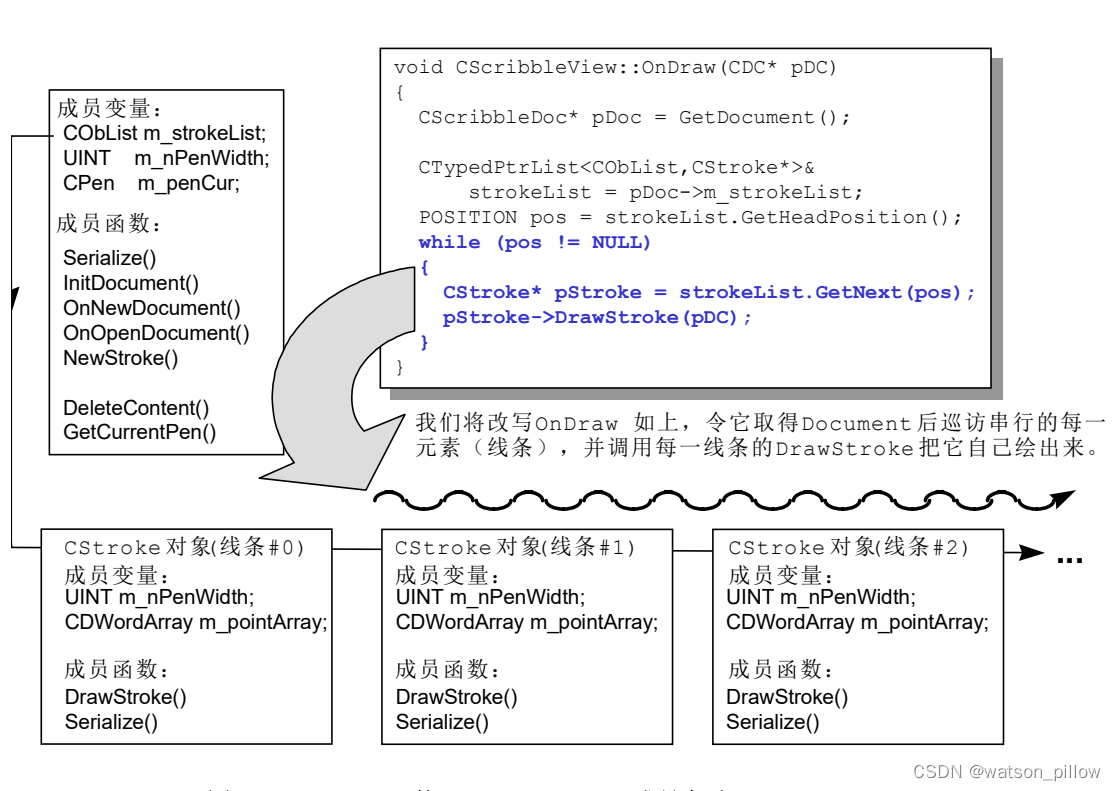
// CscribbledocView 绘图void CscribbledocView::OnDraw(CDC* pDC)
{CscribbledocDoc* pDoc = GetDocument();ASSERT_VALID(pDoc);//if (!pDoc)// return;CTypedPtrList<CObList, CStroke*>& strokeList = pDoc->m_strokeList;POSITION pos = strokeList.GetHeadPosition();while (pos != NULL){CStroke* pStroke = strokeList.GetNext(pos);pStroke->DrawStroke(pDC);}// TODO: 在此处为本机数据添加绘制代码
}// CscribbledocView 打印void CscribbledocView::OnFilePrintPreview()
{
#ifndef SHARED_HANDLERSAFXPrintPreview(this);
#endif
}BOOL CscribbledocView::OnPreparePrinting(CPrintInfo* pInfo)
{// 默认准备return DoPreparePrinting(pInfo);
}void CscribbledocView::OnBeginPrinting(CDC* /*pDC*/, CPrintInfo* /*pInfo*/)
{// TODO: 添加额外的打印前进行的初始化过程
}void CscribbledocView::OnEndPrinting(CDC* /*pDC*/, CPrintInfo* /*pInfo*/)
{// TODO: 添加打印后进行的清理过程
}//void CscribbledocView::OnRButtonUp(UINT /* nFlags */, CPoint point)
//{
// ClientToScreen(&point);
// OnContextMenu(this, point);
//}
//
//void CscribbledocView::OnContextMenu(CWnd* /* pWnd */, CPoint point)
//{
//#ifndef SHARED_HANDLERS
// theApp.GetContextMenuManager()->ShowPopupMenu(IDR_POPUP_EDIT, point.x, point.y, this, TRUE);
//#endif
//}// CscribbledocView 诊断#ifdef _DEBUG
void CscribbledocView::AssertValid() const
{CView::AssertValid();
}void CscribbledocView::Dump(CDumpContext& dc) const
{CView::Dump(dc);
}CscribbledocDoc* CscribbledocView::GetDocument() const // 非调试版本是内联的
{ASSERT(m_pDocument->IsKindOf(RUNTIME_CLASS(CscribbledocDoc)));return (CscribbledocDoc*)m_pDocument;
}
#endif //_DEBUG// CscribbledocView 消息处理程序
// CScribbleView message handlersvoid CscribbledocView::OnLButtonDown(UINT, CPoint point)
{// Pressing the mouse button in the view window starts a new strokem_pStrokeCur = GetDocument()->NewStroke();// Add first point to the new strokem_pStrokeCur->m_pointArray.Add(point);SetCapture(); // Capture the mouse until button up.m_ptPrev = point; // Serves as the MoveTo() anchor point// for the LineTo() the next point,// as the user drags the mouse.return;
}void CscribbledocView::OnLButtonUp(UINT, CPoint point)
{// Mouse button up is interesting in the Scribble application// only if the user is currently drawing a new stroke by dragging// the captured mouse.if (GetCapture() != this)return; // If this window (view) didn't capture the mouse,// then the user isn't drawing in this window.CscribbledocDoc* pDoc = GetDocument();CClientDC dc(this);CPen* pOldPen = dc.SelectObject(pDoc->GetCurrentPen());dc.MoveTo(m_ptPrev);dc.LineTo(point);dc.SelectObject(pOldPen);m_pStrokeCur->m_pointArray.Add(point);ReleaseCapture(); // Release the mouse capture established at// the beginning of the mouse drag.return;
}void CscribbledocView::OnMouseMove(UINT, CPoint point)
{// Mouse movement is interesting in the Scribble application// only if the user is currently drawing a new stroke by dragging// the captured mouse.if (GetCapture() != this)return; // If this window (view) didn't capture the mouse,// then the user isn't drawing in this window.CClientDC dc(this);m_pStrokeCur->m_pointArray.Add(point);// Draw a line from the previous detected point in the mouse// drag to the current point.CPen* pOldPen = dc.SelectObject(GetDocument()->GetCurrentPen());dc.MoveTo(m_ptPrev);dc.LineTo(point);dc.SelectObject(pOldPen);m_ptPrev = point;return;
}
View 的重绘
成员变量:
m_pStrokeCur:一个指针,指向目前正在工作的线条。
m_ptPrev:线条中的前一个工作点。我们将在这个点与目前鼠标按下的点之间画一条直线。虽说理想情况下鼠标轨迹的每一个点都应该被记录下来,但如果鼠标移动太快来不及记录,只好在两点之间拉直线。
成员函数:
OnDraw:这是一个虚拟函数,负责将Document 的数据显示出来。
GetDocument:AppWizard 为我们创建出来,以inline 方式定义于头文件,其中m_pDocument 是CView 的成员变量。可以推测,当程序设定好Document Template 之后,每次Framework 动态产生View 对象,其内的m_pDocument 已经被Framework 设定指向对应Document 。
OnPreparePrinting,OnBeginPrinting,OnEndPrinting:这三个CView 函数将用于打印。AppWizard 只是先帮我们做出空函数。
在OnDraw函数中,获取 Document,遍历其中的每条曲线(m_strokeList),调用曲线 CStroke::DrawStroke的方法绘制线段。
涉及两个CObList 成员函数:
GetNext:返回当前位置的数据,之后位置后移一位。
GetHeadPosition:传回链表的第一个元素的「位置」。
鼠标消息处理
OnLButtonDown:
// 当鼠标左键按下,
// 利用CScribbleDoc::NewStroke 产生一个新的线条空间;
// 利用CArray::Add 把这个点加到线条上去;
// 调用SetCapture 取得鼠标捕捉权(mouse capture);
// 把这个点记录为「上一点」(m_ptPrev);
OnMouseMove:
// 当鼠标左键按住并开始移动,
// 利用CArray::Add 把新坐标点加到线条上;
// 在上一点(m_ptPrev)和这一点之间画直线;
// 把这个点记录为「上一点」(m_ptPrev);
OnLButtonUp:
// 当鼠标左键放开,
// 在上一点(m_ptPrev)和这一点之间画直线;
// 利用CArray::Add 把新的点加到线条上;
// 调用ReleaseCapture() 释放鼠标捕捉权(mouse capture)。
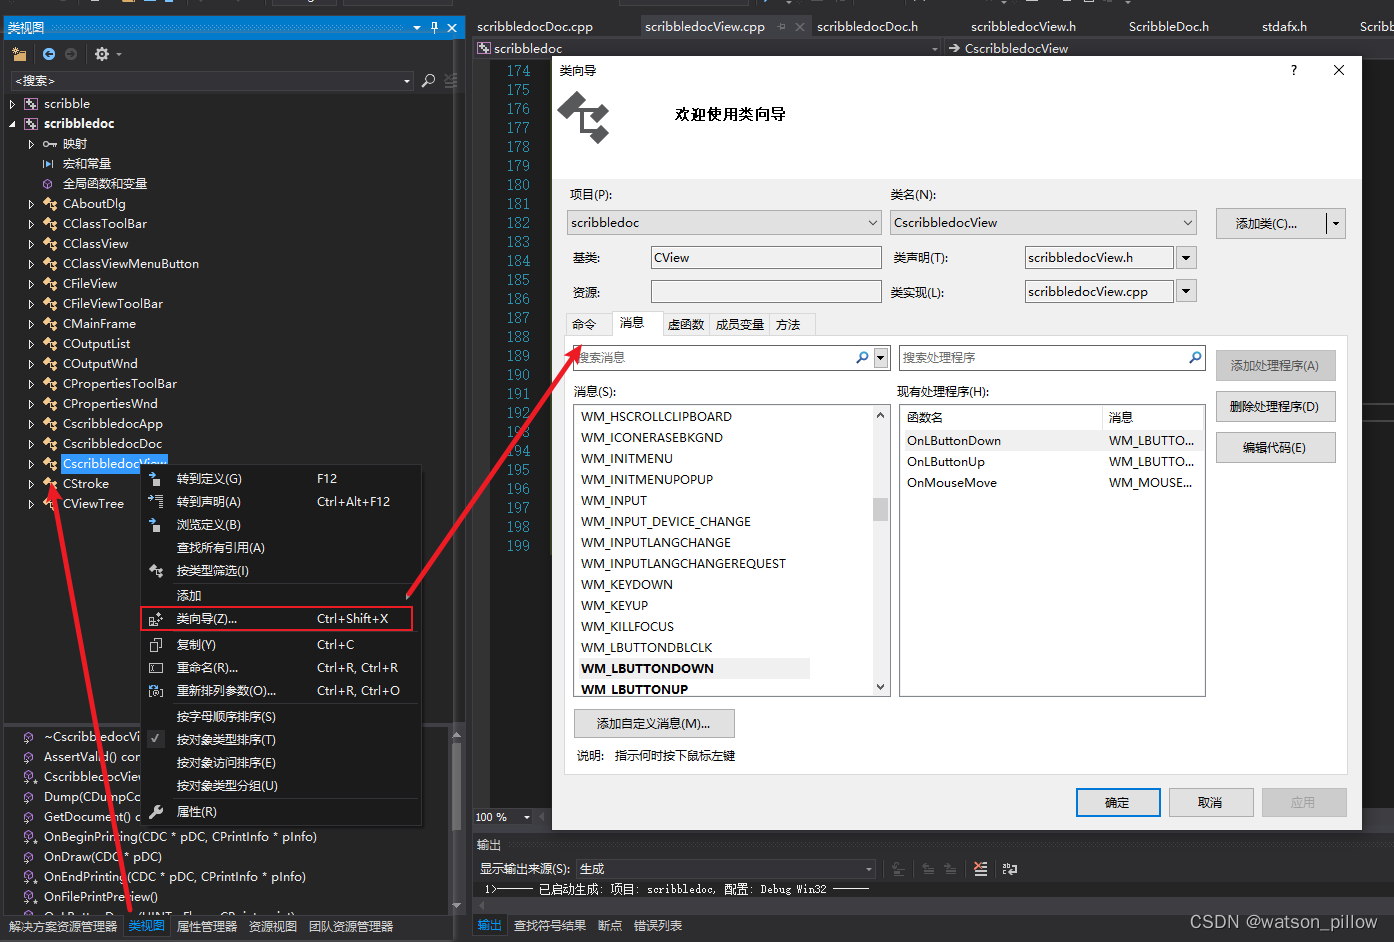
类向导
类视图中右键要修改的类,选择 类向导,即可弹出设置弹窗。
Serialize 序列化
也就是存储和读取文件,对象必须能够永续生存,也就是它们必须能够在程序结束时储存到文件中,并且在程序重新激活时再恢复回来。
CFile 操作文件
如 将文件 mydoc.doc 的所有文字转换为小写:
char* pBuffer = new char[0x1000];
try {CFile file("mydoc.doc", CFile::modeReadWrite);DWORD dwBytesRemaining = file.GetLength();UINT nBytesRead;DWORD dwPosition;while (dwBytesRemaining) {dwPosition = file.GetPosition();nBytesRead = file.Read(pBuffer, 0x1000);::CharLowerBuff(pBuffer, nBytesRead);file.Seek((LONG)dwPosition, CFile::begin);file.Write(pBuffer, nBytesRead);dwBytesRemaining -= nBytesRead;}
}
catch (CFileException* e) {if (e->cause == CFileException::fileNoteFound)MessageBox("File not found");else if (e->cause == CFileException::tooManyOpeFiles)MessageBox("File handles not enough");else if (e->cause == CFileException::hardIO)MessageBox("Hardware error");else if (e->cause == CFileException::diskFull)MessageBox("Disk full");else if (e->cause == CFileException::badPath)MessageBox("All or part of the path is invalid");elseMessageBox("Unknown file error");e->Delete();
}
delete[] pByffer;
Serialize过程
以上述 scribble 工程为例,其过程:Framework 调用CSribbleDoc::Serialize(对文件序列化),CScribbleDoc 再往下调用CStroke::Serialize(对线条序列化),CStroke 再往下调用CArray::Serialize(对点数组序列化)。
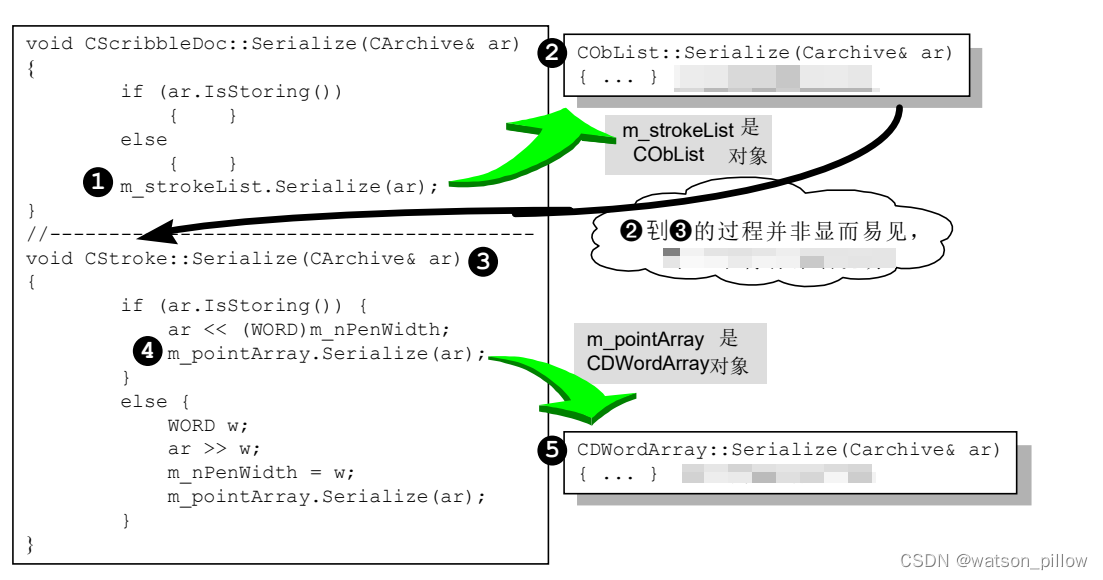
调用 Serialize 时会传一个CArchive 对象,可以认为它代表一个文件,通过其IsStoring 成员函数,即可知道究竟要读还是写。
CObList 的Serialize 函数源代码:
void CObList::Serialize(CArchive& ar)
{ASSERT_VALID(this);CObject::Serialize(ar);if (ar.IsStoring()){ar.WriteCount(m_nCount);for (CNode* pNode = m_pNodeHead; pNode != NULL;pNode = pNode->pNext){ //ASSERT(AfxIsValidAddress(pNode, sizeof(CNode)));ar << pNode->data;}}else{DWORD nNewCount = ar.ReadCount();CObject* newData;while (nNewCount--){ //ar >> newData;AddTail(newData);}}
}
CDWordArray 的Serialize 函数源代码:
void CDWordArray::Serialize(CArchive& ar)
{ASSERT_VALID(this);CObject::Serialize(ar);if (ar.IsStoring()){ar.WriteCount(m_nSize); //ar.Write(m_pData, m_nSize * sizeof(DWORD)); //}else{DWORD nOldSize = ar.ReadCount();SetSize(nOldSize); //ar.Read(m_pData, m_nSize * sizeof(DWORD)); //}
}
CArray 的Serialize 函数源代码:
template<class TYPE>
void AFXAPI SerializeElements(CArchive& ar, TYPE* pElements, int nCount)
{ASSERT(nCount == 0 ||AfxIsValidAddress(pElements, nCount * sizeof(TYPE)));// default is bit-wise read/writeif (ar.IsStoring())ar.Write((void*)pElements, nCount * sizeof(TYPE));elsear.Read((void*)pElements, nCount * sizeof(TYPE));
}template<class TYPE, class ARG_TYPE>
void CArray<TYPE, ARG_TYPE>::Serialize(CArchive& ar)
{ASSERT_VALID(this);CObject::Serialize(ar);if (ar.IsStoring()){ar.WriteCount(m_nSize);}else{DWORD nOldSize = ar.ReadCount();SetSize(nOldSize, -1);}SerializeElements(ar, m_pData, m_nSize);
}
其中 CObList 对象的 serialize 方法会内部调用各个链表中对象的 serialize 方法(通过多态、虚函数等);而CArray 对象可直接使用,内部将数组各个元素序列号,不必参与其内部过程。
serialize实现
内部通过封装使用CFile的CArchive类进行文件的读写,类的动态生成通过各个类的DECLARE_DYNCREATE / IMPLEMENT_DYNCREATE宏完成。
此处省略大篇代码。
DYNAMIC、DYNCREATE、SERIAL
DECLARE_DYNAMIC / IMPLEMENT_DYNAMIC:
afx.h
#define DECLARE_DYNAMIC(class_name) \\
public: \\static AFX_DATA CRuntimeClass class##class_name; \\virtual CRuntimeClass* GetRuntimeClass() const; \\
如
class CFoo : public CObject
{
DECLARE_DYNAMIC(CFoo)...
}
//变成
class CFoo : public CObject
{
public:static AFX_DATA CRuntimeClass classCFoo;virtual CRuntimeClass* GetRuntimeClass() const;...
}
afx.h
#define IMPLEMENT_DYNAMIC(class_name, base_class_name) \\_IMPLEMENT_RUNTIMECLASS(class_name, base_class_name, 0xFFFF, NULL)#define _IMPLEMENT_RUNTIMECLASS(class_name, base_class_name, wSchema, pfnNew) \\AFX_DATADEF CRuntimeClass class_name::class##class_name = { \\#class_name, sizeof(class class_name), wSchema, pfnNew, \\RUNTIME_CLASS(base_class_name), NULL }; \\static const AFX_CLASSINIT _init_##class_name(&class_name::class##class_name);CRuntimeClass* class_name::GetRuntimeClass() const \\{ return &class_name::class##class_name; } \\#define RUNTIME_CLASS(class_name) \\(&class_name::class##class_name)
如:
IMPLEMENT_DYNAMIC(CFoo, CObject)//变成
AFX_DATADEF CRuntimeClass CFoo::classCFoo = {"CFoo", sizeof(class CFoo), 0xFFFF, NULL, &CObject::classCObject, NULL };
static const AFX_CLASSINIT _init_CFoo(&CFoo::classCFoo);
CRuntimeClass* CFoo::GetRuntimeClass() const
{return &CFoo::classCFoo; }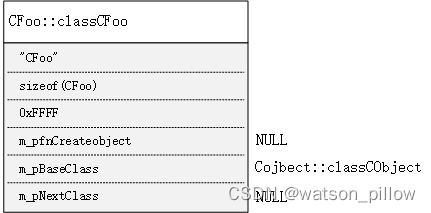
DECLARE_DYNCREATE / IMPLEMENT_DYNCREATE:
afx.h
#define DECLARE_DYNCREATE(class_name) \\DECLARE_DYNAMIC(class_name) \\static CObject* PASCAL CreateObject();
如
class CDynobj : public CObject
{DECLARE_DYNCREATE(CDynobj)...
}
//变成
class CDynobj : public CObject
{static AFX_DATA CRuntimeClass classCDynobj;virtual CRuntimeClass* GetRuntimeClass() const;static CObject* PASCAL CreateObject();...
}
afx.h
#define IMPLEMENT_DYNCREATE(class_name, base_class_name) \\CObject* PASCAL class_name::CreateObject() \\{ return new class_name; } _IMPLEMENT_RUNTIMECLASS(class_name, base_class_name, 0xFFFF, \\class_name::CreateObject)
如:
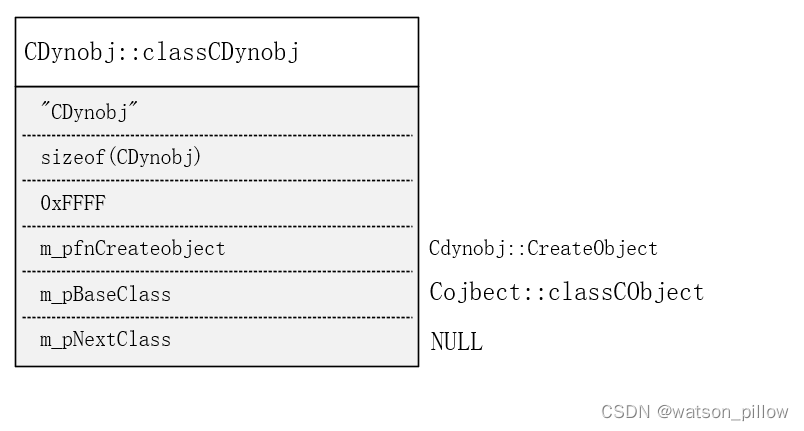
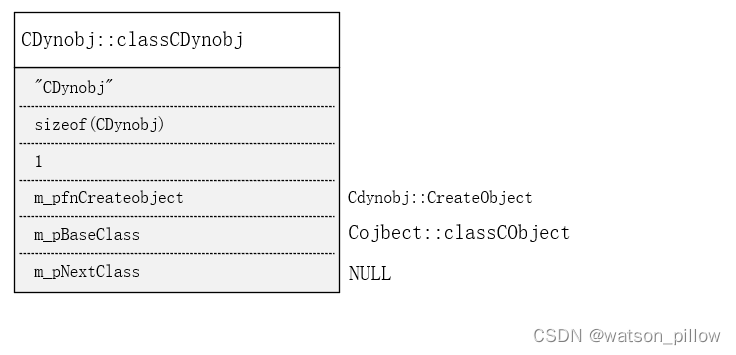
IMPLEMENT_DYNCREATE(CDynobj, CObject)
//变成
CObject* PASCAL CDynobj::CreateObject() \\{ return new CDynobj; } \\
AFX_DATADEF CRuntimeClass CDynobj::classCDynobj = {"CDynobj", sizeof(CDynobj), 0xFFFF, CDynobj::CreateObject,&CObject::classCObject, NULL };
static const AFX_CLASSINIT _init_CDynobj(&CDynobj::classCDynobj);
CRuntimeClass* CDynobj::GetRuntimeClass() const{ return &CDynobj::classCDynobj; }
DECLARE_SERIAL / IMPLEMENT_SERIAL:
afx.h
#define DECLARE_SERIAL(class_name) \\DECLARE_DYNCREATE(class_name) \\friend CArchive& AFXAPI operator>>(CArchive& ar, class_name* &pOb);
如
class CDynobj : public CObject
{DECLARE_SERIAL(CDynobj)...
}
//变成
class CDynobj : public CObject
{static AFX_DATA CRuntimeClass classCDynobj;virtual CRuntimeClass* GetRuntimeClass() const;static CObject* PASCAL CreateObject();friend CArchive& AFXAPI operator>>(CArchive& ar, CDynobj* &pOb);...
}
afx.h
#define IMPLEMENT_SERIAL(class_name, base_class_name, wSchema) \\CObject* PASCAL class_name::CreateObject() \\{ return new class_name; } \\_IMPLEMENT_RUNTIMECLASS(class_name, base_class_name, wSchema, \\class_name::CreateObject) \\CArchive& AFXAPI operator>>(CArchive& ar, class_name* &pOb) \\{ pOb = (class_name*) ar.ReadObject(RUNTIME_CLASS(class_name)); \\return ar; } \\
如
IMPLEMENT_SERIAL(CDynobj, CObject, 1)
//变成
CObject* PASCAL CDynobj::CreateObject() \\{ return new CDynobj; } \\
AFX_DATADEF CRuntimeClass CDynobj::classCDynobj = {"CDynobj", sizeof(CDynobj), 1, CDynobj::CreateObject,&CObject::classCObject, NULL };
static const AFX_CLASSINIT _init_CDynobj(&CDynobj::classCDynobj);
CRuntimeClass* CDynobj::GetRuntimeClass() const{ return &CDynobj::classCDynobj; }
CArchive& AFXAPI operator>>(CArchive& ar, CDynobj* &pOb){ pOb = (CDynobj*)ar.ReadObject(&CDynobj::classCDynobj);return ar;}
DYNAMIC / DYNCREATE / SERIAL 分别具备三个等级的性能:
- 运行时类型识别(RTTI)
- 动态生成(Dynamic Creation)
- 文件读写(Serialization)
| 功能 | RTTI(CObject::IsKindOf) | Dynamic Creation(CRuntimeClass::CreateObject) | Serialize(CArchive::operator>>, CArchive::operator<<) |
|---|---|---|---|
| DYNAMIC | Yes | No | No |
| DYNCREATE | Yes | Yes | No |
| SERIAL | Yes | Yes | Yes |
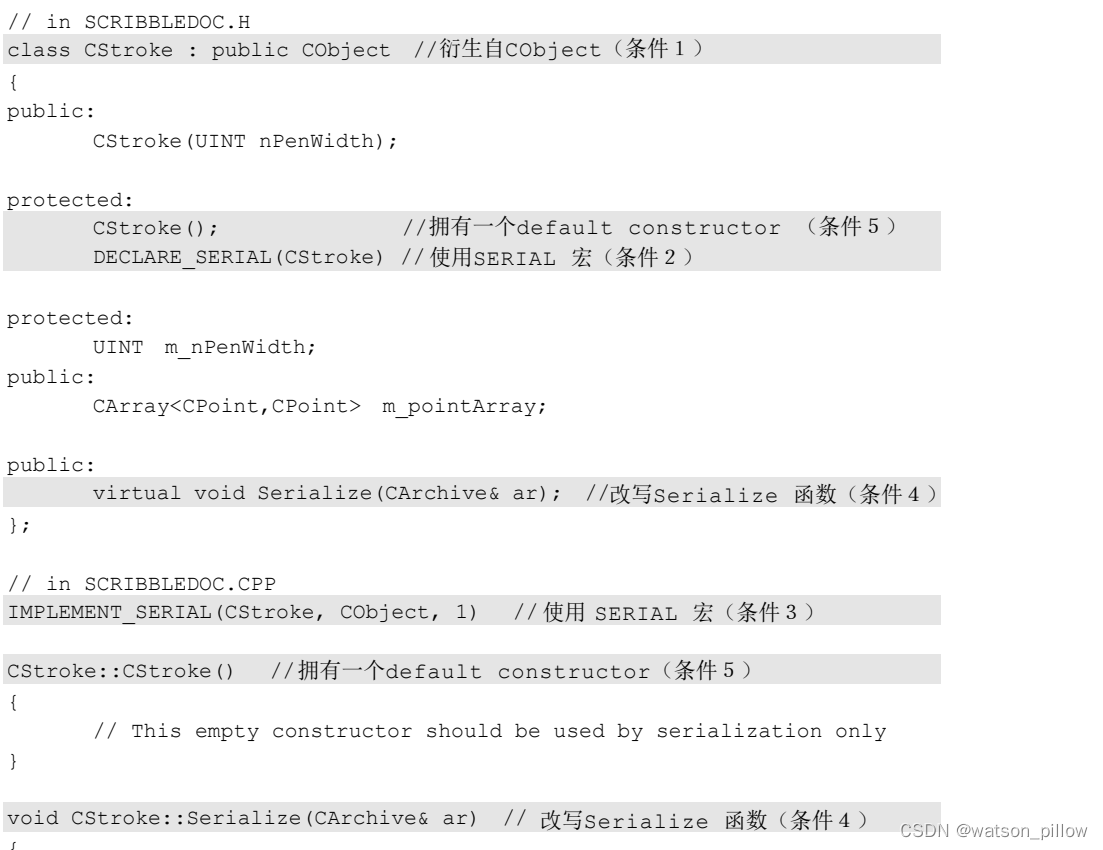
Serializable 的必要条件
- 从
CObject继承。如此一来可保有RTTI、Dynamic Creation等功能。 - 类的声明部份必须有
DECLARE_SERIAL宏。此宏需要一个参数:类名称。 - 类的实现部份必须有
IMPLEMENT_SERIAL宏。此宏需要三个参数:类名,父类名,schema no.。 - 改写Serialize 虚函数,使它能够适当地把类的成员变量写入文件中。
- 为此类加上一个default 构造函数(也就是无参构造函数)。因为若一个对象来自文件,MFC 必须先动态生成它,而且在没有任何参数的情况下调用其构造函数,然后才从文件中读出对象信息。
而CStroke满足以上条件
CObject 类
CObject 至少提供两个虚函数:IsKindOf 和 IsSerializable
IsKindOf
//CObject::IsKindOf 虚函数的源代码:
BOOL CObject::IsKindOf(const CRuntimeClass* pClass) const
{// simple SI caseCRuntimeClass* pClassThis = GetRuntimeClass();return pClassThis->IsDerivedFrom(pClass);
}
BOOL CRuntimeClass::IsDerivedFrom(const CRuntimeClass* pBaseClass) const
{// simple SI caseconst CRuntimeClass* pClassThis = this;while (pClassThis != NULL){if (pClassThis == pBaseClass)return TRUE;pClassThis = pClassThis->m_pBaseClass;}return FALSE; // walked to the top, no match
}
借m_pBaseClass 寻根判断继承关系,这种继承关系是靠 靠DECLARE_DYNAMIC 和IMPLEMENT_DYNAMIC 宏构造起来的。
IsSerializable
类的自己的那个CRuntimeClass 元素里的schema 字段里设立0xFFFF 以外的号码。
另外,m_pNextClass理解为,指向链表中下一CRuntimeClass對象的指針,就是说每创建一个 CRuntimeClass对象,都会插入到该链表中。
CObject::Serialize
每一个希望具备Serialization 能力的类都应该改写它
CArchive 类
archive相当于文件,不过它其实是文件之前的一个内存缓冲区。
如:
BOOL CDocument::OnOpenDocument(LPCTSTR lpszPathName)
{CFile* pFile = GetFile(lpszPathName,CFile::modeRead|CFile::shareDenyWrite, &fe);//令file 和archive 产生关联CArchive loadArchive(pFile, CArchive::load | CArchive::bNoFlushOnDelete);...Serialize(loadArchive); //对着archive 做serialize 动作...loadArchive.Close();ReleaseFile(pFile, FALSE);
}
operator<< 和 operator>>
// in AFX.H
class CArchive
{
public:// Flag valuesenum Mode { store = 0, load = 1, bNoFlushOnDelete = 2, bNoByteSwap = 4 };CArchive(CFile* pFile, UINT nMode, int nBufSize = 4096, void* lpBuf = NULL);~CArchive();// AttributesBOOL IsLoading() const;BOOL IsStoring() const;BOOL IsByteSwapping() const;BOOL IsBufferEmpty() const;CFile* GetFile() const;UINT GetObjectSchema(); // only valid when reading a CObject*void SetObjectSchema(UINT nSchema);// pointer to document being serialized -- must set to serialize// COleClientItems in a document!CDocument* m_pDocument;// OperationsUINT Read(void* lpBuf, UINT nMax);void Write(const void* lpBuf, UINT nMax);void Flush();void Close();void Abort(); // close and shutdown without exceptions// reading and writing stringsvoid WriteString(LPCTSTR lpsz);LPTSTR ReadString(LPTSTR lpsz, UINT nMax);BOOL ReadString(CString& rString);
public:// Object I/O is pointer based to avoid added construction overhead.// Use the Serialize member function directly for embedded objects.friend CArchive& AFXAPI operator<<(CArchive& ar, const CObject* pOb);friend CArchive& AFXAPI operator>>(CArchive& ar, CObject*& pOb);friend CArchive& AFXAPI operator>>(CArchive& ar, const CObject*& pOb);// insertion operationsCArchive& operator<<(BYTE by);CArchive& operator<<(WORD w);CArchive& operator<<(LONG l);CArchive& operator<<(DWORD dw);CArchive& operator<<(float f);CArchive& operator<<(double d);CArchive& operator<<(int i);CArchive& operator<<(short w);CArchive& operator<<(char ch);CArchive& operator<<(unsigned u);// extraction operationsCArchive& operator>>(BYTE& by);CArchive& operator>>(WORD& w);CArchive& operator>>(DWORD& dw);CArchive& operator>>(LONG& l);CArchive& operator>>(float& f);CArchive& operator>>(double& d);CArchive& operator>>(int& i);CArchive& operator>>(short& w);CArchive& operator>>(char& ch);CArchive& operator>>(unsigned& u);// object read/writeCObject* ReadObject(const CRuntimeClass* pClass);void WriteObject(const CObject* pOb);// advanced object mapping (used for forced references)void MapObject(const CObject* pOb);// advanced versioning supportvoid WriteClass(const CRuntimeClass* pClassRef);CRuntimeClass* ReadClass(const CRuntimeClass* pClassRefRequested = NULL,UINT* pSchema = NULL, DWORD* pObTag = NULL);void SerializeClass(const CRuntimeClass* pClassRef);...
protected:// array/map for CObject* and CRuntimeClass* load/storeUINT m_nMapCount;union{CPtrArray* m_pLoadArray;CMapPtrToPtr* m_pStoreMap;};// map to keep track of mismatched schemasCMapPtrToPtr* m_pSchemaMap;...
};
效率考量
当文件内含有许多对象信息时,对象隶属同一类时,只有第一个对象才连同类的CRuntimeClass 信息一并写入,此后同类的对象仅以一个代码表示。(理解为第一次存储类名称,之后代号代替,如第一次类名存储为CStroke,之后存储为8001,也代表CStroke类)
CArchive 维护类信息的作法是,当它做输出动作,对象名称以及参考值被维护在一个map 之中;
当它做读入动作,它把对象维护在一个array 之中。
union
{CPtrArray* m_pLoadArray;CMapPtrToPtr* m_pStoreMap;
};
// map to keep track of mismatched schemas
CMapPtrToPtr* m_pSchemaMap;
自定 SERIAL 宏给抽象类使用
如果一个抽象类想要增加 序列化,需要自定义宏
#define IMPLEMENT_SERIAL_MY(class_name, base_class_name, wSchema) \\_IMPLEMENT_RUNTIMECLASS(class_name, base_class_name, wSchema, NULL) \\CArchive& AFXAPI operator>>(CArchive& ar, class_name* &pOb) \\{ pOb = (class_name*) ar.ReadObject(RUNTIME_CLASS(class_name)); \\return ar; } \\
令CreateObject 函数为NULL
Document 与View 交流
考虑一个视图窗口内容改变后,如何使另外一个同时打开的窗口也改变。
CView 之中的三个虚函数:
CView::OnInitialUpdate - 负责View 的初始化。
CView::OnUpdate - 当Framework 调用此函数,表示Document 的内容已有变化。
CView::OnDraw - Framework 将在WM_PAINT 发生后,调用此函数。此函数应负责更新View 窗口的内容。
CDocument::UpdateAllViews - 如果这个函数执行起来,它会巡访所有隶属同一Document 的各个Views,找到一个就通知一个,而所谓「通知」就是调用View的OnUpdate 函数。
第九章 消息映射与命令路由
消息分类
Windows 的消息都是以WM_xxx 为名,WM_ 的意思是"Windows Message"。
所有消息都有对应的响应函数;
WM_PAINT 一定会去OnPaint 函数,WM_SIZE 一定会去OnSize 函数。
MFC 把消息分为三大类:
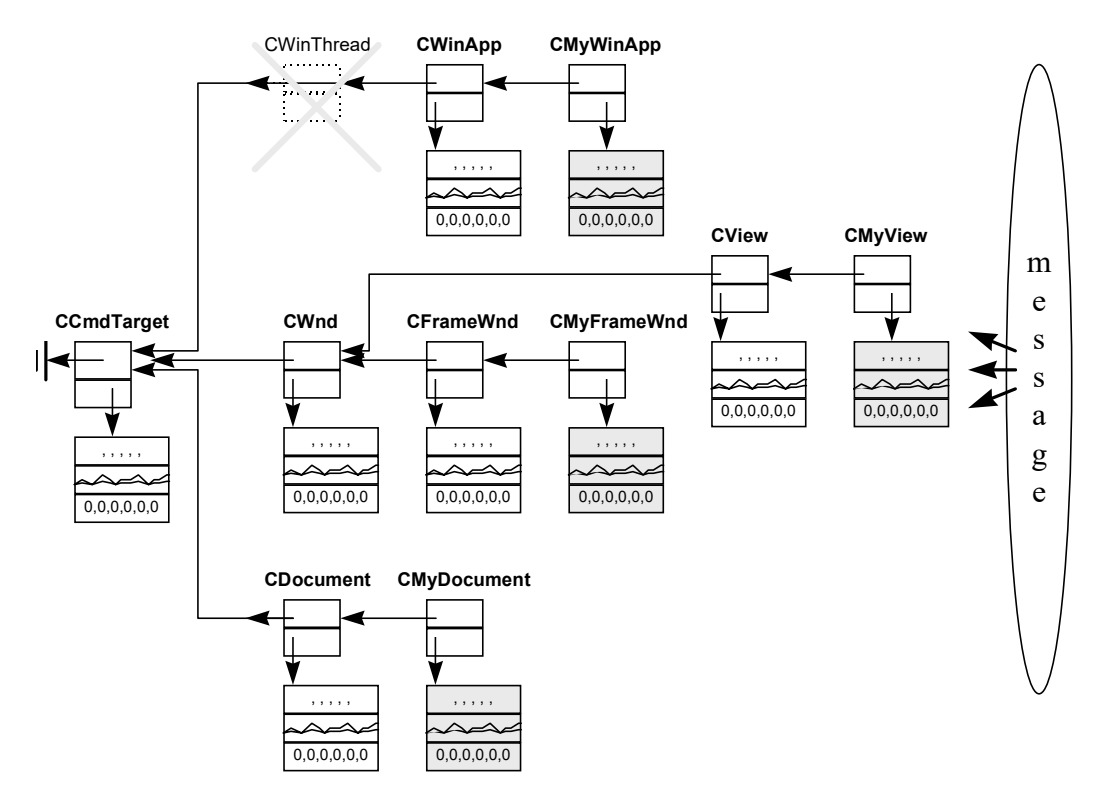
- 命令消息(WM_COMMAND):由UI 对象产生的消息都是这种命令消息,可能来自菜单或具栏,SDK程序主要靠消息的wParam分辨具体产生的位置,MFC 程序则主要靠菜单项目的menu ID。所有继承自CCmdTarget的类都可以接受此类消息,几乎囊括了mfc的所有类(CFile,CPoint等除外)
- 标准消息- 除WM_COMMAND 之外,任何以WM_ 开头的都算是这一类。任何继承自CWnd的类,均可接收此消息。
- Control Notification - 这种消息由控件产生,为的是向其父窗口通知某种情况。例如当你在ListBox 上选择其中一个项目,ListBox 就会产生LBN_SELCHANGE 传送给父窗口。这类消息也是WM_COMMAND 形式呈现。
Command Target(CCmdTarget)
CWnd的派生类可以接受处理 Windows 消息
CCmdTarget的派生类只能处理WM_COMMAND 消息
(CWnd不是CCmdTarget的子类吗)
一个Command Target 对象如何知道它可以处理某个消息呢,答案是它会看看自己的消息映表。消息映射表使得消息和函数的对映关系形成一份表格。
关键的三个宏
- 头文件声明拥有消息映射:
DECLARE_MESSAGE_MAP() - cpp中实现具体映射:
BEGIN_MESSAGE_MAP(CScribbleDoc, CDocument) - 结束宏:
END_MESSAGE_MAP()
部分常见windows消息及处理函数如下:
| 宏名称 | 对映消息 | 消息处理函数 |
|---|---|---|
| ON_WM_CHAR | WM_CHAR | OnChar |
| ON_WM_CLOSE | WM_CLOSE | OnClose |
| ON_WM_CREATE | WM_CREATE | OnCreate |
| ON_WM_DESTROY | WM_DESTROY | OnDestroy |
| ON_WM_LBUTTONDOWN | WM_LBUTTONDOWN | OnLButtonDown |
| ON_WM_LBUTTONUP | WM_LBUTTONUP | OnLButtonUp |
| ON_WM_MOUSEMOVE | WM_MOUSEMOVE | OnMouseMove |
| ON_WM_PAINT | WM_PAINT | OnPaint |
DECLARE_MESSAGE_MAP
定义如下:
#define DECLARE_MESSAGE_MAP() \\
private: \\static const AFX_MSGMAP_ENTRY _messageEntries[]; \\
protected: \\static AFX_DATA const AFX_MSGMAP messageMap; \\virtual const AFX_MSGMAP* GetMessageMap() const; \\
为类增加两个成员(且为静态成员,类对象共享):
_messageEntries:理解为当前类的 消息与处理函数映射
messageMap:消息路由,当前类和其基类的消息映射表 指针
另外AFX_MSGMAP_ENTRY结构体定义如下(每个消息的信息):
struct AFX_MSGMAP_ENTRY
{UINT nMessage; // windows messageUINT nCode; // control code or WM_NOTIFY codeUINT nID; // control ID (or 0 for windows messages)UINT nLastID; // used for entries specifying a range of control id'sUINT nSig; // signature type (action) or pointer to message #AFX_PMSG pfn; // routine to call (or special value)
};
其中涉及到的AFX_PMSG为成员函数指针:typedef void (AFX_MSG_CALL CCmdTarget::*AFX_PMSG)(void);也就是消息响应函数。
struct AFX_MSGMAP
{const AFX_MSGMAP* pBaseMap;const AFX_MSGMAP_ENTRY* lpEntries;
};
pBaseMap 是一个指向「基类消息映射表」的指针,如果基类可以处理A消息,其派生类即使未设计A
消息的消息映射表,也可以处理A消息。
DECLARE_MESSAGE_MAP 相当于为类声明了两个以上数据类型的成员。
BEGIN_MESSAGE_MAP与END_MESSAGE_MAP
定义:
#define BEGIN_MESSAGE_MAP(theClass, baseClass) \\const AFX_MSGMAP* theClass::GetMessageMap() const \\{ return &theClass::messageMap; } \\AFX_DATADEF const AFX_MSGMAP theClass::messageMap = \\{ &baseClass::messageMap, &theClass::_messageEntries[0] }; \\const AFX_MSGMAP_ENTRY theClass::_messageEntries[] = \\{ \\
#define END_MESSAGE_MAP() \\{0, 0, 0, 0, AfxSig_end, (AFX_PMSG)0 } \\};
其中AfxSig_end定义为0。
增加了一个函数GetMessageMap();
定义了messageMap成员指向的类的指针;
定义了_messageEntries数组包含的消息映射内容。
部分消息宏定义如下:
#define ON_COMMAND(id, memberFxn) \\{ WM_COMMAND, CN_COMMAND, (WORD)id, (WORD)id, AfxSig_vv, (AFX_PMSG)memberFxn },
#define ON_WM_CREATE() \\{ WM_CREATE, 0, 0, 0, AfxSig_is, \\(AFX_PMSG)(AFX_PMSGW)(int (AFX_MSG_CALL CWnd::*)(LPCREATESTRUCT))OnCreate },
#define ON_WM_DESTROY() \\{ WM_DESTROY, 0, 0, 0, AfxSig_vv, \\(AFX_PMSG)(AFX_PMSGW)(void (AFX_MSG_CALL CWnd::*)(void))OnDestroy },
#define ON_WM_MOVE() \\{ WM_MOVE, 0, 0, 0, AfxSig_vvii, \\(AFX_PMSG)(AFX_PMSGW)(void (AFX_MSG_CALL CWnd::*)(int, int))OnMove },
#define ON_WM_SIZE() \\{ WM_SIZE, 0, 0, 0, AfxSig_vwii, \\(AFX_PMSG)(AFX_PMSGW)(void (AFX_MSG_CALL CWnd::*)(UINT, int, int))OnSize },
#define ON_WM_ACTIVATE() \\{ WM_ACTIVATE, 0, 0, 0, AfxSig_vwWb, \\(AFX_PMSG)(AFX_PMSGW)(void (AFX_MSG_CALL CWnd::*)(UINT, CWnd*,
BOOL))OnActivate },
#define ON_WM_SETFOCUS() \\{ WM_SETFOCUS, 0, 0, 0, AfxSig_vW, \\(AFX_PMSG)(AFX_PMSGW)(void (AFX_MSG_CALL CWnd::*)(CWnd*))OnSetFocus },
#define ON_WM_PAINT() \\{ WM_PAINT, 0, 0, 0, AfxSig_vv, \\(AFX_PMSG)(AFX_PMSGW)(void (AFX_MSG_CALL CWnd::*)(void))OnPaint },
#define ON_WM_CLOSE() \\{ WM_CLOSE, 0, 0, 0, AfxSig_vv, \\(AFX_PMSG)(AFX_PMSGW)(void (AFX_MSG_CALL CWnd::*)(void))OnClose },
其中AFX_DATADEF 和AFX_MSG_CALL 两个宏就像afx_msg 一样是刻意保留的空间,目前定义为「无物」,就是空. #define AFX_MSG_CALL
举例:
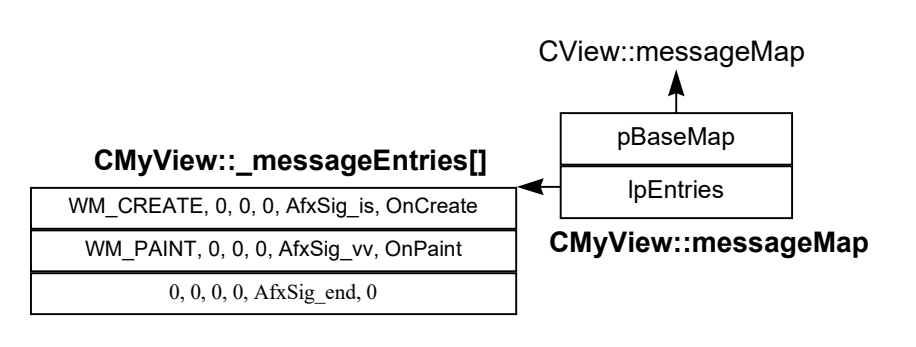
BEGIN_MESSAGE_MAP(CMyView, CView)ON_WM_CREATE()ON_WM_PAINT()
END_MESSAGE_MAP()
以上宏展开后为:
const AFX_MSGMAP* CMyView::GetMessageMap() const
{ return &CMyView::messageMap;
}
AFX_DATADEF const AFX_MSGMAP CMyView::messageMap =
{ &CView::messageMap, &CMyView::_messageEntries[0]
};
const AFX_MSGMAP_ENTRY CMyView::_messageEntries[] =
{{ WM_CREATE, 0, 0, 0, AfxSig_is, (AFX_PMSG)(AFX_PMSGW)(int (AFX_MSG_CALL CWnd::*)(LPCREATESTRUCT))OnCreate },{ WM_PAINT, 0, 0, 0, AfxSig_vv, (AFX_PMSG)(AFX_PMSGW)(void (AFX_MSG_CALL CWnd::*)(void))OnPaint },{0, 0, 0, 0, AfxSig_end, (AFX_PMSG)0 }
};
其关系就是:
一般情况,messageMap的pBaseMap都会指向基类,当时也有例外,如CWinApp,其实现中如下定义:
BEGIN_MESSAGE_MAP(CWinApp, CCmdTarget) //注意第二个参数是CCmdTarget,而不是CWinThread。
...
虽然CWinApp的基类为CWinThread,而 CWinThread 的基类为 CCmdTarget,为了能加入消息响应网中,可以像上面这样完成消息映射的定义。
消息映射虽然有些像虚函数表的方式,但是还是不一样,在类继承关系复杂时,可以省下很多存储虚函数表的空间,尤其是虚函数较多的情况。
(编译器处理虚函数的方法是:给每个对象添加一个隐藏成员。隐藏成员中保存了一个指向函数地址数组的指针。这种数组称为虚函数表。)
消息推送
1.初始化时确定
在WinMain 的初始化函数AfxWinInit之中, 自动为程序注册四个Windows 窗口类别, 并且把窗口函数一致设为AfxWndProc(所有窗口类别共享同一个窗口函数)
BOOL AFXAPI AfxWinInit(HINSTANCE hInstance, HINSTANCE hPrevInstance,LPSTR lpCmdLine, int nCmdShow)
{...// register basic WndClasses (WNDCLASS wndcls;wndcls.lpfnWndProc = AfxWndProc;// Child windows - no brush, no icon, safest default class styles...wndcls.lpszClassName = _afxWnd;
➊ if (!::RegisterClass(&wndcls))return FALSE;// Control bar windows...wndcls.lpszClassName = _afxWndControlBar;
➋ if (!::RegisterClass(&wndcls))return FALSE;// MDI Frame window (also used for splitter window)...
➌ if (!RegisterWithIcon(&wndcls, _afxWndMDIFrame, AFX_IDI_STD_MDIFRAME))return FALSE;// SDI Frame or MDI Child windows or views - normal colors...
➍ if (!RegisterWithIcon(&wndcls, _afxWndFrameOrView, AFX_IDI_STD_FRAME))return FALSE;...
}
之后的关键调用过程:
LRESULT CALLBACK AFX_EXPORT AfxWndProc(HWND hWnd, UINT message, WPARAM wParam, LPARAM lParam)
{CWnd* pWnd;pWnd = CWnd::FromHandlePermanent(hWnd);ASSERT(pWnd != NULL);ASSERT(pWnd->m_hWnd == hWnd);LRESULT lResult = _AfxCallWndProc(pWnd, hWnd, message, wParam, lParam);return lResult;
}
// Official way to send message to a CWnd
LRESULT PASCAL _AfxCallWndProc(CWnd* pWnd, HWND hWnd, UINT message, WPARAM wParam, LPARAM lParam)
{LRESULT lResult;...TRY{...lResult = pWnd->WindowProc(message, wParam, lParam);}...return lResult;
}
CWinApp::Run 调用PumpMessage,后者又调用::DispatchMessage,把消息推往到AfxWndProc,最后流向pWnd->WindowProc
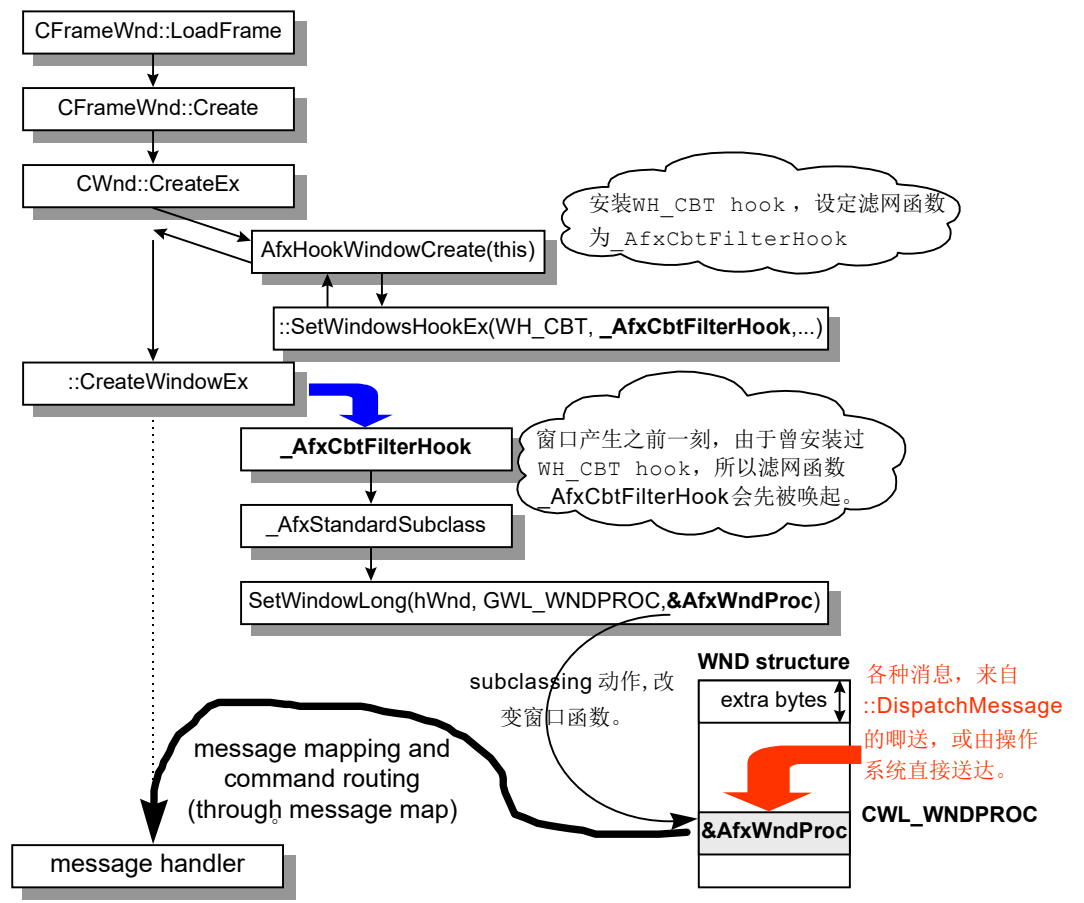
2.利用hook:
利用SetWindowsHook 和SetWindowsHookEx 两函数,捕获窗口消息(钩子函数)
其过程如下:
BOOL CWnd::CreateEx(...)
{...PreCreateWindow(cs); //AfxHookWindowCreate(this);HWND hWnd = ::CreateWindowEx(...);...
}
// in WINCORE.CPP(MFC 4.x)
void AFXAPI AfxHookWindowCreate(CWnd* pWnd)
{...pThreadState->m_hHookOldCbtFilter = ::SetWindowsHookEx(WH_CBT,_AfxCbtFilterHook, NULL, ::GetCurrentThreadId());...
}
::SetWindowsHookEx的第一个参数为钩子程序的类型,如WH_KEYBOARD用于钩取键盘消息。
WH_CBT主要捕获以下动作:
- 令一个窗口成为作用中的窗口(HCBT_ACTIVATE)
- 产生或摧毁一个窗口(HCBT_CREATEWND、HCBT_DESTROYWND)
- 最大化或最小化一个窗口(HCBT_MINMAX)
- 搬移或缩放一个窗口(HCBT_MOVESIZE)
- 完成一个来自系统菜单的系统命令(HCBT_SYSTEMCOMMAND)
- 从系统队列中移去一个鼠标或键盘消息( HCBT_KEYSKIPPED 、HCBT_CLICKSKIPPED)
调用钩子函数过程:
_AfxCbtFilterHook(int code, WPARAM wParam, LPARAM lParam)
{_AFX_THREAD_STATE* pThreadState = AfxGetThreadState();if (code != HCBT_CREATEWND){// wait for HCBT_CREATEWND just pass others on...return CallNextHookEx(pThreadState->m_hHookOldCbtFilter, code,wParam, lParam);}...if (!afxData.bWin31){// perform subclassing right away on Win32_AfxStandardSubclass((HWND)wParam);}else{...}...LRESULT lResult = CallNextHookEx(pThreadState->m_hHookOldCbtFilter, code,wParam, lParam);return lResult;
}
void AFXAPI _AfxStandardSubclass(HWND hWnd)
{...// subclass the window with standard AfxWndProcoldWndProc = (WNDPROC)SetWindowLong(hWnd, GWL_WNDPROC,(DWORD)AfxGetAfxWndProc());
}
WNDPROC AFXAPI AfxGetAfxWndProc()
{...return &AfxWndProc;
}
以上操作将窗口过程函数换为AfxWndProc。于是,::DispatchMessage 就把消息推往AfxWndProc
书中的原图:
学习了个新词唧筒,水泵的意思QWQ
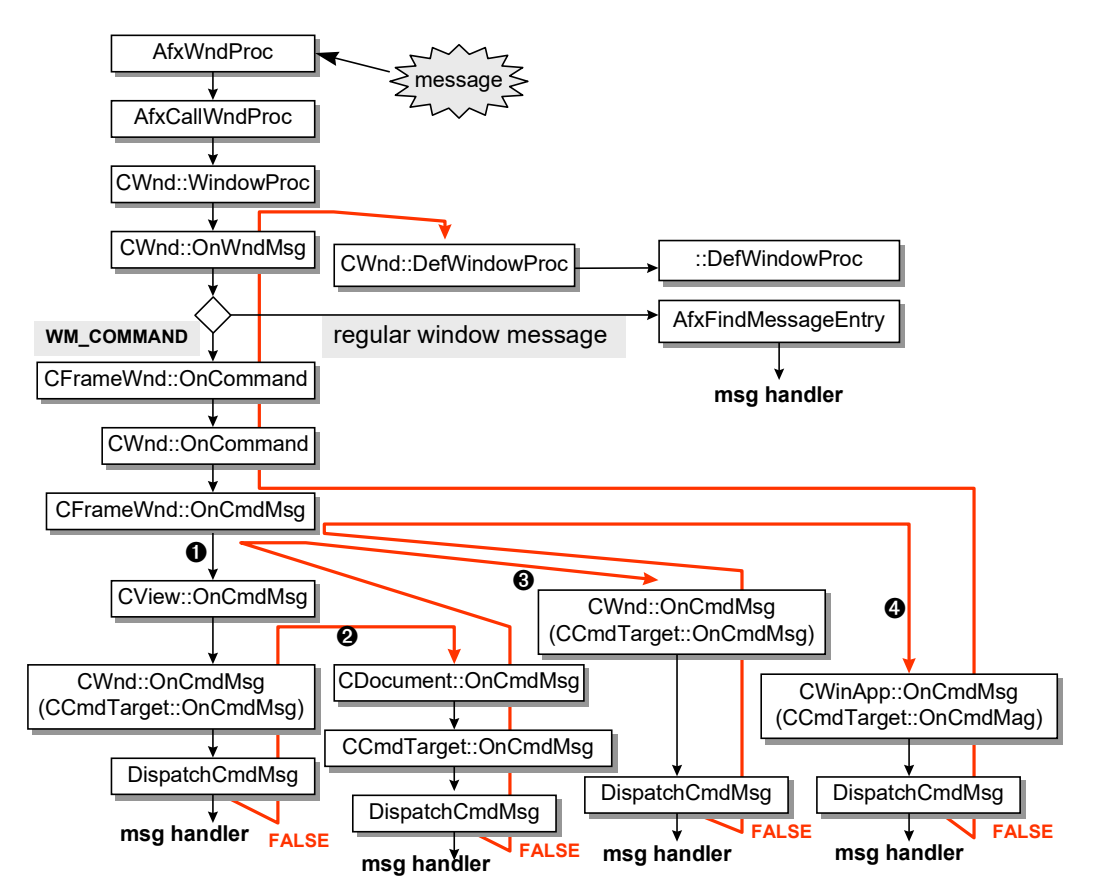
消息流动
主要代码如下:
// in WINCORE.CPP(MFC 4.x)
LRESULT CALLBACK AfxWndProc(HWND hWnd, UINT nMsg, WPARAM wParam, LPARAM lParam)
{...// messages route through message mapCWnd* pWnd = CWnd::FromHandlePermanent(hWnd);return AfxCallWndProc(pWnd, hWnd, nMsg, wParam, lParam);
}LRESULT AFXAPI AfxCallWndProc(CWnd* pWnd, HWND hWnd, UINT nMsg,WPARAM wParam = 0, LPARAM lParam = 0)
{...// delegate to object's WindowProclResult = pWnd->WindowProc(nMsg, wParam, lParam);...return lResult;
}
整个MFC 中,拥有虚函数WindowProc 者包括CWnd、CControlBar、COleControl、COlePropertyPage、CDialog、CReflectorWnd、CParkingWnd。一般窗口(例如Frame 视窗、View 窗口)都派生自CWnd
// in WINCORE.CPP(MFC 4.x)
LRESULT CWnd::WindowProc(UINT message, WPARAM wParam, LPARAM lParam)// OnWndMsg does most of the work, except for DefWindowProc callLRESULT lResult = 0;if (!OnWndMsg(message, wParam, lParam, &lResult))lResult = DefWindowProc(message, wParam, lParam);return lResult;
}LRESULT CWnd::DefWindowProc(UINT nMsg, WPARAM wParam, LPARAM lParam)
{if (m_pfnSuper != NULL)return ::CallWindowProc(m_pfnSuper, m_hWnd, nMsg, wParam, lParam);WNDPROC pfnWndProc;if ((pfnWndProc = *GetSuperWndProcAddr()) == NULL)return ::DefWindowProc(m_hWnd, nMsg, wParam, lParam);elsereturn ::CallWindowProc(pfnWndProc, m_hWnd, nMsg, wParam, lParam);
}
CWnd::WindowProc 调用OnWndMsg 来分辨并处理消息;如果是命令消息,就交给OnCommand 处理,如果是通告消息(Notification),就交给OnNotify 处理(这两个比较特殊)。WM_ACTIVATE 和WM_SETCURSOR 也都有特定的处理函数。而一般的Windows 消息,就直接在按照消息映射表分发。
// in WINCORE.CPP(MFC 4.0)
BOOL CWnd::OnWndMsg(UINT message, WPARAM wParam, LPARAM lParam, LRESULT *pResult)
{LRESULT lResult = 0;// special case for commandsif (message == WM_COMMAND){OnCommand(wParam, lParam);...}// special case for notifiesif (message == WM_NOTIFY){OnNotify(wParam, lParam, &lResult);...}... const AFX_MSGMAP *pMessageMap;pMessageMap = GetMessageMap();UINT iHash;iHash = (LOWORD((DWORD)pMessageMap) ^ message) & (iHashMax - 1);AfxLockGlobals(CRIT_WINMSGCACHE);AFX_MSG_CACHE msgCache;msgCache = _afxMsgCache[iHash];AfxUnlockGlobals(CRIT_WINMSGCACHE);const AFX_MSGMAP_ENTRY *lpEntry;if (...) //{// cache hitlpEntry = msgCache.lpEntry;if (lpEntry == NULL)return FALSE;// cache hit, and it needs to be handledif (message < 0xC000)goto LDispatch;elsegoto LDispatchRegistered;}else{// not in cache, look for itmsgCache.nMsg = message;msgCache.pMessageMap = pMessageMap;for (/* pMessageMap already init'ed */; pMessageMap != NULL;pMessageMap = pMessageMap->pBaseMap){// Note: catch not so common but fatal mistake!!// BEGIN_MESSAGE_MAP(CMyWnd, CMyWnd)if (message < 0xC000){// constant window messageif ((lpEntry = AfxFindMessageEntry(pMessageMap->lpEntries,message, 0, 0)) != NULL){msgCache.lpEntry = lpEntry;goto LDispatch;}}else{// registered windows messagelpEntry = pMessageMap->lpEntries;while ((lpEntry = AfxFindMessageEntry(lpEntry, 0xC000, 0, 0)) != NULL){UINT *pnID = (UINT *)(lpEntry->nSig);ASSERT(*pnID >= 0xC000);// must be successfully registeredif (*pnID == message){msgCache.lpEntry = lpEntry;goto LDispatchRegistered;}lpEntry++; // keep looking past this one}}}msgCache.lpEntry = NULL;return FALSE;}ASSERT(FALSE); // not reached
LDispatch:union MessageMapFunctions mmf;mmf.pfn = lpEntry->pfn;switch (lpEntry->nSig){case AfxSig_bD:lResult = (this->*mmf.pfn_bD)(CDC::FromHandle((HDC)wParam));break;case AfxSig_bb: // AfxSig_bb, AfxSig_bw, AfxSig_bhlResult = (this->*mmf.pfn_bb)((BOOL)wParam);break;case AfxSig_bWww: // really AfxSig_bWiwlResult = (this->*mmf.pfn_bWww)(CWnd::FromHandle((HWND)wParam),(short)LOWORD(lParam), HIWORD(lParam));break;case AfxSig_bHELPINFO:lResult = (this->*mmf.pfn_bHELPINFO)((HELPINFO *)lParam);break;case AfxSig_is:lResult = (this->*mmf.pfn_is)((LPTSTR)lParam);break;case AfxSig_lwl:lResult = (this->*mmf.pfn_lwl)(wParam, lParam);break;case AfxSig_vv:(this->*mmf.pfn_vv)();break;...}goto LReturnTrue;
LDispatchRegistered: // for registered windows messagesASSERT(message >= 0xC000);mmf.pfn = lpEntry->pfn;lResult = (this->*mmf.pfn_lwl)(wParam, lParam);
LReturnTrue:if (pResult != NULL)*pResult = lResult;return TRUE;
}
AfxFindMessageEntry(const AFX_MSGMAP_ENTRY *lpEntry,UINT nMsg, UINT nCode, UINT nID)
{
#if defined(_M_IX86) && !defined(_AFX_PORTABLE)// 32-bit Intel 386/486 version.... //
#else   // _AFX_PORTABLE// C version of search routinewhile (lpEntry->nSig != AfxSig_end){if (lpEntry->nMessage == nMsg && lpEntry->nCode == nCode &&nID >= lpEntry->nID && nID <= lpEntry->nLastID){return lpEntry;}lpEntry++;}return NULL; // not found
#endif  // _AFX_PORTABLE
}
简单理解为,调用AfxFindMessageEntry对比消息映射表(还有比对cache,上面没有写出来)(然后走LDispatchRegistered路线)。而后的switch (lpEntry->nSig)是确保类型安全(没有重写消息处理函数LDispatch)。
CWnd::OnWndMsg,交由OnCommand 来处理,并不一定由是CWnd::OnCommand处理,需要根据this指针的指向,其中改写OnCommand的有很多:
class CWnd : public CCmdTarget
class CFrameWnd : public CWnd
class CMDIFrameWnd : public CFrameWnd
class CSplitterWnd : public CWnd
class CPropertySheet : public CWnd
class COlePropertyPage : public CDialog
如果是CFrameWnd类调用,其过程如下:
// in FRMWND.CPP(MFC 4.0)
BOOL CFrameWnd::OnCommand(WPARAM wParam, LPARAM lParam)
{...// route as normal commandreturn CWnd::OnCommand(wParam, lParam);
}// in WINCORE.CPP(MFC 4.0)
BOOL CWnd::OnCommand(WPARAM wParam, LPARAM lParam)
{...return OnCmdMsg(nID, nCode, NULL, NULL);
}
这里调用的OnCmdMsg 并不一定就是指CWnd::OnCmdMsg,得看this 指针指向哪一种对象。目前情况是指向一个CFrameWnd 对象,而MFC 之中曾经改写过OnCmdMsg 的类:
class CCmdTarget : public CObject
class CFrameWnd : public CWnd
class CMDIFrameWnd : public CFrameWnd
class CView : public CWnd
class CPropertySheet : public CWnd
class CDialog : public CWnd
class CDocument : public CCmdTarget
class COleDocument : public CDocument
继续执行:
// in FRMWND.CPP(MFC 4.0)
BOOL CFrameWnd::OnCmdMsg(UINT nID, int nCode, void* pExtra,AFX_CMDHANDLERINFO* pHandlerInfo)
{// pump through current view FIRSTCView* pView = GetActiveView();if (pView != NULL && pView->OnCmdMsg(nID, nCode, pExtra, pHandlerInfo))return TRUE;// then pump through frameif (CWnd::OnCmdMsg(nID, nCode, pExtra, pHandlerInfo))return TRUE;// last but not least, pump through appCWinApp* pApp = AfxGetApp();if (pApp != NULL && pApp->OnCmdMsg(nID, nCode, pExtra, pHandlerInfo))return TRUE;return FALSE;
}
其执行过程如图:
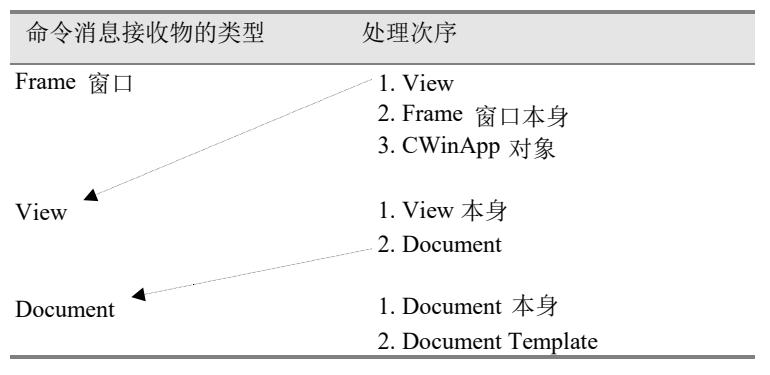
先View 而后Document
// in VIEWCORE.CPP(MFC 4.0)
BOOL CView::OnCmdMsg(UINT nID, int nCode, void* pExtra,AFX_CMDHANDLERINFO* pHandlerInfo)
{// first pump through paneif (CWnd::OnCmdMsg(nID, nCode, pExtra, pHandlerInfo))return TRUE;// then pump through documentBOOL bHandled = FALSE;if (m_pDocument != NULL){// special state for saving view before routing to document_AFX_THREAD_STATE* pThreadState = AfxGetThreadState();CView* pOldRoutingView = pThreadState->m_pRoutingView;pThreadState->m_pRoutingView = this;bHandled = m_pDocument->OnCmdMsg(nID, nCode, pExtra, pHandlerInfo);pThreadState->m_pRoutingView = pOldRoutingView;}return bHandled;
}
由于CWnd 并未改写OnCmdMsg,所以函数中调用的CWnd::OnCmdMsg,其实就是CCmdTarget::OnCmdMsg
// in CMDTARG.CPP(MFC 4.0)
BOOL CCmdTarget::OnCmdMsg(UINT nID, int nCode, void* pExtra,AFX_CMDHANDLERINFO* pHandlerInfo)
{...// look through message map to see if it applies to usfor (pMessageMap = GetMessageMap(); pMessageMap != NULL;pMessageMap = pMessageMap->pBaseMap){lpEntry = AfxFindMessageEntry(pMessageMap->lpEntries, nMsg, nCode, nID);if (lpEntry != NULL){// found itreturn DispatchCmdMsg(this, nID, nCode,lpEntry->pfn, pExtra, lpEntry->nSig, pHandlerInfo);}}return FALSE; // not handled
}
最终执行CCmdTarget 的消息映射表,如果没有对应的消息映射处理函数,则CView::OnCmdMsg 接下去调用m_pDocument->OnCmdMsg;如果有,则调用DispatchCmdMsg:
static BOOL DispatchCmdMsg(CCmdTarget* pTarget, UINT nID, int nCode,AFX_PMSG pfn, void* pExtra, UINT nSig, AFX_CMDHANDLERINFO* pHandlerInfo)// return TRUE to stop routing
{ASSERT_VALID(pTarget);UNUSED(nCode); // unused in release buildsunion MessageMapFunctions mmf;mmf.pfn = pfn;BOOL bResult = TRUE; // default is ok...switch (nSig){case AfxSig_vv:// normal command or control notification(pTarget->*mmf.pfn_COMMAND)();break;case AfxSig_bv:// normal command or control notificationbResult = (pTarget->*mmf.pfn_bCOMMAND)();break;case AfxSig_vw:// normal command or control notification in a range(pTarget->*mmf.pfn_COMMAND_RANGE)(nID);break;case AfxSig_bw:// extended command (passed ID, returns bContinue)bResult = (pTarget->*mmf.pfn_COMMAND_EX)(nID);break;...default: // illegalASSERT(FALSE);return 0;}return bResult;
}
在 CDocument中执行如下:
// in DOCCORE.CPP
BOOL CDocument::OnCmdMsg(UINT nID, int nCode, void* pExtra,AFX_CMDHANDLERINFO* pHandlerInfo)
{if (CCmdTarget::OnCmdMsg(nID, nCode, pExtra, pHandlerInfo))return TRUE;// otherwise check templateif (m_pDocTemplate != NULL && m_pDocTemplate->OnCmdMsg(nID, nCode, pExtra, pHandlerInfo))return TRUE;return FALSE;
}
整体流程如下:

OnCmdMsg 是各类专门用来处理命令消息的函数。每一个可接受命令消息的对象(Command Target)在处理命令消息时都会(都应该)遵循一个规则:调用另一个目标类别的OnCmdMsg。
整个流程:
消息响应函数调用
struct AFX_MSGMAP_ENTRY(静态数组_messageEntries[]的每个元素的类型)
{UINT nMessage;   UINT nCode;      UINT nID;        UINT nLastID;    UINT_PTR nSig;       AFX_PMSG pfn;
};//参数说明
nMessage:表示消息标识。
nCode:控制代码或WMNOTIFY通知代码。
nID:控件ID,如果是窗口消息,nID为0。
nLastID:表示一定范围的命令中的最后一个命令或控件ID,用于将一组命令映射到同一个消息处理函数中。
nSig:消息处理函数的类型。
pfn:表示消息处理的地址(指针)。
任何一个ON_ 宏会把这六个项目初始化起来。例:
#define ON_WM_CREATE() \\{ WM_CREATE, 0, 0, 0, AfxSig_is, \\(AFX_PMSG)(AFX_PMSGW)(int (AFX_MSG_CALL CWnd::*)(LPCREATESTRUCT))OnCreate },
在CWnd::OnWndMsg 和DispatchCmdMsg 中,调用消息处理函数时:
union MessageMapFunctions mmf;
mmf.pfn = lpEntry->pfn;
switch (lpEntry->nSig)
{
case AfxSig_is:lResult = (this->*mmf.pfn_is)((LPTSTR)lParam);break;
case AfxSig_lwl:lResult = (this->*mmf.pfn_lwl)(wParam, lParam);break;
case AfxSig_vv:(this->*mmf.pfn_vv)();break;
...
}
其中AfxSig_定义:
enum AfxSig
{AfxSig_end = 0, // [marks end of message map]AfxSig_bD, // BOOL (CDC*)AfxSig_bb, // BOOL (BOOL)AfxSig_bWww, // BOOL (CWnd*, UINT, UINT)AfxSig_hDWw, // HBRUSH (CDC*, CWnd*, UINT)AfxSig_hDw, // HBRUSH (CDC*, UINT)AfxSig_iwWw, // int (UINT, CWnd*, UINT)AfxSig_iww, // int (UINT, UINT)AfxSig_iWww, // int (CWnd*, UINT, UINT)AfxSig_is, // int (LPTSTR)AfxSig_lwl, // LRESULT (WPARAM, LPARAM)AfxSig_lwwM, // LRESULT (UINT, UINT, CMenu*)AfxSig_vv, // void (void)AfxSig_vw, // void (UINT)AfxSig_vww, // void (UINT, UINT)AfxSig_vvii, // void (int, int) // wParam is ignoredAfxSig_vwww, // void (UINT, UINT, UINT)AfxSig_vwii, // void (UINT, int, int)AfxSig_vwl, // void (UINT, LPARAM)AfxSig_vbWW, // void (BOOL, CWnd*, CWnd*)AfxSig_vD, // void (CDC*)AfxSig_vM, // void (CMenu*)AfxSig_vMwb, // void (CMenu*, UINT, BOOL)AfxSig_vW, // void (CWnd*)AfxSig_vWww, // void (CWnd*, UINT, UINT)AfxSig_vWp, // void (CWnd*, CPoint)AfxSig_vWh, // void (CWnd*, HANDLE)AfxSig_vwW, // void (UINT, CWnd*)AfxSig_vwWb, // void (UINT, CWnd*, BOOL)AfxSig_vwwW, // void (UINT, UINT, CWnd*)AfxSig_vwwx, // void (UINT, UINT)AfxSig_vs, // void (LPTSTR)AfxSig_vOWNER, // void (int, LPTSTR), force return TRUEAfxSig_iis, // int (int, LPTSTR)AfxSig_wp, // UINT (CPoint)AfxSig_wv, // UINT (void)AfxSig_vPOS, // void (WINDOWPOS*)AfxSig_vCALC, // void (BOOL, NCCALCSIZE_PARAMS*)AfxSig_vNMHDRpl, // void (NMHDR*, LRESULT*)AfxSig_bNMHDRpl, // BOOL (NMHDR*, LRESULT*)AfxSig_vwNMHDRpl, // void (UINT, NMHDR*, LRESULT*)AfxSig_bwNMHDRpl, // BOOL (UINT, NMHDR*, LRESULT*)AfxSig_bHELPINFO, // BOOL (HELPINFO*)AfxSig_vwSIZING, // void (UINT, LPRECT) -- return TRUE// signatures specific to CCmdTargetAfxSig_cmdui, // void (CCmdUI*)AfxSig_cmduiw, // void (CCmdUI*, UINT)AfxSig_vpv, // void (void*)AfxSig_bpv, // BOOL (void*)// Other aliases (based on implementation)AfxSig_vwwh, // void (UINT, UINT, HANDLE)AfxSig_vwp, // void (UINT, CPoint)AfxSig_bw = AfxSig_bb, // BOOL (UINT)AfxSig_bh = AfxSig_bb, // BOOL (HANDLE)AfxSig_iw = AfxSig_bb, // int (UINT)AfxSig_ww = AfxSig_bb, // UINT (UINT)AfxSig_bv = AfxSig_wv, // BOOL (void)AfxSig_hv = AfxSig_wv, // HANDLE (void)AfxSig_vb = AfxSig_vw, // void (BOOL)AfxSig_vbh = AfxSig_vww, // void (BOOL, HANDLE)AfxSig_vbw = AfxSig_vww, // void (BOOL, UINT)AfxSig_vhh = AfxSig_vww, // void (HANDLE, HANDLE)AfxSig_vh = AfxSig_vw, // void (HANDLE)AfxSig_viSS = AfxSig_vwl, // void (int, STYLESTRUCT*)AfxSig_bwl = AfxSig_lwl,AfxSig_vwMOVING = AfxSig_vwSIZING, // void (UINT, LPRECT) -- return TRUE
};
MessageMapFunctions 定义:
union MessageMapFunctions
{AFX_PMSG pfn; // generic member function pointer// specific type safe variantsBOOL (AFX_MSG_CALL CWnd::*pfn_bD)(CDC*);BOOL (AFX_MSG_CALL CWnd::*pfn_bb)(BOOL);BOOL (AFX_MSG_CALL CWnd::*pfn_bWww)(CWnd*, UINT, UINT);BOOL (AFX_MSG_CALL CWnd::*pfn_bHELPINFO)(HELPINFO*);HBRUSH (AFX_MSG_CALL CWnd::*pfn_hDWw)(CDC*, CWnd*, UINT);HBRUSH (AFX_MSG_CALL CWnd::*pfn_hDw)(CDC*, UINT);int (AFX_MSG_CALL CWnd::*pfn_iwWw)(UINT, CWnd*, UINT);int (AFX_MSG_CALL CWnd::*pfn_iww)(UINT, UINT);int (AFX_MSG_CALL CWnd::*pfn_iWww)(CWnd*, UINT, UINT);int (AFX_MSG_CALL CWnd::*pfn_is)(LPTSTR);LRESULT (AFX_MSG_CALL CWnd::*pfn_lwl)(WPARAM, LPARAM);LRESULT (AFX_MSG_CALL CWnd::*pfn_lwwM)(UINT, UINT, CMenu*);void (AFX_MSG_CALL CWnd::*pfn_vv)(void);void (AFX_MSG_CALL CWnd::*pfn_vw)(UINT);void (AFX_MSG_CALL CWnd::*pfn_vww)(UINT, UINT);void (AFX_MSG_CALL CWnd::*pfn_vvii)(int, int);void (AFX_MSG_CALL CWnd::*pfn_vwww)(UINT, UINT, UINT);void (AFX_MSG_CALL CWnd::*pfn_vwii)(UINT, int, int);void (AFX_MSG_CALL CWnd::*pfn_vwl)(WPARAM, LPARAM);void (AFX_MSG_CALL CWnd::*pfn_vbWW)(BOOL, CWnd*, CWnd*);void (AFX_MSG_CALL CWnd::*pfn_vD)(CDC*);void (AFX_MSG_CALL CWnd::*pfn_vM)(CMenu*);void (AFX_MSG_CALL CWnd::*pfn_vMwb)(CMenu*, UINT, BOOL);void (AFX_MSG_CALL CWnd::*pfn_vW)(CWnd*);void (AFX_MSG_CALL CWnd::*pfn_vWww)(CWnd*, UINT, UINT);void (AFX_MSG_CALL CWnd::*pfn_vWp)(CWnd*, CPoint);void (AFX_MSG_CALL CWnd::*pfn_vWh)(CWnd*, HANDLE);void (AFX_MSG_CALL CWnd::*pfn_vwW)(UINT, CWnd*);void (AFX_MSG_CALL CWnd::*pfn_vwWb)(UINT, CWnd*, BOOL);void (AFX_MSG_CALL CWnd::*pfn_vwwW)(UINT, UINT, CWnd*);void (AFX_MSG_CALL CWnd::*pfn_vwwx)(UINT, UINT);void (AFX_MSG_CALL CWnd::*pfn_vs)(LPTSTR);void (AFX_MSG_CALL CWnd::*pfn_vOWNER)(int, LPTSTR); // force return TRUEint (AFX_MSG_CALL CWnd::*pfn_iis)(int, LPTSTR);UINT (AFX_MSG_CALL CWnd::*pfn_wp)(CPoint);UINT (AFX_MSG_CALL CWnd::*pfn_wv)(void);void (AFX_MSG_CALL CWnd::*pfn_vPOS)(WINDOWPOS*);void (AFX_MSG_CALL CWnd::*pfn_vCALC)(BOOL, NCCALCSIZE_PARAMS*);void (AFX_MSG_CALL CWnd::*pfn_vwp)(UINT, CPoint);void (AFX_MSG_CALL CWnd::*pfn_vwwh)(UINT, UINT, HANDLE);
};
通过Union,函数参数、返回值实现多种调用。
第十章 MFC与对话框
对话框编辑器
资源视图中,ctrl + d ,设置tab键顺序(格式中),然后然顺序点击控件即可。
ctrl + T:测试对话框。
其他的正常拖拽即可。
关联对话框和类
Dialog Data eXchange(DDX):将对话框中的控制组件对应到类的成员变量上。
Dialog Data Validation(DDV) :变量内容的确认规则,指对某些特殊用途的变量进行内容查验工作。
直接通过vs向导添加类(对话框)、成员(控件)
对话框的消息处理函数
使用类向导:
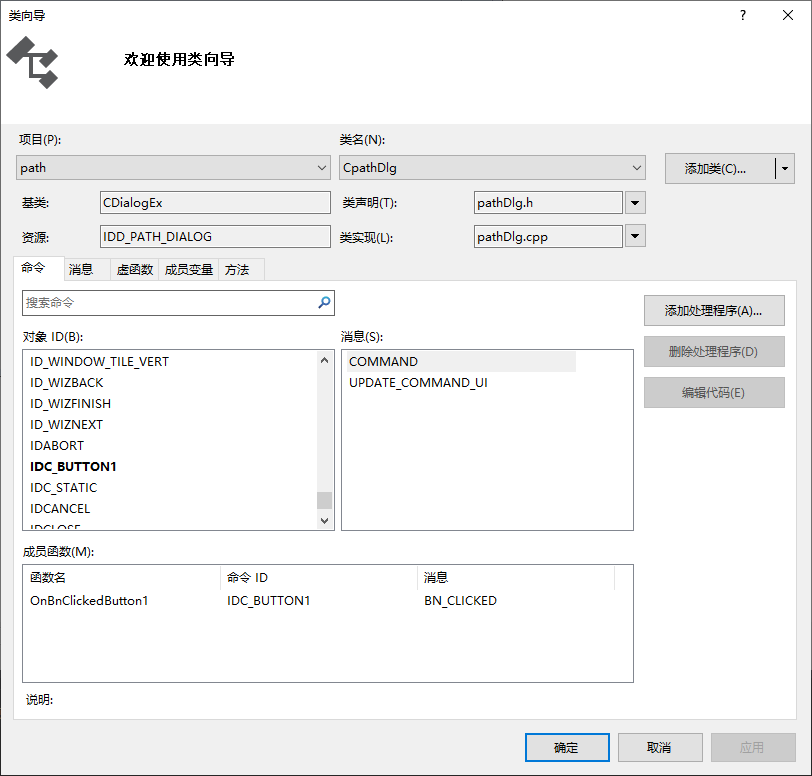
增加类成员函数、消息事件及相应函数等,都会自动生成对应的代码。
另外还有Dispatch Map使用于OLE Automation(不太了解):
DECLARE_DISPATCH_MAP() // .H
BEGIN_DISPATCH_MAP(CClikDoc, CDocument) // .CPP//{{AFX_DISPATCH_MAP(CClikDoc)DISP_PROPERTY(CClikDoc, "text", m_str, VT_BSTR)DISP_PROPERTY_EX(CClikDoc, "x", GetX, SetX, VT_I2)DISP_PROPERTY_EX(CClikDoc, "y", GetY, SetY, VT_I2)//}}AFX_DISPATCH_MAP
END_DISPATCH_MAP()
还有Event Map,使用于OLE Custom Control(也就是OCX):
DECLARE_EVENT_MAP() // .H 档中的宏,声明 Event Map。
BEGIN_EVENT_MAP(CSmileCtrl, COleControl) // .CPP 档中的 Event Map//{{AFX_EVENT_MAP(CSmileCtrl)EVENT_CUSTOM("Inside", FireInside, VTS_I2 VTS_I2)EVENT_STOCK_CLICK()//}}AFX_EVENT_MAP
END_EVENT_MAP()
DDX & DDV
如上所述,就是将UI控件与类成员关联,并在输入值时进行有效性(如数值范围等)校验(根据属性配置)。
字符串输入的校验
DDX_Text(pDX, IDC_EDIT1, m_nTestinput);
DDV_MaxChars(pDX, m_nTestinput, 3);
另外还有一个DDP,使用于OLE Custom Control(也就是OCX)的Property page
//{{AFX_DATA_MAP(CSmilePropPage)DDP_Text(pDX, IDC_CAPTION, m_caption, _T("Caption") );DDX_Text(pDX, IDC_CAPTION, m_caption);DDP_Check(pDX, IDC_SAD, m_sad, _T("sad") );DDX_Check(pDX, IDC_SAD, m_sad);//}}AFX_DATA_MAP
弹出对话框
对于模态对话框,只要调用CDialog::DoMoal 即可
CPenWidthsDlg dlg;// Initialize dialog datadlg.m_nThinWidth = m_nThinWidth;dlg.m_nThickWidth = m_nThickWidth;// Invoke the dialog boxif (dlg.DoModal() == IDOK){}
第十一章 View功能及重绘
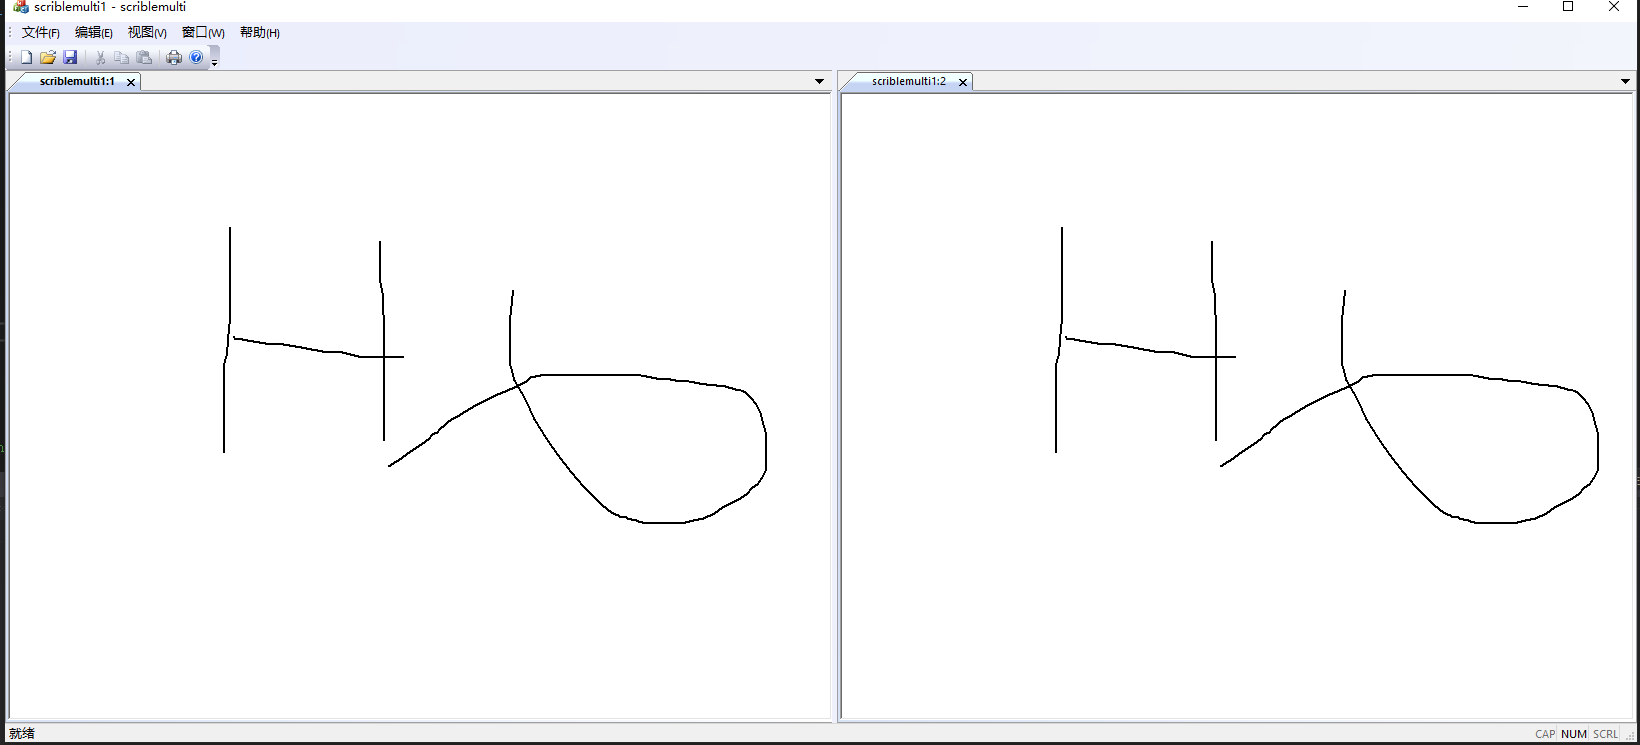
同时修改多个 Views
实现功能就是当一个view窗口上绘制的时候,另一个view窗口也绘制相同的内容。
关键步骤:
-
CDocument::UpdateAllViews- 这个函数会遍历所有隶属同一份Document 的各个Views,找到一个就通知一个,而所谓「通知」就是调用其OnUpdate 函数。 -
CView::OnUpdate- 我们可以在这个函数中设计绘图动作。全部重绘,或者想办法只绘必要的一小部份。
virtual void UpdateAllViews(CView* pSender,LPARAM lHint,CObject* pHint);
第一个参数代表发出此消息的视图窗口
后面两个参数lHint 和pHint 是提示参数(Hint),它们会被传送到同一Document 所对应的每一个Views 的OnUpdate 函数去。
lHint 可以是一些特殊的提示值,pHint 则是一个衍生自CObject 的对象指针
virtual void OnUpdate(CView* pSender,LPARAM lHint,CObject* pHint);
一旦Document 资料改变,我们应该调用CDocument::UpdateAllViews 以通知所有相关的Views。
而在CMyView::OnUpdate 函数中,利用参数中的hint 设定重绘区,使后续被唤起的OnDraw 有最快的工作速度。
通常不应该在OnUpdate 中执行绘图动作,所有的绘图动作最好都应该集中在OnDraw。
在OnUpdate 函数中的行为应该是计算哪一块区域需要重绘, 然后调用CWnd::InvalidateRect,发出WM_PAINT 让OnDraw 去画图。
hint 采用一个CRect对象,在CStroke 中增加一个变量(事实上是一个CRect 对象),用以表示hint 。
声明并定义一个名为GetBoundingRect 的函数,获取改变的矩形边界
另外再声明一个FinishStroke 函数,计算改变的矩形部分
class CStroke : public CObject
{
...
public:UINT m_nPenWidth;CDWordArray m_pointArray;CRect m_rectBounding; // smallest rect that surrounds all// of the points in the stroke
public:CRect& GetBoundingRect() { return m_rectBounding; }void FinishStroke();
...
};CRect& GetBoundingRect() { return m_rectBounding; }
初始化和序列化完善:
// in SCRIBDOC.CPP
IMPLEMENT_SERIAL(CStroke, CObject, 2) // 版本号,在反序列化的时候会提醒版本号不符合,应该
CStroke::CStroke(UINT nPenWidth)
{m_nPenWidth = nPenWidth;m_rectBounding.SetRectEmpty();
}
void CStroke::Serialize(CArchive& ar)
{if (ar.IsStoring()){ar << m_rectBounding;ar << (WORD)m_nPenWidth;m_pointArray.Serialize(ar);}else{ar >> m_rectBounding;WORD w;ar >> w;m_nPenWidth = w;m_pointArray.Serialize(ar);}
}
每当一笔画结束(鼠标左键放开,产生WM_LBUTTONUP),OnLButtonUp 就调用FinishStroke 让它计算边界
void CStroke::FinishStroke()
{if (m_pointArray.GetSize()==0){m_rectBounding.SetRectEmpty();return;}CPoint pt = m_pointArray[0];m_rectBounding = CRect(pt.x, pt.y, pt.x, pt.y);for (int i=1; i < m_pointArray.GetSize(); i++){// 如果点在四方形之外,那么就将四方形膨胀,以包含该点。pt = m_pointArray[i];m_rectBounding.left = min(m_rectBounding.left, pt.x);m_rectBounding.right = max(m_rectBounding.right, pt.x);m_rectBounding.top = min(m_rectBounding.top, pt.y);m_rectBounding.bottom = max(m_rectBounding.bottom, pt.y);}m_rectBounding.InflateRect(CSize(m_nPenWidth, m_nPenWidth));// 在四方形之外再加上笔的宽度。return;
}
通知重绘:
void CScribbleView::OnLButtonUp(UINT, CPoint point)
{...m_pStrokeCur->m_pointArray.Add(point);//已完成加点的动作,现在可以计算外围四方形了m_pStrokeCur->FinishStroke();//通知其它的views,使它们得以修改它们的图形。pDoc->UpdateAllViews(this, 0L, m_pStrokeCur);//CStroke 的确是派生自CObject...return;
}
// in SCRIBBLEVIEW.H
class CScribbleView : public CScrollView
{
protected:CStroke* m_pStrokeCur; // the stroke in progress...
};
// in SCRIBBLEVIEW.CPP
void CScribbleView::OnLButtonDown(UINT, CPoint point)
{...m_pStrokeCur = GetDocument()->NewStroke();m_pStrokeCur->m_pointArray.Add(point);...
}
void CScribbleView::OnMouseMove(UINT, CPoint point)
{...m_pStrokeCur->m_pointArray.Add(point);...
}
void CScribbleView::OnLButtonUp(UINT, CPoint point)
{...m_pStrokeCur->m_pointArray.Add(point);m_pStrokeCur->FinishStroke();pDoc->UpdateAllViews(this, 0L, m_pStrokeCur);...
}
在OnLButtonUp 函数中调用UpdateAllViews 函数,并且把整个线条(内含其四边形边界)传过去,因此我们可以想办法在OnUpdate 中重绘这个四方形小区域就好。
void CScribbleView::OnUpdate(CView* /* pSender */, LPARAM /* lHint */,CObject* pHint)
{//Document 通知View 说,某些资料已经改变了if (pHint != NULL){if (pHint->IsKindOf(RUNTIME_CLASS(CStroke))){//hint提示我们哪一线条被加入(或被修改),所以我们要把该线条的外围矩形设为无效区。//CStroke* pStroke = (CStroke*)pHint;CClientDC dc(this);OnPrepareDC(&dc);CRect rectInvalid = pStroke->GetBoundingRect();dc.LPtoDP(&rectInvalid);InvalidateRect(&rectInvalid);return;}}//如果我们不能解释hint 内容(也就是说它不是我们所预期的 CStroke 对象),那就让整个窗口重绘吧(把整个窗口设为无效区)。
Invalidate(TRUE);return;
}
void CScribbleView::OnDraw(CDC* pDC)
{CScribbleDoc* pDoc = GetDocument();ASSERT_VALID(pDoc);//取得窗口的无效区。如果是在打印状态情况下,则取printer DC 的截割区(clipping region)//CRect rectClip;CRect rectStroke;pDC->GetClipBox(&rectClip);//注意:CScrollView::OnPrepare 已经在OnDraw 被调用之前先一步//调整了DC 原点,用以反应出目前的卷动位置。//调用CStroke::DrawStroke 完成无效区中各线条的绘图动作CTypedPtrList<CObList,CStroke*>& strokeList = pDoc->m_strokeList;POSITION pos = strokeList.GetHeadPosition();while (pos != NULL){CStroke* pStroke = strokeList.GetNext(pos);rectStroke = pStroke->GetBoundingRect();if (!rectStroke.IntersectRect(&rectStroke, &rectClip))continue;pStroke->DrawStroke(pDC);}
}
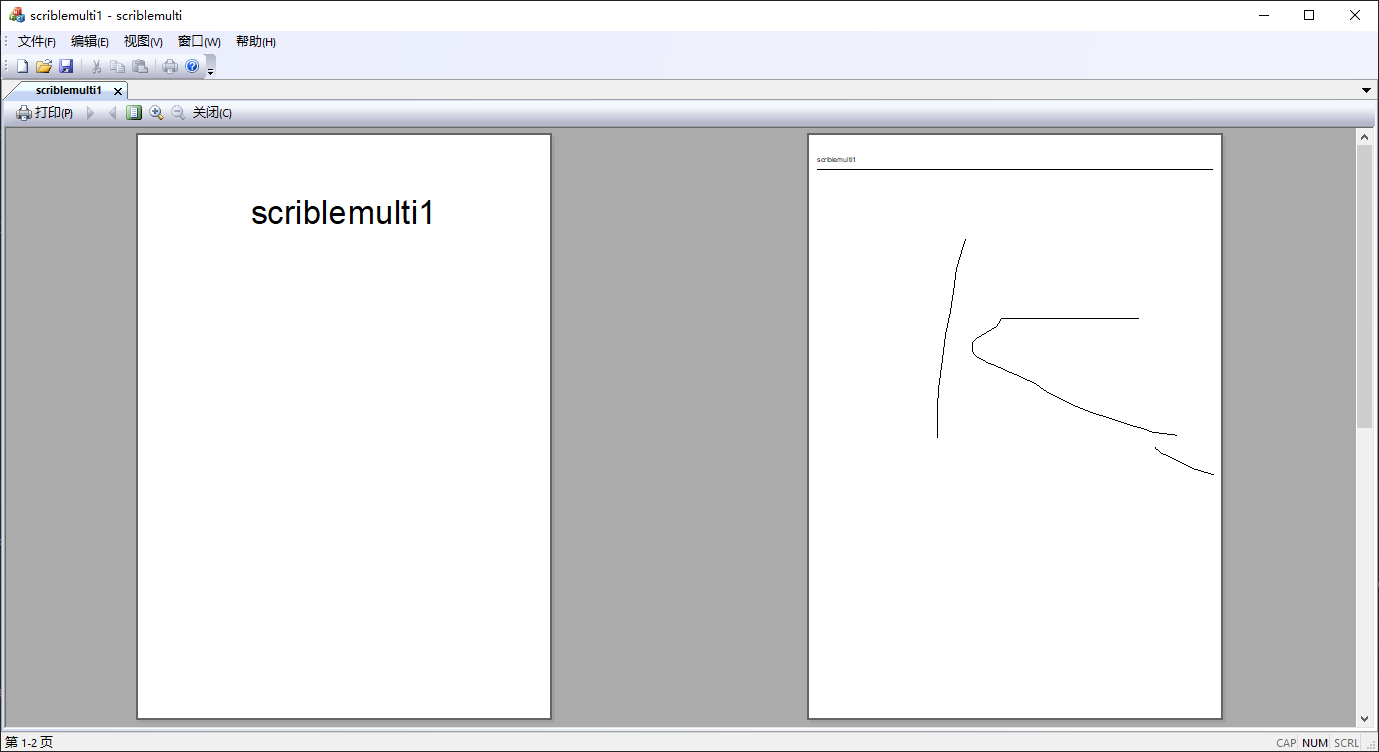
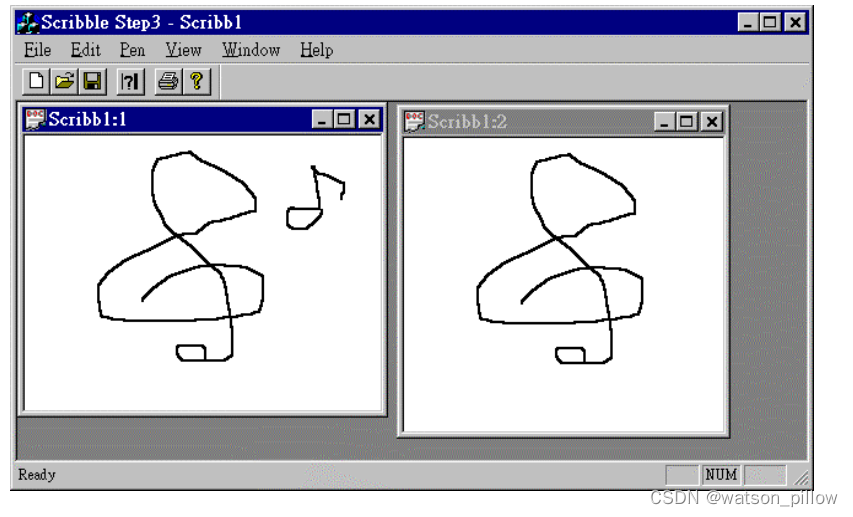
在Scribble View 上绘图,然后选按【Window/New Window】,会蹦出另一个新的View,其内的图形与前一个View 相同。这两个Views 就是同一份文件的两个「观景窗」。新窗口的产生导致WM_PAINT 产生,于是OnDraw被调用,把文件内容画出来。
滚动条CScrollView
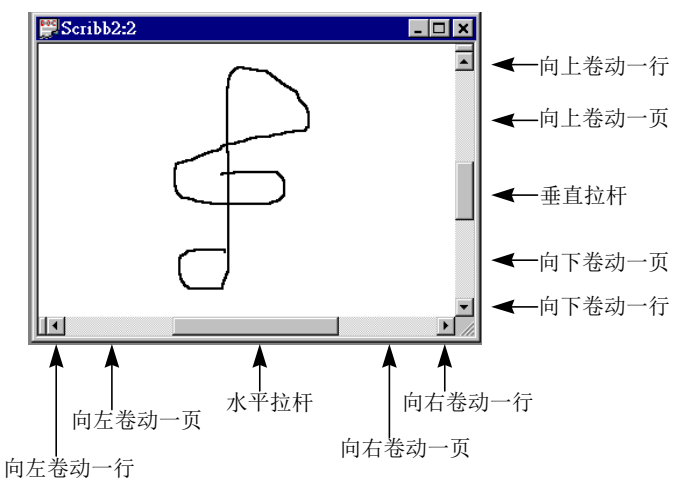
逻辑坐标与设备坐标:
文档坐标系称作逻辑坐标系,视图坐标系称为设备坐标系。
逻辑坐标按照坐标设置方式缺省模式下,坐标原点在工作区左上角,而x坐标值是向右递增,y坐标值是向下递增,单位值1代表一个像素。
MFC绘图函数都使用逻辑坐标作为位置参数。
CString str(“Hello,world!”);
dc.TextOut(10,10,str,str.GetLength());
这里的(10,10)是逻辑坐标而不是像素点数(只是在缺省映射模式MM_TEXT下,正好与像素点相对应),在输出时GDI函数会将逻辑坐标(10,10)依据当前映射模式转化为“设备坐标”,然后将文字输出在屏幕上。
设备坐标以像素点为单位,且x轴坐标值向右递增,y轴坐标值向下递增,但原点(0,0)位置却不限定在工作区的左上角。依据设备坐标的原点和用途,可以将Windows下使用的设备坐标系统分为三种:工作区坐标系统,窗口坐标系统和屏幕坐标系统。
(1)工作区坐标系统:
工作区坐标系统是最常见的坐标系统,它以窗口客户区左上角为原点(0,0),主要用于窗口客户区绘图输出以及处理窗口的一些消息。鼠标消息WM_LBUTTONDOWN、WM_MOUSEMOVE传给框架的消息参数以及CDC一些用于绘图的成员都是使用工作区坐标。
(2)屏幕坐标系统:
屏幕坐标系统是另一类常用的坐标系统,以屏幕左上角为原点(0,0)。以CreateDC(“DISPLAY” , …)或GetDC(NULL)取得设备上下文时,该上下文使用的坐标系就是屏幕坐标系。
一些与窗口的工作区不相关的函数都是以屏幕坐标为单位,例如设置和取得光标位置的函数SetCursorPos()和GetCursorPos();由于光标可以在任何一个窗口之间移动,它不属于任何一个单一的窗口,因此使用屏幕坐标。弹出式菜单使用的也是屏幕坐标。另外,CreateWindow、MoveWindow、SetWindowPlacement()等函数用于设置窗口相对于屏幕的位置,使用的也是屏幕坐标系统。
(3)窗口坐标系统:
窗口坐标系统以窗口左上角为坐标原点,它包含了窗口控制菜单、标题栏等内容。一般情况下很少在窗口标题栏上绘图,因此这种坐标系统很少使用。
在视图滚动后,如果用户在视图中单击鼠标,那么会得到鼠标位置的设备(视图)坐标。在使用这个数据处理文档(比如画点或画线)时,需要把它转化为文档坐标。这是因为利用MFC绘图时,所有传递给MFC作图的坐标都是逻辑坐标。当调用MFC绘图函数绘图时,Windows自动将逻辑坐标转换成设备坐标,然后再绘图。设备上下文类CDC提供了两个成员函数LPToDP和DPToLP完成逻辑坐标和设备坐标之间的转换工作。如其名字所示那样,LPToDP将逻辑坐标转换为设备坐标,DPToLP将设备坐标转换为逻辑坐标。
参考:https://blog.csdn.net/chen825919148/article/details/7550711
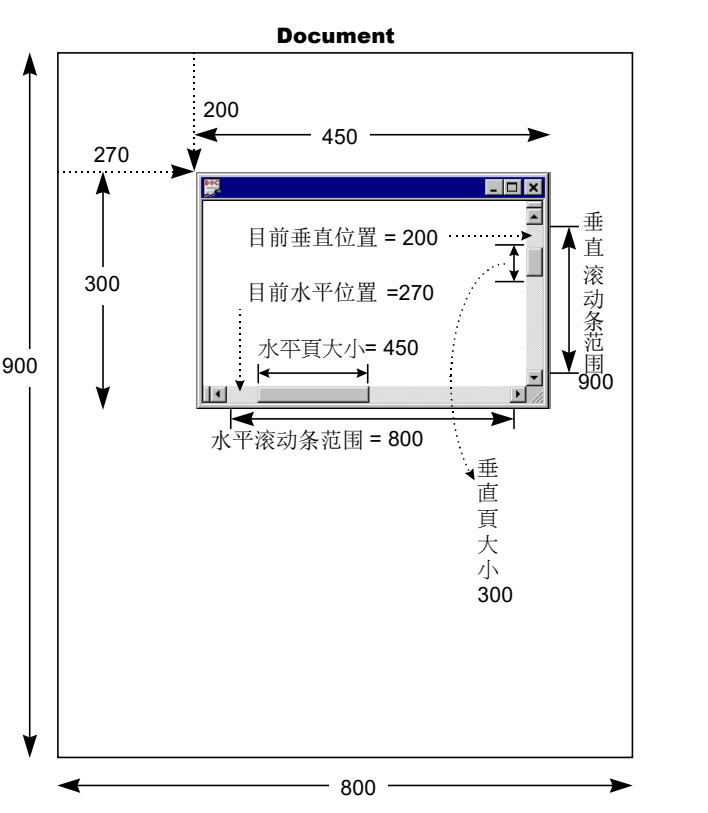
思路:
- 定义Document 大小。
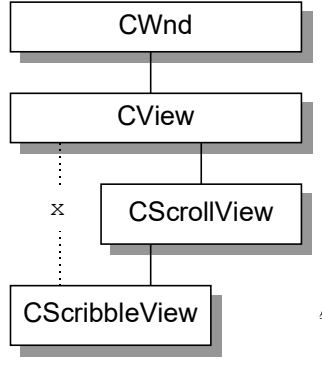
- 以CScrollView 取代CView。(CscribleView的基类)
- Document 的大小改变,就将尺寸传给CScrollView 的SetScrollSizes 函数(包括初始化)。窗口一旦被放大缩小,立刻计算窗口的宽度高度与滚动条长度的比例,重新设定卷动比例,也就是一行或一页的大小。
实现步骤:
document尺寸:
// in SCRIBBLEDOC.H
class CScribbleDoc : public CDocument
{
protected:CSize m_sizeDoc;
public:CSize GetDocSize() { return m_sizeDoc; }
...
};
// in SCRIBBLEDOC.CPP
void CScribbleDoc::InitDocument()
{m_bThickPen = FALSE;m_nThinWidth = 2; // default thin pen is 2 pixels widem_nThickWidth = 5; // default thick pen is 5 pixels wideReplacePen(); // initialize pen according to current width//预设Document 大小为800 x 900 个屏幕图素m_sizeDoc = CSize(800,900);
}
void CScribbleDoc::Serialize(CArchive& ar)
{if (ar.IsStoring()){ar << m_sizeDoc;}else{ar >> m_sizeDoc;}m_strokeList.Serialize(ar);
}
将CScribbleView 的父类由CView 改变为CScrollView。
// in SCRIBBLEVIEW.H
class CScribbleView : public CScrollView
{
public:virtual void OnInitialUpdate();...
};
// in SCRIBBLEVIEW.CPP
IMPLEMENT_DYNCREATE(CScribbleView, CScrollView)
BEGIN_MESSAGE_MAP(CScribbleView, CScrollView)...
END_MESSAGE_MAP()
改写OnInitialUpdate,在其中设定滚动条范围。这个函数的被调用时机是在View 第一次附着到Document 但尚未显现时,由Framework 调用。它会调用OnUpdate。
// in SCRIBVW.CPP
void CScribbleView::OnInitialUpdate()
{SetScrollSizes(MM_TEXT, GetDocument()->GetDocSize());//这是CScrollView 的成员函数。
}SetScrollSizes 总共有四个参数:int nMapMode:代表映射模式(Mapping Mode)SIZE sizeTotal:代表文件大小const SIZE& sizePage:代表一页大小(默认是文件大小的1/10)const SIZE& sizeLine:代表一行大小(默认是文件大小的1/100)
当滚动条移动了DC 原点,CScrollView 自动会做调整,让资料的某一部份显示而某一部份隐藏。
如果我们想在绘图之前(也就是进入OnDraw 之前)调整DC , 我们可以改写虚函数OnPrepareDC , 因为Framework 是先调用OnPrepareDC,然后才调用OnDraw 并把DC 传进去。CScrollView 已经改写了CView的OnPrepareDC 虚函数。Framework 先调用CScrollView::OnPrepareDC 再调用CScribbleView::OnDraw,所有因为滚动条而必须做的特别处理都已经在进入OnDraw 之前完成了。
DC 就是Device Context,在Windows 中凡绘图动作之前一定要先获得一个DC,它可能代表屏幕,也可能代表一个窗口,或一块内存,或打印机…。DC 中有许多绘图所需的元素,包括坐标系统(映射模式)、原点、绘图工具(笔、刷、颜色…)等等。
由于鼠标消息的坐标为设备坐标,需要转换为逻辑坐标供绘图使用。
// in SCRIBVW.CPP
void CScribbleView::OnLButtonDown(UINT, CPoint point)
{//由于CScrollView 改变了DC 原点和映射模式,所以我们必须先把装置坐标转换为逻辑坐标,再储存到Document 中//CClientDC dc(this);OnPrepareDC(&dc);dc.DPtoLP(&point);m_pStrokeCur = GetDocument()->NewStroke();m_pStrokeCur->m_pointArray.Add(point);SetCapture(); //m_ptPrev = point; //做为直线绘图的第一个点return;
}
void CScribbleView::OnLButtonUp(UINT, CPoint point)
{...if (GetCapture() != this)return;CScribbleDoc* pDoc = GetDocument();CClientDC dc(this);OnPrepareDC(&dc); //设定映射模式和DC 原点dc.DPtoLP(&point);...
}
void CScribbleView::OnMouseMove(UINT, CPoint point)
{...if (GetCapture() != this)return;CClientDC dc(this);OnPrepareDC(&dc);dc.DPtoLP(&point);m_pStrokeCur->m_pointArray.Add(point);...
}
void CScribbleView::OnUpdate(CView* /* pSender */, LPARAM /* lHint */,CObject* pHint)
{if (pHint != NULL){if (pHint->IsKindOf(RUNTIME_CLASS(CStroke))){// hintCStroke* pStroke = (CStroke*)pHint;CClientDC dc(this);OnPrepareDC(&dc);CRect rectInvalid = pStroke->GetBoundingRect();dc.LPtoDP(&rectInvalid);InvalidateRect(&rectInvalid);return;}}//Invalidate(TRUE);return;
}
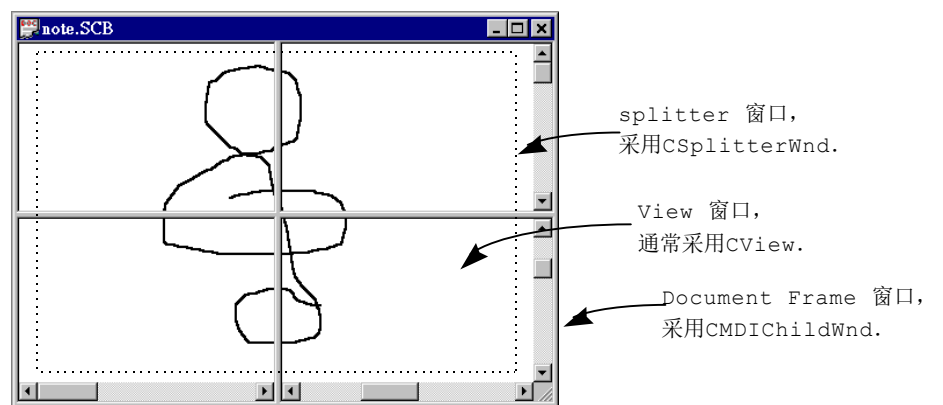
拆分窗口Splitter
需要三个窗口协作:
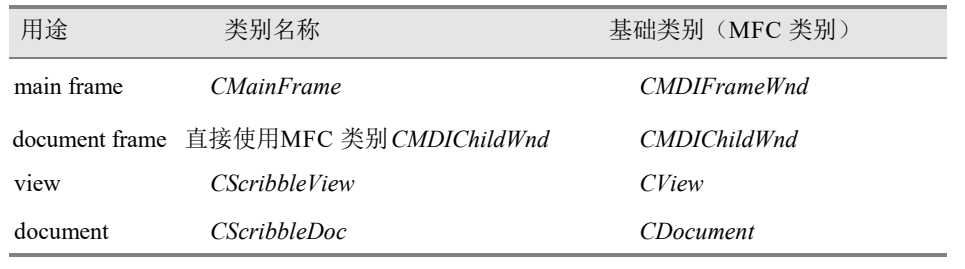
- Document Frame 窗口:负责一般性窗口行为。其类派生自CMDIChildWnd。
- Splitter 窗口:负责管理各窗口。通常直接使用CSplitterWnd 类。
- View 窗口:负责资料的显示。其类派生自CView。
修改前:
pDocTemplate = new CMultiDocTemplate(IDR_SCRIBTYPE,RUNTIME_CLASS(CScribbleDoc),RUNTIME_CLASS(CMDIChildWnd),RUNTIME_CLASS(CScribbleView));
修改:
新增类CScribbleFrame,父类为CMDIChildWnd。
成员对象:CSplitterWnd 对象,名为m_wndSplitter
改写OnCreateClient 虚函数,调用m_wndSplitter.Create 产生拆分窗口、设定窗口个数、设定窗口的最初尺寸等初始状态。
修改后:
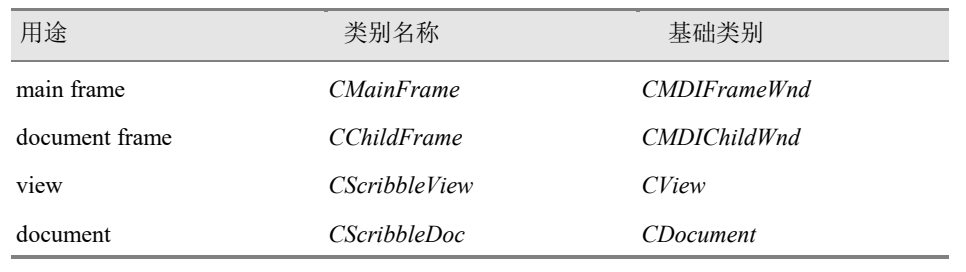
pDocTemplate = new CMultiDocTemplate(IDR_SCRIBTYPE,RUNTIME_CLASS(CScribbleDoc),RUNTIME_CLASS(CChildFrame),RUNTIME_CLASS(CScribbleView));
貌似不是这么简单,测试成功一个,参考https://blog.csdn.net/u012750259/article/details/43016919
-
用MFC AppWizard创建一个默认的单文档应用程序。
-
打开框架窗口类MainFrm.h头文件,为CMainFrame类添加一个保护型的切分窗口的数据成员,如下面的定义:
CSplitterWnd m_wndSplitter; -
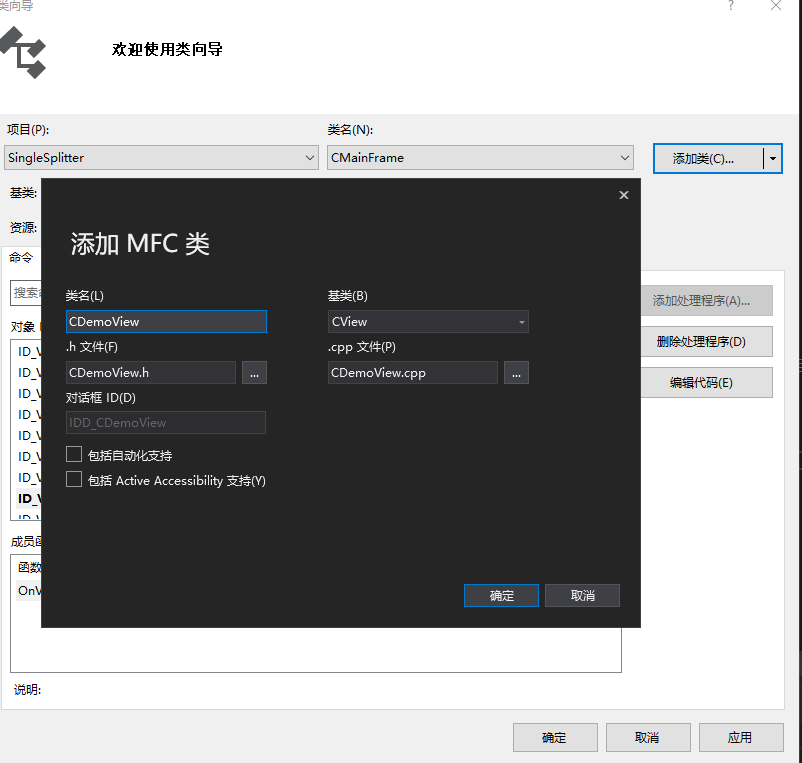
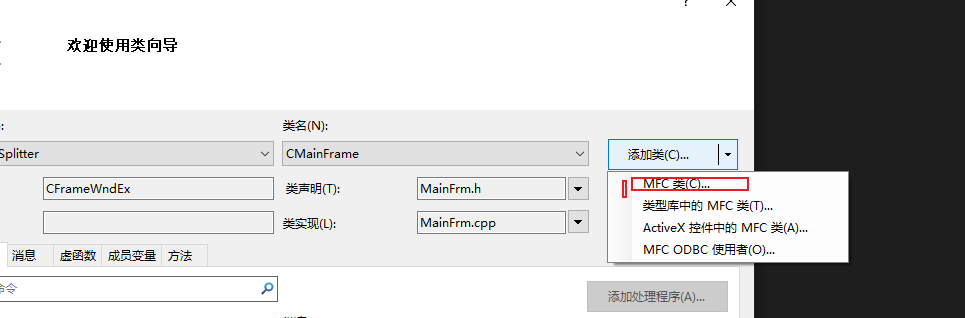
用MFC类向导创建一个新的视图类CDemoView(基类为CView)用于与静态切分的窗格相关联。
-
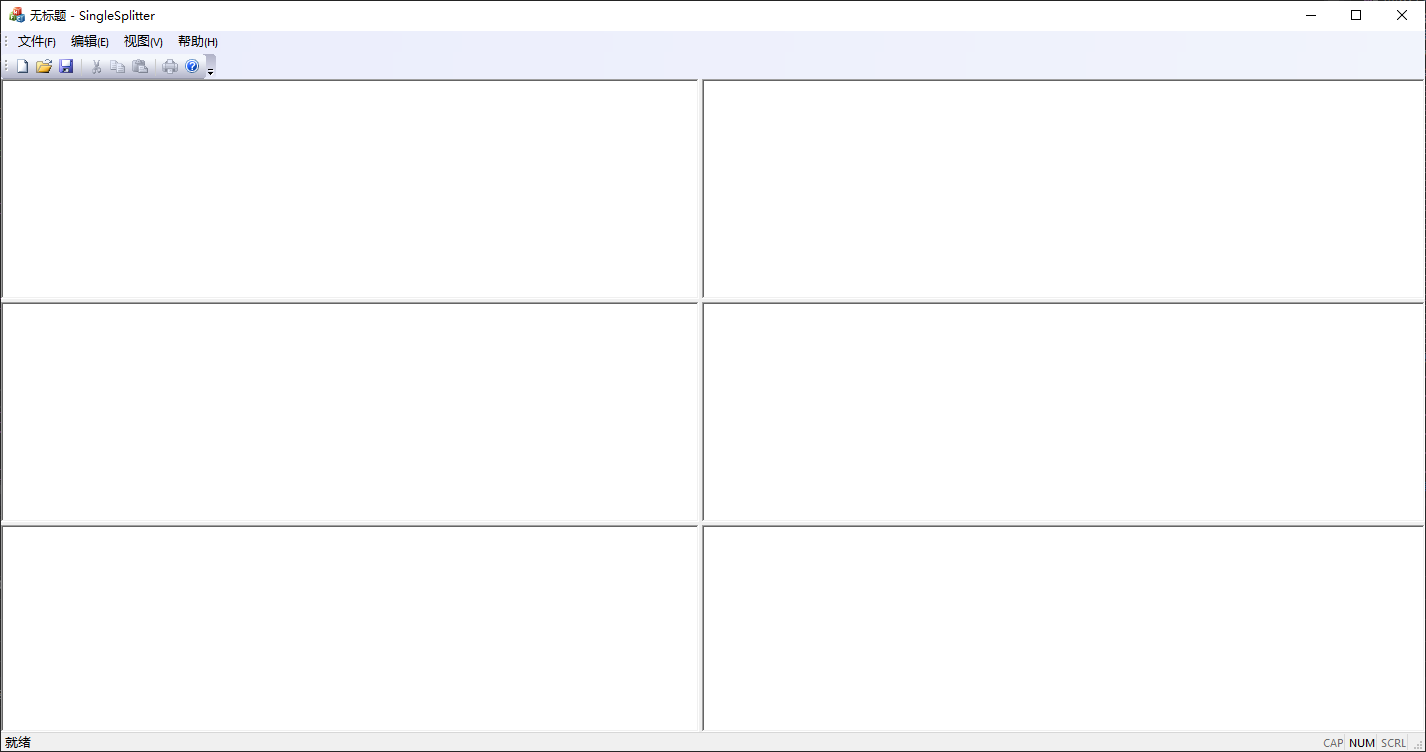
重写CMainFrame类的OnCreateClient函数(当主框架窗口客户区创建的时候自动调用该函数),并添加下列代码:
BOOL CMainFrame::OnCreateClient(LPCREATESTRUCT lpcs, CCreateContext* pContext)
{// TODO: 在此添加专用代码和/或调用基类CRect rc;GetClientRect(rc); // 获取客户区大小// 计算每个窗格的平均尺寸CSize paneSize(rc.Width() / 2 - 16, rc.Height() / 3 - 16);m_wndSplitter.CreateStatic(this, 3, 2); // 创建3 x 2个静态窗格m_wndSplitter.CreateView(0, 0, RUNTIME_CLASS(CDemoView), paneSize,pContext); // 为相应的窗格指定视图类m_wndSplitter.CreateView(0, 1, RUNTIME_CLASS(CDemoView), paneSize,pContext);m_wndSplitter.CreateView(1, 0, RUNTIME_CLASS(CDemoView), paneSize,pContext);m_wndSplitter.CreateView(1, 1, RUNTIME_CLASS(CDemoView),paneSize, pContext);m_wndSplitter.CreateView(2, 0, RUNTIME_CLASS(CDemoView),paneSize, pContext);m_wndSplitter.CreateView(2, 1, RUNTIME_CLASS(CDemoView),paneSize, pContext);return TRUE;return CFrameWndEx::OnCreateClient(lpcs, pContext);
}
- 在MainFrm.cpp 源文件的开始处,添加视图类CDemoView 的包含文件:
#include "CDemoView.h" - 编译并运行
第十二章 打印与预览
打印的背景原理(windows接口)
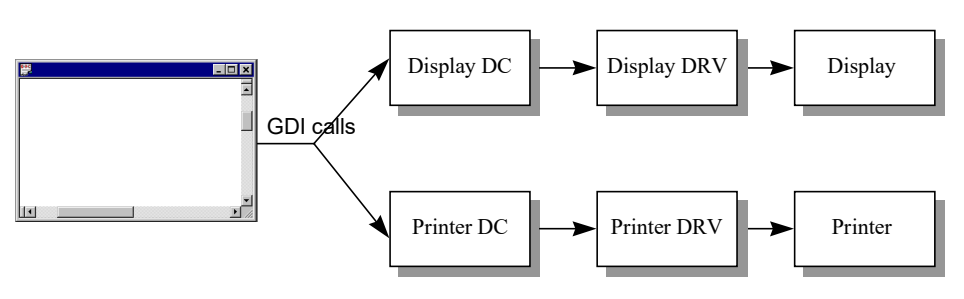
Windows 的所有绘图指令,都集中在GDI 模块之中,称为GDI 绘图函数,例如:
TextOut(hPr, 50, 50, szText, strlen(szText)); // 输出一字符串
Rectangle(hPr, 10, 10, 50, 40); // 画一个四方形
Ellipse(hPr, 200, 50, 250, 80); // 画一个椭圆形
Pie(hPr, 350, 50, 400, 100, 400, 50, 400, 100); // 画一个圆饼图
MoveTo(hPr, 50, 100); // 将画笔移动到新位置
LineTo(hPr, 400, 50); // 从前一位置画直线到新位置
根据DC(也就是第一个参数hPr)的不同,图形被绘制到不同地方(屏幕、打印机)。
显示器DC可以通过GetDC或BeginPaint 函数所获得的,如:
HDC hDC;
PAINTSTRUCT ps; // paint structure
hDC = BeginPaint(hWnd, &ps);
打印机DC可以CreateDC 获得:
HDC hPr;
hPr = CreateDC(lpPrintDriver, lpPrintType, lpPrintPort, (LPSTR) NULL);
//参数是与打印机有关的信息字符串(驱动,类型,端口吧)
计算打印的行数等:
TEXTMETRIC TextMetric;
int LineSpace;
int nPageSize;
int LinesPerPage;
GetTextMetrics(hPr, &TextMetric); //取得字题数据
LineSpace = TextMetric.tmHeight + TextMetric.tmExternalLeading; //计算字高
nPageSize = GetDeviceCaps(hPr, VERTRES); //取得纸张大小
LinesPerPage = nPageSize / LineSpace - 1; //一页容纳多少行
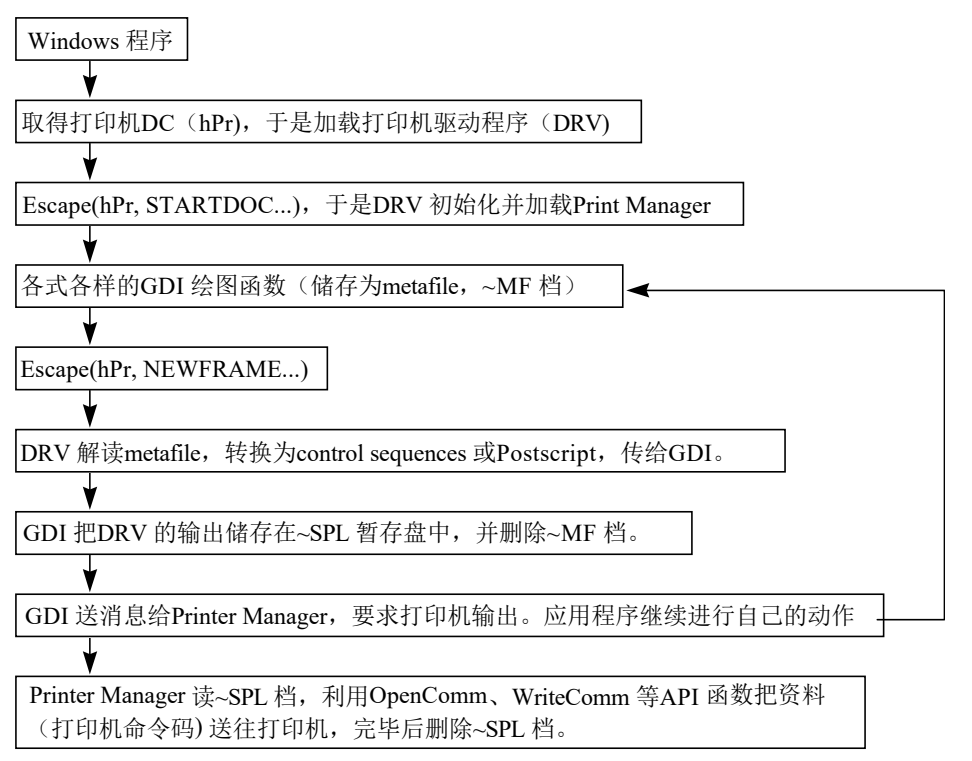
然后再循环将每一行文字送往打印机:
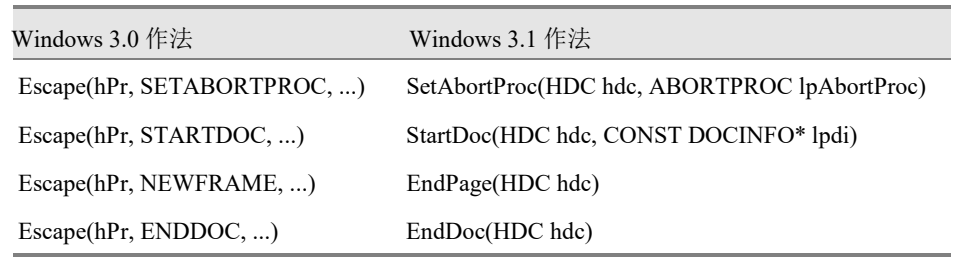
Escape(hPr, STARTDOC, 4, "PrntFile text", (LPSTR) NULL);
CurrentLine = 1;for (...) {... //取得一行文字,放在char pLine[128] 中,长度为LineLength。TextOut(hPr, 0, CurrentLine*LineSpace, (LPSTR)pLine, LineLength);if (++CurrentLine > LinesPerPage ) {CurrentLine = 1; //重设行号IOStatus = Escape(hPr, NEWFRAME, 0, 0L, 0L); //换页if (IOStatus < 0 || bAbort)break;}}if (IOStatus >= 0 && !bAbort) {Escape(hPr, NEWFRAME, 0, 0L, 0L);Escape(hPr, ENDDOC, 0, 0L, 0L);}
其中的Escape 用来传送命令给打印机(打印机命令一般称为escape code),它是一个·Windows API 函数。
打印过程中提供一个中断机制给使用者。通过 Modeless(非模态) 对话框 实现。类似如下:
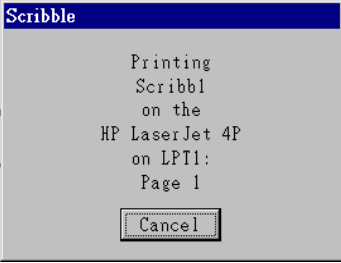
需要在开始打印前创建对话框:
HWND hPrintingDlgWnd; //【Printing】对话框
FARPROC lpPrintingDlg; //【Printing】对话框的窗口函数
lpPrintingDlg = MakeProcInstance(PrintingDlg, hInst);
hPrintingDlgWnd = CreateDialog(hInst, "PrintingDlg", hWnd, lpPrintingDlg);
ShowWindow (hPrintingDlgWnd, SW_NORMAL);
如果点击了按钮,则进行中断:
int FAR PASCAL PrintingDlg(HWND hDlg, unsigned msg, WORD wParam, LONG lParam)
{switch(msg) {case WM_COMMAND:return (bAbort = TRUE);case WM_INITDIALOG:SetFocus(GetDlgItem(hDlg, IDCANCEL));SetDlgItemText(hDlg, IDC_FILENAME, FileName);return (TRUE);}return (FALSE);
}
打印过程会产生记录用的临时文件,为了及时清除或者其他操作,可以准备一个回调函数,供操作用,通常名为AbortProc:
FARPROC lpAbortProc;
lpAbortProc = MakeProcInstance(AbortProc, hInst);
Escape(hPr, SETABORTPROC, NULL, (LPSTR)(long)lpAbortProc, (LPSTR)NULL);
GDI 模块在执行Escape(hPr, NEWFRAME…) 的过程中会持续调用这个callback 函数
int FAR PASCAL AbortProc(hDC hPr, int Code)
{MSG msg;while (!bAbort && PeekMessage(&msg, NULL, NULL, NULL, TRUE))if (!IsDialogMessage(hAbortDlgWnd, &msg)) {TranslateMessage(&msg);DispatchMessage(&msg);}return (!bAbort);
}
SDK代码如下:
hSaveCursor = SetCursor(hHourGlass); //把鼠标光标设为砂漏状
hPr = CreateDC("HP LaserJet 4P/4MP", "HPPCL5E", "LPT1:", (LPSTR)NULL);
//设定AbortProc callback 函数
lpAbortProc = MakeProcInstance(AbortProc, hInst);
Escape(hPr, SETABORTPROC, NULL, (LPSTR)(long)lpAbortProc, (LPSTR)NULL);
bAbort = FALSE;
Escape(hPr, STARTDOC, 4, "PrntFile text", (LPSTR)NULL);
//设定Printing 对话框及其窗口函数
lpPrintingDlg = MakeProcInstance(PrintingDlg, hInst);
hPrintingDlgWnd = CreateDialog(hInst, "PrintingDlg", hWnd, lpPrintingDlg);
ShowWindow(hPrintingDlgWnd, SW_NORMAL);
EnableWindow(hWnd, FALSE); //令父窗口(也就是程序的主窗口) 使能
SetCursor(hSaveCursor);    //鼠标光标形状还原
GetTextMetrics(hPr, &TextMetric);
LineSpace = TextMetric.tmHeight + TextMetric.tmExternalLeading;
nPageSize = GetDeviceCaps(hPr, VERTRES);
LinesPerPage = nPageSize / LineSpace - 1;
dwLines = SendMessage(hEditWnd, EM_GETLINECOUNT, 0, 0L);
CurrentLine = 1;
for (dwIndex = IOStatus = 0; dwIndex < dwLines; dwIndex++)
{pLine[0] = 128;pLine[1] = 0;LineLength = SendMessage(hEditWnd, EM_GETLINE,(WORD)dwIndex, (LONG)((LPSTR)pLine));TextOut(hPr, 0, CurrentLine * LineSpace, (LPSTR)pLine, LineLength);if (++CurrentLine > LinesPerPage){CurrentLine = 1;IOStatus = Escape(hPr, NEWFRAME, 0, 0L, 0L);if (IOStatus < 0 || bAbort)break;}
}
if (IOStatus >= 0 && !bAbort)
{Escape(hPr, NEWFRAME, 0, 0L, 0L);Escape(hPr, ENDDOC, 0, 0L, 0L);
}
EnableWindow(hWnd, TRUE);
DestroyWindow(hPrintingDlgWnd);
FreeProcInstance(lpPrintingDlg);
FreeProcInstance(lpAbortProc);
DeleteDC(hPr);
MFC预设的打印机制
在MFC 应用程序中,View 和application framework 分工合力完成打印工作。
Applicationframework 的责任是:
- 显示Print对话框。
- 为打印机产生一个CDC 对象。
- 调用CDC 对象的
StartDoc和EndDoc两函数。 - 持续不断地调用CDC 对象的
StartPage,通知View 应该输出哪一页;一页打印完毕则调用CDC 对象的EndPage。
View 对象上的责任是:
- 通知application framework 总共有多少页要打印。
- application framework 要求打印某特定页时,我们必须将Document 中对应的部份输出到打印机上。
- 配置或释放任何GDI 资源,包括笔、刷、字形…等等。
- 如果需要,送出任何escape 码(调用CDC 对象的Escape 函数)改变打印机状态,例如走纸、改变打印方向等等。
使用框架创建工程时,如果选择打印功能,会自动加入对应消息事件:
// in SCRIBBLEVIEW.H
class CScribbleView : public CScrollView
{...protected:virtual BOOL OnPreparePrinting(CPrintInfo* pInfo);virtual void OnBeginPrinting(CDC* pDC, CPrintInfo* pInfo);virtual void OnEndPrinting(CDC* pDC, CPrintInfo* pInfo);...
};
// in SCRIBBLEVIEW.CPP
BOOL CScribbleView::OnPreparePrinting(CPrintInfo* pInfo)
{// default preparationreturn DoPreparePrinting(pInfo);
}
void CScribbleView::OnBeginPrinting(CDC* /*pDC*/, CPrintInfo* /*pInfo*/)
{// TODO: add extra initialization before printing
}
void CScribbleView::OnEndPrinting(CDC* /*pDC*/, CPrintInfo* /*pInfo*/)
{// TODO: add cleanup after printing
}
当【File/Print…】被按下,命令消息将由CView::OnFilePrint 去处理
// in VIEWPRNT.CPP
void CView::OnFilePrint()
{// get default print infoCPrintInfo printInfo;            ////ASSERT(printInfo.m_pPD != NULL); // must be setif (GetCurrentMessage()->wParam == ID_FILE_PRINT_DIRECT){CCommandLineInfo *pCmdInfo = AfxGetApp()->m_pCmdInfo;if (pCmdInfo != NULL){if (pCmdInfo->m_nShellCommand == CCommandLineInfo::FilePrintTo) //利用::CreateDC产生一个「打印机DC//{printInfo.m_pPD->m_pd.hDC = ::CreateDC(pCmdInfo->m_strDriverName,pCmdInfo->m_strPrinterName, pCmdInfo->m_strPortName, NULL);if (printInfo.m_pPD->m_pd.hDC == NULL){AfxMessageBox(AFX_IDP_FAILED_TO_START_PRINT);return;}}}printInfo.m_bDirect = TRUE;//跳过打印对话框,直接打印}if (OnPreparePrinting(&printInfo)) //弹出对话框配置打印的设置{// hDC must be set (did you remember to call DoPreparePrinting?)ASSERT(printInfo.m_pPD->m_pd.hDC != NULL);// gather file to print to if print-to-file selectedCString strOutput;if (printInfo.m_pPD->m_pd.Flags & PD_PRINTTOFILE)//弹窗选择要打印到的文件{// construct CFileDialog for browsingCString strDef(MAKEINTRESOURCE(AFX_IDS_PRINTDEFAULTEXT));CString strPrintDef(MAKEINTRESOURCE(AFX_IDS_PRINTDEFAULT));CString strFilter(MAKEINTRESOURCE(AFX_IDS_PRINTFILTER));CString strCaption(MAKEINTRESOURCE(AFX_IDS_PRINTCAPTION));CFileDialog dlg(FALSE, strDef, strPrintDef,OFN_HIDEREADONLY | OFN_OVERWRITEPROMPT, strFilter);dlg.m_ofn.lpstrTitle = strCaption;if (dlg.DoModal() != IDOK)return;// set output device to resulting path namestrOutput = dlg.GetPathName();}// set up document info and start the document printing process////CString strTitle;CDocument *pDoc = GetDocument();if (pDoc != NULL)strTitle = pDoc->GetTitle();elseGetParentFrame()->GetWindowText(strTitle);if (strTitle.GetLength() > 31)strTitle.ReleaseBuffer(31);DOCINFO docInfo;memset(&docInfo, 0, sizeof(DOCINFO));docInfo.cbSize = sizeof(DOCINFO);docInfo.lpszDocName = strTitle;CString strPortName;int nFormatID;if (strOutput.IsEmpty()){docInfo.lpszOutput = NULL;strPortName = printInfo.m_pPD->GetPortName();nFormatID = AFX_IDS_PRINTONPORT;}else{docInfo.lpszOutput = strOutput;AfxGetFileTitle(strOutput,strPortName.GetBuffer(_MAX_PATH), _MAX_PATH);nFormatID = AFX_IDS_PRINTTOFILE;}// setup the printing DC////CDC dcPrint;dcPrint.Attach(printInfo.m_pPD->m_pd.hDC); // attach printer dc「打印机DC」附着到CDC 对象上dcPrint.m_bPrinting = TRUE;OnBeginPrinting(&dcPrint, &printInfo); //事件函数,原本什么也没做。可以改写它,设定打印前的任何初始状态。dcPrint.SetAbortProc(_AfxAbortProc);   ////// disable main window while printing & init printing status dialogAfxGetMainWnd()->EnableWindow(FALSE); //父窗口非使能CPrintingDialog dlgPrintStatus(this);//创建打印状态对话框CString strTemp;dlgPrintStatus.SetDlgItemText(AFX_IDC_PRINT_DOCNAME, strTitle);dlgPrintStatus.SetDlgItemText(AFX_IDC_PRINT_PRINTERNAME,printInfo.m_pPD->GetDeviceName());AfxFormatString1(strTemp, nFormatID, strPortName);dlgPrintStatus.SetDlgItemText(AFX_IDC_PRINT_PORTNAME, strTemp);dlgPrintStatus.ShowWindow(SW_SHOW);dlgPrintStatus.UpdateWindow();// start document printing processif (dcPrint.StartDoc(&docInfo) == SP_ERROR) //通知打印机开始打印工作。这个函数其实就是激活Windows 打印引擎{// enable main window before proceedingAfxGetMainWnd()->EnableWindow(TRUE);// cleanup and show error messageOnEndPrinting(&dcPrint, &printInfo);dlgPrintStatus.DestroyWindow();dcPrint.Detach(); // will be cleaned up by CPrintInfo destructorAfxMessageBox(AFX_IDP_FAILED_TO_START_PRINT);return;}// Guarantee values are in the valid rangeUINT nEndPage = printInfo.GetToPage();UINT nStartPage = printInfo.GetFromPage();if (nEndPage < printInfo.GetMinPage())nEndPage = printInfo.GetMinPage();if (nEndPage > printInfo.GetMaxPage())nEndPage = printInfo.GetMaxPage();if (nStartPage < printInfo.GetMinPage())nStartPage = printInfo.GetMinPage();if (nStartPage > printInfo.GetMaxPage())nStartPage = printInfo.GetMaxPage();int nStep = (nEndPage >= nStartPage) ? 1 : -1;nEndPage = (nEndPage == 0xffff) ? 0xffff : nEndPage + nStep;VERIFY(strTemp.LoadString(AFX_IDS_PRINTPAGENUM));// begin page printing loopBOOL bError = FALSE;for (printInfo.m_nCurPage = nStartPage; printInfo.m_nCurPage != nEndPage; printInfo.m_nCurPage += nStep) {//针对文件中的每一页开始做打印动作OnPrepareDC(&dcPrint, &printInfo); //事件函数。如果要在每页前面加表头,就改写这个虚函数。// check for end of printif (!printInfo.m_bContinuePrinting)break;// write current pageTCHAR szBuf[80];wsprintf(szBuf, strTemp, printInfo.m_nCurPage);dlgPrintStatus.SetDlgItemText(AFX_IDC_PRINT_PAGENUM, szBuf); //修改【打印状态】对话框中的页数// set up drawing rect to entire page (in logical coordinates)printInfo.m_rectDraw.SetRect(0, 0,dcPrint.GetDeviceCaps(HORZRES),dcPrint.GetDeviceCaps(VERTRES));dcPrint.DPtoLP(&printInfo.m_rectDraw);// attempt to start the current pageif (dcPrint.StartPage() < 0) //StartPage 开始新的一页;调用windows API ::StartPage{bError = TRUE;break;}// must call OnPrepareDC on newer versions of Windows because// StartPage now resets the device attributes.if (afxData.bMarked4)OnPrepareDC(&dcPrint, &printInfo);ASSERT(printInfo.m_bContinuePrinting);// page successfully started, so now render the pageOnPrint(&dcPrint, &printInfo); //OnPrint调用OnDraw; 我们应该在CScribbleView 中改写OnDraw 以绘出自己的图形if (dcPrint.EndPage() < 0 || !_AfxAbortProc(dcPrint.m_hDC, 0)) //一页结束,调用dcPrint.EndPage  ::EndPage{bError = TRUE;break;}}// cleanup document printing processif (!bError)dcPrint.EndDoc(); //文件结束,调用EndDoc ::EndDocelsedcPrint.AbortDoc();AfxGetMainWnd()->EnableWindow();     // enable main windowOnEndPrinting(&dcPrint, &printInfo); // clean up after printing//可以在OnEndPrinting进行绘图资源需要释放dlgPrintStatus.DestroyWindow();      //关闭 打印状态 对话框dcPrint.Detach();                    // will be cleaned up by CPrintInfo destructor//将「打印机DC」解除绑定,CPrintInfo 的析构会把DC 还给Windows。}
}
关键步骤说明:
- 首先创建一个
CPrintInfo对象,CPrintInfo是一个用来记录打印机资料的结构体,构造函数中会配置了一个Win32 通用打印对话框(common print dialog),并将它赋值给m_pPD.
// in AFXEXT.H
struct CPrintInfo // Printing information structure
{CPrintDialog* m_pPD; // pointer to print dialogBOOL m_bPreview; // TRUE if in preview mode  是TRUE,表示处于预览模式,FALSE 表示处于打印模式;BOOL m_bDirect; // TRUE if bypassing Print Dialog 如果是TRUE,表示省略 打印对话框,FALSE 表示需显示 打印对话框。...
};
对话框类:
class CPrintDialog : public CCommonDialog
{
public:PRINTDLG& m_pd;BOOL GetDefaults();LPDEVMODE GetDevMode() const; // return DEVMODECString GetDriverName() const; // return driver nameCString GetDeviceName() const; // return device nameCString GetPortName() const; // return output port nameHDC GetPrinterDC() const; // return HDC (caller must delete)HDC CreatePrinterDC();...
};
-
OnPreparePrinting是一个虚函数,也就是上面说到的事件函数,该函数默认会调用CView::DoPreparePrinting 将贮存在CPrintInfo 结构中的对话框CPrintDialog* m_pPD显示出来,在这个对话框中使用者对打印机进行各种设定,然后产生一个「打印机DC」,储存在printinfo.m_pPD->m_pd.hDC, 默认调用过程如下: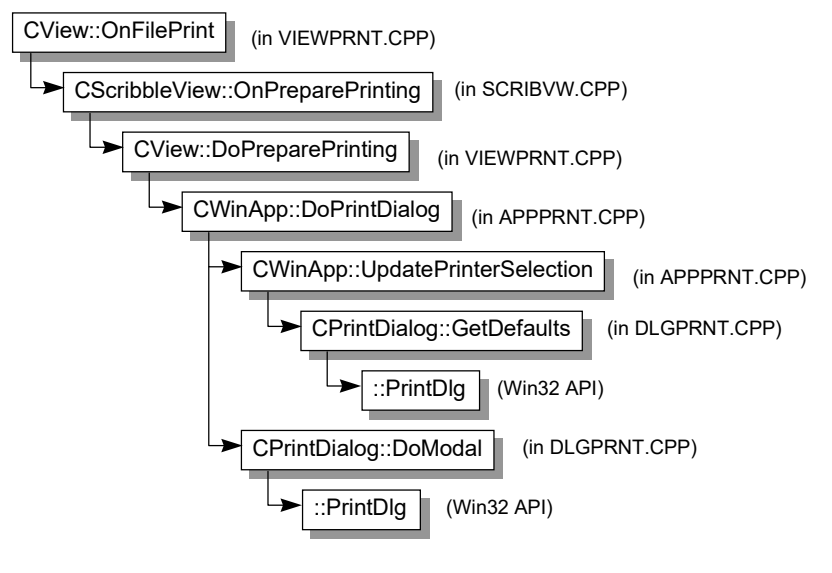
-
如果使用者在【打印】对话框中选按【打印到文件】,则再显示一个【Print to File】弹窗选择要打印到的文件。
-
设置中断用的回调函数,使用默认的回调函数
_AfxAbortProc
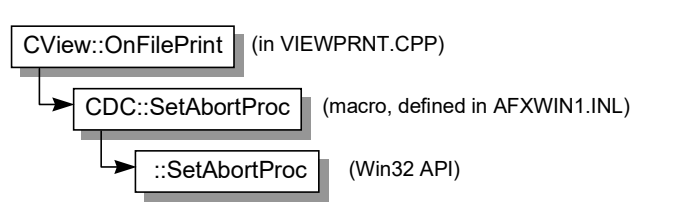
-
产生打印状态对话框
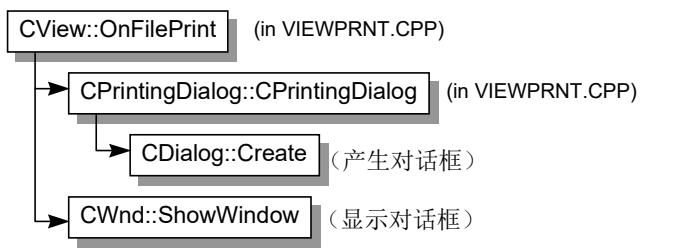
-
通知打印机开始新的打印工作
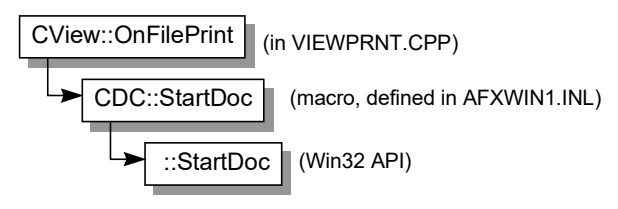
整体流程 及对应 响应事件函数如下:
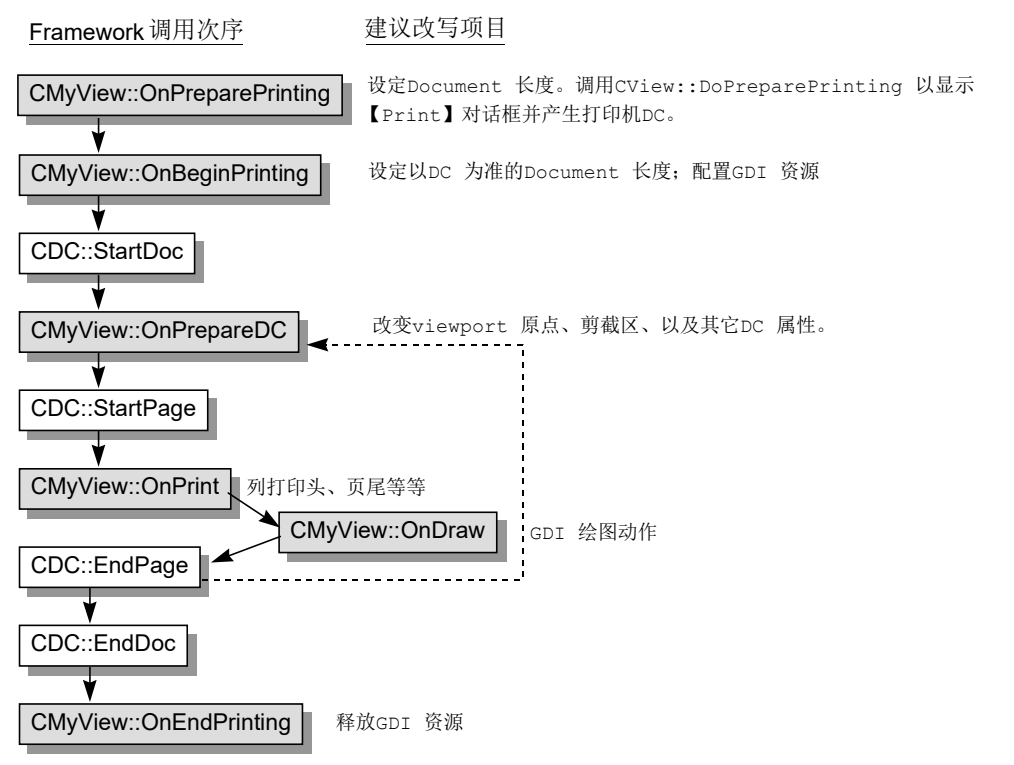
补充说明:
- 当使用者按下【File/Print 】按钮, Application Framework 首先调用
CMyView::OnPreparePrinting。这个函数接受一个CPrintInfo 指针做为参数,允许使用者设定Document 的打印长度(从第几页到第几页)。默认页码是1 至0xFFFF, 程序员应该在OnPreparePrinting中调用SetMaxPage设置页数。SetMaxPage之后,程序应该调用CView::DoPreparePrinting,它会显示【打印】对话框,并产生一个打印机DC。 - 针对每一页,Framework 会调用
CMyView::OnPrepareDC。改写这个函数,使它依目前的页码来调整DC,例如改变打印原点和切割区域以保证印出来的Document 内容的合适性等等。 Framework其实是先调用OnPrint,传两个参数进去,第一参数是个DC, 第二参数是个CPrintInfo指针。OnPrint内部再调用OnDraw,这次只传DC 过去,做为唯一参数.
// in VIEWCORE.CPP
void CView::OnPrint(CDC* pDC, CPrintInfo*)
{
ASSERT_VALID(pDC);
// Override and set printing variables based on page number
OnDraw(pDC); // Call Draw
}
OnPrint与OnDraw 区别:
OnPrint:负责「只在打印时才做(屏幕显示时不做)」的动作。例如印出表头和页尾。
OnDraw :共通性绘图动作(包括输出到屏幕或打印机上)都在此完成。
还有长得很像的OnPaint:
// in VIEWCORE.CPP
void CView::OnPaint()
{// standard paint routineCPaintDC dc(this);OnPrepareDC(&dc);OnDraw(&dc);
}
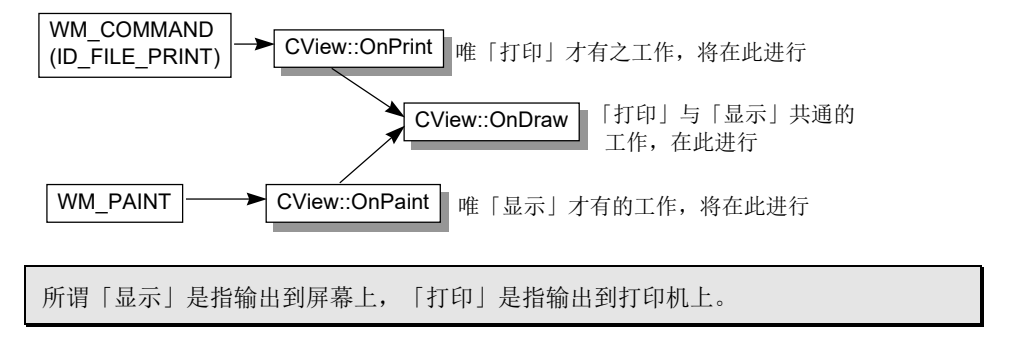
修改范例Scribble
窗口有滚动条而打印机没有,这伴随而来的就是必须计算Document 的大小和纸张的大小,以解决分页的问题,还包括:
- 打印出来的影像可能不是你要的大小
- 不会分页
- 没有页眉(header)
- 没有页脚(footer)
关于打印的大部份信息都记录在CPrintInfo 中(页码从1(而不是0)开始。)
| CPrintInfo 成员名称 | 参考到的打印页 |
|---|---|
| GetMinPage/SetMinPage | Document 中的第一页 |
| GetMaxPage/SetMaxPage | Document 中的最后一页 |
| GetFromPage | 将被印出的第一页(出现在【打印】对话框,图12-1b) |
| GetToPage | 将被印出的最后一页(出现在【打印】对话框) |
| m_nCurPage | 目前正被印出的一页(出现在【打印状态】对话框) |
| m_nNumPreviewPages | 预览窗口中的页数 |
CPrintInfo 结构体中记录的「页」数,指的是打印机的页数;Framework 针对每一「页」调用OnPrepareDC 以及OnPrint 时,所指的「页」也是打印机的页。当你改写OnPreparePrinting 时指定Document 的长度,所用的单位也是打印机的「页」。如果Document 的一页不等于打印机的一页(一张纸),必须在两者之间做转换。
此次目标打印样子为:
第一页只是单纯印出文件名称(文件名称),第二页才是文件内容。
第二页(文件内容)最顶端留一点空间,做为表头。
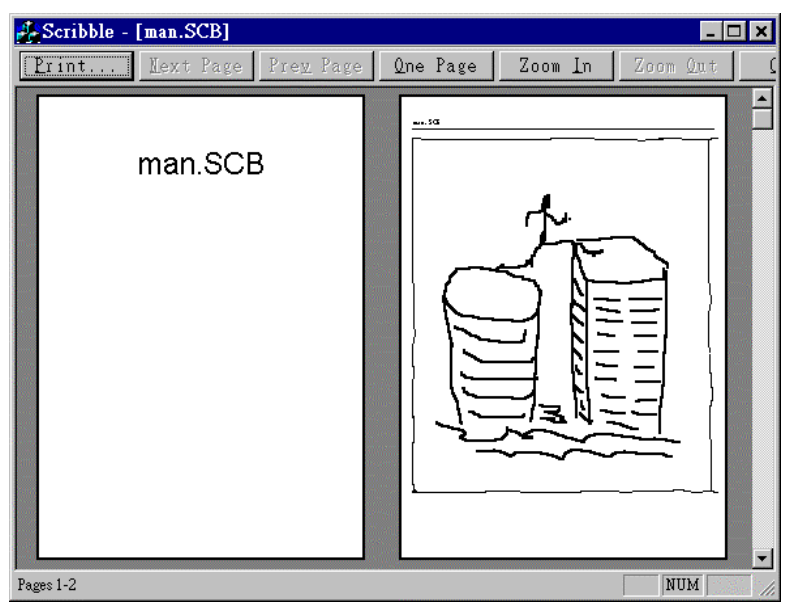
配置GDI 绘图工具
配置GDI 对象的最理想时机是OnBeginPrinting:
- 每当Framework 开始一份新的打印,它就会调用此函数一次,因此不同打印工作所需的不同工具可在此有个替换。
- 此函数的参数是一个和「打印机DC」有附着关系的CDC 对象指针,我们直接从此CDC 对象中配置绘图工具即可。
释放GDI 对象的最理想时机是在OnEndPrinting,这是每当一份打印工作结束后,Application Framework 会调用的函数。
关于映射模式(坐标系统)
CScribbleDoc 的成员变量m_sizeDoc,用来记录Document 的大小。它是一个CSize 对象
修改映射模式:
void CScribbleView::OnInitialUpdate()
{SetScrollSizes(MM_LOENGLISH, GetDocument()->GetDocSize());//原来是MM_TEXTCScrollView::OnInitialUpdate();
}
MM_TEXT 是Y 轴向下,MM_LOENGLISH(以及其它任何映射模式)是Y 轴向上。点坐标是先经过DPtoLP 才储存到CStroke 对象并且然后才由LineTo 画出的,所以这里不受影响;但是用到用到CRect 的地方需要调整。
//在FinishStroke
for (int i=1; i < m_pointArray.GetSize(); i++)
{pt = m_pointArray[i];m_rectBounding.left = min(m_rectBounding.left, pt.x);m_rectBounding.right = max(m_rectBounding.right, pt.x);m_rectBounding.top = max(m_rectBounding.top, pt.y);m_rectBounding.bottom = min(m_rectBounding.bottom, pt.y);
}
m_rectBounding.InflateRect(CSize(m_nPenWidth, -(int)m_nPenWidth));
矩形的最顶点位置应该是找Y 坐标最小者;而在Y 轴向上的系统中,矩形的最顶点位置应该是找Y 坐标最大者
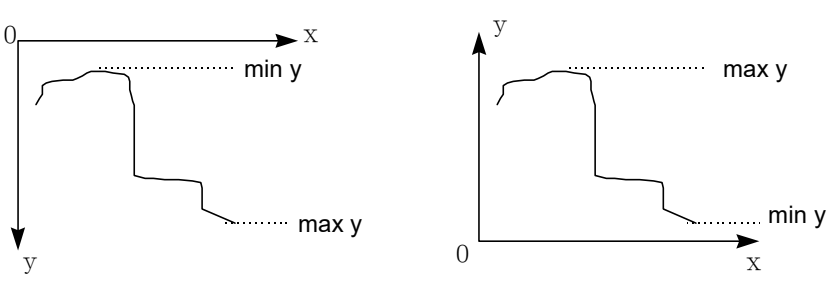
在OnDraw 中以IntersectRect 计算两个四方形是否有交集,这里需要使用设备坐标系:修改为
void CScribbleView::OnDraw(CDC* pDC)
{CScribbleDoc* pDoc = GetDocument();ASSERT_VALID(pDoc);// Get the invalidated rectangle of the view, or in the case// of printing, the clipping region of the printer dc.CRect rectClip;CRect rectStroke;pDC->GetClipBox(&rectClip);pDC->LPtoDP(&rectClip);//增加rectClip.InflateRect(1, 1); // avoid rounding to nothing// Note: CScrollView::OnPaint() will have already adjusted the// viewport origin before calling OnDraw(), to reflect the// currently scrolled position.// The view delegates the drawing of individual strokes to// CStroke::DrawStroke().CTypedPtrList<CObList,CStroke*>& strokeList = pDoc->m_strokeList;POSITION pos = strokeList.GetHeadPosition();while (pos != NULL){CStroke* pStroke = strokeList.GetNext(pos);rectStroke = pStroke->GetBoundingRect();pDC->LPtoDP(&rectStroke);//增加rectStroke.InflateRect(1, 1); // avoid rounding to nothingif (!rectStroke.IntersectRect(&rectStroke, &rectClip))continue;pStroke->DrawStroke(pDC);}
}
分页
本例一份Document 打印时被视为一张标题和一张图片的组合,因此打印一份Document 固定要耗掉两张打印纸。
BOOL CScribbleView::OnPreparePrinting(CPrintInfo* pInfo)
{pInfo->SetMaxPage(2); //文件总共有两页经线://第一页是标题页(title page)
//第二页是文件页(图形)BOOL bRet = DoPreparePrinting(pInfo); // default preparationpInfo->m_nNumPreviewPages = 2; // Preview 2 pages at a time// Set this value after calling DoPreparePrinting to override// value read from .INI filereturn bRet;
}
设计一个函数用以输出标题页,一个函数用以输出文件页(OnDraw 负责)。
class CScribbleView : public CScrollView
{
public:virtual void OnPrint(CDC* pDC, CPrintInfo* pInfo);void PrintTitlePage(CDC* pDC, CPrintInfo* pInfo);void PrintPageHeader(CDC* pDC, CPrintInfo* pInfo, CString& strHeader);...
}
void CScribbleView::OnPrint(CDC *pDC, CPrintInfo *pInfo)
{if (pInfo->m_nCurPage == 1) // page no. 1 is the title page{PrintTitlePage(pDC, pInfo);return; // nothing else to print on page 1 but the page title}CString strHeader = GetDocument()->GetTitle();PrintPageHeader(pDC, pInfo, strHeader);// PrintPageHeader() subtracts out from the pInfo->m_rectDraw the// amount of the page used for the header.pDC->SetWindowOrg(pInfo->m_rectDraw.left, -pInfo->m_rectDraw.top);// Now print the rest of the pageOnDraw(pDC);
}
void CScribbleView::PrintTitlePage(CDC *pDC, CPrintInfo *pInfo)
{// Prepare a font size for displaying the file nameLOGFONT logFont;memset(&logFont, 0, sizeof(LOGFONT));logFont.lfHeight = 75; // 3/4th inch high in MM_LOENGLISH// (1/100th inch)CFont font;CFont *pOldFont = NULL;if (font.CreateFontIndirect(&logFont))pOldFont = pDC->SelectObject(&font);// Get the file name, to be displayed on title pageCString strPageTitle = GetDocument()->GetTitle();// Display the file name 1 inch below top of the page,// centered horizontallypDC->SetTextAlign(TA_CENTER);pDC->TextOut(pInfo->m_rectDraw.right / 2, -100, strPageTitle);if (pOldFont != NULL)pDC->SelectObject(pOldFont);
}
页眉页脚
在OnPrint 调用OnDraw 之前调整窗口的原点和范围,以避免该页的主内容把页眉页脚给盖掉了。
要补偿被页眉页脚占据的空间,可以利用CPrintInfo 结构中的m_rectDraw,这个字段记录着本页的可绘图区域。
我们可以在输出主内容之前先输出页眉页脚,然后扣除m_rectDraw 四方形的一部份,代表页眉页脚所占空间。OnPrint 也可以根据m_rectDraw的数值决定有多少内容要放在打印页的主体上。
void CScribbleView::PrintPageHeader(CDC *pDC, CPrintInfo *pInfo,CString &strHeader)
{// Print a page header consisting of the name of// the document and a horizontal linepDC->SetTextAlign(TA_LEFT);pDC->TextOut(0, -25, strHeader); // 1/4 inch down// Draw a line across the page, below the headerTEXTMETRIC textMetric;pDC->GetTextMetrics(&textMetric);int y = -35 - textMetric.tmHeight;       // line 1/10th inch below textpDC->MoveTo(0, y);                       // from left marginpDC->LineTo(pInfo->m_rectDraw.right, y); // to right margin// Subtract out from the drawing rectange the space used by the header.y -= 25; // space 1/4 inch below (top of) linepInfo->m_rectDraw.top += y;
}
动态计算页码
一般 在改写OnPreparePrinting 时,利用SetMaxPage 为CPrintInfo 结构设定一个最大页码,方便计算打印结束的时机。如果不知道文档的长度,可利用赖CPrintInfo 的m_bContinuePrinting 字段。此字段如果是FALSE,Framework 就中止打印。默认情况下OnPrepareDC 把此字段设为FALSE。(如果Document 长度没有指明,Framework 就假设这份Document只有一页长。)
打印预览( Print Preview)
为了完成预览功能,MFC 在CDC 之下设计了一个子类,名为CPreviewDC。
需要改动的只有如下:
BOOL CScribbleView::OnPreparePrinting(CPrintInfo* pInfo)
{
pInfo->SetMaxPage(2); // the document is two pages long:
// the first page is the title page
// the second is the drawing
BOOL bRet = DoPreparePrinting(pInfo); // default preparationpInfo->m_nNumPreviewPages = 2; // Preview 2 pages at a time// Set this value after calling DoPreparePrinting to override// value read from .INI filereturn bRet;
}