Echarts数据可视化(下)

四、数据可视化项目实战
-
后台搭建
-
结合Vue开发图表组件
-
WebSocket实现数据推送
-
主题切换/页面合并/全屏切换
4.1 Koa2
学习介绍:koa2 - 简书
官网:Koa (koajs) -- 基于 Node.js 平台的下一代 web 开发框架 | Koajs 中文文档
4.1.1 Koa2 的介绍
-
基于Node.js平台的web开发框架
-
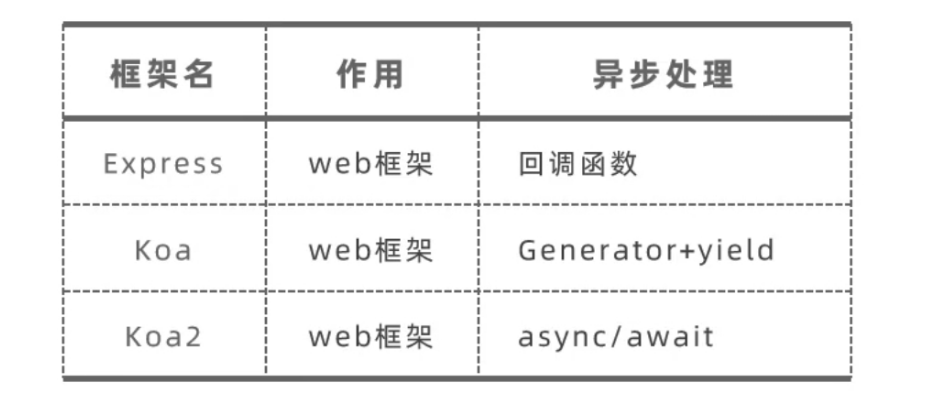
由Express原班人马打造 Express Koa Koa2
-
环境依赖 Node v7.6.0及以上
Koa2的特点
-
支持 async/await
-
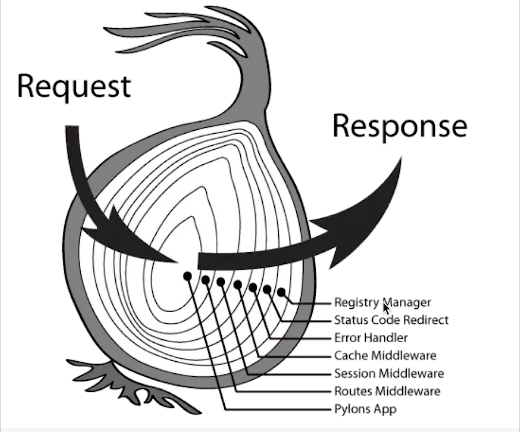
洋葱模型的中间件
4.1.2 Koa2快速上手
-
检查Node的环境

-
安装Koa
npm init -y :可以在当前文件夹下快速创建package.json文件,可以帮我们维护第三方包信息
npm install koa:下载koa到当前文件夹下(为什么不是koa2:因为它会自己联网下载最新版本的koa,而最新版本的koa就是koa2)
-
创建并编写app.js文件,服务器的入口文件
-
创建koa对象
-
编写响应函数(中间件)
-
监听端口
-
-
启动服务器
node app.js
-
打开终端
D:\\Java Project\\koa_study>node -v
v16.17.0
D:\\Java Project\\koa_study>npm init -y
Wrote to D:\\Java Project\\koa_study\\package.json:
{"name": "koa_study","version": "1.0.0","description": "","main": "index.js","scripts": {"test": "echo \\"Error: no test specified\\" && exit 1"},"keywords": [],"author": "","license": "ISC"
}
D:\\Java Project\\koa_study>npm install koa
added 42 packages, and audited 43 packages in 4s
4 packages are looking for fundingrun `npm fund` for details
found 0 vulnerabilities
D:\\Java Project\\koa_study>
2、app.js
/*
//官网教程
const Koa = require('koa');
const app = new Koa();
app.use(async ctx => {ctx.body = 'Hello World';
});
app.listen(8080);
*/
//1、创建koa对象
const Koa = require('koa')
const app = new Koa()
//2、编写响应函数(中间件)
//ctx: 上下文,web容器,ctx.request ctx.response
//next:下一个中间件,下一层中间件是否能够得到执行,取决于next这个函数有没有被调用
app.use(async (ctx,next)=>{console.log(ctx.request.url)ctx.body = 'Hello Kevin'//ctx.response.body = 'Hello Kevin' //这种方式也可以
})
//3、绑定端口号:9090
app.listen(9090)
3、启动服务器
node app.js

访问成功

D:\\Java Project\\koa_study>node app.js
/    //访问http://localhost:9090/,最后的/
/favicon.ico  //浏览器自己发出的一个图标请求
Koa2中间件的特点
-
Koa对象通过use方法加入一个中间件
//代码模板 app.use(async (ctx,next)=>{//刚进入中间件想做的事情await next()//内层所有中间件结束之后想做的事情 }) -
一个中间件就是一个函数
-
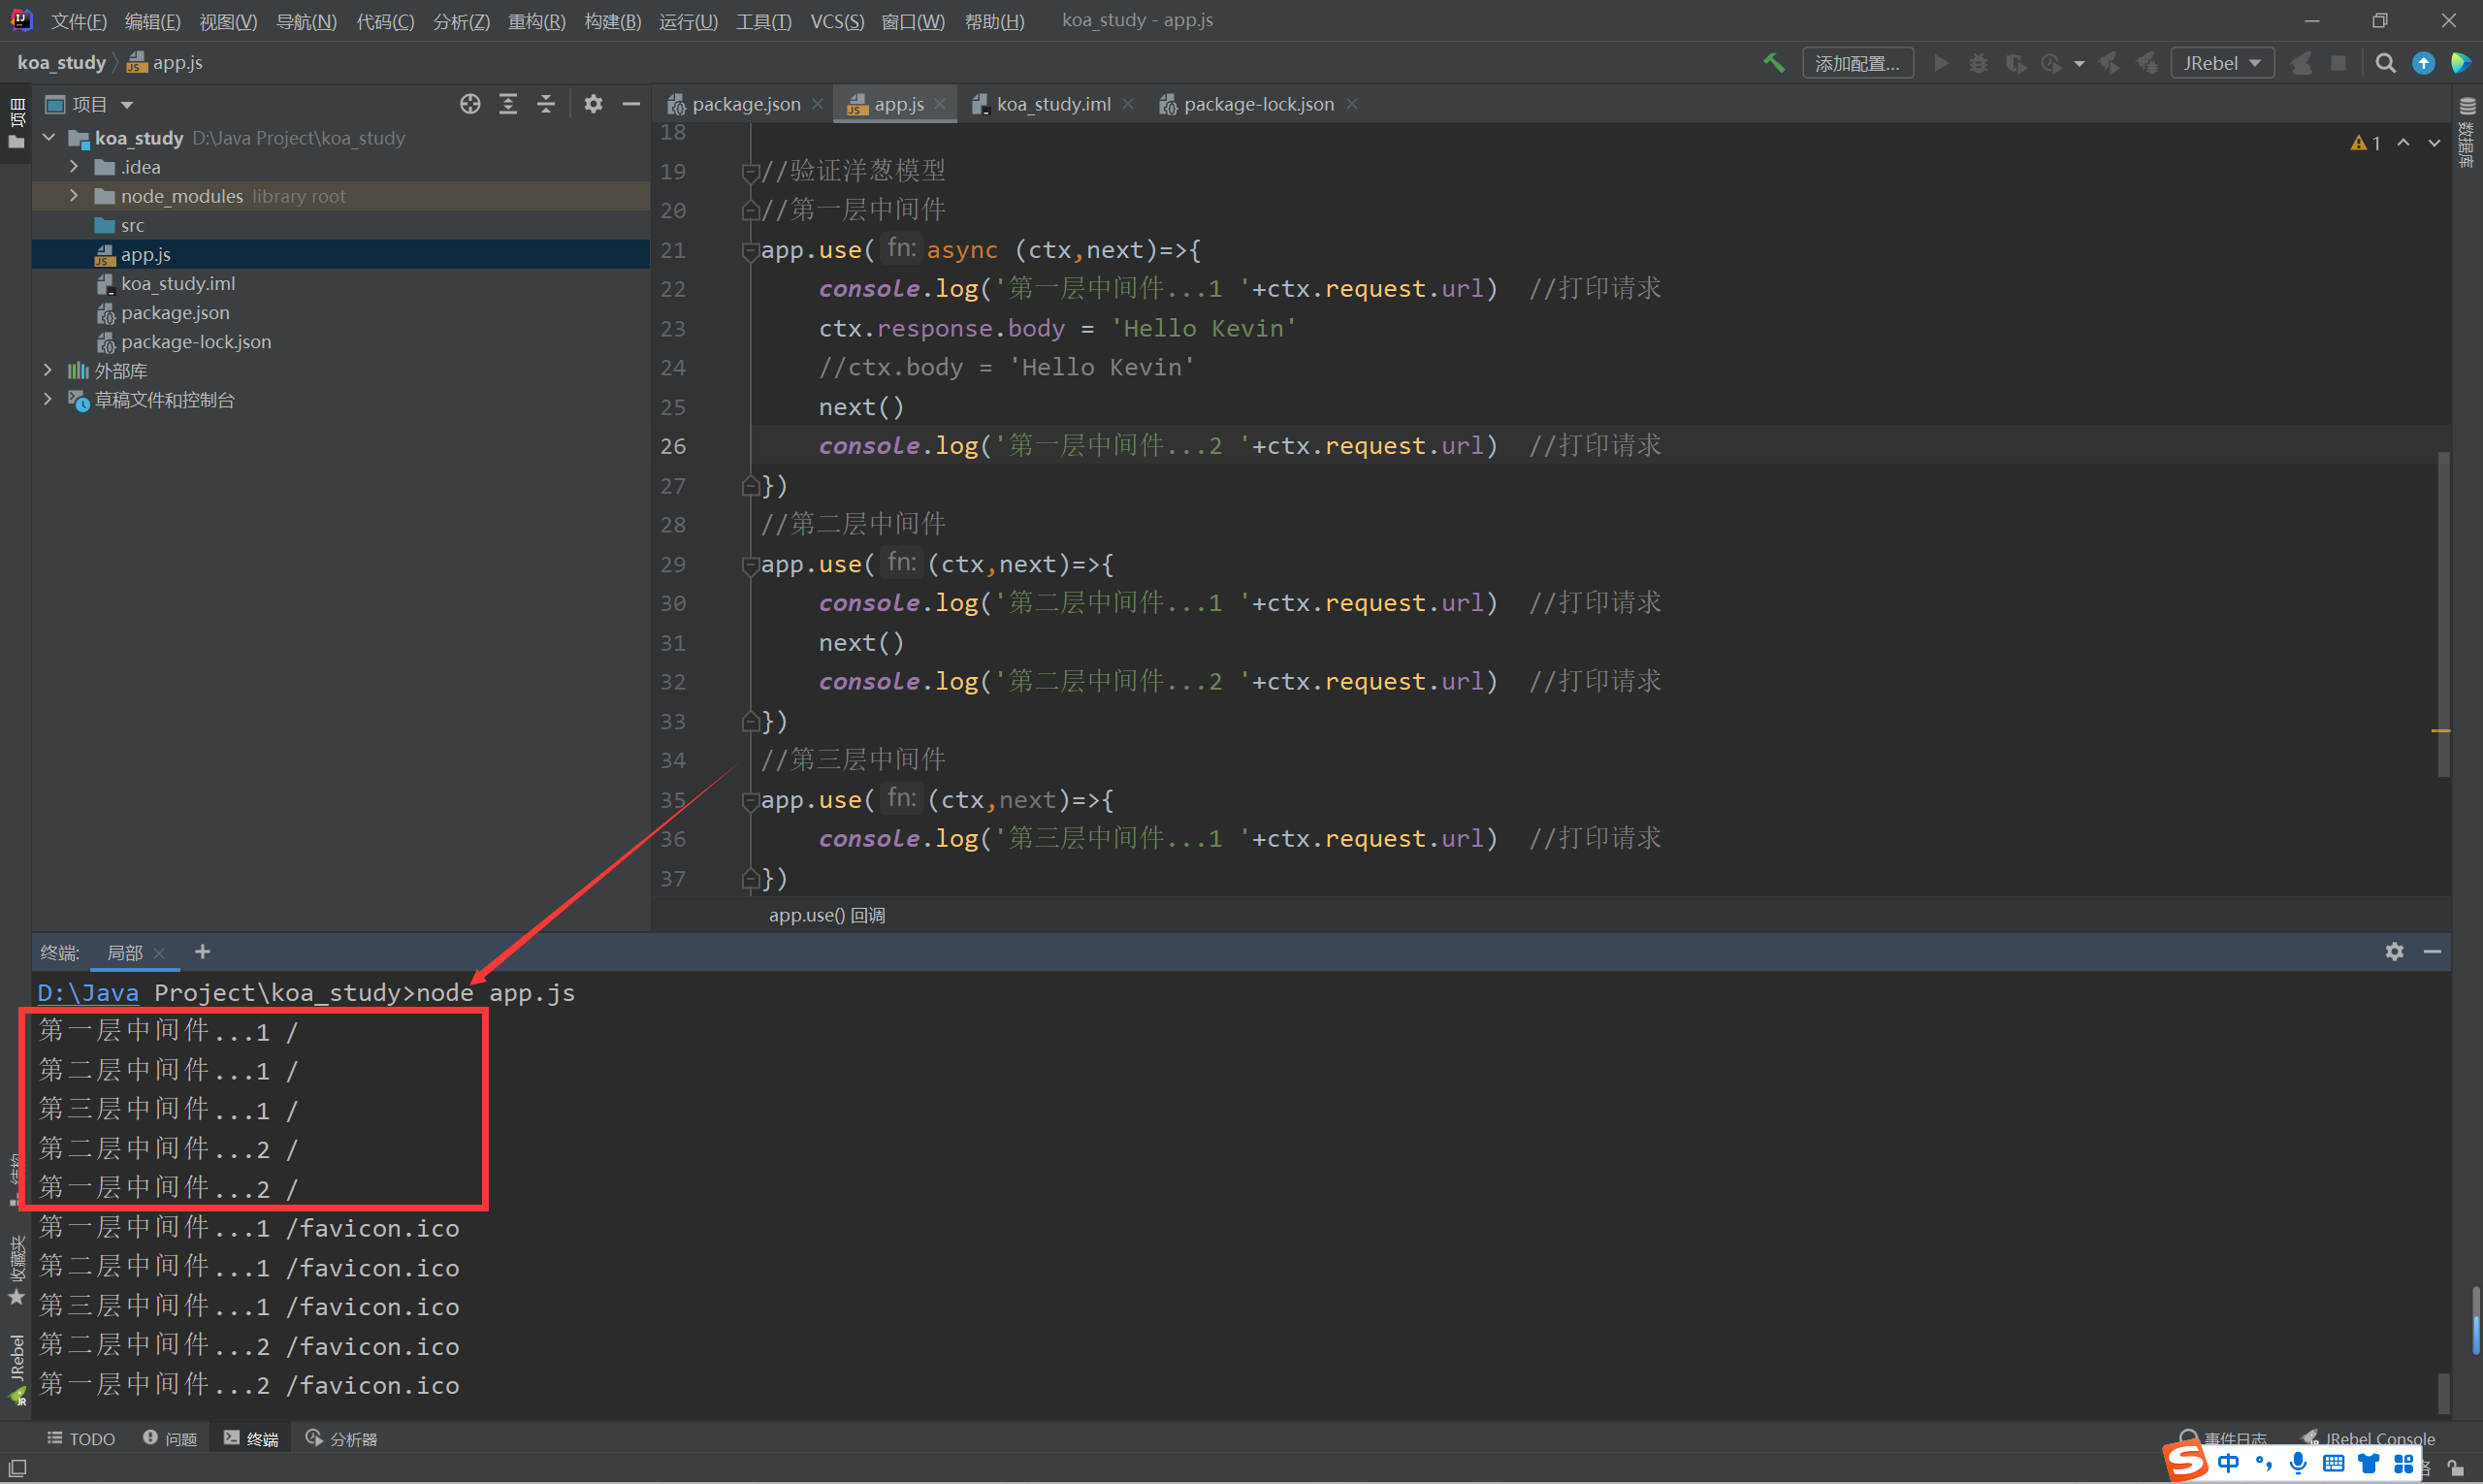
中间件的执行顺序符合洋葱模型
-
内层中间件能否执行取决于外层中间件的next函数是否调用
//验证洋葱模型
//第一层中间件
app.use(async (ctx,next)=>{console.log('第一层中间件...1 '+ctx.request.url)  //打印请求ctx.response.body = 'Hello Kevin'//ctx.body = 'Hello Kevin'next()  //进入第二层中间件console.log('第一层中间件...2 '+ctx.request.url)  //打印请求
})
//第二层中间件
app.use((ctx,next)=>{console.log('第二层中间件...1 '+ctx.request.url)  //打印请求next()console.log('第二层中间件...2 '+ctx.request.url)  //打印请求
})
//第三层中间件
app.use((ctx,next)=>{console.log('第三层中间件...1 '+ctx.request.url)  //打印请求
})
D:\\Java Project\\koa_study>node app.js
第一层中间件...1 /
第二层中间件...1 /
第三层中间件...1 /
第二层中间件...2 /
第一层中间件...2 /
第一层中间件...1 /favicon.ico
第二层中间件...1 /favicon.ico
第三层中间件...1 /favicon.ico
第二层中间件...2 /favicon.ico
第一层中间件...2 /favicon.ico
-
调用next函数得到的是Promise对象
//验证洋葱模型
//第一层中间件
app.use(async (ctx,next)=>{console.log('第一层中间件...1 '+ctx.request.url)  //打印请求ctx.response.body = 'Hello Kevin'//ctx.body = 'Hello Kevin'next()console.log('第一层中间件...2 '+ctx.request.url)  //打印请求
})
//第二层中间件
app.use((ctx,next)=>{console.log('第二层中间件...1 '+ctx.request.url)  //打印请求const ret = next()console.log(ret)console.log('第二层中间件...2 '+ctx.request.url)  //打印请求
})
//第三层中间件
app.use((ctx,next)=>{console.log('第三层中间件...1 '+ctx.request.url)  //打印请求return 'China'
})
D:\\Java Project\\koa_study>node app.js 第一层中间件...1 / 第二层中间件...1 / 第三层中间件...1 / Promise { 'China' } 第二层中间件...2 / 第一层中间件...2 / 第一层中间件...1 /favicon.ico 第二层中间件...1 /favicon.ico 第三层中间件...1 /favicon.ico Promise { 'China' } 第二层中间件...2 /favicon.ico 第一层中间件...2 /favicon.ico -
将Promise对象返回为字符串 加入await 和 async即可
//验证洋葱模型
//第一层中间件
app.use(async (ctx,next)=>{console.log('第一层中间件...1 '+ctx.request.url)  //打印请求ctx.response.body = 'Hello Kevin'//ctx.body = 'Hello Kevin'next()console.log('第一层中间件...2 '+ctx.request.url)  //打印请求
})
//第二层中间件
app.use(async (ctx,next)=>{console.log('第二层中间件...1 '+ctx.request.url)  //打印请求const ret = await next()console.log(ret)console.log('第二层中间件...2 '+ctx.request.url)  //打印请求
})
//第三层中间件
app.use((ctx,next)=>{console.log('第三层中间件...1 '+ctx.request.url)  //打印请求return 'China'
})
D:\\Java Project\\koa_study>node app.js 第一层中间件...1 / 第二层中间件...1 / 第三层中间件...1 / 第一层中间件...2 / China 第二层中间件...2 / 第一层中间件...1 /favicon.ico 第二层中间件...1 /favicon.ico 第三层中间件...1 /favicon.ico 第一层中间件...2 /favicon.ico China 第二层中间件...2 /favicon.ico
4.2 项目准备
后台项目的目标:
-
计算服务器处理请求的总耗时
-
在响应头上加上响应内容的mime类型(mime类型:指的是所返回给前端的数据类型是什么,例如:application/json)
-
根据URL读取指定目录下的文件内容
后台项目的实现步骤:
-
项目准备
-
总耗时中间件
-
响应头中间件
-
业务逻辑中间件
-
允许跨域
项目准备
-
安装包
-
npm init -y:初始化package.json文件
如果已经存在:则 npm install即可
npm install koa
-
创建文件和目录结构
app.js
data/ :此项目的数据存在json文件中,本来是应该存在数据库的(为了简化开发)
middleware/
-koa_responsedata.js :处理业务逻辑的中间件,读取某个json文件的数据
-koa_response_duration.js //计算服务器消耗时长的中间件
-koa_response_header.js //设置响应头的中间件
utils/
-file_untils.js :帮我们快速读取某个目录下的文件
4.2.1总耗时中间件
-
第一层中间件
-
计算执行时间
一进入时记录开始时间
其他所有中间件执行完后记录结束时间
两者相减
-
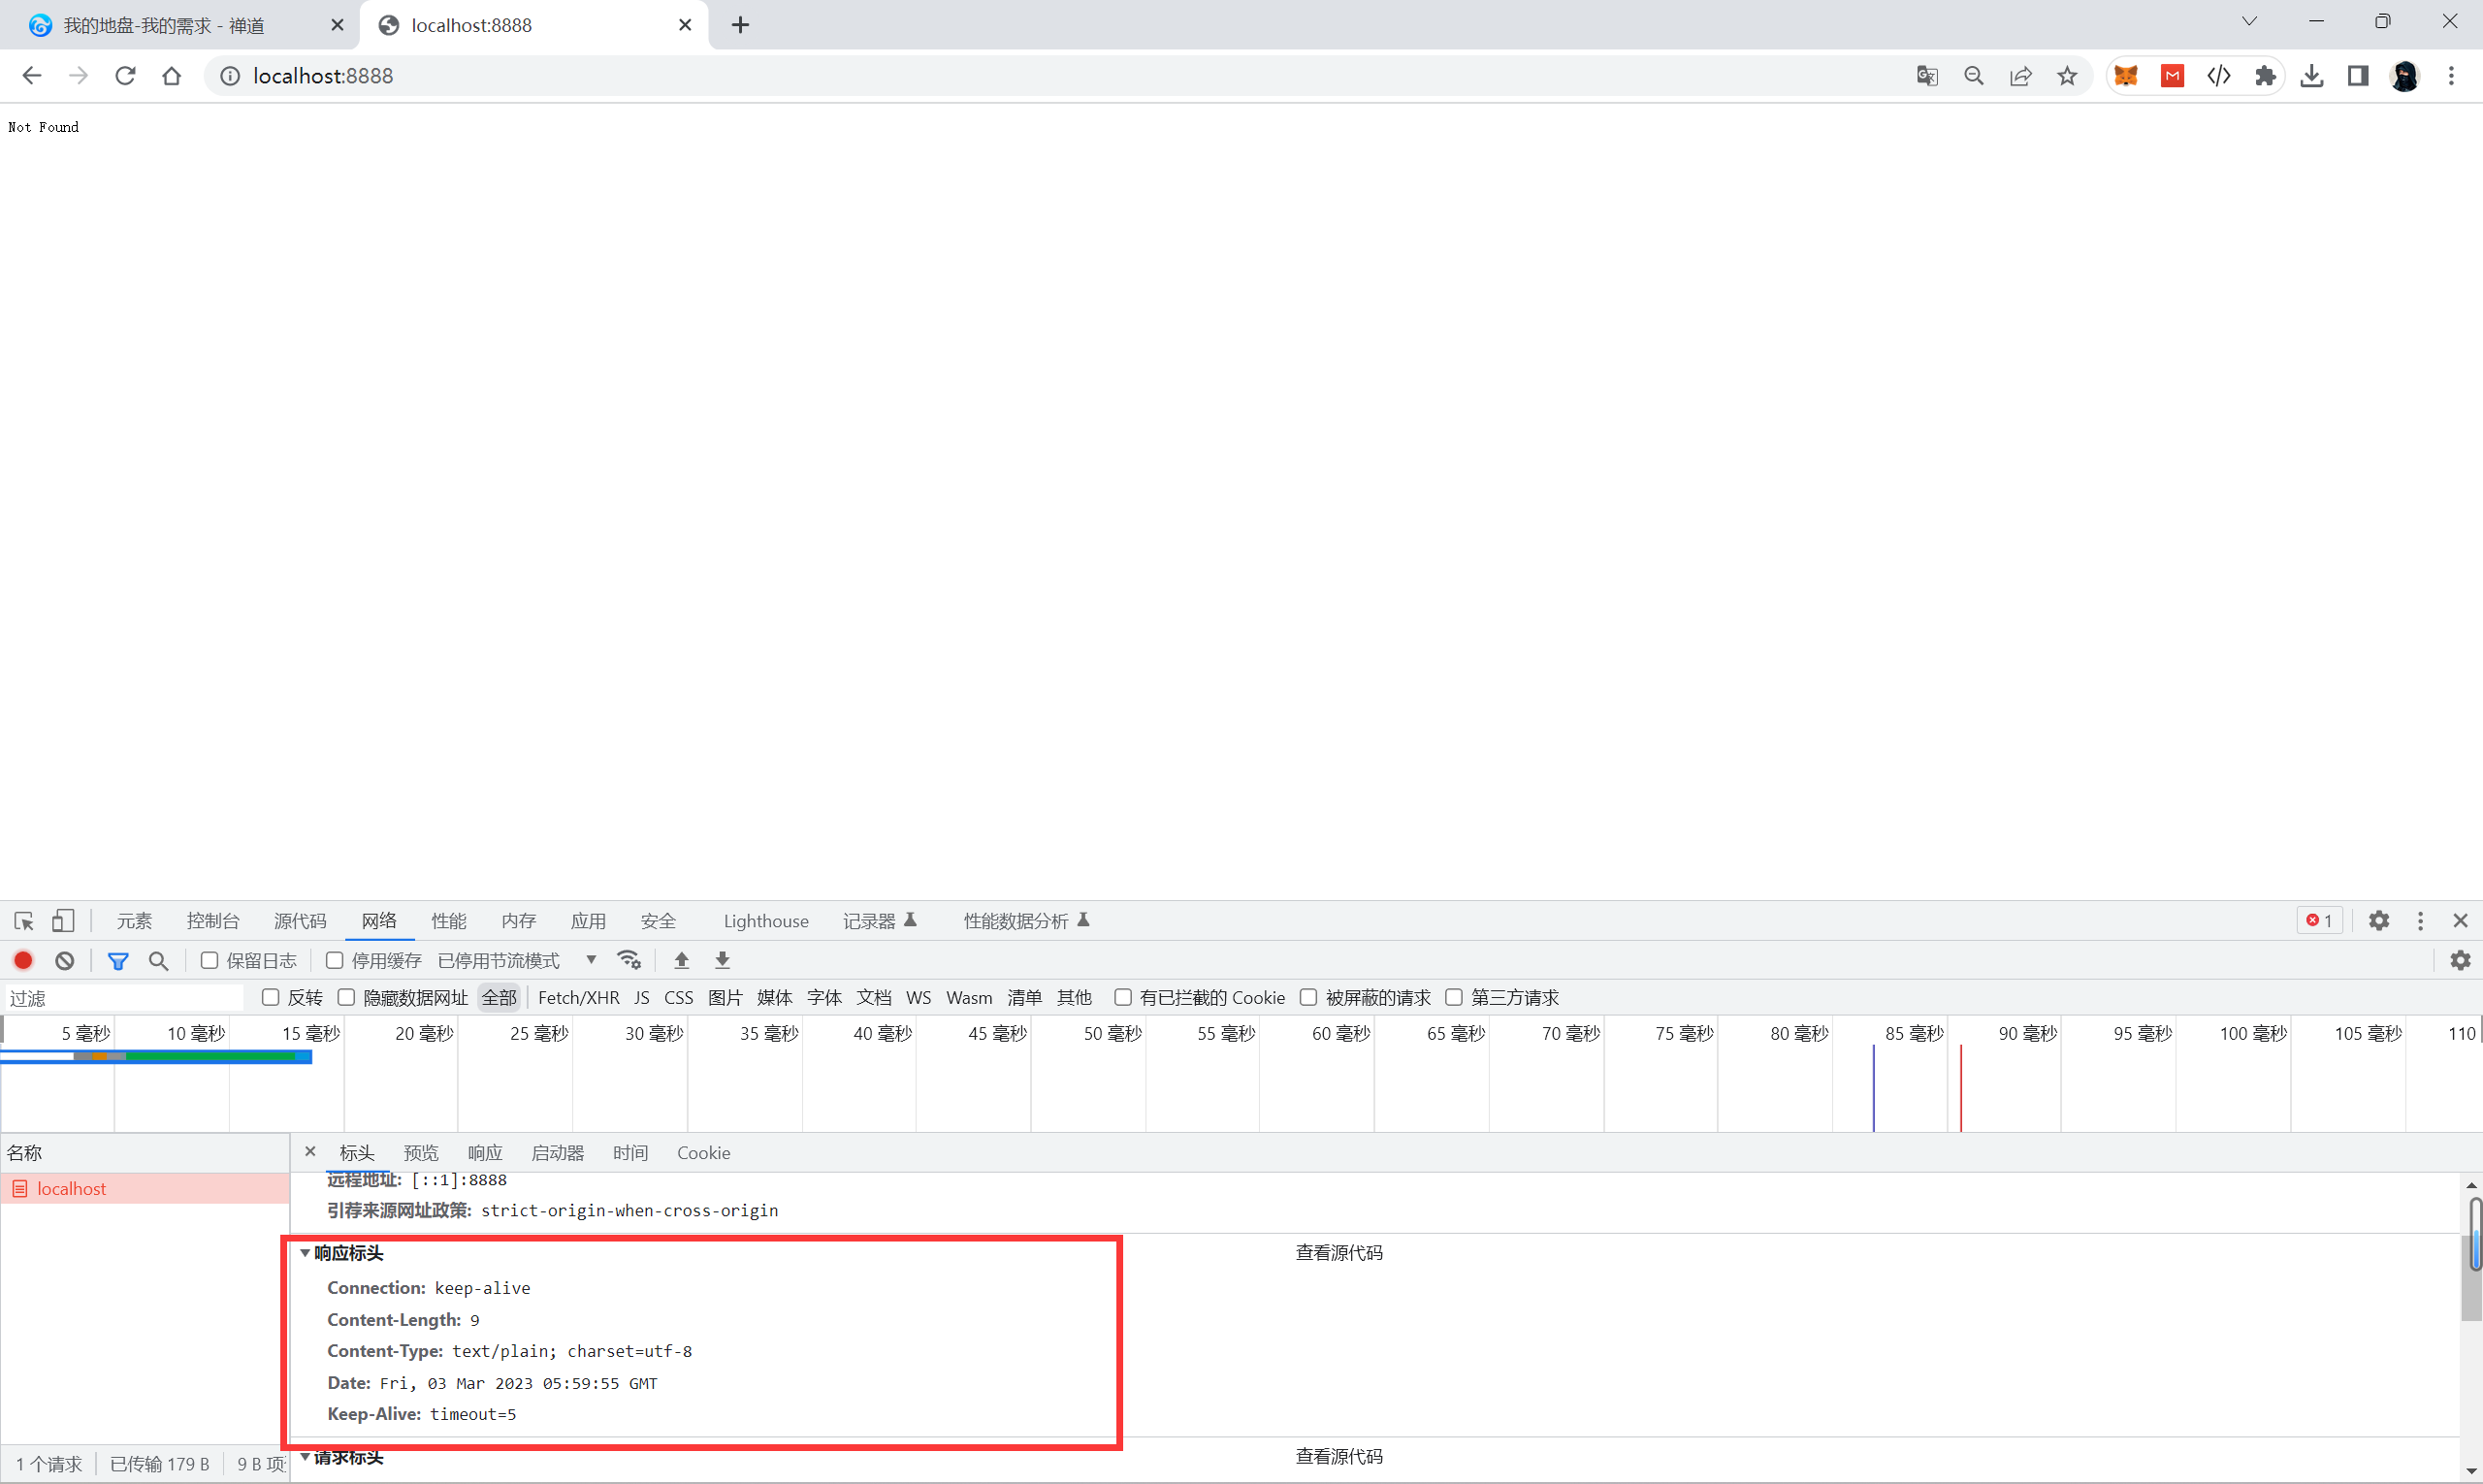
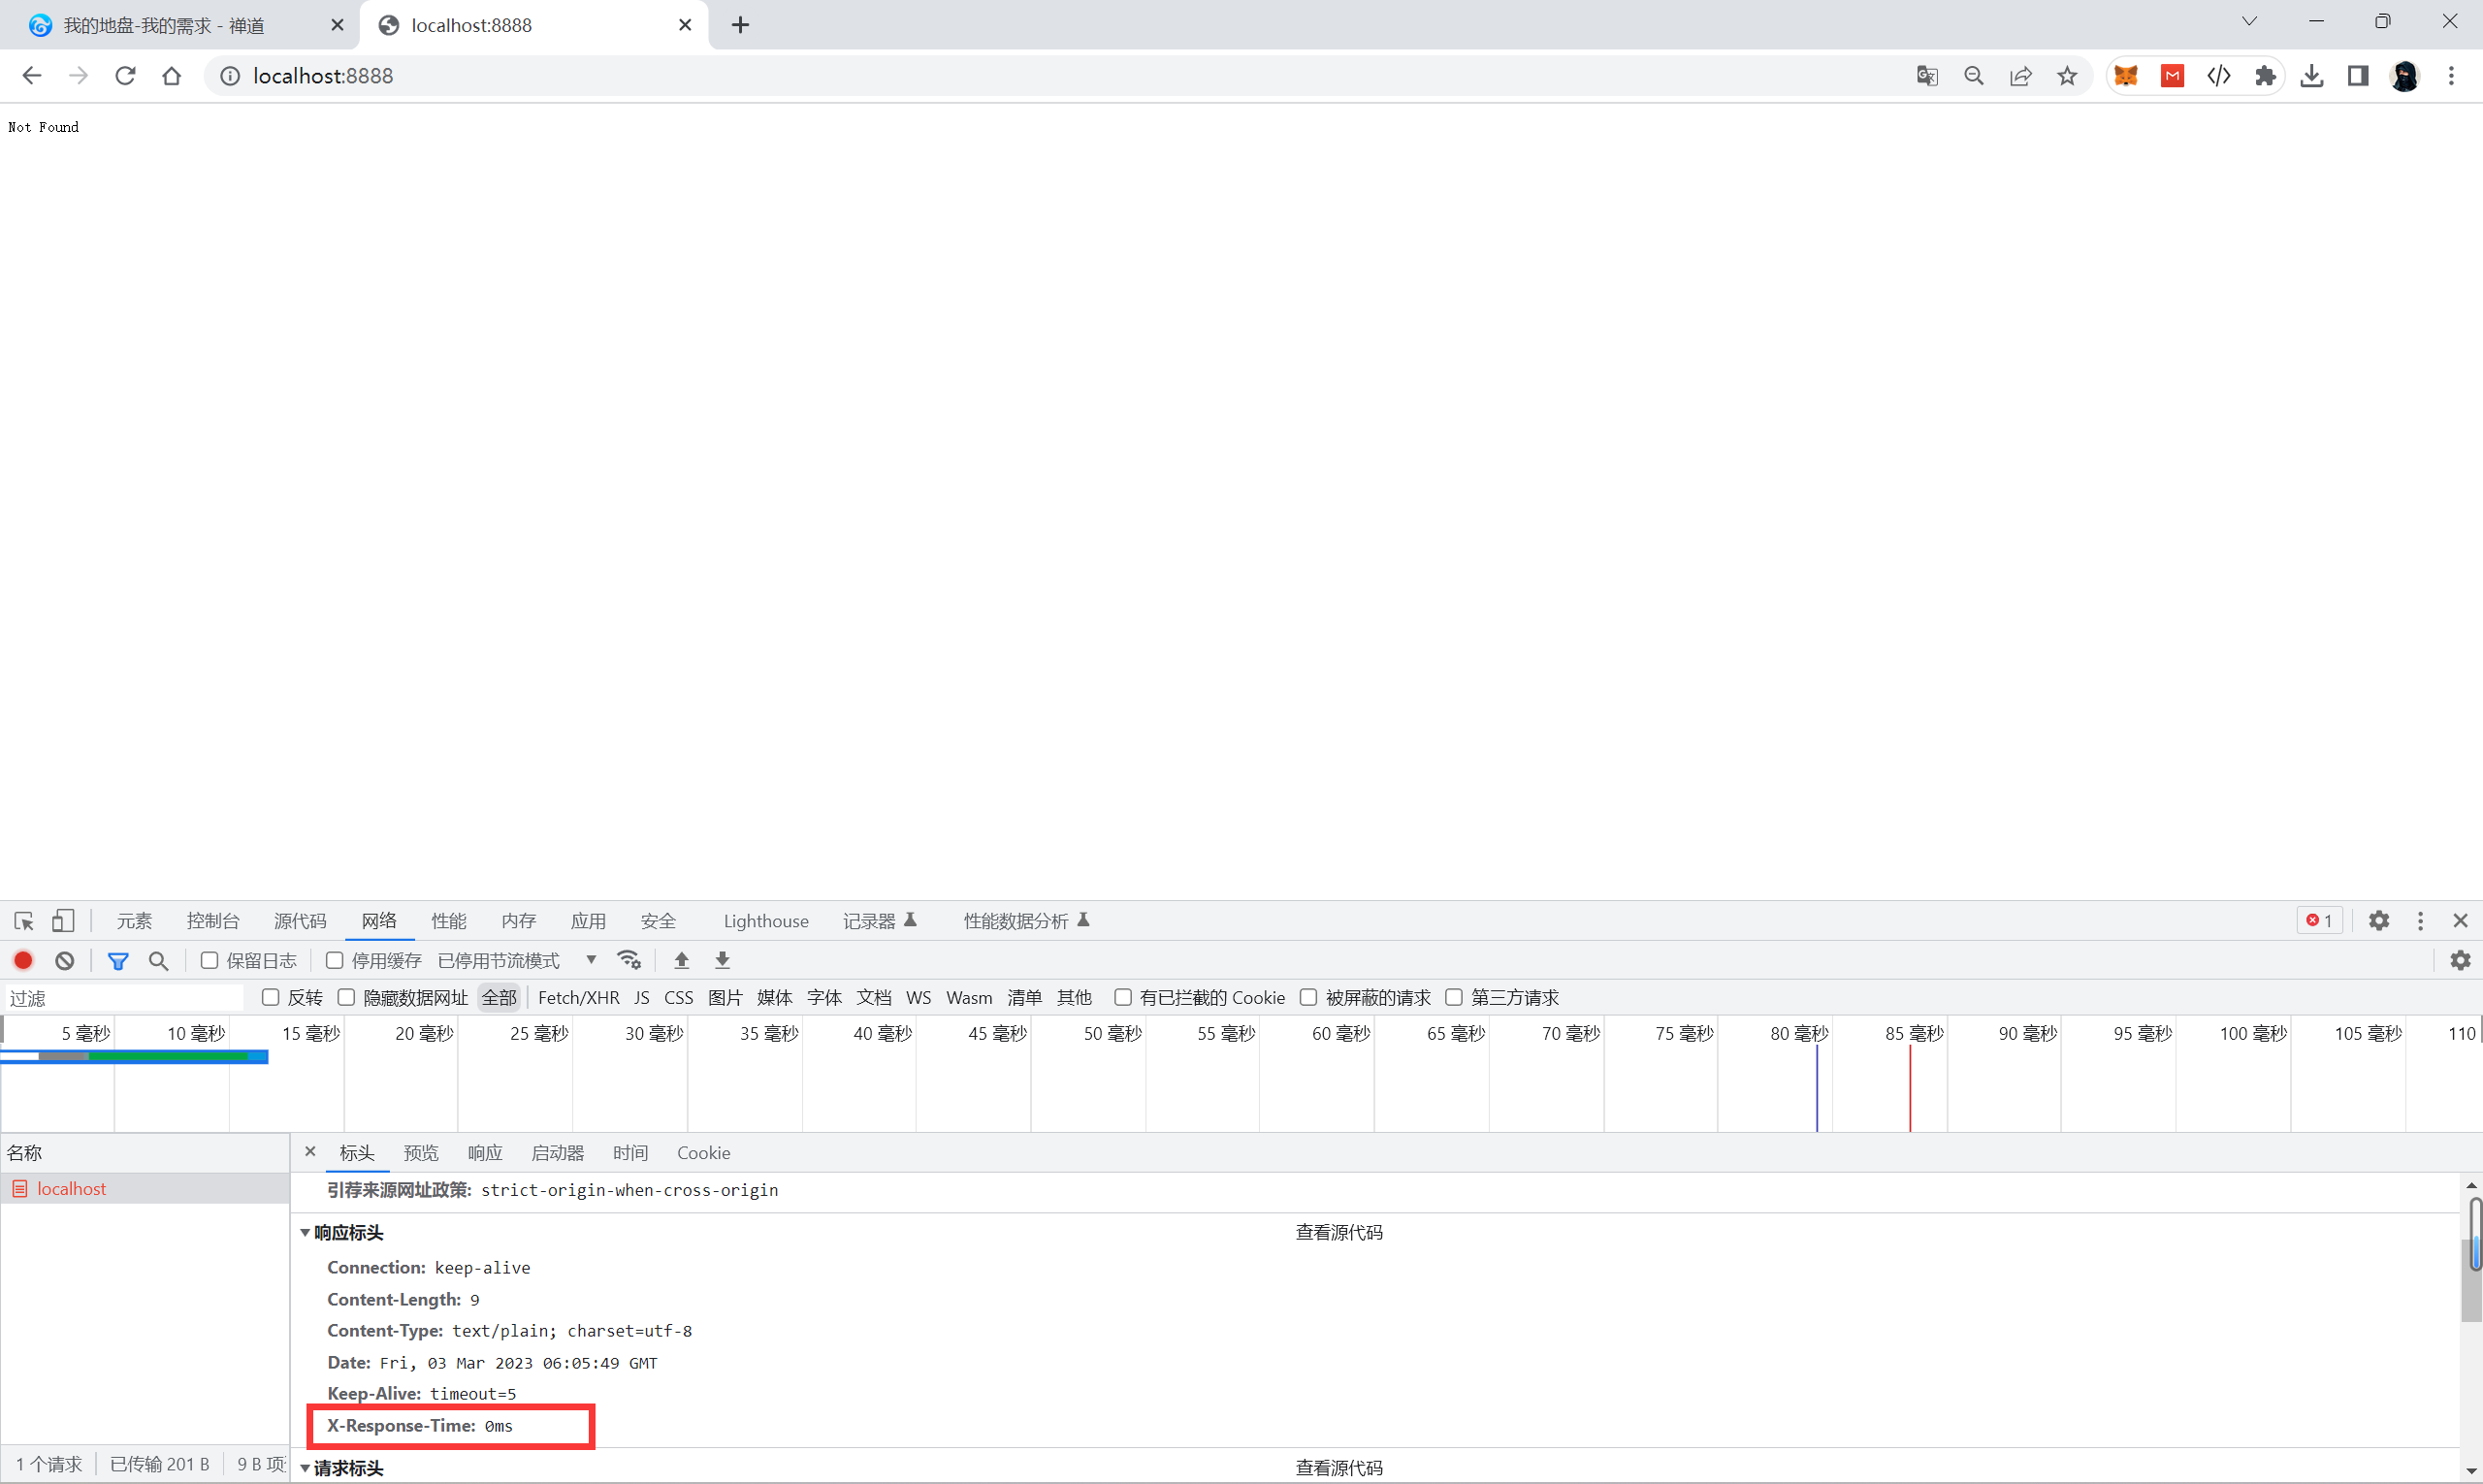
设置响应头
X-Response-Time:5ms
未设置之前的响应头
koa_response_duration.js
//计算服务器消耗时长的中间件
module.exports = async (ctx,next)=>{//记录开始时间const start = Date.now()//让内层中间件得到执行await next()  //使所有内层中间件得到执行,并返回Promise中存在的东西//记录结束时间const end = Date.now()const duration = end - start//设置响应头 X-Response-Time:ctx.set()ctx.set('X-Response-Time',duration+'ms')
}
app.js
//服务器的入口文件
//1.创建koa的实例对象
const Koa = require('koa')
const app = new Koa()
//2.绑定中间件
//绑定第一层中间件
const responseDuration = require('./middleware/koa_response_duration')
app.use(responseDuration)
//绑定第二层中间件
//绑定第三层中间件
//3.绑定端口号 8888
app.listen(8888)
启动
4.2.2响应头中间件
-
第二层中间件(没有固定放在哪,一般放在第二层)
-
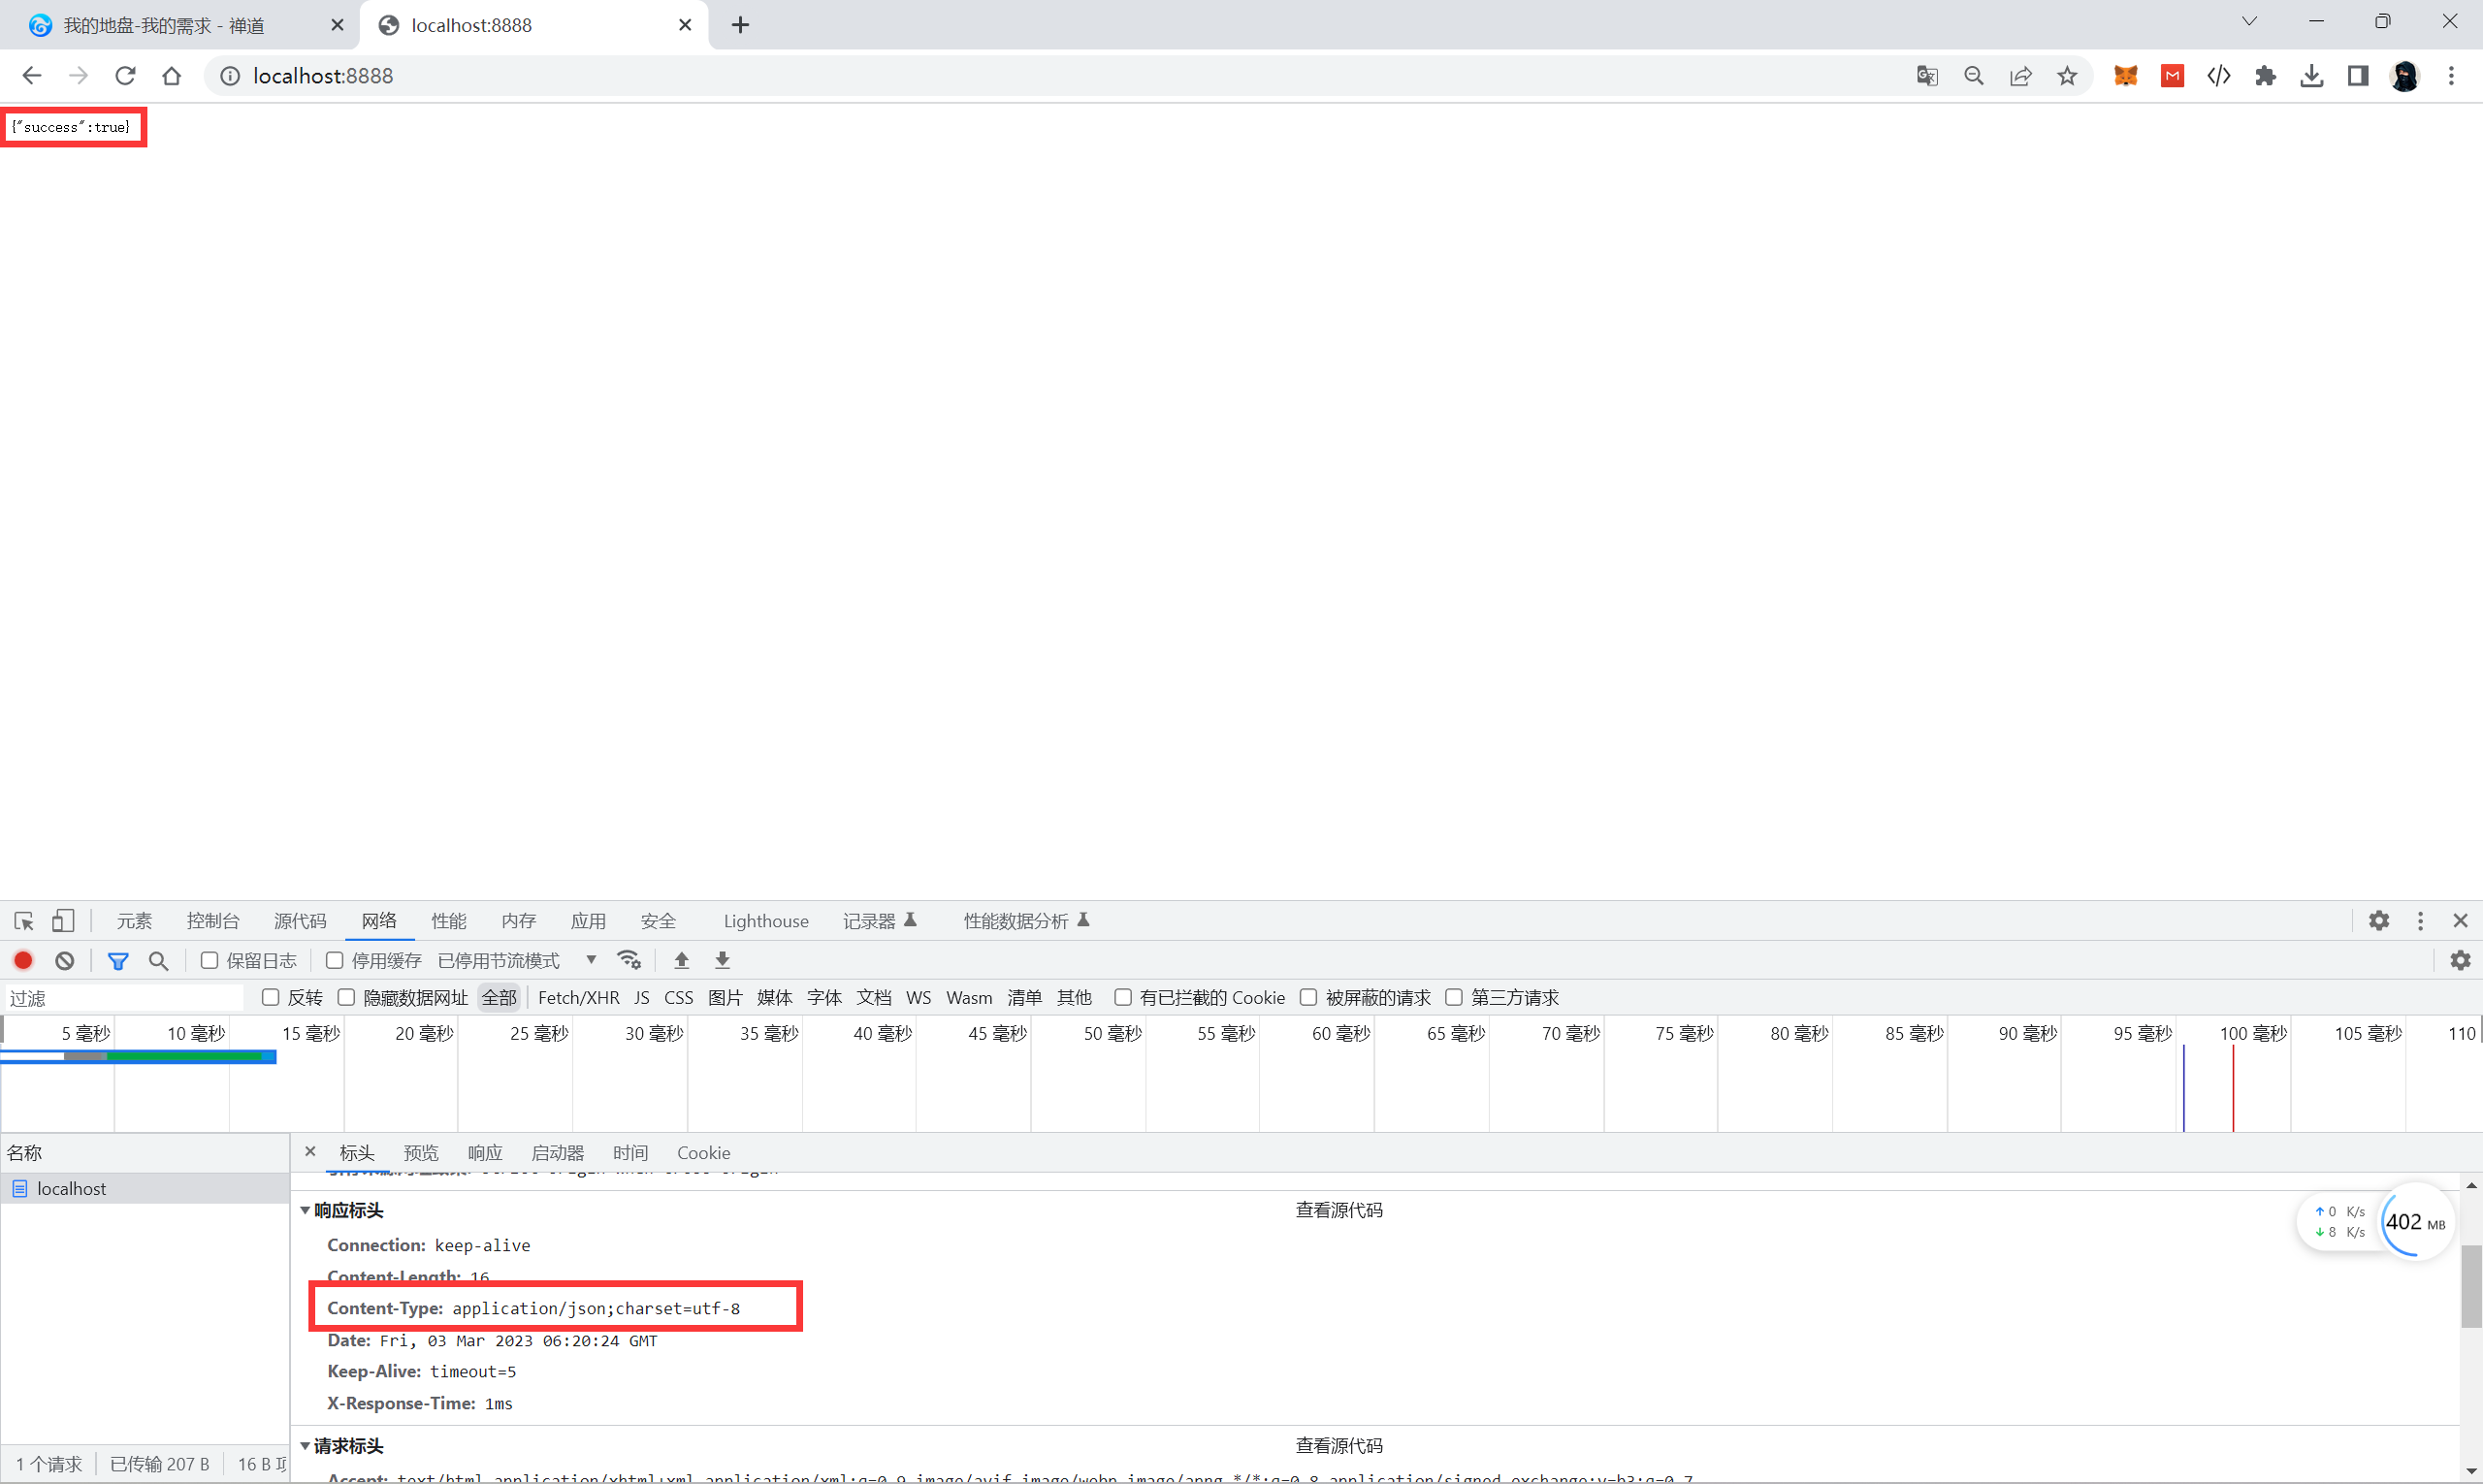
获取mime类型
application/json
-
设置响应头(响应头格式)
Content-Type:application/json;charset=utf-8
koa_response_header.js
//设置响应头的中间件
module.exports =async (ctx,next)=>{const contentType = 'application/json;charset=utf-8'ctx.set('Content-Type',contentType)ctx.response.body = '{"success":true}'await next()
}
app.js
//服务器的入口文件
//1.创建koa的实例对象
const Koa = require('koa')
const app = new Koa()
//2.绑定中间件
//绑定第一层中间件
const responseDuration = require('./middleware/koa_response_duration')
app.use(responseDuration)
const responseHeader = require('./middleware/koa_response_header')
app.use(responseHeader)
//绑定第二层中间件
//绑定第三层中间件
//3.绑定端口号 8888
app.listen(8888)
4.2.3业务逻辑中间件
-
第三层中间件
-
读取文件内容:http://localhost:8888/api/seller
-
获取请求路径,拼接文件路径
-
读取该路径对应的文件的内容
-
设置响应体
ctx.response.body
-
接口总览
-
商家销量 /api/seller
-
预算开销 /api/budget
-
库存信息 /api/stock
-
销量趋势 /api/trend
-
销量排行 /api/rank
-
商家分布 /api/map
-
热销商品 /api/hotproduct
-
koa_responsedata.js
const path = require('path')
const fileUtils = require('../utils/file_utils')
//处理业务逻辑的中间件,读取某个json文件的数据
module.exports = async (ctx,next)=>{//根据url读取文件const url = ctx.request.url // url: /api/seller 文件的路径:../data/seller.jsonvar filePath = url.replace('/api','../data') //url: ../data/sellerfilePath = filePath+'.json' // url: ../data/seller.jsonfilePath = path.join(__dirname,filePath) //__dirname:当前文件所处的路径 D:\\Java Project\\koa_server\\data\\seller.json
try {const ret = await fileUtils.getFileJsonData(filePath)ctx.response.body = ret //设置响应体}catch (error) {const errorMessage = {message: '读取文件内容失败,文件资源不存在',status: 404}ctx.response.body = JSON.stringify(errorMessage)}
console.log(filePath)await next()
}
file_utils.js
//读取文件的工具方法
const fs = require('fs')
module.exports.getFileJsonData = (filePath)=>{//return 'haha'return new Promise((resolve,reject)=>{//根据文件路径读取文件内容fs.readFile(filePath,'utf-8',(error,data)=>{if(error){//读取文件失败reject(error)}else {//读取文件成功resolve(data)}})})
}
app.js
//服务器的入口文件
//1.创建koa的实例对象
const Koa = require('koa')
const app = new Koa()
//2.绑定中间件
//绑定第一层中间件
const responseDuration = require('./middleware/koa_response_duration')
app.use(responseDuration)
//绑定第二层中间件
const responseHeader = require('./middleware/koa_response_header')
app.use(responseHeader)
//绑定第三层中间件
const responseData = require('./middleware/koa_responsedata')
app.use(responseData)
//3.绑定端口号 8888
app.listen(8888)
4.2.4 允许跨域
-
实际是通过Ajax访问服务器
-
同源策略
同协议/同域名/同端口
当前页面的地址和Ajax获取数据的地址
-
设置响应头,即可允许跨域
//设置响应头的中间件
module.exports =async (ctx,next)=>{ctx.set("Access-Control-Allow-Origin","*")ctx.set("Access-Control-Allow-Methods","OPTIONS,GET,PUT,POST,DELETE")await next()
}
4.3 前端项目_项目的创建和准备
项目开发步骤:
-
前端项目准备
-
单独图表组件的开发
-
WebSocket的引入
-
细节处理
整个项目的架构是基于Vue的,所以我们需要创建Vue项目,然后再Vue项目中开发各个图表组件
4.3.1 vue-cli 脚手架环境的安装
在全局环境中安装 vue-cli 脚手架(一台电脑只需要运行一次即可)
PS D:\\Java Project\\vue_study> npm install -g @vue/cli npm WARN deprecated source-map-url@0.4.1: See https://github.com/lydell/source-map-url#deprecated npm WARN deprecated urix@0.1.0: Please see https://github.com/lydell/urix#deprecated npm WARN deprecated source-map-resolve@0.5.3: See https://github.com/lydell/source-map-resolve#deprecated npm WARN deprecated resolve-url@0.2.1: https://github.com/lydell/resolve-url#deprecated npm WARN deprecated apollo-server-errors@3.3.1: The `apollo-server-errors` package is part of Apollo Server v2 and v3, which are now deprecated (end-of-life October 22nd 2023). This package's functionality is now found in the `@apollo/server` package. See https://www.apollographql.com/docs/apollo-server/previous-versions/ for more details. npm WARN deprecated apollo-server-env@4.2.1: The `apollo-server-env` package is part of Apollo Server v2 and v3, which are now deprecated (end-of-life October 22nd 2023). This package's functionality is now found in the `@apollo/utils.fetcher` package. See https://www.apollographql.com/docs/apollo-server/previous-versions/ for more details. npm WARN deprecated apollo-datasource@3.3.2: The `apollo-datasource` package is part of Apollo Server v2 and v3, which are now deprecated (end-of-life October 22nd 2023). See https://www.apollographql.com/docs/apollo-server/previous-versions/ for more details. npm WARN deprecated subscriptions-transport-ws@0.11.0: The `subscriptions-transport-ws` package is no longer maintained. We recommend you use `graphql-ws` instead. For help migrating Apollo software to `graphql-ws`, see https://www.apollographql.com/docs/apollo-server/data/subscriptions/#switching-from-subscriptions-transport-ws For general help using `graphql-ws`, see https://github.com/enisdenjo/graphql-ws/blob/master/README.md added 855 packages, and audited 857 packages in 2m 6 vulnerabilities (1 moderate, 5 high) To address all issues (including breaking changes), run:npm audit fix --force Run `npm audit` for details. PS D:\\Java Project\\vue_study>
4.3.2. 工程的创建
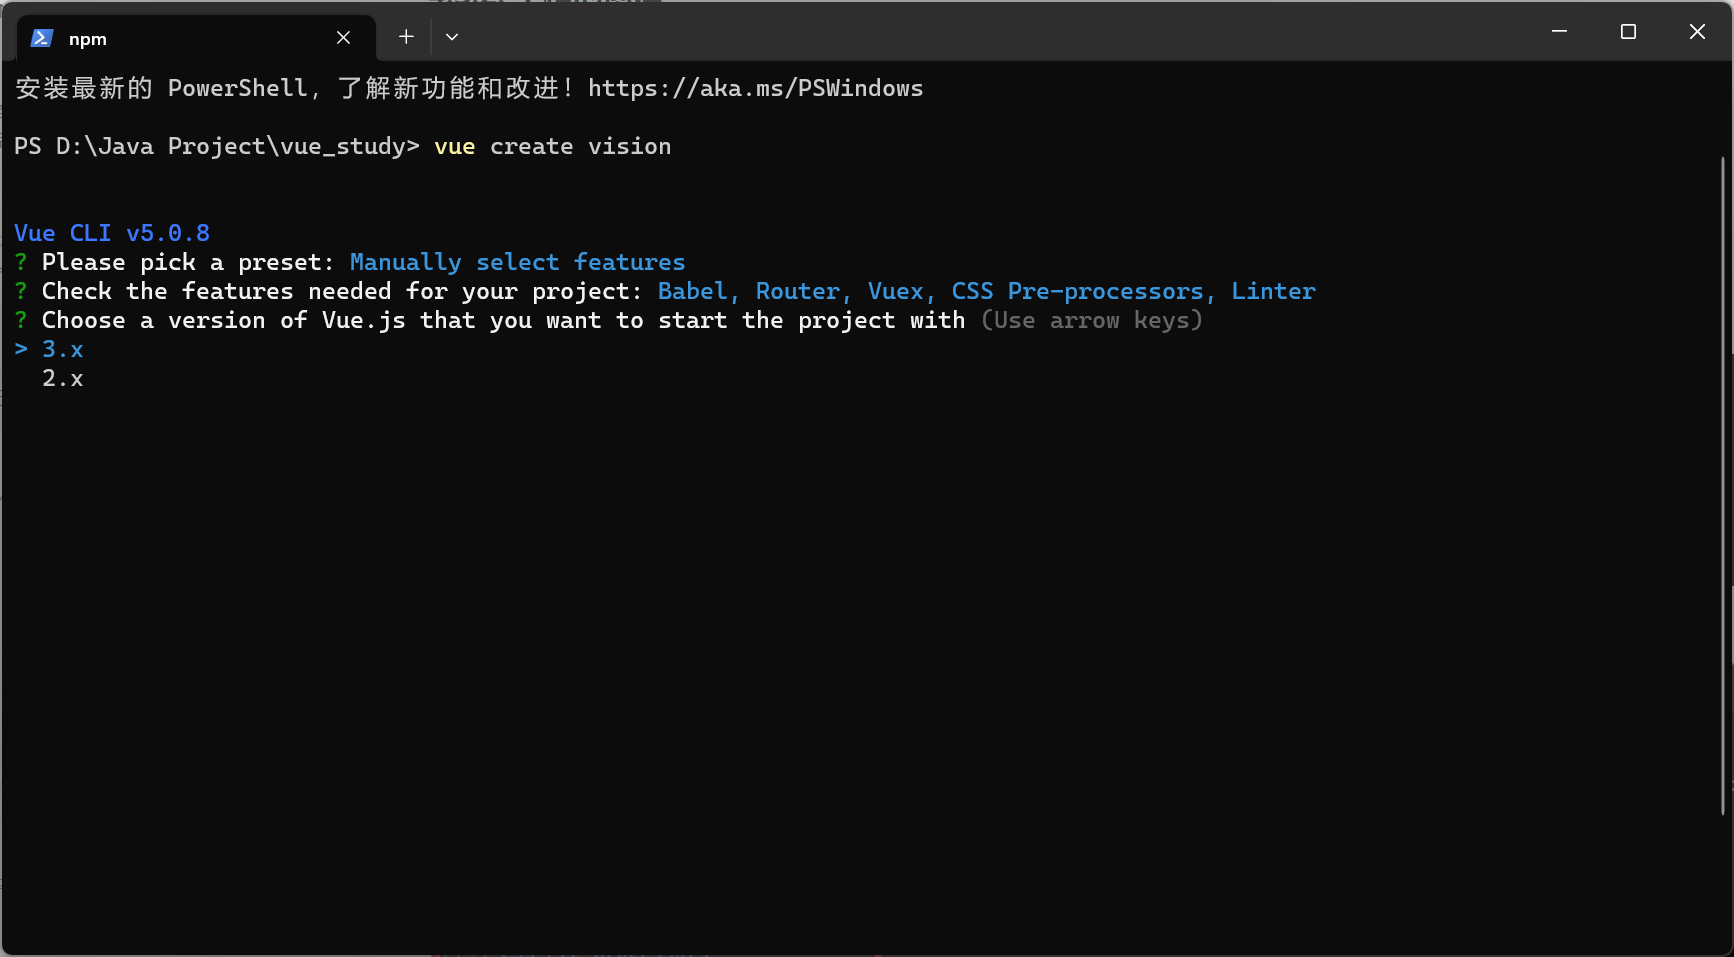
使用命令行执行
vue create vision //vision:项目名称
踩坑链接:摩杜云开发者社区-摩杜云
然后Y进入如下页面
-
进行手动选择

-
按空格进行选择如下选项

-
按下回车选择Vue版本
-
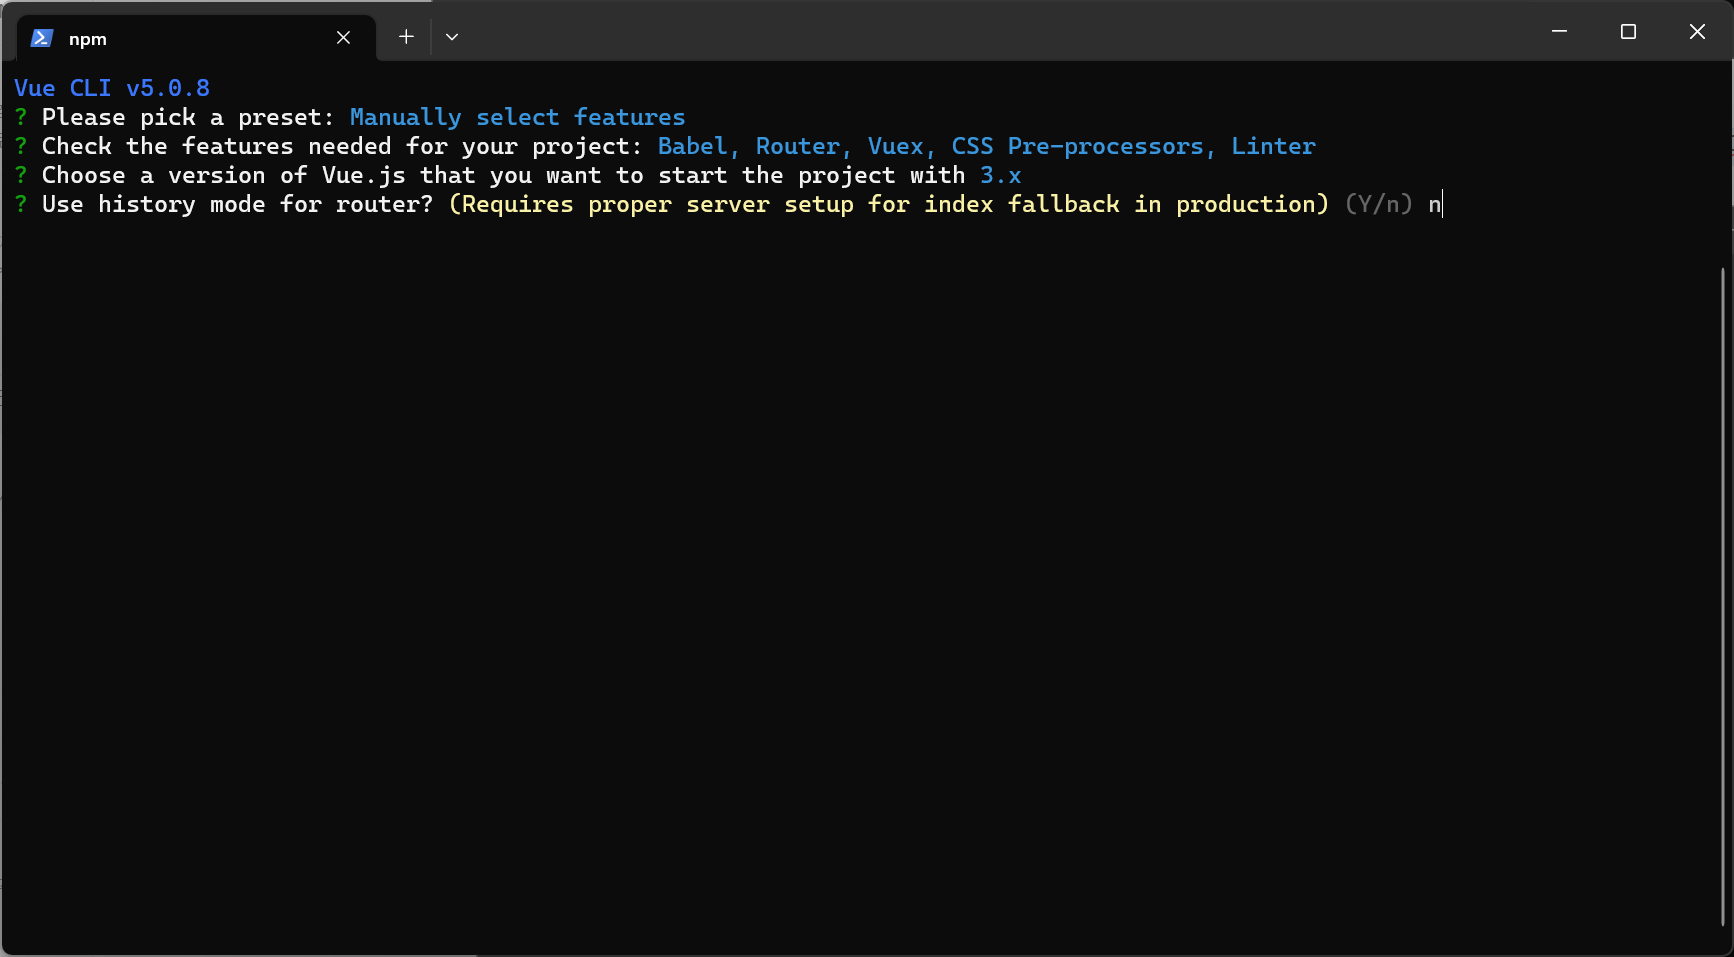
是否要选择历史模式路由 n
-
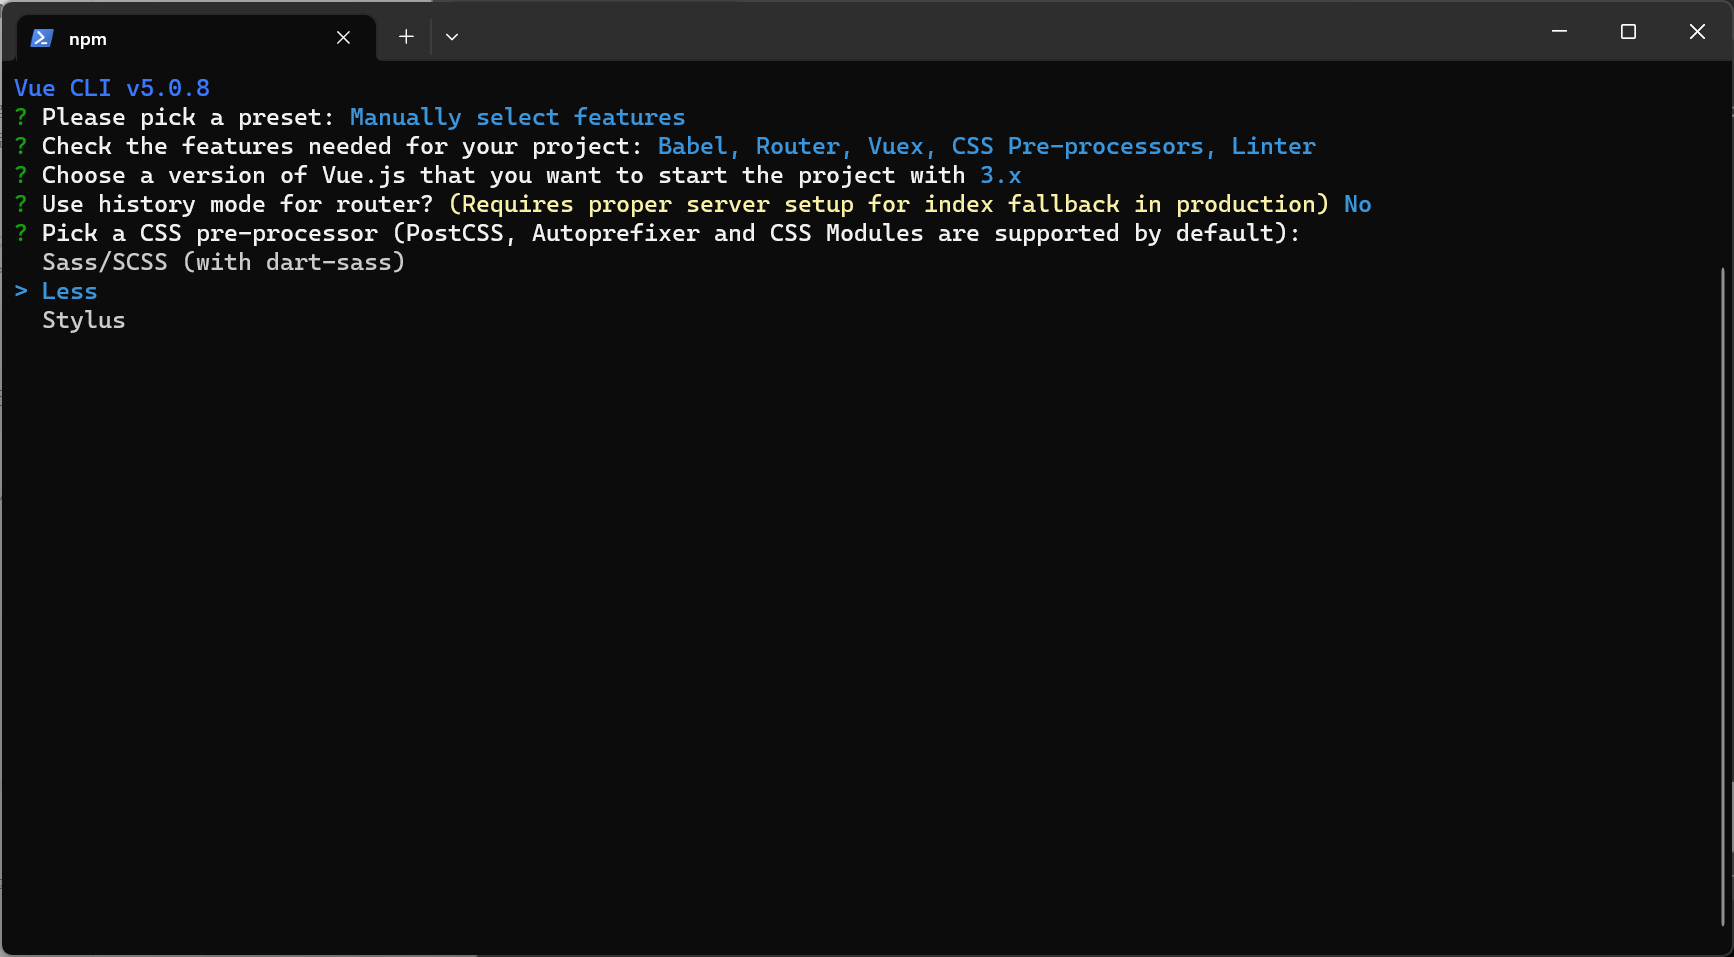
选择css预处理模式语言:less
-
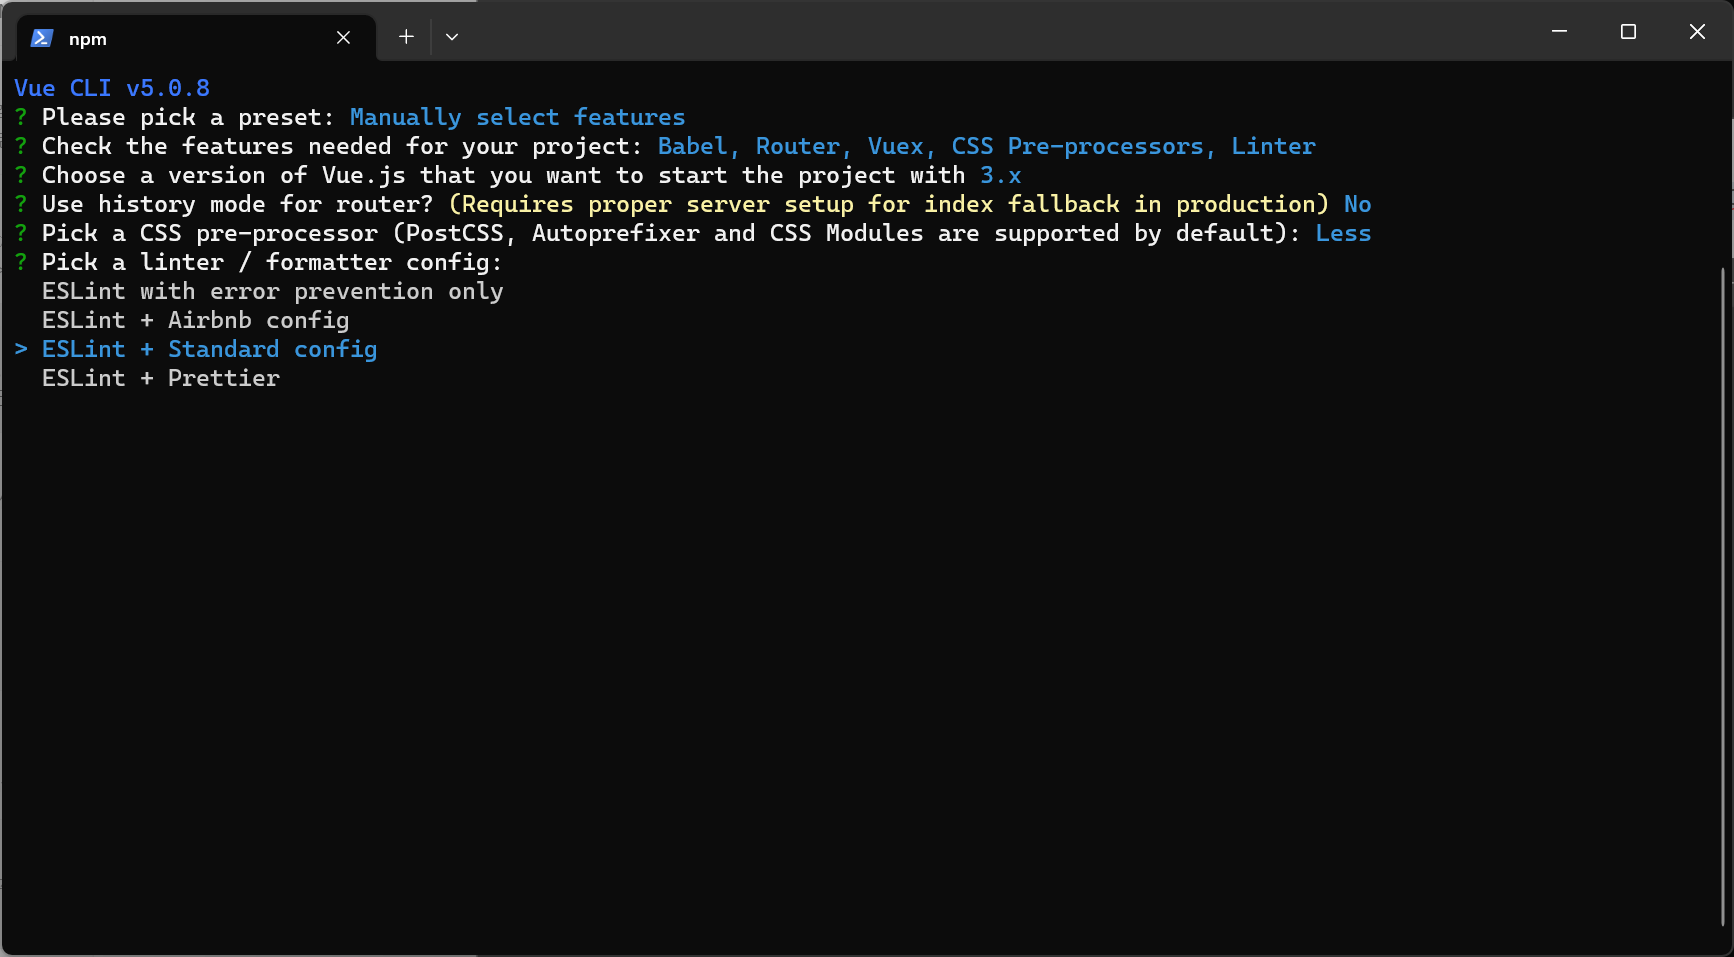
ESLint选择标准配置:ESLint + Standard config
-
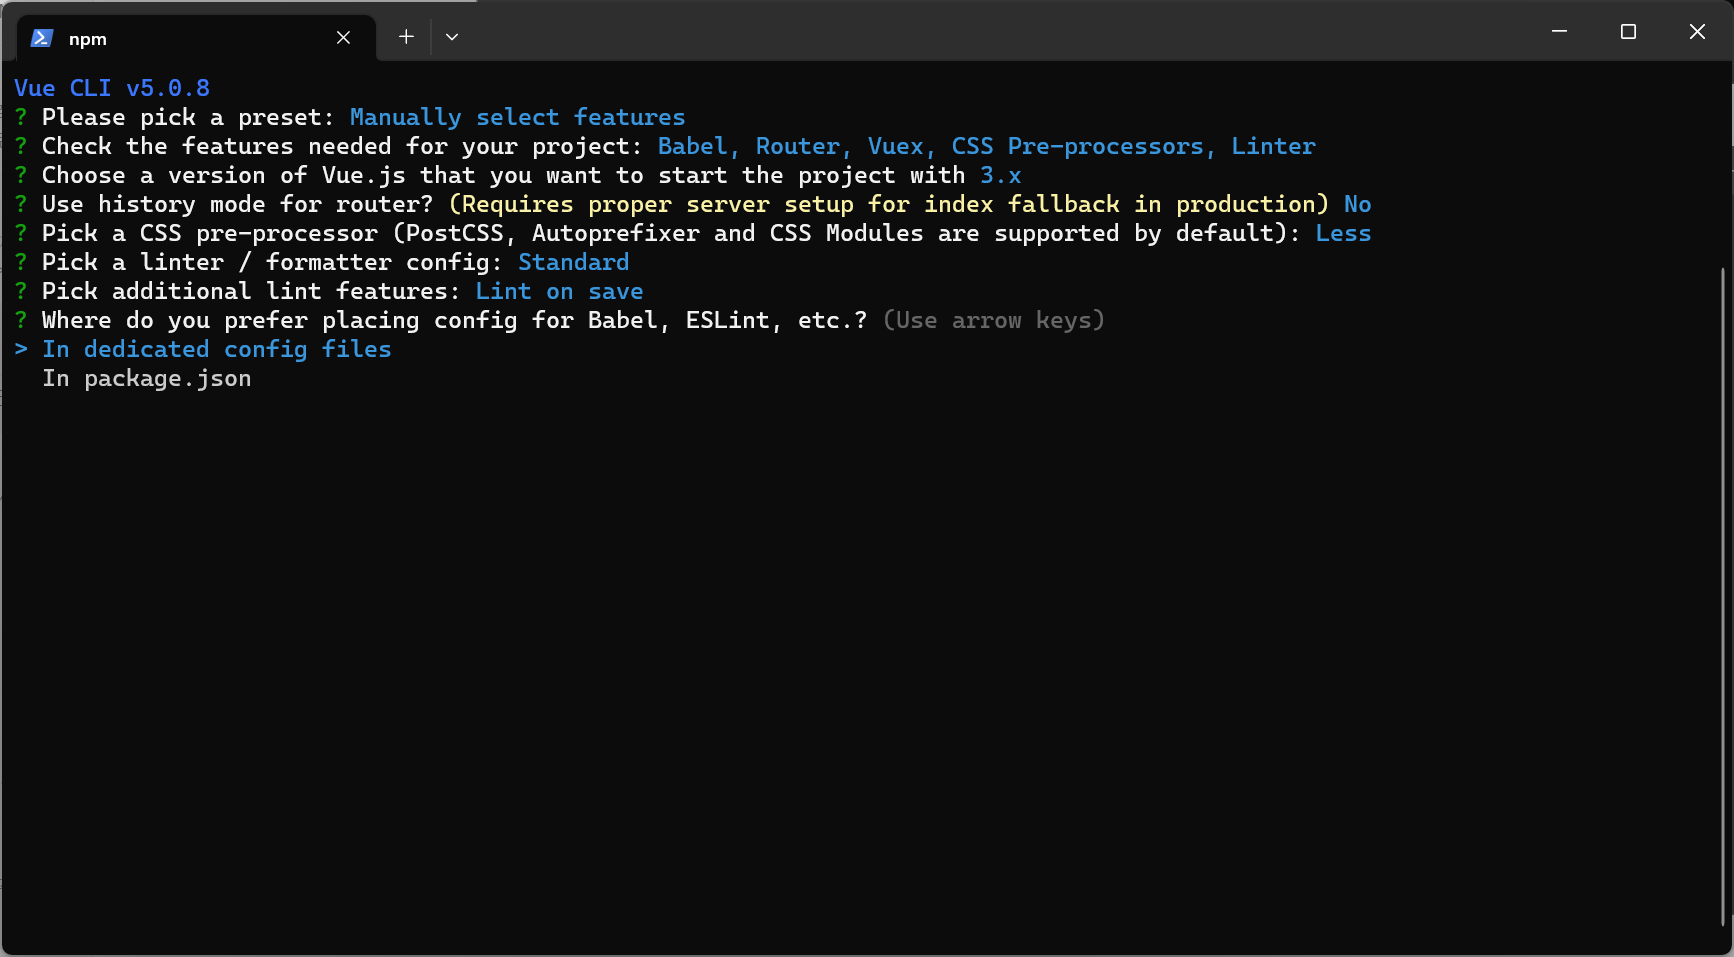
Lint on save
-
放在单独的文件中
-
是否需要保存成预设N
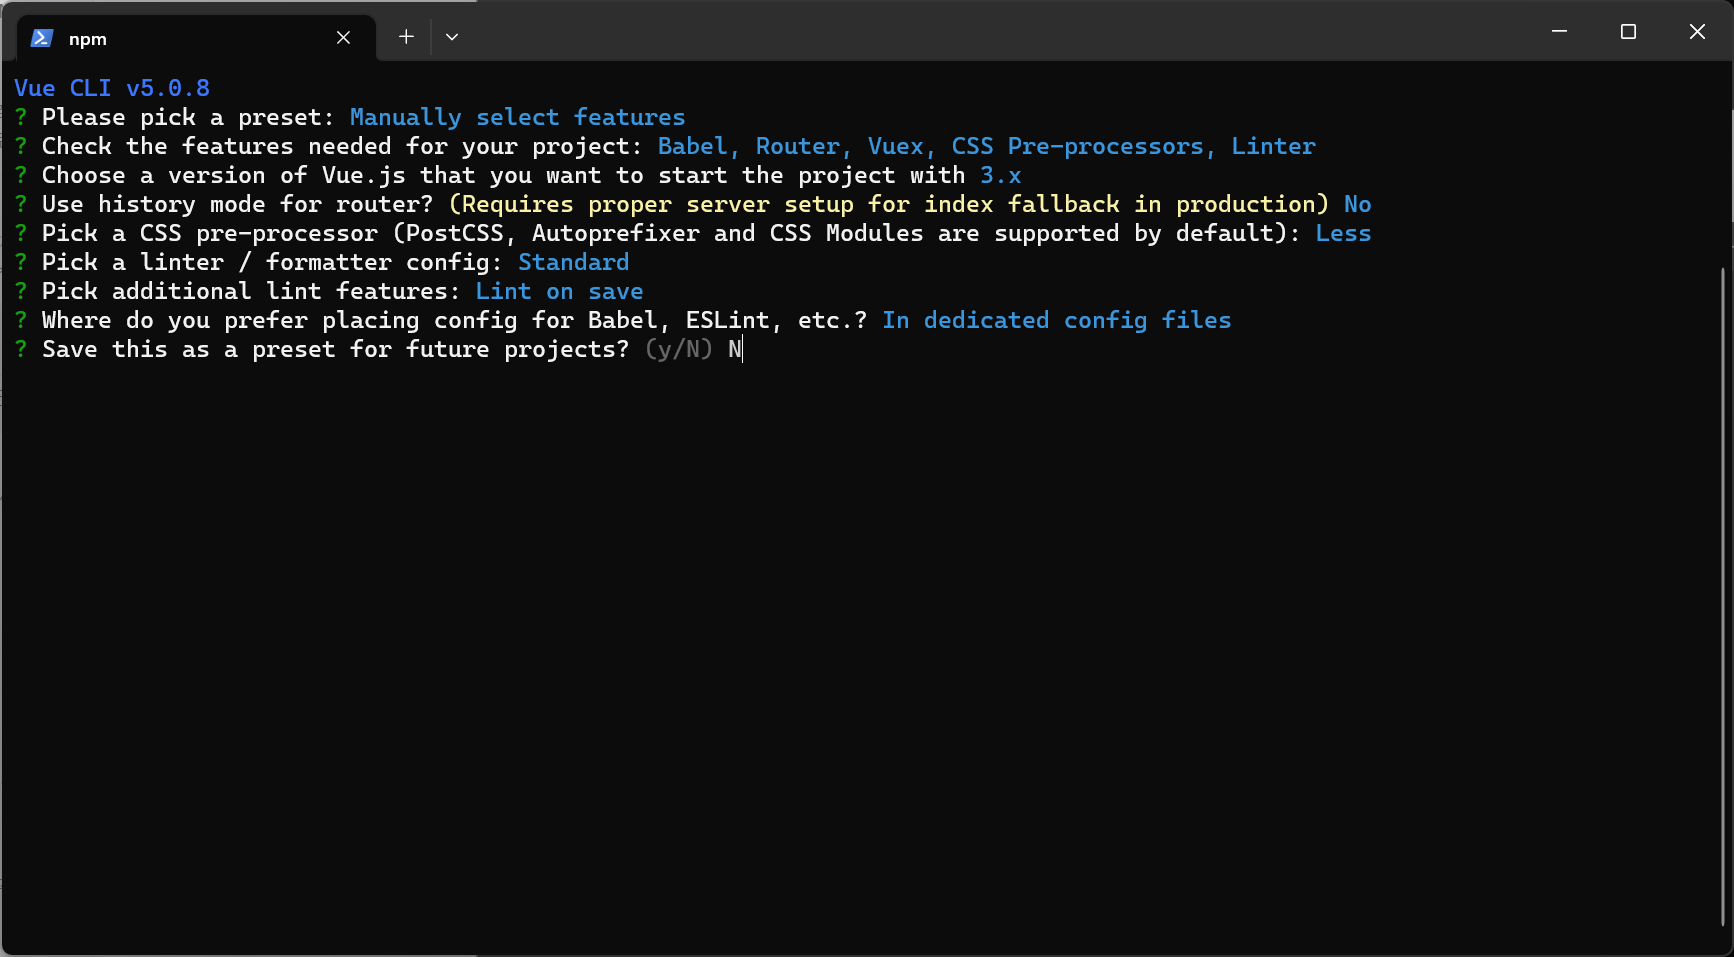
以上步骤选择项记录:
Vue CLI v5.0.8
? please pick a preset:     Manually select features
? Check the features needed for your project:     Babel, Router, Vuex, CSS Pre-processors, Linter
? Choose a version of Vue.js that you want to start the project with      3.x
? Use history mode for router? (Requires proper server setup for index fallback in production)    No
? Pick a CSS pre-processor (PostCSS, Autoprefixer and CSS Modules are supported by default):    Less
? Pick a linter / formatter config:    Standard
? Pick additional lint features:    Lint on save
? Where do you prefer placing config for Babel, ESLint, etc.?     In dedicated config files
? Save this as a preset for future projects? (y/N)    N
-
然后就会在线联网下载了
Vue CLI v5.0.8 ✨ Creating project in D:\\Java Project\\vue_study\\vision. 🗃 Initializing git repository... ⚙️ Installing CLI plugins. This might take a while... added 857 packages in 35s 🚀 Invoking generators... 📦 Installing additional dependencies... added 185 packages in 34s ⚓ Running completion hooks... 📄 Generating README.md... 🎉 Successfully created project vision. 👉 Get started with the following commands: $ cd vision$ npm run serve PS D:\\Java Project\\vue_study>
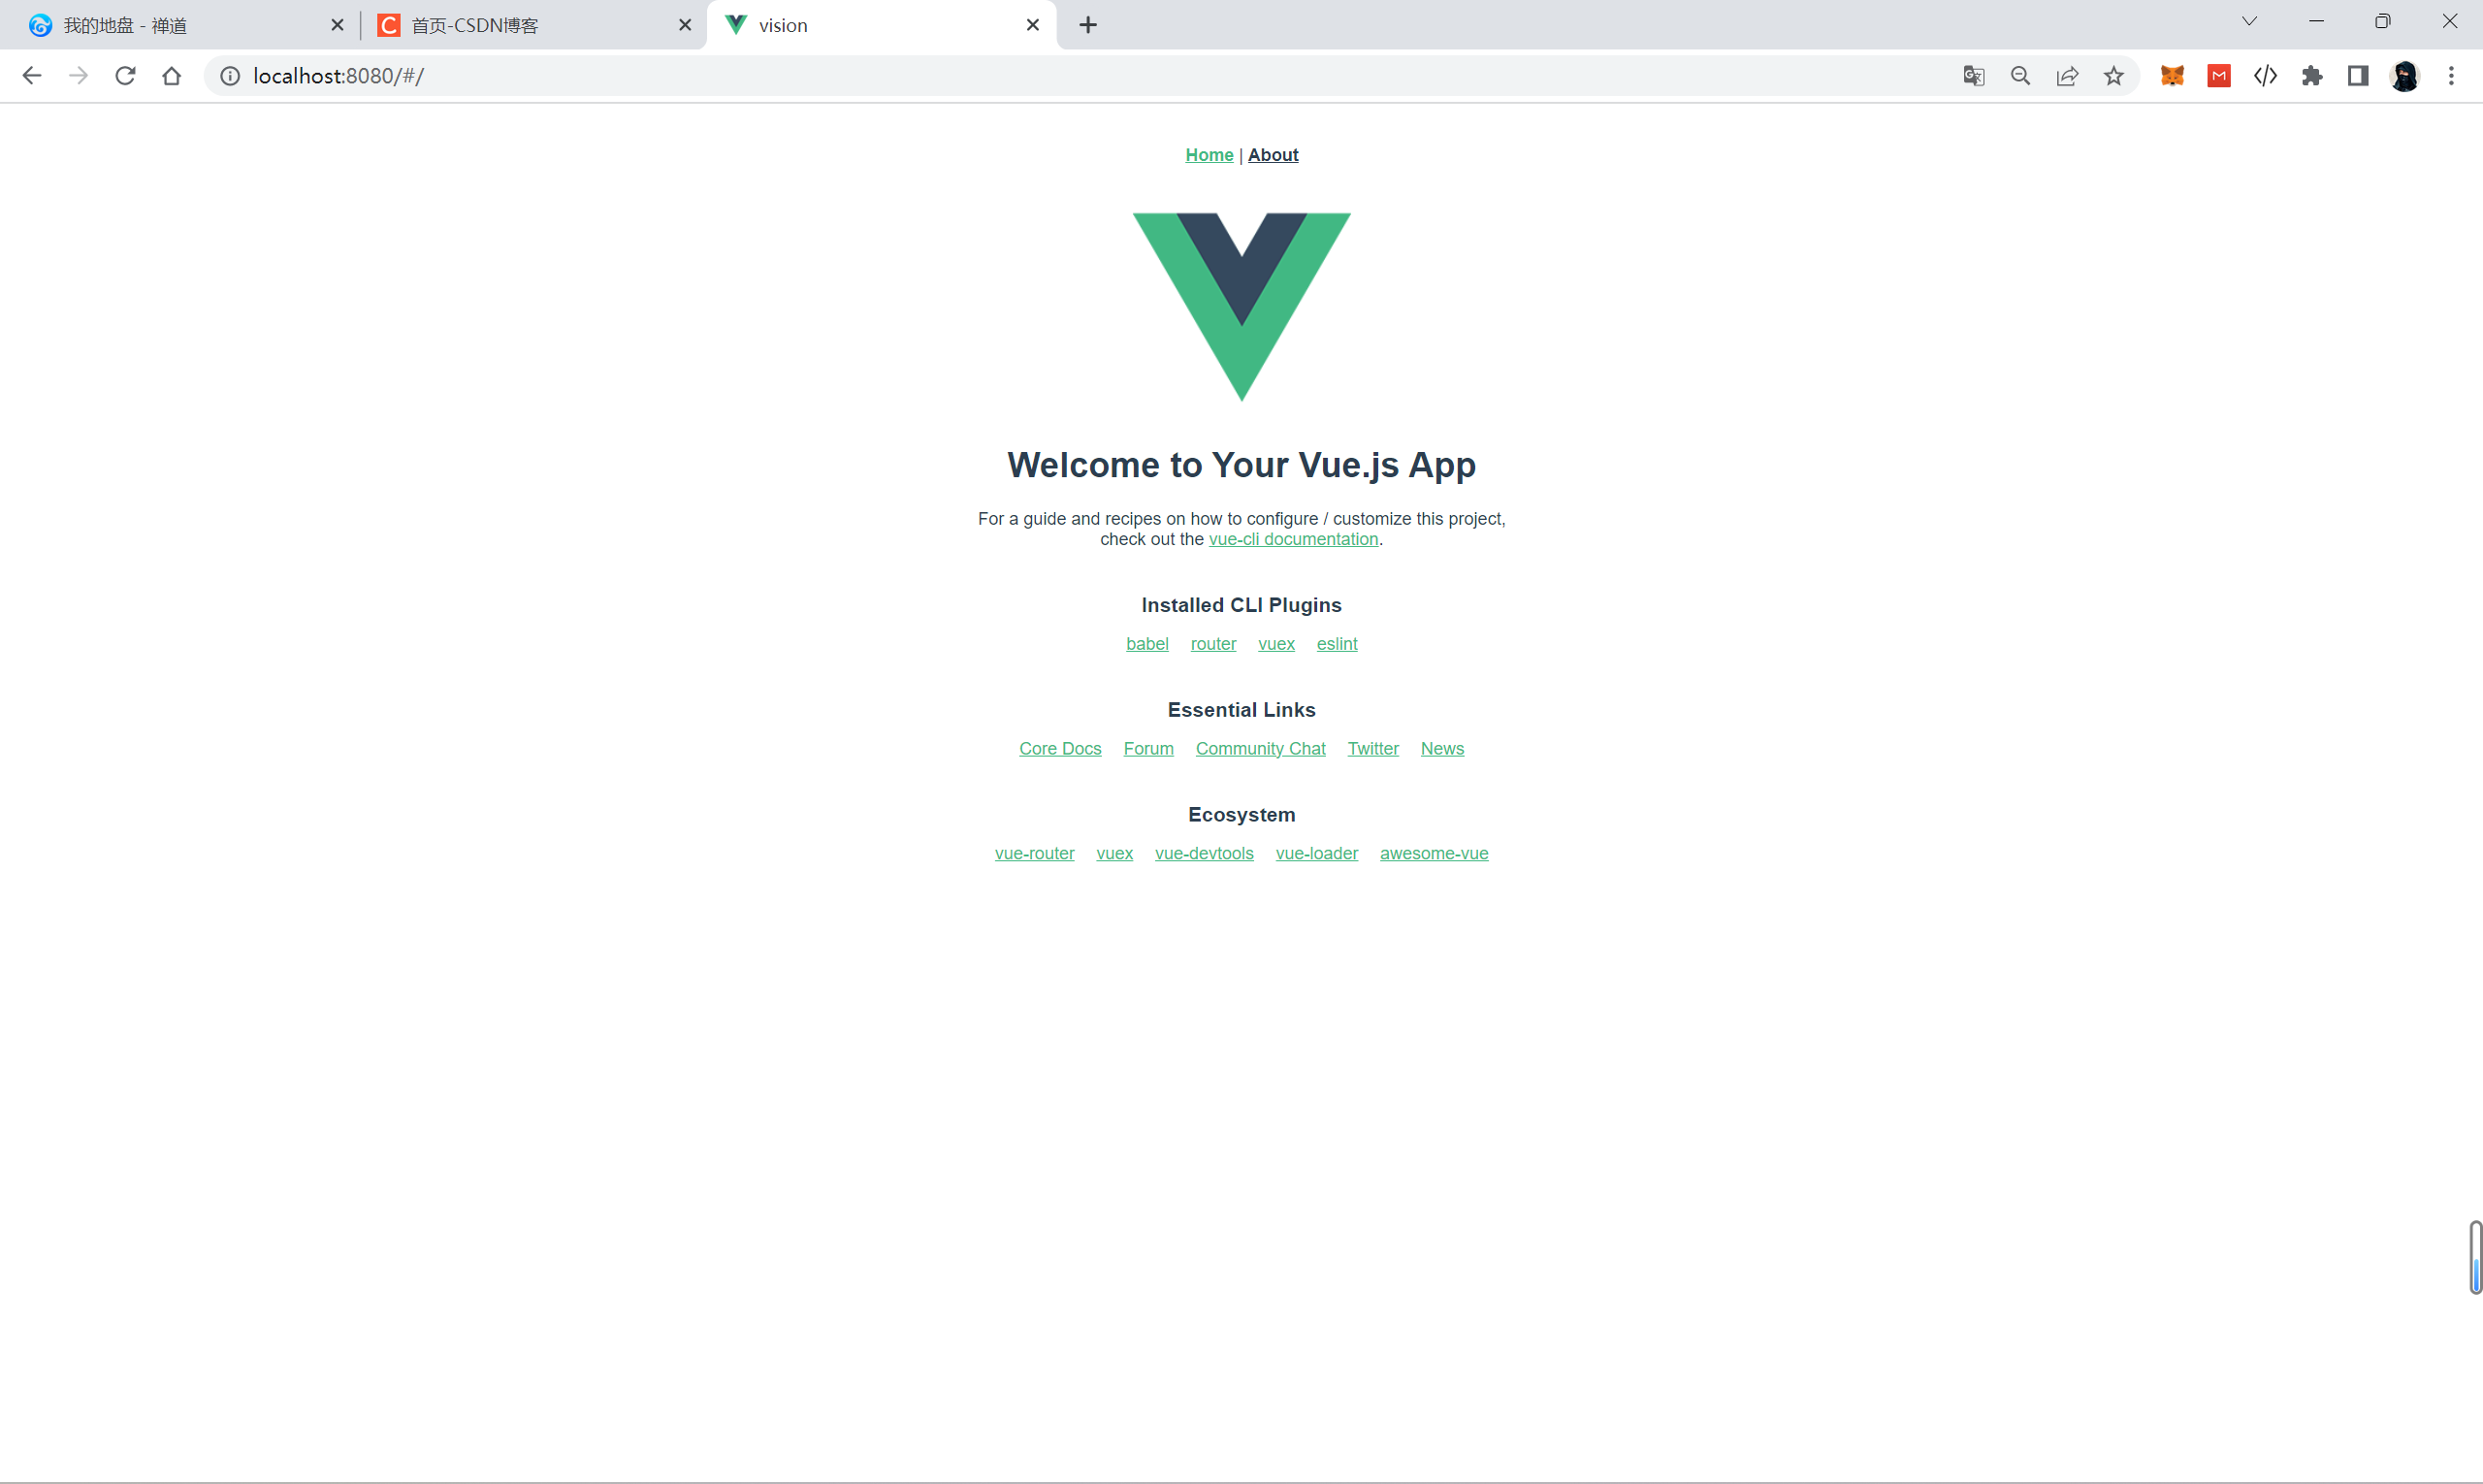
下载完毕就会看到生成的项目了

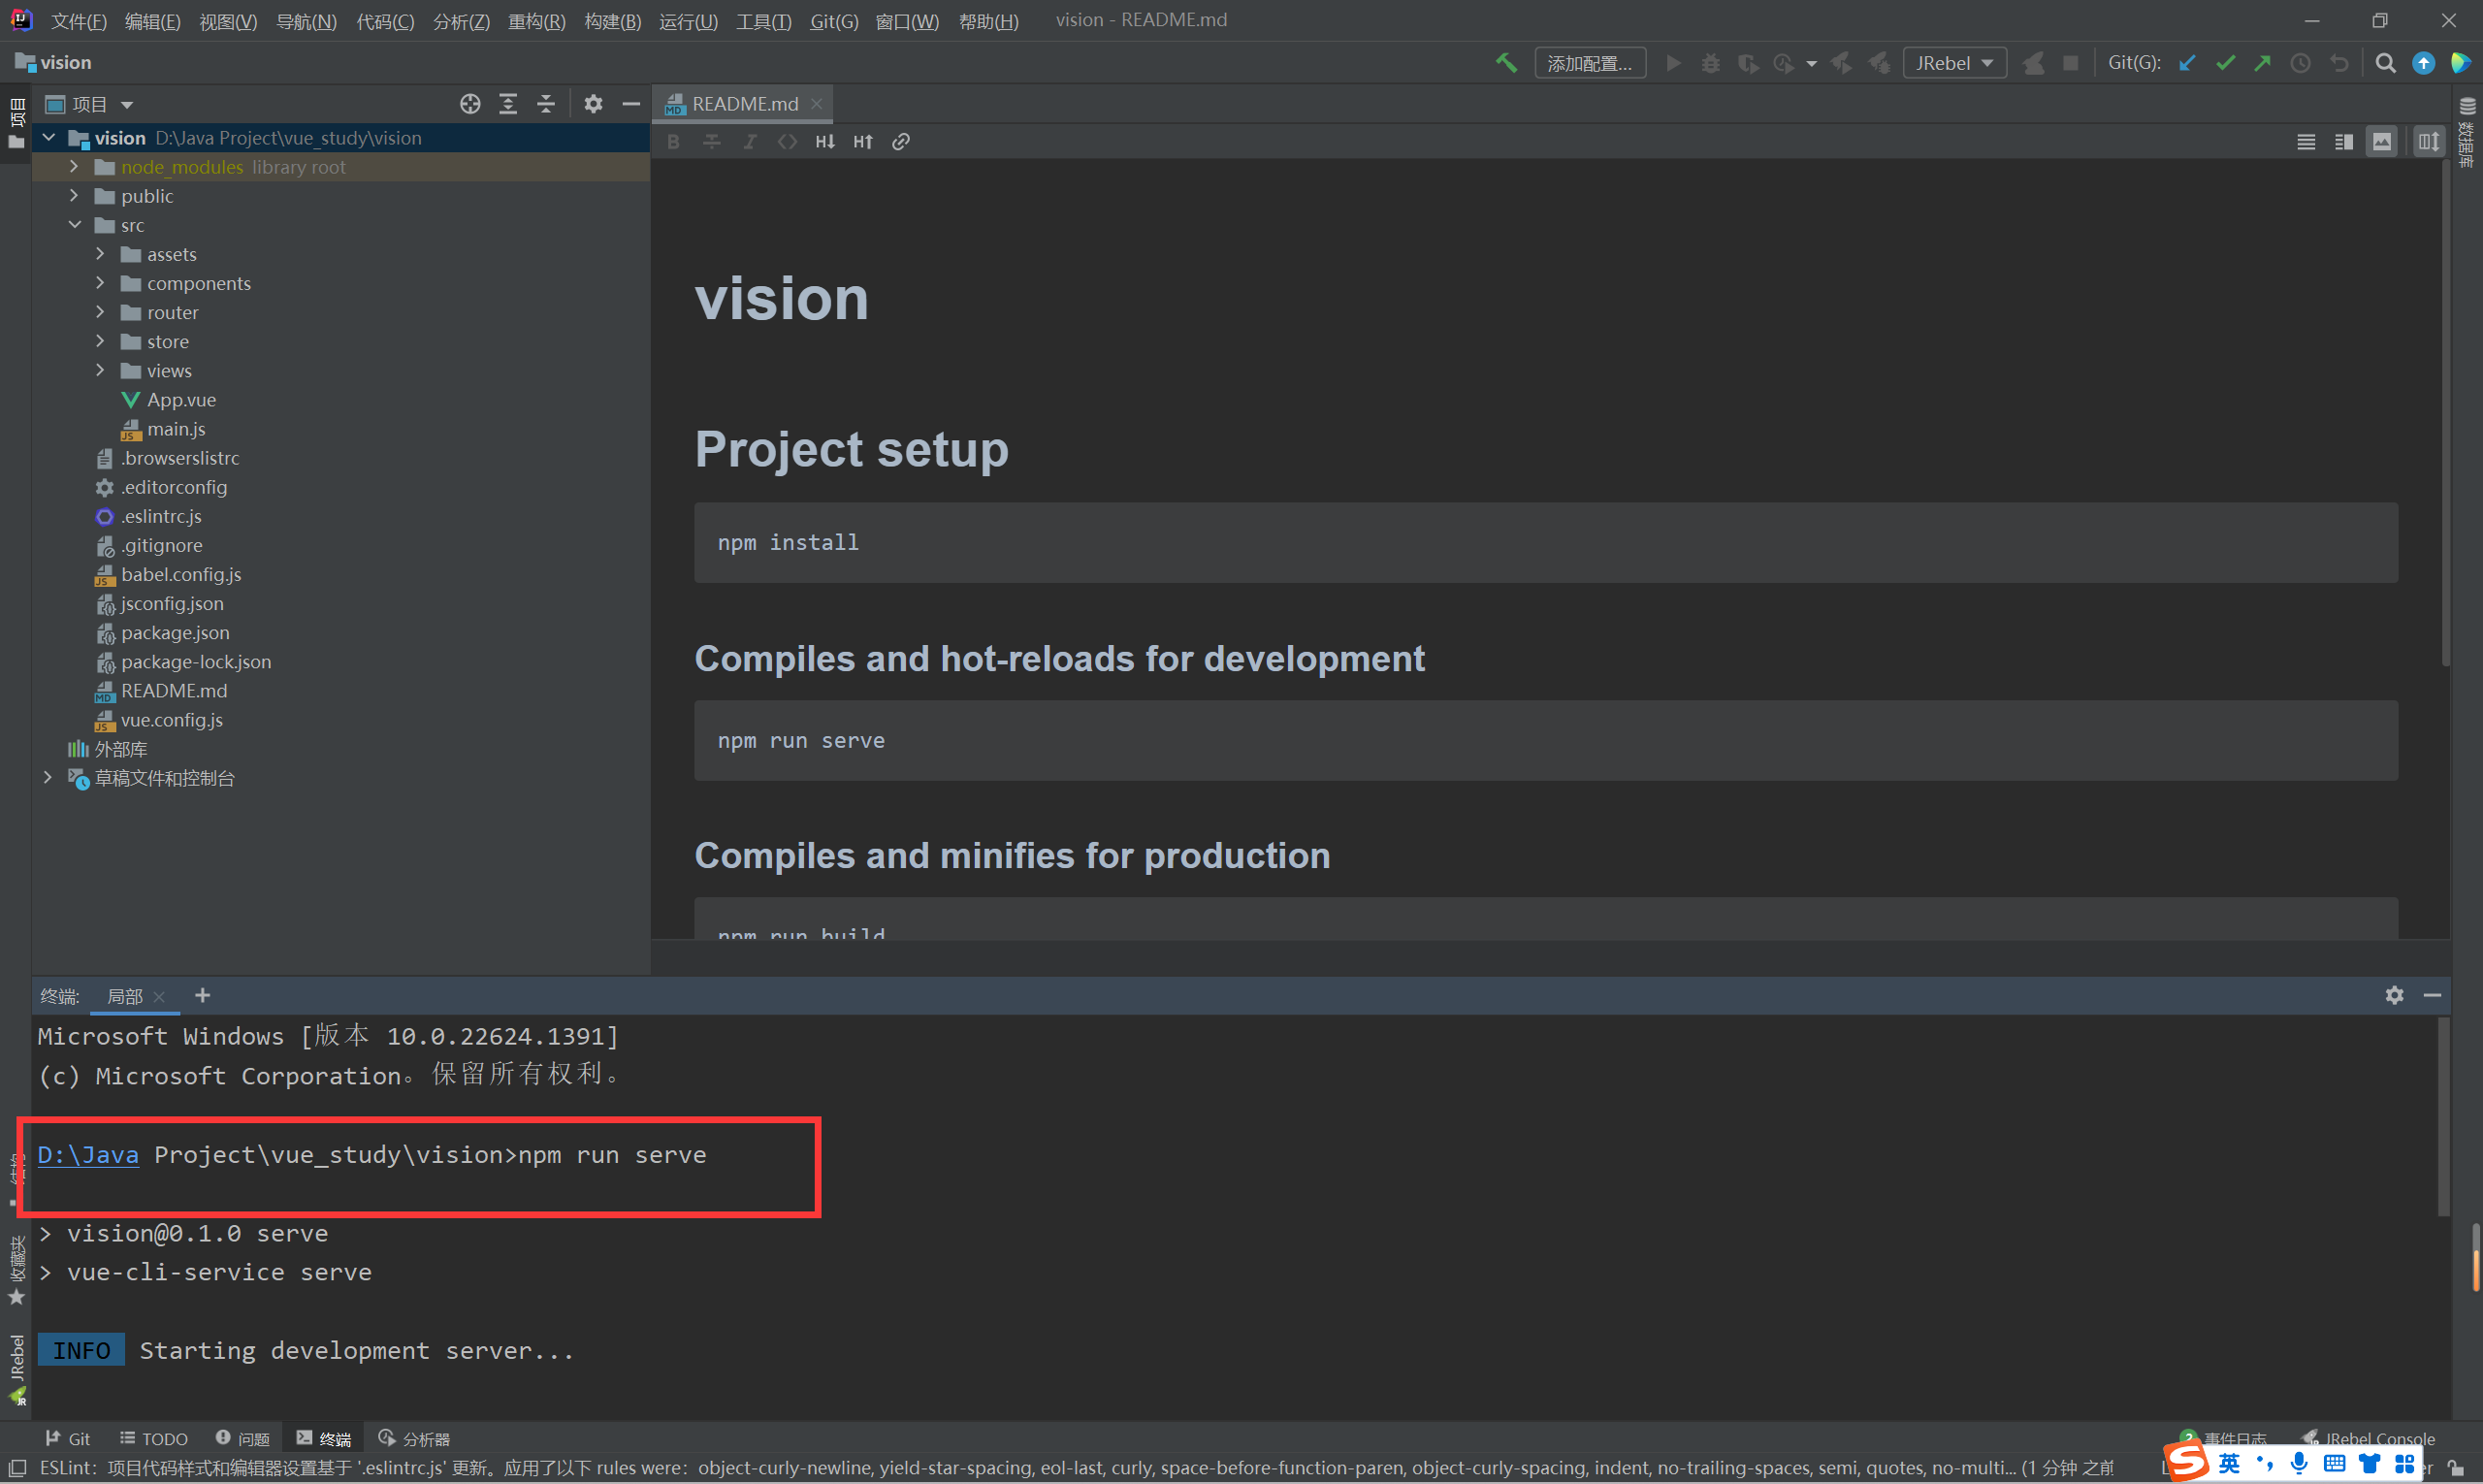
运行Vue项目
PS D:\\Java Project\\vue_study> cd vision PS D:\\Java Project\\vue_study\\vision> npm run serve > vision@0.1.0 serve > vue-cli-service serve INFO Starting development server... DONE Compiled successfully in 6692ms 18:43:53 App running at:- Local: http://localhost:8080/- Network: http://172.16.202.207:8080/ Note that the development build is not optimized.To create a production build, run npm run build.
输入链接访问页面:http://localhost:8080/
也可以用IDEA打开然后运行项目
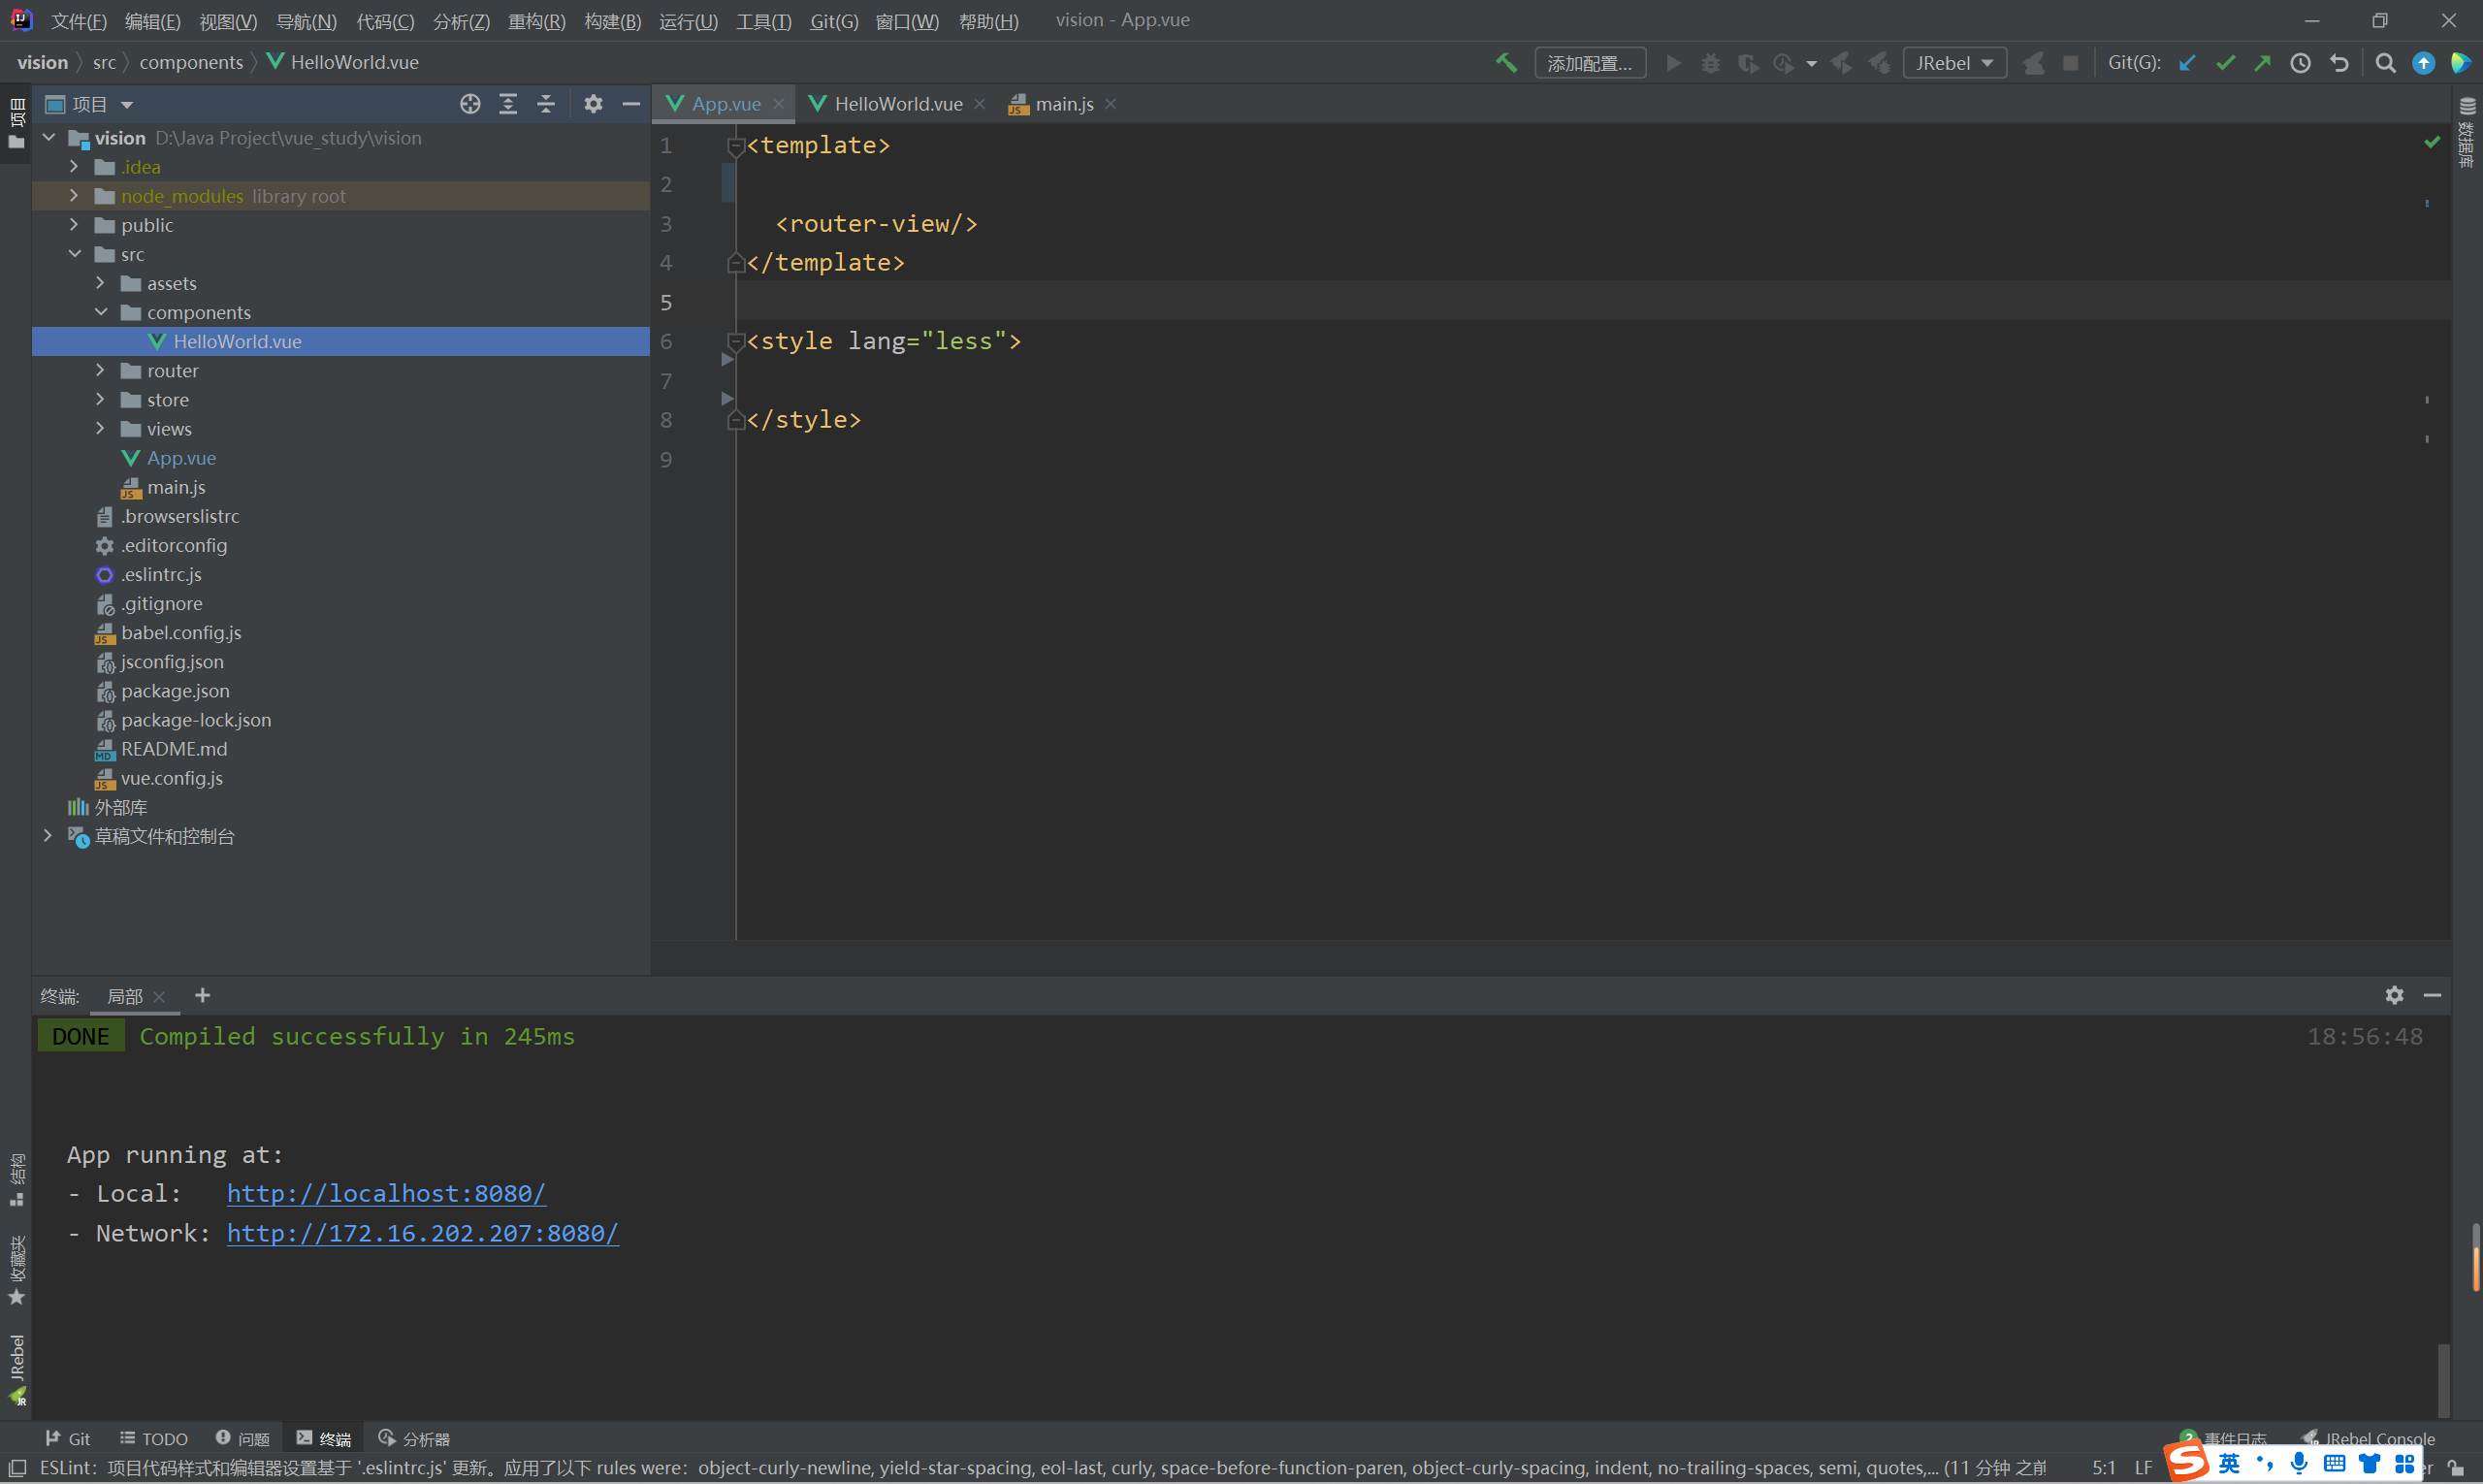
4.3.3 删除无关文件代码
App.vue删除后
<template> <router-view/> </template> <style lang="less"> </style>
删除Helloworld.vue\\AboutView.vue\\HomeView.vue

使用vue-cli重新下载一个2.x版本的vision2.0项目,进行和之前一样的操作
App.vue
<template><div id="app"> </div> </template> <style lang="less"> </style>
router/index.js
import Vue from 'vue'
import VueRouter from 'vue-router'
Vue.use(VueRouter)
const routes = [
]
const router = new VueRouter({routes
})
export default router
用另外一种方式创建 vue2.x 项目
PS D:\\企业级Java开发> vue init webpack vue-demo Command vue init requires a global addon to be installed.Please run undefined @vue/cli-init and try again. PS D:\\企业级Java开发> npm install -g @vue/cli-init npm WARN deprecated har-validator@5.1.5: this library is no longer supported npm WARN deprecated uuid@3.4.0: Please upgrade to version 7 or higher. Older versions may use Math.random() in certain circumstances, which is known to be problematic. See https://v8.dev/blog/math-random for details. npm WARN deprecated request@2.88.2: request has been deprecated, see https://github.com/request/request/issues/3142 npm WARN deprecated vue-cli@2.9.6: This package has been deprecated in favour of @vue/cli npm WARN deprecated coffee-script@1.12.7: CoffeeScript on NPM has moved to "coffeescript" (no hyphen) added 244 packages, and audited 246 packages in 1m 6 vulnerabilities (3 moderate, 3 high) Some issues need review, and may require choosing a different dependency. Run `npm audit` for details. PS D:\\企业级Java开发> npm install -g cnpm --registry=https://registry.npm.taobao.org npm WARN deprecated @npmcli/move-file@2.0.1: This functionality has been moved to @npmcli/fs added 425 packages in 25s PS D:\\企业级Java开发> vue init webpack vue-demo ? Project name vue-demo ? Project description A Vue.js project ? Author xiaoshu ? Vue build standalone ? Install vue-router? Yes ? Use ESLint to lint your code? No ? Set up unit tests No ? Setup e2e tests with Nightwatch? No ? Should we run `npm install` for you after the project has been created? (recommended) npm vue-cli · Generated "vue-demo". # Installing project dependencies ... # ======================== npm WARN deprecated stable@0.1.8: Modern JS already guarantees Array#sort() is a stable sort, so this library is deprecated. See the compatibility table on MDN: https://developer.mozilla.org/en-US/docs/Web/JavaScript/Reference/Global_Objects/Array/sort#browser_compatibility npm WARN deprecated source-map-url@0.4.1: See https://github.com/lydell/source-map-url#deprecated npm WARN deprecated urix@0.1.0: Please see https://github.com/lydell/urix#deprecated npm WARN deprecated source-map-resolve@0.5.3: See https://github.com/lydell/source-map-resolve#deprecated npm WARN deprecated chokidar@2.1.8: Chokidar 2 does not receive security updates since 2019. Upgrade to chokidar 3 with 15x fewer dependencies npm WARN deprecated chokidar@2.1.8: Chokidar 2 does not receive security updates since 2019. Upgrade to chokidar 3 with 15x fewer dependencies npm WARN deprecated resolve-url@0.2.1: https://github.com/lydell/resolve-url#deprecated npm WARN deprecated querystring@0.2.0: The querystring API is considered Legacy. new code should use the URLSearchParams API instead. npm WARN deprecated acorn-dynamic-import@2.0.2: This is probably built in to whatever tool you're using. If you still need it... idk npm WARN deprecated uuid@3.4.0: Please upgrade to version 7 or higher. Older versions may use Math.random() in certain circumstances, which is known to be problematic. See https://v8.dev/blog/math-random for details. npm WARN deprecated flatten@1.0.3: flatten is deprecated in favor of utility frameworks such as lodash. npm WARN deprecated bfj-node4@5.3.1: Switch to the `bfj` package for fixes and new features! npm WARN deprecated uglify-es@3.3.9: support for ECMAScript is superseded by `uglify-js` as of v3.13.0 npm WARN deprecated svgo@1.3.2: This SVGO version is no longer supported. Upgrade to v2.x.x. npm WARN deprecated svgo@0.7.2: This SVGO version is no longer supported. Upgrade to v2.x.x. npm WARN deprecated core-js@2.6.12: core-js@<3.23.3 is no longer maintained and not recommended for usage due to the number of issues. Because of the V8 engine whims, feature detection in old core-js versions could cause a slowdown up to 100x even if nothing is polyfilled. Some versions have web compatibility issues. Please, upgrade your dependencies to the actual version of core-js. npm WARN deprecated browserslist@2.11.3: Browserslist 2 could fail on reading Browserslist >3.0 config used in other tools. npm WARN deprecated extract-text-webpack-plugin@3.0.2: Deprecated. Please use https://github.com/webpack-contrib/mini-css-extract-plugin npm WARN deprecated html-webpack-plugin@2.30.1: out of support npm WARN deprecated browserslist@1.7.7: Browserslist 2 could fail on reading Browserslist >3.0 config used in other tools. npm WARN deprecated browserslist@1.7.7: Browserslist 2 could fail on reading Browserslist >3.0 config used in other tools. npm WARN deprecated browserslist@1.7.7: Browserslist 2 could fail on reading Browserslist >3.0 config used in other tools. added 1307 packages, and audited 1308 packages in 3m 84 packages are looking for fundingrun `npm fund` for details 86 vulnerabilities (1 low, 49 moderate, 29 high, 7 critical) To address issues that do not require attention, run:npm audit fix To address all issues (including breaking changes), run:npm audit fix --force Run `npm audit` for details. # Project initialization finished! # ======================== To get started: cd vue-demonpm run dev Documentation can be found at https://vuejs-templates.github.io/webpack PS D:\\企业级Java开发> npm install element-ui -S up to date, audited 20 packages in 1s 1 package is looking for fundingrun `npm fund` for details found 0 vulnerabilities PS D:\\企业级Java开发>
安装 element-ui 组件
D:\\企业级Java开发\\vue-demo>npm i element-ui -S added 6 packages, and audited 1314 packages in 16s 84 packages are looking for fundingrun `npm fund` for details 86 vulnerabilities (1 low, 49 moderate, 29 high, 7 critical) To address issues that do not require attention, run:npm audit fix To address all issues (including breaking changes), run:npm audit fix --force Run `npm audit` for details. D:\\企业级Java开发\\vue-demo>
4.3.4 静态资源的引入
将static文件夹放入public文件夹下
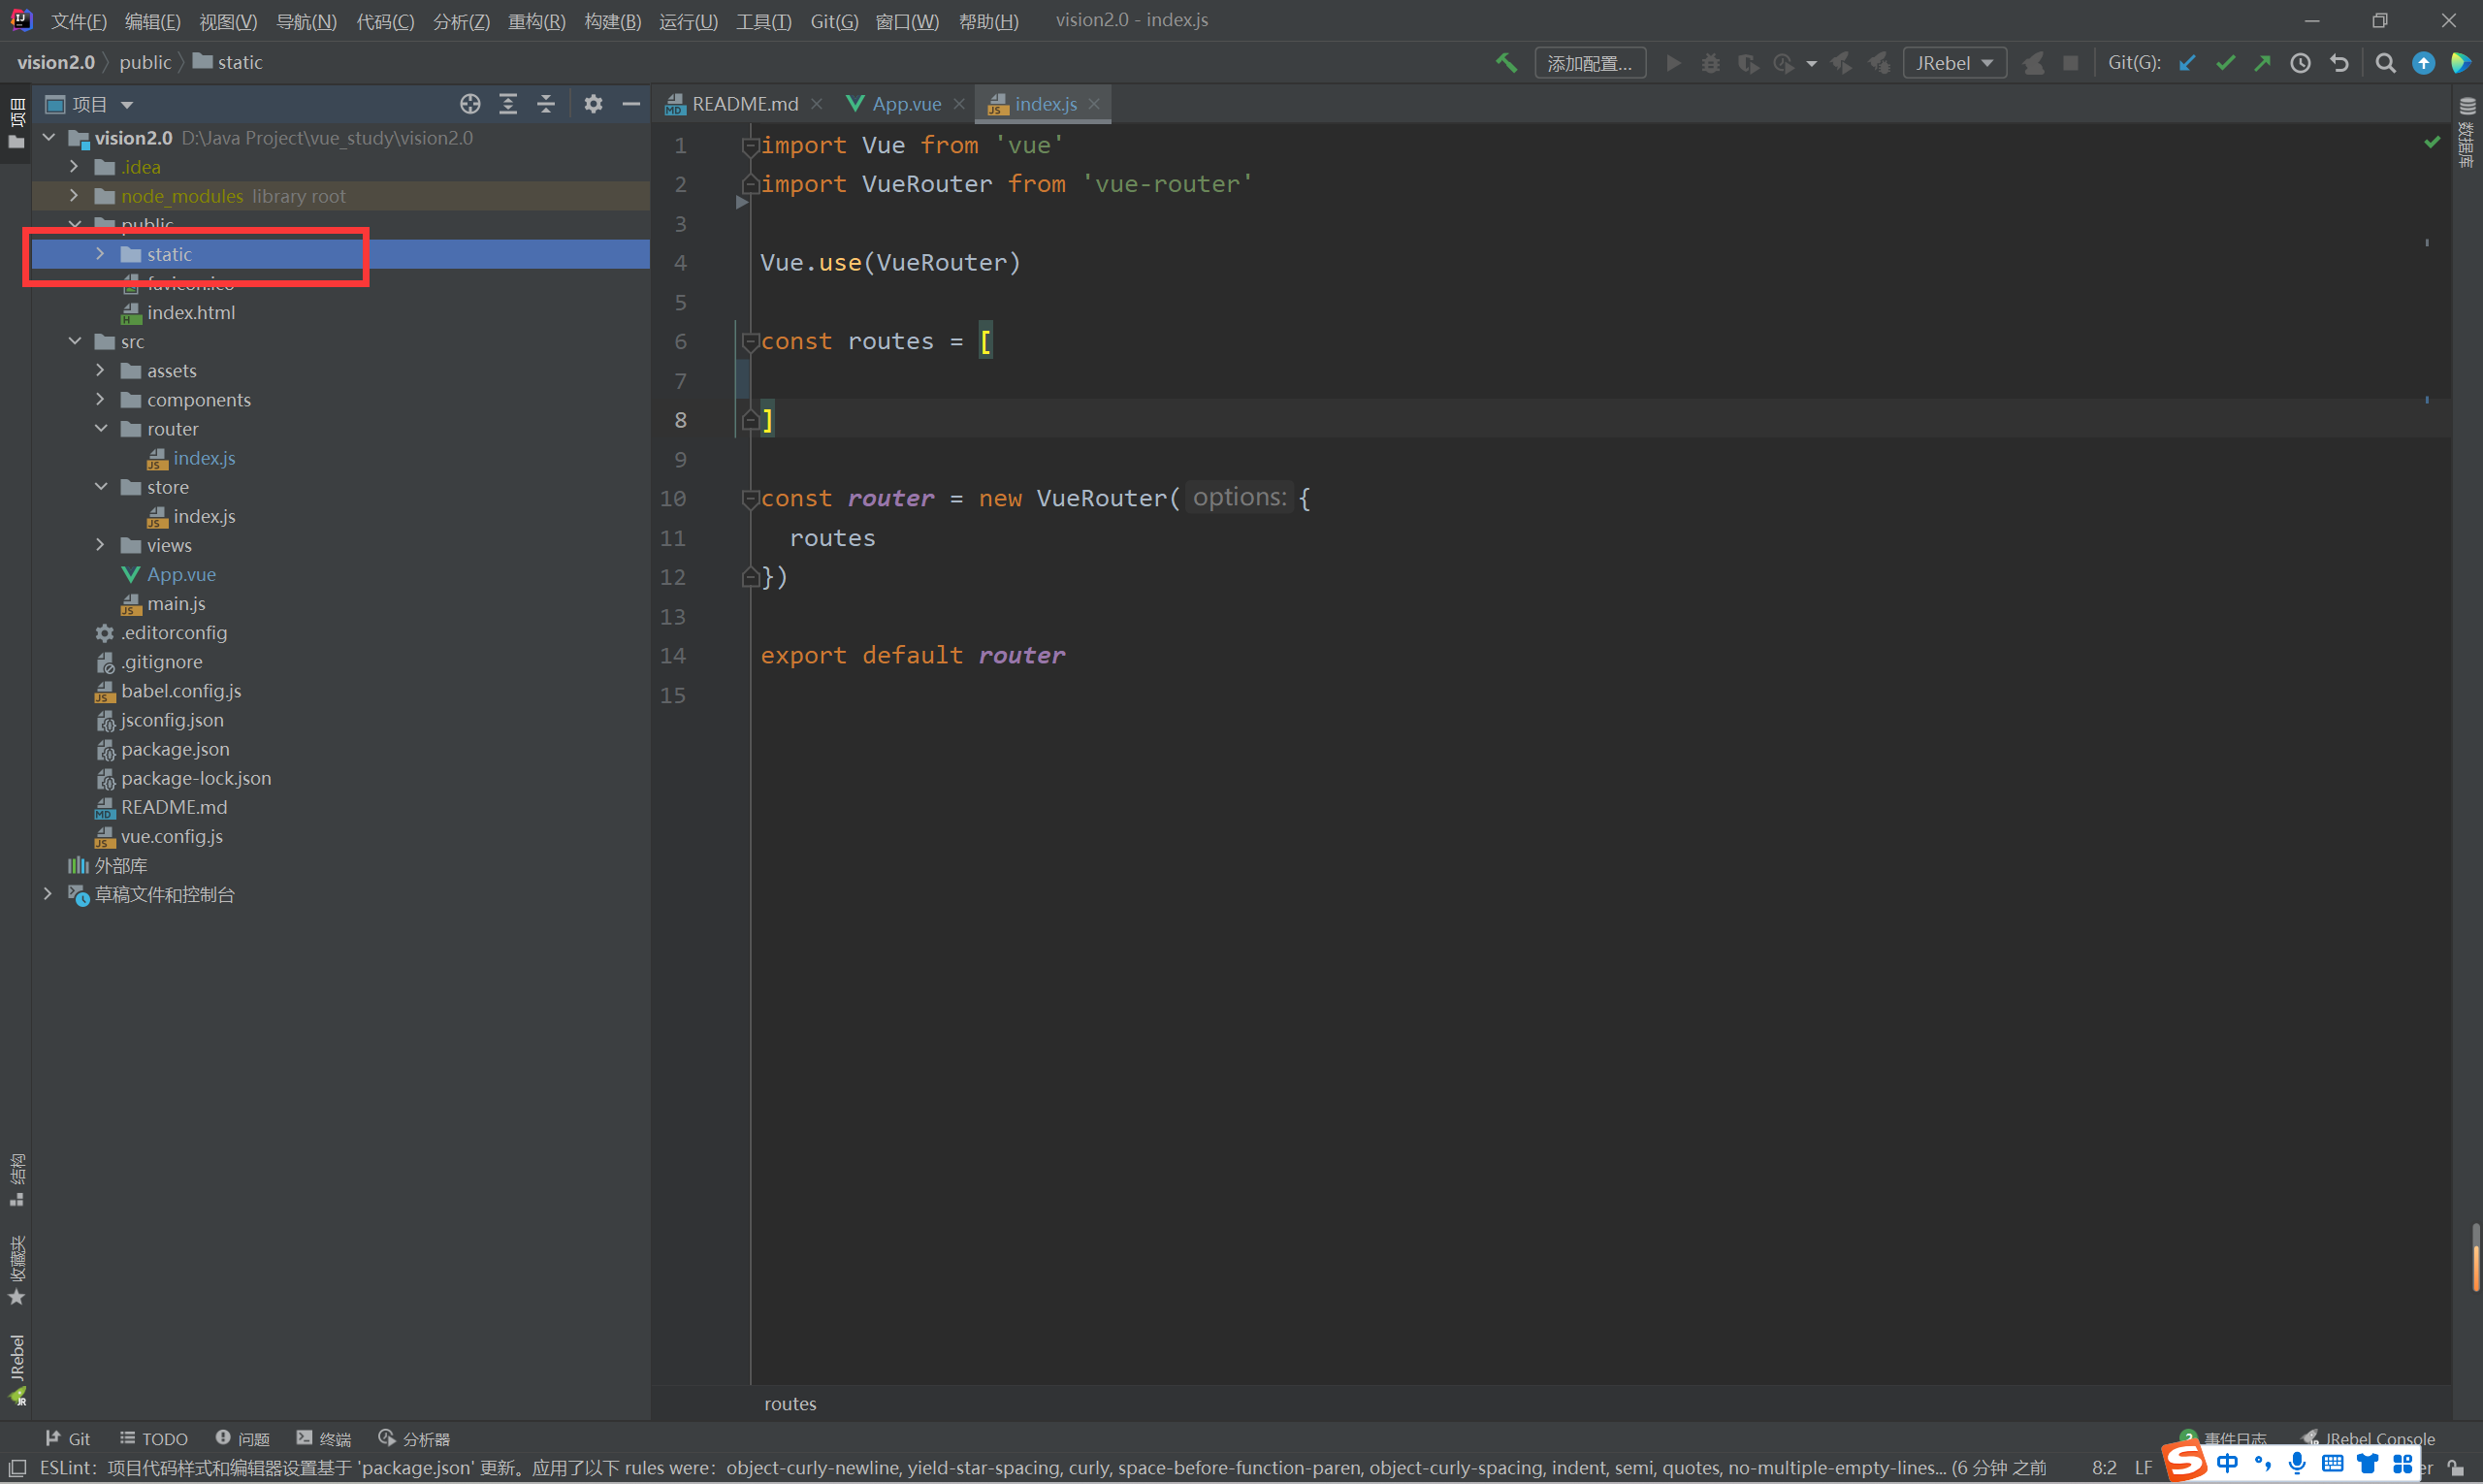
在index.html中引入echarts.js文件
也可以通过如下方式引入:在Vue中引入echarts以及使用_vue引入echart_抗争的小青年的博客-CSDN博客
ps:echarts图表需要设置容器的宽度和高度,不然echarts图表展示不出来
<!DOCTYPE html> <html lang=""><head><meta charset="utf-8"><meta http-equiv="X-UA-Compatible" content="IE=edge"><meta name="viewport" content="width=device-width,initial-scale=1.0"><link rel="icon" href="<%= BASE_URL %>favicon.ico"><title><%= htmlWebpackPlugin.options.title %></title></head><body><noscript><strong>We're sorry but <%= htmlWebpackPlugin.options.title %> doesn't work properly without JavaScript enabled. Please enable it to continue.</strong></noscript><div id="app"></div><!-- built files will be auto injected --> <!--一旦通过script标签引入了Echarts.js文件后,就可以通过window.echarts进行全局使用echarts --><script src = "static/lib/echarts.min.js"></script></body> </html>
在main.js中挂载全局echarts对象
import Vue from 'vue'
import App from './App.vue'
import router from './router'
import store from './store'
//将全局的echarts对象挂载到Vue的原型对象上
//在别的组件中怎么使用echarts对象? this.$echarts
Vue.prototype.$echarts = window.echarts //$echarts:是一个echarts对象名
Vue.config.productionTip = false
new Vue({router,store,render: h => h(App)
}).$mount('#app')
axios的封装与挂载
D:\\Java Project\\vue_study\\vision2.0>npm install axios -save --legacy-peer-deps //安装axios added 6 packages, and audited 1038 packages in 10s found 0 vulnerabilities D:\\Java Project\\vue_study\\vision2.0>
在main.js中封装与挂载axios
import Vue from 'vue'
import App from './App.vue'
import router from './router'
import store from './store'
import axios from 'axios' //导入axios
//请求基准路径的配置
axios.defaults.baseURL = 'http://127.0.0.1:8888/api/'
//将axios挂载到Vue的原型对象上,在别的组件中使用 this.$http 得到 axios 对象,从而就可以发起ajax的请求
Vue.prototype.$http = axios
//将全局的echarts对象挂载到Vue的原型对象上
//在别的组件中怎么使用echarts对象? this.$echarts
Vue.prototype.$echarts = window.echarts //$echarts:是一个echarts对象名
Vue.config.productionTip = false
new Vue({router,store,render: h => h(App)
}).$mount('#app')
进行路由配置
创建src/views/SellerPage.vue
<!--
针对 /sellerPage 这个路径显示出来的
在这个组件中,通过子组件注册的方式,要显示出Seller.vue这个组件
-->
<template>
<div>sellerpage组件
</div>
</template>
<script>
export default {name: 'SellerPage'
}
</script>
<style scoped>
</style>
创建src/components/Seller.vue
<!--商家销量统计的横向柱状图-->
<template>
</template>
<script>
export default {name: 'Seller.vue'
}
</script>
<style scoped>
</style>
进行路由配置src/router/index.js
import Vue from 'vue'
import VueRouter from 'vue-router'
import SellerPage from '@/views/SellerPage.vue' // 引入SellerPage文件
Vue.use(VueRouter)
const routes = [// 配置路由规则{path: '/sellerpage',component: SellerPage}
]
const router = new VueRouter({routes
})
export default router
设置路由占位符src/App.vue
<template><div id="app"><!-- 路由占位符 --><router-view></router-view></div> </template> <style lang="less"> </style>
进行访问http://127.0.0.1:8888/#/sellerpage
进行子组件注册
<!--
针对 /sellerPage 这个路径显示出来的
在这个组件中,通过子组件注册的方式,要显示出Seller.vue这个组件
-->
<template>
<div class="com-page"><!--子组件标签--><seller>
</seller>
</div>
</template>
<script>
import Seller from '@/components/Seller' //引入子组件
export default {name: 'SellerPage',components:{seller: Seller //进行子组件注册:components,seller是变量名}
}
</script>
<style scoped>
</style>
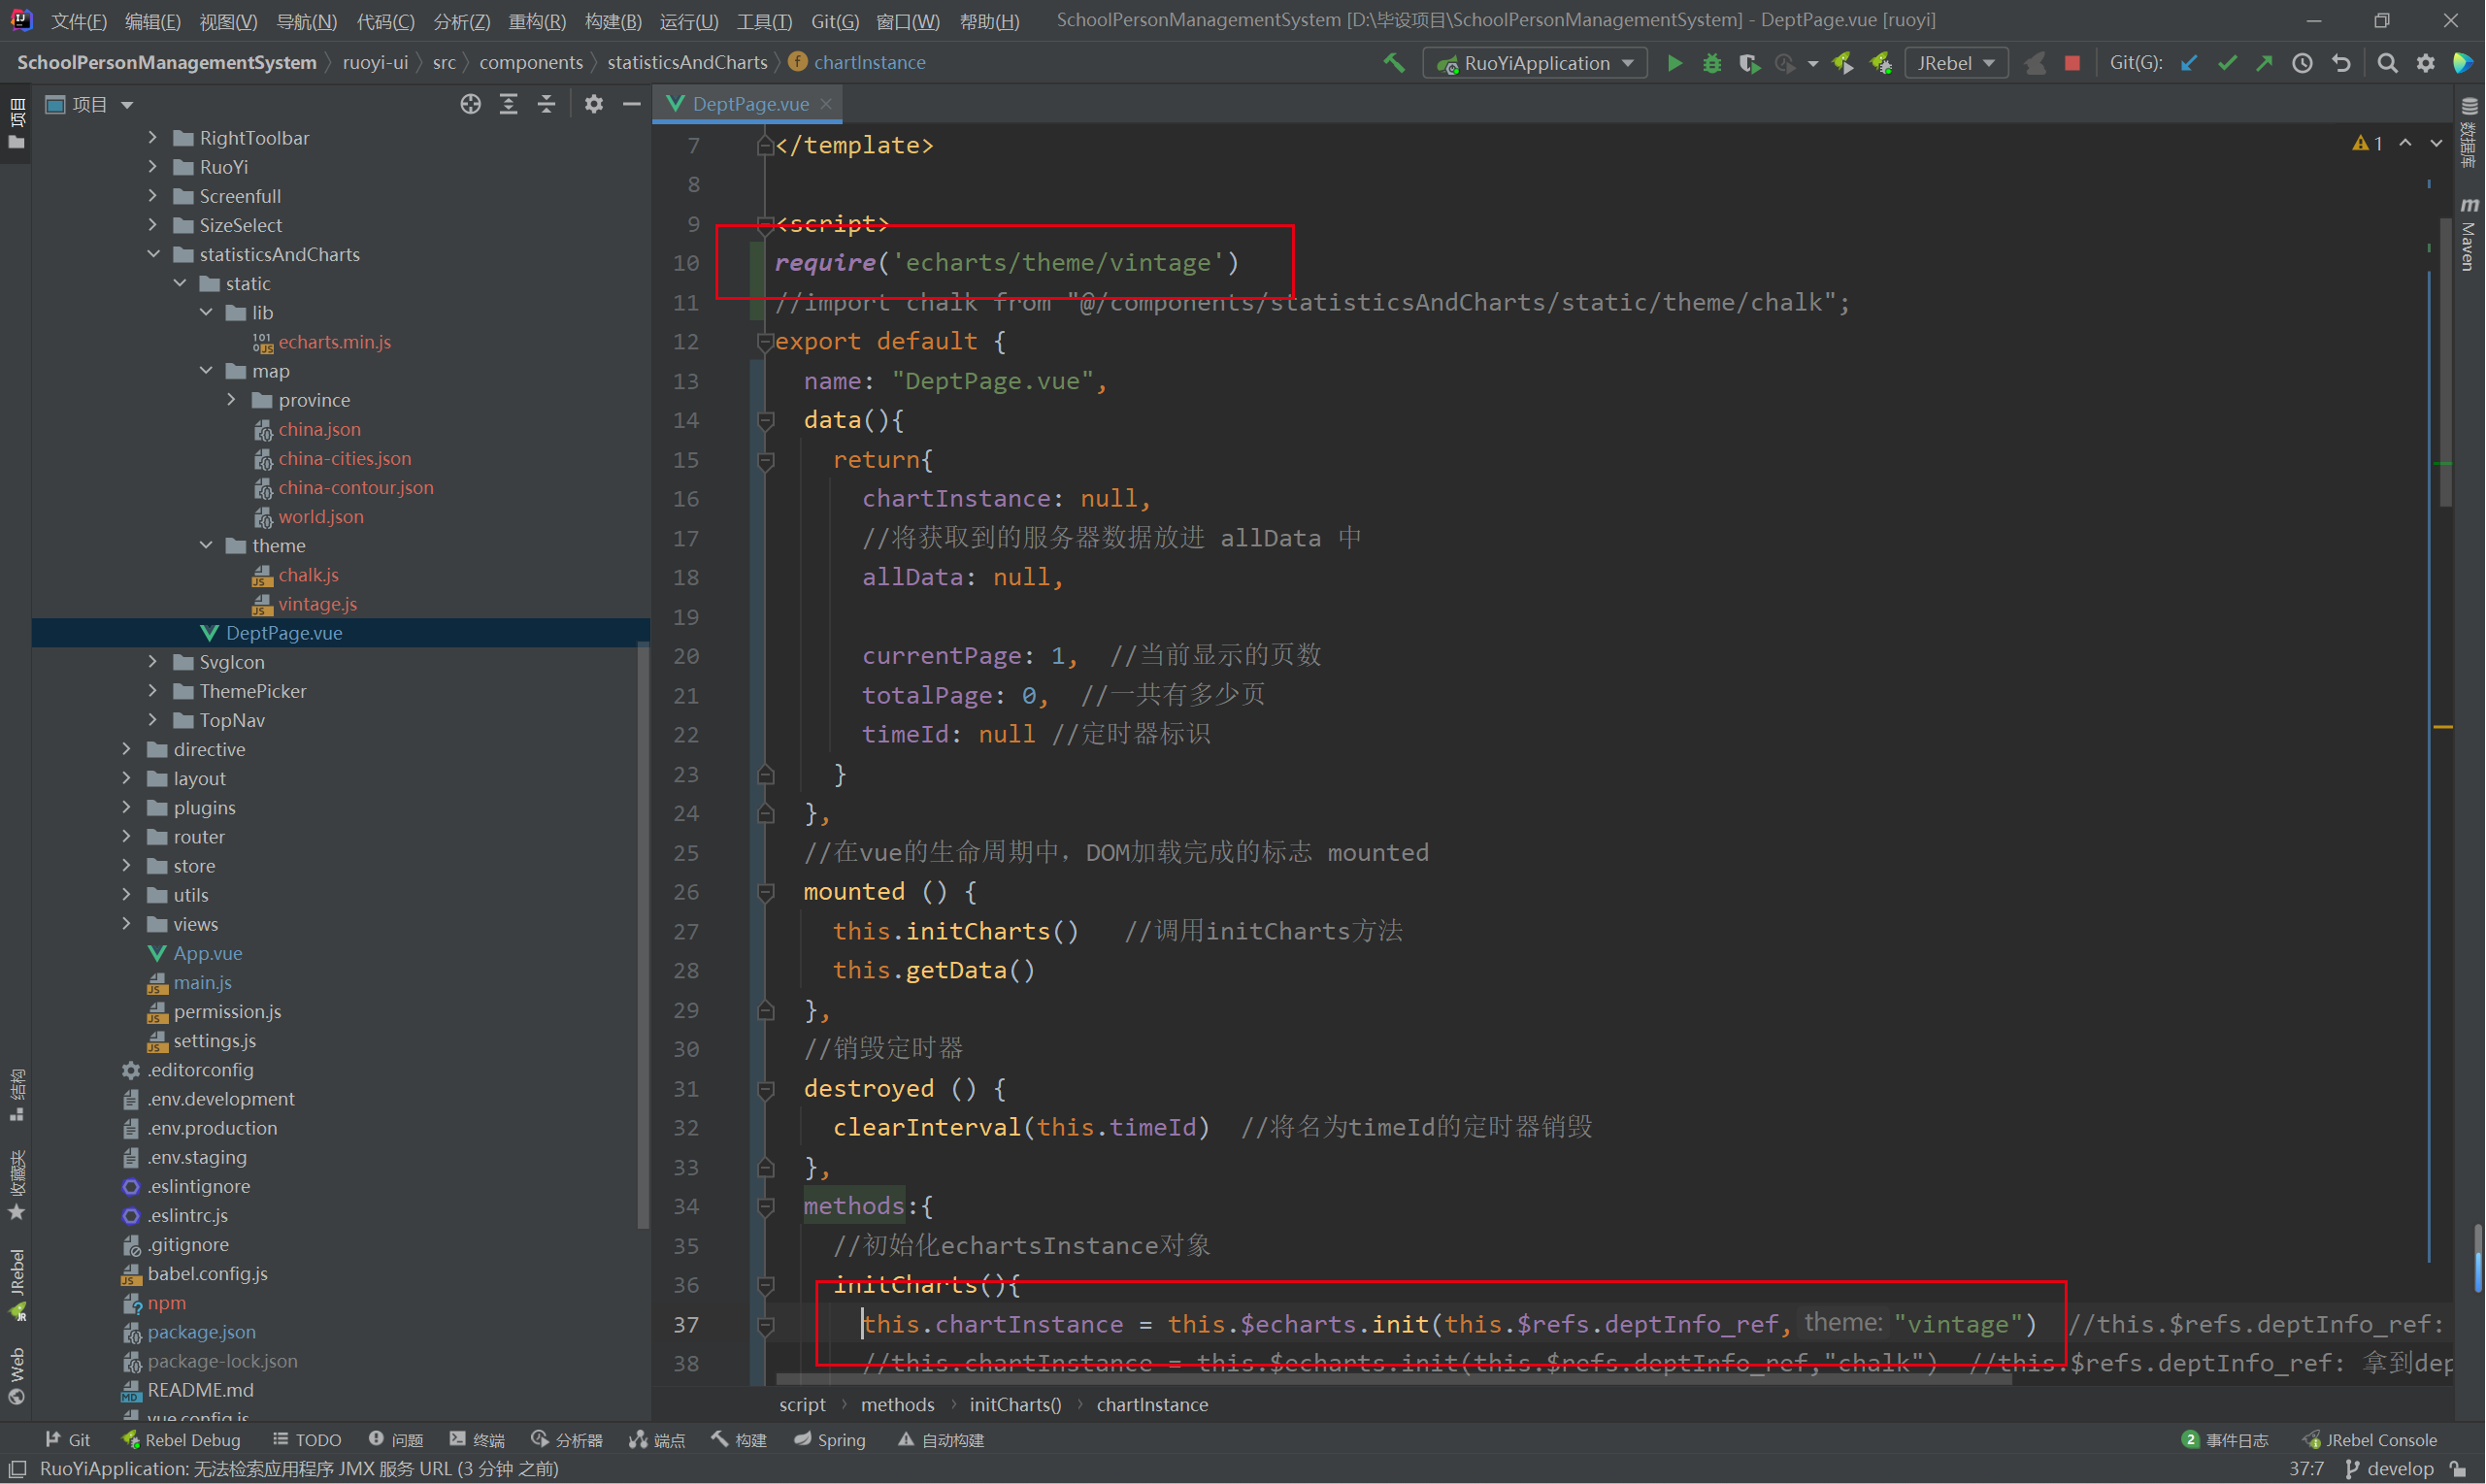
4.3.5 如何在vue文件中引入js文件
-
引用echarts默认主题的情况下
-
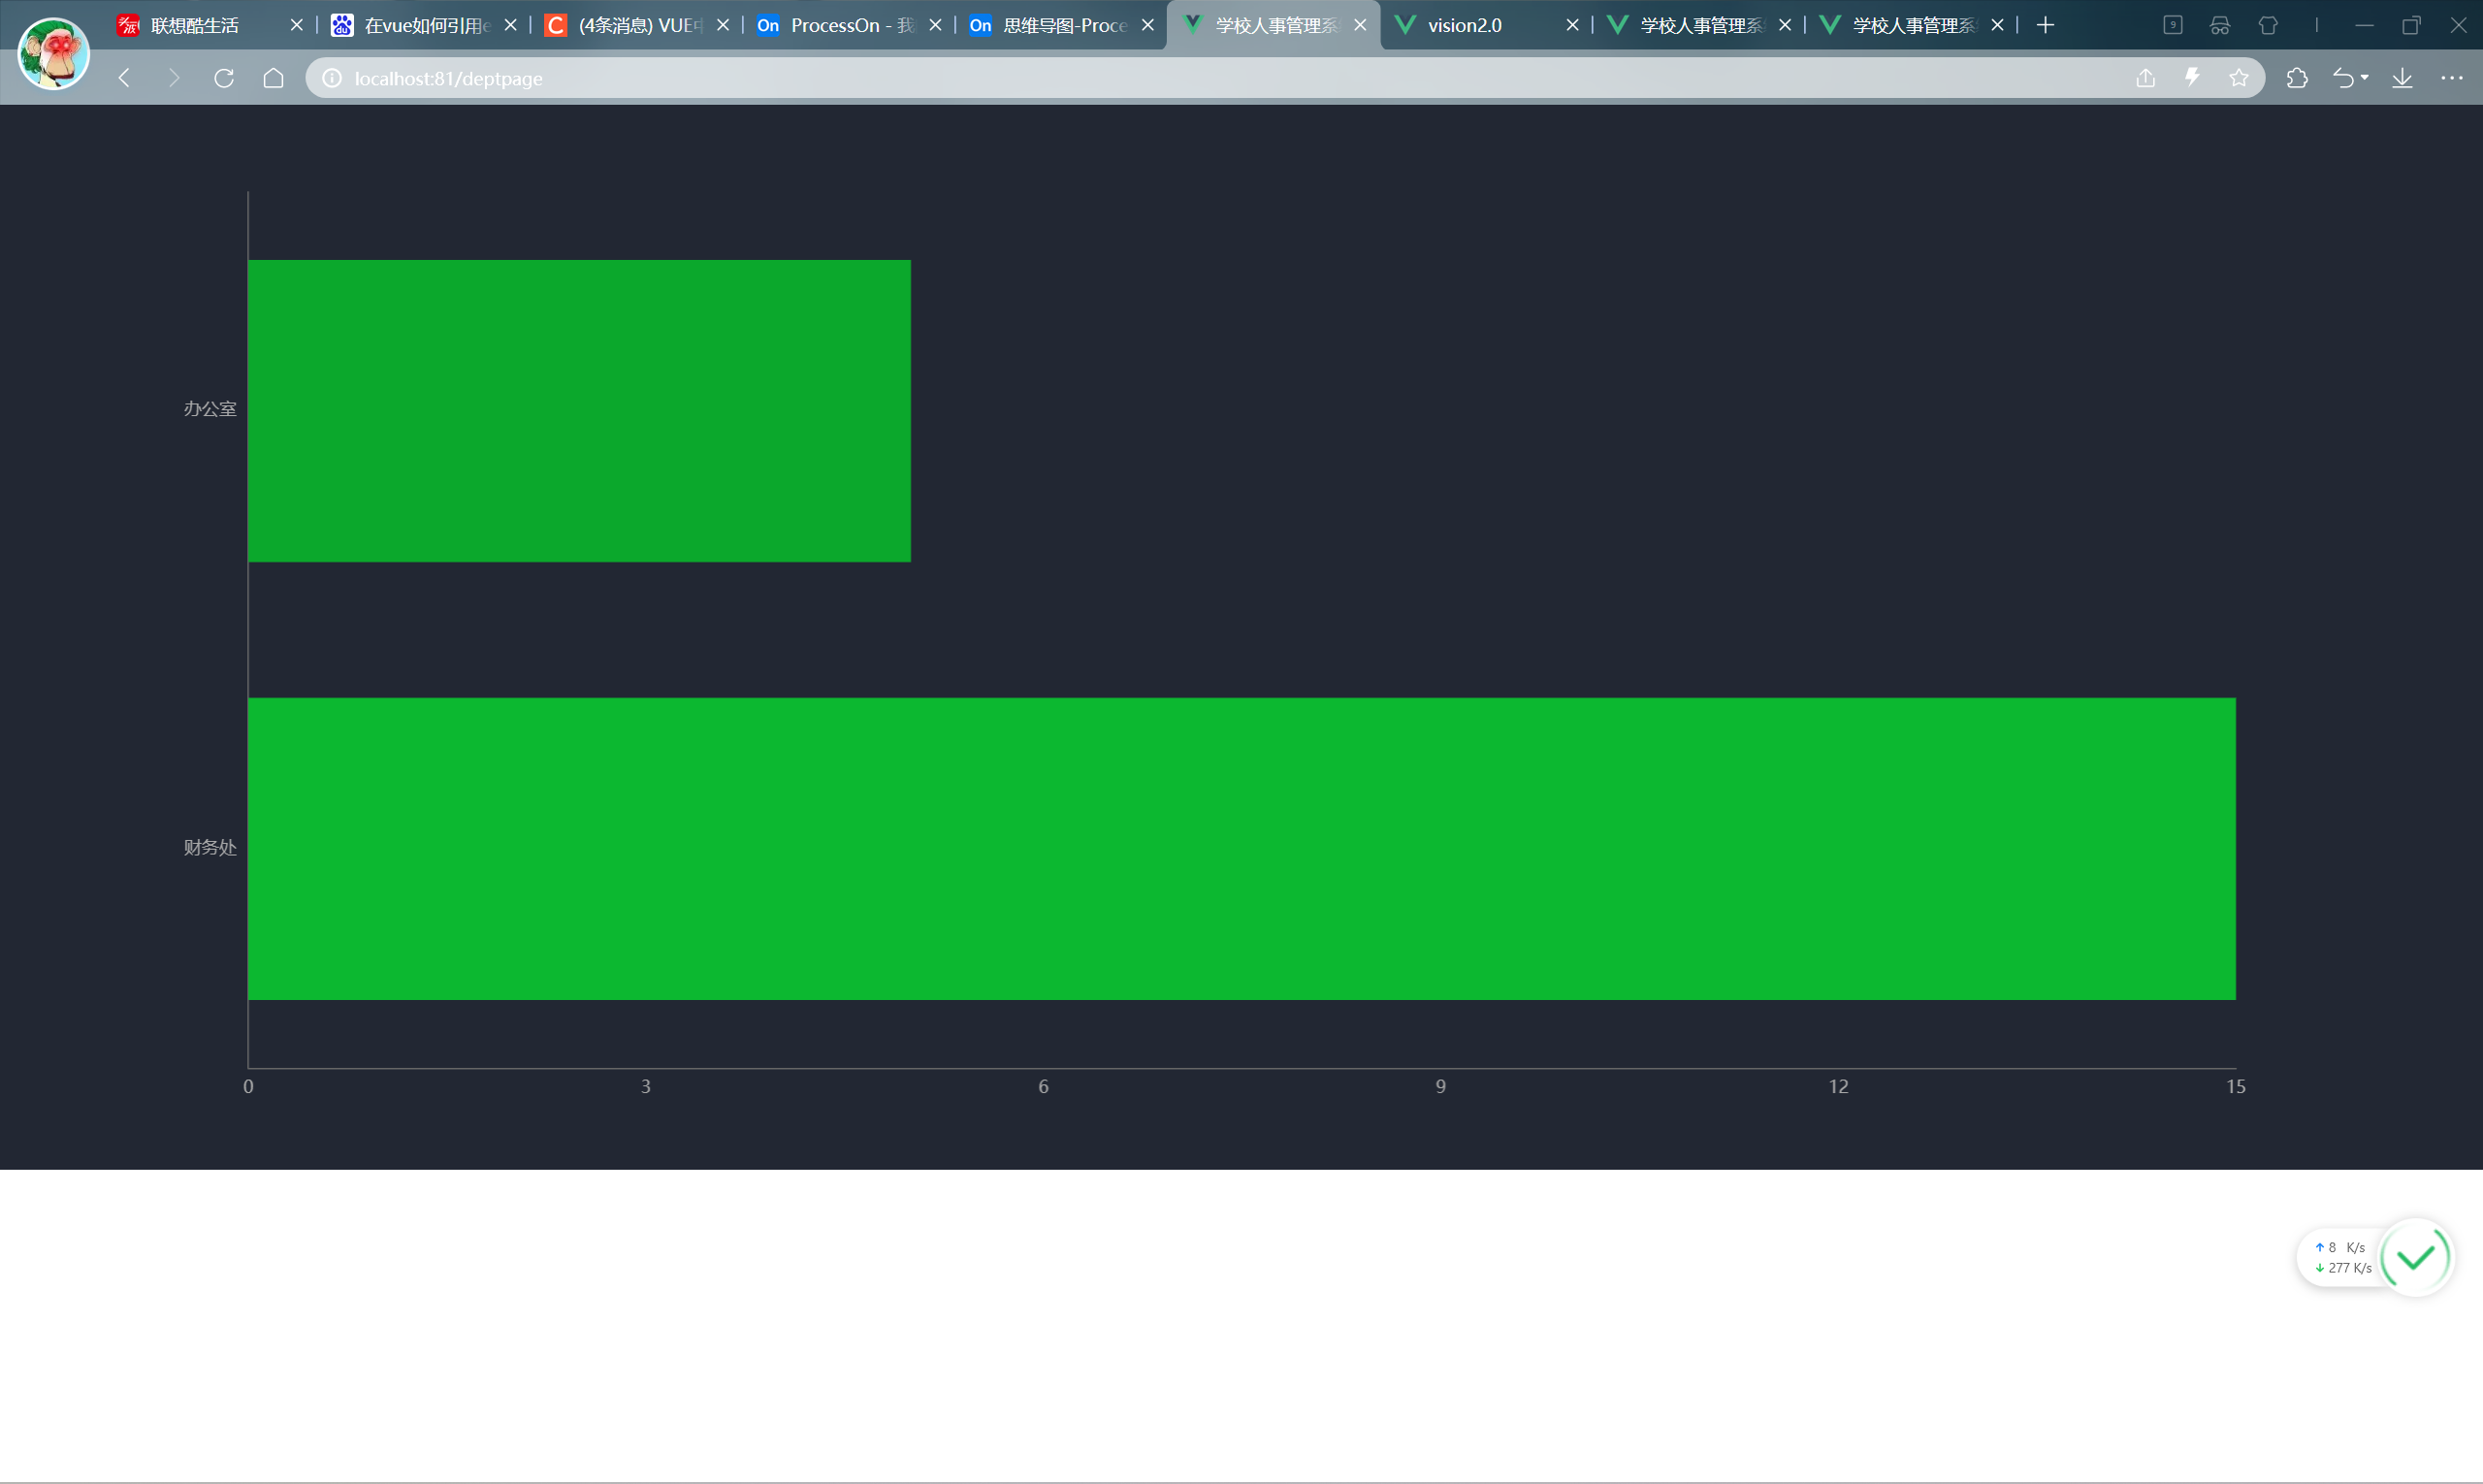
将下载好的主题chalk.js文件放到同级vue文件的static/theme/文件夹下,并修改如下代码,如下图
//require('echarts/theme/vintage')
import chalk from "@/components/statisticsAndCharts/static/theme/chalk";
...
//this.chartInstance = this.$echarts.init(this.$refs.deptInfo_ref,"vintage")
this.chartInstance = this.$echarts.init(this.$refs.deptInfo_ref,"chalk")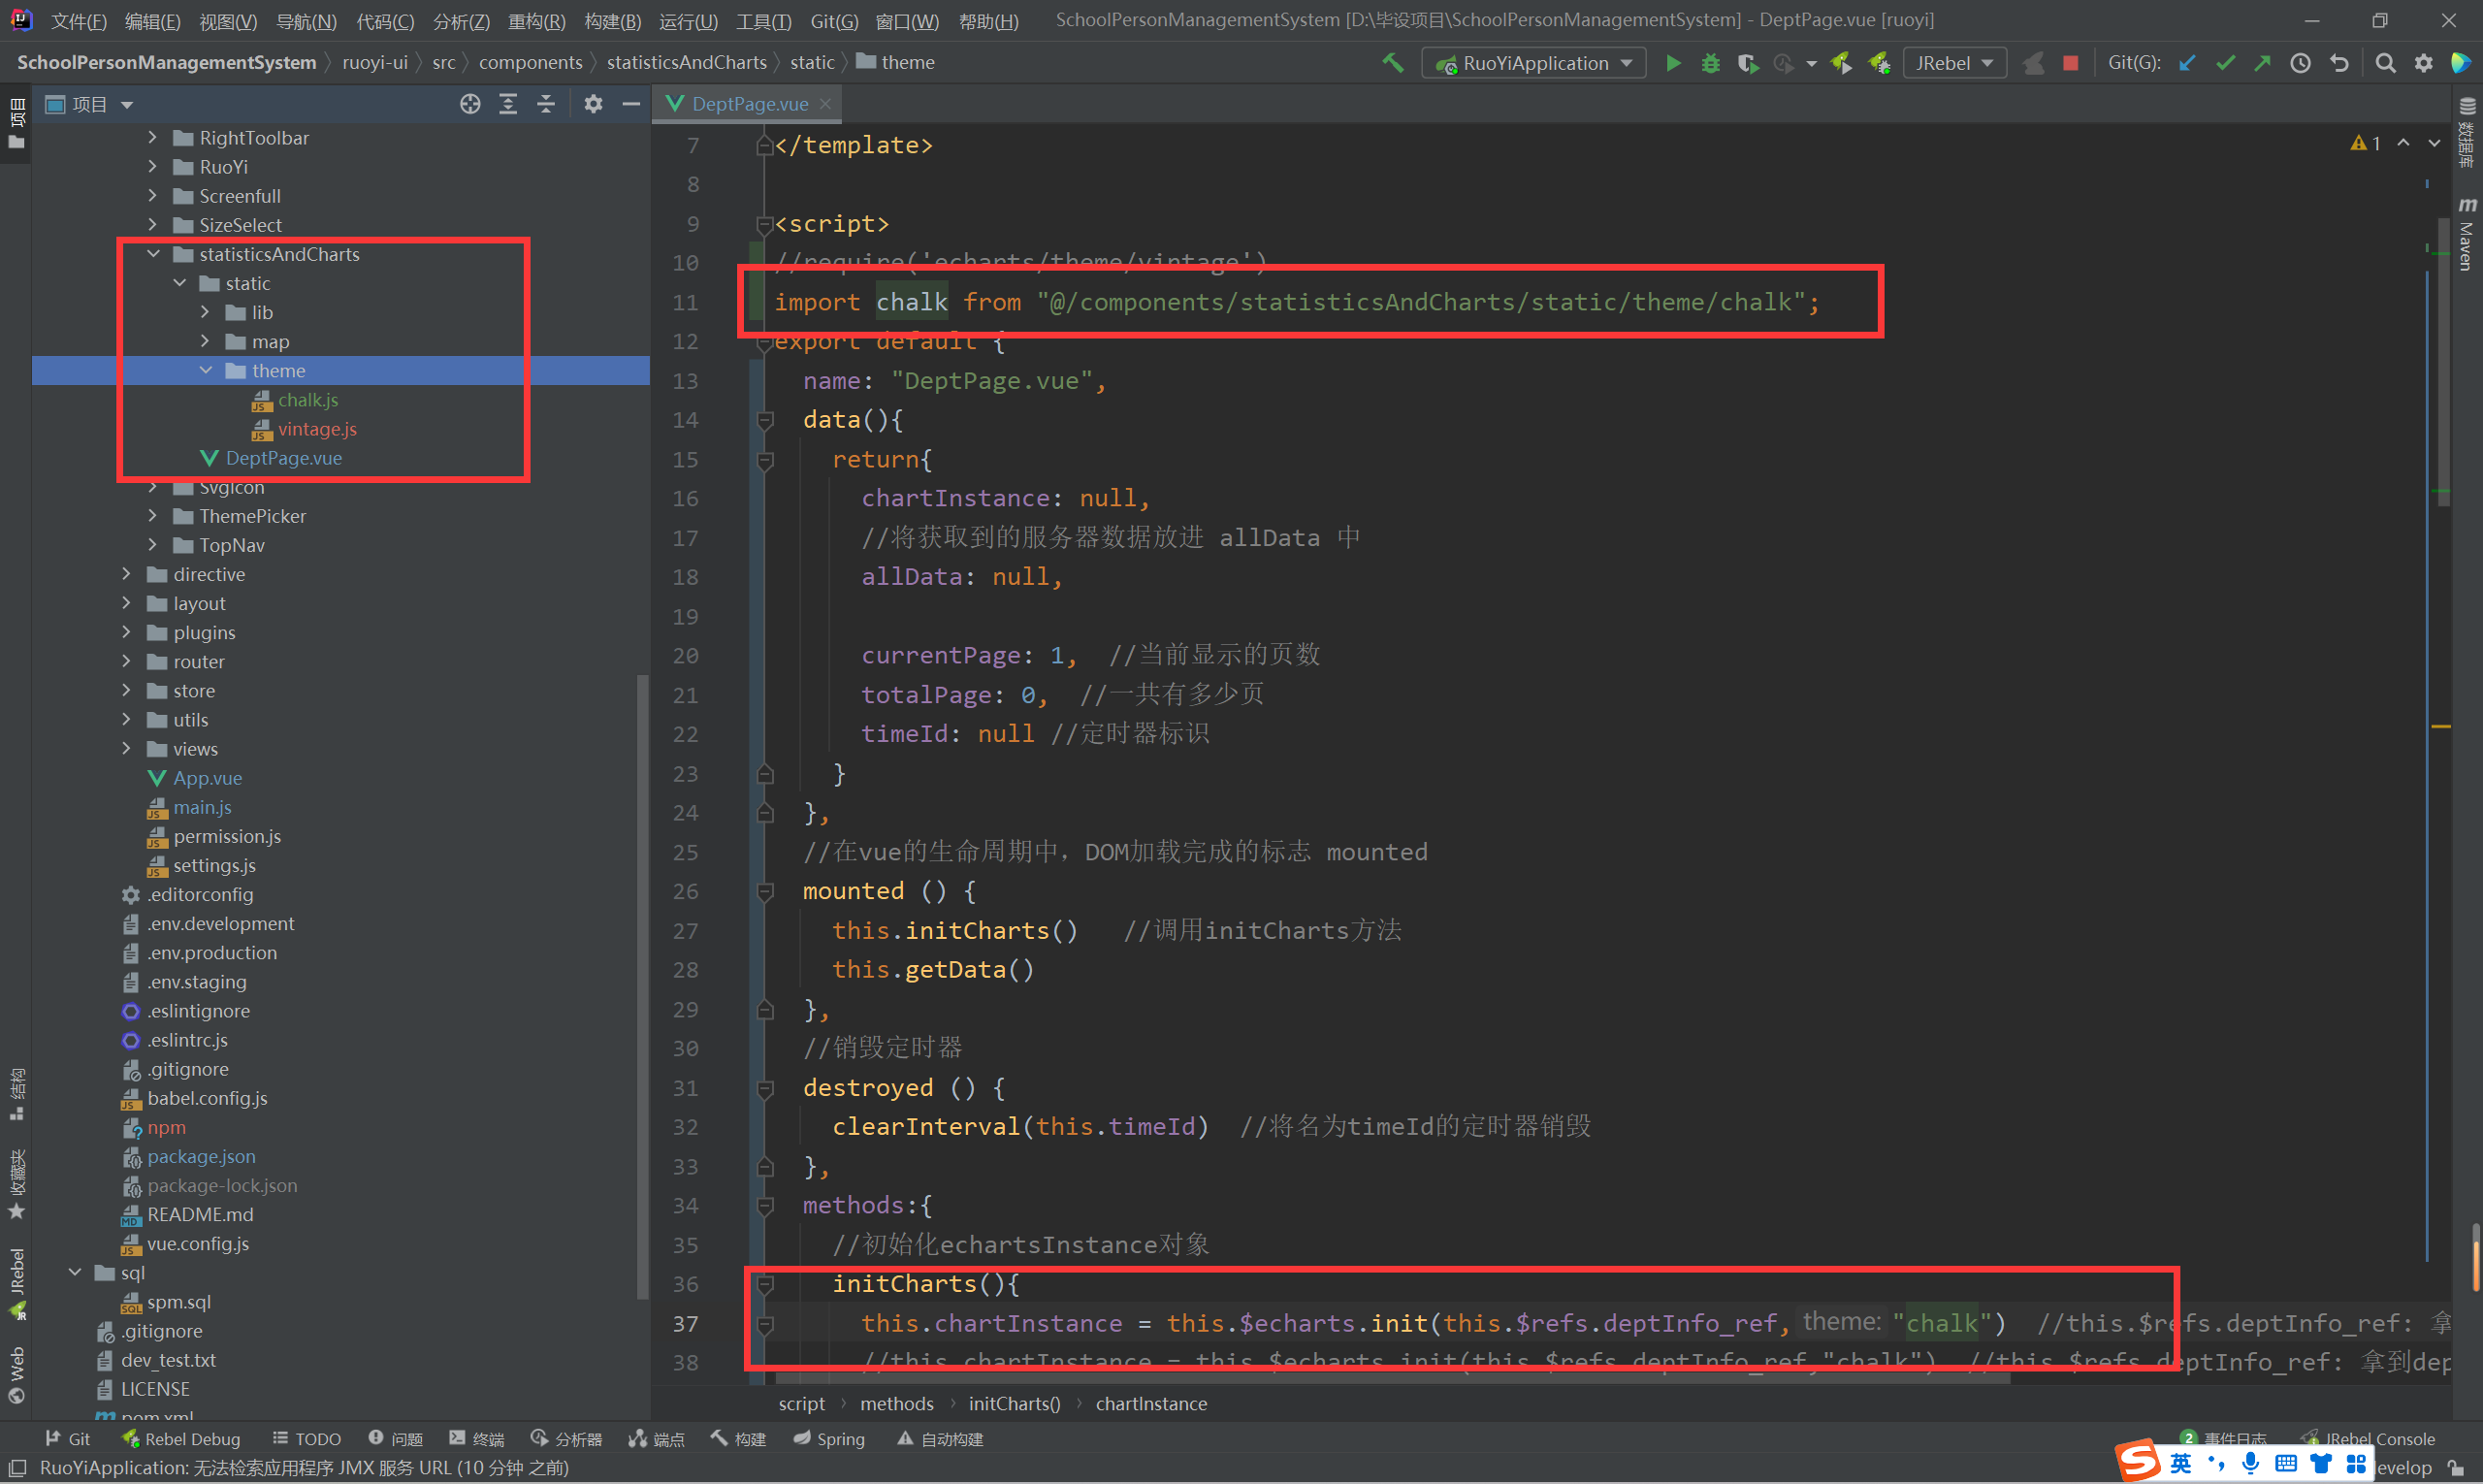
-
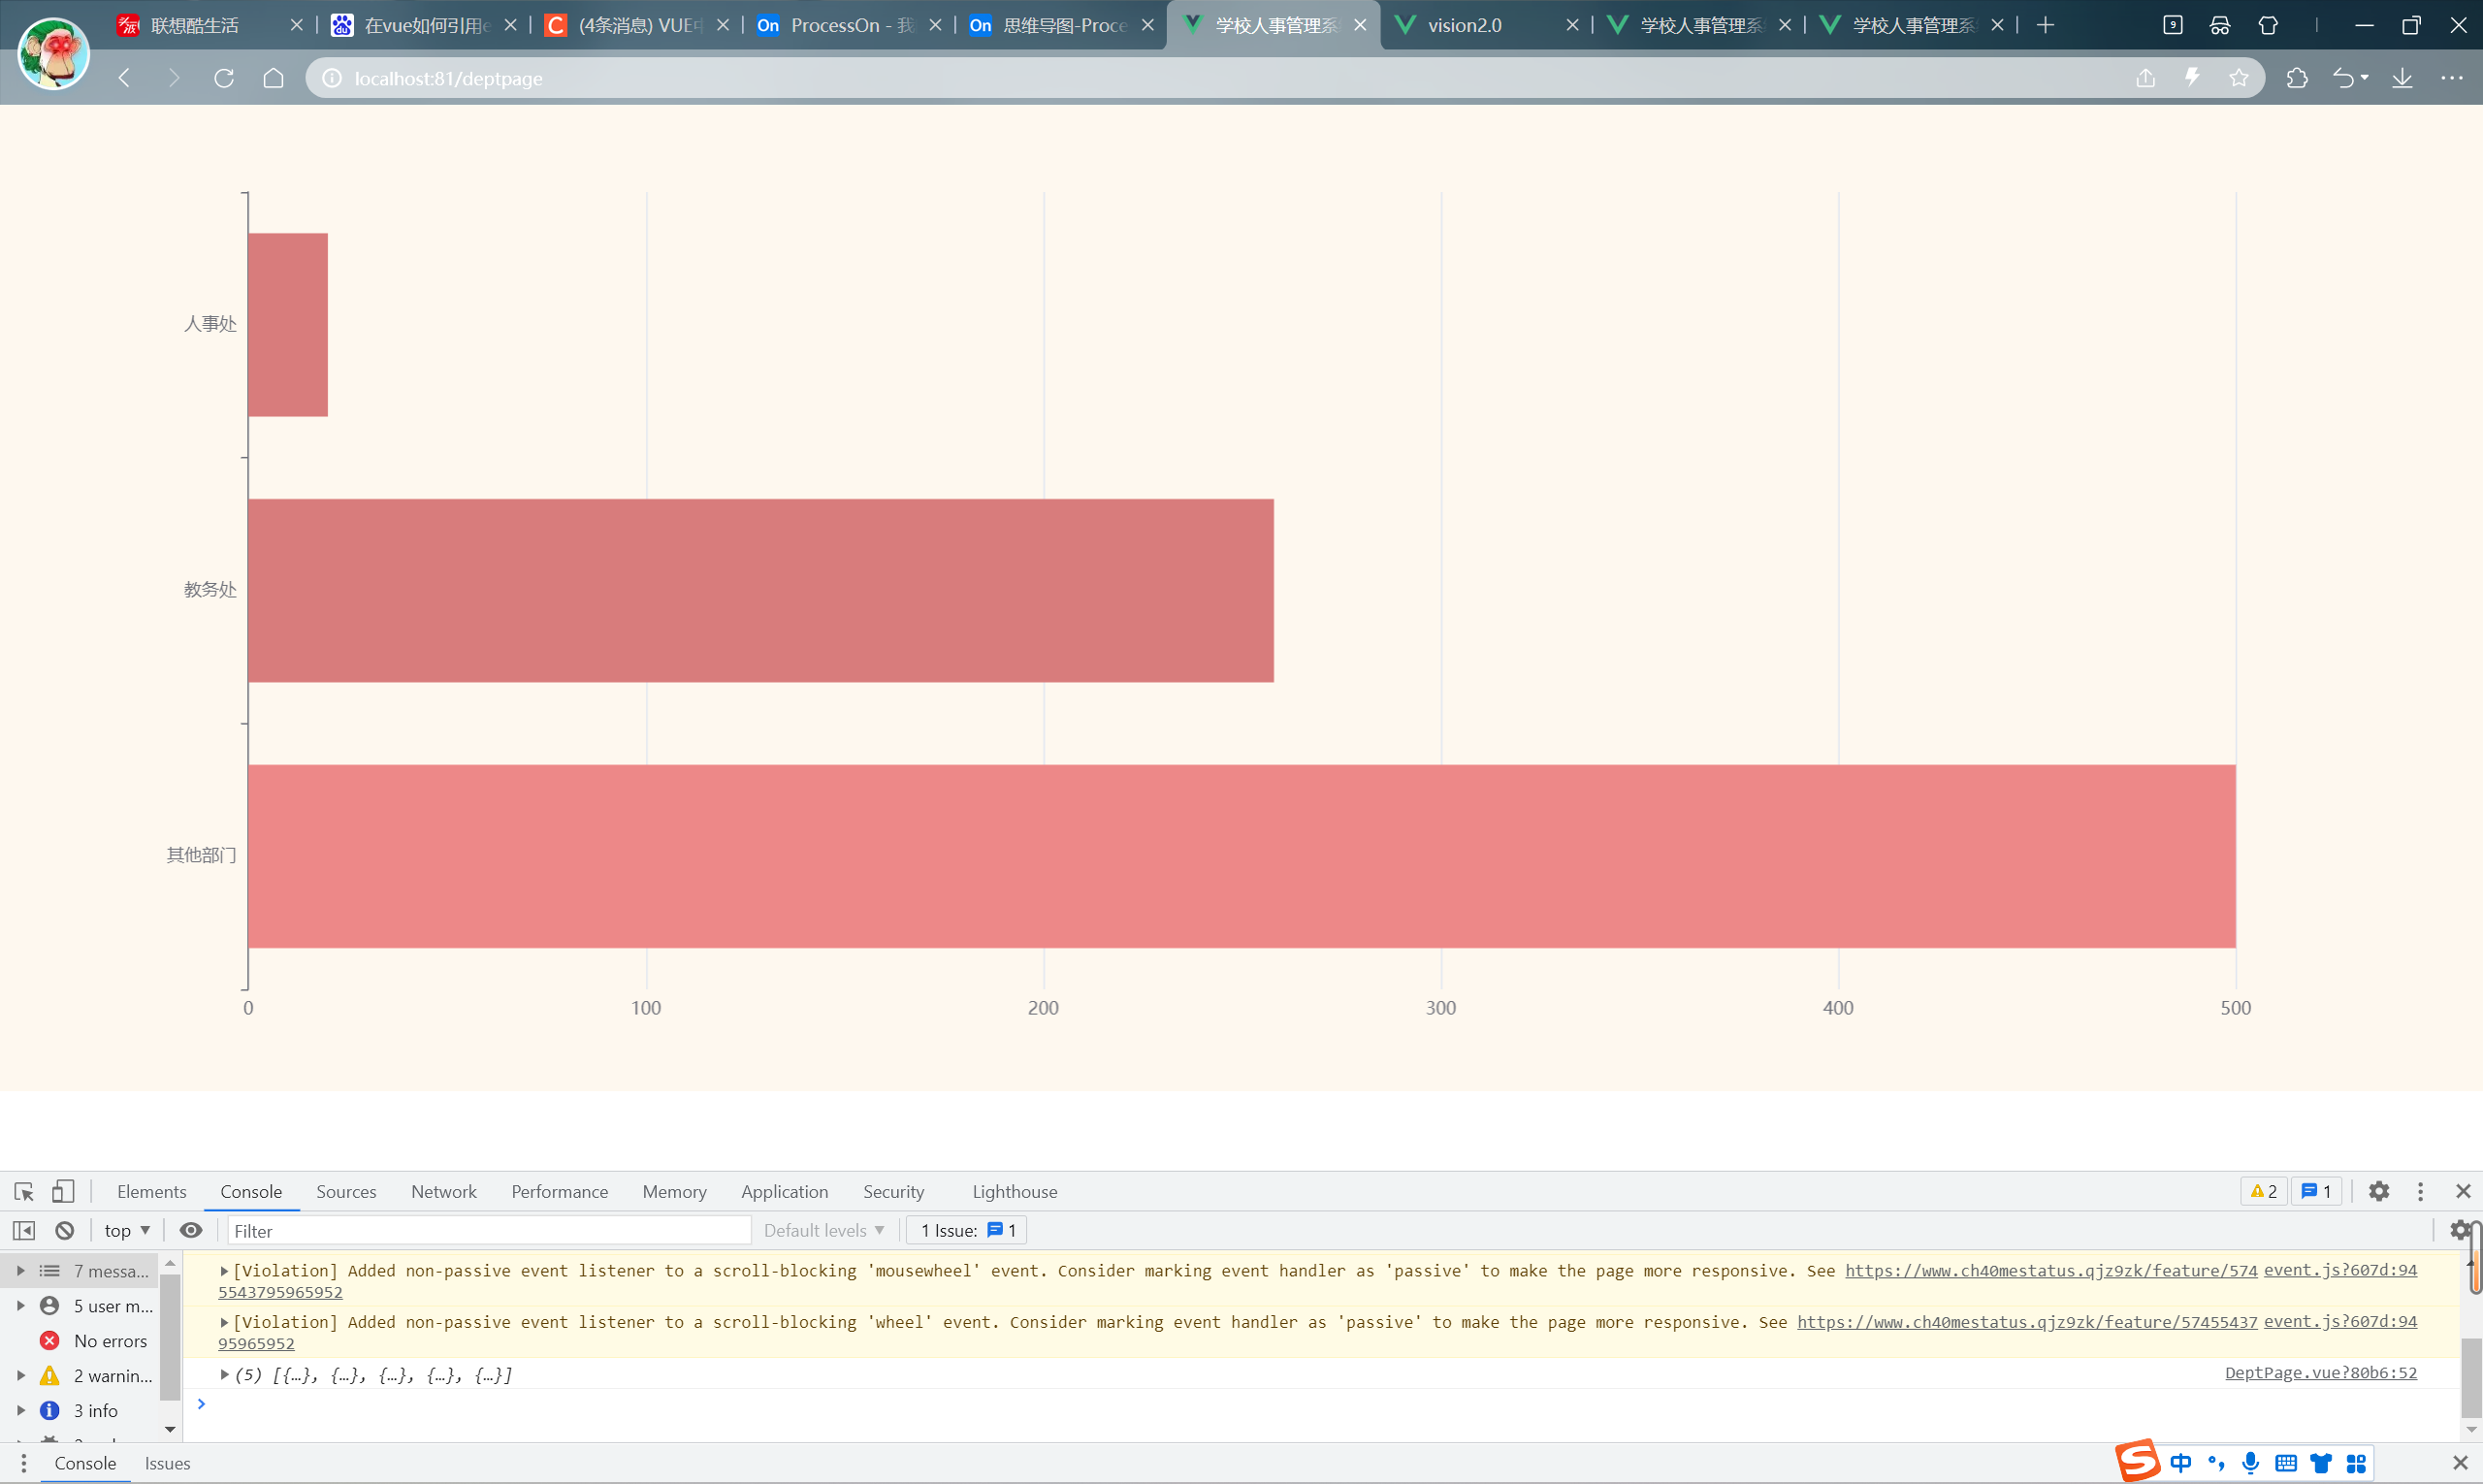
看效果(出现如下视图便可说明js导入成功)
4.3.6 主要的代码结构
<template>
<div class="com-container"><div class="com-chart" ref="trend_ref">
</div>
</div>
</template>
<script>
export default {name: 'Trend.vue',data(){return {chartInstance: null, //创建一个echarts实例对象allData: null //从服务器中获取出来的所有数据}},//生命周期函数mounted () {this.initCharts()this.getData()window.addEventListener('resize',this.screenAdapter) //进行对窗口事件进行监听this.screenAdapter() //主动的进行窗口大小的计算},destroyed () {window.removeEventListener('resize',this.screenAdapter) //将事件取消监听},methods:{//初始化echarts实例对象的方法initCharts () {this.chartInstance = this.$echarts.init(this.$refs.trend_ref)const initOption = {
}this.chartInstance.setOption(initOption)},async getData(){//await this.$http.get()//对allData进行赋值this.updateCharts()},updateCharts () {//处理数据const dataOption = {
}this.chartInstance.setOption(dataOption)},screenAdapter () {const adapterOption = {
}this.chartInstance.setOption(adapterOption)this.chartInstance.resize()}}
}
</script>
<style scoped>
</style>
4.3.7 基于vue获取json文件数据
文件物理路径
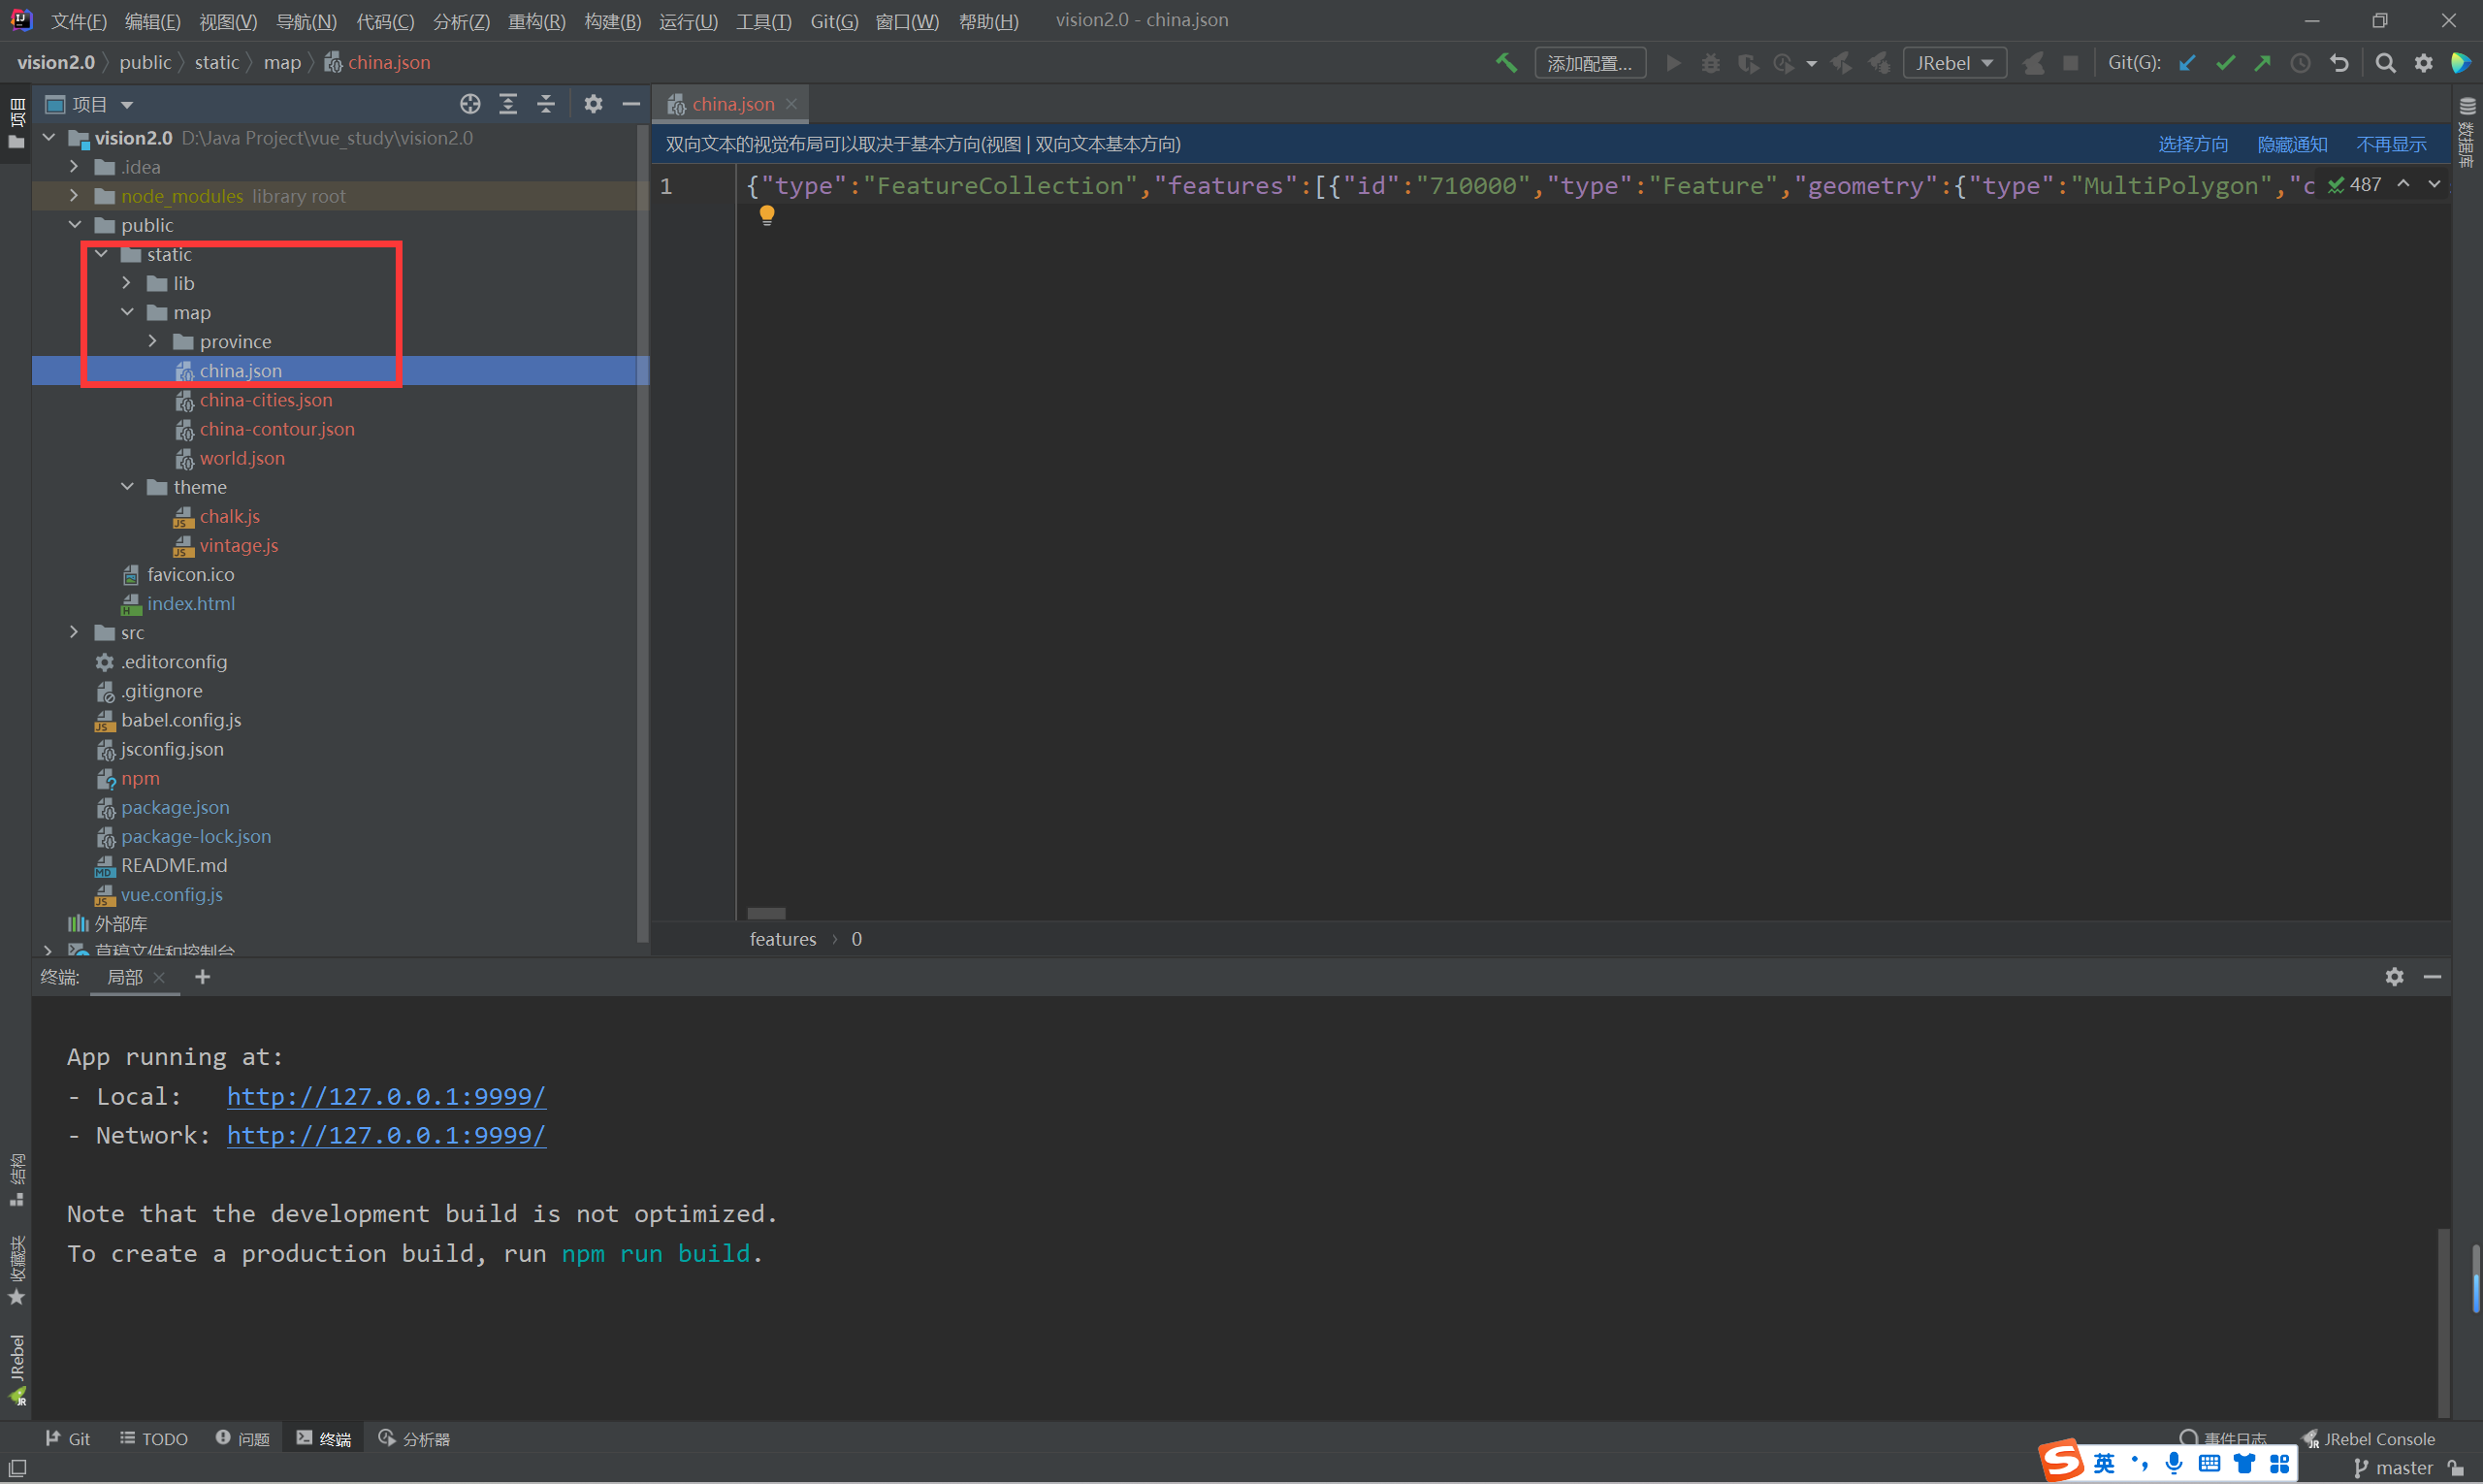
获取路径:http://127.0.0.1:9999/static/map/china.json
4.3.8 js相关
js中字符串使用‘’和“”有什么区别?
在 JavaScript 中,字符串可以用单引号('')或双引号("")来表示。在大多数情况下,这两种方式是等效的,但是它们在一些细节上是不同的。
其中一个主要区别是,如果你在字符串中使用了单引号,则需要使用双引号来将该字符串括起来,反之亦然。例如:
var str1 = 'It\\'s a nice day.'; // 使用单引号包含字符串,需要使用转义符号来转义单引号
var str2 = "He said \\"hello\\"."; // 使用双引号包含字符串,需要使用转义符号来转义双引号
另一个区别是,当字符串本身包含单引号或双引号时,需要使用相反的引号来避免语法错误。例如:
var str1 = "It's a nice day."; // 使用双引号包含字符串,避免了使用转义符号
var str2 = 'He said "hello".'; // 使用单引号包含字符串,避免了使用转义符号
总的来说,单引号和双引号在大多数情况下是可以互换的,但在某些情况下,需要选择正确的引号以避免语法错误。
4.3.9 不使用WebSocket的agePage
<template><div class="com-container"><!-- hot--><div class="com-chart" ref="age_ref"></div><!-- 向左的箭头 :style:绑定方法 --><span class="iconfont arr-left" @click="toLeft" :style="comStyle"></span><!-- 向右的箭头 --><span class="iconfont arr-right" @click="toRight" :style="comStyle"></span><span class="title-name" :style="comStyle">{{ titleName }}年龄分布</span></div>
</template>
<script>
import {getData} from "@/api/system/dict/data";
export default {name: 'AgePage',data(){return {chartInstance: null, //创建一个echarts实例对象allData: null, //从服务器中获取出来的所有数据currentIndex: 0, //当前所展示出的一级分类数据titleFontSize: 0}},//计算属性computed: {titleName (){if(!this.allData){return ''}else {return this.allData[this.currentIndex].name}},comStyle() {return {fontSize: this.titleFontSize / 3 + 'px'}}},//生命周期函数(带括号的是函数,不带括号的是属性),页面从这里开始一步步加载mounted () {this.initCharts()this.getData()window.addEventListener('resize',this.screenAdapter) //进行对窗口事件进行监听this.screenAdapter() //主动的进行窗口大小的计算},destroyed () {window.removeEventListener('resize',this.screenAdapter) //将事件取消监听},methods:{//初始化echarts实例对象的方法initCharts () {this.chartInstance = this.$echarts.init(this.$refs.age_ref,'chalk')const initOption = {title:{text: '▎各部门教职工年龄分布',left: 20,top: 20},legend: {top: '10%',icon: 'circle'},tooltip:{show: true,formatter: arg=>{//console.log(arg)return "年龄段:" + arg.name+"<br/>人数:" + arg.value + "<br/>占比:" + arg.percent+"%"}},series: [{type: 'pie',//标签label:{show: false //不显示标签},//高亮状态显示文字emphasis:{label: {show: true},labelLine:{show: false}}}]}this.chartInstance.setOption(initOption)},async getData(){//await this.$http.get()const {data: ret}= await this.$http.get('age')this.allData = retconsole.log(this.allData)//对allData进行赋值this.updateCharts()},updateCharts () {//const legendData = this.allData[0].children.map(item =>{const legendData = this.allData[this.currentIndex].children.map(item =>{return {name: item.name}})//this.allData[0] 一级分类 this.allData[0].children 二级分类//const seriesData = this.allData[0].children.map(item =>{const seriesData = this.allData[this.currentIndex].children.map(item =>{return {name: item.name,value: item.value}})console.log(seriesData)//处理数据const dataOption = {legend: {data: legendData},series:[{data: seriesData}],}this.chartInstance.setOption(dataOption)},screenAdapter () {this.titleFontSize = this.$refs.age_ref.offsetWidth / 100 * 3.6const adapterOption = {//控制标题的大小title:{textStyle:{fontSize: this.titleFontSize / 2}},//控制图例的大小legend:{itemWidth: this.titleFontSize / 2,itemHeight: this.titleFontSize / 2,itemGap: this.titleFontSize / 2,textStyle: {fontSize: this.titleFontSize / 2}},//控制饼图的大小,饼图的大小是通过半径来控制的series:[{radius: this.titleFontSize * 3, //控制饼图的大小center: ['50%','50%'] //['50%','50%'] --> ['X轴位置百分比','Y轴位置百分比']:将饼图的圆心放在界面的正中心}]}this.chartInstance.setOption(adapterOption)this.chartInstance.resize()},toLeft(){this.currentIndex--if(this.currentIndex < 0){this.currentIndex = this.allData.length-1}this.updateCharts()},toRight(){this.currentIndex++if(this.currentIndex > this.allData.length-1){this.currentIndex = 0}this.updateCharts()}}
}
</script>
<style scoped>
.arr-left{position: absolute; /*绝对定位:https://www.runoob.com/w3cnote/css-position-static-relative-absolute-fixed.html*/left: 10%;top: 50%;transform: translateY(-50%);cursor: pointer; /*鼠标移入样式*/color: white;
}
.arr-right{position: absolute; /*绝对定位:https://www.runoob.com/w3cnote/css-position-static-relative-absolute-fixed.html*/right: 10%;top: 50%;transform: translateY(-50%);cursor: pointer; /*鼠标移入样式*/color: white;
}
.title-name{position: absolute; /*不会占容器的位置*/left: 80%;top: 20px;color: white;
}
</style>
4.3.10 使用WebSocket的agePage
<template><div class="com-container"><!-- hot--><div class="com-chart" ref="age_ref"></div><!-- 向左的箭头 :style:绑定方法 --><span class="iconfont arr-left" @click="toLeft" :style="comStyle"></span><!-- 向右的箭头 --><span class="iconfont arr-right" @click="toRight" :style="comStyle"></span><span class="title-name" :style="comStyle">{{ titleName }}年龄分布</span></div>
</template>
<script>
import {getData} from "@/api/system/dict/data";
export default {name: 'AgePage',data(){return {chartInstance: null, //创建一个echarts实例对象allData: null, //从服务器中获取出来的所有数据currentIndex: 0, //当前所展示出的一级分类数据titleFontSize: 0}},//计算属性computed: {titleName (){if(!this.allData){return ''}else {return this.allData[this.currentIndex].name}},comStyle() {return {fontSize: this.titleFontSize / 3 + 'px'}}},created() {//在组件创建完成之后 进行回调函数的注册this.$socket.registerCallBack('ageData',this.getData)},//生命周期函数(带括号的是函数,不带括号的是属性),页面从这里开始一步步加载mounted () {this.initCharts()//this.getData()//发送数据给服务器,告诉服务器现在需要数据this.$socket.send({action: 'getData',socketType: 'ageData',chartName: 'age',value: ''})window.addEventListener('resize',this.screenAdapter) //进行对窗口事件进行监听this.screenAdapter() //主动的进行窗口大小的计算},destroyed () {window.removeEventListener('resize',this.screenAdapter) //将事件取消监听//在组件销毁的时候 进行回调函数的取消this.$socket.unRegisterCallBack('ageData')},methods:{//初始化echarts实例对象的方法initCharts () {this.chartInstance = this.$echarts.init(this.$refs.age_ref,'chalk')const initOption = {title:{text: '▎各部门教职工年龄分布',left: 20,top: 20},legend: {top: '10%',icon: 'circle'},tooltip:{show: true,formatter: arg=>{//console.log(arg)return "年龄段:" + arg.name+"<br/>人数:" + arg.value + "<br/>占比:" + arg.percent+"%"}},series: [{type: 'pie',//标签label:{show: false //不显示标签},//高亮状态显示文字emphasis:{label: {show: true},labelLine:{show: false}}}]}this.chartInstance.setOption(initOption)},// ret 就是服务端发送给客户端的图表的数据getData(ret){//await this.$http.get()//const {data: ret}= await this.$http.get('age')this.allData = retconsole.log(this.allData)//对allData进行赋值this.updateCharts()},updateCharts () {//const legendData = this.allData[0].children.map(item =>{const legendData = this.allData[this.currentIndex].children.map(item =>{return {name: item.name}})//this.allData[0] 一级分类 this.allData[0].children 二级分类//const seriesData = this.allData[0].children.map(item =>{const seriesData = this.allData[this.currentIndex].children.map(item =>{return {name: item.name,value: item.value}})console.log(seriesData)//处理数据const dataOption = {legend: {data: legendData},series:[{data: seriesData}],}this.chartInstance.setOption(dataOption)},screenAdapter () {this.titleFontSize = this.$refs.age_ref.offsetWidth / 100 * 3.6const adapterOption = {//控制标题的大小title:{textStyle:{fontSize: this.titleFontSize}},//控制图例的大小legend:{itemWidth: this.titleFontSize ,itemHeight: this.titleFontSize ,itemGap: this.titleFontSize ,textStyle: {fontSize: this.titleFontSize}},//控制饼图的大小,饼图的大小是通过半径来控制的series:[{radius: this.titleFontSize * 6, //控制饼图的大小center: ['50%','50%'] //['50%','50%'] --> ['X轴位置百分比','Y轴位置百分比']:将饼图的圆心放在界面的正中心}]}this.chartInstance.setOption(adapterOption)this.chartInstance.resize()},toLeft(){this.currentIndex--if(this.currentIndex < 0){this.currentIndex = this.allData.length-1}this.updateCharts()},toRight(){this.currentIndex++if(this.currentIndex > this.allData.length-1){this.currentIndex = 0}this.updateCharts()}}
}
</script>
<style scoped>
.arr-left{position: absolute; /*绝对定位:https://www.runoob.com/w3cnote/css-position-static-relative-absolute-fixed.html*/left: 10%;top: 50%;transform: translateY(-50%);cursor: pointer; /*鼠标移入样式*/color: white;
}
.arr-right{position: absolute; /*绝对定位:https://www.runoob.com/w3cnote/css-position-static-relative-absolute-fixed.html*/right: 10%;top: 50%;transform: translateY(-50%);cursor: pointer; /*鼠标移入样式*/color: white;
}
.title-name{position: absolute; /*不会占容器的位置*/left: 80%;top: 20px;color: white;
}
</style>
4.3.11使用vue生成一个在线天气预报
要使用Vue生成一个在线天气预报,需要先获取天气数据,并使用Vue将其呈现在用户界面上。以下是一些基本的步骤:
-
获取天气数据:使用一个天气API(例如OpenWeatherMap或Weather Underground)来获取天气数据。这些API通常需要您注册并获得一个API密钥。
-
创建Vue应用程序:创建一个Vue应用程序,并将其连接到您的HTML和CSS。
-
获取和处理天气数据:使用Vue的生命周期钩子,在Vue实例创建时,使用Ajax或Fetch等方法从API中获取天气数据。然后,将天气数据保存到Vue组件的状态中,并使用计算属性处理数据以便呈现到用户界面上。
-
呈现数据:在Vue组件的模板中,使用Vue指令和插值表达式来呈现天气数据。您可以使用HTML和CSS来设计和样式化您的天气预报。
下面是一个简单的Vue组件,它获取并呈现天气数据:
phpCopy code<template><div><h1>{{ city }}</h1><h2>{{ weather }}</h2><img :src="iconUrl" alt="weather icon"><p>{{ temperature }} °{{ units }}</p></div>
</template>
<script>
export default {data() {return {city: "",weather: "",temperature: "",icon: "",units: "C"};},created() {fetch(`https://api.openweathermap.org/data/2.5/weather?q=${this.city}&appid=<your api key>`).then(response => response.json()).then(data => {this.weather = data.weather[0].description;this.temperature = Math.round(data.main.temp - 273.15);this.icon = data.weather[0].icon;});},computed: {iconUrl() {return `http://openweathermap.org/img/wn/${this.icon}.png`;}}
};
</script>
<style>
</style>
在这个组件中,我们通过在created()生命周期钩子中使用Fetch API来获取天气数据。然后,我们将数据存储在组件的状态中,并使用计算属性来获取天气图标的URL。最后,我们在模板中使用Vue指令和插值表达式来呈现天气数据。
请注意,在上面的代码示例中,您需要将<your api key>替换为您在OpenWeatherMap上获得的API密钥,并且还需要为city属性提供一个值。