DPText-DETR原理及源码解读

一、原理
发展脉络:DETR是FACEBOOK基于transformer做检测开山之作,Deformable DETR加速收敛并对小目标改进,TESTR实现了端到端的文本检测识别,DPText-DETR做了精度更高的文字检测。
DETR 2020 FACEBOOK:
原理
https://shihan-ma.github.io/posts/2021-04-15-DETR_annotation(推荐)
https://zhuanlan.zhihu.com/p/267156624
https://zhuanlan.zhihu.com/p/348060767
代码解读,可对数据维度进行了解
https://blog.csdn.net/feng__shuai/article/details/106625695


DETR即DEtection TRansformer。
backbone:cnn提取图像特征,flatten后增加positional encoding获取图像序列。使用单尺度特征
spatial positional encoding:加入到了encoder的self attention和decoder的cross attention,计算方式为分别计算xy两个维度的Positional Encoding,然后Cat到一起。是二维的位置编码。加在编码器qk上,不加到v上,加在解码器k上。
编码器:
解码器:有3个输入(encoder output、 positional encoding、object queries),输出为带有位置和标签信息的embeddings
object queries:或称output positional encoding,代码中叫作query_embed。N为超参数,N通常为100,是由nn.Embedding构成的数组。作为N个查询得到 N个decoder output embedding。可学习迭代,object queries被加入到了decoder的两个attention中。
预测头prediction heads(FFN):是双分支,一次性生成N个box(xywh)及这些box的class(是哪个class或no object)。注意这里没有经过shifted right,而是一次性全部输出,也就保证了速度。如增加mask head,也可用于分割。
bipartite matching loss:举个match的例子,预测结果中绿色box不是no object ,但和gt没有match。基于匈牙利算法即可得到二分图最优匹配,再计算配对loss
准确率及耗时和Faster RCNN相当。但小目标上稍差,DETR长宽32倍下采样,如3×800×1066下采样到256×25×34,特征图较小导致小目标较差。而且很难收敛(收敛问题有说是因为基于match的loss导致,有说是因为全局attention计算空间较大导致)
注:虽然DERT没有anchor和nms了,但一般认为object queries就是一种可以学习的anchor
源码中包含全景分割、空洞卷积、各层(主loss和5层辅助loss)loss权重设置。除去cnn、transformer这些常规层后,特殊层包括:
class_embed 编码层分类,如91个类别
bbox_embed 通过3层Linear获取xywh位置信息
query_embed 解码器输入,embedding(100,256)
input_pro 将cnn输出特征图通道数量减小,衔接backbone和transformer,Con2d(2048,256,......)处理为256通道
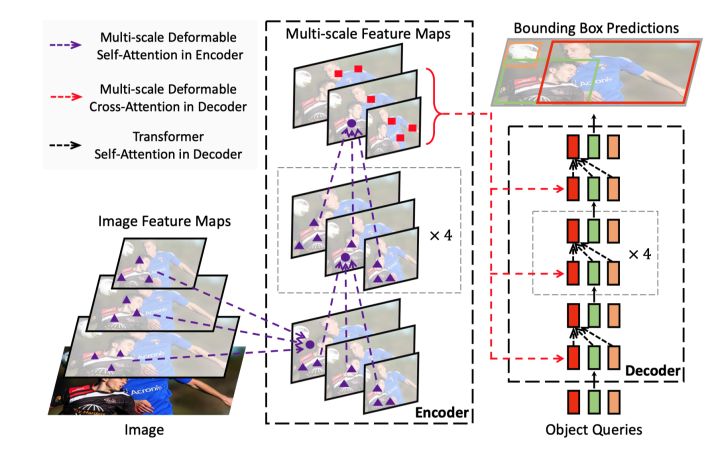
Deformable DETR 2021商汤:
原理:https://zhuanlan.zhihu.com/p/596303361
代码解读:https://www.jianshu.com/u/e6d60e29af26
变形attention+多尺度
DETR存在2个问题:
1)收敛慢:"因为全局像素之间计算注意力要收敛到几个稀疏的像素点需要消耗很长的时间"
2)小目标检测效果不好:由于attention的计算量和特征图尺寸呈平方关系,所以取了最后一层最小的特征图,特征图分辨率受限
Deformable解决上述问题的方法:
1)注意力权重矩阵往往都很稀疏,引入Deformable Attention,通过动态学习的采样点(采样少量的key)减小计算量
2)多尺度特征聚合,由于Deformable Attention做了采样,多尺度下计算量也不会很大
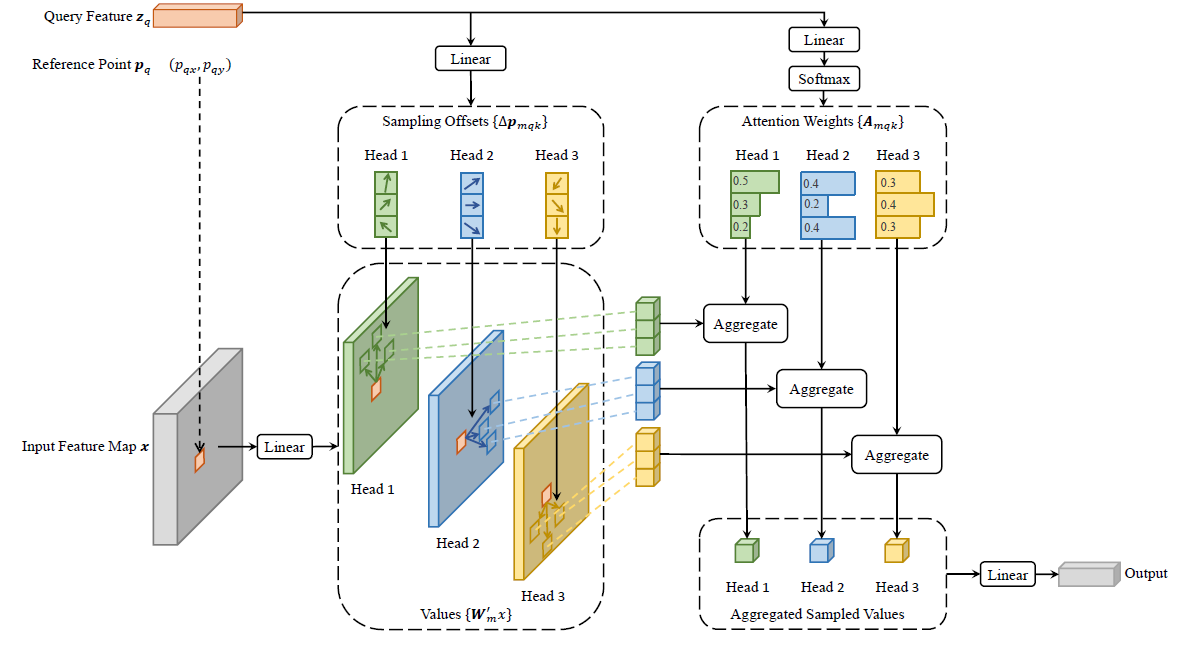
deformable attention module
Q特征:即左上角zq,通过Linear得到Offsets采样偏移和Weights权重。可以理解为不同anchor的形状及内部权重
偏移量Offsets:限制了k的数量,从而减小计算量。偏移量的维度为参考点的个数,组数为注意力头的数量,如上图的head1,head2,head3
注意力权重矩阵Weights:每个头内部和为1,由线性层得到,而传统Attention的权重矩阵由qk内积得到
参考点:即左上角Pq,通过网格torch.meshgrid在特征图中获得平铺的参考点,即橙色的框。橙色参考点(reference point)附近采样少数点(上图为3个点)来作为注意力。参考点可以理解为滑窗的基准位置
多尺度:ResNet最后三层的特征图C3,C4,C5,加上一个Conv3x3 Stride2的卷积得到的一个C6,构成了四层特征图。过卷积都处理为256通道。
各通道之间怎么组合呢???归一化到0-1??映射

M:heads数量
L:层数,C3,C4,C5,C6
K:采样点数,上图为3
A_{mlqk}:每个采样点的权重,即上图右上角中的Attention Weights(A_{mqk})
W_{m}:上图右下角的Linear,最后组合
W'_{m}:
x_{l}:
在deformable DETR中运用了多尺度的特征图,采样是用F.grid_sample实现的,具体可以参考https://www.jianshu.com/p/b319f3f026e7
算法代码可以简单概括如下
# 不完整,可视为伪代码
# 参考点+归一化的偏移量,这里参考点也是归一化到0-1的,所以可以用到不同层上sampling_locations = reference_points[:, :, None, :, None, :] \\+ sampling_offsets / offset_normalizer[None, None, None, :, None, :]  # 为了进行F.grid_sample又处理到-1~1之间
sampling_grids = 2 * sampling_locations - 1
# 对每一层
for lid_, (H_, W_) in enumerate(value_spatial_shapes):# 取出每一层信息sampling_grid_l_ = sampling_grids[:, :, :, lid_].transpose(1, 2).flatten(0, 1)# 对每一层进行不规则点采样sampling_value_l_ = F.grid_sample(value_l_, sampling_grid_l_,mode='bilinear', padding_mode='zeros', align_corners=False)
# 每层乘以权重后求和
output = (torch.stack(sampling_value_list, dim=-2).flatten(-2) * attention_weights).sum(-1).view(N_, M_*D_, Lq_)个人评价:将CNN中多尺度和anchor的实现(即偏移)更进一步用到了DETR中,为了避免Attention计算量爆炸,又引入了CNN中的变形卷积DCN,合成Deformable Attention。
TESTR(Text Spotting Transformers)2022:
https://zhuanlan.zhihu.com/p/561376987
单编码器双解码器架构,两个解码器分别进行回归和识别。可进行弯曲文本检测识别
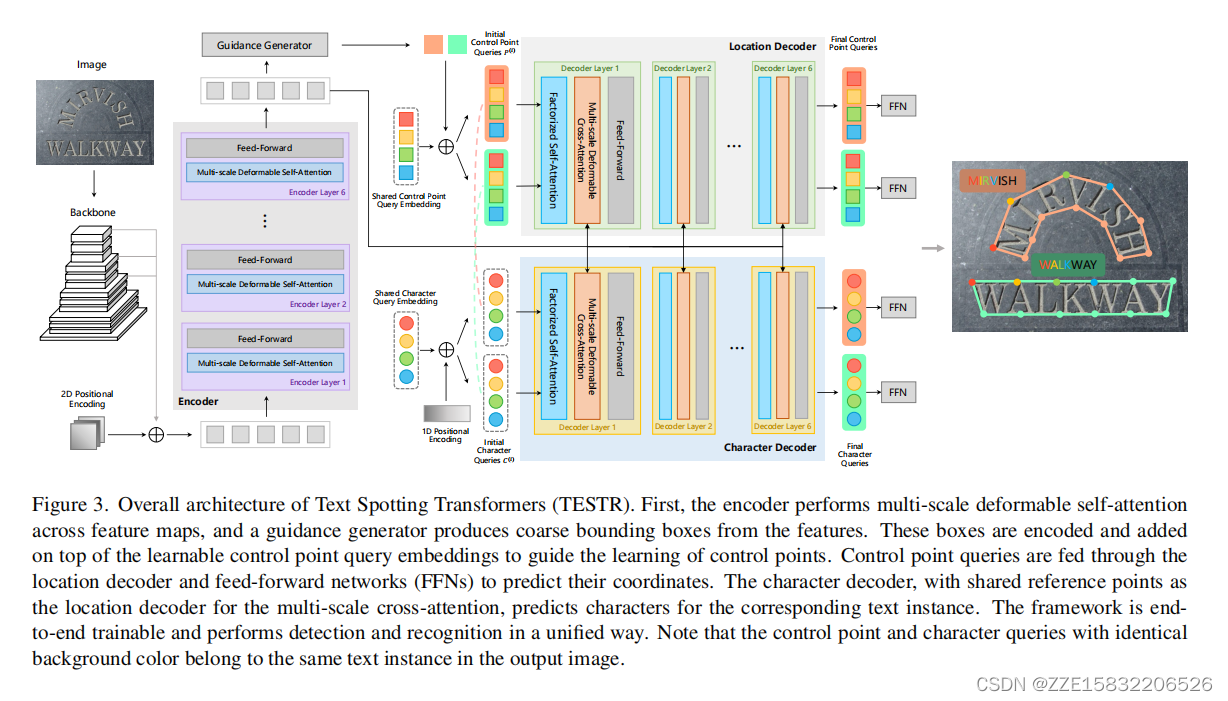
guidance generator:引导生成器
注:这里直接指明编码器通过ffn生成了粗粒度(coarse bounding boxes)的bbox,用bbox引导过解码器得到多点的文本控制点及文本,可以是边界点或贝塞尔曲线控制点。
解码器中一组query的每个query内部由多个subquery构成。是一种降低transformer计算量、复杂度的技术。
https://blog.csdn.net/Kaiyuan_sjtu/article/details/123815163
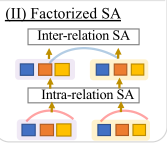
factorized self-attention(分解自注意力):组内和组间分别计算self attention
box-to-polygon:先编码器预测bbox,后解码器基于bbox预测pologon
encoder:输出bbox和概率
decoder:取得分最高的TOPN个bbox
location decoder:使用组合query的思想(composite queries), factorized self-attention(因式分解自注意力)
control point queries控制点query
character decoder:使用character queries + 1D sine positional encoding
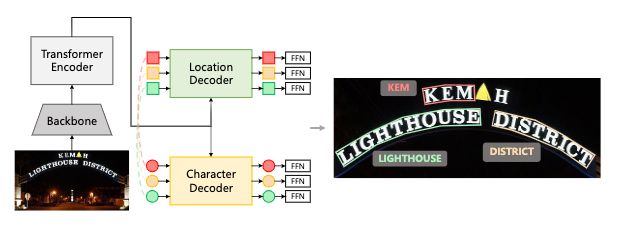
DPText-DETR:
https://zhuanlan.zhihu.com/p/569496186
https://zhuanlan.zhihu.com/p/607872370


Towards Better Scene Text Detection with Dynamic Points in Transformer
-
改进的点标签形式,从影像左上角开始,去除文本左上角开始(文本阅读顺序标注)对于模型的引导性
-
EFSA(Enhanced Factorized Self-Attention 增强的因子化自我注意):进行环形引导。通过循环卷积(环形卷积)引入局部关注
-
EPQM:显式点查询建模((Explicit Point Query Modeling),均匀采样点代替xywh的box
图像经过backbone(ResNet-50),展平后,加上二维位置编码,经编码器得到N个box和score,取TOP,转成多点均匀采样,经过EFSA进行环形引导挖掘相关关系,再过解码器获得多点的box和score。
一、环境搭建
https://github.com/ymy-k/dptext-detr
https://github.com/facebookresearch/detectron2
推荐的环境是 Python 3.8 + PyTorch 1.9.1 (or 1.9.0) + CUDA 11.1 + Detectron2 (v0.6)
参考readme,报错缺啥装啥,要么就是安装包版本的问题
注:网上没找到对这个算法的代码解读,但它的前序工作,如DETR、deformable DETR的解读还是很多的
二、推理
按照readme写就行,eval和inference区别在于Evaluation会调用到datasets路径下的test_poly.json文件,infer的输入只需要图片,且支持可视化。这个框架的奇特点在于train和eval都用了train_net.py脚本。
除了装环境花了点时间,其他挺丝滑的。这里只讲inference,推理过程大致流程为加载配置,用detectron2推理,可视化。infer的对象input可以是一张图的路径也可以是一个文件夹的路径。
调用链路为:demo.py——predictor.py ——detectron2,最重要的函数基本都是由detectron2实现。
# infer时用到的函数主要包括(这里代码不全,可视为伪代码):
# 加载配置
cfg = setup_cfg(args)  #(包括detectron、配置文件、命令行 3种来源的配置参数)
# 读图
from detectron2.data.detection_utils import read_image
img = read_image(path, format="BGR")
# 推理 & 可视化
from predictor import VisualizationDemo
demo = VisualizationDemo(cfg)
predictions, visualized_output = demo.run_on_image(img)
# 上一行demo.run_on_image(img)中run_on_image 主要函数
from detectron2.engine.defaults import DefaultPredictor
from detectron2.utils.visualizer import ColorMode, Visualizer
visualizer = Visualizer(image, self.metadata, instance_mode=self.instance_mode)
self.predictor = DefaultPredictor(cfg)
predictions = self.predictor(image)
instances = predictions["instances"].to(self.cpu_device)
vis_output = visualizer.draw_instance_predictions(predictions=instances)# 保存可视化结果
visualized_output.save(out_filename)
detectron2的DefaultPredictor介绍
# detectron2/blob/main/detectron2/engine/defaults.pyclass DefaultPredictor:"""Create a simple end-to-end predictor with the given config that runs onsingle device for a single input image.Compared to using the model directly, this class does the following additions:1. Load checkpoint from `cfg.MODEL.WEIGHTS`.2. Always take BGR image as the input and apply conversion defined by `cfg.INPUT.FORMAT`.3. Apply resizing defined by `cfg.INPUT.{MIN,MAX}_SIZE_TEST`.4. Take one input image and produce a single output, instead of a batch.This is meant for simple demo purposes, so it does the above steps automatically.This is not meant for benchmarks or running complicated inference logic.If you'd like to do anything more complicated, please refer to its source code asexamples to build and use the model manually.Attributes:metadata (Metadata): the metadata of the underlying dataset, obtained fromcfg.DATASETS.TEST.Examples:::pred = DefaultPredictor(cfg)inputs = cv2.imread("input.jpg")outputs = pred(inputs)"""def __init__(self, cfg):self.cfg = cfg.clone() # cfg can be modified by modelself.model = build_model(self.cfg) # 获取模型self.model.eval()if len(cfg.DATASETS.TEST):self.metadata = MetadataCatalog.get(cfg.DATASETS.TEST[0])checkpointer = DetectionCheckpointer(self.model)checkpointer.load(cfg.MODEL.WEIGHTS)self.aug = T.ResizeShortestEdge([cfg.INPUT.MIN_SIZE_TEST, cfg.INPUT.MIN_SIZE_TEST], cfg.INPUT.MAX_SIZE_TEST)self.input_format = cfg.INPUT.FORMATassert self.input_format in ["RGB", "BGR"], self.input_formatdef __call__(self, original_image):"""Args:original_image (np.ndarray): an image of shape (H, W, C) (in BGR order).Returns:predictions (dict):the output of the model for one image only.See :doc:`/tutorials/models` for details about the format."""# 将图像处理为BGR格式,通过最长最短边参数cfg.INPUT.MIN_SIZE_TEST、# cfg.INPUT.MIN_SIZE_TEST对图像进行resize,再进行模型推理with torch.no_grad(): # https://github.com/sphinx-doc/sphinx/issues/4258# Apply pre-processing to image.if self.input_format == "RGB":# whether the model expects BGR inputs or RGBoriginal_image = original_image[:, :, ::-1]height, width = original_image.shape[:2]image = self.aug.get_transform(original_image).apply_image(original_image)image = torch.as_tensor(image.astype("float32").transpose(2, 0, 1))inputs = {"image": image, "height": height, "width": width}predictions = self.model([inputs])[0]return build_model介绍,类似mmdet的注册机制
# detectron2/modeling/meta_arch/build.py
from detectron2.utils.registry import Registry
META_ARCH_REGISTRY = Registry("META_ARCH")  # noqa F401 isort:skipdef build_model(cfg):"""Build the whole model architecture, defined by ``cfg.MODEL.META_ARCHITECTURE``.Note that it does not load any weights from ``cfg``."""meta_arch = cfg.MODEL.META_ARCHITECTURE  # 读取配置文件中的算法名称model = META_ARCH_REGISTRY.get(meta_arch)(cfg) # 获取注册的模型model.to(torch.device(cfg.MODEL.DEVICE))_log_api_usage("modeling.meta_arch." + meta_arch)return model
model输出instance内容包含:
num_instance 检测到文本个数
image_height
image_width
fields:
scores:0-1之间的得分,有个参数限制了输出的score阈值
pred_classes:类别,我只标了text,这里全是0,应该可以标多种标签
polygons:点坐标列表,确实是左上角开始顺时针的16个点,可以通过在predictor.py中print(predictions['instances'].polygons.cpu().numpy()[0]查看第一个polygons)
三、数据准备
标签搞成了一个大json,生成格式参考process_positional_label.py。通过process_polygon_positional_label_form处理成作者论文说的从左上角开始的顺时针的16个点的标注,标注格式为COCO。另一个信息是,点的存储路径是annotations的polys下。
process_positional_label.py里做修改的只有annotations,但源码毕竟是当成COCO数据集加载的,所以还有一些其他东西也要加上,具体看下文json大致格式部分。
验证基于自己数据集制作的json文件是否初步符合要求,修改./adet/data/datasets/text.py 增加以下代码并执行实验。这里不报错只能说明大体上对,但请按照下文json大致格式把其他kv补全。
json_file='XXXXX/text_poly_pos.json'
image_root ='XXXXX/test_images'
name = 'mydata_test'   # _PREDEFINED_SPLITS_TEXT  中的对应key
load_text_json(json_file, image_root, name)
标签文件json大致格式为:
{“images”:[{"file_name": "000001.jpg", "id": int,"height":int,"width":int, }],
“categories”:[{"supercategory": "text",    # 不要用别的,配置文件builtin.py指明了是这个"id": int,   # 1,0应该是背景"name": "text", }],   # 同上
“annotations”:[{"polys":[,,,],# 左上开始顺时针的16个点"id": int,   # bbox的ind"image_id": int,"category_id": int,“bbox”:[,,,]}, # xywh格式,这里也可以是xyxy格式的2点box“bbox_mode”:BoxMode.XXYY_ABS 或BoxMode.XYWH_ABS },],   # 可去掉,默认是XYWH_ABS。BoxMode是detectrons2的方法,我不知道要怎么写到json里。也可以改下dataset_mapper.py的源码,写成自定义加载转化}
下面的脚本是源码中的数据处理脚本,可根据自己数据集的情况将label处理为目标格式json
# process_positional_label.py
import numpy as np
import cv2
from tqdm import tqdm
import json
from shapely.geometry import Polygon
import copy
from scipy.special import comb as n_over_k
import torch
import sysdef convert_bezier_ctrl_pts_to_polygon(bez_pts, sample_num_per_side):'''贝塞尔曲线转格式,主函数没用到,这里仅做提供用An example of converting Bezier control points to polygon points for a text instance.The generation of Bezier label can be referred to https://github.com/Yuliang-Liu/bezier_curve_text_spottingArgs:bez_pts (np.array): 8 Bezier control points in clockwise order, 4 for each side (top and bottom).The top side is in line with the reading order of this text instance.[x_top_0, y_top_0,.., x_top_3, y_top_3, x_bot_0, y_bot_0,.., x_bot_3, y_bot_3].sample_num_per_side (int): Sampled point numbers on each side.Returns:sampled_polygon (np.array): The polygon points sampled on Bezier curves.The order is the same as the Bezier control points.The shape is (2 * sample_num_per_side, 2).'''Mtk = lambda n, t, k: t  k * (1 - t)  (n - k) * n_over_k(n, k)BezierCoeff = lambda ts: [[Mtk(3, t, k) for k in range(4)] for t in ts]assert (len(bez_pts) == 16), 'The numbr of bezier control points must be 8's1_bezier = bez_pts[:8].reshape((4, 2))s2_bezier = bez_pts[8:].reshape((4, 2))t_plot = np.linspace(0, 1, sample_num_per_side)Bezier_top = np.array(BezierCoeff(t_plot)).dot(s1_bezier)Bezier_bottom = np.array(BezierCoeff(t_plot)).dot(s2_bezier)sampled_polygon = np.vstack((Bezier_top, Bezier_bottom))return sampled_polygondef roll_pts(in_poly):# 为了实现作者所说的标签从左上角开始的创新点,将点的开始位置重排,如将[1,2,3,4,5,6,7,8]转化为[5,6,7,8,1,2,3,4]# in_poly (np.array): (2 * sample_num_per_side, 2)num = in_poly.shape[0]assert num % 2 == 0return np.vstack((in_poly[num//2:], in_poly[:num//2])).reshape((-1)).tolist()def intersec_num_y(polyline, x):'''
计算一段折线polyline和一条垂直线x的相交点数量和交点、Args:polyline: Represent the bottom side of a text instancex: Represent a vertical line.Returns:num: The intersection number of a vertical line and the polyline.ys_value: The y values of intersection points.'''num = 0ys_value = []for ip in range(7):now_x, now_y = polyline[ip][0], polyline[ip][1]next_x, next_y = polyline[ip+1][0], polyline[ip+1][1]if now_x == x:num += 1ys_value.append(now_y)continuexs, ys = [now_x, next_x], [now_y, next_y]min_xs, max_xs = min(xs), max(xs)if min_xs < x and max_xs > x:num += 1ys_value.append(((x-now_x)*(next_y-now_y)/(next_x-now_x)) + now_y)if polyline[7][0] == x:num += 1ys_value.append(polyline[7][1])assert len(ys_value) == numreturn num, ys_valuedef process_polygon_positional_label_form(json_in, json_out):'''处理成作者论文说的从左上角开始的顺时针的16个点A simple implementation of generating the positional label form for polygon points. There are still some special situations need to be addressed, such as vertical instances and instances in "C" shape. Maybe using a rotated box proposal could be a better choice. If you want to generate the positional label form for Bezier control points, you can also firstly sample points on Bezier curves, then use the on-curve points referring to this function to decide whether to roll the original Bezier control points.(By the way, I deem that the "conflict" between point labels in the original form also impacts the detector. For example, in most cases, the first point appears in the upper left corner. If an inverse instance turns up, the first point moves to the lower right. Transformer decoders are supervised to address this diagonal drift, which is like the noise pulse. It could make the prediction unstable, especially for inverse-like instances. This may be a limitation of control-point-based methods. Segmentation-based methods are free from this issue. And there is no need to consider the point order issue when using rotation augmentation for segmentation-based methods.)Args:json_in: The path of the original annotation json file.json_out: The output json path.'''with open(json_in) as f_json_in:anno_dict = json.load(f_json_in)insts_list = anno_dict['annotations']new_insts_list = []roll_num = 0  # to count approximate inverse-like instancestotal_num = len(insts_list)for inst in tqdm(insts_list):new_inst = copy.deepcopy(inst)poly = np.array(inst['polys']).reshape((-1, 2))# suppose there are 16 points for each instance, 8 for each sideassert poly.shape[0] == 16  # 每个边缘要求16个点,上8下8。is_ccw = Polygon(poly).exterior.is_ccw   #要求是顺时针顺序# make all points in clockwise orderif not is_ccw:poly = np.vstack((poly[8:][::-1, :], poly[:8][::-1, :]))assert poly.shape == (16,2)roll_flag = Falsestart_line, end_line = poly[:8], poly[8:][::-1, :]   # 拆成上下2条线if min(start_line[:, 1]) > max(end_line[:, 1]):   #倒着的polyroll_num += 1poly = roll_pts(poly)new_inst.update(polys=poly)new_insts_list.append(new_inst)continue# right and leftif min(start_line[:, 0]) > max(end_line[:, 0]):  #找近似倒的?if min(poly[:, 1]) == min(end_line[:, 1]):roll_flag = Trueif roll_flag:roll_num += 1poly = roll_pts(poly)if not isinstance(poly, list):poly = poly.reshape((-1)).tolist()new_inst.update(polys=poly)new_insts_list.append(new_inst)continue# left and rightif max(start_line[:, 0]) < min(end_line[:, 0]):  #找近似倒的?if min(poly[:, 1]) == min(end_line[:, 1]):roll_flag = Trueif roll_flag:roll_num += 1poly = roll_pts(poly)if not isinstance(poly, list):poly = poly.reshape((-1)).tolist()new_inst.update(polys=poly)new_insts_list.append(new_inst)continuefor pt in start_line:x_value, y_value = pt[0], pt[1]  #找近似倒的?intersec_with_end_line_num, intersec_with_end_line_ys = intersec_num_y(end_line, x_value)if intersec_with_end_line_num > 0:if max(intersec_with_end_line_ys) < y_value:roll_flag = Truebreakif min(poly[:, 1]) == min(start_line[:, 1]):roll_flag = Falsebreakif roll_flag:roll_num += 1poly = roll_pts(poly)new_inst.update(polys=poly)new_insts_list.append(new_inst)else:if not isinstance(poly, list):poly = poly.reshape((-1)).tolist()new_inst.update(polys=poly)new_insts_list.append(new_inst)assert len(new_insts_list) == total_numanno_dict.update(annotations=new_insts_list)  # 更新with open(json_out, mode='w+') as f_json_out:json.dump(anno_dict, f_json_out)# the approximate inverse-like ratio, the actual ratio should be lowerprint(f'Inverse-like Ratio: {roll_num / total_num * 100: .2f}%. Finished.')if __name__ == '__main__':# an example of processing the positional label form for polygon control points.process_polygon_positional_label_form(json_in='./datasets/totaltext/train_poly_ori.json',json_out='./datasets/totaltext/train_poly_pos_example.json')
四、配置文件
训练时,当成是TotalText数据集,主要有以下几个配置文件
configs/DPText_DETR/TotalText/R_50_poly.yaml
configs/DPText_DETR/Base.yaml
adet/data/builtin.py
detectron2的配置文件
adet/config/defaults.py #对detectron2部分参数的改写
之后可以看看detectron2的CfgNode
注意这个算法工程基于detectron2,是多个配置文件拼接覆盖得到最后的模型配置,如果是在训练测试推理过程中print配置,会发现带出了各种配置参数,包括这个模型不需要用到的nms模块的配置,需要自己甄别。adet/config下还有点配置文件。下面从顶层到底层对该算法涉及到的配置进行说明。
# configs/DPText_DETR/TotalText/R_50_poly.yaml
_BASE_: "../Base.yaml"  # 这里引用了一个基础配置文件DATASETS:   # builtin.py中指向了对应的图片及json的路径TRAIN: ("totaltext_poly_train_rotate_pos",)TEST: ("totaltext_poly_test",)  # or "inversetext_test", "totaltext_poly_test_rotate"MODEL:  # 预训练或finetune模型WEIGHTS: "output/r_50_poly/pretrain/model_final.pth"  # or the provided pre-trained modelSOLVER:IMS_PER_BATCH: 8   # batch-sizeBASE_LR: 5e-5   # 学习率LR_BACKBONE: 5e-6WARMUP_ITERS: 0STEPS: (16000,) # 学习率调整iterMAX_ITER: 20000CHECKPOINT_PERIOD: 20000TEST:EVAL_PERIOD: 1000OUTPUT_DIR: "output/r_50_poly/totaltext/finetune"   # 输出路径
# configs/DPText_DETR/Base.yaml
MODEL:META_ARCHITECTURE: "TransformerPureDetector" # 本算法为TransformerPureDetectorMASK_ON: FalsePIXEL_MEAN: [123.675, 116.280, 103.530]PIXEL_STD: [58.395, 57.120, 57.375]BACKBONE: #backbone 为常见的resnet50NAME: "build_resnet_backbone"RESNETS:DEPTH: 50STRIDE_IN_1X1: FalseOUT_FEATURES: ["res3", "res4", "res5"] # 和Deformable DETR一样,取了ResNet最后三层的特征图C3,C4,C5,TRANSFORMER:ENABLED: TrueNUM_FEATURE_LEVELS: 4ENC_LAYERS: 6DEC_LAYERS: 6DIM_FEEDFORWARD: 1024HIDDEN_DIM: 256DROPOUT: 0.1NHEADS: 8NUM_QUERIES: 100 # 100个切片,限制输出检测框数量,需根据场景调整ENC_N_POINTS: 4DEC_N_POINTS: 4USE_POLYGON: TrueNUM_CTRL_POINTS: 16 # 16个控制点EPQM: TrueEFSA: TrueINFERENCE_TH_TEST: 0.4 # 推理时输出bbox的阈值,这个值越小,输出bbox越多,但不是越小越好,注意有时会导致一些重叠的bboxSOLVER:WEIGHT_DECAY: 1e-4OPTIMIZER: "ADAMW"LR_BACKBONE_NAMES: ['backbone.0']LR_LINEAR_PROJ_NAMES: ['reference_points', 'sampling_offsets']LR_LINEAR_PROJ_MULT: 0.1CLIP_GRADIENTS:ENABLED: TrueCLIP_TYPE: "full_model"CLIP_VALUE: 0.1NORM_TYPE: 2.0INPUT:MIN_SIZE_TRAIN: (480, 512, 544, 576, 608, 640, 672, 704, 736, 768, 800, 832,)MAX_SIZE_TRAIN: 1600MIN_SIZE_TEST: 1000MAX_SIZE_TEST: 1800CROP:ENABLED: TrueCROP_INSTANCE: FalseSIZE: [0.1, 0.1]FORMAT: "RGB"TEST:DET_ONLY: True # evaluate only detection metrics
# adet/data/builtin.py
# 这个脚本是有一些冗余代码的,我的任务是文本检测,不需要_PREDEFINED_SPLITS_PIC,
# 关注与TEXT相关的_PREDEFINED_SPLITS_TEXT、metadata_text、register_all_coco即可
import osfrom detectron2.data.datasets.register_coco import register_coco_instances
from detectron2.data.datasets.builtin_meta import _get_builtin_metadatafrom .datasets.text import register_text_instances# register plane reconstruction_PREDEFINED_SPLITS_PIC = {"pic_person_train": ("pic/image/train", "pic/annotations/train_person.json"),"pic_person_val": ("pic/image/val", "pic/annotations/val_person.json"),
}metadata_pic = {"thing_classes": ["person"]
}# 这里可以去掉这些开源数据集的路径配置,加一个自定义数据集的配置,注意同步修改R_50_poly.yaml
# 训练和测试的图像可以放在一个文件夹,json分开即可
_PREDEFINED_SPLITS_TEXT = {# training sets with polygon annotations"syntext1_poly_train_pos": ("syntext1/train_images", "syntext1/train_poly_pos.json"),"syntext2_poly_train_pos": ("syntext2/train_images", "syntext2/train_poly_pos.json"),"mlt_poly_train_pos": ("mlt/train_images","mlt/train_poly_pos.json"),"totaltext_poly_train_ori": ("totaltext/train_images_rotate", "totaltext/train_poly_ori.json"),"totaltext_poly_train_pos": ("totaltext/train_images_rotate", "totaltext/train_poly_pos.json"),"totaltext_poly_train_rotate_ori": ("totaltext/train_images_rotate", "totaltext/train_poly_rotate_ori.json"),"totaltext_poly_train_rotate_pos": ("totaltext/train_images_rotate", "totaltext/train_poly_rotate_pos.json"),"ctw1500_poly_train_rotate_pos": ("ctw1500/train_images_rotate", "ctw1500/train_poly_rotate_pos.json"),"lsvt_poly_train_pos": ("lsvt/train_images","lsvt/train_poly_pos.json"),"art_poly_train_pos": ("art/train_images_rotate","art/train_poly_pos.json"),"art_poly_train_rotate_pos": ("art/train_images_rotate","art/train_poly_rotate_pos.json"),#-------------------------------------------------------------------------------------------------------"totaltext_poly_test": ("totaltext/test_images_rotate", "totaltext/test_poly.json"),"totaltext_poly_test_rotate": ("totaltext/test_images_rotate", "totaltext/test_poly_rotate.json"),"ctw1500_poly_test": ("ctw1500/test_images","ctw1500/test_poly.json"),"art_test": ("art/test_images","art/test_poly.json"),"inversetext_test": ("inversetext/test_images","inversetext/test_poly.json"),
}metadata_text = {"thing_classes": ["text"]
}def register_all_coco(root="datasets"):for key, (image_root, json_file) in _PREDEFINED_SPLITS_PIC.items():# Assume pre-defined datasets live in `./datasets`.register_coco_instances(key,metadata_pic,os.path.join(root, json_file) if "://" not in json_file else json_file,os.path.join(root, image_root),)for key, (image_root, json_file) in _PREDEFINED_SPLITS_TEXT.items():# Assume pre-defined datasets live in `./datasets`.register_text_instances(key,metadata_text,os.path.join(root, json_file) if "://" not in json_file else json_file,os.path.join(root, image_root),)register_all_coco()
一些常见的参数调整
-
修改数据集路径及模型路径
在R_50_poly.yaml中的DATASETS指向了builtin.py中具体的数据集路径。在_PREDEFINED_SPLITS_TEXT 中加2行指向自己数据集的标签文件路径,及图像文件文件夹路径。修改R_50_poly.yaml中的DATASETS及MODEL。
-
修改batch_size
我的环境是单张16gGPU,实验后batch size 只能设置为1,修改R_50_poly.yaml中的 IMS_PER_BATCH
-
修改阈值,调整输出效果,解决漏检
用自己的数据集训练模型,出现大量漏检,发现很多不超过100个切片,甚至有张大量漏检的就是获得100个切片,推测有个值为100的超参限制。实验后确实为该参数限制,需根据场景调大Base.yaml中NUM_QUERIES的值。
-
修改阈值,调整输出效果,输出更低score的bbox
调小Base.yaml中INFERENCE_TH_TEST,注意可能导致多检,重复检测出同一个bbox,算法中没有nms模块,其实也就是论文指出的原有方法存在“产生具有不同起始点的假正例”
五、训练
用totalText的配置训练一晚上后,总loss还是有5左右,此时lr已经是5e-6了,而且训练集也有4k+,仔细看了下loss的构成,主要是loss_ctrl_points比较大,于是先推理一下看看效果吧,到底是没收敛还是单纯这个算法的loss大。
推理时GPU内存约使用2.5G,推理加可视化耗时约为0.5s/张。效果不说完美,但是还行不离谱
需注意:模型保存路径下有last_checkpoint和model_XXXX.pth文件,infer时不能加载这个last_checkpoint文件,会报错说pickle不能load这个文件。
观察下来大致有定位结果了,主要问题包括:
-
部分漏检,而且训练集也漏检,某种材料漏检明显(后来排查到是超参100的问题)
-
有些定位大而歪
优点:
1、可以把一些特别近甚至有点重合的分开,因为这个方法不是分割而是一系列点。
2、可以表示弯曲的文本
缺点:
1、score阈值放太低可能会同个box重复多检,
2、
六、模型结构
整套代码挺简洁的,依赖Detectron2后代码量不大。从configs/DPText_DETR/Base.yaml中的model部分即可知模型结构配置,这里不再重复展示。由下可知
META_ARCHITECTURE: "TransformerPureDetector" # 本算法为TransformerPureDetectorclass TransformerPureDetector中又引用了 class DPText_DERT,TransformerPureDetector实质主要做了一些前后处理的操作,且将backbone和DPText_DERT合在一起,并没有核心的模型代码。
这里先对TransformerPureDetector所在脚本进行说明
# adet/modeling/transformer_detector.py
from typing import List
import numpy as np
import torch
from torch import nnfrom detectron2.modeling.meta_arch.build import META_ARCH_REGISTRY
from detectron2.modeling import build_backbone
from detectron2.structures import ImageList, Instancesfrom adet.layers.pos_encoding import PositionalEncoding2D
from adet.modeling.dptext_detr.losses import SetCriterion
from adet.modeling.dptext_detr.matcher import build_matcher
from adet.modeling.dptext_detr.models import DPText_DETR
from adet.utils.misc import NestedTensor, box_xyxy_to_cxcywhclass Joiner(nn.Sequential):def __init__(self, backbone, position_embedding):super().__init__(backbone, position_embedding)def forward(self, tensor_list: NestedTensor):# self[0]为backbone# self[1]position_embedding#  结构图左下角,将backbone的输出和位置编码连接起来xs = self[0](tensor_list)out: List[NestedTensor] = []pos = []for _, x in xs.items(): # 对每项进行position_embeddingout.append(x)# position encodingpos.append(self[1](x).to(x.tensors.dtype))return out, posclass MaskedBackbone(nn.Module):""" This is a thin wrapper around D2's backbone to provide padding masking"""def __init__(self, cfg):super().__init__()self.backbone = build_backbone(cfg)backbone_shape = self.backbone.output_shape()self.feature_strides = [backbone_shape[f].stride for f in backbone_shape.keys()]self.num_channels = backbone_shape[list(backbone_shape.keys())[-1]].channelsdef forward(self, images):features = self.backbone(images.tensor)masks = self.mask_out_padding([features_per_level.shape for features_per_level in features.values()],images.image_sizes,images.tensor.device,)assert len(features) == len(masks)for i, k in enumerate(features.keys()):features[k] = NestedTensor(features[k], masks[i])  # 封装在一起return featuresdef mask_out_padding(self, feature_shapes, image_sizes, device):masks = []assert len(feature_shapes) == len(self.feature_strides)for idx, shape in enumerate(feature_shapes):N, _, H, W = shapemasks_per_feature_level = torch.ones((N, H, W), dtype=torch.bool, device=device)for img_idx, (h, w) in enumerate(image_sizes):masks_per_feature_level[img_idx,: int(np.ceil(float(h) / self.feature_strides[idx])),: int(np.ceil(float(w) / self.feature_strides[idx])),] = 0masks.append(masks_per_feature_level)return masksdef detector_postprocess(results, output_height, output_width):# 反归一化为output的尺寸,注意这里有output和results的2套hw尺寸scale_x, scale_y = (output_width / results.image_size[1], output_height / results.image_size[0])if results.has("beziers"):beziers = results.beziers# scale and clip in placeh, w = results.image_sizebeziers[:, 0].clamp_(min=0, max=w)beziers[:, 1].clamp_(min=0, max=h)beziers[:, 6].clamp_(min=0, max=w)beziers[:, 7].clamp_(min=0, max=h)beziers[:, 8].clamp_(min=0, max=w)beziers[:, 9].clamp_(min=0, max=h)beziers[:, 14].clamp_(min=0, max=w)beziers[:, 15].clamp_(min=0, max=h)beziers[:, 0::2] *= scale_xbeziers[:, 1::2] *= scale_y# scale point coordinatesif results.has("polygons"):polygons = results.polygonspolygons[:, 0::2] *= scale_xpolygons[:, 1::2] *= scale_yreturn results@META_ARCH_REGISTRY.register()
class TransformerPureDetector(nn.Module):def __init__(self, cfg):super().__init__()self.device = torch.device(cfg.MODEL.DEVICE)d2_backbone = MaskedBackbone(cfg)N_steps = cfg.MODEL.TRANSFORMER.HIDDEN_DIM // 2   # 256//2self.test_score_threshold = cfg.MODEL.TRANSFORMER.INFERENCE_TH_TEST  # 0.4self.use_polygon = cfg.MODEL.TRANSFORMER.USE_POLYGON  # Trueself.num_ctrl_points = cfg.MODEL.TRANSFORMER.NUM_CTRL_POINTS  # 16assert self.use_polygon and self.num_ctrl_points == 16  # only the polygon version is released nowbackbone = Joiner(d2_backbone, PositionalEncoding2D(N_steps, normalize=True))backbone.num_channels = d2_backbone.num_channelsself.dptext_detr = DPText_DETR(cfg, backbone)   # 传入配置文件及cnn+position embbox_matcher, point_matcher = build_matcher(cfg)loss_cfg = cfg.MODEL.TRANSFORMER.LOSSweight_dict = {'loss_ce': loss_cfg.POINT_CLASS_WEIGHT, 'loss_ctrl_points': loss_cfg.POINT_COORD_WEIGHT}enc_weight_dict = {'loss_bbox': loss_cfg.BOX_COORD_WEIGHT,'loss_giou': loss_cfg.BOX_GIOU_WEIGHT,'loss_ce': loss_cfg.BOX_CLASS_WEIGHT}if loss_cfg.AUX_LOSS:aux_weight_dict = {}   # 辅助损失# decoder aux lossfor i in range(cfg.MODEL.TRANSFORMER.DEC_LAYERS - 1):aux_weight_dict.update({k + f'_{i}': v for k, v in weight_dict.items()})# encoder aux lossaux_weight_dict.update({k + f'_enc': v for k, v in enc_weight_dict.items()})weight_dict.update(aux_weight_dict)enc_losses = ['labels', 'boxes']dec_losses = ['labels', 'ctrl_points']self.criterion = SetCriterion(self.dptext_detr.num_classes,box_matcher,point_matcher,weight_dict,enc_losses,dec_losses,self.dptext_detr.num_ctrl_points,focal_alpha=loss_cfg.FOCAL_ALPHA,focal_gamma=loss_cfg.FOCAL_GAMMA)pixel_mean = torch.Tensor(cfg.MODEL.PIXEL_MEAN).to(self.device).view(3, 1, 1)pixel_std = torch.Tensor(cfg.MODEL.PIXEL_STD).to(self.device).view(3, 1, 1)self.normalizer = lambda x: (x - pixel_mean) / pixel_stdself.to(self.device)def preprocess_image(self, batched_inputs):"""Normalize, pad and batch the input images."""images = [self.normalizer(x["image"].to(self.device)) for x in batched_inputs]images = ImageList.from_tensors(images)  # from detectron2.structures import ImageListreturn imagesdef forward(self, batched_inputs):"""Args:batched_inputs: a list, batched outputs of :class:`DatasetMapper` .Each item in the list contains the inputs for one image.For now, each item in the list is a dict that contains:* image: Tensor, image in (C, H, W) format.* instances (optional): groundtruth :class:`Instances`* proposals (optional): :class:`Instances`, precomputed proposals.Other information that's included in the original dicts, such as:* "height", "width" (int): the output resolution of the model, used in inference.See :meth:`postprocess` for details.Returns:list[dict]:Each dict is the output for one input image.The dict contains one key "instances" whose value is a :class:`Instances`.The :class:`Instances` object has the following keys:"scores", "pred_classes", "polygons""""# 一个batch的图片归一化及pad等操作images = self.preprocess_image(batched_inputs)if self.training:gt_instances = [x["instances"].to(self.device) for x in batched_inputs]targets = self.prepare_targets(gt_instances)output = self.dptext_detr(images)# compute the lossloss_dict = self.criterion(output, targets)weight_dict = self.criterion.weight_dictfor k in loss_dict.keys():if k in weight_dict:loss_dict[k] *= weight_dict[k]return loss_dictelse:# Transformer等模型操作output = self.dptext_detr(images)ctrl_point_cls = output["pred_logits"]ctrl_point_coord = output["pred_ctrl_points"]# 根据score过滤、反归一化results = self.inference(ctrl_point_cls, ctrl_point_coord, images.image_sizes)processed_results = []for results_per_image, input_per_image, image_size in zip(results, batched_inputs, images.image_sizes):height = input_per_image.get("height", image_size[0])width = input_per_image.get("width", image_size[1])# 反归一化2r = detector_postprocess(results_per_image, height, width)processed_results.append({"instances": r})return processed_resultsdef prepare_targets(self, targets):new_targets = []for targets_per_image in targets:h, w = targets_per_image.image_sizeimage_size_xyxy = torch.as_tensor([w, h, w, h], dtype=torch.float, device=self.device)gt_classes = targets_per_image.gt_classesgt_boxes = targets_per_image.gt_boxes.tensor / image_size_xyxygt_boxes = box_xyxy_to_cxcywh(gt_boxes)raw_ctrl_points = targets_per_image.polygons if self.use_polygon else targets_per_image.beziersgt_ctrl_points = raw_ctrl_points.reshape(-1, self.dptext_detr.num_ctrl_points, 2) / \\torch.as_tensor([w, h], dtype=torch.float, device=self.device)[None, None, :]gt_ctrl_points = torch.clamp(gt_ctrl_points[:,:,:2], 0, 1)new_targets.append({"labels": gt_classes, "boxes": gt_boxes, "ctrl_points": gt_ctrl_points})return new_targetsdef inference(self, ctrl_point_cls, ctrl_point_coord, image_sizes):assert len(ctrl_point_cls) == len(image_sizes)results = []prob = ctrl_point_cls.mean(-2).sigmoid()scores, labels = prob.max(-1)for scores_per_image, labels_per_image, ctrl_point_per_image, image_size in zip(scores, labels, ctrl_point_coord, image_sizes):selector = scores_per_image >= self.test_score_threshold  # 阈值过滤scores_per_image = scores_per_image[selector]labels_per_image = labels_per_image[selector]ctrl_point_per_image = ctrl_point_per_image[selector]result = Instances(image_size)   # 设定的输出格式result.scores = scores_per_imageresult.pred_classes = labels_per_imagectrl_point_per_image[..., 0] *= image_size[1]  # 反归一化ctrl_point_per_image[..., 1] *= image_size[0]if self.use_polygon:   # 展平result.polygons = ctrl_point_per_image.flatten(1)else:result.beziers = ctrl_point_per_image.flatten(1)results.append(result)return results
DPText_DETR介绍
# adet/modeling/dptext_detr/models.py
import numpy as np
import torch
from torch import nn
import torch.nn.functional as F
from adet.layers.deformable_transformer import DeformableTransformer_Det
from adet.utils.misc import NestedTensor, inverse_sigmoid_offset, nested_tensor_from_tensor_list, sigmoid_offset
from .utils import MLPclass DPText_DETR(nn.Module):def __init__(self, cfg, backbone):super().__init__()self.device = torch.device(cfg.MODEL.DEVICE)self.backbone = backboneself.d_model = cfg.MODEL.TRANSFORMER.HIDDEN_DIM  # 256self.nhead = cfg.MODEL.TRANSFORMER.NHEADS   # 8self.num_encoder_layers = cfg.MODEL.TRANSFORMER.ENC_LAYERS  # 6self.num_decoder_layers = cfg.MODEL.TRANSFORMER.DEC_LAYERS   # 6self.dim_feedforward = cfg.MODEL.TRANSFORMER.DIM_FEEDFORWARD   #1024self.dropout = cfg.MODEL.TRANSFORMER.DROPOUT   #0.1self.activation = "relu"self.return_intermediate_dec = Trueself.num_feature_levels = cfg.MODEL.TRANSFORMER.NUM_FEATURE_LEVELS   # 4self.dec_n_points = cfg.MODEL.TRANSFORMER.ENC_N_POINTS  # 4self.enc_n_points = cfg.MODEL.TRANSFORMER.DEC_N_POINTS   # 4self.num_proposals = cfg.MODEL.TRANSFORMER.NUM_QUERIES   #100self.pos_embed_scale = cfg.MODEL.TRANSFORMER.POSITION_EMBEDDING_SCALE   # 6.28xxxself.num_ctrl_points = cfg.MODEL.TRANSFORMER.NUM_CTRL_POINTS   # 16self.num_classes = 1  # only textself.sigmoid_offset = not cfg.MODEL.TRANSFORMER.USE_POLYGON  # Trueself.epqm = cfg.MODEL.TRANSFORMER.EPQM  # Trueself.efsa = cfg.MODEL.TRANSFORMER.EFSA  # Trueself.ctrl_point_embed = nn.Embedding(self.num_ctrl_points, self.d_model)  # 16,256,self.transformer = DeformableTransformer_Det(d_model=self.d_model,nhead=self.nhead,num_encoder_layers=self.num_encoder_layers,num_decoder_layers=self.num_decoder_layers,dim_feedforward=self.dim_feedforward,dropout=self.dropout,activation=self.activation,return_intermediate_dec=self.return_intermediate_dec,num_feature_levels=self.num_feature_levels,dec_n_points=self.dec_n_points,enc_n_points=self.enc_n_points,num_proposals=self.num_proposals,num_ctrl_points=self.num_ctrl_points,epqm=self.epqm,efsa=self.efsa)self.ctrl_point_class = nn.Linear(self.d_model, self.num_classes)  # 256,1self.ctrl_point_coord = MLP(self.d_model, self.d_model, 2, 3)self.bbox_coord = MLP(self.d_model, self.d_model, 4, 3)self.bbox_class = nn.Linear(self.d_model, self.num_classes)if self.num_feature_levels > 1:  # 4>1strides = [8, 16, 32]num_channels = [512, 1024, 2048]num_backbone_outs = len(strides)  # 3input_proj_list = []for _ in range(num_backbone_outs):in_channels = num_channels[_]input_proj_list.append(nn.Sequential(   # 将不同的输入通道[512, 1024, 2048]统一为256nn.Conv2d(in_channels, self.d_model, kernel_size=1),nn.GroupNorm(32, self.d_model),))for _ in range(self.num_feature_levels - num_backbone_outs):input_proj_list.append(nn.Sequential(  # 也是加上一个Conv3x3 Stride2的卷积得到的一个C6,nn.Conv2d(in_channels, self.d_model,kernel_size=3, stride=2, padding=1),nn.GroupNorm(32, self.d_model),))in_channels = self.d_modelself.input_proj = nn.ModuleList(input_proj_list)else:strides = [32]num_channels = [2048]self.input_proj = nn.ModuleList([nn.Sequential(nn.Conv2d(num_channels[0], self.d_model, kernel_size=1),nn.GroupNorm(32, self.d_model),)])self.aux_loss = cfg.MODEL.TRANSFORMER.AUX_LOSSprior_prob = 0.01bias_value = -np.log((1 - prior_prob) / prior_prob)self.ctrl_point_class.bias.data = torch.ones(self.num_classes) * bias_valueself.bbox_class.bias.data = torch.ones(self.num_classes) * bias_valuenn.init.constant_(self.ctrl_point_coord.layers[-1].weight.data, 0)nn.init.constant_(self.ctrl_point_coord.layers[-1].bias.data, 0)for proj in self.input_proj:nn.init.xavier_uniform_(proj[0].weight, gain=1)   # 使输入输出方差一样nn.init.constant_(proj[0].bias, 0)   # 常量填充num_pred = self.num_decoder_layers  # 6self.ctrl_point_class = nn.ModuleList([self.ctrl_point_class for _ in range(num_pred)])self.ctrl_point_coord = nn.ModuleList([self.ctrl_point_coord for _ in range(num_pred)])if self.epqm:self.transformer.decoder.ctrl_point_coord = self.ctrl_point_coordself.transformer.decoder.bbox_embed = Nonenn.init.constant_(self.bbox_coord.layers[-1].bias.data[2:], 0.0)self.transformer.bbox_class_embed = self.bbox_classself.transformer.bbox_embed = self.bbox_coordself.to(self.device)def forward(self, samples: NestedTensor):""" The forward expects a NestedTensor, which consists of:- samples.tensor: batched images, of shape [batch_size x 3 x H x W]- samples.mask: a binary mask of shape [batch_size x H x W], containing 1 on padded pixels"""if isinstance(samples, (list, torch.Tensor)):samples = nested_tensor_from_tensor_list(samples)features, pos = self.backbone(samples)if self.num_feature_levels == 1:raise NotImplementedErrorsrcs = []masks = []# 每层进行转256通道的操作,共4层for l, feat in enumerate(features):   src, mask = feat.decompose()srcs.append(self.input_proj[l](src))masks.append(mask)assert mask is not Noneif self.num_feature_levels > len(srcs): # 4>4 应该没执行这个if下的操作_len_srcs = len(srcs)for l in range(_len_srcs, self.num_feature_levels):if l == _len_srcs:src = self.input_proj[l](features[-1].tensors)else:src = self.input_proj[l](srcs[-1])m = masks[0]mask = F.interpolate(m[None].float(), size=src.shape[-2:]).to(torch.bool)[0]pos_l = self.backbone[1](NestedTensor(src, mask)).to(src.dtype)srcs.append(src)masks.append(mask)pos.append(pos_l)# n_pts, embed_dim --> n_q, n_pts, embed_dim 每个query都要配一个控制点embedctrl_point_embed = self.ctrl_point_embed.weight[None, ...].repeat(self.num_proposals, 1, 1)# 核心操作hs, init_reference, inter_references, enc_outputs_class, enc_outputs_coord_unact = self.transformer(srcs, masks, pos, ctrl_point_embed)outputs_classes = []outputs_coords = []for lvl in range(hs.shape[0]):if lvl == 0:reference = init_referenceelse:reference = inter_references[lvl - 1]reference = inverse_sigmoid_offset(reference, offset=self.sigmoid_offset)outputs_class = self.ctrl_point_class[lvl](hs[lvl])tmp = self.ctrl_point_coord[lvl](hs[lvl])if reference.shape[-1] == 2:if self.epqm:tmp += referenceelse:tmp += reference[:, :, None, :]else:assert reference.shape[-1] == 4if self.epqm:tmp += reference[..., :2]else:tmp += reference[:, :, None, :2]outputs_coord = sigmoid_offset(tmp, offset=self.sigmoid_offset)outputs_classes.append(outputs_class)outputs_coords.append(outputs_coord)outputs_class = torch.stack(outputs_classes)outputs_coord = torch.stack(outputs_coords)out = {'pred_logits': outputs_class[-1], 'pred_ctrl_points': outputs_coord[-1]}if self.aux_loss:out['aux_outputs'] = self._set_aux_loss(outputs_class, outputs_coord)enc_outputs_coord = enc_outputs_coord_unact.sigmoid()out['enc_outputs'] = {'pred_logits': enc_outputs_class, 'pred_boxes': enc_outputs_coord}return out@torch.jit.unuseddef _set_aux_loss(self, outputs_class, outputs_coord):# this is a workaround to make torchscript happy, as torchscript# doesn't support dictionary with non-homogeneous values, such# as a dict having both a Tensor and a list.return [{'pred_logits': a, 'pred_ctrl_points': b} for a, b in zip(outputs_class[:-1], outputs_coord[:-1])]
七、其他代码解读
在代码库中还推荐了DeepSOLO,但这是用transformer同时做检测识别,中文场景没啥用。
八、QA
了解原理的过程中,产生了一些疑问,以下问题做记录
Q:是box后进行ffn判断类别,存在先后。看图明明是双分支的
Q:Object queries 的QK为什么还要相加(猜测是query+position ),为什么还要加到交叉attention中
A:tensor+pos
Q:训练好的模型,Object queries还能改来改去,这是任意伸缩的?nn.Embedding实现可以瞎改吗
Q:Q特征哪来的
Q:偏移量的维度为参考点的个数,组数为注意力头的数量?
Q:各通道之间怎么组合呢???归一化到0-1??映射
Q:1、2还是特征,3开始是指导box了?
Q:颜色有啥说法,为什么从彩色变成了统一
Q:为啥分解自注意力可以降低计算量
https://blog.csdn.net/Kaiyuan_sjtu/article/details/123815163
Q:模型3的2个解码器都输入输出
Q:模型32个解码器交换了什么信息,即图中的红绿线
Q:EFSA(Enhanced Factorized Self-Attention 增强的因子化自我注意):进行环形引导。通过循环卷积(环形卷积)引入局部关注
Q:之后可以看看detectron2的CfgNode