思科模拟器 | 交换机与路由器的配置汇总【收藏备用】


文章目录
- 一、vlan配置【实现同一vlan的主机通信】
-
- 1、基本配置和接线
- 2、vlan配置与端口连接
- 3、测试连接
- 二、truck配置【实现连接在不同交换机上的同一vlan的主机通信】
-
- 1、基本配置和接线
- 2、vlan配置与端口连接
- 3、打truck做连接
- 3、测试连接
- 三、静态路由配置
-
- 1、自定义IP地址
- 2、基本配置与接线
- 3、接口配置与指令描述
- 4、静态路由配置【⭐】
- 5、主机测试连接
- 四、默认路由配置
-
- 1、基本命令配置
- 2、测试连接
- 五、RIPv2动态路由配置
-
- 1、基本配置和接线
- 2、接口网络配置四步走
- 3、RIP配置
- 4、测试连接
一、vlan配置【实现同一vlan的主机通信】
1、基本配置和接线
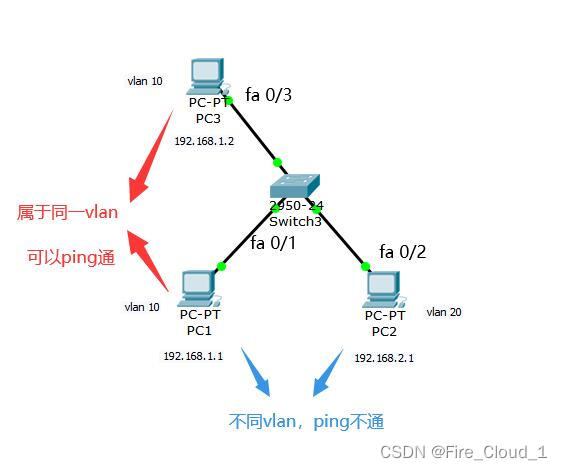
2、vlan配置与端口连接
Switch>
Switch>en
Switch>enable
Switch#conf
Switch#configure termin
Switch#configure terminal
Enter configuration commands, one per line.  End with CNTL/Z.
Switch(config)#vlan 10		//创建一个vlan 10
Switch(config-vlan)#ex
Switch(config)#vlan 20		//创建一个vlan 20
Switch(config-vlan)#ex
Switch(config)#interface fas
Switch(config)#interface fastEthernet 0/1
Switch(config-if)#switc
Switch(config-if)#switchport acc
Switch(config-if)#switchport access vlan 10		//端口1接入vlan 10
Switch(config-if)#ex
Switch(config)#iter
Switch(config)#inter
Switch(config)#interface fas
Switch(config)#interface fastEthernet 0/3
Switch(config-if)#switchport access vlan 10		//端口3接入vlan 10
Switch(config-if)#ex
Switch(config)#
Switch(config)#iner
Switch(config)#inter
Switch(config)#interface fas
Switch(config)#interface fastEthernet 0/2		//端口2接入vlan 20
Switch(config-if)#swi
Switch(config-if)#switchport acc
Switch(config-if)#switchport access vlan 20
Switch(config-if)#
Switch(config-if)#end
Switch#
%SYS-5-CONFIG_I: Configured from console by consoleSwitch#show vlan			//查看配置情况VLAN Name                             Status    Ports
---- -------------------------------- --------- -------------------------------
1    default                          active    Fa0/4, Fa0/5, Fa0/6, Fa0/7Fa0/8, Fa0/9, Fa0/10, Fa0/11Fa0/12, Fa0/13, Fa0/14, Fa0/15Fa0/16, Fa0/17, Fa0/18, Fa0/19Fa0/20, Fa0/21, Fa0/22, Fa0/23Fa0/24
10   VLAN0010                         active    Fa0/1, Fa0/3
20   VLAN0020                         active    Fa0/2
1002 fddi-default                     act/unsup
1003 token-ring-default               act/unsup
1004 fddinet-default                  act/unsup
1005 trnet-default                    act/unsup VLAN Type  SAID       MTU   Parent RingNo BridgeNo Stp  BrdgMode Trans1 Trans2
---- ----- ---------- ----- ------ ------ -------- ---- -------- ------ ------
1    enet  100001     1500  -      -      -        -    -        0      0
10   enet  100010     1500  -      -      -        -    -        0      0
20   enet  100020     1500  -      -      -        -    -        0      0
1002 fddi  101002     1500  -      -      -        -    -        0      0
3、测试连接

二、truck配置【实现连接在不同交换机上的同一vlan的主机通信】
- 接下去再配置一个交换机,将两台主机连到这台交换机上
1、基本配置和接线
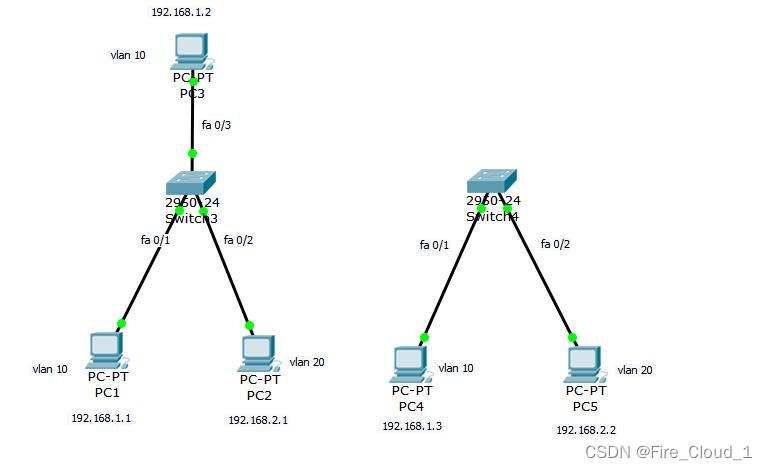
2、vlan配置与端口连接
Switch#conf
Switch#configure termin
Switch#configure terminal
Enter configuration commands, one per line.  End with CNTL/Z.
Switch(config)#vlan 10		//创建一个vlan 10
Switch(config-vlan)#ex
Switch(config)#vlan 20		//创建一个vlan 20
Switch(config-vlan)#ex
Switch(config)#
Switch(config)#inter
Switch(config)#interface fas
Switch(config)#interface fastEthernet 0/1
Switch(config-if)#swit
Switch(config-if)#switchport acc
Switch(config-if)#switchport access vlan 10		//端口1接入vlan 10
Switch(config-if)#ex
Switch(config)#inter
Switch(config)#interface fas
Switch(config)#interface fastEthernet 0/2
Switch(config-if)#swi
Switch(config-if)#switchport acc
Switch(config-if)#switchport access vlan 20		//端口2接入vlan 20
Switch(config-if)#ex
Switch(config)#
3、打truck做连接
- 交换机之间用虚线做连接
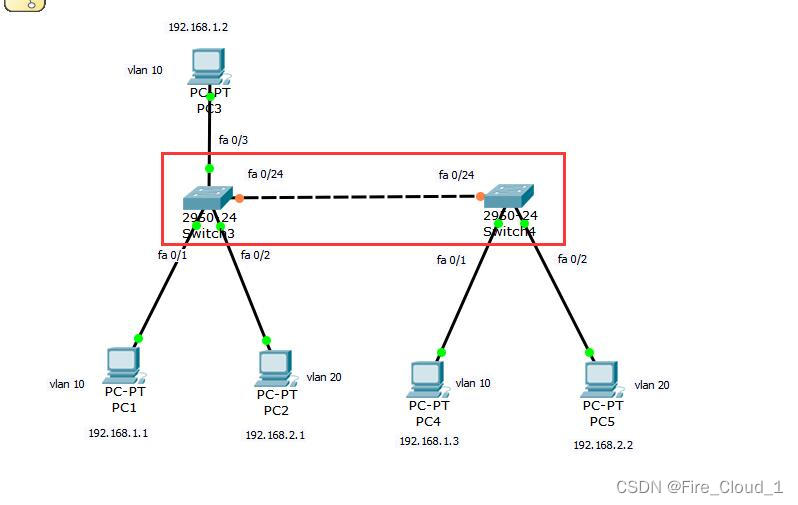
- 下面的命令两个交换机都敲一遍就行
Switch>en
Switch>enable
Switch#conf
Switch#configure termin
Switch#configure terminal
Enter configuration commands, one per line.  End with CNTL/Z.
Switch(config)#inter
Switch(config)#interface fas
Switch(config)#interface fastEthernet 0/24
Switch(config-if)#swi
Switch(config-if)#switchport mode tr
Switch(config-if)#switchport mode trunk 	//这句是重点!!Switch(config-if)#
%LINEPROTO-5-UPDOWN: Line protocol on Interface FastEthernet0/24, changed state to down%LINEPROTO-5-UPDOWN: Line protocol on Interface FastEthernet0/24, changed state to upSwitch(config-if)#
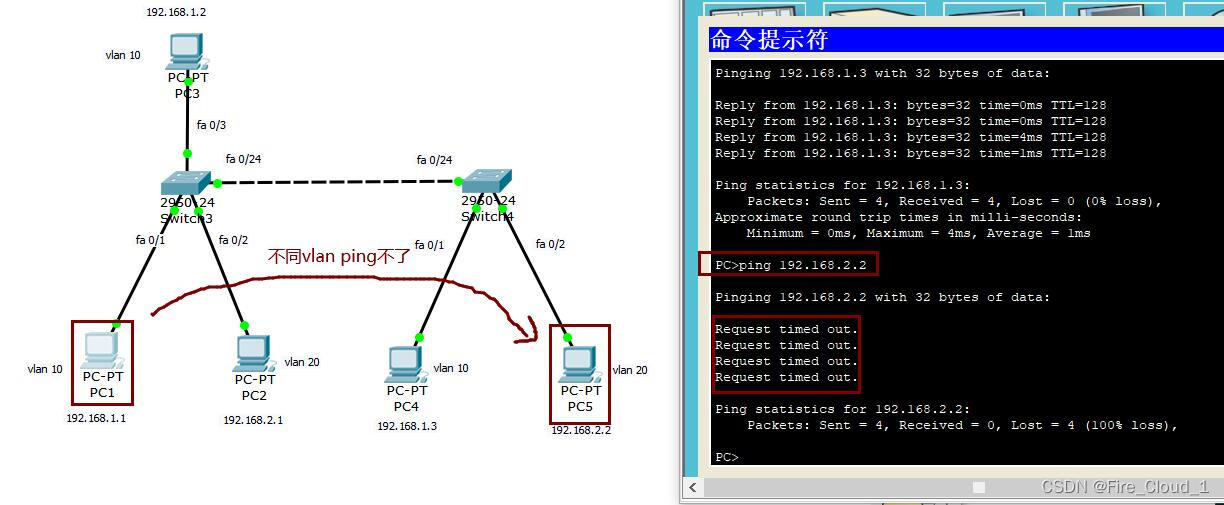
3、测试连接
- 首先让PC1和PC4进行通信
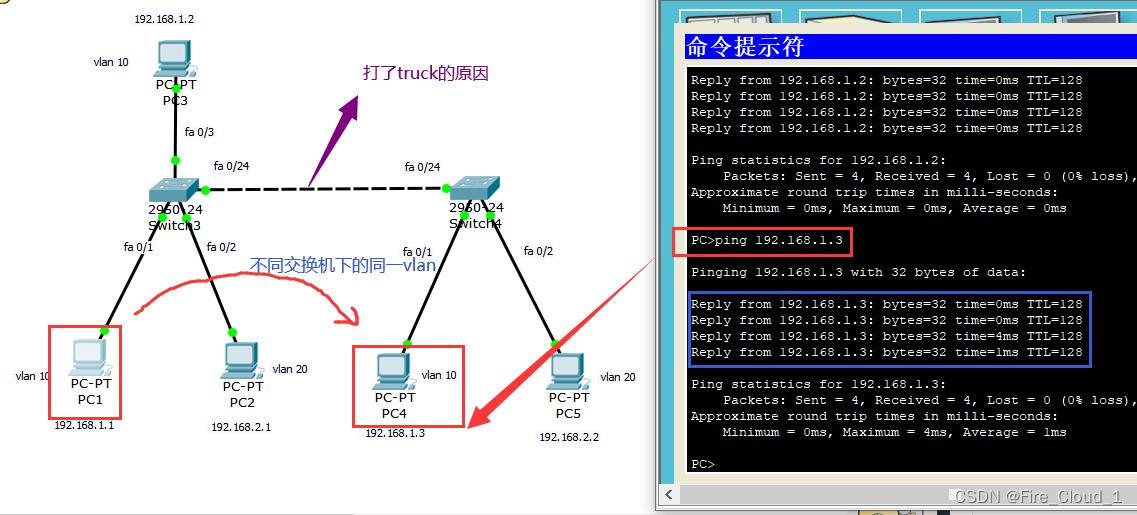
- 然后测试PC2和PC5进行通信

- 很明显他们都是同一vlan下的,因此可以ping通。但是不同vlan就不可以了
三、静态路由配置
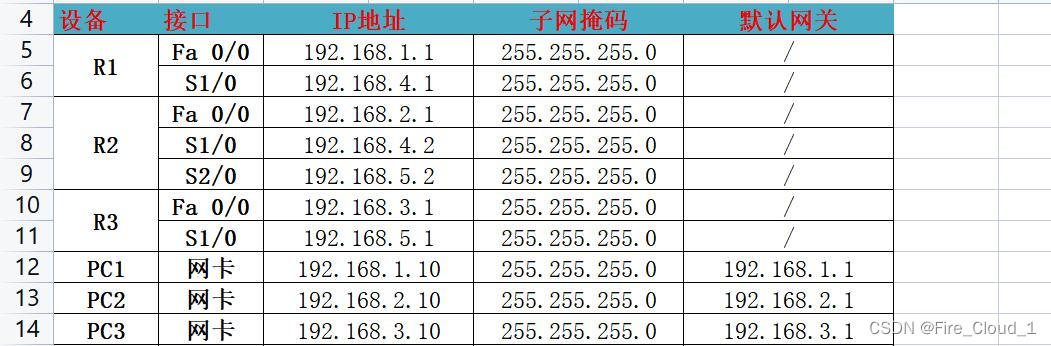
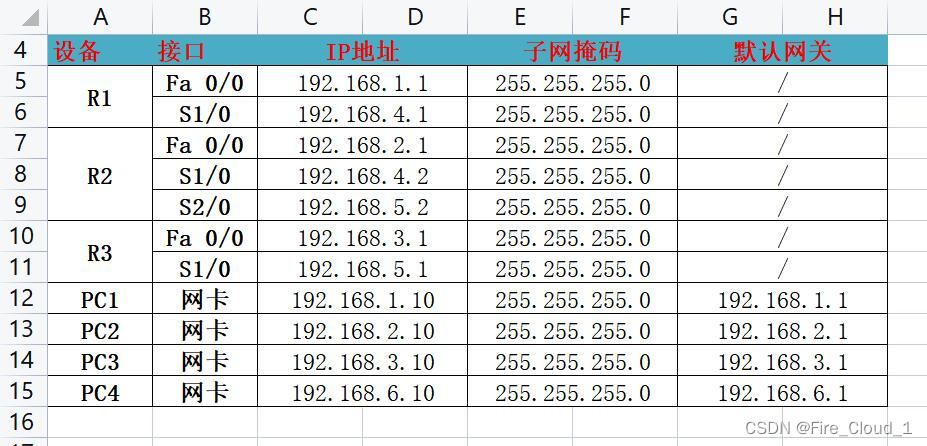
1、自定义IP地址
- 以下是我自己分配的主机和个接口的IP地址、子网掩码以及默认网关,在考试中这个是需要自己去思考配置的,可以参照我这么配,比较简易清楚一些
- 可以看到,对于各个路由器连接交换机的接口Fa,都是连接在交换机上主机的默认网关,这步操作就是将主机连入路由器,接着去主机再去ping一下它的默认网关,就可以ping通了
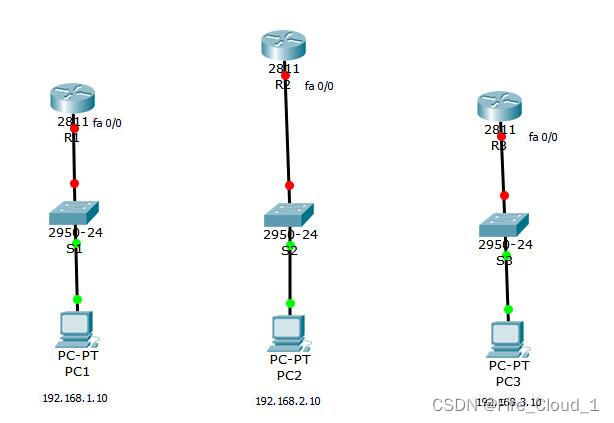
2、基本配置与接线
- 定义好各种地址后,就可以接线了
- 接下去一点很重要❗涉及到你的路由器能不能使用
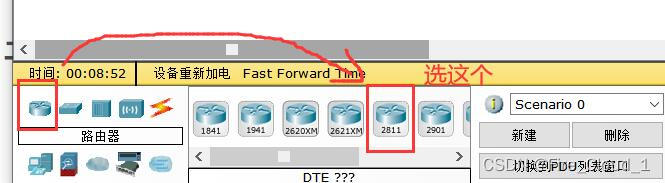
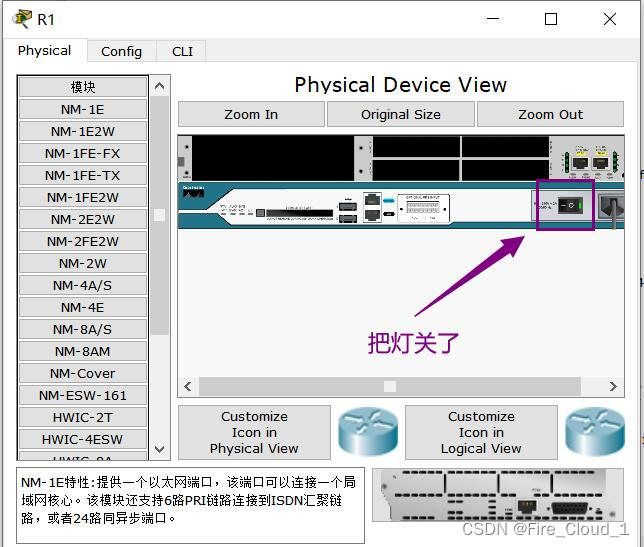

- 其他两个路由器的操作一致
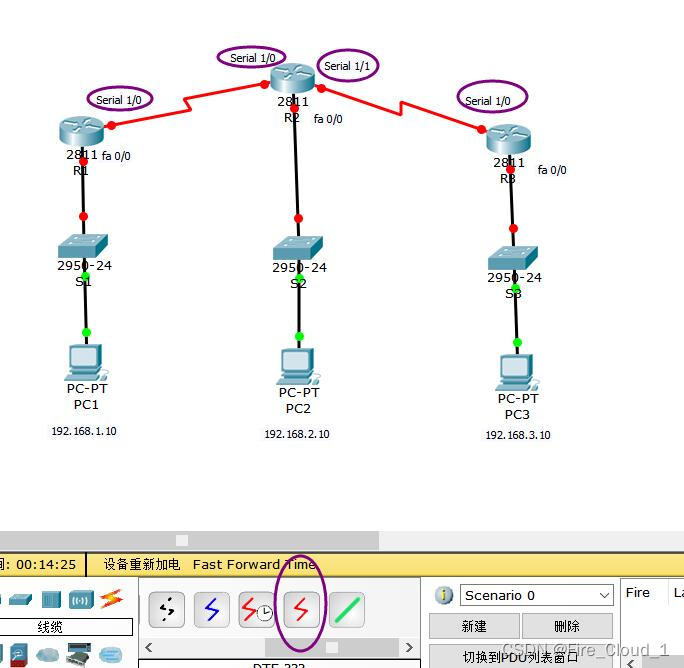
- 接下去的话将路由器之间的线接好
3、接口配置与指令描述
- 首先将主机的默认网关对应接入路由器中的Fa 0/0配置好
Router>enable
Router#conf
Router#configure
Router#configure terminal
Enter configuration commands, one per line.  End with CNTL/Z.
Router(config)#inter
Router(config)#interface fas
Router(config)#interface fastEthernet 0/0
Router(config-if)#ip addres
Router(config-if)#ip address 192.168.1.1 255.255.255.0
Router(config-if)#no shutdownRouter(config-if)#
%LINK-5-CHANGED: Interface FastEthernet0/0, changed state to up%LINEPROTO-5-UPDOWN: Line protocol on Interface FastEthernet0/0, changed state to upRouter(config-if)#
Router>enable
Router#conf
Router#configure
Router#configure terminal
Enter configuration commands, one per line.  End with CNTL/Z.
Router(config)#inter
Router(config)#interface fa
Router(config)#interface fastE、0
% Incomplete command.
Router(config)#
Router(config)#inte
Router(config)#interface fas
Router(config)#interface fastEthernet 0/0
Router(config-if)#ip add
Router(config-if)#ip address 192.168.2.1 255.255.255.0
Router(config-if)#no shutdownRouter(config-if)#
%LINK-5-CHANGED: Interface FastEthernet0/0, changed state to up%LINEPROTO-5-UPDOWN: Line protocol on Interface FastEthernet0/0, changed state to upRouter(config-if)#
Router#configure
Router#configure terminal
Enter configuration commands, one per line.  End with CNTL/Z.
Router(config)#inte
Router(config)#interface fas
Router(config)#interface fastEthernet 0/0
Router(config-if)#ip add
Router(config-if)#ip address 192.168.3.1 255.255.255.0
Router(config-if)#no shutdownRouter(config-if)#
%LINK-5-CHANGED: Interface FastEthernet0/0, changed state to up%LINEPROTO-5-UPDOWN: Line protocol on Interface FastEthernet0/0, changed state to upRouter(config-if)#
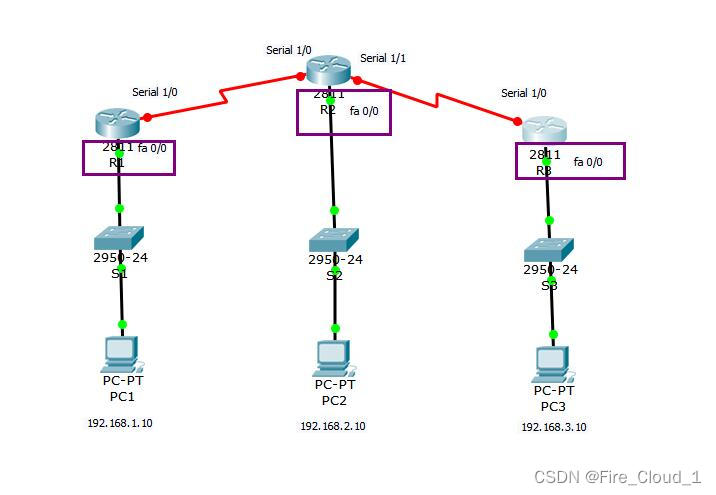
- 然后就可以看到绿起来了,一开始刚配好是黄色的,等待一段时间即可
- 接下来配置路由器之间的Serial接口
//R1
Router(config)#interface serial 1/0
Router(config-if)#ip add
Router(config-if)#ip address 192.168.4.1 255.255.255.0
Router(config-if)#clock rate 64000
This command applies only to DCE interfaces
Router(config-if)#no shutdown%LINK-5-CHANGED: Interface Serial1/0, changed state to down
Router(config-if)#
//R2
Router(config)#interface serial 1/0			//先配置1/0接口
Router(config-if)#ip add
Router(config-if)#ip address 192.168.4.2 255.255.255.0
Router(config-if)#clock rate 64000
Router(config-if)#no shutdown			//这个不要忘记了Router(config-if)#
%LINK-5-CHANGED: Interface Serial1/0, changed state to upRouter(config-if)#ex
Router(config)#
Router(config)#inter
Router(config)#interface
%LINEPROTO-5-UPDOWN: Line protocol on Interface Serial1/0, changed state to up
% Incomplete command.
Router(config)#inter
Router(config)#interface serial 1/1		//先配置1/1接口
Router(config-if)#ip add
Router(config-if)#ip address 192.168.5.2 255.255.255.0
Router(config-if)#clock rate 64000			//设置时钟时间
This command applies only to DCE interfaces
Router(config-if)#no shutdown%LINK-5-CHANGED: Interface Serial1/1, changed state to down
Router(config-if)#
Router(config-if)#
//R3
Router(config)#interface serial 1/0
Router(config-if)#ip addd
Router(config-if)#ip add
Router(config-if)#ip add
Router(config-if)#ip add
Router(config-if)#ex
Router(config)#
Router(config)#
Router(config)#inte
Router(config)#interface ser
Router(config)#interface serial 1/0
Router(config-if)#ip add
Router(config-if)#ip address 192.168.5.1 255.255.255.0
Router(config-if)#clock rate 64000
Router(config-if)#no shut
Router(config-if)#no shutdown Router(config-if)#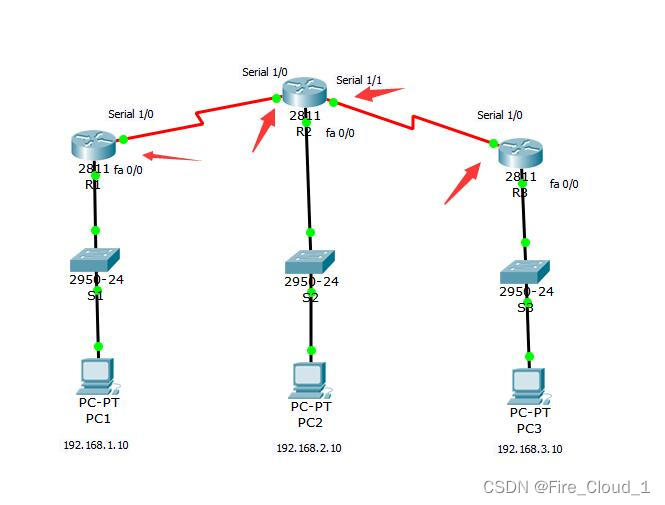
%LINK-5-CHANGED: Interface Serial1/0, changed state to up- 最后可以看到,都绿了起来,那就说明是连通了
- 以上是为了不会基本配置的小伙伴准备的,下面才是正题
4、静态路由配置【⭐】
- 接下去我们配置静态路由,只需要用到一个命令【ip route】。下面是它的格式
Router(config)# ip route network-address subnet-mask ip-address
- network-address:—要加入路由表的远程网络的目的网络地址。
- subnet-mask—要加入路由表的远程网络的子网掩码。可对此子网掩码进行修改,以总结一组网络。
- ip-address—一般指下一跳路由器的 IP 地址。
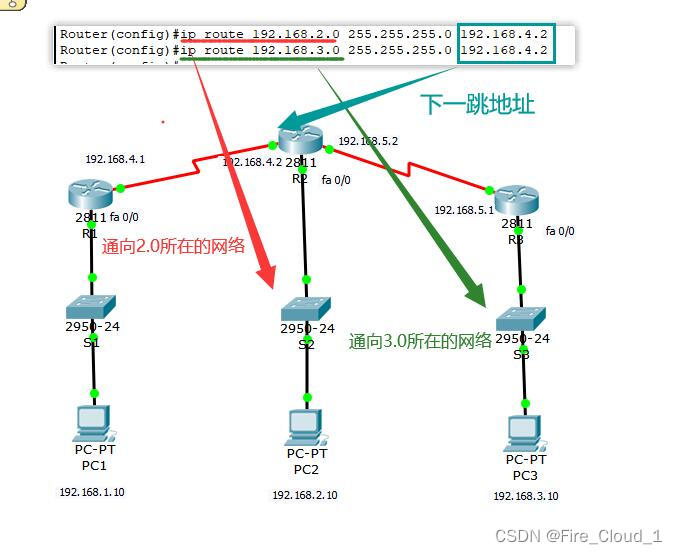
- 首先对R1进行配置。需要两个个静态路由即可,通往R2、R3所在的网络
Router(config)#ip route 192.168.2.0 255.255.255.0 192.168.4.2
Router(config)#ip route 192.168.3.0 255.255.255.0 192.168.4.2
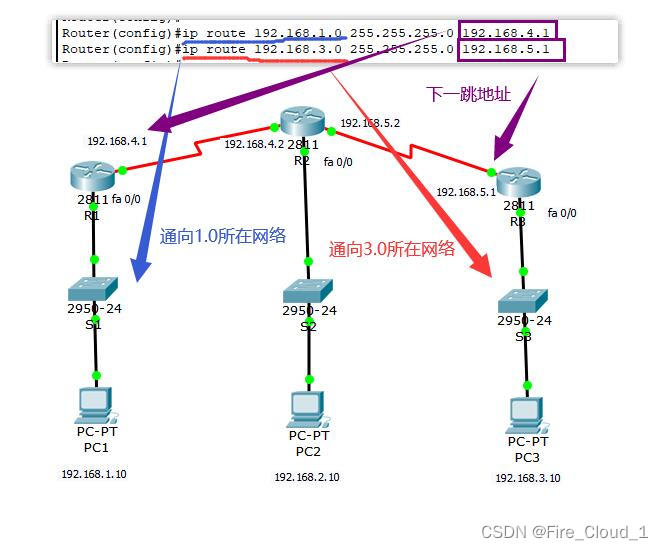
- 接下去配置R2,要配置二个静态路由,分别通往R1和R3所在的网络
Router(config)#ip route 192.168.1.0 255.255.255.0 192.168.4.1
Router(config)#ip route 192.168.3.0 255.255.255.0 192.168.5.1
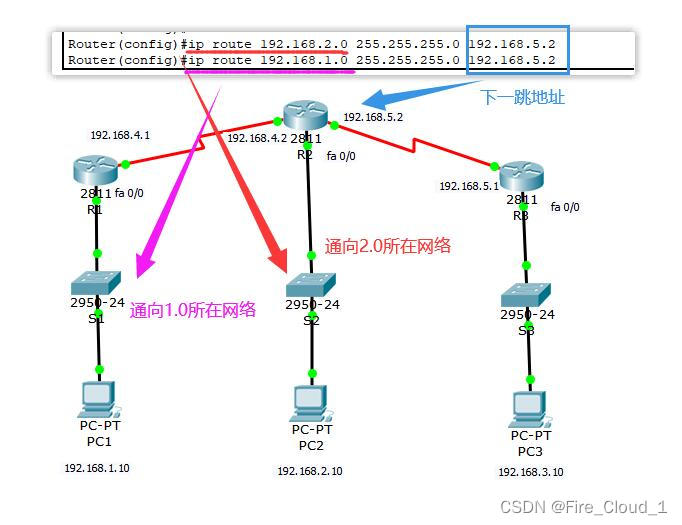
- 最后配置R3,也是需要配置两条静态路由即可
Router(config)#ip route 192.168.2.0 255.255.255.0 192.168.5.2
Router(config)#ip route 192.168.1.0 255.255.255.0 192.168.5.2
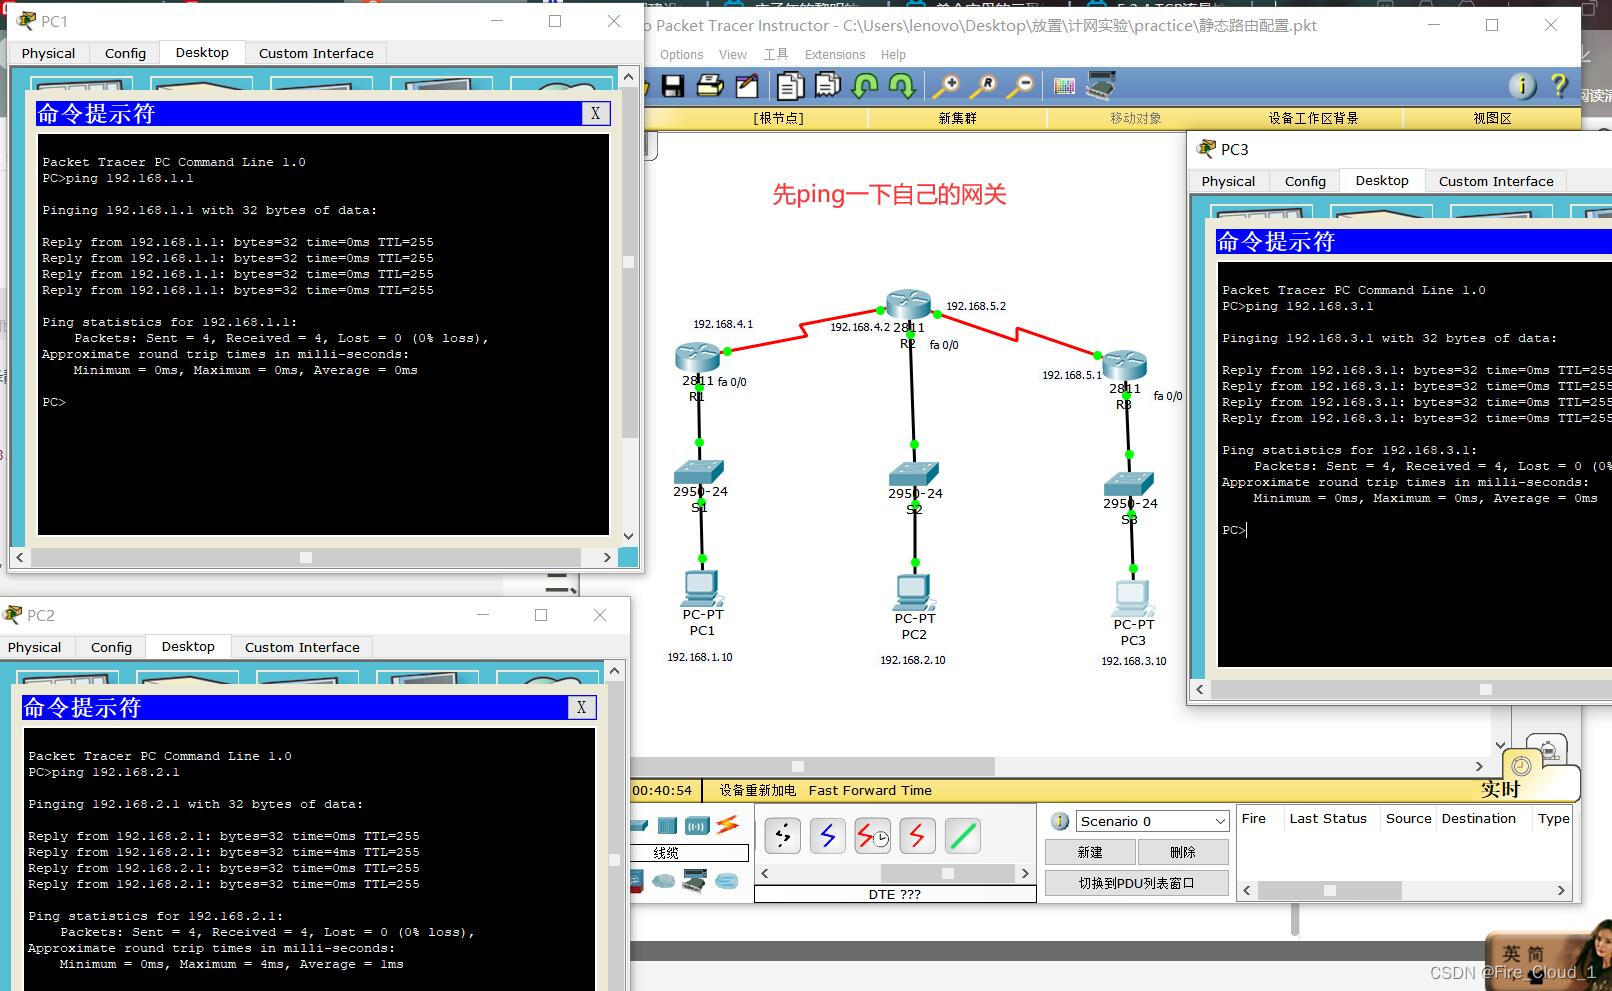
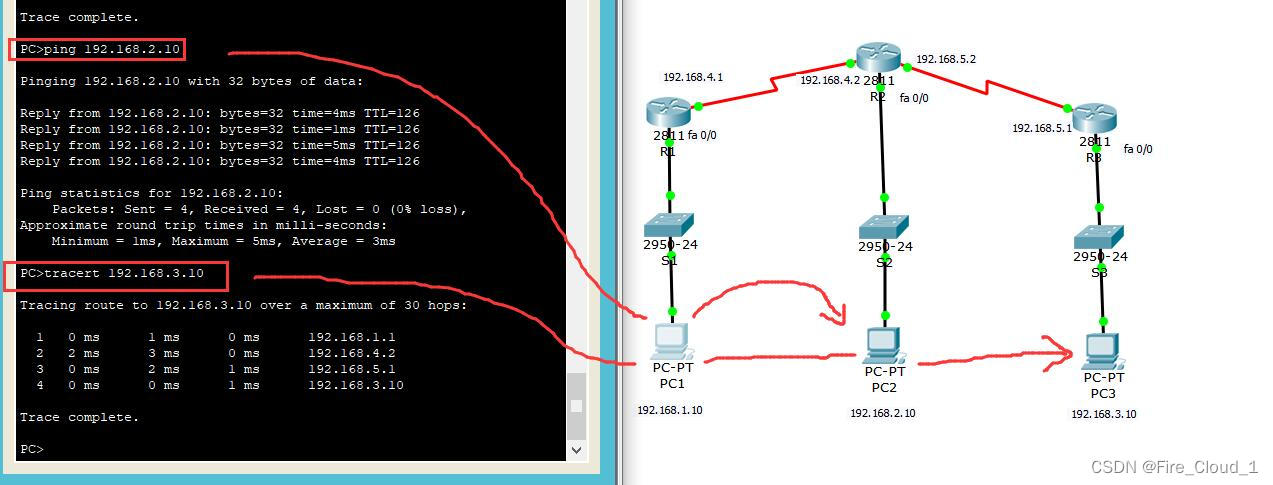
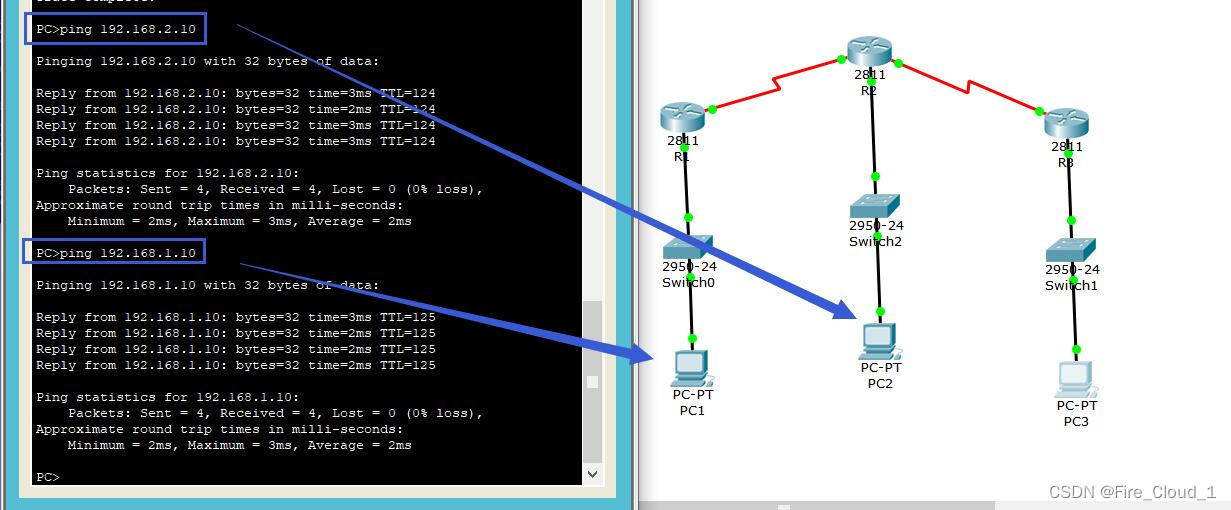
5、主机测试连接
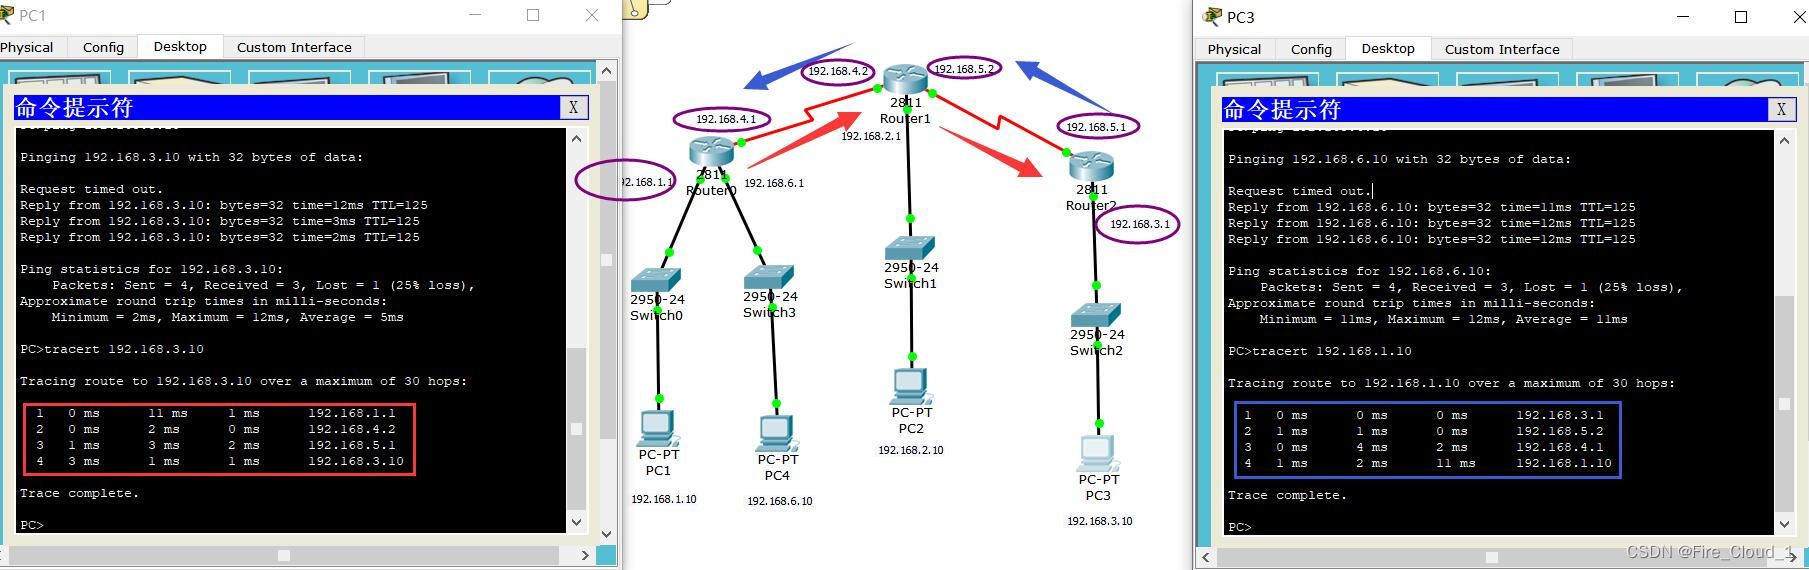
- 然后我们让主机之间相互ping一下,看看通不通
- 这里普及一个命令【tracert】,可以追踪路由的路径
四、默认路由配置
- 好,接下去我们来讲讲默认路由,这一块很简单,就是对于上面的静态,都不需要配置了,在接口与接口之间的地址都设置好连通后变绿
1、基本命令配置
Router(config)#ip route 0.0.0.0 0.0.0.0 { ip-address | interface }
- 所以三个路由器配置这四条命令即可
Router(config)#ip route 0.0.0.0 0.0.0.0 192.168.4.2 //R1
Router(config)#ip route 0.0.0.0 0.0.0.0 192.168.4.1		//R2
Router(config)#ip route 0.0.0.0 0.0.0.0 192.168.5.1		//R2
Router(config)#ip route 0.0.0.0 0.0.0.0 192.168.5.2 //R3
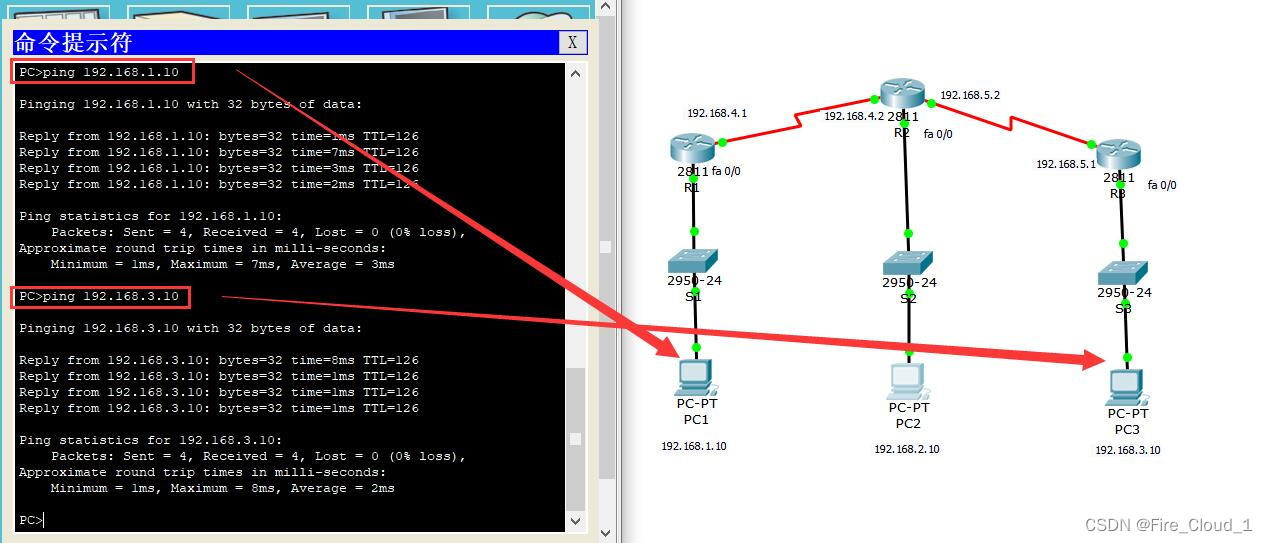
2、测试连接


五、RIPv2动态路由配置
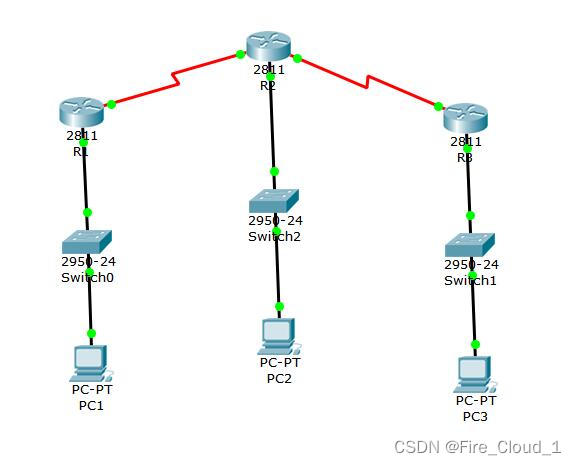
1、基本配置和接线
- 这里是我自己设定的各个主机IP以及接口之间的地址,仅供参考
- 然后就可以将各路由器、交换机和主机连上线了,接线如下

2、接口网络配置四步走
- 第一步:进入router接口
R1(config)#router rip
- 第二步:进入路由配置模式,使用 network 命令输入每个直连网络的有类网络地址
R1(config)#network 网络地址
- 第三步:启用 RIP 第 2 版
R1(config)#version 2
- 第四步:禁用自动总结
R1(config)#no auto-summary //路由器将不会在主网边界处总结路由
3、RIP配置
//R1
Router(config)#router rip
Router(config-router)#no network 192.168.1.0
Router(config-router)#no network 192.168.4.1
Router(config-router)#no network 192.168.6.0	//可以一起配
Router(config-router)#ex
Router(config-router)#ex
Router(config)#
Router(config)#router rip
Router(config-router)#network 192.168.1.0
Router(config-router)#network 192.168.6.0
Router(config-router)#version 2
Router(config-router)#no auto-su
Router(config-router)#no auto-summary
//R2
Router(config)#router rip
Router(config-router)#network 192.168.4.2
Router(config-router)#network 192.168.5.2
Router(config-router)#network 192.168.2.0
Router(config-router)#version 2
Router(config-router)#no auto-summary
//R3
Router(config)#router rip
Router(config-router)#network 192.168.5.1
Router(config-router)#network 192.168.3.0
Router(config-router)#version 2
Router(config-router)#no auto-summary
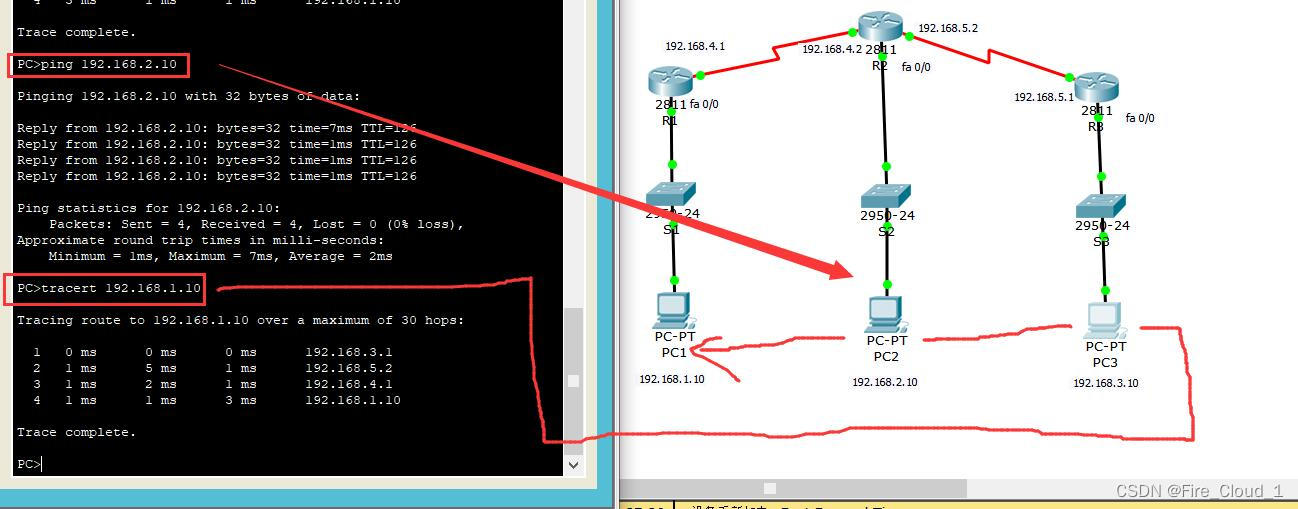
4、测试连接
- 对于动态RIP的测试,只需要使用【tracert】追踪一下就可以知道全网有没有打通了
以上就是本文要介绍的所有内容,希望对正在阅读的您有帮助🌹