Web Components学习(1)

一、什么是web components
开发项目的时候为什么不手写原生 JS,而是要用现如今非常流行的前端框架,原因有很多,例如:
- 良好的生态
- 数据驱动试图
- 模块化
- 组件化
- 等
Web Components 就是为了解决“组件化”而诞生的,它是浏览器原生支持的组件化,不依赖任何库、依赖和打包工具就可以在浏览器中运行。
Vue、React 的组件化并不是真正的组件化,虽然写代码时写的是确实的组件化代码,但是编译后就不再是组件化了。
例如用 Vue + ElementUI 开发的应用,ElementUI 的组件都是 el 开头的,如 <el-button>,但编译后显示在页面上的就不再是 <el-button> 标签了。
这有点类似于 CSS 预处理器(如 Sass、Less),那些在开发阶段编译的变量(如 $color: red;)其实并不是真正的变量,而是伪变量。在编译过后就没有变量的概念了,所以很难和 JS 通信。
例如有一个需求,在页面上给用户提供一个输入框,用户输入什么颜色(如 red、#ff00000),网站就会变成相应颜色的主题色,可是在我们获取到用户输入后,却没有变法将它们赋值给 Sass 变量上去。因为 Sass 代码在编译后已经变成了 CSS 代码,没有 Sass 变量了,例如 color: $color; 编译为 color: red;。
所以此时就需要一个浏览器原生就支持的,不需要编译就能够运行的变量,于是 CSS 变量就出现了(--color: red;、color: var(--color)),可以非常方便地与 JS 进行通信,因为它是浏览器级别地原生变量。
同理,框架的组件化也不是真正的标准,每家都用自己的组件化标准,这就导致了生态的分裂,而且这些框架的组件化也都是靠编译才能实现的,并且非常依赖于这个框架,是一种共生的关系,就像使用 Vue 时,后缀以 .vue 结尾的文件,根本没有办法在浏览器中运行,必须下载 Node、Webpack、vue-loader 等工具进行打包,但还是无法在脱离 Vue 这个框架的安装包的情况下进行运行。
通常来说,浏览器厂商会吸收一些前端非常流行框架之中的可取之处,然后推动其成为标准,并在浏览器中原生实现这些功能,最经典的莫过于 jQuery 的 $() 选择器。
“都 21 世纪了,还提 jQuery?”
尽管这几年风生水起的 Vue 和 React 加剧了 jQuery 的没落,但全世界仍有超过 6600 万个网站在使用 jQuery,同时 jQuery 也给业界留下了产生深远影响的遗产,W3C 就仿照$()函数实现了 querySelector() 和 querySelectorAll() 方法。
而讽刺的是,也正是这两个原生方法的出现,大大加快了 jQuery 的没落,因为它们取代了 jQuery 最常用的功能之一:快捷的选择 DOM 元素。
那么浏览器原生支持的组件化会取代现在所流行的库或框架么?
那么事实真的是这样么,其实不然。
Web Components 与如今非常流行的 MVVM 框架是一种共存的关系,而不是一种互斥的关系,就像 Sass 变量和 CSS 变量,两者可以非常完美的互补,而不是说用了 CSS 变量就不能用 Sass 变量。
再者来说,我们用那些 MVVM 框架也并不仅仅只是为了它们的组件化功能,虽然组件化是其中非常重要的一项功能,但是还有页面路由、数据绑定、模块化、CSS 预处理器、虚拟 DOM、Diff 算法,以及各种庞大的生态等功能。
Web Components 要解决的仅仅只是组件化的这么一项功能。
React 和 Web Components 为了解决不同的问题而生。Web Components 为可复用组件提供了强大的封装,而 React 则提供了声明式的解决方案,使 DOM 与数据保持同步。两者旨在互补。作为开发人员,可以自由选择在 Web Components 中使用 React,或者在 React 中使用 Web Components,或者两者共存。
—— 《Web Components – React》
我们认为 Vue 和 Web Components 主要是互补的技术。Vue 为使用和创建定制元素提供了出色的支持。无论你是将自定义元素集成到现有的 Vue 应用程序中,还是使用 Vue 来构建和分发自定义元素都很方便。
—— 《Vue 与 Web Components | Vue.js》
Web Components 是一个浏览器原生支持的组件化方案,允许你创建新的自定义、可封装、可重用的HTML 标记。不用加载任何外部模块,直接就可以在浏览器中跑。
它的出现原因?因为早期组件生态很乱,有各种各样的框架和库,都有各自的规范,导致一个团队切换框架很困难 。为了解决这种分化的形式,让 Web 组件模型统一化,所以才有了Web Components规范的出现。目标是提供一种权威的、浏览器能理解的方式来创建组件。
为什么要学习它?用一句话总结就是回顾历史展望未来。
2011年提出Web Components概念,React诞生
2013年 Chrome 和 Opera 又联合提出了推出的 V0 版本的 Web Components 规范,React开源
2014年Vue诞生
2016年Web Components 推进到了 V1 版本
由于浏览器兼容性、和主流框架开发效率等等问题导致现在几乎使用不到它,但我们可以学习它的思想,也许未来就会变的有用?
Web Components 由三种技术组成
Custom Elements
可以创建一个自定义标签。根据规范,自定义元素的名称必须包含连词线”-“,用与区别原生的 HTML 元素。
<body><user-card></user-card><script>class UserCard extends HTMLElement {constructor() {super();var el = document.createElement('p');el.classList.add('name');el.innerText = 'User Name';this.append(el);}}window.customElements.define('user-card', UserCard);</script>
</body>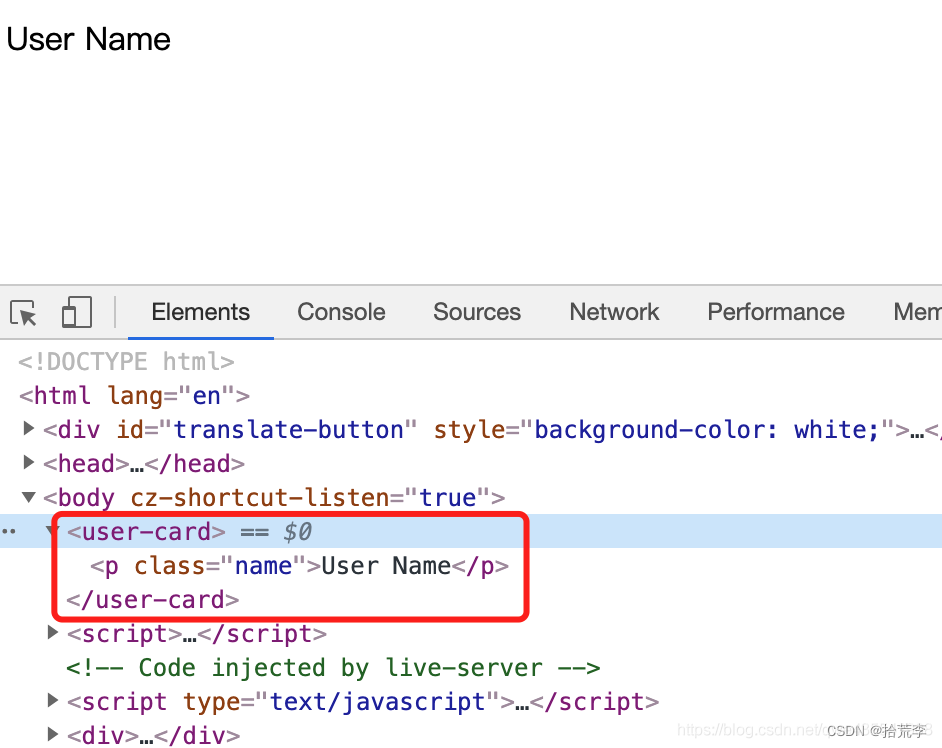
class UserButton extends HTMLButtonElement {constructor() {super();}
}customElements.define('user-button', UserButton, { extends: "button" });
<button is="user-button"></button>
使用生命周期回调函数
在custom element的构造函数中,可以指定多个不同的回调函数,它们将会在元素的不同生命时期被调用:
connectedCallback:当 custom element首次被插入文档DOM时,被调用。disconnectedCallback:当 custom element从文档DOM中删除时,被调用。adoptedCallback:当 custom element被移动到新的文档时,被调用。attributeChangedCallback: 当 custom element增加、删除、修改自身属性时,被调用。
Shadow DOM
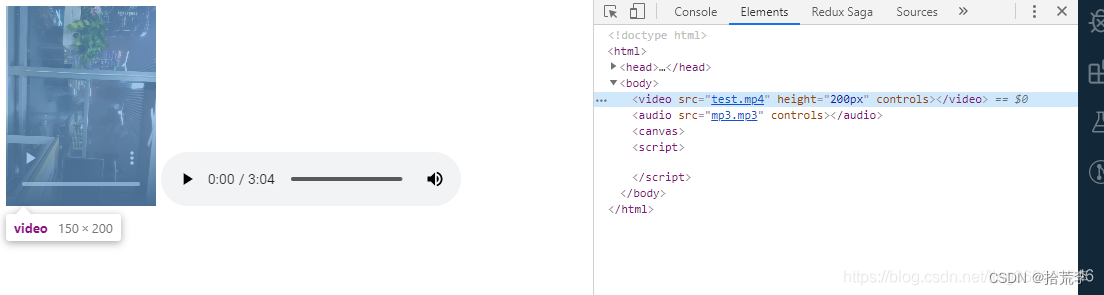
经常写video,audio等html元素在带的控制条或者模块,但是这这些模块哪里来的用什么实现的
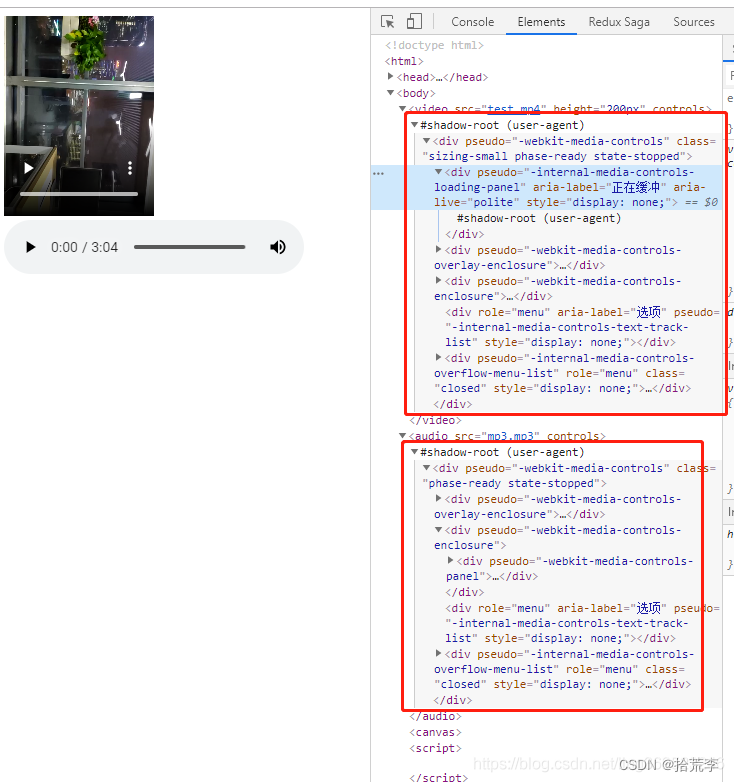
隐藏有点深刻,难以发现。
那什么是影子DOM
- 影子dom这个东西的存在,主要解决dom树建立时能够实现维护自身边界的问题。这么说有点像vue的scope保证自身不会被外来修饰入侵或者污染。
- 影子dom将对应的dom信息隐藏起来依然能在html文档里渲染出来。但不能通过普通的js方法获取到dom信息
- 影子dom事件捕获遵从常规dom事件,在影子dom内部依然传递,同时也遵从事件冒泡,向整个文档的dom上传递事件。
创建影子树
通过createShadowRoot创建影子树root节点
<!DOCTYPE html>
<html>
<head><title>影子dom</title><link rel="dns-prefetch" href="//dfhs.tanx.com"><style>.box {height: 80px;width: 80px;background-color: red;}</style>
</head>
<body><div id="box" class="box"></div>
</body>
<script>var $box = document.getElementById('box');var shadowRoot = $box.createShadowRoot(); // 获得root//var showRoot = $box.webkitGetShadowRoot() // webkit 支持var children = document.createElement('div');children.setAttribute('style', 'height: 40px; width: 40px; background-color: blue');shadowRoot.appendChild(children);
</script>
</html>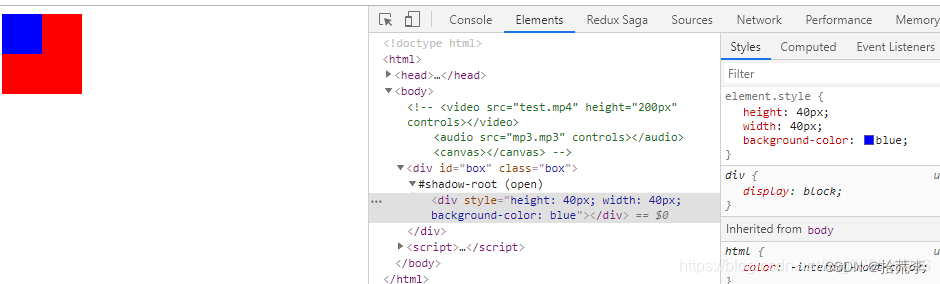
再给影子树节点添加css时不能用过class或者元素选择来添加,否则无效果
<!DOCTYPE html>
<html>
<head><title>影子dom</title><link rel="dns-prefetch" href="//dfhs.tanx.com"><style>.box {height: 80px;width: 80px;background-color: red;}.children {height: 40px;width: 40px;background-color: blue;}div {height: 40px;width: 40px;background-color: blue;}</style>
</head>
<body><video src="test.mp4" height="200px" controls></video><audio src="mp3.mp3" controls></audio><canvas></canvas><div id="box" class="box"></div>
</body>
<script>var $box = document.getElementById('box');var shadowRoot = $box.createShadowRoot(); // 获得root//var showRoot = $box.webkitGetShadowRoot() // webkit 支持var children = document.createElement('div');children.setAttribute('class', 'children');shadowRoot.appendChild(children);
</script>
</html>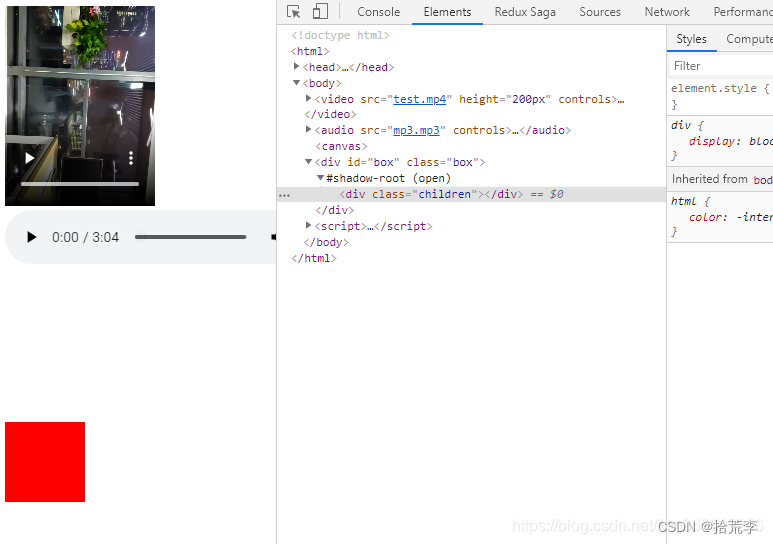
通过class选择dom时需要将style也放入影子节点里
<script>var $box = document.getElementById('box');var shadowRoot = $box.createShadowRoot(); // 获得root//var showRoot = $box.webkitGetShadowRoot() // webkit 支持var children = document.createElement('div');children.setAttribute('class', 'children')shadowRoot.innerHTML += '<style>.children { height: 40px; width: 40px; background-color: blue;}</style>';shadowRoot.appendChild(children);
</script>
不能直接获得影子DOM
通过js常规方法不能直接获取到dom节点
var $box = document.getElementById('box');var shadowRoot = $box.createShadowRoot(); // 获得root//var showRoot = $box.webkitGetShadowRoot() // webkit 支持var children = document.createElement('div');children.setAttribute('class', 'children');children.setAttribute('id', 'children');shadowRoot.appendChild(children);// 获得影子dom// 通过idvar getShadowRootById = document.getElementById('children');console.log(getShadowRootById)// 通过节点选择console.log('---------------')var getShadowRootByDomBox = document.body.firstChild.nextSibling; // 获得到box//var getShadowRootByDom = getShadowRootByDomBox.firstChildvar getShadowRootByDom = getShadowRootByDomBox.firstElementChild;console.log(getShadowRootByDom)
影子dom事件绑定
在createElement时拿到的元素,添加addEventListener事件
var $box = document.getElementById('box');var shadowRoot = $box.createShadowRoot(); // 获得root//var showRoot = $box.webkitGetShadowRoot() // webkit 支持var children = document.createElement('div');children.setAttribute('class', 'children')shadowRoot.innerHTML += '<style>.children { height: 40px; width: 40px; background-color: blue;}</style>';shadowRoot.appendChild(children);children.addEventListener('click', function(e) {console.log(e)})利用content元素select属性将目标内容匹配到template中指定位置,并且目标内容只能在影子元素里
<!DOCTYPE html>
<html>
<head><title>影子dom</title><link rel="dns-prefetch" href="//dfhs.tanx.com"><style>.box {height: 160px;width: 160px;background-color: red;}.children {height: 80px;width: 80px;background-color: blue;}.test-content {background-color: yellow;}</style>
</head>
<body><div id="box" class="box"><div class="test-content">我接着测试</div></div><template class="root-tlp"><style>.test-ctn {color: white;}</style><div><div class="test-ctn" id="test">测试</dt></div><content select=".test-content"></content></template>
</body>
<script>var $box = document.getElementById('box');var shadowRoot = $box.createShadowRoot(); // 获得rootvar children = document.createElement('div');var template = document.querySelector('.root-tlp');shadowRoot.appendChild(document.importNode(template.content, true));document.addEventListener('click', function() {console.log('test-content')})
</script>
</html>
CSS 选择器:
:host, :host(), :host-context()
:host
<template class="root-tlp"><style>.test-ctn {color: white;}:host {font-weight: bold;}</style><div><div class="test-ctn" id="test">测试</dt></div><content select=".test-content"></content></template>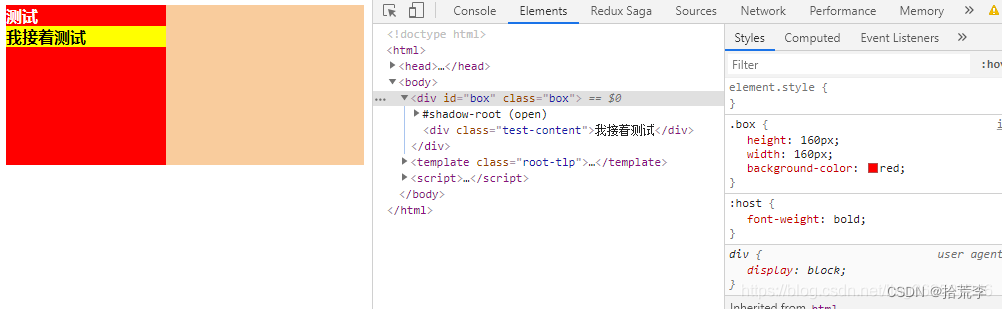
:host()选择器,选择影子dom宿主元素
<body><div id="box" class="box"><div class="test-content">我接着测试</div></div><template class="root-tlp"><style>.test-ctn {color: white;}:host {font-weight: bold;}:host(.box) {color: blue;}</style><div><div class="test-ctn" id="test">测试</dt></div><content select=".test-content"></content></template>
</body>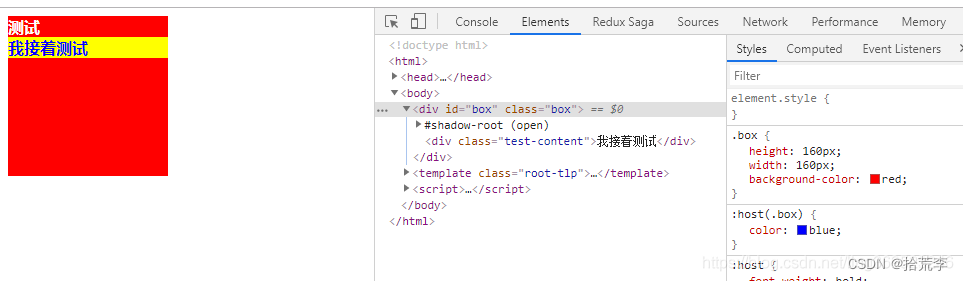
:host-context()与后代选择器表达式一起使用,以仅选择特定祖先内部的自定义元素的实例
<!DOCTYPE html>
<html>
<head><title>影子dom</title><link rel="dns-prefetch" href="//dfhs.tanx.com"><style>.box {height: 160px;width: 160px;}.children {height: 80px;width: 80px;}</style>
</head>
<body><div id="box" class="test"><div class="box-content" id="box-content"><div class="box-ctn">213</div></div></div><template class="root-tlp"><style>.test-ctn {color: white;}:host {font-weight: bold;}:host(.box-content) {color: blue;background-color:red;}:host-context(.test) {height:  300px;background-color: blueviolet}</style><div><div class="test-ctn" id="test">测试</dt></div><content select=".box-ctn"></content></template>
</body>
<script>var $box = document.getElementById('box-content');var shadowRoot = $box.createShadowRoot(); // 获得rootvar children = document.createElement('div');var template = document.querySelector('.root-tlp');shadowRoot.appendChild(document.importNode(template.content, true));
</script>
</html>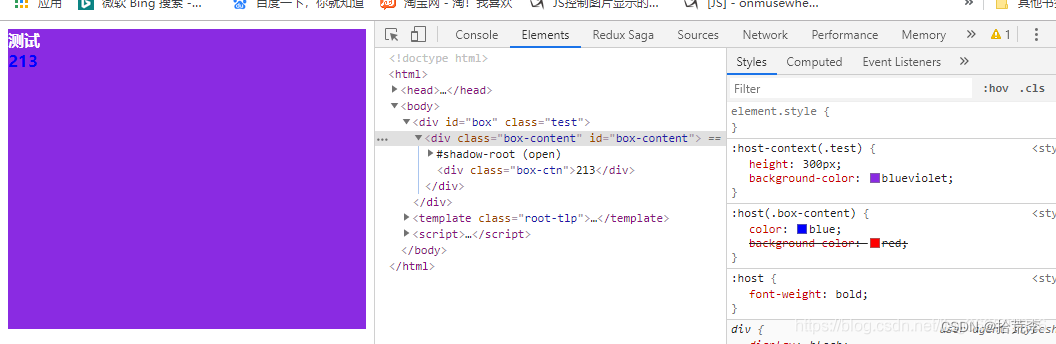
templates and slots
可以编写不在呈现页面中显示的标记模板。然后它们可以作为自定义元素结构的基础被多次重用。
- 被使用前不会被渲染。
- 被使用前对页面其他部分没有影响,脚本不会运行,图像不会加载,音频不会播放。
<body><p>会影响外部样式</p><template id="my-paragraph"><style>p{color: red;}</style><p>My paragraph</p></template><my-paragraph></my-paragraph><script>customElements.define('my-paragraph',class extends HTMLElement {constructor() {super();let template = document.getElementById('my-paragraph');let templateContent = template.content.cloneNode(true);this.appendChild(templateContent);}})</script>
</body>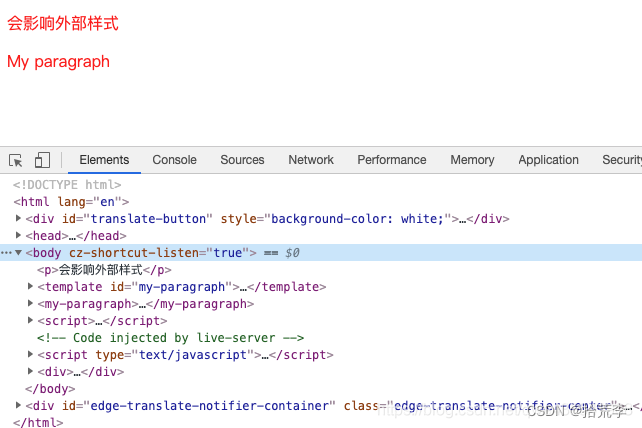
slot的使用:
<body><style>p{color: blueviolet;}</style><p>会影响外部样式</p><template id="my-paragraph"><style>p{color: red;}</style><p>My paragraph</p><slot name="my-text">My default text</slot></template><my-paragraph><p slot="my-text">slot text</p></my-paragraph><script>customElements.define('my-paragraph',class extends HTMLElement {constructor() {super();let template = document.getElementById('my-paragraph');let templateContent = template.content.cloneNode(true);this.attachShadow({mode: 'open'}).appendChild(templateContent);}})</script>
</body>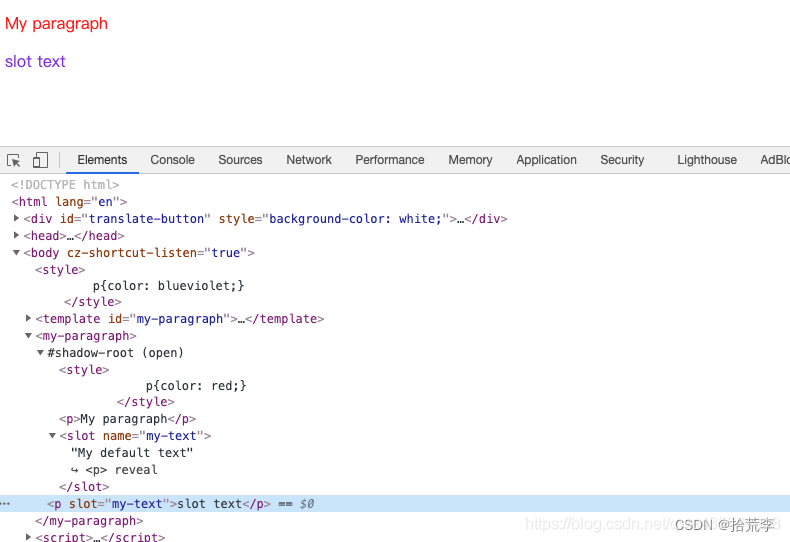
下面挑选了市面上既好玩,颜值又高的组件库来体验以下 Web Components:
- css-doodle:直译 - css 涂鸦
- fancy-components:直译 - 花式组件库,可惜没有官方文档
二、css-doodle
<!DOCTYPE html>
<html>
<head><meta charset="UTF-8"><meta http-equiv="X-UA-Compatible" content="IE=edge"><meta name="viewport" content="width=device-width, initial-scale=1.0"><title>css-doodle</title><script src="https://cdnjs.cloudflare.com/ajax/libs/css-doodle/0.6.1/css-doodle.min.js"></script><style>html, body {height: 100%;margin: 0;overflow: hidden;}</style>
</head>
<body><css-doodle>:doodle {@grid: 20 / 100vmax;background: #12152f;}::after {content: '\\@hex(@rand(0x2500, 0x257f))';font-size: 5vmax;color: hsla(@rand(360), 70%, 70%, @rand(.9))}</css-doodle>
</body>
</html>
<!DOCTYPE html>
<html>
<head><meta charset="UTF-8"><meta http-equiv="X-UA-Compatible" content="IE=edge"><meta name="viewport" content="width=device-width, initial-scale=1.0"><title>css-doodle</title><script src="https://cdnjs.cloudflare.com/ajax/libs/css-doodle/0.6.1/css-doodle.min.js"></script><style>html, body {width: 100%;height: 100%;margin: 0;overflow: hidden;background: #011627;display: grid;place-items: center;/* 公众号:前端学不动 搜:居中篇 */}</style>
</head>
<body><css-doodle>:doodle {@grid: 1x1x100 / 100vmin;animation: r 23s linear infinite}@size: 100% 50%;position: absolute;top: 25%;transform: rotate(@r(360deg));perspective: @r(100px, 200px);::after {content: '';position: absolute;@size: @r(.5vmin, 5vmin);color: @p(#fdfffc, #2ec4b6, #e71d36, #ff9f1c);background: currentColor;box-shadow: @m2(0 0 1.2vmin currentColor);animation: cycle @r(2s) linear infinite;--trans: scaleX(@r(1, 5)) translateZ(@r(10vmin, 20vmin));transform: rotateY(0) @var(--trans)}:empty::after { display: none }@keyframes cycle {to {transform: rotateY(@p(-1turn, 1turn)) @var(--trans)}}@keyframes r {to { transform: rotate(1turn) }}</css-doodle>
</body>
</html>
<!DOCTYPE html>
<html>
<head><meta charset="UTF-8"><meta http-equiv="X-UA-Compatible" content="IE=edge"><meta name="viewport" content="width=device-width, initial-scale=1.0"><title>css-doodle</title><script src="https://unpkg.com/css-doodle@0.34.5/css-doodle.min.js"></script><style>html, body {width: 100%;height: 100%;margin: 0;overflow: hidden;background: radial-gradient(#459dc1, #070729);display: grid;place-items: center;/* 公众号:前端学不动 搜:居中篇 */}</style>
</head>
<body><css-doodle><!-- css-doodle.com -->:doodle {@grid: 80x1 / 100vw 100vh;@min-size: 100px;filter: url(#filter);animation: r 23s linear infinite}@size: 100% 50%;position: absolute;top: 25%;transform: rotate(@r(360deg));perspective: 130px;::after {content: '';position: absolute;@size: @r(10px);background: #fff;box-shadow: @m3(0 0 calc(.5vmin + 5px) #fff);animation: cycle @r(2s, 8s) linear infinite;animation-delay: -@r(100s);--trans: scaleX(@r(.1, 5)) translateZ(105px);transform: rotateY(0) @var(--trans)}@keyframes cycle {to {transform: rotateY(@p(-1turn, 1turn)) @var(--trans)}}@keyframes r {to { transform: rotate(@p(-1turn, 1turn)) }}</css-doodle><svg style="width: 0; height: 0;"><filter id="filter"><feGaussianBlur in="SourceGraphic" stdDeviation="5" result="blur"></feGaussianBlur><feColorMatrix in="blur" mode="matrix" values="1 0 0 0 00 1 0 0 00 0 1 0 00 0 0 18 -7"result="goo"  ></feColorMatrix><feBlend in="SourceGraphic" in2="goo"></feBlend></filter></svg>
</body>
</html>

三、fancy-components
https://github.com/fancy-components/fancy-components
<!DOCTYPE html>
<html lang="en">
<head><title>fancy-components</title><style>* { padding: 0; margin: 0; }html, body { height: 100%; }body {display: grid;place-items: center;background: #3f2766;}fc-3d-btn {--color: #6e50a6;--shadow-color: rgba(255, 255, 255, .4);--inset-shadow-color: #315;--inset-shadow-color-active: rgba(49, 23, 7, .9);--cover-color: rgba(0, 0, 0, .4);}</style>
</head>
<body><div><!-- html 只支持小写标签,不支持驼峰命名法 --><fc-input white placeholder="Username"></fc-input><br /><fc-input white disabled value="fancy components" placeholder="Username"></fc-input><br /><fc-btn>fancy-components</fc-btn><br /><fc-warp-btn></fc-warp-btn><br /><fc-3d-btn></fc-3d-btn><br /><fc-underline-btn></fc-underline-btn><br /><fc-pixel-btn></fc-pixel-btn><br /><fc-parentheses-btn></fc-parentheses-btn><br /><fc-round-btn></fc-round-btn><br /><fc-arrow-btn></fc-arrow-btn><br /><fc-bubbles click><fc-parentheses-btn>撒花</fc-parentheses-btn></fc-bubbles></div><script type="module">import { FcTypingInput } from 'http://unpkg.com/fancy-components'import { FcDblWarpBtn } from 'http://unpkg.com/fancy-components'import { FcWarpBtn } from 'http://unpkg.com/fancy-components'import { Fc3DBtn } from 'http://unpkg.com/fancy-components'import { FcUnderlineBtn } from 'http://unpkg.com/fancy-components'import { FcPixelBtn } from 'http://unpkg.com/fancy-components'import { FcParenthesesBtn } from 'http://unpkg.com/fancy-components'import { FcRoundBtn } from 'http://unpkg.com/fancy-components'import { FcArrowBtn } from 'http://unpkg.com/fancy-components'import { FcBubbles } from 'http://unpkg.com/fancy-components'// 注册组件// 可以传递一个重命名组件名的字符串,必须是小写,且用 `-` 连接// 不传参数默认组件名就是 fc-typing-inputnew FcTypingInput('fc-input')new FcDblWarpBtn('fc-btn')new FcWarpBtn()new Fc3DBtn()new FcUnderlineBtn()new FcPixelBtn()new FcParenthesesBtn()new FcRoundBtn()new FcArrowBtn()new FcBubbles()</script>
</body>
</html>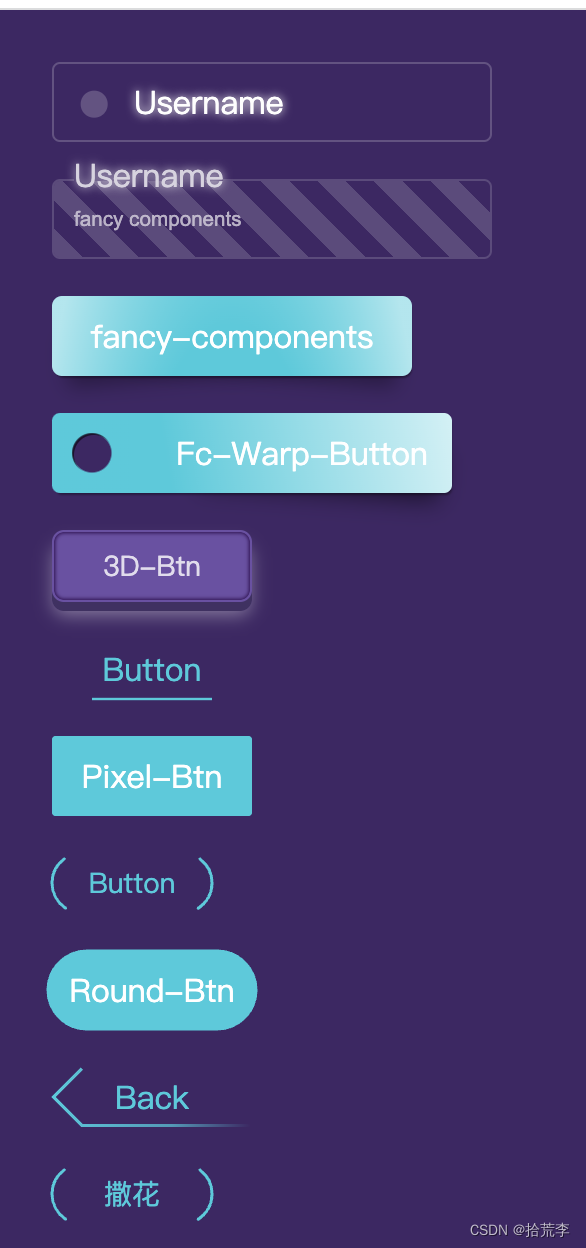
四、在脚手架中使用 Web Components 组件库
Vue 2 中使用
npm i -g @vue/cli
vue create vue2-app
cd vue2-app
npm i fancy-components
npm run serve
// src\\main.js
import Vue from 'vue'
import App from './App.vue'
import { FcBubbles } from 'fancy-components'// 禁用 no-new 校验规则
/* eslint-disable no-new */
new FcBubbles()Vue.config.productionTip = falsenew Vue({render: h => h(App)
}).$mount('#app')<!-- src\\App.vue -->
<template><div id="app"><fc-bubbles click><img alt="Vue logo" src="./assets/logo.png"></fc-bubbles><!-- <FcBubbles click><img alt="Vue logo" src="./assets/logo.png"></FcBubbles> --></div>
</template>
...Web Components 原生组件的地位和 HTML 标签的地位是相同的,大写的驼峰命名组件会被当做 Vue 组件,原生组件要和 HTML 标签一样,不要写成驼峰命名。React 框架中也一样。
Vue CLI 旧版本中使用 Web Components 控制台可能会发出警告,原因是 Vue 将 原生组件当作 Vue 组件去判断,警告组件没有注册,解决办法就是配置
ignoredElements让 Vue 忽略原生组件:
Vue.config.ignoredElements = [// 正则匹配/^fc-/,// 或字符串'css-coodle'
]
Vue 3 中使用
vue create vue3-app
cd vue3-app
npm i fancy-components
npm run serve
// src\\main.js
import { createApp } from 'vue'
import App from './App.vue'
import { FcBubbles } from 'fancy-components'/* eslint-disable no-new */
new FcBubbles()createApp(App).mount('#app')<!-- src\\App.vue -->
<template><fc-bubbles click><img alt="Vue logo" src="./assets/logo.png"></fc-bubbles><HelloWorld msg="Welcome to Your Vue.js App"/>
</template>使用上如 Vue2 一样,但实际上会报错:
[Vue warn]: Failed to resolve component: fc-bubbles
If this is a native custom element, make sure to exclude it from component resolution via compilerOptions.isCustomElement.
原因与 Vue CLI 旧版本创建的 Vue2 应用一样,解决办法依然是配置忽略原生组件(自定义元素),参考:Vue 与 Web Components
// vue.config.js
module.exports = {chainWebpack: config => {config.module.rule('vue').use('vue-loader').tap(options => ({...options,compilerOptions: {// 将所有 fc- 开头的标签名都视为自定义元素isCustomElement: tag => tag.startsWith('fc-')}}))}
}
重启应用,警告已经不见了,但是点击仍然没有生效,打开 Element 面板发现组件的 click 属性并没有添加上,而其他属性如 click1 可以添加,这可能是因为 Vue3 认为 click 是一个不能直接添加的关键字,测试发现只需将 click 改成大写 Click 即可添加上。
<fc-bubbles Click><img alt="Vue logo" src="./assets/logo.png"></fc-bubbles>在 Vite 中使用 Web Components 组件库
# npm 6.x
npm create vite@latest vite-vue-app
√ Select a framework: » vue
√ Select a variant: » vuecd vite-vue-app
npm install
npm i fancy-components
npm run dev
// src/main.js
import { createApp } from 'vue'
import App from './App.vue'
import { FcBubbles } from 'fancy-components'new FcBubbles()createApp(App).mount('#app')<!-- src\\App.vue -->
<!-- 注意 Click 大写 -->
<fc-bubbles Click><img alt="Vue logo" src="./assets/logo.png" /></fc-bubbles>还要配置忽略的自定义元素:
// vite.config.js
import { defineConfig } from 'vite'
import vue from '@vitejs/plugin-vue'// https://vitejs.dev/config/
export default defineConfig({plugins: [vue({template: {compilerOptions: {// 将所有 fc- 开头的标签名都视为自定义元素isCustomElement: tag => tag.startsWith('fc-')}}})]
})
不需要重启即可生效。