nginx实战,nginx高可用, nginx负载配置, nginx正向,反向代理,nginx各种配置, 及其配置问题

nginx配置实战, nginx负载, nginx正向,反向代理,nginx路由配置
- nginx
-
- nginx基础
- nginx 配置
- nginx正向代理
- nginx 反向代理
- nginx 负载
- nginx高可用
- nginx 配置常见问题
-
- 反向代理报426错误
- post请求变get请求
- nginx 配置前端代理, 会出现js, css找不到
nginx
简介:Nginx是一款轻量级的Web 服务器/反向代理服务器及电子邮件(IMAP/POP3)代理服务器,在BSD-like 协议下发行。其特点是占有内存少,并发能力强,事实上nginx的并发能力在同类型的网页服务器中表现较好。
场景: 因此我们有这样的一个业务场景, 我们系统会收录公司所有的api接口, 每个api都会有自己的preview 页面,有的api提供者会提供preview的共能, 有的需要重新开发ui,那当我们系统访问不同的preview时, 都会存在问题, 例如跨域, 前端, 后端等会有, 对于api提供者非常不友好, 那我就想使用nginx做代理服务, 统计管理请求。
业务设计如下:
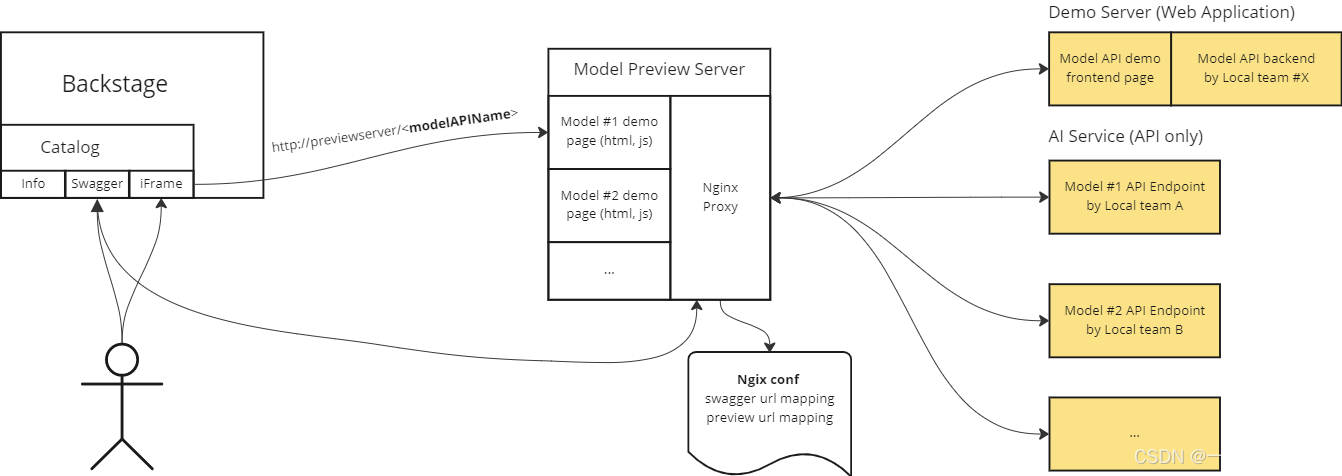
- nginx集中部署preview 前端代码,或者正向代理到preview
- nginx集中反向代理preview对应的apiserver
基于以上业务场景, 接着全面熟悉nginx知识。
如果英文够好, 可以详细了解: nginx官方文档
nginx基础
nginx 配置
1.首先来看看nginx配置的结构
# 全局配置
...              # events 配置
events {...
}
# http配置
http
{# http 全局配置...# server 配置server{ #server 全局配置...       #location配置location /xxx   {...}}
}# 全局配置: 配置影响全局, 包括运行nginx的用户组, 进程存放, 日志, 配置文件等
# events: 配置影响nginx 的服务器与客户端的网络连接, 包括进程最大连接数, 数据驱动模型, 序列化等
# http: 配置代理, 缓存, 日志, 第三方模块等, 可嵌套多个server
# server : 配置虚拟主机的参数, 可以配置多个location
# location: 配置请求路由, 页面处理
- 全局配置
# 全局配置
# nginx的用户组, 默认noboby
# user noboby noboby;# 开启进程的线程数, 根据机器的cpu核数确定
# worker_processes 1;
# 定义错误日志位置  参数log level (notice, debug, info, warn, error, crit)debug输出最多, crit最少
# error_log logs/error.log  debug;
#指定进程id的存储位置
#pid logs/nginx.pid#指定一个nginx进程打开的最多文件描述符数目,受系统进程的最大打开文件数量限制
#worker_rlimit_nofile 65535#envents 配置
events {#设置工作模式为epoll,除此之外还有select,poll,kqueue,rtsig和/dev/poll模式use epoll;#定义每个进程的最大连接数,受系统进程的最大打开文件数量限制worker_connections  1024;
}#http 配置
http {#主模块指令,实现对配置文件所包含的文件的设定,可以减少主配置文件的复杂度include       mime.types;#核心模块指令,默认设置为二进制流,也就是当文件类型未定义时使用这种方式default_type  application/octet-stream;#下面代码为日志格式的设定,main为日志格式的名称,可自行设置,后面引用log_format  main  '$remote_addr - $remote_user [$time_local] "$request" ''$status $body_bytes_sent "$http_referer" ''"$http_user_agent" "$http_x_forwarded_for"';#引用日志main格式access_log  logs/access.log  main;#设置允许客户端请求的最大的单个文件字节数client_max_body_size 20M;#指定来自客户端请求头的headebuffer大小client_header_buffer_size  32k;#指定连接请求试图写入缓存文件的目录路径client_body_temp_path /dev/shm/client_body_temp;#指定客户端请求中较大的消息头的缓存最大数量和大小,目前设置为4个32KBlarge client_header_buffers 4 32k;#开启高效文件传输模式sendfile        on;#开启防止网络阻塞tcp_nopush     on;#开启防止网络阻塞tcp_nodelay    on;#设置客户端连接保存活动的超时时间#keepalive_timeout  0; # 无限时间keepalive_timeout  65;#设置客户端请求读取header超时时间client_header_timeout 10;#设置客户端请求body读取超时时间client_body_timeout 10;#HttpGZip模块配置#开启gzip压缩gzip  on;#设置允许压缩的页面最小字节数gzip_min_length 1k;#申请4个单位为16K的内存作为压缩结果流缓存gzip_buffers 4 16k;#设置识别http协议的版本,默认为1.1gzip_http_version 1.1;#指定gzip压缩比,1-9数字越小,压缩比越小,速度越快gzip_comp_level 2;#指定压缩的类型gzip_types text/plain application/x-javascript text/css application/xml;#让前端的缓存服务器进过gzip压缩的页面gzip_vary on;
}# server 配置:
server {#单连接请求上限次数keepalive_requests 120; #监听端口listen       88;#监听地址,可以是ip,最好是域名server_name  111.222.333.123;#server_name  www.123.com;#设置访问的语言编码charset utf-8;#设置虚拟主机访问日志的存放路径及日志的格式为mainaccess_log  /info/respones.log main; #响应日志error_log  /error/erro.log main; #错误日志# includesinclude xxx.conf;#REWRITE URL重写规则引用include /nginx/conf/xxx.conf;#REWRITE-END#设置主机基本信息#请求的url过滤,正则匹配,~为区分大小写,~*为不区分大小写。location  ~*^.+$ {#根目录root html;  #设置默认页index  index.html index.htm;#拒绝的ip,黑名单deny 127.0.0.1;  #允许的ip,白名单allow 172.111.111.111; } #禁止访问的文件或目录location ~ ^/(\\.user.ini|\\.htaccess|\\.git|\\.svn|\\.project|LICENSE|README.md){return 404;}#SSL证书验证目录相关设置location ~ \\.well-known{allow all;}#图片资源配置location ~ .*\\.(gif|jpg|jpeg|png|bmp|swf)${expires      30d;error_log /dev/null;access_log off;}#网站js与css资源配置location ~ .*\\.(js|css)?${expires      12h;error_log /dev/null;access_log off; }#访问异常页面配置error_page  404              /404.html;error_page  500 502 503 504  /50x.html;location = /50x.html {root   html;}
}
- location + proxy_pass
server {listen 8081;server_name localhost;location / {root html;index index.html index.htm;}#情景1:proxy_pass后有/ ,表绝对路径,不把匹配部分加入最终代理路径(location 和proxy_pass结尾一致)#访问地址:http://localhost:8081/wcp/a2/download/asc.shtml#最终代理:http://127.0.0.1:8082/a2/download/asc.shtmllocation /wcp/a2/download/ {proxy_pass http://10.194.171.7:13082/a2/download/;}#访问地址:http://localhost:8081/model/asc.shtml#最终代理:http://127.0.0.1:8082/model/asc.shtmllocation /model/ {proxy_pass http://127.0.0.1:8082/model/;}#情景2:proxy_pass后有/ ,表绝对路径,不把匹配部分加入最终代理路径(location 和proxy_pass结尾不一致)#访问地址:http://localhost:8081/model/asc.shtml#最终代理:http://127.0.0.1:8082/asc.shtmllocation /model/ {proxy_pass http://127.0.0.1:8082/;}#情景3:proxy_pass后没有 / ,Nginx会把匹配部分带到代理的url#访问地址:http://localhost:8081/model/asc.shtml#最终代理:http://127.0.0.1:8082/model/asc.shtmllocation /model/ {proxy_pass http://127.0.0.1:8082;}#情景4#访问地址:http://localhost:8081/model/asc.shtml#最终代理:http://127.0.0.1:8082/aaamodel/asc.shtmllocation /model/ {proxy_pass http://127.0.0.1:8082/aaa;}#情景5#访问地址:http://localhost:8081/model/asc.shtml#最终代理:http://127.0.0.1:8082/asc.shtmllocation /model {proxy_pass http://127.0.0.1:8082/;}#情景6#访问地址:http://localhost:8081/modelXxxxx/asc.shtml#最终代理:http://127.0.0.1:8082/asc.shtmllocation /model {proxy_pass http://127.0.0.1:8082/;}location /opus-front-sso {proxy_pass http://10.194.170.94/opus-front-sso;}location /awater {proxy_pass http://10.194.170.94/awater;}}- rewrite
server {listen        6677;server_name   10.212.38.39;# 情景1:  http://127.0.0.1:6677/aa  -> http://127.0.0.1:6688location /aa{proxy_http_version 1.1;##rewrite ^/js/(.*)$ /$1/$2 break;rewrite ^/aa  http://127.0.0.1:6688/ break;}# 情景2:   http://127.0.0.1:6677/cc  -> https://xxx.xxxxx.com/location /cc {proxy_http_version 1.1;##rewrite ^/js/(.*)$ /$1/$2 break;rewrite ^/cc  https://xxx.xxxxx.com/ break;}#情景3: http://127.0.0.1:6677/dd/docs    ->  https://xxx.xxxxx.com/docs   参数:   (.*) = $1=docslocation /dd {rewrite ^/dd/(.*)$ https://xxx.xxxxx.com/$1 break;}
}- try_files
# try_files 解释:
# 首先:按照指定的顺序检查文件是否存在,并使用第一个找到的文件进行请求处理
# 其次:处理是在当前上下文中执行的。根据 root 和 alias 指令从 file 参数构造文件路径。
# 然后:可以通过在名称末尾指定一个斜杠来检查目录的存在,例如“ $uri/”。
# 最后:如果没有找到任何文件,则进行内部重定向到最后一个参数中指定的 uri。server {listen        6688;server_name   127.0.0.1;location /{root /home/bieber/backstage/dist1/;index index.html;try_files $uri  $uri/  /index.html;}
}# 配置解释:
# root:设置静态根目录为 /home/bieber/backstage/dist1/
# index:设置目录的默认文件为 index.html 、index.htm
# try_files:设置文件查找规则为 $uri $uri/ /index.html。即3个规则,先从 $uri 查找,再从 $uri/ 目录中查找,最后查找 /index.html# 注意: try_files 必须有一个存在, 不然一直死循环找, 最终抛出500
- includes
includes 可以使用在多个位置, 在http里面,与server并列, 在server 里面,与location 并列
// 情景1: http includes: conf1
http {
.....include /usr/local/nginx/conf/*default.conf;
}// default.conf
server {listen        5566;server_name   127.0.0.1;location / {proxy_http_version 1.1;proxy_pass https://xx.xxx.com/ssds/ssss;proxy_redirect off;}}//情景2:  http server: conf2server {listen        6677;server_name   127.0.0.1;include /usr/local/nginx/conf/*conf3.conf;include /usr/local/nginx/conf/*conf4.conf;
}// conf3
location /aa{proxy_http_version 1.1;##rewrite ^/js/(.*)$ /$1/$2 break;rewrite ^/aa  http://127.0.0.1:6688/ break;}
// conf4location /dd {rewrite ^/dd/(.*)$ https://xxx.xxxx.com/$1 break;}
nginx正向代理
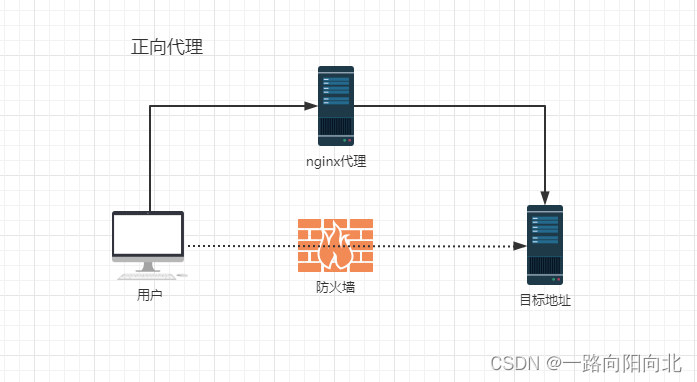
何为正向代理?
正向代理就是前端对前端, 即客户端对客户端, 比如我们的backstage前端页面要访问preview的前端, 直接访问受防火墙, 跨域等限制, 通过nginx正向代理解决了这个问题
# nginx 配置 比如公司只能用内网, 但是10.110.111.1上可以访问外网
server {listen    4433;server_name  10.110.111.1;location  / {proxy_pass  http://www.baidu.com}
}
# 重启nginx(nginx -s reload)
# 访问http://10.110.111.1:4433/  就能访问到百度
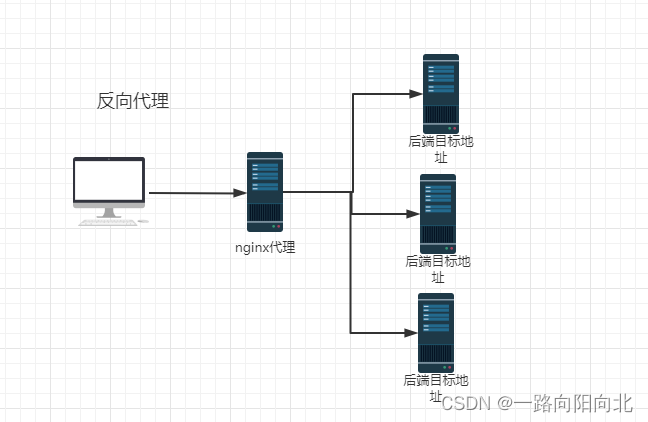
nginx 反向代理
location /opus-front-sso {proxy_pass   http://10.194.170.94/opus-front-sso;
}
nginx 负载
- nginx 负载均衡配置, 默认负载(轮询)
http {upstream myapp1 {server srv1.example.com;server srv2.example.com;server srv3.example.com;}server {listen 80;location / {proxy_pass http://myapp1;}}
}
- 最少连接的负载
upstream myapp1 {least_conn;server srv1.example.com down; // down 永久下线server srv2.example.com;server srv3.example.com;}server {listen 80;location / {proxy_pass http://myapp1;}}
- ip哈希负载
upstream myapp1 {ip_hash;server srv1.example.com;server srv2.example.com;server srv3.example.com;
}server {listen 80;location / {proxy_pass http://myapp1;}}
- 加权重负载平衡
# 每 5 个新请求将分布在 应用程序实例如下:将定向 3 个请求 对于 SRV1,一个请求将转到 SRV2,另一个请求将转到 SRV3
upstream myapp1 {server srv1.example.com weight=3;server srv2.example.com;server srv3.example.com;}server {listen 80;location / {proxy_pass http://myapp1;}}
nginx高可用
nginx的使用场景非常多了, 那nginx做到高可用就非常的重要, 下来我们借助第三方插件Keepalived 完成nginx的负载, 如下图:
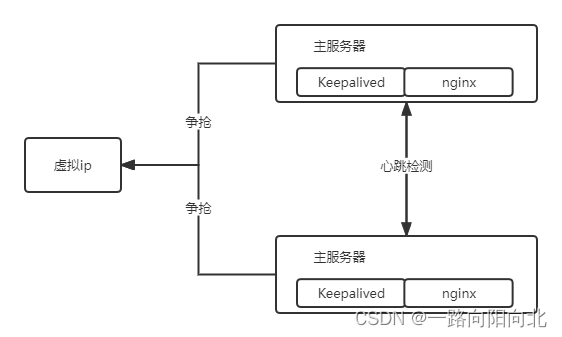
- 首先可以用一个域名代理这个虚拟ip
- 这个虚拟ip负载到两台机器上
- 每台机器装Keepalived:
yum install keepalived -y   #安装
rpm -q -a keepalived   # 查看安装情况# 修改两台配置
cd /etc/keepalived vi keepalived.conf
global_defs {notification_email {acassen@firewall.locfailover@firewall.locsysadmin@firewall.loc}notification_email_from Alexandre.Cassen@firewall.locsmtp_server 127.0.0.1smtp_connect_timeout 30router_id LVS_DEVEL #唯一}vrrp_script chk_http_port {script "/usr/local/src/nginx_check.sh"interval 2  #(检测脚本执行的间隔)2 s执行一次weight 2   # 脚本成立 权重增加2。
}vrrp_instance VI_1 {state BACKUP    # 备份服务器上将 MASTER(主) 改为 BACKUP interface ens33 # 网卡virtual_router_id 51    # 主、备机的 virtual_router_id 必须相同priority 100    # 主、备机取不同的优先级,主机值较大,备份机值较小advert_int 1 # 进行心跳检测 每隔一秒 发送检测信息 查看是否存活authentication {auth_type PASSauth_pass 1111}virtual_ipaddress {10.110.111.01 # 虚拟地址}
}# 注意: Keepalived 必须在nginx的实力存活的情况下启动
systemctl start keepalived
# 结果: 访问10.110.111.01 然后两个keepalived会抢占这个虚拟ip,同时将服务请求发送到不同对应的nginx服务器上,这样就保证了在一个服务器出现故障时候,另外一个还能够正常的工作。
nginx 配置常见问题
反向代理报426错误
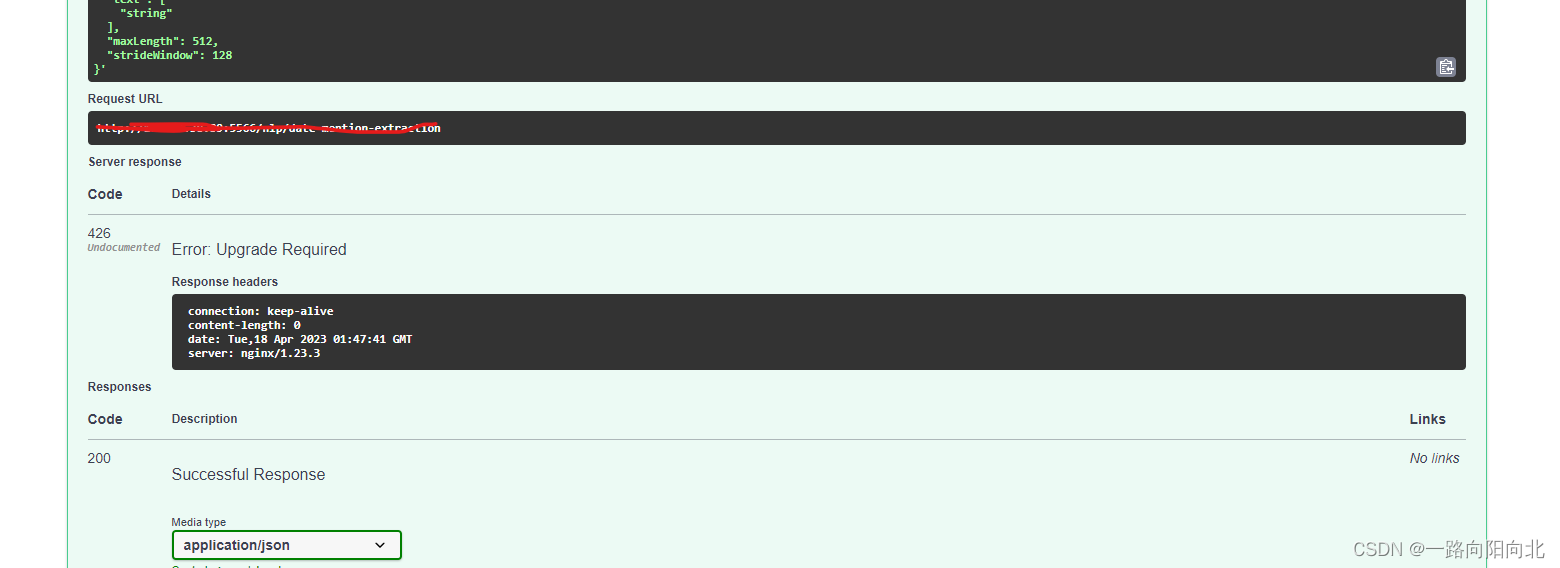
server {listen        5566;server_name   127.0.0.1;location / {proxy_pass https://xx.xxx.com/ssds/ssss;}
}// 修改如下:
server {listen        5566;server_name   127.0.0.1;location / {proxy_http_version 1.1;proxy_pass https://xx.xxx.com/ssds/ssss;}
}
post请求变get请求
问题: 使用nginx转发请求,但是明明是post请求,打到服务上确实get请求,body中的参数都没了
原因: post转get其实不是Nginx导致的!而是重定向导致, 可以关闭重定向。
server {listen 5566;server_name 10.212.38.39;location / {proxy_http_version 1.1;proxy_pass https://xx.xxx.com/ssds/ssss;proxy_redirect off;}}
nginx 配置前端代理, 会出现js, css找不到
可以使用rewrite 重定向, 或者处理js, css的再次代理
location /aa{proxy_http_version 1.1;##rewrite ^/js/(.*)$ /$1/$2 break;rewrite ^/aa  http://10.212.38.39:6688/ break;
}