ESP32在ESP-IDF框架下为LVGL(v8.3)配置SD卡文件系统

踩坑记录
1、如果SD卡曾经
做过系统盘(比如说:作为树莓派的系统盘),那么要把系统盘的分区合并成一个(这个网上有很多教程),并重新格式化,否则实验会失败。
2、并不是买回来的新的SD卡就一定能用(并不是说用读卡器插在电脑上能够正常读写,就表示一定能够实验成功),买过几张卡,确实有不能用的,导致改bug搞了一下午没有成功。
3、可以先运行一下IDF提供的SD卡示例,判断是否能够挂载文件系统成功(如果能够正常读取卡信息就表示成功了)。
说明:实验没有采用lv_fs_if作为一个组件的移植方式,可能与网上的资料稍有不同。
移植过程
说明:本实验是在该实验点击这里的基础上进行的。
1、打开小齿轮(SDK Configureation editor)找到3rd Party Libraries,选中File sysytem on top of FatFS,修改下面为83(ASCII中的‘S’),下面是读取使用的缓冲区大小。
2、创建新的小组件(ctrl+shift+p ESP-IDF:创建新的ESP-IDF组件命名为sd_card(可自行更改)),在include文件夹中创建sd_card.h文件,include文件夹之外创建sd_card.c和CMakeLists.txt文件。三个文件的内容如下。(sd_card组件代码内容是由sd卡示例文件sdspi示例项目修改而来,可直接使用下面文件,也可以自己去更改。)

//*sd_card.h文件内容
#ifndef _SD_CARD_H
#define _SD_CARD_H#ifdef __cplusplus
extern "C" {
#endif#include <string.h>
#include <sys/unistd.h>
#include <sys/stat.h>
#include "esp_vfs_fat.h"
#include "sdmmc_cmd.h"
#include "esp_err.h"
static const char *TAG = "TFCARD";#define MOUNT_POINT "/sdcard"
#define SPI_DMA_CHAN    1
// Pin assignments can be set in menuconfig, see "SD SPI Example Configuration" menu.
// You can also change the pin assignments here by changing the following 4 lines.
#define PIN_NUM_MISO  19
#define PIN_NUM_MOSI  23
#define PIN_NUM_CLK   18
#define PIN_NUM_CS    5esp_err_t sd_init();#ifdef __cplusplus
} /*extern "C"*/
#endif#endif
//sd_card.c文件内容*
#include "sd_card.h"
sdmmc_card_t *card;
esp_err_t sd_init()
{esp_err_t ret;// Options for mounting the filesystem.// If format_if_mount_failed is set to true, SD card will be partitioned and// formatted in case when mounting fails.esp_vfs_fat_sdmmc_mount_config_t mount_config = {.format_if_mount_failed = false,.max_files = 5,.allocation_unit_size = 16 * 1024};const char mount_point[] = MOUNT_POINT;ESP_LOGI(TAG, "Initializing SD card");// Use settings defined above to initialize SD card and mount FAT filesystem.// Note: esp_vfs_fat_sdmmc/sdspi_mount is all-in-one convenience functions.// Please check its source code and implement error recovery when developing// production applications.ESP_LOGI(TAG, "Using SPI peripheral");sdmmc_host_t host = SDSPI_HOST_DEFAULT();host.slot = VSPI_HOST;spi_bus_config_t bus_cfg = {.mosi_io_num = PIN_NUM_MOSI,.miso_io_num = PIN_NUM_MISO,.sclk_io_num = PIN_NUM_CLK,.quadwp_io_num = -1,.quadhd_io_num = -1,.max_transfer_sz = 4*1024*sizeof(uint8_t),};ret = spi_bus_initialize(host.slot, &bus_cfg, host.slot);if (ret != ESP_OK) {ESP_LOGE(TAG, "Failed to initialize bus.");return;}// This initializes the slot without card detect (CD) and write protect (WP) signals.// Modify slot_config.gpio_cd and slot_config.gpio_wp if your board has these signals.sdspi_device_config_t slot_config = SDSPI_DEVICE_CONFIG_DEFAULT();slot_config.gpio_cs = PIN_NUM_CS;slot_config.host_id = host.slot;ESP_LOGI(TAG, "Mounting filesystem");ret = esp_vfs_fat_sdspi_mount(mount_point, &host, &slot_config, &mount_config, &card);if (ret != ESP_OK) {if (ret == ESP_FAIL) {ESP_LOGE(TAG, "Failed to mount filesystem. ""If you want the card to be formatted, set the CONFIG_EXAMPLE_FORMAT_IF_MOUNT_FAILED menuconfig option.");} else {ESP_LOGE(TAG, "Failed to initialize the card (%s). ""Make sure SD card lines have pull-up resistors in place.", esp_err_to_name(ret));}return ESP_FAIL;}ESP_LOGI(TAG, "Filesystem mounted");// Card has been initialized, print its propertiessdmmc_card_print_info(stdout, card);return ESP_OK;}
//CMakeLists.txt文件内容*
idf_component_register(SRCS	"sd_card.c"INCLUDE_DIRS "include"REQUIRES  fatfs)
3、SD卡接线方式,如果想节省一个引脚,可将CS引脚直接接地。接线方式与安信可esp-cam模组相同,原理图参考
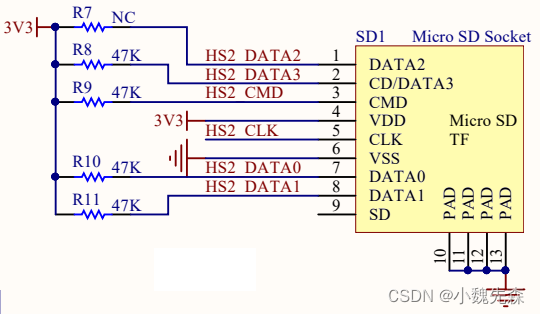
| ESP32引脚 | SD卡引脚 |
|---|---|
| 19 | MISO |
| 23 | MOSI |
| 18 | CLK |
| 5 | CS |
4、因为LVGL要使用文件系统和初始化SD卡,所以
LVGL要依赖fatfs和sd_card组件。打开lvgl–>env_support–>cmake–>esp.cmake文件,在第45行位置添加依赖(REQUIRES后面的内容),添加后的依赖如下:
idf_component_register(SRCS ${SOURCES} ${EXAMPLE_SOURCES} ${DEMO_SOURCES}INCLUDE_DIRS ${LVGL_ROOT_DIR} ${LVGL_ROOT_DIR}/src ${LVGL_ROOT_DIR}/../${LVGL_ROOT_DIR}/examples ${LVGL_ROOT_DIR}/demosREQUIRES esp_timerfatfssd_card)
5、打开
lv_fs_fatfs.c文件(路径:lvgl/src/extra/libs/fsdrv/),添加sd_card.h头文件(在第10行位置:#include "sd-card.h")。将第230行的两个DIR修改为FF_DIR。在第92行处fs_init(void)函数中调用sd_init()函数来初始化sd卡。
6、注:这种方式移植文件系统与使用lv_fs_if组件的方式不同,当调用lv_init()函数的时候,就已经初始化SD卡并且挂载了文件系统。所以对于上一次实验,不需要更改main.c的任何内容,就实现了初始化SD卡和文件系统。
测试
1、将上次实验的main.c直接拿过来。在
lv_init()之后使用vTaskDelay(pdMS_TO_TICKS(5));延时5ms,然后在初始化屏幕驱动(lvgl_driver_init();),不然可能出现花屏。
2、在阿里巴巴矢量图标库中随便下载一个200像素的小图片,并将图片在LVGL官网提供的图片转化工具Online Image Converter中生成二进制.bin文件。并将改文件存储到SD卡中pictures文件夹中。
3、使用SquareLine studio工具1.2.2版本,拖拽一个image控件放到屏幕中。像下面这样。将生成的文件放在my_ui组建中(上一实验最后有讲)。
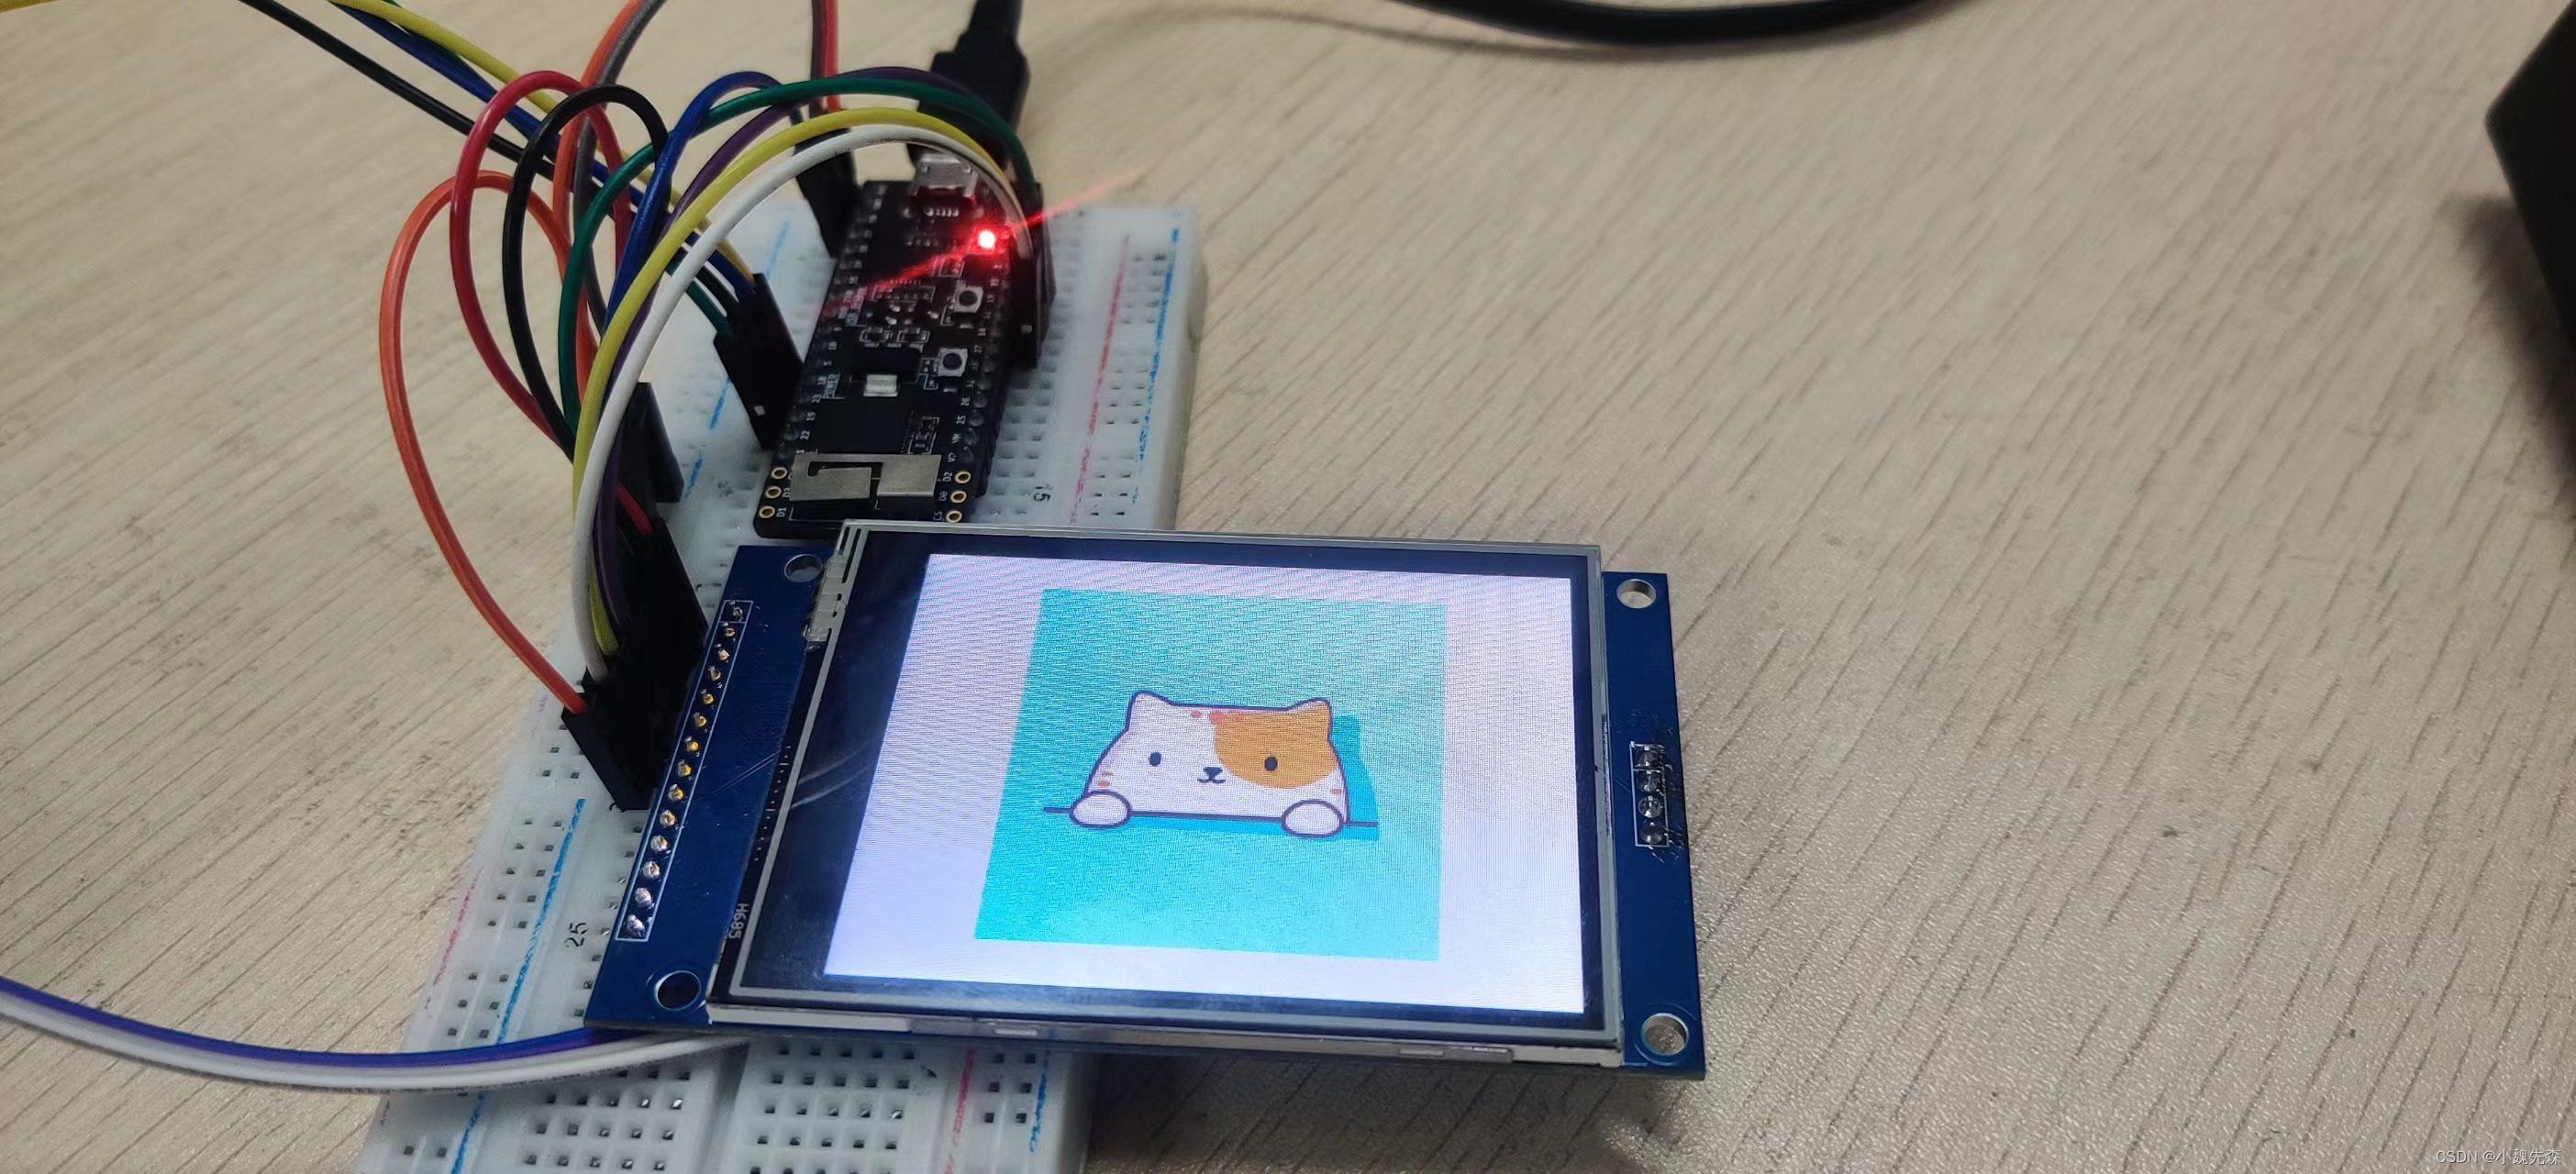
4、在main.c的ui_init()函数之后,调用lv_img_set_src(ui_Image2,“S:pictures/xxx.bin”);其中xxx是图片的名字。运行结果如下,表明SD卡文件系统移植成功:


完整的主文件代码(main.c)如下:
#include <stdbool.h>
#include <stdio.h>
#include <stdlib.h>
#include <string.h>#include "freertos/FreeRTOS.h"
#include "freertos/task.h"
#include "esp_freertos_hooks.h"
#include "freertos/semphr.h"
#include "esp_system.h"
#include "driver/gpio.h"
#include "lvgl/lvgl.h"
#include "lvgl_helpers.h"
#include <lv_demos.h>
#include <ui.h>/      DEFINES*/
#define TAG "demo"
#define LV_TICK_PERIOD_MS 1/*  STATIC PROTOTYPES/
static void lv_tick_task(void *arg);
static void guiTask(void *pvParameter);/*   APPLICATION MAIN/
void app_main() {xTaskCreatePinnedToCore(guiTask, "gui", 4096*2, NULL, 0, NULL, 1);
}SemaphoreHandle_t xGuiSemaphore;static void guiTask(void *pvParameter) {(void) pvParameter;xGuiSemaphore = xSemaphoreCreateMutex();lv_init();vTaskDelay(pdMS_TO_TICKS(5));lvgl_driver_init();lv_color_t* buf1 = heap_caps_malloc(DISP_BUF_SIZE * sizeof(lv_color_t), MALLOC_CAP_DMA);assert(buf1 != NULL);static lv_color_t *buf2 = NULL;static lv_disp_draw_buf_t disp_buf;uint32_t size_in_px = DISP_BUF_SIZE;lv_disp_draw_buf_init(&disp_buf, buf1, buf2, size_in_px);lv_disp_drv_t disp_drv;lv_disp_drv_init(&disp_drv);disp_drv.flush_cb = disp_driver_flush;disp_drv.draw_buf = &disp_buf;lv_disp_drv_register(&disp_drv);const esp_timer_create_args_t periodic_timer_args = {.callback = &lv_tick_task,.name = "periodic_gui"};esp_timer_handle_t periodic_timer;ESP_ERROR_CHECK(esp_timer_create(&periodic_timer_args, &periodic_timer));ESP_ERROR_CHECK(esp_timer_start_periodic(periodic_timer, LV_TICK_PERIOD_MS * 1000));/* 在这里更换自己的UI */ui_init();lv_img_set_src(ui_Image2,"S:pictures/cat.bin");while (1) {/* Delay 1 tick (assumes FreeRTOS tick is 10ms */vTaskDelay(pdMS_TO_TICKS(10));/* Try to take the semaphore, call lvgl related function on success */if (pdTRUE == xSemaphoreTake(xGuiSemaphore, portMAX_DELAY)) {lv_task_handler();xSemaphoreGive(xGuiSemaphore);}}/* A task should NEVER return */free(buf1);vTaskDelete(NULL);
}static void lv_tick_task(void *arg) {(void) arg;lv_tick_inc(LV_TICK_PERIOD_MS);
}