JNI技术之语言变声实现

今天,我们利用jni来实现一个变声效果,在QQ等许多社交软件上想必我们都有看过各种变声功能。想要实现这个功能需要借助fmod库。
- 官网
https://www.fmod.com/(注意:这个官网需要先登录注册才能够下载相关的api文档)
下面,我们通过一个案例来讲解如何对接具有jni相关功能的第三方库
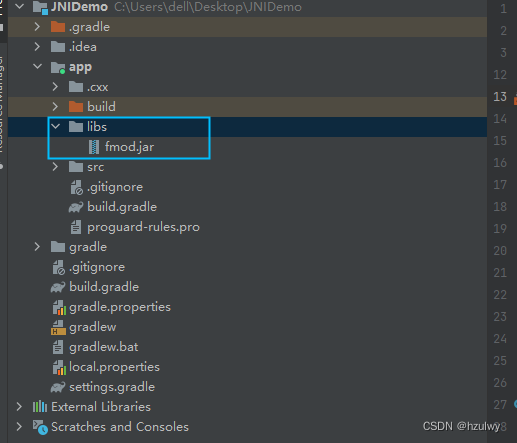
- 将相关的jar包放入libs文件夹下面
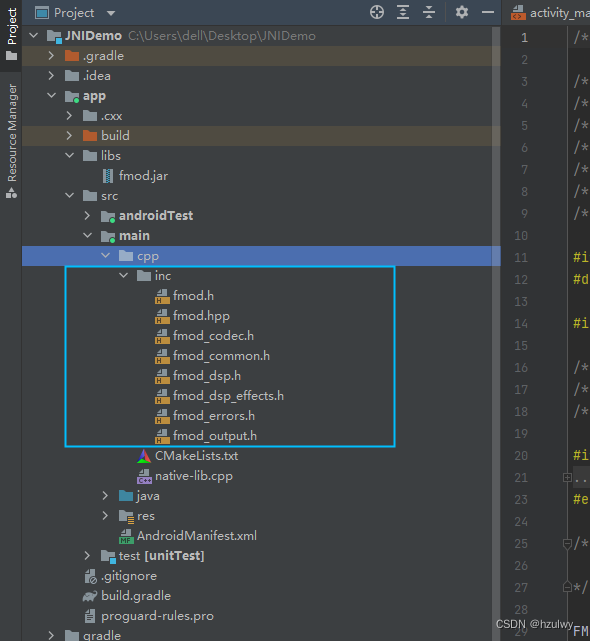
- 将第三方sdk提供的头文件导入到cpp文件夹中
-
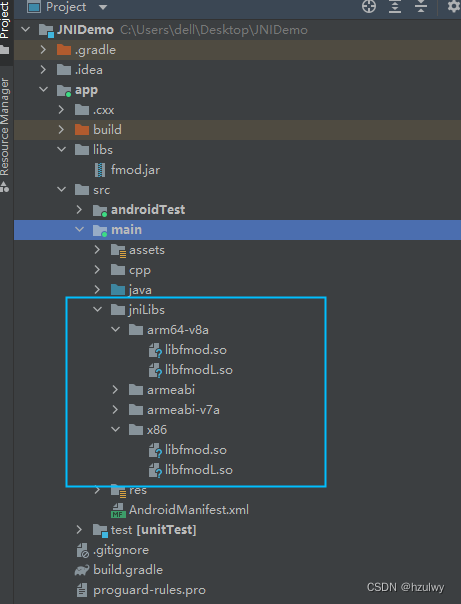
将库文件导入jniLibs文件夹下面‘
-
更改CMakeLists.txt文件——重中之重
# For more information about using CMake with Android Studio, read the
# documentation: https://d.android.com/studio/projects/add-native-code.html# Sets the minimum version of CMake required to build the native library.cmake_minimum_required(VERSION 3.18.1)# Declares and names the project.project("jnidemo")# Creates and names a library, sets it as either STATIC
# or SHARED, and provides the relative paths to its source code.
# You can define multiple libraries, and CMake builds them for you.
# Gradle automatically packages shared libraries with your APK.#第一步:导入头文件
include_directories("inc")# 批量导入所有源文件
file(GLOB allCPP *.c *.h *.cpp)#第二步:导入库文件
set(CMAKE_CXX_FLAGS "${CMAKE_CXX_FLAGS} -L${CMAKE_SOURCE_DIR}/../jniLibs/${CMAKE_ANDROID_ARCH_ABI}")add_library( # Sets the name of the library.jnidemo# Sets the library as a shared library.SHARED# Provides a relative path to your source file(s).${allCPP})# Searches for a specified prebuilt library and stores the path as a
# variable. Because CMake includes system libraries in the search path by
# default, you only need to specify the name of the public NDK library
# you want to add. CMake verifies that the library exists before
# completing its build.find_library( # Sets the name of the path variable.log-lib# Specifies the name of the NDK library that# you want CMake to locate.log)# Specifies libraries CMake should link to your target library. You
# can link multiple libraries, such as libraries you define in this
# build script, prebuilt third-party libraries, or system libraries.target_link_libraries( # Specifies the target library.jnidemo# Links the target library to the log library# included in the NDK.${log-lib}fmod # 具体的库 链接到 libnative-lib.so里面去fmodL # 具体的库 链接到 libnative-lib.so里面去)
- 修改gradle文件
plugins {id 'com.android.application'
}android {namespace 'com.mvp.jnidemo'compileSdk 32defaultConfig {applicationId "com.mvp.jnidemo"minSdk 21targetSdk 32versionCode 1versionName "1.0"testInstrumentationRunner "androidx.test.runner.AndroidJUnitRunner"externalNativeBuild {cmake {//这个闭包只会影响CMakeLists.txt文件中的CMAKE_ANDROID_ARCH_ABI// cppFlags "" // 默认五大平台// 指定CPU架构,Cmake的本地库, 例如:native-lib ---> armeabi-v7aabiFilters "armeabi-v7a" //等价于CMAKE_ANDROID_ARCH_ABI变量的值为armeabi-v7a}}ndk {//这个闭包决定生成的apk包中包含多少个cpu平台abiFilters "armeabi-v7a" // 指定CPU架构,打入APK lib/CPU平台}}buildTypes {release {minifyEnabled falseproguardFiles getDefaultProguardFile('proguard-android-optimize.txt'), 'proguard-rules.pro'}}compileOptions {sourceCompatibility JavaVersion.VERSION_1_8targetCompatibility JavaVersion.VERSION_1_8}externalNativeBuild {cmake {path file('src/main/cpp/CMakeLists.txt')version '3.18.1'}}buildFeatures {viewBinding true}
}dependencies {implementation fileTree(dir: "libs", include: ["*.jar"])implementation 'androidx.appcompat:appcompat:1.4.0'implementation 'com.google.android.material:material:1.4.0'implementation 'androidx.constraintlayout:constraintlayout:2.1.4'testImplementation 'junit:junit:4.13.2'androidTestImplementation 'androidx.test.ext:junit:1.1.5'androidTestImplementation 'androidx.test.espresso:espresso-core:3.5.1'
}
- 编写ndk代码
main.h
/* DO NOT EDIT THIS FILE - it is machine generated */
#include <jni.h>
/* Header for class com_derry_derry_voicechange_MainActivity */// xxx.h ---- xxx.c     早期
// xxx.hpp ---- xxx.cpp
// xxx.h ----  xxx.cpp  兼容的,可以的// xxx.hpp 是头文件而已#include <fmod.hpp> // TODO 最后一步 FMOD的头文件,必须导入,才能使用功能#include <string>#ifdef __cplusplus
extern "C" {
#endif
#undef NORMAL
#define NORMAL 0L
#undef LUOLI
#define LUOLI 1L
#undef DASHU
#define DASHU 2L
#undef JINGSONG
#define JINGSONG 3L
#undef GAOGUAI
#define GAOGUAI 4L
#undef KONGLING
#define KONGLING 5L
/ Class:     com_mvp_jnidemo_MainActivity_voiceChangeNative* Method:    voiceChangeNative* Signature: (ILjava/lang/String;)V*/
JNIEXPORT void JNICALL Java_com_mvp_jnidemo_MainActivity_voiceChangeNative(JNIEnv *, jobject, jint, jstring);#ifdef __cplusplus
}
#endif#include <jni.h>
#include <string>
#include <unistd.h>
#include "main.h"
using namespace FMOD;// 日志输出
#include <android/log.h>#define TAG "Brett"// __VA_ARGS__ 代表 ...的可变参数
#define LOGD(...) __android_log_print(ANDROID_LOG_DEBUG, TAG, __VA_ARGS__);
#define LOGE(...) __android_log_print(ANDROID_LOG_ERROR, TAG, __VA_ARGS__);
#define LOGI(...) __android_log_print(ANDROID_LOG_INFO, TAG, __VA_ARGS__);extern "C"
JNIEXPORT void JNICALL
Java_com_mvp_jnidemo_MainActivity_voiceChangeNative(JNIEnv *env, jobject thiz, jint mode,jstring path) {char * content_ = "默认 播放完毕";// C认识的字符串const char * path_ = env->GetStringUTFChars(path, NULL);// Java 对象// C 指针// Linux 文件// 音效引擎系统 指针System * system = 0;// 声音 指针Sound * sound = 0;// 通道,音轨,声音在上面跑 跑道 指针Channel * channel = 0;// DSP:digital signal process == 数字信号处理 指针DSP * dsp = 0;// Java思想 去初始化// system = xxxx();// C的思想 初始化// xxxx(&system);// TODO 第一步 创建系统System_Create(&system);// TODO 第二步 系统的初始化 参数1:最大音轨数, 参数2:系统初始化标记, 参数3:额外数据system->init(32, FMOD_INIT_NORMAL, 0);// TODO 第三步 创建声音 参数1:路径, 参数2:声音初始化标记, 参数3:额外数据, 参数4:声音指针system->createSound(path_, FMOD_DEFAULT, 0, &sound);// TODO 第四步:播放声音 音轨 声音// 参数1:声音, 参数2:分组音轨, 参数3:控制, 参数4:通道system->playSound(sound, 0, false, &channel);// TODO 第五步:增加特效switch (mode) {case NORMAL: // 原生content_ = "原生 播放完毕";break;case LUOLI: // 萝莉content_ = "萝莉 播放完毕";// 音调高 -- 萝莉 2.0// 1.创建DSP类型的Pitch 音调条件system->createDSPByType(FMOD_DSP_TYPE_PITCHSHIFT, &dsp);// 2.设置Pitch音调调节2.0dsp->setParameterFloat(FMOD_DSP_PITCHSHIFT_PITCH, 2.0f);// 3.添加音效进去 音轨channel->addDSP(0, dsp);break;case DASHU: // 大叔content_ = "大叔 播放完毕";// 音调低 -- 大叔 0.7// 1.创建DSP类型的Pitch 音调条件system->createDSPByType(FMOD_DSP_TYPE_PITCHSHIFT, &dsp);// 2.设置Pitch音调调节2.0dsp->setParameterFloat(FMOD_DSP_PITCHSHIFT_PITCH, 0.7f);// 3.添加音效进去 音轨channel->addDSP(0, dsp);break;case GAOGUAI: // 搞怪content_ = "搞怪 小黄人 播放完毕";// 小黄人声音 频率快// 从音轨拿 当前 频率float mFrequency;channel->getFrequency(&mFrequency);// 修改频率channel->setFrequency(mFrequency * 1.5f); // 频率加快 小黄人的声音break;case JINGSONG: // 惊悚content_ = "惊悚 播放完毕";// 惊悚音效:特点: 很多声音的拼接// TODO 音调低// 音调低 -- 大叔 0.7// 1.创建DSP类型的Pitch 音调条件system->createDSPByType(FMOD_DSP_TYPE_PITCHSHIFT, &dsp);// 2.设置Pitch音调调节2.0dsp->setParameterFloat(FMOD_DSP_PITCHSHIFT_PITCH, 0.7f);// 3.添加音效进去 音轨channel->addDSP(0, dsp); // 第一个音轨// TODO 搞点回声// 回音 ECHOsystem->createDSPByType(FMOD_DSP_TYPE_ECHO, &dsp);dsp->setParameterFloat(FMOD_DSP_ECHO_DELAY, 200); // 回音 延时 to 5000. Default = 500.dsp->setParameterFloat(FMOD_DSP_ECHO_FEEDBACK, 10); // 回音 衰减度 Default = 50 0 完全衰减了channel->addDSP(1,dsp); // 第二个音轨// TODO 颤抖// Tremolo 颤抖音 正常5 非常颤抖 20system->createDSPByType(FMOD_DSP_TYPE_TREMOLO, &dsp);dsp->setParameterFloat(FMOD_DSP_TREMOLO_FREQUENCY, 20); // 非常颤抖dsp->setParameterFloat(FMOD_DSP_TREMOLO_SKEW, 0.8f); // ???channel->addDSP(2, dsp); // 第三个音轨// 调音师:才能跳出来 同学们自己去调break;case KONGLING: // 空灵 学校广播content_ = "空灵 播放完毕";// 回音 ECHOsystem->createDSPByType(FMOD_DSP_TYPE_ECHO, &dsp);dsp->setParameterFloat(FMOD_DSP_ECHO_DELAY, 200); // 回音 延时 to 5000. Default = 500.dsp->setParameterFloat(FMOD_DSP_ECHO_FEEDBACK, 10); // 回音 衰减度 Default = 50 0 完全衰减了channel->addDSP(0,dsp);break;}// 等待播放完毕 再回收bool isPlayer = true; // 你用不是一级指针 我用一级指针接收你,可以修改给你while (isPlayer) {channel->isPlaying(&isPlayer); // 如果真的播放完成了,音轨是知道的,内部会修改isPlayer=falseusleep(1000 * 1000); // 每个一秒}// 时时刻刻记得回收sound->release();system->close();system->release();env->ReleaseStringUTFChars(path, path_);// 告知Java播放完毕jclass mainCls = env->GetObjectClass(thiz);jmethodID endMethod = env->GetMethodID(mainCls, "playerEnd", "(Ljava/lang/String;)V");jstring value = env->NewStringUTF(content_);env->CallVoidMethod(thiz, endMethod, value);
}
- 编写java代码
package com.mvp.jnidemo;import androidx.appcompat.app.AppCompatActivity;import android.os.Bundle;
import android.util.Log;
import android.view.View;
import android.widget.Button;
import android.widget.TextView;
import android.widget.Toast;import com.mvp.jnidemo.databinding.ActivityMainBinding;import org.fmod.FMOD;public class MainActivity extends AppCompatActivity {private static final String TAG = "Brett";// Used to load the 'jnidemo' library on application startup.static {//我们在工程项目里面编写的c/c++代码最后会被编译成一个so,可以认为这个so库就是c/c++的源码,有点类似于java的jar包//这个jnidemo是apk包里面的lib目录下的libjnidemo.so,注意编译后会自动给so库加上lib前缀System.loadLibrary("jnidemo");// System.load("D://xxx/xxx/xxx/xx/xx.so"); // 加载绝对路径下的 库}private static final int MODE_NORMAL = 0; // 正常private static final int MODE_LUOLI = 1; //private static final int MODE_DASHU = 2; //private static final int MODE_JINGSONG = 3; //private static final int MODE_GAOGUAI = 4; //private static final int MODE_KONGLING = 5; //private ActivityMainBinding binding;private String path;@Overrideprotected void onCreate(Bundle savedInstanceState) {super.onCreate(savedInstanceState);setContentView(R.layout.activity_main);path =  "file:///android_asset/derry.mp3";FMOD.init(this);}@Overrideprotected void onDestroy() {super.onDestroy();FMOD.close();}// 六个 点击事件public void onFix(View view) {switch (view.getId()) {case R.id.btn_normal:voiceChangeNative(MODE_NORMAL, path); // 真实开发中,必须子线程  JNI线程(很多坑)break;case R.id.btn_luoli:voiceChangeNative(MODE_LUOLI, path);break;case R.id.btn_dashu:voiceChangeNative(MODE_DASHU, path);break;case R.id.btn_jingsong:voiceChangeNative(MODE_JINGSONG, path);break;case R.id.btn_gaoguai:voiceChangeNative(MODE_GAOGUAI, path);break;case R.id.btn_kongling:voiceChangeNative(MODE_KONGLING, path);break;}}// 给C++调用的函数// JNI 调用 Java函数的时候,忽略掉 私有、公开 等private void playerEnd(String msg) {Toast.makeText(this, "" +msg, Toast.LENGTH_SHORT).show();}private native void voiceChangeNative(int modeNormal, String path);
}